importing auction data - · pdf fileimporting auction data ... compare your list of auction...
TRANSCRIPT

1
Importing Auction Data
The following document was created by Patrick Shaw, formerly of NPower Seattle. Thanks Patrick for
sharing your work for others to use!
Table of Contents Disclaimer: ................................................................................................................................................ 2
Assumptions: ............................................................................................................................................. 2
Overview: .................................................................................................................................................. 2
Preparing Your Data .................................................................................................................................. 3
Create a New Auction ............................................................................................................................... 4
Sync Your Auction and Salesforce Contacts .............................................................................................. 8
Export your Salesforce Contacts ........................................................................................................... 8
Tidy up your Auction Attendee List....................................................................................................... 9
Match Name with Salesforce Contact ID using V-lookup ..................................................................... 9
Import Contacts That Did Not Match.................................................................................................. 10
Export your Salesforce Contacts (Again) ............................................................................................. 11
Match Name with Salesforce Account ID using V-lookup .................................................................. 11
Review Your Work ............................................................................................................................... 11
Import Auction Items .............................................................................................................................. 11
Prepare Your Items Spreadsheet for Import....................................................................................... 11
Update Your Spreadsheet with New IDs ............................................................................................. 13
Prep Your Campaign Attendees Import .................................................................................................. 13
Import Auction Bids (Purchases) ............................................................................................................. 15
Review Your Work ................................................................................................................................... 17
Start Planning .......................................................................................................................................... 17
2
Disclaimer: This is a guide, not a one-sized fits all set of instructions. Please work carefully with your Salesforce
Administrator to adjust and amend these instructions so that they work for you.
Assumptions: You have Salesforce and know how to use it
You have the latest version of Auctions for Salesforce
You are up to date with the Nonprofit Starter pack updates
You are or are working with a Salesforce Administrator for your agency
You have access to a copy of Microsoft Excel and know how to use these formulae:
o VLookup
o Concatenate
o Trim
You are familiar with Salesforce nomenclature (Contacts, Households, Organizations,
Opportunities, and Campaigns) and how your agency is using those items
You have and know how to use the Apex Data Loader
You know how your nonprofit uses Salesforce – naming conventions and so on
You’ve reviewed all of the Auctions for Salesforce documentation
You are in a calm and peaceful state of mind!
Overview: Importing your auction data into Salesforce is not technically challenging. But it may take a while – you’ll
have to obtain and understand your auction data, you’ll most likely have to clean it up and organize it in
a way that Salesforce likes, and you will likely make several passes at import/export rounds to get it all
working properly. In general, though – you’ll follow these steps:
(Details on each step follow this overview).
1. Prepare your data
2. Create a new Auction in Salesforce, and export that data so you can obtain a Salesforce
Campaign ID (There are actually 4 campaigns created per Auction, and you’ll want most of them:
Auction Donated Items, Auction Attendees, Auction Sponsors, and Auction Tickets).
3. Sync your Auction and Salesforce Contacts. Compare your list of Auction attendees to the
Contacts you already have in Salesforce. If needed, import new people, tidy up any household
names, and export all of your contacts so that you have a Contact and Organization ID for each
person. (You might also want to include the people that did NOT attend – so you know whom
you invited).
4. Import the auction items (two options):

3
a. Just create the items, or;
b. Create opportunities for donated items that were given to the auction first and THEN
turn those into auction items
5. Prepare your list of Attendees
a. Assign a table captain to each table (optional)
b. Assign a bid number to each contact that attended (optional)
c. Assign each contact a table at which to sit (optional)
6. Import auction bids (two options)
a. Just the winning bids (Purchases). (We assume you are only tracking the winning bid.
You can keep track of the losing bids if you’d like. Those steps are included, but it does
mean you will have to prepare a lot of additional data to import.)
b. All of the bids. Those that won, and those that lost
7. Review the data by running reports of who attended (and who didn’t), who bid (and who didn’t)
the totals, and so on.
8. Use the data to plan your next auction!
Preparing Your Data You should plan on spending a lot of time getting your data ready. This isn’t an exhaustive list, but there
ARE things you can do in the preparation phase to make the import process much more effective. Here
are a few tips:
1. You have to import from a CSV file – but it is easier to get your data ready in a regular Excel
spreadsheet, and then once it is ready, save it as a CSV file
2. When you enter data, do NOT include a white space at the end –that may get in the way of the
import or some of the matching that you’ll do
3. Dollar amounts should be entered as a general number, not as currency
4. Dates should be entered using the *3/15/01 date format
5. Organize ALL of your similar data at the same time. See attached spreadsheet for an example.
6. The TRIM function takes out extra white spaces!
7. The CONCATENATE function lets you join two rows – so you can have a name in one row, and
the words “2012 auction” in another, and you can use that function to join them together
8. Excel had a feature called “text to columns” which will split a first and a last name into two
different columns
9. Spend a lot of time checking names! Nick might really be Nicholas. John might really be Jon.
10. Test in small increments, and don’t keep going until you’ve checked to make sure that imports
or deletions worked as you expected
11. You have an expectation in mind! If you are planning on deleting something, you should know
how many records you are starting with, and how many you are deleting, and what you should
end up with

4
Create a New Auction This is the easy part:
1. Head on over to Salesforce, look for the Auctions tab, (talk to your Administrator if you need
help finding it) and give it a click:
2. Click the “new” button
3. Give your auction a name and a date, and specify the ticket amount, if any:
That will create some additional Campaigns for you (Attendees, Tickets, Sponsors, Item Donors).
4. Open the Apex Data Loader and select “export”:

5
5. Login (remember that you login with your email address for Salesforce, and that when entering
your password, you have to append your Salesforce Security Token):
6. Don’t be fooled when you still see the login button – it will tell you if you have logged in or not –
if you have, select “next”. If you haven’t re-try your user name and password.

6
7. Select Auction (GW_Auctions_Auction_c) from the export list, and choose a name and a location
for the file:
8. Select all of the fields, and click “finish”, and then select “yes” at the next dialogue box:

7
9. Open the file and find the name of the new Auction, and note the ID’s – it will look something
like this:
10. You’ll need this ID later – next step is to ensure that you sync up your Auction attendee list with
the contacts you have in Salesforce
11. Export Campaigns – you’ll need to know of the ID numbers that are associated with your auction
campaign. Follow the steps above, but export the Campaign (campaigns) module:

8
12. Make sure you look for the current Auction – it will be the ID you collected in the previous step.
13. Keep track of the other ID’s associated with this Campaign – they will also be in the list – you’ll
want these items:
a. 2012 Attendees
b. 2012 Tickets
c. 2012 Sponsors
d. 2012 Item Donors
e. Record Type ID (this will be the same for all of the above items)
Sync Your Auction and Salesforce Contacts As you may imagine – there are many ways to do this. Check with your Salesforce Administrator if
needed to find the method that works best for you. The method I use follows these steps:
1. Prepare your Auction attendee list
a. Check for extra white spaces
b. Review names for spelling mistakes
c. If you have sample or fake names, assign them to a sample or fake contact that already
exists in Salesforce, and make a note about who they were with “John’s Guest)
Export your Salesforce Contacts
1. Export your contacts (see steps 4-6 above), but select “Contact” instead, and give the file a
name and a location:

9
2. Follow step 8 in the “Create a new auction” section
3. Open the file in Microsoft Excel
4. You only need to keep 3 columns of Data:
a. ID
b. AccountID
c. Name
5. Delete all of the other columns in the spreadsheet
Tidy up your Auction Attendee List
When preparing your Attendee list, look carefully at those names. When you match to Salesforce, it will
look for an exact match, so if your Attendee list says “Tom Smith”, but Salesforce has “Thomas Smith”,
you’ll have to decide if it is the same person. If it is, adjust the name on your Attendee list.
You’ll also need to look for partial names, such as “Tom’s Brother”. You can either call Tom (or someone
else) to find out that name, or you can assign that person to a fake contact record. To make it really
easy, create a contact in Salesforce with the first name of Fake, and a last name of Attendee. Again –
check with your Salesforce Administrator and your Auction team to decide how to handle names.
Match Name with Salesforce Contact ID using V-lookup
1. Open both your Attendee spreadsheet and Contact Export spreadsheet.
2. On the Contact export spreadsheet, put the columns in this order:
a. Name
b. ContactID
c. AccountID

10
3. Sort by name
4. Save the spreadsheet
5. On the Attendee spreadsheet, you should have two blank columns:
a. ContactID
b. AccountID
6. Insert the Vlookup function in the ContactID cell. Use the Contact Export spreadsheet for your
source data. It will probably look something like this:
You can see that I am looking up the name Fake Attendee. And I am searching the columns and rows
from my Contact Export spreadsheet. And I’m asking it “please find the name “Fake Attendee” and tell
me the contact ID, which is in column 2. And since I want each contact ID to be unique, I set the Range
Lookup value to False – that’s because Salesforce always creates a unique ID – so there shouldn’t be any
duplicates in the Contact Export sheet.
7. Copy the formula to the bottom of the column
8. If you have errors, review the features of V-Lookup
9. If you still have errors, check the spelling of the names, and adjust your Attendee list accordingly
10. Double check! Find someone that you just assigned a contact ID to on our Attendee sheet, and
then look them up in Salesforce. And then look them up on your Contact Export to make sure
that you’ve made a match!
Import Contacts That Did Not Match
Even though in the last step – you did your best to match the contacts – you can import the new
contacts as Leads. This will give you the option to allow Salesforce one more chance to try and find a
match – helping you keep your data free from duplicates! (You can skip this step, and import the list
directly as a Contact list if you prefer).

11
1. Copy the names of the contacts to be imported to a new spreadsheet. Include these fields
a. First Name (John)
b. Last Name (Smith)
c. Company (Company should be the first and last name together (John Smith)
2. Save as a CSV file
3. Open the Data Loader (see steps, above) and import as Leads
4. Select “today’s leads”
5. Shift+click on the first name (opens in a new window) and select the “search for duplicates”
button. If you find a dup, you can merge.
6. After de-duping the lead, select the “convert lead” button
7. In the next dialogue box, under “contact” select “Create New” to create a new contact.
8. Continue until you have a new contact record for all of the new folks!
Export your Salesforce Contacts (Again)
See the above steps. Now that you have added new people and they have an ID – you need to re-export
so you can match them to your attendee list.
Match Name with Salesforce Account ID using V-lookup
Repeat the steps for matching the Contact ID, but this time use the third row – the one with the Account
ID.
Review Your Work
Check again – make sure that contacts exist in Salesforce, and that you have both a ContactID and an
AccountID for each in your spreadsheet!
Import Auction Items Next step is to import your Auction items. If you are keeping track of where you got them – you’ll need
to import them as an Auction Donated Item. Otherwise, you’ll just import them as Auction Items. Here’s
how:
Prepare Your Items Spreadsheet for Import
Remember – you’ll need to import your items, and then export them with the unique ID that Salesforce
assigned to each item. So your import should have these columns:
Item Name This is the text name of the item – something like “2 Tickets to the Superbowl”
Item Category If you are tracking the kind of item (tickets, experiences, food , travel), include those here
Fair Market Value This is the value of the item
Item Description (if desired) If you plan on printing an auction booklet, you can include that description here
Auction Group If you have “rounds” of either silent, live, or both – indicate

12
which round each item is for
CampaignID This is the ID from your first step. Every item should have the same campaign ID (you want the Auction’s ID, not one of its Campaign ID’s.)
Note: You should check to make sure both your Item Category list and your Auction Group list in
Salesforce has the same names that you are using in your spreadsheet.
1. Save your file as a .CSV file
2. Open the Apex Data Loader (see earlier steps), and select the Auction Item
(GW_Auctions_Auction_Item_c) object
3. Select the file you prepared
4. Map the fields. They should look something like this:
5. Complete the import.

13
6. Head on over to Salesforce, and review the items for your current auction to make sure
everything looks right!
Update Your Spreadsheet with New IDs
Now that you’ve created your auction items in Salesforce, you’ll need to add the new IDs to your
spreadsheet. You have two options:
1. Whenever you use the DataLoader to insert or update objects, Salesforce will save a success file
that contains your original CSV, with a new column for the ID of the objects inserted or updated.
You can then use this file, rather than having to export out the ID’s.
2. Export the Auction Items.
1. Open the Apex Data Loader (see earlier steps), and select the Auction Item
(GW_Auctions_Auction_Item_c) object
2. Create a name and a location for your export
3. Open the file, and delete any auction items that are from previous auctions
4. Remember the Vlookup trick? You need to do that again, so you can ADD the Salesforce ID to
your list of auction items.
Prep Your Campaign Attendees Import 1. Create an Excel spreadsheet for importing your contacts to the auction campaign.
(You’ll need these columns in your spreadsheet):
Account ID And the Account ID that goes with John Smith. This is for your reference only – you don’t need this for the import
Bid Number This is John’s bid number. Has to be a number, and it has to be unique. People can’t share a bid number.
Campaign ID This is the Campaign ID for the Attendees list
Contact ID This is the Contact ID that goes with John Smith
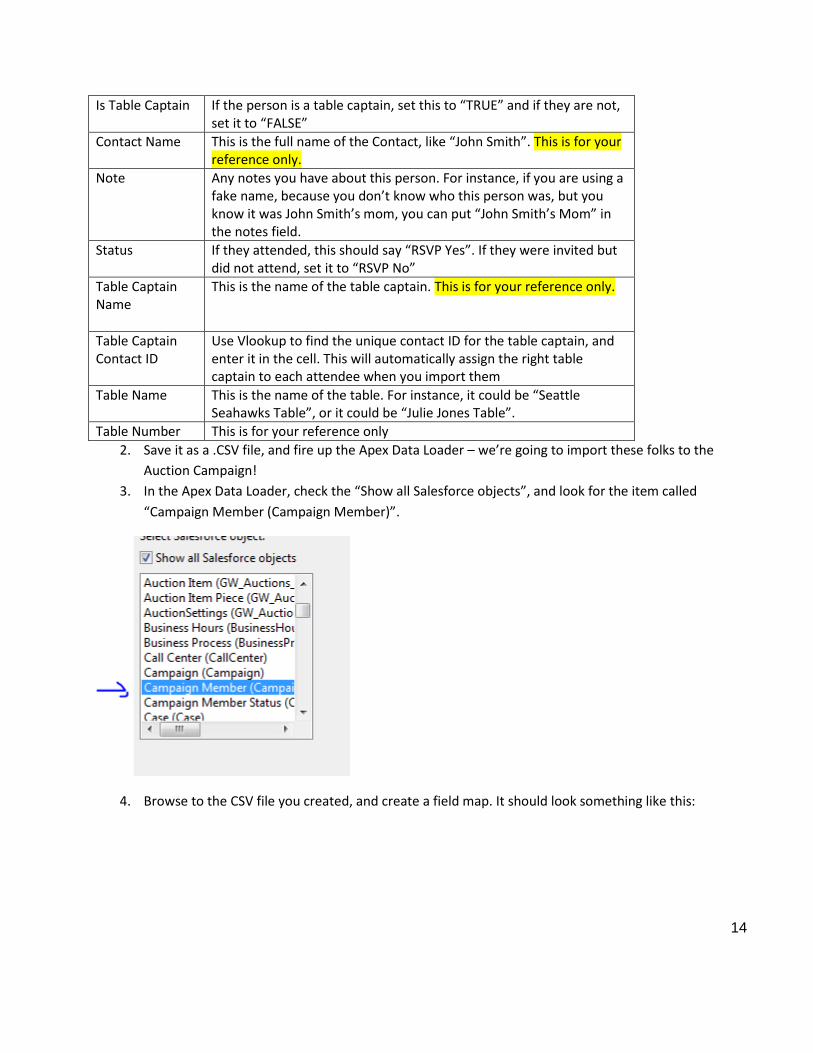
14
Is Table Captain If the person is a table captain, set this to “TRUE” and if they are not, set it to “FALSE”
Contact Name This is the full name of the Contact, like “John Smith”. This is for your reference only.
Note Any notes you have about this person. For instance, if you are using a fake name, because you don’t know who this person was, but you know it was John Smith’s mom, you can put “John Smith’s Mom” in the notes field.
Status If they attended, this should say “RSVP Yes”. If they were invited but did not attend, set it to “RSVP No”
Table Captain Name
This is the name of the table captain. This is for your reference only.
Table Captain Contact ID
Use Vlookup to find the unique contact ID for the table captain, and enter it in the cell. This will automatically assign the right table captain to each attendee when you import them
Table Name This is the name of the table. For instance, it could be “Seattle Seahawks Table”, or it could be “Julie Jones Table”.
Table Number This is for your reference only
2. Save it as a .CSV file, and fire up the Apex Data Loader – we’re going to import these folks to the
Auction Campaign!
3. In the Apex Data Loader, check the “Show all Salesforce objects”, and look for the item called
“Campaign Member (Campaign Member)”.
4. Browse to the CSV file you created, and create a field map. It should look something like this:

15
(The blank items are the fields we left in for your reference – it’s okay to leave those blank)
5. Import your records!
6. Review your import. If you get a message indicating that there are errors, you’ll want to open
that spreadsheet and review. Common errors include:
1. Duplicate bid numbers
2. Trying to add someone more than once (Like a fake attendee name)
3. If you have merged contacts in between steps, so the name or ID is no longer valid
Import Auction Bids (Purchases) Almost done! Now that you have all of the right Contacts in Salesforce, you’ve added them to a
Campaign, they have a Bid Number, are sitting at a Table, and have a Table Captain, and you’ve
imported the Auction Items – now you need to create an opportunity for each winning and losing bid. So
– back to your Excel spreadsheets!
1. Create an Excel spreadsheet for importing your Bid Import List to the auction campaign
opportunities. You’ll need these rows in your table:
Item Name For your reference only.
Item Description For your reference only
AuctionItemPurchasedID This is the unique ID that Salesforce assigned to each item
Bid Number It’s okay if this repeats, because we hope that many people bid on each item. Sometimes the same person bids several times
Contact Name For your reference only
Organization ID This is the Organization (or Account) ID that is a unique number

16
associated with each contact
Contact ID This is the Unique contact ID
Amount This is the amount of the bid. In your spreadsheet, do NOT enter this as currency, or with a dollar sign.
Stage Losing bids should be marked “Closed – Lost”. Winning bids should be marked “Closed – Thank You Sent”
Donation Name Check with your Salesforce administrator regarding naming conventions. But it should probably tell you a lot –something like: John Smith – 2012 Auction Bid
Probability Set all of these to 100
Close Date Set this to the date of the Auction
Donation RecordTypeId You collected this earlier.
CampaignID – Attendees This is the campaign ID for Auction Attendees
Auction ID This is the Auction ID for the overall auction
Item Note A text field for any notes such as “This Fake Attendee is John Smith’s Wife”.
2. Open the Apex Data Loader (see earlier steps), and select the Opportunity object
3. Select the file you prepared
4. Map the fields. They should look something like this:
5. Complete the import and review your data

17
Review Your Work Take some time to review ALL of your work. Ask your auction planning team to review, ask the person
responsible for thank you letters, ask your financial person if the data you’ve collected is a close match
for what you have recorded in your financial statements, and so on. You’ll want to make sure that
everyone substantially agrees with the data before you decide that you are done.
Start Planning Use the data to plan for next year. Maybe you’ll find that your “raise the paddle” was the most
successful part of your evening. Or maybe you’ll find that the Silent auction tired out your donors and
they didn’t have anything left to give. Or maybe you can tell that some people bid and never won – and
that might be an opportunity for you to follow up with those individuals to secure a gift of a different
sort. You get the idea – make sure you use the information you’re collecting to plan a more effective
auction next year!