improving accessibility of schools · a disabled toilet is located in a special unit only. disabled...
TRANSCRIPT

Improving Accessibilityof Schools
2006

2006
Improving Accessibilityof Schools

02
E d u c a t i o n i s i m p o r t a n t f o r
everybody—this includes people with
and without disabilities. Among other
things, education gives us the opportunity
to learn to read and write, it gives us the
opportunity to make friends and socialise
with other people, and it gives us the
opportunity to learn new skills—skills that
are important for employment in later life.
The Government of Sri Lanka (GoSL)
recognises the importance of education
for social and economic development
through the various educational
initiatives it has taken. However, many
children with disabilities overwhelmingly
are not included in either mainstream or
specialist schooling. While there are
many barriers that still exist to ensuring
equal access to education for people with
disabilities, this booklet focuses on the
issues of physical accessibility to the
school facility.
More schools currently exist than are
likely to be built in the near future. Thus,
this booklet focuses on some of the main
issues facing existing facilities. Existing
buildings pose a particular challenge as
there is a need to work within the existing
structures. Full compliance with
accessibility standards may not be
possible or reasonable in many cases.
Site visits to many schools in urban and
rural environments took place over
several months in 2005-2006 in order to
identify areas of improvement to
buildings that would assist in making
schools more accessible. This booklet
summarises some of the main issues and
suggests some improvements that could
be made. The major issues identified in
this booklet are not necessarily the only
issues for schools' accessibility. Factors
such as lighting inside classrooms,
classroom arrangement, access to sports
and playgrounds, and wheelchair access
to upper floors, for instance, are not
addressed for various reasons. It would
also be beneficial to consider these
issues as part of an ongoing maintenance
programme.
This document was written by Samantha Whybrow for John Grooms. We wish to thank all those involved in the production.
John Grooms office in Sri Lanka, 17 Cross Road, Mount Lavinia
Further information about accessibility can be obtained in Sri Lanka through:
Disability Organisations Joint Front368 Galle Road, RatmalanaPh/Fax: +94 11 272 1383E: [email protected]
At the Ministry of Health, the Youth, Elderly, Disabled and Displaced Unit can also assist with inquiries.
YEDD UnitDeans Road, Colombo 10Ph: +94 11 267 4684E: [email protected]; [email protected]
INTRODUCTION

03
Table of Contents
Access to ground floor 04
Disabled toilet facilities 11
Drainage 18
Common Areas &Specialist Classrooms 22
Stairways 24
Pathways & Corridors 27
Signage 29
Teachers' Facilities 32
Canteen 33
Car parking 35
Summary 36
04
ACCESS TO GROUND FLOOR
ACCESS TO GROUND FLOOR
As a minimum, the Ministry of Education
stipulates that access to ground floor
should be provided in all school buildings.
Theoretically, this should provide students
with access to all facilities that take place
on the ground floor. Usually, this access is
in the form of a 1:12 gradient ramp.
Common Issues:
Step up into classroom from corridor
with no ramped alternative
Uncovered drains along length of
building at entrance points [refer to
section on drainage] that create a
break in access to ground floor
Ramps are not always provided to
the ground floor of all buildings. For
instance, there may be a ramp to a
special needs unit building, but the
other buildings in the school are not
accessible. This means the
disabled child cannot access other
areas of the school and cannot be
included in activities outside their
own classroom.
Ramps are built without raised curbs
to protect the edges
Ramps are too steep (note the Sri
Lankan standards stipulate 1:15
grade for outdoor ramps)
Ramps to main entrances are not
covered
Ramps surfaces are not made to be
non-slip
Ramps are built without handrails

05
ACCESS TO GROUND FLOOR
These classrooms are all ground floor but inaccessible because access to the ground floor is over a drain, then over a step onto the corridor, then another step into the classroom.
Fig 2
Fig 3
Fig 1

Ramps should be provided at either end
of a corridor/building. This is important
along long corridors, especially, to avoid
having to travel all the way along a
corridor to the ramp in order to move to
another building that might be at the ‘non-
ramp’ end of the corridor.
Ramps should be 1:15 gradient to comply
with recent changes in legislation.
Ramps shou ld have curbs on
unprotected edges to prevent falls off the
ramp.
Handrails on either side of the ramps
would assist those with difficulty walking
up ramps.
Texture the surface of the ramp so that is
does not become slippery—especially
when wet.
Landings are at the top and bottom
Classrooms should lie level with the
corridor. Alternatively, a sloped surface
set in the door frame could help
overcome the step (this will only work for
small steps). Portable ramps should be
made available at a school to overcome
those steps at classrooms that are too
high.
06
SOME IDEAS
A small slope has been set into the door to help overcome a small step.
ACCESS TO GROUND FLOOR
Fig 4
Refer to the section on drains for ideas
on overcoming problems with exposed
drains
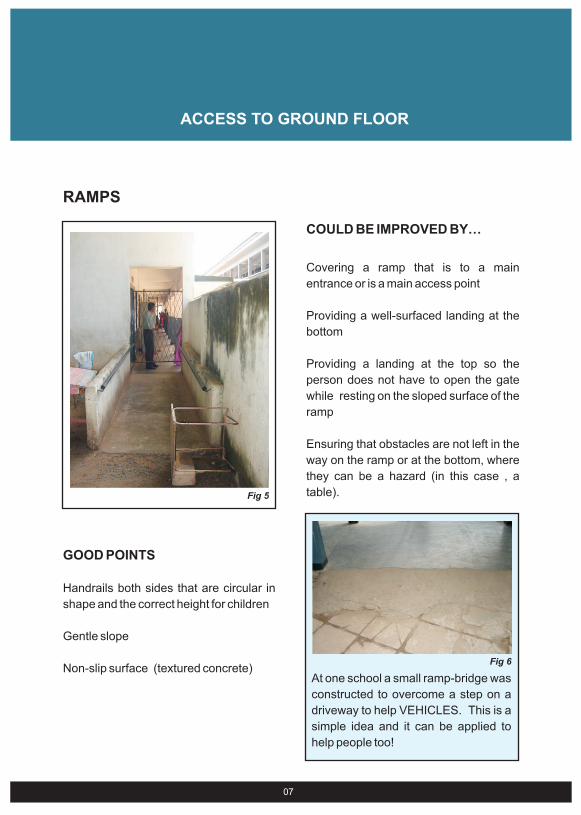
RAMPS
GOOD POINTS
Handrails both sides that are circular in
shape and the correct height for children
Gentle slope
Non-slip surface (textured concrete)
07
ACCESS TO GROUND FLOOR
Fig 5
COULD BE IMPROVED BY…
Covering a ramp that is to a main
entrance or is a main access point
Providing a well-surfaced landing at the
bottom
Providing a landing at the top so the
person does not have to open the gate
while resting on the sloped surface of the
ramp
Ensuring that obstacles are not left in the
way on the ramp or at the bottom, where
they can be a hazard (in this case , a
table).
Fig 6
At one school a small ramp-bridge was
constructed to overcome a step on a
driveway to help VEHICLES. This is a
simple idea and it can be applied to
help people too!

This picture shows one of the common
ways to enter classrooms on the ground
floor. It is not accessible due to the steps
and the open drain. There are many
possible solutions. The picture shows
how a ramp could be constructed to one
of the classrooms to allow access to at
least one classroom. This would require:• Raising the height of the corridor
directly outside the classroom
entrance to be level with the
classroom to create a level landing
of at least 1500mm length and
1200mm width.
• Construct a ramp of 1:15 gradient
that is 1200mm wide to run parallel
with the existing corridor
If it is absolutely necessary to have a
height difference at the entrance to the
classroom, set a small ramp into the
doorframe as shown in figure 06, p. 07.
An alternative solution is to provide
access to all classrooms by raising the
height of the entire corridor and placing
ramps at both ends of the corridor.
D r a i n s s h o u l d n o t b e l e f t
exposed—suitable grating or safety
measures should be provided [refer to
section on drainage].
08
Raise the height of this
platform to lie level with
the classroom entrance.
Provide a suitable ramp
with handrails here.
ACCESS TO GROUND FLOOR
Fig 7
Example of possible modification to improve ground floor access
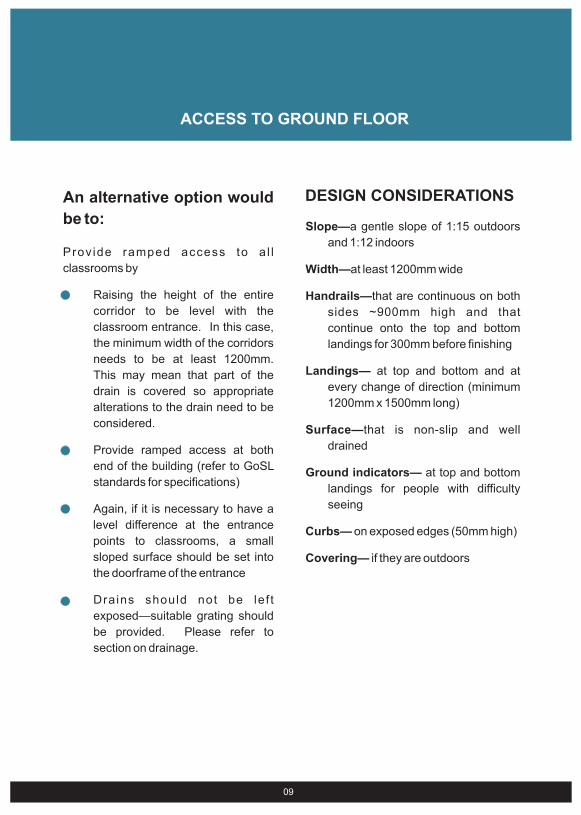
An alternative option would
be to:
Prov ide ramped access to a l l
classrooms by
o Raising the height of the entire
corridor to be level with the
classroom entrance. In this case,
the minimum width of the corridors
needs to be at least 1200mm.
This may mean that part of the
drain is covered so appropriate
alterations to the drain need to be
considered.
o Provide ramped access at both
end of the building (refer to GoSL
standards for specifications)
o Again, if it is necessary to have a
level difference at the entrance
points to classrooms, a small
sloped surface should be set into
the doorframe of the entrance
• Drains should not be lef t
exposed—suitable grating should
be provided. Please refer to
section on drainage.
02
ACCESS TO GROUND FLOOR
09
DESIGN CONSIDERATIONS
Slope—a gentle slope of 1:15 outdoors
and 1:12 indoors
Width—at least 1200mm wide
Handrails—that are continuous on both
sides ~900mm high and that
continue onto the top and bottom
landings for 300mm before finishing
Landings— at top and bottom and at
every change of direction (minimum
1200mm x 1500mm long)
Surface—that is non-slip and well
drained
Ground indicators— at top and bottom
landings for people with difficulty
seeing
Curbs— on exposed edges (50mm high)
Covering— if they are outdoors
02
ACCESS TO GROUND FLOOR
10
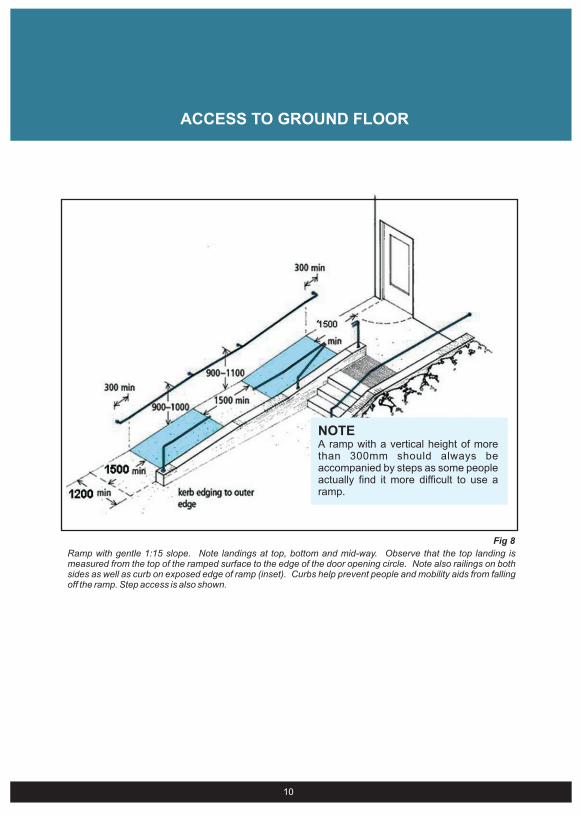
Ramp with gentle 1:15 slope. Note landings at top, bottom and mid-way. Observe that the top landing is measured from the top of the ramped surface to the edge of the door opening circle. Note also railings on both sides as well as curb on exposed edge of ramp (inset). Curbs help prevent people and mobility aids from falling off the ramp. Step access is also shown.
NOTEA ramp with a vertical height of more than 300mm should always be accompanied by steps as some people actually find it more difficult to use a ramp.
Fig 8

Proposed Disabled Toilet FacilityThis toilet facility might be acceptable for
disabled people who can walk. However,
it makes more sense to provide a fully
wheelchair accessible toilet facility
because then the school has facilities for
wheelchair users as well as ambulant
(walking) disabled people. This is easy
to do—the dimensions of the toilet need
to be enlarged slightly and the position of
the toilet and rails changed [see GoSL
standards].
Common issues:
No disabled toilet facilities for students
or teachers
Pathway leading to toilet facilities is not
accessible
Architect’s accessible design not
implemented on-site
Accessibility standards not followed
A disabled toilet is located in a special
unit only. Disabled students who are
not educated in the special unit cannot
access this toilet easily.
Disabled students may have to travel
further to reach the disabled toilet
because the path of travel has not been
properly considered (e.g., the ramp is
at the opposite end of the corridor to
the toilet)
11
Fig 9
DISABLED TOILET FACILITIES

Existing schools have a designated
number of toilet facilities according to the
number of students. It is recommended
that a proportional number of disabled
toilet facilities should also be provided.
At least one disabled toilet facility should
be provided for students and one for
staff.
In some cases, providing a disabled
toilet facility for students may be
achieved by combining two existing
squatting-type toilets. However, this will
only be useful if there is access to the
existing toilet block itself.
Where a disabled toilet cannot be
incorporated into the existing toilet block
(one for boys and one for girls), then
consideration should be given to
constructing a new disabled toilet facility.
This could be a unisex facility that boys
and girls could use, as long as that is
appropriate in that school environment.
Access to toilet blocks is an important
consideration. The pathway leading to
the toilet should be smooth, firm, and
level, and should not be located further
away from the school buildings than
other toilets. That is, a disabled student
should not have to travel further to get to
the toilet than a non-disabled student.
This means there needs to be careful
consideration of how students exit the
school building. If there is only one ramp
at the end of a long corridor and the
toilets are in the opposite direction then
the disabled student will have to travel at
least twice as far! Needless to say, a
disabled toilet facility should be located
on the ground floor.
12
DISABLED TOILET FACILITIES
Most schools only have a squatting pan option. Space is usually limited. Doors often open across the toilet pans. There are step to overcome. These toilets are inaccessible.
Fig 10

This toilet block contains 6 squatting
type toilets. There is enough space to
combine two of the toilets into an
accessible toilet BUT the path of travel
to this toilet block is entirely
inaccessible. It is situated down a
steep slope, across an open drain,
along an uneven path, and there is a
step into the block. Unless all of those
problems could be overcome, this is
not a situation where converting an
e x i s t i n g f a c i l i t y w o u l d b e
recommended.
13
Fig 11
DISABLED TOILET FACILITIES
Inaccessible path to toilet block
This toilet was designed to be
wheelchair accessible. However, the
construction site workers did not follow
the architect’s plan and positioned the
toilet and rails incorrectly. Now the
toilet is too far from the rails so the rails
cannot be used. Also, the toilet should
be close to a side wall so the
wheelchair can approach from the
side. The bidet hose is too far from the
toilet to be reached while seated.
Fig 12
Communication of accessible design to all involved.
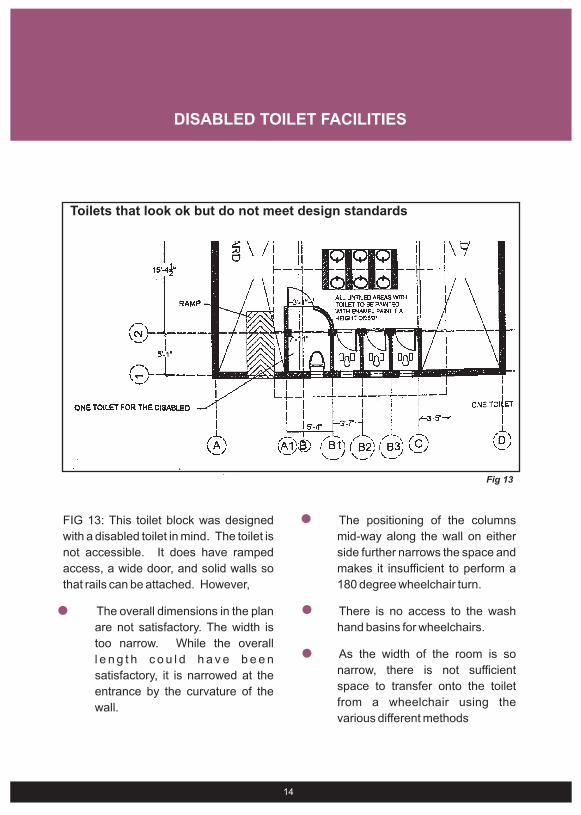
FIG 13: This toilet block was designed
with a disabled toilet in mind. The toilet is
not accessible. It does have ramped
access, a wide door, and solid walls so
that rails can be attached. However,
• The overall dimensions in the plan
are not satisfactory. The width is
too narrow. While the overall
l e n g t h c o u l d h a v e b e e n
satisfactory, it is narrowed at the
entrance by the curvature of the
wall.
• The positioning of the columns
mid-way along the wall on either
side further narrows the space and
makes it insufficient to perform a
180 degree wheelchair turn.
• There is no access to the wash
hand basins for wheelchairs.
• As the width of the room is so
narrow, there is not sufficient
space to transfer onto the toilet
from a wheelchair using the
various different methods
14
DISABLED TOILET FACILITIES
Fig 13
Toilets that look ok but do not meet design standards

16
Fig 14: Example accessible toilet—top view
DISABLED TOILET FACILITIES

SOME IDEAS
As part of a regular maintenance
programme, access to toilets for staff
and students should be checked. In
most cases a new toilet will need to be
constructed as no standard squatting
toilet will meet accessibility standards.
The main considerations will be:
Space
• In some cases there may be space
inside the existing toilet block to
construct an accessible toilet. This
might be by combining two
squatting toilets. It might be by
using ‘empty space’ inside the
block that is not being used for
anything else.
• In other cases a new toilet might
need to be constructed separate of
the existing block.
• Space of 1500mm x 2200mm is
required.
Level access
• In most cases, existing toilet blocks
have steps to get up to the block so
any alterations would need to
include ramps as well. • Some toilet cubicles have steps to
them. These should be removed
as well to create level access (an
option is to set a ramp into the
doorframe).
Accessible path to toilet
• The pathway leading to the toilet
block would need to be assessed
to ensure it has no breaks and is
accessible. A smooth, firm, even
path with a gradient of less than
1:15 and at least 1000mm wide
would need to lead to the toilet
block.
Other
In some cases a unisex facility
could be constructed at a suitable
location if no adaptations to
existing toilet facilities are possible.
This might be the case, for
example, if the existing toilet block
is very far away or is down a very
steep hill.
15
DISABLED TOILET FACILITIES
17
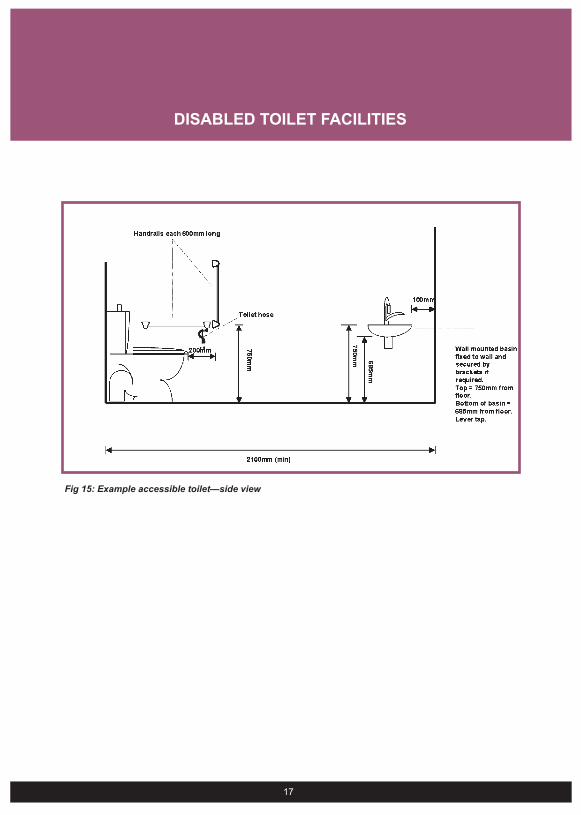
Fig 15: Example accessible toilet—side view
DISABLED TOILET FACILITIES

Good drainage is important to ensure
easy access and reduce the likelihood of
slipping when water pools on certain
surfaces.
Open drains at a school site are not
uncommon. This is a problem when
open drains are situated across a path of
travel (e.g., you have to step over the
drain to continue going where you are
going), or when the open drain is directly
beside a path of travel so that you may be
in danger of slipping into it.
Different solutions need to be considered
to reduce the dangers of open
drains—dangerous for all but especially
for those who cannot see well or cannot
recover their balance well—and to
improve the accessibility for those who
cannot step over a drain at all or without
difficulty.
Drainpipes sometimes empty onto
pathways so that water collects in areas
where it might present a difficulty or
safety hazard for someone moving
across. Careful attention should be paid
to ensure any drainwater is not directed
onto pathways.
Open DrainsIt would be virtually impossible for a
wheelchair user to get onto the
platform and would be difficult for a
person using crutches, with poor
balance, with difficulty seeing, or with
some other types of mobil i ty
impairment.
18
DRAINAGE
Fig 16

COMMON ISSUES
• Open drains create a hazard, especially for those who don’t see well or who cannot step across them
• Open drains block the path of
travel
• Open drains are too close to the
path of travel
• Open drains directly below
exposed edge of a corridor
• Drainpipes opening directly onto
steps or pathways
19
Fig 19 - Open drain directly below exposed edge of corridor
Fig 18 - Open drain blocks pathway and needs to be stepped across to reach destination
Fig 17 - Open drain too close to pathway
DRAINAGE
Fig 20 - Drainpipe opens to steps

SOME IDEAS
As part of a regular maintenance
programme drains should be checked to
assess those that lie over a pathway or at
the entrance to a building. Some simple
improvements might be through the use
of grating and bridging.
Grating
Install appropriate grating over drains.
The direction of the grate should be
perpendicular (right angles) to the main
direction of travel. The slots should not
be more than 13mm wide.
20
In this school, grating was placed over
an open drain along a corridor. This is
a good example of access as:
The holes of the grate are small
enough so that a wheelchair wheel or a
crutch would not get caught in them.
The grate lies level with the corridor
In the bottom of the picture the open
drain was partially covered by a
concrete slab.
The concrete slab lies level with the
corridor
BUT, unfortunately the slab only
covers part of the open drain—half of it
is still exposed!
Fig 22
Fig 21
DRAINAGE
Drainage channels
From - CAE (2004)Two example of Drainage slots.
Bridging
Bridging across the drain is one way to
overcome the safety and access
problems. However, it needs to be done
correctly so the bridge itself is accessible
and does not cause additional safety
problems. Level (no step) access is
essential.
21
Figures 23 and 24 show some form of
'bridging' across an open drain. This is
a good potential solution. However,
Fig 23 shows large gaps in the
MIDDLE of the pathway. Also, the
bridge does not lie level with the rest of
the path.
F igure 24 shows br idges to
classrooms over drains but the bridges
are not at every doorway. Also, they
should be much wider (at least
1200mm) and more clearly indicated.
A curb on the exposed edge would be
safer. It is good that these bridges are
level with the surrounding pathways.
Fig 24
Fig 23
DRAINAGE
Places of worship, libraries, auditoriums,
playgrounds. These are all examples of
‘common areas’; areas where it is
intended that all children will gather at
one point or another during the usual
course of their school day. All common
areas should be made accessible.
Specialist classrooms are classrooms
such as science laboratories, home
economics classrooms or computer
laboratories. They are classrooms
where special facilities are required for
learning. It may not be necessary to
make al l special ist c lassrooms
accessible. Provision should be made
so at least one of each type of class is at
an accessible location. Creative
thinking can help here. For existing
buildings, this classroom does not
necessarily need to be an actual space if
it is not required at the present time.
However, a ‘potential’ space should be
available and waiting should the need
arise. That is, an area that can be
converted easily and at relatively low
cost that is situated in an accessible
location. For new buildings it would
seem less costly to create at least one of
each type of specialist facility in an
accessible location.
22
COMMON AREAS & SPECIALIST CLASSROOMS
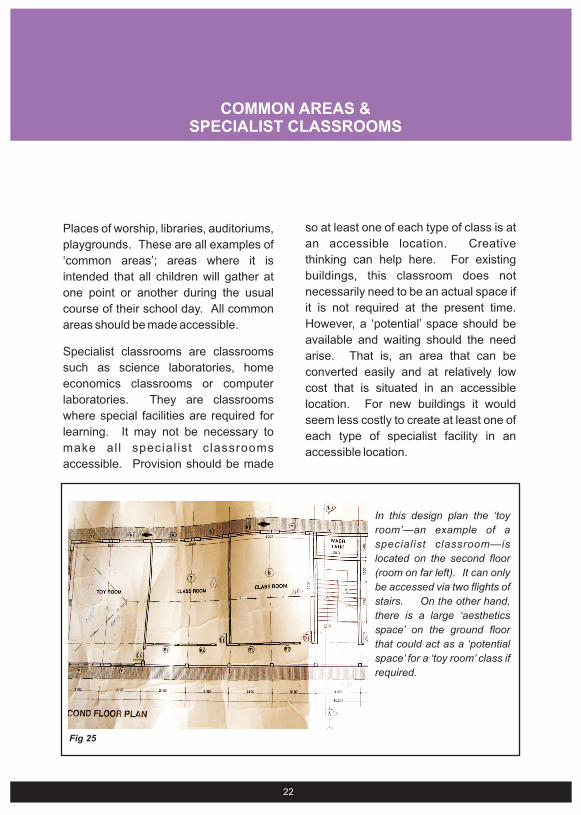
Fig 0
In this design plan the ‘toy
room’—an example of a
specialist classroom—is
located on the second floor
(room on far left). It can only
be accessed via two flights of
stairs. On the other hand,
there is a large ‘aesthetics
space’ on the ground floor
that could act as a ‘potential
space’ for a ‘toy room’ class if
required.
Fig 25
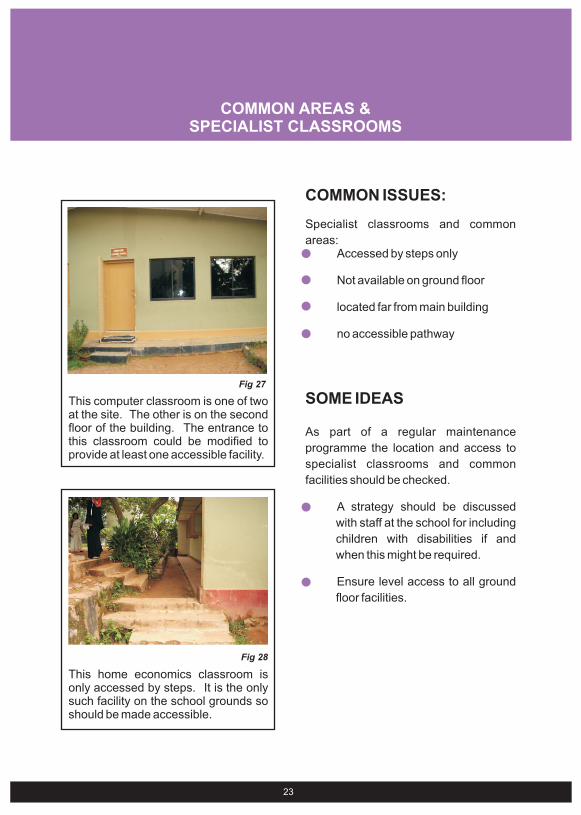
This computer classroom is one of two at the site. The other is on the second floor of the building. The entrance to this classroom could be modified to provide at least one accessible facility.
This home economics classroom is only accessed by steps. It is the only such facility on the school grounds so should be made accessible.
COMMON ISSUES:
Specialist classrooms and common
areas:• Accessed by steps only
• Not available on ground floor
• located far from main building
• no accessible pathway
SOME IDEAS
As part of a regular maintenance
programme the location and access to
specialist classrooms and common
facilities should be checked.
• A strategy should be discussed
with staff at the school for including
children with disabilities if and
when this might be required.
• Ensure level access to all ground
floor facilities.
23
COMMON AREAS & SPECIALIST CLASSROOMS
Fig 28
Fig 27

S t a i r w a y s a r e i m p o s s i b l e f o r
wheelchairs to negotiate and other
solutions must be found to ensure
appropriate access to facilities that might
take usually take place above ground
level (see section on ‘Common areas
and specialist facilities’, also ‘Access to
ground floor’ in this booklet).
Stairways can be inaccessible, unsafe or
difficult for other people too. Many older
teachers will be quick to tell you how it
gets more difficult to climb the stairs to
classes! Climbing stairs is particularly
difficult for people with mobility
impairments who find it difficult to lift and
bend their legs (e.g., people with polio,
arthr i t is, spast ic i ty, hemiplegia,
weakness), or people with visual
impairments who are at a greater risk of
falling on staircases, or people who get
tired quickly due to cardiac problems,
age, or neuromusculoskeletal problems
(ie., many people who have difficulty
walking will also get tired more quickly
because they have to put more effort into
taking each step). Therefore, good
design of stairways must be carefully
considered.
COMMON ISSUES
No handrails at all to provide support.
A banister on one side that does not provide an appropriate supporting surface so cannot be considered an adequate substitute for a handrail. Narrow stairways in some instances.
No colour contrast strip on the edge (nosing) of steps to provide guidance for people with difficulty seeing.
Low l ight ing on sta i rcases.
Sometimes steps are sloping.
Sometimes steps are too short.
Broken, crumbling steps.
24
STAIRWAYS
Fig 26: These steps are wearing away fast, creating a trip hazard.

GOOD POINTS
• Steps are appropriate height and depth
• Surface of steps is protected from the elements
• Steps appear to be unpolished so are less slippery
• There is a landing at an appropriate interval
THINGS TO IMPROVE ON…
• There is a banister on one side that is not effective for gripping or providing support. It ends before the bottom step. Circular handrails should be provided both sides that are continuous and extend 300mm beyond the top and bottom steps
• A colour contrast strip should be provided on the nosing of the steps
• L i g h t i n g c o u l d b e improved—especially towards the top of the steps
25
STAIRWAYS
Fig 29: Example of typical staircase.

SOME IDEAS
As part of a regular maintenance programme, stairs should be checked. In most schools the most simple improvements to include would be to:
• install appropriate handrails on either side of the steps.
• repair broken steps
• paint a colour contrast strip on the nosing of the steps
Good stair design includes:
• Steps 300mm long and 150mm
high with at least 1200mm wide
between the railings
• Circular handrai ls on both
sides—if the school has children of
primary school age then a second,
lower, rail might be considered at a
height of 700mm (there should
always be a gap of at least 200mm
between two rails so children’s
heads cannot be trapped between
the two railings).
• Landings at top and bottom—with
tactile indicators
• Colour contrast strips on the
nosing of steps
• Well lit
26
Figure 30, below, shows an example of good stair design.
Fig 30
STAIRWAYS
Getting from one building to another as
safely, quickly and easily as possible
requires a good pathway. Ideally,
pathways are paved, level, smooth, wide
and well-drained. While it is not always
possible to provide paved pathways,
which are very expensive, they should
be considered between the regularly
used areas.
It is very important that there is an
accessible path of travel to the toilets in
the school and careful consideration
should be made to providing a good
surface to travel along at least this one
area.
Corridors inside and outside buildings
should be wide, level, smooth and non-
slip. They should be free of obstacles
such as plants, bags, shoes, cupboards
etc. Corridors outside buildings should
additionally have some warning signal if
the corridor drops off to a step or has an
exposed edge (e.g., provide a colour
contrast strip or a raised curb).
Drains are a major issue along
pathways—please refer to the section on
drainage in this booklet for more
information.
COMMON ISSUES
• Obstacles such as plants, bags,
shoes, positioned along the
corridor that make it too narrow or
potentially hazardous.
• Exposed edges of external
corridors that drop off onto open
drains or to high steps.
• Areas of water pooling along
pathways were the drainage is not
adequate
• Open drains along pathways.
• Uneven and rough path of travel.
• Steps in the path of travel with no
ramped alternative.
27
PATHWAYS & CORRIDORS
PATHWAYS & CORRIDORS
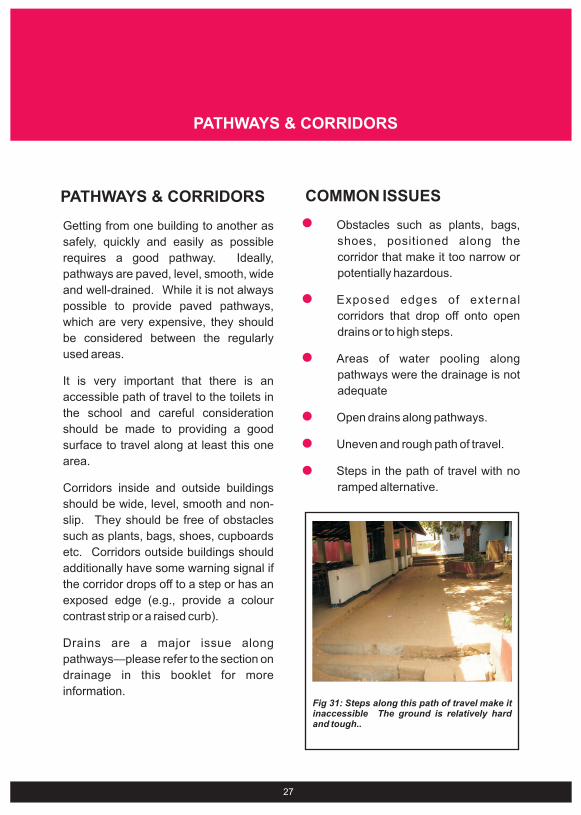
Fig 31: Steps along this path of travel make it inaccessible The ground is relatively hard and tough..
28
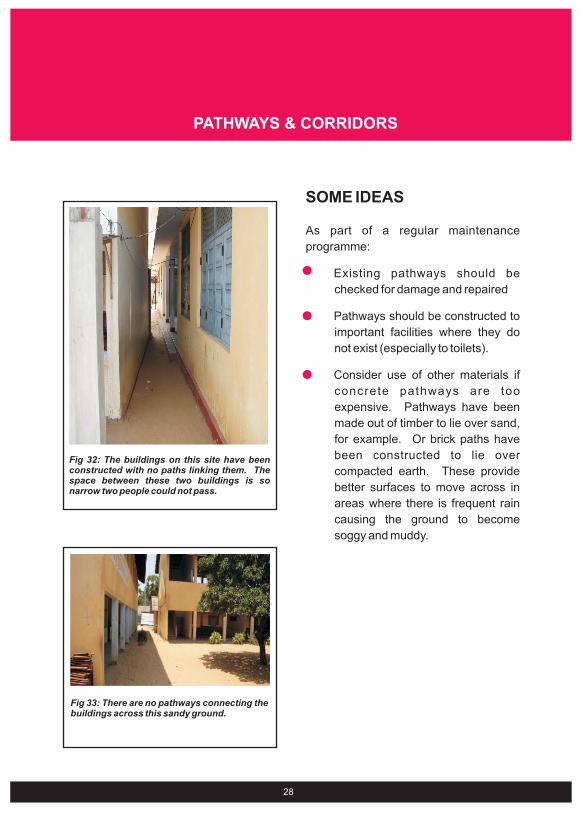
Fig 32: The buildings on this site have been constructed with no paths linking them. The space between these two buildings is so narrow two people could not pass.
Fig 33: There are no pathways connecting the buildings across this sandy ground.
SOME IDEAS
As part of a regular maintenance
programme:
• Existing pathways should be
checked for damage and repaired
• Pathways should be constructed to
important facilities where they do
not exist (especially to toilets). • Consider use of other materials if
concrete pathways are too
expensive. Pathways have been
made out of timber to lie over sand,
for example. Or brick paths have
been constructed to lie over
compacted earth. These provide
better surfaces to move across in
areas where there is frequent rain
causing the ground to become
soggy and muddy.
PATHWAYS & CORRIDORS

Good signs provide a clear and
recognizable message to all people
about how to get to a place as well as
informing people what place they are at.
Such signs are particularly important for
v i s i t o r s , p e o p l e w h o c a n n o t
communicate well such as those with
speaking and hearing impairments (e.g.,
might find it difficult to ask for directions).
People who cannot see well also benefit
from clear signs to show them the way
and people who cannot see at all benefit
from signs they can feel the way and so
they can also know more about where
they are and how to get where they are
going. People with intellectual
d i f f i c u l t i e s o r d i f f i c u l t i e s i n
thinking/thought processes also benefit
from clear signs that have symbols that
are easy to identify (such as the
universal symbol for disabled access).
COMMON ISSUES
Signs that have trees or branches
hanging over them so you cannot
read them
Signs with letters that are too small
to read well
Signs that you cannot stand close
enough to be able to read because
there are plants or rubbish bins or
benches in front of them
The colour of the letters on the sign
is too similar to the colour of the
backgroundToo many signs in the one place that
create confusion
Glare on the sign due to the material
the sign is made from reflecting too
much light
No sign!
Sign is positioned too high for
seated users to read
Sign is positioned on a door rather
than beside the door (you cannot
read signs when the door is open if
they are on the door)
29
SIGNAGE
SIGNAGE

30
SIGNAGE
Too much glairFig 34: The letters reflect glare and
can be cast in shadow so are difficult
to read
Fig 35
Fig 36
Signs obstructed by treesIn Figure 35 the bush at the front of the
sign prevents a person from being able to
get close enough to read the sign.
Reading is even more difficult as the
letters are very small. The use of
diagrams is good as they are realistic.
Too many signsIn Figure 36 there are too many signs
and the area is confusing. There are
road signs and directional signs in this
picture—too much information to give
a clear message about how to get
somewhere. The road signs are
inappropriately placed here.
Fig 34

SOME IDEAS
As part of a regular maintenance
programme, signage should be
checked. Signs that are difficult to read
due to size, position, glare, colour etc
should be replaced and positioned
appropriately. [please refer to Design
Considerat ions for Accessibi l i ty
guidelines on signage]
31
Fig 37
The sign is covered with a reflective
material so there is too much glare to
read the sign. Also, handwritten signs
can be difficult to read.
SIGNAGE

Teachers may also have a disability.
Many teachers continue to teach in their
older years, which means they may
experience difficulties in moving
associated with aging. Works to improve
access for students described earlier will
also assist such teachers who need to
move around the school.
Special teachers’ areas such as the
staffroom and teachers’ toilets should
also be made accessible. This can be
done using the guidelines described in
the rest of this document.
SOME IDEAS
As part of a regular maintenance
programme it is recommended that:
?Teachers be asked how they are
managing accessing the various
areas of the school. If they are
having difficulties with stairclimbing,
for example, improvements to stairs
such as installing handrails may
assist, otherwise relocation of their
classrooms to a suitable area might
be appropriate.
?Teachers' staffroom and toilets be
a s s e s s e d a n d a p p r o p r i a t e
improvements made to increase
their accessibility.
32
TEACHERS’ FACILIITES
TEACHERS’ FACILIITES
Fig 38: Teachers’ staffroom up steps

CANTEEN
The canteen is a common space and
access should be provided as for other
common facilities. Canteens usually
have a serving area, which needs slightly
different consideration for access. The
approach to the serving counter and the
serving counter should be accessible.
COMMON ISSUES
• Steps up to canteen
• Narrow bars that encourage
students to form a queue are too
narrow for wheelchair access
• Serving counter may too high for
younger children and wheelchair
users
• Lighting not adequate to properly
see money
• Space in room cluttered and
narrowed by arrangement of
furniture (e.g., tables and chairs).
33
Fig 39 shows steps to the canteen.
Fig 40 shows narrow rails to line up in. A clear glass and low serving counter are more accessible, however.
CANTEEN

Fig 41 shows steps and an open drain to access this canteen. It is dark. The service window is just low enough for this young child.
SOME IDEAS
As part of a regular maintenance
programme the access to and within the
canteen should be checked.
• Ensure level access (no steps or
drains)
• Widen railing for lining up to 900mm
wide. The railing should end at least
1200mm before the service counter
so that a wheelchair user could turn
and exit
• Provide at least one section of a
service counter that is 700mm from
floor level
• Provide lighting above service
counter
34
CANTEEN

Where a child, teacher, parent, or visitor
is not able to walk or arrive at school by
bus, an accessible car parking space
that is close to the entrance should be
provided. Some people with disabilities
will only be able to arrive by vehicle and a
suitable area should be provided.
Trishaws may be a possible form of
transport for wheelchair users.
It is best if the vehicle can park close to
the entrance. Also, if possible, cover the
space to protect it from rain. This is
helpful when unloading a wheelchair
from a vehicle, which might take a few
minutes, and will prevent the chair and
people from getting wet.
Level and firm ground is required so a
wheelchair can rest without tipping over.
The space should be large enough for a
vehicle and the wheelchair to be
positioned beside the vehicle.
Importantly, there should be level and
firm pathway from the car parking space
to the building entrance so the person
can move easily from the vehicle to the
building.
35
2400
1200
48
00
1
20
0
14
00
Curb ramp whereaccess is toa pedestrianroute
Access zonebetweenand at endof parkingspace
Vehicular route
Pedestrian route
CAR PARKING
CAR PARKING
Fig 42: Minimum dimensions for accessible car parking

36
SUMMARY
SUMMARY
As part of a regular programme of works and maintenance, the following areas should be closely considered:
• Provide ramped al ternat ives to ground floor
• Provide level access to classrooms
• Provide disabled access facilities – construct new or incorporate into existing
• Provide accessible pathway to toilet
• Ensure buildings are connected by accessible pathways
• Ensure no breaks in path of travel (steps or drains)
• Cover drains that lie adjacent to pathways or corridors
• Cover drains that cross the path of travel
• Grates or bridges over drains should be accessible
• Common a reas and spec ia l i s t classrooms should have groundfloor access
• Provision for converting space to a special ist classroom if required should be made
Access to ground floor classrooms
Toilets
Pathways & Corridors
Drainage
Common areas and specialist classrooms
Stairways
Signage
Teachers’ facilities
Canteen
Car parking
• Provide accessible handrails on both sides
• Repair broken steps• Provide adequate lighting
• Ensure signs are readable• Use non- re f lec t i ve and co lou r
contrasting materials• Remove unnecessary or confusing
signs
• Provide accessible toilet for teachers• Provide level access to teachers'
staffroom (no steps)
• Provide level access to canteen (no steps)
• Ensure railing in side is 900mm wide• Ensure serving counter is available at
700mm height from floor level• Ensure adequate l igh t ing over
serving counter• Ensure furniture in room leaves clear
space for easy passing (900mm wide)
• Provide accessible car parking space close to entrance

The publication of this guide was made possible by a grant from USAID administered through Motivation.