in the following steps, we will be creating the forms for the...
TRANSCRIPT

Part 3, Step 1Input Forms and Report Regions
Create Input FormsThis section shows you how to create the input form and the report region on a page.
Steps 1 through 20 provide instructions and graphics to demonstrate how to create the form and report region for the Customers page.
Steps 21 through 23 provide instructions to create the form and report region for the Publishers, Item_Types, and Subjects pages.
Return to the Amazing Books application screen shown below by clicking on the Build button in the upper right .
Above the green menu bar, select the Wizards tab.
Oracle Academy 1 13-July-2005

Part 3, Step 2Input Forms and Report Regions
Under the Forms heading, select the Form on a Table or View hyperlink.
Oracle Academy 2 13-July-2005

Part 3, Step 3Input Forms and Report Regions
Confirm the Table/View Owner is your name/schema.
Select Next to continue.
Oracle Academy 3 13-July-2005
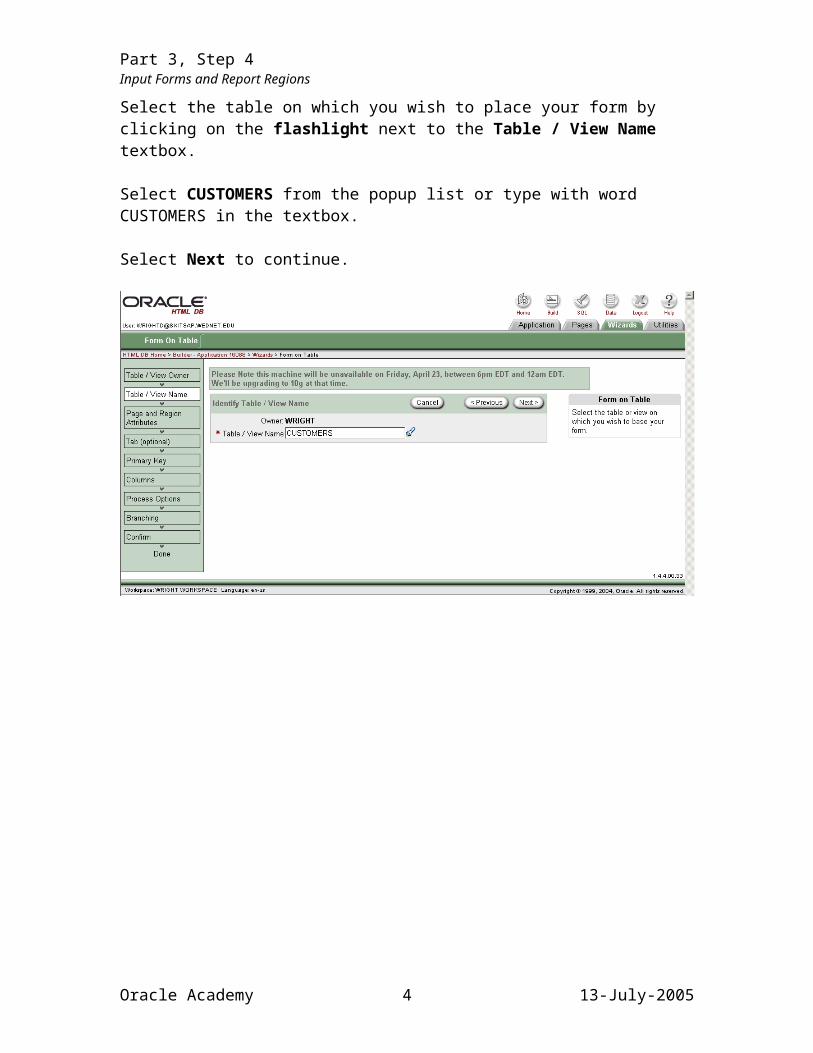
Part 3, Step 4Input Forms and Report Regions
Select the table on which you wish to place your form by clicking on the flashlight next to the Table / View Name textbox.
Select CUSTOMERS from the popup list or type with word CUSTOMERS in the textbox.
Select Next to continue.
Oracle Academy 4 13-July-2005

Part 3, Step 5Input Forms and Report Regions
Select the flashlight next to the Page textbox.
From the popup list, select Customers by clicking on the word Customers. This step tells the wizard which page in your application will receive the form.
Select Next to continue.
Oracle Academy 5 13-July-2005

Part 3, Step 6Input Forms and Report Regions
Confirm that the Primary Key drop-down list box shows CUSTOMER_ID.
Select Next to continue.
Oracle Academy 6 13-July-2005
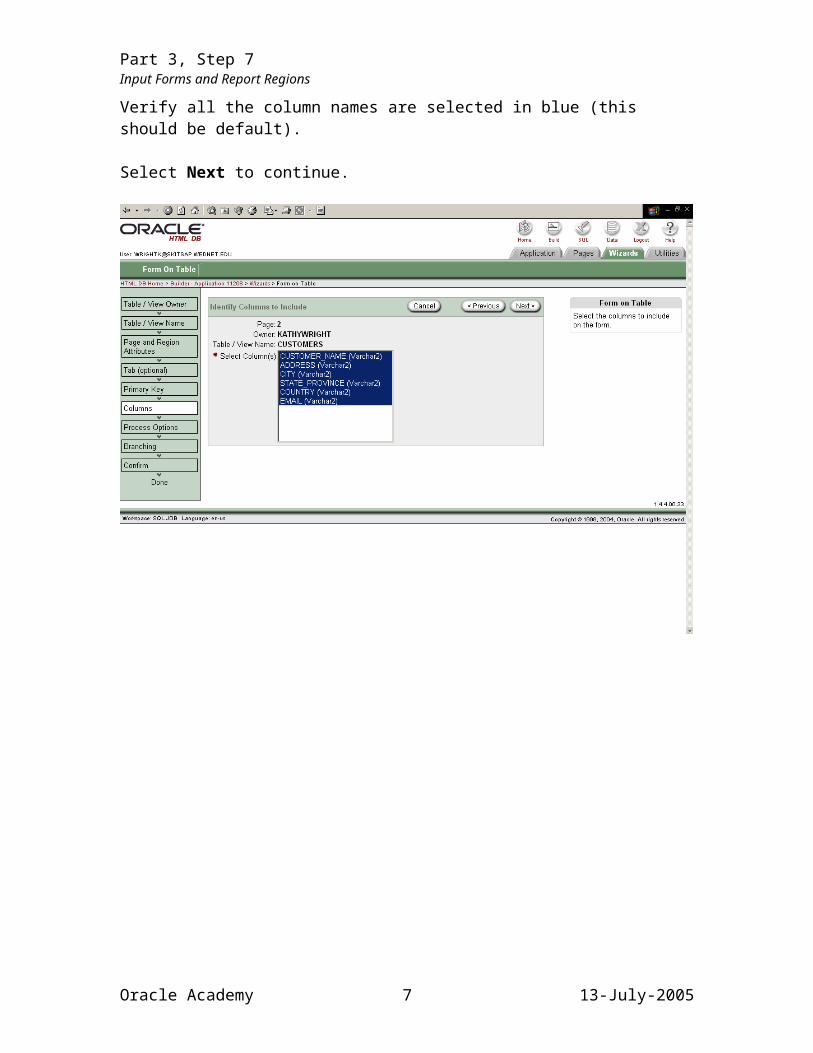
Part 3, Step 7Input Forms and Report Regions
Verify all the column names are selected in blue (this should be default).
Select Next to continue.
Oracle Academy 7 13-July-2005

Part 3, Step 8Input Forms and Report Regions
Accept the defaults in the Identify Process Options window.
Select Next to continue.
Oracle Academy 8 13-July-2005

Part 3, Step 9Input Forms and Report Regions
Select the flashlight next to each textbox shown in the Identify Branching window.
Select CUSTOMERS from the popup window. This step will direct the browser to load the Customers page after the Submit or Cancel buttons are pressed.
Select Next to continue.
Oracle Academy 9 13-July-2005

Part 3, Step 10Input Forms and Report Regions
Accept by clicking the Finish button.
Steps 1 through 10 (above) established the parameters for the input FORM that will appear on the CUSTOMERS page.
The following steps, 11-20, will create the REPORT portion to appear on the bottom of the CUSTOMERS page.
Continue now with Step 11: Do not omit Step 11.
Oracle Academy 10 13-July-2005

Part 3, Step 11Input Forms and Report Regions
Important: Select the Edit Page icon or hyperlink.
Do not Select the Run Page icon at this time.
You now begin the steps to add the REPORT region to the CUSTOMERS page. The REPORT region will ultimately appear on the page below the input FORM just created.
Oracle Academy 11 13-July-2005

Part 3, Step 12Input Forms and Report Regions
Under Page Rendering, in the Regions window, select the CREATE button.
Oracle Academy 12 13-July-2005
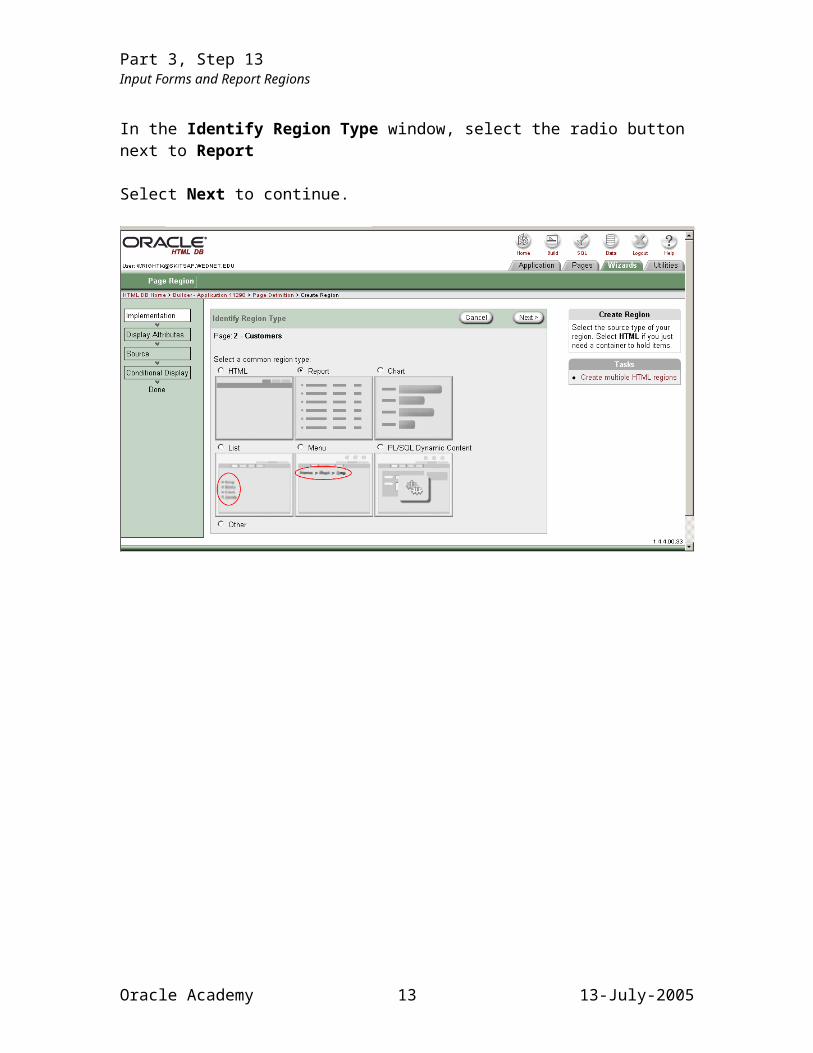
Part 3, Step 13Input Forms and Report Regions
In the Identify Region Type window, select the radio button next to Report
Select Next to continue.
Oracle Academy 13 13-July-2005

Part 3, Step 14Input Forms and Report Regions
In the Selection Report Implementation window, select the radio button next to Easy Report.
Select Next to continue.
Oracle Academy 14 13-July-2005
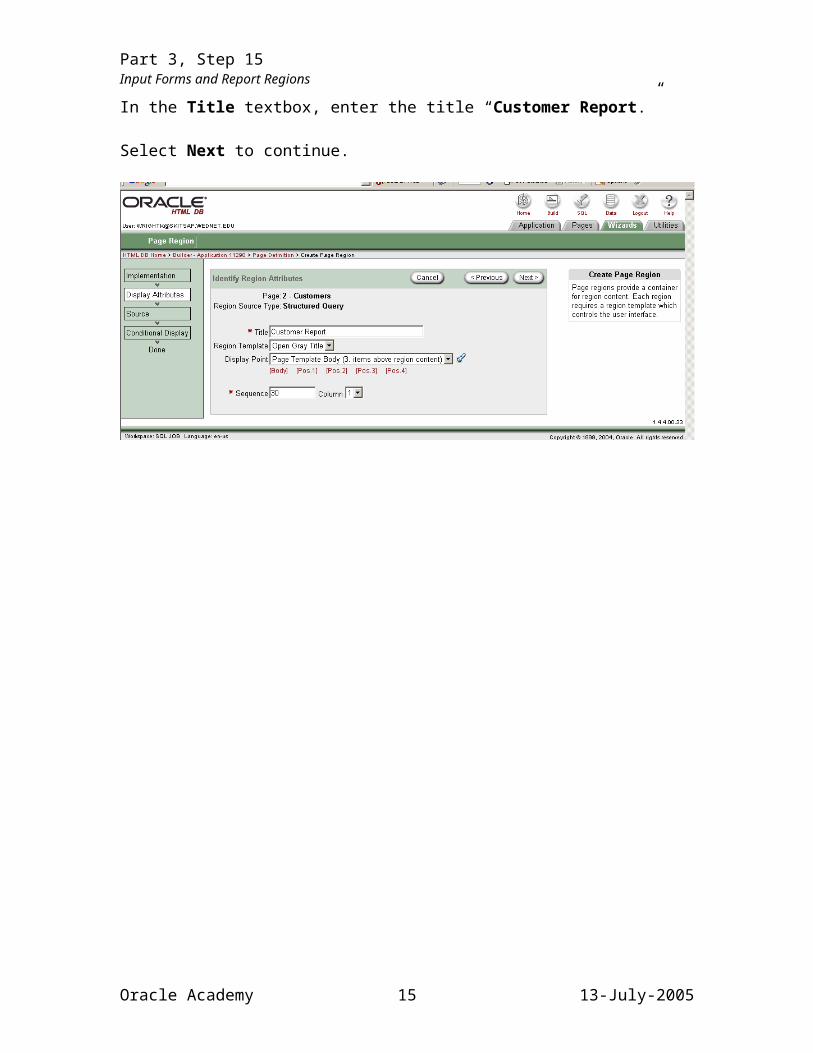
Part 3, Step 15Input Forms and Report Regions
In the Title textbox, enter the title “Customer Report.”
Select Next to continue.
Oracle Academy 15 13-July-2005

Part 3, Step 16Input Forms and Report Regions
In the Table/View Name drop-down list box, select the CUSTOMERS table, and you will see that the column names associated with the table appear under Select Columns.
Oracle Academy 16 13-July-2005

Part 3, Step 17Input Forms and Report Regions
Select the first column name in the list, then hold down the Shift key to select all of the column names. Add to the Columns Selected by striking the > sign. Once this is done, hit Next.
Oracle Academy 17 13-July-2005

Part 3, Step 18Input Forms and Report Regions
This slide verifies that all of the columns have been selected. This means that these columns will be included in the Report region of the Customers page.
Oracle Academy 18 13-July-2005

Part 3, Step 19Input Forms and Report Regions
Select Create Region.
Oracle Academy 19 13-July-2005

Part 3, Step 20Input Forms and Report Regions
Notice under the Page Rendering, Regions area, the report that you just created is now listed. The Page Template Body now contains the Input Form AND the Report regions.
Oracle Academy 20 13-July-2005

Part 3, Step 21Input Forms and Report Regions
Use the Wizard to Create Input Forms and Reports for the Publishers, Item_Types, and Subjects pages. Publishers page
To create the Input Form: Select Wizard tab Under the Forms heading, select the Form on a Table or View hyperlink. Confirm the Table/View Owner is your name/schema. Click Next. Click on the flashlight, and select Publishers from the popup list. Click
Next. Click on the flashlight next to Page, and select Publishers. Click Next. Confirm that the Primary Key shows Publisher_id. Click Next. Verify that all column names are selected in blue. Click Next. Accept the defaults in the Identify Process Options window. Click Next. Select the flashlight next to both textboxes shown in the Identify
Branching Window, and select Publishers from the popup windows. Click Next.
Accept by clicking the Finish button. Select Edit Page icon, then
Create the Report: Under Page Rendering, in the Regions window, select the Create
button. In the Identify Region Type window, select Report radio button. Click
Next. In the Selection Report Implementation window, select Easy Report.
Click Next. In the Title textbox, enter the title Publisher Report. Click Next. In the Table/View Name drop-down box, select the Publishers table.
Select all columns in the list (select first column name in the list, then hold down the Shift key to select all of the column names), and strike the > sign to add them to the Columns Selected box. Click Next.
Verify that all of the columns have been selected to appear in the Report region of the Publishers page. Click Next.
Select Create Region. You can see the RPT region that you just created is now contained on the template for Publishers.
Oracle Academy 21 13-July-2005
Part 3, Step 22Input Forms and Report Regions
Item_Types page
To create the Input Form: Select Wizard tab Under the Forms heading, select the Form on a Table or View hyperlink. Confirm the Table/View Owner is your name/schema. Click Next. Click on the flashlight, and select Item_Types from the popup list. Click
Next. Click on the flashlight next to Page, and select Item_Types. Click Next. Confirm that the Primary Key shows Item_Type_Id. Click Next. Verify that all column names are selected in blue. Click Next. Accept the defaults in the Identify Process Options window. Click Next. Select the flashlight next to both textboxes shown in the Identify
Branching Window, and select Item_Types from the popup windows. Click Next.
Accept by clicking the Finish button. Select Edit Page icon, then
Create the Report: Under Page Rendering, in the Regions window, select the Create
button. In the Identify Region Type window, select Report radio button. Click
Next. In the Selection Report Implementation window, select Easy Report.
Click Next. In the Title textbox, enter the title Item_Type Report. Click Next. In the Table/View Name drop-down box, select the Item_Types table.
Select all columns in the list (select first column name in the list, then hold down the Shift key to select all of the column names), and strike the > sign to add them to the Columns Selected box. Click Next.
Verify that all of the columns have been selected to appear in the Report region of the Item_Types page. Click Next.
Select Create Region. You can see the RPT region that you just created is now contained on the template for Item_Types.
Oracle Academy 22 13-July-2005
Part 3, Step 23Input Forms and Report Regions
Subjects page
To create the Input Form: Select Wizard tab Under the Forms heading, select the Form on a Table or View hyperlink. Confirm the Table/View Owner is your name/schema. Click Next. Click on the flashlight, and select Subjects from the popup list. Click
Next. Click on the flashlight next to Page, and select Subjects. Click Next. Confirm that the Primary Key shows Subject_Id. Click Next. Verify that all column names are selected in blue. Click Next. Accept the defaults in the Identify Process Options window. Click Next. Select the flashlight next to both textboxes shown in the Identify
Branching Window, and select Subjects from the popup windows. Click Next.
Accept by clicking the Finish button. Select Edit Page icon, then
Create the Report: Under Page Rendering, in the Regions window, select the Create
button. In the Identify Region Type window, select Report radio button. Click
Next. In the Selection Report Implementation window, select Easy Report.
Click Next. In the Title textbox, enter the title Subject Report. Click Next. In the Table/View Name drop-down box, select the Subjects table.
Select all columns in the list (select first column name in the list, then hold down the Shift key to select all of the column names), and strike the > sign to add them to the Columns Selected box. Click Next.
Verify that all of the columns have been selected to appear in the Report region of the Subjects page. Click Next.
Select Create Region. You can see the RPT region that you just created is now contained on the template for Subjects.
Do not create forms or reports for the Items or Orders pages at this time.
Oracle Academy 23 13-July-2005

Part 3, Step 24Input Forms and Report Regions
The Page that you created contains an Input Form and a Report region. The Input Form is used to enter new customers into your Amazing Books database. The Report region displays the current contents of the table(s).
Below is an example of the Customers Page. To see your Input Forms, click on the “Run Page” link in the left-hand menu. Note: you can choose between tables using the task bar at the top of the window. The Report region is blank at this time because you have not yet added any customers to the table. But, when you do add customers, the Input Form is ready for you to use…and the Report region will give the details based on the columns that you selected in the previous steps.
Oracle Academy 24 13-July-2005