inch scroll saw - sears parts direct this scroll saw to cut only wood, wood like products, plastics...
TRANSCRIPT

Save This Manual ForFuture Reference
MODEL NO.113.23611t
SerialNumber
Mod_l and seria_numbermay be foundattached to the undersicle of theworktable.
You shoutd record both model and
serial number in a safe place for future
use.
FOR YOURSAFETY:Read ALLINSTRUCTIONS
carefully.
i ,,: ...............i .JJ
/
16 iNCH SCROLL SAW
oassemblyo operating° repair parts
Sold by SEARS, ROEBUCK AND CO., Chicago_ _L. 60684 U.S.A.
Part No. SP5496 _:'r ti!d _!_,,,__ _,_

THIS WARRANTY APPLIES ONLY WHILE THiS PRODUCT IS USED IN THE UNITED STATES.
This warranty gives you specific legal rights, and you may also have other rights which vary from state to state.
SEARS, ROEBUCK AND CO., D1817WA Hoffman Estates. IL 60195
safety instructions for scroin sawSafety is a combination of common sense, staying alertand knowing how your scroll saw works. Read thismanual to understand this saw.
BEFORE USING THE SAW
WARNING: To avoid mistakeS that cou|d cause
sertous, permanent Injury, do not plug the saw inuntil the following steps ere completed.
• Assembly and alignment. (See pages 8 - 12)
= Learn the use and function of the speed control ON-OFF knob, bevel lock knob, blade holders, bladesupport, hold down tension knob, and blade guard.(See pages 13 - 14)
Review and understand all safety instructions andoperating procedures in this manual.
Review of the maintenance methods for this saw.
(See page 18)
- Put the saw on a firm level surface where there isplenty of room for handling and properly supportingthe workpiece
- Support the saw so the table is level and the saw doesnot rock.
• Bolt the saw to the work surface if ittends to slip, walk,or slide during operations like cutting long, heavyboards, or when using an auxiliary table.
- NEVER STAND ON TOOL. Serious injury couldoccur if the tool tips or you accidentally hit the cuttingtool. Do not store anything above or near the toolwhere anyone might stand on the toot to reach them.
To avoid Injury or death from electrical shock:
- GROUNDTHE SAW. This saw has an approved 3-conductor cord and a 3-prong grounding type plug,Use only 3-wire, grounded outlets rated 120 volts, 15amperes (amps). The green conductor in the cord isthe grounding wire. To avoid electrocution, NEVER
Read the WARNING label; below, found on the base ofthe saw.
WHEN INSTALLING OR MOVING THESAWAVOID DANGEROUS ENVIRONMENT. Use the saw in
a dry, indoorplace protected from rain. Keep work areawell lighted.
To avoid injury from unexpected saw movement:
- Turn saw off and unplug cord before moving the saw.
....... green wire to a live terminal.
• Make sure your fingers do not touch the plug's metalprongs when plugging or unplugging the saw.
BEFORE EACH USE:
Inspect your saw.
DISCONNECTTHE SAW. To avoid injury from acciden-tal starting, unplug the saw, turn the switch off andremove the switch key before changing the setup, re-moving covers, guards, or blade.
WARNING

CHECK DAMAGED PARTS. Check for:
. Alignment of moving parts,
. Binding of moving paris,
• Broken parts,
• Stable mounting,
• Any other conditions that may affect the way the sawworks.
If any part is missing, bent, or broken in any way, or anyelectrical parts don't work properly, turn the saw off andunplug the saw. REPLACE damaged, missing, or failedparts before using the saw again.
MAtNTAIN TOOLS WITH CARE. Keep the saw cleanfor best and safest performance. Follow instructions forlubricating.
REMOVE ADJUSTING KEYS AND WRENCHES from
tool before turning it on.
To avoid injury from jams, slips or thrown pieces:
. Choose the right size and style bladeforthe materialand the type of cutting you plan to do.
° USEONLY RECOMMENDEDACCESSORtES. (Seepage t9), Consult this Owner's manual for recom-mended accessories. Follow the instructions thatcome with the accessories. The use of improperaccessories may cause risk of injury to person.
. Make sure the blade teeth point downward, towardthe table.
• Make sure the blade tension is properly adjusted.
. Make sure the bevel lock knob is tight and no partshave excessive play.
. To avoid accidental blade contact, minimize bladebreakage and provide maximum blade support, al-ways adjust the blade hold down and blade guard tojust clear the workpiece.
• KEEP WORK AREA CLEAN. Cluttered areas andbenches invite accidents. Floor must not be slippery.
To avoid burns or other fire damage, never use the sawnear flammable liquids, vapors or gases.
PLAN AHEAD TO PROTECT YOUR EYES,HANDS, FACE, EARS.
KNOW YOUR SAW. Read and understand the owner'smanual and labels affixed to the tool. Learn its applica-tion and limitations as well as the specific potentialhazards peculiar to this tool.
To avoid injury from accidental contact with movingparts, don't do layout, assembly, or setup work on thesaw while any parts are moving.
AVOID ACCIDENTAL STARTING. Make sure switch is
"OFF" before plugging sander into a power outlet.
Plan your work.
• USE THE RIGHT TOOL. Don't force tool or attach-
ment to do a job it was not designed to do.
. Use this scroll saw to cut only wood, wood likeproducts, plastics and non-ferrous metals.
CAUTION: This saw is NOT designed for cuttingferrous metals like iron or steel When cuttingnon-ferrous metals (brass, copper and alumi-num, etc.), metal shavings can react with wooddust and start a fire. To avoid this:
, Disconnect any type of dust collecting hosefrom the saw.
- Remove all traces of wood dust from on andaround the saw.
• Remove all metal shavings from on or aroundthe saw before sanding wood again.
Dress for safety.
Any power saw can throw foreign objects into the eyes.This can cause permanent eye damage. Wear safetygoggles (not glasses) that comply with ANSI Z87.1(shown on package). Everyday eyeglasses have onlyimpact resistant lenses. They are not safety glasses.Safety goggles are available at Sears retail catalogstores. Glasses orgoggles not in compliance with ANSIZ87.1 could seriously hurt you when they break.
o Do not wear loose clothing, gloves, neckties or jew-elry (rings, wrist watches). They can get caught anddraw you into moving parts,
• Wear nonslip footwear.
• Tie back long hair.
- Roll long sleeves above the elbow.
o Noise levels vary widely. To avoid possible hearingdamage, wear ear plugs or muffs when using saw forhours at a time.
• For dusty operations, wear adust mask along withthesafety goggles,
inspect your workplece
Make sure there are nonails or foreign objects inthe partof the workpiece to be cut.
Use extra caution with large, very smal! or awkwardworkpieces:
• Never use th_stoolto finish pieces too smali to hoid byhand.
• Use extra supports (tables, saw horses, blocks, etc.)for any workpieces large enough to tip when not helddown to the table top.
° NEVER use another person as a substitute for a tableextension, or as additional support for a wo rkpiece, orto help feed, support or pul! the workpiece.

Properlysupportroundmaterialsuch as dowel rods,or tubing: Ttley have a tendency to rollduring a cut,causingthe blade to "bite". To avoid this, always usea "V" block or clamp the work to the miter gauge.
Cut only one workpiece at a time.
Clear everything except the workpiece and relatedsupport devices off the table before turning the sawon,
Plan the way you will hold the workplece from startto finish.
Do not hand hold pieces so small that your fingers willgounder the blade guard. Use jigs or fixtures to hotd thework and keep your hands away from the blade.
SECURE WORK. Use clamps to hold work whenpractical. It's often safer than usingyour hand, and freesboth hands to operate the tool,
Avoid awkward operations and hand positions where asudden slipcould cause fingers or hand to move into theblade.
DON'TOVERREACH, Keep good footing and balance.
Keep your face and body to one side of the blade, out ofline with a possible thrown piece if the blade shouldbreak.
Before starting your cut, watch the saw while it runs. !tit: makes an unfamiliar noise or vibrates a lot, stopimmediately. Turn the saw off. Unplug the saw. Do notrestart until finding and correcting the problem.
KEEP CHILDREN AWAY. Keep all visitors a safedistance from the saw, Make sure bystanders are clear
of the saw and workpiece.
DON'T FORCE TOOL. tt will do the job better and saferat its designed rate. Feed the workpiece into the sawblade only fast enough to let it cut without bogging downor binding.
Before freeing any jammed material:
• Turn switch "OFF."
- Remove switch key,
• Unplug the saw.
, Wait for all moving parts to stop.
When backing up the workplece, the blade may bindin the keH (cut). This is usually caused by sawdustclogging up the kerf. if this happens:
, Turn switch "OFF"
• Remove switch key,
e
J
Unplug the saw,
Wait for all moving parts to stop.
With a flat blade screwdriver, turn the motor by handwhile backing up the workpiece.
Before removing loose pieces from the table, turnsaw off and wal_ for al! moving parts to stop.
WHENEVER SAW IS RUNNING
WARNING: Don't let familiarity (gained from fre-quent use of your scroll saw) cause a carelessmistake. Acareless fraction of a second Is enoughto cause a severe Injury.
BEFORE LEAVING THE SAW:
Walt for all moving parts to stop.
MAKE WORKSHOP CHILD-PROOF. Unplug the saw.
Lock the shop or on/off knob. Store the key away fromchildren and others not qualified to use the tool.

motor specifications and electricam requirementsThis machine isequipped with, a 1725 RPM motor. It iswired for operation on 120 volts, 60 Hz, alternatingcurrent.
For replacement motor, refer to parts list in this manual.
t WARNING: Do not permit fingers to touch the Iterminals of plugs when installing or removing Ithe plug to or from the outlet.
Plug power cord into a 120V properly grounded typeoutlet.
CONNECTING TO POWER SUPPLYOUTLET
Ifpowercord is worn orcut, ordamaged inanyway, haveit replaced immediately.
WARNING: If not properly grounded, this powertoo! can cause an electrical shock, particularlywhen used in damp locations close to plumbing.If an electrlca! shock occurs there is the potentialof a secondary hazard, Such as your hands con-tacting t he saw blade.
If you are not sure that your outlet, as pictu red below, isproperly grounded, have it checked by a qualified elec-trician.
Your unit is for use on 120 volts, and has a plug that lookslike the iflustration below.
This power toolis equipped with a 3-conductor cord andgrounding type plug which has a grounding prong,approved by Underwriters' Laboratories. The groundconductor has a green jacket and is attached to the toolhousing at one end and to the ground prong in theattachment plug at the other end.
This plug requires a mating 3-conductor grounded typeoutlet as shown.
IO
3-PRONG PLUG
GROUNDING PRONG
PROPERLYGROUNDED
OUTLET
If the outlet you are planning to use for the power tool isof the 2 prong type, DO NOT REMOVE OR ALTER THEGROUNDING PRONG IN ANY MANNER. Use an
adapter as shown below and always connect thegrounding tug to known ground.
It is recommended that you have a qualified electricianreplace the TWO prong outlet with a properly groundedTHREE prong outlet.
GROUNDING LUG
SCREW / {*:-=-_
/ l_,t_" 'i MAKE SURE THIS tS............ CONNECTEDTOA
/ _'" RECEPTACLEADAPTER
An adapter as illustrated is available for connectingplugs to 2-prong receptacles.
WARNING: The green grounding lug extendingfrom the adapter must be connected to a perma-nent ground such as to a properly groundedoutlet box, Not all outlet boxes are properlygrounded.
If you are not sure that your outlet box is properlygrounded, have it checked by a qualified electrician,
NOTE: The adapter illustrated is for use only if youalready have a properly grounded 2-prong receptacle.
The use of any extension cord will cause some loss ofpower.
Use only a single 3 wire extension cord with a 3-pronggrounding type pfug and 3-prong receptacle which ac-cepts the tools plug for this 2 amp tool.
Length of theConductor
dpto 100 feet
Wire Sizes Required(American Wire Gauge Number)
120V Lines
No. 16
= i1,11 I lllil

g ossary of terms for woodwork=rigt. Kerr - the slot cut by the blade° 5. Blade Tooth Set - the distance that the edge of the2. Leading Edge- the edge of the workpiece which is sawblade tooth is bent (or set) outward from the s de
pushed into the blade first, of the blade.
3: Sawblade Path-the area of the workpiece directlyin 6. Trailing Edge - the workpiece edge last cut by theline with and moving toward the sawblade edge. sawblade.
4_ Bevel - the ability to slant the table to make angle 7. Workplece. the item on which the cutting operationcuts, An angle cuttingoperation through the face of is being performed.the board.
contentsWarranty Information .................................................. 2Safety Instruction for Scroll Saws .............................. 2Motor Specs and Electrical Information ..................... 5Glossary ot Terms for Woodworking .......................... 6Unpacking & Checking Contents ............................... 6Assembly .................................................................... 7
Setting Table for Hodzontal or Bevel Cutting ......... 8Aligning the Bevel Indicator ................................... 8
Removing and Installing Blades ............................... 10Mounting the Scroll Saw .......................................... 12
11 i
Getting to Know Your Scroll Saw ............................. 13Operation ................................................................. 15
Making Interior Cuts ............................................. 17Mounting Auxiliary Surface for the Work Table ... 17
Maintenance ............................................................. 18Wiring Diagram ........................................................ 19Recommended Accessories .................................... 19Trouble Shooting ...................................................... 19Repair Parts ............................................................ 20Service Information .................................................. 24
i=,1 = i .......... _: .
unpacking and checking contentsTOOLS NEEDED
/_ COMBINATION MEDIUM PHILLIPS SCREWDRIVER
CAUTION: Never lift this saw by the arm which II holds the blade or damage will occur to your saw. j
Separate a|l parts from packaging materials and checkeach item with illustration and "Table of Loose Parts".Make certain all items are accounted for before discard-ing any packaging material.
If any parts are missing, do not attempt to assemble theScroll Saw, plug in the power cord, ortum the switchonuntil the missing parts are obtained and installed cor-_'ectly.
Table of Loose Parts Qty.A 16" Scroll Saw ............................................. 1B Blade Guard ................................................ 1C Owner's Manual .......................................... 1
D Loose Parts Bag containing:Blade ....................................................... 1
Re-Oil Caps ............................................. 4Switch Key ............................................... 1
NOTE: Hardware to mount this scroll saw to a bench orleg set is _ supplied. See mounting instructions forrecommended hardware size.
6

LIFTHERE
A
DO NOT LIFT SAW BY THIS ARM
LIFT HERE
assemblyWARNING: For your own safety, never connectplug to power source outlet until all assemblysteps are comptete, and you have read and un-derstand the safety and operational instructions.
1. Lift the saw by the frame and base and place scrollsaw on work bench.
2. Familiarize yourself with the controls and features ofthis scroll saw indicated in the illustration.
ARM BEARINGSTENSION KNOB
GUARDMOUNTING HOLESSTATIONARY
BLADE HOLDER
FRAME(LIFT HERE)
BLADE
AUXILIARYHOLES
MOTOR
BEVEL SCALESWITCH KEY
BEVELPOINTER TABLE
LOCK KNOB
BASE(LIFT HERE)
assembly
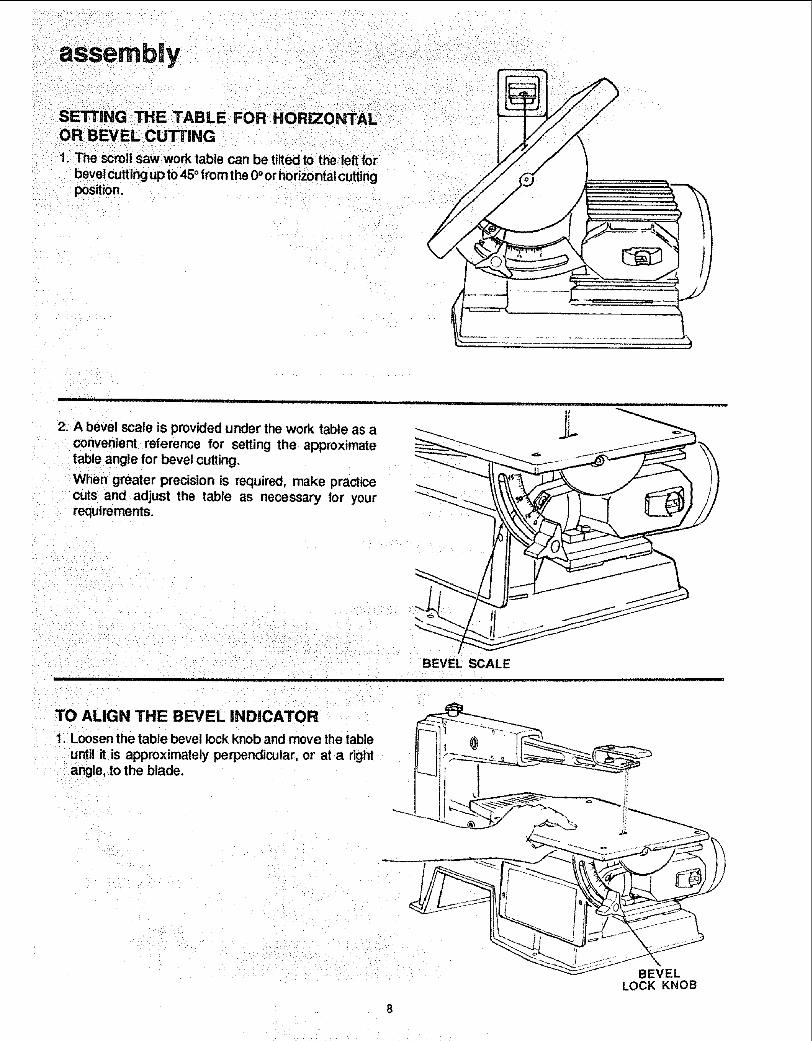
SETTING THE TABLE FOR HORIZONTALOR BEVEL CUTTING
1, The scroll saw work table can be tired to the left forbevel curtingup to 450from the 0oorhorizontal cuttingposition,
2. A bevel scale is provided under the work table as aconvenient reference for setting the approximatetable angle for bevel cutting,
When greater precision is required, make practicecuts and adjust the table as necessary for yourrequirements.
BEVEL SCALE
TO ALIGN THE BEVEL iNDiCATOR
1. Loosen the table bevel lock knob and move the table
until it is approximately perpendicular, or at a rightangle, to the blade,
BEVELLOCK KNOB

2. Use a small square to set the table at 90° to the blade.If there istoo much space between the square and theblade, the table must be adjusted.
/3. When the space between the square and the blade is
minimal, tighten the bevel lock knob.
The table should now be approximately 90° to theblade.
. Loosen the screw holding the bevel scale pointer andadjust to 0°. Tighten screw.
Remember, the bevet scale is a convenient guide butshould not be relied upon for precision.
Make practice cuts in scrap wood to determine if yourangle settings are correct. Adjust the table as required.
NOTE: Avoid settingthe edge of thetable against topof motor which could cause noise when the saw isused.
fBEVEL POINTER

removing and installing blades
WARNING: TO avoid Injury from accidental start- Iing, always turn switch OFF_ and remove switchkey before removing or replacing the blade.
1. Loosen tension on blade by turning tension knobcounterclockwise (F'_) about two full turns.
TENSION KNOB
2. Remove blade by pulling forward on blade and thenliftingthe blade through the access hole in the table.
Slight downward pressure against the upper arm maybe helpful when removing blade from upper holder.
SLIGHT PRESSURE HERE
BLADE GUARD REMOVEDFOR PICTURE CLARITY
3, Look at the blade holdersclosely and notice the bladeslotsand pin recesses inthe blade holder. The bladeholder is made so you can position the blade forcuttingfrom the front or one side of the saw.
Cutting from the side of the saw will be necessarywhen your workpiece exceeds 16 inches in length.For 0° bevel angle only.
\\
\
• 10

4. Locate the blade guard and carefully install it onto thesaw as shown.
Lightly spread apart the blade guard so pins will gointo holes in frame.
5. In order to cut, and to avoid uncontroUable lifting of theworkpiece, the teeth of the blades used on the scrollsaw should always point downward when installed onthe scroll saw.
6. Install the blade by inserting one end of the bladethrough the slot in the blade guard then the accesshole in the table until you can hook the blade pin in thepin recess in the bottom blade holder. Stide the topblade pin into the pin recess of the top blade holder.You may need to press down lightly on the arm toinstall the blade.
NOTE: Use 5 inch long, pin end type blades only.
7. Carefully tighten the blade tension by turning thetension knob clockwise ( f"--_,_) just until you feel theslack in the blade is removed.
Double check to see that pins are properly located inthe slots.
Then turn the tension knob an additional D.E_ full turnclockwise.
This amount of blade tension should do welt for most
cutting operations and blades.
Before applying power, use screwdriver in slot at endof motor shaft to turn mechanism while checking thatthe blade is properly installed.
OMERTENSIONING OR UNDEFITENSIONtNG of theblade will cause blades to break rapidly.
The thicker, harder and me re abrasive the wood you arecutting, the more blades you will have to use.
Blade breakage is caused by the following:
• overtension or undertension
• over working the blade by going too fast
- twisting or bending the blade
• over use - blade life exhausted
, OVER AGGRESSIVE FEEDING of the workpieceinto the blade.
11
imount ng the scroll =saw to a bench
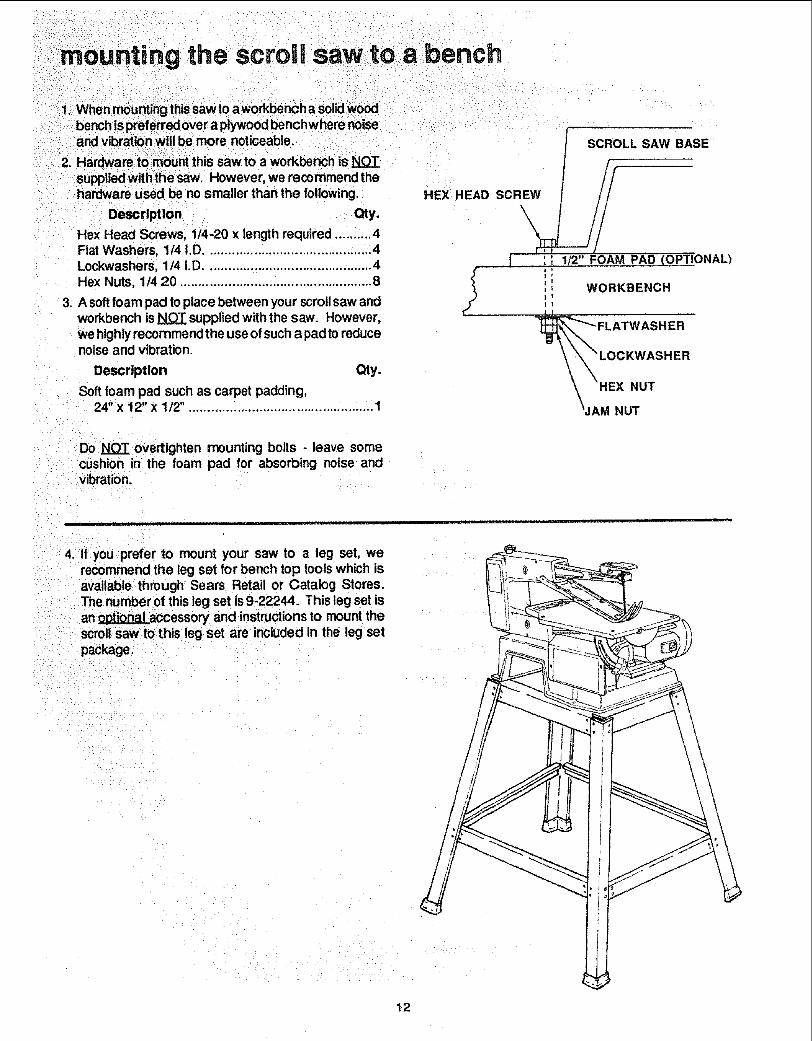
1. When mountingthis sawto aworkbench a solidwoodbench ispreferred over a plywood benchwhere noiseand vibration will be more noticeable.
2. Hardware to mount this saw to a workbench issuppliedwith the saw. However, we recommend thehardware used be no smaller than the following.
Description Qty.
Hex Head Screws, 1/4-20 x length required .......... 4Flat Washers, 1/4 I.D ............................................. 4Lockwashers, 114 I.D............................................. 4Hex Nuts, 1/4 20 .................................................... 8
3, A softfoam pad to place between your scrollsaw andworkbench is _ supplied with the saw. However,we highly recommend the use of such a pad to reducenoise and vibration.
Description Qty.
Soft foam pad such as carpet padding,24"x12" x l12" .................................................. 1
SCROLL SAW BASE
[w
HEX HEAD SCREW li
XATWASHER
:WASHER
_HEX NUT
\JAM NUT
Do _ oVerUghtenmounting bolts - leave somecushion in the foam pad for absorbing noise andvibration.
4. If you prefer to mount your saw to a leg set, werecommend the leg set for bench top tools which isavailable through Sears Retail or Catalog Stores.The number of this leg set is 9-22244. This leg set isan _accessory and instructionsto mount thescrollsaw to this leg set are included in the leg setpackage.
12

gettUng to know your scroll saw
1, TENSION KNOB
2, BLADE HOLDER
I. BLADE GUARD
4. AUXILIARY HOLES
5,ON-OFF
SWITCH
8, BEVEL SCALE
6. TABLE LOCK KNOB
7. BEVEL POINTER
1. TENSION KNOB... Tightening the knob (clockwise)will increase the tension on the blade. Loosening it(counterclockwise) will decrease the tension.
2. BLADE HOLDER ... Retain and position the blade,
3. BLADE GUARD ... Provides added control of
workpiece by being directly against thickness ofmaterial, Protects hands from blade contact.
4. AUXIUARY HOLES ... Ailowsyou to easily attach anauxiliary work surface to the saw table,
5. ON-OFF SWITCH... The On-Off Switch has alocking feature. THIS FEATURE tS INTENDED TO
PREVENT UNAUTHORIZED AND POSSIBLY HAZ-ARDOUS USE BY CHILDREN AND OTHERS.
6. TABLE LOCK KNOB... Loosening the knob allowstable to be tilted up to 45° for bevel cutting, Tighteningthe knob locks the table in the position you haveselected.
7. BEVEL POINTER... Indicateswhat angle you haveselected on the bevel scale.
8, BEVEL SCALE., .Use to set the approximate tableangle for bevel cutting.
ON-OFF SWITCH
1. insert Key into switch,
NOTE: Key is made of yeIIow plastic.
KEY
KEYPLAST|C
13
getting to know your scroll saw
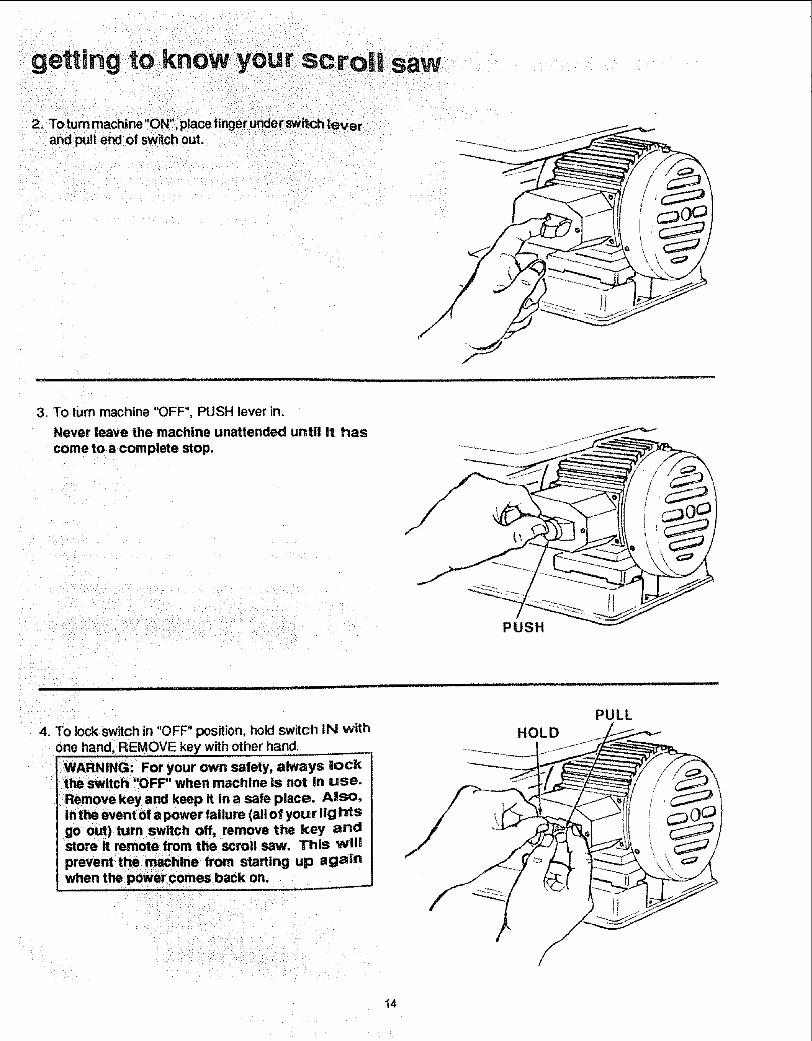
2_ To turn machine"ON", place finger under switch leverand pull end of switch out.
f
3. TO turn machine "OFF", PUSH lever in.
Never leave the machine unattended until It hascome to a complete stop.
PUSH
4. To lock switch in "OFF" position, hold switch iN withone hand, REMOVE key with other hand.
WARNING: For your own safety, always lockthe switch "OFF" when machine is not in use.Remove key and keep it in a safe place. ALSO,in the event of a power failure (all of your lightSgo out) turn switch off, remove the key andstore it remote from the scroll saw. ThiS will
prevent the machine from starUng up againwhen the pOwercomes back on.
HOLDPULL
14

operatUon of your scrolJ saw
PLEASE, read and understand _he following items aboutyour scroll saw before attempting to use the saw.
1. The saw does not cut wood by itself. You allow thesaw to cut wood by guiding the wood into the bladeas it moves.
2. The blade teeth cut wood _ on thedown stroke.
3, You must guide the wood into the blade slowlybecause the teeth of the blade are very small andthey can only remove wood when they are on thedown stroke.
4. There is a learning curve for each person who wantsto use this saw. During that period of time, it isexpected that some blades wilt break until you learnhow to use the saw and receive the greatest benefitfrom the blades.
5. Best results are achieved when cutting wood lessthan one inch thick.
6. When cutting wood thicker than one inch the usermust guide the wood very, very slowly intothe bladeand take extra care not to bend or twist the bladewhile cutting in order to maximize blade life.
blades' tendency to follow the wood grain as you are
cutting.9. This scroft saw is intended to cut wood or wood
products only,
10. When choosing a blade to use with you r scroll saw,consider the following carefully.
° Very fine, narrow blades should be used to scrollcut in thin wood 1/4 inch thick or les&
. To cut wood over 1/4 inch thick, use wide r blades.
- Most blade packages state the size or thicknessof wood which that blade is intended to cut, andthe radius, size of curve, which can be cut withthat btade.
• Widerblades can't cut curves as tight orsmali asthinner blades,
- Narrower blades work well only on thinnerwoodmaterial.
11. This saw uses 5 inch long, pin end type blades only.See your Sears Catalog or Retail Store tot acces-sory blades.
7. Teeth on scroll saw blades wear out and as suchmust be replaced frequently for best cutting results.Scroll saw blades generally stay sharp for 1/2 hourto 2 hours of cutting.
8. To get accurate cuts, be prepared to compensate for
basic saw operations
12. Blades wear faster when cutting plywood, which isvery abrasive; when sawing wood which is thickerthan the 3/4 inch blade stroke; and when sawinghardwood, or when side pressure is placed on theblade.
i iii _:
BEFORE EACH USE:
Inspect your saw,
DISCONNECTTHE SAW. To avoid injuryfrom acciden-tal starting, unplug the saw, turn the switch "OFF" andremove the switch key before changing the setup, re-moving covers, guards, or blade.
CHECK DAMAGED PARTS. Check for:
• alignment of moving parts,
• binding of moving parts,
o broken parts,
, stable mounting, and
. any other conditions that may affect the way the sawworks.
If any part is missing, bent, or broken in any way, or anyelectrical parts don1 work properly, turn the saw off andunplug the saw. REPLACE damaged, missing, or failedparts before using the saw again.
MAINTAIN TOOLS WITH CARE.
Keep the saw clean for best and safest performance.Follow instructionsfor lubricating.
REMOVE ADJUSTING KEYS AND WRENCHES fromtool before turning it on.
TO avoid Injury from jams, slips or thrown pieces.
- Choose the right size and style blade for the materialand the type of cutting you plan to do.
• USEONLYRECOMMENDEDACCESSORIES. (Seepage !9). ConsL_it this Owner's manual for recom-mended accessories. Follow the instructions thatcome with the accessories_ The use of improperaccessories may cause risk of injury to peBons.
. Make sure the blade teeth point downward, towardthe table.
• Make sure the blade tension is properly adjusted
° Make sure the bevel lock knob is tight and no partshave excessive play.
, To avoid accidental b_ade contact, minimize bladebreakage and provide maximum blade support, al-ways adjust the blade hold down and blade guard tojust clear the workpiece.
• KEEP WORK AREA CLEAN. Cluttered areas andbenches invite accidents. Floor must not be slippery,
15

PLAN AHEAD TO PROTECT YOUR EYES,HANDS, FACE, EARS
KNOW YOUR SAW. Read and understand the owner'smanual and labels affixed to the tool. Learn its applica-tionand limitations as well as the specific potentialhazards peculiar to this toot.
To avoid injury from accidental contact with movingpads, don't do layout, assembly, or setup work on thesaw while any parts are moving.
AVOID ACCIDENTAL STARTING. Make sure switch is"OFF" before plugging saw into a power outlet.
Plan your work.
. USE THE RIGHT TOOL. Don't force tool or attach-ment to do a job it was not designed to do.
• Use this scroll saw to cut only wood, wood like)inducts, plastics and non-ferrous metals.
CAUTION: This saw is _ designed for cutUngferrous metals like Iron or steel. When cuttingnon-ferrousmetals (brass, copper and aluminum,etc.), metal shavings can react with wood dustand start a fire. To avoid this:
- Dtsconnect any dust collecting hose from the,saw'.
, Remove all traces ofwood dust from inside thesaw.
o Remove ati traces of metal dust from on or
around the saw before sawing wood again.
Dress for safety_
Any power saw can throw fore On objects into the eyes.This can cause permanent eye damage. Wear safetygoggles (not glasses) that comply with ANSI Z87.1(shown on package). Everyday eyeglasses have onlyimpact resistant lenses. They are not safety glasses.Safety goggles are available at Sears retail catalogstores. Glasses or goggles not incompliance with ANSIZ87.1 could seriously hurt you when they break.
• Do not wear loose clothing, gloves, neckties or jew-:elry (rings, wrist watches). They can get caught anddraw you into moving parts,
, Wear nonslip footwear.
• :Tie back longhair.
• R0il long sleeves above the elbow.
• Noise levels vary widely, To avoid possible hearingdamage_ wear ear plL_gSor muffs when using saw forhours at a.:time_
, For dusty operations, wear a dust mask along wit hthesafety goggles_
!
Make surethere are nonails or foreign objects inthe partof the workpiece to be cut.
Use extra caution with large, very stoa!! or awkwardworkp_eces:
• Never use thistoolto finishpieces too small to holdbyhand.
, Use extra supports(tables, saw horses, blocks, etc.)for any workpieces large enough to tip when not helddown to the table top.
NEVER use another person as a substitute for a tableextension, or as additional support for a workpiece orto help feed, support or pull the workpiece.
When cutting irregularly shaped workpieces, planyour work so it will not pinch the blade. A piece ofmolding, for example, must lay flat or be held by afixture or jig that will not let it twist, rock or slip whilebeing cut.
• Propedy support round material such as dowel rods,or tubing. They have atendency to roll during a cut,causing the blade to "bite". To avoid this, always usea "V" block or clamp the work to the miter gauge.
• Cut only one workpiece at a time.
• Clear everything except the workplece and relatedsupport devices off the table before turning the saw0n.
Plan the way you wtll hold the workplece from startto finish.
Do not _and hold pieces sosmall that your lingers wiltgounder the blade guard. Use jigs or lixtures to hold thework and keep your hands away from the blade.
SECURE WORK. Use clamps to hold work whenpractical. It's often saler than using your hand, and freesboth hands to operate the tool.
Avoid awkward operations and hand positions where asudden slip could cause fingers or hand to move into theblade.
DON'T OVERREACH. Keep good footing and balance.
Keep your face and body to one side of blade, out of linewith a possible thrown piece if the blade should break.
WHENEVER SAW iS RUNNING
WARNING: Don't let familiarity (gatned from fre-quent use of your saw) cause a careless mistake.A careless fraction of a second is enough tocause a severe injury.
Before starting your cut, watch the saw while it nJns. Ifit makes an unfamiliar noise or vibrates a lot, stopimmediately. Turn the saw off. Unplug the saw. Do notrestart until finding and correcting the problem.
16

KEEPCHILDRENAWAY. Keepall visitorsa safedistancefromthesaw.Makesurebystandersareclearofthesawandworkpiece.DON'TFORCETOOL.Itwilldothejobbetterandsaferat itsdesignedrate. Feedtheworkpieceintothesawbladeonly fast enough to let it cut without bogging downor binding.
Before freeing any jammed material:• Turn switch "OFF".
, Remove switch key.
° Unptugthe saw.
- Wait for all moving parts to stop.
When backing up the workplece, the blade may bindIn the kerr (cut). This Is usually caused by sawdustclogging up the kerr. if this happens:
, Turn switch "OFF'.
, Remove switch key.
° Unplug saw.
• Wait for all moving parts to stop.
o With a fiat blade screwdriver, turn the motor by ha_,_dwhile backirg up tile workpiece_
Before removing loose pieces from the tab_,e,turnsaw off and wait for ai| moving parts to sfop.
BEFORE LEAVING THE SAW:
Wait for all moving parts to stop.
MAKE WORKSHOP CH!LDoPROOF. Unplug _he s_wLOCkthe shop or on/off knob. Store the key' away fromchildren and others not qualified to use 1he IooL
MAKING INTERIOR SCROLL CUTS
1. One of the features of this saw isthat it can be usedto make scroll cuts on the interior of a board without
breaking or cutting into the outline or perimeter of theboard.
WARNING: TO avoid Injury from accidentalstarting, always turn switch "OFF" and removeswitch key before removing or replacing theblade.
2. To make interiorcuts in a board, remove the scrollsaw blade as explained in the Assembly section.
3. Drill a 1/4" hole in the board you will use to makeinteriorcuts.
4. Place the board on the saw table with the hole in theboard over the access hole in the table.
5. Install blade through hole in board and adjust bladetension.
6. When finished making the interior scroll cuts, simplyremove the blade from the blade holders, as de-scribed in the Assembly section, and remove theboard from the table.

basic saw operationsMOUNTING ANAUXiLiARY WORK TABLE [WARNING: To avo_ tool tipping or support
]failure, auxiliary work surface should not ex-1_ Fourholesareprovidedinthework:table soyoucan _24 X12 Xl/4",i easily:attach an auxiliary work surface to the saw if
;your needs require. : _ At least a 1/4 hole w_ll be needed in the auxiliary
21 Mounting an auxiiia_ table can allow you to bu lda surface to insert blades.larger support area tO suit your pro_, and could DRILL the hole for the blade first. Then MARKrender; a smoother work surface, as your needs location of other holes.require andan aUxiliary surface can give you moresupport close to the blade for speciat cutting needslike very small or detai ed projects.
HARDWARE FOR MOUNTINGAUXILIARY TABLE NOT SUPPLIED.
#8-32X1 IN. FLAT HI). SCREW
/ (4 REQD.)/
IN, D_A. HOLE
COUNTERSINK THE AREAAROUND EACH HOLE SOSCREW HEAD WILL NOTGET tN YOUR WAY ANDAUX. SURFACE WI:LL BE SMOOTH
maintenanceWARNING: For your own safety, turn switch"OFF',, remove key and remove plug from powersource OUtlet before maintaining or lubricatingyour saw.
,,,,_
GENERAL
An occasional coat of paste wax on the work table witlallow the wood being cut to glide smoothly across thework surface,
MOTOR
If the power cord is worn_cut, or damaged in any way,have it replaced immediately.
Do not attempt to oil the motor bearings or service themotor internal parts.
ARM BEARINGS
Lubricate the arrn bearings after 10 hours of use. Re-oil
FLATWASHER (4 REQD.)
#8 LOCKWASHER (4 REQD.)
\#8-32 HEX NUT (4 REQD.)
ALTERNATE METHOD OF OILING
BEAR|NGS iF RE-OiL CAPS ARE LOST

wiring diagram SWITCH
BLACK
WARNING: To avoid fire or shock, use onlyrecommended service parts and reassemble ex-actly as origlna!ly assembled.
II
Item Sears Number
Leg Set ............................................................ 9-22244Biades ................................. See Catalog - For 5" long,
Pin end type bladesL, p_ ,,, i ._
trouble shooting
recommends the following accessoriesSears may recommend other accessories not Iisted inmanual. See your nearest Sears S_ore or CatabgDepartment for other accessories,
WARNING: Foryourownsafety, turnswltch"OFF",removekeyand |remove plug from power source outlet before troubleshooting your 1scroll saw.
PROBLEMI,L
Breaking Blades
Motor will not run'
VibrationNOTE: There will alwaysbe some vibration presentthe saw is runningbecause of the motor
operation,
Blade Runout-Btade notIn-line with arm motion,
P OBABLF:...........................CAUSE........................ i, ....
1, Wrong tension2. Over working blade.3. Wrong blade application.
4. Twis!ing blade ,!nwood.
1. Defective cord or plug.2, Defective motor.
1, Improper mounting of saw.
2. Unsuitable mountingsurface.
REMEDY SUGGES]
1. Adjust blade tension2. Reduce feed rate.3. Use narrow blades for cutting thin wood, wide
blades for thicker wood,4. Avoid side pressure on blade
1. Replace detective parts befor _using saw again,2. Consult Sears Service. Any attempt to repair
this motor may create a HAZARD untess repairis done by a qualified service hnician. Re-pair service is available at yol mrnearest SearsStore. ,,,
1. See mounting instructions in ! manualforproper mounting technique.
2, The heavier your work bench is the tess whenvibration will occur, A plywoc workbench witfnot be as good a work surfao as the same sizesolid lumber. Use common s inse in choosing amounting surface,Tighten table lock knob.
Tighten motor rnoun!ing scre____'
Loosen cap screws holding b _de holders toarms. Adjust position of blad holders.Retighten holders, _.j
3. Loose table or tableresting against motor,
4. Loose motor mounting.
t, B_ade holders not aligned
,
4.
1L
19

repair parts
47
I
IiI!IIII1!]]1]III
i/
3315
39
15
I4O 51
Figure 1
,43
.10
.,10
10
/
20

PARTS LIST FOR CRAFTSMAN 16-iNCH MOTORBZED SCROLL SAW
MODEL NO. 113.236111
FnGURE 1
No. I No._4J4,--...--4., ....
1 I 816203-12 ! 660433 i 820378
4 { STD8520045 I 660596 I 86041" ' 66068
8 i 660509 I 66049
10 I 820376
I1 I 6604612 j 820376-1
13 1820380-1
14 I STD85200615 I 46-58507-316 I 82039917 I STD84050818 I STD85200519 ] 820379-3
20 16605421 16604522 J6606023 16605124 19-2687725 166061
..............,,,T
Description
+ Housing, (Includes Key #6)BumperScrew, Hex Soc. Cap
M4 x 0.7-!0* Lockwasher, Helical M4
RetainerBearing, FlangedArm, Upper
(includes Key # 3 & 4)Holder, Upper BladeGuard, BladeScrew, Pan Hd. Ty "TT"
M4 x 0.7-35Cap, Re-oilScrew, Pan Hd Ty "TT"
M4 x 0,7-25Screw, Hex Soc. Cap
M6 x 1,0-40* Lockwasher, Helical M6* Washer, M6 x 12 x 1.6
TableNut, Hex M5 x 0.8Lockwasher, Helical M5Screw, Hex Soc. Cap
M5 x 0,8-20LinkBushingSpacer, BearingHolder, Lower Blade
1" BladeSpring
u...................
i l_ev
I No.
2627
2829303t32333435363738394041424344
46474849
5O
51
PaMNo.
46-58624-3820379-4
6606282037786042STD840611624429-2225546-57529-3660636605866052STD83301281409166044818033-166057820240-1820381-2STD8520081STD833020660406605566047
820382
820257-2
SP5496
Description
Screw, Hex Soc. CapM5 x &8-25
Retainer, BoltBolt, Carriage M6 x 1.0 -20Knob Assemb}y, Tension
* Nut, Hex M6 x 1.0A_,Switch, Locking1" Key, Swilch* Screw, Pan Hd. M4 x 0.7-6
Spring, CompressionSpring, Anti-RattleIndicator, Tilt
* Screw, Pan Cr. M6 x 1-12Knob, M6 x 1,0Bracket, TiltSupport, TabiePlate, CoverScrew, Pan Cr. M5 x 0.8-!0Screw, Hex Hal. IVi8× !.25-20
* Lockwasher, Helical M8* Screw, Hex Hd. M6 × 1.0-20
Base (includes Key #43)Motor (Includes Switch)Coupling, Eccentric
(Includes Key #t9 & 50)Screw, Hex Soc. Set Ft,
M8 x 1.25-8Screw, Pan Hd Ty "TT"
M5 x 0_8-10Owner's Manual (Not titus.)
* Standard hardware Item - May be purchased locally.
1" Stock Item - May be secured through the HardwareDepartment of most Sears Retail Stores or CatalogOrder Houses.
+ NOTE: When ordering eitherthe right orleff housing,both housings will be shipped. Because of the pre-cision drilling required, they must be replaced asmatched parts.
_ WARNING: This part is Important to the safetyof this tool. Do not replace wit h common parts. J

SERVnCE
3W TO ORDER_EPAIR PARTS
= =,=, = _1
!6 iNCH SCROLL SAW'
Now th at you have purchased you r Scroll Saw, should
a need ever exist for repair parts or service, simplycontact any Sears Service Center and most Sears,
Roebuck and Co. stores. Be sure to provide allpertinent facts when you call or visit.
The model number of your Scroll Saw wil! be foundattached to the underside of the worktable.
WHEN ORDERING REPAIR PARTS, ALWAYS GiVETHE FOLLOWING INFORMATION:
PART NUMBER PART DESCRIPTION
MODEL NUMBER113.236111
NAME OF ITEM16 Inch Scroll Saw
Ail parts listed may be ordered from any Sears Service
Center and most Sears stores. If the parts you needare not stocked locally, your order wirI be electronicallytransmitted to a Sears Repair Parts Distribution Cen-
ter for handling.
Sold by SEARS, ROEBUCK AND CO., Chicago, IL 60684 U.S.A.
qo. SP5496 Form No. SP5496-2 Printed in China 2/93