incucyte® scratch wound assay
TRANSCRIPT

Protocol
Incucyte® Scratch Wound AssayFor the Measurement of Invasion or Migration Into a Wound Region
This protocol provides an overview of our cell motility assay, which is suitable for the analysis of migration or invasion of adherent cell lines. This method utilizes our Incucyte® 96-Well Woundmaker Tool to create 96 precise, uniform cell-free zones in cell monolayers cultured on Incucyte® Imagelock 96-Well Plates. Incucyte® Scratch Wound Analysis Software module enables real time, automated measurement of label-free or dual fluorescence of cell migration and invasion in vitro.
Required Materials Cell Migration | Invasion Bundle
(Sartorius Cat. No. 4474), includes: Incucyte® Scratch Wound Analysis Software
Module (Sartorius Cat. No. 9600-0012) Incucyte® 96-Well Woundmaker Tool
(Sartorius Cat. No. 4563) Two (2) Woundmaker Rinse Boats
(Sartorius Cat. No. 5025-0191) Fifteen Incucyte® Imagelock 96-Well Plates
(Sartorius Cat. No. 4379) Incucyte® 96-Well Cell Invasion Accessories
(Sartorius Cat. No. 4444), for invasion assay includes: 2 x CoolBox 96F System plus 2 x CoolSink 96F 1 x extra CoolSink 96F
Matrigel® (BD Cat. No. 354234), for invasion assay

2
General Guidelines Following cell seeding, place plates at ambient
temperature for 15 minutes to ensure homogenous cell settling.
Do not leave any empty (dry) wells—these will damage the Woundmaker pins when creating the scratch.
Remove bubbles from all wells by gently squeezing a wash bottle (containing 70–100% ethanol with the inner straw removed) to blow vapor over the surface of each well.
For optimal assay quality, for both Incucyte® Scratch Wound Cell Migration and Invasion Assays it is recommended that cell density, the timing of the scratch wound (post cell plating) and the density of biomatrix material (if required) be investigated and optimized for different cell types.
Cell Density: The most consistent wounds are generally made when the cell monolayer is at or very near to 100% confluence; typically seeding density will range from 10–50K cells per well.
Timing of Scratch: Plating cells at the end of the day and wounding cells in the morning of the following day works well for many cell types plated on tissue culture plastic. If a biomatrix material is being utilized, cells may adhere in just a few hours, and successful wounding may be possible on the same day of seeding. On occasion, cells will adhere too tightly, causing adhered cells debris after wounding, which blocks subsequent cell migration. Plating cells for shorter time periods, (e.g., 4–8 h) can help improve the quality of the wounds.
Biomatrix: Coating the well with a biomatrix material (e.g., Collagen-I) or poly-D-Lysine will typically enhance the timing and strength of cell attachment. It can allow cells to adhere more tightly to the substrate as opposed to each other, avoiding cell sloughing or the removal of sheets of cells.
After placing the plate in the Incucyte® Live-Cell Analysis System, allow the plate to warm to 37° C for 30 minutes prior to scanning.
Please review Creating Wounds: 6 simple steps (found on pages 4–5) prior to initiating an assay for best practices when using the Incucyte® Woundmaker.
Day 0Coat Plate with ECM (if required) 1.1 Coat an Imagelock 96-Well Plate with a thin layer
(50 µL/well) of biomatrix. Gently rock the plate to ensure even coating of each well.
1.2 Depending on biomatrix used for coating, aspirate and wash coating from the wells prior to cell seeding.
Seed Cells 2.1 Seed cells at a density of 10,000–40,000 cells/well
(100 µL/well; 100,000–400,000 cells/mL stock) into each well of the coated Imagelock 96-Well Plate.
2.2 Allow the cells to settle at ambient temperature for 15 minutes, then place the plate into a 37° C incubator, 5% CO2 overnight or as pre-determined in assay optimization.
Protocol
1. Coat plate with ECM (optional)
2. Seed cells 3. Create wound area 4. Add treatment
Coat plate surface to ensure cell attachment (e.g., Collagen-1).
Plate cells (100 μL/well, 10,000–40,000 cells/well) and allow to adhere overnight.
Wound confluent cell monolayer using 96-well Woundmaker.
Add modulators of migration (100 μL/well).
Migration Protocol

3
Important In advance of invasion experiments it is important to have stored the Cool Pack accessories at the correct tempera-tures for at least 4 hours: CoolBox x 2 (block with gelpack: -20° C), CoolSink
96F x 2 (4° C), CoolSink 96F x 1 (37° C). CoolBox M30 System (block with gelpack: -20° C)
with CoolRack (4° C).
The Cool Packs are used to ensure close temperature control of Matrigel® in microplates. At 4–8° C, Matrigel® is a viscous liquid. Polymerization will occur slowly at 4–8° C, and more rapidly when at room temperature or higher. For this reason, it is imperative to keep Matrigel® solutions at 4–8° C during experimental set-up to avoid unwanted gelling. It is easier to handle low volume (< 500 μL) ECM solutions using pre-cooled (from a fridge), wide bore pipette tips or serological pipettes. We recommend sourcing a batch of Matrigel® with a concentration of > 9 mg/mL and an endotoxin level of < 1.5 (EU)/mL.
Day 0 Coat Plate with ECM (if required) 1.1 Using a CoolSink M30 System with CoolRack, dilute
Matrigel® stock to 100 μg/mL in culture media. Note: The day prior to coating the Imagelock plate, thaw a bottle
of Matrigel®, packed in ice, overnight at +4° C. When fully thawed, there should be no visible gel aggregates. If aggregates are present, replace the bottle on ice and thaw at +4° C for a longer period of time. After thawing, chill ten 2 mL micro centrifuge tubes in the CoolSink M30 System (10 min), and using a pre-cooled serological pipette, create 1 mL aliquots of Matrigel® and store at -20° C.
1.2 Coat an Imagelock 96-Well Plate with 50 µL/well of diluted Matrigel® (100µg/mL). Gently rock the plate to ensure even coating of each well.
1.3 Place the plate in a 37° C incubator, 5% CO2 and allow the biomatrix material to polymerize for 2 hours.
Day 1 Create Wound 3.1 Carefully remove the Imagelock Plate from the
incubator, and use the Woundmaker (refer to Appendix I, Creating wounds section) to simultaneously create wounds in all wells.
3.2 After wounding, immediately aspirate the media from each well and carefully wash the cells twice with culture media (100 µL/well; with our without serum) or Dulbecco’s Phosphate Buffered Saline (dPBS), if desired.
Add Treatment 4.1 After washing, add 100 µl of culture media ± test
material (e.g., small molecules, antibodies) to each well. 4.2 Place the cell plate into the Incucyte® Live-Cell
Analysis System and allow the plate to warm to 37° C for 30 minutes prior to scanning. a. Objective: 4X, 10X (recommended), or 20X b. Channel selection: Phase Contrast (+ Fluorescence
if analyzing cells with fluorescent labels) c. Scan type: Scratch Wound (Wide Mode optional
for 10X, required for 20X) d. Scan interval: Every 1–3 hours
4.3 Wash and store the Woundmaker according to the wash protocol.
1. Coat plate with ECM (optional)
2. Seed cells 3. Create wound area 4. Add EDM + media containing treatment
Coat plate surface with 100 mg/mL Matrigel® (50 mL/well) to ensure cell attachment.
Plate cells (100 μL/well, 10,000–40,000 cells/well) and allow to adhere overnight.
Wound confluent cell monolayer using 96-well Woundmaker.
Overlay cells with ECM (50 mL/well) ± treatment, polymerize, then overlay wells with media ± treatment (100 μL/well).
Invasion Protocol
4
Seed Cells 2.1 Remove plate from 37° C. Using a manual pipette,
aspirate the Matrigel® coating from the wells prior to cell seeding.
2.2 Seed cells at a density of 10,000–40,000 cells/well (100 µL/well, 100,000–400,000 cells/mL stock) into each well of the coated Imagelock 96-Well Plate.
2.3 Allow the cells to settle at ambient temperature for 15 minutes, then place the plate into a 37° C incubator, 5% CO2 overnight.
Prepare Biomatrix Top Layer, Then Create Wound 3.1 On ice, prepare the biomatrix top layer by diluting
Matrigel®, typically 4–8 mg/mL, in cold culture media ± treatments.
3.2 Carefully remove the Imagelock Plate from the incubator, and use the Woundmaker (refer to Appendix I, Creating Wounds section) to simultaneously create wounds in all wells.
3.3 After wounding, immediately aspirate the media from each well and carefully wash the cells twice with culture media (100 µL/well).
3.4 After washing, add 100 µl of culture media, then cool the cell plate to 4° C for 5 minutes using the CoolSink and CoolBox 96F.
Add ECM and Media ± Treatments 4.1 Aspirate media from wounded Imagelock Plate, and
carefully overlay cells with 50µL of the Matrigel® top layer (prepared in step 3.1). Remove any bubbles from the assay plate.
4.2 To polymerize the biomatrix top layer, warm the cell plate to 37° C by placing the plate onto a pre-warmed CoolSink inside the incubator.
4.3 After 30 minutes, add additional media (100 µL/well ± treatments). Note: Leaving the plate to polymerize longer than 60 minutes will cause the biomatrix top layer to dehydrate.
4.4 Place the cell plate into the Incucyte® Live-Cell Analysis System and allow the plate to warm to 37° C for 30 minutes prior to scanning. a. Objective: 4X, 10X (recommended), or 20X b. Channel selection: Phase Contrast (+ Fluorescence
if analyzing cells with fluorescent labels) c. Scan type: Scratch Wound (Wide Mode optional
for 10X, required for 20X) d. Scan interval: Every 2–3 hours
4.5 Wash and store the Woundmaker according to the wash protocol.
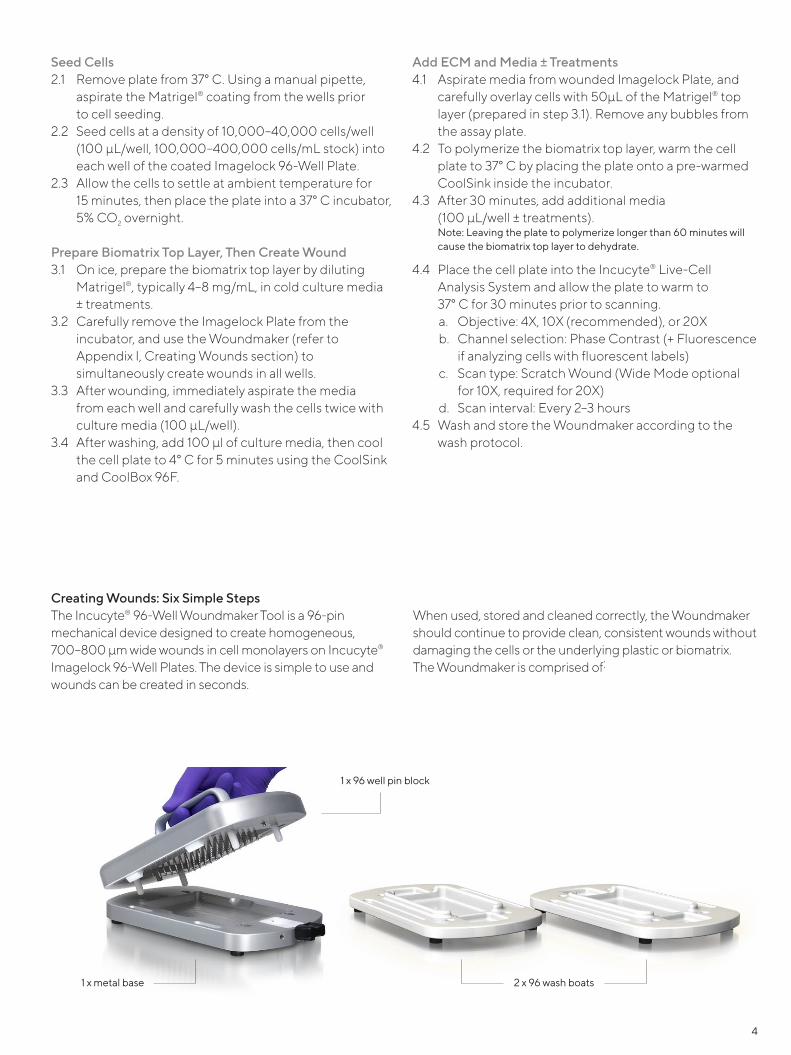
Creating Wounds: Six Simple Steps The Incucyte® 96-Well Woundmaker Tool is a 96-pin mechanical device designed to create homogeneous, 700–800 µm wide wounds in cell monolayers on Incucyte® Imagelock 96-Well Plates. The device is simple to use and wounds can be created in seconds.
When used, stored and cleaned correctly, the Woundmaker should continue to provide clean, consistent wounds without damaging the cells or the underlying plastic or biomatrix. The Woundmaker is comprised of:
1 x metal base 2 x 96 wash boats
1 x 96 well pin block
5
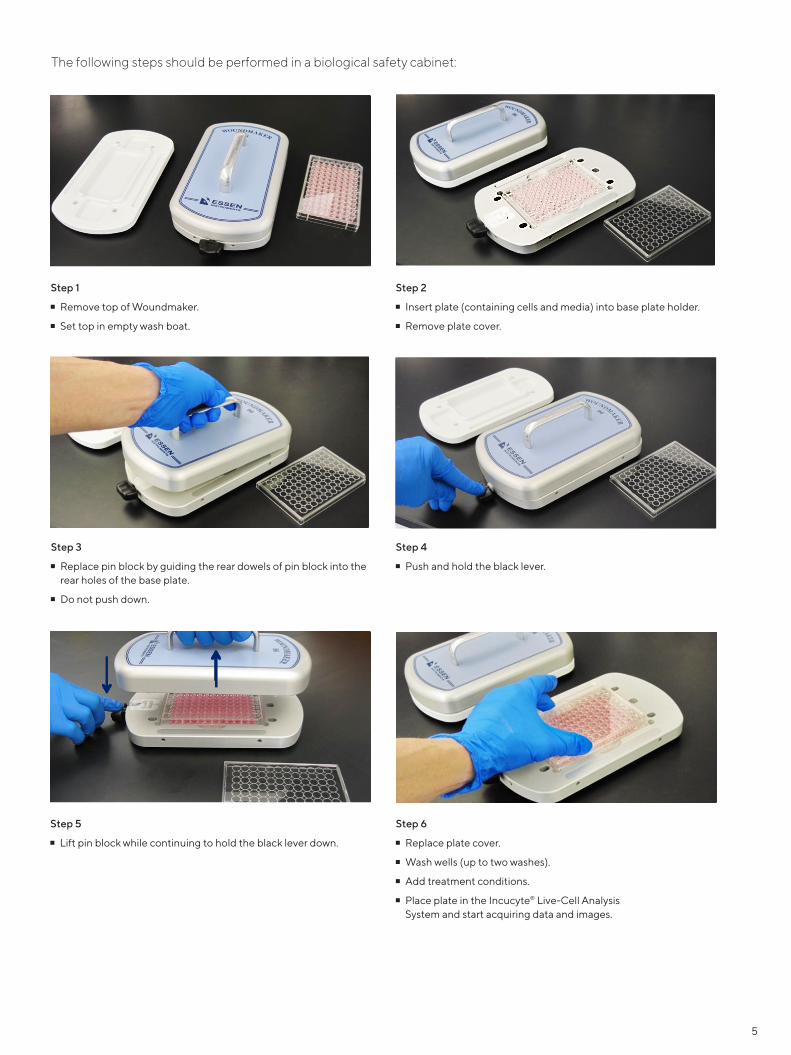
The following steps should be performed in a biological safety cabinet:
Step 1
Remove top of Woundmaker.
Set top in empty wash boat.
Step 3
Replace pin block by guiding the rear dowels of pin block into the rear holes of the base plate.
Do not push down.
Step 5
Lift pin block while continuing to hold the black lever down.
Step 6
Replace plate cover.
Wash wells (up to two washes).
Add treatment conditions.
Place plate in the Incucyte® Live-Cell Analysis System and start acquiring data and images.
Step 4
Push and hold the black lever.
Step 2
Insert plate (containing cells and media) into base plate holder.
Remove plate cover.

A complete suite of cell health applications is available to fit your experimental needs.
Find more information at www.sartorius.com/incucyte
For Research Use Only. Not For Therapeutic or Diagnostic Use.
Sales and ServiceContactsFor further contacts, visitwww.sartorius.com
Specifications subject to change without notice. 2020. All rights reserved. Incucyte, Essen BioScience, and all names of Essen BioScience products are registered trademarks and the property of Essen BioScience unless otherwise specified. Essen BioScience is a Sartorius Company. Publication No.: 8000-0597-B00Status: 08 | 2020
Essen BioScience, A Sartorius Companywww.sartorius.com/incucyteE-Mail: [email protected]
North AmericaEssen BioScience Inc. 300 West Morgan RoadAnn Arbor, Michigan, 48108USATelephone +1 734 769 1600E-Mail: [email protected] EuropeEssen BioScience Ltd.Units 2 & 3 The QuadrantNewark CloseRoyston Hertfordshire SG8 5HL United KingdomTelephone +44 1763 227400E-Mail: [email protected]
APACEssen BioScience K.K.4th Floor Daiwa Shinagawa North Bldg.1-8-11 Kita-ShinagawaShinagawa-ku, Tokyo140-0001 JapanTelephone: +81 3 6478 5202E-Mail: [email protected]