indesign manual - wordpress.com · indesign manual 01a - single page poster 2017 1st edition this...
TRANSCRIPT
InDesign Manual01a - Single Page Poster2017 1st edition
This InDesign Manual is one of an introductory series specially written for the Arts and Humanities Students at UEA by the Media Suite Team
email: [email protected].
UEA Media Suite - Introduction to InDesign PAGE 2
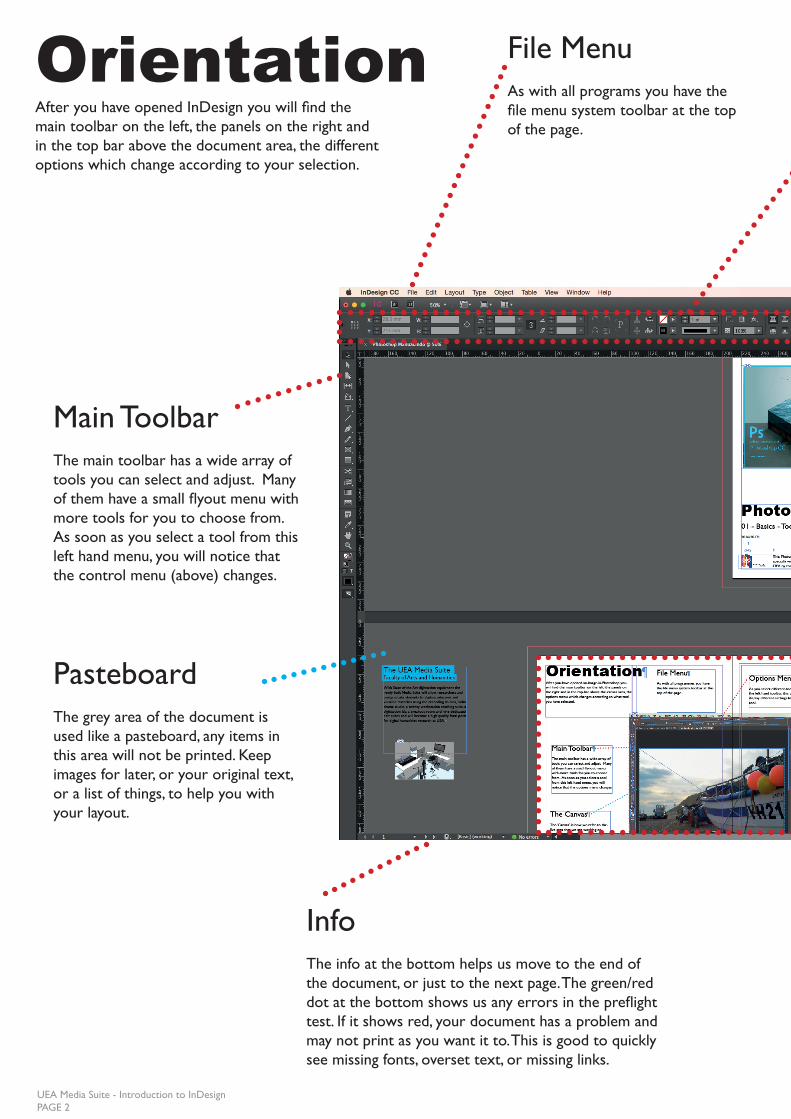
OrientationAfter you have opened InDesign you will find the main toolbar on the left, the panels on the right and in the top bar above the document area, the different options which change according to your selection.
Main ToolbarThe main toolbar has a wide array of tools you can select and adjust. Many of them have a small flyout menu with more tools for you to choose from. As soon as you select a tool from this left hand menu, you will notice that the control menu (above) changes.
InfoThe info at the bottom helps us move to the end of the document, or just to the next page. The green/red dot at the bottom shows us any errors in the preflight test. If it shows red, your document has a problem and may not print as you want it to. This is good to quickly see missing fonts, overset text, or missing links.
PasteboardThe grey area of the document is used like a pasteboard, any items in this area will not be printed. Keep images for later, or your original text, or a list of things, to help you with your layout.
File MenuAs with all programs you have the file menu system toolbar at the top of the page.
UEA Media Suite - Introduction to InDesign PAGE 3
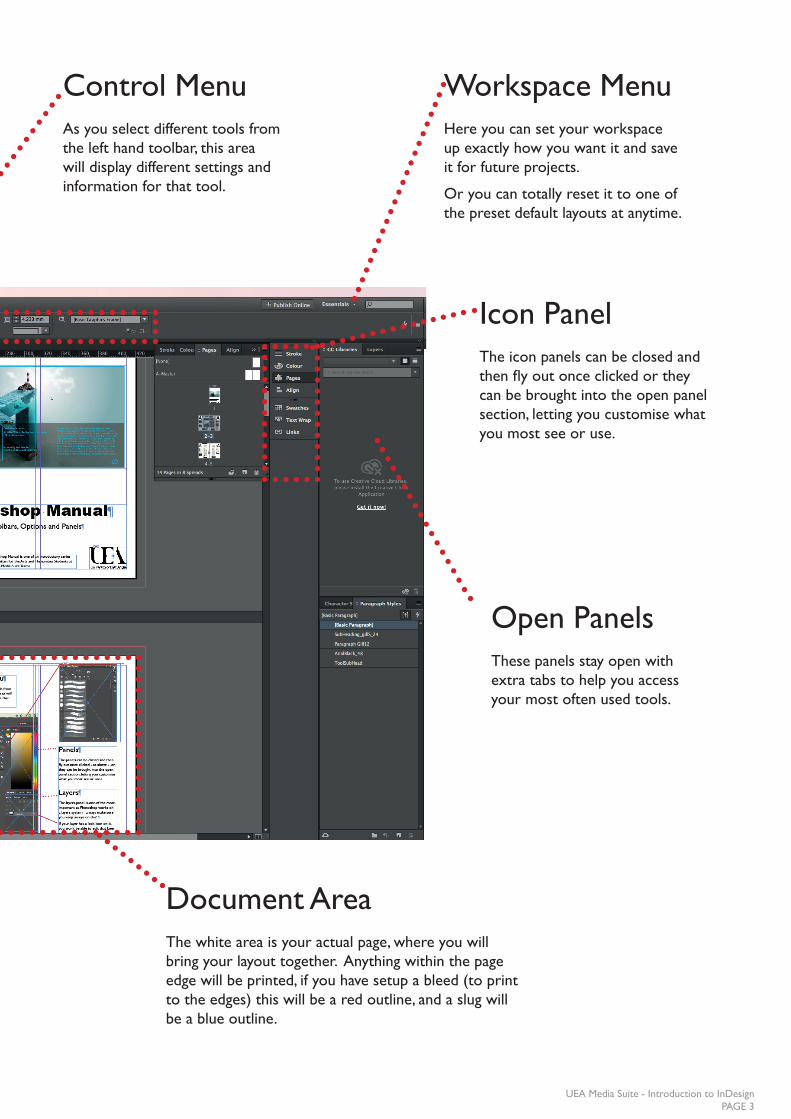
Icon PanelThe icon panels can be closed and then fly out once clicked or they can be brought into the open panel section, letting you customise what you most see or use.
Control MenuAs you select different tools from the left hand toolbar, this area will display different settings and information for that tool.
Workspace MenuHere you can set your workspace up exactly how you want it and save it for future projects.
Or you can totally reset it to one of the preset default layouts at anytime.
Open PanelsThese panels stay open with extra tabs to help you access your most often used tools.
Document AreaThe white area is your actual page, where you will bring your layout together. Anything within the page edge will be printed, if you have setup a bleed (to print to the edges) this will be a red outline, and a slug will be a blue outline.
UEA Media Suite - Introduction to InDesign PAGE 4
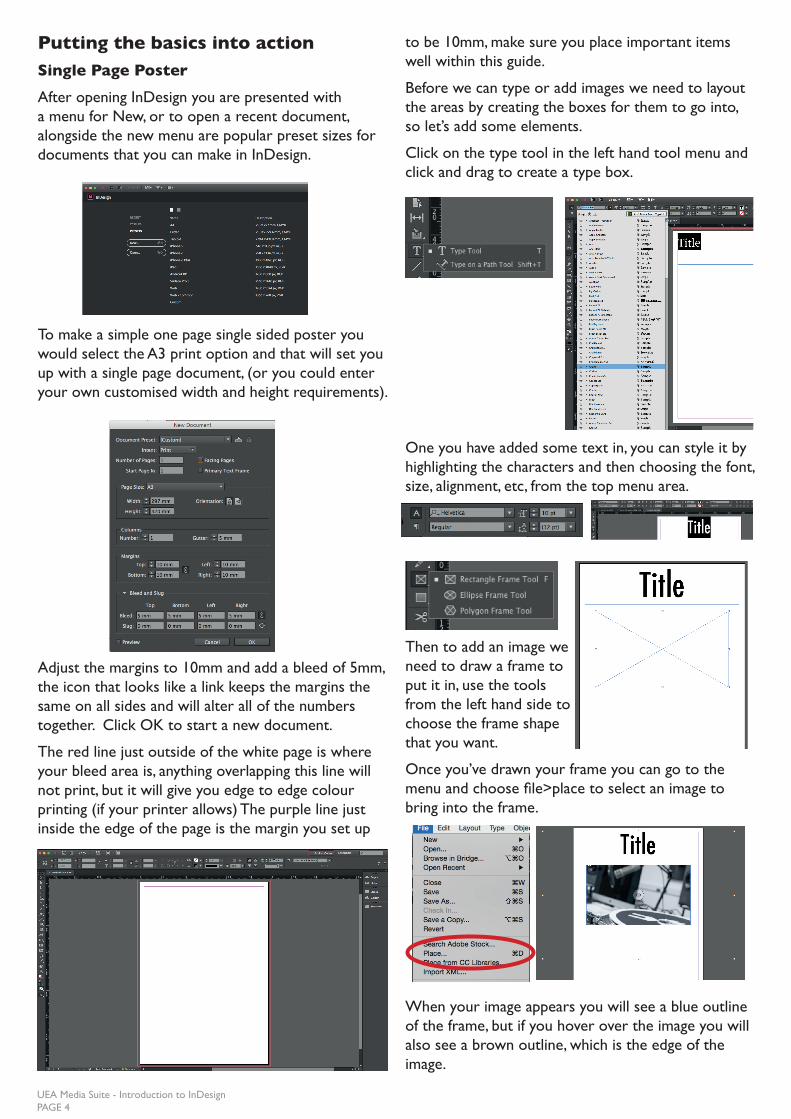
Putting the basics into actionSingle Page PosterAfter opening InDesign you are presented with a menu for New, or to open a recent document, alongside the new menu are popular preset sizes for documents that you can make in InDesign.
To make a simple one page single sided poster you would select the A3 print option and that will set you up with a single page document, (or you could enter your own customised width and height requirements).
Adjust the margins to 10mm and add a bleed of 5mm, the icon that looks like a link keeps the margins the same on all sides and will alter all of the numbers together. Click OK to start a new document.
The red line just outside of the white page is where your bleed area is, anything overlapping this line will not print, but it will give you edge to edge colour printing (if your printer allows) The purple line just inside the edge of the page is the margin you set up
to be 10mm, make sure you place important items well within this guide.
Before we can type or add images we need to layout the areas by creating the boxes for them to go into, so let’s add some elements.
Click on the type tool in the left hand tool menu and click and drag to create a type box.
One you have added some text in, you can style it by highlighting the characters and then choosing the font, size, alignment, etc, from the top menu area.
Then to add an image we need to draw a frame to put it in, use the tools from the left hand side to choose the frame shape that you want.
Once you’ve drawn your frame you can go to the menu and choose file>place to select an image to bring into the frame.
When your image appears you will see a blue outline of the frame, but if you hover over the image you will also see a brown outline, which is the edge of the image.
UEA Media Suite - Introduction to InDesign PAGE 5
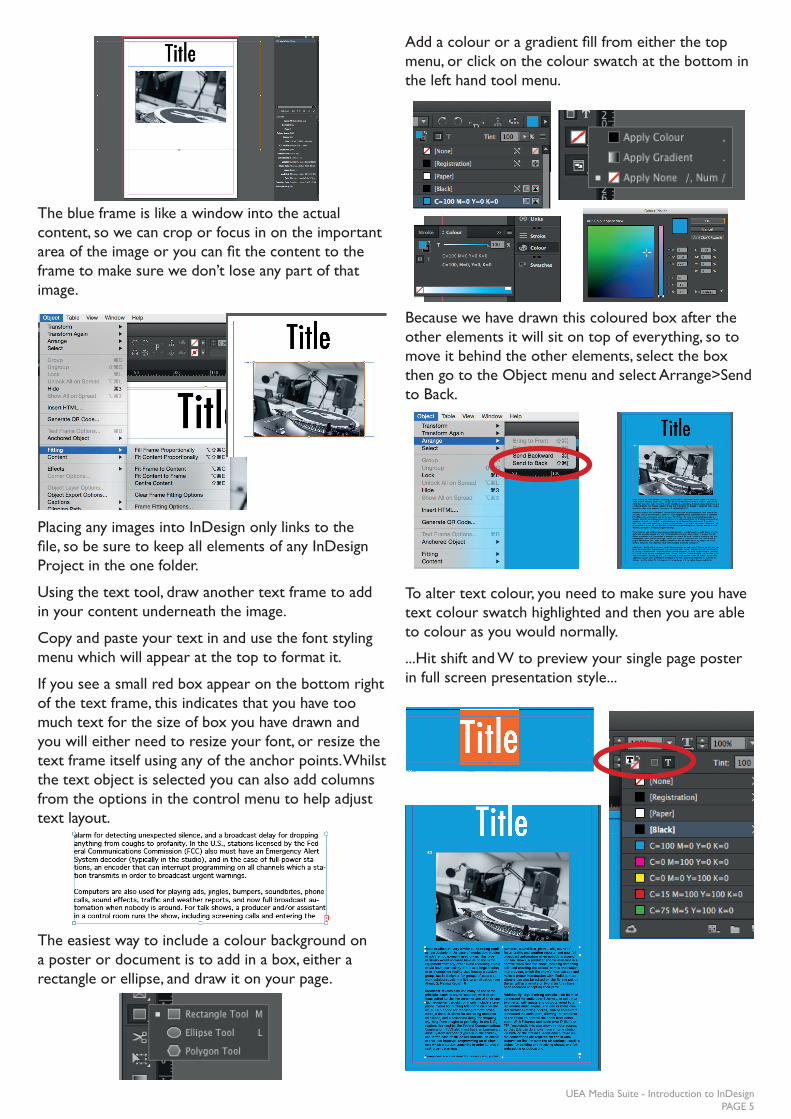
The blue frame is like a window into the actual content, so we can crop or focus in on the important area of the image or you can fit the content to the frame to make sure we don’t lose any part of that image.
Placing any images into InDesign only links to the file, so be sure to keep all elements of any InDesign Project in the one folder.
Using the text tool, draw another text frame to add in your content underneath the image.
Copy and paste your text in and use the font styling menu which will appear at the top to format it.
If you see a small red box appear on the bottom right of the text frame, this indicates that you have too much text for the size of box you have drawn and you will either need to resize your font, or resize the text frame itself using any of the anchor points. Whilst the text object is selected you can also add columns from the options in the control menu to help adjust text layout.
The easiest way to include a colour background on a poster or document is to add in a box, either a rectangle or ellipse, and draw it on your page.
Add a colour or a gradient fill from either the top menu, or click on the colour swatch at the bottom in the left hand tool menu.
Because we have drawn this coloured box after the other elements it will sit on top of everything, so to move it behind the other elements, select the box then go to the Object menu and select Arrange>Send to Back.
To alter text colour, you need to make sure you have text colour swatch highlighted and then you are able to colour as you would normally.
...Hit shift and W to preview your single page poster in full screen presentation style...
UEA Media Suite - Introduction to InDesign PAGE 6
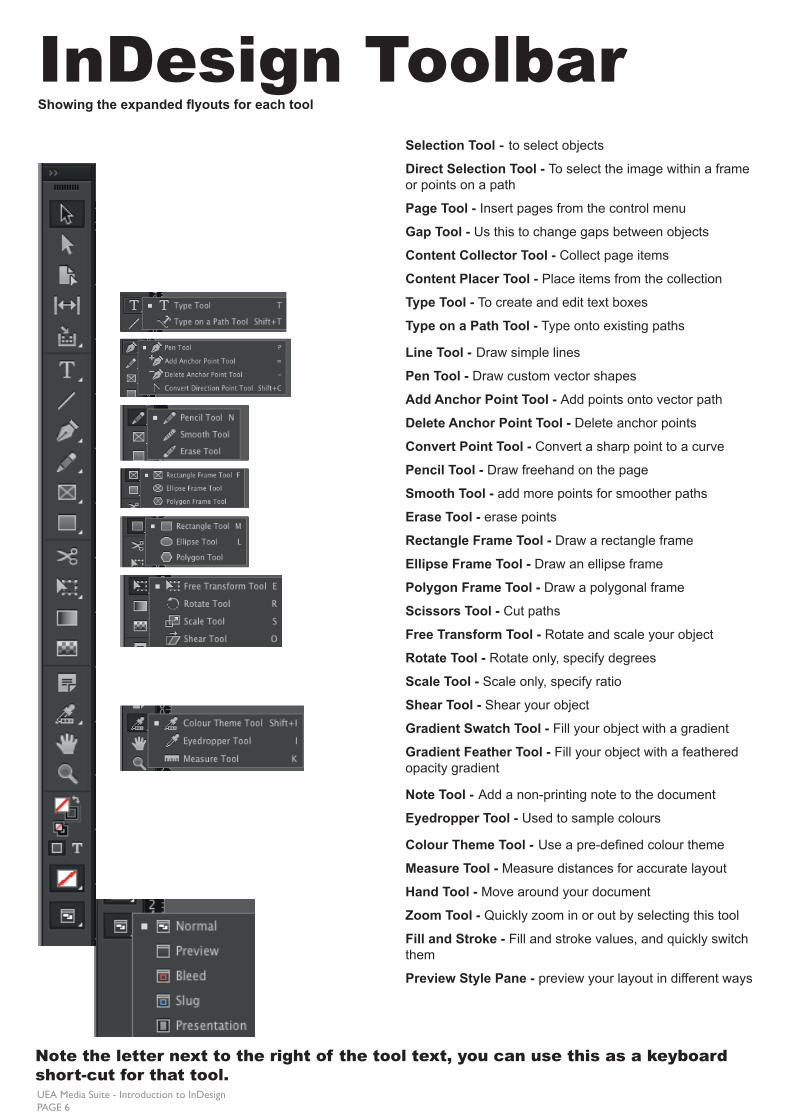
InDesign ToolbarShowing the expanded flyouts for each tool
Selection Tool - to select objects
Direct Selection Tool - To select the image within a frame or points on a path
Page Tool - Insert pages from the control menu
Gap Tool - Us this to change gaps between objects
Content Collector Tool - Collect page items
Content Placer Tool - Place items from the collection
Type Tool - To create and edit text boxes
Type on a Path Tool - Type onto existing paths
Line Tool - Draw simple lines
Pen Tool - Draw custom vector shapes
Add Anchor Point Tool - Add points onto vector path
Delete Anchor Point Tool - Delete anchor points
Convert Point Tool - Convert a sharp point to a curve
Pencil Tool - Draw freehand on the page
Smooth Tool - add more points for smoother paths
Erase Tool - erase points
Rectangle Frame Tool - Draw a rectangle frame
Ellipse Frame Tool - Draw an ellipse frame
Polygon Frame Tool - Draw a polygonal frame
Scissors Tool - Cut paths
Free Transform Tool - Rotate and scale your object
Rotate Tool - Rotate only, specify degrees
Scale Tool - Scale only, specify ratio
Shear Tool - Shear your object
Gradient Swatch Tool - Fill your object with a gradient
Gradient Feather Tool - Fill your object with a feathered opacity gradient
Note Tool - Add a non-printing note to the document
Eyedropper Tool - Used to sample colours
Colour Theme Tool - Use a pre-defined colour theme
Measure Tool - Measure distances for accurate layout
Hand Tool - Move around your document
Zoom Tool - Quickly zoom in or out by selecting this tool
Fill and Stroke - Fill and stroke values, and quickly switch them
Preview Style Pane - preview your layout in different ways
Note the letter next to the right of the tool text, you can use this as a keyboard short-cut for that tool.
UEA Media Suite - Introduction to InDesign PAGE 7
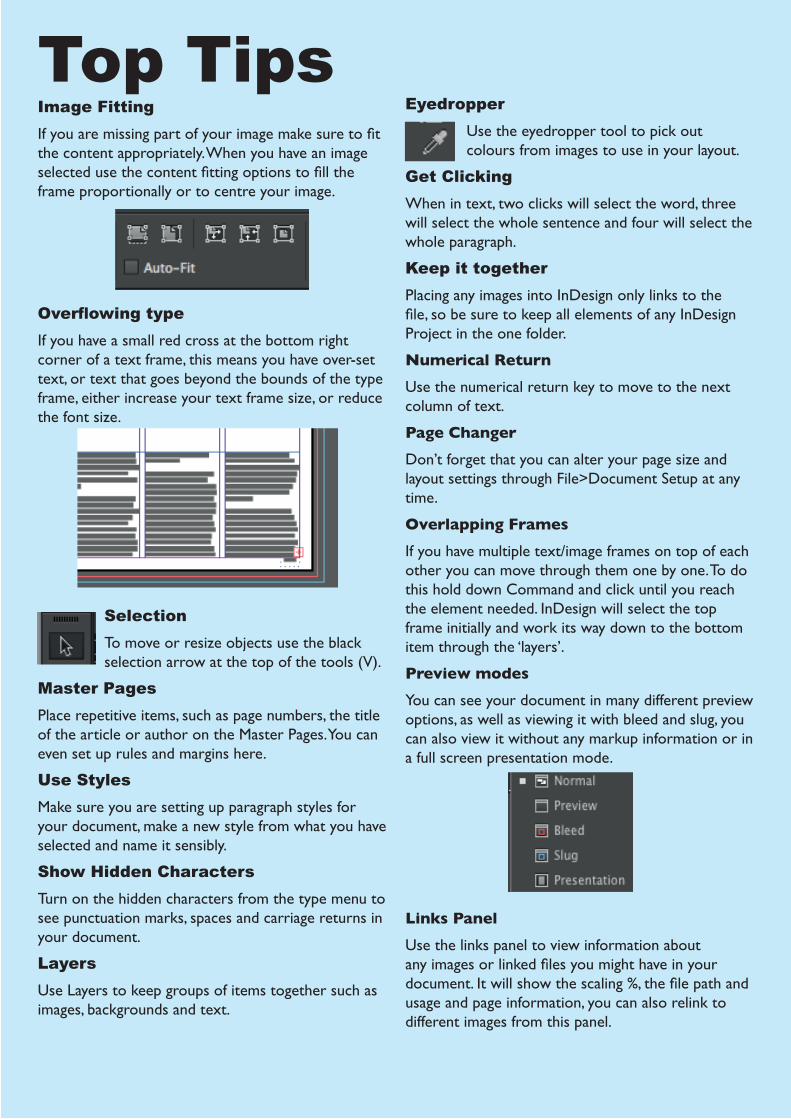
Top TipsImage FittingIf you are missing part of your image make sure to fit the content appropriately. When you have an image selected use the content fitting options to fill the frame proportionally or to centre your image.
Overflowing typeIf you have a small red cross at the bottom right corner of a text frame, this means you have over-set text, or text that goes beyond the bounds of the type frame, either increase your text frame size, or reduce the font size.
SelectionTo move or resize objects use the black selection arrow at the top of the tools (V).
Master PagesPlace repetitive items, such as page numbers, the title of the article or author on the Master Pages. You can even set up rules and margins here.
Use StylesMake sure you are setting up paragraph styles for your document, make a new style from what you have selected and name it sensibly.
Show Hidden CharactersTurn on the hidden characters from the type menu to see punctuation marks, spaces and carriage returns in your document.
LayersUse Layers to keep groups of items together such as images, backgrounds and text.
EyedropperUse the eyedropper tool to pick out colours from images to use in your layout.
Get ClickingWhen in text, two clicks will select the word, three will select the whole sentence and four will select the whole paragraph.
Keep it togetherPlacing any images into InDesign only links to the file, so be sure to keep all elements of any InDesign Project in the one folder.
Numerical ReturnUse the numerical return key to move to the next column of text.
Page ChangerDon’t forget that you can alter your page size and layout settings through File>Document Setup at any time.
Overlapping FramesIf you have multiple text/image frames on top of each other you can move through them one by one. To do this hold down Command and click until you reach the element needed. InDesign will select the top frame initially and work its way down to the bottom item through the ‘layers’.
Preview modesYou can see your document in many different preview options, as well as viewing it with bleed and slug, you can also view it without any markup information or in a full screen presentation mode.
Links PanelUse the links panel to view information about any images or linked files you might have in your document. It will show the scaling %, the file path and usage and page information, you can also relink to different images from this panel.
This InDesign Manual is one of an introductory series specially written for the Arts and Humanities Students at UEA by the Media Suite Team.
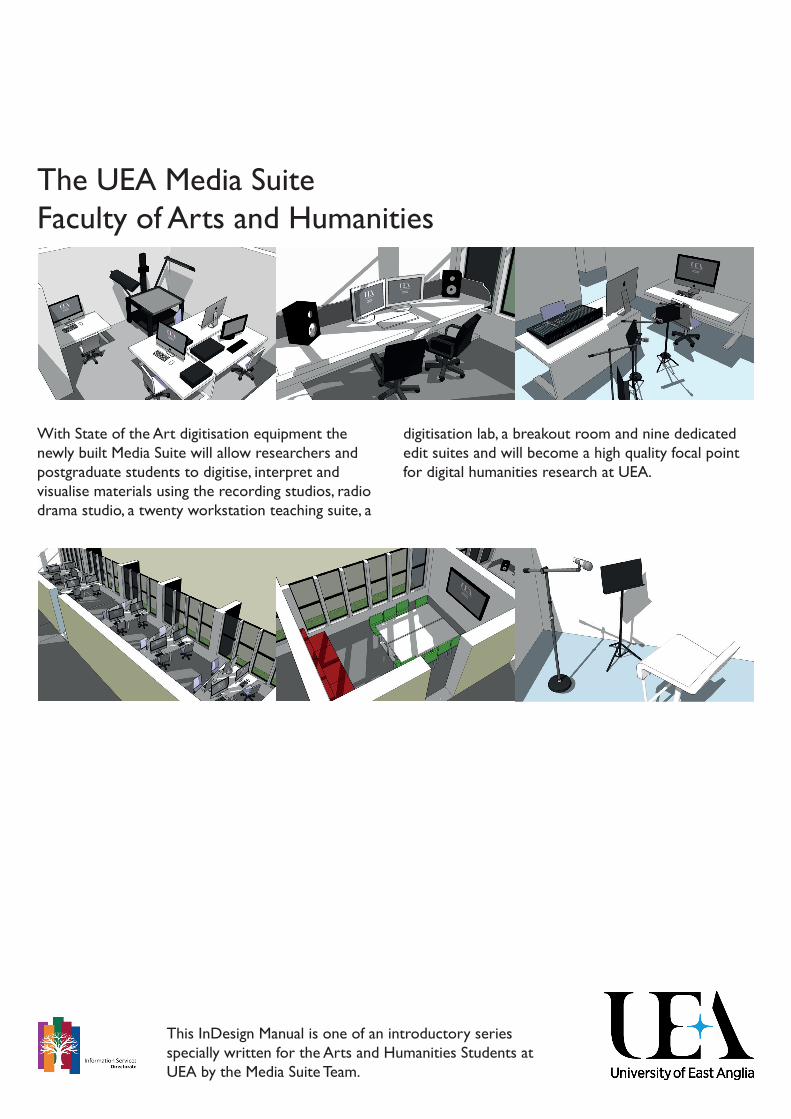
The UEA Media Suite Faculty of Arts and Humanities
With State of the Art digitisation equipment the newly built Media Suite will allow researchers and postgraduate students to digitise, interpret and visualise materials using the recording studios, radio drama studio, a twenty workstation teaching suite, a
digitisation lab, a breakout room and nine dedicated edit suites and will become a high quality focal point for digital humanities research at UEA.