indian affairs-facility management system (ia-fms) · pdf fileindian affairs-facility...
TRANSCRIPT

Indian Affairs, Division of Facilities Management and Construction
Indian Affairs-Facility Management System (IA-FMS)
Training
IA-FMS (Maximo) Navigation

IA-FMS - Navigation
Lesson goals
• This lesson will cover the following specifics within IA-FMS:
• Logging into the system
• Understanding user profile settings
• Understanding the user interface and screen elements
• Navigating within the system
• Querying and searching for data
• Attached Documents
• Bookmarks

IA-FMS Overview
IA-FMS - Integration Points

Logging into IA-FMS (Maximo)
Hyperlink to BIA Intranet Maximo BIA User Login for PRODUCTION: https://maximo.bia.gov/maximo/
IA-FMS - Navigation

IA-FMS - Start Center
1
2
3
4
1. ‘Menu’ bar. 2. ‘Favorite Applications’. 3. ‘Quick Insert’. 4. ‘Bulletin Board’.
5
6
7
5. Result Set (or filter). 6. ‘KPI (Key Performance Indicator)
Graph’. 7. ‘KPI List’.
IA-FMS - Navigation

User Profiles - Updating 1 2
1. Select ‘Profile’. 2. Select ‘Default
Information’.
3
4
5
3. Select ‘Default Insert Site’.
4. Select ‘Storeroom Site’.
5. Select ‘Default Storeroom’.
IA-FMS - Navigation

Navigation – List tab 1 2 3 4 5
1. This lets the User know what application they are currently using.
2. This field stores/displays the list of ‘Saved Queries’.
3. ‘Find’ field. The user inserts the exact record ID to display a record.
4. ‘Select Action’ list. This displays additional actions a user can perform to a record.
5. ‘Tool Bar’ icons. These are short cuts to performing actions on a record.
6
7
8 9 10
6. ‘Navigation Bar’. These values are always displayed.
7. Additional ‘Tabs’. These display additional values related to the current record.
8. ‘Advanced Search’ a more in depth searching tool.
9. ‘Saved Query’. Users can store queries they have created.
10. ‘Bookmarks’ allow the user to create a direct link to an individual record.
IA-FMS - Navigation

The Toolbar
IA-FMS - Navigation
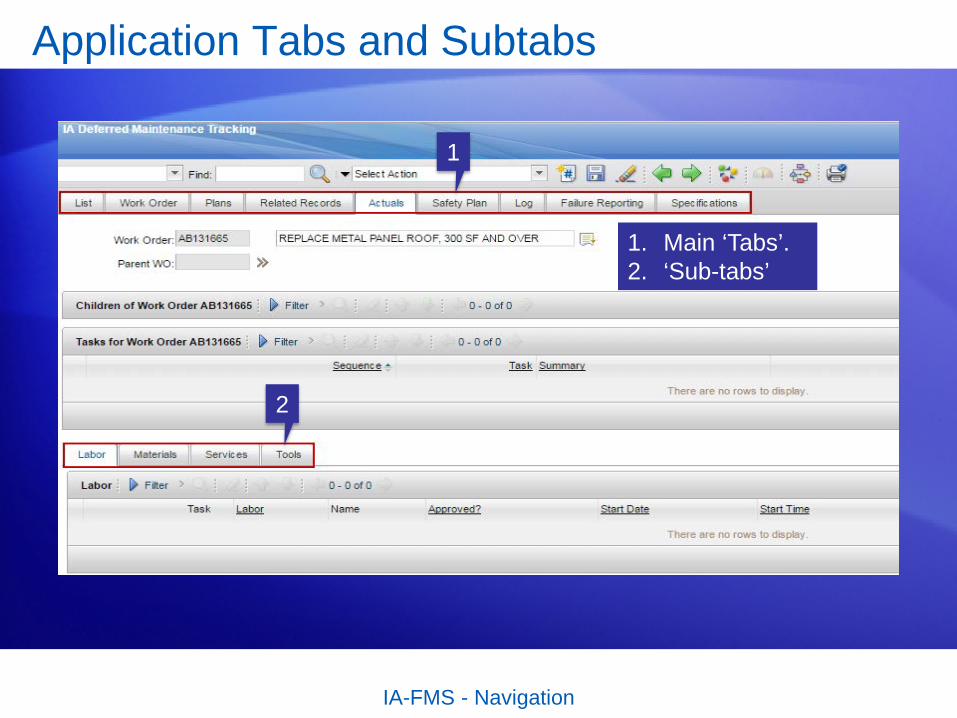
Application Tabs and Subtabs
1
2
1. Main ‘Tabs’. 2. ‘Sub-tabs’
IA-FMS - Navigation

Table Windows 1
2
1. To expand a Table window click on the ‘blue’ triangle to view additional information about the record.
2. After expanding the table the triangle will turn orange and face down. Click on the triangle again return to the original format.
IA-FMS - Navigation
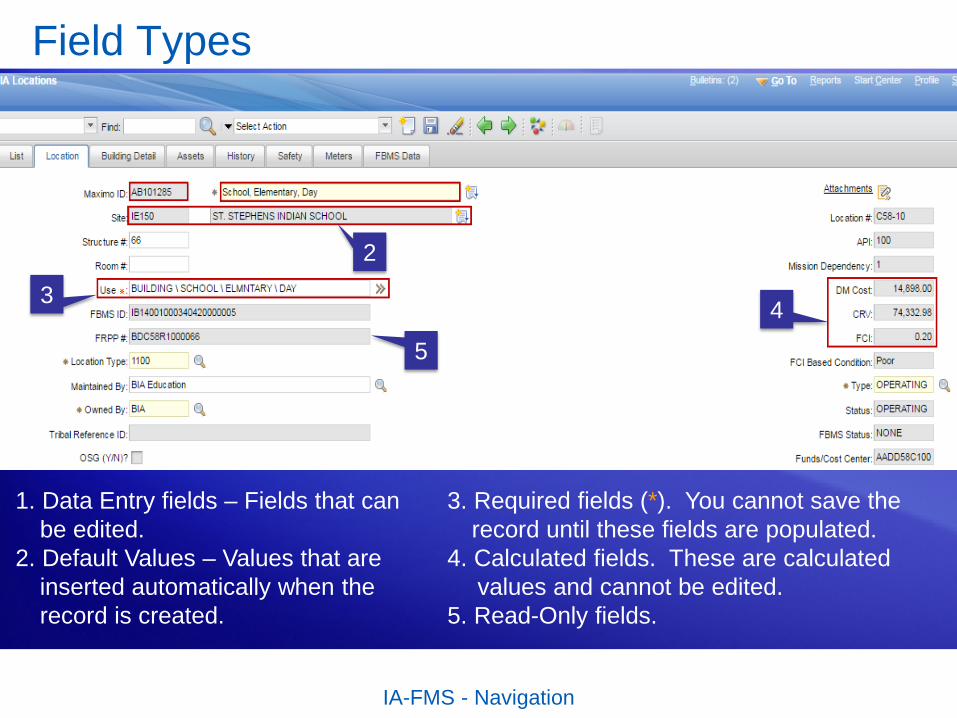
Field Types
2
3
1. Data Entry fields – Fields that can be edited.
2. Default Values – Values that are inserted automatically when the record is created.
4
5
3. Required fields (*). You cannot save the record until these fields are populated.
4. Calculated fields. These are calculated values and cannot be edited.
5. Read-Only fields.
IA-FMS - Navigation

Work Type Field Assistant Buttons
1 1. ‘Select Value’ displays a list of
selectable data items.
IA-FMS - Navigation
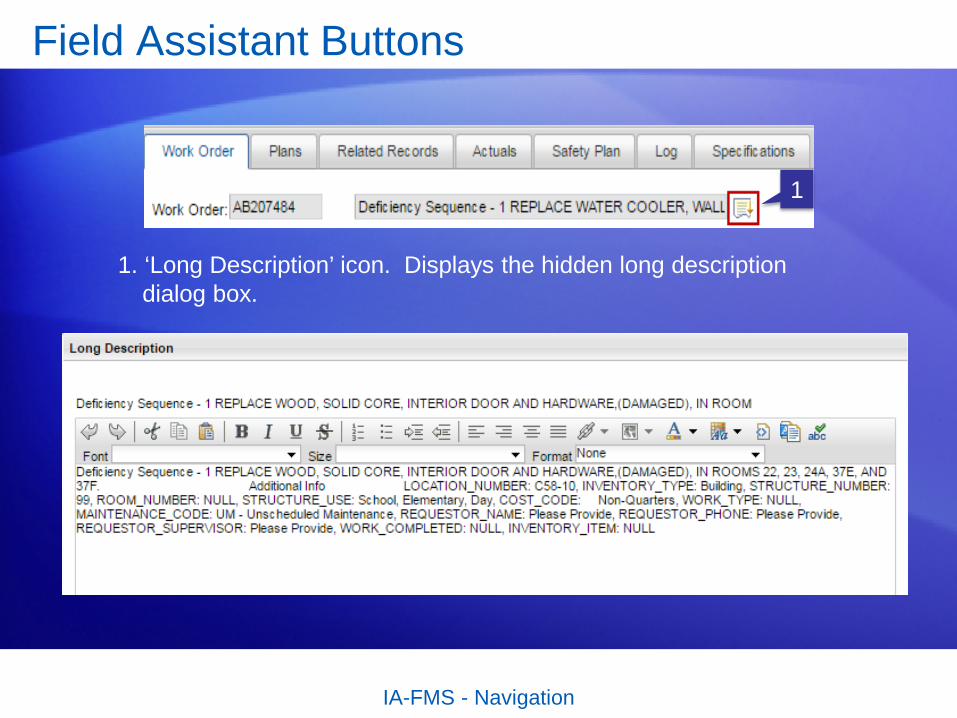
Field Assistant Buttons
1
1. ‘Long Description’ icon. Displays the hidden long description dialog box.
IA-FMS - Navigation

Schedule Start Field Assistant Buttons
1 1. ‘Select Date’ icon displays a Select Date window containing a calendar
IA-FMS - Navigation

Detail Menu Field Assistant Buttons
1
1. Detail Menu Button displays a drop-down menu of options for sources of data.
IA-FMS - Navigation

Navigating Between Applications 1
2 3
This example is used to show how to navigate to the ‘IA Deferred Maintenance Tracking’ app (from the ‘Start Center’).
1. Select ‘Go To’. 2. Select ‘Work Orders. 3. Select ‘IA Deferred Maintenance Tracking’.
IA-FMS - Navigation
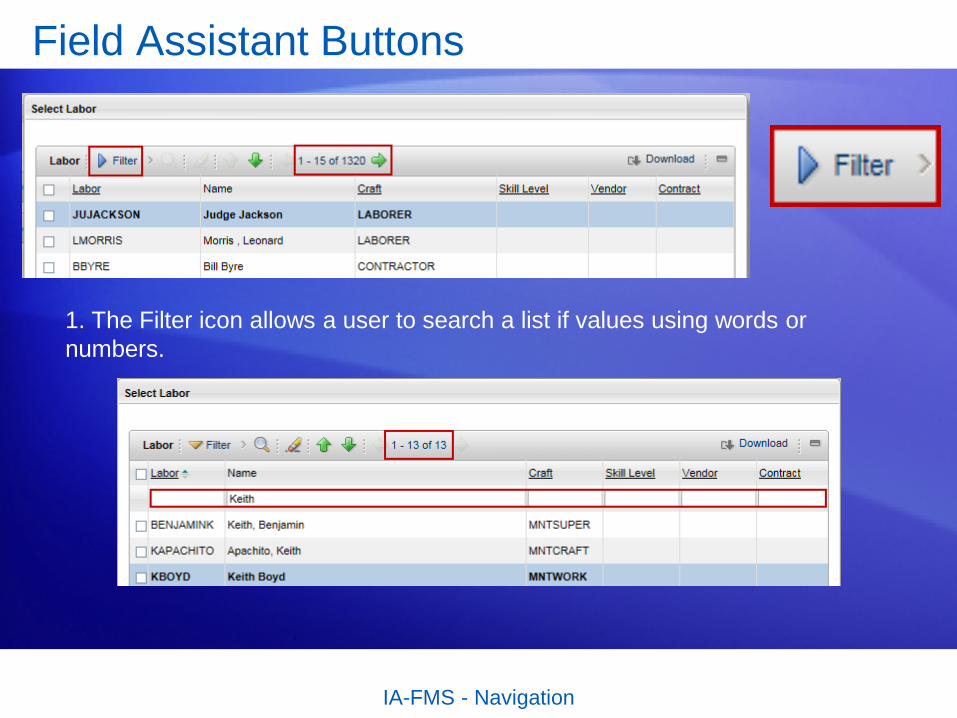
Field Assistant Buttons
1. The Filter icon allows a user to search a list if values using words or numbers.
IA-FMS - Navigation
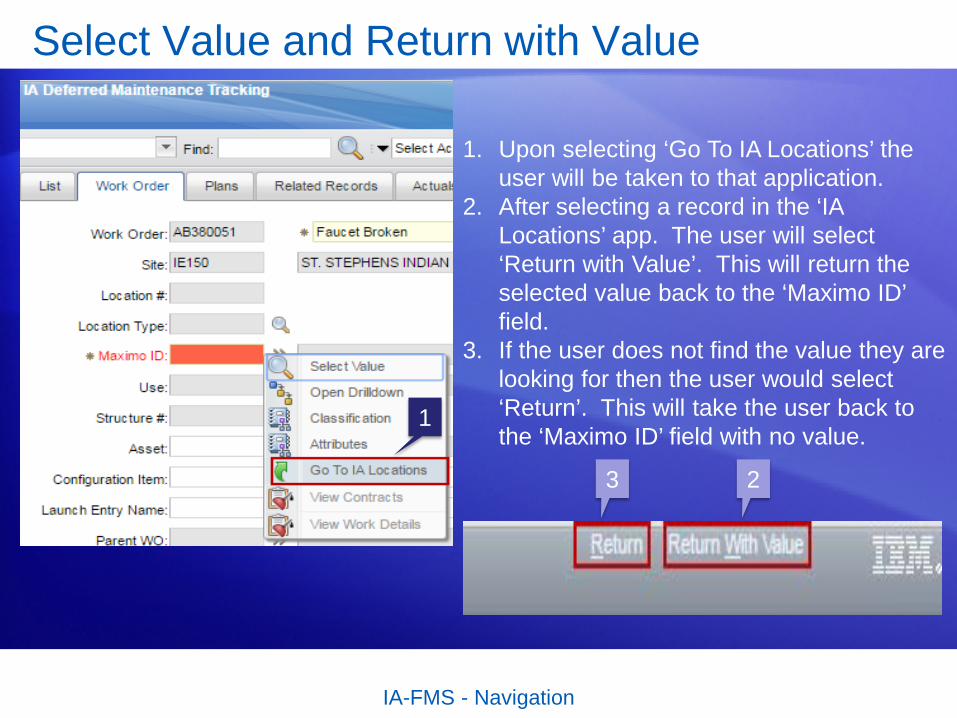
Select Value and Return with Value
1
2 3
1. Upon selecting ‘Go To IA Locations’ the user will be taken to that application.
2. After selecting a record in the ‘IA Locations’ app. The user will select ‘Return with Value’. This will return the selected value back to the ‘Maximo ID’ field.
3. If the user does not find the value they are looking for then the user would select ‘Return’. This will take the user back to the ‘Maximo ID’ field with no value.
IA-FMS - Navigation

Maximo Help Menu
1
1. Click on the word ‘Help’
2
2. The ‘Help’ support is based on the application the user is currently in. If the user was working it the ‘IA Deferred Maintenance Tracking’ app. Then the ‘Help’ will reflect this application.
IA-FMS - Navigation

Start Center Help
IA-FMS - Navigation

Field Help
In Order to look up information about a particular filed simply place the curse in the field and select the keys ‘ALT-F1’ at the same time. This will display the database table and column information plus any description concerning the purpose of the field.
IA-FMS - Navigation

Searching for Records – List Tab
1
2
1. Every application in IA-FMS opens up with a ‘List’ tab. This is the first screen you will see when you access any application.
2. All the fields boxed in RED are searchable (this applies to the ‘List’ tab Only). If the user wants to retrieve all available records then the user should place their curser in the first box (in this case is would be the ‘Asset’ field) and hit Enter on your keyboard. This will retrieve all the records you currently have access to in that application.
IA-FMS - Navigation

Searching for Records - Advanced Search
1
2
1. In the upper left corner on the ‘List’ tab of every application is the ‘Advanced Search’ option. After clicking on the word ‘Advanced Search’ a pop up will appear.
2. This pop-up provides additional fields the user can use to narrow down the search by adding greater detail to the search information.
IA-FMS - Navigation

IA-FMS - Navigation
Search Operators and Wildcards
These operators can be used in all ‘Searchable’ fields in IA-FMS:
• Equal ( = ) finds only records that match that word or number exactly
• Greater Than ( > ) finds records greater than the number
• Less Than ( < ) finds records less than the number
• NULL values are found using ~null~
• Any value that is not NULL are found using !=~null~
• Underscore ( _ ) substitutes for a single character.
• Percent sign ( % ) substitutes for a string of characters

Saved Queries
1 2
1. Once a user has performed a search for records and decides to save the search it can be saved for future use by creating a ‘Saved Query’
2. To save a query select ‘Saved Query’.
IA-FMS - Navigation

Saved Queries
1
2 3
4 5
6
1. Enter a query name in the ‘Query Name’ field 2. Enter that same name in the query ‘Description’ field 3. If you check the box ‘Public?’ then all users who log into IA-FMS will
be able to user the query. 4. If you check ‘Default?’ the every time you view data in this application
it will reflect only the records found by this query (not a good idea). 5. If you leave both boxes unchecked then you will be the only one to
see and use this query. 6. Click ‘OK’ when you are finished.
IA-FMS - Navigation

Attached Documents
1
Attachments allow users to attach a document such as a: PDF, JPEG, Work Doc. as well as web pages to a individual record. 1. Click on the ‘Attachments’ icon. This will usually be in the upper right corner of the screen.
2
2. Select ‘Add New File’ to add an new record.
IA-FMS - Navigation

Attached Documents – Adding a Document
1
2
3
4
1. Select a Folder. 2. Specify a File. 3. Name the Document. 4. Click ‘OK’.
IA-FMS - Navigation

Attached Documents – Viewing a Document
1
2
1. Click on the word ‘Attachments’
2. The menu below will appear. Then select the record you would like to view.
IA-FMS - Navigation

Bookmarks – Bookmarking a record
1
‘Bookmarks’ allow a user to mark a record they may need to access on a regular basis. Records that are ‘Bookmarked’ are only view by the user. No one else can see a users ‘Bookmarked’ records. 1. To ‘Bookmark’ a record simple click on the ‘Bookmark’ icon associated with the
record.
IA-FMS - Navigation
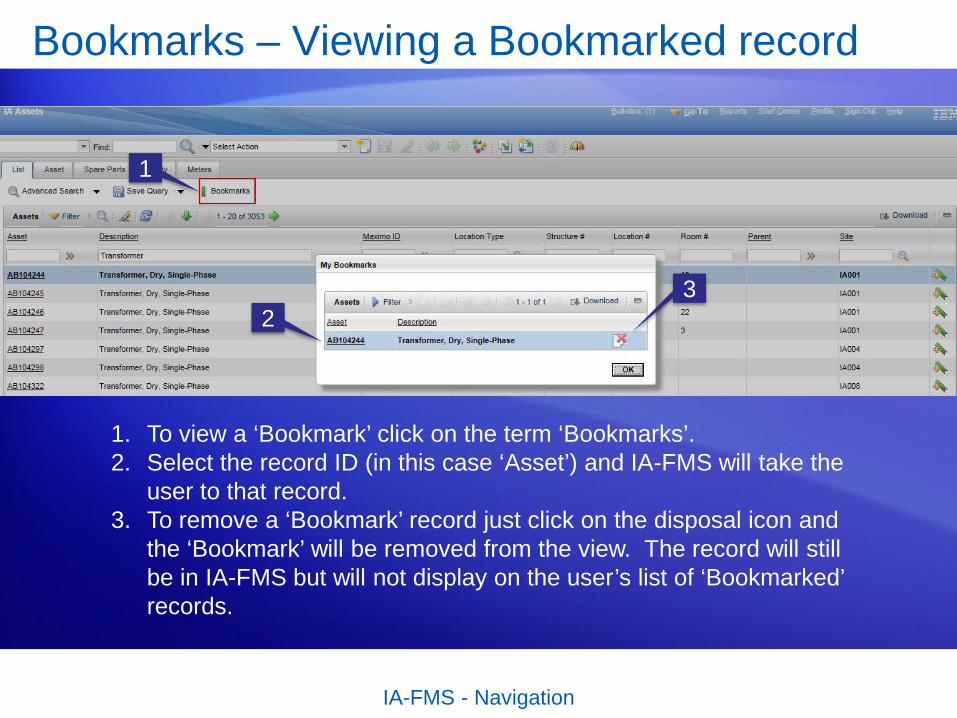
Bookmarks – Viewing a Bookmarked record
1
2 3
1. To view a ‘Bookmark’ click on the term ‘Bookmarks’. 2. Select the record ID (in this case ‘Asset’) and IA-FMS will take the
user to that record. 3. To remove a ‘Bookmark’ record just click on the disposal icon and
the ‘Bookmark’ will be removed from the view. The record will still be in IA-FMS but will not display on the user’s list of ‘Bookmarked’ records.
IA-FMS - Navigation

Demo
Maximo Navigation