individual type 1 npi application procedure - maryland · individual type 1 npi electronic...
TRANSCRIPT

Individual Type 1 NPI Electronic Application To Begin the Application Process Log into the National Plan and Provider Enumeration System (NPPES) at https://nppes.cms.hhs.gov
• Using your mouse select National Provider Identifier(NPI)
Page 1 of 15 Created by cmiles on 6/1/2006 8:40 AM

Initially you want to click “Apply Online for an NPI” In the future to view or make updates to your NPI data:
• click one of the following: Login – to view or update NPI data Create Login to View or Update your NPI Data - to create a User Id for an existing NPI
Page 2 of 15 Created by cmiles on 6/1/2006 8:40 AM

To begin completing online application, Click the “Begin Application Form” button
Page 3 of 15 Created by cmiles on 6/1/2006 8:40 AM

Select NPI User ID and Password Screen *Indicates Required Fields *NPI User ID – must be 6-12 characters and unique within the NPI System *NPI Password - must be 6-12 characters, contain at least one number, one letter, no special characters (this password can be used repeatedly when completing NPI applications) *Select Secret Question: this is the question that must be answered in the event that your password is forgotten. Choose a question from the drop down list *Answer: provide an answer to the question that you will remember Select Entity Type Screen
• Select Type 1 for individual provider
Page 4 of 15 Created by cmiles on 6/1/2006 8:40 AM

Page 5 of 15 Created by cmiles on 6/1/2006 8:40 AM
Individual Profile Page Screen * Indicates Required Fields *Provider Name – full legal name, must match name on file with Social Security Administration Other Name – Other first or last names by which the provider is or has been known; such as a maiden name *Date of Birth - must match DOB on file with Social Security Administration *Social Security Number - enter provider’s 9 digit SSN without dashes *State of Birth- required if country of birth is U.S. *Country of Birth – Country in which the provider was born; select from the “Country of Birth” drop down list. *Gender – provider’s gender

Individual Mailing Address Page Screen * Indicates Required Fields *Address Line 1 – required for NPPES to resolve any issues that may arise during the application review *City/State/Zip Mailing Address Standardization Page Screen In order to ensure the optimum performance of the system; all domestic addresses are standardized. Ex: “Avenue” is changed to “Ave.” If NPPES verifies the address, standardization results will be displayed Choose “Accept Standardized Address”- this will replace your input with the standardized address. If you choose “Use Input Address” this will delay the enumeration process.
Page 6 of 15 Created by cmiles on 6/1/2006 8:40 AM

Practice Location Page Screen *Indicates Required Fields *Address Line 1 – provide information on the address of the provider’s primary practice location *City/State/Zip Practice Location Standardization Page Screen If NPPES verifies the address, standardization results will be displayed. Choose “Accept Standardized Address”- this will replace your input with the standardized address. If you choose “Use Input Address” this will delay the enumeration process.
Page 7 of 15 Created by cmiles on 6/1/2006 8:40 AM

Other Identification Numbers Page Screen Provide any provider identification or billing numbers currently in use or formerly used by the provider
• Click “Add Identifier” button
• Enter provider’s UPIN, Medicare PIN and MA number. Select from the “Type” drop down list, and then select the corresponding state from the
“State” drop down list. • Click the “Save” button to enter the identifier
into the system. For multiple identifiers, click the “Save & Add Another” button.
After clicking the “Save” button you will be returned to the Other Identification Numbers Page (displayed to the right), where the identification number you added will be displayed in a table.
Page 8 of 15 Created by cmiles on 6/1/2006 8:40 AM
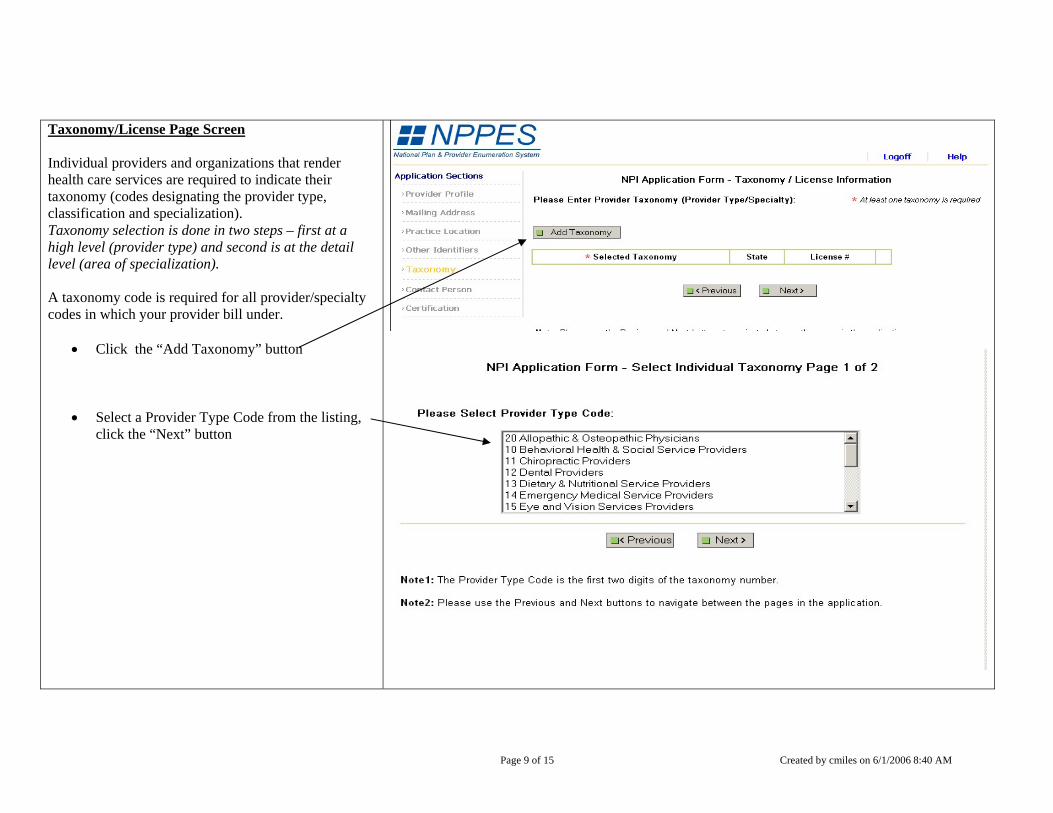
Taxonomy/License Page Screen Individual providers and organizations that render health care services are required to indicate their taxonomy (codes designating the provider type, classification and specialization). Taxonomy selection is done in two steps – first at a high level (provider type) and second is at the detail level (area of specialization). A taxonomy code is required for all provider/specialty codes in which your provider bill under.
• Click the “Add Taxonomy” button • Select a Provider Type Code from the listing,
click the “Next” button
Page 9 of 15 Created by cmiles on 6/1/2006 8:40 AM

Select Taxonomy Page 2 Screen
• Select appropriate taxonomy code from the
listing
• Enter state license information for the taxonomy code selected
• Click the “Save” button
After you have made your taxonomy selection, a table will display the selected taxonomies, along with relevant state license information. To remove a previously selected taxonomy, click the “Delete” button for that taxonomy to remove it from the system.
• Click the “Next” button to continue Note: A limit of 15 taxonomies can be added to an application.
Page 10 of 15 Created by cmiles on 6/1/2006 8:40 AM

Contact Person Page Screen The contact person is the person who will be contacted if any questions regarding the NPI application or changes in the NPS data. This is the person who will be notified of your NPI assignment via email at the email address that you provide on this page. *Indicates Required Fields *Contact information – name, phone number and email address of credentialing liaison.
Page 11 of 15 Created by cmiles on 6/1/2006 8:40 AM

Certification Page Screen Before your application or change request is accepted, you will be required to read the certification statement and check the box to indicate that you accept the terms of the application.
• Click the “Submit” button The next page will be the processing page which contains your tracking number. Be sure to print this page for your records as the tracking number will be required for all correspondence thereafter.
Page 12 of 15 Created by cmiles on 6/1/2006 8:40 AM

NPI Application Help Screen The expected response time from Web NPI applications will be between 24 hours and 5 days, assuming there were no issues with the information submitted. If the contact person does not receive the provider’s NPI via email within 5 working days, please contact the NPI Enumerator at 1-800-465-3203.
Page 13 of 15 Created by cmiles on 6/1/2006 8:40 AM

To View or Update Your NPI Data (pending completion of application process) Log into the National Plan and Provider Enumeration System (NPPES) website https://nppes.cms.hhs.gov
• select the “National Provider Identifier(NPI)” from page 1
• select Login This screen will display Enter the NPI User ID and Password that you initially created for the provider that you are updating. After successfully logging in, the View/Modify function allows the Self-Service User to navigate, browse or update NPI System data. Requests for reactivation or replacement, updates to SSN, ITIN and DOB fields are not permitted via the Self-Service interface.
Page 14 of 15 Created by cmiles on 6/1/2006 8:40 AM

To View or Update NPI Data (After NPI has been received) Log into the National Plan and Provider Enumeration System (NPPES) website https://nppes.cms.hhs.gov
• select the “National Provider Identifier(NPI)” from page 1
• select Create Login to View or Update your NPI Data
This screen will display Enter the NPI number received for the provider that you are updating and other pertinent information.
Page 15 of 15 Created by cmiles on 6/1/2006 8:40 AM