industrial pumps rebuild and maintenance guide to the final assembly of the pump casing and...
TRANSCRIPT

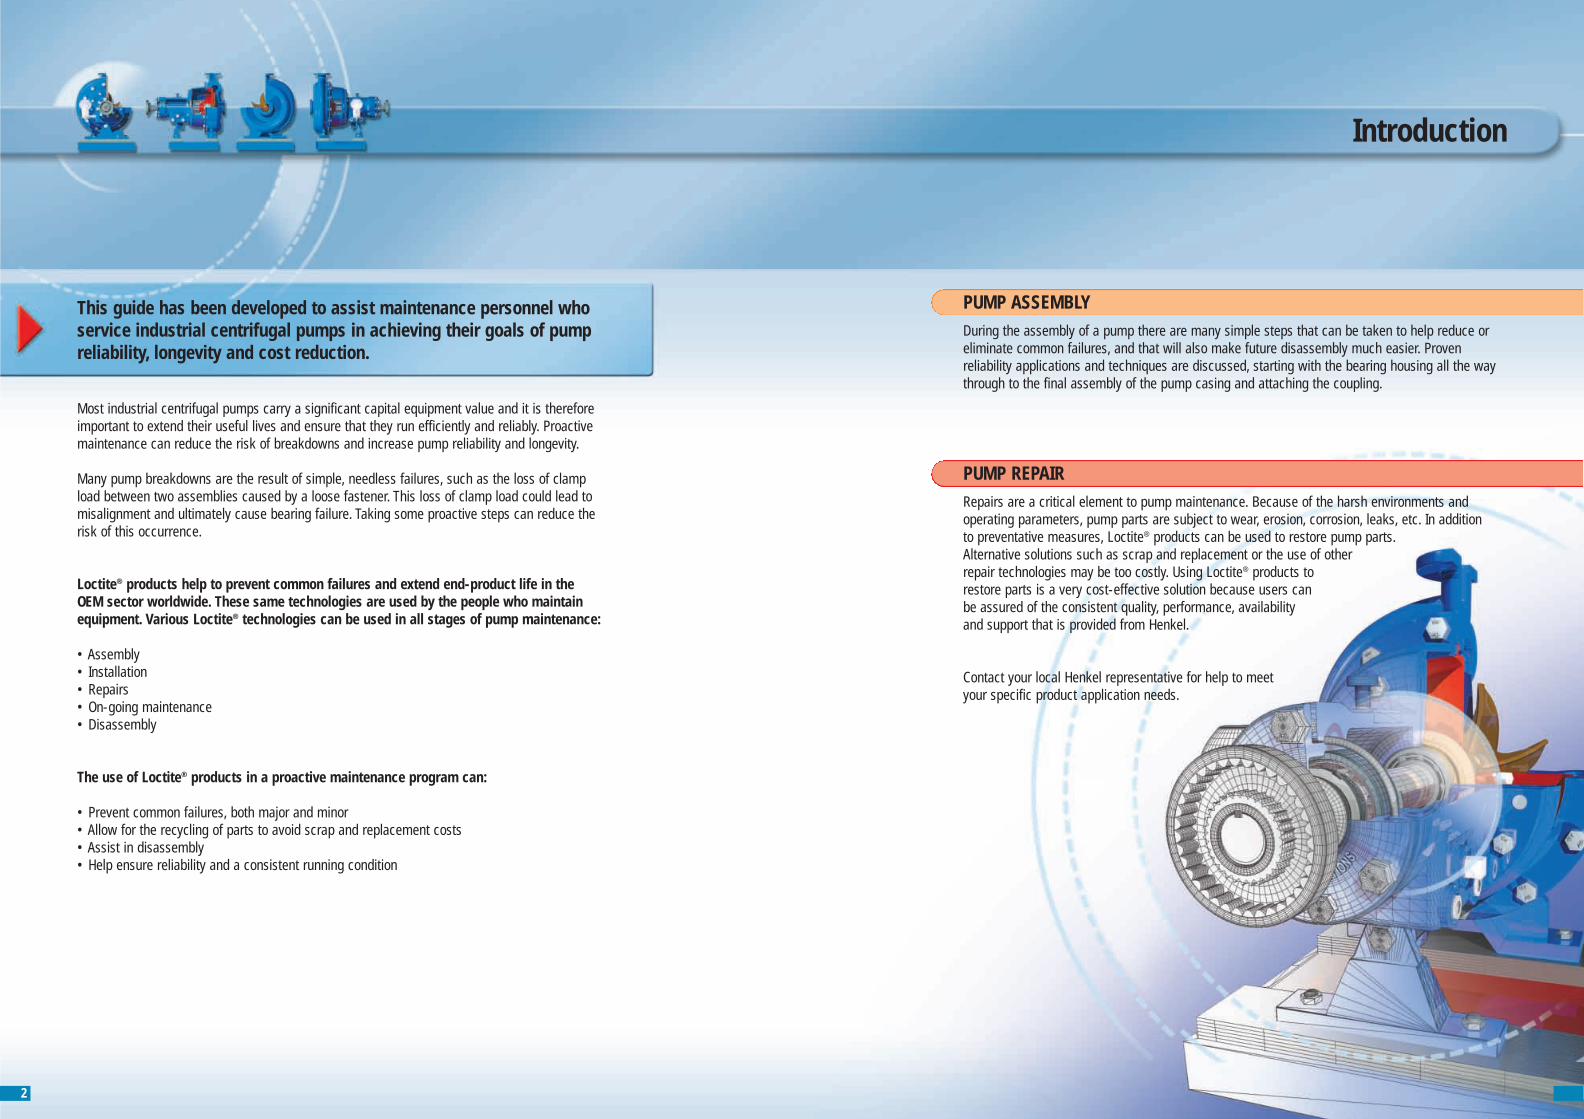
Industrial PumpsRebuild and Maintenance Guide
2
Introduction
This guide has been developed to assist maintenance personnel whoservice industrial centrifugal pumps in achieving their goals of pumpreliability, longevity and cost reduction.
Most industrial centrifugal pumps carry a significant capital equipment value and it is thereforeimportant to extend their useful lives and ensure that they run efficiently and reliably. Proactivemaintenance can reduce the risk of breakdowns and increase pump reliability and longevity.
Many pump breakdowns are the result of simple, needless failures, such as the loss of clamp load between two assemblies caused by a loose fastener. This loss of clamp load could lead tomisalignment and ultimately cause bearing failure. Taking some proactive steps can reduce the risk of this occurrence.
Loctite® products help to prevent common failures and extend end-product life in the OEM sector worldwide. These same technologies are used by the people who maintainequipment. Various Loctite® technologies can be used in all stages of pump maintenance:
• Assembly• Installation• Repairs• On-going maintenance• Disassembly
The use of Loctite® products in a proactive maintenance program can:
• Prevent common failures, both major and minor• Allow for the recycling of parts to avoid scrap and replacement costs• Assist in disassembly• Help ensure reliability and a consistent running condition
PUMP ASSEMBLYDuring the assembly of a pump there are many simple steps that can be taken to help reduce oreliminate common failures, and that will also make future disassembly much easier. Proven reliability applications and techniques are discussed, starting with the bearing housing all the waythrough to the final assembly of the pump casing and attaching the coupling.
PUMP REPAIRRepairs are a critical element to pump maintenance. Because of the harsh environments and operating parameters, pump parts are subject to wear, erosion, corrosion, leaks, etc. In addition to preventative measures, Loctite® products can be used to restore pump parts.Alternative solutions such as scrap and replacement or the use of otherrepair technologies may be too costly. Using Loctite® products to restore parts is a very cost-effective solution because users canbe assured of the consistent quality, performance, availability and support that is provided from Henkel.
Contact your local Henkel representative for help to meetyour specific product application needs.

4 54 5
Table of Contents
PUMP APPLICATION DIAGRAM 6
PUMP ASSEMBLY 8
BEARING FRAME AND HOUSING 8• Prevent oil leaks from threaded assemblies 8• Prevent leaks and seizures between the bearing housing and oil seal 10• Keeping o-rings pliable to ensure a proper seal 12• Prevent corrosion and seizure of power end jack bolts, jam nuts and clamp bolts 14• Prevent bearing spinout, corrosion and component damage 16
FRAME ADAPTER 18• Prevent oil leaks between the frame adapter and the oil seal 18• Prevent dowel pins from seizing to the bearing frame and frame adapter 20• Prevent gasket failure between the bearing frame and frame adapter 22• Prevent fastener loosening and corrosion to frame adapter mounting bolts 24
GLAND ASSEMBLY 26• Prevent corrosion and seizure of packaging gland nuts 26• Prevent seizure and loosening of gland studs 28• Prevent corrosion within the gland flushing connector 30
PUMP CASING 32• Prevent the frame adapter, stuffing box and casing from seizing together 32• Prevent leaks between the stuffing box and casing 34• Prevent corrosion and seizure of the pump casing bolts 36
IMPELLER 38• Prevent seizure of the impeller to the shaft 38
KEYWAYS / KEY STOCK 40• Prevent keyway wallow by securing the key stock in the keyway – new components 40• Stop keyway wallow and prevent downtime and scrap costs – worn components 42
COUPLING 44• Prevent coupling from loosening or moving, resulting in disengagement,
damage, or misalignment 44
PUMP BASE MOUNTING 46• Prevent pump mounting bolts from losing clamp load, leading to misalignment 46
PUMP REPAIR 48
PRODUCTS INDEX 60
OIL SEEPAGE• Prevent oil loss from seepage 48
CASING / IMPELLER WEAR• Rebuild worn areas to restore pump casing and impellers 50
SHAFT WEAR• Restore worn shaft to the original condition 54
KEYWAY WALLOW• Repair wallowed out keyways 56
CORROSION• Prevent corrosion damage to external parts 58

Industrial Pump Applications
6 7
Prevent fretting and corrosion while securingbearings with Loctite® 641Retaining Compound.See page 16
Make any size gasket withLoctite® 518 Flange Sealant.See page 34
Protect pump against chemical attack and erosion with Loctite® Nordbak® 7221 Chemical Resistant Coating.See page 52 + 58
Rebuild and protect worn voluteswith Loctite® Nordbak® 7218Wearing Compound and/or Loctite® Nordbak® 7227 or 7228 Brushable Ceramics.See page 52
Restore, coat, and protect impellervanes with Loctite® Nordbak® 7227or 7228 Brushable Ceramics.See page 52
Prevent corrosion and seizure of glandassembly nuts and seizure of the impeller to the shaft with Loctite® 8023Marine Grade Anti-Seize.See page 26
Rebuild worn shafts with Loctite®
3478 Superior Metal.See page 54
Seal and protect flushing connectors with Loctite® 572 Thread Sealant.See page 30
Prevent corrosion and secure casing bolts and adapter bolts with Loctite® 243 Threadlocker.See page 24
Keep mounting bolts tight with Loctite® 2701 Threadlocker.See page 46
Lubricate and prevent damage to o-rings with Loctite® 8104.See page 12
Secure and prevent leakage between oil seals and housing with Loctite® 243 or Loctite® 248Threadlockers.See page 10 + 18
Prevent set screws from working loose with Loctite® 222 or Loctite® 243 Threadlockers.See page 44
Prevent key wallow with Loctite® 243Threadlocker or repair key wallow with Loctite® 660 Retaining Compound.See page 40 + 42
Prevent rust and seizureof power end bolts withLoctite® 8023 Marine Grade Anti-Seize.See page 14
Seal threaded fittings with Loctite® 577 or Loctite® 572 ThreadSealants.See page 8

CHALLENGE
8 9
Prevent oil leaksfrom threaded assemblies
Bearing Frame and Housing
Cause:• Drain plugs, oiler nipples, fittings, etc. all have air space between the
threads and can weep oil out from the bearing housing• Constant pressure changes within the bearing housing can force these
threaded assemblies to leak
Seal threaded assemblies with Loctite® 577 or 572 Thread Sealants• Loctite® 572 Thread Sealant is designed to cure only when enclosed in metal, such as in a threaded assembly• Once cured, moisture and oil cannot penetrate this barrier as the pressure changes within the bearing housing• The thread sealant prevents fittings from loosening, yet allows for easy disassembly with normal hand tools• Use Loctite® 577 for instant low pressure seal
Steps:1. Clean parts of contamination with Loctite® 7063. If necessary, spray Loctite® 7649 Primer or Loctite® 7240 Activator
onto threaded parts (male and female), allow to dry2. Apply a band of Loctite® 572 Thread Sealant to male threads starting one to two threads from end of fitting3. Assemble parts as per OEM specifications
SOLUTION
• Less oil consumption, thereby reducing the risk of the pump running low on lubricant
• Elimination of the potential hazards and clean up associated with oil leaks
• Elimination of seized fittings because moisture and air have been sealed out
• Elimination of rust and corrosion within the thread space• Contaminants prevented from getting into the oil through
the gaps in the threads
RESULTS

CHALLENGE
Prevent leaks and seizures betweenthe bearing housing and oil seal
Bearing Frame and Housing
Cause:• As with any press fit, there are small air spaces between the housing
and the oil seal. This air space can create a leak path where corrosion can form
Fill the air spaces by applying a Loctite® 243 or 248 MediumStrength Threadlocker to the outside diameter of the oil seal
Steps:1. Clean the outside diameter of the oil seal and the inside diameter of the bearing housing with
Loctite® 7063 Cleaner & Degreaser2. Apply Loctite® 243 or 248 Medium Strength Threadlocker to the outside diameter of the oil seal3. Wipe off any excess and press into housing using normal techniques
SOLUTION
RESULTS• A sealed assembly eliminates leaks, contamination,
and corrosion• Elimination of clean up and hazards associated with
oil seal leaks• Less oil consumption• Reduced risk of running low on lubricant• Service of the pump is easier• The oil seal can be easily removed with a screwdriver
during the next overhaul
10 11

CHALLENGE
Keeping o-rings pliable to ensurea proper seal
Bearing Frame and Housing
Cause:• The typical pump environment is very humid and water washout
can remove lubricants from the o-ring• When adjustments are made to the impeller this creates sliding abrasion
and potential damage to the o-ring and ultimately leads to the loss of sealing
• O-rings cannot be serviced once installed and may begin to dry out
Lubricate o-rings with Loctite® 8104 Food Grade Silicone Grease• Loctite® 8104 Food Grade Silicone Grease provides good lubrication over extended periods of time and has
excellent water washout resistance
Steps:1. Clean o-ring to remove any grit or contaminants2. Apply Loctite® 8104 Food Grade Silicone Grease to the o-ring by smearing it to completely cover the entire surface3. Slide o-ring over the bearing housing and into the o-ring groove
SOLUTION
• Lubricated o-rings remain pliable and capable of sealing oil in and contaminants out
• O-rings prevented from adhering to the bearing frame
12 13
RESULTS

CHALLENGE
Prevent corrosion and seizureof power end jack bolts, jam nutsand clamp bolts
Bearing Frame and Housing
Cause:• Any exposed metal parts on a pump that are not stainless or coated, such
as power end nuts and bolts, are subject to rust. When rust forms within the air space between the threads, the bolts will seize in place
Apply Loctite® 8023 Marine Grade Anti-Seize to the power end bolts• Loctite® 8023 Marine Grade Anti-Seize is metal-free and has superior water washout resistance
Steps:1. Apply Loctite® 8023 Marine Grade Anti-Seize liberally to the bolt threads2. Assemble jam nuts onto the bolts3. Thread the bolts into the bearing housing and adjust as required
SOLUTION
• Easy adjustment of bolts when needed to ensure that the pump runs closest to its BEP [Best Efficiency Point]
• Easy disassembly/removal of bolts
1514
RESULTS

CHALLENGE
Prevent bearing spinout, corrosionand component damage
Bearing Frame and Housing
Cause:• Bearings are prone to spinning either on their shafts or within their housings, resulting
in damage to these parts regardless of whether or not they have been pressed, shrink or slip fitted in place
• The air space that exists between a bearing and shaft is an area where rust can form and cause damage to the parts
Apply a coating of Loctite® 641Retaining Compoundto the outside diameter of the outboard bearing• Loctite® 641 Retaining Compound is low strength,
which allows for easy disassembly during future overhauls
Steps:1. Clean parts with Loctite® 7063 Cleaner & Degreaser.2. Apply a coating of Loctite® 641 Retaining Compound
to the outside diameter of the outboard bearing3. Assemble using normal techniques
Inboard Bearing – Apply Loctite® 641 Retaining Compound to the inside diameter of the inboard bearing
Steps:1. Clean parts with Loctite® 7063 Cleaner & Degreaser.2. Apply a bead of Loctite® 641 Retaining Compound to
the circumference of the shaft at the leading area of engagement
3. Press the bearing onto the shaft using normal techniques
4. Wipe off any excess material
SOLUTION #1 SOLUTION #2
• Shaft and/or bearing housing damage is eliminated• Bearings are easily removed with standard tools• Corrosion (the brown smudge left on a shaft after a bearing
has been removed is rust) is eliminated because the air space between the bearing and the shaft or housing is sealed
1716
RESULTS

CHALLENGE
18 19
Prevent oil leaks between theframe adapter and the oil seal
Frame Adapter
Cause:• The small air spaces between the adapter and
the oil seal can allow oil to leak
Fill the air spaces by applying a Loctite® 243 or 248 MediumStrength Threadlocker to the outside diameter of the oil lip seal• A Loctite® Medium Strength Threadlocker allows the oil seal to be easily removed with a screwdriver during
the next overhaul
Steps:1. Clean the outside diameter of the oil seal and the inside diameter of the frame adapter with
Loctite® 7063 Cleaner & Degreaser2. Apply Loctite® Medium Strength Threadlocker to the outside diameter of the oil seal3. Wipe off any excess and press into the adapter using normal techniques and tools
SOLUTION
• Elimination of leaks along with associated clean up and hazards.• Less oil consumption• Reduced risk of running low on lubricant.• Ease of pump service• Elimination of leaks, contamination, and corrosion due to a
unitized assembly
RESULTS

CHALLENGE
Prevent dowel pins fromseizing to the bearing frameand frame adapter
Frame Adapter
Cause:• The dowel pins are exposed to the exterior pump environment and if not
protected can rust and seize themselves to the bearing frame. When these pins seize in the bearing frame the disassembly becomes very difficult
Before assembly, apply Loctite® 8023 Marine Grade Anti-Seizeto the dowel pins • Loctite® 8023 Marine Grade Anti-Seize Compound provides a protective coating to parts that are exposed to
severe heat and moisture
Steps:1. Clean the parts2. Apply Loctite® 8023 Marine Grade Anti-Seize to the pins3. Assemble adapter to the bearing frame
SOLUTION
• Prevention of rust and seizure of these close fitting parts
• The bearing frame and frame adapter will be easier to separate during the next disassembly
20 21
RESULTS
CHALLENGE
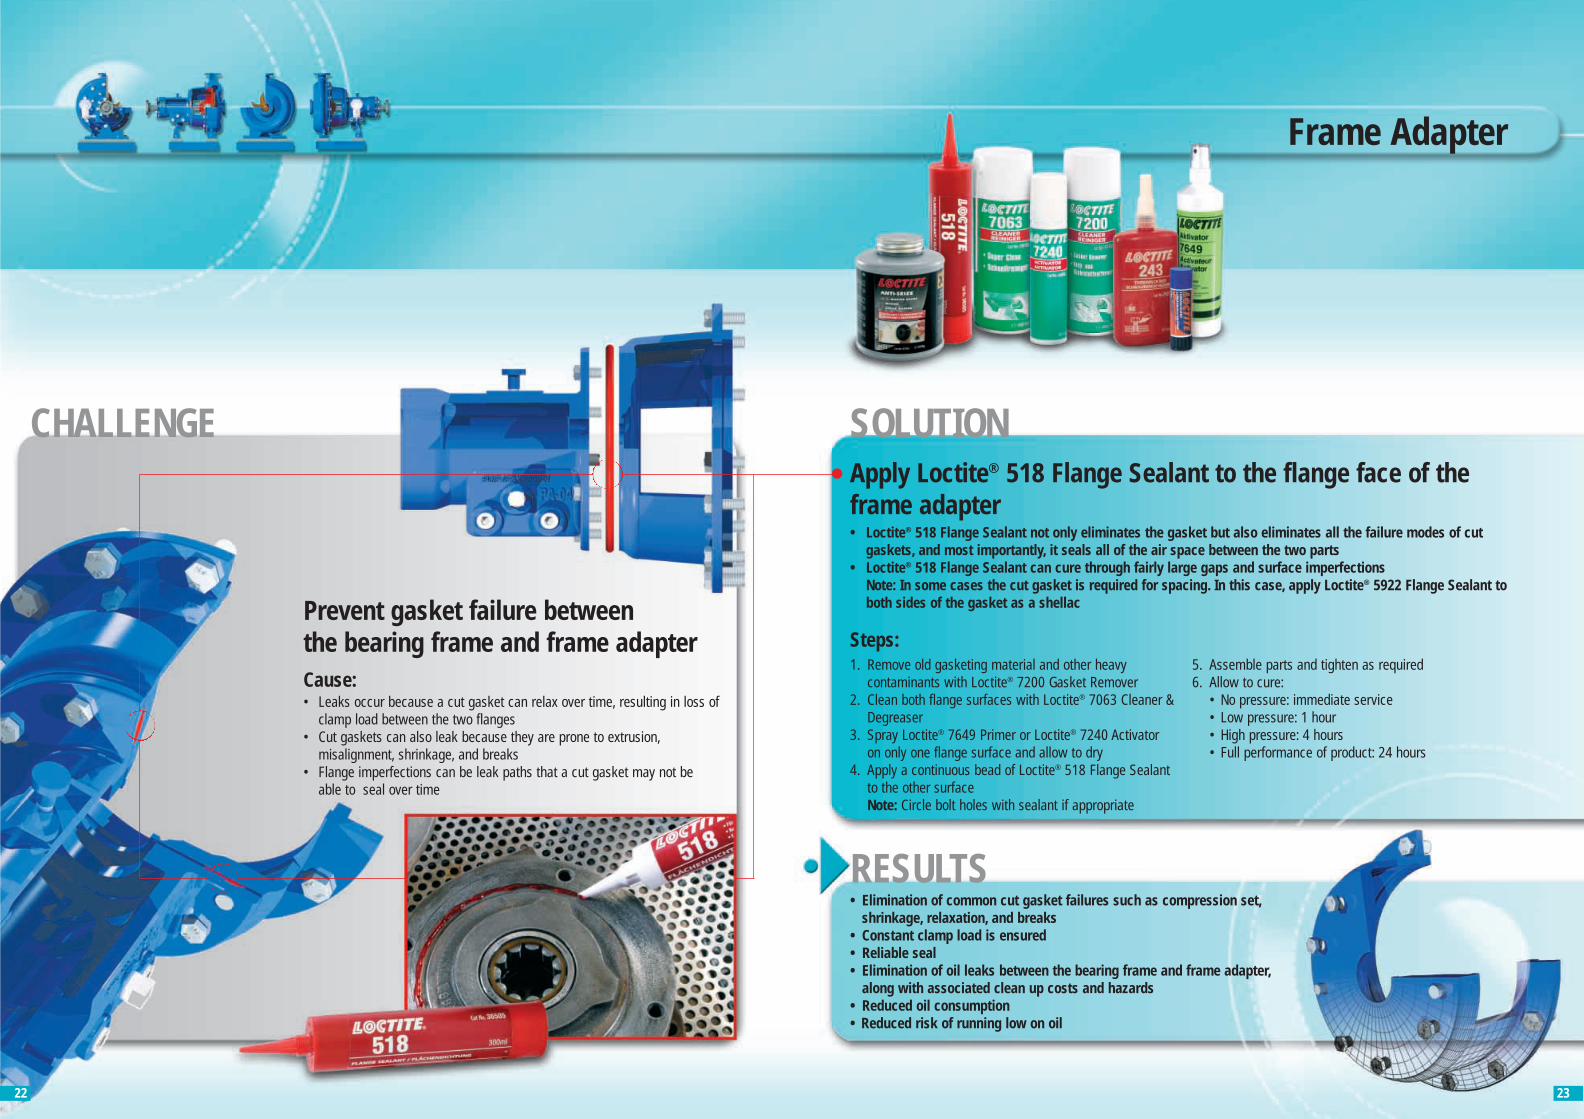
Prevent gasket failure between the bearing frame and frame adapter
Frame Adapter
Cause:• Leaks occur because a cut gasket can relax over time, resulting in loss of
clamp load between the two flanges• Cut gaskets can also leak because they are prone to extrusion,
misalignment, shrinkage, and breaks• Flange imperfections can be leak paths that a cut gasket may not be
able to seal over time
Apply Loctite® 518 Flange Sealant to the flange face of theframe adapter• Loctite® 518 Flange Sealant not only eliminates the gasket but also eliminates all the failure modes of cut
gaskets, and most importantly, it seals all of the air space between the two parts• Loctite® 518 Flange Sealant can cure through fairly large gaps and surface imperfections
Note: In some cases the cut gasket is required for spacing. In this case, apply Loctite® 5922 Flange Sealant toboth sides of the gasket as a shellac
Steps:
SOLUTION
• Elimination of common cut gasket failures such as compression set,shrinkage, relaxation, and breaks
• Constant clamp load is ensured • Reliable seal• Elimination of oil leaks between the bearing frame and frame adapter,
along with associated clean up costs and hazards• Reduced oil consumption • Reduced risk of running low on oil
22 23
1. Remove old gasketing material and other heavy contaminants with Loctite® 7200 Gasket Remover
2. Clean both flange surfaces with Loctite® 7063 Cleaner &Degreaser
3. Spray Loctite® 7649 Primer or Loctite® 7240 Activator on only one flange surface and allow to dry
4. Apply a continuous bead of Loctite® 518 Flange Sealant to the other surface Note: Circle bolt holes with sealant if appropriate
5. Assemble parts and tighten as required6. Allow to cure:
• No pressure: immediate service• Low pressure: 1 hour• High pressure: 4 hours• Full performance of product: 24 hours
RESULTS
CHALLENGE
Prevent fastener looseningand corrosion to frame adaptermounting bolts
Frame Adapter
Cause:• Bolts can work themselves loose because they are always under strain
caused by torque. Also, vibration, thermal expansion and contraction, and shock all contribute to loosening and reduction of clamp load
Apply Loctite® 243 or 248 Medium Strength Threadlocker to the frame adapter bolts
Steps:1. Clean threads with Loctite® 7063 Cleaner & Degreaser2. Apply several drops of Loctite® Medium Strength Threadlocker to the adapter bolts3. Assemble and tighten as usual
SOLUTION
• Prevention of the bolts from rusting and seizing in place because a Loctite® threadlocker will seal all of the air space within the threads
• Easy and consistent disassembly• Prevention of bolts from loosening• Torque and clamp load is maintained• Proper clamp load is ensured between flange surfaces
(when Loctite® 518 Flange Sealant is used instead of a cut gasket) which eliminates leaks
2524
RESULTS

CHALLENGE
26 27
Prevent corrosion and seizureof packing gland nuts
Gland Assembly
Cause:• The gland assembly is subject to severe corrosion and seizure because of
the continuous flow of water that lubricates and cools the packing. Thiscontinuous flow of water also causes the gland studs and nuts to rust andseize
• If the nuts seize to the studs, it becomes impossible to properly adjust thegland follower and ultimately, proper lubrication and cooling cannot be maintained. This can lead to the packing running dry, overheating andsubsequent wearing and gouging of the shaft. What starts out as a simplefailure mode of a corroded threaded assembly can lead to a major failureof one of the main pump components
Apply Loctite® 8023 Marine Grade Anti-Seize to the studs• Loctite® 8023 Marine Grade Anti-Seize is metal-free and is designed to have superior
water washout resistance, a key feature in a gland application
Steps:1. Clean the parts2. Apply Loctite® 8023 Marine Grade Anti-Seize to the studs3. Assemble gland nuts and adjust gland follower as necessary
SOLUTION
• Elimination of gland nuts freezing to the studs• Proper adjustments can be made to the gland follower• Water can properly flow through the packing
for lubrication and cooling• Excessive shaft wear can be prevented
RESULTS

Prevent seizureand loosening of gland studs
Gland Assembly
Cause:• Just as the gland nuts can rust and seize to the gland studs, so can the
gland studs rust and seize to the stuffing box. If the nuts were to seize to the studs, the torque required to remove them could cause the studs to back out
Apply Loctite® 2701 High Strength Threadlocker
Steps:1. Place several drops of Loctite® 2701 High Strength Threadlocker down the side of the female threads2. Apply several drops of Loctite® 2701 Threadlocker onto the stud threads3. Install the studs
• Eliminated potential for corrosion• Eliminated possibility of the studs
backing out during gland adjustments
28 29
CHALLENGE SOLUTION
RESULTS

CHALLENGE
Prevent corrosionwithin the gland flushing connector
Gland Assembly
Cause:• Whether using a mechanical seal or packing, these components are
typically cooled and lubricated by either a product flush or an externalflush. In either case, the flushing connector is prone to corrosion andseizure. This is especially true for pumps configured with packing. Sincepacking typically requires 40–60 drops per minute for proper coolingand lubrication, there is plenty of available moisture for rust to attack thegland assembly components
Apply Loctite® 572 Thread Sealant• Loctite® 572 Thread Sealant fills the air space within the threads• Allows the flushing connector to be removed with normal hand tools when necessary
Steps:1. Clean the parts with Loctite® 7063 Cleaner & Degreaser2. Apply a band of Loctite® 572 Thread Sealant to male threads starting one to two
threads from the end of the fitting3. Assemble parts snugly. Do not overtighten
SOLUTION
• Prevention of leaks and corrosion• Eliminated seizure• Ensured easy maintenance of flushing connectors
30 31
RESULTS

CHALLENGE
32 33
Prevent the frame adapter,stuffing box and casing fromseizing together
Pump Casing
Cause:• When assembling these components, there are areas where the
clearance is very tight. These small clearances are areas where rust and corrosion can work in to seize the components together, making disassembly very difficult
Apply Loctite® 8023 Marine Grade Anti-Seize compoundduring assembly• Loctite® Anti-Seize compounds have superior water washout resistance,
they will stay where they are applied
Steps:1. Clean the parts2. Apply Loctite® 8023 Marine Grade Anti-Seize to the outside diameter of the stuffing box at the mating point3. Assemble components as usual
SOLUTION
• Sufficient lubrication provided during assembly• Prevention of rust while in service• Efficient disassembly
RESULTS

Replace the cut gasket and apply Loctite® 518 Flange Sealant to the flange surface• Direct metal-to-metal contact along with the use of Loctite® 518TM Flange Sealant allows for a positive seal• Since there is metal-to-metal contact, proper clamp load can be maintained and the two parts become
unitized – they act as one
Steps:1. Remove old gasketing material with Loctite® 7200 Gasket Remover2. Clean both flanges with Loctite® 7063 Cleaner & Degreaser3. Spray Loctite® 7649 Primer or Loctite® 7240 Activator on only one surface and allow 1–2 minutes to dry4. Apply a continuous bead of Loctite® 518 Flange Sealant to the other surface
Note: Circle all bolt holes, if appropriate5. Assembly and tighten as required6. Allow to cure
34 35
CHALLENGE
Prevent leaks between thestuffing box and casing
Pump Casing
Cause:• The use of cut gaskets suffers from inherent problems, such as gasket
relaxation, shrinkage, extrusion, and breakage, which can lead to leaks
Coat the gasket material with Loctite® 5922 Flange Sealant• If there is not enough clearance between the impeller and the casing to eliminate the gasket, the cut gasket
must be used• Loctite® 5922 Flange Sealant will fill all the air space that cut gaskets simply cannot fill• Loctite® 5922 Flange Sealant will withstand expansion and contraction caused by pressure and temperature
changes
Steps:1. Remove old gasketing material with Loctite® 7200 Gasket Remover2. Clean both flanges with Loctite® 7063 Cleaner & Degreaser3. Spray Loctite® 7649 Primer or Loctite® 7240 Activator to both flange faces and both sides of the gasket.
Allow 1–2 minutes to dry4. Smear Loctite® 5922 Flange Sealant to both sides of the pre-cut gasket5. Assembly and tighten as required6. Allow to cure
SOLUTION #1
• Eliminated casing gasket leaks• Eliminated corrosion and damage
on the flange surface
SOLUTION #2
RESULTS

CHALLENGE
Prevent corrosion and seizureof the pump casing bolts
Pump Casing
Cause:• The severe pump environments of constant temperature, pressure,
and humidity changes result in corrosion • Casing bolts that are rusted and seized make pump maintenance
difficult and create additional labour associated with drilling and tapping the bolt hole
Apply Loctite® 243 Medium Strength Threadlocker in the boltholes prior to assembling the casing• Loctite® 243 Threadlocker fills all the air space within the threads
Steps:1. Place several drops of Loctite® 243 Medium Strength Threadlocker down the side of the female threads2. Apply several drops of Loctite® 243 Medium Strength Threadlocker onto the bolt threads3. Install bolts
SOLUTION
• Proper clamp load is maintained• Elimination of rust and seizure• Easy disassembly with normal hand tools
36 37
RESULTS
CHALLENGE
38 39
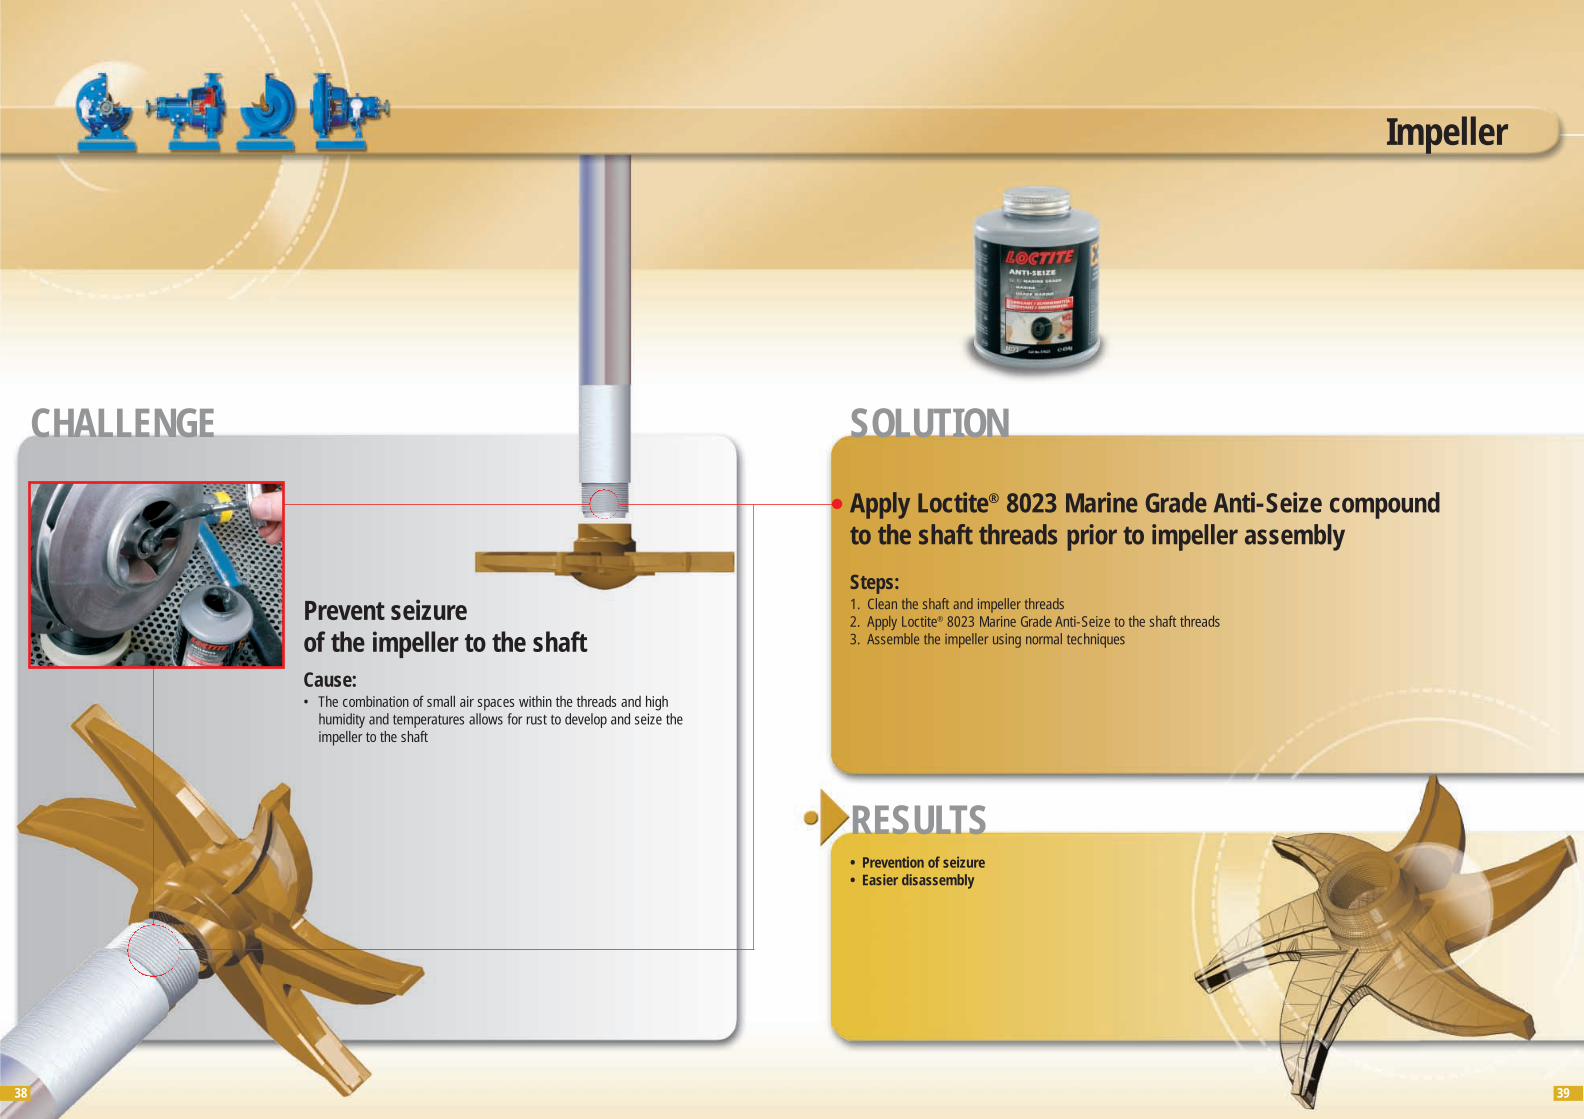
Prevent seizureof the impeller to the shaft
Impeller
Cause:• The combination of small air spaces within the threads and high
humidity and temperatures allows for rust to develop and seize the impeller to the shaft
Apply Loctite® 8023 Marine Grade Anti-Seize compound to the shaft threads prior to impeller assembly
Steps:1. Clean the shaft and impeller threads2. Apply Loctite® 8023 Marine Grade Anti-Seize to the shaft threads3. Assemble the impeller using normal techniques
SOLUTION
• Prevention of seizure • Easier disassembly
RESULTS

40 41
CHALLENGE
Prevent keyway wallow by securingthe key stock in the keyway –new components
Keyways / Key Stock
Cause:• In a new assembly the fit between the key stock and the keyway are
usually fairly tight. Over time the fit between the key stock and the keyway can loosen and lead to damage to the keyway
Proactively apply Loctite® 243 Medium Strength Threadlocker tothe keyway and then insert the key stock • The viscosity of a Loctite® Medium Strength Threadlocker is appropriate for the gap fill and provides the
proper amount of strength, while allowing for easy removal• If the key needs to be removed, simply use a hammer to tap a metal chisel or drift against the key stock to
pop it out of the keyway
Steps:1. Clean the keyway and key stock with Loctite® 7063 Cleaner & Degreaser2. Apply several drops of Loctite® 243 Medium Strength Threadlocker directly into the keyway3. Insert the key stock into the keyway
Note: Cover the shaft with a rag to prevent splatter when inserting the key stock4. Wipe off any excess threadlocker
SOLUTION
• Prevention of corrosion• Prevention of keyway wallow• A unitized assembly
RESULTS

CHALLENGE
Stop keyway wallow andprevent downtime and scrap costs –worn components
Keyways / Key Stock
Cause:• Over time, keyways can wear out if the key stock is not secured in
place, which results in keyway wallow. This is a common failure for power transmission components such as couplings, sprockets,sheaves, etc.
• If keyway wallow is allowed to perpetuate, further damage can result,such as a sheared key stock or damage to the coupling. If the key stock shears, the result is a loss of power transmission (i.e. the pump will stop running) and further damage to the shaft will occur
If the keyway has already been wallowed out, use Loctite®
660 Quick Metal Retaining Compound to stop the wallow andallow the components to return to service• Loctite® 660 Quick Metal Retaining Compound is a very thick product, which allows it to fill large gaps
Steps:1. Clean the keyway and key stock with Loctite® 7063 Cleaner & Degreaser2. Apply Loctite® 660 Quick Metal Retaining Compound into the keyway3. Assemble parts and wipe off excess
Note: If keyway wallow is severe, shims can be used on both sides of the keyways in conjunction with the Loctite® 660 Quick Metal Retaining Compound
SOLUTION
• Assembly is restored, unitized, and ready for service without a major overhaul
42 43
RESULTS
4544
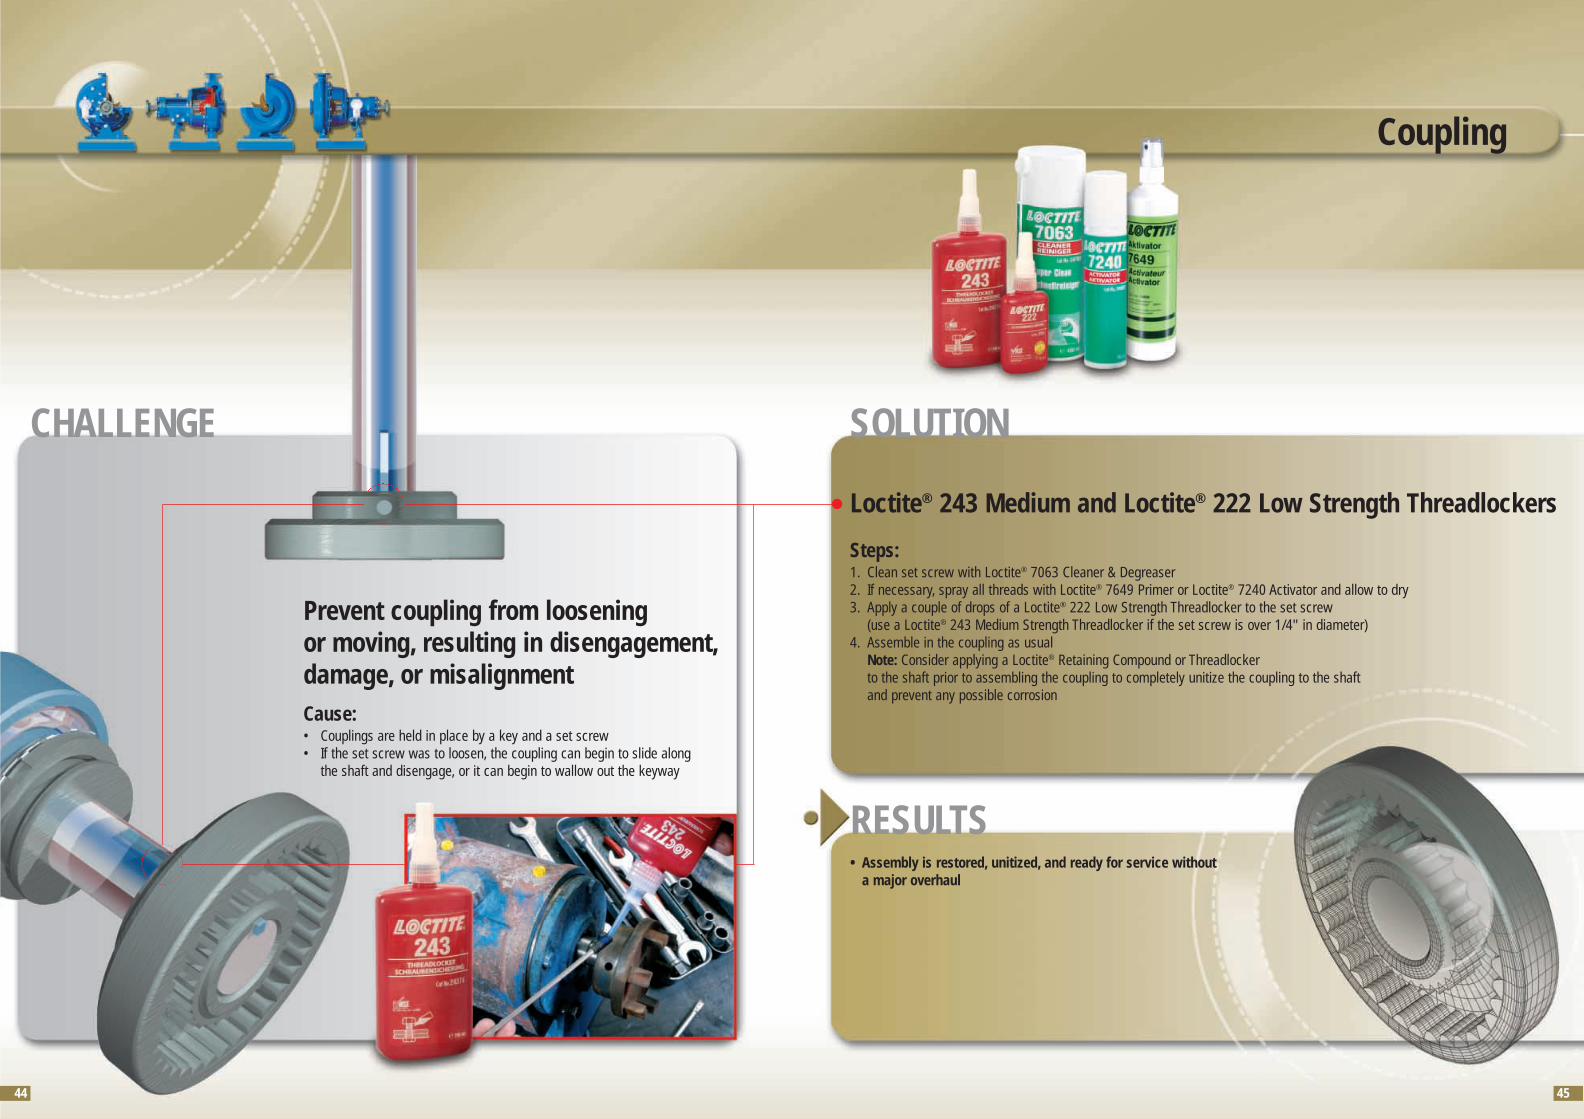
CHALLENGE
Prevent coupling from looseningor moving, resulting in disengagement,damage, or misalignment
Coupling
Cause:• Couplings are held in place by a key and a set screw• If the set screw was to loosen, the coupling can begin to slide along
the shaft and disengage, or it can begin to wallow out the keyway
Loctite® 243 Medium and Loctite® 222 Low Strength Threadlockers
Steps:1. Clean set screw with Loctite® 7063 Cleaner & Degreaser2. If necessary, spray all threads with Loctite® 7649 Primer or Loctite® 7240 Activator and allow to dry3. Apply a couple of drops of a Loctite® 222 Low Strength Threadlocker to the set screw
(use a Loctite® 243 Medium Strength Threadlocker if the set screw is over 1/4" in diameter)4. Assemble in the coupling as usual
Note: Consider applying a Loctite® Retaining Compound or Threadlocker to the shaft prior to assembling the coupling to completely unitize the coupling to the shaft and prevent any possible corrosion
SOLUTION
• Assembly is restored, unitized, and ready for service without a major overhaul
RESULTS

CHALLENGE
46 47
Prevent pump mounting boltsfrom losing clamp load, leading tomisalignment
Pump Base Mounting
Cause:• Vibration and possible impact shock can work to loosen the mounting
bolts• Loose bolts result in a loss of clamp load, which in turn allows the
pump to lose its level and aligned configuration
• Mounting bolts are secured in place• Proper clamp load is maintained• Elimination of bolt corrosion• Prevention of misalignment
Apply Loctite® 2701 HighStrength Threadlocker to the mounting bolts
Steps:1. Clean threads with Loctite® 7063 Cleaner & Degreaser2. Apply several drops of Loctite® 2701 High Strength
Threadlocker to the mounting bolts3. Assemble and tighten as usual
Apply Loctite® 290 WickingGrade Threadlocker to themounting bolts after the pumphas been levelled and aligned
Steps:1. Clean the parts with Loctite® 7063 Cleaner & Degreaser2. Align the pump3. Tighten the nuts on the mounting studs4. Apply several drops of Loctite® 290 Wicking Grade
Threadlocker to the mounting bolts
SOLUTION #1 SOLUTION #2
RESULTS

CHALLENGE
Prevent oil lossfrom seepage
Oil Seepage
Cause:• This cast part can have porosities created during the casting.
These porosities can lead to the housing weeping oil
• Elimination of oil loss through seepage• Reduced oil consumption• Reduced clean up
Coat interior of bearing frameto seal porosities with Loctite® Nordbak® 7221Chemical Resistant Coating
Steps:1. Remove visible and invisible contaminants. Clean with
Loctite® 7063 Cleaner & Degreaser2. Abrasive blast the surface to a near white metal finish.
Remove dust. Clean with Loctite® 7063 Cleaner &Degreaser
3. Mix and apply Loctite® Nordbak® 7221 ChemicalResistant Coating to the interior of the bearing frame,min 0.5 mm thick, using two coats. Apply second coatwhen gel time of first coat is reached
For a part where the specificleak points are known, brush on Loctite® 290 Wicking GradeThreadlocker
Steps:1. Clean the surface2. Bake it dry3. Brush on Loctite® 290 Threadlocker4. Allow to cure
SOLUTION #1 SOLUTION #2
48 49
RESULTS

CHALLENGE
Rebuild worn areas to restorepump casing and impellers
Casing / Impeller Wear
Cause:• Pump casings and impellers are subject to wear from abrasive slurries
and solids, cavitation, and chemical attack. Each of these can wear down internal sections of pump casing
• Some of the common wear areas include the cutwater, wear ring seats,impeller vane tips, and inside the volute
• Casing and impeller wear typically falls within the following four category types:1. Minor abrasive wear from pumping light
slurries2. Heavy casing wear and erosion from
pumping solids and/or cavitation3. Chemical attack4. Wear to specific areas of the casing or
impeller
50 51
Rebuild minor surface wear, or rebuild worn areas of the casingand impeller. Apply Loctite® 3478 Superior Metal or Loctite®
Nordbak® 7222 Wear Resistant Putty to rebuild worn cutwaters,wear ring seats, impeller vane tips, or other specific areas ofthe casing. Coat with the surface with Loctite® Nordbak® 7227or 7228 Brushable Ceramic• Provides a high gloss, low friction finish to help ensure the pump runs as close to its BEP (Best Efficiency Point)
as possible• Use Loctite® 3478 Superior Metal to rebuild worn areas, where machining is required to reach the desired
dimensions• Use Loctite® 7222 Wear Resistant Putty to rebuild worn areas on places where cavitation and wear are
constantly present. Product is not machinable
Steps:1. Remove visible and invisible contaminants. Clean with Loctite® 7063 Cleaner & Degreaser2. Abrasive blast the surface to a near white metal finish. Remove dust. Clean with Loctite® 7063 Cleaner & Degreaser3. Rebuild the surface with Loctite® 3478 Superior Metal or Loctite® 7222 Wear Resistant Putty. Mix and apply products
according to the package instructions4. Apply a coat of Loctite® Nordbak® 7228 Brushable Ceramic White. When gel time is reached, apply a second coat of
Loctite® Nordbak® 7227 Brushable Ceramic Grey, to a min 0.5 mm final thickness, to allow for easy visual inspection ofthe coating and wear
Note: Use Loctite® 7232 High Temperature Wear Resistant Putty and Loctite® 7234 High Temperature Brushable Ceramic atelevated temperatures, up to 205 °C dry service temperture.
SOLUTION #1

CHALLENGE
Casing / Impeller Wear
Repair damage from chemical attack and provide a protective coating. Coat the casing and the impeller with Loctite® Nordbak® 7221 Chemical Resistant Coating• Protects parts in severe chemical environments
Steps:1. Remove visible and invisible contaminants. Clean with Loctite® 7063 Cleaner & Degreaser2. Abrasive blast the surface to a near white metal finish. Remove dust. Clean with Loctite® 7063 Cleaner & Degreaser3. Mix and apply Loctite® Nordbak® 7221 Chemical Resistant Coating, min 0.5 mm thick, using two coats. Apply second
coat when gel time of first coat is reached
SOLUTION #2
Repair heavy surface wear to the casing. Rebuild the casing with Loctite® Nordbak®
7218 or 7219 or 7230 or 7226 or 7229 Wearing Compound• Consult a Henkel Technical Specialist for correct product selection
Steps:1. Remove visible and invisible contaminants. Clean with Loctite® 7063 Cleaner & Degreaser2. Abrasive blast the surface to a near white metal finish. Remove dust. Clean with Loctite® 7063 Cleaner & Degreaser3. Mix and apply the selected Loctite® Nordbak® Wearing Compound as per the package instructions4. Apply a topcoat of Loctite® Nordbak® 7227 or 7228 or 7234 Brushable Ceramic. When gel time is reached, apply a
second coat, to a min 0.5 mm final thickness, to provide a low-friction finish
SOLUTION #3
5352
Rebuild worn areas to restorepump casing and impellers
• Reduced component consumption by salvaging and extending the life of pump casings
• Casings protected from wear and chemical attack• Pumps helped to run close to their BEP
RESULTS

CHALLENGE
54 55
Restore worn shaftto the original condition
Shaft Wear
Cause:• Wear caused by packing and oil seals is typically the result
of constant pressure and abrasion against the shaft surface • Over time, oil seals can cut a groove in a shaft • Neglect and improper water lubrication can cause the
packing to heat up and in turn to cause severe wear to the shaft
• Quick return to service• Reduced component consumption• Extended shaft life
Rebuild shafts with Loctite® 3478 Superior Metal • Loctite® 3478 Superior Metal is an epoxy with high compressive strength that will not rust
Steps:1. To make the repairs, turn the shaft on a lathe and even out the worn areas to at least 0.75 mm (0.03"), leaving a
rough surface finish2. Clean the shaft of any cutting fluids or oils with Loctite® 7063 Cleaner & Degreaser3. Mix the product as per the package instructions4. While the shaft is turning on the lathe, apply Loctite® 3478 Superior Metal by pressing it into the shaft
Firm pressure is required to squeeze out any potential air pockets 5. The cured product can be turned on the lathe and brought down to the original shaft diameter
SOLUTION
RESULTS

CHALLENGE
Repair wallowed out keyways
Keyway Wallow
Cause:• Shaft vibration and external forces affect key stability.
Over time, this instability leads to keyway wallow
• A secured fit to the keyway• Elimination of repeat wallowing
56 57
Apply a bead of Loctite® 660 Quick Metal RetainingCompound directly in the worn keyway • Loctite® 660 Quick Metal Retaining Compound is a heavy-bodied product designed to fill large voids,
up to 0.25 mm (0.01"). For voids bigger then 0.25 mm (0.01") use Loctite® 3478 Superior Metal
Steps:1. If the keyway wallow is severe, you may need to add shims to both sides 2. Apply Loctite® 660 Quick Metal Retaining Compound directly into the keyway3. Press the new key stock into the keyway and the assembly is restored without having to take apart the pump
SOLUTION
RESULTS

CHALLENGE
Prevent corrosion damageto external parts
Corrosion
Cause:• The external components can suffer from rust and chemical attack due
to exposure to the elements, extreme temperature changes, humidity,and chemicals
• Extended equipment life• Reduced component consumption• Increased pump reliability
Loctite® Nordbak® 7221 Chemical Resistant Coating• Originally developed to protect mining equipment from sulfuric acid • Provides an excellent coating to protect pump parts from a variety of severe chemical environments
Steps:1. Remove visible and invisible contaminants. Clean with Loctite® 7063 Cleaner & Degreaser2. Abrasive blast the surface to a near white metal finish. Remove dust. Clean with Loctite® 7063 Cleaner & Degreaser3. Mix and apply Loctite® Nordbak® 7221 Chemical Resistant Coating as per the package instructions, min 0.5 mm
thick, using two coats. Apply second coat when gel time of first coat is reached
SOLUTION
58 59
RESULTS

6160
Products Table
PUMP ASSEMBLY
APPLICATIONS LOCTITE® SOLUTIONS BENEFITS PACK SIZE IDH NO. PAGE
BEARING FRAME AND HOUSING
FRAME ADAPTER
Threaded fittings Loctite® 577 Thread Sealant Controlled strength 50 ml 229342 8
Loctite® 572 Thread Sealant (excl. high temp resist) Solvent resistant 50 ml 229360
Loctite® 561 Pipe Sealant Semi-solid, controlled strength 19 g stick TBC
Oil seals Loctite® 243 Threadlocker Medium strength, oil resistant, primerless 50 ml 135278 10
Loctite® 248 Medium Strength Threadlocker Semi-solid, medium strength 19 g stick TBC
O-rings Loctite® 8104 Food Grade Grease NLGI 2, NSF H1 400 ml 12
Loctite® 8104 Food Grade Silicone Grease NLGI 2, GC-LB, NSF H1, Synthetic PAO 6 x 1 l 142550
Power end bolts Loctite® 8008 C5-A® Copper Based Anti-Seize General purpose, up to 980 °C 454 g 503147 14
Loctite® 8014 Food Grade Anti-Seize NSF approved, up to 400 °C 907 g 505467
Loctite® 8009 Heavy Duty Anti-Seize Metal-free, high lubricity 454 g 504219
Loctite® 8023 Marine Grade Anti-Seize Metal-free, water washout resistance 454 g 504618
Loctite® 8013 N-7000 High Purity Anti-Seize Metal-free, power plant safe 454 g 504588
Loctite® 8065 C5-A® Copper Anti-Seize Semi-solid, general purpose 20 g stick 525380
Loctite® 8060 Aluminium Anti-Seize Semi-solid, general purpose 20 g stick 525113
Loctite® 8150 Aluminium Anti-Seize General purpose, up to 900 °C 500 g 303147
Loctite® 8151 Aluminium Anti-Seize General purpose, up to 900 °C 400 ml 303136
Power end bolts Loctite® 641 Retaining Compound Press & slip fit, low strength, oil tolerant, 50 ml 135522 16general purpose
Loctite® 620 Retaining Compound Slip fit, high temperature
Loctite® 668 Retaining Compound Semi-solid, slip fit, high temperature 19 g stick
Loctite® 603 Retaining Compound Press fit, oil tolerant 50 ml 135280
Oil seals Loctite® 243 Threadlocker Medium strength, oil resistant, primerless 50 ml 135278 18
Loctite® 248 Medium Strength Threadlocker Semi-solid, medium strength 19 g stick TBC
Dowel pins Loctite® 8008 C5-A® Copper Based Anti-Seize General purpose, up to 980 °C 454 g 503147 20
Loctite® 8014 Food Grade Anti-Seize NSF approved, up to 400 °C 907 g 505467
Loctite® 8009 Heavy Duty Anti-Seize Metal-free, high lubricity 454 g 504219
Loctite® 8023 Marine Grade Anti-Seize Metal-free, water washout resistance 454 g 504618
Loctite® 8013 N-7000 High Purity Anti-Seize Metal-free, power plant safe 454 g 504588
Loctite® 8065 C5-A® Copper Anti-Seize Semi-solid, general purpose 20 g stick 525380
Loctite® 8060 Aluminium Anti-Seize Semi-solid, general purpose 20 g stick 525113
Loctite® 8150 Aluminium Anti-Seize General purpose, up to 900 °C 500 g 303147
Loctite® 8151 Aluminium Anti-Seize General purpose, up to 900 °C 400 ml 303136
Gasketing Loctite® 518 Flange Sealant General purpose, up to 0.25 mm 65 ml 135480 22
Loctite® 574 Flange Sealant Fast curing, up to 0.25 mm 50 ml 267437
Loctite® 5910 Quick Gasket High adhesion, greater than 0.25 mm 300 ml 142491
Loctite® 548 Gasket Eliminator® Semi-solid 19 g stick
Loctite® 5922 Flange Sealant Increases the reliability of cut gasket seals
APPLICATIONS LOCTITE® SOLUTIONS BENEFITS PACK SIZE IDH NO. PAGE
FRAME ADAPTER
Packaging Loctite® 8008 C5-A® Copper Based Anti-Seize General purpose, up to 980 °C 454 g 503147 26
gland nuts Loctite® 8014 Food Grade Anti-Seize NSF approved, up to 400 °C 907 g 505467
Loctite® 8009 Heavy Duty Anti-Seize Metal-free, high lubricity 454 g 504219
Loctite® 8023 Marine Grade Anti-Seize Metal-free, water washout resistance 454 g 504618
Loctite® 8013 N-7000 High Purity Anti-Seize Metal-free, power plant safe 454 g 504588
Loctite® 8065 C5-A® Copper Anti-Seize Semi-solid, general purpose 20 g stick 525380
Loctite® 8060 Aluminium Anti-Seize Semi-solid, general purpose 20 g stick 525113
Loctite® 8150 Aluminium Anti-Seize General purpose, up to 900 °C 500 g 303147
Loctite® 8151 Aluminium Anti-Seize General purpose, up to 900 °C 400 ml 303136
Packaging Loctite® 243 Threadlocker Medium strength, oil resistant, primerless 50 ml 135278 28
gland studs Loctite® 262 Threadlocker Medium to high strength
Loctite® 2701 Threadlocker High strength, primerless 50 ml 234853
Loctite® 8023 Marine Grade Anti-Seize Metal-free, water washout resistance 454 g 504618
Loctite® 248 Medium Strength Threadlocker Semi-solid, medium strength 19 g stick TBC
Loctite® 268 High Strength Threadlocker Semi-solid, high strength 19 g stick TBC
Flushing Loctite® 577 Thread Sealant Controlled strength 50 ml 229342 30
connectors Loctite® 572 Thread Sealant (excl. high temp resist) High temperature, solvent resistant 50 ml 229360
Loctite® 561 Pipe Sealant Semi-solid, controlled strength 19 g stick TBC
Adapter bolts Loctite® 243 Threadlocker Medium strength, oil resistant, primerless 50 ml 135278 24
Loctite® 8023 Marine Grade Anti-Seize Metal-free, water washout resistance 454 g 504618
Loctite® 248 Medium Strength Threadlocker Semi-solid, medium strength 19 g stick TBC
Stuffing box Loctite® 8008 C5-A® Copper Based Anti-Seize General purpose, up to 980 °C 454 g 503147 32
Loctite® 8014 Food Grade Anti-Seize NSF approved, up to 400 °C 907 g 505467
Loctite® 8009 Heavy Duty Anti-Seize Metal-free, high lubricity 454 g 504219
Loctite® 8023 Marine Grade Anti-Seize Metal-free, water washout resistance 454 g 504618
Loctite® 8013 N-7000 High Purity Anti-Seize Metal-free, power plant safe 454 g 504588
Stuffing box Loctite® 8065 C5-A® Copper Anti-Seize Semi-solid, general purpose 20 g stick 525380 32
Loctite® 8060 Aluminium Anti-Seize Semi-solid, general purpose 20 g stick 525113
Loctite® 8150 Aluminium Anti-Seize General purpose, up to 900 °C 500 g 303147
Loctite® 8151 Aluminium Anti-Seize General purpose, up to 900 °C 400 ml 303136
Gasketing Loctite® 518 Flange Sealant General purpose, up to 0.25 mm 65 ml 135480 34
Loctite® 574 Flange Sealant Fast curing, up to 0.25 mm 50 ml 267437
Loctite® 548 Gasket Eliminator® Semi-solid 19 g stick
Loctite® 5922 Flange Sealant Increases the reliability of cut gasket seals
Casing bolts Loctite® 243 Threadlocker Medium strength, oil resistant, primerless 50 ml 135278 37
Loctite® 8023 Marine Grade Anti-Seize Metal-free, water washout resistance 454 g 504618
Loctite® 248 Medium Strength Threadlocker Semi-solid, medium strength 19 g stick TBC
GLAND ASSEMBLY
PUMP CASING

Products Table
6362
PUMP ASSEMBLY PUMP REPAIR
APPLICATIONS LOCTITE® SOLUTIONS BENEFITS PACK SIZE IDH NO. PAGE
IMPELLER
KEYWAYS / KEY STOCK
COUPLING
Shaft & impeller Loctite® 8008 C5-A® Copper Based Anti-Seize General purpose, up to 980 °C 454 g 503147 38
threads Loctite® 8014 Food Grade Anti-Seize NSF approved, up to 400 °C 907 g 505467
Loctite® 8009 Heavy Duty Anti-Seize Metal-free, high lubricity 454 g 504219
Loctite® 8023 Marine Grade Anti-Seize Metal-free, water washout resistance 454 g 504618
Loctite® 8013 N-7000 High Purity Anti-Seize Metal-free, power plant safe 454 g 504588
Loctite® 8065 C5-A® Copper Anti-Seize Semi-solid, general purpose 20 g stick 525380
Loctite® 8060 Aluminium Anti-Seize Semi-solid, general purpose 20 g stick 525113
Loctite® 8150 Aluminium Anti-Seize General purpose, up to 900 °C 500 g 303147
Loctite® 8151 Aluminium Anti-Seize General purpose, up to 900 °C 400 ml 303136
Prevent keyway Loctite® 243 Threadlocker Medium strength, oil resistant, primerless 50 ml 135278 40
wallow Loctite® 660 Quick Metal Retaining Compound Press fit repair 12 x 50 ml 229232
Loctite® 248 Medium Strength Threadlocker Semi-solid, medium strength 19 g stick TBC
Coupling Loctite® 222 Threadlocker Low strength, small screws 50 ml 231501 44
Loctite® 243 Threadlocker Medium strength, oil resistant, primerless 50 ml 135278
Loctite® 248 Medium Strength Threadlocker Semi-solid, medium strength 19 g stick TBC
PUMP BASE MOUNTING
Mounting bolts Loctite® 262 Threadlocker Medium to high strength 46
Loctite® 2701 Threadlocker High strength, primerless 50 ml 234853
Loctite® 290 Threadlocker Wicking for post-assembly 50 ml 233733
Loctite® 268 High Strength Threadlocker Semi-solid, high strength 19 g stick TBC
APPLICATIONS LOCTITE® SOLUTIONS BENEFITS PACK SIZE IDH NO. PAGE
OIL SEEPAGE
Porosity sealing Loctite® Nordbak® 7221 Chemical Resistant Coating Protection against chemical attack 5.4 kg 48
Loctite® 290 Threadlocker Wicking for post-assembly 50 ml 233733
OTHER PRODUCTSAdhesives Loctite® 330 Multi-Bond® General purpose, no mix adhesive 50/18 ml 230054
Loctite® 3450 Premeasured epoxy mixer cups 2 x 25 ml 229177
Loctite® 3430 Fast curing, high strength 2 x 24 ml 142517
Cleaners Loctite® 7200 Gasket Remover Aggressive gasket remover 400 ml 458654
Loctite® 7850 Hand Cleaner Pre-moistened hand cleaning wipes 12 x 400 ml 234228
Loctite® 7840 Biodegradable Cleaner & Degreaser General purpose, environmentally friendly 12 x 750 ml 235330
Loctite® 7063 Cleaner & Degreaser General purpose cleaner 400 ml 458648
Penetrants/ Loctite® 8201 Five Way Spray Moisture displacer & rust preventer 12 x 400 ml 142730
Lubricants Loctite® 8040 Frees rusted parts
Loctite® 8106 Multi Purpose Grease General purpose lubricating paste 400 ml
Primer Loctite® 7649 Primer Anaerobic primer/cleaner
Wear Loctite® 3478 Superior Metal Ferro-silicon filled repair epoxy 50
Loctite® 7222 Wear Resistant Putty Ceramic fiber filled epoxy 1.3 kg
Loctite® Nordbak® 7218 Wearing Compound Trowelable, large ceramic beads 1 kg
Loctite® Nordbak® 7219 High Impact Wear and impact resistant 1 kg 255891Wearing Compound
Loctite® Nordbak® 7221 Chemical Resistant Coating Protection against chemical attack 5.4 kg
Loctite® Nordbak® 7226 Pneu-Wear Fine particle wear up to 120 °C 1 kg
Loctite® Nordbak® 7227 Brushable Ceramic Grey Smooth, corrosion resistant coating 1 kg
Loctite® Nordbak® 7228 Brushable Ceramic White Smooth, corrosion resistant coating 1 kg
Loctite® Nordbak® 7229 High Temperature Protection up to 230 °C 1 kgPneu-Wear
Loctite® Nordbak® 7230 High Temperature Protection up to 230 °C 10 kg 255896Wearing Compound
Loctite® Nordbak® 7234 High Temperature Protection up to 205 °C 1 kg 254469Brushable Ceramic
CASING / IMPELLER WEAR
Wear Loctite® 3478 Superior Metal Ferro-silicon filled repair epoxy 54
Loctite® Hysol® 3471 Steel-filled repair epoxy 500 g 229176
SHAFT WEAR
Wallow Loctite® 660 Quick Metal Retaining Compound Press fit repair 12 x 50 ml 229232 56
Corrosion Loctite® Nordbak® 7221 Chemical Resistant Coating Protection against chemical attack 5.4 kg 58
KEYWAY WALLOW
CORROSION

Henkel Loctite Adhesives LtdTechnologies HouseWood Lane EndHemel HempsteadHertfordshire HP2 4RQTel. 01442 418305Fax 01442 418228
www.loctite.co.uk
The data contained herein are intended as reference only. Please contact your local Henkel Technical Support Group for assistance and recommendation onspecifications for these products.
® designates a trademark of Henkel KGaA or its affiliates, registered in Germany and elsewhere © Henkel KGaA, 2005