inesoft cash organizer · inesoft cash organizer has a synchronization provider (software plug-in)...
TRANSCRIPT

INESOFT CASH ORGANIZER
User Manual
Inesoft Cash Organizer Copyright © Inesoft, 1998 – 2012. All rights reserved. User Manual v.1.0 by Wasyl Dolgow Cash Organizer is a registered trademark of Inesoft. Microsoft Money and Microsoft Windows are registered trademarks of Microsoft Corporation. Quicken is a registered trademark of Intuit. All other trademarks are the property of their respective companies. The information in this document is subject to change without notice. No part of this document may be reproduced or transmitted in any form or by any means, electronic or mechanical, for any purpose, without the express written permission of Inesoft.

Inesoft Cash Organizer www.cashorganizer.com
- 2 -
Table of Contents
1 Installation ............................................................................................................................. 3 2 Premium mode of operation ................................................................................................... 3 3 Financial data security ............................................................................................................ 3 4 Synchronization (Premium mode only) .................................................................................. 4 5 Synchronization – how does it work? .................................................................................... 4
5.1 Security .................................................................................................................................... 4 5.2 Synchronization process............................................................................................................. 4 5.3 Do I need to backup Cash Organizer data? ................................................................................. 4
6 Home screen ........................................................................................................................... 5 7 Accounts ................................................................................................................................. 5 8 Transactions ........................................................................................................................... 6
8.1 Entering a new transaction ........................................................................................................ 7 8.2 Transaction attributes ................................................................................................................ 7
8.2.1 Account ............................................................................................................................... 7 8.2.1 Date .................................................................................................................................... 8 8.2.2 Payee .................................................................................................................................. 8 8.2.3 Amount ............................................................................................................................... 8 8.2.4 Category .............................................................................................................................. 8 8.2.5 Project ................................................................................................................................. 8 8.2.1 Note .................................................................................................................................... 8 8.2.2 Mark .................................................................................................................................... 9 8.2.3 Number ............................................................................................................................... 9
8.3 Account balance reconciliation.................................................................................................... 9 8.4 Account group configuration .....................................................................................................11
9 Project .................................................................................................................................. 11 9.1 Create and edit projects ............................................................................................................12
10 Planner ................................................................................................................................. 13 10.1 Create scheduled transaction ....................................................................................................13 10.2 Inactive scheduled transactions .................................................................................................13 10.3 Partial performance of scheduled transaction .............................................................................14
11 Category ............................................................................................................................... 14 12 Budget .................................................................................................................................. 15
12.1 General principles .....................................................................................................................15 12.2 Create new budget group .........................................................................................................16 12.3 Add new category to the budget ...............................................................................................16 12.4 Set a date range for budget planning ........................................................................................16 12.5 Budget transactions report ........................................................................................................16
13 Report ................................................................................................................................... 17 13.1 Reporting .................................................................................................................................17 13.2 Selecting the report's form ........................................................................................................17 13.3 Process the report made ...........................................................................................................18
13.3.1 Presentation form for the report selection ............................................................................ 18 13.3.2 Getting detailed information on the report's elements ........................................................... 18 13.3.3 Create an auxiliary report ................................................................................................... 19
13.4 Custom reports ........................................................................................................................19 14 Payee .................................................................................................................................... 19
14.1 Create and edit payee ..............................................................................................................19 14.2 Delete category ........................................................................................................................20
15 Currency ............................................................................................................................... 20 16 Working with data ................................................................................................................ 21
16.1 Create and restore backup data file ...........................................................................................21 16.2 Working with backup files .........................................................................................................21 16.3 Clearing the database ...............................................................................................................22
17 Technical support ................................................................................................................. 22
Inesoft Cash Organizer www.cashorganizer.com
- 3 -
11 IInnssttaallllaattiioonn
Inesoft Cash Organizer is available as online version at www.cashorganizer.com that requires no installation and can be opened in your browser, or can be installed on your PC.
To install Inesoft Cash Organizer on your PC, perform the following steps:
1. Download the latest version from www.cashorganizer.com; 2. Run the installation program. While the installation is running, several dialog boxes will
appear on the screen. Click Next each time to continue the installation process;
22 PPrreemmiiuumm mmooddee ooff ooppeerraattiioonn
The advantage of the premium service is the ability to synchronize data between different computers: PCs, tablets and communicators, as well as multiuser mode. Your financial database is always up-to-date on all computers, anywhere. Premium service includes free software for all your computers and disabled advertisements. Please visit the purchase page to select your plan.
33 FFiinnaanncciiaall ddaattaa sseeccuurriittyy
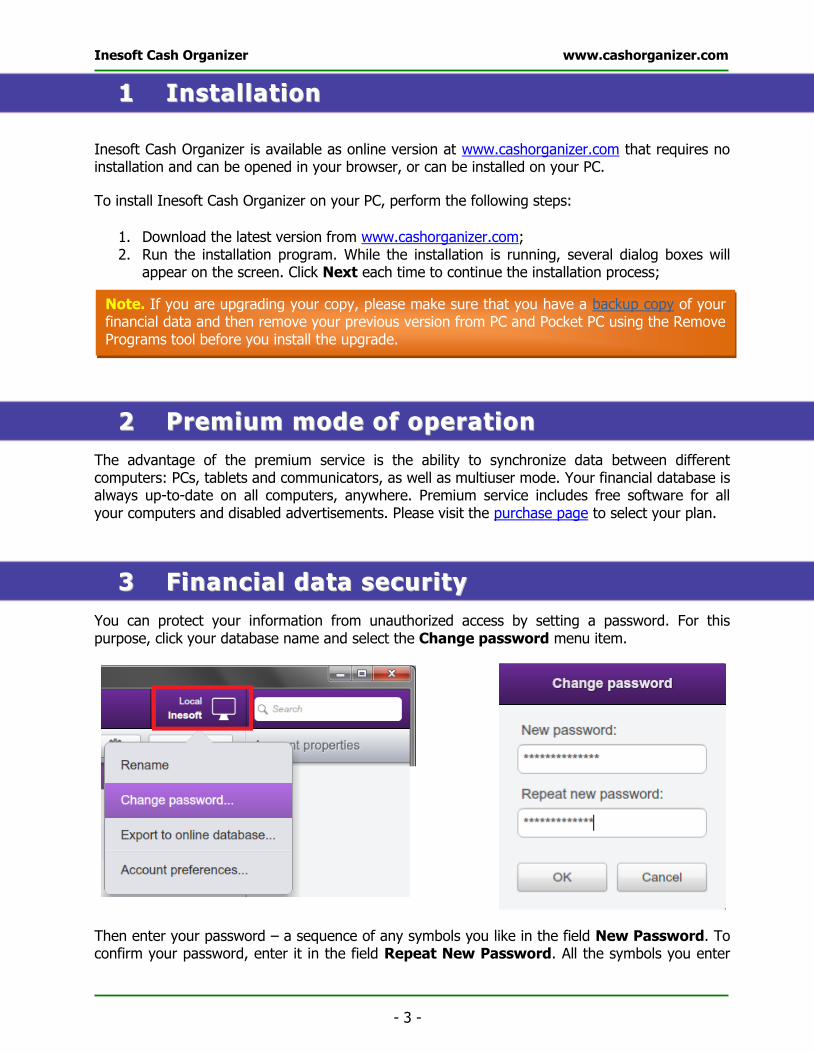
You can protect your information from unauthorized access by setting a password. For this purpose, click your database name and select the Change password menu item.
Then enter your password – a sequence of any symbols you like in the field New Password. To confirm your password, enter it in the field Repeat New Password. All the symbols you enter
Note. If you are upgrading your copy, please make sure that you have a backup copy of your financial data and then remove your previous version from PC and Pocket PC using the Remove Programs tool before you install the upgrade.
Inesoft Cash Organizer www.cashorganizer.com
- 4 -
will be shown as "*". You will be asked to enter your password each time you run the program. Click OK button to save changes.
If you want to cancel a password that you have set, move to the settings mode and set a blank password.
44 SSyynncchhrroonniizzaattiioonn ((PPrreemmiiuumm mmooddee oonnllyy)) Inesoft Cash Organizer has a synchronization provider (software plug-in) for Microsoft ActiveSync. It is intended for continuous exchange of financial data between your computers. The synchronization tool enables to:
Transfer all financial information (accounts, transactions including split details, categories and projects, currencies and budgets) from all your computers to mobile device and from mobile device to desktop computer;
Update your data files on all computers with changes made on the go and vice versa; Instantly synchronize all changes while your devices are connected to the Internet.
55 SSyynncchhrroonniizzaattiioonn –– hhooww ddooeess iitt wwoorrkk??
5.1 Security
Inesoft Cash Organizer encrypts your data with a strong 128-bit protocol BEFORE the program starts to send it to the cloud database, and your data stays encrypted on the server as well.
5.2 Synchronization process
The sync engine works fully automatically, no your attention is required. All changes are being synced in real time, that allows to run the same database on more than one computer. That means all users may have access and make changes at the same time. The only requirement for synchronization is Internet connection.
5.3 Do I need to backup Cash Organizer data?
Yes, it is recommended to backup Cash Organizer database too. Inesoft Cash Organizer has a powerful and easy to use tool for keeping your data safe.
Note. While typing a password, pay your attention to the symbols' register. If you make a mistake three times while entering the password, the program will be blocked for a few minutes.
Note. Please remember that Inesoft Cash Organizer uses a strong 128-bit data encryption. If you forgot your password, recovering it will not be possible. You will lose access to your database.
Inesoft Cash Organizer www.cashorganizer.com
- 5 -
66 HHoommee ssccrreeeenn
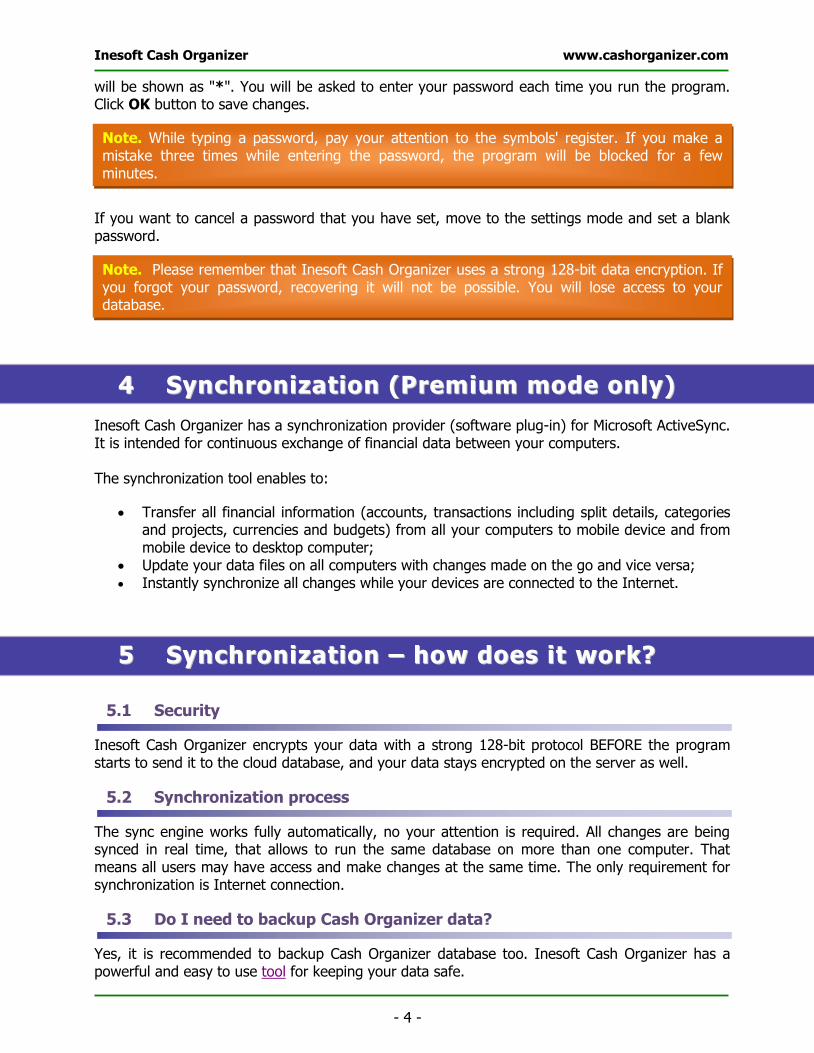
Here you will find the most important information:
Inesoft Cash Organizer offers four different widgets, that you may customize of your choice or
remove from the screen. Click the Tools button to select or deselect widgets.
77 AAccccoouunnttss
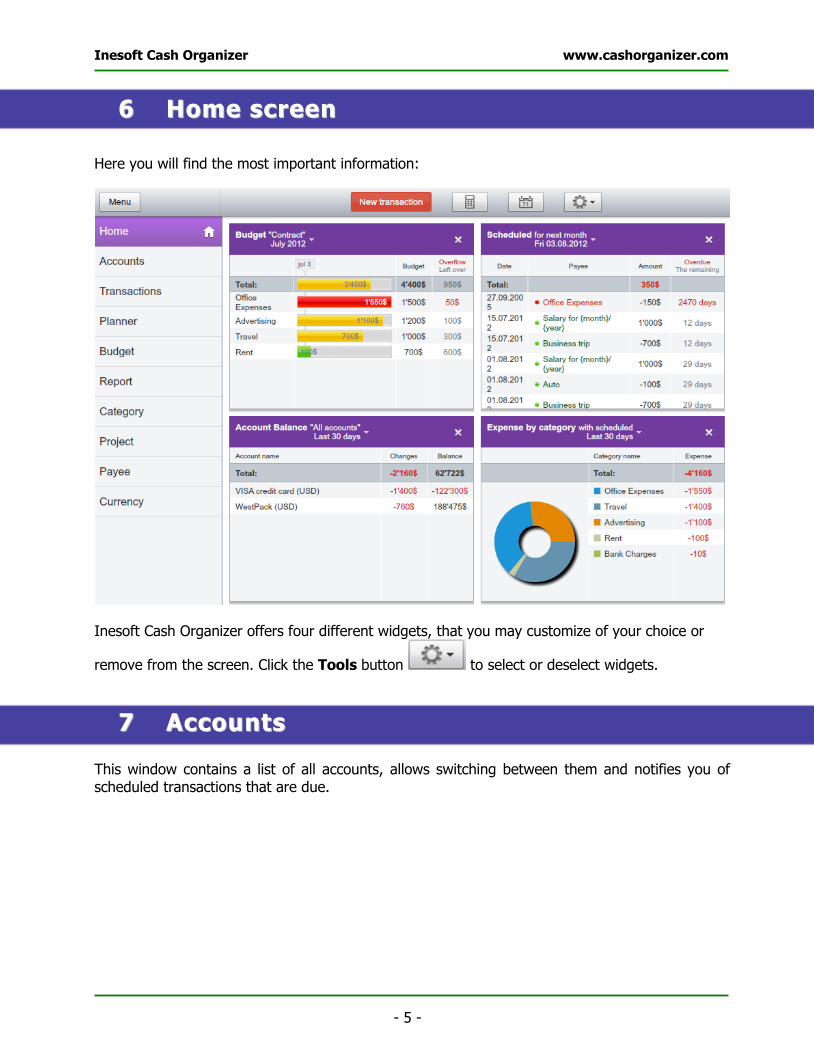
This window contains a list of all accounts, allows switching between them and notifies you of scheduled transactions that are due.
Inesoft Cash Organizer www.cashorganizer.com
- 6 -
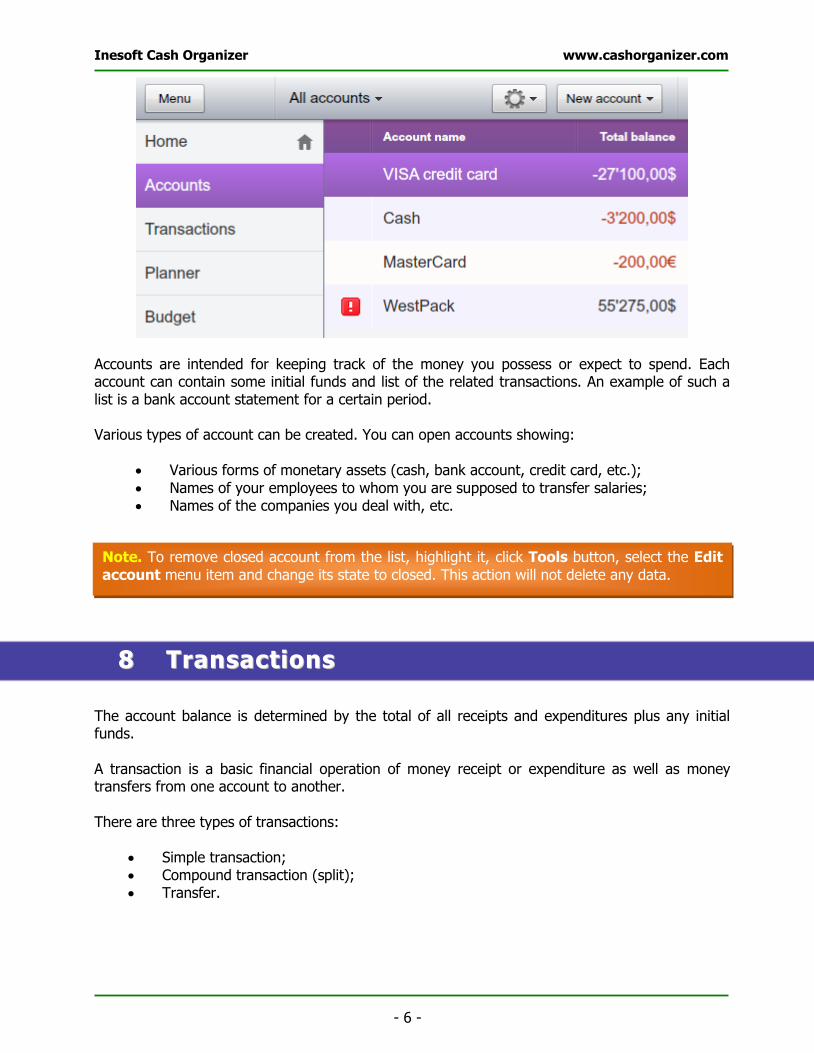
Accounts are intended for keeping track of the money you possess or expect to spend. Each account can contain some initial funds and list of the related transactions. An example of such a list is a bank account statement for a certain period. Various types of account can be created. You can open accounts showing:
Various forms of monetary assets (cash, bank account, credit card, etc.);
Names of your employees to whom you are supposed to transfer salaries; Names of the companies you deal with, etc.
88 TTrraannssaaccttiioonnss
The account balance is determined by the total of all receipts and expenditures plus any initial funds. A transaction is a basic financial operation of money receipt or expenditure as well as money transfers from one account to another. There are three types of transactions:
Simple transaction; Compound transaction (split); Transfer.
Note. To remove closed account from the list, highlight it, click Tools button, select the Edit
account menu item and change its state to closed. This action will not delete any data.

Inesoft Cash Organizer www.cashorganizer.com
- 7 -
8.1 Entering a new transaction
To initiate a new transaction, select New transaction in Transactions mode. An appropriate window will be opened. As soon as you start typing in the Payee field, Cash Organizer starts filtering the payee list. If you select a payee from the list, transaction properties will be filed out with data from memorized transaction.
Cash Organizer also allows making compound transactions (splits). A split is a transaction where you break up a transaction into parts. For example, if you are recording your paycheck, but this month you also got a bonus, you can make that a single transaction with two parts.
8.2 Transaction attributes
Each transaction contains certain attributes that allow you to classifying your receipts and expenditures by various characteristics.
8.2.1 Account Accounts contain all the records related to bank accounts, credit cards, cash and others, as well as transfers of funds between accounts.
Note. To create a money transfer, select an account you want to transfer funds to in the Category list, you will find all accounts at the end of the list.
Inesoft Cash Organizer www.cashorganizer.com
- 8 -
8.2.1 Date Transaction date shows the actual date the transaction was recorded. This information is very useful, as it allows tracing the balance changes over the course of time. To set the date of the transaction, select next to the date field (by default, the field will be filled with the current date). The calendar for the current month will appear on the screen. If you want to change the month, press the arrow next to the month's name. Select the required month and date in the calendar.
8.2.2 Payee A transaction's description is the attribute displayed in the transaction list. You should be use a description the can be easily recognized in the transaction list. For example, you can use "Hotel" to describe a transaction for a hotel room payment.
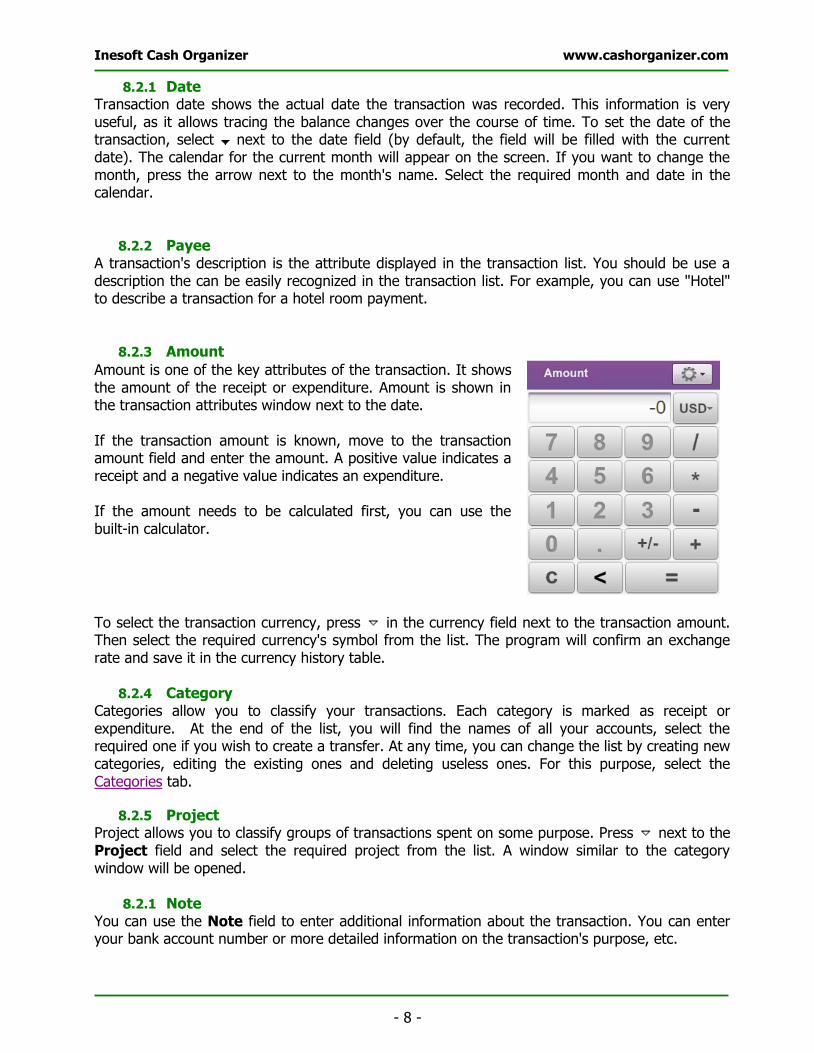
8.2.3 Amount
Amount is one of the key attributes of the transaction. It shows the amount of the receipt or expenditure. Amount is shown in the transaction attributes window next to the date. If the transaction amount is known, move to the transaction amount field and enter the amount. A positive value indicates a receipt and a negative value indicates an expenditure. If the amount needs to be calculated first, you can use the built-in calculator.
To select the transaction currency, press in the currency field next to the transaction amount. Then select the required currency's symbol from the list. The program will confirm an exchange rate and save it in the currency history table.
8.2.4 Category Categories allow you to classify your transactions. Each category is marked as receipt or expenditure. At the end of the list, you will find the names of all your accounts, select the required one if you wish to create a transfer. At any time, you can change the list by creating new categories, editing the existing ones and deleting useless ones. For this purpose, select the Categories tab.
8.2.5 Project Project allows you to classify groups of transactions spent on some purpose. Press next to the Project field and select the required project from the list. A window similar to the category window will be opened.
8.2.1 Note You can use the Note field to enter additional information about the transaction. You can enter your bank account number or more detailed information on the transaction's purpose, etc.
Inesoft Cash Organizer www.cashorganizer.com
- 9 -
8.2.2 Mark Marks are used when reconciling the balance of your electronic account with that of your real bank account using the account statement. To select a mark, press next to the mark field. There are three types of marks:
Unreconciled – transactions that are not included in the bank account balance or haven't been reconciled to the bank account;
Cleared – transactions that have cleared through the account but have not yet been reconciled on an account statement;
Reconciled – group of transactions with a total balance equal to that of the account statement.
By default, all new transactions are marked as Unreconciled.
8.2.3 Number You can assign a number attribute to the transaction. This can help you when viewing the transaction list as transactions can be arranged according to their number (for example, the check number, the time the transaction was entered or its importance). To assign a number to the transaction, move to the Number field and enter the required number.
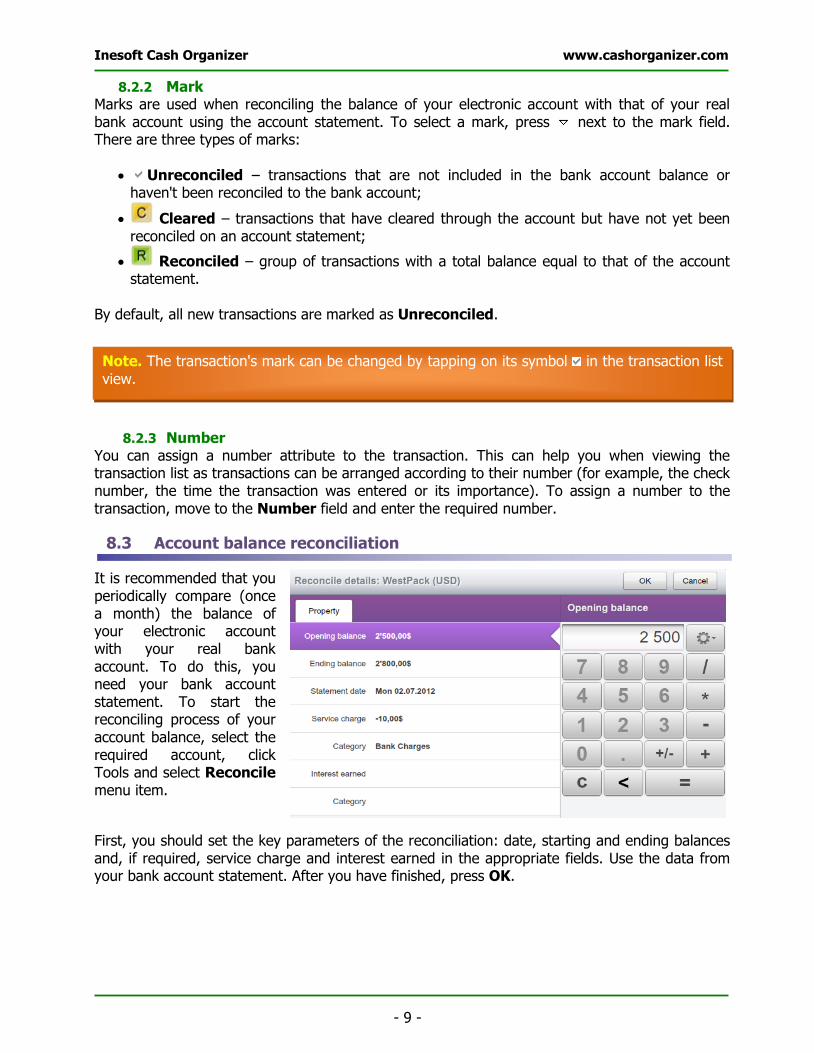
8.3 Account balance reconciliation
It is recommended that you periodically compare (once a month) the balance of your electronic account with your real bank account. To do this, you need your bank account statement. To start the reconciling process of your account balance, select the required account, click Tools and select Reconcile menu item.
First, you should set the key parameters of the reconciliation: date, starting and ending balances and, if required, service charge and interest earned in the appropriate fields. Use the data from your bank account statement. After you have finished, press OK.
Note. The transaction's mark can be changed by tapping on its symbol in the transaction list
view.

Inesoft Cash Organizer www.cashorganizer.com
- 10 -
Once you have set the parameters for account reconciliation, the balance reconciliation window will appear. In the left part of the window, you can see: the difference between the initial balances of the electronic and the real bank account, the cleared balance (starting balance and all the transactions marked as Cleared), the end balance, and the total difference.
Then you will see information on the number of all receipt and expenditure transactions marked as Cleared and their total amount as well as lists of all the receipt and expenditure transactions for this account marked as Unreconciled or Cleared. When reconciling the balance, click the "С" field for all transactions coinciding with the bank statement and they will be marked as Cleared. Make any appropriate changes in the amounts of the reconciled balances, balance disparities, number and amounts of receipt and expenditure operations. On having reconciled the entire statement, you should get zero disparity between the balances. In this case, the balance reconciliation may be successfully finished by pressing Save.
All transactions marked during the balance reconciliation will be turned into Reconciled ones, un-marked ones will remain as Unreconciled . Sometimes, for various reasons, the balance of your electronic account does not coincide with the bank statement (for example, you forgot to enter one of the transactions). In this case, if you press Save, the program will notify you that your balance does not coincide with the bank statement and the program will offer two solutions: you can either continue reconciliation or finish the procedure by entering a new transaction for the amount equal to the difference between balances. If you agree to enter such a transaction, all of the ones marked during the process of reconciliation as well as the new transaction will be marked as Reconciled. During the next reconciliation, transactions marked as Reconciled will not be included in the transaction lists.
Note. In the event you cannot reconcile the account in one session, you can interrupt reconciliation by pressing Cancel. Any transactions which have been marked up to that
moment, will be marked as "Cleared" . To continue the reconciliation, select the appropriate command from the menu; reconciled transactions will be marked in the list.

Inesoft Cash Organizer www.cashorganizer.com
- 11 -
8.4 Account group configuration
This function allows bundling account groups (for example your bank account and related credit cards) and fast switching between them.
To configure an account group, clic the Tools icon and select Manage Account Group menu item.
Click New to create a new account group, mark or clear checkboxes next to account names, click the Close button to save changes.
99 PPrroojjeecctt
Projects allow you to classify your financial operations by types of activity, which helps you obtain more detailed information on the distribution of your receipts and expenses. Using projects enables you to evaluate deals, profitability of your affiliates or your activity domains, business trip results and so on.
Note. Use button to establish the order of accounts in the Account Center list. Drag and drop an account to desired position.

Inesoft Cash Organizer www.cashorganizer.com
- 12 -
Examples of projects:
Contract #15 Trip to New York
Deal with Х company To get even more detailed information, you can enter several subprojects inside each of the projects. For instance, "Business Trips" project can contain subprojects corresponding to different trips: "London, February 2012", "New York 2012" etc.
9.1 Create and edit projects
To create a new project, click New project, the following window will be opened.
Enter the project's name into the Description field. If required, specify for which of the existing projects the new one will be a subproject. If there is no text in the Subproject of filed, the project will be independent of the others.
To edit an existing project, highlight it and click the Tools button. A similar window will be opened. Make your changes and save them by pressing the Save button.
Inesoft Cash Organizer www.cashorganizer.com
- 13 -
1100 PPllaannnneerr
There are some differences between scheduled transactions and registered ones: 1. A scheduled transaction can't be completely guaranteed. You can only expect its
performance with a certain probability on selected date. It can actually be performed at another time, performed partially or not performed at all;
2. Scheduled transaction can be either single or repeating.
In the transaction lists of accounts and projects, scheduled transactions are marked with red font.
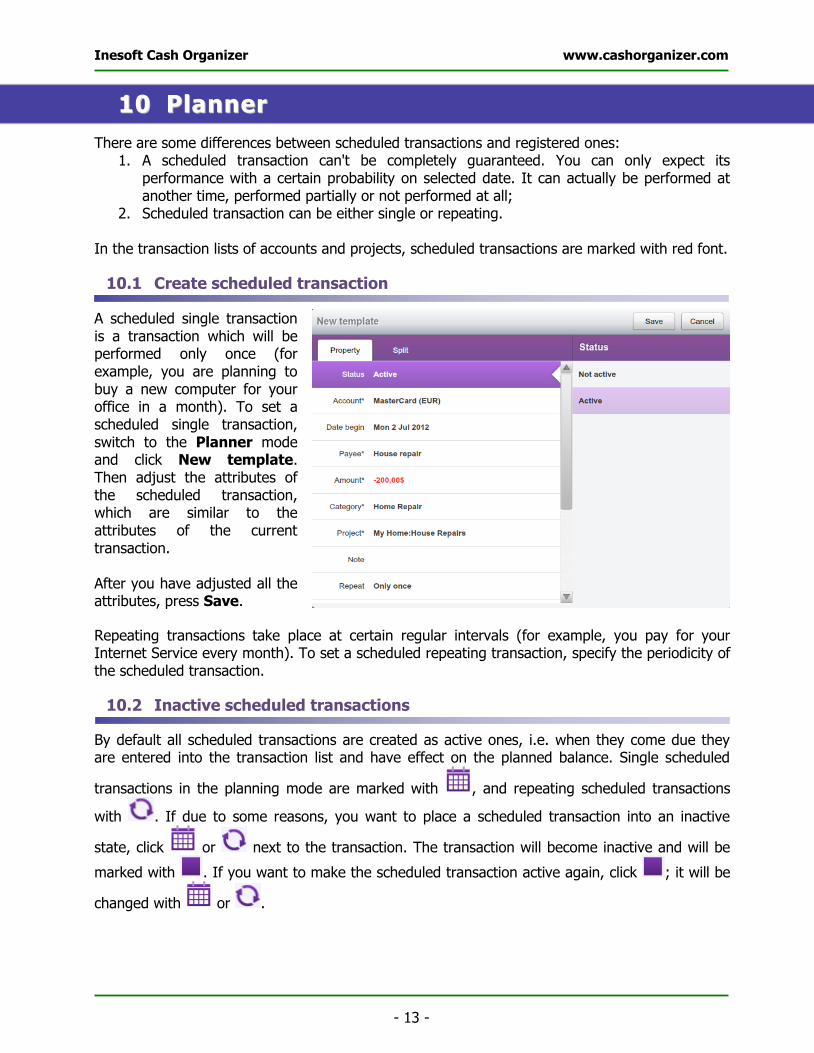
10.1 Create scheduled transaction
A scheduled single transaction is a transaction which will be performed only once (for example, you are planning to buy a new computer for your office in a month). To set a scheduled single transaction, switch to the Planner mode and click New template. Then adjust the attributes of the scheduled transaction, which are similar to the attributes of the current transaction. After you have adjusted all the attributes, press Save.
Repeating transactions take place at certain regular intervals (for example, you pay for your Internet Service every month). To set a scheduled repeating transaction, specify the periodicity of the scheduled transaction.
10.2 Inactive scheduled transactions
By default all scheduled transactions are created as active ones, i.e. when they come due they are entered into the transaction list and have effect on the planned balance. Single scheduled
transactions in the planning mode are marked with , and repeating scheduled transactions
with . If due to some reasons, you want to place a scheduled transaction into an inactive
state, click or next to the transaction. The transaction will become inactive and will be
marked with . If you want to make the scheduled transaction active again, click ; it will be
changed with or .

Inesoft Cash Organizer www.cashorganizer.com
- 14 -
10.3 Partial performance of scheduled transaction
Sometimes a scheduled transaction can be performed in several parts. For example, you set a scheduled transaction for your salary receipt but then decided to get some money in advance. In this case, you may need to perform the transaction in parts, with another amount. Switch to the account or project mode and click the transaction being partially performed. Change the transaction's amount and other attributes of the transaction (if required) and press Save. The transaction for the specified amount will appear in the list of the registered transactions. In the list of the scheduled transaction, there will remain a transaction for the amount equal to difference between the scheduled amount and the actual amount of the performed transaction.
1111 CCaatteeggoorryy
Categories allow sorting your income and expenses into meaningful groups. The program contains a default list of categories you can use for classification of your transactions. You can create your own categories and delete unneeded ones. Like projects, categories can contain subcategories. Usage of subcategories allows dividing major categories into less significant ones. For example, "Car" category can contain such subcategories as "Service", "Petrol", "Repair", etc. To create a new category, click New category button. The following window will be opened.
Enter the category's name into the Name field. If required, specify for which of the existing category the new one will be a subcategory (use the button). If there is no text in the Subcategory of filed, the category is independent of the others.
To edit an existing category, highlight it, click Tools button and select the Edit category menu item. A similar window will be opened, make your changes and save them by pressing Save button.

Inesoft Cash Organizer www.cashorganizer.com
- 15 -
To delete a category, highlight it, click Tools button and select the Delete category menu item. The confirmation window will be opened. You may reassign transactions of a category that is being deleted to another category (select it from the list) or leave them unassigned.
Choose OK to delete a category; Choose Cancel if you want to cancel
deletion.
1122 BBuuddggeett
This chapter will help you to get practical skills for corporate finance as well as your private finance management.
12.1 General principles
Budget planning is the main task of financial activity. A budget, planned correctly, will let you know exactly how much money is at your disposal and how much you can spend for certain purposes – for purchasing of new equipment for your company, to repair your house and so on. Select the categories, receipts, expenditures that you are going to include in your budget and evaluate the approximate amount of receipts and expenditures for each of the categories. You can plan you budget by presenting it in the form of a table.
When analyzing the budget, it is very important to compare the planned receipts and expenditures with actual ones. That is why there are four figures in the category's line, which allow evaluation of your budget efficiency: actual balance, planned balance, difference between them and percent of consumption. You are supposed to enter values of the planned budget only; the actual balance and the difference will be calculated based on the actual receipts and expenditures.

Inesoft Cash Organizer www.cashorganizer.com
- 16 -
12.2 Create new budget group
To create a new budget group, click New budget button and select the New budget group menu item. Enter the budget's name into the Name field, select budget group type and accounts. Click Save to save changes. To edit an existing budget, highlight it first click Tools button and select the Edit budget group menu item. A similar window will be opened, make your changes and save them by pressing the Save button.
12.3 Add new category to the budget
After creating a new budget, you should insert some categories into it. To add new categories, highlight the required budget group, click New budget button and select the New budget item menu item.
You will see the list of categories on the screen. Mark a category you are going to include in the budget. On having specified a category, select the budget type and limit and click Save to save changes.
12.4 Set a date range for budget planning
When you have set your receipt and expenditure limits in the budget, it is time to set the interval for budget planning. Tap on Period and select required date range from the list. If you wish to set a custom period, select Date and specify the starting and ending dates in the From and To forms. You can include scheduled transactions into your budget by clicking Tools button and selecting the Include scheduled menu item.
12.5 Budget transactions report
To see all transactions assigned to a group or single category, highlight its name, click the Tools button and select the Show Transactions menu item. A transaction report will be created. For

Inesoft Cash Organizer www.cashorganizer.com
- 17 -
more information on the report presentation form and its further processing, please see the Report Center section.
1133 RReeppoorrtt
In the domain of finance, it is often necessary to make a report. Such a report, when made correctly, allows the retrieving the required information in an easy to understand form.
13.1 Reporting
To make a report, select the Report tab. You will see a list of predefined forms. Select a form and double click to open it. Usage of a filter allows determining what transactions are to be considered while making a report. By selecting Accounts, Categories, Projects, Payees and other properties, you can indicate to what accounts, categories, projects and payees the transactions to be used in the report are related.
13.2 Selecting the report's form
Depending on what information is supposed to be presented in your report, you can select one of the report's forms.
Net Worth is a net value report (financial term that means a total sum of all receipts, expenditures and the initial balance). Such a report allows you to follow changes of liquid value of your company etc. Usually it is presented in the form of a bar graph.
Account Balances – this kind or report allows showing balance dynamics for each of the accounts selected by the filter and for all the accounts together.
Payee report is a comparison between receipt and expenditure values by payee.

Inesoft Cash Organizer www.cashorganizer.com
- 18 -
Profit and Loss Statement report is a comparison between receipt and expenditure values.
Category is a report showing the distribution of receipts and expenditures among the categories.
Montly Categories is a report showing monthly ratio of receipts and expenditures in all the categories selected by the filter.
Project Report is a report showing distribution of receipts and expenditures between the projects.
Monthly Project shows the ratio of receipts and expenditures in all the projects selected by the filter.
Transaction Report is a list including all the transactions selected by the filter. Budget Monthly is a report showing the ratio of the scheduled and actual receipts and
expenditures of the chosen budget.
13.3 Process the report made
Processing of the report includes:
13.3.1 Presentation form for the report selection
Inesoft Cash Organizer allows choosing between four forms of presentation for the reports: text report, pie graph, bar graph and line graph. Whichever form you prefer, each report type has one which is the most typical default form. However, you can select other presentation forms for most of the reports. See below examples of variety of presentation forms for the Category report.
You can select the required presentation form by clicking the corresponding icon in the menu bar:
13.3.2 Getting detailed information on the report's elements While viewing the graphic report, you may need detailed information on some elements of the report (for example, amount of receipts or expenditures of the category in the report like "Income & Expense Category", account balance for the selected date in the report "Account Balances" etc.). You may get the required information by moving mouse over desired elements.

Inesoft Cash Organizer www.cashorganizer.com
- 19 -
13.3.3 Create an auxiliary report If necessary, you may get additional information on an element of the report not only in the form of a table, but also in the form of an auxiliary report. For such purpose, select the corresponding element of the graphic report and double click. You may also create an auxiliary report by double clicking the element of the graphic report, which you are interested in. The type of the original report defines the type of the auxiliary report. After you have viewed the auxiliary report, press Close to get back to the original report.
13.4 Custom reports
Custom reports allow saving often-used reports and its customized settings. For example, you can save different settings for the same report type and run it immediately, without the need to customize it first. This function saves all the settings except a date period and currency.
To save a report, click Customize tab, edit the report’s filter, click Save button and select the Save report settings menu. To change a custom report's filter, open it, edit the filter and click Save.
1144 PPaayyeeee
Payee center allows to manage your payees and memorized transactions.
14.1 Create and edit payee
To create, edit and delete categories select Payee tab. To create a new payee, click New payee button. The following window will be opened.

Inesoft Cash Organizer www.cashorganizer.com
- 20 -
Enter the payee's name into the Payee field. If required, enter amount, category, project, note and update settings. To edit an existing payee, highlight it, click Tools button and select the Edit payee menu item. A similar window will be opened, make your changes and save them by pressing Save button.
14.2 Delete category
To delete a payee, highlight it, click Tools button and select the Delete payee menu item. The confirmation window will be opened. You may reassign transactions of a category that is being deleted to another category (select it from the list) or leave them unassigned.
Choose OK to delete a category; Choose Cancel if you want to cancel
deletion.
1155 CCuurrrreennccyy
The program contains a predefined currency list. To add a new currency to the list, press the New currency button. A list of currencies that can be used by the program will appear on the screen. Select the required one and press Save.
Note. You do not have to create payees specially in this mode because they are being created automatically when you register new transactions.

Inesoft Cash Organizer www.cashorganizer.com
- 21 -
The Edit currency menu item under the Tools button allows changing a symbol that will represent the currency in the transaction list, set a default currency and add new and edit rates in the currency history table. Delete all unused currencies hides all currencies that are not used in any mode from the list. To select currency update mode, click Menu button and select Options menu items. The program offers to ways of updating currencies:
Auto – currencies will be updated each time the program is launched from the Internet; Manual – you may decide when to update currency rates.
Every time you enter a new transfer between accounts using different currencies, Cash Organizer automatically opens an exchange rate confirmation window and saves those values in the exchange rate history table.
1166 WWoorrkkiinngg wwiitthh ddaattaa
When using the program, it is very important to ensure security of the database and the data’s ability to be used by other programs.
16.1 Create and restore backup data file
Storage of information in archive data files allows you to:
Ensure information safety; Work with different databases (each of them is kept in a separate file); View history of your financial state changes in the past (using the previously saved
databases).
16.2 Working with backup files
To create a new archive data file, click Menu button and select Backup menu item.

Inesoft Cash Organizer www.cashorganizer.com
- 22 -
You can switch to processing the data from the archive file at any time. Click Menu button and select Restore menu item. You will see the list of backup files stored in your PC. Click the file to start a restore process.
16.3 Clearing the database
If you want to erase all data, it is necessary to clear the existing database. Click Menu button and select Clear database menu item. The existing database will be eraced and all unsaved data will be lost.
1177 TTeecchhnniiccaall ssuuppppoorrtt
All users of the program are provided with technical support. We will answer all your questions and listen to your wishes. Please visit Cash Organizer forum or contact the Support Team at [email protected]. When contacting the Support Team, please provide us with the following information:
The product version;
Mobile device model; Description of the problem and the circumstances under which it occurred; Warning messages displayed (if applicable).
Note. When restoring an archive data file, you lose current
database. Do not forget to backup your data before restoring.