infopath and forms services lab
TRANSCRIPT

Hands-On Lab
InfoPath and Forms Services
Lab version: 1.0.0
Last updated: 2/23/2011

CONTENTS
OVERVIEW ................................................................................................................................................... 3 Starting Materials 4
EXERCISE 1: CREATING LIST FORMS IN INFOPATH ............................................................................. 4 Task 1 – Open the list form in InfoPath ................................................................................................ 4
Task 2 – Update the visual appearance of the form ............................................................................. 5
Task 3 – Add behavior to the form and publish it to the SharePoint list .............................................. 9
Exercise 1 Verification ......................................................................................................................... 12
EXERCISE 2: USING THE INFOPATH WEB PART ................................................................................. 13 Task 1 – Add the Web Parts to the site’s main page .......................................................................... 13
Task 2 – Connect the list and the InfoPath Form Web Part ................................................................ 15
Exercise 2 Verification ......................................................................................................................... 16
EXERCISE 3: INFOPATH AND FORMS LIBRARIES ............................................................................... 17 Task 1 – Connect an existing InfoPath for to external data ................................................................ 17
Task 2 – Add a View to the InfoPath form containing a Submit button ............................................. 20
Task 3 – Publish the form to the Timesheets Form Library ................................................................ 23
Task 4 – Use the Timesheet Form in a Web Part ................................................................................ 25
Exercise 3 Verification ......................................................................................................................... 26
SUMMARY .................................................................................................................................................. 26
APPENDIX .................................................................................................................................................. 28 No Items 28

Overview
In these lab exercises, you will use InfoPath to define custom forms to aid in the entry of time tracking
data for Contoso Corporation. This system will use rich InfoPath forms to manage entry of employees
and timesheet data. To provide a complete view of the system, the site’s main page contains web parts
to provide contextual information to the user.
Objectives
In this lab you will:
Learn to use InfoPath to define a list’s entry forms
Learn to use web parts to host and connect InfoPath forms
Learn to write custom code to extend the capabilities of InfoPath forms
System Requirements
This lab assumes that you have SharePoint Server installed in a test environment. For guidance on how
to setup SharePoint Server see http://msdn.microsoft.com/en-us/library/ee554869(office.14).aspx.
Note that any URL referred to in this lab must be adjusted for use with your local setup. You must have
the following items to complete this lab:
Microsoft® Windows® Vista SP1 or Microsoft® Windows Server 2008 (64-bit)
Microsoft® SharePoint Server 2010 (64-bit)
Microsoft® Office Professional Plus 2010 (32-bit or 64-bit)
Microsoft® Visual Studio 2010
Setup
You must perform the following steps to prepare your computer for this lab. This consists primarily of
creating a SharePoint site collection at http://intranet.contoso.com/sites/InfoPath and installing the
code snippets for this lab.
1. Run the command file Setup.bat located at
C:\Office2010DeveloperTrainingKit\Labs\InfoPath\Source\.

Exercises
This Hands-On Lab is comprised of the following exercises:
1. Creating list forms in InfoPath
2. Using the InfoPath Web Part
3. InfoPath and Forms Libraries
Estimated time to complete this lab: 60 minutes.
Starting Materials
This Hands-On Lab includes the following starting materials.
InfoPath Templates. The lab provides the following InfoPath Templates that you can use as
starting point for the exercises. The lab instructions assume that you installed the training kit to
the default location, C:\Office2010DeveloperTrainingKit\.
◦ C:\Office2010DeveloperTrainingKit\Labs\InfoPath\Source\Starter\Template.xsn: This
is a starting InfoPath form used in Exercise 3.
Note: Inside the lab’s Source folder, you will find a Solution folder containing an end solution
with the completed lab exercise.
Exercise 1: Creating List Forms in
InfoPath
In this exercise you will create a new form for the Employees list using InfoPath. This new form will
focus on providing a form that is organized to better represent the structure of Employee information.
Task 1 – Open the list form in InfoPath
In this first task you will enable Forms Services on the SharePoint site and open the Employees list form
in InfoPath
1. Enable the SharePoint Server Enterprise Site Collection features to enable Forms Services
a. In Internet Explorer navigate to http://intranet.contoso.com/sites/InfoPath
b. In the Site Actions menu click Site Settings
c. In the Site Collection Administration section, click the Site collection features link
d. Locate the SharePoint Server Enterprise Site Collection feature in the list

e. Click the Activate button to enable the feature
2. Open the Employees list form in InfoPath
a. Navigate to the Employees list using the navigation bar on the left of the page
b. Switch to the List ribbon using the link at the top of the page
c. Click the Customize Form button in the Employees List ribbon group
Note: This will automatically open InfoPath and load the form for the Employees list
Figure 1
Default Employees List Form
Task 2 – Update the visual appearance of the form
In this task, you will be updating the look and feel of the form.
1. Delete the previous form content
a. Select all content on the page
b. Press the delete key
2. Apply a page layout and add the layout tables to the form
a. Place the cursor at the top of the page
b. In the Page Design ribbon tab, click Page Layout Templates and choose the Title
Only option

Figure 2
InfoPath Page Layout Template
c. Place the cursor on the Add tables text
d. In the Insert ribbon tab click the drop down arrow on the Tables group and select a 4
column table with no header
Figure 3
Insert 4 Column Table
e. Add a second table with 2 columns and a sub header
f. Add a third table with 4 columns and a sub header

g. Delete the third row from each of the table by selecting all cells can pressing the
delete key
Figure 4
Empty Layout Complete
3. Populate the top section of the form with the employee’s name and title
a. Locate the upper table that has 4 columns and two rows
b. Select the right three cells on the second row, right click them and click Merge Cells
c. Drag the First Name item from the Fields task pane on to the first two cells of the
first row
Note: make sure both cells are selected to indicate to InfoPath that the left cell should
contain the label and the right cell should contain the control
Figure 1
Dragging Fields to the Layout
d. Drag the Last Name field into the rightmost two cells of the first row
e. Drag the Title field to the bottom row

Figure 6
First Section Complete
4. Populate the Contact information section of the form
a. Click the first Click to add subheading item and enter Contact Info
b. Drag the cell dividers in the table to make the first column about 25% of the total
width
c. Drag the Phone field into the two cells on the top row
d. Drag the Email field into the two cells on the bottom row
Figure 7
Contact Info Complete
5. Populate the General Information section of the form
a. Click the remaining Click to add subheading item and enter General Information
b. Drag the Department Name field into the left two cells on the first row
c. Drag the Hire Date field into the right two cells on the first row
d. Drag the Salaried field into the left two cells on the bottom row
e. Drag the Base Rate field into the right two cells on the bottom row
6. Apply a new Theme to the form
a. Click the Themes drop down button in the Page Design ribbon tab
b. Choose a theme to apply to the form
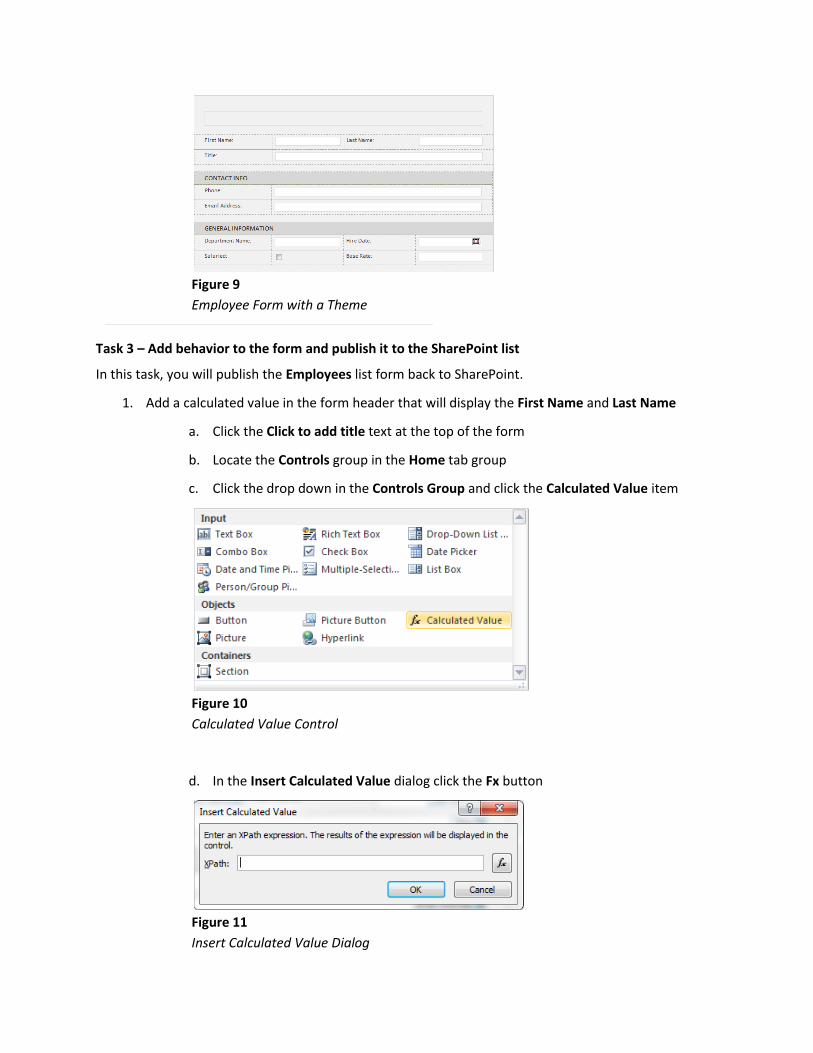
Figure 9
Employee Form with a Theme
Task 3 – Add behavior to the form and publish it to the SharePoint list
In this task, you will publish the Employees list form back to SharePoint.
1. Add a calculated value in the form header that will display the First Name and Last Name
a. Click the Click to add title text at the top of the form
b. Locate the Controls group in the Home tab group
c. Click the drop down in the Controls Group and click the Calculated Value item
Figure 10
Calculated Value Control
d. In the Insert Calculated Value dialog click the Fx button
Figure 11
Insert Calculated Value Dialog

e. Click the Insert Function button
f. Chose the Text option in the Categories list and select the concat function
g. Click OK to close the Insert Function dialog
Figure 12
Insert Formula Dialog
h. Double click the first double click to insert field
i. Choose First Name and click OK
j. Single click the second link and type “ “
k. Double click the last double click to insert field and select Last Name
Figure 13
Completed Full Name Formula
l. Click OK to complete the formula then click OK to complete the control
2. Define rules to set disable the Base Rate control when the Salaried check box is set
a. Right click the Base Rate text box and choose Rules -> Manage Rules to show the
Rules task pane
b. In the Rules task pane click the New button and select Formatting

c. Click the None link in the Condition section
Figure 14
Base Rate Disabled Rule
d. In the Condition drop down select Salaried in the first drop down list
e. In the last drop down choose TRUE and click OK
Figure 15
Salaried is true condition
f. In the Rules task pane, check the Disable this control check box
3. Define a default value for the EmployeeID field
a. In the Fields task pane, right click EmployeeID and select Properties
b. Enter 0 in the Default Value text box
c. Click OK to close the dialog
4. Publish the form using the Info tab in BackStage
a. Click the Backstage button (labeled as File)
b. In the Info tab, click the Quick Publish button
Note: You can also publish using the Quick Publish button on the Quick Access
Toolbar or in the Publish tab in BackStage and choosing SharePoint List
Exercise 1 Verification
In order to verify that you have correctly performed all steps of Exercise 1, proceed as follows:
Test the Form
Test your form to verify it is use to add or edit items in the Employees list.
1. Load the Employees list in the browser
a. In Internet Explorer navigate to http://intranet.contoso.com/sites/InfoPath
b. Click the Employees link in the left side navigation tree
c. On the employees page click the New Item button in the Items ribbon tab to load the
custom form
Figure 16
New Employee Form
d. Create a new employee and submit it using the custom form
2. Edit an existing employee using the custom InfoPath form
a. Click the first employee’s employee id to load a read only form
b. Click Edit item to see the edit view of the InfoPath form

Figure 17
Edit Employee Form
Exercise 2: Using the InfoPath Web Part
In this exercise you will use the Employees list form created in the last exercise to create a main page for
the site using Web Parts and Web Part Connections.
Task 1 – Add the Web Parts to the site’s main page
In this task, you will place two web parts on the main page. The first is a list of all Employees using the
list web part and the second is a read-only version of the InfoPath form created in the first exercise.
1. Add the List web part to the site’s main page
a. In Internet Explorer navigate to http://intranet.contoso.com/sites/InfoPath
b. In the Page ribbon tab click the Edit page button
c. In the left hand side web part zone, click the Add a Web Part link
d. In the Categories pane, select the Lists and Libraries category
e. Choose the Employees web part and click the Add button
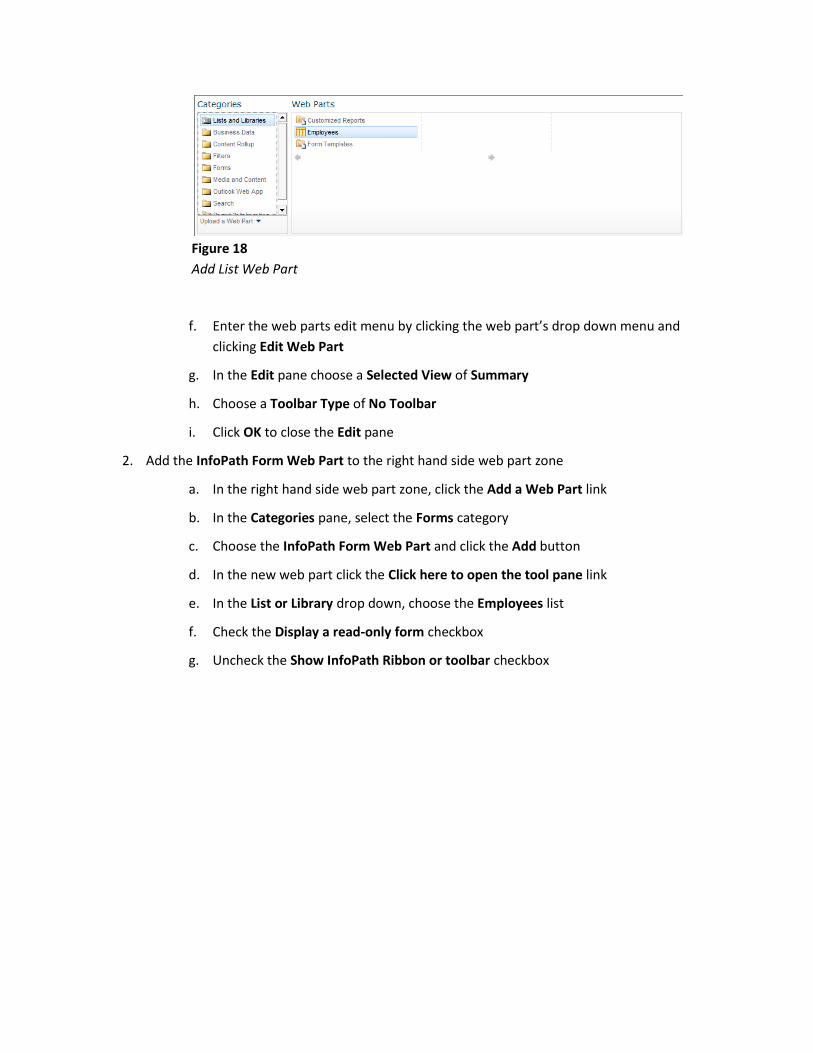
Figure 18
Add List Web Part
f. Enter the web parts edit menu by clicking the web part’s drop down menu and
clicking Edit Web Part
g. In the Edit pane choose a Selected View of Summary
h. Choose a Toolbar Type of No Toolbar
i. Click OK to close the Edit pane
2. Add the InfoPath Form Web Part to the right hand side web part zone
a. In the right hand side web part zone, click the Add a Web Part link
b. In the Categories pane, select the Forms category
c. Choose the InfoPath Form Web Part and click the Add button
d. In the new web part click the Click here to open the tool pane link
e. In the List or Library drop down, choose the Employees list
f. Check the Display a read-only form checkbox
g. Uncheck the Show InfoPath Ribbon or toolbar checkbox
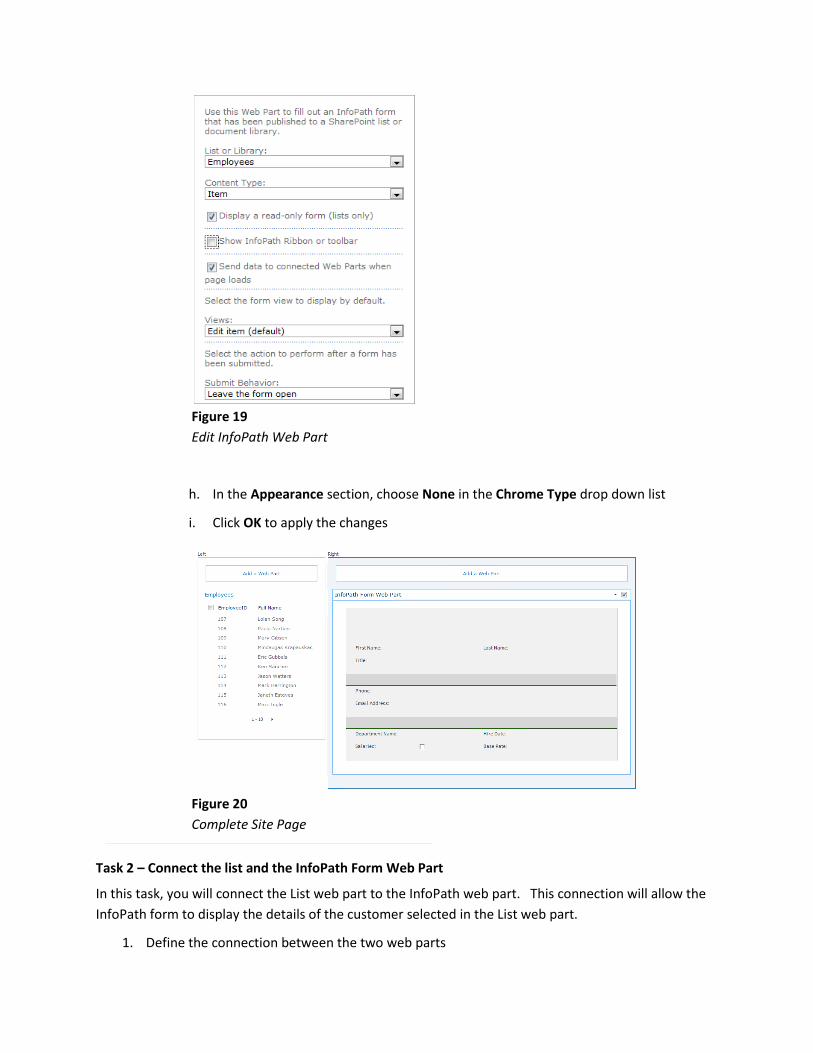
Figure 19
Edit InfoPath Web Part
h. In the Appearance section, choose None in the Chrome Type drop down list
i. Click OK to apply the changes
Figure 20
Complete Site Page
Task 2 – Connect the list and the InfoPath Form Web Part
In this task, you will connect the List web part to the InfoPath web part. This connection will allow the
InfoPath form to display the details of the customer selected in the List web part.
1. Define the connection between the two web parts

a. Click the drop down arrow on the InfoPath Form web part
b. Choose Connections -> Get Form From -> Employees
Figure 21
Connections Menu
c. Save the page by clicking the Stop Editing button in the Page ribbon tab
Exercise 2 Verification
In order to verify that you have correctly performed all steps of Exercise 2, proceed as follows:
Test the Form
Test your form to verify it is use to add or edit items in the Employees list.
1. Load the site’s main page in the browser
a. In Internet Explorer navigate to http://intranet.contoso.com/sites/InfoPath
b. Select an employee in the Employees list of the page
c. Verify the InfoPath form is populated with the selected employee’s information
Figure 22
Connected Site Page
Exercise 3: InfoPath and Forms Libraries
In this exercise you will create a custom form used to submit data to a Forms Library using InfoPath.
This form will submit timesheets to a library and use related data in the Employees list to supplement
the information entered in the form.
Task 1 – Connect an existing InfoPath Form to external data
In this task, you will connect a drop down list in the form to an external list of Employees.
1. Create a new secondary data connection to the Employees list
a. Open the Timesheet.xsn starter template in the
C:\Office2010DeveloperTrainingKit\Labs\InfoPath\Source\Starter folder by right
clicking it and choosing Design
b. Click the From SharePoint List button in the Data ribbon tab
c. In the Data Connection Wizard enter http://intranet.contoso.com/sites/InfoPath
as the site url and click Next
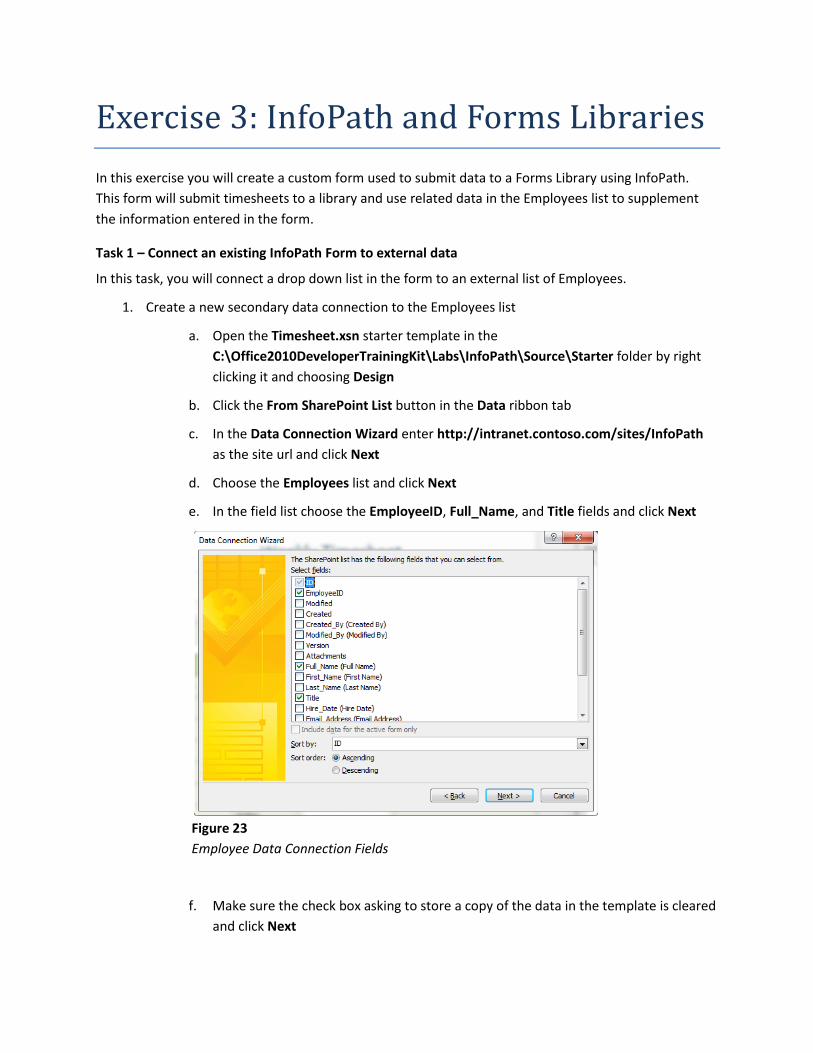
d. Choose the Employees list and click Next
e. In the field list choose the EmployeeID, Full_Name, and Title fields and click Next
Figure 23
Employee Data Connection Fields
f. Make sure the check box asking to store a copy of the data in the template is cleared
and click Next

g. Verify the name of the connection is Employees and the check box to automatically
retrieve the data is checked then click Finish
2. Convert the Employee text box to a drop down list using the new Employees data source
a. Right click the Employee text box in the form and select Change Control -> Drop-
Down List Box
b. Right click the Employee drop down list box and select Drop-Down List Box
Properties
c. In the Drop-Down List Box Properties dialog choose the Get choices from an
external data source radio button
d. Verify the Data source is Employees
e. Use the field picker button for Value and Display name settings the values as follows
i. Value = EmployeeID
ii. Display Name = Full Name
Figure 24
Employees Drop Down List Properties
f. Click OK to close the dialog
3. Create a Calculated Value control to show the title of the currently selected employee
a. Place the cursor in the table cell to the right of the Title label
b. In the Home ribbon tab, locate the Input drop down in the Controls group

c. Click the Calculated Value item in the drop down
d. In the Insert Calculated Value dialog, click the Fx button
e. In the Insert Formula dialog click the Insert Field or Group button
f. In the Select a Field or Group dialog select Employees (Secondary) in the drop down
list
g. Expand the dataFields and d:SharePointListItem_RW nodes and select Title.
Figure 25
Select Employee Title
h. Click the Filter Data button
Note: It is possible there are many employees in the list. The filter identifies which
employee title in the list is needed. In this case, the employee is chosen by relating
the Employee ID to the currently selected Employee in the Main data source.
i. In the Filter Data dialog click Add
j. In the first field drop down choose EmployeeID
k. In the last field drop down choose Select Field or Group
l. In the Select a Field or Group dialog, choose Main from the drop down
m. Select Employee and click OK

Figure 26
Select Filter Parameter
n. Click OK to close all the dialogs
4. Add a rule that will send the currently selected employee to any web parts containing this form
a. Right click the Employee Drop-Down List Box and select Rules -> Manage Rules
b. In the Rules task pane, click New -> Action
c. In the Run these actions section click Add -> Send Data to Web Part
d. In the Rule Details dialog click OK
Figure 27
Send Data to Web Part
Task 2 – Add a View to the InfoPath form containing a Submit button

In this task, you will create a copy of the existing form in a second view. Since this view will be on a main
page in a web part, you will add a button that will automatically save the timesheet.
1. Create a new view named Web Part View and copy the current content to the new view
a. Switch to the Page Design ribbon tab
b. Click the New View button in the View group
c. Enter a name of Web Part Form and click OK
d. Switch back to the View 1 view using the View dropdown in the View group
e. Select the entire form and copy it
f. Switch back to the Web Part Form view and paste all of the content into the form
2. Add a new submit data source that will automatically save the file with a file named determined
by a formula
a. Click the Submit Options in the Submit Actions group in the Data ribbon tab
b. Check the Allow users to submit this form checkbox
c. Choose SharePoint Document library in the drop down list
d. Click the Add button to create an external connection
e. Enter a Document Library url of
http://intranet.contoso.com/sites/InfoPath/Timesheets
f. Click the Fx button by file name
g. Enter a string of concat(%1, "_", string(%2))
h. Select %1 and click Insert Field or Group then select Employee and click OK
i. Select %2 and click Insert Field or Group then select WeekStart and click OK
Figure 28
Configure File Name Formula
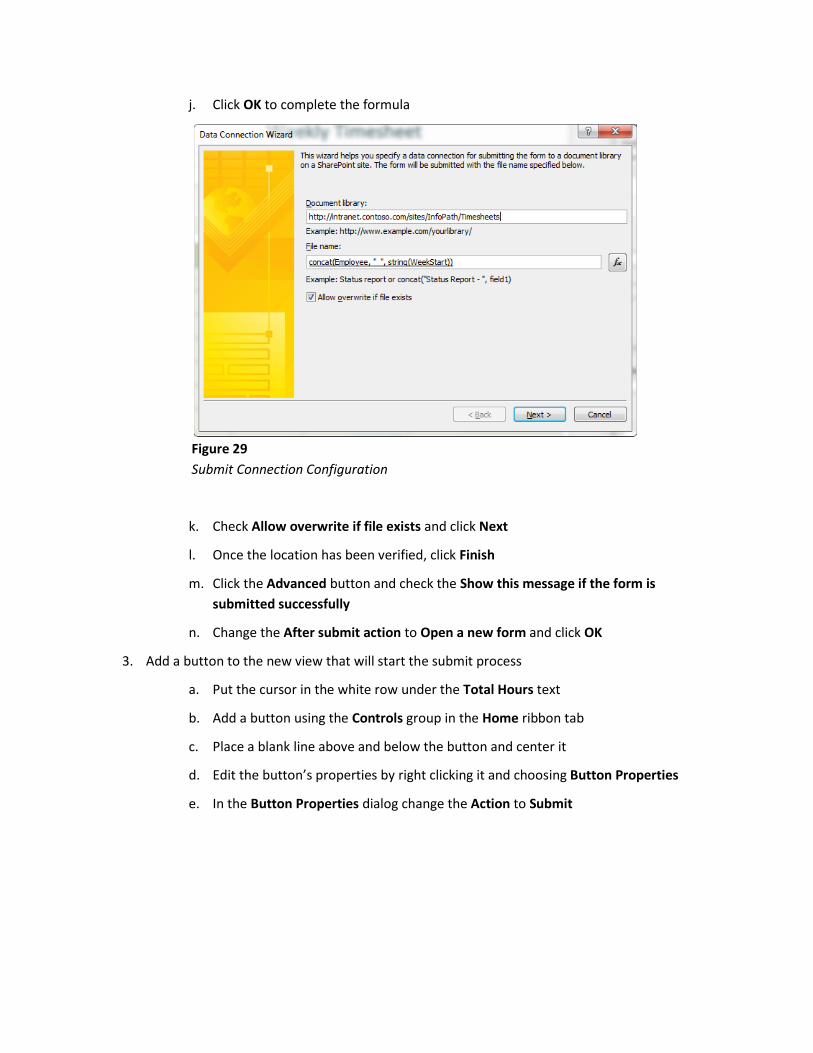
j. Click OK to complete the formula
Figure 29
Submit Connection Configuration
k. Check Allow overwrite if file exists and click Next
l. Once the location has been verified, click Finish
m. Click the Advanced button and check the Show this message if the form is
submitted successfully
n. Change the After submit action to Open a new form and click OK
3. Add a button to the new view that will start the submit process
a. Put the cursor in the white row under the Total Hours text
b. Add a button using the Controls group in the Home ribbon tab
c. Place a blank line above and below the button and center it
d. Edit the button’s properties by right clicking it and choosing Button Properties
e. In the Button Properties dialog change the Action to Submit

Figure 30
Add Submit Button
f. Enter a Label of Submit Timesheet and click OK
Task 3 – Publish the form to the Timesheets Form Library
In this task, you will publish the new form to the Timesheets form library
1. Publish the form to the existing Timesheets Form Library
a. Click the BackStage button and open the Publish tab
b. Click the SharePoint Server button
c. In the wizard, enter a url of http://intranet.contoso.com/sites/InfoPath and click
Next
d. Choose the Form Library radio button and click Next
e. Choose the Update radio button and select the Timesheets library then click Next
2. Promote the Employee ID, Total Hours, and Overtime Hours to the form library
a. Click the Add button at the top of the dialog
b. Select the Employee field in the tree
c. In the site column group drop down list choose (This form library)
d. In the Column name choose Employee and click OK
e. Repeat this process to map:
i. TotalHours to Total Hours

ii. OvertimeHours to Overtime Hours
Figure 31
Promoted Fields
3. Provide the selected employee to other Web Parts using connections
a. Click the Add button on the bottom section of the dialog
b. In the dialog, select the Employee field
c. Click OK
Figure 32
Promote Connection Data
d. Click Next to move to the next step
4. Finish the process of publishing by clicking the Publish button

Task 4 – Use the Timesheet Form in a Web Part
In this task, you will use the new Timesheet Form web part on the sites main page. You’ll be also adding
a list of timesheets already submitted filtered on the employee selected in the form.
1. Add the List web part to the site’s main page
a. In Internet Explorer navigate to http://intranet.contoso.com/sites/InfoPath
b. In the Page ribbon tab and click the Edit page button
c. In the right hand side web part zone, click the Add a Web Part link
d. In the Insert Web part pane, select the Lists and Libraries category
e. Choose the Timesheets web part and click the Add button
f. Drag the new web part below the existing InfoPath Form web part
g. Enter the web parts edit menu by clicking the web part’s drop down menu and
clicking Edit Web Part
h. In the Edit pane choose a Selected View of Summary
i. Choose a Toolbar Type of No Toolbar
j. Click OK to close the Edit pane
2. Add the InfoPath Form Web Part to the left hand side web part zone
a. In the left hand side web part zone, click the Add a Web Part link
b. In the Insert Web part pane, select the Forms category
c. Choose the InfoPath Form Web Part and click the Add button
d. Drag the new web part below the existing List web part
e. In the new web part click the Click here to open the tool pane link
f. In the List or Library drop down, choose the Timesheets list
g. Uncheck the Show InfoPath Ribbon or toolbar checkbox
h. In the Views drop down choose Web Part Form
i. In the Appearance section, choose None in the Chrome Type drop down list
j. Click OK to apply the changes
3. Define the connection between the two web parts
a. Click the drop down arrow on the InfoPath web part
b. Choose Connections -> Send Data To -> Timesheets
c. In the Configure Connection Dialog switch to the Configure Connection tab

d. Choose a Connection Type of Get Filter Values From and switch to the second tab
e. Set the Provider Field to Employee and the Consumer Field Name to Employee
f. Click Finish to close the dialog
g. Save the page by clicking the Stop Editing button in the Page ribbon tab
Exercise 3 Verification
In order to verify that you have correctly performed all steps of Exercise 3, proceed as follows:
Test the Form
Test your form to verify it is use to add or edit items in the Employees list.
1. Load the site’s main page in the browser
a. In Internet Explorer navigate to http://intranet.contoso.com/sites/InfoPath
b. Select an employee in the Timesheets form and submit a timesheet
c. In the new form select the same employee and verify the submitted timesheet shows up
in the filtered list
Figure 33
Connected Site Page
Summary
In this exercise you learned how to use InfoPath 2010 to build rich list forms and web parts. Using web
parts and connections rich mash-up applications were developed without writing a single line of code.

InfoPath 2010 is an important part of your SharePoint applications. It allows a rich UI to be designed in
an style that is familiar for designers and powerful for developers.

Appendix
No Items
No Appendix content