infor starlight pms installation and administration guide
TRANSCRIPT

Infor Starlight PMS Installation and Administration Guide
HTTPS-Interface between Infor Starlight PMS Front Office as of version 8.0.0A and a Central Reservation System

Copyright © 2013 Infor
Important Notices The material contained in this publication (including any supplementary information) constitutes and contains confidential and proprietary information of Infor. By gaining access to the attached, you acknowledge and agree that the material (including any modification, translation or adaptation of the material) and all copyright, trade secrets and all other right, title and interest therein, are the sole property of Infor and that you shall not gain right, title or interest in the material (including any modification, translation or adaptation of the material) by virtue of your review thereof other than the non-exclusive right to use the material solely in connection with and the furtherance of your license and use of software made available to your company from Infor pursuant to a separate agreement, the terms of which separate agreement shall govern your use of this material and all supplemental related materials ("Purpose"). In addition, by accessing the enclosed material, you acknowledge and agree that you are required to maintain such material in strict confidence and that your use of such material is limited to the Purpose described above. Although Infor has taken due care to ensure that the material included in this publication is accurate and complete, Infor cannot warrant that the information contained in this publication is complete, does not contain typographical or other errors, or will meet your specific requirements. As such, Infor does not assume and hereby disclaims all liability, consequential or otherwise, for any loss or damage to any person or entity which is caused by or relates to errors or omissions in this publication (including any supplementary information), whether such errors or omissions result from negligence, accident or any other cause. Without limitation, U.S. export control laws and other applicable export and import laws govern your use of this material and you will neither export or re-export, directly or indirectly, this material nor any related materials or supplemental information in violation of such laws, or use such materials for any purpose prohibited by such laws. Trademark Acknowledgements The word and design marks set forth herein are trademarks and/or registered trademarks of Infor and/or related affiliates and subsidiaries. All rights reserved. All other company, product, trade or service names referenced may be registered trademarks or trademarks of their respective owners. Publication Information Release: Infor Starlight PMS as of version 8.0.0A Publication date: May 7, 2013
Infor Starlight PMS Installation and Administration Guide | 3
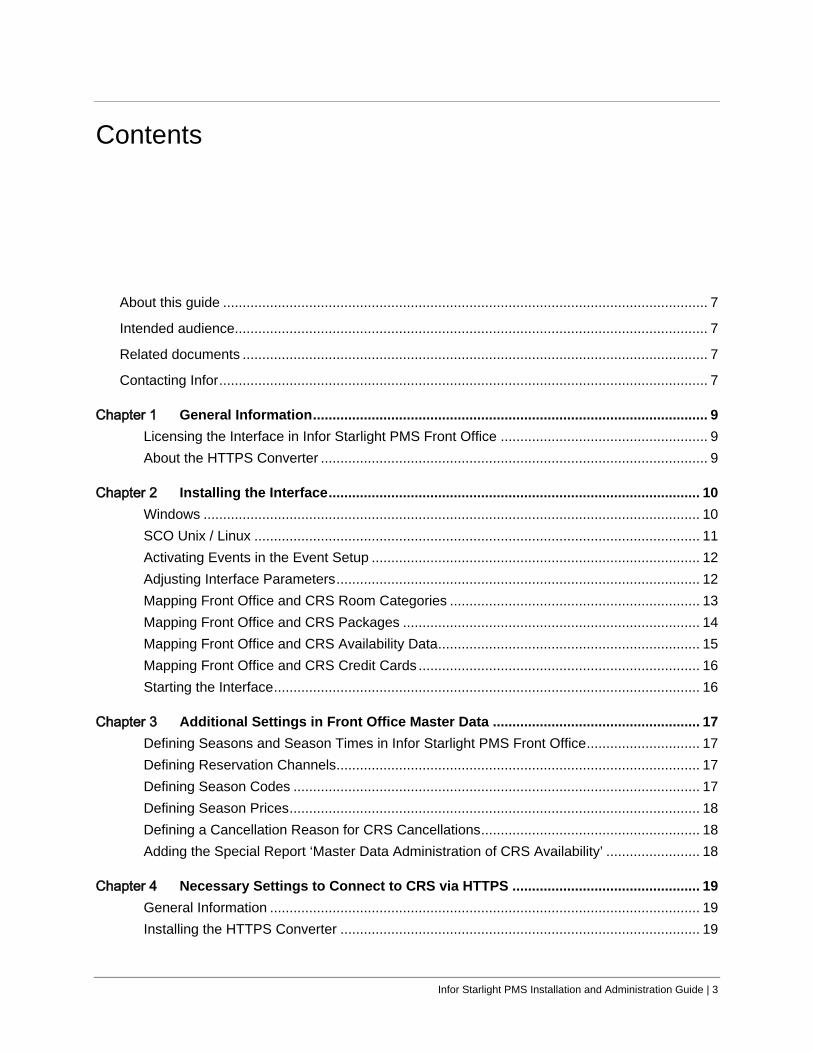
Contents
About this guide ............................................................................................................................ 7
Intended audience......................................................................................................................... 7
Related documents ....................................................................................................................... 7
Contacting Infor ............................................................................................................................. 7
Chapter 1 General Information ..................................................................................................... 9 Licensing the Interface in Infor Starlight PMS Front Office ..................................................... 9 About the HTTPS Converter ................................................................................................... 9
Chapter 2 Installing the Interface ............................................................................................... 10 Windows ............................................................................................................................... 10 SCO Unix / Linux .................................................................................................................. 11 Activating Events in the Event Setup .................................................................................... 12 Adjusting Interface Parameters ............................................................................................. 12 Mapping Front Office and CRS Room Categories ................................................................ 13 Mapping Front Office and CRS Packages ............................................................................ 14 Mapping Front Office and CRS Availability Data ................................................................... 15 Mapping Front Office and CRS Credit Cards ........................................................................ 16 Starting the Interface ............................................................................................................. 16
Chapter 3 Additional Settings in Front Office Master Data ..................................................... 17 Defining Seasons and Season Times in Infor Starlight PMS Front Office ............................. 17 Defining Reservation Channels ............................................................................................. 17 Defining Season Codes ........................................................................................................ 17 Defining Season Prices ......................................................................................................... 18 Defining a Cancellation Reason for CRS Cancellations ........................................................ 18 Adding the Special Report ‘Master Data Administration of CRS Availability’ ........................ 18
Chapter 4 Necessary Settings to Connect to CRS via HTTPS ................................................ 19 General Information .............................................................................................................. 19 Installing the HTTPS Converter ............................................................................................ 19

Contents
4 | Infor Starlight PMS Installation and Administration Guide
Prerequisites ............................................................................................................. 19 Installation Procedure ............................................................................................... 20 How to Call the New Program .................................................................................. 20 Parameters ............................................................................................................... 21 Log File ..................................................................................................................... 22 GUI-Version of the HTTPS Converter ....................................................................... 22
Starting the HTTPS Converter .............................................................................................. 22 Parameters and Other System Settings ................................................................................ 22
Adjusting the Entries in the Converter.ini file .................................................................. 22
Chapter 5 Calling the Special Report ‘Master Data Administration of CRS Availability’ ...... 23 Calling the Special Report ‘Master Data Administration of CRS Availability’ ........................ 24 Changing the Availability per Category manually .................................................................. 26 Changing the Availability in the Rate Plan for Individual Days .............................................. 27 Changing the Availability in the Rate Plan for Specific Weekdays for a Defined Period ....... 28 Setting Individual Lines Back to Default Values .................................................................... 29 Check Rejected Data ............................................................................................................ 29

Contents
Infor Starlight PMS Installation and Administration Guide | 5

Infor Starlight PMS Installation and Administration Guide | 7
About this guide This guide describes the general installation procedures of an interface between Infor Starlight PMS Front Office and a Central Reservation System (CRS) that apply to all CRS providers.
Individual settings for each CRS provider are described in separate data sheets. Naming convention of these data sheets is as follows: DS_CRS_<Name of Provider>.pdf.
CR systems use secure connections via HTTPS. You must accordingly adjust settings. See the details: Necessary Settings to Connect to CRS via HTTPS.
Intended audience The present guide is addressed to Infor software consultants, Infor IT service staff and Infor business partners, as well as system administrators at the customer’s responsible for setting up interfaces between Infor Starlight PMS Front Office as of version 8.0.0A and a Central Reservation System (CRS).
Related documents You can find the documents in the product documentation section of the Infor Xtreme Support portal, as described in "Contacting Infor" on page 7.
QSG_PMS_P-Part_Standard_IF_Eng.pdf
User manual Flexible Pricing in Infor Starlight PMS
Contacting Infor If you have questions about Infor products, go to the Infor Xtreme Support portal at www.infor.com/inforxtreme.
If we update this document after the product release, we will post the new version on this Web site. We recommend that you check this Web site periodically for updated documentation.
If you have comments about Infor documentation, contact [email protected].


Infor Starlight PMS Installation and Administration Guide | 9
Chapter 1 General Information 1
Licensing the Interface in Infor Starlight PMS Front Office You need a separate license to run the CRS interface between Infor Starlight PMS Front Office and your CRS system.
→ Infor Starlight PMS Front Office system parameter 2326: License for CRS Interface
About the HTTPS Converter As Progress Software Corporation does support Hypertext Transfer Protocol Secure (HTTPS), Infor provides a middleware to convert the data from Infor Starlight PMS accordingly.
The converter takes HTTP-output from our progress interface and forwards it to the HTTPS web-service.
The HTTPS Converter runs as windows service.

Infor Starlight PMS Installation and Administration Guide | 10
Chapter 2 Installing the Interface 2
Infor provides a standard interface between Infor Starlight PMS Front Office and CRS systems. For installation instructions, see our separate quick setup guide for setting up a multi property interface (Progress Part) (QSG_PMS_P-Part_Standard_IF_Eng.pdf).
Windows
Caution: Do not use interface IDs 1 to 5, since they are blocked for the main interface types. In addition, always enter the value ‘10’ into the [IfArt] column for all CRS interfaces, so that these interfaces are also available in the help window for the [Interface ID] of the special report “if-crsavail.w”.
Hint: The copy of the prowin32.exe file stored under \DLC\bin must be re-named to procrs.exe for the CRS-interface.

Installing the Interface
Infor Starlight PMS Installation and Administration Guide | 11
SCO Unix / Linux 1 Log on as wartung or support.
2 Change to directory /usr1/hogatex/scripts.
3 Create a backup of the hti script: Copying hti using the command
cp hti hti.backup.
4 Add the following row to the hti script:
prostart off crs >> CRSERR.LOG # CRS
5 Create a backup by copying prostart using the command
cp prostart prostart.backup
6 Add the following code in prostart:
"crs")
search5=`grep "_progres" "$psname" | grep "P#=101" | grep -c "$dbhome/$dbname"`
if [ "$search5" != "0" ]
then
error="pos_up"
if [ "$errormode" != "on" ]
then
errorconf="no"
fi
fi
program="mbpro"
minusparam="-param"
param="P#=101,B#=0"
startp="startprog.p"
;;
P# = Identification code of the interface
B# = Property number
7 Start the interface with hti.
Installing the Interface
12 | Infor Starlight PMS Installation and Administration Guide
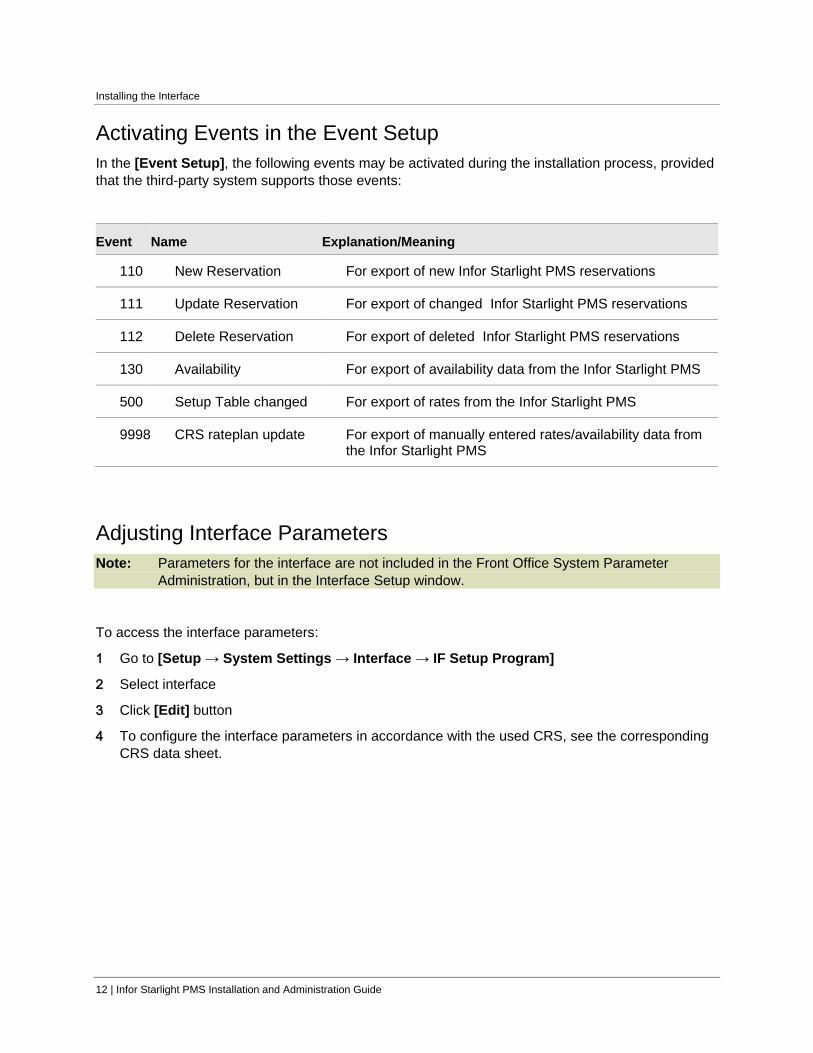
Activating Events in the Event Setup In the [Event Setup], the following events may be activated during the installation process, provided that the third-party system supports those events:
Event Name Explanation/Meaning
110 New Reservation For export of new Infor Starlight PMS reservations
111 Update Reservation For export of changed Infor Starlight PMS reservations
112 Delete Reservation For export of deleted Infor Starlight PMS reservations
130 Availability For export of availability data from the Infor Starlight PMS
500 Setup Table changed For export of rates from the Infor Starlight PMS
9998 CRS rateplan update For export of manually entered rates/availability data from the Infor Starlight PMS
Adjusting Interface Parameters Note: Parameters for the interface are not included in the Front Office System Parameter
Administration, but in the Interface Setup window.
To access the interface parameters:
1 Go to [Setup → System Settings → Interface → IF Setup Program]
2 Select interface
3 Click [Edit] button
4 To configure the interface parameters in accordance with the used CRS, see the corresponding CRS data sheet.

Installing the Interface
Infor Starlight PMS Installation and Administration Guide | 13
Mapping Front Office and CRS Room Categories All room categories that are to be made available to a CRS must be mapped with the corresponding Front Office categories. Please note that this chapter only describes the general procedure for room category mapping. To map room categories in accordance with the used CRS, see the corresponding CRS data sheet.
1 Go to main menu bar in Front Office: [Setup → System Settings → Interface → IF Setup Program]
2 Select interface and click [Edit]
3 Click [Mappings] button
4 [Interface Mappings] window: Open the [Purpose] drop-down list and select [Department].
5 In the first instance, you will have to map the Front Office room categories with their CRS equivalents:
a Click [New] and enter the identifier (integer) of the first Front Office room category into the [SourceKey] field.
b Press the [Tab] key twice to jump to the [Dest] field and type the code of the associated CRS category
c Save your first mapped record by pressing [Enter]
d Map all Front Office room categories with their CRS equivalents this way.
6 Once you have mapped all data records, you will have to map them again the other way round, which means the CRS categories with their Front Office equivalents:
a Click [New] and enter the code of the first CRS room category into the [SourceKey] field
b Press the [Tab] key twice to jump to the [Dest] field and type the code of the associated Front Office room category
c Save the mapped record by pressing [Enter]
d Map all CRS room categories with their Front Office equivalents this way.
7 Quit the window by clicking [X]

Installing the Interface
14 | Infor Starlight PMS Installation and Administration Guide
Mapping Front Office and CRS Packages All packages that are to be made available to a CRS must be mapped with the corresponding Front Office packages. Please note that this chapter only describes the general procedure for package mapping. To map packages in accordance with the used CRS, see the corresponding CRS data sheet.
1 Go to Front Office main menu bar: [Setup → System Settings → Interface → IF Setup Program]
2 Select interface and click [Edit]
3 Click [Mappings] button
4 [Interface Mappings] window: Open [Purpose] drop-down list and select [Articles]
5 Click [New] and enter the package code of the CRS package into the [SourceKey] field
6 Press [Tab] key twice to jump to the [Dest] field and enter the code of the associated Front Office package
7 Save your entries with [Enter]
Installing the Interface
Infor Starlight PMS Installation and Administration Guide | 15
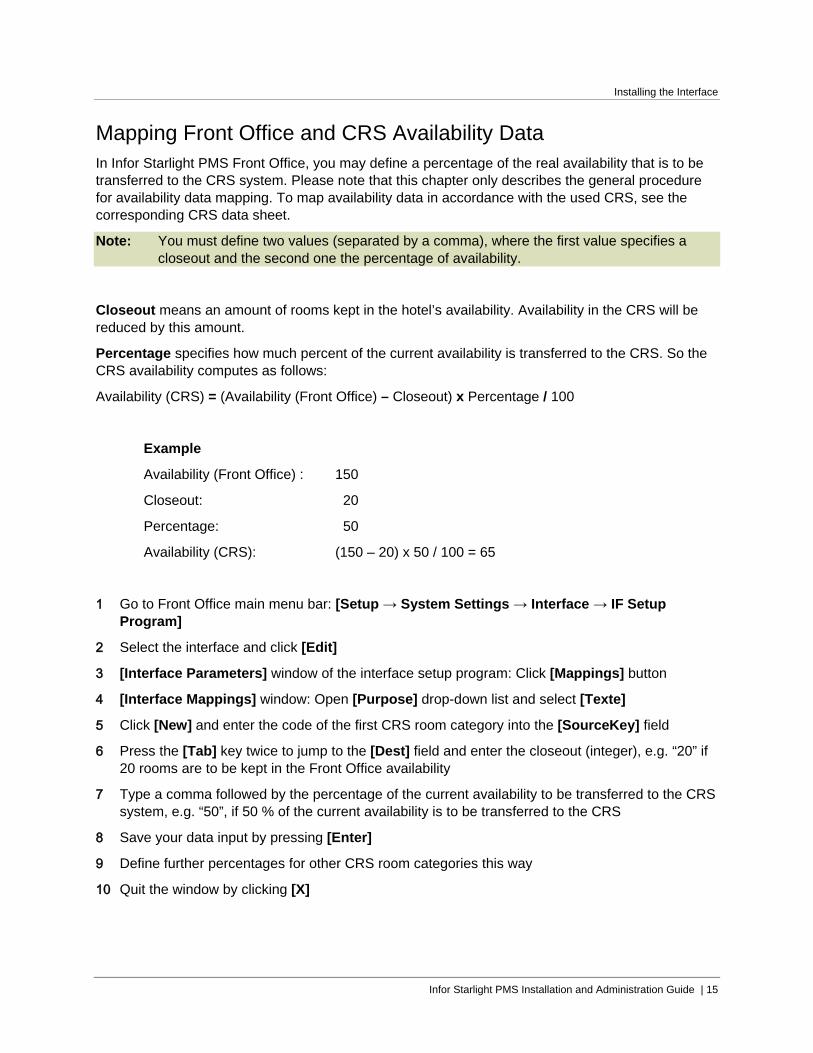
Mapping Front Office and CRS Availability Data In Infor Starlight PMS Front Office, you may define a percentage of the real availability that is to be transferred to the CRS system. Please note that this chapter only describes the general procedure for availability data mapping. To map availability data in accordance with the used CRS, see the corresponding CRS data sheet.
Note: You must define two values (separated by a comma), where the first value specifies a closeout and the second one the percentage of availability.
Closeout means an amount of rooms kept in the hotel’s availability. Availability in the CRS will be reduced by this amount.
Percentage specifies how much percent of the current availability is transferred to the CRS. So the CRS availability computes as follows:
Availability (CRS) = (Availability (Front Office) – Closeout) x Percentage / 100
Example
Availability (Front Office) : 150
Closeout: 20
Percentage: 50
Availability (CRS): (150 – 20) x 50 / 100 = 65
1 Go to Front Office main menu bar: [Setup → System Settings → Interface → IF Setup Program]
2 Select the interface and click [Edit]
3 [Interface Parameters] window of the interface setup program: Click [Mappings] button
4 [Interface Mappings] window: Open [Purpose] drop-down list and select [Texte]
5 Click [New] and enter the code of the first CRS room category into the [SourceKey] field
6 Press the [Tab] key twice to jump to the [Dest] field and enter the closeout (integer), e.g. “20” if 20 rooms are to be kept in the Front Office availability
7 Type a comma followed by the percentage of the current availability to be transferred to the CRS system, e.g. “50”, if 50 % of the current availability is to be transferred to the CRS
8 Save your data input by pressing [Enter]
9 Define further percentages for other CRS room categories this way
10 Quit the window by clicking [X]

Installing the Interface
16 | Infor Starlight PMS Installation and Administration Guide
Mapping Front Office and CRS Credit Cards All credit cards that are to be made available to a CRS must be mapped with the corresponding Front Office credit cards. Please note that this chapter only describes the general procedure for credit card mapping. To map credit cards in accordance with the used CRS, see the corresponding CRS data sheet.
1 Go to Front Office main menu bar: [Setup → System Settings → Interface → IF Setup Program]
2 Select the interface and click [Edit]
3 Click [Mappings] button
4 [Interface Mappings] window: Open [Purpose] drop-down list and select [CreditCards]
5 Click [New] and enter the CRS credit card identifier into the [SourceKey] field
6 Press [Tab] key twice to jump to [Dest] field and enter the credit card identifier of the associated Front Office credit card
7 Save mapping by pressing [Enter]
Starting the Interface The interface must be started like all standard Infor Starlight PMS interfaces (see quick setup guide for setting up a multi property interface (Progress Part) (QSG_PMS_P-Part_Standard_IF_Eng.pdf)).
Communication is done automatically. When changing any information relevant to pricing or season layout, the interface automatically displays a message after leaving the system setup menu. The user is asked whether to update information in the CRS or not.
Possible answers
Yes: All setup data is updated immediately.
No: Nothing is sent to the CRS.
Cancel: User will be asked again when calling system settings.

Infor Starlight PMS Installation and Administration Guide | 17
Chapter 3 Additional Settings in Front Office Master Data 3
Defining Seasons and Season Times in Infor Starlight PMS Front Office If the CRS system uses so-called seasons, these must also be defined in the Front Office. Unlike the normal rate periods per rate code, seasons can be named individually, e.g. Low Season, Mid Season, High Season, and can be assigned different periods.
For further information, please refer to our latest flexible pricing manual.
Defining Reservation Channels The CRS uses so-called (reservation) channels, which must be defined in the Front Office, too. These channels define the source of a reservation, for example to distinguish reservations sent from the CRS system from those made in Infor Starlight PMS Front Office.
For further information, please refer to our latest flexible pricing manual.
Defining Season Codes Note: When updating a customer system with existing CRS interface to version 6.5.0 or higher
version, parameter 3150 ‘Activate Rate Calculation with Seasons?’ must also be enabled and the check box [Season] must be activated in the rate code administration for the rate codes to be used as season codes. Furthermore, the check box ‘CRS Transfer’ must also be activated so that the rates can be transferred from the Infor Starlight PMS into the CRS.
For further information, please refer to our latest flexible pricing manual.

Additional Settings in Front Office Master Data
18 | Infor Starlight PMS Installation and Administration Guide
Defining Season Prices For further information, please refer to our latest flexible pricing manual.
Defining a Cancellation Reason for CRS Cancellations By means of interface parameter 1023, you can mark reservations cancelled by the CRS interface and afterwards in the Infor Starlight PMS Front Office with a special cancellation reason, and thus, track these kinds of cancellations easily in the Front Office cancellation statistics. We therefore advise you to set up a reasonable cancellation reason, such as “CRS Cancellation”, for example. The identification number of that cancellation reason must be entered into interface parameter 1023.
1 Go to Front Office main menu bar: [Setup → System Settings → Guests → Cancellation Reasons (Guest)]
2 Click [New] icon and enter the name of the new cancellation reason for cancellations coming from the CRS interface, e.g. “CRS cancellation”.
3 Save the new cancellation reason.
Caution: Make sure you add the identification number of the new cancellation reason to interface parameter 1023.
Adding the Special Report ‘Master Data Administration of CRS Availability’ To be able to call the CRS availability, you first have to add the special report “Master Data Administration of CRS Availability” (if-crsavail.w) to the selected special reports in the File Administration. Proceed as follows:
1 Go to Front Office main menu bar: [Setup → Internal Administration → Special Reports]
2 Left-click the special report “if-crsavail.w” in the left-hand browser and transfer it into the right-hand browser by clicking the [arrow]-button.
3 Click [Go]-button to quit the screen
Note: With the release of Infor Starlight PMS version 7.0.0, the special report can also be added via the report groups.

Infor Starlight PMS Installation and Administration Guide | 19
Chapter 4 Necessary Settings to Connect to CRS via HTTPS 4
General Information Generally, only secure connections via HTTPS are allowed. To secure HTTPS encryption, a special Windows service is provided (the so-called HTTPS Converter).
Note: If Linux or Unix servers are used, the service cannot be installed on these servers, but must be installed on a Windows Client, which is operating constantly without interruption. However, the interface itself must be installed on the corresponding server, only the service must be installed on a Windows client. Since the service is a Windows client, it is indispensable that it is installed to a Windows client.
Installing the HTTPS Converter
Prerequisites Make sure that you have installed the following required components:
Microsoft Installer service 3.1
Microsoft .NET Framework 4 web installer package
Note: Both components are available at the Microsoft Download Center. The installation of the HTTPS Converter will fail if these components are not installed.

Necessary Settings to Connect to CRS via HTTPS
20 | Infor Starlight PMS Installation and Administration Guide
Installation Procedure
1 Double-click on setup.exe to start the installation. The first screen opened during the installation routine is the Welcome Screen.
2 Press [Next >] to continue.
3 Service options screen:
a Enter a Service name: The service name is displayed in the Windows service control manager. Recommended naming convention: HTTPS Converter + CRS name The autocomplete function automatically lists installed services. If you choose the name of an existing service, the installer runs an update.
b Start service after installation: Activate this check-box option if you do not need to modify the configuration (e.g. if you update an existing service or if you want to use the default listening port 4711).
c Press [Next >] to continue.
4 Path selection screen:
a Enter an installation path (directory).
b Recommended installation path = default value
c If you choose an existing directory the installation routine displays a warning message. In this case, it is highly recommended to choose an alternative destination.
d If you have selected to update an existing service in the service options screen (step 3), you cannot edit the installation path.
5 Press [Next >] to continue, a window indicates the progress of the installation.
6 Setup finished screen: Press [Finish >] to confirm the successful installation of the HTTPS Converter.
7 Remember to verify and adjust your configuration if required and to start the service if you did deactivate the respective check-box option (step 3).
How to Call the New Program The configuration file converter.ini is optional, but must reside in the same directory as the executable to be found.
If the configuration file or any of the required parameters do not exist or are not filled, the program uses default values.

Necessary Settings to Connect to CRS via HTTPS
Infor Starlight PMS Installation and Administration Guide | 21
Parameters Default ini-format [section] key=value
Section Key Default Description
Server LogContent false Log the content of request and answer to external files. The http headers are logged to the default log file.
Server MaxHeaderLength 1000 Determine how long the http header could be in bytes.
Server Port 4711 Port number on which the Converter listens for messages from PMS. This value has to be entered in the interface parameter
Target AcceptAnyCertificate false Accept any certificate from target. Warning: This option should be used carefully due to security issues.
Target Attempts 1 Retry attempts if communication fails. In case of other errors (e.g. wrong address) no additional attempts are made.
Target Timeout 30000 Timeout for connection to the target
Target TimeoutRead 30000 Timeout for reading once the connection has been established
Target TransType https Which protocol should be used? Valid settings are https and http
Proxy Enabled false Enable usage of a proxy
Proxy Address localhost URL of the proxy to use
Proxy Port 8080 Port of the proxy to use
Proxy CredentialsUser Credentials for proxy: Username Leave it empty if the proxy does not require credentials.
Proxy CredentialsPwd Credentials for proxy: Password

Necessary Settings to Connect to CRS via HTTPS
22 | Infor Starlight PMS Installation and Administration Guide
Log File The value of each option as well as the respective position within the converter.ini is stored in the log file on startup.
Location of the log file:
<InstallationDirectory>\Log\<ServiceName>.log
GUI-Version of the HTTPS Converter You may use the GUI-version of the HTTPS Converter in order to test requests and responses or in order to send a modified request.
Location of the GUI-version:
< InstallationDirectory>\ServerUI.exe
Starting the HTTPS Converter To start the HTTPS Converter, go to [Control Panel → Administrative Tools → Services], left click the ConverterService and start the service.
Hint: To ensure that the ConverterService is started automatically after your computer boots up, we advise you to assign the autostart option to the service.
Parameters and Other System Settings
Adjusting the Entries in the Converter.ini file The converter.ini file should exist in the same directory as the executing HttpConverter.exe file. If the converter.ini file is missing, the ConverterService creates the file with some basic settings when called for the first time.
To configure the converter.ini file in accordance with the used CRS, see the corresponding CRS data sheet.
Please make sure that the entry in the server socket is identical with that in interface parameter 1010 “Port-Number” (see data sheet).
Note: If the port does not respond, please check whether the Windows firewall is active. If so, you will have to open the port in the Windows firewall (choose ‘Exceptions’ and open the corresponding port).

Infor Starlight PMS Installation and Administration Guide | 23
Chapter 5 Calling the Special Report ‘Master Data Administration of CRS Availability’
5
The special report ‘Master Data Administration of CRS Availability’ (if-crsavail.w) permits to adjust the availability for an installed CRS system per day and category. Via this report, it is now also possible to view all error messages created during the communication with the CRS system.
Note: As of version 7.1.0 SU4, you can also enter or change your Infor Starlight PMS or CRS rates per category or arrangement for individual days of the week for a predefined period. The system will automatically calculate the corresponding Infor Starlight PMS or CRS rates, respectively. For details regarding the calculation of the rates, please refer to the corresponding CRS data sheets. Screens displayed in this program depend on the CRS system you are currently using. Please refer to the corresponding interface data sheets for more information.

Calling the Special Report ‘Master Data Administration of CRS Availability’
24 | Infor Starlight PMS Installation and Administration Guide
Calling the Special Report ‘Master Data Administration of CRS Availability’
1 Go to Front Office main menu bar: [Reports → Special Reports → Master Data Administration of CRS Availability]
2 The [Administration of CRS Availability] window opens, which does not yet contain any data.
3 Enter the period of time, for which you wish to display your availability data in the [From Date/To Date] fields in the lower part of the screen
4 Select your preferred sorting order:
a by date,
b by package or
c by changed category/package availability, i.e. only lines that were changed manually are displayed
5 Enter the CRS interface number for which you wish to edit the availability data or use the help function in the [Interface ID] field. The two browsers will display all categories and packages mapped for the CRS interface.
Refer to chapter “Changing the availability per category manually” for more information on changing availability data.
6 The browser [Availability Category] contains the following information:
a [Weekday]
b [Date]
c [Category]: Short description of the category from Infor Starlight PMS
d [Conf]: Total number of current reservations for this category
e [IF-Mapping]: Current availability for this category
Caution: Availability data may vary, depending on the current availability percentage that is transferred to the CRS system (refer to chapter “Mapping Front Office and CRS Availability Data” for a definition of this percentage).
f [New]: You can enter a new availability value into this column
7 The browser [Availability Rate Plan] contains the following information:
a [Weekday]
b [Date]
c [Category]: Short description of the category from the Infor Starlight PMS

Calling the Special Report ‘Master Data Administration of CRS Availability’
Infor Starlight PMS Installation and Administration Guide | 25
d [Pkg.]: Short description of the package from the Infor Starlight PMS
e [Curr.]: Default currency from parameter 152
f [Def. Rate]: This column contains the default rate entered in the “Rate Administration” for the corresponding room category/package combination, calculated for the number of persons as entered in the field [Basic Occupancy] in the “Room Category Administration” ([Setup → System Settings → Rooms → Room Category Administration]).
g [Infor Starlight PMS Rate]: In this column, you can enter a new rate for the room category/package combination. The system calculates the CRS rate automatically when the Infor Starlight PMS rate is entered (please refer to the corresponding CRS data sheet for information regarding the calculation method). Otherwise, the default rate from the “Rate Administration” ([Setup → System Settings → Rooms → Rate Administration]) will be displayed.
h [CRS Rate]: CRS price of sale; as of version 7.1.0 SU4, this price can be changed, too. The system calculates the Infor Starlight PMS rate automatically when the CRS rate is entered (please refer to the corresponding CRS data sheet for information regarding the calculation method). Note: If the interface parameters 51 and 52 contain the value “0,00”, the column [CRS Rate] will not be displayed.
i [Closed]: By entering “Yes” in this column, you will disable the package/category combination for a particular date.
j [Min. Days]: You can enter the minimum length of stay in days in this column.
Caution: Every time data has been changed or entered in any of the two browsers, the field, in which the changes have been made, will appear in a color and the [Transmit Data] button will receive a yellow frame. As soon as the data has been transferred to the interface, all entries made manually will be deleted from the browser

Calling the Special Report ‘Master Data Administration of CRS Availability’
26 | Infor Starlight PMS Installation and Administration Guide
Changing the Availability per Category manually In the [New] column of the left-hand browser [Availability Category], you can change the current availability for this category and date individually.
Note: You cannot change any greyed-out columns.
1 In the left-hand browser, in the [New] column, click into the field you wish to edit.
2 Enter the new value and press [Enter].
3 All fields you have changed will then be marked in light green.
4 In order to send the data to the CRS interface, click on the [Transmit Data] button and confirm the message „Would you like to transmit the new availability data to the CRS interface now?“.

Calling the Special Report ‘Master Data Administration of CRS Availability’
Infor Starlight PMS Installation and Administration Guide | 27
Changing the Availability in the Rate Plan for Individual Days In the right-hand browser [Availability Rate Plan], you can change Infor Starlight PMS rates, CRS rates as well as the minimum number of days for the respective stay for every given date and every room category or package. Here, you can also close availabilities. Upon entering a Infor Starlight PMS rate, the CRS rate is calculated using the entries in interface parameters 51 (VAT) and 52 (commission), and vice versa.
Caution: You cannot change any greyed-out columns.
1 In the right-hand browser, click into the field of the [Infor Starlight PMS Rate] column you wish to edit.
2 Enter the desired price and press [Enter].
3 The [CRS Rate] column then automatically displays the rate which is calculated – depending on the provider – based on the Infor Starlight PMS rate plus VAT and commission (IF parameters 51 and 52).
4 Vice versa, you can also enter a price in the [CRS Rate] column and the corresponding Infor Starlight PMS rate will be calculated automatically.
5 If you wish to close a category, click into the corresponding field in the [Closed] column and enter “Yes”.
6 If you wish that a category is only available for a minimum number of days, enter the number of days in the [Min. Days] column.
7 All fields you have changed will be marked in color.
8 In order to send the data to the CRS interface, click on the [Transfer Data] button and confirm the message „Would you like to transmit the new availability data to the CRS interface now?“.
Calling the Special Report ‘Master Data Administration of CRS Availability’
28 | Infor Starlight PMS Installation and Administration Guide
Changing the Availability in the Rate Plan for Specific Weekdays for a Defined Period
1 In the right-hand browser, click into the field of a line to edit the availability for a specified period.
2 From the main menu, select [Options → Change Rate Plan Period] or select this option from the context menu (right mouse click).
3 First, enter the required period of time into the [From Date/To Date] fields.
4 Next, activate only the check boxes next to the weekdays for which you want to change prices.
5 Enter your prices (Infor Starlight PMS rate or CRS rate) into the correct fields. The system will then calculate the corresponding other rate automatically.
6 If you wish to close the category for a certain day of the week during the whole period, activate the check box underneath the [Closed] column, click into the corresponding line and enter a “Y” for “Yes”.
7 If you wish that a category is only available for a minimum number of days during the whole period, activate the check box underneath the [Min. Days] column and enter the new number of days in the desired line.
8 Click [OK] to save your changes and to return to the Administration of CRS Availability. The selected period and all other changes made will be adopted in the main browser and all fields you have changed will be marked in color.
9 In order to send the data to the CRS interface, click on the [Transfer Data] button and confirm the message „Would you like to transmit the new availability data to the CRS interface now?“.
10 Once the data has been transmitted to the CRS interface, the [Transmit Data] button will receive a green frame.
Note: Changes made in the CRS availability only have an effect on the CRS system that is connected.

Calling the Special Report ‘Master Data Administration of CRS Availability’
Infor Starlight PMS Installation and Administration Guide | 29
Setting Individual Lines Back to Default Values
1 In the right-hand browser, click into the field of a line to edit the availability for a specified period.
2 From the main menu, select [Options → Reset to default Values] or select this option from the context menu (right mouse click).
3 All changes you have made for the selected line will now be reset to its original values.
Check Rejected Data If the directory for the file exchange between the CRS and Infor Starlight PMS systems is entered correctly into interface parameter 1001 (see data sheet), the button [Check Rejected Data] will be displayed in the bottom right corner of the screen [Administration of CRS Availability]. Click on this button in order to display the list of rejected XML files.
1 Go to Front Office main menu bar: [Reports → Special Reports → Master Data Administration of CRS Availability]
2 Click [Check rejected Data]
3 The screen [Check rejected data] contains the following information:
a Date: Creation date of the file
b Error Code: Error code for the entry
c Error descript: Part of the text of the error message
d File name (CRS answer): Name of the CRS file containing the error
e File name (Infor Starlight PMS question): Name of the Infor Starlight PMS file that originally triggered the error message as an answer
f Directory: Path for the listed XML files
g Click [Show File Contents] to open a copy of the selected CRS file in the program “Windows Notepad”. From there, you can print out or forward the file for maintenance purposes.
Note: This functionality is only available, if the path and program name for the text editor is entered correctly in the Front Office parameter 1649 (e.g. c:\WINDOWS\notepad.exe).
4 Click [Stop] button to quit this screen and return to the [Check rejected data] screen.