information on print material - wago · 210-805 - information on handling print material 210-805...
TRANSCRIPT
210-805 - Information on Handling Print Material
210-805 – Information on Handling Print Material 004/08.2017 1 Contact customer support: [email protected]
WAGO is a registered trademark of WAGO Verwaltungsgesellschaft mbH.
Information on Print Material Note: Individual information on handling print material are representative of other print materials with
identical handling. The graphics in these notes only represent the print material to be named.
This handling instruction also applies to printing materials of the article numbers:
210-805/000-002
210-806; 210-806/000-002
210-807; 210-807/000-002
210-808
210-810
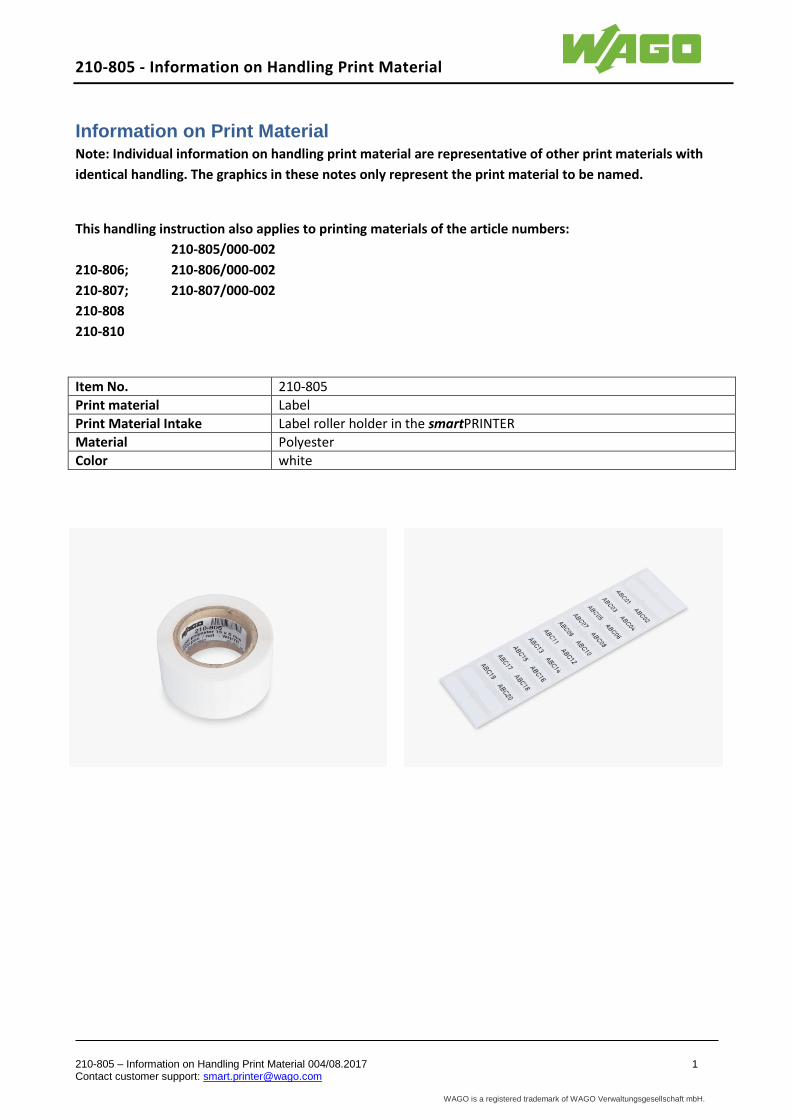
Item No. 210-805
Print material Label
Print Material Intake Label roller holder in the smartPRINTER
Material Polyester
Color white

210-805 - Information on Handling Print Material
210-805 – Information on Handling Print Material 004/08.2017 2 Contact customer support: [email protected]
WAGO is a registered trademark of WAGO Verwaltungsgesellschaft mbH.
1. Hardware Preparation
1.1 Roller
1.2 Sensor Settings
1.3 Load the Print Material and Align It
Use roller item number 258-5006.
The tip of the triangle in the housing
and the tip of the triangle on the sensor
must point directly towards each other.
Set the guide to the print material
width.
Optimum setting:
1 mm + print material width + 1 mm

210-805 - Information on Handling Print Material
210-805 – Information on Handling Print Material 004/08.2017 3 Contact customer support: [email protected]
WAGO is a registered trademark of WAGO Verwaltungsgesellschaft mbH.
2. GoDoctor – Measure the Print Material Dimensions
GoDoctor printer software
Always use the most up-to-date version of the software. Check your existing installation to make sure that it is
up to date, or download the newest version:
Link: www.wago.com/smartprinter
The program file GoDoctor.exe can be found in the smartSCRIPT installation directory on your PC / laptop.
C:/Programme(86)/Wago/smartScript/…
Notice: The [Factory Default] button resets the printer to factory settings.
All individual bits of information (this includes network settings) will be deleted!
Press [Reset Printer] ❶. Wait until the bar of the progress indicator in the display has gone through. The
current print media settings are deleted. The end of the process is confirmed after 20 seconds, by a simple
acoustic signal.
Press [Auto-Calibration] ❷. Material will be fed through the printer!
Figure 2.2 shows the info area in the GoDoctor dialog box with the correct information in line 1 and 4 on the
print material after auto-calibration.
Important:
Auto-calibration has failed if the information in the info area deviates from the information shown in
Figure 2.2.
Check the sensors setting and run auto-calibration again.
Contact our support team if doing this does not yield the results shown in the image.
Figure 2.2: The information area shows
results for the print material
Figure 2.1: GoDoctor dialog box
❶
❷

210-805 - Information on Handling Print Material
210-805 – Information on Handling Print Material 004/08.2017 4 Contact customer support: [email protected]
WAGO is a registered trademark of WAGO Verwaltungsgesellschaft mbH.
3. WAGO-Printer-Settings - Set Printer Settings
WAGO-Printer-Settings
Always use the most up-to-date version of the software. Check your existing installation to make sure that it is
up to date, or download the newest version:
Link: www.wago.com/smartprinter
Start the WAGO-printer-settings. In the [Installed Printer] ❶ window, choose the WAGO smartPRINTER. Open the [Options] menu ❷ and deactivate [Autosensing]. Select the directory ❸. Select the print material ❹. The specific printer settings for the article are transferred to the smartPRINTER as soon as you select the print material. Press [OK] to confirm the following instructions dialog box (Figure 3.2).
The smartPRINTER is now properly set up for the print material.
❹ ❸
❶
❷
Figure 3.1: WAGO-printer-settings
Figure 3.2: Instructions dialog box for driver
configuration

210-805 - Information on Handling Print Material
210-805 – Information on Handling Print Material 004/08.2017 5 Contact customer support: [email protected]
WAGO is a registered trademark of WAGO Verwaltungsgesellschaft mbH.
4. WAGO-smartSCRIPT – Creating Project Files
WAGO-smartSCRIPT
Always use the most up-to-date version of the software. Check your existing installation to make sure that it is
up to date, or download the newest version:
Link: www.wago.com/smartprinter
Important: Uninstall the existing WAGO-smartSCRIPT-software before carrying out any new installations.
Start the WAGO-smartSCRIPT to make the following selections using the wizard: ❶ Press [Forward] to confirm that [You know the item order number of marking material].
If the wizard does not start up, select [New document (WAGO SCRIPT Wizard)] from the [File] menu bar.
Select the print material ❷ and the wizard by clicking on [Finish]❸.
❶ ❷
❸
210-805 - Information on Handling Print Material
210-805 – Information on Handling Print Material 004/08.2017 6 Contact customer support: [email protected]
WAGO is a registered trademark of WAGO Verwaltungsgesellschaft mbH.
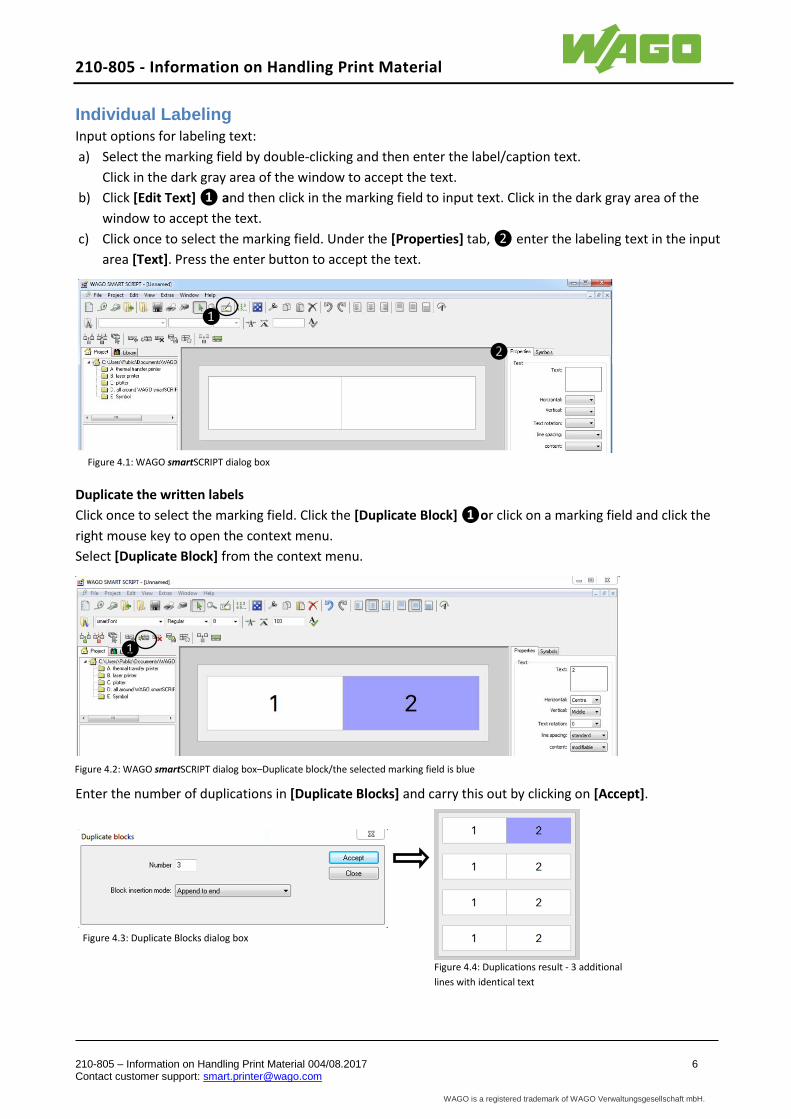
Individual Labeling
Input options for labeling text:
a) Select the marking field by double-clicking and then enter the label/caption text.
Click in the dark gray area of the window to accept the text.
b) Click [Edit Text] ❶ and then click in the marking field to input text. Click in the dark gray area of the
window to accept the text.
c) Click once to select the marking field. Under the [Properties] tab, ❷ enter the labeling text in the input
area [Text]. Press the enter button to accept the text.
Duplicate the written labels
Click once to select the marking field. Click the [Duplicate Block] ❶or click on a marking field and click the
right mouse key to open the context menu.
Select [Duplicate Block] from the context menu.
Enter the number of duplications in [Duplicate Blocks] and carry this out by clicking on [Accept].
❶
❶
❷
Figure 4.1: WAGO smartSCRIPT dialog box
Figure 4.2: WAGO smartSCRIPT dialog box–Duplicate block/the selected marking field is blue
Figure 4.3: Duplicate Blocks dialog box
Figure 4.4: Duplications result - 3 additional
lines with identical text
❶
210-805 - Information on Handling Print Material
210-805 – Information on Handling Print Material 004/08.2017 7 Contact customer support: [email protected]
WAGO is a registered trademark of WAGO Verwaltungsgesellschaft mbH.
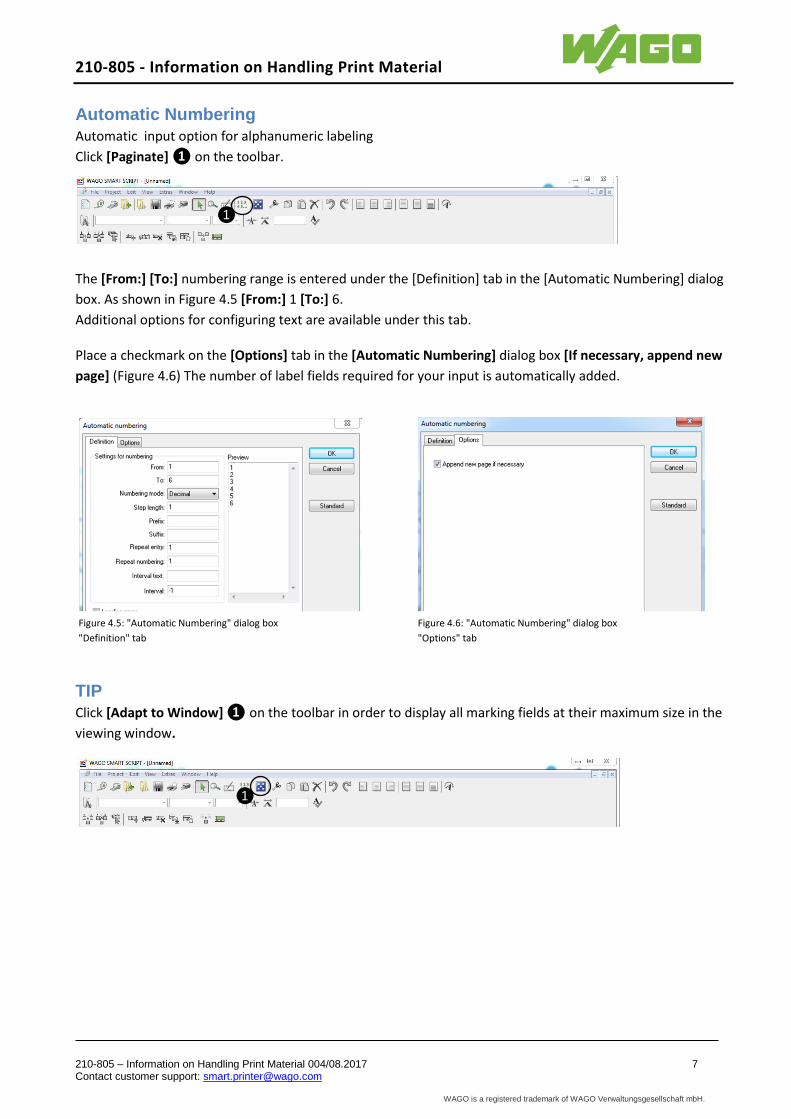
Automatic Numbering
Automatic input option for alphanumeric labeling
Click [Paginate] ❶ on the toolbar.
The [From:] [To:] numbering range is entered under the [Definition] tab in the [Automatic Numbering] dialog
box. As shown in Figure 4.5 [From:] 1 [To:] 6.
Additional options for configuring text are available under this tab.
Place a checkmark on the [Options] tab in the [Automatic Numbering] dialog box [If necessary, append new
page] (Figure 4.6) The number of label fields required for your input is automatically added.
TIP
Click [Adapt to Window] ❶ on the toolbar in order to display all marking fields at their maximum size in the
viewing window.
❶
Figure 4.5: "Automatic Numbering" dialog box
"Definition" tab
Figure 4.6: "Automatic Numbering" dialog box
"Options" tab
❶

210-805 - Information on Handling Print Material
210-805 – Information on Handling Print Material 004/08.2017 8 Contact customer support: [email protected]
WAGO is a registered trademark of WAGO Verwaltungsgesellschaft mbH.
Figure 4.7: "Data Import" – Highlighted cells 6, 7, 8
and 9 in column 2
Importing Markings
WAGO smartSCRIPT supports importing *.xls, *.xlsx, *.txt, *.csv and *.dat files.
Click [Import…] on the toolbar.
Click on [...] in the [Data Import] dialog box Figure 4.7. Select the file you want to import from the file
directory and open it with the [Open] button. The file is opened in the display area of the dialog box.
Options for selecting cells:
Cells that follow each other one after another from
column 1 or 2
Same cell area for columns 1 and 2
Sequential cells in columns 1 and 2
Select cells by clicking on them or dragging the mouse.
Click [Accept] to transfer the contents of the cells to the
labels.
Close the [Data Import] dialog box.
The contents of the selected cells from the import file have been transferred to the marking fields
Figure 4.8).
❶
Figure 4.8: The contents of selected cells 6, 7, 8 and 9 from column 2 are transferred to 4 labels.
210-805 - Information on Handling Print Material
210-805 – Information on Handling Print Material 004/08.2017 9 Contact customer support: [email protected]
WAGO is a registered trademark of WAGO Verwaltungsgesellschaft mbH.
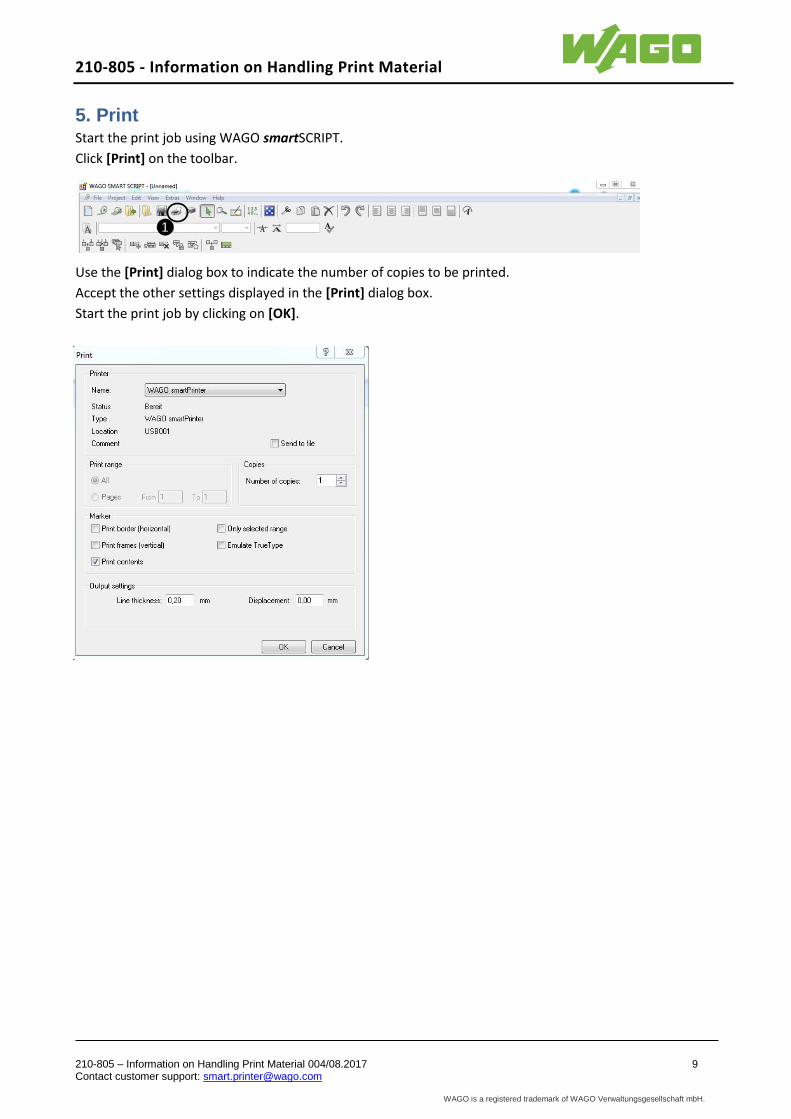
5. Print Start the print job using WAGO smartSCRIPT.
Click [Print] on the toolbar.
Use the [Print] dialog box to indicate the number of copies to be printed.
Accept the other settings displayed in the [Print] dialog box.
Start the print job by clicking on [OK].
❶

210-805 - Information on Handling Print Material
210-805 – Information on Handling Print Material 004/08.2017 10 Contact customer support: [email protected]
WAGO is a registered trademark of WAGO Verwaltungsgesellschaft mbH.
6. Correcting Print Quality WAGO Printer Settings software allows you to correct the printing quality of the labeling text afterwards.
The procedure described in this chapter is representative of all print materials.
Description of defects:
a) The labeling text is not printed vertically centered.
The labeling text is moved up or down (Fig. 1).
b) The labeling text is not printed centered horizontally.
The labeling text is moved to the right or left (Fig 2).
c) The labeling text is faint or has not been completely printed (Fig 3).
Start the WAGO Printer Settings:
Select directory ❶. Select print material ❷. Select gear icon ❸ for print material.
Correction option by changing values:
a) [Vertical(mm)] Increase value = Labeling text will be moved upward.
[Vertical(mm)] Decrease value = Labeling text will be moved downward.
b) [Horizontal(mm)] Increase value = Labeling text will be moved to the left.
[Horizontal(mm)] Decreased value = Labeling text will be moved to the right.
c) [Heat] Increase value = Labeling text will become darker.
Notice! A value >14 might damage the color ribbon.
[Heat] Decreased value = Labeling text gets lighter.
Changing the values [Save] then [Close].
Now perform several test printouts.
The printer needs the test printouts to adjust and implement the correction values.
Fig. 1: Moved vertically Fig. 2: Moved horizontally Fig. 3: Print-out faint and
incomplete
❶ ❷ ❸
210-805 - Information on Handling Print Material
210-805 – Information on Handling Print Material 004/08.2017 11 Contact customer support: [email protected]
WAGO is a registered trademark of WAGO Verwaltungsgesellschaft mbH.
Note:
You can also use the auto calibration button on your smartPRINTER to start the calibration of the print
material.
Further information on this topic can be found in the smartPRINTER operating manual.