information services ict service delivery · pdf fileict service delivery accessing the...
TRANSCRIPT
Page 1
INFORMATION SERVICES ICT Service Delivery
Accessing the Curriculum Management System Off-campus Process for obtaining a CMS certificate
Introduction This service enables staff to access the Curriculum Management System (CMS) when off-campus. It is done using a two-factor authentication mechanism known as a ‘client side certificate’. You must obtain the certificate from a University-based computer, copy it to a portable device and then install it on the computer that you will use to access the CMS off-campus. Key Steps in the Process At the University (this document)
1. Set Internet Explorer on your University PC to operate in Compatibility mode. 2. Log on to the enrolment server [the server hosting the CMS certificates] and
request a certificate. 3. Install the certificate into Internet Explorer v11 on your University PC. 4. Export the certificate to a portable device and add password protection to it.
At Home*
5. Import the certificate into the internet browser on your home PC. 6. Access the CMS from home.
* You can download the appropriate documents from our website at:
http://ulster.ac.uk/isd/services/business-applications/cms
Note: The same, single document covers both aspects for the Mac.
Obtaining the certificate from a University computer
Installing the certificate on a home computer
Internet Explorer v11 Internet Explorer v11
Firefox Firefox
Google Chrome
OSX Safari (for Mac users) OSX Safari (for Mac users)

Page 2
Step 1 Setting Internet Explorer v11 on your University PC to operate in Compatibility mode.
If you use Internet Explorer 11 the enrolment server website will not function properly in this version and therefore needs to be configured to run in “Compatibility Mode” only.
To do this click Tools from the menu in Internet Explorer 11 and select Compatibility View settings

Page 3
Click the Add button to add ulster.ac.uk to Compatibility View. Once you have completed this then press Close.
The web page will refresh and open in compatibility settings once the URL is added
to the list.

Page 4

Page 5
Step 2 Logging on to the enrolment server [the server hosting the CMS certificates] and requesting a certificate.
Now go to the following web link which will take you to the enrolment server:
https://uujadc01.ad.ulster.ac.uk/certsrv/
You will be prompted for a username and password. Enter your University network credentials (your ecode and network password) and click OK to continue.
The enrolment server window appears. Click on “Request a certificate” to continue.
Page 6
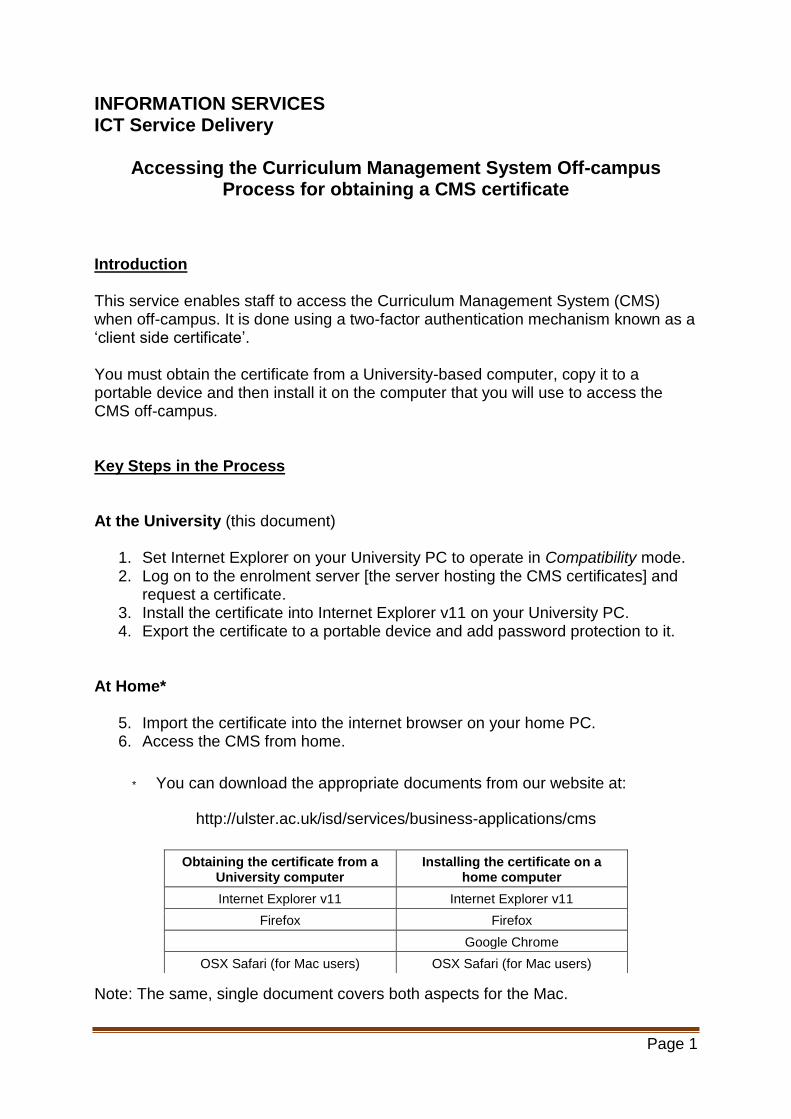
Click on “User Certificate”
Once you click on this you will be prompted by the following warning message. Select Yes to continue and proceed.
Click on the Submit button to continue.

Page 7
This following message will re-appear again. Just click on the Yes button once again and continue on.
Step 3 Installing the certificate into Internet Explorer v11 on your University PC.
Click on “Install this certificate” to release the requested certificate. This process will install the certificate on your University computer.

Page 8
Step 4 Exporting the certificate to a portable device and adding password protection to it.
You now need to export this certificate to allow access to the Curriculum Management System (CMS) when off-campus.
To export a certificate from Internet Explorer v11, select Tools from the menu bar (see below) and click on Internet Options
In the Internet Options windows, open the Content tab and click Certificates.

Page 9
Go to the Personal tab and select your certificate. Your ecode will appear in the Issued To column and the enrolment server ad-uujadc01-ca beside it in the Issued By column. This is your certificate that you want to export for home use. Click once to select your certificate and then click the Export button to start the Export Certificate Wizard.
The Certificate Export Wizard appears. Click Next.
.

Page 10
Choose the option “Yes, export the private key”. Click Next
Ensure the options “include all certificates in the certification path if possible” and “Export all extended properties” are ticked. Click Next.
Page 11
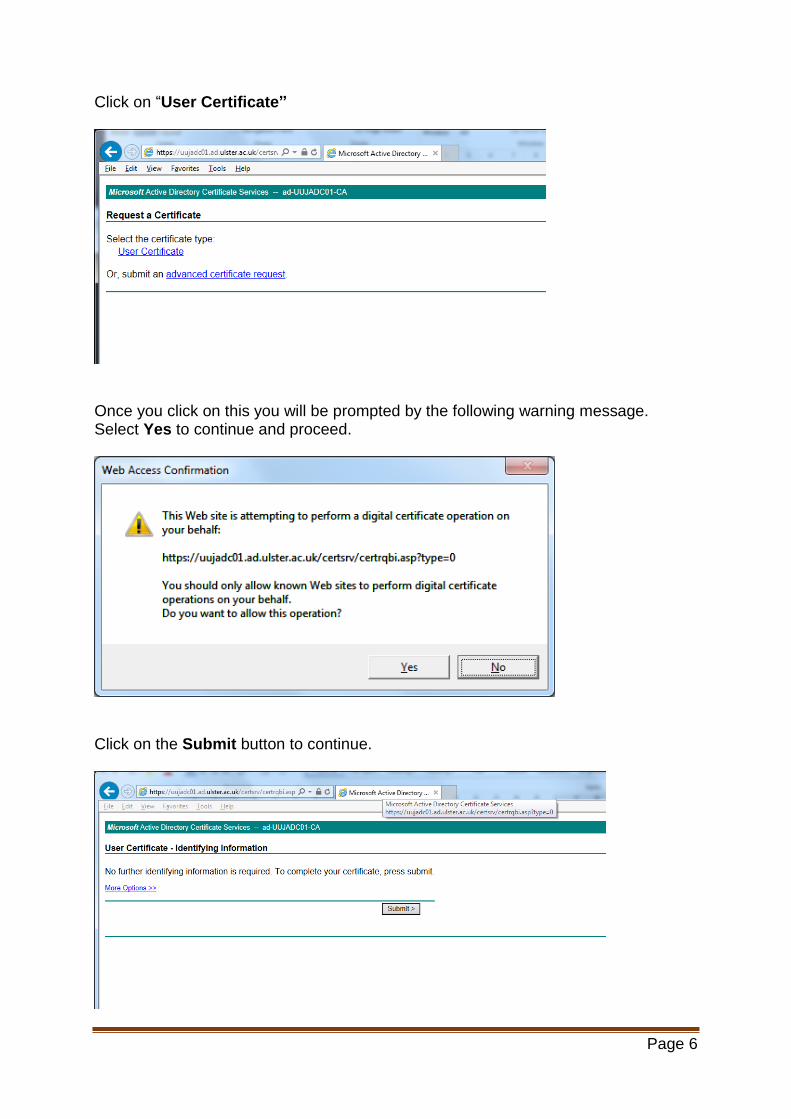
Type in a password. This is to prevent unauthorised access to the private key by someone other than the certificate owner. Click Next.
Click on the Browse button.
Page 12
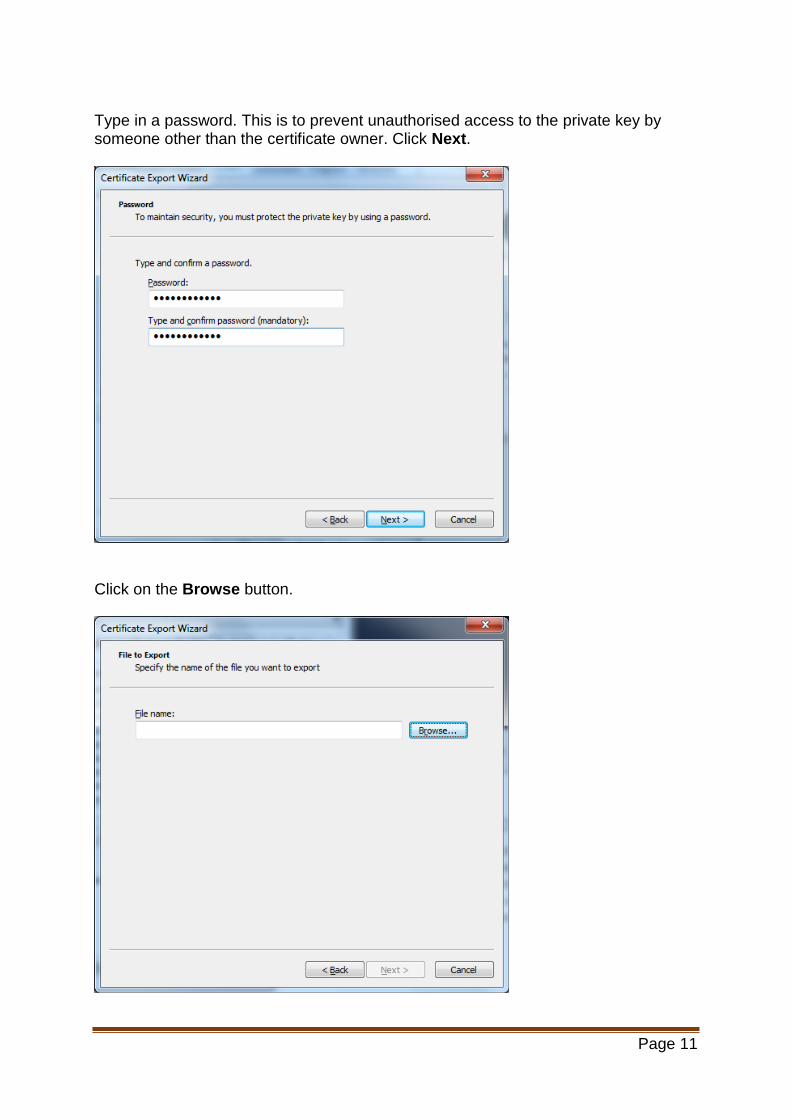
Now you will save the certificate onto your portable device. It is recommended that this device be a secure encrypted USB pen drive. (Either an Iron key USB or one that has been configured for BitLocker To Go). Choose a location to save your certificate and a name for your certificate. Click Save and then Next to continue.
The final screen appears, informing you that you have completed the process. Click Finish.
Click OK to close the small “The export was successful” dialogue box.