initial odta training · 2013-10-07 · dts billet •dd form 577 ... a dts profile and attach them...
TRANSCRIPT

Initial ODTA Training

To provide initial training and an introduction
to DTS and basic travel policies to users
and unit leaders to facilitate TAD travel
through DTS.

Agenda
•Responsibilities
•Reports
•Training
•Check in/check out process
•Maintain appointment documents
•Basic Billet Overview
• Appointment Requirements
•Authorization/Orders
•Process flow
•CTO
•Commercial Air
•Rental vehicles
•POV
•Per diem entitlements
•Line of accounting (LOA)
•Schedule Advances/Partial
Payments
•Routing List
•Review/sign

Agenda •Vouchers
•Centralized voucher process
•Voucher process flow
•Verifying expenses
•Miscellaneous expense types
•Uploading supporting documentation
•GOVCC program
•T-entering (1351-2)
•Local vouchers
• Local Voucher Process Flow
• Reimbursable Expenses
• Review/ sign

Lead Defense Travel
Administrator (LDTA)
Finance Defense Travel
Administrator (FDTA)
Normally located in your local comptroller
shop. They are the POC for DTS lines of
accounting, SABR/STARS reject codes,
and budget issues.
Organization Defense
Travel Administrator
(ODTA)
Responsible for the management of DTS
at the unit level.
Approving Official Authorize travel in accordance with the
JFTR/JTR.
Certifying Official Obligate funds to conduct the trip
Reviewing Official Ensures all entitlements are in
accordance with the JFTR/JTR.
Traveler/Unit Clerk Initiates/submits the DTS
Authorization/Voucher

DD Form 577 Appointment • Must be appointed in writing as an Accountable Official.
Certifying Officers Legislation (COL) certificate-(annual refresher training) • Found on the TRAX website under “training” tab.
Programs and Policies: Travel Policies certificate • Found on the TRAX website under “training” tab.
DTS Training Certificate (annual refresher training) • Online training certificate does not meet this requirement.
• Must attend formal training class (satellite units as well).

• Each DD Form 577 is specific to the DTS billet.
• The DD Form 577’s can be found on the I MEF DTS Help Desk website.
How to fill out a DD Form 577:
Section 1:
• Section 1 will be your Commanding Officer’s information
• Block 1: CO’s name
• Block 2: the CO’s “Title” will be “Commanding Officer
• Block 3: DoD Component/ Organization (I.E. USMC/ CLB 7)
• Block 4: the date when the CO signs the DD577
• Block 5: the CO’s signature

Section 2:
• Section 2 will be your information
• Block 6: your name
• Block 7: your FULL SSN
• Block 8: your title at your shop
• Block 9: DoD component/ organization (I.E. USMC/ 7th ESB)
• Block 10: your address (I.E. current address or home of record)
• Block 11: a contact number for you
• Block 12: the effective appointment date (the date your CO
appointed you-must match Block 4)

Section 3:
• Section 3 is your name and signature.
•Block 16: print your name
• Block 17: your signature
Section 4:
• Section 4 is filled out when you terminate your permissions.
• Block 18: date of termination
• Block 19: your initials
• Block 20: CO’s name
• Block 21: CO’s title (“Commanding Officer”)
• Block 22: CO’s signature
BLOCKS 13-15 ARE
PRE-FILLED OUT!

Reports
Maintaining files
Training
Check in/Check out process
Assisting Travelers
Updating organization’s routing list(s)
Per DTS MCO 4650.39 there are eight reports that are required to be pulled and work. • Six reports are worked and reconciled on a weekly
basis.
• Two reports are worked and reconciled on a monthly basis (minimum).
ALL REPORTS MUST BE MAINTAINED FOR THE CURRENT MONTH PLUS ONE YEAR!

1.) Signed Status
Report
Purpose: monitor proper and timely
document routing.
2.) Unsubmitted
Voucher Report
Purpose: verify that travelers are
submitting their travel vouchers within the
prescribed time frame after completion of
travel.
3.)Depart Status
Report Purpose: ensure that authorizations are
routed, approved, and ticketed by the
CTO prior to commencement of TAD.
4.) Return Status
Report Purpose: confirm that travelers have
returned from TAD and the trip actually
took place.

5.) Self Registration
Report
Purpose: ensure travelers that have
self registered to the organization have
their profiles received or returned for
appropriate corrective action.
6.) Approved Status
Report
Purpose: monitor status of possible
amendments.

•Go to the “Reports” tab and select “Report Scheduler”
• Select “Request New Report”
•Select “Signed Status Report” under the “Status Reports” section.
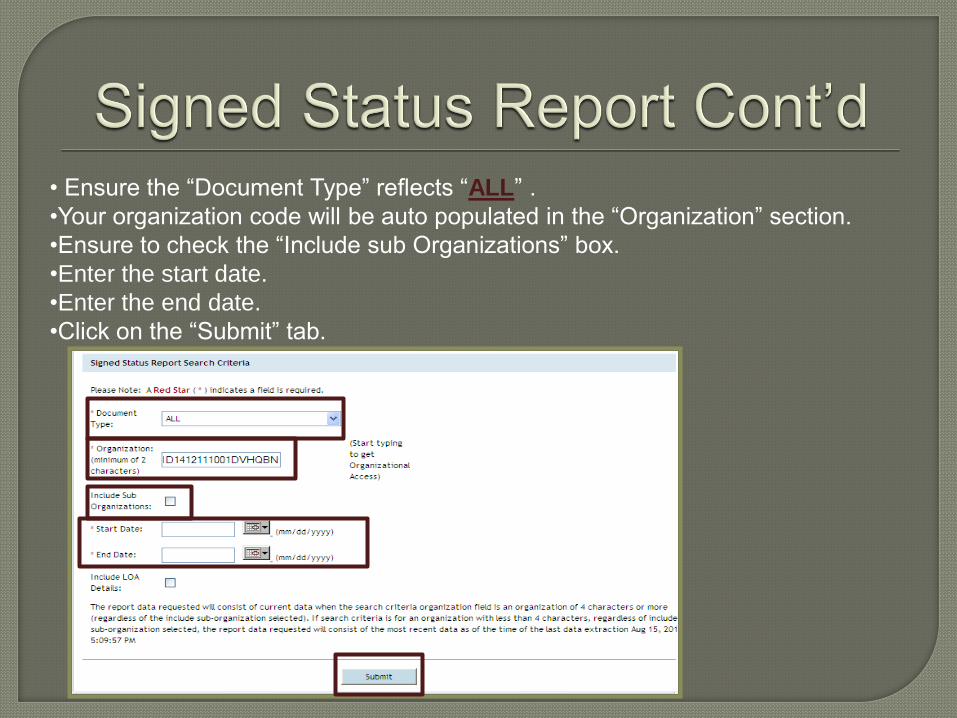
• Ensure the “Document Type” reflects “ALL” .
•Your organization code will be auto populated in the “Organization” section.
•Ensure to check the “Include sub Organizations” box.
•Enter the start date.
•Enter the end date.
•Click on the “Submit” tab.

•After you have submitted your request for the report, you
will receive an email when the report is ready.
•Once you receive an email that your report is ready:
•Go to the “Reports” tab and select “Report
Scheduler”.
• Select “Download” hyperlink next to the report.
•The report will open through Microsoft Excel.

Go to “Reports” tab and select “Report Scheduler”.
Select “Request New Report”.
Select “Unsubmitted Voucher” under the “Individual
reports” section.
Fill out the required fields.
Select the “Submit” tab located at the bottom of the
screen.
You will receive an email when the report is ready.
Go to the “Reports” tab and select “Report Scheduler”.
Select “Download” hyperlink next to the report.
The report will open through Microsoft Excel.

Go to the “Reports” tab and select “Report Scheduler”.
Select “Request New Report”.
Select “Depart Status Report” under the “Status Reports”
section.
Fill out the required fields.
Select the “Submit” tab located at the bottom of the
screen.
You will receive an email when the report is ready.
Go to the “Reports” tab and select “Report Scheduler”.
Select the “Download” hyperlink next to the report.
The report will open through Microsoft Excel.

Go to the “Reports” tab and select “Report Scheduler”.
Select “Request New Report”.
Select “Return Status Report” under the “Status Reports”
section.
Fill out the required fields.
Click the “Submit” tab located at the bottom of the
screen.
You will receive an email when the report is ready.
Go to the “Reports” tab and select “Report Scheduler”.
Click the “Download” hyperlink next to your report.
Your report will open through Microsoft Excel.

•Go to the “Administrative” tab and select “Self Registration Admin”.
•Select the “Begin” tab located at the bottom of the screen.
•Click the hyperlink next to the profile.
•Review all the information in the profile.
• Select “0” for traveler’s permissions.
•Once you have reviewed the profile select the “Accept” or the
“Reject” tab.
NOTE: If there are no profiles that show on this screen it means
there are no profiles awaiting to be accepted.

Go to the “Reports” tab and select “Report Scheduler”.
Select “Request New Report”.
Select the “Approved Status Report” under the “Status
Reports” section.
Fill out the required fields.
Click the “Submit” tab located at the bottom of the
screen.
You will receive an email when the report is ready.
Go to the “Reports” tab and select “Report Scheduler”.
Select the “Download” hyperlink next to the report.
The report will open through Microsoft Excel.

1.) Basic Traveler
Information List
Purpose: ensure personnel who are no
longer part of the organization and have
no outstanding documents or debt
management issues, have had their
profiles appropriately detached. This
report should be reconciled against the
unit Alpha roster.
2.) Complete Traveler
Information List
Purpose: monitor profile permissions.
The report should be reconciled against
the DD Form 577s on file.
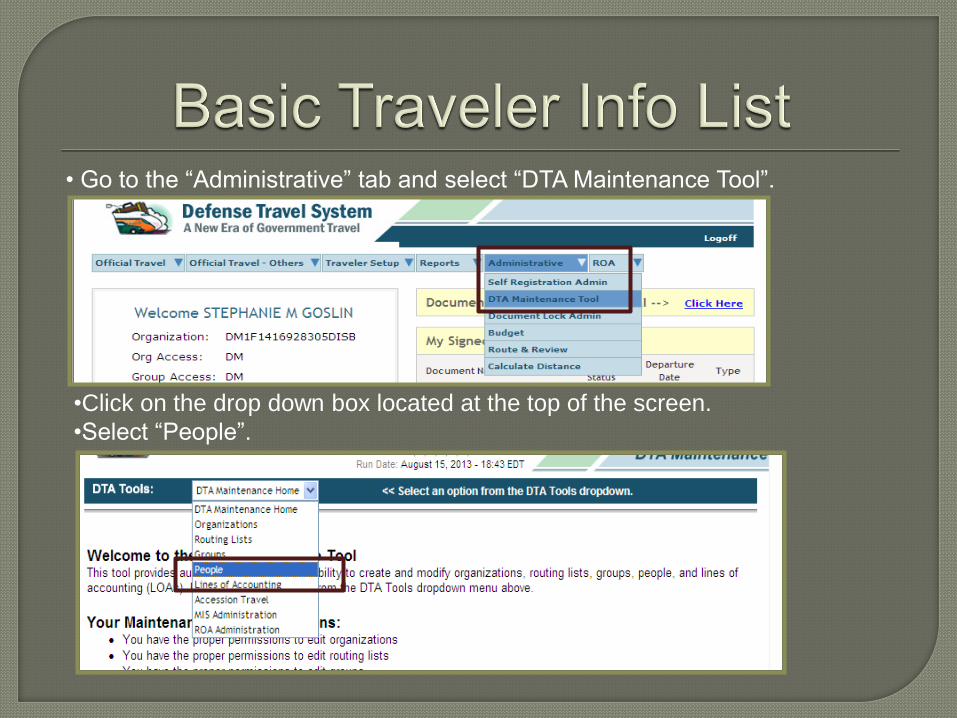
• Go to the “Administrative” tab and select “DTA Maintenance Tool”.
•Click on the drop down box located at the top of the screen.
•Select “People”.

• Select the “View Person Lists” hyperlink located at the top of the screen.
• Ensure the “Select Report” drop down box says “Basic Traveler Info
List”.
• The organization will be auto populated with your organization. Ensure
the “Include Sub-Organizations” box is selected.
•Click the “Run Report” tab.
• The report will open through Microsoft Excel.

Go to the “Reports” tab and select “Report Scheduler”.
Select “Request New Report”.
Select the “Complete Traveler Information List” under the
“Person Reports” section.
Fill out the required fields.
Click the “Submit” tab located at the bottom of the
screen.
You will receive an email when the report is ready.
Go to the “Reports” tab and select “Report Scheduler”.
Click the “Download” hyperlink next to the report.
The report will open through Microsoft Excel.

The ODTA is responsible for maintaining required
documentation for personnel within the unit that hold a
DTS billet
• DD Form 577
• COL Certificate
• Travel Policies Certificate
• After a member no longer holds a DTS billet for your
organization the DD Form 577 must be terminated. Once
the DD Form 577 has been terminated it needs to be
maintained for six years and three months.

As an ODTA you will be responsible for
training your travelers within your
organization annually.
You must retain rosters for current month
plus one year.

ODTA’s must ensure that a DTS section is on the unit’s check in/check out sheet.
When personnel are checking in with the unit, you as the ODTA must ensure/create a DTS profile and attach them to your organization.
When personnel are checking out of your unit you must detach them only if they do not have any outstanding documents or debt management issues.

• When personnel are checking in with your unit you must attach them to
your organization in DTS.
•Go to the “Administrative” tab and select “DTA Maintenance Tool”.
•Click on the drop down box located at the top of the screen and
select “People”.
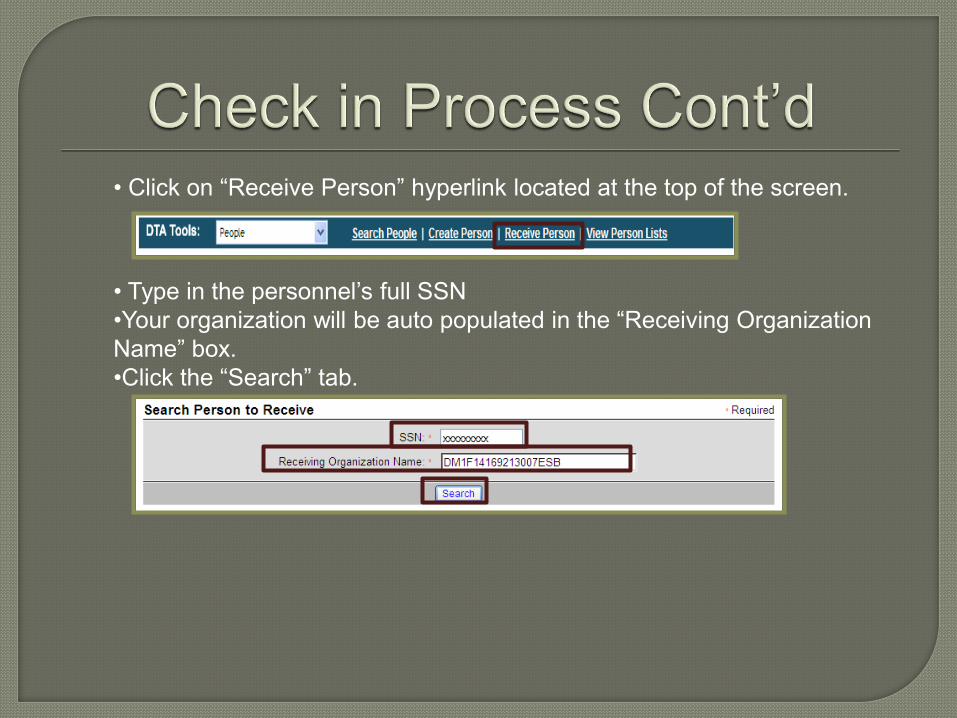
• Click on “Receive Person” hyperlink located at the top of the screen.
• Type in the personnel’s full SSN
•Your organization will be auto populated in the “Receiving Organization
Name” box.
•Click the “Search” tab.

• The traveler’s profile will appear.
•Click the “Receive Person” tab
Note: If you receive an error message stating that you cannot receive the
traveler into your organization because they are attached to another
organization in DTS you must contact the traveler’s previous unit to have
them detached.
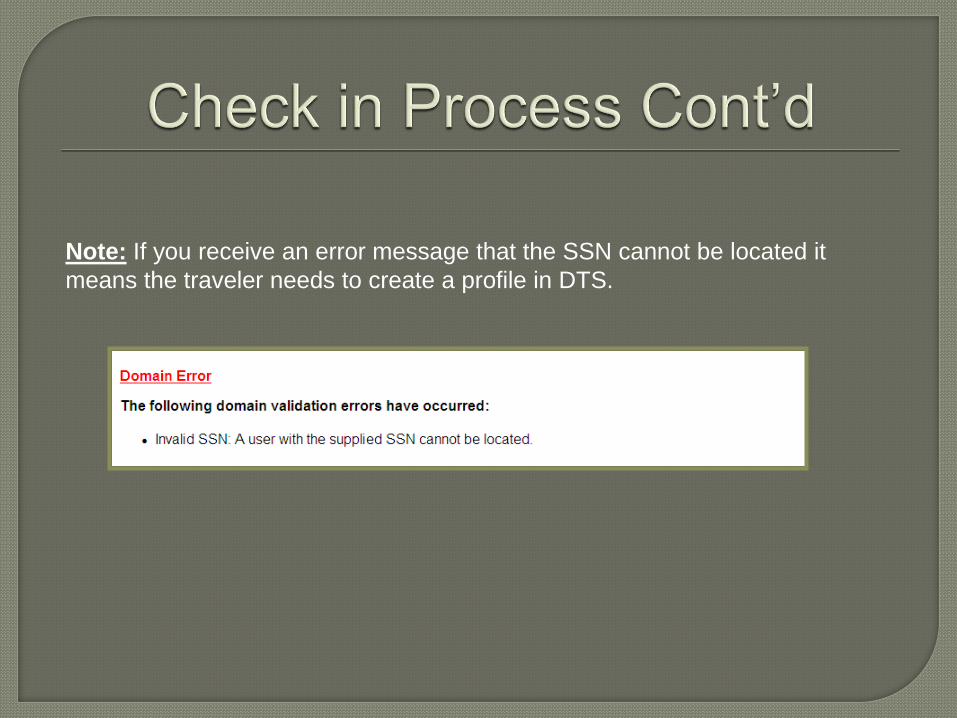
Note: If you receive an error message that the SSN cannot be located it
means the traveler needs to create a profile in DTS.

• A traveler can create a profile in DTS through “Self Registration”.
•Traveler must go to the DTS homepage
• Under the “First Time Users” section, have the traveler click on the
“Learn More” tab.
• Have the traveler follow step by step instructions on how to set up a
DTS account.
• If the traveler cannot create a DTS account for any reason (I.E. they do
not have a CAC), you as the ODTA will be responsible for creating a DTS
profile for them.
• Traveler must first fill out the “DTS Registration Worksheet” located
on the I MEF DTS Help Desk website and submit it to ODTA.

• Once you have received the DTS Registration Worksheet from the traveler
you will go to the “Administrative” tab and select “DTA Maintenance Tool”.
• Select the drop down box located at the top of the screen and
select “People”.

• Click on the “Create Person” hyperlink located at the top of the screen.
•Type in the traveler’s full SSN.
• Always select “Yes” when it asks “Is this person going to travel?”.
Note: If you select “No” when it asks “Is this person going to travel?” it will
not allow you to create a full profile for the traveler.
• Click the “Continue” tab.
• Fill out all required fields.
• When you are finished filling out all of the information, click the “Save
Changes” tab located at the bottom of the screen.
Note: The default routing list will Always be “CPEN”

•When personnel are checking out of your unit you will need to verify if they
have any outstanding documents or debt management issues.
Note: If they DO have outstanding documents or debt management issues
they CANNOT be detached from your unit in DTS until their claim or debt has
been settled.
• To detach personnel from your unit in DTS:
•Go to the “Administrative” tab and select “DTA Maintenance Tool”.

• Select the drop down box located at the top of the screen and select
“People”.
• Search personnel by full SSN or First and Last night.

• Click “Detach” tab next to profile.
• Then click on the “Detach Person” tab.

Updating unit’s routing lists(s)
Creating Authorizations/Vouchers/Local
Vouchers
Correcting EFT information
Trace request

As an ODTA it is your responsibility
to update your unit’s routing list to
ensure that it is up to date.
Go to the “Administrative” tab and
select “DTA Maintenance”.
Utilizing the drop down box
(located at the top of the screen)
select “Routing Lists”.
Your organization’s code with auto
populate in the “Organization
Name” box. Click the “Search”
tab.
Click “Update” next to the routing
list that needs to be updated.

•Click the “Add Routing Element” tab (located at the top right hand corner of
the screen).
• Under the “Document Type” section utilize the drop down box to select
Authorization, Voucher or Local Voucher.
• Under the “Document Status” section utilize the drop down box to select the
stamp for the DTS billet holder. (I.E. If you are adding a unit approver for
Authorizations you would select “APPROVED”).
•Next to the “Signature Name” section click on the “Search” tab.
•Search DTS billet holder by full SSN or first and last name.
• Click the “Search” tab.

• Click the “Select” tab next to the personnel’s profile that you are adding
into the routing list.
•Enter the “Level” number into the manual type in box.
•The level number will be the same numeric value for the specific billet
in the routing list. (I.E. For Authorization if all AO’s are a level 25 you
will add the next approver as a level 25).
• Click “Add Routing Element” tab when you have filled out the required
fields.
• Once you have update the entire routing list click “Save Changes” tab
located at the bottom of the screen.
Note: All unit AO’s will have the “Authorized” stamp and be a
level 25 on Vouchers and Local voucher.

Authorization/Orders: • Once an authorization is approved, it authorizes a
traveler to execute TAD orders according to what
was put into the authorization. Think of this as a
set of orders.

TVLR IDENTIFIED
TO GO TAD
CAC TVLR
WILL SELF
REGISTER
CREATING
A PROFILE
NON CAC
TVLR
ODTA
CREATES A
PROFILE
CAC TVLR START
AUTH IN DTS
NON CAC TVLR HAS
ODTA CREATE AUTH
CTO RESERVES
TVL THEN
GOES TO TMO
FOR REVIEW
BYPASS IF NO
RESERVATION
(S)
UNIT REVIEWING
OFFICIAL
(REVIEWED
STAMP)
UNIT APPROVING
OFFICIAL
(APPROVED
STAMP)
CTO TICKETS TVLR EXECUTES TAD

TVLR IDENTIFIED
TO GO TAD
CAC TVLR
WILL SELF
REGISTER
CREATING
A PROFILE
NON CAC
TVLR
ODTA
CREATES A
PROFILE
CAC TVLR START
AUTH IN DTS
NON CAC TVLR HAS
ODTA CREATE AUTH
CTO RESERVES
TVL THEN
GOES TO TMO
FOR REVIEW
BYPASS IF NO
RESERVATION
(S)
UNIT APPROVING
OFFICIAL
(REVIEWED
STAMP)
TECOM
APPROVING
OFFICIAL
(APPROVED
STAMP)
CTO TICKETS TVLR EXECUTES TAD
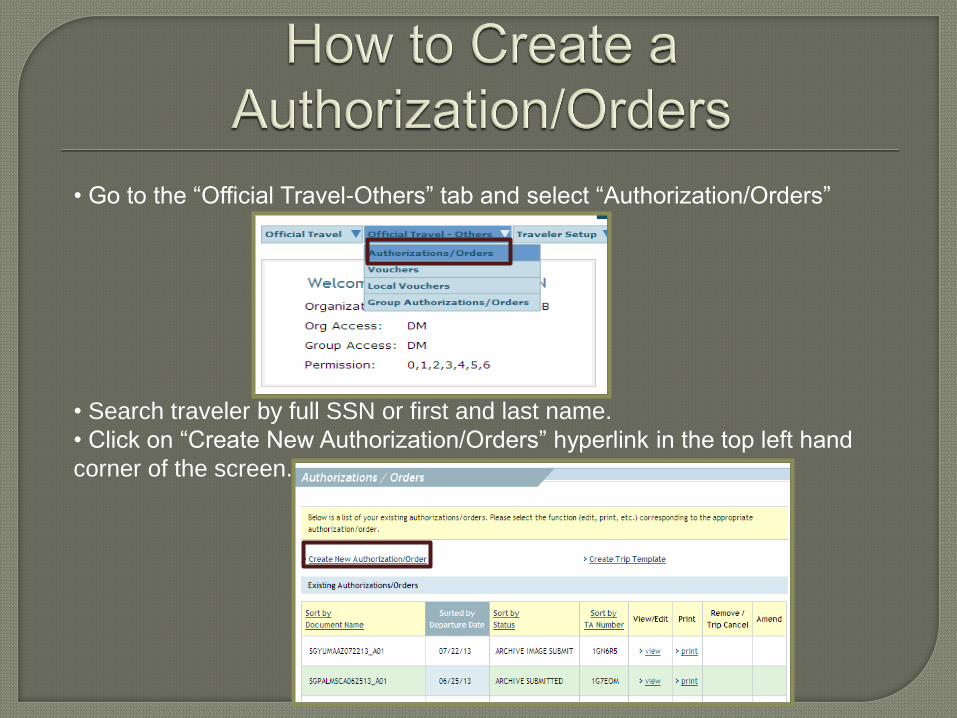
• Go to the “Official Travel-Others” tab and select “Authorization/Orders”
• Search traveler by full SSN or first and last name.
• Click on “Create New Authorization/Orders” hyperlink in the top left hand
corner of the screen.

Trip Overview:
•Section A:
•Select the “Residence” or “Duty Station” for your starting point. This
information is pulled from the traveler’s DTS profile. Ensure the traveler
updates their profile to reflect the correct information. If traveler is
leaving during the work week they will select “Duty Station”. If the
traveler is leaving during a liberty period then their starting point will be
“Residence”.
•Select what date the traveler will be leaving for TAD.
•Select the drop down box to select Trip Type.
•Select the drop down box to select the Trip Purpose.
•In the “Trip Description box type in reason for TAD or the particular
schoolhouse/formal training that the traveler will be attending.


•Section B:
•Select what transportation mode the traveler will be utilizing and what
time they will be departing.
• Section C:
•Type in the location of the TAD in the manual type in box or utilize the
blue tab labeled “Location”. Once you select the correct location click
“Select and Close” tab.
•Select the date the traveler will be departing the TAD location.
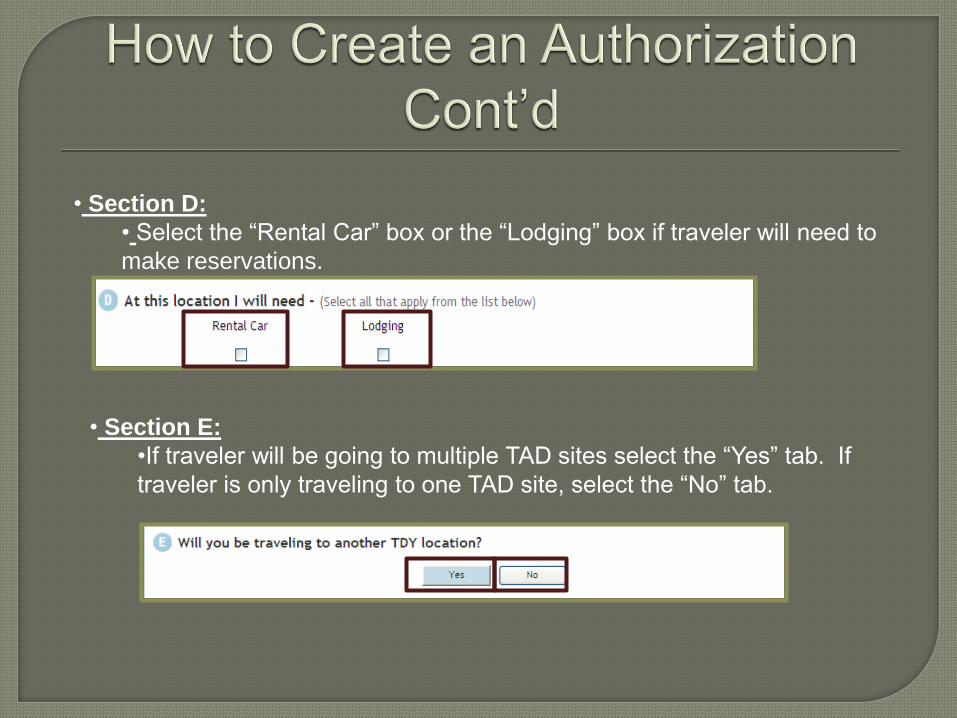
• Section D:
• Select the “Rental Car” box or the “Lodging” box if traveler will need to
make reservations.
• Section E:
•If traveler will be going to multiple TAD sites select the “Yes” tab. If
traveler is only traveling to one TAD site, select the “No” tab.

• Section C:
•Select “Residence” or “Duty Station” for the ending point of the
authorization.
• Section D:
• Select the traveler’s mode of travel when returning from TAD trip

• Section E:
• If the traveler has another transportation mode ticketed that is not listed
in Section D, check the box.
•When all the required fields have been filled out click the “Save and Proceed”
tab located at the bottom of the screen.
•Note: If you need CTO assistance select the “CTO Full Assistance
Request” tab located at the bottom of the screen.

It is DoD mandatory policy that travelers use
available CTOs to arrange official travel (JFTR,
T4025).
Transportation Modes:
• Commercial Air
• Rental Vehicle
• POV
DTS allows travelers to book flights via CTO.
Contract GSA should be first choice.
May authorize a Non-GSA flight when appropriate and IAW
established command business rules. • No contracted flights
Flights must be charged to the GOVCC vice Centrally Billed Account
(CBA) if traveler is GOVCC holder.
Must ensure traveler selects the most cost effective flight to
accomplish the mission (Maradmin 617/06).
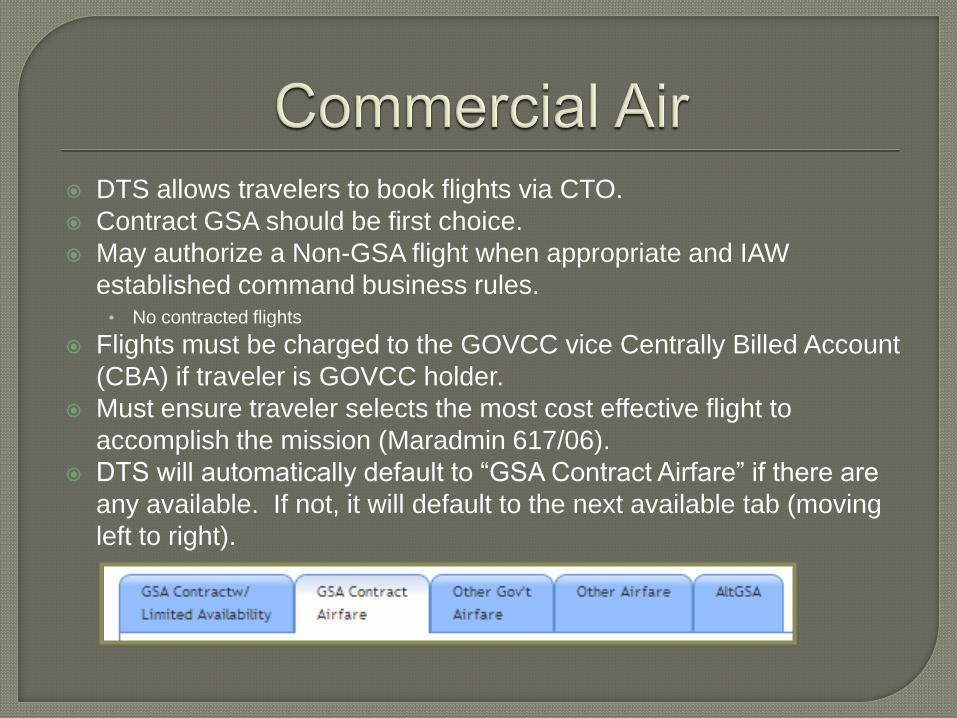
DTS will automatically default to “GSA Contract Airfare” if there are
any available. If not, it will default to the next available tab (moving
left to right).

Unused/ partially used tickets must be returned for refund
to TMO.
Coach-class will be used for all official travel.
Attach your itinerary and receipt from virtuallythere.com.
Note: tickets purchased outside of CTO will be limited to the GTR cost.

• Select the “Travel” tab and click on “Air” sub-tab.
• Once you have found the most cost effective flight to accomplish the
mission select the “ Select Flight” tab.
• You can select seat preferences if available.
• You will have to make two reservations (traveling to and from TAD site).

• You can modify your search to select different airports through the search box
located on the left side of the screen.

• Select “Travel” tab and select the “Rental Car” sub-tab.
•Select a rental vehicle that is the most effective that will accomplish
the mission. Select the “Select Car” tab next to the reservation.
•Use the Modify Search engine to select times, dates, vehicle type,
and pickup airport for the rental vehicle.
• Utilize the “Request Assistance in Booking Rental Car” tab for
further assistance on reserving a rental vehicle.

Reimburse all legitimate costs associated with the rental
vehicle. • Fuel and Oil
• Transportation to and from rental facility
• Tolls and parking fees
• Taxes
• Government administrative rate supplement (GARS)
Upgrades reimbursable per command’s guidance. • Can authorize the size/quantity necessary to meet missions
requirements.
Extra insurance is not reimbursed for CONUS TAD sites. • Authorized when TAD at OCONUS sites
TECOM will not fund rental vehicles.

Traveler will be reimbursed mileage when utilizing POV
for mode of transportation to and from TAD site.
If TAD site is 400 miles or more in distance (one way) the
traveler is required to fill out and upload a Constructed
Travel Worksheet (CTW). • Traveler will compare how much it will cost in mileage to how much it
would cost the government (GSA rate) to fly to the TAD location.
CTW can be found on the I MEF DTS Help Desk website.
• The traveler will be reimbursed whichever mode is more cost effective.
• The CTW will be uploaded under the “Expenses” tab under the
“Substantiating Records” sub-tab.

• How to input POV mileage to TAD site:
• Go to “Expenses” tab and select the “Mileage” sub tab.
• Click on the “Expense Type” drop down box and select “Pvt Auto-TDY/TAD”.
• Enter the date when the traveler will be leaving to TAD location.
• Click on the “Method of Reimbursement” drop down box and select the
traveler’s method of reimbursement (I.E. GOVCC or Personal).

• Click on the “DoD Table of Distance” hyperlink to calculate the mileage.
• Under the “Traveling From” section you can search your departing
location by typing in city, state, or country.
• Click the “Search” tab to verify the correct location.
• Once you have found the correct location of departure, click the “Select”
hyperlink next to that location.
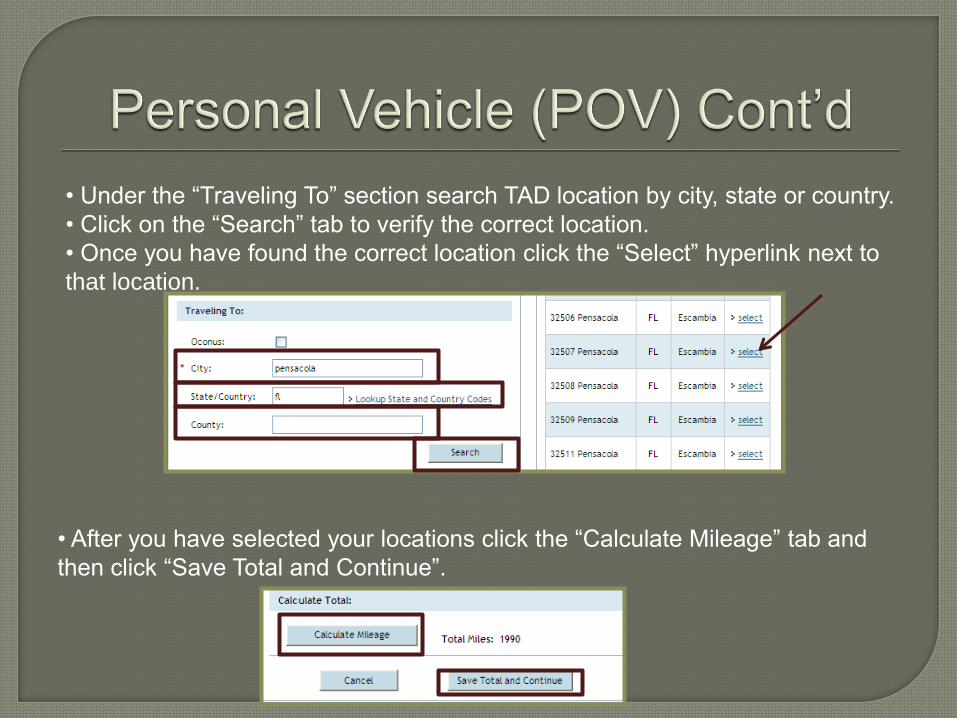
• Under the “Traveling To” section search TAD location by city, state or country.
• Click on the “Search” tab to verify the correct location.
• Once you have found the correct location click the “Select” hyperlink next to
that location.
• After you have selected your locations click the “Calculate Mileage” tab and
then click “Save Total and Continue”.

• Before you save the mileage expense, ensure to check
“Create separate mileage expense for return trip
mileage”.

• When the traveler is driving POV to airport terminal they rate mileage.
• If spouse is authorized to transport traveler, spouse rates mileage for 2 round
trips.
• How to input mileage for POV when driving to airport terminal:
• Go to the “Expenses” tab and select the “Mileage” sub-tab.
• Select the drop down box and select “Pvt Auto- Terminal”.
• Select the date that you will be traveling.
• Select the method of reimbursement.
• Type how many miles the from the duty station/residence to the airport
terminal.

AO will determine whether government quarters or commercial lodging
will be used.
If government quarters are directed but not available, the traveler needs a
Certificate of Non-Availability (CNA).
When TAD to a schoolhouse or formal training the Installation Commander
decides whether government quarters are directed.
Civilians are highly encouraged to stay in lodging but cannot be directed.
Can authorize up to 300% of published per diem rate if lodging could not
be obtained under the ceiling rate.
Do not reimburse if staying with relatives/ friends.
Taxes are paid separate from lodging when TAD CONUS through the
“Non-Mileage” expense under the “Expenses” tab.
Lodging
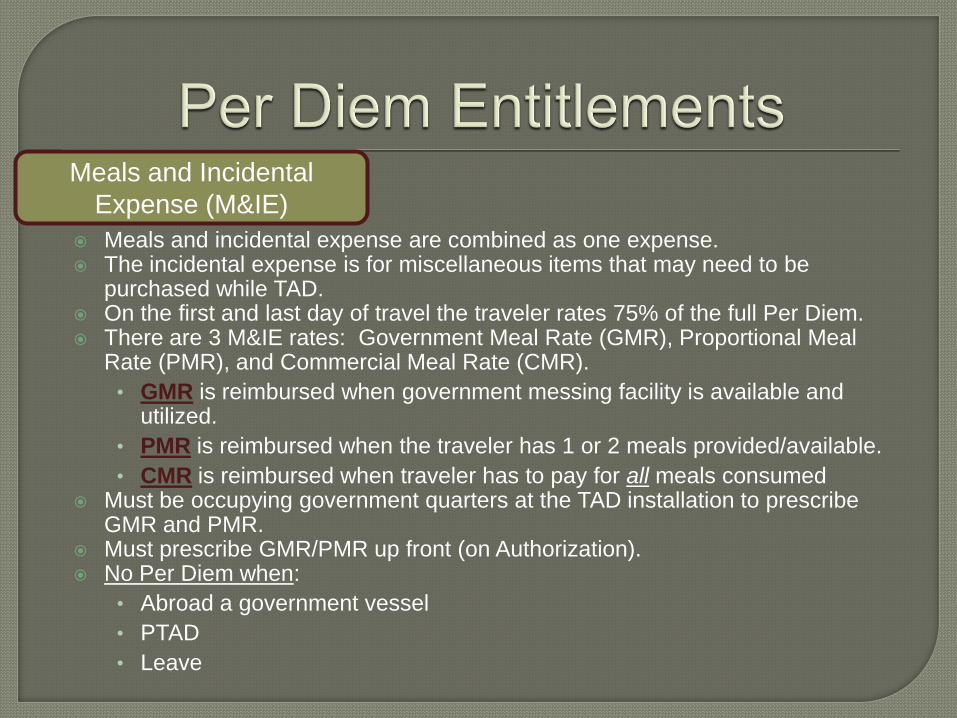
Meals and incidental expense are combined as one expense. The incidental expense is for miscellaneous items that may need to be
purchased while TAD. On the first and last day of travel the traveler rates 75% of the full Per Diem. There are 3 M&IE rates: Government Meal Rate (GMR), Proportional Meal
Rate (PMR), and Commercial Meal Rate (CMR).
• GMR is reimbursed when government messing facility is available and utilized.
• PMR is reimbursed when the traveler has 1 or 2 meals provided/available.
• CMR is reimbursed when traveler has to pay for all meals consumed Must be occupying government quarters at the TAD installation to prescribe
GMR and PMR. Must prescribe GMR/PMR up front (on Authorization). No Per Diem when:
• Abroad a government vessel
• PTAD
• Leave
Meals and Incidental
Expense (M&IE)

If occupying commercial lodging, CMR must be given unless any
meals are being provided or government messing is not available.
Must prescribe GMR/PMR up front (on Authorization).
Travelers will most likely not receive Per Diem while on Field Duty.
This limitation of Per Diem begins 0001 the day after commencing
Field Duty and ends at 2400 the day before it ends.
• Circumstances under which the traveler may rate Per Diem while
on any of the statuses afore mentioned can be found in JFTR
U4510.
M&IE Cont’d

• How to input Per Diem in DTS:
• Go to the “Expenses” tab and select “Per Diem Entitlements”
• Click “Edit” next to the day/days that need to be changed.
• When changing per diem for multiple days utilize the “Values Apply
Through” drop down box at the top of the screen to include all of the
dates.
Note: Per Diem entitlements are defaulted to the full rate.

• Under the “Per Diem Rates” section:
• Change the lodging rate in the manual type in box.
• Under the “Duty Conditions” section check any box that applies to the
traveler’s TAD trip.
Note: In order to enter GMR/PMR under Per
Diem entitlements you must select “Quarters
Available” under the “Duty Conditions” section.
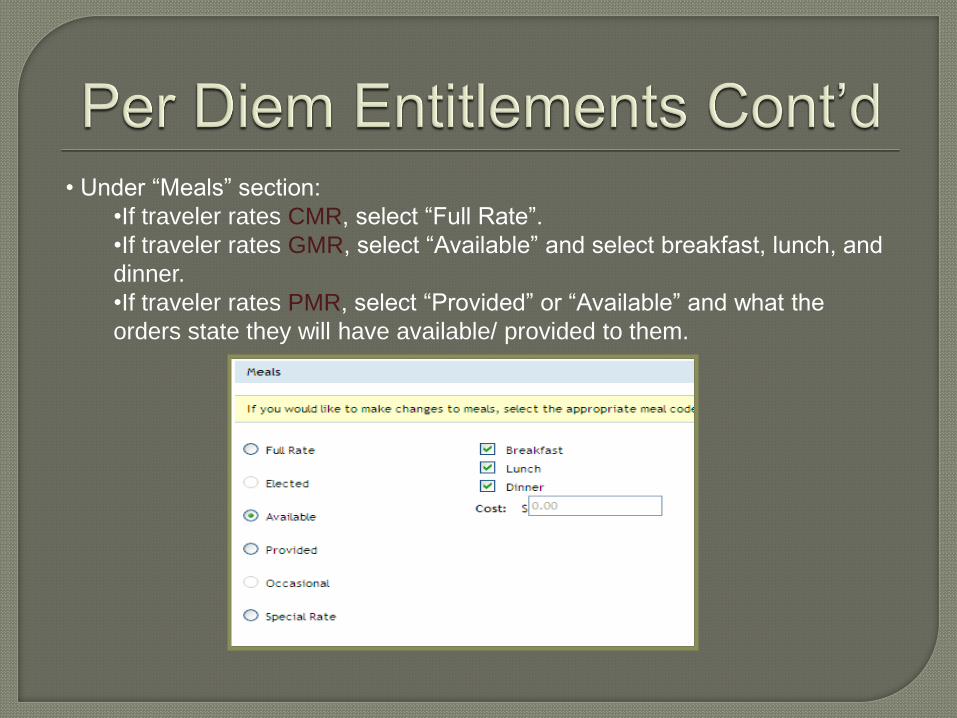
• Under “Meals” section:
•If traveler rates CMR, select “Full Rate”.
•If traveler rates GMR, select “Available” and select breakfast, lunch, and
dinner.
•If traveler rates PMR, select “Provided” or “Available” and what the
orders state they will have available/ provided to them.

• Select an boxes that apply to the traveler under “Other Per Diem
Entitlements” section.
• Once you have completed all of the required sections click “Save These
Entitlements” tab.

• Ensure the traveler’s TAD orders and/or funding letter is uploaded in the
DTS authorization/orders.
• To attach supporting documents:
•Go to the “Expenses” tab and select “Substantiating Records” sub tab.
• Click the “Browse” tab and select the document from file on computer.
•Click “Upload” tab.
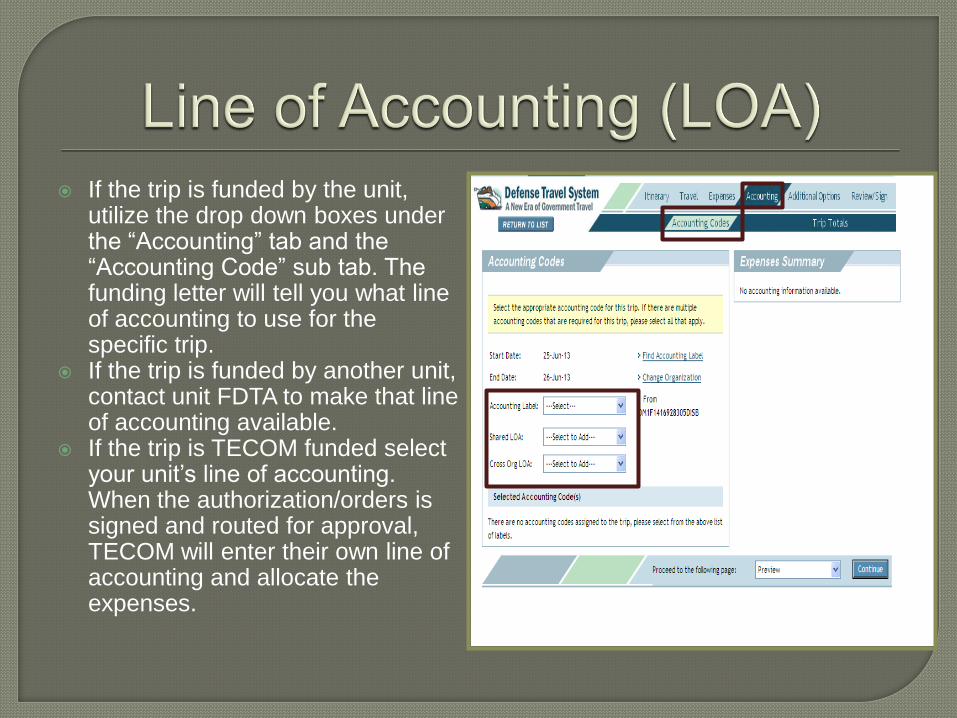
If the trip is funded by the unit, utilize the drop down boxes under the “Accounting” tab and the “Accounting Code” sub tab. The funding letter will tell you what line of accounting to use for the specific trip.
If the trip is funded by another unit, contact unit FDTA to make that line of accounting available.
If the trip is TECOM funded select your unit’s line of accounting. When the authorization/orders is signed and routed for approval, TECOM will enter their own line of accounting and allocate the expenses.

When TAD consecutively for 45 days or
more traveler rates partial payments.
Partial Payments are paid every 30
days to GOVCC/Personal account to
ensure traveler will not become
delinquent or in financial hardship.
The split disbursement between the
GOVCC/ Personal account is created
by the system based off the method of
reimbursements for each expense.
To schedule a partial payment go to the
“Additional Options” tab and select the
“Partial Payments” sub tab.
Click the “Schedule Partial Payments”
tab.

If traveler is not a GOVCC holder,
they can schedule an advance.
An advance is paid to traveler’s
personal account to assist them
with expenses prior to TAD trip.
To schedule an advance go to the
“Additional Options” tab and select
“Advances” sub tab.
Utilize the drop down box to select
the correct accounting label.
Once selected the system will
schedule the advance.
Note: The traveler’s profile must say
“Authorized Advance” in order to
schedule an advance.

• 1. Under the “Review/Sign” tab click on the “Preview” sub tab.
• Review the authorization/orders to ensure that the information that has
been inputted is correct and IAW the orders and/or funding letter.
• When you have reviewed the information click the “Save and Proceed
to Other Auths” tab (located at the bottom of the screen).
• 2. Review the Other Auths. Screen for any flags. Type in justifications for
any items that have been flagged in the system.
• Click the “Continue” tab (located at the bottom of the screen).
• 3. On the “Pre-Audit” sub tab, review anything that has been flagged in
the system. Type in justifications for any items that have been flagged
in the system.
• Click the “Save and Proceed To Digital Signature” tab
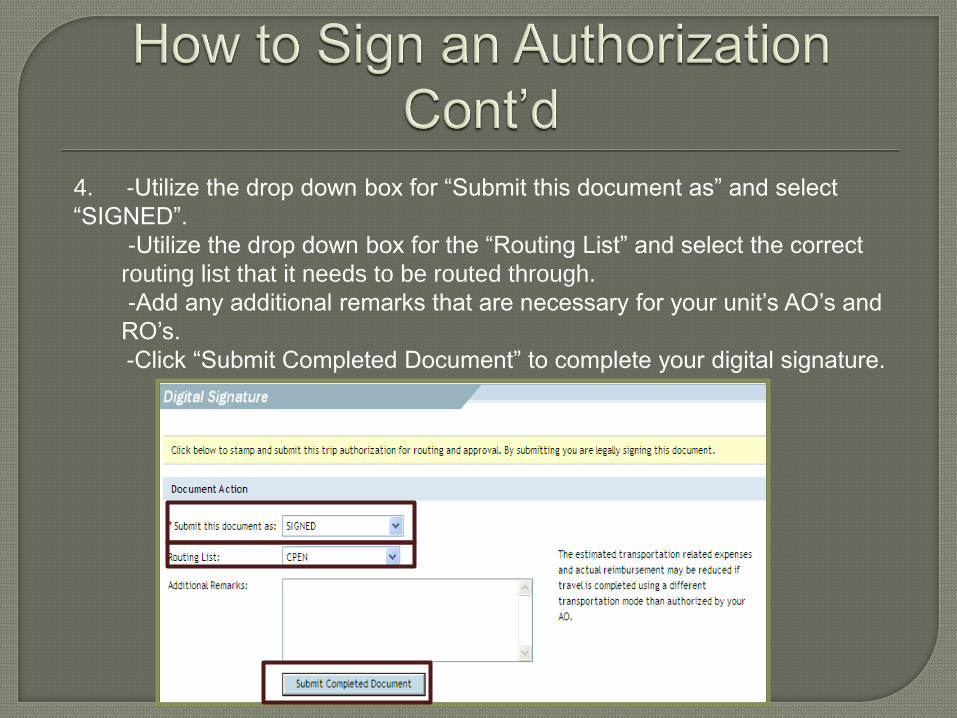
4. -Utilize the drop down box for “Submit this document as” and select
“SIGNED”.
-Utilize the drop down box for the “Routing List” and select the correct
routing list that it needs to be routed through.
-Add any additional remarks that are necessary for your unit’s AO’s and
RO’s.
-Click “Submit Completed Document” to complete your digital signature.

Voucher: • A voucher is a document that is created once TAD is
finished. It should contain all reimbursable travel expenses
that the traveler incurred while TAD. It must be completed
from a previous authorization.

Camp Pendleton Disbursing office approves all vouchers
and local vouchers that are unit funded under I MEF.
Local vouchers/ vouchers must be sent up the CPEN
routing list.
• Authorized by unit AO and then routed to disbursing for approval.

TVLR RETURNS
FROM TAD
CAC TVLR START
VOUCHER IN DTS
NON CAC TVLR HAS
ODTA CREATE
VOUCHER
UNIT APPROVING
OFFICIAL
(AUTHORIZED
STAMP)
TVLR PAID
DISBURSING
REVIEWING
OFFICIAL
(REVIEWED
STAMP)
DISBURSING
APPROVING
OFFICIAL
(APPROVED
STAMP)
PER MARADMIN 291/12 UNITS
HAVE 2 BUSINESS DAYS TO
SUBMIT THE VOUCHER TO
DISBURSING
DISBURSING HAS 3
BUSINESS DAYS FROM
WHEN IT IS RECEIVED TO
APPROVE THE VOUHCER
TRAVELER HAS 5
BUSINESS DAYS
TO SUBMIT
VOUCHER UPON
RETURN.

TVLR RETURNS
FROM TAD
CAC TVLR START
VOUCHER IN DTS
NON CAC TVLR HAS
ODTA CREATE
VOUCHER
UNIT APPROVING
OFFICIAL
(AUTHORIZED
STAMP)
TVLR PAID
TECOM
APPROVING
OFFICIAL
(APPROVED
STAMP)

• Go to “Official Travel- Others” tab and select “Vouchers”
• Search traveler by full SSN or first and last name.
• Click on the “ Create New Voucher from Authorization/Orders” located
at the top left hand corner of the screen.
• Under the “Itinerary” tab verify to ensure the TAD trip dates and
location is correct. Ensure to make any changes that are necessary.
• Under the “Travel” tab to ensure the transportation modes and
monetary values are correct. Make any necessary changes.
• Under the “Expense” tab select the “Non-Mileage” sub tab to input any
miscellaneous expenses.

Transportation in and around TAD site
Transportation to and from the airport
GOVCC/ ATM advance fee (determined by applicable rate for card).
Baggage tips
Laundry/ dry cleaning- traveler must be TAD in CONUS for at least 7
consecutive days. Maximum allowed reimbursement equal to $2.00 per day.
Civilians must be TAD in CONUS for 4 consecutive days. Laundry/ dry
cleaning expense is not reimbursable OCONUS because that expense is
included in the incidental expense.
Parking fees- travelers are limited to cost of 2 taxi fares plus tip.
Tolls
Excess baggage- must be addressed in the authorization. Contact TMO
with questions regarding limitations.
JFTR, Appendix G for Miscellaneous Expense

• To input a non-mileage expense:
•Utilize the drop down box or manual type in box to select the type
of miscellaneous expense.
•Enter in the cost of the miscellaneous expense.
•Utilize the drop down box to select the date that the expense
incurred on
• Utilize the drop box to select the method of reimbursement for
the miscellaneous expense.

• Once all miscellaneous expenses have been added
click the “Save Expense” tab located at the bottom of
the screen.
• Under the “Expense” tab select the “Mileage” sub tab
to add any mileage expense reimbursable to the
traveler.
• Under the “Expense” tab select the “Per Diem
Entitlements” sub tab ensure all per diem entitlements
are correct. If any changes need to be made click the
“edit” hyper link next to those specific days.
• Under the “Expenses” tab select the “Substantiating
Records” sub tab upload all required receipts and
supporting documentation.

To be considered a valid receipt:
• The name of the company providing the service (I.E. the name of the
hotel, airline, rental car agency, etc..)
• Dates specific services were rendered or articles purchased, and the unit
price.
• Lodging receipts
Must be itemized
Must have a zero balance
Receipts

ITEMIZED

• If traveler is a GOVCC holder, ensure that the
split disbursement will cover the balance.
• To ensure the balance on traveler’s GOVCC
card contact unit’s APC or traveler with the
current balance.
• To check the split disbursement of final
settlement go to the “Additional Options” tab and
select the “Payment Totals” sub tab.

GOVCC must be used for all lodging, rental car, and commercial air
expenses.
Apply for a GOVCC by contacting your Agency Program Coordinator
(APC). You will generally need to start applying 30 days prior to TAD
to receive and be able to use the GOVCC for travel.
Must have GOVCC activated prior to CTO ticketing.
MARADMIN 216/13 mandates that the GOVCC be paid in full at the
time the voucher is approved. As a traveler, verify your GOVCC
balance and ensure the voucher accurately reflects it will be paid in
full. Vouchers sent through Camp Pendleton Disbursing will be
automatically adjusted if the GOVCC is not paid in full. TECOM
vouchers will not be automatically adjusted.

• Use the following steps to reduce
the split disbursement going to the
GOVCC in order to increase the
payment to the personal account
prior to the final settlement.
•Enter the monetary amount into
the Less Prev Pmts to GOVCC
(By Traveler) field.
• Click the “calculate” hyperlink.
• The specified amount will be
incremented to the Personal
Net Distribution field.

• Use the following steps to increase
the split disbursement payment to the
GOVCC to decrease the split
disbursement to the personal account
prior to the final settlement.
•Enter the monetary amount in
the “Add GOVCC ATM field.
• Click the “calculate” hyperlink.
• The specified amount will be
decremented from the Personal
Net Distribution field.

• 1. Under the “Review/Sign” tab click on the “Preview” sub tab.
• Review the voucher to ensure that the information that has been
inputted is correct and has all supporting documents.
• When you have reviewed the information click the “Save and Proceed
to Other Auths” tab (located at the bottom of the screen).
• 2. Review the Other Auths. Screen for any flags. Type in justifications for
any items that have been flagged in the system.
• Click the “Continue” tab (located at the bottom of the screen).
• 3. On the “Pre-Audit” sub tab, review anything that has been flagged in
the system. Type in justifications for any items that have been flagged
in the system.
• Click the “Save and Proceed To Digital Signature” tab

4. -Utilize the drop down box for “Submit this document as” and select “T-
Entered”.
-Utilize the drop down box for the “Routing List” and select the correct
routing list that it needs to be routed through.
-Add any additional remarks that are necessary for your unit’s AO’s and
RO’s.
-Click “Submit Completed Document” to complete your digital signature.
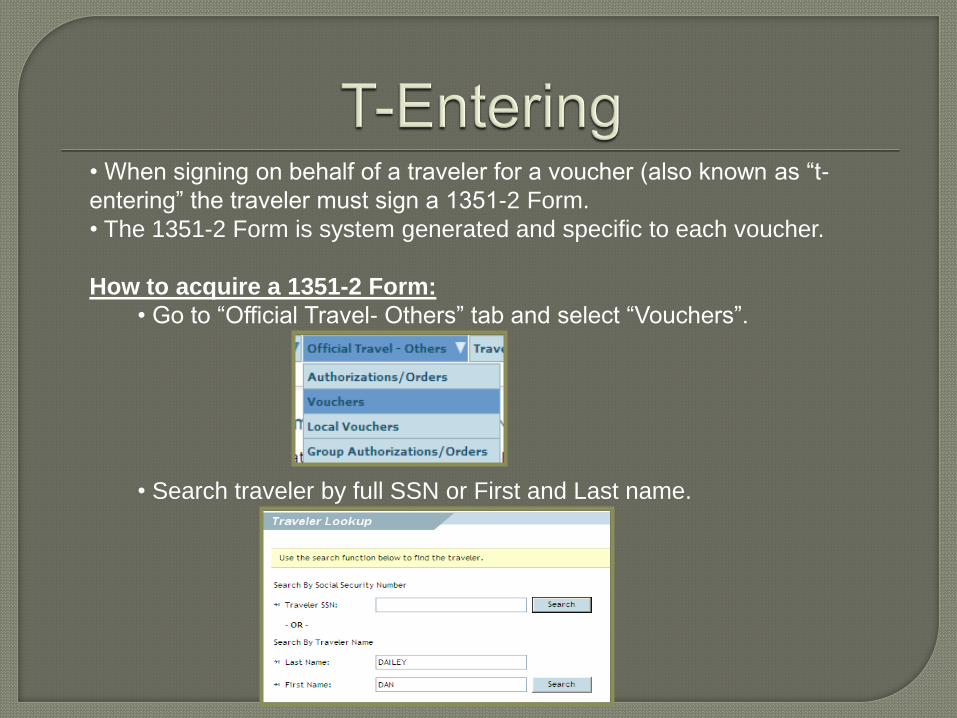
• When signing on behalf of a traveler for a voucher (also known as “t-
entering” the traveler must sign a 1351-2 Form.
• The 1351-2 Form is system generated and specific to each voucher.
How to acquire a 1351-2 Form:
• Go to “Official Travel- Others” tab and select “Vouchers”.
• Search traveler by full SSN or First and Last name.

• Click the “Print” hyperlink next to that specific Voucher.
• Have the traveler sign Block 20a.
• Scan and upload 1351-2 into “Substantiating Records” located
under the “Expenses” tab.

For 1 day of TAD outside limits of PDS:
• Over 12 hours: Traveler can be authorized M&IE (at a rate of 75% of the
full per diem) for the TAD location and any transportation expense.
• Under 12 hours: Traveler are reimbursed any authorized transportation
expense and will most likely receive no M&IE.
Utilized to reimburse travelers for mileage.
Reimbursement will be actual miles driven
subtracted by usual commute.
Utilize the Defense Table of Official Distances
(DTOD) in DTS to determine mileage that will be
reimbursed.

• Go to “Official Travel- Others” tab and select “Local Vouchers”.
• Search traveler by full SSN or first and last name.
• Click the “Select” hyperlink next to the traveler’s name.

• Click on the “Create New Local Voucher” hyperlink located at the top left
hand corner of the screen.
• Utilize the drop down box to select the date when the TAD trip took place.
• Go to the “Expenses” tab and select the “Non-Mileage” sub tab to add any
miscellaneous expense that the traveler incurred during TAD trip

• Go to the “Expenses” tab and select the “Mileage” sub tab to add any
mileage expense that is reimbursable to the traveler.
• To upload receipts and supporting documents go to the “Expenses”
tab and select the “Substantiating Records” sub tab.
• Add the Line of Accounting into the document under the
“Accounting” tab.
• To change the split disbursement of the settlement go to the
“Additional Options” tab and select the “Payment Totals” sub tab

• 1. Under the “Review/Sign” tab click on the “Preview” sub tab.
• Review the voucher to ensure that the information that has been
inputted is correct and has all supporting documents.
• When you have reviewed the information click the “Save and Proceed
to Pre-Audit” tab (located at the bottom of the screen).
• 2. On the “Pre-Audit” sub tab, review anything that has been flagged in
the system. Type in justifications for any items that have been flagged
in the system.
• Click the “Save and Proceed To Digital Signature” tab

4. -Utilize the drop down box for “Submit this document as” and select
“SIGNED”.
-Utilize the drop down box for the “Routing List” and select the correct
routing list that it needs to be routed through.
-Add any additional remarks that are necessary for your unit’s AO’s and
RO’s.
-Click “Submit Completed Document” to complete your digital signature.

Updating EFT
information
• LDTA’s or travelers are the only authorized personnel to update EFT
information.
• How traveler’s can update their EFT information:
•Have the traveler log into DTS.
• Traveler will go to the “Traveler Setup” tab and select the “Update
Personal Profile” sub tab.
• Traveler will click on the “My Account Information” hyperlink located at the
top of the screen

Updating EFT
Information Cont’d
•Traveler will type in their correct personal account information.
• Traveler must click “Update Personal Information” tab when they have finished
update their profile.
• How to submit an EFT request to LDTA:
• Fill out required fields on the EFT Request form (located on the I MEF
DTS Help Desk website under the “Forms” tab).
• Attach your DD Form 577 with the EFT Request form.
• Scan and email the EFT request form and DD form 577 to the I MEF
DTS Help Desk.

When a DTS payment shows that it was paid out and the traveler never
received those funds they will need to send a Trace Request.
The Trace Request instruction sheet can be found on the I MEF DTS Help
Desk website under the “Forms” tab.
The Trace Request will be emailed to DFAS.
DFAS will contact the bank to ensure the traveler did not receive those funds
(I.E. wrong bank account information in DTS, old bank account, or a closed
bank account).
DFAS will then re-issue the payment to the travel via EFT.
This process can take anywhere from 1-2 weeks.
For further questions or assistance call DFAS at 1-888-332-7411.
Trace Request

References to obtain additional information:
• Defense Travel System Sites
www.defensetravel.osd.mil
• JFTR, Volume 1/Appendix O of the JFTR
www.defensetravel.dod.mil/Docs/perdiem/JFTR(Ch1-10).pdf
• DoD FMR, Volume 9, Chapter 2
http://comptroller.defense.gov/fmr/archive/09arch/09_02.pdf
• Defense Travel Administrators (DTAs)
• I MEF DTS Help Desk Website
http://www.imef.marines.mil/DTSHelpdesk.aspx
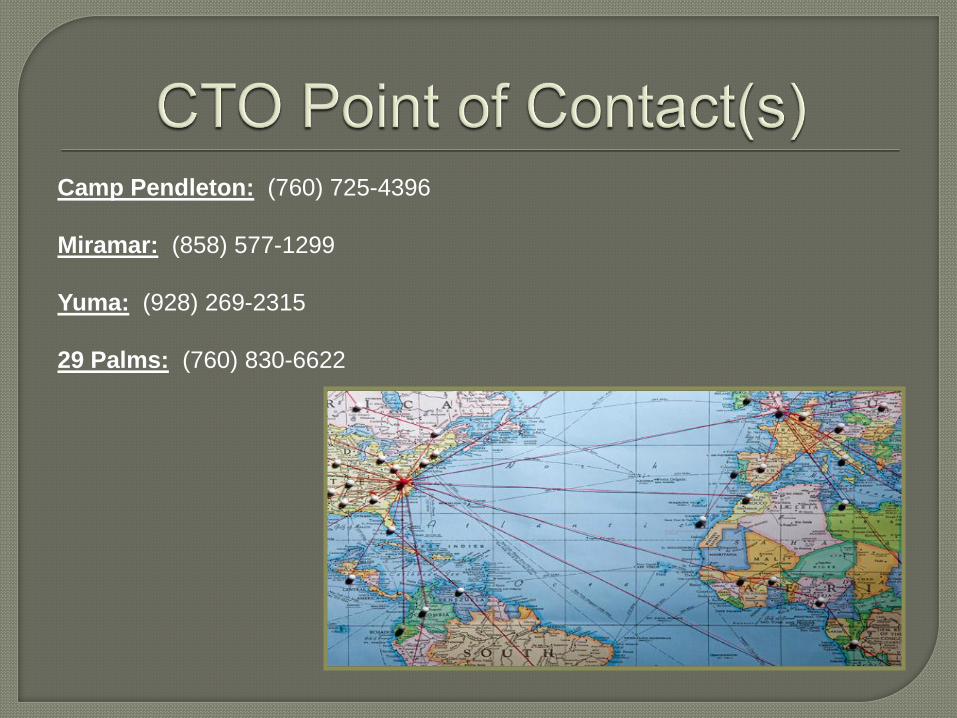
Camp Pendleton: (760) 725-4396
Miramar: (858) 577-1299
Yuma: (928) 269-2315
29 Palms: (760) 830-6622

TECOM: (703) 784-3086/ (703) 784-0553
MARSOC: (760) 725-2239
Base: (760) 763-0696
1st Mar Div: (760) 763-2099
1st MLG: (760)-9173
1st MHG: (760) 763-2566
3rd MAW: (858) 577-7414

I Marine Expeditionary Force ( I MEF) Hours of Operation: Monday –Friday 0700-1700 PST Organization Mail Box (OMB): [email protected] Phone Numbers: (760) 763-7154 (760) 763-7152 (760) 763-7157 (760) 725-5919 DSN: 365-XXXX Fax: (760) 725-6473