initializing corporate performance management at parking
TRANSCRIPT

User Manual Teacher Managers for:
Keyboard Mastery, Skillbuilding Mastery, Keyboard Short Course, Keyboarding for Kids

User Manual Table of Contents
A. Getting Started 1. Profile Manager
1.1. Create New Profile 1.2. Rename Profile 1.3. Edit Profile 1.4. Copy Profile 1.5. Delete Profile
2. Class Manager 2.1. Create Class 2.2. Rename Class 2.3. Export to Excel 2.4. Print Login Cards 2.5. Restore Class 2.6. Delete Class 2.7. Add Students 2.8. Edit Student 2.9. Restore Students 2.10. Delete Student(s) 2.11. Update Profile(s) 2.12. Update Schedule(s)
3. Create Students 3.1. One-by-One 3.2. Import from File
B. Advanced Customizations 4. Create Lessons
4.1. Create Lesson 4.2. Rename Lesson 4.3. Edit Lesson 4.4. Delete Lesson
5. Schedule Manager 5.1. Create New Schedule 5.2. Rename Schedule 5.3. Edit Schedule 5.4. Delete Schedule
6. Move Students 6.1. Move Students
C. Monitor Students 7. View Student Progress
7.1. Class Reports 7.2. Progress Reports 7.3. Grade Reports

7.4. Effort Reports
8. Print Certificates 8.1. Generate Certificates
9. Message Center 9.1. Sending Messages 9.2. Checking Messages

A. Getting Started 1. Profile Manager
1.1. Create New Profile – To create a profile you will click on the Create New Profile button, type
the name of the profile in the pop up window, and click the Save button. You will then adjust the profile settings to your preferences.
A profile is the criteria the student will be graded by in the program. The profile is assigned by student which means you can individualize the program to the differing abilities of students. You can have more than one profile assigned to different students in a single class. EX: You might create Beginner, Intermediate, and Advanced profiles for the varying skill levels of students in a single class.

1.1.1. Options
1.1.1.1. Timing Length – This column lets you know what timing lengths are available in the program. The Keyboard Mastery and Skillbuilding Mastery programs offer from 15 second up to 5 minute timings. In Keyboarding for Kids, standard timings are 15 seconds, 30 seconds, and 1 minute in length. The longer timings from 2 to 5 minutes are only available in the Created Lessons section. In the Keyboard Short Course program, standard timings are 15 seconds, 30 seconds, 1 minute and 2 minutes. The longer timings of 3, 4, and 5 minutes are only available in the Created Lessons section. If created lessons are not being used, there is no need to adjust the settings for the longer timings in the Keyboarding for Kids and Keyboard Short Course programs.
1.1.1.2. Errors Allowed – Timing scores meeting the errors allowed requirement will be saved in the “Best Three Speeds” (the fastest three scores meeting the accuracy rate). For 15 second timings it is common to allow ‘0’ errors as it will encourage

the students to type accurately the first time. For longer timings we recommend to allow one error for every one minute of timing. Ex: For 4-minute timings we recommend allowing four errors.
1.1.1.3. Correction Blocked – When enabled (checkmark), this feature disables the use of the backspace, delete, arrow keys, and mouse insertion/highlight while taking a timing.
1.1.1.4. Blackout Timing View – This is Part 1 of helping students break hunting and pecking habits. When enabled with a checkmark it will blacken the screen where the student types, as you can see below. This forces the students to keep their eyes on the copy and helps eliminate bad keyboarding habits. When the timer ends the student can see what they typed and any errors they made.
1.1.1.5. One Space / Two Space – Set spacing requirements after punctuation (“.”, “:”, “!”,
“?”, etc). We do not give a recommendation since either one or two spaces after punctuation are considered acceptable and it is ultimately left up to the instructor’s preference.
1.1.1.6. Timer Timeout – This is part 2 of breaking hunting and pecking habits. This feature resets the timing if a student stops typing for the number of seconds decided by the instructor (2 seconds recommended). If a student stops typing and waits for the timer to finish, they will risk having the timer reset and not receiving a score. This will force the students to continue typing until the timer runs out. This feature eliminates hunting and pecking because the students will not have enough time to look down at the keyboard to find the keys. This encourages students to develop good technique by keeping their eyes on the copy and to keep a reasonable rhythm as they are typing. You can also disable this feature by selecting that option from the drop down menu.

1.1.1.7. Advanced Options
1.1.1.7.1. Privacy Settings - There are two settings that can be disabled in the ‘Privacy Settings’ section. Information Entry: Check the box to restrict students from entering their email and phone number. Password Editing: Check the box to prevent students from changing their individual password that is originally assigned to them by the instructor.
1.1.1.7.2. Score Requirements – Scores required: Require students to record from 1-3 scores for each line in a lesson before marking the lesson complete. We recommend requiring one score unless your students need extra practice to improve their skill. Ex: If set to 3 your student will have to record three scores per timing before it is counted completed. Minimum WPM: The minimum WPM score that students must achieve on a timing to have their scores recorded in the “Best Three Speeds” (the default is 1). If students do not meet this threshold, they will not receive a grade for the timing and it will show that the timing has not yet been completed. Ex: If the Minimum WPM is set at 20 WPM the student must keyboard at the speed of 20 WPM to record their score in the Best Three Speeds.
1.1.1.7.3. Lesson Options – Lesson Skipping: Check the box to allow students to skip ahead to a later lesson before completing the previous lesson. If left unchecked the students will be forced to complete all of the lines in Lesson 1 before moving on to Lesson 2.
1.1.1.7.4. Text Options – Hide Master Text: Check the box if you want the students to get the text to type from the book or through dictation. This feature disables the screen-based aspect of the program. Some instructors feel that a book-based program produces a better skill in the students and for that reason we have preserved it as an option. Click on the ‘X’ to close the screen and save the settings made when finished.

1.1.2. Goal/Reports (NOTE: This feature is KBK (Keyboarding for Kids) specific)
1.1.2.1. Keyboarding Goal – This feature is to set the goal in WPM (Words per Minute) for a student to achieve. Once a student has achieved this speed, they will be congratulated by a cartoon character pop-up. Please see the recommended Keyboarding for Kids speed goals in the following table:
Grade Level Speed Goals
1st and 2nd Grade 22-25 wpm
3rd and 4th Grade 26-28 wpm
5th and 6th Grade 29-31 wpm
1.1.2.2. Grade Reports – Choosing “Yes” will keep track of all the students’ progress. This
setting will enable additional features/tabs that will need to be configured (Sections & Grades). Selecting “No” will still keep track of the student’s performances and timings, but will not calculate any grades.

1.1.3. Timing Weights (Keyboard Mastery and Skillbuilding Mastery Specific)
1.1.3.1. Timings – This column lets you know what timings are available in the program. 1.1.3.2. Timing Weights - This column allows the instructor to determine the weight that
the timings of different lengths will carry when calculating the individual lesson averages. If the instructor would like all lessons to be graded equally, set the number to 1 all the way down the list. Leaving it at 0 when calculating an average will result in 0 WPM (35 wpm *0 weight = 0 weighted score). Ex: In Lesson 1 of the Keyboard Mastery program there are five 15-second, five 30-second, and five 1-minute timings. To calculate the Average WPM for Lesson 1 using the weights in the screen shot above the 15-second, 30-second, 1-minute, and 2-minute timings would have a weight of one tenth (1/10), while 3 to 5 minute timings would have a weight of one fifth (2/10). The weight has been divided by 10 because the separate weights for all of the timings add up to 10.

1.1.4. Sections
1.1.4.1. Sections - Each program is broken up into different sections that contain a range of lessons. In the sections tab you are able to assign a percentage of the grade to each section that when combined with the percentages from the Optional Timings and Created Lessons should equal 100%.
1.1.4.1.1. Sections for Keyboarding for Kids – The Keyboarding for Kids program is designed so that it can be used for all elementary school students from first through sixth grade. The Sections tab for the Keyboarding for Kids has special settings that allow you to make the profile specific to 1st and 2nd grade, 3rd and 4th grade or 5th and 6th grade students. Sections 3, 4, and 5 are designed specifically for the grade levels indicated. For example, the words and sentences that are used in Section 3 will be shorter and more simple (for 1st and 2nd graders) than those in Section 5 (for 5th and 6th graders), but will teach

the same letters and key strokes. Please see the following table for our recommendations on which sections to assign for the different grade levels:
Grade Level Sections by Reading Level
1st and 2nd Grade Section 2, or 2 and 3
3rd and 4th Grade Sections 2 and 4
5th and 6th Grade Sections 2, 5, and 6
1.1.4.1.2. Sections for Skillbuilding Mastery – From Lesson 28 forward, only the 5-
minute timings are used for grading purposes. All exercises completed will appear on the Progress Report. Lessons 28 to 34 are punctuation and symbols lessons with a total of 15 lines per lesson. All of the lines for those lessons must be completed for the lesson score to count towards the grade. Only the score for line 15 will contribute to the final grade for the student. The 15-second timings in lines 1 to 14 of lessons 28 to 34 are not part of the grade

because this is a Skillbuilding course and the focus is on increasing keyboarding speed and not on practicing numbers and symbols.
1.1.4.2. % of Grade – This column will determine how much each Section, Optional Timing,
or Created Lesson will weigh on the student’s grade. It is possible for the total percentage to be over or fewer than 100; although most instructors have the percentages add up to 100%.
1.1.4.3. Optional Timings – These are specific to the Keyboard Mastery program. Compared to the regular timings they are longer timings that have a higher degree of difficulty. They are called “Optional” because they are more advanced than the core lesson content in lessons 1 through 33. It is up to the instructor to either assign these lessons to the students or not.
1.1.4.4. Created Lessons – These are lessons that the instructor creates in the Create Lessons section of the Teacher Manager and can assign up to ten created lessons to the students at a time. Teachers may create lessons using the students’ vocabulary lists, excerpts from their curriculum, or current events. To assign a created lesson the instructor will select the lesson from the drop-down menu. If the lesson will count towards the student’s grade the instructor will add a % of Grade next to the selected lesson. They are graded for speed and accuracy just like the regular program lessons. If a student completes a created lesson and receives a grade, the grade will remain stored in the program even if the instructor assigns another created lesson in place of the first one.
1.1.5. Grading Scale
Grading Scale – This is where you set the scale of how your students will be graded based on WPM. Using the example above, the scale works as follows: 0-34 is an F, 35-39 is a D, 40-44 is a C, 45-49 is a B, and 50+ is an A. This scale is an example only and is fully customizable to your classroom level. Note: In Keyboarding Online you have to type

accurately and with good technique to record a score in the program. Taking this into consideration the speed in wpm is an acceptable measurement of a student’s overall keyboarding ability (speed, accuracy, and technique).
1.1.6. Save and Close Profile – Once you have completed the configuring or editing of your profile for your classroom, you will need to save this profile so you can assign students to use this profile. You must click the “Save and Close Profile” button to save a new profile or any changes made to a previously created profile.
1.2. Rename Profile – By selecting a profile and clicking on the “Rename Profile” button it can be re-named by simply entering the new profile name into the field and clicking Save.
1.3. Edit Profile - This feature allows you to edit the profiles you have previously created. You can edit a profile by selecting a profile and clicking the “Edit Profile” button. After editing a profile please do not forget to click the “Save and Close Profile” button to save any changes that you made.
1.4. Copy Profile - Allows you to copy a profile that is already created so you can make minimal changes and save it with a different name. This may be easier and faster than creating an entirely new profile if many of the settings in the two profiles will be the same.
1.5. Delete Profile – You can delete a profile by selecting a profile and clicking the “Delete Profile” button. If you delete a profile that students are currently assigned to, the software will automatically change their assigned profile to default program settings until anew profile is assigned.

2. Class Manager
2.1. Create Class – This button allows you to create a class where you will then setup your
students.
2.2. Rename Class – You will select the class you would like to rename under the “Classes” column. Once highlighted, click on the “Rename Class” button which will then prompt you for a new name.
2.3. Export to Excel – Select a class and click this button to automatically export the first name, last
name, and password of each student in the class to an Excel file. Exporting classes will *not* save any of the students’ scores or data.
2.4. Print Login Cards – Select a class and click the “Print Login Cards” button to produce a PDF
with a Login Card for each student in the class. The Login Card has step by step instructions for logging into the program along with the student passwords.
2.5. Restore Class – If you have deleted a class by mistake, this function allows you to restore any
class that has been deleted within the last 2 weeks. After clicking the “Restore Class” button you will select the class to be restored and click the “Restore” button.
2.6. Delete Class – To delete a class, simply highlight the class you would like to delete and then click on the “Delete Class” button.
2.7. Add Students – Click the “Add Students” button to create students. For more information on
creating students please visit section 3 “Create Students”.
2.8. Edit Student – This window that you see below will allow you to rename a student and change the student’s password, assigned profile, or assigned schedule. Simply make the changes in the appropriate fields and click the “Save” button for the changes to go into effect.
2.1
2.5 2.6 2.7
2.8
2.9
2.2 2.3 2.4

2.9. Restore Students – If you have deleted a student by mistake, this function allows you to restore any student files that have been deleted within the last 2 weeks. After clicking the “Restore Students” button you will select the students to be restored and click the “Restore” button.
2.10. Delete Student(s) – This feature will allow deleting student files that are no longer needed. You will simply select the students to delete and then click the “Delete Student(s)” button.
2.11. Update Profile(s) – Highlight the students you want updated, click the “Update Profile(s)”
button, select a profile from the drop down menu and click the Save button. NOTE: To utilize shortcuts to select students in the student list you can click the drop-down arrow in the Select Options field. This allows you to select all students in the list, de-select all students, or invert a selection.
2.12. Update Schedule(s) – Similarly to 2.11 (Update Profiles), you will update student schedules in the same way. Highlight the students you want updated, click the “Update Schedule(s)” button, then select a schedule from the drop down and click “Save”. See the note above about shortcuts to highlight students in a list.

3. Create Students
3.1. One-by-One – This option allows the instructor to manually enter the students one by one.
3.1.1. Class – Select a class for the student from the drop-down menu. 3.1.2. Profile – Select a profile with the correct grading standards to assign to the student. 3.1.3. Student Name – Enter in the student name in this field. You should enter the student
names with the “first name last name” and they will be alphabetized by last name in the class reports that are generated by the program.
3.1.4. Password/ID – This is where you set the password that the student will login with. There are no requirements that the password has to meet except for a maximum of 15 characters. Students can change this password if you allow them to, based on your settings made in the Profile Manager. After creating the student password you will click the Create Student button to create the student file.
3.2. Import from File – If you have exported students from the Class Manager or created an Excel
file with your class list, you can then use this feature to import the student files into the program. Student progress and scores can’t be imported into the program. To start your import you will click the “Choose a file to import” button, find your Excel file, and click Open.

3.2.1. One at a Time Import – The students can be imported one by one from the Excel file by repeatedly clicking the “Create Student” button until all students from the file are created. The other option is to click on the text that refers to mass importing all of the students at once.
3.2.2. Mass Import – In the Advanced Import window that appears you will answer a series of questions identifying the data in each column and clicking the Next button after each response. After answering all of the questions to determine the class and profile to assign the students to you will click the Import button. After importing the students the last student that was added will display in the program and the program will indicate if the import was successful and complete.

B. Advanced Customizations
4. Create Lessons
4.1. Create Lesson – To create a lesson you will click the “Create New Lesson” button, enter the name of the created lesson and click the Save button. In a profile you can only assign ten created lessons at a time, even though you can create as many lessons as you want.
4.1.1. New Line – After you have entered the text for a line and selected a timing length you can add another line to the lesson by clicking the “New Line” button. A Line is not limited to a single line of text, but represents a single timing. One line may have an entire paragraph for that timing. The student will be expected to type the text the exact way it is entered when creating the line. Refer to the following table that outlines how many lines can be created per lesson for each program:
Program Lines per Created Lesson Assignable Created Timings
Keyboarding for Kids 4 40
Keyboard Short Course 10 100
Keyboard Mastery 18 180
Skillbuilding Mastery 15 150

4.1.2. Timing Length – Choose from the drop down menu the desired timing length for the line that you have selected. You can choose from 15 seconds, 30 seconds, 1 minute, 2 minute, 3 minute, 4 minute, and 5 minute timing lengths.
4.1.3. Save and Close Lesson – To save a lesson and all lines that have been created in a lesson you must click the “Save and Close Lesson” button. You will then see the name of the lesson appear in the list of lessons on the left hand side of the window. You must save the current lesson you are working with before moving on to create a new lesson or add to an existing lesson. If you do not save after any changes you make to a lesson you will lose this new material.
4.1.4. Delete Line – To delete a line in a lesson you will select the lesson, select the line that you want to delete, and click the “Delete Line” button. Any lines that are deleted are lost for good and cannot be recovered.
4.1.5. Sample Content – Ability to re-create a line from any of Keyboarding Online’s four typing programs. Simply click on the program, section, lesson and line that you want to copy. The text from that line will appear in the white space under the blank line you are creating.
4.2. Rename Lesson – To rename a created lesson you will select the lesson, click the “Rename
Lesson” button, type the new name for the lesson, and click Save. 4.3. Edit Lesson – To edit a lesson you will select the lesson you wish to change and click the “Edit
Lesson” button. You can edit a lesson by changing the timing length, adding new lines, or deleting lines. After making any changes you must remember to click the “Save and Close Lesson” button to save all of your changes.
4.4. Delete Lesson – To delete a lesson you will select the lesson you want to delete and click the “Delete Lesson” button. Any deleted lessons are gone forever and cannot be recovered.

5. Schedule Manager
5.1. Create New Schedule – The Schedule Manager allows the instructor to decide what days and times their students are allowed to access the lessons. To create a schedule you will click the “Create New Schedule” button, type the name of the schedule and click Save. This will open the Schedule Options in the Schedule Manager which will allow you to decide on the settings you want for your schedule.
5.1.1. Enable Start/End Date – By setting a Start/End Date for your schedule it will make it so the students cannot start working before the start date or continue working after the end date.
5.1.2. Daily Access Schedule – This is the time range and days of the week that students are able to access their lessons. To create day and time limits for program use the instructor will simply click the “Add Daily Access Schedule” button, select the days for students to

work, and select the time window for students to log in. You can create more than one Daily Access Schedule if you want to.
5.1.3. Days Allowed – These are the days that students are allowed to access the lessons. As the instructor you will simply check the days you want to allow students to access the lessons.
5.1.4. Check Time Zone – Be sure to select your correct time zone from the drop down menu since the time used to enforce the schedules is originally in Mountain Standard Time and must be converted to your specific time zone for it to work correctly.
5.1.5. Save and Close Schedule – After creating your schedule or making changes to a previously created schedule you need to click the “Save and Close Schedule” button to make sure that your newest settings were saved. Please refer to Section 2.12 in this manual for learning to assign a schedule to a student or group of students.
5.2. Rename Schedule – To rename a schedule you will select a schedule, click the “Rename Schedule” button, type the new schedule name, and click Save.
5.3. Edit Schedule - This feature allows you to edit the schedules you have previously made. You can edit a schedule by selecting a schedule and clicking the “Edit Schedule” button.
5.4. Delete Schedule - At any time you can delete a schedule. You can delete a schedule by selecting a schedule and clicking the “Delete Schedule” button.
6. Move Students 6.1. Move Student(s) – Select the class you are moving the student(s) from, select the student(s) to
be moved, select the class you are moving the student(s) to, and then click the “Move Student(s)” button.

C. Monitor Students
7. View Student Progress
7.1. Class Reports 7.1.1. Class Summary Report – This report is to give an overview of each student in the class so
the instructor can see basic information about the student. This report also shows the instructor which profile and schedule is assigned to each student in the class.

(Teacher Manager > View Reports > Select Class > Class Summary Report)
7.1.1.1. View Another Class – Click the drop-down arrow to reveal a list of all the classes in the school account. Select a class to pull up its Class Summary Report.
7.1.1.2. Print - Click this printer icon to print the Class Summary Report. 7.1.1.3. Download as Excel - Click this button to export this Class Summary Report as an
Excel file. 7.1.1.4. Showing 15 students per page – To show more students you will click the drop-
down menu and make your selection. 7.1.1.5. Message Class – Click this button to send a message to one or more students in
the class without having to navigate away from this webpage. 7.1.1.6. ID/Password – This is the individual ID/Password for each student. This is
assigned by the instructor when the student file is created. If the password is changed by the student the instructor will always be able to find it out by viewing this report.
7.1.1.7. Last Worked – This shows the date of when the student last logged in to work on his/her lessons.
7.1.1.8. Last Effort/Total Effort – “Last Effort” is the amount of time the student spent typing on the “Last Worked” date. “Total Effort” is the total cumulative time the student has typed in the program. Typing time only counts towards effort when a student completes a timing and does not count if the timing is reset or if they stop the timing before the time runs out.
7.1.1.9. Lessons Completed – Shows the number of Regular, Optional, and Created Lessons that have been completed by the students.
7.1.1.10. Un-weighted Score – The average word per minute score of all completed lessons. 7.1.1.11. Grade/Weighted – After all assigned lessons are completed by the student the
letter grade and weighted word per minute score will appear.
7.1.2. Class Progress Report – When you have a class selected and run the “Class Progress Report”, it will display the average word per minute score for each lesson for all of the students in the class. This report will show all the line averages for each completed lesson. An example of a Class Progress Report is given below:
(Teacher Manager > View Reports > Select Class > Class Progress Report)

7.1.2.1. View Another Class – Click the drop-down arrow to reveal a list of all the classes in the school account. Select a class to pull up its Class Progress Report.
7.1.2.2. Print – Click this printer icon to print the Class Progress Report. 7.1.2.3. Download as Excel – Click this spreadsheet icon to export this Class Progress
Report as an Excel file. 7.1.2.4. Showing 15 students per page – To show more students you will click the drop-
down menu and make your selection. 7.1.2.5. Message Class – Click this button to send a message to one or more students in
the class without having to navigate away from this webpage.
7.1.3. Class Effort Report – This report displays the effort broken down per lesson in minutes and the total effort in minutes.
(Teacher Manager > View Reports > Select Class > Class Effort Report)
7.1.3.1. View Another Class – Click the drop-down arrow to reveal a list of all the classes in the school account. Select a class to pull up its Class Effort Report.
7.1.3.2. Print – Click this printer icon to print the Class Effort Report. 7.1.3.3. Message Class – Click this button to send a message to one or more students in
the class without having to navigate away from this webpage. 7.1.3.4. Showing 15 students per page – To show more students you will click the drop-
down menu and make your selection. 7.1.3.5. Show scores from – Choose a date range of effort scores to appear or click on the
suggested ranges: Since Sunday, Since the 1st, Last Full Week, Last Full Month, or This Year Total.
7.2. Progress Reports – These two report options are for individual student reports. A class and
student must be selected in order to retrieve these reports.
7.2.1. Simple Report – The simple report for the individual student shows the highest score for every line of every lesson. This report is opened by selecting a class and a student, choosing Simple Report, and then clicking the “Get Report” button.

(Teacher Manager > View Reports > Select Class > Select Student > Simple Report)
7.2.1.1. Select Another Student – Click the drop-down arrow to reveal a list of all the students in the class. Select a student to pull up the Simple Progress Report for any student in the class.
7.2.1.2. Print – Click this printer icon to print the Simple Progress Report that is showing on the screen.
7.2.1.3. Message – Click this button to send a message to the student whose report is being viewed.
7.2.1.4. About Score – If you want to learn more about a score a student has achieved, you can right click the score and click on “About Score”. This will tell you the date and time the score was recorded and whether or not correction was used. Some scores may appear red because they no longer meet the grading profile standards. Clicking About will tell you how the score does not meet the program requirements.
7.2.1.5. Delete Score – To delete a score, right click the score and click “Delete Score”. Once deleted the score cannot be recovered (there is no undelete). After a score is deleted, the score -1/-1 will show for the deleted score, indicating that the score has been deleted.
7.2.1.6. Edit Score – In the event that you need to change a student’s score, you can do so by right-clicking the score with the mouse and click on “Edit Score”. Once a score is changed, it cannot be undone. After a score is edited, the score color will change to orange, indicating that the score has been edited.
7.2.1.7. Show score from – This feature allows you to show only the scores during a specific date or range of dates in the calendar period.
7.2.1.8. Asterisk by Scores – Each score with an asterisk notifies the instructor that the student used the backspace, delete, or arrow keys during the timing.
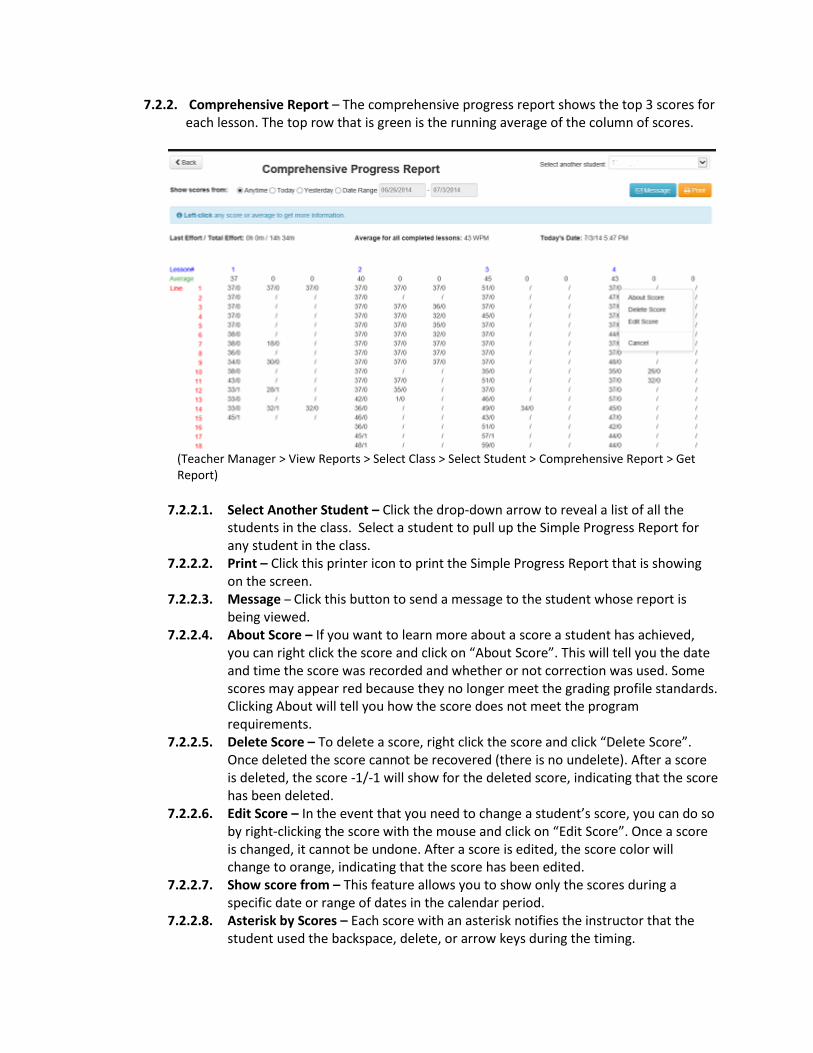
7.2.2. Comprehensive Report – The comprehensive progress report shows the top 3 scores for each lesson. The top row that is green is the running average of the column of scores.
(Teacher Manager > View Reports > Select Class > Select Student > Comprehensive Report > Get Report)
7.2.2.1. Select Another Student – Click the drop-down arrow to reveal a list of all the
students in the class. Select a student to pull up the Simple Progress Report for any student in the class.
7.2.2.2. Print – Click this printer icon to print the Simple Progress Report that is showing on the screen.
7.2.2.3. Message – Click this button to send a message to the student whose report is being viewed.
7.2.2.4. About Score – If you want to learn more about a score a student has achieved, you can right click the score and click on “About Score”. This will tell you the date and time the score was recorded and whether or not correction was used. Some scores may appear red because they no longer meet the grading profile standards. Clicking About will tell you how the score does not meet the program requirements.
7.2.2.5. Delete Score – To delete a score, right click the score and click “Delete Score”. Once deleted the score cannot be recovered (there is no undelete). After a score is deleted, the score -1/-1 will show for the deleted score, indicating that the score has been deleted.
7.2.2.6. Edit Score – In the event that you need to change a student’s score, you can do so by right-clicking the score with the mouse and click on “Edit Score”. Once a score is changed, it cannot be undone. After a score is edited, the score color will change to orange, indicating that the score has been edited.
7.2.2.7. Show score from – This feature allows you to show only the scores during a specific date or range of dates in the calendar period.
7.2.2.8. Asterisk by Scores – Each score with an asterisk notifies the instructor that the student used the backspace, delete, or arrow keys during the timing.

7.3. Grade Reports 7.3.1. Current Grade Report – The average un-weighted word per minute score for all
completed lessons. Instructor or student is able to look at a current score and compare it to the displayed grading scale to determine if they are on track to earn their desired grade.
(Teacher Manager > View Reports > Select Class > Select Student > Current Grade Report)
7.3.1.1. Select Another Student – Click the drop-down arrow to reveal a list of all the students in the class. Select a student to pull up the Current Grade Report for any student in the class.
7.3.1.2. Print – Click this printer icon to print the Current Grade Report that is showing on the screen.
7.3.1.1. Average WPM Score – The average of all completed lessons. Incomplete lessons do not count towards the current grade. Weights set by the instructor to be used in calculating the final grade also do not apply to this score.

7.3.2. Final Grade Report – Shows all information for a single student as well as the calculation of the final weighted word per minute score.
(Teacher Manager > View Reports > Select Class > Select Student > Current Grade Report)
7.3.2.1. Select Another Student – Click the drop-down arrow to reveal a list of all the students in the class. Select a student to pull up the Final Grade Report for any student in the class.
7.3.2.2. Ctrl + P – Hold down the Control key while clicking the P key to print this Final Grade Report.

7.4. Effort Reports
7.4.1. Daily Effort Report – Track daily effort by referencing graph produced by the program based on the provided date range. To see the effort from a specific day you will hover over or click on the data point for that day on the graph.
(Teacher Manager > View Reports > Select Class > Select Student > Daily Effort Report)
7.4.1.1. Select Another Student – Click the drop-down arrow to reveal a list of all the students in the class. Select a student to pull up the Daily Effort Report for any student in the class.
7.4.1.2. Print – Click this printer icon to print the Daily Effort Report that is showing on the screen.
7.4.1.3. Message – Click this button to send a message to the student whose report is being viewed.
7.4.1.4. Show score from – Choose a date range of effort scores to appear or click on the suggested ranges: Since Sunday, Since the 1st, Last Full Week, Last Full Month, or This Year Total.

7.4.2. Lesson Effort Report – Track student effort per lesson by referencing the graph produced by the program over the provided date range. To see the effort for a specific lesson you will hover over or click on the data point for that lesson on the graph.
(Teacher Manager > View Reports > Select Class > Select Student > Lesson Effort Report)
7.4.2.1. Select Another Student – Click the drop-down arrow to reveal a list of all the students in the class. Select a student to pull up the Lesson Effort Report for any student in the class.
7.4.2.2. Print – Click this printer icon to print the Lesson Effort Report that is showing on the screen.
7.4.2.3. Message – Click this button to send a message to the student whose report is being viewed.
7.4.2.4. Show score from – Choose a date range of effort scores to appear or click on the suggested ranges: Since Sunday, Since the 1st, Last Full Week, Last Full Month, or This Year Total.

8. Print Certificates 8.1. Generate Certificates – Select a class, select students to receive a certificate, and click the
“Generate Certificates” button to produce a PDF with all student certificates for the entire class.
9. Message Center 9.1. Sending Messages – To send a message you will click the “Compose Message” button.
9.1.1. Select Class / Students – Select the class and the students to send the message to from the drop-down menus. Click the Next button once the selection is made.

9.1.2. Send Message – Enter a Subject, a Message, and click the Send Message button. The message will automatically appear for the students to see when they log into the program.
9.2. Checking Messages – When a student sends a message to the instructor the Message Center icon will display the text “New Messages” as you can see in the image below:
To check your messages you will click the “Message Center” icon where you will see the screen displayed below. From this screen you look at the numbers next to each class to determine how many messages have been received from the students in that class. After clicking on a class the subject line for the messages from that class will appear in the Messages box. By clicking on the message the full text of the message will appear on the right with the option to Delete it or Reply to it.