initializing web audio (simple)
TRANSCRIPT
Bonus Recipes
Initializing Web Audio (Simple)We'll need to create and initialize Web Audio before we can use it. In this recipe, we'll do exactly that. The first thing we'll need to do is to initialize Web Audio if it's available. We'll output a message to the console window of the app so that we'll know the initialization status.
Getting readyThe complete source code for this recipe is available in the code bundle at recipes/Recipe1_1.
How to do it...1. Start with a clean copy of the base framework template. The template bundle is
located at tools/RecipeFramework in the code bundle.
2. Open index.html with a text editor.
3. In the JavaScript code section, create the WebAudioApp member function, initWebAudio(). This function contains the Web Audio initialization routine, as shown in the following code:WebAudioApp.prototype.initWebAudio = function() { if( window.webkitAudioContext == null ) return false;
this.audioContext = new window.webkitAudioContext (); return true;};
Bonus Recipes
2
4. In WebAudioApp.start(), execute WebAudioApp.initWebAudio(). The Web Audio initialization is now executed as a part of the application startup. We'll use the console functionality of the framework so that we can see what's happening under the hood: WebAudioApp.prototype.start = function() { if( !this.initWebAudio() ) { consoleout( "Browser does not support WebAudio" ); return; }
consoleout( "WebAudio initialized" ); };
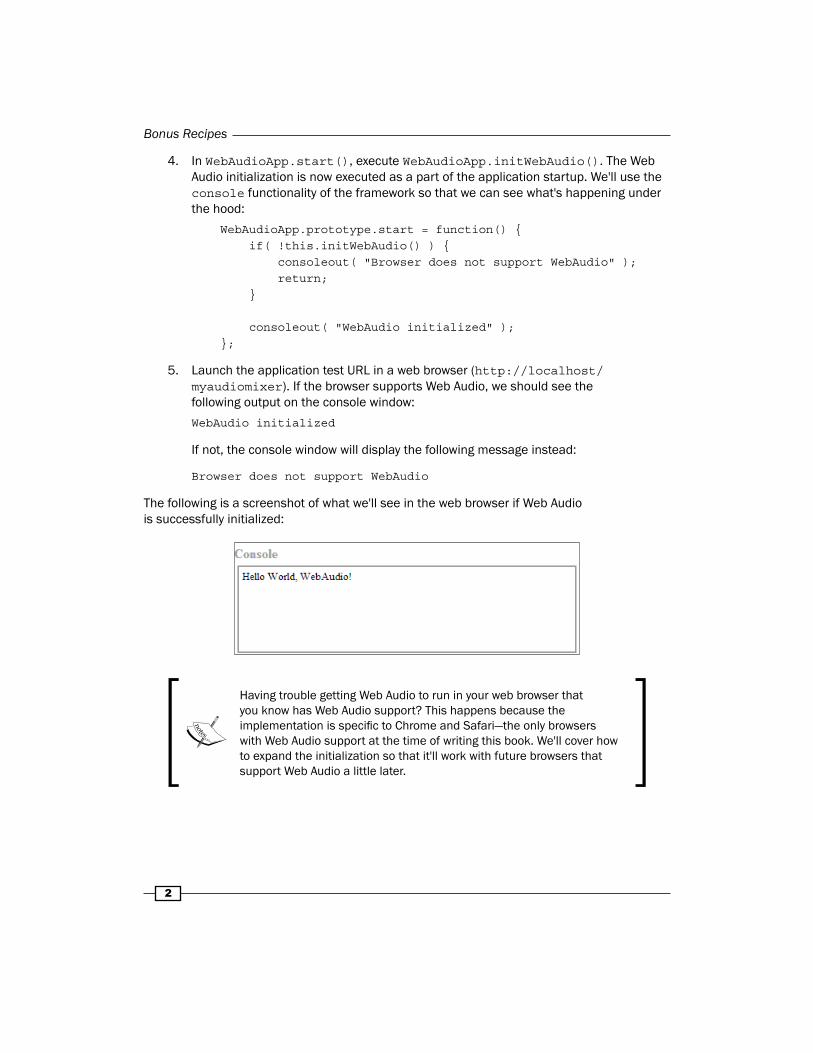
5. Launch the application test URL in a web browser (http://localhost/myaudiomixer). If the browser supports Web Audio, we should see the following output on the console window:WebAudio initialized
If not, the console window will display the following message instead:
Browser does not support WebAudio
The following is a screenshot of what we'll see in the web browser if Web Audio is successfully initialized:
Having trouble getting Web Audio to run in your web browser that you know has Web Audio support? This happens because the implementation is specific to Chrome and Safari—the only browsers with Web Audio support at the time of writing this book. We'll cover how to expand the initialization so that it'll work with future browsers that support Web Audio a little later.
Bonus Recipes
3
How it works...Web Audio is initialized by instantiating an AudioContext instance. Each AudioContext instance is an independent Web Audio environment—resources associated in one context are not available in another context. Applications should only need one AudioContext instance.
Web Audio initialization logic is implemented in WebAudioApp.initWebAudio():
if(window.webkitAudioContext == null ) return false;
We determine whether a browser supports Web Audio by checking for the AudioContext class. In this case, we're checking for webkitAudioContext instead, because this is the AudioContext class name for WebKit browsers, such as Chrome and Safari.
When a browser supports an API which is still in development, it is common practice to add a browser-specific prefix to all of the API's methods. The prefix is dropped once the API has stabilized.
Finally, we instantiate the AudioContext instance:
this.audioContext = new window.webkitAudioContext ();
It's good practice to check for the AudioContext class definition through an explicit window object reference so that the checking behavior is consistent. Attempts to check for a class definition directly may throw an exception instead of returning undefined (depending on whether the code is running in strict mode or not).
There's more...It would be great if the implementation works with future Web Audio compatible browsers. We can do exactly that ("future proof" the implementation) by checking for AudioContext in addition to webkitAudioContext. AudioContext is the standard name of the Web Audio class as defined in the W3C Web Audio specification:
WebAudioApp.prototype.initWebAudio = function() { var audioContextClass = window.webkitAudioContext || window.AudioContext;
if( audioContextClass == null ) return false;
Bonus Recipes
4
this.audioContext = new audioContextClass(); return true;};
The initialization routine is now future proof and ready for use in subsequent recipes.
Playing audio files (Simple)Playing sounds using an audio file is a basic audio system operation. Web Audio provides multiple ways of accomplishing this. In this recipe, we'll explore the most common way of playing back audio files—by employing audio buffers. We'll load an explosion sound effect audio file into an audio buffer and use this audio buffer as the sound source for playback when the user clicks on the Explosion button.
Getting readyThe complete source code for this recipe is available in the code bundle at recipes/Recipe2_1.
How to do it...1. Start with a clean copy of the base framework template. The template bundle is
located at tools/RecipeFramework in the code bundle.
2. Open index.html with a text editor.
3. In the HTML section, declare the explosion HTML button:<div id="appwindow"> <h2>Playing Audio Files Using Audio Buffers</h2> <a id="explosion" class="audioplay" href="javascript:void(0);">Explosion</a></div>
4. In the JavaScript section, add the function loadAudioFromUrl() for handling the gnarly task of loading audio files using Ajax:function loadAudioFromUrl( url, loadedCallbackFn, callbackContext ) { var request = new XMLHttpRequest(); request.open("GET", url, true); request.responseType = "arraybuffer";
request.onload = function() { consoleout( "Loaded audio '" + url + "'" ); later( 0, loadedCallbackFn, callbackContext,

Bonus Recipes
5
request.response ); };
request.onerror = function() { consoleout( "ERROR: Failed to load audio from " + url ); };
request.send();}
5. Add the function WebAudioApp.initBufferedAudioButton() to configure an HTML button to play back an audio file:WebAudioApp.prototype.initBufferedAudioButton = function( elemId, audioSrc ) { // Initialize the button and disable it by default var jqButton = $( elemId ).button({ disabled: true });
// Load the audio var audioBuffer; loadAudioFromUrl( audioSrc, function(audioData){ // Decode the audio data into an audio buffer this.audioContext.decodeAudioData( audioData, function( audioBufferIn ) { consoleout( "Decoded audio for '" + audioSrc + "'" );
// Cache the audio buffer audioBuffer = audioBufferIn;
// Re-enable the audio button jqButton.button( "option", "disabled", false ); } ); }, this );
// Register a click event listener to trigger playback var me = this; jqButton.click(function( event ) { // Create the button's audio source node var sourceNode = me.audioContext.createBufferSource(); sourceNode.buffer = audioBuffer;
Bonus Recipes
6
// Connect it to the AudioContext destination node sourceNode.connect( me.audioContext.destination );
// Start the audio playback if( sourceNode.start instanceof Function ) sourceNode.start( 0 ); if( sourceNode.noteOn instanceof Function ) sourceNode.noteOn( 0 );
consoleout( "Played audio '" + audioSrc + "'" ); });};
6. Add the Web Audio initialization logic from the recipe, Building an equalizer using BiquadFilterNode (Advanced), from the book:WebAudioApp.prototype.initWebAudio = function() { var audioContextClass = window.webkitAudioContext || window.AudioContext;
if( audioContextClass == null ) return false;
this.audioContext = new audioContextClass(); return true;};
7. Finally, execute the Web Audio and HTML button initialization routines in WebAudioApp.start():
WebAudioApp.prototype.start = function() { if( !this.initWebAudio() ) { consoleout( "Browser does not support WebAudio" ); return; }
this.initBufferedAudioButton( "#explosion", "assets/explosion.mp3" );};

Bonus Recipes
7
Launch the application test URL in a web browser (http://localhost/myaudiomixer) and trigger the explosion sound multiple times using the Explosion button. The browser view should be similar to the following screenshot:
What an explosive conclusion to the recipe!
How it works...Let's delve deeper into how Web Audio uses audio buffers to produce sounds. First, we'll need to understand Web Audio's functionality for producing and processing sound.
Web Audio provides different AudioNode instance types, which applications may use to process and produce sounds. An AudioNode instance:
f Belongs to an AudioContext instance
f Performs some sort of audio task
f May have one or more inputs to receive audio signals for processing
f May have one or more outputs for forwarding the processed audio signal
Applications produce and/or process audio by connecting the AudioNode instances together to form a node graph. An application builds and modifies the node graph at runtime. There are no restrictions on when the node graph may be modified—an application may alter the node graph while it's actively producing audio!
To produce sound output to the device speakers, the node graph must be connected to AudioDestinationNode. AudioDestinationNode is a special AudioNode instance which routes its input signal to the device speakers. Each AudioContext instance has only one AudioDestinationNode instance, and it is instantiated when the context is instantiated.
Bonus Recipes
8
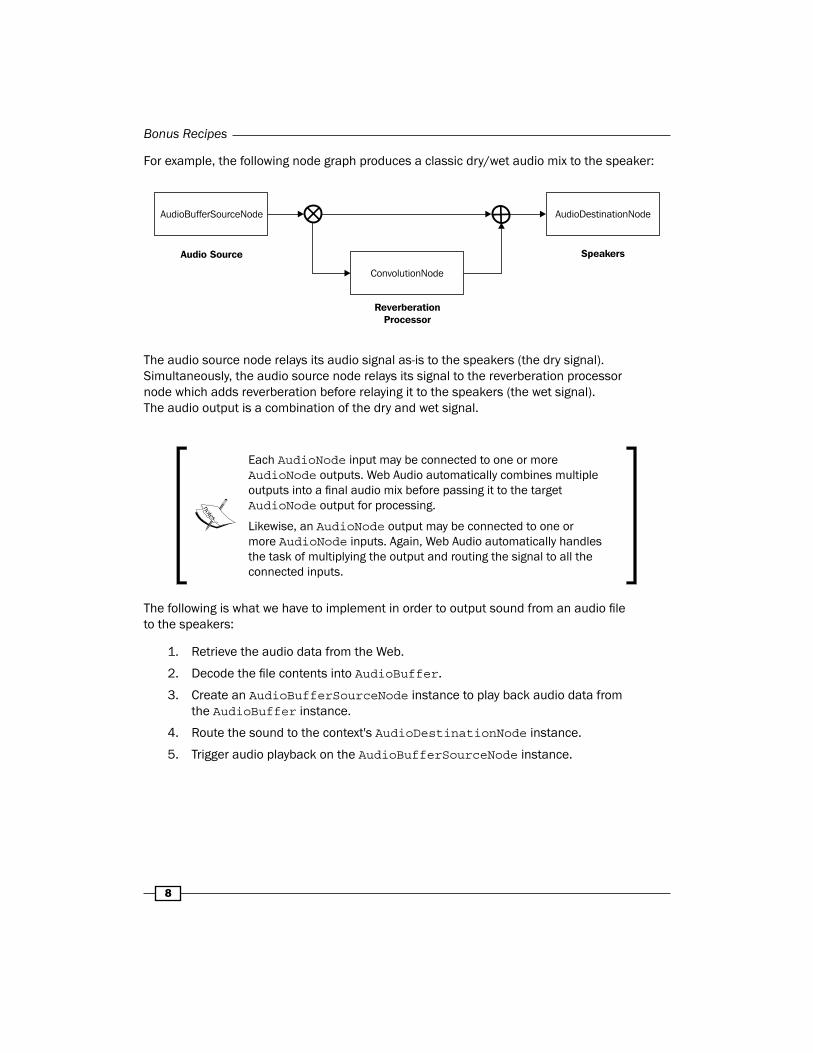
For example, the following node graph produces a classic dry/wet audio mix to the speaker:
Audio Source
ConvolutionNode
ReverberationProcessor
Speakers
AudioBufferSourceNode AudioDestinationNode+ +
The audio source node relays its audio signal as-is to the speakers (the dry signal). Simultaneously, the audio source node relays its signal to the reverberation processor node which adds reverberation before relaying it to the speakers (the wet signal). The audio output is a combination of the dry and wet signal.
Each AudioNode input may be connected to one or more AudioNode outputs. Web Audio automatically combines multiple outputs into a final audio mix before passing it to the target AudioNode output for processing.
Likewise, an AudioNode output may be connected to one or more AudioNode inputs. Again, Web Audio automatically handles the task of multiplying the output and routing the signal to all the connected inputs.
The following is what we have to implement in order to output sound from an audio file to the speakers:
1. Retrieve the audio data from the Web.
2. Decode the file contents into AudioBuffer.
3. Create an AudioBufferSourceNode instance to play back audio data from the AudioBuffer instance.
4. Route the sound to the context's AudioDestinationNode instance.
5. Trigger audio playback on the AudioBufferSourceNode instance.
Bonus Recipes
9
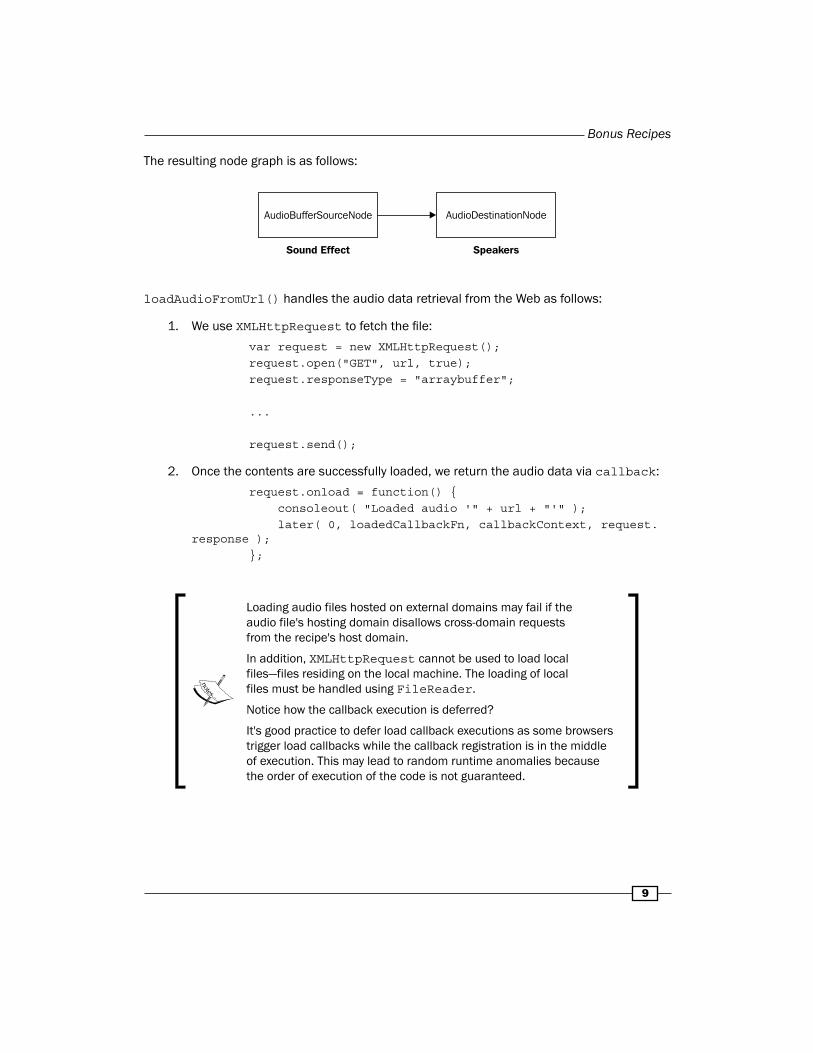
The resulting node graph is as follows:
Sound Effect Speakers
AudioBufferSourceNode AudioDestinationNode
loadAudioFromUrl() handles the audio data retrieval from the Web as follows:
1. We use XMLHttpRequest to fetch the file: var request = new XMLHttpRequest(); request.open("GET", url, true); request.responseType = "arraybuffer";
...
request.send();
2. Once the contents are successfully loaded, we return the audio data via callback: request.onload = function() { consoleout( "Loaded audio '" + url + "'" ); later( 0, loadedCallbackFn, callbackContext, request.response ); };
Loading audio files hosted on external domains may fail if the audio file's hosting domain disallows cross-domain requests from the recipe's host domain.
In addition, XMLHttpRequest cannot be used to load local files—files residing on the local machine. The loading of local files must be handled using FileReader.
Notice how the callback execution is deferred?
It's good practice to defer load callback executions as some browsers trigger load callbacks while the callback registration is in the middle of execution. This may lead to random runtime anomalies because the order of execution of the code is not guaranteed.
Bonus Recipes
10
3. WebAudioApp.initBufferedAudioButton() then takes the audio data, loads it into Web Audio, and associates the playback with the audio button click event:var audioBuffer;loadAudioFromUrl( audioSrc, function(audioData){ this.audioContext.decodeAudioData( audioData, function( audioBufferIn ) { audioBuffer = audioBufferIn; } );}, this );
The audio data is asynchronously loaded into an AudioBuffer instance using AudioContext.decodeAudioData(). Upon completion, the function returns the resulting AudioBuffer instance through the completion success callback.
An AudioBuffer instance not only stores the decoded audio data, but it also provides useful metrics about it. We'll explore the AudioBuffer interface a little later.
Every time the user clicks on the button, we want to trigger sound playback. The AudioBuffer sound playback is handled by the AudioBufferSourceNode node.
4. In the click event handler of the sound button, we construct an AudioBufferSourceNode instance and associate the AudioBuffer instance of the sound with it:var me = this;jqButton.click(function( event ) { var sourceNode = me.audioContext.createBufferSource(); sourceNode.buffer = audioBuffer;
5. We connect the AudioBufferSourceNode instance to the AudioDestinationNode input of the context so that its playback output is routed to the speakers:sourceNode.connect( me.audioContext.destination );
6. Finally, we call the start() or noteOn() method of the AudioBufferSourceNode instance to trigger playback:
// Start the audio playback if( sourceNode.start instanceof Function ) sourceNode.start( 0 ); if( sourceNode.noteOn instanceof Function )
Bonus Recipes
11
sourceNode.noteOn( 0 );});
The method start() of the AudioBufferSourceNode instance was previously named noteOn(). W3C recommends supporting both function names for backward compatibility.
The following are the Web Audio members covered in this recipe:
1. AudioContext.destination holds a reference to the AudioDestinationNode instance of the context:interface AudioContext { destination: AudioDestinationNode; // readonly
2. AudioContext.decodeAudioData() asynchronously decodes data into linear PCM values and caches the result in an AudioBuffer instance. After completion, the function returns the output AudioBuffer instance through the successFn call. Decoding failures triggers a call to errorFn instead: decodeAudioData( data:ArrayBuffer, successFn:{function(result:AudioBuffer)}? failFn:{function()}? );
AudioContext.decodeAudioData() will fail if the data is corrupted or if the audio format of data is not supported. It is possible for the decoding operation to succeed in some browsers and fail in others, because W3C does not define a standard set of audio formats to support.
3. AudioContext.createBufferSource() creates and returns an AudioBufferSourceNode instance: createBufferSource():AudioBufferSourceNode;
4. AudioNode.connect() connects the output of the instance to the input of the destinationNode instance. Applications may explicitly choose the input connector and output connector to link together using optional parameters inputIndex and outputIndex:};
interface AudioNode { function connect( destinationNode:AudioNode, inputIndex:Number?, outputIndex:Number? );};
Bonus Recipes
12
5. AudioBufferSourceNode.buffer contains the AudioBuffer instance associated with this source node. Applications specify the target AudioBuffer instance to use for playback through this attribute:interface AudioSourceNode : AudioNode {};
interface AudioBufferSourceNode : AudioSourceNode { var buffer:AudioBuffer;
6. AudioBufferSourceNode.start() schedules the playback operation. The when parameter specifies the operation's timing. Playback starts immediately when when is set to 0: function start( when:Number, offset:Number?,
duration:Number? );
The offset and duration parameters allow the caller to customize the audio data segment to play back. By default, the instance will play the audio sample from the beginning to the end.
In Web Audio, time is measured in seconds. Also, audio event times are measured relative to the AudioContext timeline.
7. AudioBufferSourceNode.stop() schedules the playback stop operation. The when parameter specifies the operation timing. Playback stops immediately when when is set to 0.
function stop( when:Number );};
This function is used to only stop looping sounds, or to interrupt playback. That's because the AudioBufferSourceNode instances automatically stop playing when they reach the end of the audio segment.
The AudioBufferSourceNode method stop() was previously named noteOff(). Once again, W3C recommends supporting both function names for backward compatibility.
Bonus Recipes
13
There's more...We can play local audio files just as easily as we can play audio files from the Web—we just have to use FileReader to load the file instead of XMLHTTPRequest. Let's modify our recipe so that users can associate a local audio file with the button for sound effects by dragging-and-dropping the target audio file on it.
First, we'll add a function to load audio files using FileReader. Add the following function to the JavaScript section:
function loadAudioFromLocalFile( file, loadedCallbackFn, callbackContext ) { var reader = new FileReader();
reader.onload = function() { consoleout( "Loaded audio from '" + file.name + "'" ); later( 0, loadedCallbackFn, callbackContext, reader.result ); };
reader.onerror = reader.onabort = function() { consoleout( "ERROR: Failed to load audio from " + file.name ); };
reader.readAsArrayBuffer( file );}
Next, we'll add a drag-and-drop functionality to the button for sound effects so that users can associate local sound files with the button by dropping audio files on the button. Add the highlighted lines to the end of the WebAudioApp.initBufferedAudioButton() method:
WebAudioApp.prototype.initBufferedAudioButton = function( elemId, audioSrc ) { ...
// Intercept drag events to enable drop event $( elemId ).on({ "dragenter": function(event) { // Prevent the default drag behavior event.stopPropagation(); event.preventDefault(); }, "dragexit": function(event) { // Prevent the default drag behavior event.stopPropagation();

Bonus Recipes
14
event.preventDefault(); }, "dragover": function(event) { // Prevent the default drag behavior event.stopPropagation(); event.preventDefault(); } });
// Allow file drops to change the sound association $( elemId ).on("drop", function(event) { // Prevent the default drop behavior event.stopPropagation(); event.preventDefault();
// Process the drop event ourselves var files = event.originalEvent.dataTransfer.files;
// No files to process? We're done... if( files.length == 0 ) return;
// Use the first file in the drop list var fileTarget = files[0];
// Disable the button while the data is being replaced jqButton.button( "option", "disabled", true );
// Load the audio from the local file loadAudioFromLocalFile( fileTarget, function(audioData){ // Decode the audio data into an audio buffer this.audioContext.decodeAudioData( audioData, function( audioBufferIn ) { consoleout( "Decoded audio for '" + fileTarget.name + "'" );
// Make a note of the audio source audioSrc = fileTarget.name;
// Cache the audio buffer audioBuffer = audioBufferIn;
Bonus Recipes
15
// Re-enable the button jqButton.button( "option", "disabled", false ); } ); }, me ); } );};
Now users can assign local sound files to the Explosion button by dropping local audio files on to the button.
Sound playback and the AudioNode lifecycleThere are two odd details about the recipe presented:
f The implementation creates and adds a new AudioBufferSourceNode instance to the node graph every time it starts a new playback request
f No AudioNode instances are explicitly removed from the node graph
This is deliberate. Furthermore, this is exactly how Web Audio expects the AudioNode instances to be handled!
The AudioNode instances are meant to be instantiated, used, and then quickly discarded. In fact, source nodes such as the AudioBufferSourceNode instances are designed for one-time playback. Once playback stops, the instance is no longer usable—subsequent calls to the start() method will throw runtime exceptions. Therefore, applications must create a new source node each time in order to replay sounds.
Managing a node graph full of the AudioNode instances based on the "rapid discard" philosophy would be a nightmare for developers. That's why the API wisely chose to internalize this operation.
The AudioNode instances stay alive so long as there are references to it. There are several types of references:
f A normal JavaScript reference which obeys the garbage collection rules of the language
f A connection reference when another AudioNode instance is connected to it
f A tail-time reference where an instance maintains a reference to itself as long as its processing has not completed
f A playing reference when an audio source node is playing
Instances which are no longer alive are automatically trimmed from the node graph and deleted.
Bonus Recipes
16
Alternative approaches for playing audio filesAs mentioned earlier, Web Audio offers multiple approaches for playing audio files. The following is a list of the most common approaches and their use cases:
f Audio buffers: Load the entire audio sample into memory and use an AudioBufferSourceNode instance to play the sound. This approach is best suited for short audio samples which don't consume a lot of memory.
f Streaming: Stream an audio file using an HTML5 <audio> element, then use an MediaElementAudioSourceNode instance to route the <audio> sound output of the element into Web Audio. This approach is designed for long audio samples or web streams.
f Programmatically: Write custom JavaScript code to write data of an audio file into a ScriptProcessorNode instance where the data is output as an audio signal. This approach is best suited for cases when the output of an audio file requires some sort of custom processing steps. For example, we may have to use this approach if we have to write our own audio data decoder because the browser does not support the file's data format.
We will not be discussing the other approaches as they are outside the scope of this book. Further documentation on MediaElementAudioSourceNode and ScriptProcessorNode is available at the Web Audio home page at http://www.w3.org/TR/webaudio/.
Scheduling audio playback (Intermediate)We've touched on the fact that the AudioBufferSourceNode methods start() and stop() take a time parameter indicating when they should occur. This high fidelity scheduling capability allows us to implement advanced audio behaviors such as audio stitching. In this recipe, we'll build a basic music beat application offering two beat loops. As users toggle between the two loops, the application will stitch the audio so that transitions are seamless and occur at a logical spot.
Getting readyThe complete source code for this recipe is available in the code bundle at recipes/Recipe5_1.
How to do it...1. Start with a clean copy of the base framework template Version 2. The template
bundle is located at tools/RecipeFrameworkV2 in the code bundle.
2. Open index.html in a text editor.
Bonus Recipes
17
3. We'll start by declaring our music beat controls in the HTML section:<div id="appwindow"> <h2>Scheduling Audio Playback</h2> <form> <input type="checkbox" id="beat1" /> <label for="beat1">Beat 1</label> <input type="checkbox" id="beat2" /> <label for="beat2">Beat 2</label> </form></div>
4. We'll add the function WebAudioApp.initToggle() to the JavaScript section. This function will be responsible for initializing a toggle button and it'll implement its playback logic:WebAudioApp.prototype.initToggle = function( elemId, audioSrc ) {};
5. We'll start by adding the logic for loading the audio data into WebAudioApp.initMusicControls() and initializing the sound toggle:var jqButton = $( elemId ).button({ disabled: true });
// Load the audiovar audioBuffer;this.loadAudio( audioSrc, function( audioBufferIn ) { // Cache the audio buffer audioBuffer = audioBufferIn;
// Enable the toggle when audio is ready jqButton.button( "option", "disabled", false );}, this );
var musicLayer = this.musicLayer;
// Register toggle click eventvar me = this;jqButton.click(function( event ) {});
6. Now, we'll add the logic for starting sound playback into the toggle click event handler:jqButton.click(function( event ) { var BUFFER_TIME = 2 / 1000; // 2 ms time buffer

Bonus Recipes
18
// Starting a new loop from scratch? if( $(this).is(':checked') && me.activeLoop == null ) { // Start the loop at the earliest dependable // time var startSecs = me.audioContext.currentTime + BUFFER_TIME; var audioNode = musicLayer.playAudioBuffer( audioBuffer, startSecs, true );
// Cache the active loop information me.startSecs = startSecs; me.activeLoop = audioNode; me.activeElemId = elemId; me.activeSrc = audioSrc;
consoleout( "Starting new loop '" + audioSrc + "'" );
return; }});
7. Next, we'll add the logic for stopping sound playback into the toggle click event handler:jqButton.click(function( event ) {
...
// Stopping the active loop? if( !$(this).is(':checked') ) { consoleout( "Stopping loop '"+ me.activeSrc + "'" );
me.activeLoop.stop( 0 );
me.startSecs = -1; me.activeLoop = null; me.activeElemId = null; me.activeSrc = null; return; }});
Bonus Recipes
19
8. Finally, we add it in the logic for seamless loop-to-loop transitions to the click event handler:jqButton.click(function( event ) {
...
var BPM = 120; // 120 bpm var BEATS_PER_MEASURE = 4;
var BEAT_DURATION = 60 / BPM; var MEASURE_DURATION = BEAT_DURATION * BEATS_PER_MEASURE;
// Calculate the earliest transition time var transitionSecs = me.audioContext.currentTime + BUFFER_TIME;
// Calculate the elapsed time for the active loop var elapsedSecs = transitionSecs - me.startSecs;
if( elapsedSecs > 0 ) { // Adjust the transition time to occur // on the next downbeat var measureSecs = elapsedSecs % MEASURE_DURATION;
if( measureSecs > 0 ) transitionSecs += MEASURE_DURATION - measureSecs; } else { // The active loop hasn't started? Use its // transition time transitionSecs = me.startSecs; }
// Turn off the last active loop's toggle $( me.activeElemId ).prop('checked', false ) .button( "refresh" );
// Stop the last active loop at the transition time me.activeLoop.stop( transitionSecs );
// Start the new loop at the transition time var audioNode = musicLayer.playAudioBuffer( audioBuffer,

Bonus Recipes
20
transitionSecs, true );
// Cache the active loop information me.startSecs = transitionSecs; me.activeLoop = audioNode; me.activeElemId = elemId; me.activeSrc = audioSrc;
consoleout( "Transition to '" + audioSrc + "'" );});
9. In WebAudioApp.start(), we initialize Web Audio, create our music AudioLayer instance, and initialize the toggles separately:
WebAudioApp.prototype.start = function() { if( !this.initWebAudio() ) { consoleout( "Browser does not support WebAudio" ); return; }
this.musicLayer = new AudioLayer( this.audioContext );
this.initToggle( "#beat1", "assets/looperman-blandbru-nu-step-with-a-punch-120-bpm.wav" ); this.initToggle( "#beat2", "assets/looperman-blueeskies-club-beat-120-bpm.wav" );};
Launch the application test URL in a web browser (http://localhost/myaudiomixer) to see the end result. The following is a screenshot of what we should see in the browser:

Bonus Recipes
21
How it works...The following is a summary of how the loop toggle buttons function:
1. Start playing a loop immediately if a loop is activated and no other loop is active.
2. If we're turning off the active loop, stop playing immediately.
3. If there's an activate loop when we activate a new loop, calculate a logical point in time for the transition. Then, schedule the old and new loops to stop and start playback at the designated time respectively.
So, how do we know when the logical transition time is due to occur? For that, we'll have to brush up on a little music theory.
Music has a rhythm, a repeating pattern of weak and strong beats. This rhythm is organized into measures which are composed of a predefined number of beats as shown in the following diagram. The time duration between beats are defined by the music's tempo which is measured in beats per minute (bpm).
downbeat
measure
Musical transitions sound most natural on the first beat in a measure (called the downbeat). We can calculate when the downbeat occurs if we know the music's tempo and the number of beats per measure. Luckily we have both loops' timing information:
f Tempo: 120 bpm
f Beats per measure: 4
Now that we know how to calculate the loop transition time, let's take a peek at Web Audio's event scheduling functionality.
Audio synchronization requires high precision timing. Unfortunately, JavaScript's built-in timing functionality is not accurate enough to pull this off. Web Audio resolves this issue by implementing its own timing system. Each Web Audio AudioContext instance has its own time coordinate system which measures time in seconds. Web Audio events are scheduled by specifying an exact time value with respect to the time coordinate system.

Bonus Recipes
22
Scheduling the AudioContext events in the past
It is possible to schedule audio events in the past by specifying an event time which is earlier than the timeline of the AudioContext instance. When this occurs, the event is fired immediately. In previous recipes, we took advantage of this behavior to schedule immediate playback events by passing in 0 as the scheduled time.
Let's take a look at the synchronization logic implemented in the toggle control's click event handler. We'll find the implementation inside the function WebAudioApp.initToggle():
1. When we're starting a loop for the first time, we schedule the loop playback to start at the earliest possible time. The playback timing is calculated by reading the context's current time through the AudioContext.currentTime attribute, and adding a small time buffer:jqButton.click(function( event ) { var BUFFER_TIME = 2 / 1000; // 2 ms time buffer
// Starting a new loop from scratch? if( $(this).is(':checked') && me.activeLoop == null ) { // Start the loop at the earliest dependable // time var startSecs = me.audioContext.currentTime + BUFFER_TIME; var audioNode = musicLayer.playAudioBuffer( audioBuffer,startSecs,true );
Why do we need a time buffer?
The practice of adding a time buffer is highly recommended when dealing with high-precision timer events. JavaScript does not provide any timing guarantees in regard to the code execution. Therefore, we can't really be sure that there won't be an execution delay between the moment we sample the AudioContext timeline and the moment we initiate playback.
2. We then cache the loop's playback time in WebAudioApp.startSecs—we'll use this information later to calculate the loop transition time. We also cache the AudioNode instance and any information we may need to manipulate its playback: // Cache the active loop information me.startSecs = startSecs; me.activeLoop = audioNode; me.activeElemId = elemId;

Bonus Recipes
23
me.activeSrc = audioSrc;
...
return; }
3. If we're just stopping the active loop, we schedule the playback stop event to occur immediately. We also clear all the cached information to indicate that there is no longer an active loop: // Stopping the active loop? if( !$(this).is(':checked') ) { ...
me.activeLoop.stop( 0 );
me.startSecs = -1; me.activeLoop = null; me.activeElemId = null; me.activeSrc = null; return; }
4. Finally, we get down to the loop-to-loop transition logic. The first thing we do is to calculate MEASURE_DURATION—the duration of a measure in seconds. We'll need the duration so that we can calculate the music playback position in relation to a measure: // Handle loop-to-loop transition var BPM = 120; // 120 bpm var BEATS_PER_MEASURE = 4;
var BEAT_DURATION = 60 / BPM; var MEASURE_DURATION = BEAT_DURATION * BEATS_PER_MEASURE;
5. transitionSecs stores the exact transition time. We start by assuming that we can transition as soon as possible.
We use transitionSecs and the music's playback start time to figure out the music playback position and we store it in elapsedSecs:
var transitionSecs = me.audioContext.currentTime + BUFFER_TIME;
// Calculate the elapsed time for the active loop var elapsedSecs = transitionSecs - me.startSecs;
Bonus Recipes
24
6. We then calculate the music playback position in relation to a measure, measureSecs, by taking the modulus of the music's elapsed play time with respect to the duration of a measure: if( elapsedSecs > 0 ) { // Adjust the transition time to occur // on the next downbeat var measureSecs = elapsedSecs % MEASURE_DURATION;
7. Unless the estimated transition timing occurs on the downbeat (that is, measureSecs is exactly 0), we'll have to offset the transition time to the start of the next measure: if( measureSecs > 0 ) transitionSecs += MEASURE_DURATION - measureSecs;
8. Sometimes, the new loop may be scheduled to start before the active loop starts playing. When this occurs, we can skip all the calculations and use the previous loop's transition time instead: } else { // The active loop hasn't started? Use its // transition time transitionSecs = me.startSecs; }
9. With the transition time calculated, we update the UI to reflect the state of the playing loop, and we schedule the loop playback events to occur at the designated time: // Turn off the last active loop's toggle $( me.activeElemId ).prop('checked', false ) .button( "refresh" );
// Stop the last active loop at the transition time me.activeLoop.stop( transitionSecs );
// Start the new loop at the transition time var audioNode = musicLayer.playAudioBuffer( audioBuffer, transitionSecs, true );

Bonus Recipes
25
10. Finally, we cache the active loop's playback information for subsequent loop toggles:
// Cache the active loop information me.startSecs = transitionSecs; me.activeLoop = audioNode; me.activeElemId = elemId; me.activeSrc = audioSrc; ...
});
The following is a summary of the new Web Audio API members introduced in this recipe:
interface AudioContext { var currentTime: Number; // readonly};
The AudioContext currentTime attribute returns the instance's time position measured in seconds. It starts off at zero when the context is created and increases in real-time. All scheduled audio event times are relative to it.
