input 3g sdi / hdmi video mixer and production switcher
TRANSCRIPT

6-input 3G-SDI / HDMI Video Mixer and
Production Switcher with Integrated Capture

USING THE UNIT SAFELY
Before using this unit, please read below warning and precautions which provide important information
concerning the proper operation of the unit. Besides, to assure that you have gained a good grasp of
every feature of your new unit, read below manual. This manual should be saved and kept on hand for
further convenient reference.
Warning and Cautions
※ To avoid falling or damage, please do not place this unit on an unstable cart, stand, or table.
※ Operate unit only on the specified supply voltage.
※ Disconnect power cord by connector only. Do not pull on cable portion.
※ Do not place or drop heavy or sharp-edged objects on power cord. A damaged cord can cause fire or
electrical shock hazards. Regularly check power cord for excessive wear or damage to avoid possible fire
/ electrical hazards.
※ Ensure unit is properly grounded at all times to prevent electrical shock hazard.
※ Do not operate unit in hazardous or potentially explosive atmospheres. Doing so could result in fire,
explosion, or other dangerous results.
※ Do not use this unit in or near water.
※ Do not allow liquids, metal pieces, or other foreign materials to enter the unit.
※ Handle with care to avoid shocks in transit. Shocks may cause malfunction. When you need to
transport the unit, use the original packing materials or alternate adequate packing.
※ Do not remove covers, panels, casing, or access circuitry with power applied to the unit! Turn power off
and disconnect power cord prior to removal. Internal servicing / adjustment of unit should only be
performed by qualified personnel.
※ Turn off the unit if an abnormality or malfunction occurs. Disconnect everything before moving the unit.
Note: due to constant effort to improve products and product features, specifications may change without
notice.

1
CONTENTS
1. BRIEF INTRODUCTION .............................................................................................................................. 2
1.1. Overview ..................................................................................................................................................... 2
1.2. Main Features............................................................................................................................................. 2
2. INTERFACES ................................................................................................................................................ 3
2.1. Rear Interfaces ........................................................................................................................................... 3
2.2. Tally PIN Definition .................................................................................................................................... 3
3. SPECIFICATION ........................................................................................................................................... 4
4. FRONT CONTROL PANEL ......................................................................................................................... 5
5. OPERATION INSTRUCTION ..................................................................................................................... 6
5.1. Multiview Output Layout ........................................................................................................................... 6
5.2. PGM PVW Switching................................................................................................................................. 7
5.2.1. PGM, PVW Channel Selection ............................................................................................................. 7
5.3. Transition Control....................................................................................................................................... 8
5.3.1. FTB (Fade to Black) ............................................................................................................................... 8
5.4. Transition Effects ....................................................................................................................................... 8
5.4.1. MIX Transition ......................................................................................................................................... 8
5.4.2. WIPE Transition ...................................................................................................................................... 8
5.4.3. FADE Transition ..................................................................................................................................... 9
5.5. Audio Mixer Setting ................................................................................................................................... 9
5.5.1. Audio Description ................................................................................................................................... 9
5.6. USB3.0 Live Streaming............................................................................................................................. 9
6. MENU SETTING ......................................................................................................................................... 10
6.1. SDI PGM/ AUX and Multiview Output Format..................................................................................... 10
6.2. Audio Setting ............................................................................................................................................ 10
6.2.1. Mixing Mode .......................................................................................................................................... 10
6.2.2. AFV Mode .............................................................................................................................................. 10
6.3. PIP Mode................................................................................................................................................... 11
6.4. Main Menu Setting ................................................................................................................................... 11
6.4.1. System Settings .................................................................................................................................... 11
6.5. Network Settings ...................................................................................................................................... 12
6.5.1. Network .................................................................................................................................................. 12
6.5.2. NetMask ................................................................................................................................................. 12
6.5.3. GateWay ................................................................................................................................................ 12
Warranty / Mission Statement ……………………………………………………………………………...13

2
1. BRIEF INTRODUCTION
1.1. Overview
The BG-MFVS61-G2 is a compact 6-channel SDI/HDMI multi-format video switcher that allows video
switching, audio mixing, and different transition effects. The inclusion of a USB 3.0 video output allows
direct connection to a PC or Mac for streaming directly to platforms like YouTube and Facebook.
Featuring 4 SDI inputs, 2 HDMI inputs, 2 scalable SDI outputs and 1 scalable HDMI output this versatile
unit is equipped to handle nearly any combination of equipment you can find. This cost-effective video
switcher will be your perfect choice for various events production applications etc.
1.2. Main Features
6 channel inputs:4×SDI & 2×HDMI inputs
1×USB type-C output, 2×SDI & 1×HDMI PGM outputs, 1×SDI & 1×HDMI multiview outputs
Uncompressed capture for live streaming, compatible with UVC & UAC
1×SDI AUX output, can be selected as PGM or PVW
Multi-format support, input format auto-detected and PGM outputs selectable
T-Bar/ AUTO/ CUT transitions
Mix/ Fade/ Wipe transition effects
PIP mode size and position adjustable
Support audio MIXING and AFV mode
GPIO for Tally, FTB for emergency
3
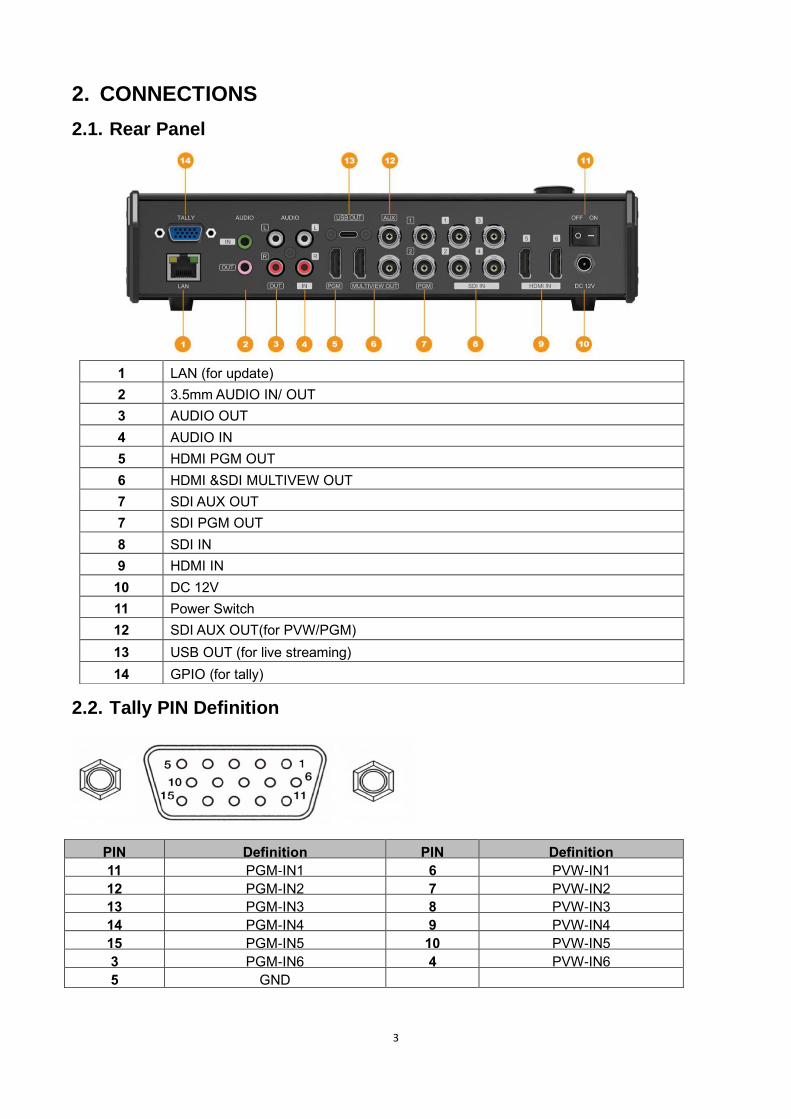
2. CONNECTIONS
2.1. Rear Panel
2.2. Tally PIN Definition
PIN Definition PIN Definition
11 PGM-IN1 6 PVW-IN1
12 PGM-IN2 7 PVW-IN2
13 PGM-IN3 8 PVW-IN3
14 PGM-IN4 9 PVW-IN4
15 PGM-IN5 10 PVW-IN5
3 PGM-IN6 4 PVW-IN6
5 GND
1 LAN (for update)
2 3.5mm AUDIO IN/ OUT
3 AUDIO OUT
4 AUDIO IN
5 HDMI PGM OUT
6 HDMI &SDI MULTIVEW OUT
7 SDI AUX OUT
7 SDI PGM OUT
8 SDI IN
9 HDMI IN
10 DC 12V
11 Power Switch
12 SDI AUX OUT(for PVW/PGM)
13 USB OUT (for live streaming)
14 GPIO (for tally)

4
3. SPECIFICATIONS
Inputs
Video Inputs 4×3G/HD/SD-SDI, 2×HDMI
SDI Input Format
1080p 60/59.94/50/30/29.97/25/24/23.98
1080psF 30/29.97/25/24/23.98
1080i 60/59.94/50
720p 60/59.94/50/30/29.97/25/24/23.98
625i 50 PAL, 525i 59.94 NTSC
HDMI Input Format
1080p 60/59.94/50/30/29.97/25/24/23.98/23.976
1080i 50/59.94/60
720p 60/59.94/50/30/29.97/25/24/23.98
576i 50, 576p 50
SDI Video Rate Auto detection, SD/HD/3G-SDI
SDI Compliance SMPTE 259M/ SMPTE 292M/ SMPTE 424M
Color Space and Precision
SDI: YUV 4:2:2, 10-bit;
HDMI: RGB 444 8/10/12bit; YUV 444 8/10/12bit;
YUV 422 8/10/12bit
Video Outputs
PGM Outputs 2×3G/HD/SD-SDI; 1×HDMI Type A
PGM Output Format 1080p 60/50/30/25/24; 1080i 50/60
Multiview Output 1×3G-SDI; 1×HDMI Type A
Multiview Output Format 1080p 60
USB Output
USB interface 1×USB3.0 Type-C (USB3.1 Gen1, up to 200MB/s)
Output Format
1920×1200, 1920×1080, 1680×1050, 1440×900,
1368×768,1280×1024, 1280×960, 1280×800,
1280×720, 1024×768, 1024×576, 960×540,
856×480, 800×600, 768×576, 720×576, 720×480,
640×480, 640×360
Frame Rate Up to 60fp
Supports OS Windows 7/8/10, Linux (Kernel version 2.6.38 and
above), Mac OS (10.8 and above)
Software compatibility
OBS studio, Skype, ZOOM, Teams, Google Meet,
Youtube Live, QuikcTime Player, Face time,
Wirecast, CAMTASIA, Ecamm.live, Twitch.tv, etc.
(Windows) etc.
Audio Audio Input 1×3.5mm Stereo audio; 1×RCA(L/R)
Audio Output 1×3.5mm Stereo audio; 1×RCA(L/R)
Others GPIO Tally

5
4. FRONT CONTROL PANEL
LAN RJ45
Power DC 12V, 1.8A
Consumption ≤ 22W
Operation Temperature -20℃~60℃
Storage Temperature -30℃~70℃
Operation Humidity 20%~70%RH
Dimensions 330×243.5×67mm
Weight 1kg
Warranty 2-Year Limited
Accessories Accessories 1×Power Supply (DC12V 2A),
1×USB3.0 Cable Type-C to Type-A
1 PVW:1-6 Select the signal source for Preview.
2 PGM:1-6 Select the signal source for Program
3 MENU Menu Setting
4 MIXER Select 2-ch audio mixing

6
5. OPERATION INSTRUCTIONS
5.1. Multiview Output Layout
PGM and PVW (Preview and Program) are displayed as in the following image. The signal level meter of
PGM audio is shown only in multiview. SDI/HDMI PGM out has no overlays.
The following 6 windows come from the 6 input signals.
5 AFV Audio follow video mode
6 FADE Fade transition effect
7 MIX Mix transition effect
8
Wipe transition effect
9 PIP Picture in Picture
10 FTB Fade to Black
11 AUTO Performs an automated switch between Program and Preview.
12 CUT Performs a simple immediate switch between Program and Preview.
13 T-bar Manual Transition between Program and Preview.

7
The lower right corner of the display features the menu and status information. The CH1, CH2 are the
channel selection of the 2 audio sources for audio mixer. There is a real-time Digital clock/Analog clock
displayed beside the menu.
5.2. PGM PVW Switching
5.2.1. PGM, PVW Channel Selection
PGM and PVW buttons 1-6 in the image below correspond with the 6 windows in the image of the
multiview layout. The selected button from PGM turns red, and the selected button from PVW turns green.
The selected PGM source will have a red border, while the selected PVW source will have a green border.

8
5.3. Transition Control
There are two transition control types for this video switcher: Transition without effects and Transition with
effects.
1) Transition without Effects
CUT performs a simple immediate switch between Preview and Program views. This is no delay
seamless switching and the selected transition effect WIPE, MIX or FADE is not used.
2) Transition with Effects
AUTO performs an automated switch between Preview and Program views. The timing of the transition is
set by the chosen speed button. The selected transition WIPE, MIX or FADE will also be used.
T-Bar manual transition performs like AUTO, but it is more flexible that the timing of the transition depends
on the speed of the manual switch.
5.3.1. FTB (Fade to Black)
Press FTB button it will fade the current video Program source to black. The button will flash to indicate
that it’s active. When press the button again it acts in reverse from complete black to the currently
selected Program video source, and button stop flashing. FTB is usually used for an emergency situation.
Note: When the PGM window display black and keep black even after transition, please check if the FTB
button flashing. Press the button again when it is flashing to stop black.
5.4. Transition Effects
5.4.1. MIX Transition
Pressing the MIX button selects a basic A/B Dissolve for the next transition. When button LED turns on it
is active. Then use T-Bar or AUTO to operate the transition. The MIX transition effect as below
5.4.2. WIPE Transition
WIPE is a transition from one source to another and is achieved by replacing the current source by
another source. Press the WIPE button and the LED turns on then it is active. There are total 8 WIPE
selections wiping start from different directions.
9
For example:
If choosing , use T-Bar or AUTO to operate the transition and the WIPE effect is as follows:
INV button is an alternative button. Press it first and then press a Direction button, the WIPE will start from
an inverse direction.
5.4.3. FADE Transition
Fade is a transition from one source to another with fade gradually transition effect. Press the FADE
button and use T-Bar or AUTO to operate the FADE transition.
5.5. Audio Mixer Setting
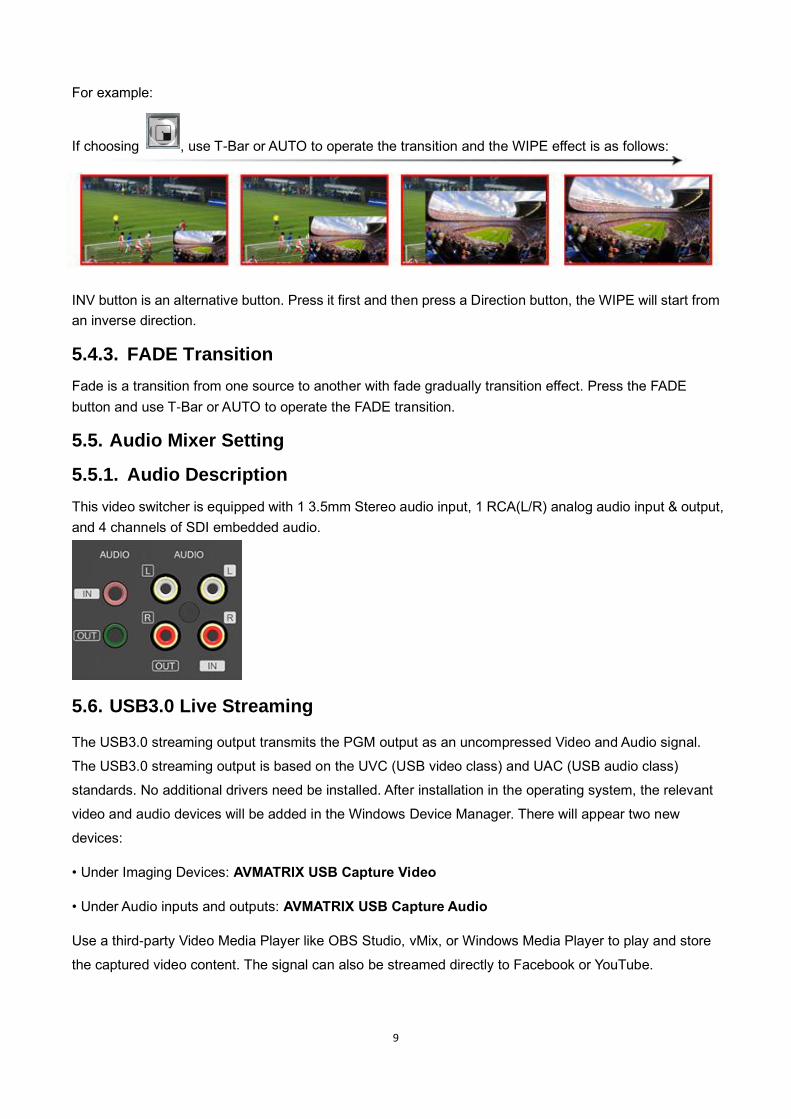
5.5.1. Audio Description
This video switcher is equipped with 1 3.5mm Stereo audio input, 1 RCA(L/R) analog audio input & output,
and 4 channels of SDI embedded audio.
5.6. USB3.0 Live Streaming
The USB3.0 streaming output transmits the PGM output as an uncompressed Video and Audio signal.
The USB3.0 streaming output is based on the UVC (USB video class) and UAC (USB audio class)
standards. No additional drivers need be installed. After installation in the operating system, the relevant
video and audio devices will be added in the Windows Device Manager. There will appear two new
devices:
• Under Imaging Devices: AVMATRIX USB Capture Video
• Under Audio inputs and outputs: AVMATRIX USB Capture Audio
Use a third-party Video Media Player like OBS Studio, vMix, or Windows Media Player to play and store
the captured video content. The signal can also be streamed directly to Facebook or YouTube.

10
6. MENU SETTING
6.1. SDI PGM/ AUX and Multiview Output Format
The output format of multiview is fixed at 1080p60, and for PGM output it can be set in the menu. In
addition to the PVW and PGM outputs there is a selectable AUX output. The auxiliary output can easily be
switched between PVW and PGM via Menu knob. The default setting is PGM after reset. Selectable
resolutions include 1080P 50/60/30/25/24Hz and 1080I 50/60Hz selectable for SDI/HDMI PGM and AUX
outputs.
6.2. Audio Setting
This video switcher features 1 channel L/R analog audio input & output and 1 channel 3.5mm stereo
audio input and output, and supports both audio following video mode and audio mixing mode.
6.2.1. Mixing Mode
Press the MIXER button to set audio mode as mixing. Press menu and choose audio for 2 channel audio
mixing, users can select audio source from IN1/ IN2/ IN3/ IN4/ IN5 / IN6/ Phone/ RCA IN.
6.2.2. AFV Mode
Press AFV button to enable the audio follows video mode. When the audio is in follow mode the audio is
taken from the embedded audio of the Program video source. Users can control the audio volume by
adjusting the master fader (the left one).

11
6.3. PIP Mode
When PIP is pressed a small image will appear on the top left corner of PVW window as in following
image. The menu will enter an interface as shown below. The window size, position and border of PIP can
be set from the menu.
6.4. Main Menu Setting
When STATUS menu is not selected, press the MENU button to enter main menu directly. If one of the
items is selected (see below), rotate the MENU button rotate counter-clockwise to exit the choice, then
press the MENU button to enter main menu.
6.4.1. System Settings
Entering system settings allows the system language to be switched between English and Chinese. From
this menu the real-time clock can also be switched between Analog or Digital.

12
Connect the switcher to a PC and download the time control software from our website:
https://bzbgear.com/knowledge-base/how-to-set-the-time-on-the-bg-mfvs-61/
Open the software and click Scan to search and connect the device, then the clock time will be changed
to same time as the PC.
6.5. Network Settings
6.5.1. Network
There are two ways to acquire the IP: Dynamic (IP configured by router) and Static (set IP manually).
Select the method you need in the menu. The default setting is Dynamic.
Dynamic: Connect the video switcher to a router with DHCP, it will obtain an IP address automatically.
Make sure that the video switcher and PC are on the same local area network.
Static: Select static IP when the PC is without DHCP. Connect the video switcher directly to the PC with a
network cable, set the PC’s IP address to the same IP range as video switcher (the video switcher’s
default IP address 192.168.1.215), or set the video switcher’s IP address to the same IP range as PC’s IP
address.
6.5.2. NetMask
Set the NetMask. The default setting is 255.255.255.0.
6.5.3. Gateway
Set the Gateway according to the current IP address.
Save the configuration when finished.

13
Warranty
BZBGEAR wants to assure you peace of mind. All BZBGEAR cameras and camera-related products
include our Stress-Free Three-Year Warranty.
For complete warranty information, please visit BZBGEAR.com/warranty.
For questions, please call 1.888.499.9906 or email [email protected].
Mission Statement
BZBGEAR manifests from the competitive nature of the audiovisual industry to innovate while keeping the
customer in mind. AV solutions can cost a pretty penny, and new technology only adds to it. We believe
everyone deserves to see, hear, and feel the advancements made in today’s AV world without having to
break the bank. BZBGEAR is the solution for small to medium-sized applications requiring the latest
professional products in AV.
We live in a DIY era where resources are abundant on the internet. With that in mind, our team offers
system design consultation and expert tech support seven days a week for the products in our BZBGEAR
catalog. You’ll notice comparably lower prices with BZBGEAR solutions, but the quality of the products is
on par with the top brands in the industry. The unparalleled support from our team is our way of showing
we care for every one of our customers. Whether you’re an integrator, home theater enthusiast, or a
do-it-yourselfer, BZBGEAR offers the solutions to allow you to focus on your project and not your budget.