inspector app for faro scene - rithm · inspector app instructions – updated january 16th, 2015...
TRANSCRIPT

Inspector App Instructions – Updated January 16th, 2015
Inspector App for FARO SCENE
Simulates testing for conformance to the ASTM 1155 for concrete floors,
ADA ramp slope, and IBC stair height/spacing requirements
Contents Installation ................................................................................................................................................ 2
Before Running the App ............................................................................................................................ 2
Activating the App ..................................................................................................................................... 5
Running a Floor Flatness Testing Session ................................................................................................. 6
Options Menu ........................................................................................................................................... 8
Analyzing Stairs ......................................................................................................................................... 8
Analyze Stair Sets ...................................................................................................................................... 9
Results ..................................................................................................................................................... 12
Stairs Options .......................................................................................................................................... 12
Feedback is always welcome! ................................................................................................................. 13

Inspector App Instructions – Updated January 16th, 2015
Installation 1. To install the FPP file, you must first make sure that you have the latest version of SCENE (5.3+).
If you do not have the latest version, you may download it here. To check which version you
have, go to Help>About SCENE and read the SCENE Version number.
2. Once you have verified that you have the latest version of SCENE, run
RithmSoftwareInstaller.exe, and choose the app(s) you’d like to download and install.
Before Running the App Prior to running the app, make sure you’ve done the following to ensure a fast and more reliable
performance:
1. Delete Scan Point Clouds – Although Scan Point clouds may be an important part of the registration
process, they will prevent the Rithm Apps from functioning properly (due to issues with the Scene
API; it’s out of our control at the moment). You will know that you have Scan Point Clouds if you see
clouds next to your individual scans
Inspector App Instructions – Updated January 16th, 2015
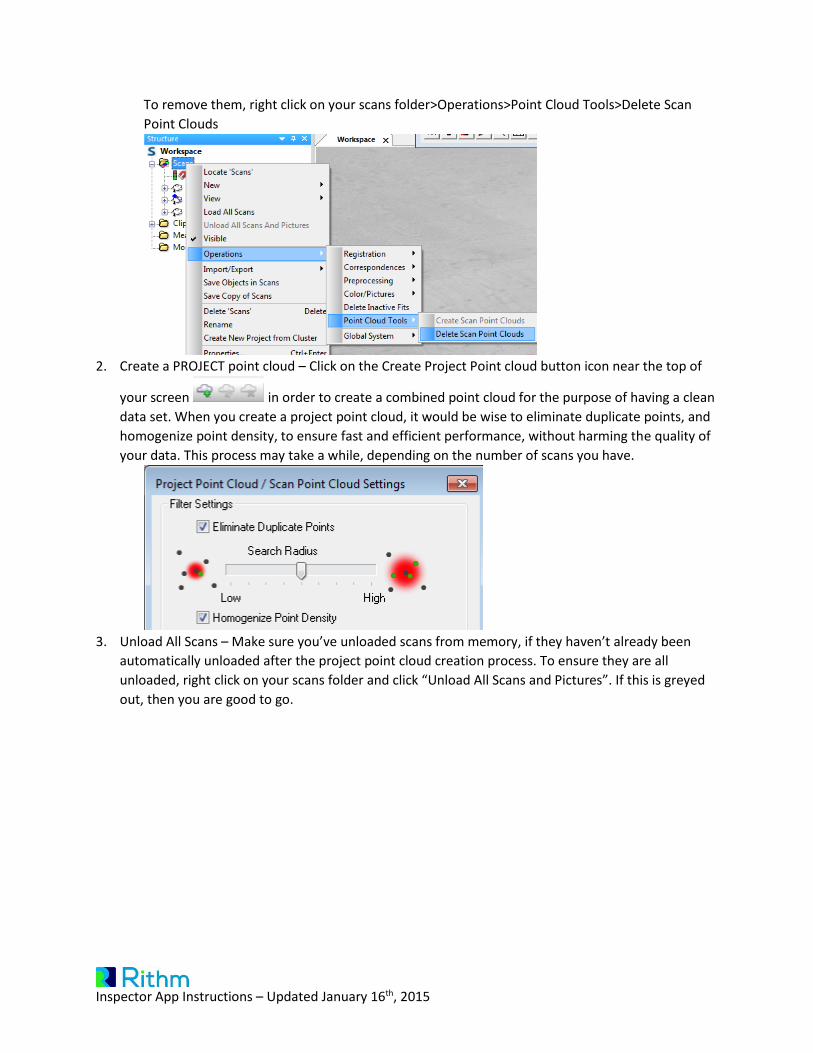
To remove them, right click on your scans folder>Operations>Point Cloud Tools>Delete Scan
Point Clouds
2. Create a PROJECT point cloud – Click on the Create Project Point cloud button icon near the top of
your screen in order to create a combined point cloud for the purpose of having a clean
data set. When you create a project point cloud, it would be wise to eliminate duplicate points, and
homogenize point density, to ensure fast and efficient performance, without harming the quality of
your data. This process may take a while, depending on the number of scans you have.
3. Unload All Scans – Make sure you’ve unloaded scans from memory, if they haven’t already been
automatically unloaded after the project point cloud creation process. To ensure they are all
unloaded, right click on your scans folder and click “Unload All Scans and Pictures”. If this is greyed
out, then you are good to go.

Inspector App Instructions – Updated January 16th, 2015
4. Create a Clipping Box – Most data sets have large amounts of data, such as trees, walls, ceilings, or
even adjacent buildings, which you might want to leave out for your analysis. Keeping this data in
the 3D view while using the apps will lead to very long processing times, as the apps will have to
search through the entire point cloud for information. To ensure efficiency and make sure you can
work efficiently without having to wait very long to produce deliverables, create a Clipping box
that isolates the area of interest (the smaller, the better).
You will be clicking on points within the 3D view. Once you’ve created your clipping box and isolated
your area, be sure to make the clipping box not “visible” by right clicking on the clipping box on the left
side of your screen in the structure window, and un-check the “Visible” option. Otherwise, when you
click on objects within the 3D view, you will inadvertently be activating the clipping box properties
window.
Inspector App Instructions – Updated January 16th, 2015
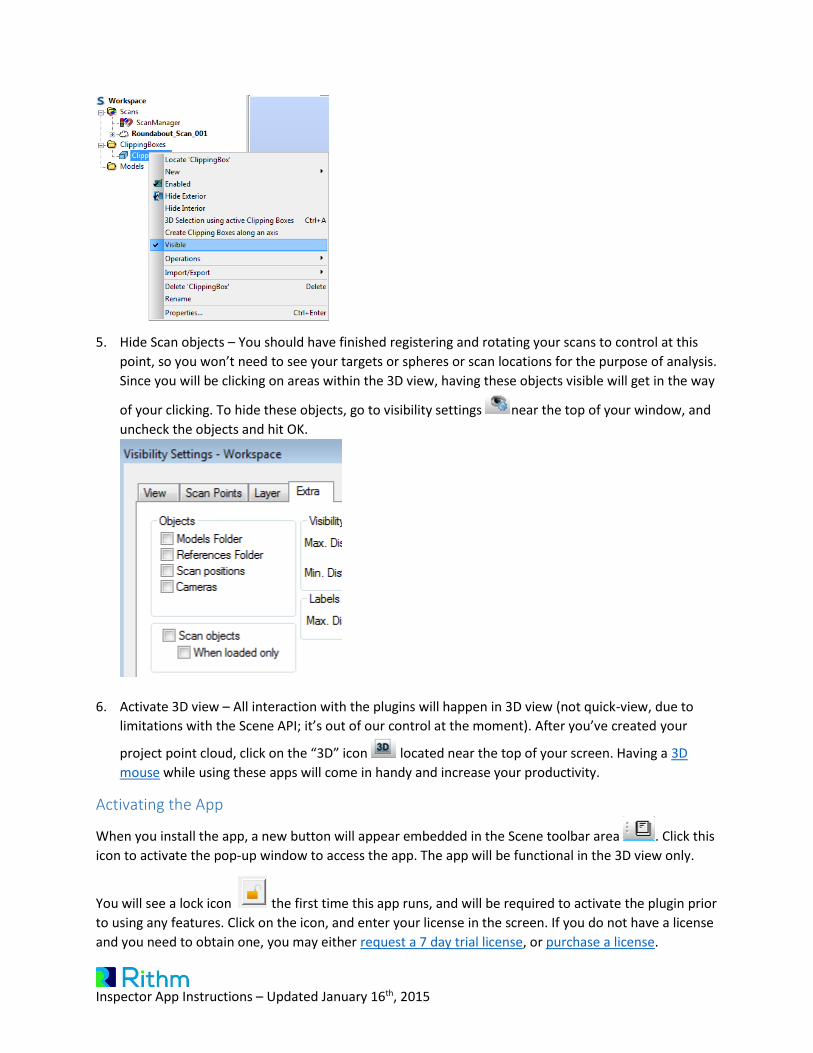
5. Hide Scan objects – You should have finished registering and rotating your scans to control at this
point, so you won’t need to see your targets or spheres or scan locations for the purpose of analysis.
Since you will be clicking on areas within the 3D view, having these objects visible will get in the way
of your clicking. To hide these objects, go to visibility settings near the top of your window, and
uncheck the objects and hit OK.
6. Activate 3D view – All interaction with the plugins will happen in 3D view (not quick-view, due to
limitations with the Scene API; it’s out of our control at the moment). After you’ve created your
project point cloud, click on the “3D” icon located near the top of your screen. Having a 3D
mouse while using these apps will come in handy and increase your productivity.
Activating the App
When you install the app, a new button will appear embedded in the Scene toolbar area . Click this
icon to activate the pop-up window to access the app. The app will be functional in the 3D view only.
You will see a lock icon the first time this app runs, and will be required to activate the plugin prior
to using any features. Click on the icon, and enter your license in the screen. If you do not have a license
and you need to obtain one, you may either request a 7 day trial license, or purchase a license.

Inspector App Instructions – Updated January 16th, 2015
Alternatively, you may request a 7 day trial license by entering your email and clicking “send”, which will
automatically create a request email if you have Microsoft Outlook installed on your computer.
Running a Floor Flatness Testing Session
1. Hit the pencil icon to begin the test runs. Double click the first location, then double click
both ends of the run you want to test. This will create a “test run”, and you will be given a
minimum Floor Flatness value for that run.
2. Continue to create runs in accordance to the ASTM 1155 procedure. In general, you will want to
keep lines perpendicular to each other, and crossing each other.
3. Hit the "Done" icon to save the results and generate a PDF report. Before you do this, make
sure to position yourself in the 3D view to get a good overall view of your runs, because the App
will take a snapshot of this and include it in the report.

Inspector App Instructions – Updated January 16th, 2015
Each graph will represent the profile along each run. A flatness and levelness value will be given for each
run.
The overall results gives an overall Flatness and Levelness value, as well as minimum values, as required
in many project specifications.
Here is a table below for reference:

Inspector App Instructions – Updated January 16th, 2015
Options Menu
You may make tweaks to the behavior of the Floor Flatness testing procedure in the options menu .
Here, you may change the sensitivity of the minimum density of points required in a given test location
before you are prevented from creating a run. It is generally best to obtain relatively dense data during a
concrete pour to ensure maximum accuracy of the test. You can also alter sensitivity to debris, which
may affect result accuracy. You will not need to alter these options if you stick to relatively clean areas
with dense point cloud overlap.
Analyzing Stairs The Analyze Stairs command will allow you to quickly generate elevation difference between step risers
on a stairway.
1. Go to Tools>Analyze stairs to activate the command. Alternatively, you can use the Ctrl+D
shortcut on your keyboard.
2. The Analyze Stairs command will give you differences between one step and the next. You will
first start at the bottom of the stairs. Once you’ve found the bottom, double click to establish an
elevation.

Inspector App Instructions – Updated January 16th, 2015
3. Now double click on the first rising step, to create an elevation difference.
4. Double click on the 2nd step, then 3rd step, then so on until you’ve reached the top of the
stairway. When you are finished, go to Tools>Analyze Stairs to de-activate the command.
5. If a step height difference falls outside of specified tolerance, the point on the step will be
colored red. By default, the minimum height will be 4” per International Building Code.
Analyze Stair Sets The Analyze Stair Sets command will allow you to execute the Analyze Stairs command rapidly on
multiple locations along the riser.

Inspector App Instructions – Updated January 16th, 2015
1. Go to Tools>Analyze Stair Sets to activate the command. Alternatively, you can use the Ctrl+G
shortcut on your keyboard.
2. You will first start at the bottom-left side of the stairs. Once you’ve found the bottom-left side,
double click to establish an elevation.
3. Next, double click on a location towards the bottom-right side of the stairway to create a line of
measurements that is perpendicular to the direction of the stairway. It may take a bit of time for
this process to complete. The measurement increments will be spaced evenly at 12” increments
by default, which you can change in the Stair Options menu.
4. Double click on the 2nd step directly above the 1st location you clicked on at the bottom left of
the stairway. This will automatically give riser differences along the stairway at the same 12”
evenly spaced increments.

Inspector App Instructions – Updated January 16th, 2015
5. Keep double-clicking on each step until you get to the top of the stairway. Once you’re done, go
to Tools>Analyze Stair Sets to de-activate the command.

Inspector App Instructions – Updated January 16th, 2015
Stair Results 1. Go to Tools>Results to view the results of the Stair analyzes you have performed.
2. Each “session” will refer to a series of connected height measurements. Click on a session on the
left to view the associated riser step heights. If you performed an analysis using “Analyze Stair
Sets”, you will see multiple sessions created at once.
3. You will also notice that a Maximum Deviation will be listed on the bottom right of the window.
This is calculated by finding the difference between the minimum and maximum riser heights
along each Session/Stair run. By default, the value will turn red when it exceeds ½” per
International Building Code.
4. You may delete an individual session to clear it from the 3D view, or Clear All to remove all
results from both the Results Window and the objects drawn in the 3D view.
Stairs Options You can change the various options of the Stairs App by going to Tools>Stairs Options. Here, you may
change the minimum/maximum riser height required before the App considers a height “out of
compliance”, i.e. colored Red (by default).

Inspector App Instructions – Updated January 16th, 2015
You may also change other options such as the colors of objects drawn in the 3D view, the spacing of
Analyze Stair Sets, or whether or not you want to display the Elevation Labels at the beginning of
Sessions/test runs.
Sharing Project Information to others When you’ve conducted some inspections in the app, you may share the information to others on
different computers by doing the following:
1. Ensure that you and the recipient are using the same version of Faro Scene and the Inspector
App
2. Click on the save button , and choose a location to save an XML file. This XML file will
contain all information regarding any inspection reports you’ve created, or anything you’ve
drawn, with the Inspector App.
3. Send the XML file to the recipient, and have the recipient click on the open file button in the
Inspector App
4. The recipient will now be able to view information created, such as Floor Flatness reports, ADA
slope analysis, etc.
Ensuring Tightly Registered Scans Many of these features, especially the ASTM 1155 Floor Flatness inspection, will require scans that are
very tightly registered, specifically in the Z direction; even small errors will result in undesired results.
To ensure that scans are registered properly:
If registering scans using traditional checkerboards and targets, ensure that you have placed
targets both high and low – to ensure tight Z elevation registration.
If registering scans using traditional checkerboards and targets, try to “refine” the registration
and achieve even tighter results by using cloud to cloud afterwards, and using a small (<1”)
search radius.
Ensure that your laser scanner does not exhibit “coffee cup stains”, which looks like a cosine
wave emanating from the scanner position in the scan when viewing points up-close. This may
be caused by either:
o Excess dust in the lenses – make sure to use air-blower frequently if you are around
construction jobsites or outdoors
o A scanner that has not been calibrated in over a year
Feedback is always welcome! Feel free to contact us anytime at [email protected] or (US) 1-909-837-5189 for the following:
If you run into any problems with using this App
Would like some guidance/training on this App or other Scene/Laser Scanning related questions
You would like to any additional features, or have an idea for a new App entirely