inspirations magazine errata · inspirations. the designs and materials for the remaining two...
TRANSCRIPT
INSPIRATIONS MAGAZINE
ERRATA
CU
RR
EN
T A
S A
T D
EC
EM
BE
R 2
01
9

E R R ATA | 2
ISSUE 33ARABIAN NIGHTSEmbroidery key, p. 49There was an error in the embroidery key instructions for Camel 2. It should read:
Under blanket = AU (hem stitch)
Tassel = AU (tassels), T or AU (couching)
ISSUE 35HOME SWEET HOMEPattern, sheet 1 side 2The embroidery design for the floor was omitted. Please see page 8 for the embroidery design.
ISSUE 36BUNNIES IN THE BERRY PATCHPattern, sheet 2 side 2The embroidery design was printed in mirror image.
You will need to trace the design from the centre liftout pattern and flip it over before transferring to the fabric.
NATURE’S JEWELEmbroidery, p. 27All surface embroidery should be worked on the taffeta, not on the white poplin.
Only the detached elements are worked on the white poplin.
ISSUE 39DES FLEURS POUR GRANDMÉREPreparation for Embroidery, p. 19There was an error in diagram 1.
The measurement of 8cm should be changed to 9.25cm (3 5/8") to centre the design correctly on the front cover.
ISSUE 41VINTAGERequirements, p. 55There was an error in the measurements for the Lugana linen and the ivory satin. The correct measurements are:
50cm x 25cm wide (19 3/4" x 10") piece of Lugana linen.
50cm x 25cm wide (19 3/4" x 10") piece of ivory satin.
ISSUE 42VEIL OF GOLDThreads, p. 52There was an error in the thread list. The correct entry should read:
E = 280 x 2mm (1/16") pearls (5gm)
ISSUES 43 AND 44FIL D’OR
Unfortunately, due to space constraints, we will not be featuring the remaining two designs from the beautiful goldwork sampler in Inspirations.
The designs and materials for the remaining two designs can be purchased directly from Tanja Berlin. You can contact her at [email protected] or via her website www.berlinembroidery.com
ISSUE 45TAKING TEAThreads, p. 39There was an error in the thread list. The correct entry should read:
K = 077 royal jewels
ISSUE 49A FINE ROMANCETransferring the design, p. 53There was an error in the instructions for transferring the oval and embroidery design. The correct instructions are:
Press and starch the linen thoroughly, applying two or three layers of starch to the fabric. The layer of starch will protect the fabric while being handled and make it easier to wash out any visible transfer markings after the project is complete.
Use a very sharp pencil to lightly transfer the oval onto the linen, and the embroidery design onto the organdie after it is inserted into the oval.
Once the sachet is complete, wash it using pure soap and, if necessary, an oxygen-based bleach. Leave to dry. Press the sachet with the embroidery facing down on a well-padded surface.
ISSUE 53RAINBOW DREAMSNeedles, p. 91There was an error in the needle size conversion. The correct needle size is:
8mm (US no. 11, English no. 0) 61cm (24") circular needle
ISSUE 55THE PRETTY PASSIONFLOWERThreads, p. 32There was an error with the quantities in the threads list.
The no. 3 white Mountmellick thread needs three skeins, not one.
ISSUE 56DECK THE HALLSThreads, p. 70One of the threads was incorrectly listed. It should read:
Presencia no. 8 perlé cotton
C = 4812 yellow-green
RHAPSODY IN BLUEPattern, sheet 2 side 2There was an error in the embroidery design.
To replicate the exact design, trace one long side twice so the design travels in a clockwise direction.
ISSUE 58VICTORIAN LACEPattern, sheet 2 side 1The embroidery chart was omitted. Please see page 8 for the embroidery chart.
Step-by-steps, p. 58The incorrect step-by-step instructions were given for the needleweaving. To achieve the same look as the pincushion, please follow the following instructions.
Step-by-step Needleweaving
Needleweaving forms the pattern on the overcast mesh. The needleweaving spans two or more bars of thread of the mesh.
ERRATA

E R R ATA | 3
1. Bring the needle to the front at the required position.
2. Take the needle under the group of threads for the left bar from right to left.
3. Take the needle under the group of threads for the right bar from left to right.
4. Continue weaving back and forth across the two bars, until there are five journeys across in each direction.
5. To weave across more than two bars, again bring the needle out on the right side of the far right bar. From right to left, take the needle under the second and fourth bars from the right.
6. From left to right, take the needle under the second and fourth bars from the left.
7. Continue weaving back and forth under and over the bars, until there are five journeys across in each direction.
ISSUE 59MARKER MICEPreparing the fabrics, p. 21There is an error in the instructions. The correct instructions are:
Fold the fabric in half diagonally – not along the straight grain. The second fold in the opposite direction should also be made diagonally. Please see the additional diagram also to assist with placement of the embroidery. The diagonal foldline should align with the centre of the embroidered design.
fold
embro
idery
starts
approxim
ately 13
mm
(1/2”
) fro
m th
e fold
in this edgeenough spacewill stay empty to embroider the face
no embroidery in this space
starting point
Cut a 1cm (3/8") diameter circle of pink felt for each ear. A tiny pleat is formed by pinching together one side of a circle. Secure the pleat with small tacking stitches and attach to the mouse’s head with tiny hand stitches using matching sewing thread. Use the photograph in the article as a guide for placement.
ISSUE 61HIDDEN SECRETSPattern, sheet 2 side 2The embroidery design was omitted for the scissor case. Please see page 8 for the embroidery design and pattern pieces.
ISSUE 63MEMORIES – PANSIESThreads, p. 77One of the threads was incorrectly listed. It should read:
Rajmahal rayon thread
F = 521 maidenhair
SEED OF LIFEPattern, sheet 1 side 1There is an error in the construction information. It should read:
3. Joining the front to the back
With right sides together and matching raw edges, pin and stitch the cover front and back together down the sides and along the lower edge (diag 2).
Cover

E R R ATA | 4
ISSUE 70GONE SHOPPINGRequirements, p. 81The requirements for the heavyweight light blue cotton ticking were incorrect. The correct measurements are:
95cm x 100cm wide (36" x 40").
Pattern, sheet 2 side 1The cutting out measurements were incorrect. The correct measurements are:
Heavyweight light blue cotton ticking
Base: cut two, each 42cm x 12cm wide (16 1/2" x 4 3/4")
Top: cut two, each 42cm x 7.5cm wide (16 1/2" x 3")
Handles: cut two, each 55cm x 10cm wide (215/8" x 41/8")
Light blue polycotton
Base: cut two, each 42cm x 12cm wide (16 1/2" x 4 3/4")
Top: cut two each 42cm x 7.5cm wide (16 1/2" x 3")
Handles: cut two, each 55cm x 10cm wide (215/8" x 4 1/8")
Medium weight interfacing
Base: cut two each 42cm x 12cm wide (16 1/2" x 4 3/4")
Top: cut two each 42cm x 7.5cm wide (16 1/2" x 3")
ISSUE 72MONKEY BUSINESSPreparing the fabric, p. 26The conversion to imperial measurements for trimming the ivory wool and cashmere velour is incorrect.The correct measurements are:
80cm x 60cm wide (29 1/2" x 22")
ISSUE 73NATIVE COLOURRequirements, p. 16The measurements for the black cotton homespun were incorrect. The correct measurements are:
33cm x 45cm wide (13" x 18") piece of black cotton homespun
Pattern, sheet 2 side 2The cutting out measurements for the black cotton are incorrect. The correct measurements are:
Lining: cut one, 31cm x 44cm wide (12 1/4" x 17 3/8")
SWEET SECRETPattern, sheet 2 side 2The embroidery design and pattern is too large. Please see page 9 for the correct size design.
The cutting out measurements for the blue/cream cotton ticking are incorrect. The correct measurements are:
Pouch cover: cut one 25cm x 15cm wide (10" x 6")
Flap lining: cut one 10cm x 15cm wide (4" x 6")
TREASURE CHESTStep-by-step p. 37The photographs used in the step-by-step instructions for the needlewoven bars were incorrect. Please follow the step-by-step instructions below:
Needlewoven bars
The needlewoven bars are worked in groups of three around the cutwork border. Each bar is worked over four threads. The bars should be narrow as the sides are pulled in when each stitch is tightened. If you use a looser tension the bars will require more stitches and be too wide, which is incorrect for Hardanger embroidery.
1. Secure the thread under the kloster blocks. Rotate the work so that the threads you will be weaving across are horizontal.
A
2. Bring the thread to the front at A, between the second and third drawn threads. Take the needle around the two threads below, re-emerging at A.
Lining
Cover
Diag 4
Diag 5
Turn to the right side and press the seams gently. With right sides together and matching raw edges, pin and stitch the lining pieces together, leaving an opening in the lower edge.
4. Attaching the lining
With right sides together, align the stitchline of the upper edge of the lining with the tacked upper casing line. Stitch (diag 3).
Pull the cover through the lining opening and stitch the opening closed. Position the lining inside the cover.
ISSUE 65CENTAUREAPattern, sheet 3 side 2Pinball: Diagrams 4 and 5 are incorrect. Please use the diagrams below for correct layering of the felt.
Scissor sheath: Diagram 4 is incorrect. Please use the diagram below for fusing the wadding.
Wadding
Wadding CardCard
Front Back
Wadding
Wadding CardCard
Front Back
Diag 4
Front
Back
E R R ATA | 5
A
3. Pull the stitch taut. Take the needle around two threads above, re-emerging at A.
4. Pull the stitch taut. Continue to work another four stitches around each pair of threads, pulling each stitch taut to form a narrow bar.
5. Take the needle to the back one thread from the end of the bar, and emerge below the next two drawn threads for the centre of the next bar.
6. Take the needle around the two threads below and re-emerge at the centre.
7. Weave five times around each side of the bar in the same manner as before. Take the needle to the back one thread from the end of the bar, and emerge below the next two drawn threads.
8. Stitch the third bar in the same manner. Pass the needle behind the bar and emerge two threads into the next group of drawn threads.
9. Rotate the work. Continue stitching needlewoven bars in the same manner as before.
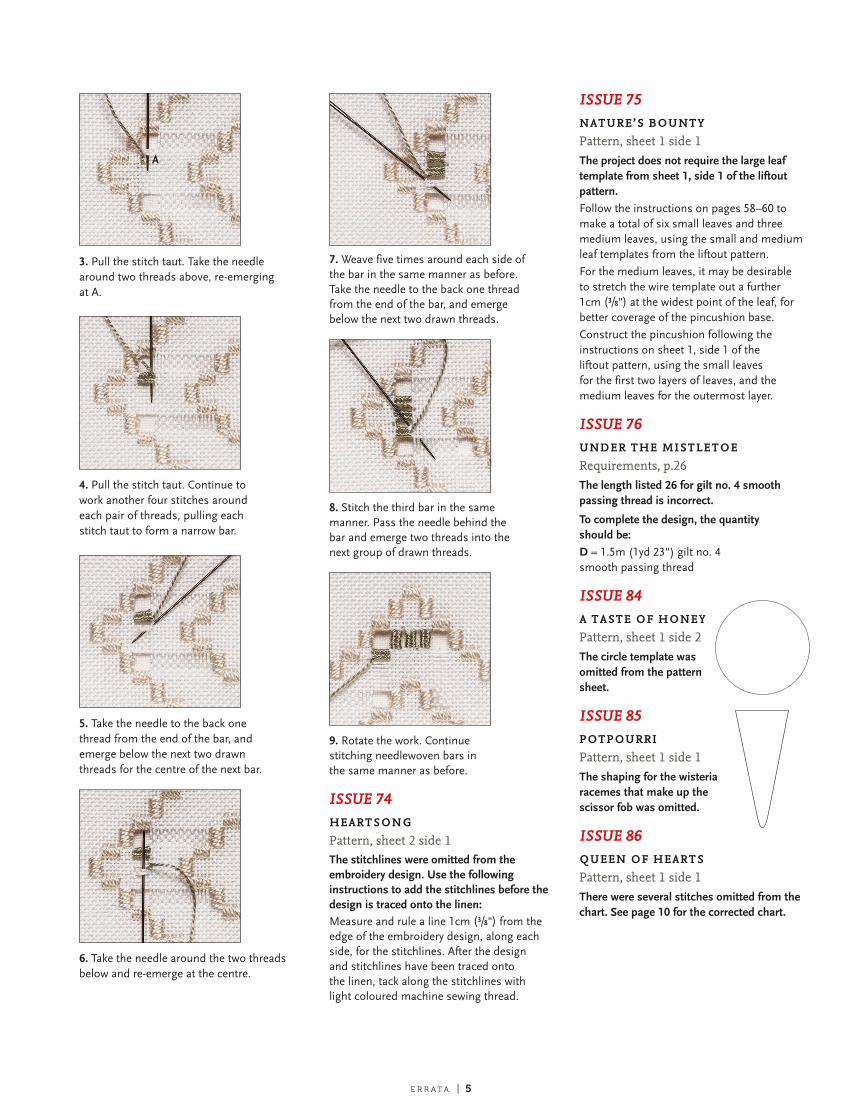
ISSUE 74HEARTSONGPattern, sheet 2 side 1The stitchlines were omitted from the embroidery design. Use the following instructions to add the stitchlines before the design is traced onto the linen:Measure and rule a line 1cm (3/8") from the edge of the embroidery design, along each side, for the stitchlines. After the design and stitchlines have been traced onto the linen, tack along the stitchlines with light coloured machine sewing thread.
ISSUE 75NATURE’S BOUNTYPattern, sheet 1 side 1The project does not require the large leaf template from sheet 1, side 1 of the liftout pattern.
Follow the instructions on pages 58–60 to make a total of six small leaves and three medium leaves, using the small and medium leaf templates from the liftout pattern.
For the medium leaves, it may be desirable to stretch the wire template out a further 1cm (3/8") at the widest point of the leaf, for better coverage of the pincushion base.
Construct the pincushion following the instructions on sheet 1, side 1 of the liftout pattern, using the small leaves for the first two layers of leaves, and the medium leaves for the outermost layer.
ISSUE 76UNDER THE MISTLETOE Requirements, p.26The length listed 26 for gilt no. 4 smooth passing thread is incorrect.
To complete the design, the quantity should be:
D = 1.5m (1yd 23") gilt no. 4 smooth passing thread
ISSUE 84A TASTE OF HONEYPattern, sheet 1 side 2The circle template was omitted from the pattern sheet.
ISSUE 85POTPOURRIPattern, sheet 1 side 1The shaping for the wisteria racemes that make up the scissor fob was omitted.
ISSUE 86QUEEN OF HEARTSPattern, sheet 1 side 1There were several stitches omitted from the chart. See page 10 for the corrected chart.

E R R ATA | 6
ISSUE 89CHATELAINETransferring the design, p.50There was an error in the thread indicated in the text. The correct entry should read:
Work a line of tacking around the outline shaping on each piece using L.
Order of work, p.50There were errors in the threads indicated in the text for the rose. The correct entry should read:
Rose
Using L, couch K around the inside edge of all five outer petals. When reaching the starting point take K to the back and emerge in a valley at the outer edge (diag 3).
Using L, couch K around the outer edge of each petal, taking K to the back in each valley at the edge of the inner petal, making a tiny stitch and emerging in the same valley.
ISSUE 91WARM WELCOME | THE BEARSPattern, sheet 1 side 1The percentage given for enlarging the alphabet, 400%, is incorrect. The correct entry should read:
Alphabet – enlarge 200%
ISSUE 92SWEET TREATSEmbroidery, p.44Apple The following sentence was omitted from the text:
Stitch the stems and leaves in back stitch using D.
SUGAR PLUMDiagrams 9 and 10, p.53The bead numbering on diagrams 9 and 10 is incorrect on one bead. The correct numbering is shown below.
10 36
35 42 469
8
7
6
5
4
3
2
1
32
34
33
38
37 43 47
45
44
40
4139
10 11
9
8 12
7
6 13
5
4 14
3
2 15
1
1
2
32
39
40
45
47
44
ISSUE 93TALL YEAR SQUAREBase, p.28The text should read:
Base The base panel is the large square marked on the rectangle of sandstone linen.
Pattern, sheet 1 side 2On the base graph the upper cross stitch triangle only should be moved to the right one square so that it aligns with the lower triangle.
CHATTERBOXPattern, sheet 1 side 11. Preparing the embroidery.The following sentence was omitted from the end of this step:
Centre the large piece of fusible wadding onto the wrong side of the pot embroidery and fuse in place.
ISSUE 95STRAWBERRY FAYREPattern sheet 1, side 1, diag 17When measuring the heart to determine the starting position for the beading, measure 11.5cm (4 ½") from the tip of the ‘V’ at the base of the heart.
11.5cm
(4½")
A PARTRIDGE IN A PEAR TREERequirements, p.63The colour number listed for the DMC floche thread, C = 832 golden olive is incorrect.
The correct number is 834.
ISSUE 96NOËLPattern, sheet 2 side 2The alphabet for this project is too small. See page 10 for the correct alphabet.
A PARTRIDGE IN A PEAR TREERequirements, p.63The colour number listed for the DMC floche thread, C = 832 golden olive is incorrect.
The correct number is 834.
THE BOBBIN TREEPattern, sheet 1 side 1The bag base template provided is for the heavy interlining only.
Before cutting out two bag base pieces from the natural cotton/linen blend, add a 5cm (2") seam allowance to the template.
ISSUE 97GILLIANRequirements, p.20The inch conversion for the fabric is incorrect. It should read:
38cm x 40cm wide (15" x 16")
E R R ATA | 7
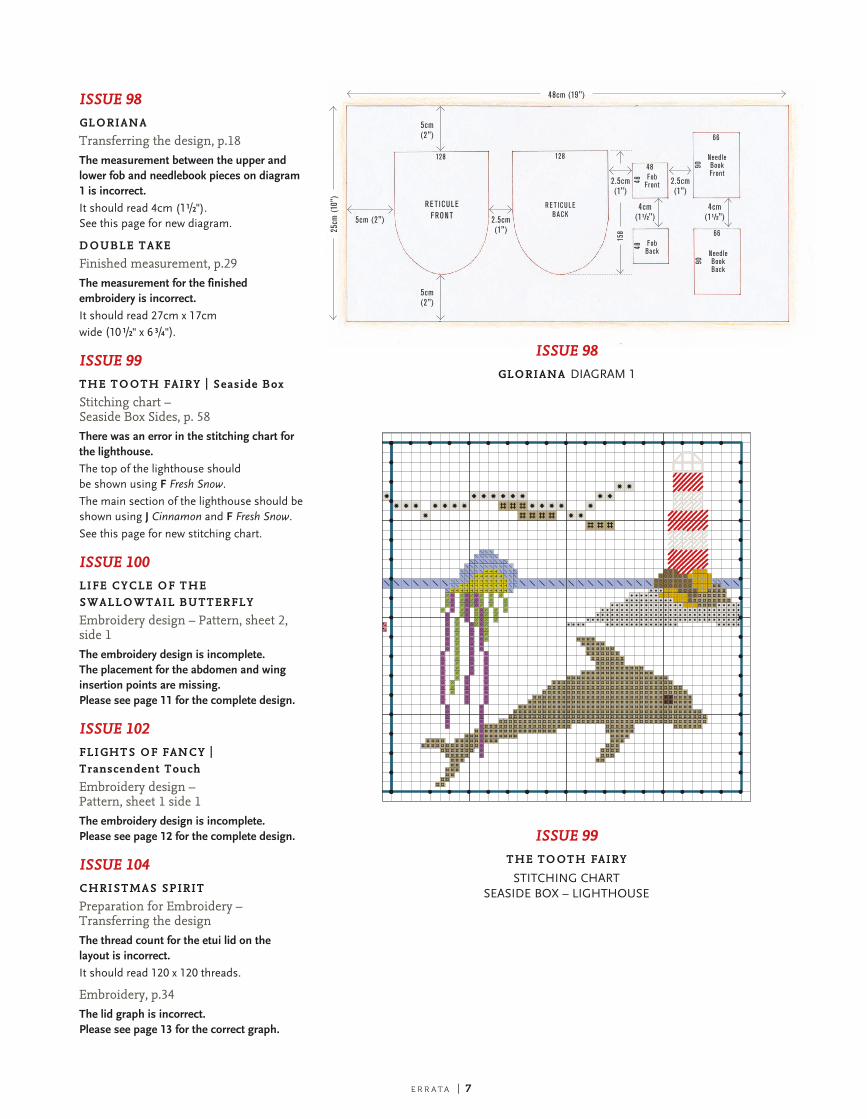
ISSUE 98GLORIANATransferring the design, p.18The measurement between the upper and lower fob and needlebook pieces on diagram 1 is incorrect.
It should read 4cm (11/2"). See this page for new diagram.
DOUBLE TAKEFinished measurement, p.29The measurement for the finished embroidery is incorrect.
It should read 27cm x 17cm wide (10 1/2" x 6 3/4").
ISSUE 99THE TOOTH FAIRY | Seaside BoxStitching chart – Seaside Box Sides, p. 58There was an error in the stitching chart for the lighthouse.
The top of the lighthouse should be shown using F Fresh Snow.
The main section of the lighthouse should be shown using J Cinnamon and F Fresh Snow.
See this page for new stitching chart.
ISSUE 100LIFE CYCLE OF THE SWALLOWTAIL BUTTERFLYEmbroidery design – Pattern, sheet 2, side 1The embroidery design is incomplete. The placement for the abdomen and wing insertion points are missing. Please see page 11 for the complete design.
ISSUE 102FLIGHTS OF FANCY | Transcendent TouchEmbroidery design – Pattern, sheet 1 side 1The embroidery design is incomplete. Please see page 12 for the complete design.
ISSUE 104CHRISTMAS SPIRITPreparation for Embroidery – Transferring the designThe thread count for the etui lid on the layout is incorrect.
It should read 120 x 120 threads.
Embroidery, p.34The lid graph is incorrect. Please see page 13 for the correct graph.
RE T ICULE FRONT
RE T ICUL E BACK
Fob Front
Fob Back
Needle Book Front
Needle Book Back
25cm
(10
")
5cm (2")
5cm (2")
5cm (2")
2.5cm (1")
2.5cm (1")
4cm (1 1/2")
4cm (1 1/2")2.5cm
(1")
158
4848
48 9090
66
66
128128
48cm (19")PREPARATION FOR EMBROIDERYTRANSFERRING THE DESIGN
Diag 1
Errata – Gloriana, issue 98
There is an error in the diagram on page 18.
The measurement between the upper and lower fob and needlebook pieces should be 4cm (1 1/2") as shown on this amended diagram.
We apologise for any inconvenience this may have caused.
ISSUE 98GLORIANA DIAGRAM 1
ISSUE 99THE TOOTH FAIRY
STITCHING CHART SEASIDE BOX – LIGHTHOUSE

E R R ATA | 8
>
ISSUE 58VICTORIAN LACE
EMBROIDERY CHART QUARTER VIEW
ISSUE 35HOME SWEET HOME
FLOOR EMBROIDERY
DESIGN
ISSUE 61HIDDEN SECRETS
SCISSOR CASE FRONT
CUT 1 BEIGE LINEN (after embroidery is
complete)
CUT 1 LIGHTWEIGHT WADDING
CUT 1 LIGHTWEIGHT CARD
ISSUE 61HIDDEN SECRETS
SCISSOR CASE BACK LININGCUT 1 ECRU LINEN
(after embroidery is complete)
CUT 1 LIGHTWEIGHT CARD

E R R ATA | 9
15mm
( 5/8”) seam
allowance
15mm
( 5/8”) seam
allowance
ISSUE 73SWEET SECRET
EMBROIDERY DESIGN AND
PATTERNCUT 1
BLUE/CREAM COTTON TICKING

E R R ATA | 10
ISSUE 86QUEEN OF
HEARTS
EMBROIDERY CHART
QUEEN OF HEARTSBY KIM BEAMISH OF CANADA For colour photos and full details, see pages 50–55.
QUEEN OF HEARTSEMBROIDERY CHART
ISSUE 96NOËL
ALPHABET

E R R ATA | 11
12
3
54
6
13
12
7
11
10
98
Papilio machon
placemen t mark
placemen t mark
wing insertion points
abdomen2mm2mm
10mm
ISSUE 100LIFE CYCLE OF THE
SWALLOWTAIL BUTTERFLY
EMBROIDERY DESIGN

TRANSCENDENT TOUCHEMBROIDERY DESIGN
placement mark
placement mark
placement mark
placement mark
E R R ATA | 12
ISSUE 102FLIGHTS OF FANCY
Transcendent Touch
EMBROIDERY DESIGN

¬ ¬ ¬ ¬ ¬
¬
¬
¬
¬
¬ ¬ ¬ ¬ ¬ ¬ ¬ ¬ ¬ ¬ ¬ ¬ ¬ ¬ ¬ ¬ ¬ ¬ ¬ ¬ ¬ ¬ ¬ ¬ ¬¬ ¬ ¬ ¬ ¬
¬
¬
¬
¬
¬
¬
¬
¬
¬
¬
¬
¬
¬
¬
¬
¬
¬
¬
¬
¬
¬
¬
¬
¬
¬¬ ¬ ¬ ¬ ¬ ¬ ¬ ¬ ¬ ¬ ¬ ¬ ¬ ¬ ¬ ¬ ¬ ¬ ¬ ¬ ¬ ¬ ¬ ¬ ¬ ¬ ¬ ¬ ¬ ¬¬ ¬ ¬ ¬ ¬
¬
¬
¬
¬
¬
¬
¬
¬
¬
¬
¬
¬
¬
¬
¬
¬
¬
¬
¬
¬
¬
¬
¬
¬
¬
¬
¬
¬
¬
¬¬
�
¬ ¬
E R R ATA | 13
ISSUE 104CHRISTMAS SPIRIT
ETUI LID GRAPH