installation • operation • maintenance electric & gas hot ...€¦ · file claim with...
TRANSCRIPT
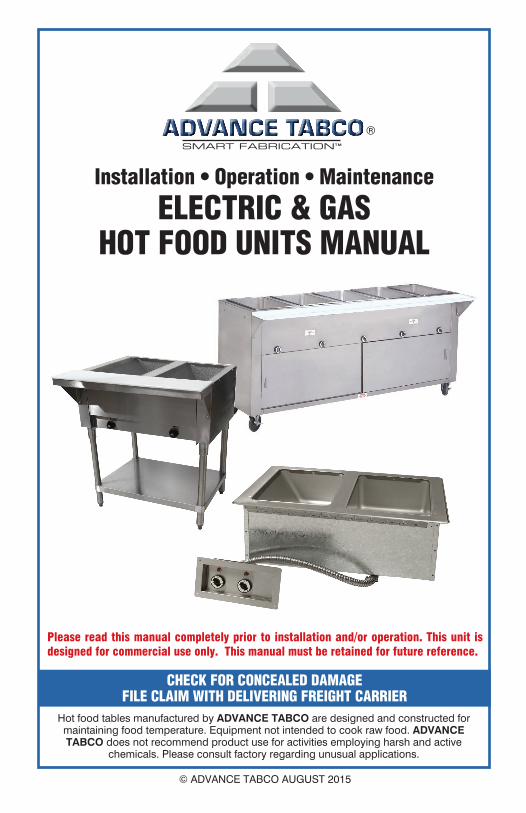
CHECK FOR CONCEALED DAMAGE FILE CLAIM WITH DELIVERING FREIGHT CARRIER
Hot food tables manufactured by ADVANCE TABCO are designed and constructed for maintaining food temperature. Equipment not intended to cook raw food. ADVANCE TABCO does not recommend product use for activities employing harsh and active
chemicals. Please consult factory regarding unusual applications.
© ADVANCE TABCO AUGUST 2015
Installation • Operation • Maintenance
ELECTRIC & GAS HOT FOOD UNITS MANUAL
®
Please read this manual completely prior to installation and/or operation. This unit is designed for commercial use only. This manual must be retained for future reference.

ASSEMBLY (NOT REQUIRED FOR DROP-IN UNITS): Follow figures on page 3.
For Units With Undershelf ( For units with an enclosed base, proceed to Step 6):
RECEIVING & INSPECTING THE EQUIPMENT:Even though most equipment is shipped crated, care should be taken during unloading so the equipment is not damaged while being moved into the building.
1. Visually inspect the exterior of the package and skid or container. Any damage should be noted and reported to the delivering carrier immediately.2. If damaged, open and inspect the contents with the carrier.3. In the event that the exterior is not damaged, yet upon opening, there is concealed damage to the equipment notify the carrier. Notification should be made verbally as well as in written form.4. Request an inspection by the shipping company of the damaged equipment. This should be done within 10 days from receipt of the equipment.5. Freight carriers can supply the necessary damage forms upon request.6. Retain all crating material until an inspection has been made or waived.
Qty. Description
1 Hot Food Table Body1 Poly Cutting Board1 Stainless Steel Shelf1 Stainless Steel Undershelf2 Cutting Board Support Brace
Qty. Description
4 Legs1 Screw Pack8 Set Screws12 1/4-20 Nylon Tree Plugs
Qty. Description
4 1/4-20 x 1/2” Screws2 10-32 x 3/8” Screws2 #10 Star Washers2 10-32 Acorn Nuts
2 WWW.ADVANCETABCO.COM • 800-645-3166
PARTS & SCREW PACKET LIST
(Figure 1)
SHELF ASSEMBLY:3. Remove Plastic Cap from Gusset. Set Screws &
Hardware located inside the Gusset (Figure 2).
1. This unit is shipped with the Undershelf. The 4 Legs (item 6) are in a separate carton.
2. Remove the unit from the shipping box, and place it upside down (Figure 1).
Tools Required: Philip’s Head Screw Driver, Adjustable Wrench, 5/32” Allen Wrench
(Figure 2)

3WWW.ADVANCETABCO.COM • 800-645-3166
(Figure 3) (Figure 4)
(Figure 5) (Figure 6)
(Figure 7)
4. Insert top of Leg into adjustable shelf corner. Figure 3). Align bottom of Shelf to approx. 6” minimum from bottom of Bullet Foot. Insert Allen Head Set Screws into adjustable shelf corner and tighten (Figure 4).
LEG ASSEMBLY: 5. Install Legs into Leg Gussets (Figure 5 & 6).
6. Secure legs with set screws (Figure 7).

4 WWW.ADVANCETABCO.COM • 800-645-3166
INSTALLING TCB SERIES POLY CUTTING BOARD
CONTENTS:(4) 1/4-20 x 1/2” Screws(2) 10-32 x 3/8” Screws(2) #10 Star Washers(2) 10-32 Acorn Nuts
TOOLS REQUIRED:Philip’s Head Screw DriverAdjustable Wrench
STEP 1:Bolt on Cutting Board Brackets using 1/4-20 x 1/2” Screws (Figure 1). Do not tighten completely.
STEP 2:Place Stainless Steel Shelf on top of brackets (Figure 2).
(Figure 1)
(Figure 2)

5WWW.ADVANCETABCO.COM • 800-645-3166
STEP 3:Connect Shelf to Brackets using two 10-32 x 3/8” Stainless Steel Screws, Washers & Acorn Nuts. Tighten with Wrench.
NOTE: Acorn Nut to be positioned on surface of stainless Steel Shelf (Figure 3).
STEP 4:Place Poly Cutting Board on Shelf by aligning the holes with the Acorn Nuts (Figure 4). Tighten all bolts on the two brackets.
CLEANING INSTRUCTIONS AVAILABLE ONLINE AT
WWW.ADVANCETABCO.COM/SUPPORTAny questions, please contact our customer service at 800-645-3166.
GENERAL INSTALLATION:1. Upon completion of assembly you should fi rst choose a proper location for the unit. Take care when placing unit, do not place unit near any fl ammable or heat sensitive surfaces.2. Each unit comes with a three pronged plug and a 6’ cord. You must plug this hot food table into a matching three pronged outlet. For gas models, see instructions on page 4. 3. For the fi rst time that this unit will be used, you need to turn the knob to high and let it heat up and remain on for 30 minutes. This will burn off any residue on the heating element. Some smoke may appear, this is normal.
(Figure 3)
(Figure 4)

6
WARNING: If the information in this manual is not followed exactly, a fire or explosion may result causing property damage, personal injury or death.
NOTE: All maintenance and repairs should be referred to the authorized representative of Advance Tabco, Inc. or to the qualified local service repairman.
FOLLOW THESE INSTRUCTIONS FOR GAS MODELS ONLY.GAS PIPING: 1. Check all connections and fittings on valves and tubing supplied as a part of this unit to make sure they did not come loose during shipment.2. The installation of this unit must conform with local codes, or in the absence of local codes, with the National Fuel Gas Code, ANS Z223.l/NFPA 54 - latest edition, or the booklet titled “CSA B149.1-10: Natural gas and propane installation code”. This booklet is available from the American Gas Association, 400 North Capitol St., NW, Washington, DC 20001. Natural Gas units (model numbers containing ‘NAT’) should never be connected to propane sources and propane units (model numbers containing ‘LP’) should never be connected to a Natural Gas source. If in doubt contact a certified and experienced installer.3. A manual shut-off valve should be installed between the gas supply system and the gas inlet on the appliance. This item is not included with the unit and must be purchased separately. A gas regulator should be installed on the gas supply line to maintain a 5” WC for Natural Units and/or 11” WC for LP(bottled gas) units. This is in addition to the appliance regulator supplied with the unit. This item is not included and must be purchased separately.4. The appliance and its individual shutoff valve must be disconnected from the gas supply piping system during any pressure testing of that system at test pressures in excess of 1/2 psig (3.45 kPa).5. The appliance must be isolated from the gas supply piping system by closing its individual manual shutoff valve during any pressure testing of the gas supply piping system at pressures equal to or less than 1/2 psig (3.45 kPa).6. Before the initial lighting of this appliance, check for gas leaks by applying a soapy solution to all connections. DO NOT USE AN OPEN FLAME TO CHECK FOR APPLIANCE LEAKS.
VENTILATION: 1. Care should be taken so as not to obstruct the area around the burner or pilot. DO NOT close off the space between the undershelf and lower edge of the body. A minimum of 4 inches air space must be maintained between items stored the undershelf and the burner.2. DO NOT obstruct the ventilation air flow or the combustion air flow. Keep area around the front and the rear of the unit clear.3. This unit must be placed in an area free and clear from combustibles.
CLEARANCES: 1. This appliance is approved for installation on both combustible and noncombustible floors with the clearances listed to the right. 2. Adequate clearances for service, cleaning, and ease of proper operation of this appliance must be allowed.
NON-COMBUSTIBLE & COMBUSTIBLE UNITS
HF SERIESSIDES 1”
REAR 1”
WB & SPWB SERIES
SIDES 1”
REAR 2”
WWW.ADVANCETABCO.COM • 800-645-3166

7
CAUTION: When loading the pans into the wells, do not drop the pans as this may cause the pilot flame or the main burner flame to be extinguished
from the concussion. Always check the pilot and burner flames after loading pans into the wells.
FOLLOW THESE INSTRUCTIONS FOR GAS MODELS ONLY.
LIGHTING INSTRUCTIONS: For The HF & WB Series 1. Turn all control and the main gas valves to the off position. Wait at least 5 minutes before trying to light the pilots. This will allow any gas that has accumulated in the burner compartment to escape.2. After waiting 5 minutes, open the main gas valve and place a lighted match at each pilot and adjust the pilot to a height of at least 5/8 inches. This can be performed by taking a screwdriver and placing it in the pilot adjustment screw slot and turning it. Turn the screw counter clockwise to increase the pilot flame, or clockwise to make decrease it. (See Figure 4)
3. If the pilot extinguishes, repeat the lighting instructions beginning with STEP 1.4. Turn the main burner valve in a counter clockwise direction to the desired setting. If the main burners do not light within 4 seconds, then repeat the light instructions beginning with STEP 1.
For The SPWB Series 1. Turn all manual valves to the off position. Wait at least 5 minutes before trying to light the pilots. This will allow any gas that has accumulated in the burner compartment to escape.2. Depress the reset button while holding a lighted match to the pilot. Keep the button depressed for at least 60 seconds so that the pilot will remain lit.3. Release the reset button, if the pilot does not stay lit, then repeat the lighting instructions beginning with STEP 1 and allow a longer period of time before releasing the button.4. Adjust the pilot flame to a minimum height of at least 5/8 inches. This can be performed by first removing the pilot adjustment screw cap located on the valve. Next turn the pilot adjustment screw to the approximate flame height. Finally, replace the pilot adjustment screw cap.5. If the pilot remains lit, then turn the main burner valve in a counter clockwise direction to the desired setting. If the main burners do not light within 4 seconds, then repeat the light instructions beginning with STEP 1.
Figure 4
WWW.ADVANCETABCO.COM • 800-645-3166

8
FOLLOW THESE INSTRUCTIONS FOR GAS MODELS ONLY.
SHUT-DOWN INSTRUCTIONS:
1. For a nightly shut-down, just turn the main burner manual valve in a clockwise direction to off position.
2. For a seasonal shut· down, tum the main burner manual valve in clockwise direction to off position. Then turn the pilot adjustment screw also in a clockwise direction until the screw is snug and there is no longer a pilot flame.
HEATING INSTRUCTIONS:
For The HF Series 1. Turn the main burner manual valves to the maximum setting for approximately 10 to 20 minutes with the openings covered before the food is placed in the compartment. The pan openings should be covered to prevent the loss of heat.
For The WB & SPWB Series 1. Fill the water compartment with a maximum of 2 inches of HOT water.
2. Turn the main burner manual valves to the maximum setting for approximately 15 to 30 minutes with the opening covered before the pans containing the HOT FOOD are placed in the unit.
3. The height of the burner flame that is required to hold at a desired temperature will vary with different types of operations. Many things will effect this such as room temperature, air movement, amount of food in pan, size of pan, amount of water in unit, and food turn over. Experience, in most cases, will determine the correct setting for your usage.
WWW.ADVANCETABCO.COM • 800-645-3166

9
GAS MANIFOLD ASSEMBLY & PARTS BREAKDOWN
Jet Burner
Oriface Elbow
Gas Convertible Regulator
Burner Gas Tube
Plug Allen HD1/8” NPT
Manifold
Gas Valve
Pilot Assembly Pilot Bracket
Gas Pilot Valve
Plug Allen HD1/8” NPT
1/4” x 36”Copper Tube
Manifold
Gas Valve
Burner Gas Tube
Oriface Elbow
WB Oriface Mounting Bracket
Gas Convertible Regulator
Elbow Street 1/2” Pipe
Tube Burner
Oriface Elbow
PilotUNI 2CH6
Pilot Assembly
Gas PilotValve
Gas Valve
SPWB SERIES WATER BATH HOT FOOD UNIT W/ SAFETY PILOT
WB SERIES WATER BATH HOT FOOD UNIT
HF SERIES DRY HOT FOOD UNIT
WWW.ADVANCETABCO.COM • 800-645-3166
10 WWW.ADVANCETABCO.COM • 800-645-3166
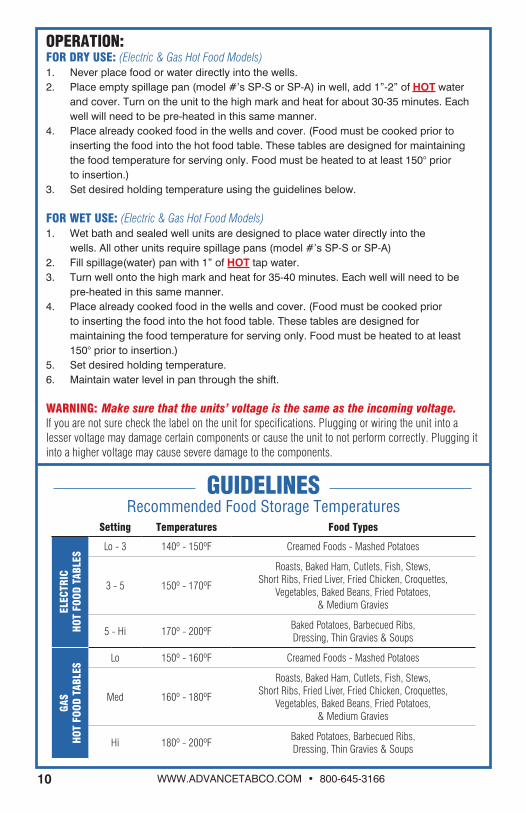
OPERATION:FOR DRY USE: (Electric & Gas Hot Food Models) 1. Never place food or water directly into the wells.2. Place empty spillage pan (model #’s SP-S or SP-A) in well, add 1”-2” of HOT water and cover. Turn on the unit to the high mark and heat for about 30-35 minutes. Each well will need to be pre-heated in this same manner.4. Place already cooked food in the wells and cover. (Food must be cooked prior to inserting the food into the hot food table. These tables are designed for maintaining the food temperature for serving only. Food must be heated to at least 150° prior to insertion.)3. Set desired holding temperature using the guidelines below.
FOR WET USE: (Electric & Gas Hot Food Models) 1. Wet bath and sealed well units are designed to place water directly into the wells. All other units require spillage pans (model #’s SP-S or SP-A)2. Fill spillage(water) pan with 1” of HOT tap water.3. Turn well onto the high mark and heat for 35-40 minutes. Each well will need to be pre-heated in this same manner.4. Place already cooked food in the wells and cover. (Food must be cooked prior to inserting the food into the hot food table. These tables are designed for maintaining the food temperature for serving only. Food must be heated to at least 150° prior to insertion.)5. Set desired holding temperature.6. Maintain water level in pan through the shift.
WARNING: Make sure that the units’ voltage is the same as the incoming voltage. If you are not sure check the label on the unit for specifications. Plugging or wiring the unit into a lesser voltage may damage certain components or cause the unit to not perform correctly. Plugging it into a higher voltage may cause severe damage to the components.
GUIDELINES Recommended Food Storage Temperatures
Setting Temperatures Food Types
ELEC
TRIC
H
OT F
OOD
TABL
ES
Lo - 3 140º - 150ºF Creamed Foods - Mashed Potatoes
3 - 5 150º - 170ºF
Roasts, Baked Ham, Cutlets, Fish, Stews, Short Ribs, Fried Liver, Fried Chicken, Croquettes,
Vegetables, Baked Beans, Fried Potatoes, & Medium Gravies
5 - Hi 170º - 200ºFBaked Potatoes, Barbecued Ribs, Dressing, Thin Gravies & Soups
GAS
HOT
FOO
D TA
BLES
Lo 150º - 160ºF Creamed Foods - Mashed Potatoes
Med 160º - 180ºF
Roasts, Baked Ham, Cutlets, Fish, Stews, Short Ribs, Fried Liver, Fried Chicken, Croquettes,
Vegetables, Baked Beans, Fried Potatoes, & Medium Gravies
Hi 180º - 200ºFBaked Potatoes, Barbecued Ribs, Dressing, Thin Gravies & Soups
ADVANCE TABCO’S LIMITED WARRANTY Thank you for purchasing a top-quality Advance Tabco product. We hope that you will be pleased with your purchase and get many years of productive use from it. We make every effort to ensure that our products are free of defects in workmanship and materials. In the unlikely event that you receive an Advance Tabco product that does not meet your expectations, we offer the following warranty:
General Terms for all Advance Tabco items (including those listed below):• Warranty applies in the 48 contiguous United States only• ALL WARRANTY WORK MUST BE AUTHORIZED BY THE FACTORY BEFORE ANY WORK IS PERFORMED. Work performed without prior authorization shall be covered under this warranty only at the sole discretion of Advance Tabco• At no time will expenses to be paid under warranty exceed the original cost of the item• Routine maintenance and wear items are not covered by warranty. • Repair parts are sent by ground transportation. Any expedited freight charges will be at the expense of the end user• Warranty applies only under conditions of normal use and does not apply to defects which result from negligence, misuse, freight damage, improper installation or accidents.• Warranty does not include any coverage for loss of business, damages, freight or other miscellaneous expenses incurred due to the defect or in servicing the unit.• This warranty is made in lieu of all other warranties express or implied and no additional warranties express or implied, including one of merchantability or fitness for a particular purpose are given.
If defects are the result of freight or handling damage your first recourse MUST be to notify the delivering freight carrier of the damage. If possible any damage should be noted on the delivery receipt at the time of delivery. Defects due to freight damage should be referred to the freight carrier for correction and compensation (this applies regardless of who was responsible for paying the freight charges or selecting the carrier).
Hot food tables are warranted for 12 months from the date of shipment from the factory or 6 months from the date first placed into service (whichever comes first) and include the following terms:• Applies only to parts directly related to the electric or gas components of covered items (see below for all other parts)• Covers parts and labor during the warranty period. Labor performed after hours, as overtime, on weekends or on holidays is not covered by this warranty (end user may authorize and pay such expenses directly to service agency if desired)• Includes travel up to 100 miles round trip or 2 hours of travel time (additional travel will be at the end users expense)
Hot Food Tables are warranted free of defects in workmanship and materials for 90 days from the date of shipment from the factory. Warranty includes parts only (no labor). At Advance Tabco’s discretion we may repair or replace the defective item.
Rev. 12/9/2014
11WWW.ADVANCETABCO.COM • 800-645-3166
Please visit www.advancetabco.com/support for all available replacement parts. Any questions, please contact customer service at 800-645-3166.
REPLACEMENT PARTS For Gas & Electric Hot Food Units

Edgewood, New York 11717-8380
www.advancetabco.com
800-645-3166
®
PLACE PRODUCT INFO LABEL HERE(MODEL & SERIAL NUMBERS)
PRODUCT REGISTRATION IMPORTANT NOTICE: In order to facilitate possible warranty coverage, Advance Tabco strongly encourages you to register your produce online as soon as possible. Be sure to fill in all information requested, including your purchase date and serial number. Registration is not required to receive warranty coverage, but registering will make it easier and faster to provide warranty service, if it becomes necessary.
SCAN FOR EASY ONLINE
REGISTRATION
REGISTER ONLINE BY VISITING
WWW.ADVANCETABCO.COM/REGISTEROR SCAN CODE TO THE RIGHT.
Any questions, please contact our customer service at 800-645-3166.