installation and care instructions - amazon s3 · installation and care instructions 52...
TRANSCRIPT

Vertical ApplicationsHoneycomb Shades
INSTALLATION AND CARE INSTRUCTIONS
52 C8-10-3401•Rev 2/14

2
CONTENTS
INTRODUCTIONThank you for purchasing our Vertical Application product. Your new shade has been custom built for you from the highest quality materials. Once in your window, it will provide you with a lifetime of beauty and trouble-free use.
Getting Started• Remove the shade from the package. Keep the packaging until the shade
operates to your satisfaction. • Locate the packaging label attached to the side or end of the shipping
carton which contains your shade information.• Read these instructions all the way through to acquaint yourself with the
installation procedures.
Introduction ............................................................................................2Before You Begin ....................................................................................3Vertical Application Parts Overview...........................................................4Materials Required ..................................................................................5Tools Required ........................................................................................6Outside Mount Installation ........................................................................7
Outside Mount - Bracket Installation .....................................................8Outside Mount - Headrail Installation .................................................10Outside Mount - Vertical Rails Installation ...........................................10Outside Mount - Stationary Rail Bottom Bracket Attachment ..................18
Inside And Ceiling Mount Installation .......................................................19Inside Mount - Bracket Installation ......................................................20Inside Mount - Headrail Preparation ..................................................22Inside Mount - Headrail Installation ....................................................26Inside Mount - Vertical Rails Installation ..............................................27Inside Mount - Stationary Rail Bottom Bracket Attachment .....................31
Traditional (On The Floor) Inside And Outside Mount Installation.................33Traditional Mount - Bracket Installation ...............................................34Traditional Mount - Rail Preparation/Installation ..................................34Traditional Mount - Headrail Installation .............................................38Traditional Mount - Stationary Rail Bottom Bracket Attachment ..............40
Final Adjustments ..................................................................................43Shade Adjustment ...........................................................................44Valance And Handle(s) Attachment ....................................................46
Care And Cleaning ...............................................................................48Troubleshooting Procedures ....................................................................49
51

3
Left Stack
Right Stack
Center Stack
Split Stack and 2-Fabric Combo
Vertical ApplicationDesign
# StationaryRails
# MovingRails
Install Vertical Rails Into Top RailIn This Order
1. Stationary Rail2. Moving Rail
1. Left Stationary Rail2. Left Moving Rail3. Right Moving Rail4. Right Stationary Rail
1. Stationary Rail2. Moving Rail
1. Left Moving Rail2. Right Moving Rail
1 1
1 1
22
0 2
BEFORE YOU BEGIN
Determine Your Shade TypeInstallation for Vertical Application shades varies based on the design of your shade and the manner in which you are mounting your shade.
Refer to the packaging label to determine each of the following:• Determine which Vertical Application design you are installing: left stack,
right stack, center stack, or split stack (center opening). • Determine if your shade is an inside mount (IB-mounting inside the window
casement), outside mount (OB-mounting outside the window casement), or ceiling mount (IB-mounting directly into the ceiling).
50

4
VERTICAL APPLICATION PARTS OVERVIEW
Left Stack Shown
MountingBracket
Inside MountShim
Aluminum Valance
Headrail
ExtensionBracket
Stationary RailBracket
Cord Tensioner Cord
Cord Tensioner
Stationary RailBottom Bracket
Inside MountAdaptor
Moving Rail
Handle
Moving RailBracket Assembly
End Plate
End Plate
FabricClip
RailClip
Stationary Rail
Snap Pin
ValanceCornerEnd Cap
ValanceReturn
ValanceClip
Lock
49
The installation brackets do not allow enough clearance for the shade (to clear moldings or window cranks).
A fabric carrier needs to be reattached.
TROUBLESHOOTING PROCEDURES
Problem Symptom/Solution
• If the shade does not slide with ease, you may need to adjust the cord tension. Slide the cord tensioner away from the fabric stack slightly to decrease the tension.
• Check that the cord is not pinched.
The shade does not stay in position.
The shade binds or moves with difficulty.
• If the shade does not stay in position, you may need to adjust the cord tension. Slide the cord tensioner toward the fabric stack slightly to increase the tension.
The shade is not vertically aligned. • Adjust the screws on the moving rail. To move the bottom of the rail to the right, loosen the left screw 1/2 turn and tighten the right screw 1/2 turn. To move the bottom of the moving rail to the left, reverse the process and loosen the right screw as you tighten the left.
• Use an extension bracket or spacer blocks for mounting each installation bracket to allow adequate clearance for your shade.
• Place each carrier between a pair of fabric cells.
• Align the hole in the fabric carrier with the hole in the fabric cells.
• Snap the carrier closed by pinching the two pieces of the carrier together from top to bottom.
The cord tensioner does not lock into place.
• Using a small 1/8" flat blade screwdriver, scrape the paint from the inside of the channel used for the cord tensioner.
5
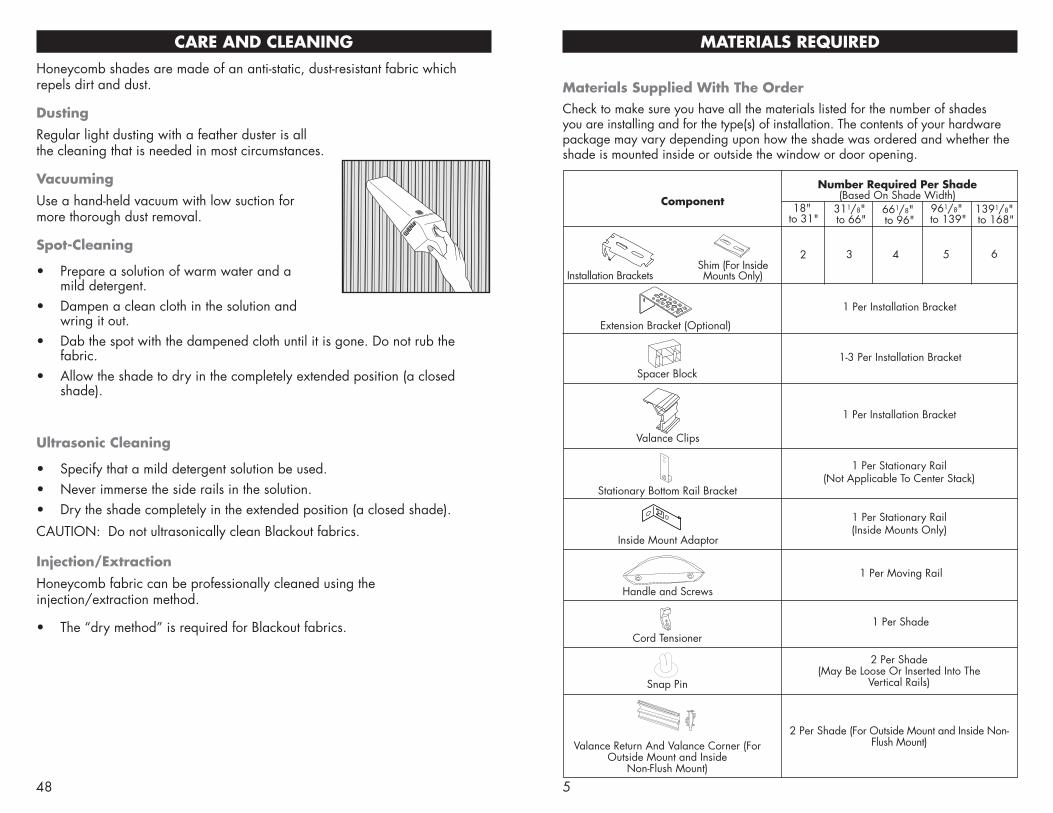
MATERIALS REQUIRED
Materials Supplied With The OrderCheck to make sure you have all the materials listed for the number of shades you are installing and for the type(s) of installation. The contents of your hardware package may vary depending upon how the shade was ordered and whether the shade is mounted inside or outside the window or door opening.
Inside Mount Adaptor
Cord Tensioner
Valance Clips
2 43
Number Required Per Shade (Based On Shade Width)
661/8" to 96"
Component
1 Per Installation Bracket
311/8" to 66"
961/8" to 139"
5
Installation Brackets
18" to 31"
Stationary Bottom Rail Bracket
1 Per Moving Rail
Valance Return And Valance Corner (For Outside Mount and Inside
Non-Flush Mount)
1 Per Stationary Rail(Not Applicable To Center Stack)
1391/8" to 168"
6
2 Per Shade (For Outside Mount and Inside Non-Flush Mount)
1 Per Installation Bracket
1 Per Stationary Rail(Inside Mounts Only)
Handle and Screws
1 Per Shade
Extension Bracket (Optional)
Spacer Block1-3 Per Installation Bracket
Snap Pin
2 Per Shade (May Be Loose Or Inserted Into The
Vertical Rails)
Shim (For Inside Mounts Only)
48
CARE AND CLEANINGHoneycomb shades are made of an anti-static, dust-resistant fabric which repels dirt and dust.
DustingRegular light dusting with a feather duster is all the cleaning that is needed in most circumstances.
Vacuuming
Use a hand-held vacuum with low suction for more thorough dust removal.
Spot-Cleaning
• Prepare a solution of warm water and a mild detergent.
• Dampen a clean cloth in the solution and wring it out.
• Dab the spot with the dampened cloth until it is gone. Do not rub the fabric.
• Allow the shade to dry in the completely extended position (a closed shade).
Ultrasonic Cleaning
• Specify that a mild detergent solution be used.• Never immerse the side rails in the solution.• Dry the shade completely in the extended position (a closed shade).
CAUTION: Do not ultrasonically clean Blackout fabrics.
Injection/Extraction
Honeycomb fabric can be professionally cleaned using the injection/extraction method.
• The “dry method” is required for Blackout fabrics.

6
Mounting Surface Fastener
No. 6 Hex Head Screws (Provided)
Wall Anchors, Expansion Bolts(Not Provided)
Sheet Metal Screws(Not Provided)
Wood
Drywall, Plaster
Metal
Your Vertical Application Shade As Shipped (Left Stack Shown)
TOOLS REQUIRED
• Carpenter’s Level• Flat Blade And Phillips Screwdrivers• Hacksaw• Measuring Tape• Pencil• Scissors• Variable Speed Drill With Assorted Drill Bits
Inside Mount Adaptor (For Inside Mounted
Shades Only)
Cord Tensioner
End Plates
Stationary RailBottom Bracket
Moving Rail Bracket
Moving Rail
Headrail
Stationary Rail Bracket
Roller Clips/Fabric Clips(Attached To Fabric)
Snap Pin
47
FrontOf
Shade
Front
Attach The Handle(s)
• Position the handle so the holes on the flat portion of the handle are aligned with the screw holes on the moving rail. The curve of the handle should face out, away from the fabric.
• Attach each handle to its moving rail using the provided screws. Holes are pre-drilled into each moving rail.
Headrail RemovalShould the need arise, the headrail can be easily removed.
• Remove the valance.• While holding the headrail
assembly, push back on the bottom tab of the mounting bracket to release the bottom edge of the headrail.
• Roll the back of the headrail downward and out from the bracket.
CAUTION: Because the bracket is stiff, the headrail may be difficult to remove. Use a flat blade screwdriver wrapped in a soft cloth. Push the blade against the bottom tab of the mounting bracket and twist slightly to pop the rail off the bracket. Be careful not to scratch the finish on the back of the headrail.

7
OUTSIDE MOUNT INSTALLATION
For inside and ceiling mount installations, see page 19.
For traditional (on the floor) inside and outside mount installations, see page 33.
46
VALANCE AND HANDLE(S) ATTACHMENT
Valance Attachment Attach the valance clips to the headrail.
Slide the valance clip under the bottom lip of the headrail.
Rotate the valance clip up to snap it into place on the headrail.
Keep a minimum of 3" between the end of the headrail and the valance clips.
NOTE: Be sure to avoid areas where the headrail attaches to the installation brackets.
Outside mounts and non-flush inside mounts only: Attach the valance return to the valance.
Use the valance corner end cap and the lock to attach a return to each end of the valance.
NOTE: Use a flat surface to attach the return to the valance.
Slide the valance corner end cap into the valance return.
IMPORTANT: Do not hammer the end cap into the valance return. The end cap will bend.
Place the lock into the circular opening of the valance corner end cap with the prongs facing out.
Using a flat blade screwdriver, turn the lock to the upright position. The tab on the valance corner end cap will stop the lock from turning all the way around.
NOTE: It is normal for the prongs on the lock to separate when the screwdriver is inserted.
Headrail
ValanceClip
ValanceReturnValance
CornerEnd Cap
Valance(Front of Shade) Lock
Valance Corner End Cap
Valance Return (Left Return Shown)
Prong
Once the valance corner end cap is attached to the valance return, repeat the steps to attach the valance corner end cap to the valance.
Insert the top of the valance into the top of the valance clip.
Rotate the valance down to snap it into place onto the headrail.
For wider shades with two-piece valances: Lay the two pieces on a flat surface and butt together.
Attach a valance clip at the seam to hold the two pieces together.
TIP: Tap the valance at each clip to assure that the valance is securely attached to the valance clips and the clips are securely attached to the headrail.

8
Floor Clearance
Top Of Bracket
OrderedShadeHeight
5/8"Minimum
Mount The Brackets
Bracket Spacing
• Measure and mark where to attach the installation brackets. Place installation brackets 8" in from the ends of the shade.
• Space additional brackets evenly between the two end brackets.
Outside MountPlace the top of the mounting bracket a minimum of 5/8" from the top of the window opening.
Note: When mounting to drywall, you must use a wall anchor.
Note: To locate where to place the top of the bracket, take the ordered shade height and add to it the desired floor clearance. The shade height can be found on the packaging label. If no label exists, contact your dealer.
• Use a carpenter’s level to ensure that the brackets are level and aligned.
OUTSIDE MOUNT — BRACKET INSTALLATION
Space Evenly Space Evenly8" 8"
Installation Brackets
45
Adjust The Vertical Alignment
Check to see if the vertical rail is aligned. If not, locate the adjusting lever on the moving rail bracket.
Tip: When adjusting the moving rail, it is much easier to adjust if the cord tension is minimal. To fine-tune the adjustments, do not loosen the tension. Loosen the tension to make large angle adjustments only.
To Adjust The Bottom End Of The Moving Rail To The Right:Loosen the left screw 1/2 turn, then tighten the right screw 1/2 turn. Repeat until the shade is properly aligned.
To Adjust The Bottom Of The Moving Rail To The Left:Loosen the right screw 1/2 turn, then tighten the left screw 1/2 turn. Repeat until the shade is properly aligned.
After adjustment, tighten both screws completely.

9
SpacerBlocks
11/8"Minimum
ExtensionBracket
Outside Mount With Spacer Blocks
Each spacer block projects installation brackets 1/2" away from the mounting surface. Spacer blocks can be useful for above-trim installations.
Place the top of the spacer block a minimum of 11/8" from the top of the window opening.
• Position each spacer block with the solid side facing the mounting surface.
• Mounting screws should be long enough to secure the bracket to the mounting surface.
• Use a maximum of three spacer blocks per bracket.Note: When mounting to drywall, you must use a wall anchor. The
supplied screws are not long enough for use with spacer blocks. Please make sure the screws used are long enough to mount the rail securely.
Note: To locate where to place the top of the bracket, review the information under “Outside Mount,” bottom of page 8.
Outside Mount With Extension BracketsExtension brackets project installation brackets up to 2 1/2" away from the mounting surface, allowing additional clearance for obstructions such as window cranks, handles, and moldings.
• Use a hacksaw to shorten extension brackets at indentations, if needed.
• Use two screws to mount extension brackets.
Note: When mounting to drywall, you must use a wall anchor.
Note: To locate where to place the top of the bracket, review the information under “Outside Mount,” bottom of page 8.
• Level and align brackets with a carpenter’s level.
• Attach installation brackets to the underside of extension brackets using the machine screws and speed nuts provided.
44
SHADE ADJUSTMENT
Slip Knot
1.Remove Excess Cord
1. Pull on the end of the cord at the cord tensioner to release the slip knot.
2. Pull cord to create tension.
3. Re-tie a knot at the cord tensioner.
4. Trim the excess cord.
Adjust The Cord Tension
Test The ShadeMove the moving rail to check the shade tension. The moving rail should slide easily, yet there should be enough cord tension to hold the shade in place at any position.
• Decrease the cord tension if the moving rail does not move smoothly.
• Increase the cord tension if the rail does not hold its position.
Adjust The Cord Tension• To tension: slide the cord
tensioner away from the end plate until you feel resistance.
• Continue to slide the cord in 1” increments to make the moving rail hold its position. Repeat if necessary.
2. 3.
Cord Tensioner
Top Rail

10
OUTSIDE MOUNT — VERTICAL RAILS INSTALLATIONPrepare The Rails
Side Stack (Left And Right) And Split Stack
Install The Stationary Rail Bottom BracketNote: Do not insert the bracket completely.
Leave at least 1/4" of the bracket showing below the stationary rail.
Insert the stationary rail bottom bracket into the bottom of the stationary rail. (For split stack, insert a bottom bracket into each stationary rail.) The base of the bottom bracket should extend toward the window.
Front OfShade
MountingBracket
Top Rail
Install The Headrail Note: The headrail will not slide
in the mounting brackets once installed.
• Measure and mark the centerpoint on the mounting surface.
• Measure and mark the headrail’s centerpoint.
• Align the headrail to the matching marks, then install.~ Slip the headrail into the
installation brackets so the front of the bracket slides under the front groove on the top of the rail.
~ Gently roll the back of the headrail up and push back to snap into place.
OUTSIDE MOUNT — HEADRAIL INSTALLATION
StationaryRail
Base
Stationary Rail Bottom Bracket
Front Of Shade(Left Stack Illustrated)
The Base ShouldExtend Toward The Window.
43
FINAL ADJUSTMENTS

11
Assemble The Moving Rail(s)Side Stack (Left And Right)
Insert the moving rail bracket into the moving rail.
• If attached, remove the snap pin located in the moving rail.
• Slide the moving rail bracket into the moving rail.
• Replace the snap pin through both the moving rail and the moving rail bracket.
Center StackInsert both moving rail brackets into the moving rails.
• Remove both snap pins located in each moving rail.
• Slide the moving rail bracket into the moving rail.
• Replace the snap pins through both the moving rail and the moving rail bracket.
Split Stack
Insert both moving rail brackets into the moving rails (as shown above).
• Remove both snap pins located in each moving rail.
• Slide the moving rail bracket into the moving rail.
• Replace the snap pins through both the moving rail and the moving rail bracket.
42

12
Front OfHeadrail
(Left StackIllustrated)
End Plate
Side Stack (Left And Right)
1. Remove the end plate from the stationary side of the headrail, if attached (for a left stack, remove the left end plate; for a right stack, remove the right end plate).
2. Pick up the rails and fabric as one unit and slide the rollers of the moving rail bracket onto the rear track of the headrail.
3. Slide the rail clips onto the appropriate groove in the front track.• 3/4" fabric – back groove
Install The Vertical Rails
3/4" Fabric Back Groove
41
Inside Mount
Side Stack (Left And Right) And Split Stack
• Use a carpenter’s level to ensure the stationary rail is exactly vertical when viewed from both the front and the side.
• Secure the screw through the bracket and into the bottom of the mounting surface. See the next step if you ordered your shade with a cut-out or you prefer to secure the rail to the side.
Use the inside mount adaptor to secure the stationary rail to the side of the casement.
Note: If you ordered your shade with a cut-out, such as for baseboards or other obstructions, you must use the inside mount adaptor.
• Align the screw hole of the adaptor to face the window casement (or wall). Slide the inside mount adaptor onto the stationary rail bottom bracket.
• Secure a screw through the inside mount adaptor and into the casement.
Bottom Bracket
StationaryRail
InsideMount
Adaptor
StationaryRail
BottomBracket

13
CordTensioner
FrontOfTop Rail
EndPlate
4. Install the stationary rail.• The stationary rail bracket
has two slots at the top. The back tracks of the headrail fit into these slots.
• Insert the bracket into the back track of the headrail as shown. Twist the rail 90º to lock it in place.
• Make sure the bracket aligns with the end of the headrail.
5. Install the cord tensioner.• Unwind the cord from the
end plate.• Slide the cord tensioner into
the channel at the front of the headrail.
Note: You will adjust the cord tensioner later.
6. Attach the stationary rail side end plate.
7. Attach the moving rail side end plate.
40
TRADITIONAL MOUNT — STATIONARY RAIL BOTTOM BRACKET ATTACHMENT
Outside Mount
Side Stack (Left And Right) And Split Stack
• Use a carpenter’s level to ensure that the stationary rail is exactly vertical when viewed from both the front and the side.
• Secure the screw through the bracket and into the mounting surface.
• You may use an extension bracket to mount the stationary rail away from the wall. An extension bracket may be necessary if you used spacer blocks with the mounting brackets.
Stationary Rail Bottom Bracket
StationaryRail
ExtensionBracket
(Side View)
Top Of Stationary Rail Bracket

14
Center Stack
1. Pick up all the rails and fabric and slide the rollers of the right moving rail onto the left side of the headrail.
2. Slide the rail clips onto the appropriate front track in the headrail.• 3/4" fabric – back groove
3. Slide the left moving rail bracket into the headrail.
4. Install the left end plate.
3/4" Fabric Back Groove
39
Inside Mount — Headrail Installation
Front OfShade
MountingBracket
Headrail
Front OfShade
UP
BACK
1.
2.
Shim
Valance Attachment
Attach the valance clips to the headrail.
• Slide the valance clip under the bottomlip of the headrail.
• Rotate the alance clip up to snap it into place on the headrail.
• Keep a minimum of 3" betwen the end of the headrail and the valance clips.
NOTE: Be sure to avoid areas where the headrail attaches to the installation brackets.
Install The Headrail
• Gather up all the rails and fabric as one unit.
• Hold the headrail parallel to the installation brackets. The front of the brackets should be under the front groove on the top of the rail.
1) Push the headrail straight up.
2) Slide the headrail into the brackets until they click.

15
5. Install the cord tensioner.• Unwind the cord and spring
from the right end plate.• Slide the cord tensioner into
the channel at the front of the headrail.
• Attach the right end plate.
Note: You will adjust the cord tensioner later.
Split Stack
1. Remove the left end plate from the headrail.
2. Insert the center pull plate in the center channel and screw in at the center point of the headrail. (The illustration at right references the placement of the center pull plate in the center groove. It still needs to be centered in the headrail before screwing down.)
CordTensioner
Spring
FrontOfTop Rail
EndPlate
Front OfHeadrail
(Left StackIllustrated)
End Plate
38
Front OfShade
MountingBracket
Top Rail
Install The Headrail Note: The headrail will not slide
in the mounting brackets once installed.
• Measure and mark the centerpoint on the mounting surface.
• Measure and mark the headrail’s centerpoint.
• Gather up all the rails and fabric as one unit.
• Align the headrail mark to the matching mark on the mounting surface, then install.~ Slip the headrail into the
installation brackets so the front of the bracket slides under the front groove on the top of the rail.
~ Gently roll the back of the headrail up and push back to snap into place.
TRADITIONAL MOUNT — HEADRAIL INSTALLATION
Outside Mount — Headrail Installation
6. Install the cord tensioner.• Unwind the cord and spring
from the right end plate.• Slide the cord tensioner into
the channel at the front of the headrail.
• Attach the right end plate.
Note: You will adjust the cord tensioner later.
7. Attach the other end plate.

16
3. Pick up the left set of rails and fabric and slide the rollers of the moving rail bracket onto the rear track of the headrail.
4. Slide the rail clips onto the appropriate front track in the headrail.• 3/4" fabric – back groove
5. Install the stationary rail.• The stationary rail bracket
has two slots at the top. The back tracks of the headrail fit into these slots.
• Insert the bracket into the back track of the headrail as shown. Twist the rail to lock it in place.
Top Of Stationary Rail Bracket
3/4" Fabric Back Groove
37
5. Install the stationary rail (Left/Right Stack and Split Stack).• The stationary rail bracket
has two slots at the top. The back tracks of the headrail fit into these slots.
• Insert the bracket into the back track of the headrail as shown. Twist the rail 90º to lock it in place.
• Make sure the bracket aligns with the end of the headrail.
Note: It may be necessary to use a screwdriver and mallet to move the bracket to the end of the headrail.
6. Attach the stationary rail side end plate.

17
CordTensioner
FrontOfTop Rail
EndPlate
• Make sure the bracket aligns with the end of the headrail.
Note: It may be necessary to use a screwdriver and mallet to move the bracket to the end of the headrail.
6. Install the left end plate.
7. Install the right fabric panel and stationary rails using the previously described process (Steps 3 - 6).
8. Install the cord tensioner.• Unwind the cord from the
end plate.• Slide the cord tensioner into
the channel at the front of the headrail.
9. Attach the right end plate.
Note: You will adjust the cord tensioner later.
36
3/4" Fabric Back Groove
1. Remove the end plate from the stationary side of the headrail, if attached. For a Left Stack, remove the left end plate; for a Right Stack, remove the right end plate.
Split Stack
2. Insert the center pull plate in the center channel and screw in at the center point of the headrail. (The illustration at right references the placement of the center pull plate in the center groove. It still needs to be centered in the headrail before screwing down.)
3. Gather all the rails and fabric and slide the rollers of the moving rail bracket onto the rear track of the headrail.
4. Slide the rail clips onto the appropriate groove in the front track.• 3/4" fabric – back groove
Front OfHeadrail
(Left StackIllustrated)
End Plate

18
OUTSIDE MOUNT — STATIONARY RAIL BOTTOM BRACKET ATTACHMENT
Secure The Stationary Rails
Side Stack (Left And Right) And Split Stack
• Use a carpenter’s level to ensure that the stationary rail is exactly vertical when viewed from both the front and the side.
• Secure the screw through the bracket and into the mounting surface.
• You may use an extension bracket to mount the stationary rail away from the wall. An extension bracket may be necessary if you used spacer
blocks with the mounting brackets.
Go to page 43 for Final Adjustments.
Stationary Rail Bottom Bracket
StationaryRail
ExtensionBracket
(Side View)
35
Assemble The Moving Rail(s)Side Stack (Left And Right)
Insert the moving rail bracket into the moving rail.
• If attached, remove the snap pin located in the moving rail.
• Slide the moving rail bracket into the moving rail.
• Replace the snap pin through both the moving rail and the moving rail bracket.
Center Stack Insert both moving rail brackets into the moving rails.
• Remove both snap pins located in each moving rail.
• Slide the moving rail bracket into the moving rail.
• Replace the snap pins through both the moving rail and the moving rail bracket.
Split Stack
Insert both moving rail brackets into the moving rails (as shown above).
• Remove both snap pins located in each moving rail.
• Slide the moving rail bracket into the moving rail.
• Replace the snap pins through both the moving rail and the moving rail bracket.

19
INSIDE AND CEILING MOUNT INSTALLATION
34
TRADITIONAL MOUNT — BRACKET INSTALLATION
Note: For Outside Mounts: Follow the instructions on page 8-9, for installing the installation brackets.
Note: For Inside Mounts: Follow the instructions on page 20-21 for installing the installation brackets.
Note: Larger installations will require two people.
TRADITIONAL MOUNT — RAIL PREPARATION
Prepare the Rails
Gather and layout all the components for installation on a clean, cloth covered surface.
Side Stack (Left And Right) And Split Stack
Install The Stationary Rail Bottom Bracket
Note: Do not insert the bracket completely. Leave at least 1/4" of the bracket showing below the stationary rail.
Insert the stationary rail bottom bracket into the bottom of the stationary rail. (For split stack, insert a bottom bracket into each stationary rail.) The base of the bottom bracket should extend toward the window.
Note: Do not attach the bracket to the mounting surface at this time.

20
Space Evenly Space Evenly8" 8"
Installation Brackets
INSIDE MOUNT — BRACKET INSTALLATION
Mount The Brackets
Bracket Spacing
• Measure and mark where to attach the installation brackets. Place installation brackets 8" in from the ends of the shade.
• Space additional brackets evenly between the two end brackets.
Attach the Bracket Shim
• Attach the shim to the top of the mounting bracket. It snaps on and is held in place by the screw holes.
Note: The shim is necessary for the valance installation.
• Mount each bracket with an attached shim at the previously marked location.
• Use a carpenter’s level to ensure that the brackets are level and aligned.
33
TRADITIONAL (ON THE FLOOR)
INSIDE AND OUTSIDE MOUNT INSTALLATION

21
8"
See ChartFor Depth
Fabric Pleat Size
Minimum DepthRequired For
Fully RecessedMount
Minimum DepthRequired ForInside Mount
¾"
Valance Type
Aluminum 35/8"3/4"
Inside Mount/Ceiling Mount
• Position the installation brackets so the tops of the brackets attach to a flat horizontal surface.
• Measure and mark all bracket locations. Use the chart below for your measurements.
• Use a carpenter’s level to ensure that the brackets are level and aligned.
Note: When mounting to drywall, you must use a wall anchor.
32

22
Center Pull Plate(In The Headrail)
Moving Rail Bracket
Moving Rail Bracket
Moving Rail Bracket
Moving Rail Bracket
Rail Clips
Rail Clips
Spring
Rail Clips
End Plate
End Plate
End Plate
Headrail
Rail Clips
Stationary Side End Plate
Headrail
Headrail
Headrail
INSIDE MOUNT — HEADRAIL PREPARATION
Install The Components Into The Headrail
Side Stack - Left Stack
See the illustration at right for the order of components as they are installed in the headrail.
1. Detach the rail clips from the fabric clips. To detach, twist the rail clip while holding the base of the fabric clip in place.
Note: Should the rail clip become slightly open, gently squeeze the prongs back together.
RailClip Fabric
Clip
31
INSIDE MOUNT — STATIONARY RAIL BOTTOM BRACKET ATTACHMENT
Secure The Stationary Rail(s)
Side Stack (Left And Right) And Split Stack
• Use a carpenter’s level to ensure the stationary rail is exactly vertical when viewed from both the front and the side.
• Secure the screw through the bracket and into the bottom of the mounting surface. See the next step if you ordered your shade with a cut-out or you prefer to secure the rail to the side.
Use the inside mount adaptor to secure the stationary rail to the side of the casement.
Note: If you ordered your shade with a cut-out, such as for baseboards or other obstructions, you must use the inside mount adaptor.
• Align the screw hole of the adaptor to face the window casement (or wall). Slide the inside mount adaptor onto the stationary rail bottom bracket.
• Secure a screw through the inside mount adaptor and into the casement.
23
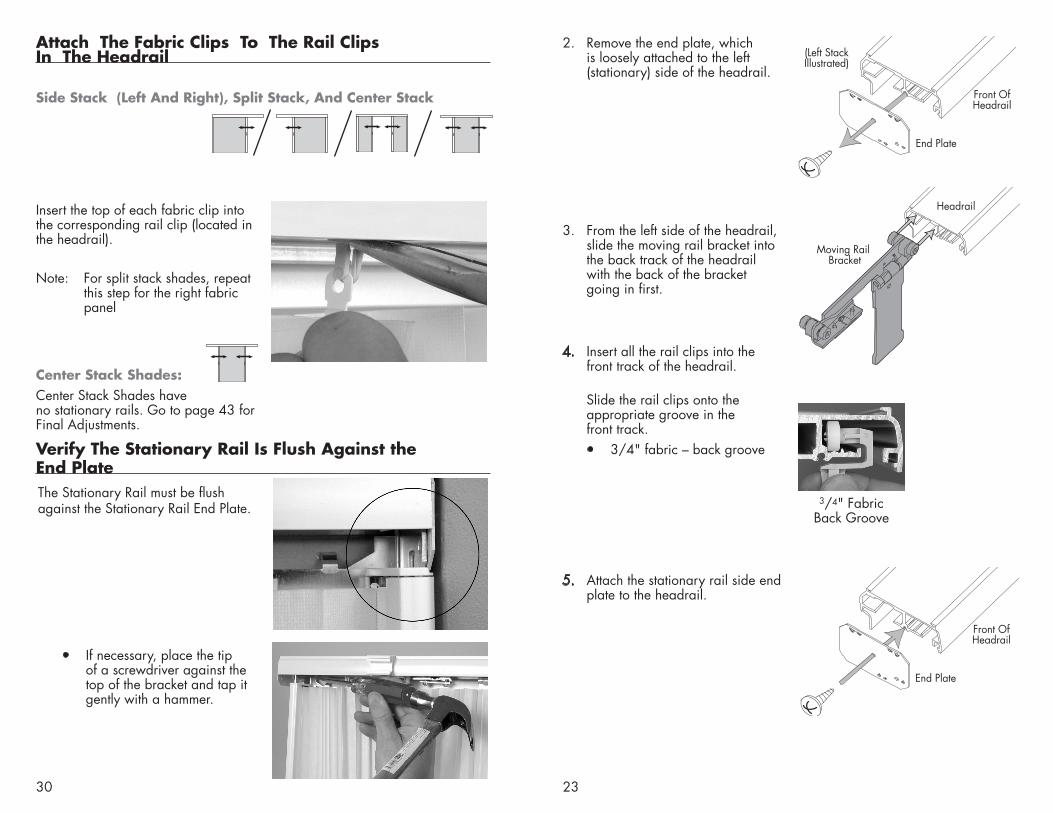
2. Remove the end plate, which is loosely attached to the left (stationary) side of the headrail.
3. From the left side of the headrail, slide the moving rail bracket into the back track of the headrail with the back of the bracket going in first.
4. Insert all the rail clips into the front track of the headrail.
Slide the rail clips onto the appropriate groove in the front track.• 3/4" fabric – back groove
5. Attach the stationary rail side end plate to the headrail.
Front OfHeadrail
(Left StackIllustrated)
End Plate
Headrail
Moving Rail Bracket
3/4" Fabric Back Groove
Front OfHeadrail
End Plate
30
Attach The Fabric Clips To The Rail Clips In The Headrail
Side Stack (Left And Right), Split Stack, And Center Stack
Insert the top of each fabric clip into the corresponding rail clip (located in the headrail).
Note: For split stack shades, repeat
this step for the right fabric panel
Center Stack Shades:Center Stack Shades have no stationary rails. Go to page 43 for Final Adjustments.
The Stationary Rail must be flush against the Stationary Rail End Plate.
• If necessary, place the tip of a screwdriver against the top of the bracket and tap it gently with a hammer.
Verify The Stationary Rail Is Flush Against the End Plate

24
Center Pull Plate(In The Headrail)
Moving Rail Bracket
Moving Rail Bracket
Moving Rail Bracket
Moving Rail Bracket
Rail Clips
Rail Clips
Spring
Rail Clips
End Plate
End Plate
End Plate
Headrail
Rail Clips
Stationary Side End Plate
Headrail
Headrail
Headrail
CordTensioner
FrontOfTop Rail
EndPlate
6. Unwind the cord wrapped around the right end plate. The cord tensioner is attached to the end of the cord.
7. Slide the cord tensioner down the cord tensioner slot on the right end of the headrail.
8. Screw the right end plate onto the headrail.
Side Stack - Right Stack
Follow the steps starting on page 22, except install the components on the right side of the shade and the cord tensioner on the left side of the shade. See the illustration at right for the order of components as they are installed in the headrail.
29
Install The Moving Rail Bracket(s)
Side Stack (Left And Right), Split Stack, And Center Stack
Slide the moving rail bracket (located in the headrail) into the moving rail.
• Remove the snap pin, located in the moving rail or loose in the parts bag.
• Slide the moving rail bracket into the moving rail.
Note: The moving rail bracket is hinged to allow easier access for attaching it to the moving rail.
• Replace the snap pin through both the moving rail and the moving rail bracket.
Note: For center stack and split stack shades, repeat this step for the right moving rail.

25
Center Pull Plate(In The Headrail)
Moving Rail Bracket
Moving Rail Bracket
Moving Rail Bracket
Moving Rail Bracket
Rail Clips
Rail Clips
Spring
Rail Clips
End Plate
End Plate
End Plate
Headrail
Rail Clips
Stationary Side End Plate
Headrail
Headrail
Headrail
Center Pull Plate(In The Headrail)
Moving Rail Bracket
Moving Rail Bracket
Moving Rail Bracket
Moving Rail Bracket
Rail Clips
Rail Clips
Spring
Rail Clips
End Plate
End Plate
End Plate
Headrail
Rail Clips
Stationary Side End Plate
Headrail
Headrail
Headrail
Center Stack
Follow the steps starting on page 22. See the illustration at right for the order of components as they are installed in the headrail.
Split StackFollow the steps starting on page 22. See the illustration at right for the order of components as they are installed in the headrail.
28
Install The Vertical Rails
Top Of Stationary Rail Bracket
Side Stack (Left And Right) And Split Stack
Install The Stationary Rail(s)
1. Side Stack: Pick up all the rails and fabric as one unit.
Split Stack: Pick up all the left panel rails and fabric as one unit, repeat with the right panel of rails and fabric.
2. Install the stationary rail.• The stationary rail bracket
has two slots at the top. The back tracks of the headrail fit into these slots.
• Insert the bracket into the back track of the headrail. Twist the rail 90º to lock it in place.
Tip: Install the stationary rail as close to the end of the headrail as possible.

26
INSIDE MOUNT — HEADRAIL INSTALLATION
Valance AttachmentAttach the valance clips to the headrail.
• Slide the valance clip under the bottomlip of the headrail.
• Rotate the alance clip up to snap it into place on the headrail.
• Keep a minimum of 3" betwen the end of the headrail and the valance clips.
NOTE: Be sure to avoid areas where the headrail attaches to the installation brackets.
Install The Headrail
• Hold the headrail parallel to the installation brackets. The front of the brackets should be under the front groove on the top of the rail.
1) Push the headrail straight up.
2) Slide the headrail into the brackets until they click.
Front OfShade
MountingBracket
Headrail
Front OfShade
UP
BACK
1.
2.
Shim
27
INSIDE MOUNT — VERTICAL RAILS INSTALLATION
Preparing The Vertical Rails
Side Stack (Left And Right) And Split Stack
Install The Stationary Rail Bottom BracketNote: Do not insert the bracket
completely. Leave at least 1/4" of the bracket showing below the stationary rail.
Insert the stationary rail bottom bracket into the bottom of the stationary rail. (For split stack, insert a bottom bracket into each stationary rail.) The base of the bottom bracket should extend toward the window.Note: Do not attach the bracket
to the mounting surface at this time.
Center StackCenter Stack shadings do not have stationary rails. Skip this section and go to page 29, Install The Moving Rail Bracket(s).
StationaryRail
Base
Stationary Rail Bottom Bracket
Front Of Shade(Left Stack Illustrated)
The Base ShouldExtend Toward The Window.