installation and configuration guide - oracle · internet explorer compatibility view settings for...
TRANSCRIPT
Oracle® Smart View for OfficeInstallation and Configuration Guide
Release 11.1.2.5.810F10364-03March 2019
Oracle Smart View for Office Installation and Configuration Guide, Release 11.1.2.5.810
F10364-03
Copyright © 2004, 2019, Oracle and/or its affiliates. All rights reserved.
Primary Author: EPM Information Development Team
This software and related documentation are provided under a license agreement containing restrictions onuse and disclosure and are protected by intellectual property laws. Except as expressly permitted in yourlicense agreement or allowed by law, you may not use, copy, reproduce, translate, broadcast, modify,license, transmit, distribute, exhibit, perform, publish, or display any part, in any form, or by any means.Reverse engineering, disassembly, or decompilation of this software, unless required by law forinteroperability, is prohibited.
The information contained herein is subject to change without notice and is not warranted to be error-free. Ifyou find any errors, please report them to us in writing.
If this is software or related documentation that is delivered to the U.S. Government or anyone licensing it onbehalf of the U.S. Government, then the following notice is applicable:
U.S. GOVERNMENT END USERS: Oracle programs, including any operating system, integrated software,any programs installed on the hardware, and/or documentation, delivered to U.S. Government end users are"commercial computer software" pursuant to the applicable Federal Acquisition Regulation and agency-specific supplemental regulations. As such, use, duplication, disclosure, modification, and adaptation of theprograms, including any operating system, integrated software, any programs installed on the hardware,and/or documentation, shall be subject to license terms and license restrictions applicable to the programs.No other rights are granted to the U.S. Government.
This software or hardware is developed for general use in a variety of information management applications.It is not developed or intended for use in any inherently dangerous applications, including applications thatmay create a risk of personal injury. If you use this software or hardware in dangerous applications, then youshall be responsible to take all appropriate fail-safe, backup, redundancy, and other measures to ensure itssafe use. Oracle Corporation and its affiliates disclaim any liability for any damages caused by use of thissoftware or hardware in dangerous applications.
Oracle and Java are registered trademarks of Oracle and/or its affiliates. Other names may be trademarks oftheir respective owners.
Intel and Intel Xeon are trademarks or registered trademarks of Intel Corporation. All SPARC trademarks areused under license and are trademarks or registered trademarks of SPARC International, Inc. AMD, Opteron,the AMD logo, and the AMD Opteron logo are trademarks or registered trademarks of Advanced MicroDevices. UNIX is a registered trademark of The Open Group.
This software or hardware and documentation may provide access to or information about content, products,and services from third parties. Oracle Corporation and its affiliates are not responsible for and expresslydisclaim all warranties of any kind with respect to third-party content, products, and services unless otherwiseset forth in an applicable agreement between you and Oracle. Oracle Corporation and its affiliates will not beresponsible for any loss, costs, or damages incurred due to your access to or use of third-party content,products, or services, except as set forth in an applicable agreement between you and Oracle.
Contents
Documentation Accessibility
Documentation Feedback
1 Welcome to Smart View Installation and Configuration
2 Installing Smart View
About Installing Smart View 2-1
Installation Guidelines 2-1
Installation and Windows Access Control Settings 2-2
Installer Language 2-3
Microsoft .NET Framework Support 2-3
BiDi Support in Installer 2-3
Upgrading from Smart View 11.1.1.3.x or Earlier 2-3
Oracle BI EE Extension Users: Upgrading from Smart View 11.1.2.5.500 orEarlier 2-3
Oracle BI EE Version Requirement for Multiple Connection and View DesignerFeatures 2-4
Planning Offline Support 2-4
Installing from My Oracle Support or Oracle Technology Network 2-4
Installing Browser Add-ons 2-6
Installing by Autodeployment in EPM System 2-7
Server Setup 2-7
Client Installation 2-9
Installing from EPM Workspace 2-10
Workspace Setup 2-10
Client Installation 2-10
Installing from Oracle BI EE 2-11
Configuring the BI Home Page 2-11
Installing from the BI Home Page 2-12
Running Command Line or Silent Installations 2-13
iii
Installing Smart View from the Command Line 2-14
Installing Smart View Silently 2-14
Installing Smart View Extensions Silently 2-15
Registry Settings to Reduce Timeouts and Flickering 2-15
Downloading Help for Local or Web Server Installation 2-16
Uninstalling Smart View 2-17
3 Administering Extension Installations and Updates
About Extension Installations and Updates 3-1
Configuring Manual Extension Updates 3-2
Manual Update XML Defined 3-4
Manual Update XML Example 3-6
Configuring Auto-Update Extensions 3-6
Auto-Update XML Defined 3-6
Auto-Update XML Example 3-7
Downloading Extensions From Microsoft Internet Explorer 3-8
Administering Extensions When Using Mozilla Firefox 3-8
4 Accessing Shared Connections from an XML File
About Accessing Shared Connections from an XML File 4-1
Setting Up the Shared Connections XML File 4-2
Connection File Syntax and Example 4-6
Connection File Syntax 4-7
Connection File Example 4-8
5 Installing and Configuring Help Locally or on a Web Server
About Installing Help Locally or on a Web Server 5-1
Setting Up Help Locally or on a Web Server 5-1
Optional Local Help Configuration via the Shared Connections XML File 5-4
6 Tips and Troubleshooting
Diagnostics Tools and Health Check 6-2
Installation and Languages 6-3
Windows, Office, and Smart View Locale Settings 6-3
Office .NET Installation Option Requirement 6-4
Microsoft Office 365 ProPlus Support 6-4
Installing in Program Files Folder on Windows 10 6-4
Installing a Pre 11.1.2.5.510 Version of Smart View 6-4
iv

VBA Function Error for Oracle Analytics Cloud or Oracle BI EE 6-5
Disclosure Management Autodeployment Issue 6-5
Failure Connecting to Oracle Analytics Cloud 6-6
Smart View Ribbon Fails to Display After Non-Admin Installation on Windows 10 6-7
Error When First Launching Excel After Installing Smart View 6-8
Issues When Starting Excel in Automation Mode 6-9
Enabling and Disabling Smart View and Other Office Add-ins 6-10
Extension Installation from EPM Cloud and Message Window Focus 6-12
Extension Updates and Office Applications Remaining Open 6-13
Slowness with Extension Options Dialog Box 6-13
Office Slow to Start when Internet Connectivity is Not Available 6-13
Excel Process Stops Responding (Hangs) on Shut Down 6-14
Extension Updates and Outlook 6-14
Enabling the Smart View Extension for Firefox 6-15
Uninstallation Process Stops Responding 6-16
Excel Looks for HsTbar.xml File After Uninstall 6-16
Internet Explorer Compatibility View Settings for Financial Reporting 6-17
Web Launch with Internet Explorer in Protected Mode 6-18
Working with Custom HTML-based Login Forms 6-19
Browser Settings When Working with XML Files on HTTP Server 6-19
Flickering Issues on Office 2013 and Office 2016 6-20
Disable Window Transitions (DisableWindowTransitionsOnAddinTaskPanes) 6-20
Disable Office Animations (DisableAnimations) 6-21
Transition Navigation Keys Not Supported 6-21
Smart View HTTP Session Timeout 6-22
Duplicate Queries in Word Slow to Refresh 6-23
Issues with Dynamic Data Exchange Option in Excel 6-25
Performance and Memory Usage Considerations for Smart View with Excel 6-26
Unbalanced Loads in Provider Services Clustered Environments 6-27
Two-Way SSL and Problematic Certificates 6-27
v
Documentation Accessibility
For information about Oracle's commitment to accessibility, visit the OracleAccessibility Program website at http://www.oracle.com/pls/topic/lookup?ctx=acc&id=docacc.
Access to Oracle Support
Oracle customers that have purchased support have access to electronic supportthrough My Oracle Support. For information, visit http://www.oracle.com/pls/topic/lookup?ctx=acc&id=info or visit http://www.oracle.com/pls/topic/lookup?ctx=acc&id=trsif you are hearing impaired.
Documentation Accessibility
vi

Documentation Feedback
To provide feedback on this documentation, send email to [email protected],or, in an Oracle Help Center topic, click the Feedback button located beneath theTable of Contents (you may need to scroll down to see the button).
Follow EPM Information Development on these social media sites:
LinkedIn - http://www.linkedin.com/groups?gid=3127051&goback=.gmp_3127051
Twitter - http://twitter.com/hyperionepminfo
Facebook - http://www.facebook.com/pages/Hyperion-EPM-Info/102682103112642
Google+ - https://plus.google.com/106915048672979407731/#106915048672979407731/posts
YouTube - https://www.youtube.com/oracleepminthecloud
vii
1Welcome to Smart View Installation andConfiguration
This help includes topics on these subjects:
• Installing Oracle Smart View for Office
• Administering extensions
• Configuring shared connections in an XML file
• Configuring locally-installed help
• Troubleshooting tips
• Limitations
To find information in this help, click Contents or Search in the left frame.
1-1
2Installing Smart View
Related Topics
• About Installing Smart View
• Installation Guidelines
• Installing from My Oracle Support or Oracle Technology Network
• Installing Browser Add-ons
• Installing by Autodeployment in EPM System
• Installing from EPM Workspace
• Installing from Oracle BI EE
• Running Command Line or Silent Installations
• Downloading Help for Local or Web Server Installation
• Uninstalling Smart View
About Installing Smart ViewOracle Smart View for Office uses a single installer for 64-bit and 32-bit versions ofMicrosoft Office, starting with release 11.1.2.5.
Late-breaking information about the Smart View installation is provided in the OracleSmart View for Office Readme. You should thoroughly review this chapter along withthe information in the readme before installing Smart View.
Late-breaking information about installing client products in Oracle EnterprisePerformance Management Cloud environments is provided in the What's Newdocument for each service. Review this information thoroughly before installing clientproducts.
Late-breaking information about the installation of Oracle Enterprise PerformanceManagement System products is provided in the Oracle Enterprise PerformanceManagement System Installation and Configuration Readme. Review this informationthoroughly before installing EPM System products.
Installation GuidelinesRelated Topics
• Installation and Windows Access Control Settings
• Installer Language
• Microsoft .NET Framework Support
• BiDi Support in Installer
• Upgrading from Smart View 11.1.1.3.x or Earlier
2-1

• Oracle BI EE Extension Users: Upgrading from Smart View 11.1.2.5.500 or Earlier
• Oracle BI EE Version Requirement for Multiple Connection and View DesignerFeatures
• Planning Offline Support
Installation and Windows Access Control SettingsStarting with the 11.1.2.5.400 release, you can install Oracle Smart View for Office asa System user or as a non-admin user.
Windows User Access Control (UAC) settings can affect Smart View installation. Forinformation on setting UAC, see the Microsoft Windows documentation.
Also, see Tips and Troubleshooting if you encounter issues related to installation.
Table 2-1 Installation Guidelines for System, Admin, and Non-Admin Users
Installation Context Scenario UAC-Enabled Result
System user SmartView.exe is launchedby the Windows scheduleror PsExec
Not applicable Smart View is installed onthe machine level
Administrator The user runsSmartView.exe with the"Run as Administrator"command or from anelevated command prompt
Depending on the UAClevel, the user may need togo through the UAC UIsequence
Smart View is installed onthe machine level
Non-admin user The user installing SmartView may or may not be amember of theAdministrators group.Note: Not supported onWindows server platforms.
No UAC interaction isexpected.
Smart View is installed onthe current user's level;other users will not be ableto run Smart View
Notes:
• This scenario is not supported: A user installs Smart View, and then, on the samemachine, another user tries to install Smart View in the same location as theprevious installation.
• After non-admin installations:
– Launching Office applications with Smart View content from Internet Explorerwill fail in protected mode.
See Web Launch with Internet Explorer in Protected Mode to add trusted siteswhen Internet Explorer is run in protected mode.
– The Smart View ribbon may fail to appear on Windows 10.
See Smart View Ribbon Fails to Display After Non-Admin Installation onWindows 10 for steps to take to display the ribbon.
• Upgrade in mixed installation context is not supported. For example, upgrading thepreviously-installed per-machine installation with a per-user one is not supported(Error 1925).
Chapter 2Installation Guidelines
2-2
• Silent installations are not supported for non-admin users. When attempting asilent installation, the /s flag is ignored for non-admin users, causing the SmartView product installer to launch.
• Non-admin users are not authorized to install Smart View in the C:\Program Filesor C:\Program Files (x86) folders.
Installer LanguageThe installer is automatically displayed in the language set in the Format field of theWindows Region and Language dialog box in the Control Panel.
However, some messages, both on-screen and in the log file, cannot be translatedand will appear in English.
For more information about language settings, see Windows, Office, and Smart ViewLocale Settings.
Microsoft .NET Framework SupportTo install and use Oracle Smart View for Office release 11.1.2.5.600+, Microsoft .NETFramework 4.5 or higher is required.
BiDi Support in InstallerThe Oracle Smart View for Office installer does not fully support bidirectional (BiDi)languages. This can result in installer screens containing formatting errors such asmisaligned text and icons. The installer can be used, however, and the installed SmartView product will display correctly in BiDi languages.
Upgrading from Smart View 11.1.1.3.x or EarlierWhen upgrading from Oracle Smart View for Office release 11.1.1.3.x or earlier,Oracle recommends uninstalling Smart View before installing this release.
Oracle BI EE Extension Users: Upgrading from Smart View11.1.2.5.500 or Earlier
If you’re using the Oracle BI EE extension, and upgrading from Oracle Smart View forOffice 11.1.2.5.500 or earlier to Smart View 11.1.2.5.510 or later, a complete uninstallof Smart View is required:
1. Close all Office applications.
2. Uninstall Smart View from the Windows Control Panel.
3. Install Smart View.
See Installing from My Oracle Support or Oracle Technology Network.
Chapter 2Installation Guidelines
2-3
Oracle BI EE Version Requirement for Multiple Connection and ViewDesigner Features
To use the multiple connection and View Designer features described below, ensurethat the Oracle Business Intelligence Enterprise Edition 11.1.1.7.140527 patch orhigher is installed. Go to My Oracle Support, Patches & Updates tab, and search by"Product or Family." In the Product field, select Oracle Business IntelligenceEnterprise Edition; in the Release field, select OBI EE 11.1.1.7.140527.
• Multiple connections are supported with Oracle BI EE version 11.1.1.7.140527 andhigher. If connecting to earlier versions of Oracle BI EE, then only one connectionis allowed.
• To use the Oracle BI EE View Designer feature (introduced in the 11.1.2.5.200release), the Oracle BI EE 11.1.1.7.140527 patch or higher is required.
You should only use the View Designer in Oracle Smart View for Office to editviews that were created and inserted using the View Designer.
See "Editing Views Created in View Designer" in the Oracle Smart View for OfficeUser's Guide for more information.
Planning Offline SupportAlthough Planning Offline is supported for 64-bit operating systems, it is not supportedfor 64-bit Oracle Smart View for Office installations. If you use Planning Offline withSmart View, you must install the 32-bit version of Microsoft Office.
Note:
Planning Offline is supported with Oracle Hyperion Planning on-premisesonly. Planning Offline is not supported with Oracle Planning and BudgetingCloud.
Installing from My Oracle Support or Oracle TechnologyNetwork
To install Oracle Smart View for Office directly from My Oracle Support (MOS) orOracle Technology Network (OTN):
1. Before you begin:
• If you are upgrading to this release from an earlier Smart View release, Oraclerecommends that you first uninstall the earlier release before installing thisrelease.
• Ensure that Microsoft .NET Framework 4.5 or higher is installed on thecomputer where you are installing Smart View.
Microsoft .NET Framework 4.5 or higher is required to install and use SmartView.
Chapter 2Installing from My Oracle Support or Oracle Technology Network
2-4
• Review the information in Installation Guidelines.
2. Close all Microsoft Office applications.
3. Download the Smart View zip file from either MOS or OTN:
• From MOS:
https://support.oracle.com/oip/faces/secure/km/DocumentDisplay.jspx?id=1923582.1
This Knowledge Article provides a link to the current version of Smart View.
• From OTN:
http://www.oracle.com/technetwork/middleware/smart-view-for-office/overview/index.html
Before downloading, review the "OTN License Agreement" accessed from theSmart View download page to ensure that your usage is compliant.
4. Unzip the file to a temporary location.
5. Double-click SmartView.exe to start the installation wizard.
6. Select a destination folder for Smart View, and then click OK.
For new installations, Smart View is installed by default in:
C:\Oracle\SmartView
If you are upgrading an existing installation of Smart View, the installer defaults tothe folder where Smart View was previously installed.
7. When installation is complete, click OK.
The Smart View ribbon is displayed the next time you open Microsoft Excel,PowerPoint, or Word.
Note:
Starting with Smart View 11.1.2.5.510, the Oracle BI EE per-userextension installer is included with the Smart View client installation. Ifthe extension is not already installed and it is not disabled, then it isinstalled the first time you start Office.
8. If your default browser is Mozilla Firefox or Google Chrome, a browser add-on isrequired. See Installing Browser Add-ons for more information.
Note:
If you encounter issues related to installation and startup, see Tips andTroubleshooting.
Chapter 2Installing from My Oracle Support or Oracle Technology Network
2-5
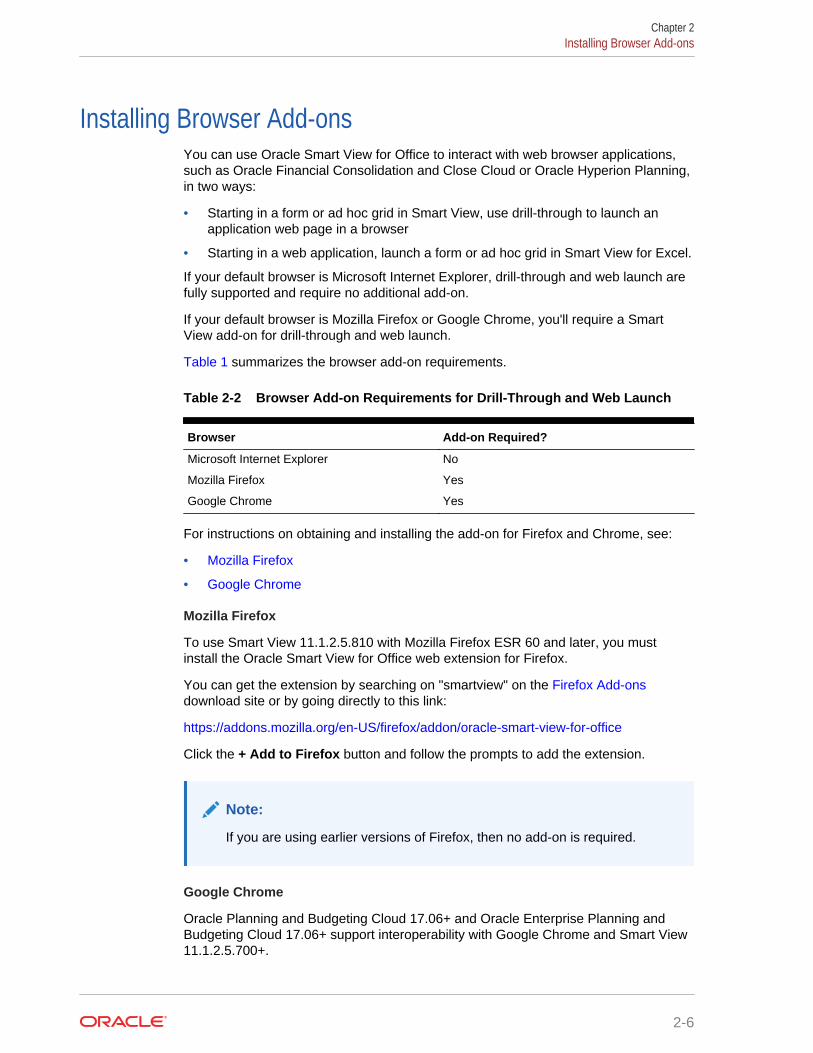
Installing Browser Add-onsYou can use Oracle Smart View for Office to interact with web browser applications,such as Oracle Financial Consolidation and Close Cloud or Oracle Hyperion Planning,in two ways:
• Starting in a form or ad hoc grid in Smart View, use drill-through to launch anapplication web page in a browser
• Starting in a web application, launch a form or ad hoc grid in Smart View for Excel.
If your default browser is Microsoft Internet Explorer, drill-through and web launch arefully supported and require no additional add-on.
If your default browser is Mozilla Firefox or Google Chrome, you'll require a SmartView add-on for drill-through and web launch.
Table 1 summarizes the browser add-on requirements.
Table 2-2 Browser Add-on Requirements for Drill-Through and Web Launch
Browser Add-on Required?
Microsoft Internet Explorer No
Mozilla Firefox Yes
Google Chrome Yes
For instructions on obtaining and installing the add-on for Firefox and Chrome, see:
• Mozilla Firefox
• Google Chrome
Mozilla Firefox
To use Smart View 11.1.2.5.810 with Mozilla Firefox ESR 60 and later, you mustinstall the Oracle Smart View for Office web extension for Firefox.
You can get the extension by searching on "smartview" on the Firefox Add-onsdownload site or by going directly to this link:
https://addons.mozilla.org/en-US/firefox/addon/oracle-smart-view-for-office
Click the + Add to Firefox button and follow the prompts to add the extension.
Note:
If you are using earlier versions of Firefox, then no add-on is required.
Google Chrome
Oracle Planning and Budgeting Cloud 17.06+ and Oracle Enterprise Planning andBudgeting Cloud 17.06+ support interoperability with Google Chrome and Smart View11.1.2.5.700+.
Chapter 2Installing Browser Add-ons
2-6
To use Google Chrome with Smart View, install the Oracle Smart View for Office webextension from the Chrome Web Store. You can get the extension by searching on"smartview" in the Chrome Web Store or by going directly to this link:
https://chrome.google.com/webstore/detail/oracle-smart-view-for-off/cjbpfomjjhkmfkembnjejkhpihjnomne
Click the + Add to Chrome button and follow the prompts to add the extension.
Installing by Autodeployment in EPM SystemThese instructions are for upgrading from Oracle Smart View for Office 11.1.2.1.x andlater only. If you are upgrading from Smart View 11.1.2.0.x or earlier, use theautodeployment instructions provided in the documentation for the specific release.
Server SetupTo set up the server environment for autodeployment of Oracle Smart View for Office:
1. Enable autodeployment for your data provider as follows.
• Oracle Essbase: Choose a method:
– Use Administration Services Console (if available).
a. Connect to the Provider Server, select Edit, then Properties, thenClient Deployment.
b. Choose either Force Smart View client to upgrade or Warn SmartView client to upgrade.
c. Select the Apply Smart View client to upgrade check box, and thenclick Apply.
– Update essbase.properties as follows:
a. Navigate to EPM_ORACLE_INSTANCE\bin\essbase.properties.
b. Set either or both of these properties to true:
smartview.webservice.autodeploy.force=truesmartview.webservice.autodeploy.warn=true
• Oracle Hyperion Planning:
a. Select Administration, then Manage Properties, and then SystemProperties.
b. Set these properties:
SMART_VIEW_FORCE_INSTALL=trueSMART_VIEW_DISPLAY_WARNING=true
• Oracle Hyperion Financial Management: Autodeployment is enabled bydefault starting in Financial Management 11.1.2.4. To configure FinancialManagement to turn off messages about upgrading Smart View, complete theprocedure in Oracle Support Document 1993603.1 on My Oracle Support:
https://mosemp.us.oracle.com/epmos/faces/DocumentDisplay?id=1993603.1
• Oracle Hyperion Reporting and Analysis: Autodeployment is automatic.
Chapter 2Installing by Autodeployment in EPM System
2-7
2. Make backup copies of your current SmartView.exe and version.xml beforedeploying the replacement files.
3. Download the Smart View zip file from either OTN or MOS, as described in Installing from My Oracle Support or Oracle Technology Network.
4. Unzip the downloaded file to a temporary location.
5. Copy SmartView.exe and version.xml to the location of the Oracle HyperionEnterprise Performance Management Workspace installation, typically:
C:\Oracle\Middleware\EPMSystem11R1\common\epmstatic\wspace\SmartView
This is the epmstatic location specific to Smart View.
6. Depending on which version of Smart View your users are upgrading from,perform either Option A OR Option B.
• Option A (Upgrading from 11.1.2.1.x, 11.1.2.2.x, or 11.1.2.3.x)
If your users are upgrading from an installed Smart View version of 11.1.2.1.x,11.1.2.2.x, or 11.1.2.3.x, open the version.xml file in the epmstatic locationspecific to Smart View (see step 5), and edit the value in the installFile tag topoint to the location of the Smart View executable file (step 5) as follows:
<installFile> /epmstatic/wspace/SmartView/SmartView.exe</installFile>
• Option B (Upgrading from 11.1.2.5.000 or Later)
If your users are upgrading from an installed Smart View version 11.1.2.5.000or later, choose only one of the following options and perform the tasksdescribed:
– OTN Option
Do not modify the version.xml file in the epmstatic location specific toSmart View (step 5).
Your users will automatically be directed to the Smart View page on OTN,where they can download the installation zip file to their own machines,unzip the contents, and run the installer.
– "epmstatic" Option
Open the version.xml file in the epmstatic location specific to Smart View(see step 5) and edit the value in the installFile tag to point to thelocation of the Smart View executable file (step 5) as follows:
<installFile> /epmstatic/wspace/SmartView/SmartView.exe</installFile>
– Web App Server Option
Post the SmartView.exe file to a web app server in your environment, andthen modify the version.xml file to point to the fully-qualified URL.
a. Copy only the SmartView.exe to the web app server where you will behosting the file.
b. Open the version.xml file in the epmstatic location specific to SmartView (see step 5), and edit the value in the installFile tag to point to
Chapter 2Installing by Autodeployment in EPM System
2-8
the fully-qualified URL where you are hosting the Smart Viewexecutable file (see step a); for example:
<installFile> http://webServerHost:webServerPort/pathToSmartViewExe/SmartView.exe</installFile>
Your Smart View users can now proceed with Client Installation.
Client InstallationIn the previous section, Server Setup, if you chose the OTN Option in Option B, thenyour users will be directed to OTN for the Oracle Smart View for Office download. Inthat case, your users should follow the instructions for OTN download and installationin Installing from My Oracle Support or Oracle Technology Network.
If you did not choose the epmstatic Option or Web App Server Option in Option B,then complete the following procedure.
To install the Smart View client:
1. In Smart View, select Panel.
2. Connect to a data source in one of the following ways:
• Through a shared connection
• Through a private connection with the following URL:
– Oracle Essbase: http://<server>:19000/aps/SmartView
– Oracle Hyperion Planning: http://<server>:19000/HyperionPlanning/SmartView
– Oracle Hyperion Financial Management: http://<server>:19000/hfmofficeprovider/hfmofficeprovider.aspx
– Oracle Hyperion Reporting and Analysis: http://<server>:19000/raframework/browse/listxml
Note:
If you are using Reporting and Analysis release 11.1.2.1.000 orearlier, Smart View autodeployment will not work (10233672,12870087).
3. When the message “New Smart View client version available” is displayed, selectClick here to Install.
4. In the Internet Explorer browser that launches, in File Download, select Run.
Note:
Internet Explorer will launch even if Firefox is your default browser.
5. If a Microsoft Excel security warning is displayed, select Run.
Chapter 2Installing by Autodeployment in EPM System
2-9
6. When prompted, confirm the upgrade; click Yes.
7. The installation wizard is displayed; click OK.
The installer is automatically displayed in the language set in the Format field ofthe Windows Region and Language dialog box in the Control Panel.
8. If prompted, close all open Microsoft Office applications, and then click OK.
9. In the installation wizard, click OK and follow the prompts to install Smart View.
10. When installation is complete, click OK.
The Smart View ribbon is displayed the next time you open Microsoft Excel,PowerPoint, or Word.
11. Open Excel.
12. On the Smart View ribbon, select the arrow next to Help, and then select About.
13. Verify the new version of Smart View.
Installing from EPM WorkspaceRelated Topics
• Workspace Setup
• Client Installation
Workspace SetupTo set up the Workspace environment for the updated Oracle Smart View for Officeinstaller:
1. Make backup copies of your current SmartView.exe and version.xml beforedeploying the replacement files.
2. Download the Smart View zip file from either OTN or MOS, as described in Installing from My Oracle Support or Oracle Technology Network.
3. Unzip the downloaded file to a temporary location.
4. Copy SmartView.exe and version.xml to the location of the Oracle HyperionEnterprise Performance Management Workspace installation, typically:
C:\Oracle\Middleware\EPMSystem11R1\common\epmstatic\wspace\SmartView
Client InstallationTo install Oracle Smart View for Office from Oracle Hyperion Enterprise PerformanceManagement Workspace:
1. In EPM Workspace, select Tools, then Install, and then Smart View.
2. In File Download, select Run.
3. If a Microsoft Excel security warning is displayed, select Run.
4. Select a destination folder for Smart View, and then click OK.
For new installations, Smart View is installed by default in:
C:\Oracle\SmartView
Chapter 2Installing from EPM Workspace
2-10
If you are upgrading an existing installation of Smart View, the installer defaults tothe folder where Smart View was previously installed.
5. When installation is complete, click OK.
The Smart View ribbon is displayed the next time you open Microsoft Excel,PowerPoint, or Word.
Installing from Oracle BI EERelated Topics
• Configuring the BI Home Page
• Installing from the BI Home Page
Configuring the BI Home Page
Note:
Configuring a custom download link for the Smart View installer applies toOracle Business Intelligence Enterprise Edition 11.1.1.7.1 and later versions,and might not be available in earlier versions.
Starting in Oracle BI EE release 11.1.1.9, the Smart View for MS Office link on theDownload BI Desktop Tools drop-down list points to the Oracle Smart View for Officedownload on Oracle Technology Network.
If you do not want to direct your users to Oracle Technology Network, you canconfigure the Smart View for MS Office link to point to a custom download link for theSmart View installer. You can then ensure that the correct version of Smart View foryour environment is always available to your users. Do this by adding theSmartViewInstallerURL element to instanceconfig.xml.
You can configure the download link point to a location where the smartview.exeresides; for example:
• An external URL
• An internal URL, such as internal web page or intranet location where theinstallation can start immediately
• A folder on a local server where the installation can start immediately
To configure a custom download link for the Smart View installer:
1. Open the instanceconfig.xml file for editing
Refer to "Where Are Configuration Files Located?" in the Oracle FusionMiddleware System Administrator's Guide for Oracle Business IntelligenceEnterprise Edition.
2. Locate the CatalogPath and <DSN>AnalyticsWeb</DSN> sections and add theSmartViewInstallerURL element after those sections.
3. Use the syntax in the following examples to add the SmartViewInstallerURLelement.
Chapter 2Installing from Oracle BI EE
2-11
Example for download from Oracle Technology Network:
<CatalogPath>/example/path/work/abc/instances/instance1/bifoundation/OracleBIPresentationServicesComponent/coreapplication_obips1/catalog/SampleApp</CatalogPath><DSN>AnalyticsWeb</DSN><SmartViewInstallerURL>http://www.oracle.com/technetwork/middleware/epm/downloads/smart-view-1112x-1939038.html</SmartViewInstallerURL>
Example for download from an intranet site:
<CatalogPath>/example/path/work/abc/instances/instance1/bifoundation/OracleBIPresentationServicesComponent/coreapplication_obips1/catalog/SampleApp</CatalogPath><DSN>AnalyticsWeb</DSN> <SmartViewInstallerURL>http://myserver:8080/downloads/smartview.exe</SmartViewInstallerURL>
Example for download from an internal server:
<CatalogPath>/example/path/work/abc/instances/instance1/bifoundation/OracleBIPresentationServicesComponent/coreapplication_obips1/catalog/SampleApp</CatalogPath><DSN>AnalyticsWeb</DSN> <SmartViewInstallerURL>\\myserver\downloads\smartview.exe</SmartViewInstallerURL>
4. Save your changes and close the file.
5. Restart the Oracle BI EE instance.
Installing from the BI Home PageTo install Oracle Smart View for Office from Oracle Business Intelligence Home:
1. In the BI Home page, click the arrow next to Download BI Desktop Tools, andthen select Smart View for MS Office.
If you are directed to the Smart View download page on Oracle TechnologyNetwork, then follow the procedure in Installing from My Oracle Support or OracleTechnology Network. Otherwise, proceed with step 2.
2. Choose an option:
• Click Run to run the installer directly.
If the User Account Control dialog box is displayed, click Yes, and thencontinue to step 3.
• Click Save to save the Smart View installer file to a directory to which youhave access and from which you can run executable files.
Open the folder where you saved the Smart View executable and double-clickit to run it. Then continue to step 3.
3. Select the language to use for the installation wizard.
4. Click Next.
5. Follow the prompts in the wizard.
6. When installation is complete, click Finish.
The Smart View ribbon is displayed the next time you open Microsoft Excel,PowerPoint, or Word.
Chapter 2Installing from Oracle BI EE
2-12
Note:
Starting with Smart View 11.1.2.5.510, the Oracle BI EE per-userextension installer is included with the Smart View client installation.
The extension is installed the first time you start Office if the Oracle BIEE extension is not already installed and it is not disabled.
Running Command Line or Silent InstallationsOracle Smart View for Office can be installed from the command line. Additionally,administrators can enable silent installations—installations that do not require settingsto be specified each time—for Smart View and Smart View extensions. The silentinstallation command can be included in scripts to automate installation.
Note:
Silent installations are only supported for admin users.
Use the options in Table 1 to install Smart View from the command line and for silentinstallations.
Related Topics:
• Installing Smart View from the Command Line
• Installing Smart View Silently
• Installing Smart View Extensions Silently
• Registry Settings to Reduce Timeouts and Flickering
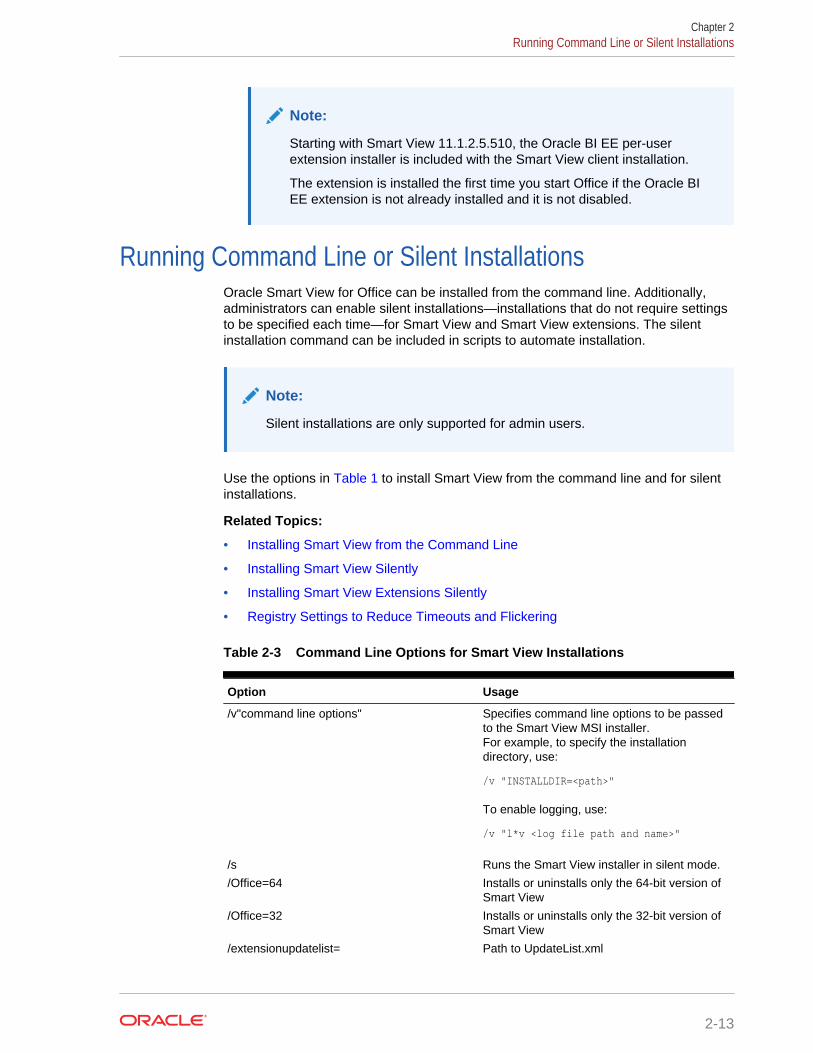
Table 2-3 Command Line Options for Smart View Installations
Option Usage
/v"command line options" Specifies command line options to be passedto the Smart View MSI installer.For example, to specify the installationdirectory, use:
/v "INSTALLDIR=<path>"
To enable logging, use:
/v "l*v <log file path and name>"
/s Runs the Smart View installer in silent mode.
/Office=64 Installs or uninstalls only the 64-bit version ofSmart View
/Office=32 Installs or uninstalls only the 32-bit version ofSmart View
/extensionupdatelist= Path to UpdateList.xml
Chapter 2Running Command Line or Silent Installations
2-13

Table 2-3 (Cont.) Command Line Options for Smart View Installations
Option Usage
/x Uninstalls Smart View
Before You Begin
Before you begin, follow the procedure in Installing from My Oracle Support or OracleTechnology Network to download the Smart View installation zip file and unzip it to thefolder you will be working in.
Installing Smart View from the Command LineTo install Oracle Smart View for Office from the command line:
1. Open a command prompt.
2. Navigate to the directory of the Smart View installer.
3. Run the installation commands in Table 1; for example:
• To install in the default directory, run:
SmartView.exe
• To install in another directory, run:
SmartView.exe /v" INSTALLDIR=<target path>"
For example:
SmartView.exe /v" INSTALLDIR=D:\SmartView"
• To specify the location of UpdateList.xml, run:
SmartView.exe /extensionupdatelist=<path to UpdateList.xml>
• To run an installation and log the installation sequence:
SmartView.exe /v” INSTALLDIR=D:\SmartView /L*v c:\install.log”
4. Optional: Run your organization-specific commands to deploy to your users theWindows Registry settings noted in Registry Settings to Reduce Timeouts andFlickering.
Installing Smart View SilentlyThe silent installer wrapper follows these rules:
• It passes the value of the /v parameter intact to the MSI.
• The /s flag is converted to /qn and passed to the MSI. There is no need to specifythe /qn parameter if /s is already present in your script.
• Unless the /v parameter contains any /q specifier, the wrapper passes /qb+ to theMSI.
To run silent installations:
1. Open a command prompt.
Chapter 2Running Command Line or Silent Installations
2-14
2. Navigate to the directory of the Oracle Smart View for Office installer.
3. Run the installation commands in Table 1; for example:
• To install in the default directory, run:
SmartView.exe /s
• To install in another directory, run:
SmartView.exe /s /v" INSTALLDIR=<target path>"
For example:
SmartView.exe /s /v" INSTALLDIR=D:\SmartView"
• To specify the location of UpdateList.xml, run:
SmartView.exe /s /extensionupdatelist=<path to UpdateList.xml>
• To run a silent installation and log the installation sequence:
SmartView.exe /s /v” INSTALLDIR=D:\SmartView /L*v c:\install.log”
4. Optional: Run your organization-specific commands to deploy to your users theWindows Registry settings noted in Registry Settings to Reduce Timeouts andFlickering.
Installing Smart View Extensions SilentlyAdministrators can push extension installations silently by calling the followingcommand:
svlaunch.exe /i <path to the extension installer>
For example, after a typical Oracle Smart View for Office installation, Smart View isinstalled on C:\Oracle\SmartView. In this installation, the extensions included with SmartView are located in C:\Oracle\SmartView\extensions. Using the command above, anadmin can silently install the Oracle Journals extension using the following command:
svlaunch.exe /i C:\Oracle\SmartView\extensions\SVFMJournalInstaller.svext
After installation, the extension files are located on the user's machine here:
%APPDATA%\Oracle\SmartView\extensions\Bin
Registry Settings to Reduce Timeouts and FlickeringUse your own organization-specific procedures to deploy these Windows Registrysettings to your users. These settings can help to reduce timeouts and flickering inOracle Smart View for Office.
Timeout Settings
Configure these Registry settings to help reduce timeouts:
• ReceiveTimeout
• KeepAliveTimeout
• ServerInfoTimeout
Chapter 2Running Command Line or Silent Installations
2-15
See Smart View HTTP Session Timeout for information on these settings.
Flickering Settings
Configure these Registry settings to help reduce flickering:
• DisableWindowTransitionsOnAddinTaskPanes
• DisableAnimations
Note:
Oracle recommends setting the registry key,DisableWindowTransitionsOnAddinTaskPanes, to reduce POV toolbarflickering. Consider rolling this out this setting to your users along with theSmart View install.
See Flickering Issues on Office 2013 and Office 2016 for information on thesesettings.
Downloading Help for Local or Web Server InstallationAfter installing Oracle Smart View for Office, the online help is retrieved from a URLhosted on the Oracle.com web site. This is the default behavior for Smart View, and nochanges are required by users to launch help.
However, you may require that the help be installed locally or on a web server in yourorganization. Some examples for the need to access help from a location other thanOracle.com are:
• Help files must be installed on a local drive on an individual's computer for Section508 accessibility purposes.
• Internet access limitations; for example, your users only have access to URLs onyour organization's intranet.
To accommodate the above types of cases, a downloadable help zip file is posted onMy Oracle Support as a patch to the current Smart View release.
The procedure below describes downloading the help zip file. Further instructions forinstallation and configuration are in the following guides:
• Installing and Configuring Help Locally or on a Web Server in this guide.
• Oracle Smart View for Office Accessibility Guide. See "Installing and ConfiguringHelp Locally."
To download the Smart View help zip file from My Oracle Support (MOS):
1. Log in to MOS.
2. Select the Patches & Updates tab.
The Patch Search area is displayed at the right of the screen with the Search tabselected by default.
3. Under the Number/Name or Bug Number (Simple) heading, ensure that PatchName or Number is selected in the drop-down list box.
Chapter 2Downloading Help for Local or Web Server Installation
2-16
4. In the Patch Search text box, type this Smart View patch number:
23206405
The Patch Search text box is to the right of the Patch Name or Number drop-down list box.
5. Click Search.
6. Download the patch zip file to a temporary directory.
7. To install and configure the help according to your requirements, follow theinstructions in either of the following guides:
• Installing and Configuring Help Locally or on a Web Server in this guide.
• Oracle Smart View for Office Accessibility Guide. See "Installing andConfiguring Help Locally."
Uninstalling Smart ViewThis topic describes uninstalling Oracle Smart View for Office.
To uninstall extensions, see "Uninstalling Extensions" in the Oracle Smart View forOffice User's Guide.
To uninstall Smart View:
1. Before you begin, close all Office applications.
2. Go to your Windows system Control Panel and navigate to Uninstall or changea program.
3. Locate and select the version of Smart View that applies to your installation:
• Oracle Smart View 32-bit for Office
• Oracle Smart View 64-bit for Office
4. Click Uninstall.
Chapter 2Uninstalling Smart View
2-17
3Administering Extension Installations andUpdates
The extension installation and update process described in this topic enables OracleSmart View for Office end users to install, update, or uninstall extensions based onparameters set by the Smart View administrator in the manifest file, UpdateList.xml.
About Extension Installations and UpdatesAuto-Update versus Manual Update
In releases earlier than Oracle Smart View for Office 11.1.2.5.400, extensions wereupdated using the Auto-Update process. To update extensions with Auto-Update,Smart View end users could go to the Extensions tab of the Options dialog box andclick the Check for updates link or select the Check for updates when MicrosoftOffice starts check box to initiate extension updates. For all extensions, if anyupdates were available, they were retrieved and installations were automaticallyinitiated.
In release 11.1.2.5.400 and later, you can customize the extension update process sothat Smart View end users can control when they install, update, and removeextensions. The Smart View administrator configures attributes in the UpdateList.xmlmanifest file to control the options available to the users. If the administrator does notconfigure these attributes in UpdateList.xml, extensions will continue to be updatedusing the existing Auto-Update process.
Types of Extensions
There are two types of extensions that can be installed on a Smart View clientmachine:
• Provider extensions. Extensions that are dependent on, or integrated with,Oracle components are provider extensions. Examples are the DisclosureManagement and Oracle Hyperion Financial Reporting extensions. Providerextensions can be configured as required extensions.
• Per-user extensions. Extensions that are installed in the user’s application datafolder. These extensions may or may not be dependent on Oracle components.Additionally, per-user extensions can also be configured as required extensions.
The Smart View administrator configures the UpdateList.xml file to specify the list ofprovider and per-user extensions available to end users along with options forinstalling, updating, and removing them. Additionally, per-user extensions can also beconfigured to display an indicator for required extensions and does not force theinstallation. The Smart View end user then accesses the Options dialog box andinstalls, updates, or uninstalls the extensions that are available to him or her in theExtensions tab.
To configure provider and per-user extension installation, uninstallation, and updating,complete the procedure in Configuring Manual Extension Updates.
3-1
If you do not want to make changes to the extension update process, you may refer to Configuring Auto-Update Extensions for information on the structure of the XML andexamples, but you do not need to take any further action.
For instructions on installing, updating, and removing extensions in Smart View, endusers can refer to the procedure topics in "Extensions" in the "Smart View Options"chapter in the Oracle Smart View for Office User's Guide.
About the Oracle Journals for Financial Management Extension
The Oracle Journals extension is unique among Smart View extensions in that theextension installer file is included in the extensions folder of the Smart Viewinstallation. End users can install the Oracle Journals extension directly from theextensions folder of their Smart View installation.
Or, as administrator, you can control how your Smart View end users install the OracleJournals extension, automatically or manually, via the Extensions page of the SmartView Options dialog box.
If you choose to set up automatic or manual installations of the Oracle Journalsextension, you should install Smart View in a test environment first, then refer to theUpdateList.xml file, found in the extensions folder of your Smart View installation. Usethe entry in this file as a guideline for the Oracle Journals entry you will add to theUpdateList.xml file, as described in Configuring Manual Extension Updates.
Configuring Manual Extension UpdatesAuto-Update extensions in the UpdateList.xml manifest file can be configured so thatthe Oracle Smart View for Office end user can see the available extensions, includingper-user extensions, and install them from the Extensions tab of the Options dialogbox.
You can add two attributes, visible and allowUninstall, to the UpdateList.xml manifestfile to change the behavior of the extensions from auto-update to manual update sothat the extensions are displayed in the Options dialog box:
• visible—A value of "1" indicates that the extension will appear in the Extensionstab of the Smart View Options dialog and will NOT be part of the Auto-Updateprocess.
If the visible attribute is missing or the value is not "1", the extension is included inthe Auto-Update process.
• allowUninstall—A value of "1" indicates that the user can initiate an uninstallthrough the Extensions tab of the Options dialog box using the Remove link.
If the allowUninstall attribute is missing or the value is not "1", the user may notinitiate an uninstall in the Extensions interface (the Remove link will not be there).
This procedure is optional. If you choose not to add the attributes to UpdateList.xml,extensions will continue to be updated as they were in releases earlier than11.1.2.5.400. In pre-11.1.2.5.400 releases, users click the Check for updates link orselect the Check for updates when Microsoft Office starts check box to initiateextension updates.
See Manual Update XML Defined and Manual Update XML Example for reference.
To add attributes to the UpdateList.xml manifest file for extensions:
Chapter 3Configuring Manual Extension Updates
3-2
1. Open the UpdateList.xml file for editing.
The manifest file is found in two locations:
• epmstatic:
http://server:port/epmstatic/smartview/Client/UpdateList.xml
• The location pointed to by the <extensionupdatelist> tag in C:\Oracle\SmartView\cfg\properties.xml.
To populate the <extensionupdatelist> tag, you can either perform a commandline installation, as described in Running Command Line or Silent Installations,or manually update the tag in the properties.xml file.
Note:
In properties.xml, if multiple URLs exist for an extension installer,Smart View checks all locations and installs from the locationcontaining the latest version.
If multiple URLs exist for the same version of an extension installer,Smart View installs from the first URL in the list.
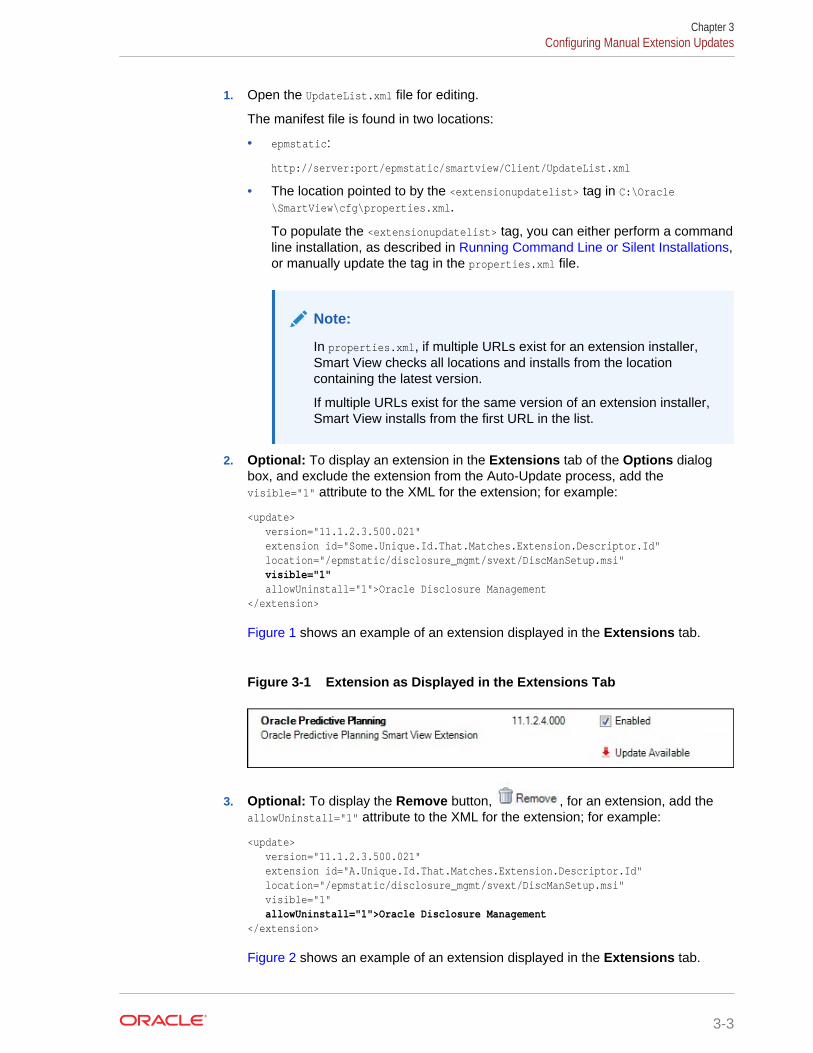
2. Optional: To display an extension in the Extensions tab of the Options dialogbox, and exclude the extension from the Auto-Update process, add thevisible="1" attribute to the XML for the extension; for example:
<update> version="11.1.2.3.500.021" extension id="Some.Unique.Id.That.Matches.Extension.Descriptor.Id" location="/epmstatic/disclosure_mgmt/svext/DiscManSetup.msi" visible="1" allowUninstall="1">Oracle Disclosure Management</extension>
Figure 1 shows an example of an extension displayed in the Extensions tab.
Figure 3-1 Extension as Displayed in the Extensions Tab
3. Optional: To display the Remove button, , for an extension, add theallowUninstall="1" attribute to the XML for the extension; for example:
<update> version="11.1.2.3.500.021" extension id="A.Unique.Id.That.Matches.Extension.Descriptor.Id" location="/epmstatic/disclosure_mgmt/svext/DiscManSetup.msi" visible="1" allowUninstall="1">Oracle Disclosure Management</extension>
Figure 2 shows an example of an extension displayed in the Extensions tab.
Chapter 3Configuring Manual Extension Updates
3-3
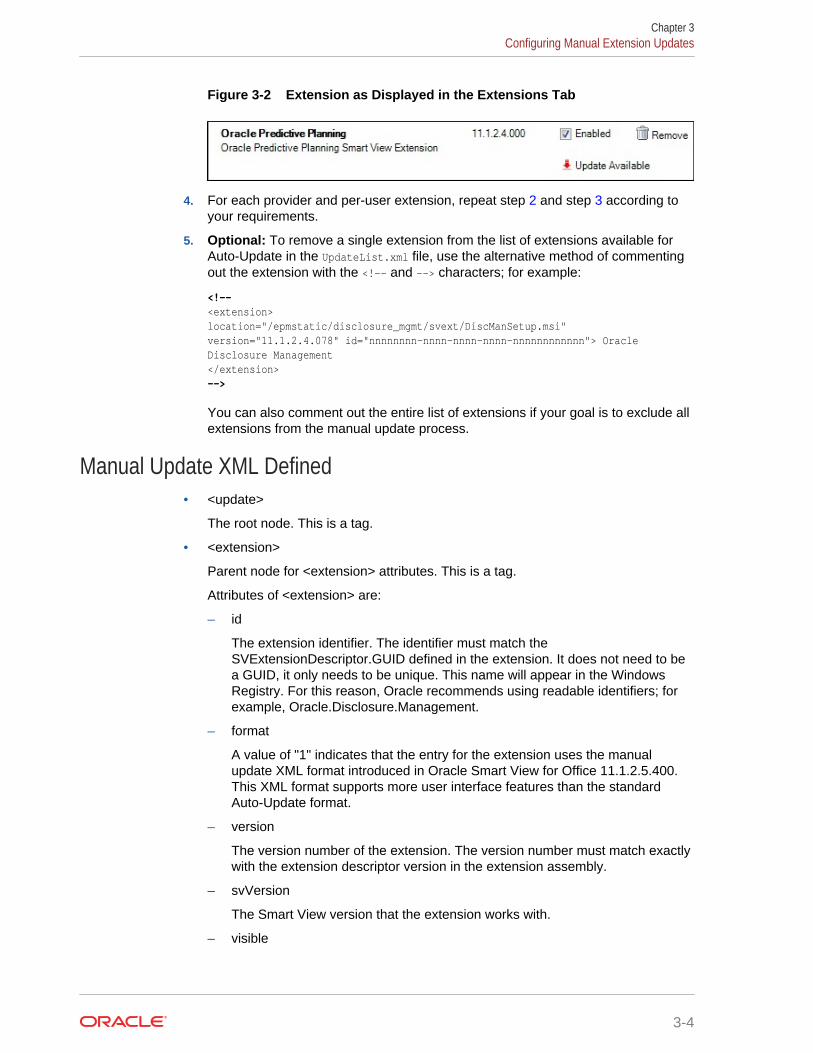
Figure 3-2 Extension as Displayed in the Extensions Tab
4. For each provider and per-user extension, repeat step 2 and step 3 according toyour requirements.
5. Optional: To remove a single extension from the list of extensions available forAuto-Update in the UpdateList.xml file, use the alternative method of commentingout the extension with the <!-- and --> characters; for example:
<!--<extension>location="/epmstatic/disclosure_mgmt/svext/DiscManSetup.msi" version="11.1.2.4.078" id="nnnnnnnn-nnnn-nnnn-nnnn-nnnnnnnnnnnn"> Oracle Disclosure Management</extension>-->
You can also comment out the entire list of extensions if your goal is to exclude allextensions from the manual update process.
Manual Update XML Defined• <update>
The root node. This is a tag.
• <extension>
Parent node for <extension> attributes. This is a tag.
Attributes of <extension> are:
– id
The extension identifier. The identifier must match theSVExtensionDescriptor.GUID defined in the extension. It does not need to bea GUID, it only needs to be unique. This name will appear in the WindowsRegistry. For this reason, Oracle recommends using readable identifiers; forexample, Oracle.Disclosure.Management.
– format
A value of "1" indicates that the entry for the extension uses the manualupdate XML format introduced in Oracle Smart View for Office 11.1.2.5.400.This XML format supports more user interface features than the standardAuto-Update format.
– version
The version number of the extension. The version number must match exactlywith the extension descriptor version in the extension assembly.
– svVersion
The Smart View version that the extension works with.
– visible
Chapter 3Configuring Manual Extension Updates
3-4
Set this value to "1" to display the extension in the Extensions tab of theOptions dialog box. When this is set to "1", the extension will NOT be part ofthe Auto-Update process.
– manualUpdate
Set this value to "1" if the user needs to close Excel for installation update.The update installer file will be downloaded and a message will be displayedindicating the required restart of Office. Also, the download folder will beopened.
– manualInstall
Set this value to "1" if the user needs to close Excel for installation. Theinstaller file will be downloaded and a message will be displayed indicating therequired restart of Office. The download folder will be opened.
– allowUninstall
Set this value to "1" to display the Remove button in the Extensions tab ofthe Options dialog box.
– type
The type of extension. Valid values are:
* 0 = optional extension
* 1 = provider extension
* 2 = Smart View client
– required
Set to display a "Required" or "Recommended" icon for the extension. Noaction is done other than the visible icon.
• <name>
The name of the extension. This is a tag.
• <desc>
The extension description. This is a tag.
Uses the "default" attribute. The default description for the extension will be thedescription displayed in the Extensions tab.
• owner
The creator or owner of the extension; for example, Oracle.
• location
The location and file name of the extension installer file. This can be msi or svext;exe is not supported.
• <uninstallMsg>
Optional. For uninstalls, displays a custom message to the user.
Uses the "default" attribute. The default description for the uninstallMsg will be thecustom message displayed during uninstall.
• <options>
Optional. For msi installations only. All options for the Microsoft Windows InstallerTool, Msiexec.exe, are supported.
Chapter 3Configuring Manual Extension Updates
3-5
Manual Update XML Example<update><extension id="Oracle.SmartView.ExtensionSamples.PowerPack.AdjustData" format="1" version="1.1.3.0" svVersion="11.1.2.2.310" visible="1" allowUninstall="1" manualUpdate=”0” manualInstall=”0” type="0" required="1"> <name>Adjust Data</name> <desc default="Simple data adjustment panel for use with Smart View"> <owner>Oracle</owner> <location>file://server_name/shared/ExtensionInstallers/AdjustDataInstaller.svext </location> <uninstallMsg default=”This will remove the extension and all its components" </uninstallMsg></extension></update>
Configuring Auto-Update ExtensionsYou can add the visible and allowUninstall attributes to the UpdateList.xml manifestfile to change the behavior of the extensions that are part of the Auto-Update process.
If you do not add the attributes to UpdateList.xml, extensions will continue to beupdated using the existing Auto-Update process.
To add the visible and allowUninstall attributes to the Auto-Update extensions,complete the procedure in Configuring Manual Extension Updates.
See Auto-Update XML Defined and Auto-Update XML Example for reference.
You can also remove an single extension from the list of extensions available for Auto-Update in the UpdateList.xml file by commenting out the extension using the <!-- and--> characters. For example:
<!--<extension>location="/epmstatic/disclosure_mgmt/svext/DiscManSetup.msi" version="11.1.2.4.078" id="nnnnnnnn-nnnn-nnnn-nnnn-nnnnnnnnnnnn"> Oracle Disclosure Management</extension>-->
If you comment out the entire list of extensions, then all extensions are excluded fromthe manual update process.
Auto-Update XML Defined• <update>
The root node. This is a tag.
• <extension>
Chapter 3Configuring Auto-Update Extensions
3-6
Text that contains the extension name. This is a tag. The extension name appearsin the Extensions tab of the Options dialog box. Examples of extension namesare Oracle Predictive Planning Extension, Disclosure Management, or AdjustData.
Attributes of <extension> are:
– id
The extension identifier. The identifier must match theSVExtensionDescriptor.GUID defined in the extension. It does not need to bea GUID, it only needs to be unique. This name will appear in the WindowsRegistry. For this reason, Oracle recommends using readable identifiers; forexample, Oracle.Disclosure.Management.
– version
The version number of the extension.
– location
The location and file name of the extension installer file. This can be msi orsvext; exe is not supported.
– operation
Optional. For Auto-Updates, set this value to “delete” to have the uninstallautomatically begin when the user opens Office.
Note:
The first time a user opens Office, if Oracle Smart View for Officedetermines that the extension needs to be uninstalled, thesubsequent opening of Office initiates the uninstall process.
– options
Optional. For msi installations only. All options for the Microsoft WindowsInstaller Tool, Msiexec.exe, are supported.
– visible
Set this value to "1" to display the extension in the Extensions tab of theOptions dialog box. When this is set to "1", the extension will NOT be part ofthe Auto-Update process.
– allowUninstall
Set this value to "1" to display the Remove button in the Extensions tab ofthe Options dialog box.
Auto-Update XML Example
<update><extension id="A.Unique.Id.That.Matches.Extension.Descriptor.Id" version="11.1.2.3.500.021" location="/epmstatic/disclosure_mgmt/svext/DiscManSetup.msi" visible="1" allowUninstall="1">Disclosure Management</extension>
Chapter 3Configuring Auto-Update Extensions
3-7
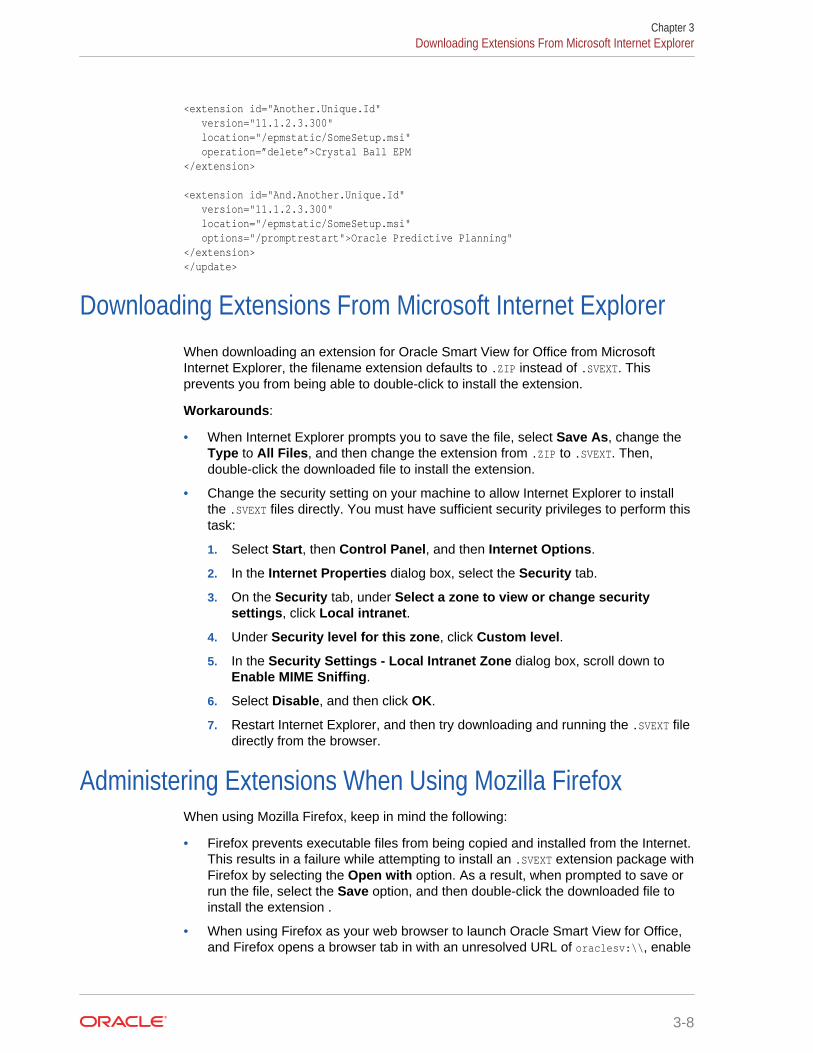
<extension id="Another.Unique.Id" version="11.1.2.3.300" location="/epmstatic/SomeSetup.msi" operation=”delete”>Crystal Ball EPM</extension>
<extension id="And.Another.Unique.Id" version="11.1.2.3.300" location="/epmstatic/SomeSetup.msi" options="/promptrestart">Oracle Predictive Planning"</extension></update>
Downloading Extensions From Microsoft Internet ExplorerWhen downloading an extension for Oracle Smart View for Office from MicrosoftInternet Explorer, the filename extension defaults to .ZIP instead of .SVEXT. Thisprevents you from being able to double-click to install the extension.
Workarounds:
• When Internet Explorer prompts you to save the file, select Save As, change theType to All Files, and then change the extension from .ZIP to .SVEXT. Then,double-click the downloaded file to install the extension.
• Change the security setting on your machine to allow Internet Explorer to installthe .SVEXT files directly. You must have sufficient security privileges to perform thistask:
1. Select Start, then Control Panel, and then Internet Options.
2. In the Internet Properties dialog box, select the Security tab.
3. On the Security tab, under Select a zone to view or change securitysettings, click Local intranet.
4. Under Security level for this zone, click Custom level.
5. In the Security Settings - Local Intranet Zone dialog box, scroll down toEnable MIME Sniffing.
6. Select Disable, and then click OK.
7. Restart Internet Explorer, and then try downloading and running the .SVEXT filedirectly from the browser.
Administering Extensions When Using Mozilla FirefoxWhen using Mozilla Firefox, keep in mind the following:
• Firefox prevents executable files from being copied and installed from the Internet.This results in a failure while attempting to install an .SVEXT extension package withFirefox by selecting the Open with option. As a result, when prompted to save orrun the file, select the Save option, and then double-click the downloaded file toinstall the extension .
• When using Firefox as your web browser to launch Oracle Smart View for Office,and Firefox opens a browser tab in with an unresolved URL of oraclesv:\\, enable
Chapter 3Downloading Extensions From Microsoft Internet Explorer
3-8

the extension for Smart View from the Extensions tab of Firefox Add-ons Managerand restart Firefox.
Chapter 3Administering Extensions When Using Mozilla Firefox
3-9

4Accessing Shared Connections from anXML File
Related Topics
• About Accessing Shared Connections from an XML File
• Setting Up the Shared Connections XML File
• Connection File Syntax and Example
About Accessing Shared Connections from an XML File
Note:
The procedures in this chapter apply to shared connections only.
You can use shared connection information from an XML file to connect to supportedOracle Smart View for Office providers, both cloud and on-premises. The XML file canexist either locally on each individual Smart View client machine or on a web server.Smart View end users point to this XML file in the Shared Connections URL field ofthe Options dialog box, and then access the available providers as they would anyother shared connection to which they have access.
To connect to an Oracle Business Intelligence Enterprise Edition provider from theShared Connections Panel in Smart View, you must follow the procedures in this topic.However, you may also connect to Oracle BI EE data sources from the PrivateConnections Panel using the procedure described in "Creating Private Connections" inthe Oracle Smart View for Office User's Guide.
Note:
Only ASCII characters are supported in the XML file. Do not use non-ASCIIcharacters in any of the entries you make in this file.
Caution:
The procedures in this chapter should be completed by the Smart Viewadministrator.
4-1
Setting Up the Shared Connections XML FileSetting up the shared connections XML file involves preparing the XML file distributingit to your users.
To set up shared connections in an XML file:
1. Create an empty XML file using any text editor and save it on your Oracle SmartView for Office client machine.
Give the file a meaningful name, such as SmartViewProviders.xml, and ensure thatit has the .xml extension.
Note:
Only ASCII characters are supported in the XML file. Do not use non-ASCII characters in any of the entries you make in this file.
2. Add the following line to the beginning of the file:
<?xml version="1.0" encoding="UTF-8"?>
3. Next, add the opening res_GetProvisionedDataSources tag:
<res_GetProvisionedDataSources>
4. Add entries for the applicable providers.
You can add entries for Oracle Hyperion Provider Services (Oracle Essbase),Oracle Hyperion Planning (both on-premises and in Oracle Planning andBudgeting Cloud), Oracle Hyperion Financial Management, Oracle HyperionReporting and Analysis, Oracle Hyperion Strategic Finance, Oracle BusinessIntelligence Enterprise Edition, and Oracle Enterprise Performance ReportingCloud. The XML can contain entries for supported cloud providers, on-premisesproviders, or a mix of both.
When you create your entries, copy the syntax exactly and make ONLY thesesubstitutions:
• In the Product tag, name attribute:
name—An internal identifier for the provider. This will not display to users.
• In the Product tag, displayVersion attribute:
version—The version number of the specified provider. This will not display tousers.
• In the Server tag, context attribute:
webServerHost—The web server host machine name.
webServerPort—The web server port number. Use the default port number thatis already noted in the syntax for each provider. Or, if you have configuredyour system using non-default port numbers, provide them.
The syntax for each provider type is below.
Provider Services (Essbase)
Chapter 4Setting Up the Shared Connections XML File
4-2
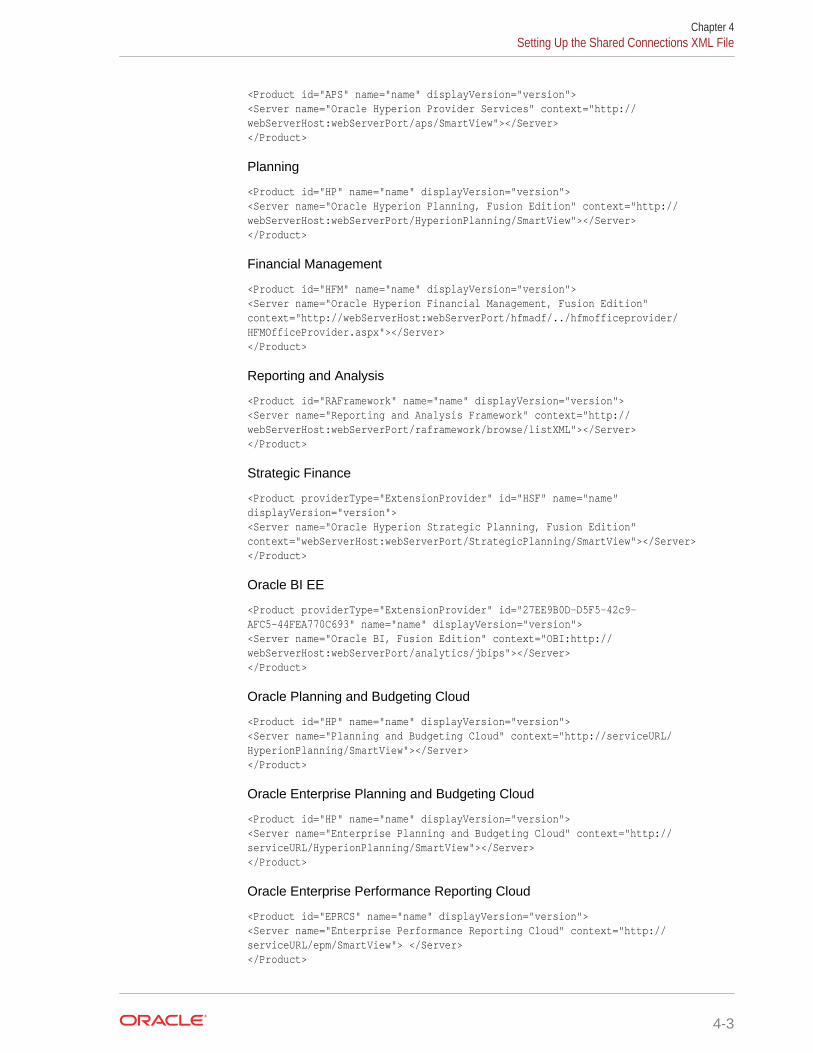
<Product id="APS" name="name" displayVersion="version"><Server name="Oracle Hyperion Provider Services" context="http://webServerHost:webServerPort/aps/SmartView"></Server></Product>
Planning
<Product id="HP" name="name" displayVersion="version"><Server name="Oracle Hyperion Planning, Fusion Edition" context="http://webServerHost:webServerPort/HyperionPlanning/SmartView"></Server></Product>
Financial Management
<Product id="HFM" name="name" displayVersion="version"><Server name="Oracle Hyperion Financial Management, Fusion Edition" context="http://webServerHost:webServerPort/hfmadf/../hfmofficeprovider/HFMOfficeProvider.aspx"></Server></Product>
Reporting and Analysis
<Product id="RAFramework" name="name" displayVersion="version"><Server name="Reporting and Analysis Framework" context="http://webServerHost:webServerPort/raframework/browse/listXML"></Server></Product>
Strategic Finance
<Product providerType="ExtensionProvider" id="HSF" name="name" displayVersion="version"><Server name="Oracle Hyperion Strategic Planning, Fusion Edition" context="webServerHost:webServerPort/StrategicPlanning/SmartView"></Server></Product>
Oracle BI EE
<Product providerType="ExtensionProvider" id="27EE9B0D-D5F5-42c9-AFC5-44FEA770C693" name="name" displayVersion="version"><Server name="Oracle BI, Fusion Edition" context="OBI:http://webServerHost:webServerPort/analytics/jbips"></Server></Product>
Oracle Planning and Budgeting Cloud
<Product id="HP" name="name" displayVersion="version"><Server name="Planning and Budgeting Cloud" context="http://serviceURL/HyperionPlanning/SmartView"></Server></Product>
Oracle Enterprise Planning and Budgeting Cloud
<Product id="HP" name="name" displayVersion="version"><Server name="Enterprise Planning and Budgeting Cloud" context="http://serviceURL/HyperionPlanning/SmartView"></Server></Product>
Oracle Enterprise Performance Reporting Cloud
<Product id="EPRCS" name="name" displayVersion="version"> <Server name="Enterprise Performance Reporting Cloud" context="http://serviceURL/epm/SmartView"> </Server></Product>
Chapter 4Setting Up the Shared Connections XML File
4-3
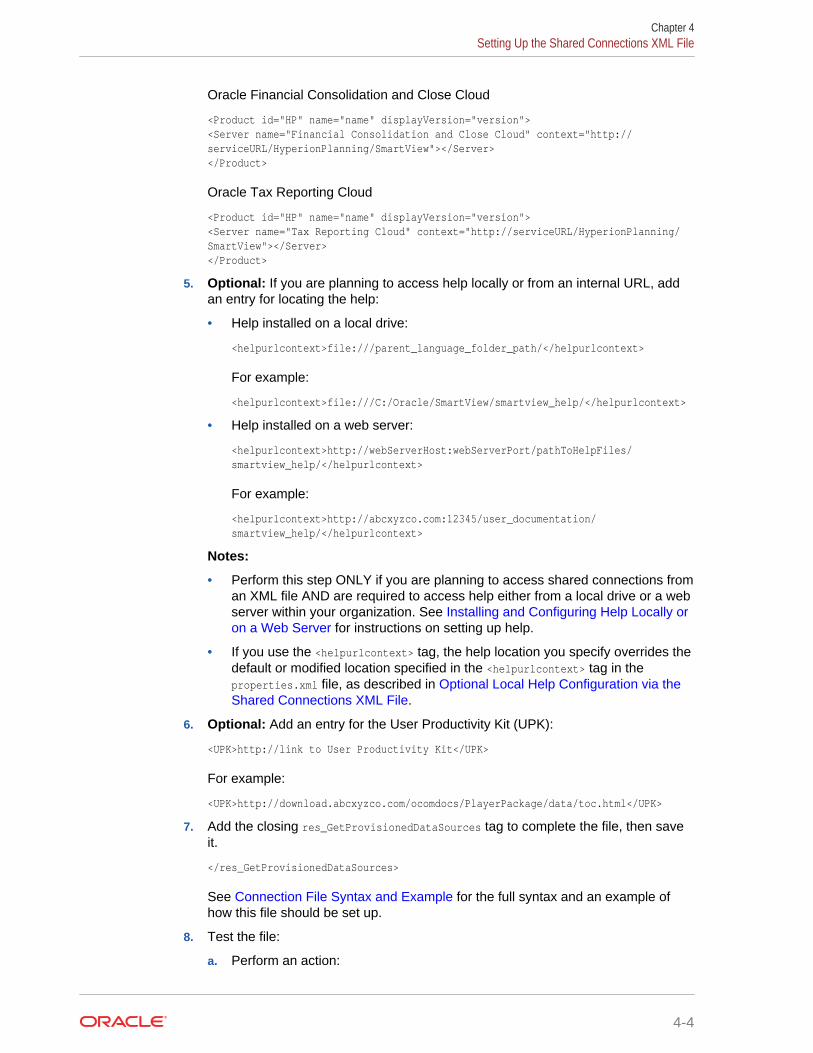
Oracle Financial Consolidation and Close Cloud
<Product id="HP" name="name" displayVersion="version"><Server name="Financial Consolidation and Close Cloud" context="http://serviceURL/HyperionPlanning/SmartView"></Server></Product>
Oracle Tax Reporting Cloud
<Product id="HP" name="name" displayVersion="version"><Server name="Tax Reporting Cloud" context="http://serviceURL/HyperionPlanning/SmartView"></Server></Product>
5. Optional: If you are planning to access help locally or from an internal URL, addan entry for locating the help:
• Help installed on a local drive:
<helpurlcontext>file:///parent_language_folder_path/</helpurlcontext>
For example:
<helpurlcontext>file:///C:/Oracle/SmartView/smartview_help/</helpurlcontext>
• Help installed on a web server:
<helpurlcontext>http://webServerHost:webServerPort/pathToHelpFiles/smartview_help/</helpurlcontext>
For example:
<helpurlcontext>http://abcxyzco.com:12345/user_documentation/smartview_help/</helpurlcontext>
Notes:
• Perform this step ONLY if you are planning to access shared connections froman XML file AND are required to access help either from a local drive or a webserver within your organization. See Installing and Configuring Help Locally oron a Web Server for instructions on setting up help.
• If you use the <helpurlcontext> tag, the help location you specify overrides thedefault or modified location specified in the <helpurlcontext> tag in theproperties.xml file, as described in Optional Local Help Configuration via theShared Connections XML File.
6. Optional: Add an entry for the User Productivity Kit (UPK):
<UPK>http://link to User Productivity Kit</UPK>
For example:
<UPK>http://download.abcxyzco.com/ocomdocs/PlayerPackage/data/toc.html</UPK>
7. Add the closing res_GetProvisionedDataSources tag to complete the file, then saveit.
</res_GetProvisionedDataSources>
See Connection File Syntax and Example for the full syntax and an example ofhow this file should be set up.
8. Test the file:
a. Perform an action:
Chapter 4Setting Up the Shared Connections XML File
4-4
• If you plan to have users copy the XML file to their local drive, ensure thatthe file is copied to a local drive on your Smart View client machine.
For example, the file may be copied to the SmartView\bin directory.
• Alternatively, if you plan to copy the file to a web server, ensure that thefile is accessible to your users from a fully-qualified URL that includes theXML file name and the .xml extension.
b. Start Smart View and in the Options dialog box, edit the SharedConnections URL to add the full path to the file or a URL, ensuring thatthe .xml file name extension is included.
Note:
This feature will not work if the .xml file name extension in notincluded at the end of the local drive path or URL.
• Local drive example:
C:/Oracle/SmartView/bin/SmartViewProviders.xml
Ensure that you use forward slashes (/) as separators in the file path.
The directory path and file should now be available in the list of sharedconnections.
• Web server URL syntax:
http://webServerHost:webServerPort/pathToFile/filename.xml
Web server URL example:
http://abcxyzcowebserver:1234/SmartViewDataSources/SmartViewProviders.xml
The URL should now be available in the list of shared connections.
c. Connect to the file using the Shared Connections option in the Smart ViewPanel, as described in "Connecting to Data Sources" in the Oracle Smart Viewfor Office User's Guide.
If you do not see provider entries listed in the Shared Connections drop-down list, then the XML file may contain incorrect syntax or invalid characters.
Tip:
Verify the XML by opening the file in a browser; for example, inInternet Explorer. The browser will specify the invalid syntax. Correctany errors in the XML file editor, save, and refresh the browserdisplay.
9. When the XML file is correct and complete, perform one of the followingprocedures:
• If you plan to have users copy the XML file to their local drive, distribute the fileto your Smart View users with these instructions:
Chapter 4Setting Up the Shared Connections XML File
4-5
a. Do not modify this file in any way.
b. Copy the file to a local drive on your Smart View client machine.
For example, the file may be copied to the SmartView\bin folder.
c. Start Smart View and in the Options dialog box, edit the SharedConnections URL with the full path to the file on the local drive, includingthe file name and .xml extension; for example:
C:/Oracle/SmartView/bin/SmartViewProviders.xml
Ensure that you use forward slashes (/) as separators in the file path.
The directory path and file is now available in the list of sharedconnections.
d. Test by connecting to the file using the Shared Connections option in theSmart View Panel, as described in "Connecting to Data Sources" in theOracle Smart View for Office User's Guide.
If you have problems connecting, contact your Smart View administrator.
• If you plan to copy the XML file to a web server, notify your Smart View userswith these instructions:
a. Start Smart View and in the Options dialog box, edit the SharedConnections URL with the URL provided, including the file nameand .xml extension; for example:
http://abcxyzcowebserver:1234/SmartViewDataSources/SmartViewProviders.xml
b. Test by connecting to this URL using the Shared Connections option inthe Smart View Panel, as described in "Connecting to Data Sources" inthe Oracle Smart View for Office User's Guide.
If you have problems connecting, contact your Smart View administrator.
c. Internet Explorer users: To use the URL given in step a, Oraclerecommends setting the following options in Internet Explorer:
i. Select Tools, then Internet Options.
ii. In the General tab, Browsing history group, select Settings.
iii. In the Check for newer versions of stored pages section, selectEvery time I visit the webpage, and then click OK.
iv. In the Internet Options dialog box, select the Advanced tab.
v. In the Security section, select the Empty Temporary Internet Filesfolder when browser is closed option.
vi. Click OK to close Internet Options and restart the browser.
Connection File Syntax and ExampleRelated Topics
• Connection File Syntax
• Connection File Example
Chapter 4Connection File Syntax and Example
4-6

Connection File SyntaxBelow is the file syntax in its entirety:
<?xml version="1.0" encoding="UTF-8"?><res_GetProvisionedDataSources><Product id="APS" name="name" displayVersion="version"><Server name="Oracle Hyperion Provider Services" context="http://webServerHost:webServerPort/aps/SmartView"></Server></Product><Product id="HP" name="name" displayVersion="version"><Server name="Oracle Hyperion Planning, Fusion Edition" context="http://webServerHost:webServerPort/HyperionPlanning/SmartView"></Server></Product><Product id="HFM" name="name" displayVersion="version"><Server name="Oracle Hyperion Financial Management, Fusion Edition" context="http://webServerHost:webServerPort/hfmadf/../hfmofficeprovider/HFMOfficeProvider.aspx"></Server></Product><Product id="RAFramework" name="name" displayVersion="version"><Server name="Reporting and Analysis Framework" context="http://webServerHost:webServerPort/raframework/browse/listXML"></Server></Product><Product providerType="ExtensionProvider" id="name" name="HSF-11.1.2" displayVersion="version"><Server name="Oracle Hyperion Strategic Planning, Fusion Edition" context="http://webServerHost:webServerPort/StrategicPlanning/SmartView"></Server></Product><Product providerType="ExtensionProvider" id="27EE9B0D-D5F5-42c9-AFC5-44FEA770C693" name="name" displayVersion="version"><Server name="Oracle BI, Fusion Edition" context="OBI:http://webServerHost:webServerPort/analytics/jbips"></Server></Product><Product id="HP" name="name" displayVersion="version"><Server name="Planning and Budgeting Cloud" context="http://serviceURL/HyperionPlanning/SmartView"></Server></Product><Product id="HP" name="name" displayVersion="version"><Server name="Enterprise Planning and Budgeting Cloud" context="http://serviceURL/HyperionPlanning/SmartView"></Server></Product><Product id="EPRCS" name="name" displayVersion="version"> <Server name="Enterprise Performance Reporting Cloud" context="http://serviceURL/epm/SmartView"></Server></Product><Product id="HP" name="name" displayVersion="version"><Server name="Financial Consolidation and Close Cloud" context="http://serviceURL/HyperionPlanning/SmartView"></Server></Product><Product id="HP" name="name" displayVersion="version"><Server name="Tax Reporting Cloud" context="http://serviceURL/HyperionPlanning/SmartView"></Server></Product><helpurlcontext>a valid entry as per optional step 5</helpurlcontext><UPK>http://link to User Productivity Kit</UPK></res_GetProvisionedDataSources>
Chapter 4Connection File Syntax and Example
4-7
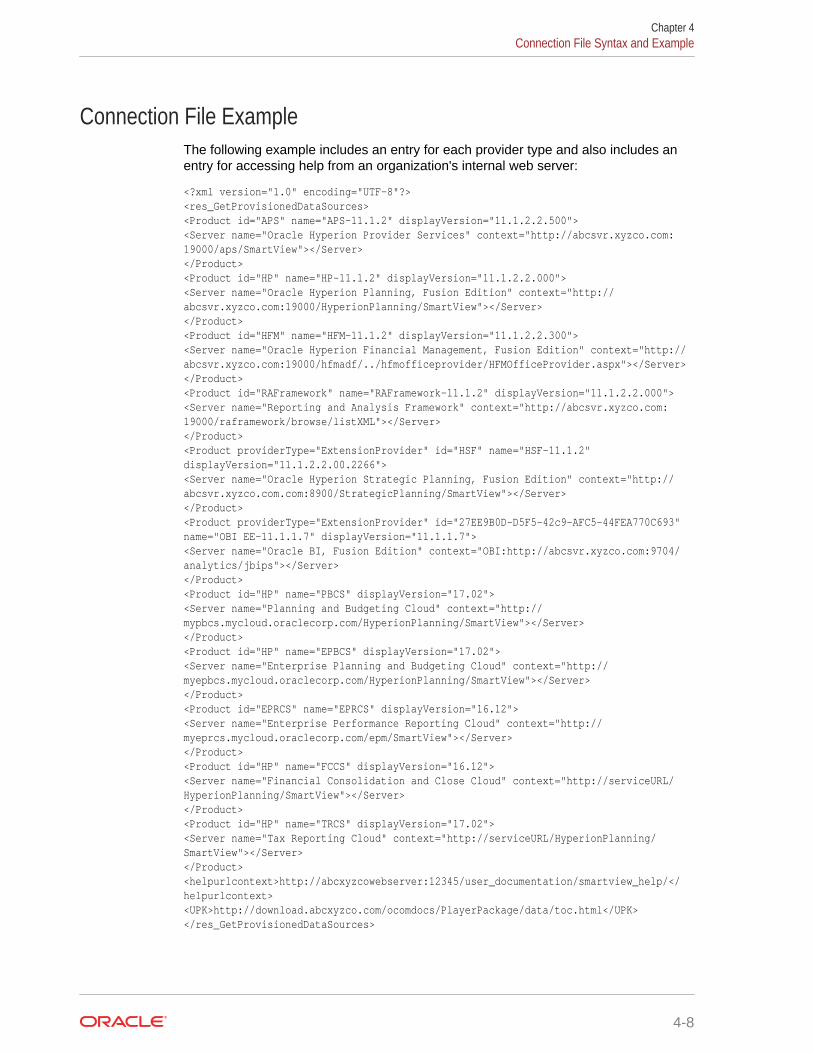
Connection File ExampleThe following example includes an entry for each provider type and also includes anentry for accessing help from an organization's internal web server:
<?xml version="1.0" encoding="UTF-8"?><res_GetProvisionedDataSources><Product id="APS" name="APS-11.1.2" displayVersion="11.1.2.2.500"><Server name="Oracle Hyperion Provider Services" context="http://abcsvr.xyzco.com:19000/aps/SmartView"></Server></Product><Product id="HP" name="HP-11.1.2" displayVersion="11.1.2.2.000"><Server name="Oracle Hyperion Planning, Fusion Edition" context="http://abcsvr.xyzco.com:19000/HyperionPlanning/SmartView"></Server></Product><Product id="HFM" name="HFM-11.1.2" displayVersion="11.1.2.2.300"><Server name="Oracle Hyperion Financial Management, Fusion Edition" context="http://abcsvr.xyzco.com:19000/hfmadf/../hfmofficeprovider/HFMOfficeProvider.aspx"></Server></Product><Product id="RAFramework" name="RAFramework-11.1.2" displayVersion="11.1.2.2.000"><Server name="Reporting and Analysis Framework" context="http://abcsvr.xyzco.com:19000/raframework/browse/listXML"></Server></Product><Product providerType="ExtensionProvider" id="HSF" name="HSF-11.1.2" displayVersion="11.1.2.2.00.2266"><Server name="Oracle Hyperion Strategic Planning, Fusion Edition" context="http://abcsvr.xyzco.com.com:8900/StrategicPlanning/SmartView"></Server></Product><Product providerType="ExtensionProvider" id="27EE9B0D-D5F5-42c9-AFC5-44FEA770C693" name="OBI EE-11.1.1.7" displayVersion="11.1.1.7"><Server name="Oracle BI, Fusion Edition" context="OBI:http://abcsvr.xyzco.com:9704/analytics/jbips"></Server></Product><Product id="HP" name="PBCS" displayVersion="17.02"><Server name="Planning and Budgeting Cloud" context="http://mypbcs.mycloud.oraclecorp.com/HyperionPlanning/SmartView"></Server></Product><Product id="HP" name="EPBCS" displayVersion="17.02"><Server name="Enterprise Planning and Budgeting Cloud" context="http://myepbcs.mycloud.oraclecorp.com/HyperionPlanning/SmartView"></Server></Product><Product id="EPRCS" name="EPRCS" displayVersion="16.12"> <Server name="Enterprise Performance Reporting Cloud" context="http://myeprcs.mycloud.oraclecorp.com/epm/SmartView"></Server></Product><Product id="HP" name="FCCS" displayVersion="16.12"><Server name="Financial Consolidation and Close Cloud" context="http://serviceURL/HyperionPlanning/SmartView"></Server></Product><Product id="HP" name="TRCS" displayVersion="17.02"><Server name="Tax Reporting Cloud" context="http://serviceURL/HyperionPlanning/SmartView"></Server></Product><helpurlcontext>http://abcxyzcowebserver:12345/user_documentation/smartview_help/</helpurlcontext><UPK>http://download.abcxyzco.com/ocomdocs/PlayerPackage/data/toc.html</UPK></res_GetProvisionedDataSources>
Chapter 4Connection File Syntax and Example
4-8

5Installing and Configuring Help Locally oron a Web Server
Related Topics
• About Installing Help Locally or on a Web Server
• Setting Up Help Locally or on a Web Server
• Optional Local Help Configuration via the Shared Connections XML File
About Installing Help Locally or on a Web ServerAfter installing Oracle Smart View for Office, the online help is accessed from a URLhosted on the Oracle.com web site. This is the default behavior for Smart View, and nochanges are required by users to launch help.
However, you may require that the help be installed locally or on a web server in yourorganization. Some examples for the need to access help from a location other thanOracle.com are:
• Help files must be installed on a local drive on an individual's computer for Section508 accessibility purposes.
• Internet access limitations; for example, your users only have access to URLs onyour organization's intranet.
To accommodate the above types of cases, a help zip file can be downloaded from MyOracle Support. You unzip the help to a local drive or web server, and then modify theSmart View properties.xml file to point the help location.
Note:
Depending on your requirements, you may also want to specify the<helpurlcontext> tag in a shared connections XML file, as described in Setting Up the Shared Connections XML File of Accessing SharedConnections from an XML File. Refer to Optional Local Help Configurationvia the Shared Connections XML File for more information.
Setting Up Help Locally or on a Web ServerTo install and configure Oracle Smart View for Office help locally or on a web server:
1. Obtain the help zip file for this release from My Oracle Support.
2. Extract the contents to either a local folder on the computer where Smart View isinstalled or to a folder accessible by your users on an HTTP web server in yourorganization.
5-1
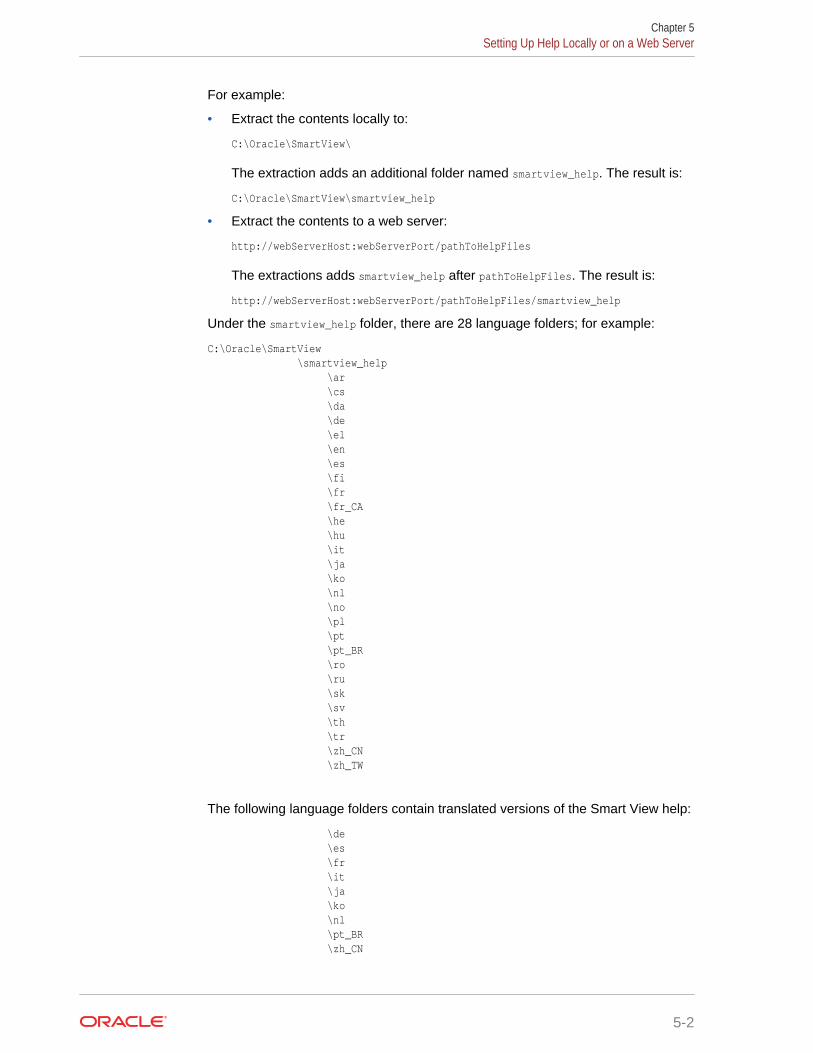
For example:
• Extract the contents locally to:
C:\Oracle\SmartView\
The extraction adds an additional folder named smartview_help. The result is:
C:\Oracle\SmartView\smartview_help
• Extract the contents to a web server:
http://webServerHost:webServerPort/pathToHelpFiles
The extractions adds smartview_help after pathToHelpFiles. The result is:
http://webServerHost:webServerPort/pathToHelpFiles/smartview_help
Under the smartview_help folder, there are 28 language folders; for example:
C:\Oracle\SmartView \smartview_help \ar \cs \da \de \el \en \es \fi \fr \fr_CA \he \hu \it \ja \ko \nl \no \pl \pt \pt_BR \ro \ru \sk \sv \th \tr \zh_CN \zh_TW
The following language folders contain translated versions of the Smart View help:
\de \es \fr \it \ja \ko \nl \pt_BR \zh_CN
Chapter 5Setting Up Help Locally or on a Web Server
5-2
\zh_TW
The remaining language folders contain the English version of the help. When yourun Smart View in one of those languages (for example, Swedish) and you click abutton for Help, the English help is displayed.
Additionally, the English folder contains a copy of the help in PDF format,smartview_user.pdf.
3. Modify the helpurlcontext property in the Smart View properties.xml file:
a. In your Smart View installation, navigate to the SmartView\cfg folder.
b. Make a backup copy of the original properties.xml file.
c. Open properties.xml for editing.
d. Modify the helpurlcontext property, providing the path to the folder that isparent to the language folders using the following syntax:
• If installing locally, provide the path to the folder that is parent to thelanguage folders using the following syntax:
<helpurlcontext>file:///parent_language_folder_path/</helpurlcontext>
Tip:
Use forward slashes in the syntax and ensure that you enter afinal forward slash (/) after the parent language folder path thatyou provide.
Using the example from step 2, after extracting the zip contents to C:\Oracle\SmartView, the smartview_help folder is the parent folder of thelanguage folders. Thus, you would modify theparent_language_folder_path placeholder as follows:
<helpurlcontext>file:///C:/Oracle/SmartView/smartview_help/</helpurlcontext>
• If installing on a web server, provide the path to the folder that is parent tothe language folders using the following syntax:
<helpurlcontext>http://webServerHost:webServerPort/pathToHelpFiles/smartview_help/</helpurlcontext>
Tip:
Use forward slashes in the syntax and ensure that you enter afinal forward slash (/) after the parent language folder path thatyou provide.
Using the example from step 2 and substituting user_documentation forpathToHelpFiles, after extracting the zip contents to http://abcxyzco.com:12345/user_documentation, the smartview_help folder is the parent folder ofthe language folders. For example:
Chapter 5Setting Up Help Locally or on a Web Server
5-3
<helpurlcontext>http://abcxyzco.com:12345/user_documentation/smartview_help/</helpurlcontext>
4. Restart your Microsoft Office applications and access the help from the SmartView ribbon.
5. Repeat this procedure for each computer that requires Smart View local help.
Optional Local Help Configuration via the SharedConnections XML File
In a new installation, Oracle Smart View for Office help is available as soon as youstart Excel. You do not need to be connected to a Smart View provider in order to viewthe help. After making the changes to the properties.xml file described in this chapter,help is accessed from the help location you indicate.
If you are also planning to access shared connections from an XML file (as describedin Accessing Shared Connections from an XML File), AND you require an alternativelocation for the help, note the following:
• You can add the <helpurlcontext> tag to the shared connections XML file. Thehelp location you specify in the shared connections XML file overrides the helplocation specified in properties.xml once you click the Shared Connectionsbutton in the Smart View Panel. This is true whether or not you modify the<helpurlcontext> tag in properties.xml.
• If you do not add or specify the <helpurlcontext> tag to the shared connectionsXML file, then the local help defined in the properties.xml file will ALWAYS beused and is available as soon as you start Excel.
Chapter 5Optional Local Help Configuration via the Shared Connections XML File
5-4
6Tips and Troubleshooting
Related Topics
• Diagnostics Tools and Health Check
• Installation and Languages
• Windows, Office, and Smart View Locale Settings
• Office .NET Installation Option Requirement
• Microsoft Office 365 ProPlus Support
• Installing in Program Files Folder on Windows 10
• Installing a Pre 11.1.2.5.510 Version of Smart View
• VBA Function Error for Oracle Analytics Cloud or Oracle BI EE
• Disclosure Management Autodeployment Issue
• Failure Connecting to Oracle Analytics Cloud
• Smart View Ribbon Fails to Display After Non-Admin Installation on Windows 10
• Error When First Launching Excel After Installing Smart View
• Issues When Starting Excel in Automation Mode
• Enabling and Disabling Smart View and Other Office Add-ins
• Extension Installation from EPM Cloud and Message Window Focus
• Extension Updates and Office Applications Remaining Open
• Slowness with Extension Options Dialog Box
• Office Slow to Start when Internet Connectivity is Not Available
• Excel Process Stops Responding (Hangs) on Shut Down
• Extension Updates and Outlook
• Enabling the Smart View Extension for Firefox
• Uninstallation Process Stops Responding
• Excel Looks for HsTbar.xml File After Uninstall
• Internet Explorer Compatibility View Settings for Financial Reporting
• Web Launch with Internet Explorer in Protected Mode
• Working with Custom HTML-based Login Forms
• Browser Settings When Working with XML Files on HTTP Server
• Flickering Issues on Office 2013 and Office 2016
• Transition Navigation Keys Not Supported
• Smart View HTTP Session Timeout
• Duplicate Queries in Word Slow to Refresh
6-1

• Issues with Dynamic Data Exchange Option in Excel
• Performance and Memory Usage Considerations for Smart View with Excel
• Unbalanced Loads in Provider Services Clustered Environments
• Two-Way SSL and Problematic Certificates
Diagnostics Tools and Health CheckDiagnostic Tools
Health Check
Diagnostic Tools
When an issue arises while using Oracle Smart View for Office that you cannot resolveon your own, use the Smart View Diagnostic tools to create and collect log files andscreenshots to send to Oracle Support. When you are finished collecting diagnosticdata, you use the diagnostic tools to zip up the files. Then you transmit the ZIP file toOracle Support for analysis. The log files and screenshots are used by Oracle Supportto troubleshoot and resolve your issue.
The Smart View Diagnostic tools are located in the Diagnostics group in the SmartView ribbon. You enable the display of the tools by
You can customize certain features of Smart View Diagnostic tools; for example:
• Hide data values in an Office document.
• Hide member names in an Office document.
• Direct the diagnostics output files to a folder other than the default.
• Allow automatic screenshots for each warning or error message that is displayed.
See Smart View Diagnostics in the Oracle Smart View for Office User's Guide for moreinformation on the Diagnostics tools.
Health Check
You can perform a "health check" on your system to optimize performance and to getinformation about your machine, Microsoft Office version, Smart View version, and theextensions you have installed.
You can view the following information about your system:
• Version Information—Operating System, Excel Version, Smart View Version
• Hardware Information—RAM Memory, Processor, Smart View Installed DriveSpace
• Excel Add-ins—Depends on the Excel add-ins that are installed
• COM Add-ins—Depends on the COM add-ins that are installed
You can make the following changes to system settings and Smart View options:
• Registry Information
– KeepAlive Timeout
– Receive Timeout
Chapter 6Diagnostics Tools and Health Check
6-2
– ServerInfo Timeout
• Smart View Options
– Undo Buffer
– Improve Metadata Storage
• Graphic Setting
– Disable Windows Transitions on Addin Task Panes
– Disable Animations
For more information, see "Performing a Health Check On Your System" in the OracleSmart View for Office User's Guide.
Installation and LanguagesThe Oracle Smart View for Office installer uses the language set in the Format field ofthe Windows Region and Language dialog box, Formats tab. This language alsobecomes the default language when running Smart View.
After installation, anytime you change the Smart View language setting (Optionsdialog box, Advanced tab), Smart View remembers the new setting on eachsubsequent launch of Excel.
To return Smart View to the default language, you can use either of the followingmethods in the Options dialog box, Advanced tab:
• Click the Reset button.
• Select the first option in the Language drop-down list. This is always Default,which is the language specified in the Region and Language dialog box,Formats tab
After uninstalling and then reinstalling, Smart View reverts to the language specified inthe Windows Region and Language dialog box, Formats tab, and not the lastlanguage specified in the Smart View Options dialog box, Advanced tab.
Windows, Office, and Smart View Locale SettingsOn each Oracle Smart View for Office client machine, the following locale settingsshould match:
• Smart View language option
• Microsoft Office language
• Windows Regional Settings
• Windows operating system
Running Smart View in a language other than the language of the machine's Windowsoperating system, system locale, or Office language, may result in incorrect data beingreturned. For example, if the Windows operating system, system locale, and Officelanguage are English, and you run Smart View in Russian, reports or chart data maydisplay incorrectly.
Chapter 6Installation and Languages
6-3

Office .NET Installation Option RequirementDuring Microsoft Office installation, you must enable the .NET installation option.When enabled, files are placed in your Office installation that support interoperabilitybetween Office and other programs and add-ins, such as Oracle Smart View for Officeand Smart View extensions.
Smart View works with these Office interop files:
• Microsoft.Office.Interop.Excel
• Microsoft.Office.Interop.Powerpoint
• Microsoft.Office.Interop.Word
• Microsoft.Office.Interop.Outlook
If these files are not installed, Smart View does not behave as expected. For example,when connected to Oracle Enterprise Performance Reporting Cloud, you may see ablank report package panel, resulting in an exception error when clicking in your Officeapplication. Additionally, in the Smart View log file, you will get errors for an Officeinterop file; for example:
System.IO.FileNotFoundException: Could not load file or assembly 'Microsoft.Office.Interop.PowerPointCould not load file or assembly 'Microsoft.Office.Interop.PowerPoint
If you see errors in the Smart View log file such as the one shown above, reinstallOffice and ensure that the .NET option is enabled.
Microsoft Office 365 ProPlus SupportA known issue with Microsoft Office 365 ProPlus patch 16.0.10228.20051, updatedthrough the insider slow channel, prevents users from accessing Oracle Smart Viewfor Office with Office 365, resulting in the “Member not found” message beingdisplayed. This Microsoft patch was pushed to users who signed up for monthlychannel updates between June 12 and June 14, 2018.
Workaround: Update Office with Microsoft Office 365 Version 1806 (Build10228.20080), which contains the fix for this issue.
Installing in Program Files Folder on Windows 10On Windows 10, non-administrator users are not authorized to modify the ProgramFiles folder. Therefore, if an administrator installs Oracle Smart View for Office inProgram Files, a non-admin user will not be able to uninstall Smart View.
By default, Smart View is installed in C:\Oracle\SmartView, not in the Program Filesfolder.
Installing a Pre 11.1.2.5.510 Version of Smart ViewIf you have installed Oracle Smart View for Office 11.1.2.5.510 or later, and you wantto go to a pre-11.1.2.5.510 version, you must first perform these steps to remove theOracle BI EE extension installation:
Chapter 6Office .NET Installation Option Requirement
6-4
1. In the Smart View ribbon, go the Options dialog box, Extensions tab, and clickthe Check for Updates, New Installs, and Uninstalls link.
2. Locate the Oracle BI EE extension in the list, and clear the Enabled check box.
3. Click Remove.
4. Close and restart Office to verify that the Oracle BI EE extension is removed fromthe list in the Extensions tab.
5. Close all Office applications.
6. Uninstall Smart View from the Windows Control Panel.
7. After installing a pre-11.1.2.5.510 version of Smart View, go the Options dialogbox, Extensions tab, to verify that the Oracle BI EE extension is enabled.
VBA Function Error for Oracle Analytics Cloud or Oracle BIEE
28791548 -- After uninstalling and reinstalling Oracle Smart View for Office, thefollowing error was displaying when using a VBA function for Oracle Analytics Cloud orOracle Business Intelligence Enterprise Edition:
Error '-2147024894(800700002)': Automation error The system cannot find the file
specified.
In some cases, when Smart View is installed as administrator, the uninstall andreinstall does not handle registration of the Oracle BI EE extension file correctly.
To remedy this issue, after installation, and before starting Office, install the Oracle BIEE extension manually:
1. After uninistalling and reinstalling Smart View, ensure that all Office applicationsremain closed.
2. Navigate to C:\Oracle\SmartView\extensions and double-click onJBIPSProviderInstaller.svext.
3. In the message that indicates successful installation, click OK.
The Oracle BI EE extension installation is complete and you may start Office.
Disclosure Management Autodeployment Issue18347708 -- Disclosure Management 11.1.2.4.0.78 will always trigger theautodeployment process. To work around this issue, update the version number forDisclosure Management in the Oracle Smart View for Office UpdateList.xml file:
From: version="11.1.2.4.078"
To: version="11.1.2.4.0.78"
For information on modifying the UpdateList.xml file, see the Oracle Smart View forOffice Installation and Configuration Guide, "Administering Extension Installations andUpdates" chapter.
Chapter 6VBA Function Error for Oracle Analytics Cloud or Oracle BI EE
6-5

Failure Connecting to Oracle Analytics CloudIssue
In some cases, in an Oracle Analytics Cloud production environment, users may haveissues connecting to Oracle Analytics Cloud from their Oracle Smart View for Officeinstallation.
This is the type of scenario where this situation can occur:
• Users connect to Oracle Analytics Cloud via VPN
• Oracle Analytics Cloud is protected by Oracle Identity Cloud Service, which isrequested through an Internet Proxy
• Oracle Identity Cloud Service is integrated with a federated single-signon system,such as Ping Identity
• Users on two different domains install Smart View via a package, delivered usingMicrosoft Application Virtualization (Microsoft App-V)
When trying to connect, an empty login screen pops up repeatedly, and then the loginfinally fails. This can happen when pasting a connection URL in the PrivateConnection Panel.
Cause
The root cause for this issue is that the Smart View packaged version, prior to login,opened a browser process named ielowutil.exe. The non-packaged local install ofSmart View, or packaged install with Micorosoft Internet Explorer already running, bothlaunched iexplore.exe instead.
The ielowutil.exe file is a special protected version of Internet Explorer named "LowMIC [Medium Integrity Cookie] Utility." It prevents the sharing of cookie data betweenprocesses of differing integrity.
This can explain why login to Oracle Analytics Cloud likely fails – since it requirescookie information that is set by both Oracle Identity Cloud Service and Ping Identity,and continues to assume the user is not logged in – redirecting back to Oracle IdentityCloud Service in a loop that escapes only after 12 times.
Solution
Using Process Monitor (Windows Sysinternals), the registry key used to read thebrowser was different in each case and was identified as followed:
• Working Key:
HKEY_CLASSES_ROOT\Wow6432Node\CLSID\{0002DF01-0000-0000-C000-000000000046}\
(Default)
Presents the value:
Internet Explorer(Ver 1.0)
• Non-working Key:
HKEY_CLASSES_ROOT\Wow6432Node\CLSID\{0002DF01-0000-0000-
C000-000000000046}\LocalServer32\(Default)
Presents the value:
Chapter 6Failure Connecting to Oracle Analytics Cloud
6-6
"%ProgramFiles(x86)%\Internet Explorer\ielowutil.exe" -CLSID:
{0002DF01-0000-0000-C000-000000000046}
The registry key:
HKEY_CLASSES_ROOT\Wow6432Node\CLSID\{0002DF01-0000-0000-
C000-000000000046}\LocalServer32\(Default)
is a pointer to:
HKEY_LOCAL_MACHINE\SOFTWARE\Classes\Wow6432Node\CLSID\{0002DF01-0000-0000-
C000-000000000046}\LocalServer32\(Default)
Changing this key to a new value of:
"%ProgramFiles(x86)%\Internet Explorer\iexplore.exe"
results in the Smart View package calling iexplore.exe instead, and the loginsucceeding.
All registry checks and changes must be done in the same App-V Package/Version IDenvironment as the Smart View package, ensuring that the local system is left intact;that is:
regedit /appvve:307790F2-DE31-4EBE-B3BC-4C9337032E73_0BE1C6E6-85CC-48C3-
A0FF-3BBB789681C3
Since users generally do not have admin access, you may roll out the fix toHKEY_CURRENT_USER by adding the key to the same path:
HKEY_CURRENT_USER\Software\Classes\Wow6432Node\CLSID\{0002DF01-0000-0000-
C000-000000000046}\LocalServer32\(Default)
In the case of different Smart View packaged versions (some in an App-V connectiongroup) across different domains, a PowerShell script can been written to identify theSmart View packages and make the correct registry changes.
Testing, this key change should result in Smart View users being able to successfullyand consistently log in to Oracle Analytics Cloud.
Smart View Ribbon Fails to Display After Non-AdminInstallation on Windows 10
In some cases, installing Oracle Smart View for Office on Windows 10 as a non-admincan cause the Smart View ribbon to fail to display.
In a non-admin install, you double-click the SmartView.exe file to launch the installer. Inan admin install, you right-click SmartView.exe and select Run as administrator.
If you installed Smart View as a non-admin and the Smart View ribbon does notdisplay, complete the following procedures to troubleshoot this issue:
Add the COM Add-in
Reinstall Smart View as Administrator
Add the COM Add-in
To add the Smart View COM add-in:
Chapter 6Smart View Ribbon Fails to Display After Non-Admin Installation on Windows 10
6-7
1. Go to File, then Options, and then Add-ins.
2. From Manage, select COM Add-ins, and then Go.
3. In COM Add-ins, select the check box to enable the Oracle Smart View forOffice add-in, and click OK.
4. Restart Excel.
If the Smart View ribbon does not display after restarting Excel, proceed to Reinstall Smart View as Administrator
Reinstall Smart View as Administrator
If the Smart View ribbon still fails to display after adding the COM add-in, performthese steps:
1. Uninstall Smart View.
See Uninstalling Smart View for more information.
2. Reinstall Smart View by right-clicking SmartView.exe and selecting Run asadministrator.
See Installing from My Oracle Support or Oracle Technology Network for moreinformation.
3. Launch Excel and verify that the Smart View ribbon is displayed.
Error When First Launching Excel After Installing SmartView
After installing Oracle Smart View for Office and launching Excel for the first time, youmay get an error message similar to the following: "Unable to set the installed propertyof the add-in class."
Workarounds: Enable the Smart View Excel add-in using one of the followingmethods:
Trust Center Method
1. Perform the task appropriate for your Office version:
• 2016, 2013, 2010: Go to File, then Options, and then Trust Center.
• 2007: Click the Office button in the top left corner of Excel, then select ExcelOptions, and then Trust Center.
2. Click the Trust Center Settings button.
3. In the left pane, select Trusted Locations.
4. Click Add new location to launch the Microsoft Office Trusted Location dialogbox.
5. In Path, enter the path to the Smart View bin folder; for example:
C:\Oracle\SmartView\bin
6. Click OK.
7. Click OK to close the Trust Center, and then click OK to close Excel Options.
COM Add-ins Method:
Chapter 6Error When First Launching Excel After Installing Smart View
6-8
1. Perform the task appropriate for your Office version:
• 2016, 2013, 2010: Go to File, then Options, and then Add-ins.
• 2007: Click the Office button in the top left corner of Excel, then select ExcelOptions, and then Add-ins.
2. From Manage, select COM Add-ins, and then Go.
3. In COM Add-ins, select the check box to enable the Oracle Smart View forOffice add-in, and click OK.
Issues When Starting Excel in Automation ModeIn some cases, third-party software that automates Excel processes, such asexporting to Excel, may cause issues with Excel and a conflict with Oracle Smart Viewfor Office.
Workaround:
To disable Smart View when Excel is started in automation mode, you may enable"DisableInAutomation" by adding a key and key value to the Windows Registry. To dothis, create the Options key and DisableInAutomation key value as follows:
• Key Name:
[HKEY_CURRENT_USER\Software\Oracle\SmartView\Options]
• Key Value:
"DisableInAutomation"=dword:00000001
When set to 00000001, Smart View is disabled when Excel is started in automationmode. Smart View starts correctly when Excel is started manually, outside of anautomated process.
When set to 0 or not created at all, then Smart View is enabled and starts whenExcel is started in automation mode, which may cause issues. Smart View startscorrectly when Excel is started manually, outside of an automated process.
Creating the Registry Key and Key Value
To create and update the registry key, Options:
1. Click Start, click Run, type regeditin the Open box, and then click OK.
2. Locate and then select the following registry subkey:
HKEY_CURRENT_USER\Software\Oracle\SmartView\
3. From the Edit menu, select New, and then select Key.
4. Type Options, and then press Enter.
5. From the Edit menu, select New, and then select DWORD Value.
6. Type DisableInAutomation, and then press Enter.
7. In the Details pane, right-click DisableInAutomation, and then click Modify.
8. In the Value data box, type 00000001, and then click OK.
The value, 00000001, enables the DisableInAutomation key.
Chapter 6Issues When Starting Excel in Automation Mode
6-9
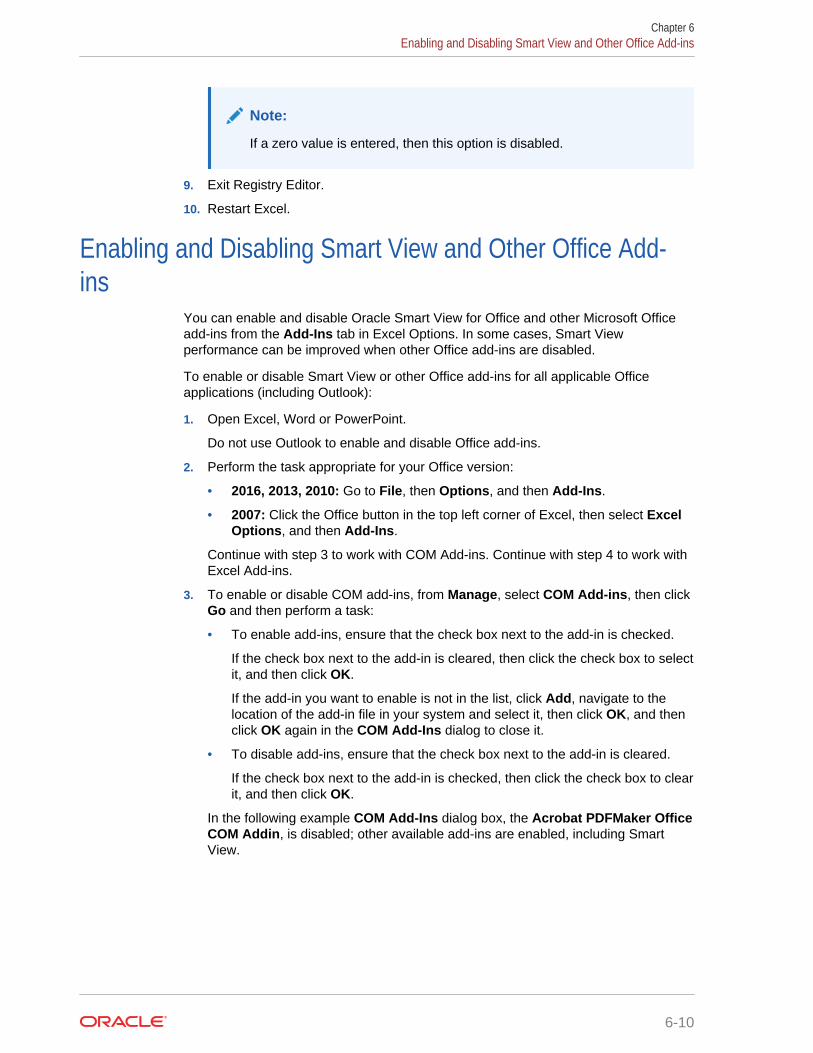
Note:
If a zero value is entered, then this option is disabled.
9. Exit Registry Editor.
10. Restart Excel.
Enabling and Disabling Smart View and Other Office Add-ins
You can enable and disable Oracle Smart View for Office and other Microsoft Officeadd-ins from the Add-Ins tab in Excel Options. In some cases, Smart Viewperformance can be improved when other Office add-ins are disabled.
To enable or disable Smart View or other Office add-ins for all applicable Officeapplications (including Outlook):
1. Open Excel, Word or PowerPoint.
Do not use Outlook to enable and disable Office add-ins.
2. Perform the task appropriate for your Office version:
• 2016, 2013, 2010: Go to File, then Options, and then Add-Ins.
• 2007: Click the Office button in the top left corner of Excel, then select ExcelOptions, and then Add-Ins.
Continue with step 3 to work with COM Add-ins. Continue with step 4 to work withExcel Add-ins.
3. To enable or disable COM add-ins, from Manage, select COM Add-ins, then clickGo and then perform a task:
• To enable add-ins, ensure that the check box next to the add-in is checked.
If the check box next to the add-in is cleared, then click the check box to selectit, and then click OK.
If the add-in you want to enable is not in the list, click Add, navigate to thelocation of the add-in file in your system and select it, then click OK, and thenclick OK again in the COM Add-Ins dialog to close it.
• To disable add-ins, ensure that the check box next to the add-in is cleared.
If the check box next to the add-in is checked, then click the check box to clearit, and then click OK.
In the following example COM Add-Ins dialog box, the Acrobat PDFMaker OfficeCOM Addin, is disabled; other available add-ins are enabled, including SmartView.
Chapter 6Enabling and Disabling Smart View and Other Office Add-ins
6-10
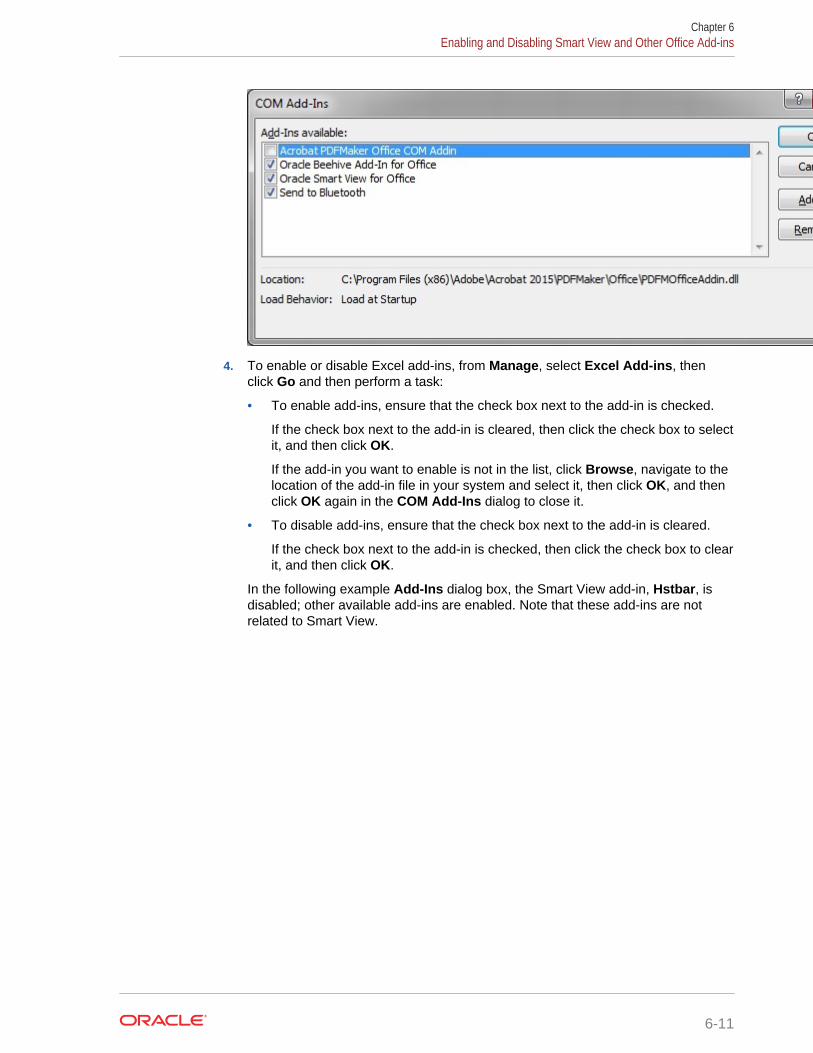
4. To enable or disable Excel add-ins, from Manage, select Excel Add-ins, thenclick Go and then perform a task:
• To enable add-ins, ensure that the check box next to the add-in is checked.
If the check box next to the add-in is cleared, then click the check box to selectit, and then click OK.
If the add-in you want to enable is not in the list, click Browse, navigate to thelocation of the add-in file in your system and select it, then click OK, and thenclick OK again in the COM Add-Ins dialog to close it.
• To disable add-ins, ensure that the check box next to the add-in is cleared.
If the check box next to the add-in is checked, then click the check box to clearit, and then click OK.
In the following example Add-Ins dialog box, the Smart View add-in, Hstbar, isdisabled; other available add-ins are enabled. Note that these add-ins are notrelated to Smart View.
Chapter 6Enabling and Disabling Smart View and Other Office Add-ins
6-11
5. Restart any open Office applications.
Extension Installation from EPM Cloud and MessageWindow Focus
Installing extensions from supported Oracle Enterprise Performance ManagementCloud services involves downloading an extension installer file and double-clicking it.When double-clicking an extension installer (.svext), a message window is displayedindicating the success or failure of the installation. The message window cansometimes lose focus and go behind another open window, and can easily gounnoticed. This may lead to users trying to install the extension again, causing an errordue to the previous open message window having a hold on the folder and files.
To clean up this extension installation issue:
1. Close all Office applications (Excel, Word, PowerPoint, Outlook).
2. Check the Windows task bar for an existing message window, and close it.
3. Remove prior extension installations:
a. Navigate to %AppData%\Oracle\SmartView\extensions\bin
b. Delete the extension folder.
For example, to delete the Oracle Enterprise Performance Reporting Cloudextension folder, delete the Oracle.SmartView.EPRCSExtension folder.
c. Delete the extension installation folder.
For example, to delete the Oracle Enterprise Performance Reporting Cloudextension installation folder, delete the EPRCSProviderInstaller folder.
Chapter 6Extension Installation from EPM Cloud and Message Window Focus
6-12
4. Remove pending installations:
a. Navigate to %AppData%\Oracle\SmartView\extensions\update
b. Delete the pending extension installation folder.
For example, to delete the Oracle Enterprise Performance Reporting Cloudpending extension installation folder, then delete theOracle.SmartView.EPRCSExtension folder.
5. Return to the location where you previously downloaded the extension installerfile, and double-click it.
For example, to install the Oracle Enterprise Performance Reporting Cloudextension, double-click EPRCSProviderInstaller.svext.
6. Open Excel, Word, or PowerPoint, and in the Smart View ribbon, click Options,then select Extensions, and then verify that the extension you installed is listed.
Extension Updates and Office Applications Remaining OpenIn order for extensions to be properly installed, removed, or updated, all Officeapplications must be shut down. When an Office application is reopened, updates forextensions are applied.
Sometimes, even though an Office application has been closed, it does not completelyshut down, or does not shut down in a timely manner. In these cases, an instance ofOffice is still running and Oracle Smart View for Office is unable to apply the extensionupdates correctly.
For these situations, it may be necessary to open the Windows Task Manager andlook for possible Office applications that may still be running. For Windows 10 users,navigate to the Details tab to find the correct process name corresponding to theOffice applications. Other Windows version users, navigate to the Processes tab.Application names to look for are Excel.exe, Outlook.exe, PowerPnt.exe, andWinword.exe.
If any of these application names are displayed in the Task Manager, click on thename and end the process.
Once all Office applications are closed, reopen one of the applications so that SmartView can apply pending updates.
Slowness with Extension Options Dialog BoxWhen opening the Extensions tab of the Options dialog box or when checking forextension updates, if your system seems to be taking a long time to complete thesetasks, ensure that the machine has access to the internet.
Office Slow to Start when Internet Connectivity is NotAvailable
When starting Office, Oracle Smart View for Office performs various security checks atstartup, including checks on all the installed extensions. Internet connectivity isrequired in order to perform these checks.
Chapter 6Extension Updates and Office Applications Remaining Open
6-13
Without internet connectivity, the security checks on extensions cannot be carried outand Office applications will be very slow to launch.
You may disable extensions in order to improve Office startup time, but you will losethe functionality related to those extensions, even if you are still able to connect todata providers through your company's intranet.
Oracle recommends verifying that you can connect to the internet when starting Officewith Smart View installed.
Excel Process Stops Responding (Hangs) on Shut DownExcel may be slow to shut down if the Excel15.xlb file is corrupted. This file storeschanges to the ribbons in Excel.
A simple fix to this issue is to rename Excel15.xlb. A clean Excel15.xlb file isrebuilt the next time you start Excel.
The Excel15.xlb file is located in the C:\Users\user\AppData\Roaming\Microsoft\Excel folder.
To rename the Excel15.xlb file:
1. Close any open Excel applications and ensure that all excel.exe processes in theTask Manager are ended.
2. Locate the Excel15.xlb file in your AppData folder; the default location is:
C:\Users\user\AppData\Roaming\Microsoft\Excel
Tip:
You can quickly navigate to this folder by entering %appdata%\Microsoft\Excel in the address bar of Windows Explorer.
3. Right-click the Excel15.xlb file name, then select Rename, then enter a newname for the file, and then press Enter.
For example, append .old to the name:
Excel15.xlb.old
4. Restart Excel.
A new Excel15.xlb file is created in the C:\Users\user\AppData\Roaming\Microsoft\Excel folder.
Extension Updates and OutlookWhen applying extension updates, if any Office application is running, includingOutlook, a message directs the user to close all Office applications. This includesOutlook, as well as Excel, Word, and PowerPoint.
If the message in Figure 1 is displayed after attempting an extension update, it meansthat one of the Office applications was not closed. Often, the application left open isOutlook.
Chapter 6Excel Process Stops Responding (Hangs) on Shut Down
6-14
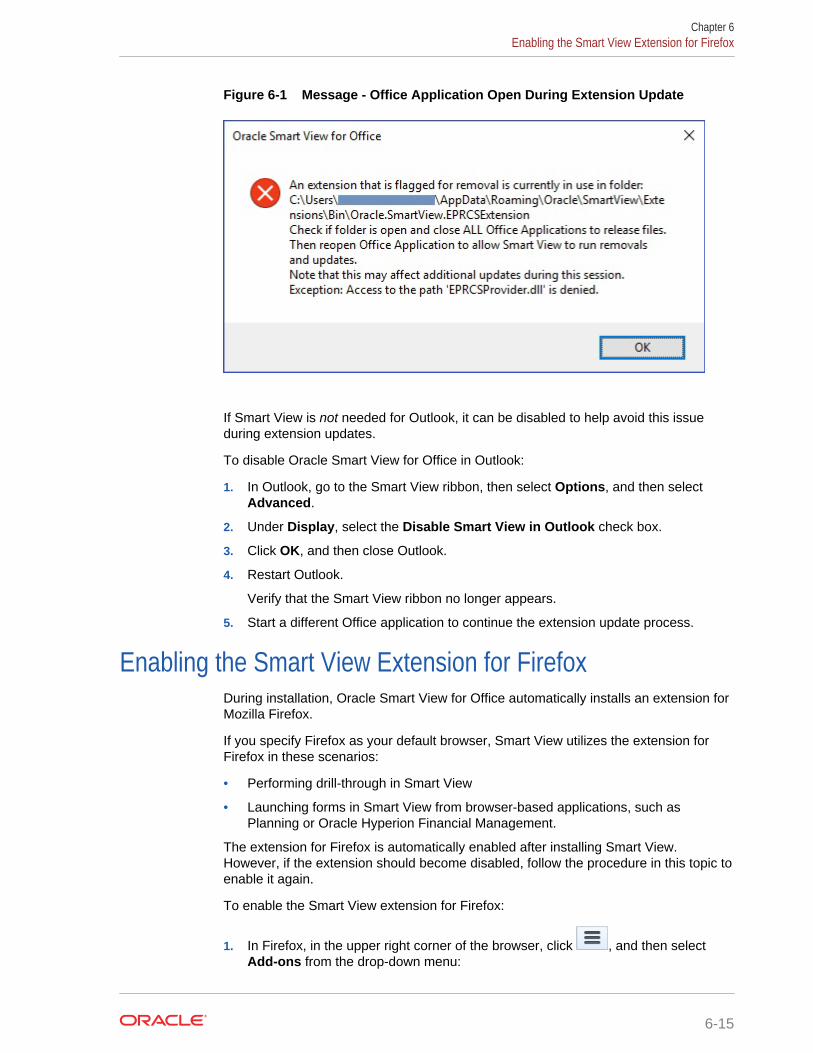
Figure 6-1 Message - Office Application Open During Extension Update
If Smart View is not needed for Outlook, it can be disabled to help avoid this issueduring extension updates.
To disable Oracle Smart View for Office in Outlook:
1. In Outlook, go to the Smart View ribbon, then select Options, and then selectAdvanced.
2. Under Display, select the Disable Smart View in Outlook check box.
3. Click OK, and then close Outlook.
4. Restart Outlook.
Verify that the Smart View ribbon no longer appears.
5. Start a different Office application to continue the extension update process.
Enabling the Smart View Extension for FirefoxDuring installation, Oracle Smart View for Office automatically installs an extension forMozilla Firefox.
If you specify Firefox as your default browser, Smart View utilizes the extension forFirefox in these scenarios:
• Performing drill-through in Smart View
• Launching forms in Smart View from browser-based applications, such asPlanning or Oracle Hyperion Financial Management.
The extension for Firefox is automatically enabled after installing Smart View.However, if the extension should become disabled, follow the procedure in this topic toenable it again.
To enable the Smart View extension for Firefox:
1. In Firefox, in the upper right corner of the browser, click , and then selectAdd-ons from the drop-down menu:
Chapter 6Enabling the Smart View Extension for Firefox
6-15
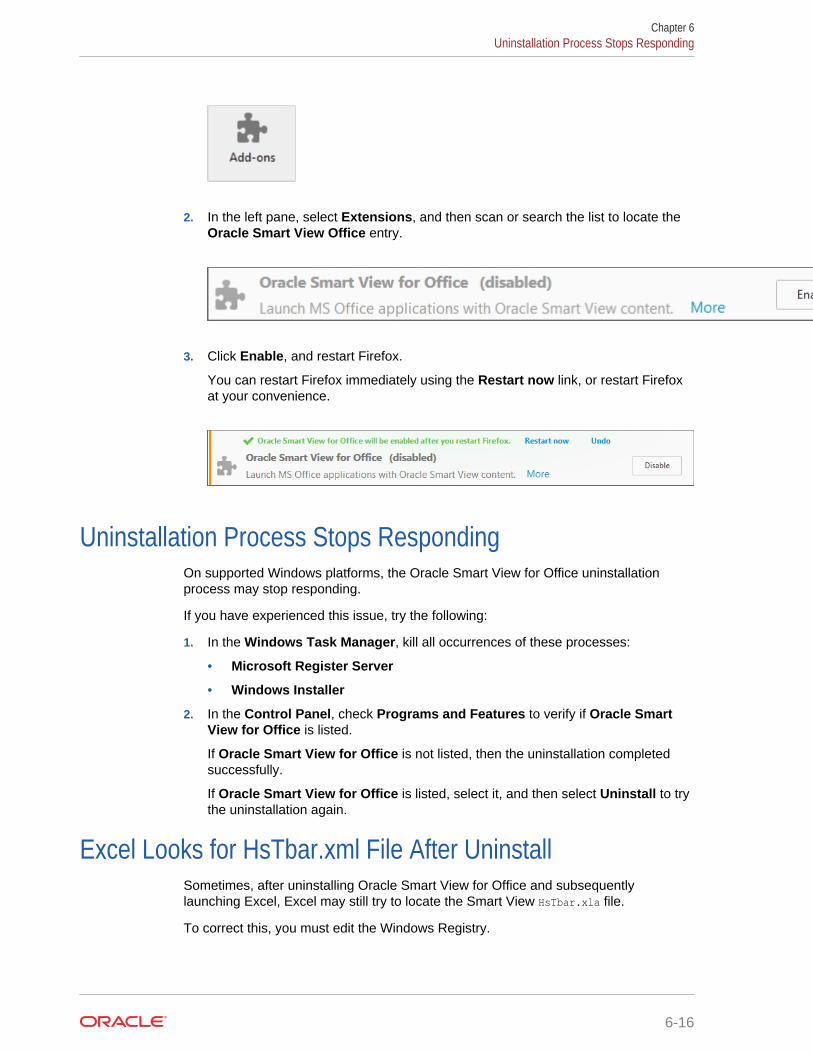
2. In the left pane, select Extensions, and then scan or search the list to locate theOracle Smart View Office entry.
3. Click Enable, and restart Firefox.
You can restart Firefox immediately using the Restart now link, or restart Firefoxat your convenience.
Uninstallation Process Stops RespondingOn supported Windows platforms, the Oracle Smart View for Office uninstallationprocess may stop responding.
If you have experienced this issue, try the following:
1. In the Windows Task Manager, kill all occurrences of these processes:
• Microsoft Register Server
• Windows Installer
2. In the Control Panel, check Programs and Features to verify if Oracle SmartView for Office is listed.
If Oracle Smart View for Office is not listed, then the uninstallation completedsuccessfully.
If Oracle Smart View for Office is listed, select it, and then select Uninstall to trythe uninstallation again.
Excel Looks for HsTbar.xml File After UninstallSometimes, after uninstalling Oracle Smart View for Office and subsequentlylaunching Excel, Excel may still try to locate the Smart View HsTbar.xla file.
To correct this, you must edit the Windows Registry.
Chapter 6Uninstallation Process Stops Responding
6-16
To edit the Windows Registry to keep Excel from looking for HsTbar.xml file afteruninstalling Smart View:
1. Open the Windows Registry Editor (enter regedit in a command window).
2. Locate this key:
HKEY_CURRENT_USER\Software\Microsoft\Office\<OfficeVersion>\Excel\Options
3. Delete the OPEN or OPEN<n> entry where the value in the Data column containsHsTbar.xla.
For example:
C:\Oracle\SmartView\bin\HsTbar.xla
When there are multiple OPEN entries, perform these steps:
a. Delete all OPEN entries where the Data column value contains HsTbar.xla.
b. Rename all remaining OPEN<n> entries, maintaining their sequential values.
For example, here are six OPEN entries, where two of the entries, OPEN andOPEN4, contain HsTbar.xla in the Data column.
Name Value in Data ColumnOPEN Contains HsTbar.xlaOPEN1 Does not contain HsTbar.xlaOPEN2 Does not contain HsTbar.xlaOPEN3 Does not contain HsTbar.xlaOPEN4 Contains HsTbar.xlaOPEN5 Does not contain HsTbar.xla
Delete the OPEN and OPEN4 entries, and then rename the remaining entries asfollows, maintaining their sequential order:
• Rename OPEN1 to OPEN
• Rename OPEN2 to OPEN1
• Rename OPEN3 to OPEN2
• Rename OPEN5 to OPEN3
The remaining entries are:
Name Value in Data ColumnOPEN Does not contain HsTbar.xlaOPEN1 Does not contain HsTbar.xlaOPEN2 Does not contain HsTbar.xlaOPEN3 Does not contain HsTbar.xla
Internet Explorer Compatibility View Settings for FinancialReporting
When running a Oracle Hyperion Financial Reporting report from Oracle Smart Viewfor Office, a web control is called that causes this error to display: "The product doesnot support compatibility view. Contact your system administrator to help configureyour settings."
By default, the web control runs in compatibility mode, triggering the compatibilitymessage.
Chapter 6Internet Explorer Compatibility View Settings for Financial Reporting
6-17
Workarounds:
• Click to clear the message, and the report preview displays as expected.
• To avoid the compatibility message, modify the Windows Registry as follows.
For 32-bit Office:
In [HKEY_LOCAL_MACHINE\SOFTWARE\Wow6432Node\Microsoft\Internet Explorer\MAIN\FeatureControl\FEATURE_BROWSER_EMULATION], add the following three DWORD (32-bit) values:
"EXCEL.EXE"=dword:00008000"POWERPNT.EXE"=dword:00008000"WINWORD.EXE"=dword:00008000
For 64-bit Office:
Add the three DWORD values for Excel, PowerPoint, and Word in[HKEY_LOCAL_MACHINE\SOFTWARE\Microsoft\Internet Explorer\MAIN\FeatureControl
\FEATURE_BROWSER_EMULATION].
The values must match your installed version of Internet Explorer. If you areunsure which entry to use, then use the 32-bit Office values noted above.
Internet Explorer 8:
"EXCEL.EXE"=dword:00008000"POWERPNT.EXE"=dword:00008000"WINWORD.EXE"=dword:00008000
Internet Explorer 9:
"EXCEL.EXE"=dword:00009000"POWERPNT.EXE"=dword:00009000"WINWORD.EXE"=dword:00009000
Internet Explorer 10:
"EXCEL.EXE"=dword:00010000"POWERPNT.EXE"=dword:00010000"WINWORD.EXE"=dword:00010000
Internet Explorer 11:
"EXCEL.EXE"=dword:00011000"POWERPNT.EXE"=dword:00011000"WINWORD.EXE"=dword:00011000
Web Launch with Internet Explorer in Protected ModeWhen Microsoft Internet Explorer is running in protected mode, web launch does notfunction. This means you cannot launch Oracle Smart View for Office content fromInternet Explorer.
In Internet Explorer, you can add specific website URLS as trusted sites and clear theprotected mode setting for those sites. Then you can launch Smart View content fromInternet Explorer
To add trusted URLs and clear the protected mode setting for those URLs:
Chapter 6Web Launch with Internet Explorer in Protected Mode
6-18
1. In Internet Explorer, go to Internet Options, then Security, and then Trustedsites.
2. Click Sites, then add the workspace URL or cloud service URL to the list of trustedsites.
Repeat for all trusted workspace and cloud service URLs that you want to add.
3. Click Close.
4. Verify that in the Security tab, the Enable Protected Mode check box is cleared.
5. Click OK to exit the Internet Options dialog, and restart Internet Explorer.
Working with Custom HTML-based Login FormsIf you are using a custom HTML-based login form instead of the default Oracle AccessManager login form, ensure that the source of the custom form includes the stringloginform. This is required for Oracle Smart View for Office integration with OracleAccess Manager to work.
Browser Settings When Working with XML Files on HTTPServer
Internet Explorer may cache XML files posted on an HTTP server and referenced byOracle Smart View for Office. This can cause problems when using the followingSmart View functionality:
• Accessing shared connections from an XML file
This is the XML file posted on an HTTP server and noted in the SharedConnections URL field of the Smart View Options dialog box. If you plan toaccess online help from a local drive or internal web server, this file can alsospecify the location of the help.
• Updating extensions
Smart View references the UpdateList.xml file that is posted on an HTTP serverwhen Smart View end users install, update, and remove extensions in theExtensions tab of the Options dialog box.
Complete the steps in this topic to clear the browser cache so that the latest version ofthe XML file is used for the purposes noted above.
To clear the cache so that Smart View is accessing the latest XML file version postedon an HTTP server, set the following options in Internet Explorer:
1. Select Tools, then Internet Options.
2. In the General tab, Browsing history group, select Settings.
3. In the Check for newer versions of stored pages section, select Every time Ivisit the webpage, and then click OK.
4. In the Internet Options dialog box, select the Advanced tab.
5. In the Security section, select the Empty Temporary Internet Files folder whenbrowser is closed option.
6. Click OK to close Internet Options and restart the browser.
Chapter 6Working with Custom HTML-based Login Forms
6-19
Flickering Issues on Office 2013 and Office 2016When using Smart View with Microsoft Office 2013 or 2016, 32-bit or 64-bit, flickeringoccurs with the POV toolbar and the Smart View Panel. The flickering is likely causedby changes in Excel 2013 and Excel 2016.
To reduce flickering, Oracle advises that you add the following two DWORD values tothe Windows Registry:
• Disable Window Transitions (DisableWindowTransitionsOnAddinTaskPanes)
• Disable Office Animations (DisableAnimations)
Disable Window Transitions(DisableWindowTransitionsOnAddinTaskPanes)
To improve the user experience, you may enable the DWORD valueDisableWindowTransitionsOnAddinTaskPanes for Office 2013 and 2016. To do this,add the DisableWindowTransitionsOnAddinTaskPanes key value to the Toolbars keyin the Windows Registry as follows:
• Key Name:
[HKEY_CURRENT_USER\Software\Microsoft\Office\<OfficeVersion>\Common\Toolbars]
• New DWORD and value:
"DisableWindowTransitionsOnAddinTaskPanes"=dword:1
To add the new DisableWindowTransitionsOnAddinTaskPanes DWORD to theToolbars registry key:
1. Click Start, click Run, type regedit in the Open box, and then click OK.
2. Depending on your Office version, locate and then select the following registrykey:
• Office 2013:
HKEY_CURRENT_USER\Software\Microsoft\Office\15.0\Common\Toolbars
• Office 2016:
HKEY_CURRENT_USER\Software\Microsoft\Office\16.0\Common\Toolbars
3. From the Edit menu, select New, and then select DWORD Value.
4. Type DisableWindowTransitionsOnAddinTaskPanes, and then press Enter.
5. In the Details pane, right-click DisableWindowTransitionsOnAddinTaskPanes,and then select Modify.
6. In the Value data box, type 1, and then click OK.
7. Exit Registry Editor.
8. Restart Excel.
Chapter 6Flickering Issues on Office 2013 and Office 2016
6-20
Disable Office Animations (DisableAnimations)To further improve the user experience, you may disable Office Animations for Office2013 and 2016 by adding a key and DWORD value to the Windows Registry. To dothis, create the Graphics key and DisableAnimations key value as follows:
• Key Name:
[HKEY_CURRENT_USER\Software\Microsoft\Office\<OfficeVersion>\Common\Graphics]
• Key Value:
"DisableAnimations"=dword:00000001
To create and then update the registry key, Graphics, and add the newDisableAnimations DWORD value:
1. Click Start, click Run, type regedit in the Open box, and then click OK.
2. Locate and then select the following registry key:
• Office 2013:
HKEY_CURRENT_USER\Software\Microsoft\Office\15.0\Common\
• Office 2016:
HKEY_CURRENT_USER\Software\Microsoft\Office\16.0\Common\
3. From the Edit menu, select New, and then select Key.
4. Type Graphics, and then press Enter.
5. From the Edit menu, select New, and then select DWORD Value.
6. Type DisableAnimations, and then press Enter.
7. In the Details pane, right-click DisableAnimations, and then click Modify.
8. In the Value data box, type 00000001, and then click OK.
9. Exit Registry Editor.
10. Restart Excel.
Transition Navigation Keys Not SupportedOracle Smart View for Office does not support Excel’s Transition navigation keysoption.
Due to a Microsoft limitation, many of the Microsoft APIs that Smart View depends onfor both Smart View and Excel functionality do not work when the Transitionnavigation keys option is enabled. For example:
• In Excel, copy/paste, macros, automation API calls do not work correctly.
• In the Planning Admin extension, member formula formatting in the Smart ViewDimension Editor does not display correctly; formulas have incorrect syntax whensubmitted to Oracle Hyperion Planning.
In order to ensure the best performance possible, Smart View requires the following:
• The Excel option, Transition navigation keys, must be cleared.
Chapter 6Transition Navigation Keys Not Supported
6-21
• The Smart View option, Improve Metadata Storage, must be enabled (bydefault, this option is enabled).
Smart View HTTP Session TimeoutHTTP session timeouts can occur, for example, when working with large queries thattake a long time to run, or when you're experiencing slower internet connections.
To avoid HTTP session timeouts, you may add the following Windows RegistryDWORDS to the Internet Settings key:
• Key Name:
HKEY_CURRENT_USER\Software\Microsoft\Windows\CurrentVersion\Internet Settings
• Key Values:
– DWORD: ReceiveTimeout
Value data: value in milliseconds
– DWORD: KeepAliveTimeout
Value data: value in milliseconds
– DWORD: ServerInfoTimeout
Value data: value in milliseconds
For example, 900000 milliseconds is the equivalent of 15 minutes. Adjust thetiming according to your requirements.
As a guideline, 900000 milliseconds is the equivalent of 15 minutes.
To add the timeout key values to the Internet Settings registry key:
1. Ensure that all Office applications, including Outlook, are closed.
2. Launch the Windows Registry Editor.
3. Locate and then select the following registry subkey:
HKEY_CURRENT_USER\Software\Microsoft\Windows\CurrentVersion\Internet Settings
4. Add the three DWORD key values, ReceiveTimeout, KeepAliveTimeout, andServerInfoTimeout:
a. From the Edit menu, select New, and then select DWORD Value.
b. Type the DWORD name, and then press Enter.
c. In the Details pane, right-click DWORD you added in step 4.b, and then selectModify.
d. In the Value data text box, type the timeout value in milliseconds, selectDecimal, and then click OK.
e. Repeat step 4.a through step 4.d for each of the three required DWORD keyvalues.
5. Exit Registry Editor.
6. Restart Excel.
Chapter 6Smart View HTTP Session Timeout
6-22
Duplicate Queries in Word Slow to RefreshIn some Word documents containing a large number of queries and created prior toOracle Smart View for Office release 11.1.2.5.520, performance may be an issuewhen refreshing the data in the document. In some cases, instead of re-using existingqueries where appropriate, each Smart View data point in the Word document istreated as a separate query. The result is that Refresh operations can be very slow.
If the document contains many duplicate queries (that is, queries with the samename), the duplicate queries are displayed in the Document Contents pane in Word.For example, Document Contents might look like this:
Chapter 6Duplicate Queries in Word Slow to Refresh
6-23
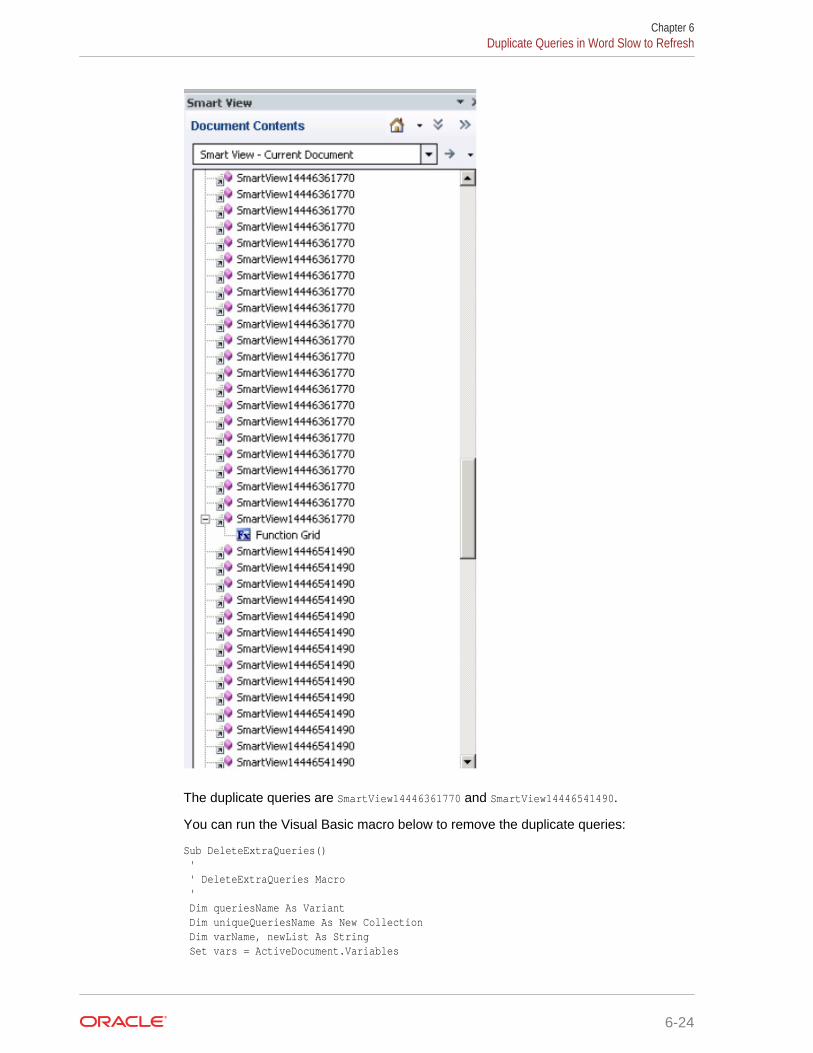
The duplicate queries are SmartView14446361770 and SmartView14446541490.
You can run the Visual Basic macro below to remove the duplicate queries:
Sub DeleteExtraQueries() ' ' DeleteExtraQueries Macro ' Dim queriesName As Variant Dim uniqueQueriesName As New Collection Dim varName, newList As String Set vars = ActiveDocument.Variables
Chapter 6Duplicate Queries in Word Slow to Refresh
6-24
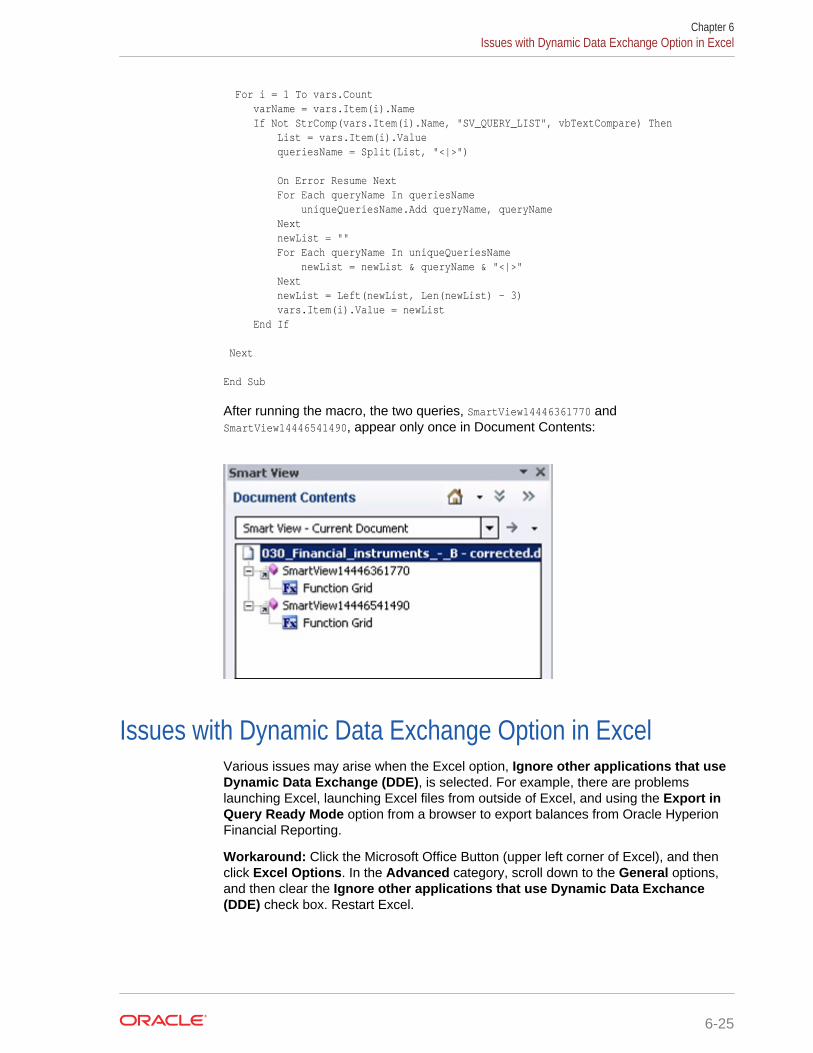
For i = 1 To vars.Count varName = vars.Item(i).Name If Not StrComp(vars.Item(i).Name, "SV_QUERY_LIST", vbTextCompare) Then List = vars.Item(i).Value queriesName = Split(List, "<|>") On Error Resume Next For Each queryName In queriesName uniqueQueriesName.Add queryName, queryName Next newList = "" For Each queryName In uniqueQueriesName newList = newList & queryName & "<|>" Next newList = Left(newList, Len(newList) - 3) vars.Item(i).Value = newList End If Next End Sub
After running the macro, the two queries, SmartView14446361770 andSmartView14446541490, appear only once in Document Contents:
Issues with Dynamic Data Exchange Option in ExcelVarious issues may arise when the Excel option, Ignore other applications that useDynamic Data Exchange (DDE), is selected. For example, there are problemslaunching Excel, launching Excel files from outside of Excel, and using the Export inQuery Ready Mode option from a browser to export balances from Oracle HyperionFinancial Reporting.
Workaround: Click the Microsoft Office Button (upper left corner of Excel), and thenclick Excel Options. In the Advanced category, scroll down to the General options,and then clear the Ignore other applications that use Dynamic Data Exchance(DDE) check box. Restart Excel.
Chapter 6Issues with Dynamic Data Exchange Option in Excel
6-25
Performance and Memory Usage Considerations for SmartView with Excel
Oracle Smart View for Office is a Microsoft Office add-in. As an add-in, it is loaded into the Microsoft Excel process. When a report is imported into Excel through SmartView, the Excel process consumes memory and this can negatively impactperformance.
For example, instances of grids and forms, objects in the Undo buffer, XML parsing,etc., will cause the Excel process to consume memory. Because of this, the Excel ormachine memory limit becomes the Smart View memory limit as well. This canseverely impact performance.
There is no memory configuration parameter in Smart View to manage this.
Excel 32-bit and 64-bit have different memory limits:
• For Excel 32-bit, the maximum memory limit, or RAM, is 2GB.
Oracle testing showed that when Excel 32-bit memory usage reaches beyond 700MB, Excel can behave abnormally and can terminate unexpectedly.
• The 64-bit versions of Excel are not constrained to 2 GB of RAM, as are the 32-bitOffice applications.
For large reports, Oracle recommends using 64-bit Excel. Or consider reducingthe data being sent to Smart View by reducing the number of rows, columns, andPOVs in the reports.
Oracle suggests that you consider taking some or all of the actions listed below in aneffort to limit memory usage and improve performance.
The following actions can help to limit memory usage:
1. In the Smart View Options dialog box, Advanced tab, ensure that these optionsare enabled:
• Reduce Excel File Size
• Improve Metadata Options
2. In the Options dialog box, Advanced tab, set Number of Undo Actions to '0'(zero), if possible, or to a low number such as 1 or 2.
3. Change Excel calculation from Automatic to Manual. Go to the Excel Formulasribbon, then select Calculation Options, and then select Manual.
4. In the Options dialog box, Formatting tab,
a. If you have selected the Use Excel Formatting option, then you should clearthe Move Formatting on Operations option.
b. Clear the Adjust Column Width option.
c. Clear the Retain Numeric Formatting option.
5. In the Options dialog box, Extensions tab, disable any unneeded extensions.
6. In Excel, to improve performance and stability, disable or uninstall any unusedadd-ins. For example, disable or uninstall the Oracle Essbase Spreadsheet Add-
Chapter 6Performance and Memory Usage Considerations for Smart View with Excel
6-26
in. Other possible add-ins to disable or uninstall are, for example, Adobe PDF,WebEx, or Send to Bluetooth
7. Reduce the workbook size.
8. Limit the data imported to Excel:
a. Use prompts, filters, POVs, or other ways to reduce the data returned back toSmart View.
b. Enable the Suppress Rows and Suppress Columns options in the DataOptions tab of the Smart View Options dialog box.
The following actions can help to improve performance, as well as limit memoryusage:
1. In the Options dialog box, Advanced tab, set Number of Undo Actions to '0'(zero), if possible.
2. In the Options dialog box, Member Options tab, ensure that these options arecleared:
• Preserve Formulas and Comments in ad hoc options
• Formula Fill
Clear these options only if you do not need to preserve formulas or commentsduring ad hoc operations.
Also, refer to the following documentation from Microsoft, "Excel 2010 Performance:Performance and Limit Improvements":
http://msdn.microsoft.com/en-us/library/ff700514(v=office.14).aspx
Unbalanced Loads in Provider Services ClusteredEnvironments
In some Oracle Hyperion Provider Services clustered environments, if Oracle SmartView for Office requests appear to be going to only one server in the cluster (that is,the load is unbalanced), then try changing the security level in Microsoft InternetExplorer to Medium.
To do this, in Internet Explorer, go to Tools, then Internet Options, and then selectthe Security tab. Under Security levels for this zone, set the allowed level for theaffected zone to Medium.
Two-Way SSL and Problematic CertificatesIf two-way SSL is set up with problematic certificates between Oracle Smart View forOffice and other Oracle Enterprise Performance Management System data providers,Smart View will prompt for the client-side certificate with every request. For example,the user will be prompted when connecting to the data source, connecting to anapplication, connecting to a database, and at every refresh, submit, or zoom operation.
To avoid this situation, you must update the properties.xml file on each end usermachine to add the clientCert name tag. For example:
<cfg> <provider>
Chapter 6Unbalanced Loads in Provider Services Clustered Environments
6-27
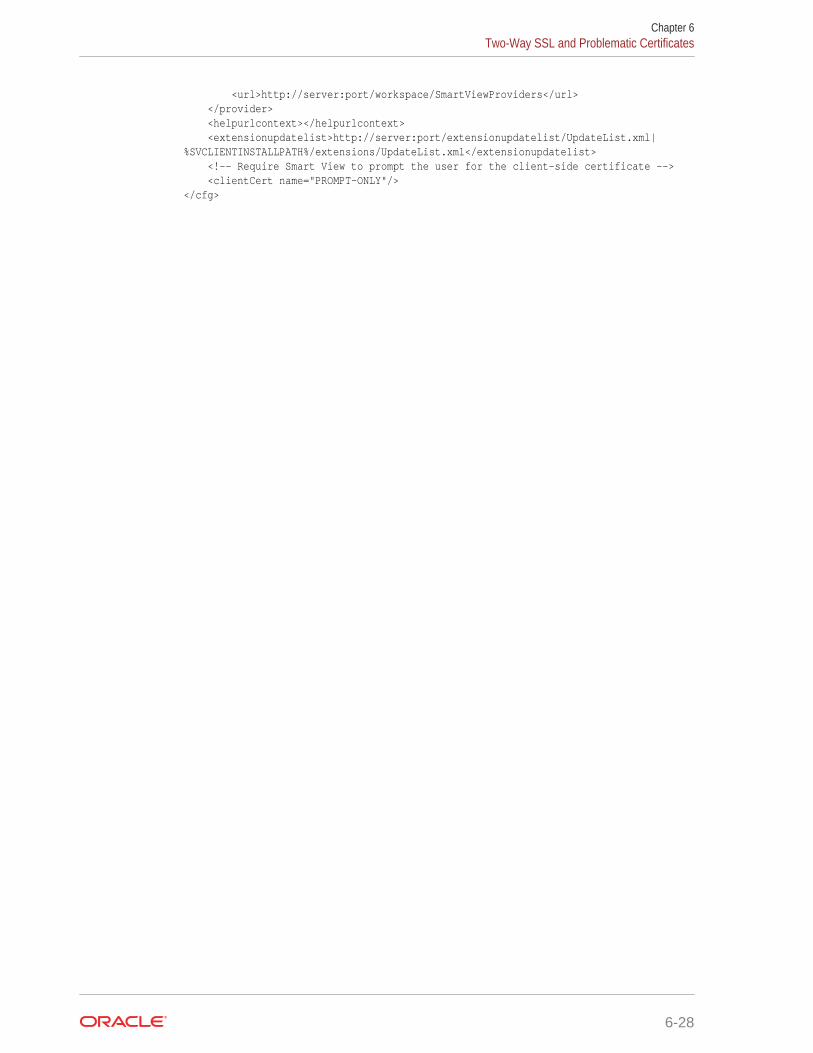
<url>http://server:port/workspace/SmartViewProviders</url> </provider> <helpurlcontext></helpurlcontext> <extensionupdatelist>http://server:port/extensionupdatelist/UpdateList.xml|%SVCLIENTINSTALLPATH%/extensions/UpdateList.xml</extensionupdatelist> <!-- Require Smart View to prompt the user for the client-side certificate --> <clientCert name="PROMPT-ONLY"/></cfg>
Chapter 6Two-Way SSL and Problematic Certificates
6-28