installation and release notes - micro focus · accurev 7.0 upgrades the postgresql version from...
TRANSCRIPT

Revised 17-November-2016
AccuRev®
Installation and Release NotesVersion 7.0

Copyright and TrademarksCopyright © Micro Focus 2016. All rights reserved.
This product incorporates technology that may be covered by one or more of the following patents: U.S. Patent Numbers: 7,437,722; 7,614,038; 8,341,590; 8,473,893; 8,548,967.
AccuRev, AgileCycle, and TimeSafe are registered trademarks of Micro Focus.
AccuBridge, AccuReplica, AccuSync, AccuWork, AccuWorkflow, Kando, and StreamBrowser are trademarks of Micro Focus.
All other trade names, trademarks, and service marks used in this document are the property of their respective owners.

Table of Contents
Introduction............................................................................................................................................... 1Highlights of this Release .................................................................................................................... 1
Disaster Recovery - Replica Rollback........................................................................................... 1License Manager............................................................................................................................ 1Change Package Usability Enhancements..................................................................................... 1GUI Improvements ........................................................................................................................ 2Database Upgrade.......................................................................................................................... 3
AccuRev Installation Notes...................................................................................................................... 5Compatibility with Previous Versions ................................................................................................. 5System Requirements........................................................................................................................... 5Browser Requirements ......................................................................................................................... 6Installation Overview........................................................................................................................... 7
Installation Packages ..................................................................................................................... 7The Mosquitto MQTT Message Broker ........................................................................................ 8Installation Wizards....................................................................................................................... 8Post-installation Administrative Scripts ........................................................................................ 8
Preparing for Installation...................................................................................................................... 8Get an AccuRev License ............................................................................................................... 9Determine Configurable Elements ................................................................................................ 9Download the Installation Packages............................................................................................ 10What to Do Next.......................................................................................................................... 10
Installing or Upgrading an AccuRev Server ...................................................................................... 11Before You Begin........................................................................................................................ 11Running the AccuRev Installation Wizard.................................................................................. 12
Server and Database Upgrades........................................................................................................... 17Upgrading an AccuRev Server from 5.7 or Higher..................................................................... 17Upgrading a Replica Server......................................................................................................... 17
Installing or Upgrading an AccuRev Client....................................................................................... 18Installation Methods .................................................................................................................... 18Before You Begin........................................................................................................................ 18Using the AccuRev Client-only Installation Package ................................................................. 19Using "Silent" Client Installations............................................................................................... 22
Installing or Updating the AccuRev Web UI Server ......................................................................... 24Before You Begin........................................................................................................................ 24How to Run the AccuRev Installation Wizard ............................................................................ 24Starting, Stopping, and Testing the AccuRev Web UI Server .................................................... 27Testing the AccuRev Web UI...................................................................................................... 27Configuring the AccuRev Web UI .............................................................................................. 27Post-Installation Information....................................................................................................... 28
Configuring Database Tuning Parameters ......................................................................................... 28Starting and Stopping AccuRev Servers ............................................................................................ 29
Starting and Stopping the AccuRev Server ................................................................................. 29Starting and Stopping the AccuRev Database Server ................................................................. 29
AccuRev® Installation and Release Notes iii

Starting and Stopping the AccuRev Tomcat Server and Mosquitto MQTT Message Broker .... 30Summary of Start and Stop Operations ....................................................................................... 31
Platform Support Notes...................................................................................................................... 31Platform Support Matrix.............................................................................................................. 31Java Compatibility....................................................................................................................... 31(UNIX/Linux only) Workaround for Java Runtime Library Problems....................................... 32Linux............................................................................................................................................ 32AIX .............................................................................................................................................. 32Solaris .......................................................................................................................................... 33Windows...................................................................................................................................... 34Mac OS X .................................................................................................................................... 34
Uninstalling AccuRev ........................................................................................................................ 34
AccuRev 7.0 Release Notes..................................................................................................................... 35Changes in AccuRev Release 7.0....................................................................................................... 35
Corrections and Changes to the Documentation ......................................................................... 38Known Issues ..................................................................................................................................... 39
Known Issues in AccuRev........................................................................................................... 39
AccuRev® Installation and Release Notes iv

IntroductionMicro Focus proudly introduces AccuRev Version 7.0, helping you unleash the power of software development teams to deliver superior results. AccuRev 7.0 contains new features designed to increase productivity among software development teams, including several change package usability enhancements and a new Show Ancestry feature in the GUI’s Version Browser. AccuRev 7.0 also provides replica rollback capability, performance improvements, a database upgrade, and a new built-in license manager.
Highlights of this ReleaseHighlights of the exciting developments in AccuRev 7.0 are captured here.
Disaster Recovery - Replica RollbackReplica rollback streamlines disaster recovery operations in a replicated environment. When the master AccuRev server has been restored to a previous backup, the replica sync command detects the change and initiates the rollback. The operation calculates how far back the replica must roll, removing database transactions and unused storage containers in depot slices. It then performs the normal sync to bring the replica in sync with the master.
License ManagerAccuRev 7.0 replaces the Reprise RLM license manager with a new built-in license manager. The new license manager supports standard and flexible licenses. The license file is now named aclicense.txt instead of accurev.lic.
Note: In order to upgrade to AccuRev 7.0, you must first obtain a new license. For instructions on that procedure, see Get an AccuRev License on page 9.
See the AccuRev Administrator’s Guide for a full description of license management in AccuRev 7.0.
Change Package Usability Enhancements
Promote and Demote an Issue VariantAccuRev 7.0 provides the ability to promote or demote an issue variant in certain use cases. The prerequisites for promoting or demoting an issue variant are the same as those for operating on a regular (non-variant) issue: no dependencies on other issues; no overlap; the basis version must be in the backing stream; and the version must coalesce with the backing stream versions.
Show Diff By IssuesIn AccuRev 7.0 the Show Diff by Issues operation can display differences in issue variants.
AccuRev® Installation and Release Notes 1

Change Package DependenciesAccuRev 7.0 can display change package dependencies of an issue variant. That is, it can display the issues that a particular issue variant depends on, ignoring the issues that other variants might depend on.
Merge with Backing StreamFor the merge with backing stream operation, AccuRev 7.0 has switched the “Merge-from” version and the direct ancestor version in the Version Browser display. The red merge line now originates at a workspace version instead of a backing stream version. This change enables a rebase merge to occur without losing any change package information. This change affects only Merge operations executed in 7.0 and later; it does not modify Merge operations recorded prior to 7.0.
New “Already Included” Change Package Element StatusIn the GUI’s Show Active Issues tab, clicking on an issue in the top pane causes the bottom pane to display data about the elements in that issue’s change package, including the version and status of each element. In AccuRev 7.0, the status of an element might be displayed as “Already Included”. This means that the exact version that is part of the change package is not in the stream, but a variant of it is. The version in the stream (the variant) is either a merge ancestor or a path ancestor of the version in the change package.
GUI Improvements
Show Ancestry Feature of Version BrowserThe Version Browser’s new Show Ancestry feature helps the user see through the clutter of a complex, crowded version tree. The new Ancestry button in the Version Browser allows the user to select a version in the display and then toggle between displaying only the ancestor versions of the selected version (along with related virtual versions) and displaying all of the element’s versions. The Show Ancestry context menu item enables the user to continually refine the display by viewing the ancestors of one version, then the ancestors of one of those ancestors, etc.
Stream Browser PerformanceAccuRev 7.0 accomplishes a significant improvement in Stream Browser performance by implementing lazy rendering of versions in the Stream Browser display. As the user scrolls to different parts of the version tree, the versions in those parts are rendered in the display and then cached. This approach dramatically speeds up opening a Stream Browser in a depot that has thousands of streams.
Rich Text EditorA new rich text editor is included in AccuRev 7.0. It resolves some defects related to pasting text into the editor, and it supports the new Spell Checking feature.
Spell CheckingSpell checking functionality has been added to the AccuRev GUI. A new AccuRev preference called Enable Spell Checking toggles spell checking functionality in Text- and Log-type issue fields and in the comment field for operations like Keep and Promote. Toggling the value affects tabs that are opened from that time forward; tabs that are already open are not affected.
Spell checking functionality:
AccuRev® Installation and Release Notes 2

Potential misspellings are highlighted by a red underline. The case of the first letter of any word is not significant during dictionary lookup.
Spell checking can be done either from the context menu or by pressing the F7 key to bring up a dialog.
In rich-text fields, correcting a spelling error removes any formatting of the word.
Users can define their own dictionaries and change the language used for spell checking. Currently supported languages are: English, German, Spanish, French, and Portuguese.
Database UpgradeAccuRev 7.0 upgrades the PostgreSQL version from 8.4.3 to 9.5.3. The db directory is no longer under the storage directory; instead, it is now located under postgresql/9.5/, conforming to PostgreSQL convention. After upgrading AccuRev to version 7.0, the system administrator must upgrade the database by running maintain migratepg <db_admin>.
See the AccuRev Administrator’s Guide for more information.
AccuRev® Installation and Release Notes 3

AccuRev® Installation and Release Notes 4

AccuRev Installation NotesThis chapter describes how to install and upgrade AccuRev 7.0 software at your site. In addition to installation procedures, it provides information about installation package options, considerations for upgrading, and post-installation procedures. AccuRev 7.0 is intended for new customers, and for all existing customers who wish to upgrade to the latest AccuRev release.
This chapter is intended for the AccuRev administrator responsible for installing and upgrading AccuRev. Users responsible for installing or upgrading their individual AccuRev Client installations will probably be most interested in the material discussed in Installing or Upgrading an AccuRev Client on page 18.
Compatibility with Previous VersionsAccuRev 7.0 is not compatible with previous versions of AccuRev -- 7.0 AccuRev Clients will only work with the 7.0 AccuRev Server, and the 7.0 AccuRev Server does not support existing (6.2.3 and earlier) AccuRev Clients.
For a high level summary of new features in Release 7.0, see Highlights of this Release on page 1. For a detailed list of changes, see AccuRev 7.0 Release Notes on page 35.
IMPORTANT NOTE ABOUT LICENSES: Because AccuRev 7.0 has a new license manager and license file format, it is necessary to obtain a new AccuRev license before upgrading to AccuRev 7.0. For instructions on that procedure, see Get an AccuRev License on page 9.
See the AccuRev Administrator’s Guide for a full description of license management in AccuRev 7.0.
System RequirementsAccuRev has the following system requirements
Client
Microsoft Windows 7 Enterprise SP1 (32-bit and 64-bit)
Microsoft Windows 8 Enterprise (32-bit and 64 bit)
Microsoft Windows 8 Professional (32-bit and 64-bit)
Microsoft Windows 8.1 Enterprise (64-bit)
Microsoft Windows 8.1 Professional (64-bit)
Microsoft Windows 10 Pro (64-bit)
Microsoft Windows Server 2008 SP2 (32-bit and 64-bit)
Microsoft Windows Server 2012 (64-bit)
Apple Mac OSX Mavericks 10.9 (64-bit)
Apple Mac OSX Yosemite 10.10 (64-bit)
Apple Mac OSX El Capitan 10.11 (64-bit)
AccuRev® Installation and Release Notes 5

Linux Red Hat Enterprise 5 (32-bit and 64-bit)
Linux Red Hat Enterprise 6 (32-bit and 64-bit)
Linux Red Hat Enterprise 7 (64-bit)
Linux SUSE 12+ (32-bit and 64-bit)
Linux Fedora 23+ (32-bit and 64-bit)
Linux Ubuntu 12+ (32-bit and 64-bit)
Linux CentOS 6 (32-bit and 64-bit)
Linux CentOS 7 (64-bit)
Unix IBM AIX 6.x (Command Line only)
Unix IBM AIX 7.x (Command Line only)
Unix Solaris 10 (Intel 64-bit)
Unix Solaris 11 (Intel 64-bit)
Server
Microsoft Windows 7 Enterprise SP1 (64-bit)
Microsoft Windows 8 Enterprise (64 bit)
Microsoft Windows 8 Professional (64-bit)
Microsoft Windows 8.1 Enterprise (64-bit)
Microsoft Windows 8.1 Professional (64-bit)
Microsoft Windows 10 Pro (64-bit)
Microsoft Windows Server 2008 SP2 (64-bit)
Microsoft Windows Server 2012 (64-bit)
Linux Red Hat Enterprise 5 (64-bit)
Linux Red Hat Enterprise 6 (64-bit)
Linux Red Hat Enterprise 7 (64-bit)
Linux SUSE 12+ (64-bit)
Linux Fedora 23+ (64-bit)
Linux Ubuntu 12+ (64-bit)
Linux CentOS 6 (64-bit)
Linux CentOS 7 (64-bit)
Unix Solaris 10 (Intel 64-bit)
Unix Solaris 11 (Intel 64-bit)
Browser RequirementsAccuRev has the following browser requirements:
6 AccuRev® Installation and Release Notes

Microsoft Internet Explorer 11 and later
Microsoft Edge
Mozilla Firefox 20 and later
Google Chrome 20 and later
Apple Safari 6 and later
Installation OverviewGenerally speaking, installing AccuRev involves downloading an installation package from the Micro Focus Web site and running it on the target machines at your site. One machine should be designated as the AccuRev Server machine -- the one that runs the AccuRev Server process, the Web UI Server process, and hosts the AccuRev data repository. Other machines can access the AccuRev Server after you install the AccuRev Client software on them.
You can also have one or more replica servers in your environment. AccuRev replica servers enable you to provide access to remote users spread across multiple geographic sites. Replication can also enable you to distribute the load off a single server.
Installation PackagesAccuRev provides two installation packages: the AccuRev installation package, and the AccuRev Client-only installation package.
The AccuRev installation package lets you install either:
The AccuRev Server and Web UI Server - This is the correct choice for a new customer setting up the AccuRev infrastructure for the first time.
The AccuRev Web UI Server only - This is appropriate for users who wish to install only the AccuRev Web UI.
Both installation types can be used to install AccuRev components for the first time, or to upgrade existing AccuRev components. They can be run in either graphical (GUI) or text-based (console) interactive modes.
The AccuRev Client-only installation package lets you install or upgrade just the AccuRev Client. The client-only installation is useful if you just need to perform a simple client installation to use with an existing, up-to-date AccuRev Server. In addition to graphical (GUI) and text-based (console) interactive install modes, the Client-only installation package also supports a "silent" install mode. The "silent" install requires the presence of a response file, which contains a record of responses to prompts from an earlier installation. See Using "Silent" Client Installations on page 22 for more information.
If you are installing the AccuRev Client for the first time, or if you are upgrading from a previous version of AccuRev, you must download the AccuRev Client-only installation package for your client’s platform from the Micro Focus SupportLine download page.
If you are upgrading an existing client from AccuRev 5.7 or higher, however, consider using the Upgrade Client feature. See Installing or Upgrading an AccuRev Client on page 18 for more information.
AccuRev® Installation and Release Notes 7

AccuRev and AccuRev Client-only installation packages are available on the Micro Focus SupportLine page (http://supportline.microfocus.com/).
The Mosquitto MQTT Message BrokerAccuRev supports Message Queue Telemetry Transport (MQTT) message broker communications. By using an MQTT message broker, the AccuRev GUI client can automatically receive messages about dynamic changes occurring in Gated Streams from the AccuRev Server.
As of AccuRev 6.2, the Mosquitto MQTT message broker is automatically installed on Windows, Linux, and Solaris platforms so that the AccuRev server can update the AccuRev client with changes from the AccuRev server. MQTT automatically starts after the install. However after a reboot, the administrator should ensure that the process has been restarted or start it manually as required.
In a Windows environment, the Mosquitto message broker runs as a new service. By default, AccuRev attempts to access port number 1883 to use this message broker. If this port number is already in use or if your firewall denies access, the Mosquitto message broker does not work and the AccuRev GUI client has to be refreshed manually.
Installation WizardsAccuRev Installation Wizards guide you through the AccuRev installation process. The Installation Wizard can be run in either a graphical (GUI) or text-based (console) mode.
Post-installation Administrative ScriptsAccuRev installation packages provide the ability to invoke a script or executable. To configure this feature you simply set environment variable ACCUREV_POST_INSTALL to the fully-qualified path of the script or executable. The AccuRev installer will execute that script as the last step of the installation process.
Preparing for InstallationThis section describes the steps to take to prepare for installing AccuRev 7.0, as summarized in the following table.
Table 1. Preparing to Install AccuRev
Step Action Comments
1 Get an AccuRev License You do not need a license to install just the AccuRev Client or the AccuRev Web UI Server.
2 Determine Configurable Elements The installation instructions use generic names. Refer to this section to determine values appropriate for your site prior to installation.
3 Download the Installation Packages If you are installing just the AccuRev Client, check with your AccuRev administrator to see if the Upgrade Client feature is available at your site.
8 AccuRev® Installation and Release Notes

Get an AccuRev LicenseIn order to install AccuRev 7.0, you need an aclicense.txt license file. You do not need a license file to install the AccuRev Web UI Server or AccuRev Client.
The process for getting an aclicense.txt license file varies based on several factors, including your current license type and whether or not you are currently under maintenance, as summarized in the following table.
See the AccuRev Administrator’s Guide for a full description of license management in AccuRev 7.0.
Determine Configurable ElementsThe installation and setup process involves a number of configurable elements. For simplicity and clarity, the instructions consistently use a set of generic names, using <this font>. When you see a generic name in a procedure, you must replace that name with the value that is appropriate for your site. For example, you might replace <ac-install> with C:\Program Files\AccuRev.
Tip: Use the Name at Your Site column in the following table to record the names you plan to use.
Table 3. Generic and actual names used during installation
Table 2. Getting an AccuRev License
Type of Installation
Current License Type
Procedure Comments
New n/a Use the License Request form at http://supportline.microfocus.com/licensing/AccuRevLicensing.aspx to get a license for any new AccuRev installation.
None
Upgrade accurev.lic If you are currently under maintenance, use the License Request form at http://supportline.microfocus.com/licensing/AccuRevLicensing.aspx to get a new AccuRev license.
If you are not currently under maintenance, contact a sales representative.
To determine whether or not you are still under maintenance: In accurev.lic, check the
maintenance expiration date shown in each license section as replace options=<date>.
Note: Use the AccuRev CLI command hostinfo to obtain the name of the License Manager host machine (Host Name) required by the License Request form.
Generic Name Name at Your Site Description
<installer-loc> Location of the downloaded AccuRev installation package.
<ac-install> Location that AccuRev is installed to. Defaults to: (Windows) C:\Program Files\AccuRev (64-bit) or
C:\Program Files (x86)\AccuRev (32-bit) (UNIX/Linux) <homeDirectory>/accurev
<ac-storage> Location of the AccuRev database and container files. Defaults to: (Windows) C:\Program Files\AccuRev\storage (64-bit) or
C:\Program Files (x86)\AccuRev\storage (32-bit) (UNIX/Linux) <homeDirectory>/accurev/storage
<ac-host> Hostname of the AccuRev Server.
<ac-port> Port number that the AccuRev Server runs on. Defaults to 5050.
AccuRev® Installation and Release Notes 9

Download the Installation PackagesOn the Micro Focus supportline page (http://supportline.microfocus.com/websync/productupdatessearch.aspx), download the appropriate AccuRev installation package for your operating system to a local directory (referred to as <installer-loc> throughout this document).
Users can install AccuRev by downloading the AccuRev installation package to the client machine and manually running the installation package executable. Users can also start the installation automatically by selecting Help > Upgrade Client in the GUI or by using the accurev upgrade_client in the CLI, if someone (typically, the system administrator) has already downloaded the installation package to the AccuRev server, copied it to the appropriate location, and renamed it as described in Enabling the Client Upgrade feature on page 19.
If you download a compressed package (.zip or .gz file), first extract the files from the package before continuing. Many extraction tools are freely available and the unzip and gunzip programs are standard on many UNIX/Linux systems. The Mac OS X operating system does not require any special software for .zip files -- just double-click the file to extract its contents.
What to Do NextWhat to do next depends on whether you are installing or upgrading AccuRev, the AccuRev Client, or the AccuRev Web UI Server, as summarized in the following table.
<ac-user> Name of the operating-system user that runs the AccuRev Server. Defaults to: acserver.
<ac-pass> Password for <ac-user>.
<db-port> Port number that the database server runs on. Defaults to 5075.
<db-admin-name> Name of the database superuser. Defaults to postgres.Note: AccuRev recommends that you retain the default value, postgres. If you create a different value for the database superuser, it must be lowercase.
<db-admin-pass> Password for <db-admin-name>. Note: The database password must be lowercase.
Table 4. Next Steps in the Installation Process
If You Are Installing or Upgrading Go To
The AccuRev Server Installing or Upgrading an AccuRev Server on page 11
Just the AccuRev Client Installing or Upgrading an AccuRev Client on page 18
Just the AccuRev Web UI Server Installing or Updating the AccuRev Web UI Server on page 24
Generic Name Name at Your Site Description
10 AccuRev® Installation and Release Notes

Installing or Upgrading an AccuRev ServerThe procedure for installing AccuRev is largely the same whether you are installing AccuRev for the first time or you are upgrading an existing AccuRev installation. Note, however, that there are several important considerations and prerequisites for users upgrading to AccuRev 7.0. See Server and Database Upgrades on page 17 for more information on this topic.
Before You BeginWhether you are performing a new AccuRev Server installation or upgrading an existing installation, before installing AccuRev 7.0 you should:
1. Read the Platform Support Notes on page 31 for your operating system before proceeding, and follow the instructions there.
2. If you are installing a new AccuRev Server on a UNIX/Linux machine, run the adduser command to make an OS-level user (<ac-user>). You should set <ac-install> as the home directory for this user. The AccuRev Server cannot be installed by root on UNIX/Linux platforms.
3. Acquire an aclicense.txt license file if you have not already done so. See Get an AccuRev License on page 9 for more information.
Note: You must have an aclicense.txt file in order to install AccuRev 7.0.
4. If you are upgrading an existing AccuRev Server:
IMPORTANT: Perform a full backup of your AccuRev data. This includes backing up any replica servers. For detailed instructions, see the section titled “Backing Up the Repository” in the AccuRev Administrator’s Guide for your existing release. MAKE SURE TO USE THE CORRECT BACK UP PROCEDURES FOR YOUR EXISTING INSTALLATION.
Read through the upgrade information that applies to your current AccuRev installation in Server and Database Upgrades on page 17 before you start the installation process.
Plan a maintenance window for this upgrade and data migration, during which clients will not be able to connect to the server. See the instructions at Upgrading a Replica Server on page 17 for running a trial upgrade and estimating the time to complete the process.
5. Before starting the installation on UNIX/Linux, ensure that the LC_ALL environment variable is set to a UTF-8 locale (such as "en_US.UTF-8", NOT "en_US.latin".) Windows installations are not affected, however proceeding with a non UTF-8 locale on UNIX/Linux can lead to a failed, partially-complete installation. Use the locale command to determine your current locale setting, and locale -a to determine what locales are available. See the documentation for your operating system for details about how to install and change locale settings.
Considerations for AccuRev Replication ServersBefore deciding to install a replica server, see the "Replication of the AccuRev Repository" and "License Management" chapters in the 7.0 AccuRev Administrator’s Guide. Before proceeding with replica server installation, contact AccuRev Support Services for more information.
Use Native ShellsAccuRev recommends using only shells that are native to/installed with the OS. Avoid using a third-party shells as they do not always work as expected.
AccuRev® Installation and Release Notes 11

Running the AccuRev Installation WizardThis section describes how to run the AccuRev Installation Wizard. It assumes you have already downloaded the correct installation package for your platform as described in Download the Installation Packages on page 10.
OverviewThe AccuRev wizard guides you through steps for installing a new AccuRev Server or upgrading an existing server. If the Installation Wizard discovers that an AccuRev server already exists in the location you specify, it will prompt you through the upgrade process.
Upgrading to 7.0 from an earlier AccuRev release requires a database upgrade, independent of the installation process. The complexity of the database upgrade depends on the release from which you are upgrading. See Server and Database Upgrades on page 17 for more information.
If the Installation Wizard determines that you have an existing, nonstandard 5.x database installation (for example, if you installed your own copy of PostgreSQL, or you have multiple instances running on the same machine), the installer will not continue. Nonstandard database installations are not supported. You need to contact AccuRev Support Services (http://accurev.force.com/customerportal) to continue.
At the end of the installation, make sure that you tune your database parameters as described in Configuring Database Tuning Parameters on page 28. You must reboot the database for the tuning parameters to take effect.
Before You BeginBefore running the AccuRev Installation Wizard:
1. Log in -- Log in to the machine on which you will be installing AccuRev. Log in as <ac-user> (UNIX/Linux) or a user with installation privileges (Windows). (See Before You Begin on page 11 to learn about creating <ac-user> on UNIX/Linux machines.)
Note: For security reasons, you CANNOT install the AccuRev server on UNIX/Linux if you are logged in as root.
2. Stop the AccuRev Server and AccuRev DB Server -- If you are upgrading an existing AccuRev Server, you must stop the AccuRev Server and the AccuRev DB Server before you can install the current version. See Starting and Stopping AccuRev Servers on page 29 if you need help with this step.
Tip: Stopping the AccuRev DB Server also stops the AccuRev Server.
3. Stop the AccuRev Tomcat Server and the Mosquitto MQTT Message Broker -- If you are upgrading an existing AccuRev Server, you muct stop the AccuRev tomcat Server and the Mosquitto MQTT Message Broker.
4. Verify that the Tomcat process has stopped -- The Tomcat process sometimes continues even when the Tomcat service has been stopped. Manually terminate the process if necessary.
How to Run the AccuRev Installation WizardThis section describes how to install AccuRev using the AccuRev Installation Wizard.
Note: The specific prompts that you see and the order in which you see them can vary depending on your particular installation and the options that you select. Not all users will see all the prompts described in the following procedure, which focuses on the graphical version of the Installation Wizard but provides information about console mode in [brackets].
12 AccuRev® Installation and Release Notes

To run the AccuRev Installation Wizard:
1. Start the Installation Wizard -- Start the AccuRev Installation Wizard you downloaded from the Micro Focus web site by double-clicking the installer icon, or by entering the installer name on the command line as summarized in the following table. Note that the installation program can be run with a graphical user interface (GUI) or as a console (text-only) application.
Tip: If you are installing AccuRev from the console you can type:
"back" to return to the previous prompt in the installation program
"quit" to exit the installation program
2. License Agreement -- Before you can proceed, you must click “I accept the terms of the License Agreement.” and then click Next to continue. [Console: You can type "y" to agree, "n" to refuse, or press Enter to page through the license agreement.]
3. Confirm Administrator Privileges -- If the installer prompts you for this information:
Windows: Specify whether or not the current user has Administrator privileges on the current machine. Note that Windows requires that you have Administrator privileges.
UNIX/Linux: Specify whether the current user is root. Note that for security reasons, you CANNOT install the AccuRev server on UNIX/Linux if you are logged in as root.
4. Choose Install Folder -- Specify a different directory if you do not want to use the <ac-install> defaults: <homeDirectory>/accurev on UNIX/Linux, C:\Program Files\AccuRev on Windows. See Determine Configurable Elements on page 9 if you are not familiar with the values represented by <ac-install> and <homeDirectory>.
If you are installing software for the first time, and do not wish to use the default location, specify a location where you have write permission.
If you are upgrading and the existing installation is not at the default location, specify your existing AccuRev installation directory.
Table 5. Starting the AccuRev Installation Wizard
Platform Installation Mode Run This Procedure
Windows GUI accurev-n.n.n-windows-clientonly.exewhere _n_n_n is the AccuRev version numberaccurev-7.0.0-windows-clientonly.exe, for example
Console (text-based) accurev-n.n.n-windows.exe -i consolewhere _n_n_n is the AccuRev version numberaccurev-7.0.0-windows.exe -i console, for example
UNIX/Linux GUI sh accurev-n.n.n-platform-clientonly.binwhere: -n.n.n is the AccuRev version number
platform is the UNIX/Linux platform namesh accurev-7.0.0-linux-x86-clientonly.bin, for example
Console (text-based) sh accurev-n.n.n-platform.bin - i consolewhere: -n.n.n is the AccuRev version number
platform is the UNIX/Linux platform namesh accurev-7.0.0-linux-x86.bin - i console, for example
AccuRev® Installation and Release Notes 13

Click Next to accept the default and continue. [Console: Press Enter to accept the default and continue.]
5. Choose Installation Type -- Select one of the following:
AccuRev Server and Web UI Server -- Installs the AccuRev Server, the AccuRev Web UI Server, and a local AccuRev Client. Note that the AccuRev Web UI Server includes an Apache Tomcat web server. [Console: Press Enter to install the AccuRev Server and Web UI Server.]
Web UI Server only -- Installs only the AccuRev Web UI Server and AccuRev Client. If you choose this installation option, click Next and go to Installing or Upgrading an AccuRev Client on page 18 to complete the installation. [Console: Type "2" and press Enter to install the Web UI Server only.]
6. Install Replication [Console: “Choose Replication Type”] -- Choose No replication [Console: “1” for None] unless you have already determined (along with AccuRev Support Services) that your site will be implementing one or more replica servers. If you have any questions about AccuRev replication servers, refer to Considerations for AccuRev Replication Servers on page 11 before continuing.
If you know for a fact that your site is implementing replica servers, select either:
“Yes, this is the master” for the site that will be sending elements out to the replica [Console: type "2" for Master.]
“Yes, this is a replica” for the site (typically remote) that will be connecting to a master server to receive files [Console: type "3" for Replica.]
Proceed through the remainder of the installation program. When prompted for replication options, confirm your choice of master server or replica server as appropriate.
To upgrade an existing replica server, see Upgrading a Replica Server on page 17.
Note: Installing the replica software is only part of the process. Before you can use a newly-installed replica server, you need to configure both it and the master server. Configuration and licensing information about replica servers is located in the “Replication of the AccuRev Repository” and “License Management” chapters in the AccuRev Administrator’s Guide.
7. Customize: Choose a Folder for AccuRev Server Data Storage [Console: “Choose a Folder for AccuRev Server Data Storage”.] -- If you do not want to use the <ac-storage> default (<homeDirectory>/accurev/storage on Linux/UNIX, C:\Program Files\AccuRev\storage on Windows), specify a different directory in the Please Choose a Folder field. AccuRev creates the folder you specify if it does not already exist.
Note: Ensure that the path you specify is LOCAL disk storage (not a network drive) and that it has plenty of space.
Click Next to continue. [Console: Press Enter.]
8. Configure Database Port and User -- Enter the values for the Database Port (<db-port>) and Superuser Name (<db-admin-name>) fields. [Console: Prompts for these values individually.]
Unless the default database port "5075" conflicts with something else on your machine, you should not change the value in the Database Port field. Likewise, AccuRev recommends that you keep the default value "postgres" for the Superuser Name unless you have a specific reason to change it.
Note: If you create a different value for the database superuser, it must be lowercase.
14 AccuRev® Installation and Release Notes

9. Configure Database Password [Console: “Set Database Superuser Password”.] -- In the Superuser Password field, enter the value for <db-admin-pass> that you chose in Table 3 on page 9. Enter it again in the Confirm Superuser Password field. Make sure that you record this password in a secure location for later use.
Note: The database password must be lowercase.
10. Specify AccuRev License Location -- Specify the full path of your aclicense.txt license file. If the Installation Wizard detects an existing aclicense.txt file where you have chosen to install AccuRev, it initialized the field to that location.
For more information about licensing, see the “License Management” chapter in the AccuRev Administrator’s Guide.
11. Configure: Set Host and Port [Console: Choose Hostname and Port number] -- Review the default values for the Host and Port fields for the AccuRev Server. You should accept the default values chosen by the Installation Wizard unless you have a good reason to change them. [Console: Review the host name value, then press Enter to continue; then review the port value and press Enter to continue.]
Click Next to continue. [Console: Press Enter to continue.]
12. Adjust System PATH Variable -- Responding Yes enables the AccuRev Installation Wizard to modify the PATH environment variable on your system so that you do not need to specify a full path on the command line when using AccuRev commands. Click Install to continue. [Console: Type "y" and press Enter to continue.]
Note: You might need to reboot after installation before changes to the PATH environment variable take effect.
13. Installing AccuRev -- The Installation Wizard displays a splash screen [Console: displays "Installing" with a progress bar] while it installs the software on your local machine. It displays a Please Wait message while it performs configuration tasks.
14. Database Tuning -- The Installation Wizard reminds you that you can use database tuning parameters to improve performance. See Configuring Database Tuning Parameters on page 28 for more information. Click Next to continue. [Console: Press Enter to continue.]
15. Reminder -- If you are upgrading from AccuRev 5.7 or higher, the Installation Wizard reminds you to run maintain migratepg to migrate to the current database version installed with AccuRev 7.0. Click Next to continue. [Console: Press Enter to continue.]
16. Configure: Start AccuRev WebUI Server -- In a new installation, the Installation Wizard prompts you to start the AccuRev Web UI Server. Accept the default value (Yes) unless you want to start it later. Click Next to continue. [Console: Press Enter to continue.]
Note: See Installing or Upgrading an AccuRev Client on page 18 for more information on Web UI Server installation and configuration.
17. Configure: Start AccuRev Server -- In a new installation, the Installation Wizard prompts you to start the AccuRev Server. Accept the default value (Yes) unless you want to start it later. Click Next to continue. [Console: Press Enter to continue.]
Note: See Starting and Stopping AccuRev Servers on page 29 if you choose to start the AccuRev Server at a later time.
18. Install Complete -- The Installation Wizard displays a message when the installation is complete. Click Next to continue [Console: Press Enter to continue.].
AccuRev® Installation and Release Notes 15

To exit, click Done. [Console: Press Enter.]
What to Do NextWhat to do after a successful AccuRev installation depends on whether you performed a new installation or an upgrade, as summarized in the following table:
Table 6. Upgrading to AccuRev 7.0
Installation Type Next Steps For More Information
New If you chose not to start the AccuRev Server as part of the installation process, you must start it before you can use AccuRev.
If you plan to make the AccuRev Web UI available to your users, you must: Start the Web UI Server if you chose not to start
it as part of the installation process Configure the Web UI for use with the
AccuRev GUI
See Starting and Stopping AccuRev Servers on page 29
Go to Starting, Stopping, and Testing the AccuRev Web UI Server on page 27Go to Configuring the AccuRev Web UI on page 27
Upgrade After upgrading to AccuRev 7.0, you need to: Run the maintain migratepg command to
migrate your database to the current version installed with AccuRev
Start the AccuRev Server
Go to: Upgrading an AccuRev Server from
5.7 or Higher on page 17 Starting and Stopping AccuRev
Servers on page 29
16 AccuRev® Installation and Release Notes

Server and Database UpgradesThis section contains instructions for upgrading AccuRev databases from previous releases to 7.0. Note that if you have existing replica servers, you must also follow the instructions in Upgrading a Replica Server on page 17. AccuRev strongly recommends that you first perform a trial upgrade of your production data on a separate test machine to determine if you will encounter any issues, and to estimate how long the upgrade is likely to take so that you will know how long your servers will be unavailable to your users.
AccuRev 7.0 supports upgrades from existing 5.7 and later installations. In order to upgrade from a pre-5.7 version, you must first perform an upgrade installation to 5.7 or a 6.x version. (We recommend the latest pre-7.0 version, which is 6.2.3.) Refer to the release notes associated with that release for more detailed information on upgrading from prior versions.
Upgrading an AccuRev Server from 5.7 or HigherThe upgrade process from AccuRev 5.7 or higher includes a PostgreSQL update. To do this update, you must manually run the maintain migratepg <db_admin> command after the installer completes:
1. Make sure that you have performed the log in and back up steps described in Before You Begin on page 11 and Running the AccuRev Installation Wizard on page 12.
2. After the upgrade installation completes, PostgreSQL 9.5 should be running. The AccuRev server will not be running and cannot be started until the migration completes successfully.
3. Run the maintain migratepg <db_admin> command and be sure to specify the same database password (<db-admin-pass>) that is used by your existing database.
4. Confirm the PostgreSQL 8.4 database location. Typically this is <ac-storage>/db/.
5. Confirm the location of the pg_dump backup file. This defaults to <ac-storage>/site_slice/backup/. The backup file will be roughly equivalent in size to your database, so be sure that you have enough free disk space in the selected location.
6. The migratepg process will then perform the following steps:
Start PostgreSQL 8.4 server.
Backup the 8.4 metadata.
Stop the PostgreSQL 8.4 server.
Start PostgreSQL 9.5 if it is not already running.
Restore the 8.4 metadata into 9.5.
Upgarde the database schema if needed.
Move the PostgreSQL 8.4 binaries to <ac-install>/postgresql/8.4/.
Move the <ac-storage>/db/ directory to <ac-install>/postgresql/8.4/db/. (If unable to move, the db directory will be renamed.)
Upgrading a Replica ServerUse these instructions to upgrade an existing AccuRev replica server:
1. Perform a full backup and ensure that you have enough disk space as discussed above in Before You Begin on page 11.
AccuRev® Installation and Release Notes 17

If your site uses AccuWork: For every replicated depot that has AccuWork issues, copy the entire <ac-storage>/depots/<depotName>/dispatch directory from the master server to each replica server. Tip: Run "accurev show slices" to see the exact locations of your depots.
2. Proceed with the installation as if the replica server were a master server. See Upgrading an AccuRev Server from 5.7 or Higher on page 17.
3. After the upgraded replica server has started, execute the following command against the replica server:
accurev replica sync
Installing or Upgrading an AccuRev ClientThis section describes the methods available to install and upgrade AccuRev Client software and procedures for their use.
Installation MethodsThere are two methods for installing or upgrading the AccuRev Client:
An interactive AccuRev Client-only installation requires the user to run an Installation Wizard and provide information during the installation process. There are two possible ways to accomplish this:
If you download the Client-only installation package to the client machine and run the installation executable manually, you can run the installation package with a graphical user interface (GUI) or as a console (text-only) application. See Using the AccuRev Client-only Installation Package on page 19 for more information.
If you are upgrading an AccuRev version 5.7 (or later) client, and someone (typically, the system administrator) has already downloaded the installation package to the AccuRev server, copied it to the appropriate location, and renamed it as described in Enabling the Client Upgrade feature on page 19, then you can automatically start the installation by selecting the Help -> Upgrade Client option in the AccuRev GUI or by using the accurev upgrade_client in the CLI.
A "silent" AccuRev Client installation is typically used by the AccuRev administrator to automate the client installation or upgrade process in a distributed or networked environment. "Silent" installations are run from the command line and do not require any interaction by the end-user. See Using "Silent" Client Installations on page 22 for more information.
Tip: Ask your AccuRev administrator if the "silent" client installation method has been implemented at your site.
Before You BeginRegardless of which installation method you use, review the following steps before installing or upgrading the AccuRev Client:
1. Read the Platform Support Notes on page 31 for your operating system before proceeding, and follow the instructions there.
2. (Mac OS X users only) If you are installing the AccuRev Client on Mac OS X 10.7.5 or later, make sure the Gatekeeper feature is set to allow applications to be downloaded from Anywhere. To access this setting from the Apple menu, go to System Preferences… > Security & Privacy > General tab.
18 AccuRev® Installation and Release Notes

Tip: The AccuRev Client displays a notification message if it requires upgrading. This can happen when the AccuRev Server has been upgraded but the AccuRev Client has not. The notification message gives the user the option of downloading the AccuRev Client-only installation package directly from the AccuRev Server.
Uninstalling Existing AccuRev ClientsIf you are upgrading an AccuRev client, you do not need to uninstall any existing software. The AccuRev Installation Wizard lets you preserve your development data and configuration files, and installs the upgrade in the same place as your existing version.
Using Native ShellsAccuRev recommends using only shells that are native to/installed with the OS.
Using the AccuRev Client-only Installation PackageThe AccuRev Client-only installation package lets you install a new AccuRev Client or upgrade an existing installation.
Downloading the Client-only Installation PackageIf you have not already done so, take the following steps to download AccuRev client-only installation packages:
1. Navigate to Product Updates on the Micro Focus Support Line page:
http://supportline.microfocus.com/
2. Select a search mechanism, then click Find Updates.
3. Check the license agreement, and then expand the Product and Version tabs to locate the appropriate AccuRev release.
4. Locate the client-only installation packages you require and click the download button.
5. Depending on the installation package you have chosen, the downloaded file is either a .exe file or a .bin file. Save this file to the appropriate location, which depends on your preferred method of installation:
If you are a user planning to install AccuRev on your client machine manually, save the file to your client machine.
If you are an administrator who intends to make the file available to your users so that they can get the file, copy it to their client machines, and run it manually, then save the file to some location and inform your users where they can get the file to install it themselves.
If you are an administrator and you want to enable the Client Upgrade feature for users who have an existing installation of AccuRev 5.7 or later, then save the file to the appropriate location on the AccuRev server and rename the file as described in the following section, Enabling the Client Upgrade feature.
Enabling the Client Upgrade featureIf you are an administrator and you want to enable the Client Upgrade feature, take the following steps:
1. Download the client as described in Downloading the Client-only Installation Package.
AccuRev® Installation and Release Notes 19

2. When prompted, rename the file you just downloaded as AccuRevClientInstall.[exe | bin], and copy it to the appropriate location on your AccuRev server. For example, if you downloaded accurev-7.0.0-windows-clientonly.exe, save it to c:\Program Files\AccuRev\bin\installers\Windows\AccuRevClientInstall.exe.
Important! Client-only install packages must be named AccuRevClientInstall.exe or AccuRevClientInstall.bin or they will not be recognized by the client upgrade feature.
The client-only installation package is now available for AccuRev users, who can automatically upgrade their AccuRev client by selecting Help > Upgrade Client in the GUI or by using the accurev upgrade_client in the CLI.
Running the Client-only Installation PackageTo run the AccuRev Client-only installation package, take the following steps:
1. Start the installation:
If you are running the installation manually on your client, proceed to step 2.
If the Client Upgrade feature has been enabled as described in the previous section, Enabling the Client Upgrade feature, start the installation by selecting Help > Upgrade Client in the GUI or by using the accurev upgrade_client in the CLI.
2. If you are manually installing AccuRev on your client machine, start the AccuRev Client Installation Wizard using the applicable procedure:
Tip: If you are installing the AccuRev Client from the console you can type:
"back" to return to the previous prompt in the installation program
"quit" to exit the installation program
Table 7. Starting the AccuRev Client Installation Wizard
Platform Installation Mode Run This Procedure
Windows GUI accurev-n.n.n-windowsclientonly.exewhere -n.n.n is the AccuRev version numberaccurev-7.0.0-windowsclientonly.exe, for example
Console (text-based) accurev-n.n.n-windowsclientonly.exe -i consolewhere -n.n.n is the AccuRev version numberaccurev-7.0.0-windowsclientonly.exe -i console, for example
UNIX/Linux GUI sh accurev-n.n.n-platform.binwhere: -n.n.n is the AccuRev version number
platform is the UNIX/Linux platform namesh accurev-7.0.0-linuxclientonly-x86.bin, for example
Console (text-based) sh accurev-n.n.n-platform.bin - i consolewhere: -n.n.n is the AccuRev version number
platform is the UNIX/Linux platform namesh accurev-7.0.0-linuxclientonly-x86.bin- i console, for example
20 AccuRev® Installation and Release Notes

3. Shutdown Existing AccuRev Apps -- When you start the AccuRev Client Installation Wizard, it first reminds you to shut down any existing AccuRev applications. Click Next to continue. [Console: Press Enter to continue.]
4. License Agreement -- Before you can proceed, you must click "I accept the terms of the license agreement." and then click Next to continue. [Console: You can type "y" to agree, "n" to refuse, or press Enter to page through the license agreement.]
5. Choose Install Folder -- Specify a different directory if you do not want to use the <ac-install> defaults: <homeDirectory>/accurev on Linux/UNIX, C:\Program Files\AccuRev on 64-bit Windows, C:\Program Files (x86)\AccuRev on 32-bit Windows. (See Determine Configurable Elements on page 9 if you are not familiar with the values represented by <ac-install> and <homeDirectory>.)
If you are installing software for the first time and do not wish to use the default location, specify a location where you have write permission.
IMPORTANT: If you are installing the AccuRev Client on a machine running Windows Vista, you must install AccuRev in the \Users folder. If you install to the default Windows directory (C:\Program Files\, for example), you not be able to use the Upgrade Client feature to upgrade your AccuRev Client in the future.
If you are upgrading and the existing installation is not at the default location, specify your existing AccuRev installation directory.
Click Next to accept the default and continue. [Console: Press Enter to accept the default and continue.]
6. Configure: Set Host and Port [Console: Choose What Server to Connect To] -- Specify the values for the Host and Port fields for the AccuRev Server to which this client will connect. You should accept the default value for the server port chosen by the Installation Wizard unless you have a good reason to change it. Click Next to continue. [Console: Prompts for these values individually. Type a value for the host name and press Enter to continue. Review the value for the port number and press Enter again to continue.]
7. Adjust System PATH Variable -- Responding Yes enables the AccuRev Client Installation Wizard to modify the PATH environment variable on your system so that you do not need to specify a full path on the command line when using AccuRev commands. Click Next to continue. [Console: Enter "y" and press Enter to continue.]
Note: You might need to reboot after installation before changes to the PATH environment variable take effect.
8. Pre-Installation Summary -- At this point, the Installation Wizard displays a summary of the choices you have made regarding your installation. Click Install to continue; otherwise click Previous to change a value. [Console: Press Enter to continue; otherwise, type "back" and the press Enter to return to change a value.]
9. Installing AccuRev -- The Installation Wizard displays a splash screen [Console: displays "Installing..." and a progress bar] while it installs the software on your local machine. It displays a Please Wait message while it performs configuration tasks.
10. Installation Complete -- The Installation Wizard displays a message when the installation is complete. Click Next to exit the program. [Console: Press Enter to exit the program.]
AccuRev® Installation and Release Notes 21

Note: If you are using the GUI installation wizard, when the installation is complete you are given the opportunity to start the AccuRev user interface. To start the AccuRev user interface, accept the default value of Yes and click Done. Otherwise, select No and click Done.
Using "Silent" Client InstallationsSo-called "silent" client installations allow the AccuRev Client software to be installed or upgraded in an automated fashion, without requiring any interaction or input by the user on whose machine the AccuRev Client is being installed. "Silent" client installations are particularly useful when AccuRev Client installations or upgrades can be performed by a centralized software distribution mechanism. "Silent" client installations provide a highly efficient mechanism for large AccuRev deployments to keep pace with current versions of AccuRev.
Note: The "silent" upgrade is not supported for Mac OS X clients.
OverviewIn a "silent" client installation, the Client-only installation package is pushed to each client machine. Then, an AccuRev Client is installed manually on a single machine using a command line option to create a response file. The response file records choices made during installation of the AccuRev Client, including:
Installation directory
The host (or IP address) and port number associated with the AccuRev Server
Whether or not "<ac_install>/bin" should be added to the user’s path. See Determine Configurable Elements on page 9 if you are not familiar with the value represented by<ac-install>.
The response file resulting from the manual installation can then be used as input by the "silent" client installer to automate the installation process on your system’s clients. Note that if you have clients on multiple platforms (Windows and Linux, for example), you must perform one manual client installation on each of them to create platform-specific response files.
Sample Response File. An example response file for a Windows installation is shown here:
# Wed Aug 01 17:50:06 EDT 2012
# Replay feature output
# ---------------------
# This file was built by the Replay feature of InstallAnywhere.
# It contains variables that were set by Panels, Consoles or Custom Code.
#Choose Install Folder
#---------------------
USER_INSTALL_DIR=C:\\Program Files\\myAccuRev
#Configure: Set Host and Port
#----------------------------
HOST_NAME_INPUT=localhost
HOST_PORT_INPUT=5050
22 AccuRev® Installation and Release Notes

#Adjust System PATH Variable
#---------------------------
ADD_TO_PATH_INPUT_RESULTS=\"Yes\",\"\"
ADD_TO_PATH_INPUT_RESULTS_1=Yes
ADD_TO_PATH_INPUT_RESULTS_2=
ADD_TO_PATH_INPUT_RESULTS_BOOLEAN_1=1
ADD_TO_PATH_INPUT_RESULTS_BOOLEAN_2=0
#Install
#-------
-fileOverwrite_C\:\\Program\ Files\\myAccuRev\\bin\\UninstallerData\\Uninstall\ AccuRev.lax=Yes
-fileOverwrite_C\:\\Program\ Files\\myAccuRev\\bin\\UninstallerData\\resource\\iawin32.dll=Yes
-fileOverwrite_C\:\\Program\ Files\\myAccuRev\\bin\\UninstallerData\\resource\\win64_32_x64.exe=Yes
-fileOverwrite_C\:\\Program\ Files\\myAccuRev\\bin\\UninstallerData\\resource\\remove.exe=Yes
-fileOverwrite_C\:\\Program\ Files\\myAccuRev\\bin\\vcredist_x86_2010.exe=Yes
-fileOverwrite_C\:\\Program\ Files\\myAccuRev\\bin\\vcredist_x64_2010.exe=Yes
-fileOverwrite_C\:\\Program\ Files\\myAccuRev\\bin\\acgui.lax=Yes
-fileOverwrite_C\:\\Program\ Files\\myAccuRev\\bin\\acdiffgui.lax=Yes
-fileOverwrite_C\:\\Program\ Files\\myAccuRev\\bin\\acclient.cnf=Yes
-fileOverwrite_C\:\\Program\ Files\\myAccuRev\\LICENSE.TXT=Yes
#Start AccuRev User Interface
#----------------------------
START_UI_INPUT_RESULTS=\"\",\"No\"
START_UI_INPUT_RESULTS_1=
START_UI_INPUT_RESULTS_2=No
START_UI_INPUT_RESULTS_BOOLEAN_1=0
START_UI_INPUT_RESULTS_BOOLEAN_2=1
Creating the Response FileTo create the response file, run the AccuRev Client-only installer from the command line. Use the -r <filename> option to specify the full path of the response file. Note that if you have clients on multiple platforms (Windows and Linux, for example), you must run the client installation procedure on one machine on each platform in order to create platform-specific response files.
Windows example
<installer_loc>\accurev-7.0.0-windowsclientonly.exe –r c:\tmp\ac_win_install.out
UNIX/Linux example
<installer_loc>/accurev-7.0.0-linuxclientonly-x86.bin –r /tmp/ac_linux_install.out
AccuRev® Installation and Release Notes 23

Running a "Silent" InstallationOnce you have created the response file for a given platform, you can use it to perform automated "silent" installations on other clients for that platform. To run a "silent" installation, invoke the AccuRev Client-only installation package from the command line. Use the -i silent option to specify the installation type, and the -f <filename> option to specify the full path of the response file to use as input.
Windows example
<installer_loc>\accurev-7.0.0-windowsclientonly.exe -i silent –f c:\tmp\ac_win_install.out
UNIX/Linux example
<installer_loc>/accurev-7.0.0-linuxclientonly-x86.bin -i silent –f /tmp/ac_linux_install.out
Installing or Updating the AccuRev Web UI ServerThis section provides background information and procedures for installing or upgrading the AccuRev Web UI Server as a standalone installation using the AccuRev Installation Wizard.
This section is intended for the AccuRev administrator. If you are an end user and want to use the Web UI client, you simply need to open a supported Web browser and point it to an existing Web UI Server using URL information provided to you by your administrator.
Note: If you have already installed AccuRev as described in Step 5 of Running the AccuRev Installation Wizard on page 12, the AccuRev Web UI Server is already installed. Go to What to Do Next on page 26.
Before You BeginBefore running the AccuRev Installation Wizard, log in to the machine on which you will be installing the AccuRev Web UI Server. Log in as <ac-user> (UNIX/Linux) or a user with installation privileges (Windows). (See Before You Begin on page 11 to learn about creating <ac-user> on UNIX/Linux machines.)
Notes for UNIX/Linux Installations For security reasons, you CANNOT install the AccuRev server on UNIX/Linux if you are logged in as
root.
See Known Issues in the AccuRev Installation and Release Notes.
How to Run the AccuRev Installation WizardThis section describes how to install the AccuRev Web UI Server using the AccuRev Installation Wizard. If you are running the Installation Wizard in console mode, instructions are displayed in italicized brackets, [Like this.]
To run the AccuRev Installation Wizard:
1. Start the Installation Wizard -- Start the AccuRev Installation Wizard you downloaded from the Micro Focus SupportLine web site by double-clicking the installer icon, or by entering the installer
24 AccuRev® Installation and Release Notes

name on the command line as summarized in the following table. Note that the installation program can be run with a graphical user interface (GUI) or as a console (text-only) application.:
Tip: If you are installing AccuRev from the console you can type:
"back" to return to the previous prompt in the installation program
"quit" to exit the installation program
2. License Agreement -- Before you can proceed, you must click “I accept the terms of the license agreement.” and then click Next to continue. [Console: You can type "y" to agree, "n" to refuse, or press Enter to page through the license agreement.]
3. Choose Install Folder -- Specify a different directory if you do not want to use the <ac-install> defaults: <homeDirectory>/accurev on Linux/UNIX, C:\Program Files\AccuRev on Windows. (See Determine Configurable Elements on page 9 if you are not familiar with the values represented by <ac-install> and <homeDirectory>.)
If you are installing software for the first time, and do not wish to use the default location, specify a location where you have write permission.
If you are upgrading and the existing installation is not at the default location, specify your existing AccuRev installation directory.
Click Next to accept the default and continue. [Console: Press Enter to accept the default and continue.]
4. Choose Installation Type -- Select Web UI Server only and then click Next to continue. [Console: Type "2" and press Enter to continue.]
5. Configure: Set Host and Port -- In the Host and Port fields, set values for the AccuRev Server that the Web UI will use and click Next to continue. [Console: Prompts for these values individually. Type a value and press Enter to continue.]
6. Adjust System PATH Variable -- Responding Yes enables the AccuRev Installation Wizard to modify the PATH environment variable on your system so that you do not need to specify a full path on
Table 8. Starting the AccuRev Installation Wizard
Platform Installation Mode Run This Procedure
Windows GUI accurev-n.n.n-windows.exewhere -n.n.n is the AccuRev version numberaccurev-7.0.0-windows.exe, for example
Console (text-based) accurev-n.n.n-windows.exe -i consolewhere -n.n.n is the AccuRev version numberaccurev-7.0.0-windows.exe -i console, for example
UNIX/Linux GUI sh accurev-n.n.n-platform.binwhere: -n.n.n is the AccuRev version number
platform is the UNIX/Linux platform namesh accurev-7.0.0-linux-x86, for example
Console (text-based) sh accurev-n.n.n-platform.bin - i consolewhere: -n.n.n is the AccuRev version number
platform is the UNIX/Linux platform namesh accurev-7.0.0-Linux_x86 - i console, for example
AccuRev® Installation and Release Notes 25

the command line when using AccuRev commands. Click Install to continue. [Console: Type "y" and press Enter to continue.]
Note: You may need to reboot after installation before changes to the PATH environment variable take effect.
7. Installing AccuRev -- The Installation Wizard displays a splash screen [Console: displays "Installing" with a progress bar] while it installs the software on your local machine. It displays a Please Wait message while it performs configuration tasks.
8. Configure: Start AccuRev WebUI Server -- In a new installation, the Installation Wizard prompts you to start the AccuRev Web UI Server. Accept the default value (Yes) unless you want to start it later. Click Next to continue. [Console: Press Enter to continue.]
9. Install Complete -- The Installation Wizard displays a message when the installation is complete. Click Done to exit. [Console: Press Enter to exit.]
What to Do NextThe following table summarizes tasks you should consider performing after installing the AccuRev Web UI Server. See also Considerations for Users Upgrading from AccuRev 6.0 and Earlier.
Considerations for Users Upgrading from AccuRev 6.0 and EarlierThe Tomcat web server is used by the AccuRev Web UI. AccuRev 7.0 installs Tomcat 8.0.33, AccuRev versions 6.1 through 6.2.3 installed Tomcat 7, and versions of AccuRev prior to 6.1 used Tomcat 6.
Table 9. After Installing the AccuRev Web UI Server
Task Comments
Start the Web UI Server. You need to start the Web UI Server to make the AccuRev Web UI available to your users.
If you did not start the AccuRev Web UI Server during the installation process, see Starting, Stopping, and Testing the AccuRev Web UI Server on page 27.
Test the Web UI Before informing your users that the AccuRev Web UI is available, perform a simple test to make sure that it is working as you expect.
See Testing the AccuRev Web UI on page 27.
Configure the Web UI Server to make it accessible by IDE plug-ins for AccuRev.
AccuRev has plug-ins for numerous IDEs like Eclipse and Visual Studio. To be able to access the AccuRev Web UI in these IDEs, you need to create a configuration file on the AccuRev Web UI Server.
See Configuring the AccuRev Web UI on page 27.
Review advanced configuration settings.
You can use a configuration file to change the default session timeout, provide access to multiple AccuRev Servers, and more. These and other advance topics are described in the AccuRev Web Interface Administrator’s Guide.
See Post-Installation Information on page 28.
26 AccuRev® Installation and Release Notes

Depending on your upgrade path and whether or not you customized your existing Tomcat web server, you might have to perform additional steps in order for your Tomcat web server to operate as it did before upgrading to AccuRev 7.0, as summarized in the following table:
Starting, Stopping, and Testing the AccuRev Web UI ServerLinux shell (.sh) and Windows batch (.bat) scripts are provided for stopping and starting the Tomcat web server for the AccuRev Web UI:
<ac-install>/WebUI/tomcat/bin/[ startup | shutdown ].[ sh | bat ]
Testing the AccuRev Web UITo test the AccuRev Web UI, open a browser and enter the following URL:
http://<webui-host>:8080/accurev
If this does not display an AccuRev login window, try restarting the AccuRev Web UI Tomcat server. See Starting, Stopping, and Testing the AccuRev Web UI Server on page 27. If the Web UI appears as expected, you can make this URL available to users to whom you want to provide access to the AccuRev Web UI.
Also, if you want to make the Web UI accessible through your users’ AccuRev GUI, you should ensure that the AccuRev installation is included in their PATH setting. If they try to open the Web UI from the AccuRev GUI (using the View > Open in Web choice on the AccuRev GUI menu, for example) and the Web UI login screen appears but does not display a valid server to connect to, the PATH is probably not set correctly.
Configuring the AccuRev Web UIThis section describes how to configure the AccuRev Web UI to make it available to:
The AccuRev GUI (some features in the AccuRev GUI make use of the Web UI)
AccuRev IDE integrations (like the Eclipse plug-in for AccuRev, for example)
You do this by creating a settings.xml file on the AccuRev Server as described in the following procedure.
Table 10. Customizing Tomcat after Upgrading to AccuRev 7.0
Current AccuRev Version
Did You Customize Tomcat?
Are Additional Steps Required?
6.1 or later No No.
Yes No.
6.0 or earlier No No.
Yes Yes. If you made any changes to your Tomcat 6 web server, you need to merge those changes with your Tomcat 8 installation. For example, if you modified server.xml, you need to reflect those modifications in the server.xml file that is installed with Tomcat 8 -- the format of the Tomcat 6 server.xml file is incompatible with Tomcat 8.
To help you with this process, AccuRev renames your <AccuRev_install>\WebUI\tomcat directory to <AccuRev_install>\WebUI\tomcat.old when you upgrade.
AccuRev® Installation and Release Notes 27

Creating the settings.xml fileInstructions for creating this file are found in the AccuRev Installation and Release Notes for each integration, but in summary:
1. Shut down any third-party packages.
2. Create a file called settings.xml in the <ac-install>/storage/site_slice/dispatch/config directory.
3. Edit the file to add the lines shown below (replacing <webui-host> with the actual name of the host providing access to the AccuRev Web UI), and save it.
<settings>
<webui url="https://<webui-host>:8080/accurev"/>
</settings>
(If necessary, change the port from “8080” to the value in use at your site.)
Note: Refer to the installation and release notes for specific AccuRev integrations (Eclipse and Visual Studio plug-ins, for example) for additional information specific to your third-party IDE.
4. Restart any third-party packages shut down in Step 1.
Post-Installation InformationSee the AccuRev Web Interface Administrator’s Guide for post-installation configuration information.
Configuring Database Tuning ParametersUse these instructions to set the database tuning parameters to allow the database to make the best use of your system resources. You should do this after installing AccuRev but before starting the server or before running the maintain migratepg command.
1. Log in as <ac-user>.
2. Ensure that the database server is stopped using the procedures described in Starting and Stopping AccuRev Servers on page 29.
3. To improve database performance you may elect to increase the amount of memory allocated exclusively to PostgreSQL by editing <ac-storage>/db/postgresql.conf.
(non-Windows platforms) Note that editing postgresql.conf could also require you to alter part of your operating system's kernel configuration and possibly reboot your system. Read the section applicable to your operating system at http://www.postgresql.org/docs/9.5/static/kernel-resources.html for more information.
shared_buffers – Change to 512MB or 25% of total physical memory installed on the machine running AccuRev, whichever is less.
effective_cache_size – Set to 75% of free physical memory reported by the operating system when both AccuRev and the database are stopped (see Starting and Stopping AccuRev Servers on page 29).
Free physical memory can be estimated as follows:
UNIX/Linux (expressed in MB):
free -m | awk '/buffers.cache/{print $4}'
28 AccuRev® Installation and Release Notes

Windows Server 2008/Windows 7 or later (expressed in MB): Access the Performance tab on the Windows Task Manager. Use only the Available value under “Physical Memory”.
Other operating systems: You may be able to use the top command; refer to your operating system vendor’s documentation.
Note: On 64-bit operating systems with more than 4GB of memory, the effective_cache_size is not limited to 4GB, as it does not reflect memory allocated by PostgreSQL. This setting is an estimate of the amount of memory available to the operating system for filesystem caching.
4. Start the AccuRev Database Server process according to the instructions in Starting and Stopping AccuRev Servers on page 29.
Starting and Stopping AccuRev ServersThis section describes the procedures you can use to start and stop the AccuRev Server and the AccuRev Database Server.
Starting and Stopping the AccuRev ServerUse the procedures below to start and stop the AccuRev Server.
Starting
Stopping
When you start the AccuRev Server, the database is automatically started first.
Starting and Stopping the AccuRev Database ServerUse the procedures below to start and stop the AccuRev Database Server.
Platform Interface Start Procedure
Windows GUI Services window > Locate service, right-click, choose Start Service
Command line net start accurev
UNIX/Linux Command line cd <ac-install>/bin./acserverctl start
Platform Interface Stop Procedure
Windows GUI Services window > Locate service, right-click, choose Stop Service
Command line net stop accurev
UNIX/Linux Command line cd <ac-install>/bin./acserverctl stop
AccuRev® Installation and Release Notes 29

Starting
Stopping
When you stop the AccuRev Database, the AccuRev Server is automatically shut down first.
Starting and Stopping the AccuRev Tomcat Server and Mosquitto MQTT Message BrokerUse the procedures below to start and stop the AccuRev Tomcat Server and Mosquitto MQTT Message Broker.
Starting
Stopping
Platform Interface Start Procedure
Windows GUI Services window > Locate service, right-click, choose Start Service
Command line net start "accurev db server"
UNIX/Linux Command line cd <ac-install>/bin./acserverctl dbstart
Platform Interface Stop Procedure
Windows GUI Services window > Locate service, right-click, choose Stop Service
Command line net stop "accurev db server"
UNIX/Linux Command line cd <ac-install>/bin./acserverctl dbstop
Platform Interface Start Procedure
Windows GUI Services window > Locate service, right-click, choose Start Service
Command line net start AccuRevTomcatnet start "AccuRev Mosquitto"
UNIX/Linux Command line For Tomcat:<ac-install>/WebUI/tomcat/bin/startup.sh >> <ac-install>/storage/site_slice/logs/accurev_tomcat_startstop.log 2>&1 &
For Mosquitto:cd <ac-install>/mosquitto./mosquitto --daemon -c ./mosquitto.conf >> <ac-install>/storage/site_slice/logs/mosquitto.log 2>&1 &
Platform Interface Stop Procedure
Windows GUI Services window > Locate service, right-click, choose Stop Service
Command line net stop AccuRevTomcatnet stop "AccuRev Mosquitto"
30 AccuRev® Installation and Release Notes
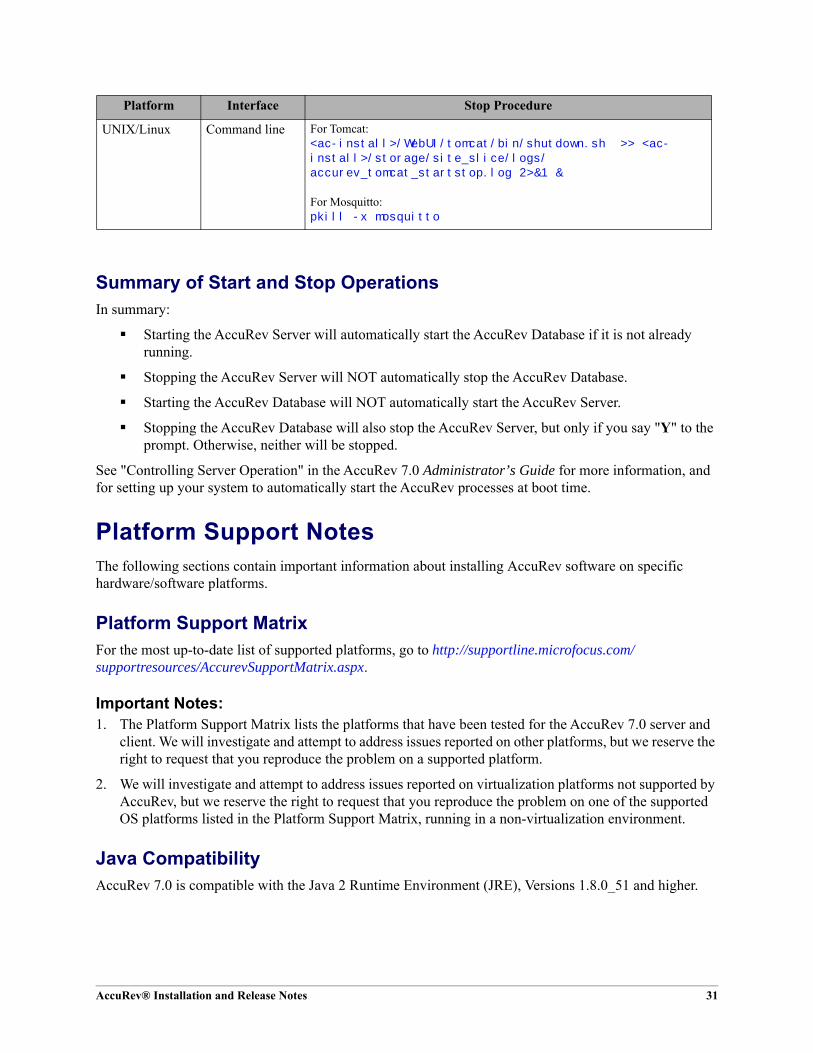
Summary of Start and Stop OperationsIn summary:
Starting the AccuRev Server will automatically start the AccuRev Database if it is not already running.
Stopping the AccuRev Server will NOT automatically stop the AccuRev Database.
Starting the AccuRev Database will NOT automatically start the AccuRev Server.
Stopping the AccuRev Database will also stop the AccuRev Server, but only if you say "Y" to the prompt. Otherwise, neither will be stopped.
See "Controlling Server Operation" in the AccuRev 7.0 Administrator’s Guide for more information, and for setting up your system to automatically start the AccuRev processes at boot time.
Platform Support NotesThe following sections contain important information about installing AccuRev software on specific hardware/software platforms.
Platform Support MatrixFor the most up-to-date list of supported platforms, go to http://supportline.microfocus.com/supportresources/AccurevSupportMatrix.aspx.
Important Notes:1. The Platform Support Matrix lists the platforms that have been tested for the AccuRev 7.0 server and
client. We will investigate and attempt to address issues reported on other platforms, but we reserve the right to request that you reproduce the problem on a supported platform.
2. We will investigate and attempt to address issues reported on virtualization platforms not supported by AccuRev, but we reserve the right to request that you reproduce the problem on one of the supported OS platforms listed in the Platform Support Matrix, running in a non-virtualization environment.
Java CompatibilityAccuRev 7.0 is compatible with the Java 2 Runtime Environment (JRE), Versions 1.8.0_51 and higher.
UNIX/Linux Command line For Tomcat:<ac-install>/WebUI/tomcat/bin/shutdown.sh >> <ac-install>/storage/site_slice/logs/accurev_tomcat_startstop.log 2>&1 &
For Mosquitto:pkill -x mosquitto
Platform Interface Stop Procedure
AccuRev® Installation and Release Notes 31

(UNIX/Linux only) Workaround for Java Runtime Library ProblemsThe AccuRev Installation Wizard and the AccuRev GUI fail on some UNIX/Linux platforms because of Java library problems. Use this procedure to work around these problems:
1. Run the Installation Wizard with environment variable LIBXCB_ALLOW_SLOPPY_LOCK set to the value 1.
2. Fix the runtime library file in the new AccuRev installation area:
> cd ac-install/jre/lib/i386/xawt> sed -i 's/XINERAMA/FAKEEXTN/g' ./libmawt.so
Linux PostgreSQL may fail to function properly when SELinux mode is set to “Enforcing”. See http://
docs.fedoraproject.org/en-US/Fedora/13/html/SELinux_FAQ/#id2963608 for more information. To find out the current SELinux mode run getenforce (as root). To set SELinux mode to “Permissive”, run setenforce PermissiveEdit.
Linux systems require glibc version 2.4 or higher. To determine your glibc version, run rpm -qi glibc in a command shell. Ubuntu systems require libc6-i386.
The AccuRev Installation program and the AccuRev GUI fail on some older UNIX/Linux platforms because of Java library problems. Use this procedure to work around these problems:
Set the environment variable LIBXCB_ALLOW_SLOPPY_LOCK to the value 1.
Run the installation program.
Fix the runtime library file in the new AccuRev installation area:
> cd <ac-install>/jre/lib/i386/xawt> sed -i 's/XINERAMA/FAKEEXTN/g' ./libmawt.so
AIX Only the AccuRev client software is supported on this platform.
You cannot upgrade the AccuRev Client using the Help > Upgrade Client menu choice.
If you use the console method to upgrade your AccuRev Client, the response file is not read; you must provide values for host, port, and path when prompted.
The following shared libraries must be accessible, both by the AccuRev Installation Wizard and by the installed AccuRev executables. The pathnames below show typical locations for these shared libraries.
/usr/freeware/lib/libcrypto.a/usr/freeware/lib/libintl.a/usr/lib/libc.a/usr/lib/libcrypt.a/usr/lib/libdl.a/usr/lib/libpthread.a/usr/lib/libpthreads.a
Note: It is recommended that the LIBPATH environment variable not be set, as it can interfere with the loading of libraries from /opt/accurev/bin.
The libraries above are typically part of the following AIX filesets and/or open-source RPM packages:
32 AccuRev® Installation and Release Notes

bos.loc.utf.EN_US (or any other non-EN_US UTF locales)
bos.rte.bind_cmds
bos.rte.libc
bos.rte.libpthreads
bos.rte.security
openssl-0.9.7X
gettext-0.17-1 (or later)
AIX 5.3: fix pack 5300-07 or newer required
AIX 6.1: fix pack 6100-GOLD or newer required
AIX 7.1: fix pack 7100-GOLD or newer required
The installer mistakenly warns you that you have not chosen the bundled JRE. Complete the installation, then change this setting in /opt/accurev/bin/acgui.lax:
lax.nl.current.vm=../jre/bin/java
Solaris The AccuRev Server and Client are supported on Solaris x64.
If you upgrade the AccuRev Client using the console mode, you are not prompted to provide values for host, port, and path. AccuRev uses values from your existing AccuRev Client installation to perform the upgrade.
The following shared library must be accessible, both by the AccuRev Installation Wizard and by the installed AccuRev executables. The pathname below shows the typical location for this shared library.
/usr/sfw/lib/libgcc_s.so.1
Note: It is recommended that the LD_LIBRARY_PATH environment variable not be set, as it can interfere with the loading of libraries from <ac-install>/bin.
The library above is typically part of the following SUN package:
SUNWgccruntime
Restrictions on the Use of AccuRev Clients in Solaris ZonesThe following restrictions apply to the use of AccuRev clients in Solaris zones:
The AccuRev Server should be run from a global zone. If you want to run an AccuRev Server from a non-global zone, you should give that zone a private disk volume and not use a loopback mount to the global zone for any of the AccuRev Server metadata or storage files.
Workspaces can only be created on zones with private host names.
Workspaces in the non-global zone cannot be used from the global zone.
Workspaces on NFS mounts (not recommended) must be NFS-mounted directly from the non-global zone, not through a loopback mount in the non-global zone to an NFS mount in the global zone.
• Solaris requires operating system patches, as described on the Oracle Technology Network (http://www.oracle.com/technetwork/systems/patches/index.html).
AccuRev® Installation and Release Notes 33

Windows Disable anti-virus checking for the <ac-storage> directory and all directories beneath it to avoid
performance problems associated with anti-virus checks.
Mac OS X AccuRev Release 7.0 supports only the AccuRev client software on the Mac OS X platform.
The following is a recommended method for getting all required executables into the PATH for Mac OS X:
Create the following three files using "sudo":
sudo echo "/Applications/AccuRev/bin" > /etc/paths.d/AccuRev
sudo echo "/Applications/AccuRev/bin/acdiffgui.app/Contents/MacOS" > /etc/paths.d/Acdiffgui
sudo echo "/Applications/AccuRev/bin/acgui.app/Contents/MacOS" > /etc/paths.d/Acgui
To enable the AccuRev diff GUI tool (acdiffgui) to work stand-alone as well as from an IDE integration such as Eclipse, do the following:
1. Make a backup copy of acdiffgui:
cd /Applications/AccuRev/bin/acdiffgui.app/Contents/MacOS
mv acdiffgui acdiffgui.orig
2. Create a new acdiffgui file with the following content:
#!/usr/bin/perlmy $acbin = '/Applications/AccuRev/bin';my @jars = qw(oro.jar xercesImpl.jar xml-apis.jar fw.jar werken.opt.jar diff.jar);my $cp = join(':', map {"$acbin/$_"} @jars);my @args = ('java', "-Duser.dir=$acbin", '-Xms32M', '-Xmx512M', '-classpath', $cp, 'diff.DiffApp', @ARGV);system (@args);
3. Create the following link:
ln -s /Applications/AccuRev/bin/acdiffgui.app/Contents/MacOS/acdiffgui /Applications/AccuRev/bin/acdiffgui
4. Close any shells.
5. Open a new shell.
Running acdiffgui should now bring up the AccuRev graphical diff tool, and it should also work from within any integrated IDE.
Uninstalling AccuRevOn Windows, we recommend that you run <ac-install>\bin\UninstallerData\Uninstall AccuRev.exe to ensure that the AccuRev services and registry entries are removed cleanly. Back up and remove any folders and files left under <ac-install>.
On UNIX/Linux, simply halt and remove any AccuRev services, and back up and remove any folders and files left under <ac-install>.
34 AccuRev® Installation and Release Notes

AccuRev 7.0 Release NotesThis chapter describes changes and other information related to AccuRev 7.0.
Note: To ensure optimal performance, install all applicable updates for your operating system.
Changes in AccuRev Release 7.0AccuRev Release 7.0 includes the following new features and bug fixes.
Note: In cases where an issue is identified with two numbers, such as 26649 (1094789), the first number is the issue number in the AccuWork issue tracking system, and the second, in parentheses, is the issue number in the SupportLine system used by Customer Care.
New License ManagerIn AccuRev 7.0 the Reprise RLM license manager has been replaced with a new built-in license manager, which supports standard and flexible licenses. In order to upgrade to AccuRev 7.0, you must first obtain a new license file named aclicense.txt. For instructions on that procedure, see Get an AccuRev License on page 9.
See the AccuRev Administrator’s Guide for a full description of license management in AccuRev 7.0.
24355 (609971) -- CLI: Hist command does not show filename that was 'removed' from the issue
Output from the Hist command now includes the names of files that have been removed from an issue.
26649 (1094789) -- GUI: In the Schema Editor, removing a field can result in an invalid logic.xml file
Previously, the GUI would sometimes behave erratically in the Queries tab if a schema field had been manually deleted from the schema.xml file. (Manual changes to any of the AccuRev schema files are highly discouraged.) With this release, the GUI instead writes an error log message to the GUI log and ignores any references to the manually deleted field.
33753 (1102274) -- xlink on xlink fails if both are snapshots
Previously, when displaying the elements in a directory cross-linked to another cross-linked directory, where both are snapshots, the status of the elements was displayed as "no such element". With this release, the correct status of those elements is displayed.
34936 (1095751) -- RFE: Request for way to disable Admin Menu button on Web GUI toolbar
One can now hide the “Admin” menu in the WebUI toolbar by adding a “disableAdmin” tag inside the “security” tag in the wui_config.xml file and then restarting Tomcat. An example of the new “disableAdmin” tag:
<security>
<userName minLength = "0" minDigitCount = "0" minLetterCount = "0"/>
AccuRev® Installation and Release Notes 35

<password minLength = "0" minDigitCount = "0" minLetterCount = "0"/>
<disableAdmin>true</disableAdmin>
</security>
35176 (1096053) -- RFE: Use stream names in the WebUI rather than stream numbers
The WebUI issue form now displays stream names instead of stream numbers in the Version and Basis Version columns of the Changes tab.
35350 (1096166) -- RFE: Ability to add a user to multiple groups via a single CLI command
The CLI "addmember" command now supports adding a member to multiple groups. The group names must be specified in a comma-separated list that is the last argument of the command.
35818 (1096586) -- GUI: AccuWork query for dates has issues when comparing against current date
Previously, for a Timestamp-type field with a granularity of days, an “is before or equal to” comparison of the field against “CUR_DATE” would not yield the proper results. With this release, the comparison is done correctly.
35839 (1096610) -- GUI: Pasting text into a rich text field in AccuWork destroys existing layout of the field being pasted into
A new WYSIWYG editor has been introduced in AccuRev 7.0. Pasting text into a rich text field no longer inserts extra line breaks into the text.
37473 (1099867) -- GUI: Pasting text that starts with a slash '/' fails in text and log fields
A new WYSIWYG editor has been introduced in AccuRev 7.0. Pasting in text that starts with a slash causes no problems.
39139 (1101999) -- Correct directory element not showing after defuncting evil twin directory
Previously, after defuncting an evil twin directory and promoting it to the backing stream, the backing stream's Stream Explorer still showed the defuncted directory element, with a status of "(twin)(member)". With this release, the Stream Explorer shows the directory element that was not defuncted.
39235 (1102322) -- GUI: Version Browser displays the wrong issue number
Previously, under certain circumstances, the Version Browser would display only the last few digits of an issue number associated with a version. With this release, the full issue number is always displayed.
39250 (1102389) -- GUI: Diff Prev Trans opens diff with wrong version
Previously, executing "Diff Prev Trans." on the first version of a file in a stream would sometimes bring up a Diff window comparing that first version with another version of the file. With this release, that operation will result in a dialog window saying "Previous transaction cannot be found for selected version."
39540 (1103182) -- User did a revert on a link from a replica and it crashed the server
The server used to crash if this sequence of operations was executed: Link to a file (via “accurev ln”), promote, change the link to point to a different file, promote the link again, then revert the last promote in the backing stream. With this release, the Revert operation executes successfully.
36 AccuRev® Installation and Release Notes

39568 (1103306) -- AccuRev is reporting a protocol mismatch when client runs out of disk space
The error message has been improved. It now reads:
"A problem occurred writing to the file system. There is not enough space on the disk."
41134 (609864) -- RFE: Request to have timestamps in Postgres log by default
A timestamp is now added to each record in the postgresql*.log file.
41140 (1095548) -- RFE: Stream Favorites search should be case-insensitive
The Create/Edit Stream Favorite dialogs and the Find dialog in the Stream Browser now have a "Case-Sensitive" checkbox that controls whether searches are case-sensitive or case-insensitive. The setting of this checkbox is sticky, and it is shared across the Create, Edit, and Find dialogs.
41161 (1104364) -- RFE: Request to be able to view and interact with issue 0
AccuRev 6.x removed the ability for users to view and to promote changes against issue 0. AccuRev 7.0 restores the ability to promote changes against issue 0, either from the command line or in the GUI, as a way of indicating that the changes are not associated with any issue. It is not possible to view issue 0 in AccuRev 7.0.
41231, 43104 (1104539) -- RFE: Stream history menu option to use time model in addition to transactions
Previously, the History Browser's "Show:" menu listed options for 20 transactions, 50 transactions, 100 transactions, and "Everything". AccuRev 7.0 supports additional options -- 1 month, 3 months, and 6 months -- allowing the user to specify the amount of history to see as a number of months.
41266 (1103111) -- RFE: Upgrade tomcat used by WUI (to Tomcat 8.0.33)
The AccuRev 7.0 WebUI is installed with and runs on Tomcat 8.0.33.
41799 (1100524) -- Values are not populated to trigger parameter file for Revert action
For the Revert operation, the stream name and change package ID are now passed in the trigger parameter file so that they are available to the trigger.
41802 (1096649) -- CLI: anc -1 -v returns an invalid version number
Previously, if the command “anc -1 -v” was executed for the first version of a file in a stream, an invalid version number would be returned. With this release, the correct answer of “0/0” is returned.
41807 (1102080) -- RFE: lsrules '-fmx' option to be used with -d command option
The "lsrules" command now supports the use of the "-d" option with the "-fmx" option to list only the rules that were explicitly set for the workspace (or stream), excluding rules that are inherited from higher-level streams.
41812 (1101574) -- RFE: Ability to use more than one type when using the -k switch with the hist command
The CLI "hist" command now supports specifying multiple types of transactions. The transaction types must be specified in a comma-separated list after the "-k" option flag.
41814 (1102504) -- GUI: Search button not active on Find box
Pasting text into the Stream Browser's Find text box now enables the Search button properly.
AccuRev® Installation and Release Notes 37

41816 (1103844) -- RFE: Annotate from Active Transaction/History view in GUI
The Annotate command has been added to the context menu of the Versions pane (the lower pane) in the History Browser.
41903 (621027) -- GUI: No label on CPK Dialog Box for Issue field
In the "Send to Issue" operation, the issue number field in the "Select Issue (Change Package)" dialog used to be unlabeled. Now the field is labeled "Issue:".
43422 (1106840) -- Core: show streams performance issue because of extended backing stream info on passthrough streams
The performance problem has been resolved. The "show streams" command now builds stream hierarchy information only for the Demote operation, which requires that information.
43895 (1107122) -- GUI: Remove logback.xml from fw.jar
The logback.xml file has been removed from the fw.jar file and is now installed directly in the <ac_install>/bin/ directory.
Corrections and Changes to the DocumentationPlease note the following corrections and changes to the AccuRev 7.0 documentation.
25496, 43031 (1100525) -- DOC: Trigger documentation needs improvement
Appendix B, "Trigger Commands and Parameters", has been added to the Administrator's Guide. It lists the parameters that are passed to trig_server_all and trig_server_preop for each command.
36259 (1097551) -- DOC: hist option -f3 missing from the hist man page
The Help page for the "hist" CLI command now describes the -f3 option.
37124 (1103084) -- DOC: Add documentation about the ability to set max size of files within AccuRev
In the 7.0 Administrator's Guide, the section called "Server-Side Triggers" describes the ability to enforce a maximum file size for the "add" and "keep" commands. An example is provided in the server_preop_trig.pl sample file, which is installed in the AccuRev examples folder. The sample trigger file defines a maximum file size and compares that to the file sizes that AccuRev passes in as parameters to the trigger file.
39773 (1103740) -- DOC: CLI - mkuser doc page is missing GitCentric in the "Description" field for a “full” license
The mkuser doc page has been corrected.
39797 (1103792) -- DOC: 6.2.2 client install fails with "api-ms-win-crt-runtime-I1-1-0.dll is missing" error
The System Requirements have been amended to state that Windows 7 SP1 is required. SP1 resolves the missing dll error.
38 AccuRev® Installation and Release Notes

42016 (1105390) -- DOC: Document support for custom user properties that was introduced in 6.2.3
Discussion of custom user properties and other enhanced user management features (group-type issue fields, new validation actions, forward matching) has been added to these sections of the documentation:
- "setproperty" in the CLI User's Guide
- "The History Browser" in On-Line Help
- "Schema Tab" in The Schema Editor
- "Validation Tab" in The Schema Editor
- "Working with Issues" and "Issue Form" in AccuWork
Known IssuesThis section describes known issues in AccuRev and in the AccuRev Web UI.
Known Issues in AccuRevGitCentric server is incompatible with AccuRev 7.0
GitCentric releases from 2015 and earlier are not compatible with AccuRev 7.0. An upcoming release of GitCentric will resolve the incompatibility. If you have GitCentric Server, we recommend that you wait for the next release of GitCentric before you install AccuRev 7.0.
Upgrade install ignores user-entered configuration information
During an upgrade install (i.e., an install on top of an existing AccuRev bin directory), the installer prompts the user to enter the same configuration information that it asks for during a fresh (non-upgrade) install. However, for an upgrade install, the information entered by the user is actually ignored, and the installer instead uses the values that are already stored in the <ac_install>/bin/acserver.cnf file.
Cannot upgrade AccuRev client on macOS
macOS: Because the package name for the client installer has changed from AccuRev to AccuRevClient in 7.0, there is no way to upgrade earlier macOS clients. Uninstall the previous client (or simply discard the Applications/AccuRev directory) and do a fresh install of AccuRevClient 7.0.
No master license server in AccuRev 7.0
AccuRev 7.0 has replaced the standalone Reprise License Manager (RLM) with a new license manager directly built into the AccuRev server. A side effect of this change is that each master AccuRev server now needs to be issued its own license file.* The issue of a master license server will be addressed in a future release of AccuRev.
*(Replica servers do not need their own license files; they get licenses from their master servers.)
Issues synced to JIRA show HTML formatting tags in rich text issue fields
Because of the new rich text editor control used in AccuRev 7.0, rich text issue fields that are edited in AccuWork display HTML formatting tags in JIRA after the issue is synced to JIRA. If users commonly use JIRA to edit issues, the impact is minimal. However, if users mostly use AccuWork to edit issues, we recommend upgrading to AccuSync 2016.2 in order to reduce the number of tags that are visible in JIRA.
AccuRev® Installation and Release Notes 39

Issuelist incorrectly marks an issue as incomplete if a defuncted element was promoted to the backing stream
The “issuelist” command incorrectly marks an issue as incomplete if all of the following are true:
1. The stream hierarchy has cross-links in it
2. The issue contains a defuncted element that has been promoted to the current stream’s backing stream
3. Other changes for the issue are still active in the current stream
In this scenario, the defuncted element is incorrectly labeled as "missing".
40 AccuRev® Installation and Release Notes