installation artificial grass · 2014-09-05 · installation plan the first step when buying...
TRANSCRIPT

Installation manual

Thank you for choosing a Royal Grass® lawn to enhance your landscaping and garden experience. By selecting Royal Grass® you are automatically making a decision for long term quality. Royal Grass® products are specially designed to combine the characteristics of natural grass with the additional benefits of minimal maintenance, long life, always green and durability. With a minimum of proactive maintenance you will enjoy your Royal Grass® lawn for many years to come.
Royal Grass® gives warranty on your artificial grass lawn, with an average of 8 years, and guarantees that it will retain its UV stability during the warranty period. Please refer to your reseller for local conditions and the valid warranty terms.
In this manual you will find all the information you need to install Royal Grass®
your self. In advance we wish you many enjoyable Royal Grass® moments!
Royal Grass®
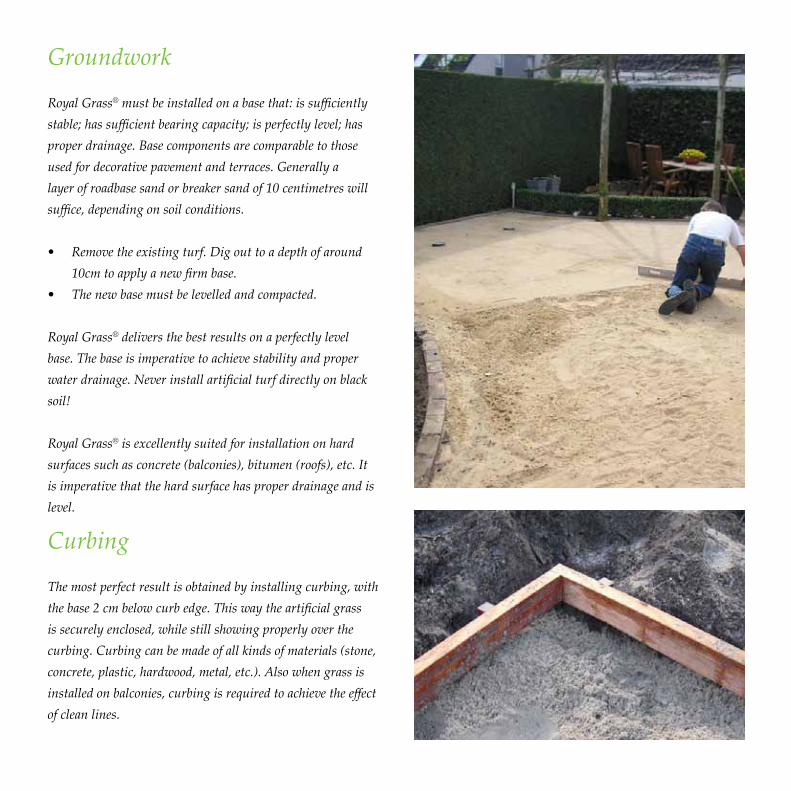
Groundwork
Royal Grass® must be installed on a base that: is sufficiently stable; has sufficient bearing capacity; is perfectly level; has proper drainage. Base components are comparable to those used for decorative pavement and terraces. Generally a layer of roadbase sand or breaker sand of 10 centimetres will suffice, depending on soil conditions.
• Remove the existing turf. Dig out to a depth of around 10cm to apply a new firm base.
• The new base must be levelled and compacted.
Royal Grass® delivers the best results on a perfectly level base. The base is imperative to achieve stability and proper water drainage. Never install artificial turf directly on black soil!
Royal Grass® is excellently suited for installation on hard surfaces such as concrete (balconies), bitumen (roofs), etc. It is imperative that the hard surface has proper drainage and is level.
Curbing
The most perfect result is obtained by installing curbing, with the base 2 cm below curb edge. This way the artificial grass is securely enclosed, while still showing properly over the curbing. Curbing can be made of all kinds of materials (stone, concrete, plastic, hardwood, metal, etc.). Also when grass is installed on balconies, curbing is required to achieve the effect of clean lines.

Installation plan
The first step when buying artificial grass for a garden is to calculate how many metres are needed and where to make the seams. This can be done by drawing up an installation plan.
Points of attention:• When installing Royal Grass® on areas broader than 4
metres; make sure you lay the rolls in parallel. Rotating or flipping the artificial grass will give an optical color difference (such as with patterned wallpaper).
• Royal Grass® is delivered on 2-metre or 4-metre wide rolls.
• Include at least an extra 15 cm for both the width and the length to compensate for losses when cutting the artificial turf to size.
• Artificial grass comes with a pile direction. It is advisable to lay pile direction so that it points to your favourite vantage point; generally the (main) terrace. The pile direction is always lengthwise on the role, never widthwise.
Order Royal Grass®
See example to calculate how much artificial turf you require on 2-metre or 4-metre rolls*. If you have more than one roll of artificial turf, then you need seam tape to connect the pieces together. The required length of seam tape is equal to the length of the roll of artificial turf.
* Including an extra 15 cm for both the width and the length to
compensate for losses!
5,2 metre
9,8
met
re
Option A - Viewing direction from the narrow side (2 strips):• Artificial turf: 4*10.0 metres + 2*10.0 metres = 60 m2• Seam tape for one seam of 10 metres.
Option B - Viewing direction from the wide side (3 strips):• Artificial turf: 4*10.8 metres (for 2 strips which are 4
metres wide) + 2*5.4 metres = 54 m2• Seam tape for three seams of 5.2 metres.

Optional: underlay
It is advisable to lay a pressure-distributing fabric under the artificial grass. There are a number of advantages to this fabric. Firstly, it protects your foundation from damage during installation. The foundation remains nice and flat as a result. It also provides added protection from point loads after laying your grass. In addition, it helps prevent weeds and ants from getting under the grass. Considering all the advantages, the minor extra cost of a pressure-distributing fabric is a very worthwhile investment.
The underlay is delivered on 2-metre wide rolls. Order the required number of square metres. Unlike artificial grass, underlay does not need a specific installation plan.
Final preparations
• If you do not install the artificial grass immediately or if you have to transport it to a different location, avoid folding or creasing it, because this will damage the grass. Always roll up the grass and never fold it double, not even for a short period of time.
• Before cutting the artificial grass to size, make sure the rolls that were delivered to you are the correct size. A roll cannot be exchanged if it has been cut.
• Check whether the sand bed has been well compacted. Pay particular attention to the corners.
• Check whether the edges of the sand bed are level along the kerb. The edge may not raise up.
• The ideal temperature for installing artificial grass is between 15 °C and 25 °C. (For very hot climates, we recommend to unroll the grass, cut it roughly to size and let it acclimatize for one day. Artificial grass can stretch due to sudden exposure to the heat. With letting it acclimatize you prefent cutting failures.)
• Plan to install the artificial grass on a dry day, so that any seams can dry properly.
• Any seams must be sufficiently pressed down by walking on them after the artificial grass has been laid, but it is recommended to avoid intensive (uncontrolled) use for the first 24 hours, so that the seams can dry properly.
• Do you have a fixed path across your grass? Then it is recommended to mark out this path with stepping stones or other hard paving materials.
• All you need to install the artificial grass is a measuring tape and a sharp Stanley knife.
Delivery of the artificial grass
Artificial grass weighs approximately 3 kg/m2. You must take the volume (2-metre or 4-metre roll), the weight and the access to your location into consideration. For example, a 4-metre roll is difficult to carry up or down a staircase. It may, therefore, be necessary to order 2-metre rolls or rent an industrial lift if you intend to install the artificial grass on a roof terrace.
Make sure you have sufficient help when the artificial grass is delivered, when laying it and when cutting it to the correct size. In most cases, this cannot be done by just one person. However, it is possible for one person to cut the sides to the correct size.

3. Cutting the seam
To create a centre seam, first make a clean cut along the sides of the artificial grass mat. Sides are made of black backing fabric sticking out generally about 5 to 10 cm on both sides. Make a clean cut along the sides between the first and second rows of grass fibers, using a sharp Stanley tool. (A roll is slightly wider than 4 metres. You will, therefore, always have enough artificial grass.)
Make sure the 2 halves are placed as close together as possible. There cannot be any overlap! This must be done very precisely, because you want to create a fitted seam. Look at the seam from a number of different angles before joining the strips together.
1. Pressure-distributing fabric (optional)
Unroll the underlay over the (level and compacted) surface and cut it to the correct size. Allow the strips to overlap by approximately 5 cm. You do not need a specific installation plan. You only need to make sure the underlay is laid tightly and does not have any wrinkles.
2. Unrolling and cutting
Unroll Royal Grass® across the base. Allow for an overlap of about 10 cm to make the joints. Allow for a small overlap along the perimeter (about 10 cm) to make sure that the artificial grass shows properly over the curbing. (Only cut the edges to the correct size after the centre seam has been laid, so that the artificial grass strips accurately touch each other. Do not cut the edges before that.) Cut off any excess artificial grass on the sides, otherwise you will not be able to slide the artificial grass so that it fits correctly.
Artificial grass can be cut to any desired shape, but the contours of the surface determine how difficult it is to lay. Obstacles along the edges and in the middle, such as walls, flowerbeds, etc., may make it more difficult to lay. It is recommended to make sure the grass strip is flat and not too tight before doing the seams.
Always try to cut at the back of the strip. This will prevent you from damaging the grass fibres. The row of fibres is also a good guide for cutting in a straight line.

4. Connecting the seam
The seams can be simply connected with Royal Grass® QuickSeaming tape. This is a self-adhesive tape. It has an adhesive layer which is suitable for artificial grass.
Before adhering both pieces ensure that both edges have been properly trimmed, straight, and will match up perfectly.
Fold both sides away and unroll the QuickSeam tape. Cut the tape on the same length as the carpet. Remove the thin sheet of the tape. Now fold and close the artificial grass and press down on the seams; repeat this several times. The seam requires some time to bond. Therefore, avoid opening the seam to see whether the bond is strong enough. On the first day, walk along the seam a number of times. Note: both the tape and the back of the grass strip must be dry. Never make seams whilst it is raining. The glue’s bond becomes weaker below 15 °C. Therefore, install the artificial grass in good weather.
Make sure when folding the joint closed, that no fibers are caught! They remain clearly visible. You can choose to fold back the artificial grass before removing the film and then carefully pull the film between the seam. Doing so will ensure that no fibres get stuck to the tape. Do this carefully and check whether the seam remains in place. (The tape sticks to the artificial grass immediately, but it is still possible to move the artificial grass).
5. Finishing and points of attention
Royal Grass® can, in principle, be laid on a surface without additionally securing it. When installing a lawn that will be subjected to intensive use, such as a lawn on which children play, we always recommend adding a thin layer of silica sand, because this will extend the lifespan of the product. It also prevents wrinkles and it prevents the artificial grass from moving. The sand filling cannot be seen and is concealed by the frizzy fibre (the sand can always be added after installation). Make sure to use sand that is suitable for artificial grass!
If you wish to secure the grass in place, then it is possible to use tent pegs along the edges. You can insert them through the artificial grass. Make sure you use tent pegs with a flat head. On a hard surface, such as concrete and asphalt, you can glue the artificial grass in place.
You can lay the artificial grass so that it directly touches the soil (flower bed). However, this requires extra maintenance and you must ensure that the soil does not get on to the artificial grass. It is recommended to have a narrow side partition that separates the artificial grass from the soil, such as a hardwood or aluminium strip.
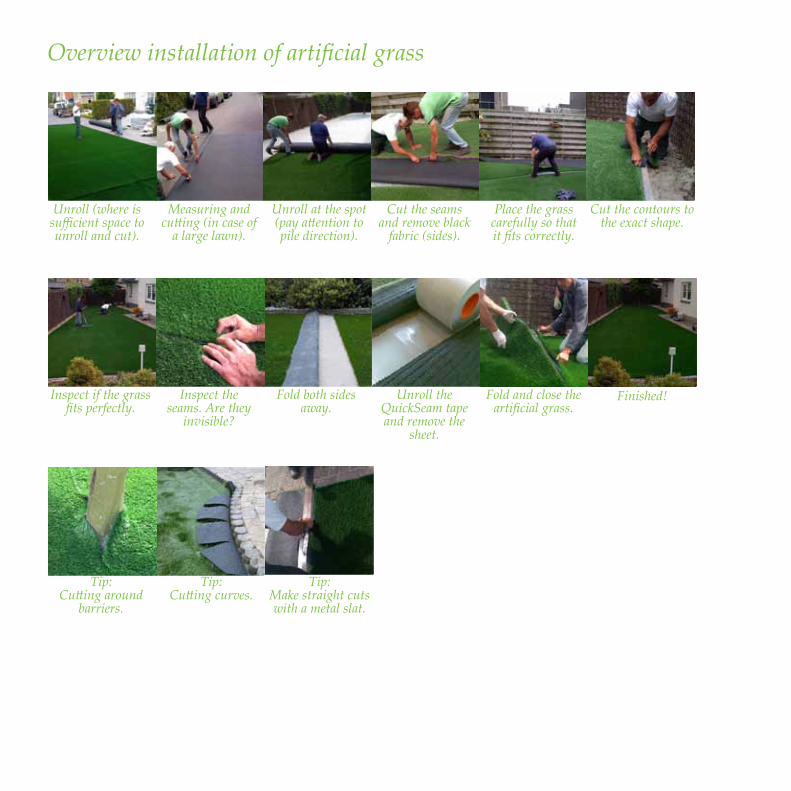
Overview installation of artificial grass
Unroll (where is sufficient space to unroll and cut).
Measuring and cutting (in case of
a large lawn).
Unroll at the spot (pay attention to pile direction).
Cut the seams and remove black
fabric (sides).
Place the grass carefully so that it fits correctly.
Inspect the seams. Are they
invisible?
Fold both sides away.
Unroll the QuickSeam tape and remove the
sheet.
Fold and close the artificial grass.
Cut the contours to the exact shape.
Inspect if the grass fits perfectly.
Finished!
Tip: Cutting around
barriers.
Tip: Cutting curves.
Tip: Make straight cuts with a metal slat.
Use and maintenance
In order to maintain the natural look and beauty of your Royal Grass® installation it is recommended that, on a regular basis, you remove organic debris like leaves and seeds from your Royal Grass® lawn. When leaves aren’t removed, they will compost and lead to grow of moss and weed. Using a weed killer is possible but it is better to prevent it. Also don’t enter the lawn if it is full of leaves, remove the leaves first.
Remove leafsA normal leaf blower can be used to clean your Royal Grass® surface from fallen leaves and other debris. The frequency of performing proactive maintenance to your Royal Grass® lawn depends on your surrounding environment and usage of your lawn.
Heavy itemsIn cases where you may have placed a heavy item on the Royal Grass® surface, like an inflatable swimming pool or flower pot, the grass fibres will flatten. When the heavy item is removed simply take a broom with firm bristles and brush the fibres back up again to make your lawn return to its original beauty. Over time, it is possible that the imprint stays visible. Remember to always brush against the natural pile direction of your Royal Grass® lawn.
Winter seasonWinter conditions are not a problem for Royal Grass®, it will not damage due to frost or break at entry. However if snow is stamped into the grass and a icy layer has been formed, this may not be removed manually in order to prevent the fibers from damaging. This must melt naturally.
Fire and hot itemsAt all times prevent fire and hot items like BBQ ashes and cigarettes from getting into direct contact with your Royal Grass® lawn as this will potentially cause melting of the grass. Repairing is possible but it will be slightly visible.
Weed controlWeed is easy to remove by picking, brushing or rake the grass. Ensure that weed is removed before it has the chance to take root, especially at the edges. It is advisable to take care of good cleaning of the lawn.
A number of environmentally-friendly products can be purchased at DIY centres and garden centres to kill algae, moss and weeds. Provided the instructions are observed, these products will not cause damage to Royal Grass®
artificial grass.
Warranty
With normal usage your Royal Grass® lawn will have a lifetime of more than 10 years. Your Royal Grass® lawn comes with an average UV stability guarantee of 8 years (ask you reseller for local valid warranty terms). Within the context of this warranty Royal Grass® is deemed to have retained its UV stability if the original tensile strength of the Royal Grass® fibres has not decreased by more than fifty per cent.
This warranty does not apply: 1) if your lawn is used for applications other than as ground cover in the garden or roof garden, 2) if damage has occurred during or resulting from inexpert processing, laying or repairs, or 3) to the extent that possible defects or damage are caused by:• fire, rips, accidents, vandalism, negligence or neglect;• the use of any infill sand other than the special sand for
artificial turf;• failure to keep the infill sand at the requisite level (if
applicable);• the use of the artificial grass surface for any purpose
other than the purpose for which the artificial grass was designed and laid;
• the use of incorrect cleaning methods or aggressive cleaning products, herbicides and insecticides;
• force majeure and other situations that the Royal Grass® reseller reasonably cannot control;
• exposure to direct or reflected temperatures in excess of 75° C;
• failure to maintain, protect or repair Royal Grass® in the appropriate manner.
Royal Grass® is at all times subject to normal wear and tear. Normal wear and tear is not a manufacturing defect and is not covered by this warranty. In addition to the factors listed above, wear and tear among other things depends on the intensity with which Royal Grass® is used.
Under influence of warmth, cold and UV radiation, artificial grass is subject to minor expansion and shrinkage. This is influenced by the foundation on which the artificial grass is installed. An expansion and/or shrinkage percentage of 1% falls within the permitted specifications.
Please note, the warranty has a depreciation factor. Save your invoice to be able to lay claim on the warranty and to prove when your lawn was delivered.
Royal Grass® isn’t responsible or liable for installation or additional warranty terms given by the reseller of Royal Grass®.
