installation & flashing guidelines€¦ · flashing, overlapping the edge of the flashing by at...
TRANSCRIPT
Jan-2017, Rev 3BI 7.2.3-5_1
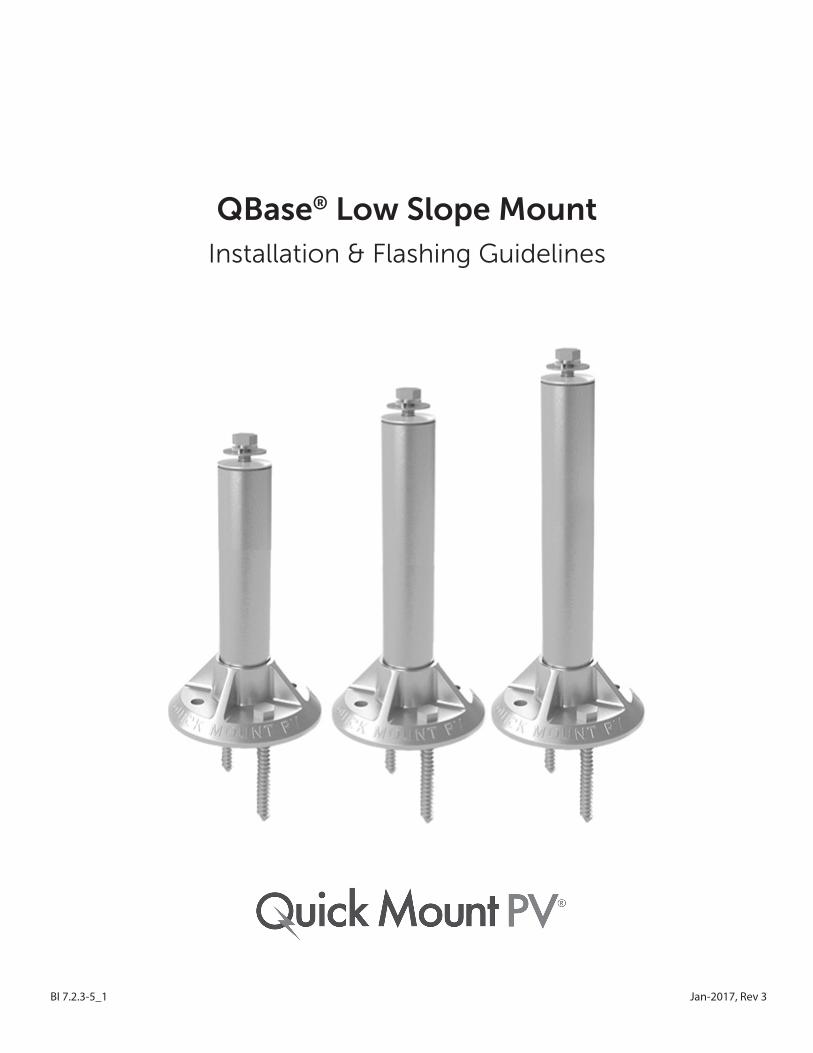
QBase® Low Slope MountInstallation & Flashing Guidelines
Jan-2017, Rev 3BI 7.2.3-5_1
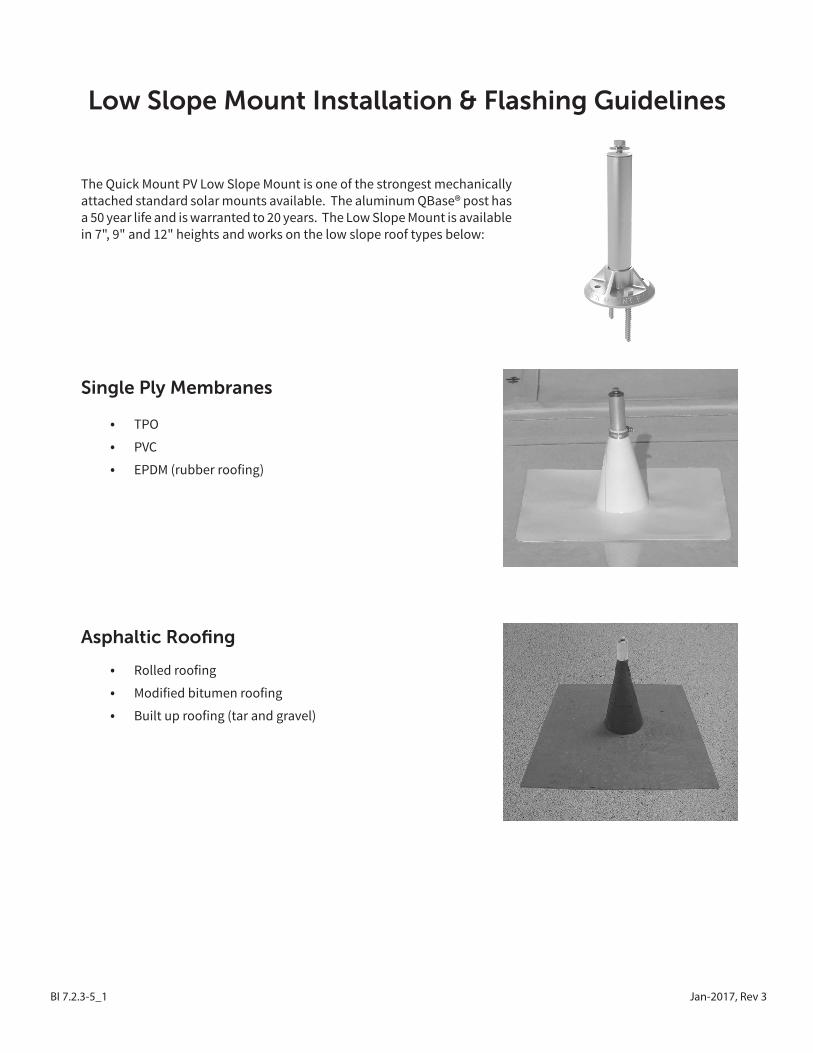
Single Ply Membranes
Asphaltic Roofing
Low Slope Mount Installation & Flashing Guidelines
The Quick Mount PV Low Slope Mount is one of the strongest mechanically attached standard solar mounts available. The aluminum QBase® post has a 50 year life and is warranted to 20 years. The Low Slope Mount is available in 7", 9" and 12" heights and works on the low slope roof types below:
• TPO
• PVC
• EPDM (rubber roofing)
• Rolled roofing
• Modified bitumen roofing
• Built up roofing (tar and gravel)
Jan-2017, Rev 3BI 7.2.3-5_1
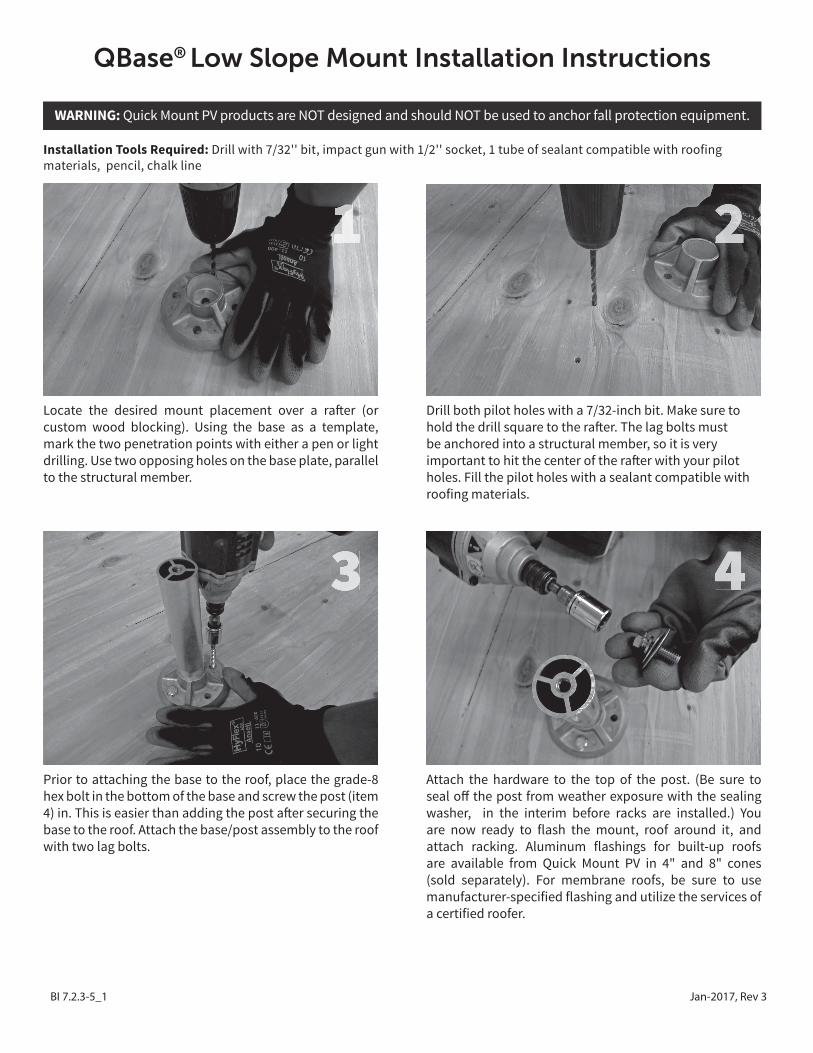
QBase® Low Slope Mount Installation Instructions
Installation Tools Required: Drill with 7/32'' bit, impact gun with 1/2'' socket, 1 tube of sealant compatible with roofing materials, pencil, chalk line
Locate the desired mount placement over a raft er (or custom wood blocking). Using the base as a template, mark the two penetration points with either a pen or light drilling. Use two opposing holes on the base plate, parallel to the structural member.
Drill both pilot holes with a 7/32-inch bit. Make sure to hold the drill square to the raft er. The lag bolts must be anchored into a structural member, so it is very important to hit the center of the raft er with your pilot holes. Fill the pilot holes with a sealant compatible with roofing materials.
1 2
Prior to attaching the base to the roof, place the grade-8 hex bolt in the bottom of the base and screw the post (item 4) in. This is easier than adding the post aft er securing the base to the roof. Attach the base/post assembly to the roof with two lag bolts.
3 4
Attach the hardware to the top of the post. (Be sure to seal off the post from weather exposure with the sealing washer, in the interim before racks are installed.) You are now ready to flash the mount, roof around it, and attach racking. Aluminum flashings for built-up roofs are available from Quick Mount PV in 4" and 8" cones (sold separately). For membrane roofs, be sure to use manufacturer-specified flashing and utilize the services of a certified roofer.
WARNING: Quick Mount PV products are NOT designed and should NOT be used to anchor fall protection equipment.
Jan-2017, Rev 3BI 7.2.3-5_1
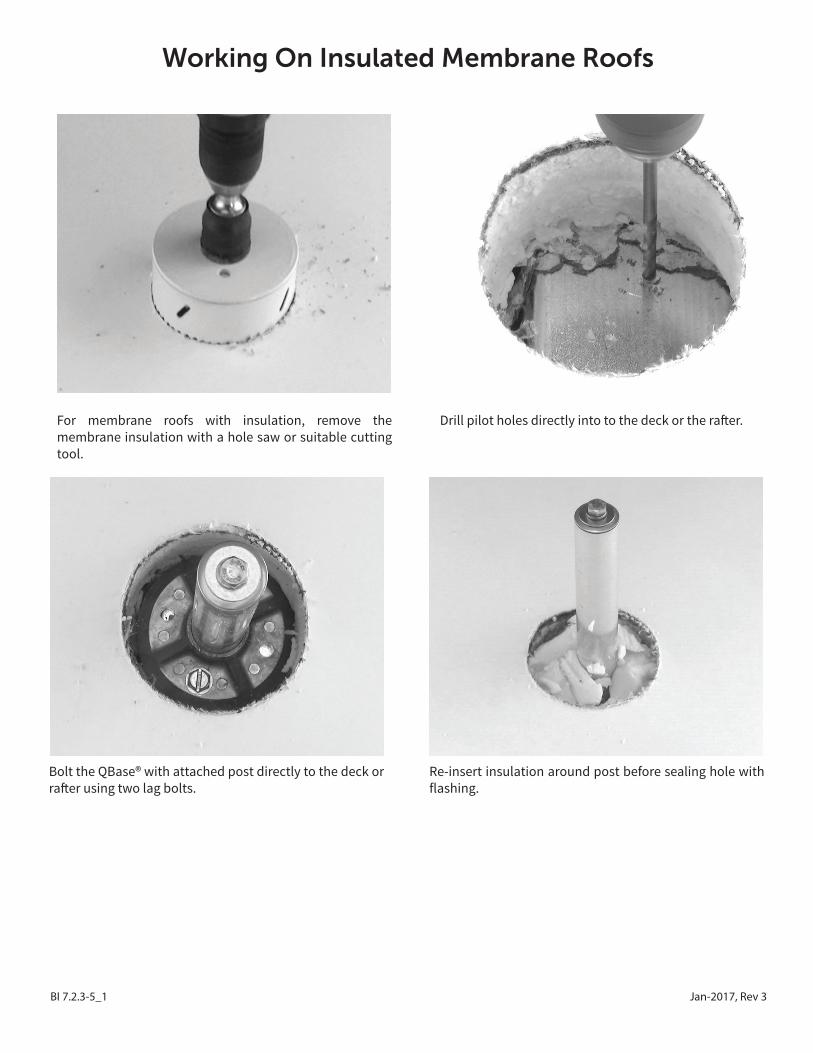
Working On Insulated Membrane Roofs
For membrane roofs with insulation, remove the membrane insulation with a hole saw or suitable cutting tool.
Re-insert insulation around post before sealing hole with flashing.
Bolt the QBase® with attached post directly to the deck or raft er using two lag bolts.
Drill pilot holes directly into to the deck or the raft er.
4
Jan-2017, Rev 3BI 7.2.3-5_1
Single Ply Membrane Flashing
TPO
PVC
EPDM (rubber roofing)
Single Ply membrane typically requires that qualified roofers install flashings using heat welded or chemically welded flashing from approved suppliers, but other solutions can be used depending on circumstances.
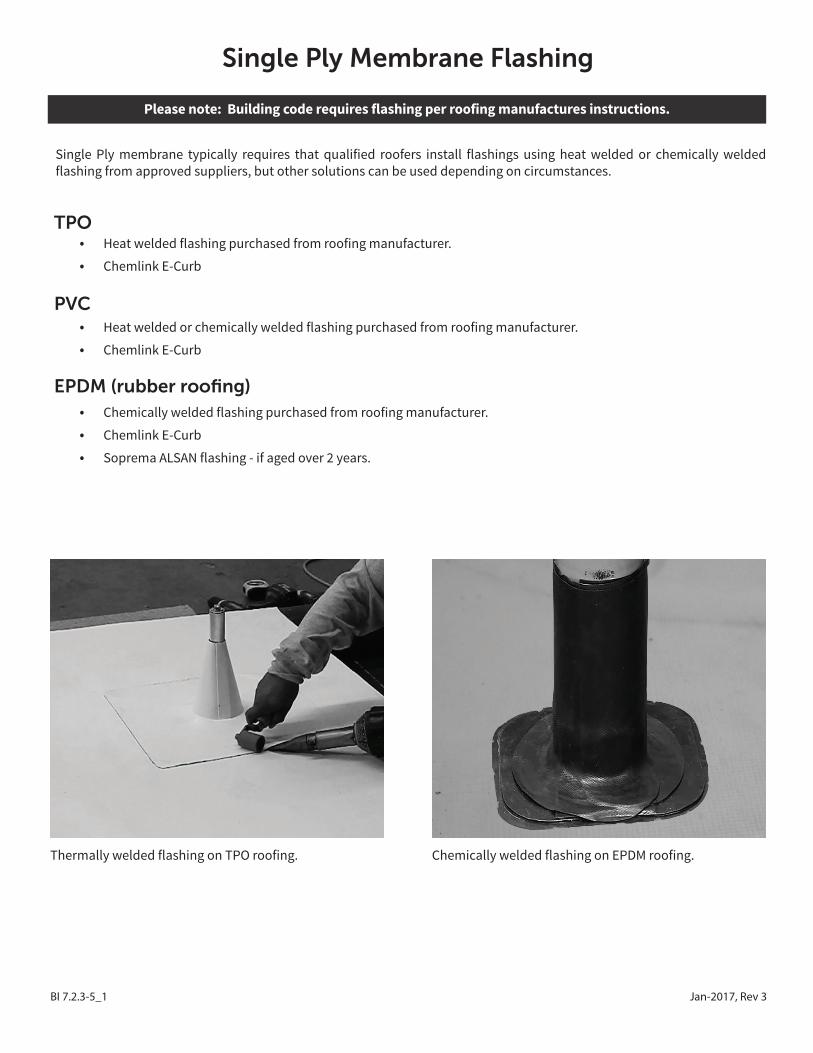
Thermally welded flashing on TPO roofing. Chemically welded flashing on EPDM roofing.
• Heat welded flashing purchased from roofing manufacturer.
• Chemlink E-Curb
• Heat welded or chemically welded flashing purchased from roofing manufacturer.
• Chemlink E-Curb
• Chemically welded flashing purchased from roofing manufacturer.
• Chemlink E-Curb
• Soprema ALSAN flashing - if aged over 2 years.
Please note: Building code requires flashing per roofing manufactures instructions.
Jan-2017, Rev 3BI 7.2.3-5_1
3
Asphaltic Roofi ng Material Flashing
Built-up Roofi ng (Rubber Roofi ng)
Modifi ed Bitumen Roofi ng
Rolled Roofi ng
Modifi ed bitumen membranes typically require that a qualifi ed roofer install metal fl ashings using torch down the method shown below, but other solutions, including Soprema ALSAN fl ashing or Chemlink E-Curb can be used depending on circumstances.
• Soprema ALSAN fl ashing
• Chemlink E-Curb
• Torch down metal fl ashing
• Soprema ALSAN fl ashing
• Chemlink E-Curb
• Torch down metal fl ashing
• Soprema ALSAN fl ashing may work with smaller sized pebbles.
• Chemlink E-Curb
• Torch down metal fl ashing
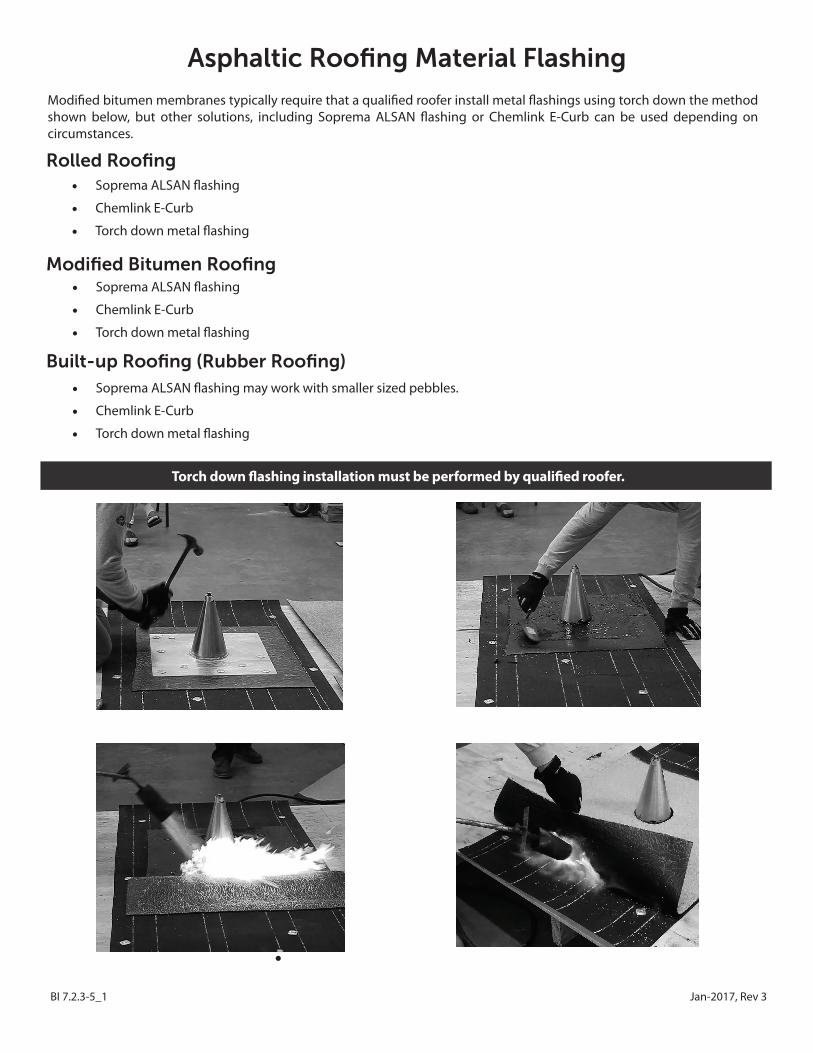
Torch down � ashing installation must be performed by quali� ed roofer.
Jan-2017, Rev 3BI 7.2.3-5_1
Chemlink E-Curb Flashing Installation Instructions
Find more information at www.chemlink.com/index.php/chemlink-products/e-curb-system.
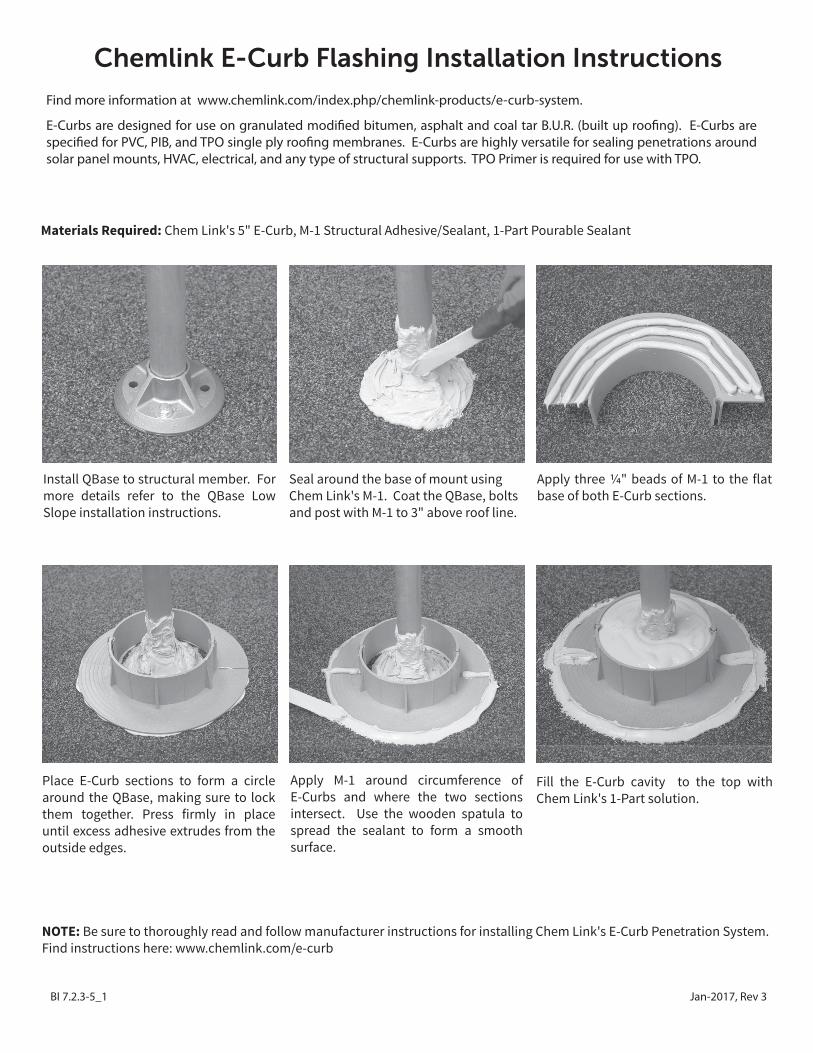
E-Curbs are designed for use on granulated modified bitumen, asphalt and coal tar B.U.R. (built up roofing). E-Curbs are specified for PVC, PIB, and TPO single ply roofing membranes. E-Curbs are highly versatile for sealing penetrations around solar panel mounts, HVAC, electrical, and any type of structural supports. TPO Primer is required for use with TPO.
Place E-Curb sections to form a circle around the QBase, making sure to lock them together. Press firmly in place until excess adhesive extrudes from the outside edges.
Apply M-1 around circumference of E-Curbs and where the two sections intersect. Use the wooden spatula to spread the sealant to form a smooth surface.
Fill the E-Curb cavity to the top with Chem Link's 1-Part solution.
Install QBase to structural member. For more details refer to the QBase Low Slope installation instructions.
Seal around the base of mount using Chem Link's M-1. Coat the QBase, bolts and post with M-1 to 3" above roof line.
Apply three 1/4" beads of M-1 to the flat base of both E-Curb sections.
NOTE: Be sure to thoroughly read and follow manufacturer instructions for installing Chem Link's E-Curb Penetration System. Find instructions here: www.chemlink.com/e-curb
Materials Required: Chem Link's 5" E-Curb, M-1 Structural Adhesive/Sealant, 1-Part Pourable Sealant
Jan-2017, Rev 3BI 7.2.3-5_1925-478-8269 | www.quickmountpv.com | [email protected]
2700 Mitchell Dr. | Walnut Creek, CA 94598
Soprema ALSAN Flashing Installation Instructions
Find more information at www.soprema.us.
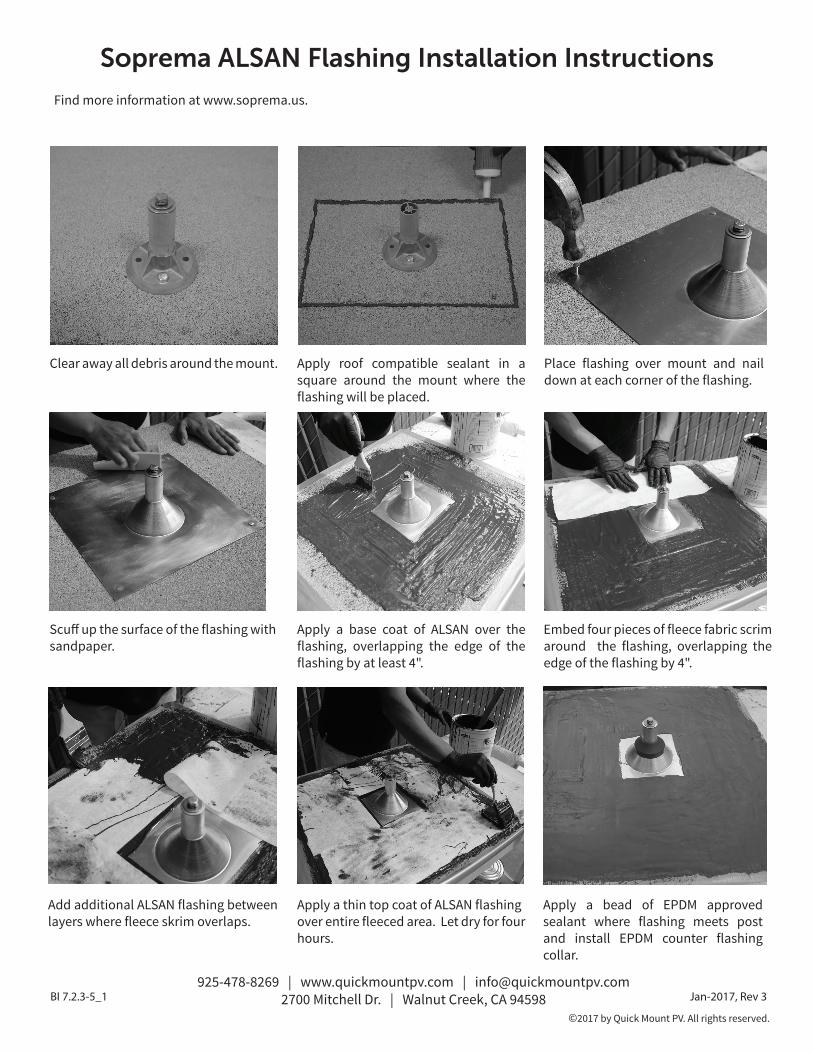
Clear away all debris around the mount. Apply roof compatible sealant in a square around the mount where the flashing will be placed.
Apply a base coat of ALSAN over the flashing, overlapping the edge of the flashing by at least 4".
Apply a bead of EPDM approved sealant where flashing meets post and install EPDM counter flashing collar.
Embed four pieces of fleece fabric scrim around the flashing, overlapping the edge of the flashing by 4".
Add additional ALSAN flashing between layers where fleece skrim overlaps.
Place flashing over mount and nail down at each corner of the flashing.
Scuff up the surface of the flashing with sandpaper.
Apply a thin top coat of ALSAN flashingover entire fleeced area. Let dry for four hours.
©2017 by Quick Mount PV. All rights reserved.