installation guide › is › content › trex › trex-rain...trex rainescape is a unique...
TRANSCRIPT
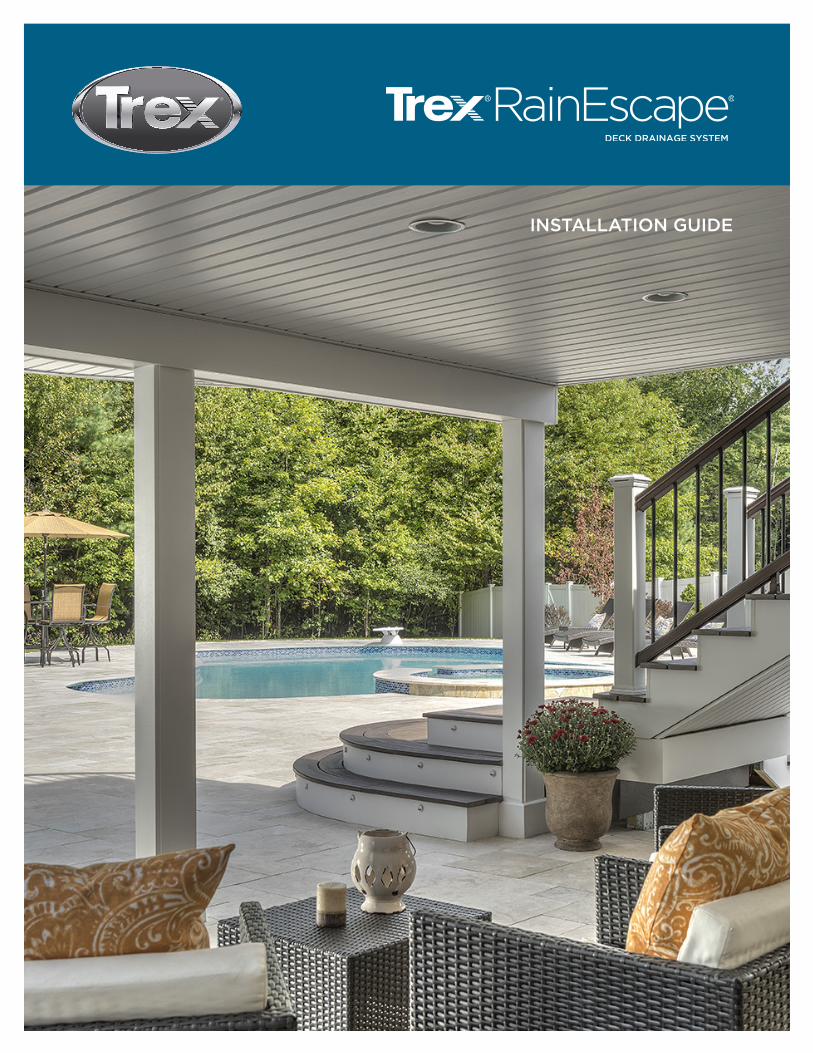
INSTALLATION GUIDE

Trex RainEscape is a unique under-deck drainage system – a network of troughs and gutters–keeps rain, spills and snow melt from dripping through
elevated deck boards, creating a dry patio area on the ground level below, perfect for adding lighting fixtures, ceiling fans, entertainment systems, and more.
CREATE YOUR OUTDOOR LIVING ROOM
LIGHTING FIXTURES
ENTERTAINMENT SYSTEMS
CEILING FANS FIREPITS
GE
NE
RA
L IN
FO
RM
AT
ION
3
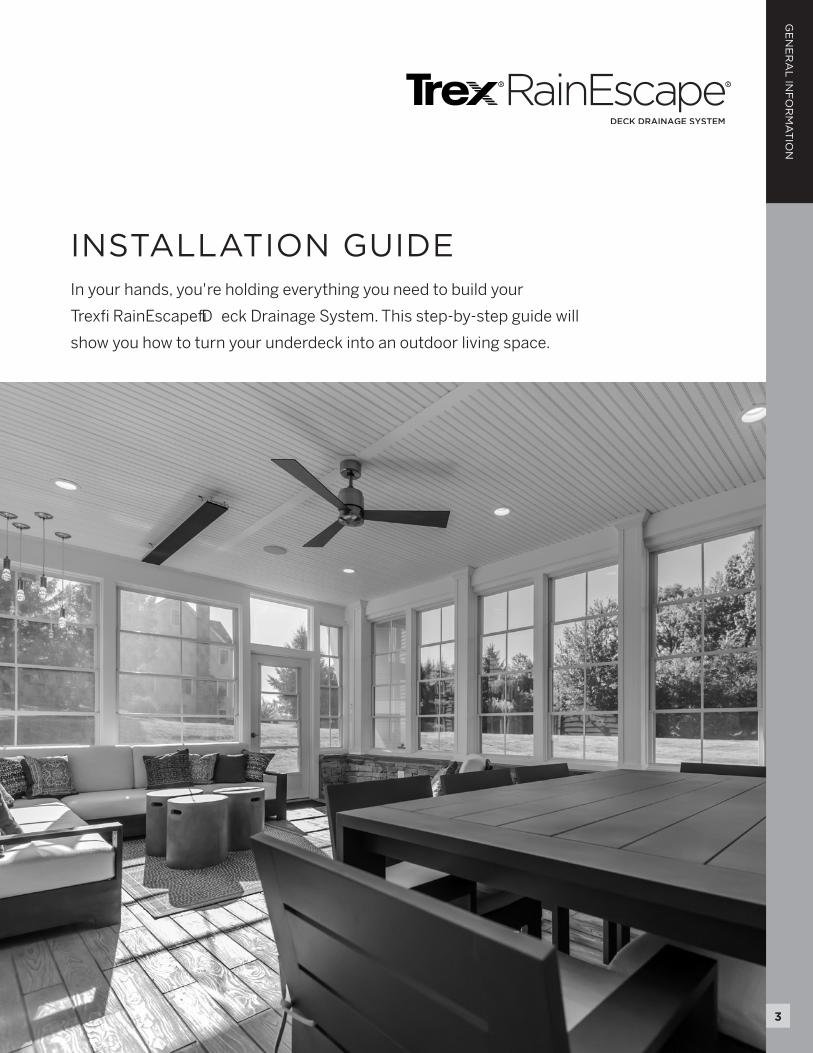
INSTALLATION GUIDEIn your hands, you're holding everything you need to build your
TrexÆ RainEscapeÆ D eck Drainage System. This step-by-step guide will
show you how to turn your underdeck into an outdoor living space.
GE
NE
RA
L IN
FO
RM
AT
ION
4
BASIC INSTALLATION
Parts ............................................................................................................................................................................... 3
Tools ............................................................................................................................................................................... 3
Prep ................................................................................................................................................................................ 4
Installing the Trex RainEscape Downspout ................................................................................................................. 4
Installing the Trex RainEscape Trough ......................................................................................................................... 5
Tape all Seams .............................................................................................................................................................. 6
Installation of a Gutter System .....................................................................................................................................7
MODIFICATIONS & SPECIAL CASES
Single Picture Frame ..................................................................................................................................................... 8
Double or Triple Picture Frame .................................................................................................................................... 8
Cantilevered Downspout .............................................................................................................................................. 9
Obstructions & Posts .................................................................................................................................................... 9
Using the Trex RainEscape Post Flash .......................................................................................................................... 9
Surface Post Mount ......................................................................................................................................................10
Installation of a Trough Over a Double or Triple Beam ..............................................................................................10
Modifi ed Downspouts ..................................................................................................................................................10
Cutting Around Downspouts and Obstructions ........................................................................................................10
Double Extended Decks .............................................................................................................................................. 11
Low Profi le Can Lights ................................................................................................................................................. 11
Installing Over Deck Steps ........................................................................................................................................... 11
INSTALLATION OVER A TREX ELEVATIONS® SYSTEM ..................................................................................12
WARRANTY .............................................................................................................................................................. 13
Q & A .......................................................................................................................................................................... 14
DO'S
» DO make sure your joists are straight and square. Gutters should have outlets every 12' to 14'.
» DO make sure the trough is wrinkle free and has proper fall to the downspout. Check with local agencies for permits and codes prior to any electrical installations.
» DO check out Trex RainEscape channel on youtube.com.
» DO call Trex RainEscape at (1-877-348-1385).
DON'TS
» DO NOT staple Trex RainEscape products anywhere other than over fl oor joist, ledgers, rim joists, headers, etc.
» DO NOT use spiked hidden fasteners. Call Trex RainEscape (1-877-348-1385) for directions.
» DO NOT stand anywhere other than directly on top of fl oor joists, ledgers, rim joists or headers as the Trex RainEscape system will not support you.
» DO NOT pre-drill decking on the Trex RainEscape product.
» DO NOT overlap troughs to extend length.
TREX ® RAINESCAPE ® INSTALLATION GUIDE
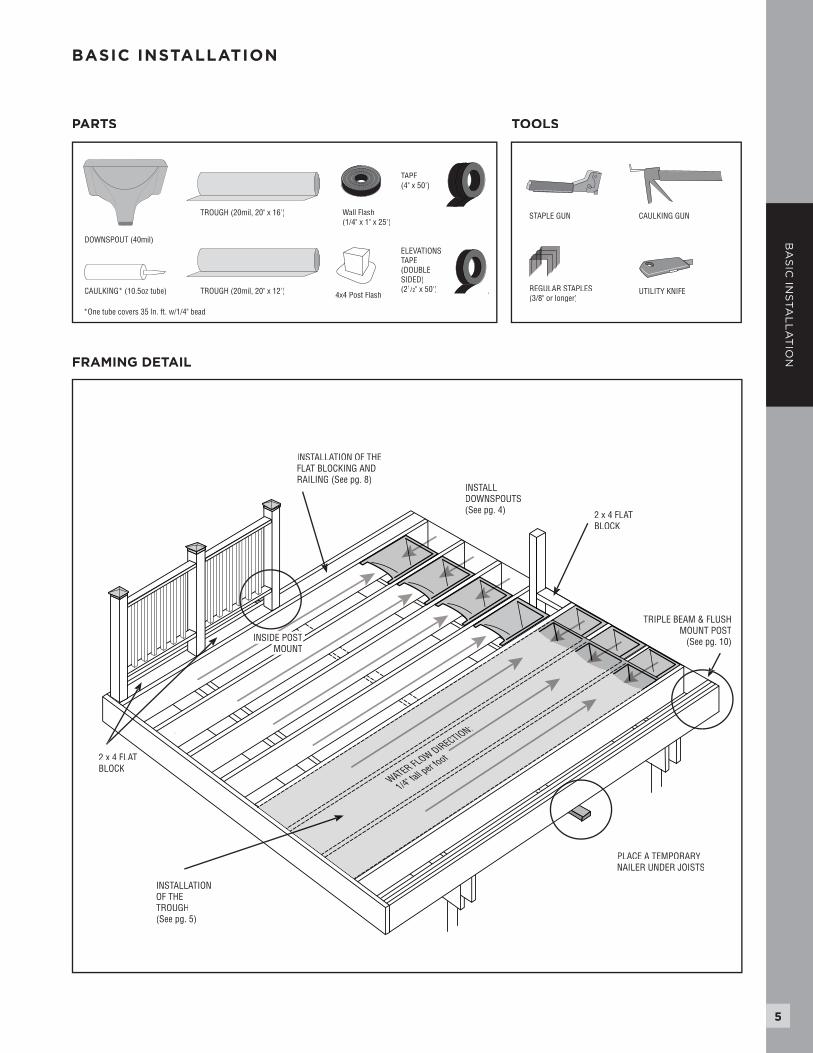
PARTS TOOLS
DOWNSPOUT (40mil)
4x4 Post Flash
Wall Flash(1/4" x 1" x 25')
TROUGH (20mil, 20" x 16')
TROUGH (20mil, 20" x 12')CAULKING* (10.5oz tube)
TAPE (4" x 50')
STAPLE GUN
REGULAR STAPLES (3/8" or longer)
CAULKING GUN
UTILITY KNIFE
WATER FLOW DIRECTION:
1/4" fall per f
oot
INSTALL DOWNSPOUTS(See pg. 4)
INSIDE POST INSIDE POST INSIDE POST INSIDE POST INSIDE POST INSIDE POST INSIDE POST INSIDE POST INSIDE POST MOUNTMOUNTMOUNTMOUNTMOUNT
2 x 4 FLAT BLOCK
2 x 4 FLAT BLOCK
TRIPLE BEAM & FLUSH MOUNT POST
(See pg. 10)
PLACE A TEMPORARYNAILER UNDER JOISTS
ELEVATIONS TAPE (DOUBLE SIDED)(21/2" x 50')
BASIC INSTALLATION
FRAMING DETAIL
BA
SIC
INS
TA
LL
AT
ION
5
*One tube covers 35 ln. ft. w/1/4" bead
INSTALLATION OF THE FLAT BLOCKING AND RAILING (See pg. 8)
INSTALLATION OF THE TROUGH(See pg. 5)
BASIC INSTALLATION
BA
SIC
INS
TA
LL
AT
ION
6
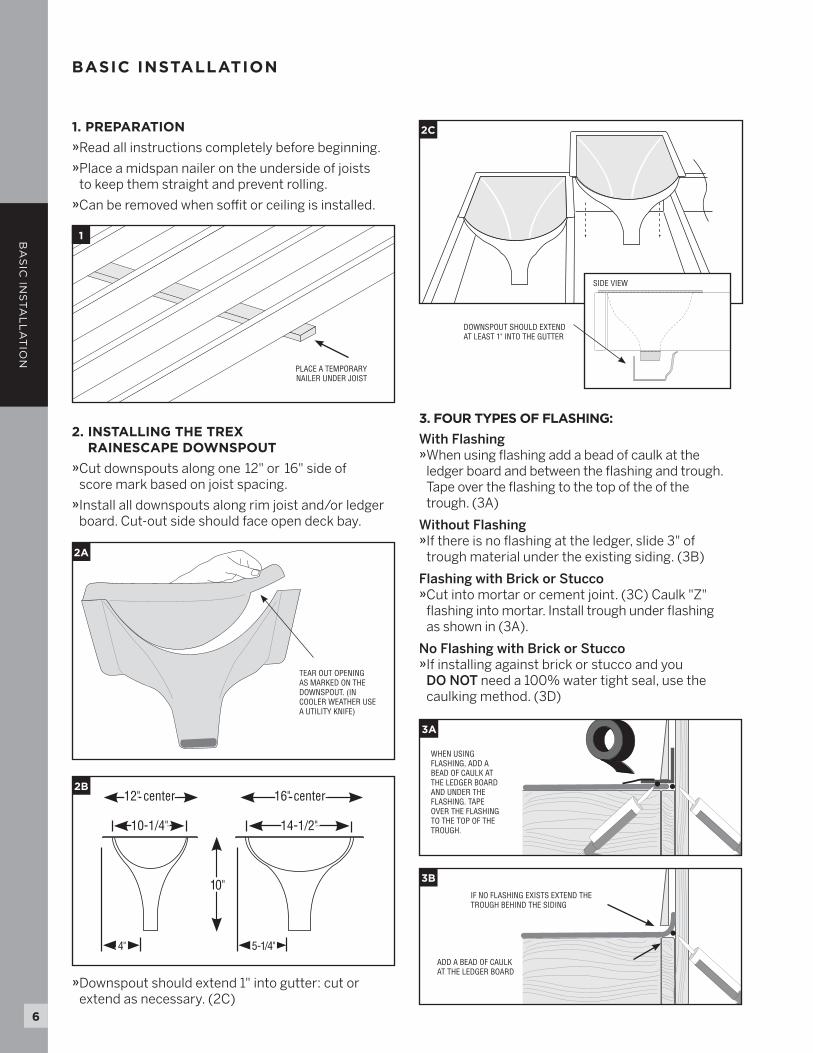
3. FOUR TYPES OF FLASHING:
With Flashing » When using fl ashing add a bead of caulk at the
ledger board and between the fl ashing and trough. Tape over the fl ashing to the top of the of the trough. (3A)
Without Flashing » If there is no fl ashing at the ledger, slide 3" of
trough material under the existing siding. (3B)
Flashing with Brick or Stucco » Cut into mortar or cement joint. (3C) Caulk "Z"
fl ashing into mortar. Install trough under fl ashing as shown in (3A).
No Flashing with Brick or Stucco » If installing against brick or stucco and you
DO NOT need a 100% water tight seal, use the caulking method. (3D)
ADD A BEAD OF CAULKAT THE LEDGER BOARD
IF NO FLASHING EXISTS EXTEND THE TROUGH BEHIND THE SIDING
3B
3A
1. PREPARATION
»Read all instructions completely before beginning.» Place a midspan nailer on the underside of joists
to keep them straight and prevent rolling.» Can be removed when soffit or ceiling is installed.
PLACE A TEMPORARYNAILER UNDER JOIST
2. INSTALLING THE TREX RAINESCAPE DOWNSPOUT
» Cut downspouts along one 12" or 16" side of score mark based on joist spacing.
» Install all downspouts along rim joist and/or ledger board. Cut-out side should face open deck bay.
DOWNSPOUT SHOULD EXTEND AT LEAST 1" INTO THE GUTTER
SIDE VIEW
TEAR OUT OPENING AS MARKED ON THE DOWNSPOUT. (IN COOLER WEATHER USE A UTILITY KNIFE)
10"
12" center
10-1/4" 14-1/2"
16" center
» Downspout should extend 1" into gutter: cut or extend as necessary. (2C)
1
2A
2B
2C
3A
WHEN USING FLASHING, ADD A BEAD OF CAULK AT THE LEDGER BOARD AND UNDER THE FLASHING. TAPE OVER THE FLASHING TO THE TOP OF THE TROUGH.
5-1/4"4"
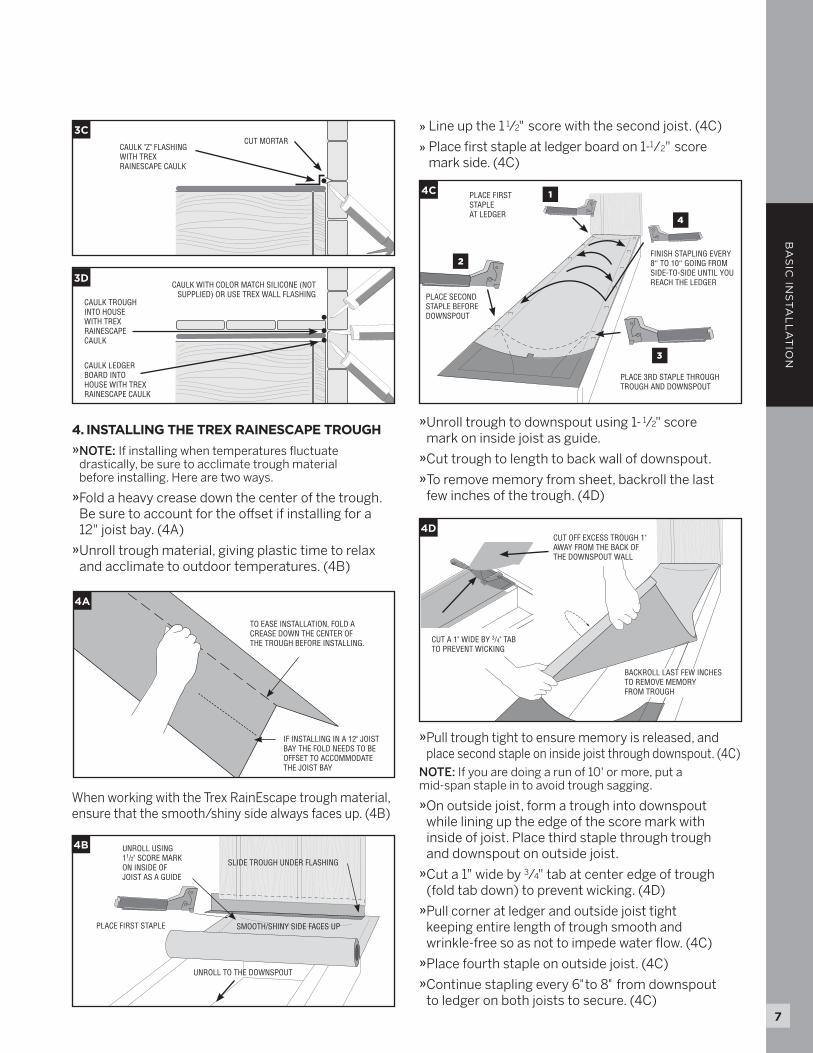
4. INSTALLING THE TREX RAINESCAPE TROUGH
» NOTE: If installing when temperatures fl uctuate drastically, be sure to acclimate trough material before installing. Here are two ways.
» Fold a heavy crease down the center of the trough. Be sure to account for the offset if installing for a 12" joist bay. (4A)
» Unroll trough material, giving plastic time to relax and acclimate to outdoor temperatures. (4B)
TO EASE INSTALLATION, FOLD ACREASE DOWN THE CENTER OFTHE TROUGH BEFORE INSTALLING.
IF INSTALLING IN A 12" JOIST BAY THE FOLD NEEDS TO BE OFFSET TO ACCOMMODATE THE JOIST BAY
4A
BA
SIC
INS
TA
LL
AT
ION
7
side view of trough
If no flashing exist, foldthe TrexRainEscape Trough
behing the house sidingto create the flashing
UNROLL USING 11/2" SCORE MARKON INSIDE OF JOIST AS A GUIDE
SLIDE TROUGH UNDER FLASHING
PLACE FIRST STAPLE
UNROLL TO THE DOWNSPOUT
SMOOTH/SHINY SIDE FACES UP
4B
When working with the Trex RainEscape trough material, ensure that the smooth/shiny side always faces up. (4B)
CAULK "Z" FLASHING WITH TREX RAINESCAPE CAULK
CAULK LEDGER BOARD INTO HOUSE WITH TREX RAINESCAPE CAULK
CAULK TROUGH INTO HOUSE WITH TREX RAINESCAPE CAULK
CUT MORTAR3C
3D
» Line up the 1 1/2" score with the second joist. (4C)
» Place fi rst staple at ledger board on 1-1/2" score mark side. (4C)
1
2
3
4
PLACE 3RD STAPLE THROUGHTROUGH AND DOWNSPOUT
PLACE FIRST STAPLEAT LEDGER
CAULK WITH COLOR MATCH SILICONE (NOT SUPPLIED) OR USE TREX WALL FLASHING PLACE SECOND
STAPLE BEFOREDOWNSPOUT
FINISH STAPLING EVERY 8” TO 10” GOING FROM SIDE-TO-SIDE UNTIL YOU REACH THE LEDGER
4C
» Unroll trough to downspout using 1- 1/2" score mark on inside joist as guide.
» Cut trough to length to back wall of downspout.» To remove memory from sheet, backroll the last
few inches of the trough. (4D)
BACKROLL LAST FEW INCHESTO REMOVE MEMORY FROM TROUGH
CUT A 1" WIDE BY 3/4" TABTO PREVENT WICKING
CUT OFF EXCESS TROUGH 1" AWAY FROM THE BACK OF THE DOWNSPOUT WALL
4D
» Pull trough tight to ensure memory is released, and place second staple on inside joist through downspout. (4C)
NOTE: If you are doing a run of 10' or more, put a mid-span staple in to avoid trough sagging.» On outside joist, form a trough into downspout
while lining up the edge of the score mark with inside of joist. Place third staple through trough and downspout on outside joist.
» Cut a 1" wide by 3/4" tab at center edge of trough (fold tab down) to prevent wicking. (4D)
» Pull corner at ledger and outside joist tight keeping entire length of trough smooth and wrinkle-free so as not to impede water fl ow. (4C)
» Place fourth staple on outside joist. (4C)» Continue stapling every 6" to 8" from downspout
to ledger on both joists to secure. (4C)
BA
SIC
INS
TA
LL
AT
ION
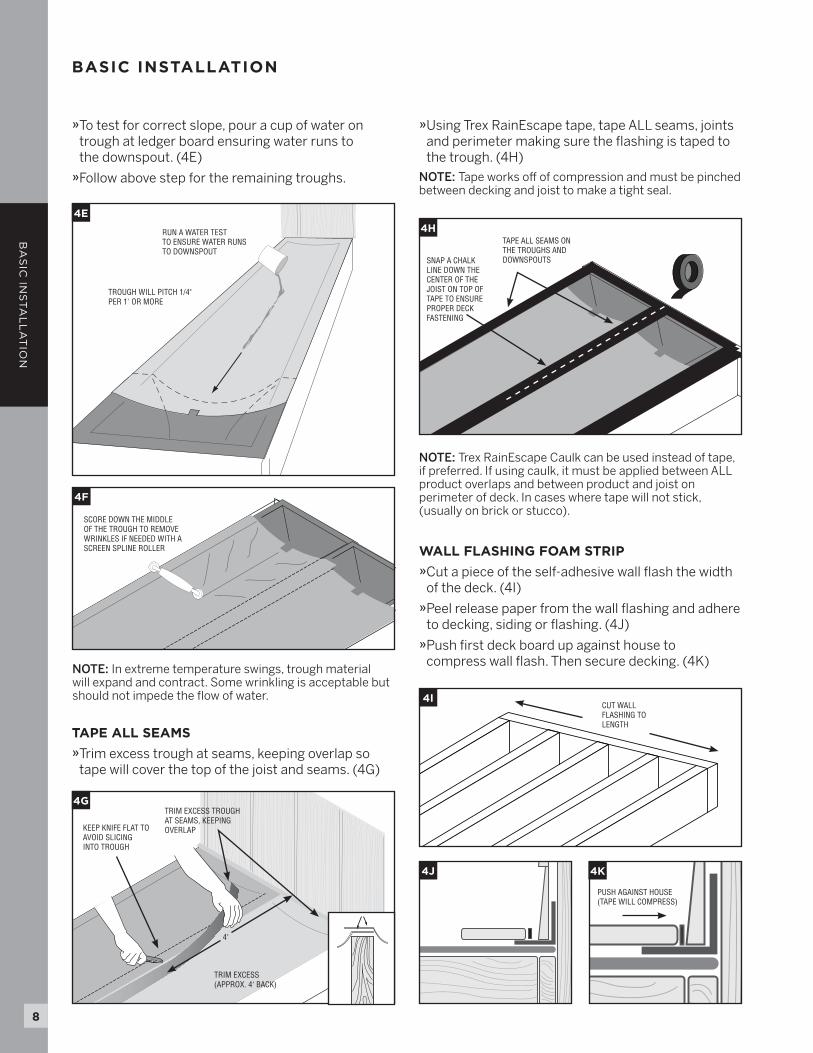
TAPE ALL SEAMS ON THE TROUGHS AND DOWNSPOUTS
CUT WALL FLASHING TO LENGTH
PUSH AGAINST HOUSE (TAPE WILL COMPRESS)
SNAP A CHALKLINE DOWN THE CENTER OF THE JOIST ON TOP OF TAPE TO ENSURE PROPER DECK FASTENING
TRIM EXCESS TROUGHAT SEAMS, KEEPINGOVERLAPKEEP KNIFE FLAT TO
AVOID SLICING INTO TROUGH
TRIM EXCESS (APPROX. 4’ BACK)
4’
4G
SCORE DOWN THE MIDDLE OF THE TROUGH TO REMOVE WRINKLES IF NEEDED WITH A SCREEN SPLINE ROLLER
4F
NOTE: Trex RainEscape Caulk can be used instead of tape, if preferred. If using caulk, it must be applied between ALL product overlaps and between product and joist on perimeter of deck. In cases where tape will not stick, (usually on brick or stucco).
4H
4I
4J 4K
BASIC INSTALLATION
RUN A WATER TEST TO ENSURE WATER RUNS TO DOWNSPOUT
TROUGH WILL PITCH 1/4" PER 1' OR MORE
4E
8
» Using Trex RainEscape tape, tape ALL seams, joints and perimeter making sure the fl ashing is taped to the trough. (4H)
NOTE: Tape works off of compression and must be pinched between decking and joist to make a tight seal.
TAPE ALL SEAMS
» Trim excess trough at seams, keeping overlap so tape will cover the top of the joist and seams. (4G)
WALL FLASHING FOAM STRIP
» Cut a piece of the self-adhesive wall fl ash the width of the deck. (4I)
» Peel release paper from the wall fl ashing and adhere to decking, siding or fl ashing. (4J)
» Push fi rst deck board up against house to compress wall fl ash. Then secure decking. (4K)
NOTE: In extreme temperature swings, trough material will expand and contract. Some wrinkling is acceptable but should not impede the fl ow of water.
» To test for correct slope, pour a cup of water on trough at ledger board ensuring water runs to the downspout. (4E)
» Follow above step for the remaining troughs.
BA
SIC
INS
TA
LL
AT
ION
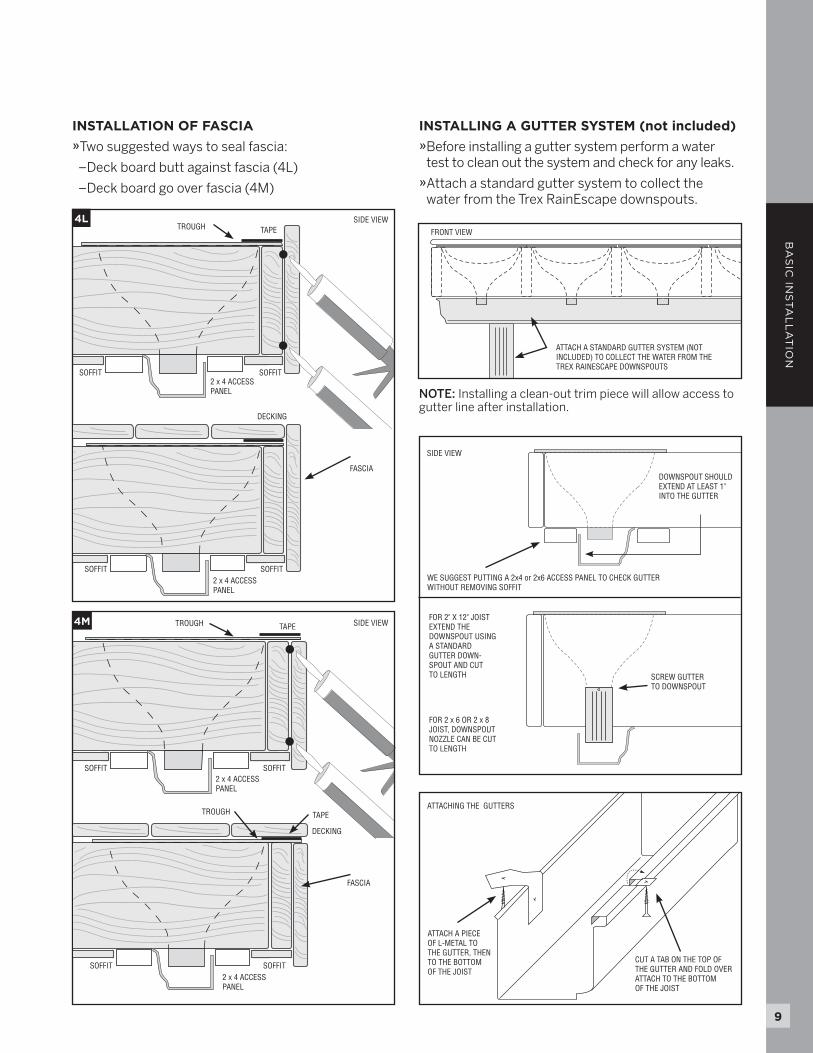
ATTACH A STANDARD GUTTER SYSTEM (NOT INCLUDED) TO COLLECT THE WATER FROM THE TREX RAINESCAPE DOWNSPOUTS
FRONT VIEW
CUT A TAB ON THE TOP OF THE GUTTER AND FOLD OVER ATTACH TO THE BOTTOM OF THE JOIST
ATTACH A PIECE OF L-METAL TOTHE GUTTER, THEN TO THE BOTTOM OF THE JOIST
ATTACHING THE GUTTERS
INSTALLING A GUTTER SYSTEM (not included)
» Before installing a gutter system perform a water test to clean out the system and check for any leaks.
» Attach a standard gutter system to collect the water from the Trex RainEscape downspouts.
DOWNSPOUT SHOULD EXTEND AT LEAST 1" INTO THE GUTTER
WE SUGGEST PUTTING A 2x4 or 2x6 ACCESS PANEL TO CHECK GUTTER WITHOUT REMOVING SOFFIT
SIDE VIEW
NOTE: Installing a clean-out trim piece will allow access to gutter line after installation.
4M FOR 2" X 12" JOIST EXTEND THE DOWNSPOUT USING A STANDARD GUTTER DOWN-SPOUT AND CUT TO LENGTH
FOR 2 x 6 OR 2 x 8 JOIST, DOWNSPOUT NOZZLE CAN BE CUT TO LENGTH
SCREW GUTTER TO DOWNSPOUT
DECKING
TROUGH
TROUGH
TAPE
TAPE
FASCIA
SOFFIT
SOFFIT
SOFFIT
SOFFIT
SOFFIT
SOFFIT
SOFFIT
SOFFIT
9
INSTALLATION OF FASCIA
» Two suggested ways to seal fascia:
± Deck board butt against fascia (4L)
± Deck board go over fascia (4M)
4L
2 x 4 ACCESS PANEL
2 x 4 ACCESS PANEL
2 x 4 ACCESS PANEL
2 x 4 ACCESS PANEL
DECKING
TAPETROUGHSIDE VIEW
SIDE VIEW
FASCIA
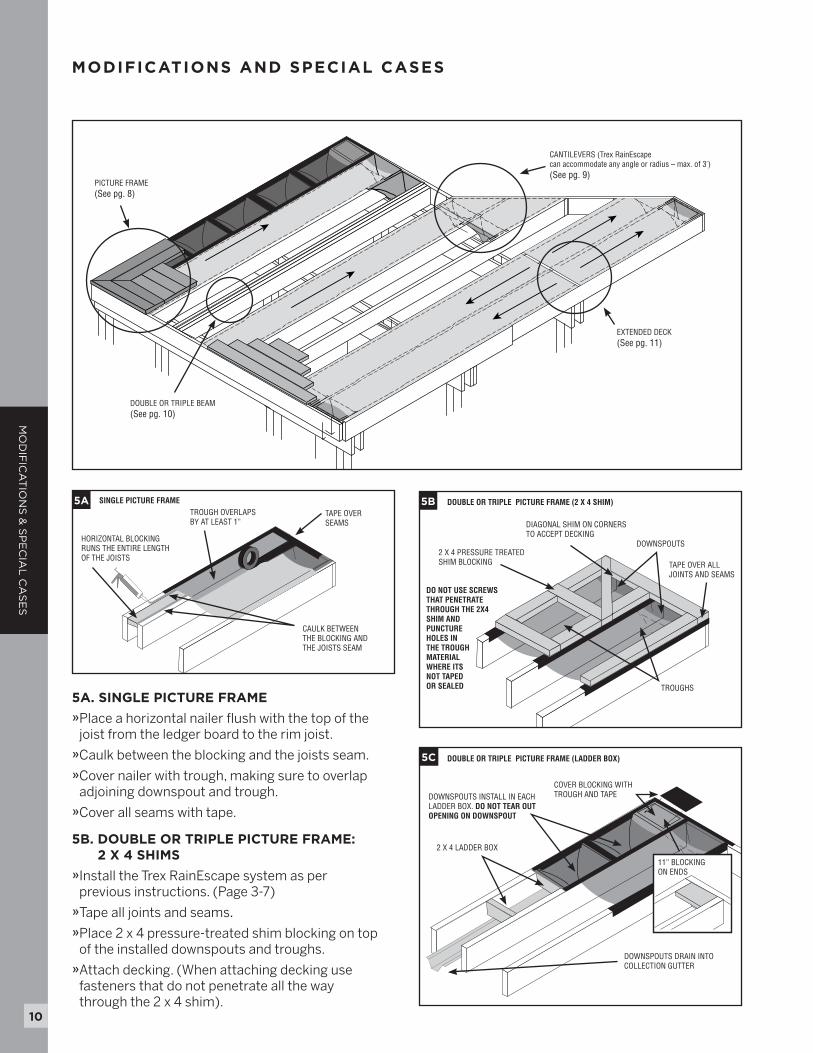
DOUBLE OR TRIPLE PICTURE FRAME (2 X 4 SHIM)
2 X 4 PRESSURE TREATEDSHIM BLOCKING
DIAGONAL SHIM ON CORNERS TO ACCEPT DECKING
DOWNSPOUTS
TROUGHS
TAPE OVER ALLJOINTS AND SEAMS
DOUBLE OR TRIPLE PICTURE FRAME (LADDER BOX)
2 X 4 LADDER BOX
DOWNSPOUTS DRAIN INTOCOLLECTION GUTTER
DOWNSPOUTS INSTALL IN EACH LADDER BOX. DO NOT TEAR OUT OPENING ON DOWNSPOUT
11" BLOCKING ON ENDS
COVER BLOCKING WITHTROUGH AND TAPE
DO NOT USE SCREWS THAT PENETRATE THROUGH THE 2X4 SHIM AND PUNCTURE HOLES IN THE TROUGH MATERIAL WHERE ITS NOT TAPED OR SEALED
SINGLE PICTURE FRAME
HORIZONTAL BLOCKING RUNS THE ENTIRE LENGTH OF THE JOISTS
TROUGH OVERLAPSBY AT LEAST 1"
TAPE OVER SEAMS
CAULK BETWEENTHE BLOCKING AND THE JOISTS SEAM
PICTURE FRAME (See pg. 8)
CANTILEVERS (Trex RainEscape can accommodate any angle or radius – max. of 3') (See pg. 9)
EXTENDED DECK (See pg. 11)
5A. SINGLE PICTURE FRAME
» Place a horizontal nailer fl ush with the top of the joist from the ledger board to the rim joist.
» Caulk between the blocking and the joists seam.» Cover nailer with trough, making sure to overlap
adjoining downspout and trough.» Cover all seams with tape.
5B. DOUBLE OR TRIPLE PICTURE FRAME: 2 X 4 SHIMS
» Install the Trex RainEscape system as per previous instructions. (Page 3-7)
» Tape all joints and seams.
» Place 2 x 4 pressure-treated shim blocking on top of the installed downspouts and troughs.
» Attach decking. (When attaching decking use fasteners that do not penetrate all the way through the 2 x 4 shim).
DOUBLE OR TRIPLE BEAM (See pg. 10)
MODIFICATIONS AND SPECIAL CASES
5A 5B
5C
MO
DIF
ICA
TIO
NS
& S
PE
CIA
L C
AS
ES
10

CUT 1" OFF THE BACK OF THE DOWNSPOUT THAT FACES THE CANTILEVER
ATTACH TROUGHS
ATTACH A SECOND TROUGHFROM THE BACK OF THECANTILEVER AND EXTENDBEYOND THE EXISTINGTROUGH
TRIM OFF EXCESS TROUGH MATERIAL
5C. DOUBLE OR TRIPLE PICTURE FRAME: LADDER BOX
» Place a 11" blocking horizontally on the ends of the bay to support 45° d ecking.
» Install a 2 x 4 ladder box to support downspouts.» Trim off all downspout nozzles to accommodate gutter.» Place downspouts into ladder box
(DO NOT REMOVE OPENINGS).» Install a piece of trough material over the 11"
blocking, making sure to overlap downspouts and the adjoining trough.
» Tape over blocking, joints and seams making sure that all screw penetrations go through trough and tape.
6. CANTILEVERED DOWNSPOUT
» Tear off the cut-out on the front panel of the downspout.» On the back side of the downspout draw a line
from corner to corner extending down 1". Cut the downspout following the line.
» Staple the trough material from the end of the cantilever over the existing trough. Repeat all the steps as necessary for trough installation.
» Tape over all joints and seams.
7. POST/RAILINGS AND OBSTRUCTIONS WITHOUT POST FLASH
» To install a post or obstruction on the inside rim joist, fi rst mark the edges of the post on the trough and draw two lines, corner to corner. Cut along the diagonal lines.
» Pull up tabs and install the post.» Tape starting at bottom of the trough, up the post
overlapping layers to assure a water tight seal working up around the post extending down onto
8. USING THE TREX RAINESCAPE POST FLASH
» Install the trough as shown in number 5A of this installation guide.
» Run a bead of caulk around the post, no more than 1" above the base of the post.
» Slide the post fl ash down over the bead of caulk, and tape the fl anges to the top of the trough and then tape the top of the post fl ash to the 4x4 post.
» After decking is installed, attach the post sleeve.» If no post sleeve is used for the fi nal deck, trim the
post fl ash to the height of the fi nished deck.
MO
DIF
ICA
TIO
NS
& S
PE
CIA
L C
AS
ES
11
6
the trough. Cut the tape at a 45-degree angle on all corners. Place a small piece of tape over the corners where the trough and post meet, to seal the corners from any leaks.
» Staple trough as per the previous instructions.
MARK EDGES OF POST ON TROUGH AND CUT DIAGONAL LINESFROM CORNER TO CORNER
PULL UP TABS ON ALL FOURCORNERS AND INSTALLTHE POST
WRAP TAPE AROUND THE POST EXTENDING DOWN ONTO THE TROUGH. CUT THE TAPE AT A 45 DEGREE ANGLE ON ALL CORNERS WHERE THE TROUGH AND POST MEET TO SEAL THE CORNERS FROM ANY LEAKS.
7
FOLLOW "5A" OF THIS INSTALLATION GUIDE FOR ALL POST INSTALLATIONS
8
POST
SLE
EVE
BEFORE INSTALLING THE POST FLASHING, APPLY A BEAD OF CAULK 1" ABOVE THE TROUGH, THEN SLIDE THE POST FLASHING DOWN
APPLY TAPE TO THE TOP OF THE TROUGH OVER THE BLOCKING, OR ANY-WHERE THERE MAY BE A PENETRATION FROM NAILS OR DECK SCREWS
TOP VIEW SIDE VIEW
APPLY TAPE TO THE FLASHING AND THE TROUGH MATERIAL
IF USING A POST SLEEVE APPLY TAPE TO THE FLASHING AND THE POST
IF NOT INSTALLING A POST SLEEVE, CUT POST FLASHING TO THE TOP OF THE FINISHED DECK
TAPE
TROUGHTROUGH
TRIPLE BEAM
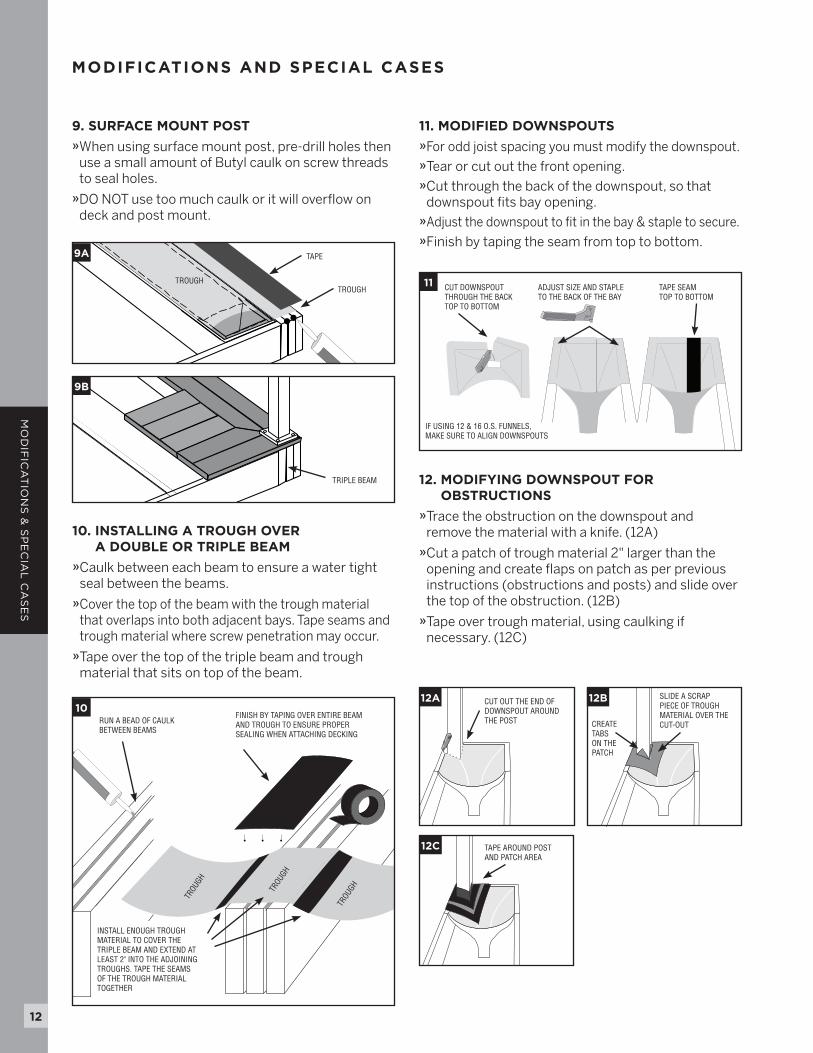
11. MODIFIED DOWNSPOUTS
» For odd joist spacing you must modify the downspout.» Tear or cut out the front opening.» Cut through the back of the downspout, so that
downspout fi ts bay opening.» Adjust the downspout to fi t in the bay & staple to secure.» Finish by taping the seam from top to bottom.
CUT DOWNSPOUT THROUGH THE BACKTOP TO BOTTOM
ADJUST SIZE AND STAPLETO THE BACK OF THE BAY
IF USING 12 & 16 O.S. FUNNELS, MAKE SURE TO ALIGN DOWNSPOUTS
TAPE SEAMTOP TO BOTTOM
MODIFICATIONS AND SPECIAL CASES
MO
DIF
ICA
TIO
NS
& S
PE
CIA
L C
AS
ES
12
11
CUT OUT THE END OF DOWNSPOUT AROUNDTHE POST
SLIDE A SCRAP PIECE OF TROUGH MATERIAL OVER THE CUT-OUTCREATE
TABS ON THE PATCH
12. MODIFYING DOWNSPOUT FOR OBSTRUCTIONS
» Trace the obstruction on the downspout and remove the material with a knife. (12A)
» Cut a patch of trough material 2" larger than the opening and create fl aps on patch as per previous instructions (obstructions and posts) and slide over the top of the obstruction. (12B)
» Tape over trough material, using caulking if necessary. (12C)
9. SURFACE MOUNT POST
» When using surface mount post, pre-drill holes then use a small amount of Butyl caulk on screw threads to seal holes.
» DO NOT use too much caulk or it will overfl ow on deck and post mount.
TAPE AROUND POST AND PATCH AREA
12A
9A
9B
12B
12C
RUN A BEAD OF CAULK BETWEEN BEAMS
FINISH BY TAPING OVER ENTIRE BEAM AND TROUGH TO ENSURE PROPER SEALING WHEN ATTACHING DECKING
10. INSTALLING A TROUGH OVER A DOUBLE OR TRIPLE BEAM
» Caulk between each beam to ensure a water tight seal between the beams.
» Cover the top of the beam with the trough material that overlaps into both adjacent bays. Tape seams and trough material where screw penetration may occur.
» Tape over the top of the triple beam and trough material that sits on top of the beam.
10
TROU
GH
TROU
GH
TROU
GH
INSTALL ENOUGH TROUGH MATERIAL TO COVER THE TRIPLE BEAM AND EXTEND AT LEAST 2" INTO THE ADJOINING TROUGHS. TAPE THE SEAMS OF THE TROUGH MATERIAL TOGETHER
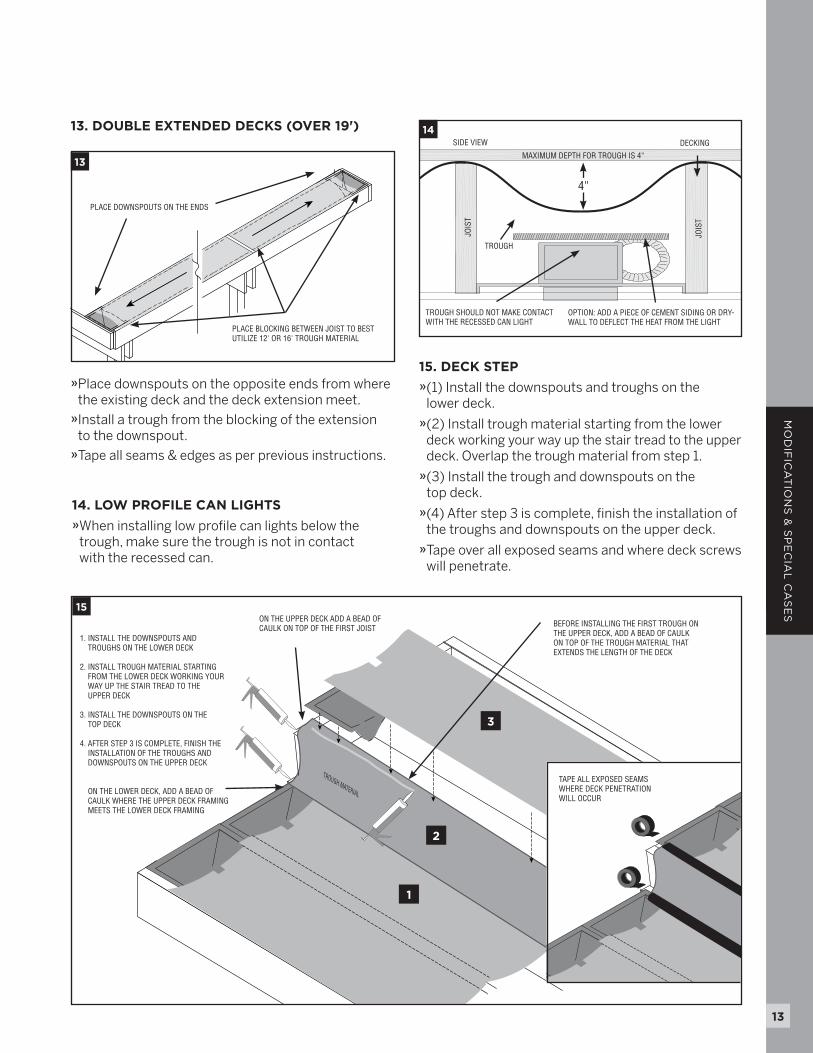
13. DOUBLE EXTENDED DECKS (OVER 19')
» Place downspouts on the opposite ends from where the existing deck and the deck extension meet.
» Install a trough from the blocking of the extension to the downspout.
» Tape all seams & edges as per previous instructions.
PLACE DOWNSPOUTS ON THE ENDS
TROUGH SHOULD NOT MAKE CONTACT WITH THE RECESSED CAN LIGHT
MAXIMUM DEPTH FOR TROUGH IS 4"
4"
TROUGH
SIDE VIEW DECKING
JOIS
T
JOIS
T
OPTION: ADD A PIECE OF CEMENT SIDING OR DRY-WALL TO DEFLECT THE HEAT FROM THE LIGHT
PLACE BLOCKING BETWEEN JOIST TO BEST UTILIZE 12' OR 16' TROUGH MATERIAL
13
14
14. LOW PROFILE CAN LIGHTS
» When installing low profi le can lights below the trough, make sure the trough is not in contact with the recessed can.
15. DECK STEP
» (1) Install the downspouts and troughs on the lower deck.
» (2) Install trough material starting from the lower deck working your way up the stair tread to the upper deck. Overlap the trough material from step 1.
» (3) Install the trough and downspouts on the top deck.
» (4) After step 3 is complete, fi nish the installation of the troughs and downspouts on the upper deck.
» Tape over all exposed seams and where deck screws will penetrate.
EL
EV
AT
ION
S S
YS
TE
M
13
MO
DIF
ICA
TIO
NS
& S
PE
CIA
L C
AS
ES
1. INSTALL THE DOWNSPOUTS AND TROUGHS ON THE LOWER DECK
2. INSTALL TROUGH MATERIAL STARTING FROM THE LOWER DECK WORKING YOUR WAY UP THE STAIR TREAD TO THE UPPER DECK
3. INSTALL THE DOWNSPOUTS ON THE TOP DECK
4. AFTER STEP 3 IS COMPLETE, FINISH THE INSTALLATION OF THE TROUGHS AND DOWNSPOUTS ON THE UPPER DECK
ON THE LOWER DECK, ADD A BEAD OF CAULK WHERE THE UPPER DECK FRAMING MEETS THE LOWER DECK FRAMING
ON THE UPPER DECK ADD A BEAD OF CAULK ON TOP OF THE FIRST JOIST BEFORE INSTALLING THE FIRST TROUGH ON
THE UPPER DECK, ADD A BEAD OF CAULK ON TOP OF THE TROUGH MATERIAL THAT EXTENDS THE LENGTH OF THE DECK
15
TAPE ALL EXPOSED SEAMS WHERE DECK PENETRATIONWILL OCCUR
2
1
3
EL
EV
AT
ION
S S
YS
TE
M
14
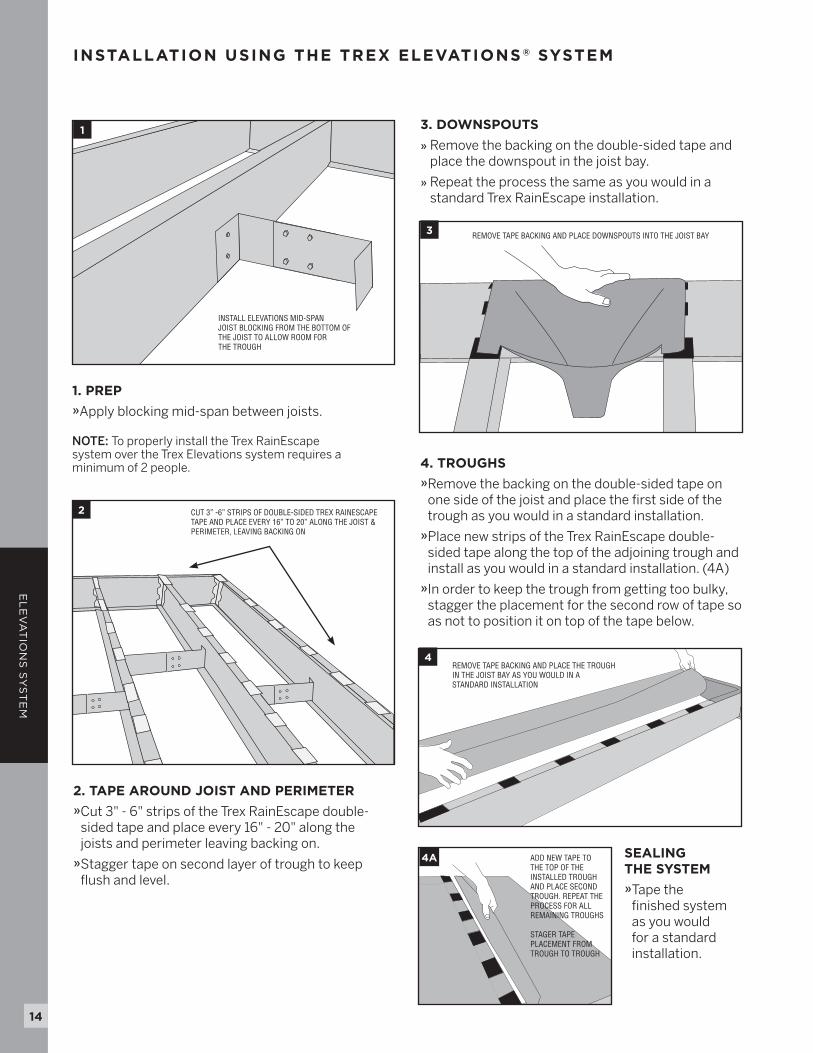
1. PREP » Apply blocking mid-span between joists.
NOTE: To properly install the Trex RainEscape system over the Trex Elevations system requires a minimum of 2 people.
INSTALL ELEVATIONS MID-SPAN JOIST BLOCKING FROM THE BOTTOM OF THE JOIST TO ALLOW ROOM FOR THE TROUGH
CUT 3” -6” STRIPS OF DOUBLE-SIDED TREX RAINESCAPE TAPE AND PLACE EVERY 16” TO 20” ALONG THE JOIST & PERIMETER, LEAVING BACKING ON
REMOVE TAPE BACKING AND PLACE DOWNSPOUTS INTO THE JOIST BAY
INSTALLATION USING THE TREX ELEVATIONS ® SYSTEM
3. DOWNSPOUTS
» Remove the backing on the double-sided tape and place the downspout in the joist bay.
» Repeat the process the same as you would in a standard Trex RainEscape installation.
2
2. TAPE AROUND JOIST AND PERIMETER
» Cut 3" - 6" strips of the Trex RainEscape double- sided tape and place every 16" - 20" along the joists and perimeter leaving backing on.
» Stagger tape on second layer of trough to keep fl ush and level.
3
4. TROUGHS
» Remove the backing on the double-sided tape on one side of the joist and place the fi rst side of the trough as you would in a standard installation.
» Place new strips of the Trex RainEscape double- sided tape along the top of the adjoining trough and install as you would in a standard installation. (4A)
» In order to keep the trough from getting too bulky, stagger the placement for the second row of tape so as not to position it on top of the tape below.
4REMOVE TAPE BACKING AND PLACE THE TROUGHIN THE JOIST BAY AS YOU WOULD IN A STANDARD INSTALLATION
4A ADD NEW TAPE TO THE TOP OF THE INSTALLED TROUGH AND PLACE SECOND TROUGH. REPEAT THE PROCESS FOR ALL REMAINING TROUGHS
STAGER TAPE PLACEMENT FROM TROUGH TO TROUGH
SEALING THE SYSTEM
» Tape the fi nished system as you would for a standard installation.
1
READ THESE WARRANTY TERMS CAREFULLY BEFORE INSTALLING OR USING THE TREX RAINESCAPE DECK DRAINAGE SYSTEM. YOUR INSTALLATION AND USE OF THE SYSTEM OR ANY OF ITS COMPONENTS INDICATES THAT YOU AGREE TO BE BOUND BY THESE TERMS. IF YOU DO NOT AGREE TO ALL OF THE TERMS OF THIS WARRANTY, RETURN THE PRODUCT TO THE PLACE OF PURCHASE FOR A FULL REFUND.This warranty gives you specifi c legal rights, and you may also have other rights which vary from State to State.
1. WARRANTYDri-Deck Enterprises, LLC (Dri-Deck) warrants that at the time of sale the components of the Trex RainEscape Deck Drainage System (the ™Systemº ) will be free from defects in material and manufacture and will conform to Dri-Deck's specifi cations for the components. Dri-Deck further war-rants that for a period of twenty years after sale the System will not leak, PROVIDED THAT it is installed and maintained in accordance with Dri-Deck's instructions and is not sub-jected to (a) alteration or unauthorized repairs, (b) misuse or abuse, such as by puncturing, cutting, burning, melting and the like, (c) Acts of God (including without limitation hurricanes, tornadoes, fl oods, earthquakes, or other severe weather or natural phenomena), or (d) improper storage or handling or other treatment or installations for which it was not intended. This warranty extends only to the fi rst own-er (™the Ownerº ) of the structure on which the system is installed who uses the structure for its intended purpose-----whether residential or commercial.
2. DISCLAIMER OF OTHER WARRANTIES The preceding warranties are the exclusive and sole ex-press warranties given by Dri-Deck. They supersede any prior, contrary or additional representations, whether oral or written. DRI-DECK HEREBY DISCLAIMS AND EX-CLUDES ALL WARRANTIES WHETHER EXPRESS, IMPLIED, OR STATUTORY-INCLUDING ANY ARISING FROM COURSE OF DEALING OR USAGE OF TRADE, ANY WARRANTY OF MERCHANTABILITY AND ANY WARRANTY OF FITNESS FOR A PARTICULAR PURPOSE, except that for System components purchased directly by a consumer, any implied warranties are limited in duration to the term of express warranties provided above. Some states do not allow limita-tions on how long an implied warranty lasts, so the above limitation may not apply to you.
3. EXCLUSIVE REMEDY FOR ANY NONCONFORMITIESIf during the applicable warranty period, the System or its components do not conform to the preceding Warranties, the Owner shall notify Dri-Deck as provided below, and with-
in a reasonable time Dri-Deck will provide, at its option, one of the following: (1) replacement components for any non-conforming or defective components or (2) the percent-age of the purchase price for the non-conforming System components equal to the percentage of the warranty period remaining when Dri-Deck is notifi ed of the nonconformity. Dri-Deck will not be liable for labor, costs of removal or re-installation of components, disposal, freight, taxes, or other incidental charges. THESE REMEDIES ARE THE EXCLUSIVE AND SOLE REMEDIES FOR ANY BREACH OF WARRANTY. For any breach of warranty, the owner must notify Dri-Deck in writing at the address in Section 7 within thirty (30) days after discovering the nonconformity. The notice must de-scribe the location and nature of the nonconformity. The owner must give Dri-deck a reasonable opportunity to ex-amine the claimed nonconformity before undertaking any repairs, removal or replacement. The owner must present the original invoice, bill, or other proof of date of purchase. Compliance with the requirements of this paragraph is a condition to coverage under the Warranty: if these require-ments are not complied with Dri-Deck will have no obligation to provide any remedy for any breach of warranty.
4. DISCLAIMER OF INCIDENTAL AND CONSEQUENTIAL DAMAGES
IN NO EVENT SHALL DRI-DECK BE LIABLE FOR ANY INCIDENTAL, SPECIAL, INDIRECT, OR CONSEQUENTIAL DAMAGES, WHETHER RESULTING FROM NONDELIVERY OR FROM THE USE, MISUSE, OR INABILITY TO USE THE PRODUCT OR FROM DEFECTS IN THE PRODUCT OR FROM DRI-DECK'S OWN NEGLIGENCE. Some states do not allow the exclusion or limitation of incidental or consequential damages, so the above limitations may not apply to you.
5. APPLICABLE LAWThis warranty will be interpreted, construed, and enforced in all respects in accordance with the Laws of the State of Colorado , without reference to its choice of law rules. The U.N. Convention on Contracts for International Sale of Goods will not apply to this warranty.
6. SEVERABILITYIf any provision of this warranty is found to be invalid or unenforceable, then the remainder shall have full force and the invalid provision shall be partially enforced to the maximum extent permitted by law to effectuate the purpose of the agreement.
7. ADDRESS FOR NOTICES TO DRI-DECK2965 S Tejon StEnglewood , CO 80110
WA
RR
AN
TY
15
20-YEAR WARRANTY
TrexÆ R ainEscapeÆ i s manufactured and distributed by Dri-Deck Enterprises, LLC. TrexÆ i s a trademark of, and is used by Dri-Deck Enterprises, LLC under a license with, Trex Company, Inc.
FREQUENTLY ASKED QUESTIONS
Q: Do you have installation videos?
A: Yes, go to youtube.com and type in "Trex RainEscape".
Q: Can I install the system myself?
A: Yes, with the easy-to-follow instructions that come with the Trex RainEscape system, utility knife, staple gun and caulking gun are all you need to install the system in one or two hours on most decks. The installation goes quicker with two people.
Q: Can I install this over an existing deck?
A: Yes, but the existing deck boards must be removed while you install the Trex RainEscape System.
Q: How do Trex RainEscape’s prices compare to other similar systems?
A: Although Trex RainEscape is a unique water drainage system, it costs less then the nearest competitor.
Q: How durable is the Trex RainEscape System?
A: Made with durable plastic and Ultra Violet inhibitors, the Trex RainEscape system will be protected from the sun, snow and rain.
Q: How do you clean out the debris?
A: There should be very little if any debris that enters the system because it has to be small enough to fit through the decking. Small debris simply passes through the system with water. In the rare case that there is some build up, simply remove the piece of decking over the affected area and clean as needed or use the 2x4 access panel.
Q: What are the overall benefits of the Trex RainEscape System?
1. It protects the structural integrity of your joist.2. Easy to install.3. The Trex RainEscape System allows you to create an indoor environment outdoors
underneath your deck. You can install ceiling fans, speakers, video electronics and furniture that will all be safe from the elements.
Q: If I run into problems, is there a number I can call to ask questions?
A: Yes, go to our website @ trexrainescape.com or 1-800-BUY TREX
FA
Qs
16
HELPFUL TIPS
TREX RAINESCAPE IS EASIER TO INSTALL WITH TWO PEOPLE
Snow build-upSnow will sit on the decking and, as it melts, will run through the system.
LeavesIf leaves and debris accumulate in the troughs, a standard washing or a hard rain will clean out the system.
If the tape will not stickIn areas, such as the perimeter, brick or stucco, where the Trex RainEscape tape will not stick, use the Trex RainEscape caulking to adhere the material.
CautionDo not splice trough material. If the trough material is spliced it must be replaced. Do not try to repair any damage with the Trex RainEscape tape.
TIP
S
17

NOTES
NO
TE
S
18
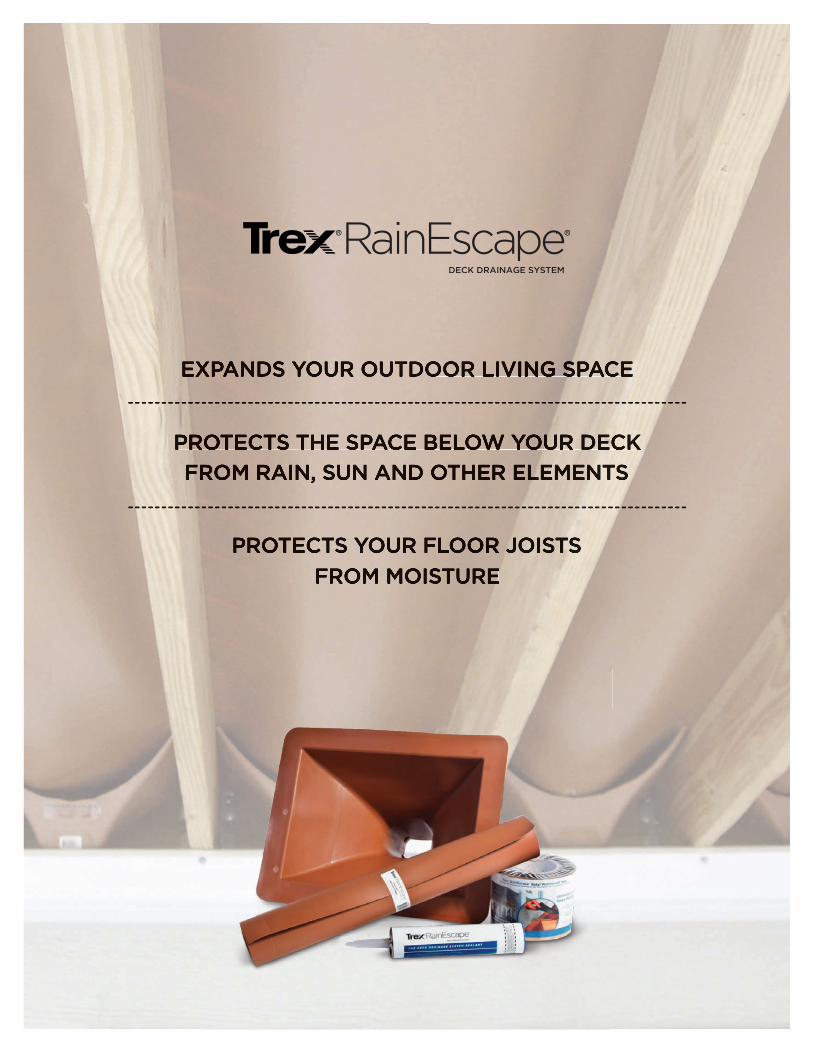
EXPANDS YOUR OUTDOOR LIVING SPACE
PROTECTS THE SPACE BELOW YOUR DECK
FROM RAIN, SUN AND OTHER ELEMENTS
PROTECTS YOUR FLOOR JOISTS
FROM MOISTURE
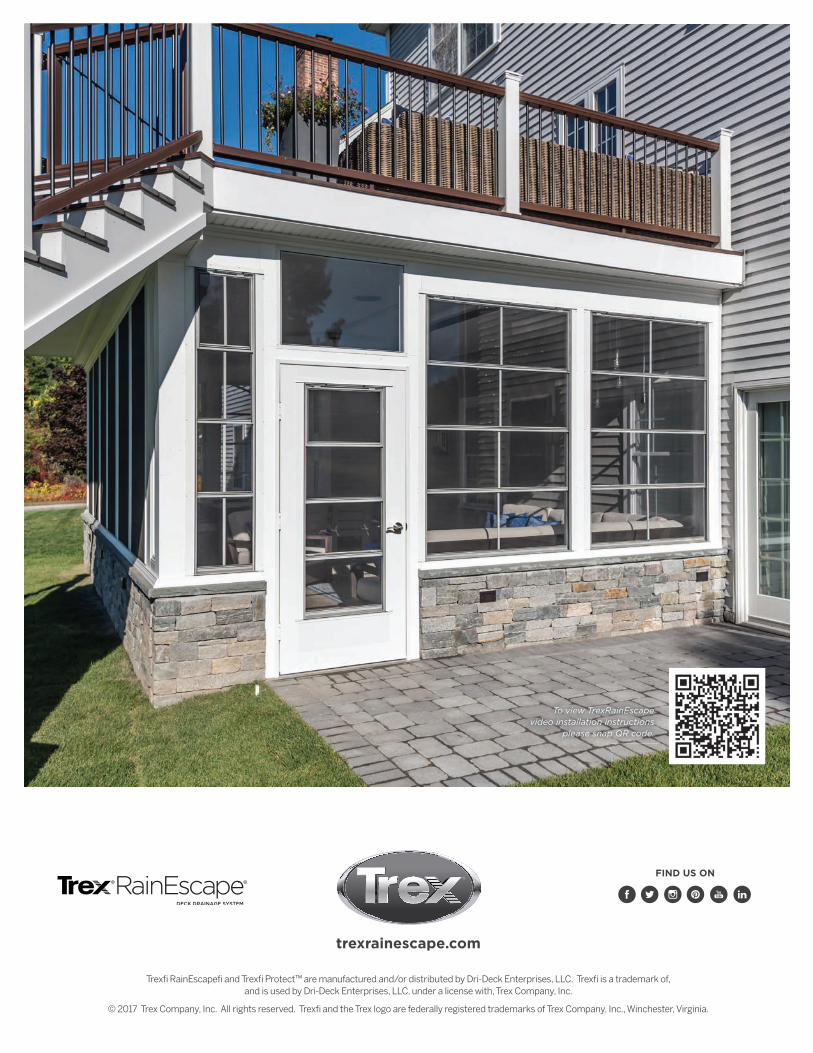
TrexÆ RainEscapeÆ and TrexÆ Protectô are manufactured and/or distributed by Dri-Deck Enterprises, LLC. TrexÆ is a trademark of, and is used by Dri-Deck Enterprises, LLC. under a license with, Trex Company, Inc.
© 2017 Trex Company, Inc. All rights reserved. TrexÆ and the Trex logo are federally registered trademarks of Trex Company, Inc., Winchester, Virginia.
trexrainescape.com
FIND US ON
To view TrexRainEscapevideo installation instructions
please snap QR code.