installation guide - cortex e-invoicing solutions · 2016-07-27 · call help desk ... open and...
TRANSCRIPT

Cortex DesktopTM Installation Guide i
Cortex DesktopTM
Installation Guide
May 2013
Document Version E4

Version E4 of the Installation Guide is current as of May 2013 and has been updated to include detailed instructions for Windows XP, Vista and Windows 7 Operating Systems.

Cortex DesktopTM Installation Guide i
Contents
About This Guide ............................................................................................ 1
Prerequisites .................................................................................................. 2
Cortex Desktop Installation ............................................................................ 3
Checking Available Disk Space ............................................................................. 4
Windows XP .................................................................................................. 4
Vista and Windows 7 ...................................................................................... 5
Checking Your Operating System Type: 32-bit or 64-bit .......................................... 6
Windows XP .................................................................................................. 6
Windows Vista and Windows 7: ....................................................................... 6
Downloading Cortex Desktop ............................................................................... 7
Installing Cortex Desktop .................................................................................... 9
Windows XP .................................................................................................. 9
Vista and Windows 7 .................................................................................... 12
Setting a “Write” Permission on the Cortex Desktop Installation Location ................. 15
Opening Cortex Desktop ................................................................................17
Updating Cortex Desktop ...............................................................................20
How to change your Windows Display settings in Windows 7 and 8 ..............21
Uninstalling Previous Cortex Desktop Versions .............................................24
Windows XP ................................................................................................ 24
Vista and Windows 7 .................................................................................... 25
Cortex Desktop Maintenance .........................................................................28
Cortex Support ..............................................................................................28
Call Help Desk .................................................................................................. 28
Send Email ...................................................................................................... 28
Submit Your Inquiry Online ................................................................................ 28


About This Guide
Cortex DesktopTM Installation Guide 1
About This Guide
This Guide provides the Cortex Desktop installation requirements and explains how to install, open and update Cortex Desktop on your computer.
This Guide is intended for users who are required to install Cortex Desktop on their computers and for IT personnel who may need to provide assistance with installation. Should any further assistance be needed, this guide also provides the contact details for the Cortex Help Desk.
NOTE The information provided in this Guide applies to Windows XP, Vista and Windows 7 Operating Systems. Applicable sections have been broken out into Operating System specific instructions.

Prerequisites
2 Cortex DesktopTM Installation Guide
Prerequisites
Cortex Desktop™ requires the following components:
Internet connection
It is recommended to use a high-speed internet connection.
NOTE Satellite, dial-up or fast dial-up connection may impede your Cortex Desktop performance.
Supported Operating System
Cortex Desktop can be installed on the following Operating Systems:
Windows 7 (64 and 32 bit)
Windows Vista Ultimate, Vista Business, Vista Home Premium (64 and 32 bit)
Windows XP Pro Service Pack 2 (32 bit and 64 bit)
Critical Windows updates can be downloaded from www.windowsupdate.com.
NOTE Cortex Desktop is not supported on Vista Home Basic, Windows XP Pro 64-bit
Operating Systems or on MAC computers.
Microsoft Data Access Components (MDAC) 2.6 or higher
Available at: http://www.microsoft.com/downloads/browse.aspx?displaylang=en&productID=B7ADDC23-DEC1-4C5F-8479-EAD9245A8D61
NOTE Windows XP and newer systems will have MDAC 2.6 installed by default.
.NET Framework 2.0
Available at: http://www.microsoft.com/downloads/details.aspx?FamilyID=0856eacb-4362-4b0d-8edd-aab15c5e04f5&displaylang=en
NOTE Windows Vista and newer systems will have .NET Framework 2.0 installed by default.
Adobe Acrobat Reader
Available at: http://www.adobe.com/products/acrobat/readstep2.html
Port 443 must be opened on your corporate firewall.
Monitor resolution must be set to 1024x768 or larger.
Regional Language Options should be set to English (US); the default setting.
A minimum of 300MB of free space on your computer. To determine if you have the necessary free space, refer to Checking Available Disk Space on page 4.
Installation must be performed by a user with administrator rights on the computer.
NOTE If you are not sure about any of the prerequisites, contact your IT personnel. Should
any further assistance be needed, your IT personnel can contact the Cortex Customer Care Center. Refer to Cortex Support on page 28 for contact details.

Cortex Desktop Installation
Cortex DesktopTM Installation Guide 3
Cortex Desktop Installation
To install Cortex Desktop, follow these steps:
1 If you have a previous version of Cortex Desktop installed on your computer, uninstall it. Refer to Uninstalling Previous Cortex Desktop Versions on page 24 for details.
2 Make sure all prerequisites are met, including the available disk space. To verify these requirements, see Checking Available Disk Space on page 4 and Checking Your Operating System Type: 32-bit or 64-bit on page 6.
3 Download the Cortex Desktop Launcher as instructed in Downloading Cortex Desktop on page 7.
4 Install Cortex Desktop by following the directions in Installing Cortex Desktop on page 9.
5 For 64 bit systems only, set up a “write” permission for the Cortex Desktop installation location as explained in Setting a “Write” Permission on the Cortex Desktop Installation Location on page 15.

Cortex Desktop Installation
4 Cortex DesktopTM Installation Guide
Checking Available Disk Space
The installation requires at least 300 MB of free space on your computer.
Windows XP
To verify available disk space:
1 In the lower left corner of your screen, click the Start button and select My Computer. The contents of your computer are displayed.
2 Hover your mouse over the Local Disk (C:) drive to display the amount of free space.
3 If you have more than 300 MB of free space, proceed to downloading and installing Cortex Desktop. Otherwise, contact your IT personnel for assistance.

Cortex Desktop Installation
Cortex DesktopTM Installation Guide 5
Vista and Windows 7
To verify available disk space:
1 In the lower left corner of your screen, click the Start button and select Computer.
The contents of your computer are displayed, and the amount of free space on Local Disk (C:) is shown.
2 If you have more than 300 MB of free space, proceed to downloading and installing Cortex Desktop. Otherwise, contact your IT personnel for assistance.

Cortex Desktop Installation
6 Cortex DesktopTM Installation Guide
Checking Your Operating System Type: 32-bit or 64-bit
Checking your Operating System type is the same for Windows 7 and Windows Vista and slightly for Windows XP.
Windows XP
Click the Start button, right-click My Computer and select Properties. The System Properties window is displayed, with the General tab selected.
On Windows XP, the system type is shown for
64-bit systems only. If no system type is displayed, your Windows XP system type is 32-bit.
Windows Vista and Windows 7:
Click the Start button, right-click Computer
and select Properties.
Your computer’s information is displayed.
Under the System section, check your System type. In the example above, the Operating System type is 64-bit.

Cortex Desktop Installation
Cortex DesktopTM Installation Guide 7
Downloading Cortex Desktop
Cortex Desktop can be downloaded from the Cortex website. You can access the download file either by clicking the link below, or from the Cortex website.
NOTE The images for this section are specific to Windows XP only, however the windows and buttons selected are the same for all three operating systems:
Windows XP, Vista and Windows 7.
To download Cortex Desktop:
3 Click this link to start the download: http://www.cortex.net/Training_Download/CortexDesktopLauncherV3.0.1.1Setup.exe or copy and paste into your Internet browser.
NOTE If you receive a security warning, click Allow.
4 Alternatively, you can download Cortex Desktop from the Cortex web site.
a Browse to the Cortex website at www.cortex.net.
b Hover over Training & Support and select Updates & Downloads.
The Updates & Downloads website is displayed.
c Once the site is displayed, click the Cortex Desktop download link:

Cortex Desktop Installation
8 Cortex DesktopTM Installation Guide
5 Before the download begins, the File Download – Security Warning displays:
6 Click Save. The Save As window opens.
7 Select Desktop, and click Save.
8 The download process begins, and the progress window is displayed.

Cortex Desktop Installation
Cortex DesktopTM Installation Guide 9
9 At the end of the download, the Download complete window is displayed.
10 Close the Download Complete window and proceed to the Cortex Desktop installation.
At the end of the download process, the Cortex Desktop Launcher icon appears on your desktop.
Installing Cortex Desktop
Once all of the Cortex Desktop installation prerequisites are met and you have downloaded Cortex Desktop Launcher, you can start the installation process.
NOTE If a previous version of Cortex Desktop is installed on your computer, you need to remove it prior to installing the new version. Otherwise, the installation of the new version will fail. For details, refer to Uninstalling Previous Cortex Desktop Versions on
page 24 for details.
Windows XP
To install Cortex Desktop:
1 On your desktop, double-click the Cortex Desktop Launcher icon . The WinZip Self-Extractor window is displayed.
2 Click Setup.
NOTE If Crystal Reports has not been installed on your computer, Cortex installs it for you at this point as part of Cortex Desktop installation. Crystal Reports is a program that is required for full-functioning Cortex Desktop.

Cortex Desktop Installation
10 Cortex DesktopTM Installation Guide
3 The Cortex Desktop Launcher Setup Wizard is displayed.
4 Click Next. The Select Installation Folder window is displayed.
NOTE Clicking the Disk Cost… button will show you whether you have enough space to
install Cortex Desktop. Omit this verification if you have checked the available disk
space prior to installation.
5 Click Next if you wish to install Cortex Desktop in the default location. This is C:\Program
Files\Cortex for 32-bit Operating Systems and C:\Program Files (x86)\Cortex on 64-bit Operating Systems.
NOTE If you are not sure which Operating System you have – 32-bit or 64-bit, refer to Checking Your Operating System Type: 32-bit or 64-bit on page 6.
If you wish to change the installation location, click Browse and then select a different destination folder.

Cortex Desktop Installation
Cortex DesktopTM Installation Guide 11
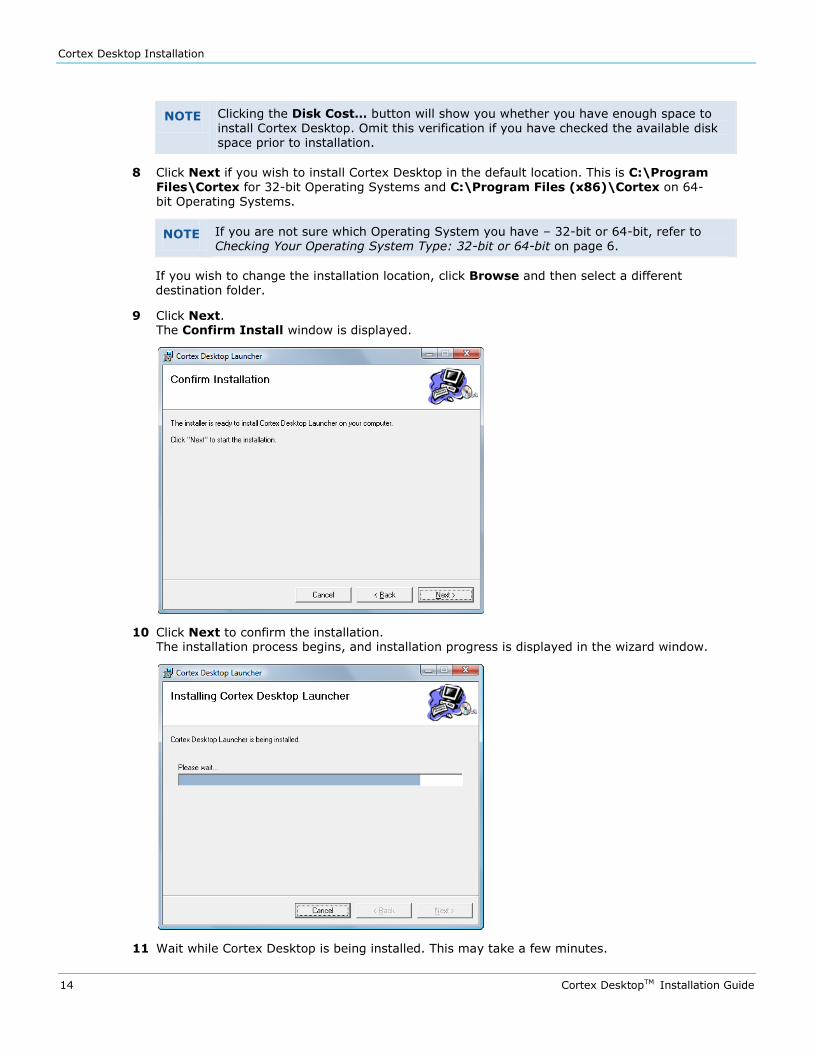
6 Click Next. The Confirm Install window is displayed.
7 Click Next to confirm the installation. The installation process begins, and installation progress is displayed in the wizard window.
8 Wait while Cortex Desktop is being installed. This may take a few minutes.

Cortex Desktop Installation
12 Cortex DesktopTM Installation Guide
9 When the installation is finished, the Installation Complete message is displayed in the wizard window.
10 Click Close.
Cortex Desktop has been installed. The Cortex Desktop icon has been created on your desktop, and Cortex Desktop appears on the list of programs on your computer.
Vista and Windows 7
To install Cortex Desktop:
1 On your desktop, right-click the Cortex Desktop Launcher icon .
2 In the menu that is displayed, select Run as administrator.
3 In the security warning, click Run. The User Access Control window is displayed.

Cortex Desktop Installation
Cortex DesktopTM Installation Guide 13
4 In the User Account Control window, click Allow. The WinZip Self-Extractor window is displayed.
5 Click Setup.
NOTE If Crystal Reports has not been installed on your computer, Cortex installs it for you at this point as part of Cortex Desktop installation. Crystal Reports is a program that is
required for full-functioning Cortex Desktop.
6 The Cortex Desktop Launcher Setup Wizard is displayed.
7 Click Next. The Select Installation Folder window is displayed.
Cortex Desktop Installation
14 Cortex DesktopTM Installation Guide
NOTE Clicking the Disk Cost… button will show you whether you have enough space to install Cortex Desktop. Omit this verification if you have checked the available disk space prior to installation.
8 Click Next if you wish to install Cortex Desktop in the default location. This is C:\Program Files\Cortex for 32-bit Operating Systems and C:\Program Files (x86)\Cortex on 64-bit Operating Systems.
NOTE If you are not sure which Operating System you have – 32-bit or 64-bit, refer to Checking Your Operating System Type: 32-bit or 64-bit on page 6.
If you wish to change the installation location, click Browse and then select a different destination folder.
9 Click Next. The Confirm Install window is displayed.
10 Click Next to confirm the installation. The installation process begins, and installation progress is displayed in the wizard window.
11 Wait while Cortex Desktop is being installed. This may take a few minutes.

Cortex Desktop Installation
Cortex DesktopTM Installation Guide 15
12 When the installation is finished, the Installation Complete message is displayed in the wizard window.
13 Click Close.
Cortex Desktop has been installed. The Cortex Desktop icon has been created on your desktop, and Cortex Desktop appears on the list of programs on your computer.
NOTE If you installed Cortex Desktop on a 64-bit Operating System, set a “write” permission to the Cortex Desktop installation location. For more details, refer to
Setting a “Write” Permission on the Cortex Desktop Installation Location on page 15.
If you are not sure which Operating System you have – 32-bit or 64-bit, refer to Checking Your Operating System Type: 32-bit or 64-bit on page 6.
Setting a “Write” Permission on the Cortex Desktop Installation Location
If you are running Cortex Desktop on a 64-bit Operating system, you require a “write”
permission for the Cortex Desktop installation location. This permission ensures your ability to download Cortex Desktop updates.
Downloading Cortex Desktop updates is vital to keeping Cortex Desktop functioning properly. An automatic download of updates occurs when you first login. Without downloading the updates,
you will not be able to log in. It is also a highly recommended procedure for your subsequent work in Cortex Desktop. For more details on updates, refer to Updating Cortex Desktop on page 20.
To be able to set a “write” permission, you need to be defined as the administrator on the computer. If you need help, contact your IT personnel.
To set a “write” permission on the Cortex Desktop installation location:
1 In Windows Explorer, browse to the folder where you installed Cortex Desktop. If you have not changed the default installation location, this is C:\Program Files\Cortex.

Cortex Desktop Installation
16 Cortex DesktopTM Installation Guide
2 In the Cortex Desktop installation location, right-click the Cortex Desktop Launcher folder and select Properties. The Cortex Desktop Launcher Properties window opens.
3 In the Cortex Desktop Launcher Properties window, click the Security tab. The Security tab is displayed showing a list of users and their rights.
4 In the Security tab, click .
NOTE Windows XP users will not have an Edit button and have the correct information already displayed.
The following information is displayed.

Setting up Cortex Desktop to Run As Administrator on Windows 7 and 8
Cortex DesktopTM Installation Guide 17
5 Under Group or user names: locate your user name or group. For example, in the picture above the required entry is Users (win 7-pro-64\Users) entry. Contact your IT personnel if you do not know which entry to select.
6 Under Permissions for Users, make sure the Write check box in the Allow column is selected.
7 Click Apply to save the permissions.
8 Click OK to close the Cortex Desktop Launcher Properties window.
Setting up Cortex Desktop to Run As Administrator on Windows 7 and 8
If you are running Cortex Desktop on Windows 7 or 8 you must allow Cortex Desktop to run as
administrator. This permission ensures your ability to download Cortex Desktop updates.
Downloading Cortex Desktop updates is vital to keeping Cortex Desktop functioning properly. An automatic download of updates occurs when you first login. Without downloading the updates, you will not be able to log in. It is also a highly recommended procedure for your subsequent work in Cortex Desktop. For more details on updates, refer to Updating Cortex Desktop on page 20.
To be able to set administrator permissions, you need to be defined as the administrator on the computer. If you need help, contact your IT personnel.
To set administrator permissions for Cortex Desktop from the installation directory:
1 In Windows Explorer, browse to the folder where you installed Cortex Desktop. If you have not changed the default installation location, this is C:\Program Files\Cortex or C:\Program Files (x86)\Cortex.
2 Double-click on the Cortex Desktop Launcher folder.
3 Right-click on the Cortex Desktop Launcher (application) and click Properties to open the Properties window.

Setting up Cortex Desktop to Run As Administrator on Windows 7 and 8
18 Cortex DesktopTM Installation Guide
4 In the Compatibility tab, check Run this program as an Administrator, and then click OK.
5 Open and update Cortex Desktop as described on pages 19 and 20.
To set administrator permissions for Cortex Desktop from the Windows desktop:
1 On the Windows desktop, right-click on the Cortex Desktop Launcher icon and click Properties.
2 On the Compatibility tab, check Run this program as an Administrator, and then click OK.
3 Open and update Cortex Desktop as described on pages 19 and 20.

Opening Cortex Desktop
Cortex DesktopTM Installation Guide 19
Opening Cortex Desktop
After Cortex Desktop has been installed on your computer, you are ready to open the application and start transacting.
NOTE To be able to open Cortex Desktop, you need to know your user name and password.
To open Cortex Desktop:
1 On your desktop, double-click the Cortex Desktop icon .
OR
Click the Start button and then select All Programs>Cortex>Cortex Desktop.
The Logon window is displayed.
NOTE If the Logon window is not displayed and you are prompted to install updates, click Yes. For more details, refer to Updating Cortex Desktop, page 20.
2 Enter you user name and password and click Login. The Cortex Desktop window is displayed.

Updating <Cortex Desktop>
20 Cortex DesktopTM Installation Guide
Updating Cortex Desktop
Once Cortex Desktop has been installed on your computer, you are periodically prompted to
download updates. Always download these updates so you will have the latest features of Cortex Desktop.
To update Cortex Desktop:
Open Cortex Desktop, as explained in Setting up
Cortex Desktop to Run As Administrator on Windows 7 and 8
If you are running Cortex Desktop on Windows 7 or 8 you must allow Cortex Desktop to run as administrator. This permission ensures your ability to download Cortex Desktop updates.
Downloading Cortex Desktop updates is vital to keeping Cortex Desktop functioning properly. An automatic download of updates occurs when you first login. Without downloading the updates, you will not be able to log in. It is also a highly recommended procedure for your subsequent work in Cortex Desktop. For more details on updates, refer to Updating Cortex Desktop on
page 20.
To be able to set administrator permissions, you need to be defined as the administrator on the computer. If you need help, contact your IT personnel.
To set administrator permissions for Cortex Desktop from the installation directory:
3 In Windows Explorer, browse to the folder where you installed Cortex Desktop. If you have not changed the default installation location, this is C:\Program Files\Cortex or C:\Program Files (x86)\Cortex.
4 Double-click on the Cortex Desktop Launcher folder.
5 Right-click on the Cortex Desktop Launcher (application) and click Properties to open the Properties window.

Open <Cortex Desktop>, as explained in Setting up Cortex Desktop to Run As Administrator on Windows 7 and 8
Cortex DesktopTM Installation Guide 21
6 In the Compatibility tab, check Run this program as an Administrator, and then click
OK.
7 Open and update Cortex Desktop as described on pages 19 and 20.
To set administrator permissions for Cortex Desktop from the Windows desktop:
8 On the Windows desktop, right-click on the Cortex Desktop Launcher icon and click Properties.

Open <Cortex Desktop>, as explained in Setting up Cortex Desktop to Run As Administrator on Windows 7 and 8
22 Cortex DesktopTM Installation Guide
9 On the Compatibility tab, check Run this program as an Administrator, and then click OK.
10 Open and update Cortex Desktop as described on pages 19 and 20.

Open <Cortex Desktop>, as explained in Setting up Cortex Desktop to Run As Administrator on Windows 7 and 8
Cortex DesktopTM Installation Guide 23
1 Opening Cortex Desktop, page 17.
2 If any Cortex Desktop updates are available, the following window is displayed:
3 Click Yes. The update begins. While the update is running, the following window is displayed:
4 Once the update is complete, the Cortex Desktop Launcher window is displayed.
5 Click Launch Cortex Desktop. The Logon window is displayed.
6 Continue from step 2 in Setting up Cortex Desktop to Run As Administrator on Windows 7 and 8
If you are running Cortex Desktop on Windows 7 or 8 you must allow Cortex Desktop to run as
administrator. This permission ensures your ability to download Cortex Desktop updates.
Downloading Cortex Desktop updates is vital to keeping Cortex Desktop functioning properly. An
automatic download of updates occurs when you first login. Without downloading the updates, you will not be able to log in. It is also a highly recommended procedure for your subsequent work in Cortex Desktop. For more details on updates, refer to Updating Cortex Desktop on page 20.
To be able to set administrator permissions, you need to be defined as the administrator on the computer. If you need help, contact your IT personnel.

Open <Cortex Desktop>, as explained in Setting up Cortex Desktop to Run As Administrator on Windows 7 and 8
24 Cortex DesktopTM Installation Guide
To set administrator permissions for Cortex Desktop from the installation directory:
7 In Windows Explorer, browse to the folder where you installed Cortex Desktop. If you have not changed the default installation location, this is C:\Program Files\Cortex or C:\Program Files (x86)\Cortex.
8 Double-click on the Cortex Desktop Launcher folder.
9 Right-click on the Cortex Desktop Launcher (application) and click Properties to open the Properties window.
10 In the Compatibility tab, check Run this program as an Administrator, and then click OK.

Open <Cortex Desktop>, as explained in Setting up Cortex Desktop to Run As Administrator on Windows 7 and 8
Cortex DesktopTM Installation Guide 25
11 Open and update Cortex Desktop as described on pages 19 and 20.
To set administrator permissions for Cortex Desktop from the Windows desktop:
12 On the Windows desktop, right-click on the Cortex Desktop Launcher icon and click Properties.
13 On the Compatibility tab, check Run this program as an Administrator, and then click OK.
14 Open and update Cortex Desktop as described on pages 19 and 20.

Open <Cortex Desktop>, as explained in Setting up Cortex Desktop to Run As Administrator on Windows 7 and 8
26 Cortex DesktopTM Installation Guide
15 Opening Cortex Desktop on page 17.

How to change your Windows Display settings in Windows 7 and 8
Cortex DesktopTM Installation Guide 27
How to change your Windows Display settings in
Windows 7 and 8
If you encounter problems viewing Cortex Desktop correctly in Windows 7 or 8, you may need to adjust your Windows Display settings.
To change your settings in Windows 7 or Windows 8:
1 Right click on your Windows Desktop and select Screen resolution.
2 Click Screen resolution.

How to change your Windows Display settings in Windows 7 and 8
28 Cortex DesktopTM Installation Guide
The Change the appearance of your displays window appears.
3 Click Make text and other items larger or smaller.

How to change your Windows Display settings in Windows 7 and 8
Cortex DesktopTM Installation Guide 29
The Make it easier to read what’s on your screen window appears.
4 Select the Smaller – 100% (default) radio button and click Apply.
5 Close the window by clicking the red X, close button.

Uninstalling Previous Cortex Desktop Versions
30 Cortex DesktopTM Installation Guide
Uninstalling Previous Cortex Desktop Versions
Windows XP
1 In the lower left corner of the computer, click the Start button and select Control Panel.
2 In the Control Panel, select Add or Remove Programs.
A list of the programs installed on your computer is displayed.

Uninstalling Previous Cortex Desktop Versions
Cortex DesktopTM Installation Guide 31
3 In the list of programs, click Cortex Desktop Launcher to highlight it, then click the Remove button.
4 Click Yes on the Add or Remove Programs confirmation window.
5 The uninstall process begins. This may take a few minutes. During the uninstall process, the Cortex Desktop Launcher window is displayed.
6 Once Cortex Desktop is uninstalled, Cortex Desktop Launcher is removed from your list of programs.
7 Close the list of programs.
8 Browse to the location where Cortex Desktop was installed (by default, C:/Program Files/Cortex) and delete the Cortex folder. A confirmation window is displayed.
9 Click Yes. The folder is deleted.
You have successfully uninstalled Cortex Desktop.
Vista and Windows 7
1 In the lower left corner of the computer, click the Start button and select Control Panel.

Uninstalling Previous Cortex Desktop Versions
32 Cortex DesktopTM Installation Guide
2 In the Control Panel, make sure Classic View is selected and then click the Programs and Features button.
A list of programs on your computer is displayed.
3 In the list, right-click Cortex Desktop Launcher and select Uninstall. A confirmation message is displayed.

Uninstalling Previous Cortex Desktop Versions
Cortex DesktopTM Installation Guide 33
4 Click Yes to uninstall Cortex Desktop. Prior to uninstalling, the User Access Control window is displayed.
5 In the User Access Control window, click Allow. The uninstall process begins. This may take a few minutes. During the uninstall process, the Cortex Desktop Launcher window is displayed.
6 Once Cortex Desktop is uninstalled, Cortex Desktop Launcher is removed from the list of programs.
7 Close the list of programs.
8 Browse to the location where Cortex Desktop was installed (by default, C:/Program Files/Cortex) and delete the Cortex folder. A confirmation window is displayed.
9 Click Yes. Before the folder is deleted, the following window is displayed:

Cortex Desktop Maintenance
34 Cortex DesktopTM Installation Guide
10 Click the Continue button to start the deletion. The folder is deleted. You have successfully uninstalled Cortex Desktop.
NOTE As part of Cortex Desktop, Crystal Reports were installed on your computer. If you do not intend to use Cortex Desktop and do not use Crystal Reports, you can remove this program as well.
Cortex Desktop Maintenance
Every Sunday Cortex Business Solutions runs a regularly scheduled maintenance of its software. As a result, Cortex Servers and applications are not available between 8:00 AM (MST) to 12:00 PM (MST) that day.
Cortex Support
For any questions regarding Cortex Desktop, contact Cortex Customer Care Center – by phone, email or online.
Call Help Desk
Call our Help Desk at 1-866-716-6272.
Hours of Operation:
Application monitoring provided 24 hours a day, 7 days a week.
Customer Care Centre is operational from 6:00 AM MT/8:00 AM ET to 6:00 PM MT/8:00 PM ET, Monday through Friday, excluding statutory holidays.
If you reach voicemail, please leave a detailed message with the following information:
Your full name
Your company name
Your phone number
A detailed description of the reason for your call
A Customer Service Representative will return your call within the same business day.
Send Email
[email protected] for Help Desk, Technical Support, user advice.
[email protected] for sales inquiries.
Submit Your Inquiry Online
You can fill in an inquiry form and submit it online from the Cortex web site at http://www.cortex.net/s/Contact_Support.asp.