installation guide… · installation guide 1 contents ... remove sharp edges at the top and...
TRANSCRIPT

Installation Guide

Installation Guide
1
ContentsintroDUction ................................................................................................... 2
BeFore yoU Begin ............................................................................................. 3
storage anD preparation ............................................................................ 3
tools & materials yoU may neeD ................................................................. 4
Adhering your Think Timber™ benchtop to your cabinets
Joining
Appliance installation
pre-FinisheD sizes ............................................................................................ 5
caBinet reQUirements .................................................................................... 6
span & oVerhang sUpport ........................................................................... 6
Benchtop sizing & cUtting ........................................................................... 7
Preparation
Scribing benchtops
sink & cooktop cUt-oUts .............................................................................. 9
Making cut-out templates
Routing
sealing components ................................................................................... 10
Joining & installation oF Benchtops ...................................................... 11
Join preparation
Cleaning and preparing joins
Positioning the first top
Installing the second/third tops
care anD maintenance ............................................................................... 14

2
Think Timber™ surfaces are excellent for kitchen work surfaces as timber is extremely durable and its natural beauty is enhanced with age. Timber is warm and inviting to the touch.
Think Timber™ surfaces are crafted from solid hardwood timber. Staves of kiln dried timber are finger jointed in the length, butt jointed and glued together along their width. When finely oiled, Think Timber™
creates a beautiful water repellent surface that will mellow with age. Simple maintenance is all that is required, occasionally re-oiling will help to maintain the beauty and water resistance of the wood.
As with any high quality benchtops, care should be taken against possible scoring with knives or other cutting tools and chopping boards should always be used. Although accidental damage can be sanded out and then re-oiled to restore it to its original condition.
Think Timber™ should not be subjected to high temperatures. Always use a heat pad or trivet when placing hot pots/pans on the benchtop. Please see our care and maintenance literature for more information.
Think Timber™ wood is a natural, living product and just as no two sets of fingerprints are alike, the same can be said of variations in wood graining and colouring, as not two lengths of wood benchtops will ever look exactly alike. It should be pointed out that the following can occur:
Variations in colour & graining
Possibility of knots
Wood will darken with age
Wood is water resistant it is NOT WATER PROOF!
Wood grain can lift if subjected to standing water for any length of time
Remove all spillages immediately
The information contained in this document is provided as a guide for the installation of Think Timber™. No warranty, however expressed or implied, is given in relation to the guidelines in this document.
Think Timber™ is brought to you by CASF, one of Australia’s leading suppliers of high quality decorative surface solutions. The Think Timber™ species offered have been carefully selected to meet the needs of the Australian market. It has been engineered in a range of pre-finished sizes, that will allow you to significantly reduce the time to install your new Think Timber™ benchtops.
Introduction

Installation Guide
3
Fig. 2Fig. 1
Before you beginPlease read this booklet before commencing installation of your benchtops. Some of the information may not be applicable to your particular installation, however certain stages of preparation and assembly are important, and spending a short time to review this booklet may save time later.
important notes
1. Installation of the benchtops MUST be carried out by a competent person. If in any doubt, consult an expert for any technical advice.
2. Always carry your benchtop on edge (never flat) (see Fig. 1).
3. Do not rush your installation. Take time and care during installation to achieve a professional finish.
4. Protect your benchtop from damage by keeping all metal tools off the surface during the installation process.
5. For achieving the best installation results, DO NOT store in extremes of temperature or humidity, this may result in the material being adversely affected, causing splitting or bowing. Store in a dry weatherproof room, where the temperature is around 20°C and humidity is that of the room where it is to be fitted.
6. Before installing, ensure both sides of the Think Timber™ surfaces are sealed (oiled). These instructions refer to oiling as a sealing product. You may also choose to use polyurethane sealers. Simply follow the manufacturers instructions for product selected.
Storage & preparationInstallation of the benchtops should be carried out as soon as possible after delivery. If storage is necessary, benchtops MUST be laid flat and fully supported in their original packaging (see Fig. 2). Make sure the storage area is indoors, and in a completely dry area. Do not unpack the benchtops unless the room humidity is stable and all cabinets are installed with any debris cleared away.
To achieve the best installation results, store your benchtops in a room temperature of around 20°C. This should be for at least 24 hours prior to installation.

4
Tools & materials you may need
ProfessIonal TIP - The operation of sanding and routing will generate dust. It is strongly recommended to use extraction on your power tools to remove the dust, i.e. vacuum cleaner. There will be airborne dust which can only be cleaned after routing. Sealing doorways etc. to occupied areas is advisable or alternatively do these tasks externally.
aDhering yoUr think timBer™ Benchtop to yoUr caBinets
Tape measure
Spirit level
Silicone gun
Slotted angle brackets (optional 4-6 per benchtop length)
Sanding block
180 grit & 240 grit sand paper
Straight edge
Mason’s mitre jig
Work surface sealing product (timber oils or other type sealer)
Lint free cloth
Joining
Power/cordless drill
Packers or wedges
Methylated spirits
Standard benchtop joiner bolts (3 per 600mm join, 4 per 900mm join)
Silicone adhesive
appliance installation
Face mask
Safety glasses
Pencil & square
Jigsaw (used for cutting template board material)
Router (1800-2300 watts / 2.5-3 hp), (used for cut-outs in Think Timber™ benchtop)
Sand paper (150 grit, to smooth edges of cut-outs)
Vacuum cleaner
Template board
Thin moisture/heat resistant board
Router bits

Installation Guide
5
proDUct technical Drawing Description
Benchtop
Size (mm) 1200x600x32
Approx. Weight 18kg
These lengths can be finished on all edges and can be used to make returns or complete benchtop runs.
Benchtop
Size (mm) 1800x600x32
Approx. Weight 27kg
Benchtop
Size (mm) 2405x600x32
Approx. Weight 36kg
Benchtop
Size (mm) 3005x600x32
Approx. Weight 45kg
Benchtop
Size (mm) 1800x900x32
Approx. Weight 41kg
These lengths can be finished on all edges and can be used as an island benchtop or to make a breakfast bar return.
Benchtop
Size (mm) 2400x900x32
Approx. Weight 54kg
600mm
1200mm
32mm
600mm
3005mm
32mm
600mm
1800mm
32mm
900mm
1800mm
32mm
600mm
2405mm
32mm
900mm
2400mm
32mm
Pre-finished sizes
NB: Weight is approximate as there is a variance between species.
6
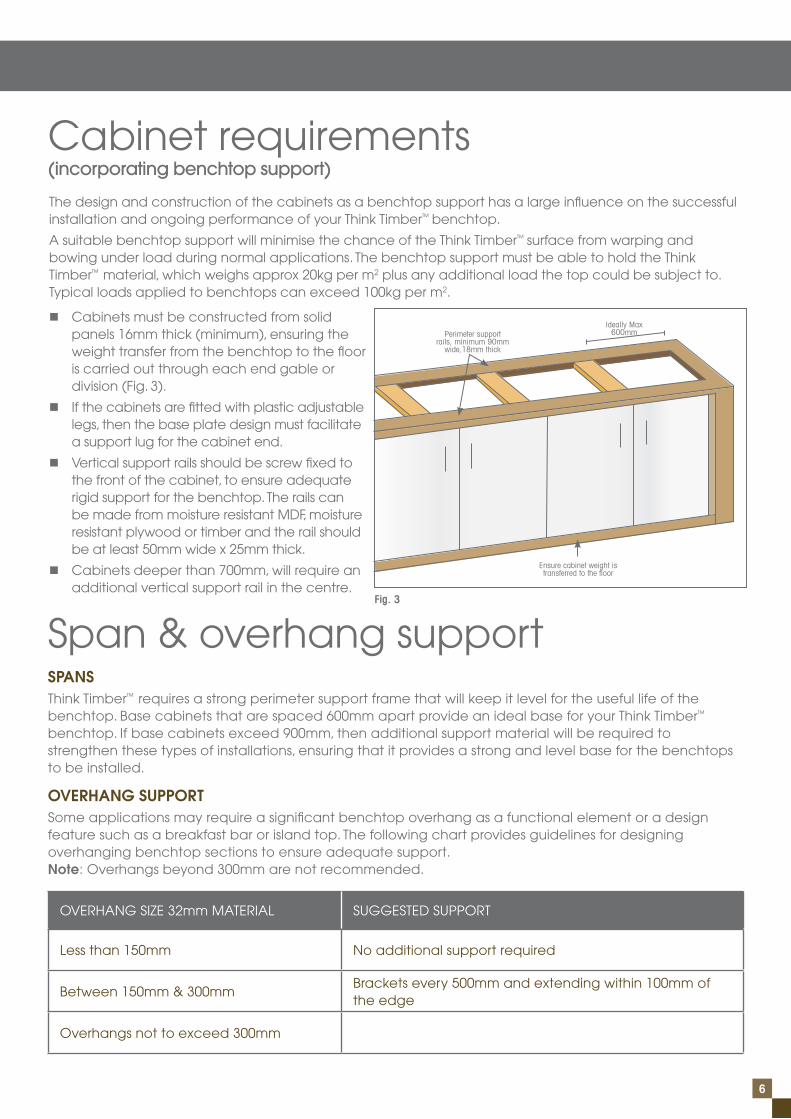
Cabinet requirementsThe design and construction of the cabinets as a benchtop support has a large influence on the successful installation and ongoing performance of your Think Timber™ benchtop.
A suitable benchtop support will minimise the chance of the Think Timber™ surface from warping and bowing under load during normal applications. The benchtop support must be able to hold the Think Timber™ material, which weighs approx 20kg per m2 plus any additional load the top could be subject to. Typical loads applied to benchtops can exceed 100kg per m2.
Cabinets must be constructed from solid panels 16mm thick (minimum), ensuring the weight transfer from the benchtop to the floor is carried out through each end gable or division (Fig. 3).
If the cabinets are fitted with plastic adjustable legs, then the base plate design must facilitate a support lug for the cabinet end.
Vertical support rails should be screw fixed to the front of the cabinet, to ensure adequate rigid support for the benchtop. The rails can be made from moisture resistant MDF, moisture resistant plywood or timber and the rail should be at least 50mm wide x 25mm thick.
Cabinets deeper than 700mm, will require an additional vertical support rail in the centre.
(incorporating benchtop support)
Fig. 3
Ideally Max 600mmPerimeter support
rails, minimum 90mm wide,18mm thick
Ensure cabinet weight is transferred to the floor
spansThink Timber™ requires a strong perimeter support frame that will keep it level for the useful life of the benchtop. Base cabinets that are spaced 600mm apart provide an ideal base for your Think Timber™ benchtop. If base cabinets exceed 900mm, then additional support material will be required to strengthen these types of installations, ensuring that it provides a strong and level base for the benchtops to be installed.
oVerhang sUpportSome applications may require a significant benchtop overhang as a functional element or a design feature such as a breakfast bar or island top. The following chart provides guidelines for designing overhanging benchtop sections to ensure adequate support. note: Overhangs beyond 300mm are not recommended.
OVERhANg SIzE 32mm MATERIAL SUggESTED SUPPORT
Less than 150mm No additional support required
Between 150mm & 300mm Brackets every 500mm and extending within 100mm of the edge
Overhangs not to exceed 300mm
Span & overhang support
Installation Guide
7
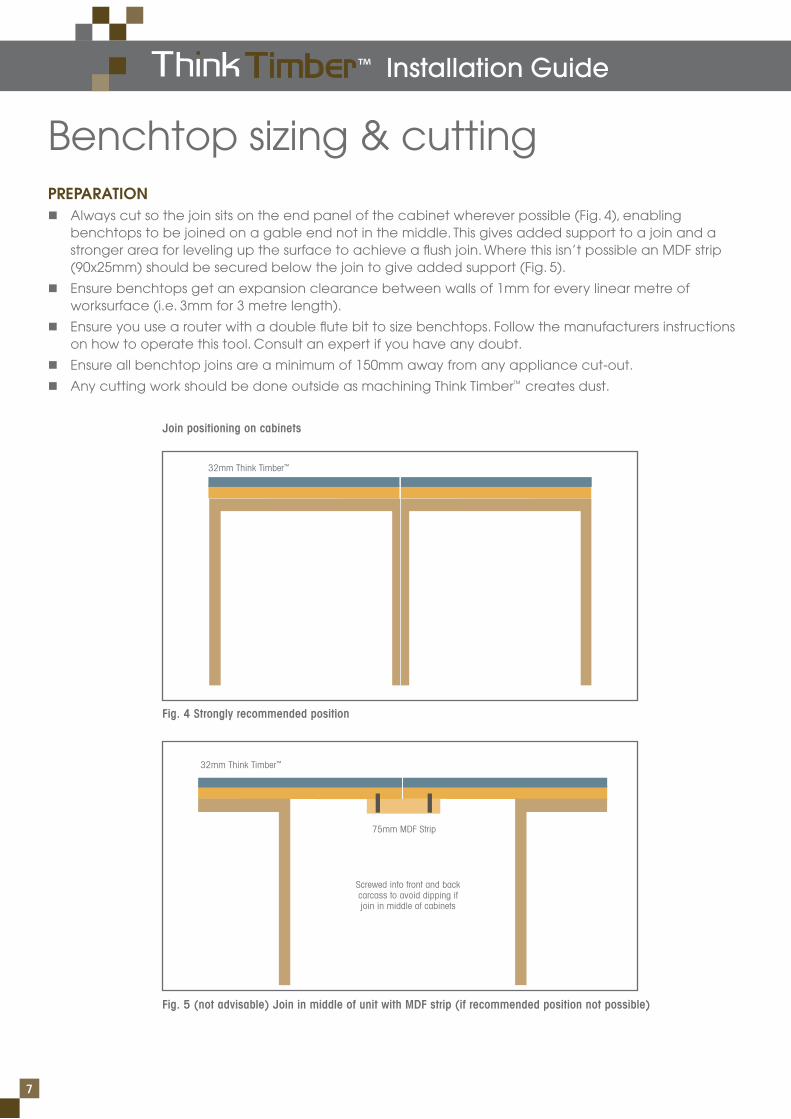
Benchtop sizing & cuttingpreparation Always cut so the join sits on the end panel of the cabinet wherever possible (Fig. 4), enabling
benchtops to be joined on a gable end not in the middle. This gives added support to a join and a stronger area for leveling up the surface to achieve a flush join. Where this isn’t possible an MDF strip (90x25mm) should be secured below the join to give added support (Fig. 5).
Ensure benchtops get an expansion clearance between walls of 1mm for every linear metre of worksurface (i.e. 3mm for 3 metre length).
Ensure you use a router with a double flute bit to size benchtops. Follow the manufacturers instructions on how to operate this tool. Consult an expert if you have any doubt.
Ensure all benchtop joins are a minimum of 150mm away from any appliance cut-out.
Any cutting work should be done outside as machining Think Timber™ creates dust.
Join positioning on cabinets
Fig. 4 Strongly recommended position
32mm Think Timber™
32mm Think Timber™
75mm MDF Strip
Screwed into front and back carcass to avoid dipping if join in middle of cabinets
Fig. 5 (not advisable) Join in middle of unit with MDF strip (if recommended position not possible)
8
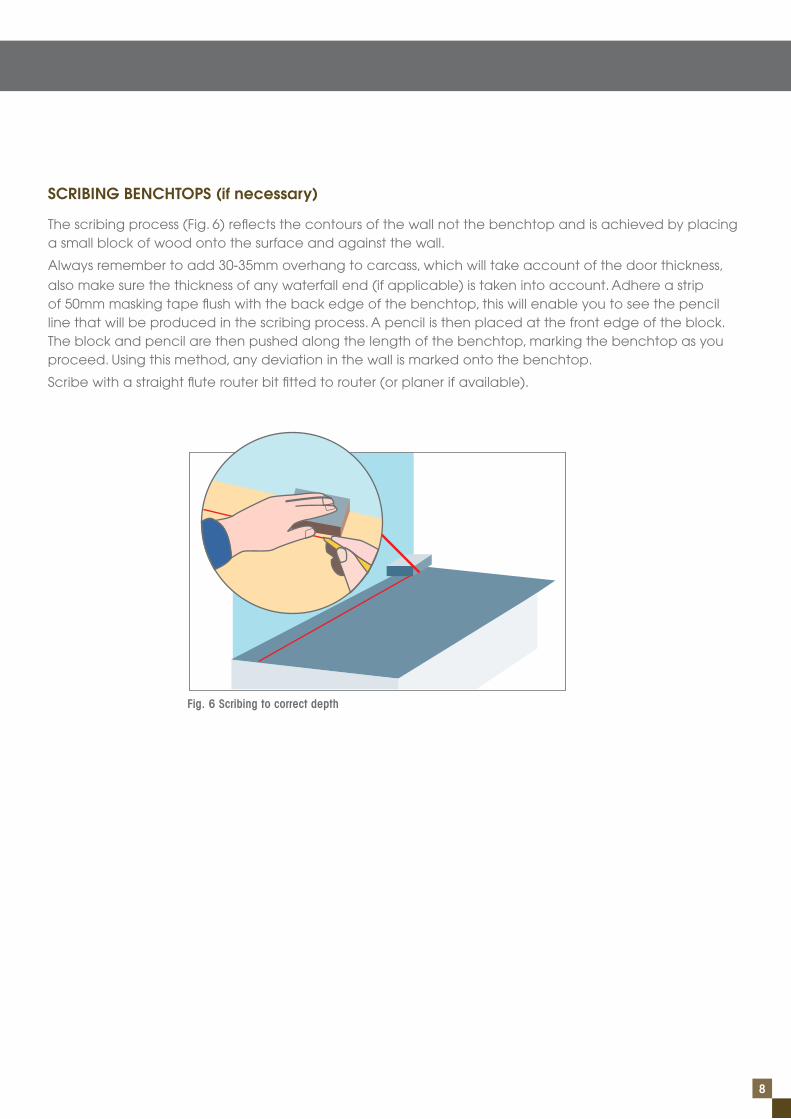
scriBing Benchtops (if necessary)
The scribing process (Fig. 6) reflects the contours of the wall not the benchtop and is achieved by placing a small block of wood onto the surface and against the wall.
Always remember to add 30-35mm overhang to carcass, which will take account of the door thickness,
also make sure the thickness of any waterfall end (if applicable) is taken into account. Adhere a strip of 50mm masking tape flush with the back edge of the benchtop, this will enable you to see the pencil line that will be produced in the scribing process. A pencil is then placed at the front edge of the block. The block and pencil are then pushed along the length of the benchtop, marking the benchtop as you proceed. Using this method, any deviation in the wall is marked onto the benchtop.
Scribe with a straight flute router bit fitted to router (or planer if available).
Fig. 6 Scribing to correct depth
Installation Guide
9
step 2 - roUting
caUtion: Use a router to make a cut-out in a Think Timber™ benchtop. Ensure you operate this power tool according to the manufacturer’s instructions. Consult an expert if you have any doubt.
Ensure the benchtop is properly supported before you commence routing the cut-out, making sure the waste part of the benchtop is supported at all times.
Once you have the template board clamped into the correct position, plunge the router into the cut-out using a profile router bit similar to that shown in Fig. 7.
Using the template board as your guide, route in a left to right direction around the template to complete the cut-out.
Using a 180 grit sandpaper, sand the inside edge of the cut-out to remove cutting marks.
Remove sharp edges at the top and bottom of the cut-out by sanding the edges to an approx. 2mm radius.
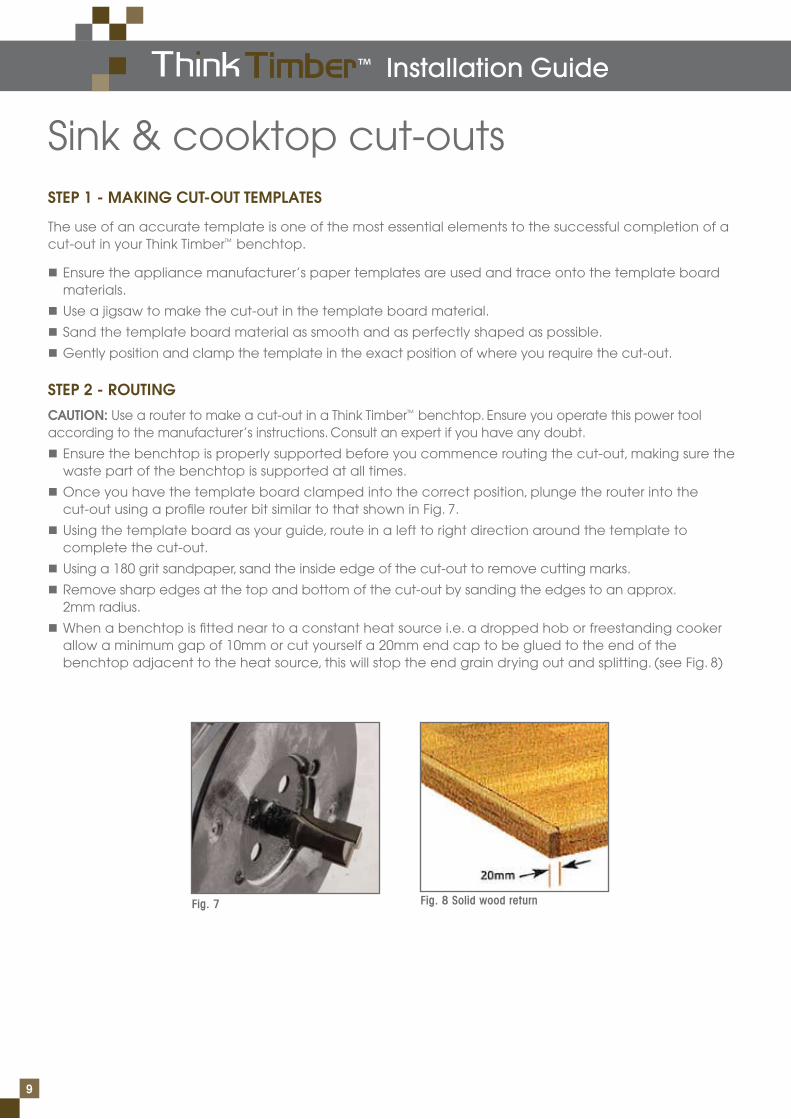
When a benchtop is fitted near to a constant heat source i.e. a dropped hob or freestanding cooker allow a minimum gap of 10mm or cut yourself a 20mm end cap to be glued to the end of the benchtop adjacent to the heat source, this will stop the end grain drying out and splitting. (see Fig. 8)
Montelli® Installation Guide
Step 2 – Routing
CAUTION:Onlyusearouterwhenmakingacut-outinaMontelli®benchtop.Ensureyouoperatethispowertoolaccordingtothemanufacturer’sinstructions.Consultanexpertifyouhaveanydoubt.
n Ensurethebenchtopisproperlysupportedbeforeyoucommenceroutingthecut-out,makingsurethewastepartofthebenchtopissupportedatalltimes.(optionalextra)
CAUTION:Failuretoproperlysupportthewastesectionofthecut-outwillcausedamagetoyourbenchtop!
CAUTION:Ajig-sawshouldnotbeusedtomakethecut-outintheMontelli®material.
n Onceyouhavethetemplateboardclampedintothecorrectposition,plungetherouterintothecut-outusingtheprofilerouterbitsupplied(seefig5)
n Usingthetemplateboardasyourguide,routeinalefttorightdirectionaroundthetemplatetocompletethecut-out.
n Usinga150gritsandpaper,sandtheinsideedgeofthecut-outtoremovecuttingmarks.(seefig6)
n Removesharpedgesatthetopandbottomofthecut-outbysandingtheedgestoanapp.2mmradius.Ifthisisnotdonecorrectly,stressriserswhichcouldresultincrackingofthecut-outmayoccur.
n Forcooktopcut-outsonly,applythealuminiumheatconductivetapearoundthecut-outinonecontinuouspiece.(seefig7)
n Ensurethealuminiumheattapeextendsupthecutoutedgeandoverthesurfaceofthebenchtopenoughtorunpasttheoutsideedgeofthecooktopflange.
fig 4
fig 6
fig 5
fig 7
Professional Tip - After properly finishing the edges of the off cut of your sink or cooktop cut out, apply four rubber feet under the surface and use this as a colour matched heat pad in your kitchen.
Fig. 7 Fig. 8 Solid wood return
Sink & cooktop cut-outsstep 1 - making cUt-oUt templates
The use of an accurate template is one of the most essential elements to the successful completion of a cut-out in your Think Timber™ benchtop.
Ensure the appliance manufacturer’s paper templates are used and trace onto the template board materials.
Use a jigsaw to make the cut-out in the template board material.
Sand the template board material as smooth and as perfectly shaped as possible.
gently position and clamp the template in the exact position of where you require the cut-out.

10
Sealing benchtop componentsBefore installing your “sized” benchtop components, it is easier to seal them as they can be accessed for “all over” sealing. Timber needs to be sealed on both sides to maintain a balance. There are a few options to choose from when selecting your sealing product but always check that the product chosen is suitable for kitchen benchtops.
Options range from Natural plant oils and Polyurethane sealers/varnishes. Characteristically, any of the products can be finished to a practical satin finish or the higher maintenance gloss finish.
Your Think Timber™ benchtops are pre-sanded to a 180grit finish and are supplied in a raw finish, giving you the option of staining to alter the colour if desired prior to sealing.
Natural plant oils penetrate deep into timbers. Light also travels with the oils along the timber fibres into the wood, enhancing all the colour, glow and character of the structure. When the light reflects back it will however reveal any imperfections in the surface sanding. By using the wet on wet friction sanding technique you will be able to minimise sanding imperfections.
step 1
Fine sand timbers to minimum 400 grit (power disc) or hand sand to 600 grit wet & dry paper. Sand until timber begins to show a slight lustre. Retain the sawdust in the last paper used - do not dust off as it will be used as a grain filler in the next process.
step 2
Apply first coat of oil to all surfaces (with underside/rearside of projects, one, oil-sealing application will suffice) allowing to soak well into timber. To outer, presented surfaces, apply a light second coat 2-3 hours after the first application, also allowing time to be absorbed. Wipe off excess or pooling oil leaving a moist surface then begin to massage or burnish the oil into the timber surface with the last paper used in Step 1. The oil and sawdust will form a slurry and should be worked to fill the pore structure of the timber. If needing more slurry to fill open grain/imperfections in the timber, add oil only to the surface of the paper being used. Should you have excess of slurry, clean the face of the paper with an oil dampened lint-free cloth making sure not to add oil to the timber surface. By now you should have achieved a satin finish across the surface. Firmly wipe excess slurry from the timber surface with a clean paper towel before moving to Step 3.
nB: Put the lid back on the can to resist the temptation of adding more oil to the timber.
step 3
To obtain a higher lustre than a satin finish, carry on sanding (manual or power) using 1200 grit wet & dry paper. Two to three sandings with 1200 grit paper may be necessary to bring up the desired finish. Paper face should at all times remain clean and free from excess slurry - clean down with oil dampened lint-free cloth.
step 4
To achieve the “ultimate” with an oil finish it is necessary to leave for 24 to 48 hours and then power buff.
ProfessIonal TIP - De-nib is the process of removing high spots and raised grain after sealing. 180 grit and then 240 grit is used to give a beautiful finish.

Installation Guide
11
Joining & installation of benchtopsstep 1 - Join preparation (Butt joins)
The following joining technique is one of the most basic methods of joining timber. It has the advantage of being quick to make and we recommend using benchtop bolts and silicone to strengthen it.
Router using a double flute straight cutter from left to right with slight pressure to the side of the straight edge closest to you (run router through the blank without stopping and taking care not to tilt router). A second pass should be made to reduce chatter marks.
Once components have been sized, prepare components by machining positions for benchtop joiner bolts. Cut bolt cut-outs to a depth of 20mm using a mason mitre jig and router. When joining 2 benchtops together, 3 standard benchtop bolts must be used on each join.
Fig. 13 Standard cut method with router
Fig. 14 Benchtop bolts insitu Fig. 15 Benchtop bolts
After all cut-outs have been made, dry fit the pieces together to double check the alignment and fit. Also make sure the tops are level.
note: Ensure the edges which are joining meet along the full length. Where benchtops are butted together they can be leveled underneath with thin packing pieces to ensure the top surfaces are level. Note: Properly leveled joins allow a better quality finish.
12
step 2 - cleaning anD preparing Joins
Clean the pre-prepared edges with a lint free cloth prior to applying the silicone adhesive to ensure the join will be free of any dirt or grime. If there is contamination on the join, use a 240 grit sand paper to clean lightly.
step 3 - position anD Fixing Benchtops (installing first top)
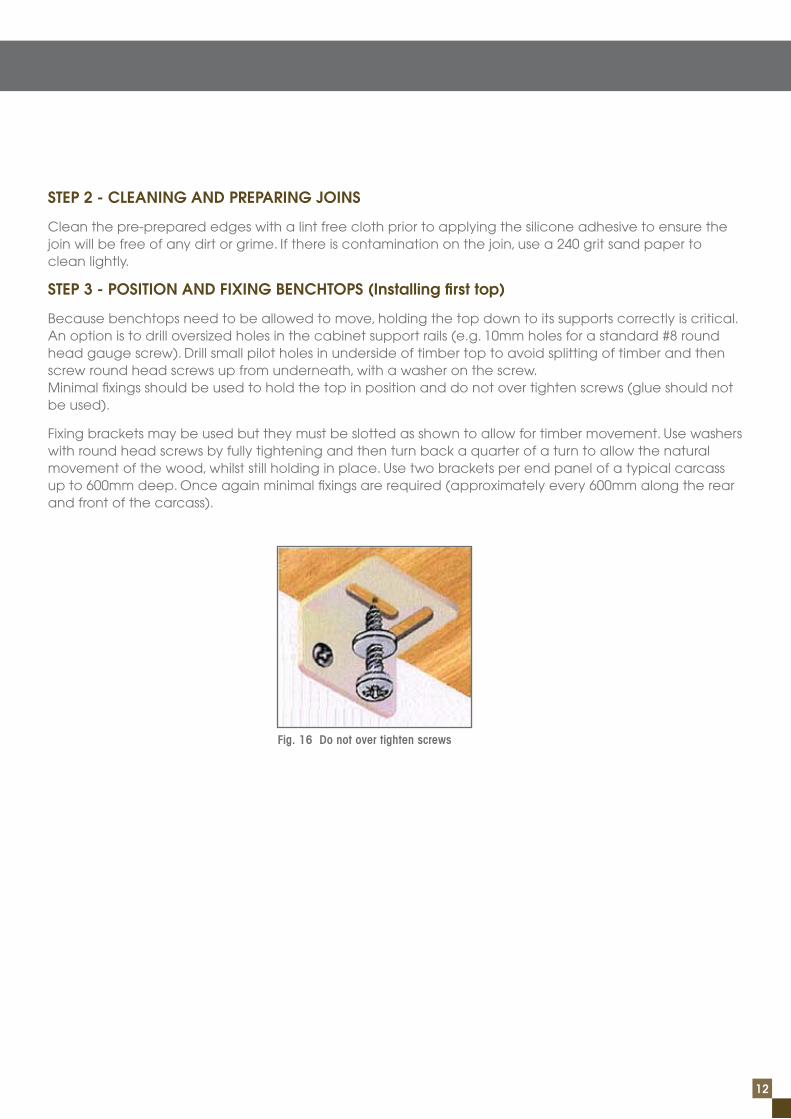
Because benchtops need to be allowed to move, holding the top down to its supports correctly is critical. An option is to drill oversized holes in the cabinet support rails (e.g. 10mm holes for a standard #8 round head gauge screw). Drill small pilot holes in underside of timber top to avoid splitting of timber and then screw round head screws up from underneath, with a washer on the screw. Minimal fixings should be used to hold the top in position and do not over tighten screws (glue should not be used).
Fixing brackets may be used but they must be slotted as shown to allow for timber movement. Use washers with round head screws by fully tightening and then turn back a quarter of a turn to allow the natural movement of the wood, whilst still holding in place. Use two brackets per end panel of a typical carcass up to 600mm deep. Once again minimal fixings are required (approximately every 600mm along the rear and front of the carcass).
Fig. 16 Do not over tighten screws
Installation Guide
13
step 4 - installing the seconD/thirD tops
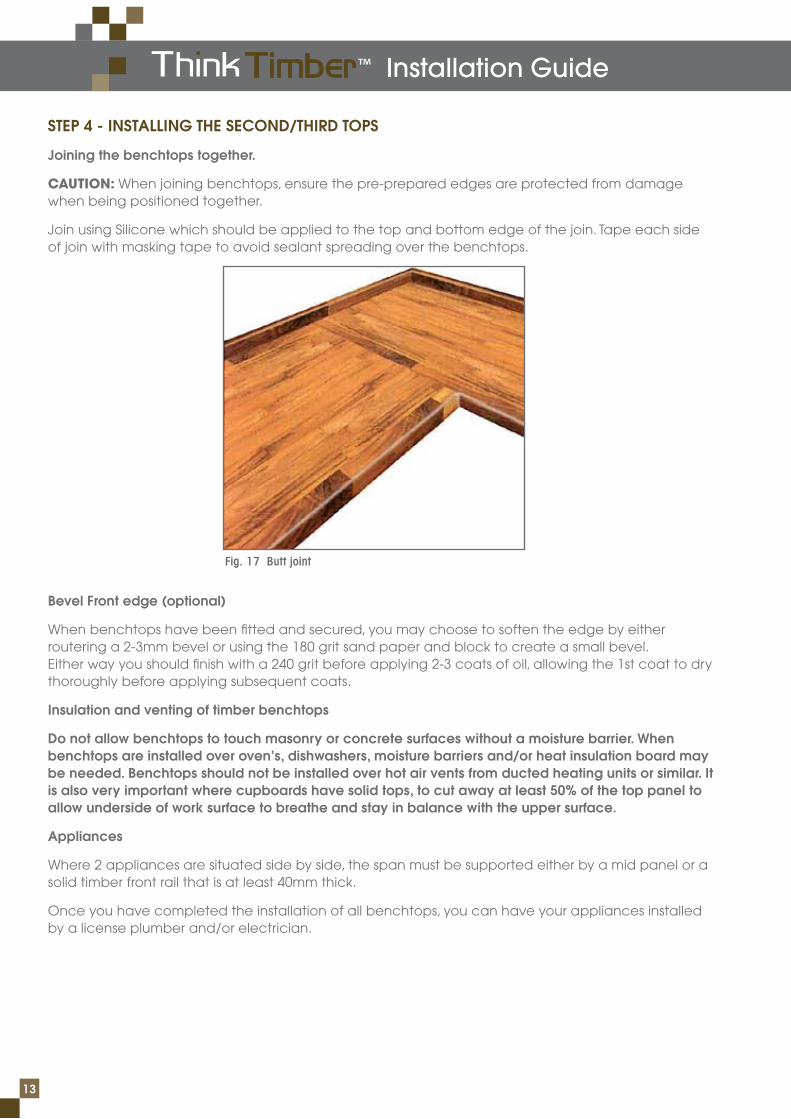
Joining the benchtops together.
CAUTION: When joining benchtops, ensure the pre-prepared edges are protected from damage when being positioned together.
Join using Silicone which should be applied to the top and bottom edge of the join. Tape each side of join with masking tape to avoid sealant spreading over the benchtops.
Bevel Front edge (optional)
When benchtops have been fitted and secured, you may choose to soften the edge by either routering a 2-3mm bevel or using the 180 grit sand paper and block to create a small bevel. Either way you should finish with a 240 grit before applying 2-3 coats of oil, allowing the 1st coat to dry thoroughly before applying subsequent coats.
insulation and venting of timber benchtops
Do not allow benchtops to touch masonry or concrete surfaces without a moisture barrier. when benchtops are installed over oven’s, dishwashers, moisture barriers and/or heat insulation board may be needed. Benchtops should not be installed over hot air vents from ducted heating units or similar. it is also very important where cupboards have solid tops, to cut away at least 50% of the top panel to allow underside of work surface to breathe and stay in balance with the upper surface.
appliances
Where 2 appliances are situated side by side, the span must be supported either by a mid panel or a solid timber front rail that is at least 40mm thick.
Once you have completed the installation of all benchtops, you can have your appliances installed by a license plumber and/or electrician.
Fig. 17 Butt joint
14
Your benchtop is extremely durable but like any work surface it can be damaged if mistreated. Scratches can be removed and re-oiling is required to return the benchtops to its original finish.Please read the following information to take care of, and enjoy your Think Timber™ benchtops for many years to come.
roUtine care
Wipe benchtops clean with water and diluted detergents when required.
spills anD stains
Most spills will wipe up without any problems. It is best to wipe up spills as they occur. Ordinary food products will wipe clean with soap and water. If stains persist, use a solution of warm water and a drop of washing up liquid, soak a cloth in the solution, ring out and wipe the surface down.
preVenting heat Damage
hot pans or items that generate extreme heat should not be placed directly onto the benchtop surface. It is recommended to use heat pads under these appliances and heat emitting items. Modern appliances reach higher temperatures quicker and often hold heat longer. In addition, certain cooking methods may cause heat to reflect onto your benchtop leading to heat build-up that may damage your surface. Always use the correct size pan for the burner. Place it centrally. Remember, a wok burner is designed for a wok, not flat-bottom saucepans. Do not use two burners as one (eg for a large flat-bottomed cast iron pan) as it has the same effect.
preVenting scratches
As Timber is a natural product, it will mark from time to time. It is recommended to use chopping boards to avoid knife marks and scratches. Should scratches occur, you are able to refresh the surface by buffing or sanding out the scratches.
reJUVenating yoUr Benchtops
From time to time, you may wish to re-oil your benchtops to freshen their appearance. For general maintenance, follow your “Sealing” agents recommendations. Re-sanding will remove scorch marks and scratches. Re-oiling areas that appear to be “dry” or to sometimes re-sand areas before re-sealing as per “Sealing” agent instructions is considered normal. This process will generally restore your timber bench top to an “as new” appearance.
Care and Maintenance

For more inFormation, please contact casF1300 366 [email protected] 9:00am - 5:00pm est