installation guide - · pdf filelinear shower drains installation guide 1. shower drain...
TRANSCRIPT

Linear shower drains
Installation Guide
1. Shower Drain PlacementThe placement of the QuARTz Plus linear shower drain should be ideally at the end wall or at the threshold of the shower.
Installation at shower threshold.
Stainless steel grate
Height adjustable leveling feet
ACO Shower Channel
Waterproof membrane
Outlet pipe
Drain flange (PVC or cast iron)
Membrane clamp
Thinset/mortar
Tile
Leveling feet
Waterproof membrane(supplied by others)
Outlet pipe (supplied by others)
Drain flange (PVC or cast iron - supplied by others)
2” threaded coupling
2” threaded membrane clamp (supplied by others)
ABS drain channel
Exploded view of the typical linear drain components.
Installation against the end wall.
2. Locate PipeworkRe-locate rough-in pipework if necessary to align with desired placement of linear drain. Cover with flooring mortar as necessary.
3. Install Drain FlangeInstall a 2” threaded drain flange with a preferred method to the rough-in pipe. Note: drain flange not supplied; obtain from plumbing supply retailer.
Electronic Contact:[email protected] Follow us on
ACO Polymer Products, Inc.
West Sales OfficeP.O. Box 12067Casa Grande, AZ 85130Tel: (520) 421-9988 Toll Free: (888) 490-9552Fax: (520) 421-9899
Northeast Sales OfficeP.O. Box 245Chardon, OH 44024Tel: (440) 285-7000Toll free: (800) 543-4764Fax: (440) 285-7005
Southeast Sales Office4211 Pleasant RoadFort Mill, SC 29708Toll free: (800) 543-4764Fax: (803) 802-1063
© November 2012 ACO Polymer Products, Inc. This information is believed to be accurate but it is not guaranteed to be so. We cannot assume liability for results that buyer obtains with our product since conditions of use are beyond the control of the company. It is the customer’s responsibility to evaluate suitability and safety of product for his own use. ACO Polymer Products Inc. reserves the right to change the product and specifications without notice.
4. Waterproof Floor Install a waterproofing membrane over the floor and cut to size. Cut out an area for the drain flange opening and secure the membrane in place over the drain flange with the membrance clamp.
5. Install CouplingThread the 2” coupling (included) into the standard 2” shower drain flange. Hand tighten.
6. Insert Drain ChannelCoat the exterior of the drain channel outlet with ABS solvent cement and insert into the 2” coupling. Push the channel down to the correct height. Note: the top of the linear drain channel should be flush with the surface of the finished floor.
7. Level the DrainUse the leveling feet (included) to level the unit for proper drainage and to help stabilize the channel during floor installation.
8. FlooringComplete the installation of the linear shower drain by installing the preferred flooring.
Coladera lineal para ducha
Guía de Instalación
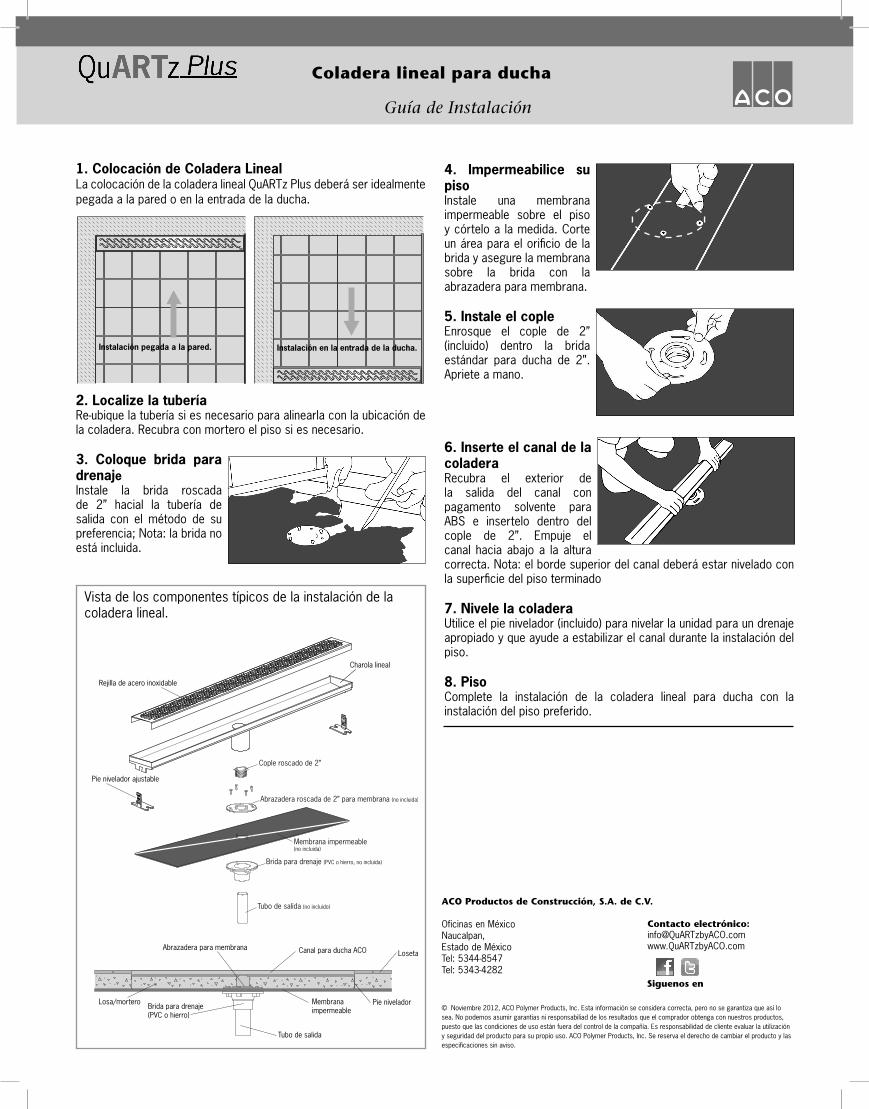
1. Colocación de Coladera LinealLa colocación de la coladera lineal QuARTz Plus deberá ser idealmente pegada a la pared o en la entrada de la ducha.
Instalación en la entrada de la ducha.
Vista de los componentes típicos de la instalación de la coladera lineal.
Instalación pegada a la pared.
2. Localize la tuberíaRe-ubique la tubería si es necesario para alinearla con la ubicación de la coladera. Recubra con mortero el piso si es necesario.
3. Coloque brida para drenajeInstale la brida roscada de 2” hacial la tubería de salida con el método de su preferencia; Nota: la brida no está incluida.
4. Impermeabilice su piso Instale una membrana impermeable sobre el piso y córtelo a la medida. Corte un área para el orificio de la brida y asegure la membrana sobre la brida con la abrazadera para membrana.
5. Instale el copleEnrosque el cople de 2” (incluido) dentro la brida estándar para ducha de 2”. Apriete a mano.
6. Inserte el canal de la coladeraRecubra el exterior de la salida del canal con pagamento solvente para ABS e insertelo dentro del cople de 2”. Empuje el canal hacia abajo a la altura correcta. Nota: el borde superior del canal deberá estar nivelado con la superficie del piso terminado
7. Nivele la coladeraUtilice el pie nivelador (incluido) para nivelar la unidad para un drenaje apropiado y que ayude a estabilizar el canal durante la instalación del piso.
8. PisoComplete la instalación de la coladera lineal para ducha con la instalación del piso preferido.
Rejilla de acero inoxidable
Pie nivelador ajustable
Canal para ducha ACO
Membranaimpermeable
Tubo de salida
Brida para drenaje (PVC o hierro)
Abrazadera para membrana
Losa/mortero
Loseta
Pie nivelador
Membrana impermeable(no incluida)
Tubo de salida (no incluido)
Brida para drenaje (PVC o hierro, no incluida)
Cople roscado de 2”
Abrazadera roscada de 2” para membrana (no incluida)
Charola lineal
Contacto electrónico:[email protected]
Siguenos en
ACO Productos de Construcción, S.A. de C.V.
Oficinas en MéxicoNaucalpan, Estado de MéxicoTel: 5344-8547Tel: 5343-4282
© Noviembre 2012, ACO Polymer Products, Inc. Esta información se considera correcta, pero no se garantiza que así lo sea. No podemos asumir garantias ni responsabiliad de los resultados que el comprador obtenga con nuestros productos, puesto que las condiciones de uso están fuera del control de la compañía. Es responsabilidad de cliente evaluar la utilización y seguridad del producto para su propio uso. ACO Polymer Products, Inc. Se reserva el derecho de cambiar el producto y las especificaciones sin aviso.