installation guidelines...b. remove first piece of release paper, cover horizontal sill by aligning...
TRANSCRIPT
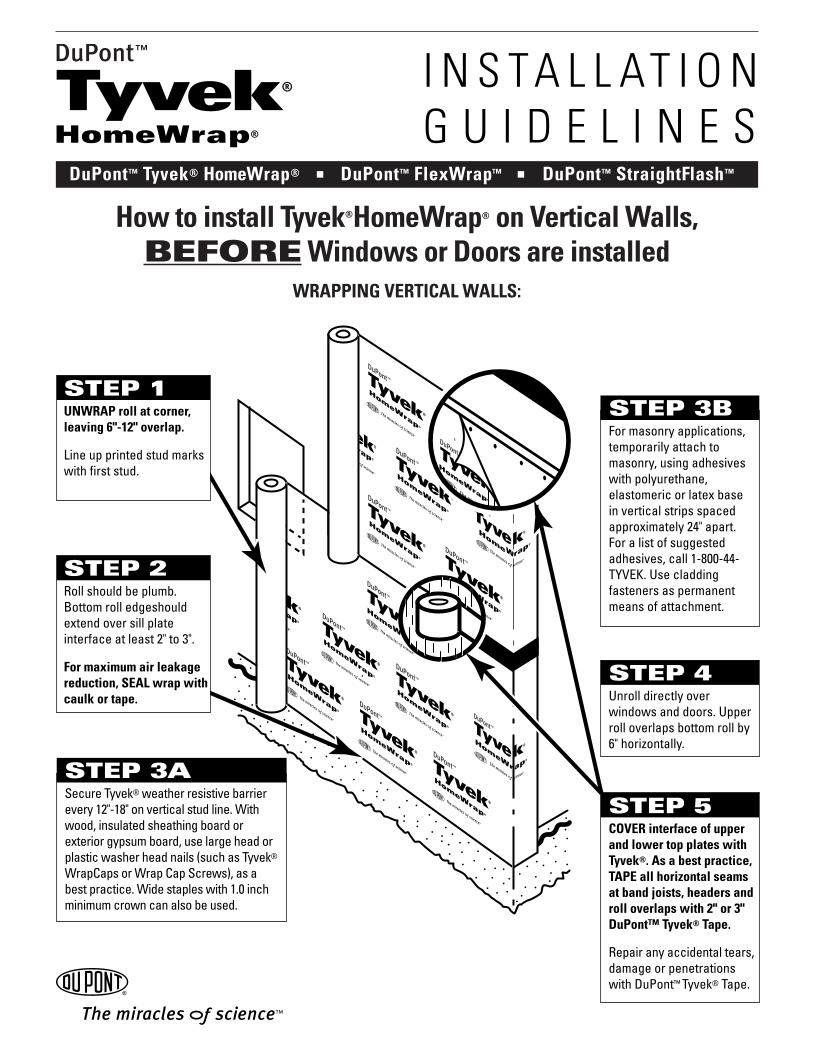
STEP 1UNWRAP roll at corner, leaving 6"-12" overlap.
Line up printed stud marks with first stud.
STEP 3BFor masonry applications, temporarily attach to masonry, using adhesives with polyurethane, elastomeric or latex base in vertical strips spaced approximately 24" apart. For a list of suggested adhesives, call 1-800-44-TYVEK. Use cladding fasteners as permanent means of attachment.
STEP 3ASecure Tyvek® weather resistive barrier every 12"-18" on vertical stud line. With wood, insulated sheathing board or exterior gypsum board, use large head or plastic washer head nails (such as Tyvek®
WrapCaps or Wrap Cap Screws), as a best practice. Wide staples with 1.0 inch minimum crown can also be used.
STEP 4Unroll directly over windows and doors. Upper roll overlaps bottom roll by 6" horizontally.
STEP 5COVER interface of upper and lower top plates with Tyvek®. As a best practice, TAPE all horizontal seams at band joists, headers and roll overlaps with 2" or 3" DuPont™ Tyvek® Tape.
Repair any accidental tears, damage or penetrations with DuPont™ Tyvek® Tape.
STEP 2Roll should be plumb. Bottom roll edgeshould extend over sill plate interface at least 2" to 3".
For maximum air leakage reduction, SEAL wrap with caulk or tape.
How to install Tyvek®HomeWrap® on Vertical Walls,BEFORE Windows or Doors are installed
WRAPPING VERTICAL WALLS:
I N S T A L L AT I O NG U I D E L I N E S
DuPont™ Tyvek® HomeWrap® ■ DuPont™ FlexWrap™ ■ DuPont™ StraightFlash™

FOR RECTANGULAR WINDOWS FOR ROUNDTOP WINDOWS
2"
INSTALLATION GUIDELINESfor DuPont™ Flashing Systems™ with integral flanged windows
AFTER weather-resistive barrier is installed.DuPont™ FlexWrap™ and DuPont™ StraightFlash™ are highly engineered flashing tapes designed to be compatible withTyvek® Weatherization Systems products. For optimal weather-resistive protection, we suggest you use Tyvek®
HomeWrap®, Tyvek® StuccoWrap® or Tyvek® CommercialWrap®, DuPont™ Tyvek® Tape, and Tyvek® Wrap Caps.
GENERAL INSTRUCTIONS:• DuPont™ FlexWrap™ and StraightFlash™ should be installed on
clean, dry surfaces. Wipe surfaces to remove moisture, dirt,grease and other debris that could interfere with adhesion.
• Apply pressure along entire surface for a good bond.• Remove all wrinkles and bubbles by smoothing surface and
repositioning as necessary.
• DO NOT STRETCH DuPont™ FlexWrap™ WHEN INSTALLING.• DuPont™ FlexWrap™ performs best when installed at
temperatures above 40°F (4°C).• For additional guidelines and suggested caulks, please call
1-800-44-TYVEK (800-448-9835).
STEP 6PREPARE WEATHER-RESISTIVE BARRIER FOR WINDOW OR DOOR INSTALLATION:A. Make a modified ”I-Cut” in the weather-resistive barrier. Begin with a horizontal cut across the top of the window frame. (For
roundtop windows, the cut should begin 2” above the mull joint [see D]). From the center cut straight down about two-thirds ofthe way then angling the cut to each corner (see A).
B. Cut a flap above the rough opening to expose sheathing or framing members and allow head flashing installation. Head flashingshould adhere to exposed sheathing or framing members.
C. Fold side and bottom flaps into rough opening and secure. Flip head flap up and temporarily secure.

STEP 7A. Cut DuPont™ FlexWrap™ at least 12" longer than width of rough opening sill (S).B. Remove first piece of release paper, cover horizontal sill by aligning inside edge of sill, and adhere into rough opening across
sill and up jambs (min. 6"). Cover horizontal sill by aligning FlexWrap™ edge with inside edge of sill.C. Remove second release paper.
STEP 8A. Fan DuPont™ FlexWrap™ at bottom corners onto face of wall.B. Firmly press sill flashing to ensure full adhesion.C. SECURE FANNED EDGES WITH MECHANICAL FASTENERS.
(i.e. CapNails, staples, screws, etc.)
STEP 9A. Apply continuous bead of caulk to wall or back side of
window mounting flange across jambs and head, but leavebottom sill flange uncaulked.
B. DO NOT APPLY CAULK ACROSS BOTTOM SILL FLANGE.

Tyvek
Weatherization
System
Tyvek
Wea
theri
zation
Syste
m
Tyvek
Weatherizatio
n
System
FOR RECTANGULAR WINDOWS:
STEP 10A. Install window/door according to manufacturer’s instructions. (illustration A)B. Cut two pieces of DuPont™ StraightFlash™ or FlexWrap™ for jamb flashing extending 1" above window head flange and below
bottom edge of sill flashing. Remove release paper and press tightly along sides of window frame. (illustration B).C. Cut a piece of DuPont™ StraightFlash™ or FlexWrap™ for head flashing, which extends beyond outer edges of jamb flashings. Remove
release paper and install completely covering mounting flange and adhering to exposed sheathing or framing members. (illustration C)
STEP 11A. Flip down upper flap of weather-resistive barrier so it lays
flat across head flashing.B. Tape along all cuts in weather-resistive barrier and across
head of the window with DuPont™ Tyvek® Tape.
STEP 12Caulk (using backer rod if necessary) to seal rear of window/door frame to inside of rough opening across bottom and aminimum of 12" up the sides to form a back dam. To air sealaround the window opening, caulk completely around theback edge of the window perimeter.

Minimum6"
overlap
12"Minimum
Tyvek
Weatherization
System
Tyvek
Wea
theri
zation
Syste
m
Tyvek
Weatherizatio
n
System
STEP 13A. Cut head flashing at least 12" longer than the arc length (H)
of round-top window.B. Remove both release papers and install to conform around
top of window, covering entire mounting flange andadhering to exposed sheathing or framing members. Headflashing should overlap jamb flashings at least 6".
STEP 14Secure outer edges of head flashing using mechanicalfasteners. (eg. CapNails, staples, screws etc.).
STEP 15A. Flip down upper flap of weather-resistive barrier so it lays flat across head flashing.B. Tape along all cuts in weather-resistive barrier and across head of the window with DuPont™ Tyvek® Tape.C. Caulk (using backer rod if necessary) to seal rear of window/door frame to inside of rough opening across bottom and a
minimum of 12" up the sides to form a back dam. To air seal around the window opening, caulk completely around the back edgeof the window perimeter.
INSTALLATION TIP!
Remove short lengths
of release papers, begin
installation, then repeat
until installation is
complete.
FOR ROUNDTOP WINDOWS:
B U I L D I N G C O D E R E P O R T SNational Evaluation Report NER-642. Meets the ASTM E1677 Type 1 AirRetarder when installed according to Tyvek® Weatherization Systems bestpractices. See installation instructions on label.
T E C H N I C A L S P E C I F I C A T I O N STyvek® used in construction products is made from 100% flash spunbondedhigh density polyethylene fibers which have been bonded together by heatand pressure, without binders or fillers, into a tough, durable sheet structure.Additives have been incorporated into the polyethylene to provide ultravioletlight resistance. DuPont suggests that Tyvek® be covered within four months(120 days) of installation.
DuPont™ FlexWrap™ and StraightFlash™ are made from a synthetic rubberadhesive and a laminate of polyethylene film, elastic fiber, synthetic rubberadhesive, polyurethane adhesive, and a top sheet of flash spunbonded highdensity polyethylene fibers. Additives have been incorporated into thesematerials to provide ultraviolet light resistance. DuPont suggests thatDuPont™ FlexWrap™ and StraightFlash™ be covered within four months (120days) of installation.
P R O D U C T G U A R A N T E EDuPont will replace any Tyvek® Weatherization System product damagedduring installation by weather or normal handling if it is installed accordingto procedures published by DuPont. If you have any questions, call DuPont™
Tyvek® Weatherization Systems at 1-800-44-TYVEK.
If DuPont™ FlexWrap™ and StraightFlash™ product fails to meet publishedmaterial specifications at the time of shipment, or contains defects createdduring its production, DuPont will replace defective material at no charge.
W A R N I N GTyvek® is slippery and should not be used in any application where it will bewalked on. In addition, because it is slippery, DuPont recommends usingkickjacks or scaffolding for exterior work above the first floor. If ladders mustbe used, extra caution must be taken to use them safely by following therequirements set forth in ANSI Standards 14.1, 14.2 and 14.5 for laddersmade of wood, aluminum, and fiberglass, respectively. Tyvek® is combustibleand should be protected from a flame and other high heat sources. Tyvek®
will melt at 275°F (135°C) and if the temperature of Tyvek® reaches 750°F(400°C), it will burn and the fire may spread and fall away from the point ofignition. For more information, call 1-800-44-TYVEK.
DuPont™ FlexWrap™ and StraightFlash™ and their release paper are slipperyand should not be walked on. Remove release paper from work areaimmediately. DuPont™ FlexWrap™ and StraightFlash™ will melt at tempera-tures greater than 250°F (121°C). DuPont™ FlexWrap™ and StraightFlash™ arecombustible and should be protected from flame and other high heat sources.DuPont™ FlexWrap™ and StraightFlash™ will not support combustion if the heatsource is removed. However, if burning occurs, ignited droplets may fall awayfrom the point of ignition. For more information, call 1-800-44-TYVEK.
K-20107 ©2004 by E.I. du Pont de Nemours and Company, Inc., all rights reserved. Tyvek®, StuccoWrap®,FlexWrap™, StraightFlash™, the DuPont Oval, The miracles of science™ and DuPont™ are registered trademarksor trademarks of E.I. du Pont de Nemours and Company, Inc.
N O T ETo Achieve greater potential energy savings and weather-resistance, anytears, breaks, holes, etc. created during normal construction should berepaired by taping or patching with Tyvek® weather resistive barriers. Wheninstalled in conjunction with other building materials, DuPont™ FlexWrap™
and StraightFlash™ should be properly shingled with these materials, suchthat water is diverted to the exterior of the wall system. Tyvek® products areweather resistive barriers not the primary water barrier (the outer facade isthe primary barrier). Contamination of any Tyvek® weather-resistive barriersand building papers with building site chemicals which increase theirwettability (e.g., surfactants) will adversely affect their water-resistance andtherefore, their contribution to the overall water-resistance of the wallsystem. Tyvek® StuccoWrap®, DuPont™ FlexWrap™ and StraightFlash™ aresuggested for use as outlined in this brochure. DuPont™ FlexWrap™ andStraightFlash™ are not suggested for use on roof windows. For superiorprotection against bulk water penetration DuPont suggests a systemcombining a quality exterior facade, a good secondary weather-resistivemembrane and an exterior sheathing, appropriate flashing materials anddetails; and high quality windows and doors with particular attention toproper installation of each component. In a system where no exteriorsheathing is used and Tyvek® is installed directly over the wall studs, exteriorfacade materials should be selected to ensure maximum protection againstwater intrusion. Careful workmanship and proper installation of eachcomponent is very important.
DuPont believes this information to be reliable and accurate. The informationmay be subject to revision as additional experience and knowledge isgained. It is the user’s responsibility to determine the proper constructionmaterials needed. Because conditions are outside of our control, DUPONTMAKES NO WARRANTIES, EXPRESSED OR IMPLIED, AND ASSUMES NOLIABILITY WHATSOEVER AS TO THE PERFORMANCE OF THE PRODUCTS FORA PARTICULAR USE. This information is not intended to be used by others foradvertising, promotion or other publication for commercial purposes.
For more information:1-800-44-TYVEK
www.Tyvek.com