installation instructions and system administrator's...
TRANSCRIPT

i
Installation Instructions andSystem Administrator’s Guide
for Release 8.2 (TS2M0) of the SAS® Systemunder UNIX® Environments
Table of Contents
Chapter 1, Before You Install the SAS® System ....................................................................................... 1
Audience ..................................................................................................................................................... 1Using This Book ......................................................................................................................................... 1Terminology................................................................................................................................................ 2Using Netscape Communicator................................................................................................................... 3Recovering From Errors ............................................................................................................................. 3Service and Support .................................................................................................................................... 3
Online Documentation ............................................................................................................................ 3Additional Publications........................................................................................................................... 4Contacting SAS Technical Support ........................................................................................................ 4What’s New ............................................................................................................................................ 5Contracts Customer Service.................................................................................................................... 5
Chapter 2, Installing the SAS® System ...................................................................................................... 7
SAS Setup................................................................................................................................................... 7Important Files........................................................................................................................................ 7Installation Overview.............................................................................................................................. 8Installation Requirements ....................................................................................................................... 9Launching SAS Setup ........................................................................................................................... 11Menu Conventions ................................................................................................................................ 13Primary Menu ....................................................................................................................................... 14Loading Software.................................................................................................................................. 14Loading Selected Software ................................................................................................................... 15Setup Utilities ....................................................................................................................................... 15SAS System Configuration ................................................................................................................... 16Product Specific Configuration............................................................................................................. 16
Chapter 3, Post-Installation Instructions.................................................................................................. 19
Making the SAS System Available ........................................................................................................... 19Invoking SAS Software............................................................................................................................. 20Restoring Your Configuration File ........................................................................................................... 20Adjusting Memory Settings ...................................................................................................................... 21Accessing a Web Browser ........................................................................................................................ 21Installing Man Pages................................................................................................................................. 21Configuring User Authorization................................................................................................................ 21Using SAS/GRAPH Software Map Data Sets........................................................................................... 22

ii
Applying SETINIT to Authorize the SAS System................................................................................... . 23Running the SAS System with the X Window System.............................................................................. 24
The XKeysymDB File .......................................................................................................................... 25Maintaining Your Installation................................................................................................................... 26The Directory Structure of the SAS System.............................................................................................. 27
Appendix A, Post-Installation Validation for SAS/ACCESS® Interface Software ...................... 29
Validating the SAS/ACCESS Interface to DB2...................................................................................... 30Validating the SAS/ACCESS Interface to INFORMIX.......................................................................... 31Validating the SAS/ACCESS Interface to CA-OpenIngres Software ..................................................... 32Validating the SAS/ACCESS Interface to Microsoft SQL Server ............................................................ 34Validating the SAS/ACCESS Interface to ODBC ....................................................................................35Validating the SAS/ACCESS Interface to ORACLE.............................................................................. 37Post-Installation Steps / Validating the SAS/ACCESS Interface to PeopleSoft ..................................... 39Validating the SAS/ACCESS Interface to SYBASE .............................................................................. 39Validating the SAS/ACCESS Interface to TERADATA ........................................................................ 40
Standard Installation ............................................................................................................................. 40Non-standard Installation...................................................................................................................... 41
Sample SAS/ACCESS Installation Output ............................................................................................... 41SAS/ACCESS Verification Tests ......................................................................................................... 42
Appendix B, Post-Installation Setup for SAS/ACCESS® Interface to R/3® Software................. 45
Appendix C, Post-Installation Setup for SAS/ASSIST® Software.................................................. 47
Adding a Master Profile............................................................................................................................ 47
Appendix D, Post-Installation Setup for SAS/CONNECT® Software ........................................... 49
User Authorization.................................................................................................................................... 49Storing and Locating SAS/CONNECT Script Files..................................................................................49System Configuration for the TCP Access Method .................................................................................. 49System Configuration for the APPC Communications Access Method.................................................... 50System Configuration for the APPC Communications Access Method under HP-UX............................. 50
Software Requirements ......................................................................................................................... 50SAS System Configuration ................................................................................................................... 50HP-UX Configuration and Management............................................................................................... 52Sample Configuration ........................................................................................................................... 53References............................................................................................................................................. 58
System Configuration for the APPC Communications Access Method under AIX.................................. 58Software Requirements ......................................................................................................................... 58SAS System Configuration ................................................................................................................... 58SNA Server/6000 Configuration........................................................................................................... 61SAS Specifics ....................................................................................................................................... 64References............................................................................................................................................. 65
Appendix E, Post-Installation Setup of Enterprise Miner Server Software................................ 67
Configuring Enterprise Miner Server Software ........................................................................................ 67Setup Default Data Library................................................................................................................... 67Provide Information to Configure Enterprise Miner Client Software ................................................... 67

Installation Instructions and System Administrator’s Guide for the SAS System under UNIX Environments iii
Appendix F, SAS/GIS® Census Tract Maps Installation and Configuration................................ 69
Mounting and Installing the SAS/GIS Census Tract Maps....................................................................... 69Configuring the SAS/GIS Census Tract Maps...................................................................................... .... 69
Appendix G, Post-Installation Setup for SAS/GRAPH® Software........................................................ 71
ContourApplet (ctrapp.jar).................................................................................................................... 71GraphApplet (graphapp.jar).................................................................................................................. 71MapApplet (mapapp.jar and related map data jar files)........................................................................ 71MetaViewApplet (metafile.zip) ............................................................................................................ 71RangeViewApplet (rvapplet.jar) ........................................................................................................... 71SAS/GRAPH Control for ActiveX ....................................................................................................... 72
Client Components.................................................................................................................................... 72
Appendix H, Installing SAS Integration Technologies ............................................................................73
Client Components.................................................................................................................................... 73Integration Technologies Documentation ............................................................................................. 73Java Client Development and Runtime Component.............................................................................. 73Windows Client Development and Runtime Component...................................................................... 73Integration Technologies Administrator ............................................................................................... 73SAS Package Reader ............................................................................................................................ 73Subscription Manager ........................................................................................................................... 73
Client Component Delivery ...................................................................................................................... 74
Appendix I, Installing SAS/IntrNet ® Software........................................................................................ 75
Introduction............................................................................................................................................... 75Installing SAS/IntrNet Web Server or Client Components....................................................................... 75User Authorization.................................................................................................................................... 75Configuring SAS/IntrNet Components ..................................................................................................... 75Updates to Components and Documentation ............................................................................................ 76
Appendix J, Post-Installation Setup for SAS/MDDB Server® Software............................................... 77
Appendix K, Installing IT Service Vision® Solution Software Release 2.4 ........................................... 79
IT Service Vision Functionality............................................................................................................ 79Installing IT Service Vision ...................................................................................................................... 79
Migration Considerations...................................................................................................................... 79Installation Customizations................................................................................................................... 79Configuring the SAS System for IT Service Vision Release 2.4 .......................................................... 80Starting IT Service Vision .................................................................................................................... 80
IT Service Vision Documentation............................................................................................................. 80Site Library Considerations ...................................................................................................................... 81
First Time Installations ......................................................................................................................... 81Upgrading existing installations............................................................................................................ 81Maintaining SITELIB with Previous IT Service Vision Installations................................................... 81Modifying the default pointer to SITELIB library................................................................................ 82

iv
Appendix L, Post-Installation Setup for the Metabase Facility.............................................................. 85
Setting Up the System Repository Manager Files................................................................................. .... 85Registering the SASHELP Repository in the Repository Manager .......................................................... 86Converting Version 6 SAS/EIS Metabases to Version 8 Repositories ..................................................... 86
Appendix M, Post-Installation Instructions for Setting up National Language Support (NLS) ......... 87
Tips for Setting up Your System........................................................................................................... 87Choosing to Run the Locale Setup Application as Part of the Install ................................................... 87Other times you need to run the Locale Setup application.................................................................... 88Background........................................................................................................................................... 88
NLS-Related System Options ................................................................................................................... 88LOCALE............................................................................................................................................... 89ENCODING ......................................................................................................................................... 89
Locale Setup Window............................................................................................................................... 90How to configure your system .................................................................................................................. 90
Running SAS in a Different Locale ...................................................................................................... 90Running SAS with Special Locale Settings .......................................................................................... 91
Additional Information ............................................................................................................................. 91Setting up your Server for an EBCDIC Client ...................................................................................... 91Devmaps and Keymaps for SAS/Graph................................................................................................ 91
Appendix N, Post-Installation Setup for SAS® OLAP Server Software ............................................... 95
Setting up Access Control without SAS/EIS Software on Your Server .................................................... 95Starting the Access Control Setup Dialog Window .............................................................................. 95Setting Your Access Control Key and Environment Programmatically................................................ 95Setting Your Access Control Definitions (Users, Groups, ACL) Programmatically............................. 98Write Access to SASHELP.AC and SASHELP.MB .......................................................................... 107
Specifying OLAP Classes ....................................................................................................................... 107
Appendix O, Post-Installation Setup for Risk Dimensions Software ................................................ 109
Starting the Risk Dimensions Application .............................................................................................. 109
Appendix P, Post-Installation Setup for SAS/SECURE Software..................................................... 111
SAS/SECURE Client for Windows ........................................................................................................ 111SAS/SECURE Client for Java ................................................................................................................ 111Client-Side Components CD................................................................................................................... 111
Appendix Q, Post-Installation Setup for SAS/SHARE® Software................................................ 113
User Authorization.................................................................................................................................. 113System Configuration for the TCP/IP Communications Method ............................................................ 113System Configuration for the APPC Communications Access Method.................................................. 113Client-Side Components ......................................................................................................................... 114
SAS/SHARE Data Provider................................................................................................................ 114SAS ODBC Driver.............................................................................................................................. 114SAS/SHARE Driver for JDBC ........................................................................................................... 114SAS/SHARE SQL Library for C ........................................................................................................ 114

Installation Instructions and System Administrator’s Guide for the SAS System under UNIX Environments v
Appendix R, Post-Installation Setup for WebHound ............................................................................ 115
WebHound Functionality......................................................................................................... ........... 115Configuring WebHound.......................................................................................................................... 115
Creating a SAS/IntrNet Application Server Repository Manager for Use with WebHound............... 116Creating the Application Server Repository Manager ........................................................................ 116Application Server Setup ....................................................................................................... ............. 117
Configuring your Web server for use with WebHound .......................................................................... 118
Appendix S, Using Host Sort Routines.................................................................................................... 121
Making Host Sort Routines Available .................................................................................................... 121Using Host Sort Routines in a SAS Session............................................................................................ 123
Government Notice ................................................................................................................................ 125


1
Chapter 1, Before You Install the SAS® System
This document provides instructions for installing and configuring the SAS System for UNIXenvironments. The following systems are supported in this release. We recommend that you referto the accompanying System Requirements for specific operating system and hardwarerequirements.
q ABI+ for Intel® Architecture, supported on the following systems:• NCR MP-RAS• SCO UnixWare• Sequent DYNIX/ptx• Sun Solaris
q AIX (32 & 64 bit enabled)q Compaq Tru64 UNIXq HP-UX (32 & 64 bit enabled)q IRIXq Linuxq Solaris (32 & 64 bit enabled)
Audience
This document is intended for persons responsible for installing and maintaining UNIX softwareat your site.
Using This Book
This document conforms to the following conventions:
A Computer icon indicates that system-specific information appearsto the right of the graphic.
monospace Monospace type indicates commands, directory paths, filenames, etc.
italics Italic type indicates documentation references or key notes.
UPPERCASE Uppercase type indicates variable and option settings.
dollar sign $ Indicates a UNIX environment variable.
exclamation ! Indicates an internal SAS environment variable. Note that when avariable can be either a SAS or UNIX environment variable, the SASconvention is used.

2 Installation Instructions and System Administrator’s Guide for the SAS System under UNIX Environments
Terminology
The following are brief descriptions of some of the SAS System-specific terms used throughoutthis document:
q Maintenance and Hot Fixes
replacement files containing fixes and enhancements to the SAS System.
q National Language Support (NLS)
components of the SAS System that have been adapted for a particular locale.
q Post-Processing
After installation, some SAS software components require special processing. SAS Setup willperform most of the required post-processing, however, certain post-processing steps must becompleted manually. Please see Chapter 3 “Post-Installation Instructions” on page 19 fordetails.
q SAS Setup
the program that performs the installation and maintenance of the SAS System. When youperform an install, SAS Setup is stored in !SASROOT/sassetup.
q SASROOT
the root directory of the SAS System where all SAS files and subdirectories are loaded.
Note: Throughout this document, !SASROOT is used in directory paths referring to files inyour SAS root directory. This is a logical concept. You should substitute the actualpath of your SAS root directory wherever you see !SASROOT.
q SETINIT
information used to authorize the SAS System at your site. The Contracts Division at SASsupplies SETINIT information. When you contract to renew the SAS System or add additionalproducts to your current license, you must apply new SETINIT information. For moreinformation, refer to “Applying SETINIT to Authorize the SAS System” on page 23 inChapter 3 of this document.
q TS-level
a specific value assigned to a release of the SAS System. For example, the TS-level for Release8.2 of the SAS System is TS2M0. You can find this value at the top of the SAS log.

Installation Instructions and System Administrator’s Guide for the SAS System under UNIX Environments 3
Using Netscape Communicator
You must have Netscape Communicator installed on your system because some SAS Systemproduct features will not function without it. If you have Netscape installed on your system,make sure the directory containing the browser is included in your $PATH before invoking theSAS System. Please refer to the System Requirements document to find out where to obtain theappropriate release of Netscape Communicator for your system.
Recovering From Errors
Errors can occur during the installation process. If they occur during the prompting phase of theinstall, you will be notified of the nature of the error and given suggestions on how to correct it. Iferrors occur during the loading or post-processing phases of the install, they are written to theinstall logs, and an error status is returned from the installation. You should always check theinstall logs for errors after the installation is complete. All installation logs are stored in!SASROOT/.install/, in the logs, logs_sh, and sas subdirectories. If errors occur, SASSetup points you to the appropriate log file where you can determine the cause.
If you need assistance with correcting an error, contact SAS Technical Support as described in“Contacting SAS Technical Support” later in this chapter.
Service and Support
Online Documentation
A SAS OnlineDoc CD is included in your package containing a complete library of SAS softwaredocumentation. The SAS OnlineDoc CD can be mounted or installed on any system and requiresNetscape Navigator. Please refer to the System Requirements accompanying the CD for specificversion requirements.
The directory !SASROOT/doc contains versions of Alert Notes, System Requirements, and theInstallation Instructions in several formats. See the README file, also found in !SASROOT/doc, forinformation on how to browse and print these files. Copies of these enclosures can also be foundin the doc directory on the installation media. The latest versions of these enclosures can bedownloaded from the SAS Technical Support Web page:
http://www.sas.com/ts
You may also visit the following Web page for access to the most up-to-date Alert Notes, SystemRequirements, new feature documentation, etc.:
http://www.sas.com/newversion
If you are unable to access this URL, you can request a CD-ROM with documentation in PDFformat about SAS software changes and enhancements. Contact the SAS Distribution Center at(919) 531-7851. Changes and enhancements documentation for most Release 8.2 SAS products canbe found in SAS System Help.

4 Installation Instructions and System Administrator’s Guide for the SAS System under UNIX Environments
It is essential that one or more representatives at your site subscribe to TSNEWS-L in order toreceive valuable problem notifications concerning your software. To subscribe, send e-mail [email protected]. The body of the e-mail should read SUBSCRIBE TSNEWS-L. In thepast, problem notifications were sent hardcopy to customers; however, now, they will only beavailable via TSNEWS-L.
Additional Publications
SAS provides many publications about SAS System products and how to use them on specifichosts. For a complete list of SAS System publications, refer to the current Publications Catalog. Thecatalog is produced twice a year. You can view a current on-line copy of the Publications Catalogon your SAS OnlineDoc CD or on the World Wide Web at:
http://www.sas.com/pubs/
You can also order a free copy of the catalog by writing to the following address:
SASBook Sales DepartmentSAS Campus Dr.Cary, NC 27513-2414
Contacting SAS Technical Support
If you encounter errors or have questions regarding the installation, SAS provides technicalsupport via the World Wide Web, telephone, mail, dial-up computer access, or electronic mail.For technical support via the World Wide Web, use the following URL:
http://www.sas.com/ts/
For technical support by phone, call (919) 677-8008 between the hours of 9:00 a.m. and 8:00 p.m.,Eastern Time, on business days. Electronic methods for contacting SAS Technical Support areavailable 24 hours a day, 7 days a week.
Note: Make sure you have the following information available when contacting SAS TechnicalSupport:
• your SAS site number• your operating system and version number• any errors you received during installation
If you are a non-U.S./Canadian customer, contact your SAS Representative for the SAS officenearest you. For technical support by mail, address all correspondence to:
SASTechnical Support DivisionSAS Campus DriveCary, N.C. 27513-2414
Installation Instructions and System Administrator’s Guide for the SAS System under UNIX Environments 5
Electronic mail access is available through the Electronic Mail Interface to Technical Support(EMITS). This facility allows you to open a technical support problem, track it, and/or addinformation to a previously reported problem. To obtain more information on EMITS, sendelectronic mail to [email protected] with the body of the message containing the command:
Help
What’s New
Visit the new Web page http://www.sas.com/newversion for information about what isnew in Release 8.2 of SAS Software. You can browse or print What’s New in SAS Software,Release 8.2 and follow links to additional documentation. Visit this site often for the most up-to-date information about Release 8.2. If you prefer to access Release 8.2 documentation on CD-ROM, contact the SAS Distribution Center at 919-531-7851. To purchase the hardcopy book,contact SAS Fulfillment Services at 800-727-3228.
Contracts Customer Service
For questions related to your organization’s customer licensing relationship with SAS, pleasecontact Contracts Customer Service. This department can help with non-technical questionsrelated to hardware configuration and SETINIT issues, such as verifying SETINIT informationand requesting SETINIT extensions.
You can access Contracts Customer Service via the World Wide Web, telephone, mail, dial-upcomputer access, or electronic mail. For Contract Customer Service via the World Wide Web,please use the following URL:
http://www.sas.com/service/contracts/intro.html
For Contracts Customer Service by phone, please call (919) 677-8003 or (800) 727-0025 between thehours of 9:00 a.m. and 8:00 p.m., Eastern Time, on business days. Electronic methods forcontacting Contracts Customer Service are available 24 hours a day, 7 days a week.


7
Chapter 2, Installing the SAS® System
SAS Setup is provided on your installation media and is used to install and maintain your SASSystem. This chapter describes SAS Setup and how to use it, as well as how to load and maintainthe SAS System.
SAS Setup
SAS Setup is a set of scripts supplied with the installation media that provides a menu-driveninterface for installing and maintaining the SAS System. When launched, SAS Setup firstperforms a series of tests to make sure it can run properly and then guides you through a series ofmenus. A SAS Setup installation has three distinct phases:
q Prompting
using a series of menus, prompts you for all the information necessary to complete theinstallation.
q Loading
loads all selected software to a specified location.
q Post-Processing
performs SAS System and product-specific configuration. This phase occurs automaticallyafter all software has been loaded.
SAS Setup is loaded along with any selected software to the specified destination. You can invokeSAS Setup directly from the installation media, or from !SASROOT after the installation iscomplete.
During the prompting phase of installation, you are prompted for information before any actualloading or post-processing occurs. Before anything is loaded, you can exit at any time.
Note: You must use SAS Setup to install the SAS System. Using another installer will result inerrors.
Important Files
SAS Setup uses several control files to accomplish its tasks and log its progress. These files shouldnot be deleted or modified because they may be used in subsequent installations or inmaintaining your existing installation.
8 Installation Instructions and System Administrator’s Guide for the SAS System under UNIX Environments
q TOC File
a control file used by SAS Setup to serve as an index of the products and/or maintenance. It isshipped on the installation media and is copied to !SASROOT/.install/tocs during aninstallation.
q Config File
a file containing SAS System options that take effect when the SAS System is invoked. SASSetup creates a default config file during installation, !SASROOT/sasv8.cfg.
q History File
a SAS Setup control file containing the history of the components that were loaded during theinstallation process. The history file is located in your !SASROOT/.install directory.
q Log Files
files created by SAS Setup that contain useful diagnostic information about any errors thatmay have occurred during the installation process. These files are located in your!SASROOT/.install/logs and !SASROOT/.install/logs_sh directories. In additionto install log files, you can also find log files in !SASROOT/.install/sas for the actual SASprograms that run during configuration.
q Run Script
a SAS Setup control file containing all of the responses you provided to prompts during theinstallation process. This file can be used as input for subsequent installations. The run scriptis located in !SASROOT/.install/script.
q SAS Setup
a set of scripts used to install and maintain the SAS System. When the SAS System is loaded,SAS Setup is named !SASROOT/sassetup, and its components are found in!SASROOT/install.
Installation Overview
A typical SAS System installation involves the following steps:
1. Prerequisites: Review your product package to make sure it is appropriate for your site.Make sure your system is properly backed up. Review the Alert Notes, System Requirementsand Installation Instructions prior to installing the software.
2. Environment: Make sure your system has adequate memory and free disk space to completethe installation. Be sure you have the ability to mount the media and write files to theinstallation directory. Make sure your system meets the operating system specificationsoutlined in the System Requirements document.

Installation Instructions and System Administrator’s Guide for the SAS System under UNIX Environments 9
3. Installation: Run SAS Setup from your installation media to install the SAS System Solutionsappropriate for your site.
4. Post-Installation: Complete post-installation steps to make the SAS System available for useat your site. Please see Chapter 3 “Post-Installation Instructions” on page 19 for instructionsabout the steps to complete.
5. Client Installations: You have the option of installing additional components of the SASSystem found on the Client-Side Components CD, the SAS OnlineDoc CD and/or theSAS/GIS Census Tract Maps CD. Refer to the documentation included for each of these CDsfor requirements and installation instructions.
Installation Requirements
SAS Setup requires certain information to complete an installation successfully. Before you runSAS Setup to install software, the following information must be obtained:
q Operating System Version
Determine which version of the operating system is being used for this installation. Comparethe version with those listed in the System Requirements to make sure you are installing on asupported version of the operating system.
q Source Directory
Determine the directory path of the installation source directory. This is typically the mountpoint of a CD-ROM device. Make sure you know the path of the device for proper mounting.
q Destination Directory
Determine where you want to install the software. Make a note of the full path of yourdestination directory so you can provide the information when SAS Setup asks for it. Makesure there is adequate free disk space available on the destination disk. You can estimate thedisk space requirements from the “Space Requirements” section listed in the SystemRequirements.
q Installation Scenario
Know which type of installation you intend to perform prior to running SAS Setup. Somebasic installation scenarios are outlined below:
� NewIn this scenario you can choose to Load All Software from Media or Load SelectedSoftware. A new installation requires a destination directory that is empty. SAS Setupwill create a directory if you specify a destination that does not exist.
� UpgradeIn some cases, you are allowed to install an upgrade directly into an existing SAS Systeminstallation. However, we recommend that you always load upgrades into a separate

10 Installation Instructions and System Administrator’s Guide for the SAS System under UNIX Environments
location. This allows you to run both the existing system and the upgraded system inparallel.
There are two types of upgrade installations: a Major Upgrade and a Minor Upgrade.
Major UpgradeA Major Upgrade involves installing a higher release of the SAS System than that ofthe existing installation. An example would be upgrading SAS System Release 6.12 toRelease 8.2. SAS Setup does not allow you to load a major upgrade into your existinginstallation. A new destination directory must be chosen, along with the selection ofLoad All Software from Media or Load Selected Software.
Minor UpgradeA Minor Upgrade provides an existing installation of the SAS System with anupdated version of the same release. An example would be upgrading the SASSystem Version 8 production release to an enhanced Version 8 release. In the MinorUpgrade scenario, specify your existing installation root directory as the destinationdirectory and choose to Load All Software from Media or Load SelectedSoftware.
� AddonAn Addon installation loads additional products to an existing installation of the samerelease. An example of an Addon installation would be choosing to load SAS/GRAPHSoftware to an existing installation containing Base SAS, SAS/AF, and SAS/FSPSoftware.
In the Addon scenario, specify your existing installation root directory as the destinationdirectory and choose Load Selected Software. Then choose the Addon productsthat you want to load. Some Addon products require a certain level of maintenance inorder to load. If this is the case, you will also be prompted to load maintenance alongwith the Addon product.
� MaintenanceA Maintenance scenario loads maintenance files you requested to an existing installation.When you want to load maintenance for all products in an existing installation, specifyyour existing installation root directory as the destination directory and choose to LoadSoftware Maintenance Only. You may also choose to Load All Software fromMedia or Load Selected Software to load maintenance files. In these scenarios, youwill be prompted to load maintenance when it is available for the products you havechosen to load or have already installed.
� NLS OnlyAn NLS Only scenario restricts installation to NLS components for the products in anexisting installation. NLS Only can be chosen if you receive media with NLS translationsfor products currently installed. Specify your existing installation root directory as thedestination directory and choose Load NLS Translations Only. You may alsochoose Load Selected Software or Load All Software from Media to loadNLS translations.

Installation Instructions and System Administrator’s Guide for the SAS System under UNIX Environments 11
Launching SAS Setup
The SAS System can be installed in any location with sufficient space. When you launch SASSetup and choose to load software, the program prompts you for a source location of the mediaand a destination location (referred to as SASROOT) in which to install the SAS System. SASSetup will verify that the specified directory is valid before proceeding with the install.
Complete the following steps to launch SAS Setup directly from the installation media:
1. Locate the CD labeled Installation Disk and insert it in your CD-ROM drive. If your systemuses an automount feature, you may skip to Step 5 below since the CD will be automaticallymounted for you.
2. Mounting a CD requires root privilege on UNIX. Log in as root to manually mount the CD.
3. Create a local directory in which to mount your CD:
mkdir /cdrom
Note: These instructions assume your CD is mounted as /cdrom. However, you maychoose another location and substitute that location appropriately in theseinstructions.
4. Mount the CD using one of the following examples appropriate for your system. Substitutethe actual device names where appropriate in the examples shown. This release of the SASSystem supports ISO-9660 CD-ROM and Rockridge extensions where available.
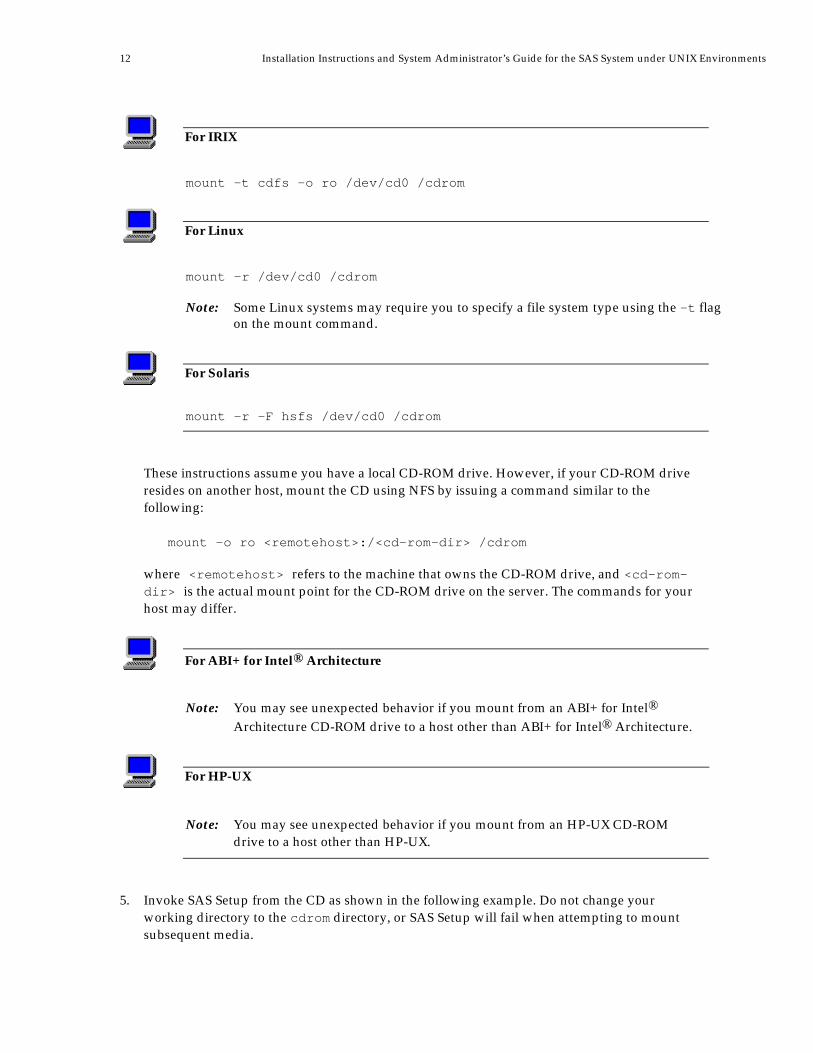
For ABI+ for Intel® Architecture
mount –F cdfs –o ro /dev/cd0 /cdrom
For AIX
mount -r -v cdrfs /dev/cd0 /cdrom
For Compaq Tru64 UNIX
mount -rt cdfs -o noversion,rrip /dev/cd0 /cdrom
For HP-UX
mount -r /dev/cd0 /cdrom
12 Installation Instructions and System Administrator’s Guide for the SAS System under UNIX Environments
For IRIX
mount –t cdfs –o ro /dev/cd0 /cdrom
For Linux
mount -r /dev/cd0 /cdrom
Note: Some Linux systems may require you to specify a file system type using the –t flagon the mount command.
For Solaris
mount -r -F hsfs /dev/cd0 /cdrom
These instructions assume you have a local CD-ROM drive. However, if your CD-ROM driveresides on another host, mount the CD using NFS by issuing a command similar to thefollowing:
mount -o ro <remotehost>:/<cd-rom-dir> /cdrom
where <remotehost> refers to the machine that owns the CD-ROM drive, and <cd-rom-dir> is the actual mount point for the CD-ROM drive on the server. The commands for yourhost may differ.
For ABI+ for Intel® Architecture
Note: You may see unexpected behavior if you mount from an ABI+ for Intel®
Architecture CD-ROM drive to a host other than ABI+ for Intel® Architecture.
For HP-UX
Note: You may see unexpected behavior if you mount from an HP-UX CD-ROMdrive to a host other than HP-UX.
5. Invoke SAS Setup from the CD as shown in the following example. Do not change yourworking directory to the cdrom directory, or SAS Setup will fail when attempting to mountsubsequent media.
Installation Instructions and System Administrator’s Guide for the SAS System under UNIX Environments 13
/cdrom/SASSETUP
Some file systems may show SAS Setup as a VMS-style file or in lowercase. In these cases,invoke SAS Setup using:
/cdrom/SASSETUP.\;1
or
/cdrom/sassetup
Note: You are not required to run SAS Setup directly from the installation media. If you havepreviously installed this release of the SAS System, you can launch SAS Setup from thislocation:
!SASROOT/sassetup
where !SASROOT refers to the root directory of your previous installation.
6. Provide the information requested from prompts and menus to complete the installation. Ifadditional media is required, SAS Setup will prompt you to mount it.
The next several sections outline the menu choices available to you and the conventions usedwhen navigating through them.
Menu Conventions
The following conventions are used in the menus throughout the installation process:
* indicates the default selection
[ ] indicates the default choice
( ) indicates an item is not selectable
G go back to a previous menu or prompt
Q quit the install and exit
H, H#, #H displays help on an item or menu
The following conventions are used to make custom selections throughout the installationprocess:
n next screen
p previous screen
# select numbered item
-# deselect numbered item

14 Installation Instructions and System Administrator’s Guide for the SAS System under UNIX Environments
* select all items
-* deselect all items
#-# select range of items
-#-# deselect range of items
Return continue
Primary Menu
The first menu presented from SAS Setup is the primary menu, which gives you the choice ofloading software or running utilities to maintain your existing installation. The SAS Setupprimary menu contains the following options:
q Load Software From Mediaallows you to choose software to load from the media.
q Run Setup Utilitiesallows you to maintain your installed SAS System by running utilities that configure andupdate your system.
q Quit SAS Setupexits SAS Setup.
Loading Software
When you choose Load Software From Media from the SAS Setup primary menu, the loadsoftware menu is presented. You can then choose from the following options:
q Load All Software From Medialoads the entire contents of your media.
q Load Selected Softwareloads components based on your custom selections.
q Load Software Maintenance Onlyloads only maintenance files to an existing installation.
q Load NLS Translations Onlyloads only NLS translations for products in an existing installation.
If maintenance is found on your installation media, you will be prompted to load the maintenancealong with any product selections you have made.

Installation Instructions and System Administrator’s Guide for the SAS System under UNIX Environments 15
Loading Selected Software
Selecting Load Selected Software allows you to load software based on your customselections. You can then use the menus that follow to choose which product components will beinstalled. Selecting components from these menus is cumulative. You have the option of viewingor clearing your selections at any time before you choose to install the current selections.
q Select National Language Support (NLS)allows you to select components of the SAS System translated into languages other thanEnglish.
q Select Productsallows you to select among all the products for which your site is licensed.
q Select Samplesallows you to select among all the sample programs for products for which your site islicensed.
q Select Mapsallows you to select which SAS/Graph Map Datasets you want to install.
q Select National Language Support (NLS)allows you to select components of SAS System translated into languages other than English.
q Preview Selectionsdisplays a list of your current custom selections.
q Install Current Selectionsinstalls your current custom selections.
q Clear All Selectionsclears your current custom selections.
Setup Utilities
When you select Run Setup Utilities from the SAS Setup primary menu, the followingutility options are available. The utilities are used to modify or maintain an existing installation.Unlike the loading options, the utilities are all executed as you select them.
q Perform SAS System Configurationconfigures the SAS System for use.
q Perform Product Specific Configurationconfigures specific product components for use.
q Run Technical Support Toolsruns various tools provided by Technical Support.
q List Previously Installed Productslists products that have been previously installed.

16 Installation Instructions and System Administrator’s Guide for the SAS System under UNIX Environments
SAS System Configuration
SAS Setup allows you to maintain your installation by providing access to all the configurationsteps required when changes occur to your SAS System installation. This menu allows you toperform SAS System configuration steps.
q Create New Config Filescreates a new sasv8.cfg file, which contains site-specific configuration options.
q Patch the SAS Executable Imagepatches the SAS executable with the current installation location, which tells the SAS Systemwhere to find the SASROOT directory.
q Apply SETINIT to Authorize the SAS Systemapplies SETINIT information to authorize your SAS System installation for use.
q Update SAS Registry Informationcreates a new SAS Registry used by the SAS System.
q Run Installation Testsruns test programs to certify your installation.
q Uncompress Map Data Setsuncompresses map datasets that are loaded in compressed format to save disk space. Themaps are not useful until they are uncompressed.
q Create the SAS online Help Indicesbuilds index files for the SAS online help system based on the products you loaded.
q Configure User Authorizationauthenticate a client’s identity and its authority to access resources.
q Update Default Language Settingmodify the default language of your SAS System installation.
Product Specific Configuration
Some products or components require special configuration to function properly. This menuallows you to select which product specific configuration you want to perform.
q SAS/ACCESS Configurationconfigures and tests access to external databases using SAS/ACCESS products.
q Desktop Configurationcreates data sets required by the SAS Desktop and other products.
q Specify SAS OnlineDoc Locationupdates the config file with the location of the SAS OnlineDoc.

Installation Instructions and System Administrator’s Guide for the SAS System under UNIX Environments 17
q Update SAS/IntrNet Services Configuration Programupdates the SAS/IntrNet configuration scripts for use on your local SAS Systeminstallation.
q Specify SAS/GIS Census Tract Maps Locationupdates the config file with location of SAS/GIS Census Tract maps installed or mounted onyour system.


19
Chapter 3, Post-Installation Instructions
Now that you have loaded your SAS software, you need to complete the appropriateconfiguration steps for your installation, listed below, to make the system available for use.
The following items are discussed in this chapter:q Making the SAS System Availableq Invoking SAS Softwareq Modifying Your Configuration Fileq Adjusting Memory Settingsq Accessing a Web Browserq Installing Man Pagesq Configuring User Authorizationq Using SAS/GRAPH Software Map Datasetsq Applying SETINIT to Authorize the SAS Systemq Running the SAS System With the X Window System
The XkeysymDB Fileq Maintaining Your Installationq The Directory Structure of the SAS System
Making the SAS System Available
Once you have loaded the SAS System, you need to make it available to your users. You can useeither of the following two methods to accomplish this:
q Make a symbolic link from the SAS command (sas) to a directory that is already in yourusers’ default search path by issuing a command similar to the following:
ln -s /usr/local/sas8/sas /usr/bin/sas
where /usr/local/sas8 is your SASROOT location.
Note: We recommend using this method because it is flexible and easy to maintain.
q Edit each user’s shell startup scripts so that the SASROOT directory is included in the searchpath.
Note: Commands used to set your $PATH environment variable may be different fromthese examples, based on how you have defined your $PATH environment.
For example, for Bourne Shell users change the following line in $HOME/.profile:
PATH=/bin:/usr/bin:/usr/local/bin:.
to read:
20 Installation Instructions and System Administrator’s Guide for the SAS System under UNIX Environments
PATH=/bin:/usr/bin:/usr/local/bin:/usr/local/sas8:.
where /usr/local/sas8 is your SASROOT location.
Invoking SAS Software
When you have completed making the SAS System available for use, you can invoke it from theUNIX command line as follows:
sas <options>
where <options> are valid SAS command line options.
Depending on your site, you may have more than one invocation point available in which to runthe SAS System. This can occur if you install NLS localizations or asynchronous addon products(products that load entirely into a separate subdirectory for various reasons). You must make anyalternative invocation points available to your users in similar fashion to the examples listed inthe previous section.
The invocation point for a localized version of the SAS System is
!SASROOT/nls/<language>/sas
where <language> is the two-character code for the language or localization you want to run.For example, the invocation point for the Primary Japanese Encoding version of the SAS Systemis:
!SASROOT/nls/ja/sas
Similarly, the invocation point for an asynchronous addon product is
!SASROOT/sas_addon/sas
Restoring Your Configuration File
A default configuration file, !SASROOT/sasv8.cfg., is created during the installation of theSAS System. To modify this config file to fit your needs, refer to SAS Companion for UNIXEnvironments for information on how to customize the SAS configuration file.
If you modify your config file and then want to restore the default version, follow these steps:
1. Run !SASROOT/sassetup. Make sure you have the appropriate privilege to update a file inSASROOT.
2. Select Run Setup Utilities from the SAS Setup Primary menu.
3. Select Perform SAS System Configuration.
4. Select Create New Config Files.

Installation Instructions and System Administrator’s Guide for the SAS System under UNIX Environments 21
Adjusting Memory Settings
The MEMSIZE option is set in the sasv8.cfg file. It controls the maximum amount of virtualaddress space an individual SAS System session will use. Each session uses only as much virtualaddress space as it needs and never uses more than the MEMSIZE option dictates. Manyprocedures will have improved performance if the MEMSIZE is raised. However, the MEMSIZEoption should never be set to a value so high that the amount of physical RAM on the serverwould be exceeded if every SAS session used the maximum allowed.
You may also specify the SORTSIZE option to limit the amount of memory available to the SORTprocedure.
The default settings for MEMSIZE and SORTSIZE are listed below:
q 32-bit systems (ABI+ for Intel Architecture, AIX, HP-UX, IRIX, Linux, and Solaris)• MEMSIZE = 64M• SORTSIZE = 48M
q 64-bit systems (AIX, Compaq Tru64 UNIX, HP-UX, and Solaris)• MEMSIZE = 96M• SORTSIZE = 80M
For more information on the MEMSIZE and SORTSIZE options, refer to the SAS Companion forUNIX Environments.
Accessing a Web Browser
Netscape Communicator is required with this release of the SAS System for UNIX Environments.The Netscape path should either be in each user’s $PATH setting, or set in the X Windowsresource/application default SAS.helpBrowser (for example,SAS.helpBrowser:/usr/local/netscape-4.06/netscape).
You may receive authorization failures using Netscape to view ODS output. These errors arecorrected by completing the steps in the section “Configuring User Authorization” below.
Installing Man Pages
This release includes manual pages (referred to as “man pages”) that should be installed. Refer toyour system documentation on how to install new man pages. The SAS man pages are in thedirectory !SASROOT/utilities/man.
Configuring User Authorization
In order to authenticate a client’s identity and check the client’s authority to access resources,some setup is required by the root account. This setup changes the setuid permissions of files in!SASROOT/utilities/bin to root. If you installed the SAS System from the root account,SAS Setup performed this task automatically. Otherwise, you can perform this task using either ofthe following methods:
22 Installation Instructions and System Administrator’s Guide for the SAS System under UNIX Environments
q Using SAS Setup, follow these steps:
1. Run !SASROOT/sassetup from the root account.
2. Select Run Setup Utilities from the SAS Setup Primary Menu.
3. Select Perform SAS System Configuration.
4. Select Configure User Authorization
or,
q Manually, execute the following commands at the system command line:
su rootcd !SASROOT/utilities/bin
chown root sasauth sasperm sastcpd objspawnchmod 4755 sasauth sasperm sastcpd objspawn
exit
Note: The file objspawn is installed along with the SAS/Integration Technologies productand therefore may not be present on your system.
For ABI+ for Intel® Architecture
For ABI+ for Intel® Architecture compliant systems, sasauth is used to determinewhich system you are running on and the ownership and permissions should not bemodified. Instead, you must modify the sasauth executable for each of the supportedsystems, as follows:
su rootcd !SASROOT/utilities/bin
chown root sasauth.* sasperm sastcpd objspawnchmod 4755 sasauth.* sasperm sastcpd objspawn
exit
Using SAS/GRAPH Software Map Data Sets
The maps provided on the distribution media have been compressed to reduce the amount ofdisk space required to install them. SAS/Graph map data sets are loaded in !SASROOT/maps,and compressed map data sets have a .Z extension. If you want to use the maps, they must beuncompressed. You can uncompress them during the install process, or at a later time byfollowing the steps below:

Installation Instructions and System Administrator’s Guide for the SAS System under UNIX Environments 23
1. Run !SASROOT/sassetup. Make sure you have the appropriate privilege to update files in!SASROOT.
2. Select Run Setup Utilities from the SAS Setup Primary Menu.
3. Select Perform SAS System Configuration.
4. Select Uncompress Maps Data Sets.
Applying SETINIT to Authorize the SAS System
The SAS System requires the application of SETINIT information before your licensed softwarewill run. This authorization process takes place whenever you contract to renew your existingSAS System or add additional products to your site license.
Your SETINIT information should be applied when you receive new SETINIT data from yourSAS Contracts Administrator.
Note: You should not change the SETINIT information unless you are the SAS Systemadministrator.
For AIX, HP-UX and Solaris
Beginning in Release 8.2, the SAS System is offered in both 32 and 64 bit enabledimplementations for AIX, HP-UX and Solaris. If your site has both implementationsinstalled, it is important that you apply the correct SETINIT to each installation.
If you are not sure if your system matches your SETINIT, you can compare theOSNAME field in your SETINIT text with the value returned when you run thefollowing SAS statements:
%put &sysscp;
If the values match, then it is safe to apply the SETINIT to that installation.
Complete the following steps to apply your SETINIT. Note that !SASROOT refers to the directorypath of your SAS System installation.
1. Create or modify a SETINIT file. Be sure the SETINIT file exactly matches the updatedinformation you received from your SAS Contracts Administrator.
Note: Your original SETINIT file is !SASROOT/setinit.sas. You can use this file as atemplate.
2. Run !SASROOT/sassetup. Make sure you have appropriate privilege to update files locatedin the SASROOT directory.

24 Installation Instructions and System Administrator’s Guide for the SAS System under UNIX Environments
3. Select Run Setup Utilities from the SAS Setup Primary Menu.
4. Select Perform SAS System Configuration.
5. Select Apply SETINIT to Authorize the SAS System. Specify the location of theSETINIT file you have created or modified when prompted.
6. If errors occur, a message will be displayed indicating the log files to be checked. If theSETINIT applies successfully, you can enter Q to quit sassetup and run SAS normally.
We recommend using the previous method of applying your SETINIT information. However, ifyou wish to apply your SETINIT manually, you can follow these steps:
1. Copy your original file, setinit.sas, and rename it, for example, setinit.old. Then edityour setinit.sas file and add any new or modified information.
2. Apply the SETINIT file by issuing the command from the !SASROOT directory:
./sas -setinit ./setinit.sas
3. A log file, setinit.log, will be created in the !SASROOT directory. Check the log file forthe following note:
NOTE: Siteinfo data have been updated.
If there are no errors in the log, you can disregard any other notes or warnings in thesetinit.log file. If you do find error messages, check the setinit.sas file for extraneouscharacters (such as misspellings, carriage returns or line feeds) that might have been introducedwhen you edited the file. Make any corrections that are needed, save the file, and then execute thecommand in Step 2 above.
If you have questions about your SETINIT data, please call our Customer Service Department at(919) 677-8003 between 9:00 a.m. and 8:00 p.m. Eastern Time.
If you encounter problems applying your SETINIT, and you are a U.S. or Canadian customer,please call our Technical Support Division at (919) 677-8008 between 9:00 a.m. and 8:00 p.m.Eastern Time. Ask the Technical Receptionist for a UNIX consultant. Please have your sitenumber ready when you call.
If you are a non-U.S./Canadian customer with a problem applying your SETINIT, please contactyour SAS Representative for the SAS office nearest you.
Running the SAS System with the X Window System
The SAS System includes a user interface based on the X Window system. On most systems, theSAS System functions correctly and completely without altering the files that manage theinterface. However, if you want to customize the interface, follow the instructions included in thissection.

Installation Instructions and System Administrator’s Guide for the SAS System under UNIX Environments 25
The OSF/Motif Interface to the SAS System makes an attempt to recognize the type of X server onwhich the interface is displayed so that the proper key definitions can be established. The vendorstring supplied with the server can recognize many X servers. You can examine this string withthe xdpyinfo program which should be in the X Windows bin directory on your system.
Many of the files in !SASROOT/X11/resource_files contain the definitions used for thevarious X servers. You do not need to do anything with these files. However, users who want tocustomize the keys for an X server may find these files useful as a starting point.
The file !SASROOT/X11/resource_files/Resource_Defaults documents the defaultvalues given to the SAS application resources that do not vary for different servers. Again, thisfile does not need to be installed, but is provided as a reference for those wanting to do their owncustomization of these interfaces.
For more information on the OSF/Motif Interface, refer to Chapter 3, “Customizing the SASWindowing Environment,” in SAS Companion for UNIX Environments, Version 8, First Edition.
The XKeysymDB File
Some sites may need to update the XKeysymDB file when they install the SAS System. Thissection explains what this file is, who needs to update it, and how to update it.
The XKeysymDB file is a database of X keysym names, and is used by the OSF/Motif Interface tothe SAS System, and many other X clients. Your site will already have a version of this file.However, it may not contain all of the vendor-defined keysym names that are used with theOSF/Motif Interface to the SAS System. The SAS version of the XKeysymDB file includes thekeysyms defined by the various X server vendors, as well as the virtual keysyms used byOSF/Motif.
You only need to install the SAS-supplied XKeysymDB file if you see warnings containing thephrase unknown keysym when you execute this release of the SAS System.
Using the XKeysymDB File
You can use the SAS System XKeysymDB file in either of the following ways:
q Method 1
replaces the existing XKeysymDB file. (You must have root permission to perform this task.)When you enter the following commands, replace the variables !SASROOT and $LIBDIRwith the directory names used on your system.
The !SASROOT variable indicates the directory where the SAS System is installed. The$LIBDIR variable indicates the directory containing the XKeysymDB file. For most systems,the $LIBDIR directory should be /usr/lib/X11.

26 Installation Instructions and System Administrator’s Guide for the SAS System under UNIX Environments
For Solaris
The $LIBDIR directory should be /usr/openwin/lib.
Once you have determined the values for these variables, enter the following commands:
cd $LIBDIRmv XKeysymDB XKeysymDB.oldcp !SASROOT/X11/resource_files/XKeysymDB .
If the new XKeysymDB file was installed correctly, you should no longer see any messagesabout unknown keysyms when you run the SAS System.
q Method 2
defines the XKEYSYMDB environment variable to point to this version of the file. X clients,including the SAS System, can then use this one instead of the system version.
For example, if you installed the SAS System in /usr/local/sas8, you can define theXKEYSYMDB environment variable as follows:
• For Bourne or Korn shells:
XKEYSYMDB=/usr/local/sas8/X11/resource_files/XKeysymDBexport XKEYSYMDB
• For C Shell:
setenv XKEYSYMDB /usr/local/sas8/X11/resource_files/XKeysymDB
Maintaining Your Installation
SAS Setup is automatically loaded along with your SAS System installation. You should use SASSetup to maintain your installation by choosing the Run Setup Utilities option from theSAS Setup Primary menu. Each of the utility options available are briefly discussed in Chapter 2of this document.
Once the SAS System is installed at your site, you should not directly modify any files in theSASROOT directory. Any user modifications to files in SASROOT should be maintained in alocation other than SASROOT or the !SASROOT/sascfg directory. When you update yourinstallation at a later date, it is your responsibility to take any previously made user modificationsand reintegrate them into the system.
Installation Instructions and System Administrator’s Guide for the SAS System under UNIX Environments 27
The Directory Structure of the SAS System
The following subdirectories are created when the SAS System is installed. This information isprovided for reference only. No post-processing is needed in this section.
The SAS System is installed in a root directory referred to as SASROOT. Within the SASROOTdirectory is the invocation point, configuration file, SETINIT file, a copy of SAS Setup and all therelated subdirectories, described below:
doccontains the Alert Notes, System Requirements, and Installation Instructions in variousformats. See the README file for information on how to browse and print these files.
installcontains all of the scripts and data files for SAS Setup.
.installcontains configuration information about your current SAS System installation, includinginstall logs, history files, and TOC entries. Do not remove or modify the contents of thisdirectory, as doing so will result in incorrect behavior of SAS Setup.
sascfgcontains site-specific SAS System configuration information.
sasexecontains the executable SAS software files for all of your installed products.
sashelpcontains data sets, data views, catalogs, etc.
sasmsgcontains the SAS message files.
saspgmcontains miscellaneous files for several products.
sasautoscontains the SAS macro files.
X11contains bitmaps, X resource files, and SAS help files.
mapscontains the SAS/GRAPH software map data sets.
gismapscontains the SAS/GIS census tract maps.
28 Installation Instructions and System Administrator’s Guide for the SAS System under UNIX Environments
misccontains miscellaneous files such as product-specific on-line documentation, scripts foruse with SAS/CONNECT, SAS/GRAPH drivers, applets, and other miscellaneous items.
samplescontains the Sample Library programs.
sastestcontains the installation test programs.
utilitiescontains utility files in these subdirectories:q bin
contains useful tools such as the patchname and cleanwork commands.q man
contains the SAS man pages that you can make available on your system.
In addition to the standard SASROOT tree, you may have similar tree structures within SASROOTif you install any NLS language localizations or asynchronous addon products. In these situations,there will be a configuration file within the subtree that sets the proper path information to lookthrough to the main SASROOT tree.

29
Appendix A, Post-Installation Validation forSAS/ACCESS
® Interface Software
For each SAS/ACCESS interface that you want to use at your site, you can execute a validationprocess specific to your Data Base Management System (DBMS), which validates SAS/ACCESSimages against your DBMS. Please read this appendix before executing the validation procedure,so you can provide the correct information for validation.
You can either run the validation during installation of your SAS/ACCESS interface software oras a post-installation step at a later time. Refer to the System Requirements document provided inyour installation package to determine if the combination of your operating system and theversion of your DBMS is supported by the SAS/ACCESS interface you are validating.
Whether you run the validation during installation or as a post-installation step, you must set theappropriate environment variables prior to validating the software. Before beginning thevalidation process, you should know the following information about your DBMS:
• The version of the DBMS client libraries installed on your system, required due toincompatibilities between DBMS versions.
• The DBMS root directory of your client install, required so the validation procedure can findthe DBMS shared libraries to test the SAS/ACCESS interface.
You are automatically prompted for this information if you choose to complete validation duringinstallation. But, if you choose to run validation as a post-installation step, follow theseinstructions.
1. Run SAS Setup located in the SASROOT directory. Make sure you have appropriate privilegeto write to files in this directory:
!SASROOT/sassetup
2. Select Run Setup Utilities from the Primary menu.
3. Select Perform Product Specific Configuration from the Utilities menu.
4. Select SAS/ACCESS Configuration from the Product Specific Configuration menu.
5. Choose the SAS/ACCESS Interface you wish to validate.
6. Provide any information requested by prompts. You will be notified about the success orfailure of the validation.
Refer to the following sections appropriate for your DBMS for detailed instructions on validatingyour SAS/ACCESS interface software.
30 Installation Instructions and System Administrator’s Guide for the SAS System under UNIX Environments
Validating the SAS/ACCESS Interface to DB2®
Refer to the System Requirements document provided in your installation package to find the exactreleases supported by SAS/ACCESS software for UNIX environments.
The SAS/ACCESS Interface to DB2 executable uses shared libraries. You must add the location ofthe DB2 shared libraries to one of the system environment variables below, and if necessaryindicate the DB2 version that you have installed at your site.
Note: The validation process allocates the shared libraries for you based on the DBMSinformation you provide for your client install. The environment variables below must beset before you can use the SAS/ACCESS interface. You must also set the INSTHOMEenvironment variable to your DB2 DBMS home directory before setting the environmentvariables as shown in the example code below.
For AIX
Set LIBPATH to point your DBMS shared library as shown in the following examples:
q For Bourne Shell
LIBPATH=$INSTHOME/lib:$LIBPATHExport LIBPATH
q For C Shell
setenv LIBPATH $INSTHOME/lib:$LIBPATH
For HP-UX
Set SHLIB_PATH to point to your DBMS shared library as shown in the followingexamples:
q For Bourne Shell
SHLIB_PATH=$INSTHOME/lib:$SHLIB_PATHexport SHLIB_PATH
q For C Shell
setenv SHLIB_PATH $INSTHOME/lib:$SHLIB_PATH

Installation Instructions and System Administrator’s Guide for the SAS System under UNIX Environments 31
For Linux and Solaris
Set LD_LIBRARY_PATH to point to your DBMS shared library as shown in the followingexamples:
q For Bourne Shell
LD_LIBRARY_PATH=$INSTHOME/lib:$LD_LIBRARY_PATHexport LD_LIBRARY_PATH
q For C Shell
setenv LD_LIBRARY_PATH $INSTHOME/lib:$LD_LIBRARY_PATH
Validating the SAS/ACCESS Interface to INFORMIX®
Refer to the Systems Requirements document provided in your installation package to find theexact releases of INFORMIX supported by SAS/ACCESS software for UNIX environments.
The SAS/ACCESS Interface to INFORMIX executable uses shared libraries. You must add thelocation of the INFORMIX shared libraries to one of the system environment variables below and,if necessary, indicate the INFORMIX version you have at your site.
Note: The validation process allocates the shared libraries for you based on the DBMSinformation you provide for your client install. The environment variables below must beset before you can use the SAS/ACCESS interface. You must also set the INFORMIXDIRenvironment variable to your INFORMIX DBMS home directory before setting theenvironment variables as shown in the example code below.
For AIX
Set LIBPATH to point your DBMS shared library as shown in the following examples:
q For Bourne Shell
LIBPATH=$INFORMIXDIR/lib:$INFORMIXDIR/lib/esql:$LIBPATHexport LIBPATH
q For C Shell:
setenv LIBPATH $INFORMIXDIR/lib:$INFORMIXDIR/lib/esql:$LIBPATH
32 Installation Instructions and System Administrator’s Guide for the SAS System under UNIX Environments
For HP-UX
Set SHLIB_PATH to point to your DBMS shared library as shown in the followingexamples:
q For Bourne Shell
SHLIB_PATH=$INFORMIXDIR/lib:$INFORMIXDIR/lib/esql:$SHLIB_PATHexport SHLIB_PATH
q For C Shell
setenv SHLIB_PATH$INFORMIXDIR/lib:$INFORMIXDIR/lib/esql:$SHLIB_PATH
For Compaq Tru64 UNIX and Solaris
Set LD_LIBRARY_PATH to point to your DBMS shared library as shown in the followingexamples:
q For Bourne Shell
LD_LIBRARY_PATH=$INFORMIXDIR/lib:$INFORMIXDIR/lib/esql: $LD_LIBRARY_PATH
export LD_LIBRARY_PATH
q For C Shell
setenv LD_LIBRARY_PATH $INFORMIXDIR/lib:$INFORMIXDIR/lib/esql:$LD_LIBRARY_PATH
Validating the SAS/ACCESS Interface to CA-OpenIngres Software
To successfully validate the SAS/ACCESS Interface to CA-OpenIngres Software, you must haveaccess to CA-OpenIngres Software either through a server or client installation. Refer to theSystem Requirements document provided in your installation package to find the exact releasessupported by SAS/ACCESS under the different operating systems.
The SAS/ACCESS Interface to CA-OpenIngres Software executable uses shared libraries. Youmust add the location of the CA-OpenIngres Software shared libraries to one of the systemenvironment variables below, and if necessary indicate the CA-OpenIngres Software version thatyou have installed at your site.

Installation Instructions and System Administrator’s Guide for the SAS System under UNIX Environments 33
Note: The validation process allocates the shared libraries for you based on the DBMSinformation you provide for your client install. The environment variables below must beset before you can use the SAS/ACCESS interface. You must also set the II_SYSTEMenvironment variable to your CA-OpenIngres Software DBMS home directory beforesetting the environment variables as shown in the example code below.
For AIX
Set LIBPATH to point to your DBMS shared library as shown in the following examples:
q For Bourne Shell
LIBPATH=$II_SYSTEM/lib:$LIBPATHexport LIBPATH
q For C Shell
setenv LIBPATH $II_SYSTEM/lib:$LIBPATH
For Compaq Tru64 UNIX, ABI+ for Intel® Architecture, and Solaris
Set LD_LIBRARY_PATH to point to your DBMS shared library as shown in the followingexamples:
q For Bourne Shell
LD_LIBRARY_PATH=$II_SYSTEM/ingres/lib:$LD_LIBRARY_PATH exportLD_LIBRARY_PATH
q For C Shell
setenv LD_LIBRARY_PATH $II_SYSTEM/lib:$LD_LIBRARY_PATH
For HP-UX
Set SHLIB_PATH to point to your DBMS shared library as shown in the followingexamples:
q For Bourne Shell
SHLIB_PATH=$II_SYSTEM/lib:$SHLIB_PATHexport SHLIB_PATH

34 Installation Instructions and System Administrator’s Guide for the SAS System under UNIX Environments
q For C Shell
setenv SHLIB_PATH $II_SYSTEM/lib:$SHLIB_PATH
Validating the SAS/ACCESS Interface to Microsoft SQL Server
Before you can use the SAS/ACCESS Interface to Microsoft SQL Server, the following productsare required:
q Base SAS softwareq SAS/ACCESS Interface to Microsoft SQL Serverq Microsoft SQL Server Version 7.0
The SAS/ACCESS product contains the Merant Microsoft SQL Server ODBC driver componentthat is unloaded when you installed the SAS/ACCESS Interface to Microsoft SQL Server Product.The setup/configuration procedures are described below:
ODBCHOME – defines the location where you unloaded the Merant Microsoft SQL Server driversduring the SAS System installation.
You will have to edit the .odbc.ini file with a text editor to configure data sources. A sample ofan .odbc.ini file, it will need to be made available to the SAS/ACCESS Interface to MicrosoftSQL Server.
The Merant Microsoft SQL Server ODBC drivers are ODBC API-compliant shared libraries,referred to in UNIX as shared objects. You must include the full path to the shared libraries in theshared library path as shown below so that the ODBC drivers can be loaded dynamically at runtime. Also note that you may have to include your DBMS shared library path as described in theDBMS-specific section. You must also set the ODBCHOME environment variable to your ODBChome directory before setting the environment variables as shown in the example code below.
Note: The ODBC home directory is the path you specified when you installed theSAS/ACCESS to Microsoft SQL Server Product.
For AIX
Set LIBPATH to point to your DBMS shared library as shown in the following examples:
q For Bourne Shell:
LIBPATH=$ODBCHOME/lib:$LIBPATHexport LIBPATH
q For C Shell
setenv LIBPATH $ODBCHOME/lib:$LIBPATH

Installation Instructions and System Administrator’s Guide for the SAS System under UNIX Environments 35
For Solaris
Set LD_LIBRARY_PATH to point to your DBMS shared library as shown in the followingexamples:
q For Bourne Shell
LD_LIBRARY_PATH=$ODBCHOME/lib:$LD_LIBRARY_PATHexport LD_LIBRARY_PATH
q For C Shell
setenv LD_LIBRARY_PATH $ODBCHOME/lib:$LD_LIBRARY_PATH
For HP-UX
Set SHLIB_PATH to point to your DBMS shared library as shown in the followingexamples:
q For Bourne Shell
SHLIB_PATH=$ODBCHOME/lib:$SHLIB_PATHexport SHLIB_PATH
q For C Shell
setenv SHLIB_PATH $ODBCHOME/lib:$SHLIB_PATH
Validating the SAS/ACCESS Interface to ODBC
Before you can use the SAS/ACCESS Interface to ODBC, the following products are required:
q Base SAS softwareq SAS/ACCESS Interface to ODBCq ODBC Driver for your databaseq DBMS client software may be required to connect to your database.
These drivers are often available from the DBMS vendor and other third party ODBC driverdevelopers. The driver you choose may require additional DBMS software in order to access thedata.

36 Installation Instructions and System Administrator’s Guide for the SAS System under UNIX Environments
Release 8.2 of the SAS System on HPUX supports both Cfront and ACC-compiled ODBC drivers.The driver type would have been selected when you installed the SAS System.
You may have to edit the .odbc.ini file in your home directory with a text editor to configuredata sources. Some ODBC driver vendors may allow system administrators to maintain acentralized copy by setting the environment variable. Please refer to your ODBC driver’s vendordocumentation to find more specific information.
The ODBC drivers are ODBC API-compliant shared libraries, referred to in UNIX as sharedobjects. You must include the full path to the shared libraries in the shared library path as shownbelow so that ODBC drivers can be loaded dynamically at run time. Also note that you may haveto include your DBMS shared library path as described in the DBMS-specific section. You mustalso set the ODBCHOME environment variable to your ODBC home directory before setting theenvironment variables as shown in the example code below.
Note: SAS/ACCESS Interface to ODBC software has been tested using the MERANTDataDirect Connect ODBC driver and the DataDirect SequeLink ODBC driver.
For AIX
Set LIBPATH to point to your DBMS shared library as shown in the following examples:
q For Bourne Shell:
LIBPATH=$ODBCHOME/lib:$LIBPATHexport LIBPATH
q For C Shell
setenv LIBPATH $ODBCHOME/lib:$LIBPATH
For Compaq Tru64 UNIX, Linux and Solaris
Set LD_LIBRARY_PATH to point to your DBMS shared library as shown in the followingexamples:
q For Bourne Shell
LD_LIBRARY_PATH=$ODBCHOME/lib:$LD_LIBRARY_PATHexport LD_LIBRARY_PATH
q For C Shell
setenv LD_LIBRARY_PATH $ODBCHOME/lib:$LD_LIBRARY_PATH
Installation Instructions and System Administrator’s Guide for the SAS System under UNIX Environments 37
For HP-UX
Set SHLIB_PATH to point to your DBMS shared library as shown in the followingexamples:
q For Bourne Shell
SHLIB_PATH=$ODBCHOME/lib:$SHLIB_PATHexport SHLIB_PATH
q For C Shell
setenv SHLIB_PATH $ODBCHOME/lib:$SHLIB_PATH
Validating the SAS/ACCESS Interface to ORACLE®
Refer to the System Requirements document provided in your installation package to find the exactreleases supported by SAS/ACCESS software under the different operating systems.
The SAS/ACCESS Interface to ORACLE executable uses shared libraries. You must add thelocation of the ORACLE shared libraries to one of the system environment variables below, and ifnecessary indicate the ORACLE version that you have installed at your site.
Note: The validation process allocates the shared libraries for you based on the DBMSinformation you provide for your client install. The environment variables below must beset before you can use the SAS/ACCESS interface. You must also set theORACLE_HOME environment variable to your ORACLE DBMS home directory beforesetting the environment variables as shown in the example code below.
For AIX
Set LIBPATH to point your DBMS shared library as shown in the following examples:
q For Bourne Shell
LIBPATH=$ORACLE_HOME/lib:$LIBPATHexport LIBPATH
q For C Shell
setenv LIBPATH $ORACLE_HOME/lib:$LIBPATH

38 Installation Instructions and System Administrator’s Guide for the SAS System under UNIX Environments
For ABI+ for Intel® Architecture, Compaq Tru64 UNIX, IRIX, and Linux
Set LD_LIBRARY_PATH to point to your DBMS shared library as shown in the followingexamples:
q For Bourne Shell
LD_LIBRARY_PATH=/usr/ucblib:$ORACLE_HOME/lib:$LD_LIBRARY_PATHexport LD_LIBRARY_PATH
q For C Shell
setenv LD_LIBRARY_PATH=/usr/ucblib:$ORACLE_HOME/lib:$LD_LIBRARY_PATH
For HP-UX
Set SHLIB_PATH to point to your DBMS shared library as shown in the followingexamples:
q For Bourne Shell
SHLIB_PATH=$ORACLE_HOME/lib:$SHLIB_PATHexport SHLIB_PATH
q For C Shell
setenv SHLIB_PATH $ORACLE_HOME/lib:$SHLIB_PATH
For Solaris
Set LD_LIBRARY_PATH to point to your DBMS shared library as shown in the followingexamples:
q For Bourne Shell
LD_LIBRARY_PATH=$ORACLE_HOME/lib:/usr/ucblib:$LD_LIBRARY_PATHexport LD_LIBRARY_PATH
q For C Shell
setenv LD_LIBRARY_PATH=$ORACLE_HOME/lib:usr/ucblib:$LD_LIBRARY_PATH

Installation Instructions and System Administrator’s Guide for the SAS System under UNIX Environments 39
Post-Installation Steps / Validating the SAS/ACCESS Interface toPeopleSoft®
Refer to the System Requirements document provided in your installation package to find the exactreleases supported by SAS/ACCESS software for UNIX environments, as well as theSAS/ACCESS products required for access to the underlying PeopleSoft database.
The SAS/ACCESS Interface to PeopleSoft requires that a libname statement be executed prior torunning the application. This libname statement produces a libref to the database where thePeopleSoft data resides.
Here is an example of the libname statement:
libname psdb oracle user=userid pass=pass path=’dbpath’;
Validating the SAS/ACCESS Interface to SYBASE®
Refer to the System Requirements document provided in your installation package to find the exactreleases supported by SAS/ACCESS software under the different operating systems.
The SAS/ACCESS Interface to SYBASE executable uses shared libraries. You must add thelocation of the SYBASE shared libraries to one of the system environment variables below, and ifnecessary indicate the SYBASE version that you have installed at your site.
Note: The validation process allocates the shared libraries for you based on the DBMSinformation you provide for your client install. The environment variables below must beset before you can use the SAS/ACCESS interface. You must also set the SYBASEenvironment variable to your SYBASE DBMS home directory before setting theenvironment variables shown in the example code below.
For AIX
Set LIBPATH to point to your DBMS shared library of your client install as shown in thefollowing example:
q For Bourne Shell
LIBPATH=$SYBASE/lib:/lib:$LIBPATHexport LIBPATH
q For C Shell
setenv LIBPATH $SYBASE/lib:/lib:$LIBPATH

40 Installation Instructions and System Administrator’s Guide for the SAS System under UNIX Environments
For Compaq Tru64 UNIX, IRIX, Linux, and Solaris
Set LD_LIBRARY_PATH to point to your DBMS shared library as shown in the followingexamples:
q For Bourne Shell
LD_LIBRARY_PATH=$SYBASE/lib:/lib:$LD_LIBRARY_PATHexport LD_LIBRARY_PATH
q For C Shell
setenv LD_LIBRARY_PATH $SYBASE/lib:/lib:$LD_LIBRARY_PATH
For HP-UX
Set SHLIB_PATH to point to your DBMS shared library as shown in the followingexamples:
q For Bourne Shell
SHLIB_PATH=$SYBASE/lib:/lib:$SHLIB_PATHexport SHLIB_PATH
q For C Shell
setenv SHLIB_PATH $SYBASE/lib:/lib:$SHLIB_PATH
Validating the SAS/ACCESS Interface to TERADATA®
SAS ACCESS to Teradata runs under Solaris (SPARC hardware architecture only) and underUNIX MP-RAS. On Solaris, SAS invocation must include the setjmp option, as in
sas -setjmp.
Refer to the System Requirements document provided in your installation package to find the exactreleases supported by SAS/ACCESS software under the different operating systems.
Standard Installation
The SAS/ACCESS interface to TERADATA uses Teradata-supplied CLIv2 shared libraries andmessage files. In particular, SAS/ACCESS uses libcliv2.so, libtdusr.so, anderrmsg.txt, which typically reside in usr/lib.

Installation Instructions and System Administrator’s Guide for the SAS System under UNIX Environments 41
If Teradata client software is not installed, then libcliv.so, libtdusr.so and errmsg.txtwill not exist on your system and SAS/ACCESS to Teradata will not function.
Non-standard Installation
If libcliv2.so, libtdusr.so and errmsg.txt do not reside in /usr/lib (the Teradataclient software installation was non-standard), then the environment variablesLD_LIBRARY_PATH and COPERR must be set.
If, for example, libcliv2.so and libtdusr.so reside in Teradata/lib, and errmsg.txt,resides in TERADATA2/txt, you would set LD_LIBRARY_PATH and COPERR as follows:
q For Bourne Shell
LD_LIBRARY_PATH=TERADATA1/lib:$LD_LIBRARY_PATHexport LD_LIBRARY_PATH
COPERR=TERADATA2/txt
export COPERR
q For C Shell
setenv LD_LIBRARY_PATH $TERADATA1/lib:$LD_LIBRARY_PATH
setenv COPERR $TERADATA2/txt
Sample SAS/ACCESS Installation Output
$ ./sassetup
SAS System Installation Setup
Welcome to SAS Setup, a menu driven application used to installand maintain the SAS System. SAS Setup is fully documented inthe installation instructions included in your installationpackage. Online copies of the enclosures can be found in the docdirectory on the installation media, or in !SASROOT/doc once thesystem is installed.
Some conventions for SAS Setup are: * indicates the default selection [ ] indicates the default choice ( ) indicates an item is not selectable H, H#, #H displays help for an item or menu G goback to previous menu or prompt Q quits SAS Setup
Press <Return> to continue...
SAS Setup Primary Menu * 1. Load Software from Media 2. Run Setup Utilities

42 Installation Instructions and System Administrator’s Guide for the SAS System under UNIX Environments
3. Quit SAS SetupAction ? [1] 2
Run Setup Utilities * 1. Perform SAS System Configuration 2. Perform Product Specific Configuration 3. List Previously Installed Products
1. Go BackAction ? [1] 2
Product Specific Configuration * 1. SAS/ACCESS Configuration 2. Desktop Configuration 3. Specify SAS OnlineDoc Location 4. Update SAS/IntrNet Services Configuration Program 5. Specify SAS/GIS Census Tract Maps Location 6. GoBackAction ? [1] 1
SAS/ACCESS Verification Tests
Some SAS/ACCESS products require post-processing or validation programs to run prior to use.You will be asked to select which products to validate in the following selection screen. Werecommend that you run the validation programs for all the SAS/ACCESS products you haveinstalled.
Num Item Num Item----------------------------------------------------------------------------- 1. SAS/ACCESS Interface to INGRES 2. SAS/ACCESS Interface to DB2 3. SAS/ACCESS Interface to INFORMIX 4. SAS/ACCESS Interface to ORACLE 5. SAS/ACCESS Interface to SYBASE
Page 1 of 1------------------------------------------------------------------------------’.’ = unselected ’*’ = selected ’|’ = previously installed------------------------------------------------------------------------------ #: select item -#: deselect item n: next page g: goback#-#: select range -#-#: deselect range p: prev page q: quit *: select all -*: deselect all <return>: done h: help4
Num Item Num Item------------------------------------------------------------------------------ 1. SAS/ACCESS Interface to INGRES 2. SAS/ACCESS Interface to DB2 3. SAS/ACCESS Interface to INFORMIX 4* SAS/ACCESS Interface to ORACLE 5. SAS/ACCESS Interface to SYBASE
Page 1 of 1------------------------------------------------------------------------------’.’ = unselected ’*’ = selected ’|’ = previously installed------------------------------------------------------------------------------ #: select item -#: deselect item n: next page g: goback#-#: select range -#-#: deselect range p: prev page q: quit *: select all -*: deselect all <return>: done h: help

Installation Instructions and System Administrator’s Guide for the SAS System under UNIX Environments 43
SAS/ACCESS Interface to ORACLE Configuration
Enter the full path for the location of databases installed on your system.This is necessary for the SAS/ACCESS validation programs to find thedatabases to access.
Enter the ORACLE root/home directory? []/usr/local/dbi/oracle/7.3.3.0.0
Enter the version of the database installed on your system. If the versionof your database doesn’t exactly match those listed, choose the highestnumber listed that is not greater than the version of your database.
Enter the version of your database: * 1. 7.3.x 2. 8.0.4.xAction ? [1]
Running validation tests for SAS/ACCESS Interface to ORACLE...
The database SAS/ACCESS Interface to ORACLE successfully completed itsvalidation test.


45
Appendix B, Post-Installation Setup for SAS/ACCESS®
Interface to R/3® Software
SAS/ACCESS Interface to R/3 software requires extensive installation setup before the productcan be used. You can view or download the detailed setup instructions from the SAS Web site:
http://www.sas.com/software/enclosures/installation.html
Select the SAS/ACCESS link under the Products heading.
From this page, you can locate information regarding configurations, system & machinerequirements, and upgrades.
For Linux
Note: Linux is not a supported platform for SAS/ACCESS Interface to R/3 software.


47
Appendix C, Post-Installation Setup for SAS/ASSIST®
Software
This appendix describes how to add an optional master profile to SAS/ASSIST software. You canuse a master profile to override the default settings as sent by SAS Institute. This allows you toprovide a customized setup for SAS/ASSIST software. With the master profile, you can controlthe profile options of all SAS/ASSIST users from one central place. For information on the profileoptions, refer to SAS/ASSIST Software Administrator’s Guide.
Adding a Master Profile
Complete the following steps to add a master profile to SAS/ASSIST software:
1. Specify the location of the master profile by creating a new directory that all users ofSAS/ASSIST software will have read access to.
All users with write access to this directory will automatically also have write access to themaster profile in SAS/ASSIST software. Select a name that conforms to the namingconventions at your installation. The name of this new directory must be stored in an entry inthe SASHELP library. This requires that you have write access to the SASHELP library.
On line 1 of the Program Editor window of the SAS Display Manager System, type thephysical pathname of the master profile directory. Execute the Save command to store thisin the SASHELP.QASSIST catalog. Save it as sashelp.qassist.parms.source. Thelocation of the master profile is now known by SAS/ASSIST software.
2. Create the master profile.
The first time SAS/ASSIST software is started, a master profile is created ifSASHELP.QASSIST.PARMS.SOURCE contains the name of an existing physical pathname,and the person who starts SAS/ASSIST software has write access to this physical pathname.
3. Customize the master profile by starting SAS/ASSIST software and selecting
Setup … Profiles … Master/group ...
If you have write access to the SAS library containing the master profile, you can specifydefault values for your installation. New users will use these values as they start SAS/ASSISTsoftware.
Note: If you restrict values by typing R in Status , users will not be allowed to changethe values you define.

48 Installation Instructions and System Administrator’s Guide for the SAS System under UNIX Environments
You can run SAS/ASSIST software in two different styles - workplace or block menu. Theblock menu can be new style or old style. You can control this using the profile options below.
Run workplace:
SAS/Assist style: Workplace
Run block menu new style:
SAS/Assist style: Block MenuSave selections on end: YesMenu Style: New
Run old style:
SAS/Assist style: Block MenuSave selections on end: YesMenu Style: Old
By setting the default values in the master profile, you can control if users should use the newor old style of SAS/ASSIST software. In addition, there are many other profile options. Formore information on these options, refer to SAS/ASSIST Software Administrator’s Guide.
4. Create group profiles.
From the master profile, it is possible to create group profiles to allow groups of users to havedifferent setups. The master profile controls group profiles and user profiles when a user isnot a member of any group. All users are indirectly controlled by the master profile whenoption values are set to a restricted (R) status.
From Setup...Master/Group, select Locals...Create Group Profile. To add usersto a group profile, select Locals...Update User Group. By default, the userid is found inthe macro variable &SYSJOBID. This value is set in the option Userid in the master profile(option type System Administration). Change the value if your site uses another variableto keep the userid. If the value name starts with &, it is a macro variable; otherwise, it is anenvironment variable, which is set before the start of the SAS System.
49
Appendix D, Post-Installation Setup forSAS/CONNECT
® Software
This appendix describes the use of the sample script files shipped with SAS/CONNECT software,lists supported software for access methods available for UNIX environments, and outlinesconfiguration procedures for those access methods that require additional configuration.
TCP/IP and APPC are the access methods supported for UNIX environments and theirderivatives. Refer to Communications Access Methods for SAS/CONNECT and SAS/SHARE Softwarefor information on the access methods supported by other systems.
User Authorization
You are required to complete the steps from the section “Configuring User Authorization” inChapter 3, “Post-Installation Instructions.” This allows SAS/CONNECT, SAS/SHARE and SASIntegration Technologies software to authenticate a client’s identity and check a client’s authorityto access resources.
Storing and Locating SAS/CONNECT Script Files
SAS/CONNECT software ships several sample script files that are used to establish a connectionto a remote SAS session. The SASSCRIPT configuration option points to the location of theSAS/CONNECT script files. The SASSCRIPT option is used by SAS/ASSIST software and canbe used by user-written SCL applications.
For UNIX environments, the script files are installed into the !SASROOT/misc/connectdirectory by default. The following line has been included in the sasv8.cfg file in order todefine the default script file location:
-SASSCRIPT !SASROOT/misc/connect
If you want to move the script files to another directory, you must edit the sasv8.cfg file andupdate the SASSCRIPT option with the new directory location.
System Configuration for the TCP Access Method
The TCP/IP access method supplied with SAS/CONNECT software runs with the TCP/IPservices that are native to the UNIX operating system. There are no additional requirements.
50 Installation Instructions and System Administrator’s Guide for the SAS System under UNIX Environments
System Configuration for the APPC Communications Access Method
The following sections provide reference information for establishing an environment to use SNALU6.2 APPC (Advanced Program-to-Program Communications) communications within yourSAS applications under HP-UX and AIX.
Note: Currently, only a client-side implementation is available for use with eitherSAS/CONNECT or SAS/SHARE software.
System Configuration for the APPC Communications Access Methodunder HP-UX
Software Requirements
q Version 10.20 of the HP-UX operating system
q Release 3 or later of SNAplusAPI and SNAplusLink tested with Release 3/Dart 16components. Recommended patches at Release 3/Dart 16: PHNE_4773, PHNE_5314,PHNE_5374
SAS System Configuration
System Options
q COMAMID=APPC
specifies that the APPC access method should be used for communication betweenSAS/CONNECT local and remote sessions or SAS/SHARE user and server sessions. Thisoption may be specified in the SAS command, in a SAS configuration file, or in an OPTIONSstatement.
q REMOTE=remote-session-id
specifies the logical unit (LU) to use in establishing a SAS/CONNECT remote session. Toestablish a remote session on another workstation, the value of this option in the local sessionon this workstation should be a partner lu_alias.
When the remote session is on MVS, the value of this option should be the name of theAPPC/MVS scheduler LU.
When the remote session is on CMS, the value of this option should be the name of the AVS(APPC/VM VTAM Support) private gateway LU for the VM system.
When the remote session is on VSE, the value of this option should be the name of the VTAMAPPL ID (ABCNAME) that has been set up for APPC LU6.2 communications.
When the remote session is on OS/2 or Windows, the value of this option should be the nameof the control point LU configured on the remote workstation.
Installation Instructions and System Administrator’s Guide for the SAS System under UNIX Environments 51
In all cases, the value of this option must be the same in the local and remote sessions. Thisoption may be specified in the SAS command, in a SAS Configuration file, or in an OPTIONSstatement.
Environment Variables
The following SAS environment variables may be specified globally in a SAS configuration file oron the SAS invocation command line with the following syntax:
-SET <variable> <value>
Note: The variable name must be specified in uppercase letters.
q APPC_LU
specifies the name of the local lu_alias to use. This name must match an LU aliasestablished during configuration. This variable is required unless a default local APPC LUhas been defined. A macro-variable analog exists for runtime specifications.
q APPC_MODE
specifies the communication mode to use that represents the set of networking characteristicsdefined during configuration. The default name is SASAPPC. The mode name, whether youspecify it with the APPC_MODE variable or allow it to default to SASAPPC, must be definedin both the local and remote environments. A macro variable exists for runtime specification.
q APPC_SECURE
specifies a userid and password for the remote partner where a secured SAS/CONNECTremote session is to be established or a secured SAS/SHARE server is running. The value ofthis variable can be a “userid.password” string, _PROMPT_, or _NONE_. By specifying_PROMPT_, you will be prompted for a userid and password for the remote partner, whichprovides more security than specifying a readable “userid.password” string. The default is_NONE_, which causes no security userid or password to be presented to the remote partner.APPC/MVS, CMS, and VSE require security presentation while OS/2 and Windows do notunless security has been explicitly defined. A macro variable exists for runtime specification.
Note: Security information can now be specified using the USERID and PASSWORD optionson the SIGNON command or statement. This is the recommended method forspecifying security information. Refer to the SAS/CONNECT Software User’s Guide inthe online doc for details about these options. APPC_SECURE is still supported as well.
q APPC_SURROGATE_LUNAME
specifies which LU to use for a SAS/CONNECT remote session on MVS. If this variable is notdefined, the MVS remote session dynamically selects an LU from the pool of LUs defined onMVS for this purpose.

52 Installation Instructions and System Administrator’s Guide for the SAS System under UNIX Environments
q APPC_PARTNER_COUNT
specifies the number of simultaneous partners that this local session will have at any onetime. This estimate permits better allocation of memory resources for internal control blockusage.
Macro Variables
The following SAS macro variables can be specified with the following SAS syntax:
%let <variable>=value;
q APPCSEC
specifies a userid and password for the remote partner where a secured SAS/CONNECTremote session is to be established or a secured SAS/SHARE server is running. This macrovariable may be used in lieu of the APPC_SECURE environment variable, and takesprecedence.
q APPCLU
specifies the name of the local lu_alias to use. This macro variable may be used in lieu ofthe APPC_LU environment variable, and takes precedence.
q APPCMODE
specifies the communication mode to use that represents the set of networking characteristicsdefined during configuration. This macro variable may be used in lieu of the APPC_MODEenvironment variable, and takes precedence.
HP-UX Configuration and Management
SNAplusLink
The SNAplusLink product allows three types of connectivity: Synchronous Data Link Control(SDLC), Qualified Logical Link Control (QLLC), and Token Ring (TR). To use SNAplus overQLLC link, either X.25/9000 Link for the Series 700 or X.25/9000 Link for the Series 800 must havebeen installed and configured before you install and configure SNAplus. To use SNAplus over aTR link, either HP Token Ring/9000 for the Series 700 or HP Token Ring/9000 for the Series 800must have been installed and configured before you install and configure SNAplus.
Before installing SNAplus with the installation script, you must first decide whether SNAplussoftware will function in a standalone or a client/server environment. In a standaloneenvironment, all functionality is isolated to a single HP workstation. In a client/serverenvironment, client HP workstations running SNAplus Presentation Services products(SNAplusAPI) can access server HP workstations running SNAplusLink where the physical linkresides. Configuration related files that are created automatically by the installation script are:sna.ini, com.cfg, com.sec, and sna.net (client/server environment).

Installation Instructions and System Administrator’s Guide for the SAS System under UNIX Environments 53
To configure SNAplusLink, use the snapconfig program. This program allows you to configurethe link (SDLC,QLLC,TR), connection (logical path), and local node (PU 2.1).
SNAplusAPI
SNAplusAPI APPC can be configured with the snapconfig program. This program allows youto configure APPC modes, remote APPC LUs, and local APPC LUs.
Management
The SNAplus control daemon controls the SNAplusLink product (local nodes, links, andconnections) and manages communication among SNAplus products and product components.The SNAplus control daemon must be started on each machine on the LAN (and on eachstandalone computer) before you can use any SNAplus products installed on that machine. Tostart the SNAplus control daemon issue the command snapstart daemon at the HP-UXcommand prompt.
The snapmanage program allows you to start and stop SNAplus products (SNAplusLink localnodes, links, and connections), view the status and monitor the use for SNAplus products, andcontrol logging and tracing.
Sample Configuration
The following sample configuration snapshot was created using the snaptextcfg command. Itis a subset of the information produced so as to limit the output to APPC specifics with TokenRing connection.
;******************************************************************; SNAplus Binary to Text Configuration Utility; Copyright (C) 1993 Hewlett-Packard Company; Binary Configuration = /usr/lib/sna/com.cfg; Security File = /usr/lib/sna/com.sec; File version = 100.20;******************************************************************
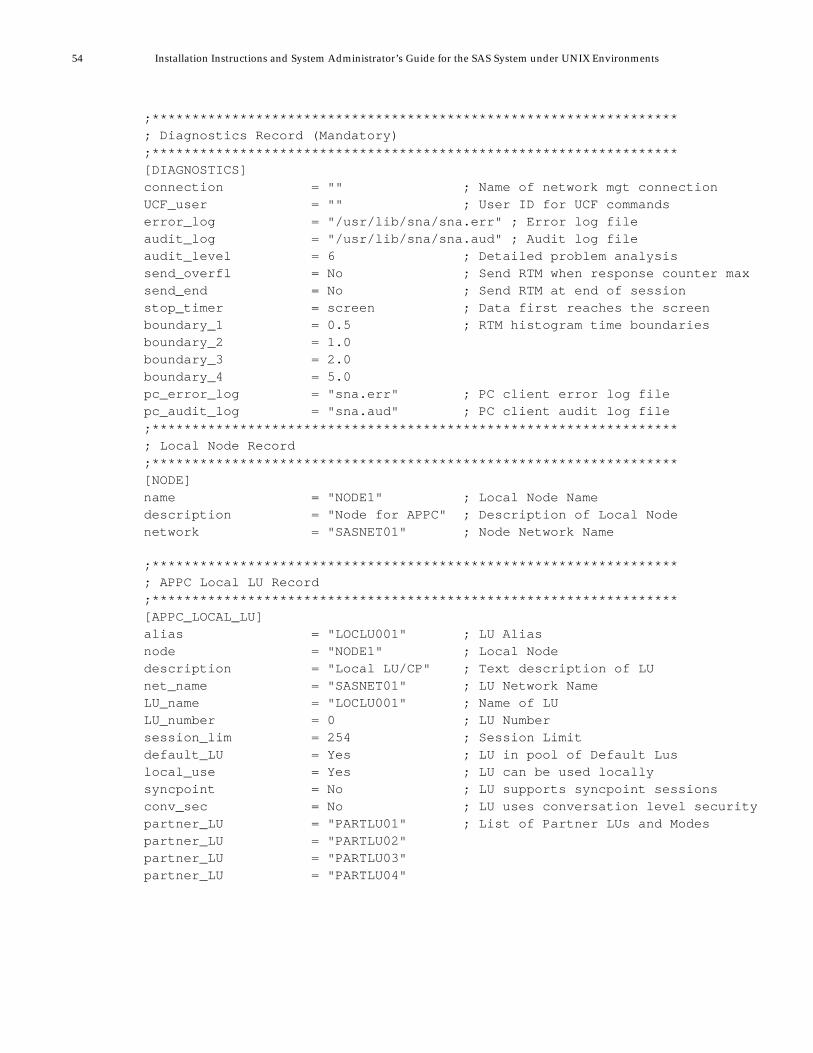
54 Installation Instructions and System Administrator’s Guide for the SAS System under UNIX Environments
;******************************************************************; Diagnostics Record (Mandatory);******************************************************************[DIAGNOSTICS]connection = "" ; Name of network mgt connectionUCF_user = "" ; User ID for UCF commandserror_log = "/usr/lib/sna/sna.err" ; Error log fileaudit_log = "/usr/lib/sna/sna.aud" ; Audit log fileaudit_level = 6 ; Detailed problem analysissend_overfl = No ; Send RTM when response counter maxsend_end = No ; Send RTM at end of sessionstop_timer = screen ; Data first reaches the screenboundary_1 = 0.5 ; RTM histogram time boundariesboundary_2 = 1.0boundary_3 = 2.0boundary_4 = 5.0pc_error_log = "sna.err" ; PC client error log filepc_audit_log = "sna.aud" ; PC client audit log file;******************************************************************; Local Node Record;******************************************************************[NODE]name = "NODE1" ; Local Node Namedescription = "Node for APPC" ; Description of Local Nodenetwork = "SASNET01" ; Node Network Name
;******************************************************************; APPC Local LU Record;******************************************************************[APPC_LOCAL_LU]alias = "LOCLU001" ; LU Aliasnode = "NODE1" ; Local Nodedescription = "Local LU/CP" ; Text description of LUnet_name = "SASNET01" ; LU Network NameLU_name = "LOCLU001" ; Name of LULU_number = 0 ; LU Numbersession_lim = 254 ; Session Limitdefault_LU = Yes ; LU in pool of Default Luslocal_use = Yes ; LU can be used locallysyncpoint = No ; LU supports syncpoint sessionsconv_sec = No ; LU uses conversation level securitypartner_LU = "PARTLU01" ; List of Partner LUs and Modespartner_LU = "PARTLU02"partner_LU = "PARTLU03"partner_LU = "PARTLU04"

Installation Instructions and System Administrator’s Guide for the SAS System under UNIX Environments 55
;******************************************************************; Token Ring Connection Record;******************************************************************[TR_CONN]name = "TRCON" ; Name of connectionnode = "NODE1" ; Name of nodedescription = "Token Ring connection"; Descriptionremote_end = peer ; Remote end is peerlink_role = negotiable ; Station behaves as negotiableactivation = initially ; Initially activenode_send = "05D.FF815" ; Node id to sendnode_rcv = "017.00000" ; Node id to receivecontrol_point = "SASNET01.LOCALCP"; Fully qualified control point nameremote_address = 400031740001 ; Address of remote TR networkremote_sap = 04 ; Remote SAP addressretry_limit = 10 ; Retry limitrcv_ack_limit = 10 ; Receive acknowledgment thresholdsend_ack_limit = 10 ; Unacknowledged send thresholdmax_btu = 4096 ; Maximum BTU lengthlink = "TOKEN" ; link;**********************************************************************;APPC Mode Record;Note: Be generous in defining session limits. Define enough sessions so;that session limits will never be reached. As a APPC API limitation, if;session limits are reached, the next time a conversation/session is;requested, the APPC layer will not return to the application layer until;a session is available. This indefinite waiting condition may cause you;to think that SAS is not responding or that it is in a loop when in fact;the underlying APPC layer is waiting for a session to become available.;***********************************************************************[APPC_MODE]name = "SASAPPC" ; Mode namemode_ID = 4 ; Unique Mode IDdescription = "APPC Mode" ; Descriptionconnection = "TRCON" ; Connection used by this modepriority = high ; Mode is High Prioritysession_limit = 12 ; Mode Session LimitMCW = 12 ; Min Conwinner Sessionspartner_MCW = 0 ; Partner Min Conwinner Sessionsauto_act = 0 ; Auto activated sessionsmin_sendRU = 256 ; Min Send RU sizemax_sendRU = 4096 ; Max Send RU sizesend_pace = 10 ; Send Pacing countmin_rcvRU = 256 ; Min Receive RU sizemax_rcvRU = 4096 ; Max Receive RU sizercv_pace = 10 ; Receive Pacing count

56 Installation Instructions and System Administrator’s Guide for the SAS System under UNIX Environments
;******************************************************************; APPC Remote LU Record;******************************************************************[APPC_REMOTE_LU]alias = "PARTLU01" ; LU Aliasdescription = "MVS remote LU" ; Text description of LUnet_name = "SASNET01" ; LU Network NameLU_name = "PARTLU01" ; Name of LUSSCP_Alias = "PARTLU01" ; SSCP LU Aliasparallel_sess = Yes ; Parallel Sessions supportedconv_sec = Yes ; LU uses conversation level securitypreval_sec = No ; LU can prevalidate securitysession_sec = none ; No Session Level Security
;******************************************************************; APPC Remote LU Record;******************************************************************[APPC_REMOTE_LU]alias = "PARTLU02" ; LU Aliasdescription = "MVS Surrogate LU"; Text description of LUnet_name = "SASNET01" ; LU Network NameLU_name = "PARTLU02" ; Name of LUSSCP_Alias = "PARTLU02" ; SSCP LU Aliasparallel_sess = Yes ; Parallel Sessions supportedconv_sec = Yes ; LU uses conversation level securitypreval_sec = No ; LU can prevalidate securitysession_sec = none ; No Session Level Security
;*******************************************************************; APPC Remote LU Record;*******************************************************************[APPC_REMOTE_LU]alias = "PARTLU03" ; LU Aliasdescription = "Windows remote LU" ; Text description of LUnet_name = "SASNET01" ; LU Network NameLU_name = "PARTLU03" ; Name of LUSSCP_Alias = "PARTLU03" ; SSCP LU Aliasparallel_sess = Yes ; Parallel Sessions supportedconv_sec = Yes ; LU uses conversation level securitypreval_sec = No ; LU can prevalidate securitysession_sec = none ; No Session Level Security

Installation Instructions and System Administrator’s Guide for the SAS System under UNIX Environments 57
;******************************************************************; APPC Remote LU Record;******************************************************************[APPC_REMOTE_LU]alias = "PARTLU04" ; LU Aliasdescription = "OS/2 remote LU" ; Text description of LUnet_name = "SASNET01" ; LU Network NameLU_name = "PARTLU04" ; Name of LUSSCP_Alias = "PARTLU04" ; SSCP LU Aliasparallel_sess = Yes ; Parallel Sessions supportedconv_sec = Yes ; LU uses conversation level securitypreval_sec = No ; LU can prevalidate securitysession_sec = none ; No Session Level Security
;******************************************************************; APPC Remote LU Record;******************************************************************; Token Ring Link Record;******************************************************************[TR_LINK]name = "TOKEN" ; Name of LUdescription = "Token Ring link"; Text description of LUdevice_name = "sna_TR" ; Name of device file for linkport_number = 0 ; Adapter port;******************************************************************; Token Ring Link Usage Record;******************************************************************[TR_USAGE]node = "NODE1" ; Node namelink = "TOKEN" ; Link nameincoming = Yes ; Incoming calls acceptedmax_conn = 1 ; Maximum number of connectionslocal_sap = 04 ; Local SAP address
SAS specifics
An example SAS configuration file (sasv8.cfg) containing APPC specific environment variableoptions for client-side execution is listed below:
-set APPC_LU local-LU-alias-set APPC_MODE mode-name-set APPC_SECURE _PROMPT_
where local-LU-alias and mode-name is a defined and configured local LU and modeprofile respectively.

58 Installation Instructions and System Administrator’s Guide for the SAS System under UNIX Environments
The following is an example SAS/CONNECT signon:
options comamid=appc remote=partner-LU-alias;signon;
where partner-LU-alias is a defined and configured remote partner LU.
The following is an example LIBNAME start to connect to a SAS/SHARE server:
options comamid=appc;libname xxxx ’remote.data’ server=partner-LU-alias;
where partner-LU-alias is a defined and configured remote partner LU.
Note: If the server is running on a CMS system that is connected to your system through aglobal VTAM gateway, you must use a two-level server name specification as follows:
server=gateway.serverid
where gateway is defined to the CMS system and is locally defined as a partner-LU-alias.
References
q HP-UX SNAplus Installation Guide (J2220-61021)q HP-UX SNAplusLink Administrator’s Guide (J2220-61023)q HP-UX SNAplusAPI Administrator’s Guide (J2223-61008)q HP-UX SNAplus Diagnostics Guide (J2220-61022)q Installing and Administering X.25/9000 (36940-90018)q Installing and Administering Token Ring/9000 (J21625-61001)q IBM SNA: Technical Overviewq IBM SNA: Formats
System Configuration for the APPC Communications Access Methodunder AIX
Software Requirements
q AIX version 4.2 or greaterq AIX SNA Server/6000 version 2.1.1q IBM Communication Server for AIX, version 5.0 or greater
SAS System Configuration
System Options
q COMAMID=APPC
specifies that the APPC access method should be used for communication betweenSAS/CONNECT local and remote sessions or SAS/SHARE user and server sessions. This

Installation Instructions and System Administrator’s Guide for the SAS System under UNIX Environments 59
option can be specified in the SAS command, in a SAS configuration file, or in an OPTIONSstatement.
q REMOTE=remote-session-id
specifies the logical unit (LU) to use in establishing a SAS/CONNECT remote session. Toestablish a remote session on another workstation, the value of this option in the local sessionon this workstation should be a partner LU name.
When the remote session is on MVS, the value of this option should be the name of theAPPC/MVS scheduler LU.
When the remote session is on CMS, the value of this option should be the name of the AVS(APPC/VM VTAM Support) private gateway LU for the VM system.
When the remote session is on VSE, the value of this option should be the name of the VTAMAPPL ID (ACBNAME) that has been set up for APPC LU6.2 communications.
When the remote session is on OS/2 or Windows, the value of this option should be the nameof the control point LU configured on the remote workstation.
In all cases, the value of this option must be the same in the local and remote sessions. Thisoption can be specified in the SAS command, in a SAS Configuration file, or in an OPTIONSstatement.
Environment Variables
The following SAS environment variables can be specified globally in a SAS configuration file oron the SAS invocation command line with the following syntax:
-SET <variable> <value>
q APPC_NET
specifies the network name to utilize in order to form the fully qualified partner LU name inAPPN environments. This name is required to exploit APPN connections in the absence ofexplicitly configured partner LU profiles. A macro-variable analog exists for runtimespecification.
q APPC_MODE
specifies the communication mode to use that represents the set of networking characteristicsdefined during configuration. The default name is SASAPPC. The mode name, whether youspecify it with the APPC_MODE variable or allow it to default to SASAPPC, must be definedin both the local and remote environments. A macro-variable analog exists for runtimespecification.
60 Installation Instructions and System Administrator’s Guide for the SAS System under UNIX Environments
q APPC_SECURE
specifies a userid and password for the remote partner where a secured SAS/CONNECTremote session is to be established or a secured SAS/SHARE server is running. The value ofthis variable can be a userid.password string, _PROMPT_, or _NONE_. By specifying_PROMPT_, you are prompted for a userid and password for the remote partner, whichprovides more security than specifying a readable “userid.password” string. The default is_NONE_, which causes no security userid or password to be presented to the remote partner.APPC/MVS, CMS, and VSE require security presentation while OS/2 does not unless youhave established a user profile on the OS/2 workstation with Communications Manager orwith User Profile Management. A macro-variable analog exists for runtime specification.
Note: Security information can now be specified using the USERID and PASSWORD optionson the SIGNON command or statement. This is the recommended method forspecifying security information. Refer to the SAS/CONNECT Software User’s Guide inthe online doc for details about these options. APPC_SECURE is still supported as well.
q APPC_SURROGATE_LUNAME
specifies which LU to use for a SAS/CONNECT remote session on MVS. If this variable is notdefined, the MVS remote session dynamically selects an LU from the pool of LUs defined onMVS for this purpose.
Macro Variables
The following SAS macro variables can be specified with the following SAS syntax:
%let <variable>=value;
q APPCNET
specifies the network name to utilize in order to form the fully qualified partner LU name inAPPN environments. This macro variable can be used in lieu of the APPC_NET environmentvariable, and takes precedence.
q APPCMODE
specifies the communication mode to use that represents the set of networking characteristicsdefined during configuration. This macro variable can be used in lieu of the APPC_MODEenvironment variable, and takes precedence.
q APPCSEC
specifies a userid and password for the remote partner where a secured SAS/CONNECTremote session is to be established or a secured SAS/SHARE server is running. This macrovariable can be used in lieu of the APPC_SECURE environment variable, and takesprecedence.
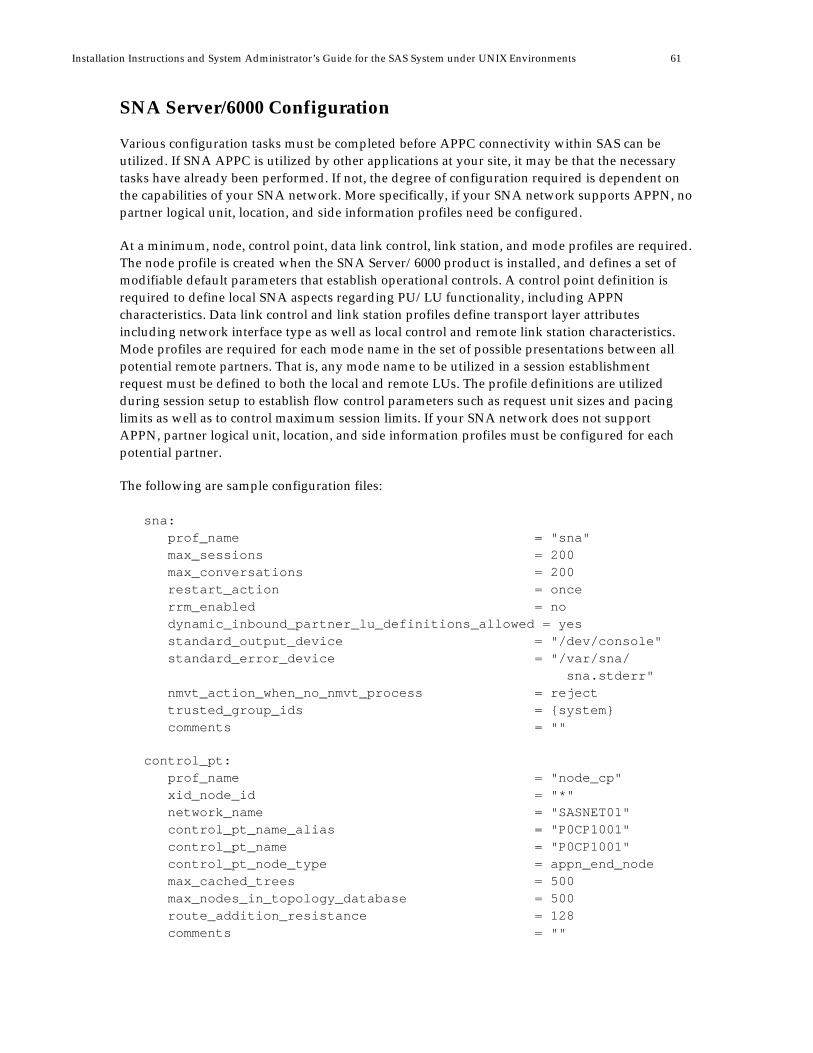
Installation Instructions and System Administrator’s Guide for the SAS System under UNIX Environments 61
SNA Server/6000 Configuration
Various configuration tasks must be completed before APPC connectivity within SAS can beutilized. If SNA APPC is utilized by other applications at your site, it may be that the necessarytasks have already been performed. If not, the degree of configuration required is dependent onthe capabilities of your SNA network. More specifically, if your SNA network supports APPN, nopartner logical unit, location, and side information profiles need be configured.
At a minimum, node, control point, data link control, link station, and mode profiles are required.The node profile is created when the SNA Server/6000 product is installed, and defines a set ofmodifiable default parameters that establish operational controls. A control point definition isrequired to define local SNA aspects regarding PU/LU functionality, including APPNcharacteristics. Data link control and link station profiles define transport layer attributesincluding network interface type as well as local control and remote link station characteristics.Mode profiles are required for each mode name in the set of possible presentations between allpotential remote partners. That is, any mode name to be utilized in a session establishmentrequest must be defined to both the local and remote LUs. The profile definitions are utilizedduring session setup to establish flow control parameters such as request unit sizes and pacinglimits as well as to control maximum session limits. If your SNA network does not supportAPPN, partner logical unit, location, and side information profiles must be configured for eachpotential partner.
The following are sample configuration files:
sna:prof_name = "sna"max_sessions = 200max_conversations = 200restart_action = oncerrm_enabled = nodynamic_inbound_partner_lu_definitions_allowed = yesstandard_output_device = "/dev/console"standard_error_device = "/var/sna/ sna.stderr"nmvt_action_when_no_nmvt_process = rejecttrusted_group_ids = {system}comments = ""
control_pt:prof_name = "node_cp"xid_node_id = "*"network_name = "SASNET01"control_pt_name_alias = "P0CP1001"control_pt_name = "P0CP1001"control_pt_node_type = appn_end_nodemax_cached_trees = 500max_nodes_in_topology_database = 500route_addition_resistance = 128comments = ""

62 Installation Instructions and System Administrator’s Guide for the SAS System under UNIX Environments
partner_lu6.2:prof_name = "P0LU2001"fq_partner_lu_name = "SASNET01. POLU2001"partner_lu_alias = "P0LU2001"session_security_supp = noparallel_session_supp = yesconversation_security_level = nonecomments = ""
partner_lu6.2_location:prof_name = "P0LU2001"fq_partner_lu_name = "SASNET01. P0LU2001"partner_location_method = owning_cpfq_partner_owning_cp_name = "SASNET01. P00U1000"local_node_is_network_server_for_len_node = nofq_node_server_name = "SASNET01. P00U1000"local_lu_name = ""link_station_profile_name = ""comments = ""
side_info:prof_name = "P0LU2001"local_lu_or_control_pt_alias = "P0CP1001"partner_lu_alias = ""fq_partner_lu_name = "SASNET01. P0LU2001"mode_name = "MODE001"remote_tp_name_in_hex = noremote_tp_name = ""comments = ""
link_station_token_ring:prof_name = "TR3174"use_control_pt_xid = yesxid_node_id = "*"sna_dlc_profile_name = "TR3174"stop_on_inactivity = notime_out_value = 0LU_registration_supported = noLU_registration_profile_name = ""link_tracing = notrace_format = longaccess_routing_type = link_addressremote_link_name = ""remote_link_address = 0x400000000001remote_sap = 0x04call_out_on_activation = yes
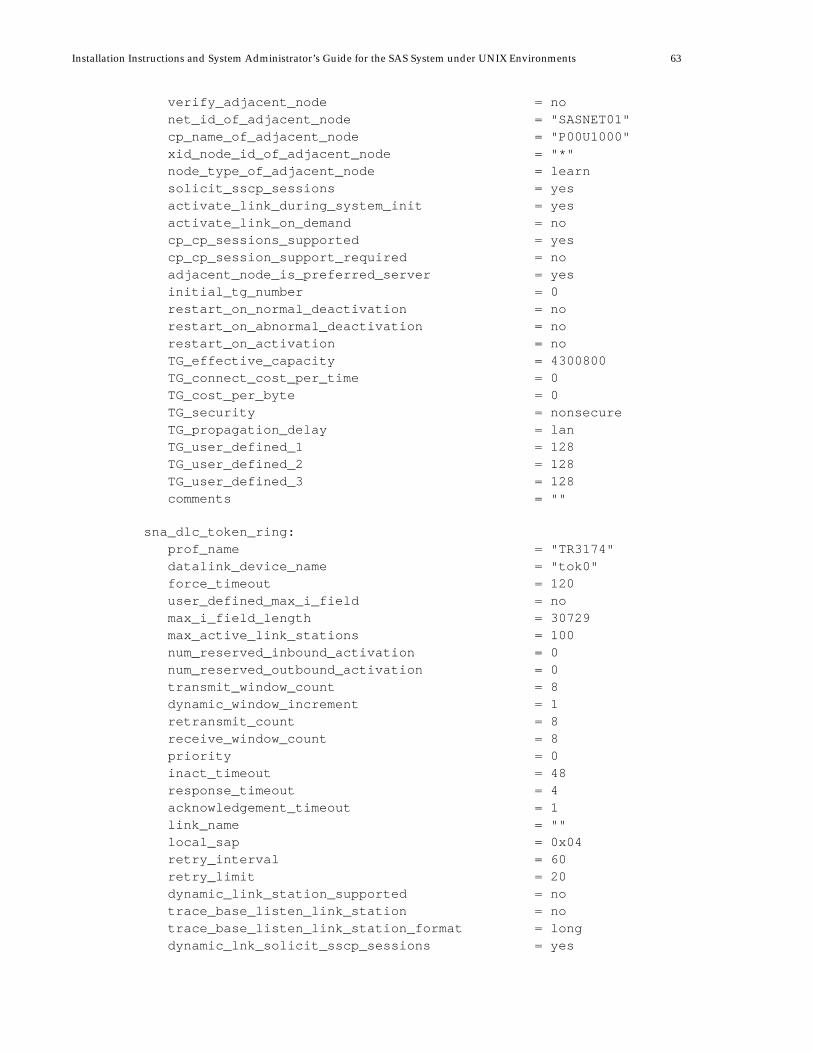
Installation Instructions and System Administrator’s Guide for the SAS System under UNIX Environments 63
verify_adjacent_node = nonet_id_of_adjacent_node = "SASNET01"cp_name_of_adjacent_node = "P00U1000"xid_node_id_of_adjacent_node = "*"node_type_of_adjacent_node = learnsolicit_sscp_sessions = yesactivate_link_during_system_init = yesactivate_link_on_demand = nocp_cp_sessions_supported = yescp_cp_session_support_required = noadjacent_node_is_preferred_server = yesinitial_tg_number = 0restart_on_normal_deactivation = norestart_on_abnormal_deactivation = norestart_on_activation = noTG_effective_capacity = 4300800TG_connect_cost_per_time = 0TG_cost_per_byte = 0TG_security = nonsecureTG_propagation_delay = lanTG_user_defined_1 = 128TG_user_defined_2 = 128TG_user_defined_3 = 128comments = ""
sna_dlc_token_ring:prof_name = "TR3174"datalink_device_name = "tok0"force_timeout = 120user_defined_max_i_field = nomax_i_field_length = 30729max_active_link_stations = 100num_reserved_inbound_activation = 0num_reserved_outbound_activation = 0transmit_window_count = 8dynamic_window_increment = 1retransmit_count = 8receive_window_count = 8priority = 0inact_timeout = 48response_timeout = 4acknowledgement_timeout = 1link_name = ""local_sap = 0x04retry_interval = 60retry_limit = 20dynamic_link_station_supported = notrace_base_listen_link_station = notrace_base_listen_link_station_format = longdynamic_lnk_solicit_sscp_sessions = yes

64 Installation Instructions and System Administrator’s Guide for the SAS System under UNIX Environments
dynamic_lnk_cp_cp_sessions_supported = yesdynamic_lnk_cp_cp_session_support_required = nodynamic_lnk_TG_effective_capacity = 4300800dynamic_lnk_TG_connect_cost_per_time = 0dynamic_lnk_TG_cost_per_byte = 0dynamic_lnk_TG_security = nonsecuredynamic_lnk_TG_propagation_delay = landynamic_lnk_TG_user_defined_1 = 128dynamic_lnk_TG_user_defined_2 = 128dynamic_lnk_TG_user_defined_3 = 128comments = ""
mode:prof_name = "MODE001"mode_name = "MODE001"max_sessions = 5000min_conwinner_sessions = 5000min_conloser_sessions = 0auto_activate_limit = 0max_adaptive_receive_pacing_window = 16receive_pacing_window = 7max_ru_size = 1024min_ru_size = 256class_of_service_name = "#CONNECT"comments = ""
SAS Specifics
The following is an example SAS configuration file (sasv8.cfg) containing APPC specificenvironment variable options for client-side execution:
-set APPC_MODE mode-name-set APPC_SECURE _PROMPT_
where mode-name is a defined and configured LU 6.2 mode profile.
The following is an example SAS/CONNECT signon:
options comamid=appc remote=partner-LU;signon;
where partner-LU is a defined and configured partner LU or network name augmented inorder to form an APPN fully qualified partner LU name.
The following is an example LIBNAME statement to connect to a SAS/SHARE server:
options comamid=appc;libname xxxx ’remote.data’ server=partner-LU;

Installation Instructions and System Administrator’s Guide for the SAS System under UNIX Environments 65
where partner-LU is a defined and configured partner LU profile or is network nameaugmented (through the APPC_NET environment variable or APPCNET macro variable) in orderto form an APPN fully-qualified partner LU name.
Note: If the server is running on a CMS system that is connected to your system through aglobal VTAM gateway, you must use a two-level server name specification as follows:
server=gateway.serverid
where gateway is defined to the CMS system and is locally defined as apartner_lu_alias.
References
q AIX SNA Server/6000 Command Reference (SC31-7100)q AIX SNA Server/6000 Diagnosis Guide and Messages (SC31-7101)q AIX SNA Server/6000 User’s Guide (SC31-7002)q AIX SNA Server/6000 Transaction Program Reference (SC31-7003)q AIX SNA Server/6000 Configuration Reference (SC31-7014)


67
Appendix E, Post-Installation Setup of EnterpriseMiner Server Software
Enterprise Miner uses a client/server architecture that provides the following features:
• distributes data-intensive processing to the most appropriate machine• minimizes network traffic by processing data on the server machine• minimizes data redundancy by maintaining one central data source• distributes server profiles to multiple clients• regulates access to data sources• toggles between remote and local processing
Enterprise Miner Server runs under UNIX on ABI+ for Intel Architecture, AIX, Compaq Tru64UNIX, HP-UX, Linux, and Solaris operating systems, as well as on Microsoft Windows NT Server,and OS/390 operating systems.
Enterprise Miner Client runs on Microsoft Windows platforms supported by Release 8.2 of theSAS System.
Configuring Enterprise Miner Server Software
Setup Default Data Library
Create a data library on the server to which Enterprise Miner Client Software users haveread/write access. This library should be a different directory from the SASROOT location, andideally, on a different disk altogether. To create the data library, make or designate a directory onan available disk, and set appropriate permissions and ownership to allow remote users read andwrite access.
Provide Information to Configure Enterprise Miner ClientSoftware
Provide the following information to users of Enterprise Miner Client Software to complete theconfiguration steps necessary for Enterprise Miner Client Software:
• the machine name and/or IP address of the server• the SASROOT location for the SAS System installed on the server machine• the directory path of the default data library you created on the server
Note: Do not use an NFS mount point.
Enterprise Miner Server Software is invoked from the Enterprise Miner Client viaSAS/CONNECT. For more information on running Enterprise Miner, refer to Getting Started with

68 Installation Instructions and System Administrator’s Guide for the SAS System under UNIX Environments
the Enterprise Miner Software, Release 4.1, and Enterprise Miner Software: Changes and Enhancements,Release 4.1.

69
Appendix F, SAS/GIS® Census Tract Maps Installation
and Configuration
If you have licensed the SAS/GIS product you will automatically receive a separate CDcontaining SAS/GIS Census Tract Maps. The SAS/GIS Census Tract Maps CD can either beinstalled to a disk location on your system or mounted and accessed directly from the SASSystem.
These map data sets are based on extractions from the U.S. Census Bureau TIGERLine files.Installation of these data sets enables the Build Census Tract Maps utility in the SAS/GISproduct to create Census Tract maps to the SAS System user’s specifications.
Mounting and Installing the SAS/GIS Census Tract Maps
Follow the steps outlined in Chapter 2 of this document in “Launching SAS Setup” that refer tomounting the SAS System CD for your particular operating system. These same steps apply to theSAS/GIS Census Tract Maps CD. If you want to access the CD directly from the SAS System,please refer to the section “Configuring the SAS/GIS Census Tract Maps” below.
If you want to install the SAS/GIS Census Tract Maps, continue following the steps outlined inChapter 2 and launch SAS Setup from the SAS/GIS Census Tract Maps CD.
Note: The SAS System must be installed before you attempt to install the SAS/GIS Census TractMaps.
Configuring the SAS/GIS Census Tract Maps
SAS Setup will automatically configure the SAS/GIS Census Tract Maps if you install them todisk. However, if you want to change the location of your installed SAS/GIS Census Tract Mapsor you have mounted the CD for direct access, you must update your config file for the SASSystem to set the -gismaps configuration option to reference the location of the map data sets.
Complete the following steps to configure the SAS/GIS Census Tract Maps:
1. Log in with appropriate privileges to write to files in SASROOT.
2. Run SAS Setup located in SASROOT.
!SASROOT/sassetup
3. Select Run Setup Utilities from the primary menu.
4. Select Perform Product Specific Configuration from the utilities menu.

70 Installation Instructions and System Administrator’s Guide for the SAS System under UNIX Environments
5. Select Specify SAS/GIS Census Tract Maps Location to update your config filewith the location of the SAS/GIS Census Tract Maps.
6. Enter Q to quit sassetup.

71
Appendix G, Post-Installation Setup for SAS/GRAPH®
Software
Using SAS/GRAPH Software, you can produce interactive charts and plots for Web publishing.The GCHART, GCONTOUR, GMAP, GPLOT, and G3D procedures can produce scripted ActiveXControls or Java Applets in HTML pages using the SAS/GRAPH Java or ActiveX drivers and theOutput Delivery System (ODS). The DS2GRAF, DS2CSF, and META2HTM macros can also be usedto generate HTML output with embedded ActiveX Controls or Java Applets.
The following controls and applets are available:
ContourApplet (ctrapp.jar)
A scriptable Java applet for visualization of Contour and Surface plots in a Web browser. Theapplet supports outline and filled modes and interactive exploration of the data. ContourAppletis supported by the SAS/GRAPH Java driver with ODS.
GraphApplet (graphapp.jar)
A scriptable Java applet for visualization of 2D and 3D charts in a Web browser. The appletsupports bar charts, pie charts and scatter plots, and interactive exploration of the data.GraphApplet is supported by the SAS/GRAPH Java driver with ODS, and also by the DS2GRAFmacro.
MapApplet (mapapp.jar and related map data jar files)
The Java Map Applet is a scriptable Java graphics control that allows the user to embedinteractive spatial data in a Java 1.1 compliant Web page. The Web page is created with PROCGMAP and uses the map jar files that correspond to the SAS Map Data Sets. MapApplet issupported by the SAS/GRAPH Java driver with ODS.
MetaViewApplet (metafile.zip)
A Java applet for displaying SAS/GRAPH metagraphics data. MetaViewApplet is supported bythe SAS/GRAPH metagraphics driver and the META2HTM macro.
RangeViewApplet (rvapplet.jar)
A Java applet for displaying a Critical Success Factor (CSF). A CSF is a graphic that visuallyrepresents the position of some value in a range of data. RangeViewApplet is supported by theDS2CSF macro.

72 Installation Instructions and System Administrator’s Guide for the SAS System under UNIX Environments
SAS/GRAPH Control for ActiveX
This ActiveX control enables you to embed interactive graphs in Web pages and OLE documents(in Microsoft Office products), as well as in applications written in Visual Basic, C++, HTML, andJavaScript. When the graph is displayed, you can point-and-click to rotate, change, or furtherinvestigate the graph.
The SAS/GRAPH Control for ActiveX supports the following graph types:
• area plots • bar charts • box-and-whisker plots• bubble plots • contour plots • high-low plots• line plots • maps • pie charts• regression plots • scatter plots • standard deviation plots• surface plots
SAS/GRAPH Control for ActiveX is supported by the SAS/GRAPH ActiveX driver with ODS,and also by the DS2GRAF macro.
Client Components
Documentation for the SAS/GRAPH Client Components can be found on the SAS Web site athttp://www.sas.com/rnd/webgraphs. Documentation for the HTML Formatting Tools(including the DS2GRAF, DS2CSF, and META2HTM macros) can be found athttp://www.sas.com/rnd/web/format.
All the Java applet clients except the RangeView Applet are installed with SAS/GRAPHSoftware. The applets are located in !APPLETLOC (normally !SASROOT/misc/applets.) Todetermine the location of !APPLETLOC, run PROC OPTIONS or view the SAS configuration file tofind the value of APPLETLOC.
If you wish to publish SAS/GRAPH output on a Web server or create SAS/IntrNet applicationsusing SAS/GRAPH, you may need to install these SAS/GRAPH clients on your Web server. Theclients can be copied from APPLETLOC (applets only) or the SAS Client-Side Components CDincluded with your SAS Software distribution. See the installation instructions on the SAS Client-Side Components CD for more information on installing SAS/GRAPH clients on a Web server.

73
Appendix H, Installing SAS Integration Technologies
Client Components
SAS Integration Technologies includes client components that are used outside of your SASinstallation. These components must be installed in the client environment before they can beused. The following component packages are available:
Integration Technologies Documentation
The documentation package provides complete documentation for SAS Integration Technologies.You can install the documentation on a Web server for common access, or you can install it foreach developer and end-user. The Integration Technologies documentation will be updated andprovided on the SAS Web site.
Java Client Development and Runtime Component
Install this package for each developer who will be creating applications that run in a Javaenvironment and communicate with a SAS session.
Windows Client Development and Runtime Component
Install this package for each developer who will be creating applications that run in a Windowsenvironment and communicate with a SAS session. You must also install this package on eachclient machine that will access the COM interfaces that are provided by the SAS server.
Integration Technologies Administrator
Install this Java application where you plan to manage your object servers and spawners and yourpublishing framework. To use this application, you must also have an LDAP server installed.
SAS Package Reader
Install this application for every user who will access an SPK file that was created using thepublishing framework.
Subscription Manager
Install this applet on a Web server for all users to access. Note that subscriptions can also bemanaged using the Administrator application.
74 Installation Instructions and System Administrator’s Guide for the SAS System under UNIX Environments
Client Component Delivery
SAS Integration Technologies client components are delivered with SAS Integration TechnologiesSoftware, and can be installed from the SAS Client-Side Components CD included with your SASSoftware distribution. For updated components and documentation, please visit the followingWeb site:
http://www.sas.com/rnd/itech/updates.

75
Appendix I, Installing SAS/IntrNet® Software
Introduction
If you licensed SAS/IntrNet software and have completed the installation instructions describedearlier in this document, you have installed the SAS server components of SAS/IntrNet software(referred to as the SAS/IntrNet server). The Client-Side Components CD that is included withyour SAS software package also contains the complete documentation for SAS/IntrNet software.
Installing SAS/IntrNet Web Server or Client Components
SAS/IntrNet software also includes components that must be installed on a Web server or onindividual client machines. To install any of the additional SAS/IntrNet components:
1. Locate the Client-Side Components CD that is included in your SAS software package, andmount the CD according to the platform-specific instructions that are provided on the insidecover.
2. In a browser, view the index.html page that is located in the root directory of your CD.
3. From the index page, select the SAS/IntrNet Software link to go to the SAS/IntrNethome page.
4. From the SAS/IntrNet home page, select the Install icon and follow the instructions thatare provided on the “Installing SAS/IntrNet Software for Version 8” page.
User Authorization
You are required to complete the steps from the section “Configuring User Authorization” onpage 21 in Chapter 3, “Post-Installation Instructions.” This allows SAS/CONNECT, SAS/SHAREand SAS Integration Technologies software to authenticate a client’s identity and check a client’sauthority to access resources.
Configuring SAS/IntrNet Components
Both the SAS/IntrNet server and the Web server components require additional configurationbefore you can use them in your Web-enabled environment. Configuration information isprovided as part of the SAS/IntrNet documentation that is on the Client-Side Components CDand is also available as a downloadable package that you can install for easier access.

76 Installation Instructions and System Administrator’s Guide for the SAS System under UNIX Environments
Updates to Components and Documentation
Additional documentation and component updates may be available from our Web site athttp://www.sas.com/rnd/web/. You may want to monitor the What’s New page(new.html) for information about new or updated components.
77
Appendix J, Post-Installation Setup for SAS/MDDBServer
® Software
SAS/MDDB Server Software includes an OLE DB provider, Open OLAP Server Software. TheOpen OLAP Server allows you to access, update, and manipulate MDDB data on your SASSystem from OLE DB-compliant and ADO-compliant applications on Windows platforms.
The Open OLAP Server is packaged as a self-installing program for Windows platforms and isavailable on your UNIX SAS Software installation at !SASROOT/misc/mddbserver or on theSAS Client-Side Components CD included with your SAS Software distribution.
The ooscl30.exe file is a Windows executable and must be copied to the Windows platformusing a binary transfer protocol such as FTP. The installation instructions for this component canbe found at !SASROOT/misc/mddbserver/ooscl30.txt or on the SAS Client-SideComponents CD.


79
Appendix K, Installing IT Service Vision® Solution
Software Release 2.4
IT Service Vision Functionality
IT Service Vision is a data management and presentation software package for evaluating thedelivery of services to your IT users. With IT Service Vision, you can report on the utilization andservice levels from such diverse parts of your IT operation as file servers, mainframes, telephonePBX’s, Help Desks, or network links using one tool.
IT Service Vision has both client and server components. The server software is required toprocess, reduce, and/or update the data in a performance data warehouse (PDB) located on yoursystem. The client software is required only if you want to access a performance data warehouseon a remote server system from a client PC platform.
IT Service Vision Server runs on Microsoft Windows NT Server, OS/390 and selected UNIXoperating systems.
IT Service Vision Client runs on Microsoft Windows platforms supported by Release 8.2 of theSAS System and OS/2.
For the latest installation information about IT Service Vision, please download the InstallationInstructions from the Library section of the IT Service Vision home page,http://www.sas.com/vision/itservice.
Installing IT Service Vision
Migration Considerations
If you have modified your SITELIB library, you will need to save a copy of it so that you canmerge it into the new SITELIB library. Please see the instructions relating to “Site LibraryConsiderations” on page 81.
If you have an existing IT Service Vision installation and want to migrate from SAS Version 6 toSAS Version 8, refer to the conversion information in the directory!SASROOT/saspgm/cpe/itsvdocs/convert.htm and at www.sas.com/itsvconv.
Installation Customizations
IT Service Vision Solution will be installed in the !SASROOT folder. If you wish to customize yourIT Service Vision installation, or see any additional SAS System components present on yourmedia, select Load Selected Software from Media. For instance, you can choose not to

80 Installation Instructions and System Administrator’s Guide for the SAS System under UNIX Environments
install additional sample PDBs and DeskTop Reporter files by selecting Select Samples anddeselecting IT Service Vision Server Samples.
Configuring the SAS System for IT Service Vision Release 2.4
Verify that X resource SAS.dmsContrastCheck is set to True to assure that IT Service Visionmessage windows have the appropriate contrast between text and background, regardless of yourpersonal settings for background and foreground colors.
Starting IT Service Vision
To start IT Service Vision from the UNIX command line, issue the command sasitsv, which islocated in the !SASROOT directory. If SAS was installed in /usr/local/sasv8, then thecommand to issue would be /usr/local/sasv8/sasitsv.
To start IT Service Vision from within the SAS System, issue the itsv command. You can enter theitsv command in the SAS toolbar command area or after the Command===> prompt, which isobtained by clicking on Globals ===> Options ===> Command Line. You can also start ITService Vision Release 2.4 from within SAS by submitting this statement via the Program Editor:
%CPSTART();
To start the DeskTop Reporter from the UNIX command line, start SAS by referencing the!SASROOT/saspgm/cpe/dtr/dtrstart.sas file in the -autoexec parm using a commandsimilar to the following:
sas -autoexec /usr/local/sasv8/saspgm/cpe/dtr/dtrstart.sas
IT Service Vision Documentation
For more information on running and configuring IT Service Vision, please see Getting Startedwith IT Service Vision, Release 2.
Online documentation is also available from within SAS and IT Service Vision. From SAS, selectHelp => Getting Started with SAS Software => Help on SAS softwareProducts => IT Service Vision.
From the IT Service Vision user interface, select OnlineHelp => IT Service Vision Help=> Help on SAS software Products =>IT Service Vision.
Select OnlineHelp => Other ITSV Documentation for the following documents:
• Install Instructions
• Server Setup Guide - Printable versions of the Setup guide are also available in!SASROOT/saspgm/cpe/itsvdocs/sa/pdfs
• Showroom - Also directly available with a Web browser from!SASROOT/saspgm/cpe/itsvdocs/showroom/welcome.htm
Installation Instructions and System Administrator’s Guide for the SAS System under UNIX Environments 81
• QuickStart Examples - Also directly available with a Web browser from!SASROOT/saspgm/cpe/itsvdocs/qs/welcome.htm
• Migration - Also directly available with a Web browser from!SASROOT/saspgm/cpe/itsvdocs/convert.htm and at www.sas.com/itsvconv
Site Library Considerations
First Time Installations
If you are installing IT Service Vision for the first time you may want, at some future date, to create aseparate SITELIB directory to store site-wide options or customizations, such as your site’s preferredgraphics device. The supplied version of this directory containing default values will have beencreated in !SASROOT/saspgm/cpe/sitelib during the default production installation of ITService Vision.
Wherever you choose to locate SITELIB, you must have write access to it, and all other IT ServiceVision software users must have read access. If you choose to re-locate SITELIB, follow theinstructions in the section “Modifying the default pointer to SITELIB library” below.
Upgrading existing installations
If this is not your first installation of IT Service Vision, it is strongly recommended that you considerthe location of your existing production SITELIB before you install. Without planning, you riskoverlaying and losing existing PDB and site options.
When you installed IT Service Vision previously, a directory containing default values wascreated in !SASROOT/saspgm/cpe/sitelib. Since then, you may have created anotherSITELIB library and re-programmed IT Service Vision to use this new location as its defaultSITELIB. If you are not sure if this happened, you can find out by starting SAS and your existingIT Service Vision interactively, and then issuing the LIBNAME command from the command linein the toolbar. Note the location of the SITELIB library.
In either case, you should close your LIBNAME window, the IT Service Vision application, and theSAS session and make a backup of that whole directory now. This will ensure that you have amethod of restoring the directory’s contents if a problem occurs after the update.
If this is not your first installation of IT Service Vision, you now need to consider the maintenanceof the SITELIB library. In the SASMISC directory just installed, locate a member calledCPSITEUP. This code will merge your old, production SITELIB library with your newlyinstalled version. Please read the following sections for details on site libraries and how to run thecode.
Maintaining SITELIB with Previous IT Service Vision Installations
Note: The following section is relevant when this is not a first installation of IT Service Vision.
When a new version or release of IT Service Vision is installed, a new SITELIB library is created.This ensures that you are able to access any SITELIB updates that may have been made in theproduct.

82 Installation Instructions and System Administrator’s Guide for the SAS System under UNIX Environments
However, since you have the opportunity to update the menu and other SITELIB datasets, youwill probably want to save your modifications and avoid re-engineering them in the new libraryfrom scratch. To preserve your modifications, we have supplied code that will merge yourexisting production SITELIB datasets and catalogs in with the new versions. This code iscontained in the !SASROOT/sasmisc/cpe directory.
If you have an existing production SITELIB library that contains site-wide options or datasetsthat you want to make available to the new release of IT Service Vision, locate the CPSITEUPmember and review its contents.
The CPSITEUP code refers to three SITELIB libraries:
1. The newly installed SITELIB, referred to as NEWSITE,
2. The current, production/default SITELIB (whether it is the previously installed SITELIB ora subsequently re-located version), referred to as OLDSITE, and
3. PRODSITE, which is used in referring to your chosen location for the production SITELIB forthe newly installed release of IT Service Vision.
So, before running CPSITEUP, ensure that the following updates have been made:
• NEWSITE points to your newly installed SITELIB.
• OLDSITE points to your current production/default SITELIB.
• PRODSITE points to a directory or library from which you want to run IT Service Vision 2.4.This could be the same location as OLDSITE or NEWSITE, in which case those libraries will beoverwritten, or it could be somewhere new.
Run the CPSITEUP code, following the instructions at the top of the code.
If you have decided to use a SITELIB library whose location is not that of the newly installedSITELIB for 2.4, CPSITEUP will also update the pointer held in PGMLIB so that your chosenSITELIB becomes the new default SITELIB. You will not need to perform the task described in thefollowing section, “Modifying the default pointer to SITELIB library.”
Other tools that are available for modifying site-wide options are the macros %CPPDBOPT and%CPHDAY, both of which are documented in the IT Service Vision Macro Reference.
Modifying the default pointer to SITELIB library
A SITELIB directory and its files must be write-able by the IT Service Vision administrator andreadable by all other IT Service Vision software users.
When IT Service Vision is started using the %CPSTART macro, you have the option of specifyingthe SITELIB= parameter. This is not required and is usually not specified. If it is specified, theSITELIB= value is used as the SITELIB library for only that invocation. Otherwise, the defaultSITELIB library will be used.

Installation Instructions and System Administrator’s Guide for the SAS System under UNIX Environments 83
This default value is stored in the PGMLIB library and is set at installation to be the name of thenewly installed SITELIB library. If you need to change that default, submit the followingprogram:
Note: Update-access to the PGMLIB library and its components is required.
LIBNAME PGMLIB ’!SASROOT/saspgm/cpe/pgmlib’;DATA PGMLIB.CPSITE;CPSITE="name.of.new-or-updated.SITELIB";RUN;


85
Appendix L, Post-Installation Setup for the MetabaseFacility
Starting with Version 7 of the SAS System, the SAS/EIS Metabase facility has been converted tothe new Common Metadata Repository. The Common Metadata Repository is a general-purposemetadata management facility that provides common metadata services to various metadata-driven applications. The Common Metadata Repository enables applications to share metadatabetween SAS System products.
Using the Common Metadata Repository requires a one-time setup. If the repository managerwas set up in a previous release, it may not need to be set up again. The steps in the followingsections should be completed before you attempt to use the Metabase Facility. For MetabaseFacility users who were using a release prior to Version 7, using the Common MetadataRepository requires a conversion.
Setting Up the System Repository Manager Files
Complete the following steps to set up the necessary system repository manager files. You musthave write access to SASHELP in order to specify the system repository manager.
1. Create a directory that will be dedicated exclusively to the storage of repository managerfiles, for example: !SASROOT/RPOSMGR
This directory should not be used to store other SAS files.
2. At a SAS command line, type REPOSMGR and then select Setup Repository Manager.
3. In the Repository Manager Setup window, Library will default to RPOSMGR. For Path,specify the path from Step 1, above, and then select the Write values to system registrycheck box. Then select OK.
4. In the resulting dialog window, select Yes to generate the necessary repository manager files.
This completes the setup for the System Repository Manager. You can create additionalrepository managers (a user repository manager, for example) by repeating the steps aboveand by using a different path.
Note: This step sets the default location for the repository manager for your site. Individualusers may specify their own repository manager location by following the stepsabove and not selecting the Write values to system registry check box.

86 Installation Instructions and System Administrator’s Guide for the SAS System under UNIX Environments
Registering the SASHELP Repository in the Repository Manager
The SASHELP repository is used in various samples, including the SAS/EIS Report Gallerytemplates. Before beginning the steps below, a repository manager must be created (see previoussection). Complete the following steps to register the SASHELP repository in the RepositoryManager:
1. At a SAS command line, type REPOSMGR and then select Repository Registration.
2. In the Repository Registration window, select New.
3. In the Register Repository (New) window, type SASHELP (in uppercase) in the Repositoryfield. Then type the full directory path where the CORE catalog is located in the Path field, forexample:
!SASROOT/sashelp
4. In the Description field, you can type any character string (for example, SASHELPRepository). Select OK to close the Register Repository (New) window. Select Close to exitthe Repository Registration window.
Note: Repositories cannot span multiple directories because the path cannot containconcatenated directories. If you have existing metabases in concatenated directories, youshould copy the metabases to a single path that will be referenced as a repository.
Converting Version 6 SAS/EIS Metabases to Version 8 Repositories
Please refer to the SAS/EIS software online documentation for instructions on converting Version6 SAS/EIS metabases to Version 8.

87
Appendix M, Post-Installation Instructions for Settingup National Language Support (NLS)
Starting with Version 8.2 of the SAS System, you can set the locale and/or the encoding SASassumes for external data, catalogs and data sets. The following section provides some specificinstructions for installing and setting up your system to run in a locale other than the default.More detailed instructions are provided in the following sections with specific information abouthow the options and Locale Setup application influence the SAS system.
If you do plan to select a locale other than the default, you may also benefit from the additionalnotes. If you will be running SAS as a server on your platform that serves a SAS client on anEBCDIC platform, see the section “Setting up your Server for an EBCDIC Client” in thisappendix. For SAS/Graph users, there are instructions for setting up the correct devmaps andkeymaps in the section “Devmaps and Keymaps for SAS/Graph” later in this appendix.
Tips for Setting up Your System
If you are installing SAS in an environment other than North America, you may want to make useof some of the new features that have been added to Version 8.2 of the SAS system. You will finddocumentation for the SAS system options LOCALE, ENCODING and for the Locale Setupapplication, which provide different levels of National Language Support.
This table below may help you decide what components and options you need to use. Followingthe table, you will find information to help you determine whether to run the Locale Setupapplication as part of your install process.
You are installing SAS for the first time at thiscustomer site and you would like to run in alocale other than the default.
Add the following option in your configurationfile: LOCALE=language[_region]
If you intend to run all of your SASapplications using the default locale.
You do not need to set any of the NLS options.
Choosing to Run the Locale Setup Application as Part of the Install
The Locale Setup application extends the support of the NLS options. You will need to run theLocale Setup application in administrator mode and select the locale if one of the followingconditions is true:
• If you are using PROCs UPLOAD and DOWNLOAD to transfer a SAS data set and both yourclient and server sessions are Version 7 or later.
• If applications at your site reference trantabs created using the TRABASE application.
88 Installation Instructions and System Administrator’s Guide for the SAS System under UNIX Environments
• If you use Remote Library Services or Cross Environment Data Access to access SAS files,views, or external data sets.
Other times you need to run the Locale Setup application
The Locale Setup application also sets up the remote SAS environment for data transfer. Run theLocale Setup application if you are running Version 8.2 of SAS in a locale other than the defaultand you signon to a host running any version of the SAS system.
In the application’s window, you will need to select the locale you want. You will also need tospecify the remote submit option before you close the window.
Background
When you set the locale for Version 8.2 of the SAS system, the locale then influences the encoding,international date and time formatting, and translation tables that are used by the SAS system.You can also set the encoding of the system, which will also influence the translation tables.
A “locale” reflects the local conventions, language, and culture for a particular geographicalregion. A locale’s conventions may include the formatting of dates, times, and numbers. Thecurrency symbol is also a locale convention.
Locale is not the same as language; a language may be spoken in many countries whereconventions are very different. It is also worth noting that a country may have more than oneofficial language. For example, Canada has two languages: English and French.
An encoding is a combination of a character set and an encoding method. In an encoding, eachcharacter in the character set is represented by a unique number. The encoding is used by the SASsystem to process data. It also influences the TRANTAB system option setting.
In Version 8.1, you could run the Locale Setup application to select a locale and encoding for theSAS session. Locale information was stored in the SAS Registry and was queried by applicationsthat needed to be aware of the locale name, encoding, Euro character, and translation tables. Forexample, the SAS session used the trantab information stored in the CORE\LSW\INIT registrywas used to set the TRANTAB system option at startup.
Starting in Version 8.2, three new system options are provided to give you more flexibility forsetting up the locale and session encoding for your SAS session. The Locale Setup application (orLSW) has been redesigned to allow you to enhance the environment set up by the new options.
NLS-Related System Options
The new NLS-related system options that you can use to set your SAS environment are LOCALEand ENCODING. These options are valid in the configuration file and at session startup. They aredocumented in the SAS Companion for the host environment where you install the SAS system.
Installation Instructions and System Administrator’s Guide for the SAS System under UNIX Environments 89
LOCALE
The LOCALE option allows you to specify a locale setting. LOCALE option values contain thelanguage name. For some locales, you can also specify a country name or region to provide morespecific locale information. For example, valid locales for France are French andFrench_France. See the SAS Companion for the host environment where you run the SASsystem for values that can be specified for LOCALE.
When LOCALE is set, the DFLANG system option is set to a value that corresponds to the chosenlocale or “English” if no corresponding value is available. For more information about theDFLANG option, see the SAS Language Reference.
The locale you set also has a common encoding that is used most often on the platform where theSAS system is running. When the LOCALE option is set, it compares the default SAS encodingwith the most common locale encoding. If the two encodings are not the same, the ENCODINGoption is set to the locale encoding. This only occurs if you do not set the ENCODING option atstartup. When the ENCODING option is set, the TRANTAB system option is also set. So, in that way,the LOCALE option also causes the TRANTAB option to be set.
Unlike the LSW, the LOCALE option does not store values in the SAS registry. Run PROCOPTIONS to display the value of the LOCALE option.
ENCODING
The ENCODING option sets the encoding that SAS uses for processing external data. TheENCODING option can be set by specifying ENCODING at startup or, more commonly, byspecifying a LOCALE that uses an encoding other than the default compiler encoding. “Compilerencoding” is the encoding that was used to compile the SAS system on the platform where yourun SAS. Valid values for ENCODING are listed in the SAS Companion for the host environmentwhere you run the SAS system.
Note: ENCODING values on one platform are not necessarily supported on another platform.
When ENCODING is set, the TRANTAB option is also set. On most platforms, all of the first fiveslots are filled:
• local to transport• transport to local• upper case• lower case• character classification trantabs
For more information about the TRANTAB option, please refer to the SAS Language Reference.
SAS will assume that external data is in the specified encoding. If your files are in a differentencoding, use the ENCODING= option on the FILENAME, INFILE, or FILE statement to indicatethe correct encoding. If you use the SAS display manager to manage your files, you will also needto specify ENCODING= on the INCLUDE or FILE commands to indicate an encoding other than thecurrent encoding.

90 Installation Instructions and System Administrator’s Guide for the SAS System under UNIX Environments
Locale Setup Window
In Version 8.2, the Locale Setup SCL application, or LSW, has been redesigned to work inconjunction with the new system options described above. Unless you are in AdministratorMode, the LSW will only list the languages that are supported by the current encoding. Thisallows you to set additional options or safely change to a locale that is supported for that session.
When a new locale is set, the DFLANG system option is set to a value that corresponds to thechosen locale or English if no corresponding value is available. The hex value of the Eurocharacter is also set for the locale. The DFLANG and Euro values are stored in the SAS registry.
The TRANTAB option string is stored in the registry with the new setting. As in V8.1, the LSWdoes copy the trantabs from the LOCALE catalog into the SASUSER.PROFILE and SASCFG.HOSTcatalogs if you have the proper permissions. The LSW will also create trantabs using the TRABASEnaming convention at your request.
The LSW does not set the encoding for the SAS session. Please see Locale Setup Windowdocumentation in the SAS System Help for complete information.
How to configure your system
If you would like to configure your SAS session for a locale other than the default, you haveseveral options. This section describes how you would use the options documented above to getthe results you want from the SAS system.
Running SAS in a Different Locale
To set the locale for the SAS system at your site, add the LOCALE system option to yourconfiguration file. You can find a list of locale values in the SAS Companion for the host whereyou install the SAS system.
When you read or write a file, the SAS system expects the data in the external files to be in thecompiler encoding. The “compiler encoding” is the encoding used to compile the SAS system onthe platform where you run SAS. To specify a different encoding, see the documentation for theENCODING= option on the FILENAME, INFILE, or FILE statement in the SAS Companion for thehost where you install the SAS system.
When LOCALE is set, the ENCODING system option will be set to an encoding that supports thelanguage for the locale. The SAS system expects user data to be in the encoding that matches theENCODING option. If you prefer an encoding other than the most common encoding for the locale,you can also set the ENCODING system option in the configuration file.
When the ENCODING option is set, the TRANTAB option will always be set to match the ENCODINGsystem option. The transport format trantabs set by the TRANTAB option are used by PROCsCPORT and CIMPORT to transfer SAS data files. They are also used by PROCs UPLOAD andDOWNLOAD for transferring files and catalogs, rsubmitting code to the server, and returning logsand listings to the client. However, the transport format trantabs are not used for SAS data settransfer. Please see the next section for a description of the host-to-host trantabs that are set up bythe LSW.
Installation Instructions and System Administrator’s Guide for the SAS System under UNIX Environments 91
The Output Delivery System (ODS) will create output using the encoding that matches theENCODING system option. Refer to the documentation for the Output Delivery System if youwould like your output created using a different encoding.
For more information, please see the SAS Procedures Guide in the Base SAS software fordocumentation about PROCs CPORT and CIMPORT. Please see the SAS/Connect User’s Guide fordocumentation on PROCs UPLOAD and DOWNLOAD.
Running SAS with Special Locale Settings
The LSW extends the support of the locale in your SAS system. The LSW will set the Eurocharacter that matches the encoding and copy the host-to-host trantabs into place. The host-to-host trantabs have a different purpose than then transport trantabs that are set in the TRANTABsystem option by the LOCALE and ENCODING system options.
The host-to-host trantabs that the LSW sets up are used by PROCs UPLOAD and DOWNLOAD forSAS data set transfer, Cross Environment Data Access (or CEDA), and Remote Library Services(RLS). Please see the SAS/Connect User's Guide for information on the procedures. Also, see theSAS/Connect User’s Guide and SAS/Share User’s Guide for documentation on RLS.
If users at your site depend on using trantabs that were created by the Version 6 TRABASE sampleprogram, the LSW can be used to copy those trantabs into place as well.
Additional Information
Setting up your Server for an EBCDIC Client
If you are running your SAS session as a server to an EBCDIC client, you may want to setup yourserver so it will process the SAS syntax correctly. Some special scanner translation tables arelocated in the SASHELP.LOCALE catalog that you can use for this purpose. Look for the trantabswith the name lapl_E2A, where ‘la’ is a two-character language identifier for the EBCDICencoding and ‘pl’ is a two-character encoding identifier for the encoding on your platform.
For example, to set up your server for a Danish user running SAS as a client on EBCDIC, youwould use the trantab that matches the EBCDIC Danish encoding and the ISO-8859-1 Latin1encoding, which is DAL1_E2A. Set the scanner trantab as follows:
options trantab=( , , , , , dal1_e2a );
This options statement can be added to the configuration or autoexec file used by your server.The server must always be Version 8.2. However, this should work for an EBCDIC client runningany version of SAS.
Use the trantab descriptions for tips about which trantab you need.
Devmaps and Keymaps for SAS/Graph
If you are running SAS/Graph and your SAS session locale is not the default, you will need to usethe devmaps and keymaps for the locale. The devmap and keymap entries you need are in the
92 Installation Instructions and System Administrator’s Guide for the SAS System under UNIX Environments
SASHELP.LOCALE catalog. You will need to copy those that match the locale to yourGFONT0.FONTS catalog.
Change the name of the entry to ’default’ so they will be loaded for you. For example, a Polishuser on a UNIX platform would need to use the devmap and keymap named LAT2.
libname gfont0 ’your-font-library’;%lswgraph(e142);
Here is a list of the devmaps and keymaps that match the locales on your platform:
Locale Devmap and Keymap NameArabic arab
Bulgarian cyrl
Byelorussian cyrl
Croatian lat2
Czech lat2
Danish lat9
Dutch lat1
English lat1
English_Australia lat1
English_Britain lat9
English_Canada lat1
English_Caribbean lat1
English_Ireland lat9
English_Jamaica lat1
English_NewZealand lat1
English_SouthAfrica lat1
English_UnitedStates lat1
Estonian lat6
Finnish lat9
French lat9
French_Belgium lat9
French_Canada lat1
French_France lat9
French_Switzerland lat9
German lat9
German_Austria lat9
German_Germany lat9
German_Switzerland lat9
Greek grek
Hebrew hebr

Installation Instructions and System Administrator’s Guide for the SAS System under UNIX Environments 93
Hungarian lat2
Icelandic lat1
Italian lat9
Italian_Italy lat9
Italian_Switzerland lat9
Latvian lat6
Lithuanian lat6
Norwegian lat9
Polish lat2
Portuguese lat1
Portuguese_Brazil lat1
Portuguese_Portugal lat1
Romanian lat2
Russian cyrl
Serbian cyrl
Slovakian lat2
Slovenian lat2
Spanish lat9
Spanish_Spain lat9
Spanish_LatinAmerica lat1
Swedish lat9
Turkish lat5
Ukrainian cyrl


95
Appendix N, Post-Installation Setup for SAS® OLAP
Server Software
Setting up Access Control without SAS/EIS Software on Your Server
Please keep in mind that Access Control Setup consists of three steps:
1. Set your Access Control Key - modifies SASHELP.MB2. Set your Access Control environment (aclroot, ac_active flag, etc.) - modifies
SASHELP.AC3. Create your Access Control definitions (users, groups, the actual ACL) – data sets PASSWD,
GROUPS, and ACL in aclroot
Each of these steps can be performed interactively in a set of windows (where available) orprogrammatically.
Starting the Access Control Setup Dialog Window
Use the command AF C=SASHELP.EISSRV.STARTAC.SCL <USER=uid PASSWD=password>
Follow the instructions in Help or the description in SAS/EIS Software: Administrator’s Guide -Access Control Tasks to assist you through the setup process. On 3270 platforms, where the AccessControl Setup GUI is not very comfortable to use, you may prefer to do your AC setupprogrammatically. Please see the following section for more information on that subject.
Setting Your Access Control Key and EnvironmentProgrammatically
Setting the Access Control Key
The Access Control Key is stored in the entry SASHELP.MB.ACLAPWM.SCL. You need writeaccess to this entry in order to change the Access Control Key. Please refer to How to set up writeaccess to SASHELP.AC and SASHELP.MB for more information.
Using a command
Use the following command to set the Access Control Key (for setting the Access Control Key toADMIN):
96 Installation Instructions and System Administrator’s Guide for the SAS System under UNIX Environments
AF C=SASHELP.EISSRV.SETAPW.SCL PW=ADMIN
• To reset the Access Control Key to its initial status (no key set), pass in an empty string ("").• Use the special value "0" to use no Access Control Key.• Use the option ECHO=Y to dump the settings in the log.
Using a statement
Use the following command to submit the command as a SAS statement:
DM ’AF C=SASHELP.EISSRV.SETAPW.SCL PW=ADMIN’;
Using SCL
Within SCL code, you can use the following method call to set the Access Control Key:
CALL METHOD (’SASHELP.MBEISSRV.APWUTIL’,’CREAAPWM’, flag, pw-value, rc);
where
• flag is ‘0’ or ‘1’. A ‘0’ indicates to not use a control key; ‘1’ indicates to use a control key• pw-value is the value of the new control key. If flag is ‘0’, this value is ignored• rc is ‘0’ if the update was successful; ‘1’ if it was not successful
Setting the Access Control Environment
The Access Control Environment information is stored in the entry SASHELP.AC.ACLINIT.SCL.You need write access to this entry in order to change the Access Control Environment settings.Please refer to How to set up write access to SASHELP.AC and SASHELP.MB for more information.
Using a command
Use the following command to set the Access Control Environment:
AF C=SASHELP.EISSRV.SETAC.SCLAPW=access control keyACTIVE=Y/NACLROOT=access control root pathACLSERV=serverLOGIN=login applicationAUTOUSER=Y/NLIBSEC=Y/NPW_ENCRYPT=Y/NDISP_CLASS=access control start classQUERY_CLASS=access control query classSERVER_CLASS=access control server classADMIN_CLASS=access control administration classECHO=Y

Installation Instructions and System Administrator’s Guide for the SAS System under UNIX Environments 97
Using a statement
Submit the previous command using a DM statement, e.g.,
DM ’AF C=SASHELP.EISSRV.SETAC.SCL APW=ADMIN ACTIVE=Y ACLROOT="path"’;
Using SCL
Within SCL code, you can use the following method call to set the Access Control Environment:
CALL METHOD (’SASHELP.EISSRV.ACLUTIL’, ’CREAACLI’, rc, flag active,aclroot, aclserv, login_window, autouser_enabled, libsec, pw_encrypt,disp_class, query_class, server_class, admin_class);
Key Description
APW The Access Control Key (required for setac)
ACTIVE Y/N to switch access control on or off
ACLROOT The path of a directory that holds the ACL files
ACLSERVThe name of the remote session or share server forACLROOT. If the session is local, this parameter should beblank.
LOGIN
The four-level name of the AF application or APPLSCR touse as a login dialog. The default isSASHELP.EISSRV.GATE_KPR.FRAME - a dialog with entryfor User ID and Password, and OK and Cancel buttons.There is one other login dialog provided with the system,SASHELP.EISSRV.GATE_KP2.FRAME, which has anadditional Change Password button.
AUTOUSER
Y/N to indicate whether to allow the use of the USER= andPASSWD= options on the EIS, RUNEIS, and METABASEcommands. If these options are given, no login dialogappears (Default=Y)
LIBSEC
Y/N to indicate when the temporary library to access accesscontrol files will be allocated‘Y’ (default): the ACLTMP library is allocated before anddeallocated after each access to the ACL files. Use thissetting to assure that the ACL files don't show up in the SASExplorer.‘N’: the ACLTMP library is allocated once at access controlserver initialization and deallocated at access control servertermination.

98 Installation Instructions and System Administrator’s Guide for the SAS System under UNIX Environments
PW_ENCRYPTY/N indicates whether to encrypt the user passwordstored in the PASSWD file. (Default=Y).
DISP_CLASSThe class used to start the access control subsystemand optionally display a login dialog. The default isSASHELP.EISSRV.ACLDISP.CLASS
QUERY_CLASSThe class used to satisfy queries on the current access controlpermissions. The default is SASHELP.MB.ACLMAIN.CLASS.
SERVER_CLASSThe class used for loading and persisting acl information.The default is SASHELP.EISSRV.ACLSERV.CLASS.
ADMIN_CLASSThe class used for managing user and group information andfor updating the ACL. The default isSASHELP.MB.ACLADMIN.CLASS.
ECHO=Y Dump the current and updated settings in the LOG.
RC(creaacli only) a flag that indicates if the update wassuccessful, where ‘0’ indicates that the update was successfuland ‘1’ indicates that it was not.
Setting Your Access Control Definitions (Users, Groups, ACL)Programmatically
To set your Access Control definitions programmatically, you need to know some basics aboutthe storage of User and Group information and the actual Access Control List.
The Access Control definitions are stored in three data sets in the Access Control Root Path. Thedata sets are password-protected and encrypted using the Access Control Key.
User definitions are stored in the PASSWD data set. Group definitions are stored in the GROUPSdata set. The Access Control List is stored in the ACL data set.
To set your definitions, follow these steps:
1. Set up the Access Control Key and Environment page 992. Set a libname ACL on your aclroot path page 993. Define the groups page 994. Define the users page 1025. Create your metabase registrations page 1026. Create your ACL page 102
a. Initialize partial ACL data sets page 102b. Edit the partial ACL data sets page 103c. Merge the partial ACL data sets page 106
Installation Instructions and System Administrator’s Guide for the SAS System under UNIX Environments 99
1. Set up the Access Control Environment
Here is a simple example of how to set up the Access Control Environment. Choose an AccessControl Key, and create a location where you want to store your AC definitions. Then submit:
DM ’AF C=SASHELP.EISSRV.SETAPW.SCL PW=access control key’;DM ’AF C=SASHELP.EISSRV.SETAC.SCL APW=access control key ACLROOT=”access control root path” PW_ENCRYPT=N’;
Note: By default, user passwords stored in the PASSWD data set are encrypted using the_encryptPassword method of the ACLSERV class. This adds an additional layer ofprotection to the information stored in the PASSWD data set. To be able to store plain textpasswords in the PASSWD data set when managing the user setup outside of the AccessControl definition dialogs, use PW_ENCRYPT=N option when setting up the access controlenvironment.
2. Set a libname ACL on your aclroot path
LIBNAME ACL “ access control root path”;
3. Define the groups
The GROUPS data set holds the names and descriptions of the access control groups. The data sethas one record for each group defined to the system. When the GROUPS data set is initiallycreated, two additional records are also added, one for the SYSTEM (Administrator) and anotherfor the USERS (Users) group.
A group name can have from three to eight characters. Group names begin with a letter, and arefollowed by letters, numbers, or underscores. Letters must be in upper case.
The GROUPS data set has the following structure:
GROUP $8 Group Name (needs to be upper case!)
DESC $32 Group Description
You can edit the acl.groups data set by using an interactive facility, like FSEDIT, or FSVIEW,or data management tools like the data step.
Example for using a data step:
data work.groups;infile datalines;length group $8 desc $32;input group / desc &;datalines;SALESSales Staff

100 Installation Instructions and System Administrator’s Guide for the SAS System under UNIX Environments
MKTMarketingMGMTManagement;proc sort data=work.groups;by group;proc sort data=acl.groups(pw=access control key);by group);data acl.groups(pw=access control key);merge acl.groups(pw=access control key) work.groups;by group;run;
Group names must be upper case valid SAS names, of three to eight characters length.
Please note that when you first activate Access Control (using either the Access Control Setupwindow or the SETAC facility) a GROUPS data set is created in your aclroot path, with the twogroups SYSTEM and USERS already defined. That is why the previous data step merges your newdefinitions with the already existing ones.
4. Define the users
The PASSWD holds the definitions for the access control users. The following information is storedfor each user:
User idA 32-character string that must start with a character,followed by characters, numbers, or underscores. Theuserid is stored in upper case.
Description Mixed case, free format descriptive string.
GroupsNames of the groups a user belongs to, in upper case,separated by commas.
Password
A 16-character string that must start with a character,followed by characters, numbers, or underscores. By default,this password is stored encrypted using the_encryptPassword method of the ACLSERV class. UsePW_ENCRYPT=N when setting up the access controlenvironment to use unencrypted passwords. Unencryptedpasswords are stored in upper case.
Creation date/timeA SAS datetime value indicating the creation time of theuser’s record.
The data set holds one record for each user of the system. When the PASSWD data set is initiallycreated, one record for the ADMIN user (password ADMIN) is added.

Installation Instructions and System Administrator’s Guide for the SAS System under UNIX Environments 101
The PASSWD data set has the following structure:
USERID $32 User ID (upper case)
FULLNAME $32 User Description
GROUP $198 User Groups
PASSWORD $16 User Password
C_DATET $8 DateTime
You can edit the acl.passwd data set by using an interactive facility, like FSEDIT, or FSVIEW,or a data management tool like the data step.
Example for using the data step:
data work.passwd;infile datalines dsd;length userid fullname $32 group $198 password $16 c_datet 8;format c_datet datetime16.;c_datet=time();input userid / fullname & / group / password ;datalines;MJONESMarkus JonesSALESMJONES1OFIELDSOscar FieldsMKTOFIELDS1ABEANAbraham BeanSALES,MKT,MGMTABEAN1;proc sort data=work.passwd;by userid;proc sort data=acl.passwd(pw=admin);by userid;data acl.passwd(pw=admin);merge acl.passwd(pw=admin) work.passwd;by userid;run;
Userids must be upper case valid SAS names, of 3 to 32 characters length. Passwords must beupper case valid SAS names, of 3 to 16 characters length.

102 Installation Instructions and System Administrator’s Guide for the SAS System under UNIX Environments
Please note that when you first activate Access Control (using either the Access Control Setupwindow, or the SETAC facility) a PASSWD data set is created in your aclroot path, with the userADMIN (password ADMIN) already defined. That is why the previous data step merges your newdefinitions with the already existing ones.
5. Create your metabase registrations
If you have not already done so, create your metabase registrations now. An Access Controldefinition is always linked to an existing metabase registration.
Use the METABASE command to invoke the Metabase GUI.
6. Create your ACL
For each group/metabase registration combination, fill a data set with the structural informationfrom the metabase registration, and, if needed and available, with the class column valuecombinations. There is a utility, FILLACL, that does that for you. Edit those partial data sets to setyour access control tags. Finally, merge the partial ACL data sets back into ACL.ACL.
A. Initialize partial ACL data sets
Note: The FILLACL utility uses the SAS OLAP Server classes to access the data. If you donot have SAS/EIS software, you might have to run the following utility first, to makesure the correct data model classes are being used:
DM ’AF C=SASHELP.EISSRV.SET_OLAP_CLASSES.SCL MODMGR=SASHELP.EISSRV.MODMGR.CLASS MODMGRE=SASHELP.EISSRV.MODMGRE.CLASS EMDDB_C=SASHELP.EISSRV.EMDDB_C.CLASS’;
Use the FILLACL utility to create a data set with the same structure as the ACL data set, andinitialize it with information from the registration and the data.
DM ’AF C=SASHELP.EISSRV.FILLACL.SCL APW=access control key OUTDS=partial ACL data set name GROUP=groupname REP="repository name” REG=" registration name” LEVEL=ALL/DIMSONLY';
using a different OUTDS= value each time , and setting the other options accordingly.
Installation Instructions and System Administrator’s Guide for the SAS System under UNIX Environments 103
FILLACL accepts the following named parameters:
Key Description
APW The access control key. This is required.
OUTDSThe data set where the partial ACL file should be written. If thedata set exists, it will be overwritten.
GROUPName of the user group for initializing the GROUP column (uppercase!)
REPThe name of the repository in which the registration is stored. Usequotes if the repository name contains blanks or special characters.
REG
The name of the metabase registration to use. Please note that thetypical registration name has the form LIB.MEM, e.g.,SASHELP.PRDMDDB. By default, a metabase registration has thename of the SAS file (data set or MDDB) that was registered.
LEVELALL/DIMSONLY. ALL is the default. DIMSONLY only reads out thestructural information, no data values.
B. Edit the partial ACL data sets
Edit each data set created by FILLACL, using an interactive facility like FSEDIT or FSVIEW.Usually, you would only edit the TAG column. Use TYPE, VALUE, and ITEM to identify theelement for which a tag will be set.
For example, to drop the COUNTRY variable, find the record with TYPE=CL,VALUE=COUNTRY, and set a ‘D’ in the TAG column.
Do not set any values for TAG in those records that you do not want to restrict. These recordswill be removed when merging the partial ACL data sets in the next step.
Please refer to SAS/EIS Software: Administrator’s Guide - Using Access Control for informationon how to use Access Control tags.

104 Installation Instructions and System Administrator’s Guide for the SAS System under UNIX Environments
Each partial ACL has the following structure:
GROUP $8 Group Identifier
TARGET $17 Target Identifier
TYPE $2 Information Type
ITEM $42 Information Item
VALUE $200 Information Value
TAG $1 Access Control Tag
The columns hold the following information: Column name, Description – values.
GROUPName of the group to which the access control definitions in thecurrent record apply (upper case!)
TARGET
The ID of the metabase registration to which the access controldefinitions in the current record apply, or #A, forapplications/application databases, or #F, for application functions.
Record type:If TARGET is a metabase registration ID:
T Table
H Hierarchy
HL Hierarchy Level
A Analysis variable (ANALYSIS, COMPUTED)
S Statistic
C Category variable (CATEGORY)
CL Category variable level (data value)
If target is #A:
AP for application
AD for application database
TYPE
If target is #F: Always F
Installation Instructions and System Administrator’s Guide for the SAS System under UNIX Environments 105
Depending on TYPE, value can be:
Type Value
TTABLE (dummy value when the wholetable is being dropped)
H Hierarchy name
HL Hierarchy level name
A Analysis variable name
S Statistic keyword
C Category variable name
CL Category variable value. Special value #T for _Total_
AP Application name (2-level)
AD Application Database name (4-level)
VALUE
F Function id.
Additional identifier, set to identify what the VALUE refers to for
HL to identify the hierarchy
CL to identify the Category variableITEM
S to identify the Analysis variable

106 Installation Instructions and System Administrator’s Guide for the SAS System under UNIX Environments
Access Tag. This is the only column you would typically edit. Validtags are as follows:
D Drop
K Keep
I Initial
H Hide
S Show
Valid TAGs by TYPE:
T D
A D, K, H
S D, K
H D, K
C D, K
CL D, K, I, H, S
HL D, K, I
AP D, K
AD D, K
TAG
F D, K
C. Merge the partial ACL data sets
The result is a collection of data sets. To merge them and remove the unneeded observations(the ones with TAG=’’), submit:
data acl.acl(pw=access control key encrypt=yes);set work.onework.two..;if tag = ’’ then delete;run;

Installation Instructions and System Administrator’s Guide for the SAS System under UNIX Environments 107
Write Access to SASHELP.AC and SASHELP.MB
1. Choose an empty library or path for use as a playpen. Later you can either merge it into yourSASHELP library, or concatenate it in front of your SASHELP path.
libname playpen ’path’;proc catalog; copy in=sashelp.ac out=playpen.ac; copy in=sashelp.mb out=playpen.mb; select aclapwm.scl;run;quit;
catname sashelp.ac (playpen.ac);catname sashelp.mb (playpen.mb sashelp.mb);
2. Set up your Access Control Key and Environment. When setting up your SAS applicationserver, or distributing the application to your users, make sure the modified catalogs areconcatenated in front of your SASHELP path by modifying the SAS CONFIG file, or the SASclist accordingly.
Specifying OLAP Classes
The following utility program can be used to override the default OLAP Server classes andspecify your custom OLAP Server classes.
DM ‘AF C=SASHELP.EISSRV.SET_OLAP_CLASSES.SCLMODMGR=MODMGRE=EMDDB_C=DP=MDVIEWER=MDMODEL=
‘;
SET_OLAP_CLASSES accepts the following named parameters:
Key Description
MODMGR The 4-level name of the model manager class.
MODMGRE The 4-level name of the model manager engine class.
EMDDB_C The 4-level name of the model coordinator class.
DP The 4-level name of the data provider class.
MDVIEWER The 4-level name of the OLAP metadata viewer class.
MDMODEL The 4-level name of the OLAP metadata model class.


109
Appendix O, Post-Installation Setup for RiskDimensions
Software
Starting the Risk Dimensions Application
A UNIX script file called sasrisk is located in your SASROOT directory. Append your SASROOTdirectory name to your system PATH environment variable, and use sasrisk to start up theRisk Dimensions software.


111
Appendix P, Post-Installation Setup for SAS/SECURESoftware
SAS/SECURE software includes client components that you can use to create non-SAS Systemclient applications that communicate with a SAS server in a secure environment. To useencryption between a non-SAS System client and a SAS Server with SAS/SECURE softwarelicensed, you must install the SAS/SECURE client components on the client machine.
SAS/SECURE Client for Windows
The secwin.exe executable installs the files necessary for the IOM Bridge for COM to use theCryptoAPI algorithms. It also contains a TAR and ZIP file that is used to develop Java clients thatutilize the encryption support.
SAS/SECURE Client for Java
The SAS/SECURE client for Java provides encryption support for Java applications. You canincorporate this support into applications that are written using the following components:
• SAS/SHARE driver for JDBC• SAS/CONNECT driver for Java• IOM Bridge for Java
Client-Side Components CD
The SAS/SECURE client components are available on the SAS Client-Side Components CDincluded with your SAS Software distribution.


113
Appendix Q, Post-Installation Setup for SAS/SHARE®
Software
User Authorization
You are required to complete the steps from the section “Configuring User Authorization” onpage 21 in Chapter 3, “Post-Installation Instructions.” This allows SAS/CONNECT, SAS/SHARE,and SAS Integration Technologies software to authenticate a client’s identity and check a client’sauthority to access resources. Using SAS Setup, follow these steps:
System Configuration for the TCP/IP Communications Method
The SAS system option COMAMID= specifies which access method SAS/SHARE software shoulduse for communication. You must specify COMAMID=TCP to use the TCP/IP access method,which is the only access method available for use with this release of SAS/SHARE serversrunning under UNIX.
Each SAS/SHARE server that runs on a network node must be defined as a service in the file/etc/services or /etc/inet/services on that node. Each entry in this file associates aservice name with the port number and protocol used by that service. An entry for a SAS/SHAREserver has the following form:
<server name> <port number>/tcp # <comments>
The server name must be 1-8 characters in length. The first character must be a letter orunderscore; the remaining seven characters can include letters, digits, underscores, the dollar ($)sign, or the at (@) sign.
An entry for a server whose name is MKTSERV might look like the following:
mktserv 5000/tcp # SAS/SHARE server for Marketing and Sales
The server name is specified with the SERVER= option in the LIBNAME statement, and theOPERATE procedure in user and server administrator programs.
System Configuration for the APPC Communications Access Method
See “System Configuration for the APPC Communications Access Method,” on page 50 in theappendix “Post-Installation Setup for SAS/CONNECT Software,” for information on establishingan environment to use SNA LU6.2 APPC (Advanced Program-to-Program Communications)within your SAS applications under HP-UX and AIX.
Note: Currently, only a client-side implementation is available for use with eitherSAS/CONNECT or SAS/SHARE software. The SAS/SHARE server cannot be

114 Installation Instructions and System Administrator’s Guide for the SAS System under UNIX Environments
configured to run on a UNIX Operating System using the APPC Communications AccessMethod.
Client-Side Components
SAS/SHARE software includes client components that are used outside of your SAS installation.These components are described below:
SAS/SHARE Data Provider
The SAS/SHARE data provider enables you to access, update, and manipulate SAS data usingOLE DB- and ADO-compliant applications on Windows platforms.
SAS ODBC Driver
The SAS ODBC driver enables you to access, update, and manipulate SAS data from ODBC-compliant applications on Windows platforms.
SAS/SHARE Driver for JDBC
The SAS/SHARE driver for JDBC enables you to write applets, applications, and servlets thataccess and update SAS data. The Java Tools package that includes the SAS/SHARE driver forJDBC also includes the SAS/CONNECT driver for Java. If you are writing Java programs usingthese interfaces, you may also want to use the tunnel feature. This optional feature can be usedwith the Java applets you write to solve some common configuration problems.
SAS/SHARE SQL Library for C
The SAS SQL Library for C provides an application programming interface (API) that enablesyour applications to send SQL queries and statements through a SAS/SHARE server to data onremote hosts.
SAS/SHARE client components are delivered with SAS/SHARE Software and may be found inthe !SASROOT/misc/share directory. See the readme.txt file in this directory for adescription of each component file. SAS/SHARE client components are also available on the SASClient-Side Components CD included with your SAS Software distribution.

115
Appendix R, Post-Installation Setup for WebHound
WebHound Functionality
WebHound turns Web traffic data into information and enables you to optimize your e-businessinvestment. WebHound captures information about Web traffic, summarizes the information fordetailed and historical analyses and defines that information to your data warehouse.
In addition, WebHound provides standard reports, both static and dynamic, and allows customizedreports and queries to be built. Presentation is in graphical or tabular form, and is presentedthrough your Web browser, either NetScape Communicator or Microsoft Internet Explorer.
WebHound can transform the largest Web system and the most complex Web logs into a fullyfunctioning data warehouse, giving you the ability to combine this data with other customer data.WebHound allows you to discover information about your customers and to personalize yourprocesses to increase sales. WebHound is an important part of Customer RelationshipManagement (CRM) Solution.
If your site is authorized for WebHound software and the installation instructions for SASsoftware detailed earlier in this document have been followed, then your WebHound softwarehas been installed in the !SASROOT/ folder. The following sections describe WebHound’sconfiguration.
Configuring WebHound
Complete the following steps to configure your WebHound software:
1. Bring up SAS and enter webhound on the SAS command bar. This will bring up theAdministrator GUI wizard.
2. Enter the name, the description and the directory for your WebHound environment, and thelocation of your Web log data.
3. To process Web log data, enter the following macro commands from your program editorwindow:
%WebHound(data_store=<WebHound_environment_directory>, program=extract);%WebHound(data_store=<WebHound_environment_directory>, program=load);%WebHound(data_store=<WebHound_environment_directory>,program=make_reports);%WebHound(data_store=<WebHound_environment_directory>, program=make_mddbs);
where <WebHound_environment_directory> is the directory of your WebHoundenvironment where you defined using the Administrator GUI wizard.

116 Installation Instructions and System Administrator’s Guide for the SAS System under UNIX Environments
Creating a SAS/IntrNet Application Server Repository Manager forUse with WebHound
WebHound registers its MDDBs and HOLAP views to an Open Metadata Repository, which, inturn, is registered to a repository manager. The MDDBs and HOLAP views are accessed viaSAS/IntrNet.
For WebHound, it is recommended that a separate repository manager be created for the sole useof the application server that is servicing MDDB Report Viewer requests. Normally, this shouldneed to be done once at WebHound installation time.
During weblog data processing, WebHound creates a repository (called WBREPOS) and registersthat repository in the existing repository manager for your SAS session. This WBREPOS repositorymust not use the same repository manager as the application server. During WebHoundprocessing, if WebHound cannot find a repository manager or cannot successfully utilize anexisting repository manager, WebHound will create a new repository manager in SASUSER,register WBREPOS repository there, and continue processing.
Creating the Application Server Repository Manager
Complete the following steps to set up the necessary repository manager files for the Applicationserver:
1. Create a directory that will be dedicated exclusively to the storage of repository manager filesfor the application server, for example: /usr/webhound/stayarea/mddbs/RPOSMGR
Note: The RPOSMGR directory can be in any location that is readable by the userid underwhich the application server will run. It does not need to be within the WebHoundenvironment directory.
2. Start an interactive SAS session. In normal operations, the application server should have itsown SASUSER and should not share a SASUSER with other SAS sessions.
3. At a SAS command line, type REPOSMGR. This will bring up Repository Manager window.Select Setup Repository Manager.
4. In the Repository Manager Setup window, Library will default to RPOSMGR.a. For Path, record its current value and then specify the path from Step 1 above.b. Do not check the Write values to system registry check box.c. Select OK.
5. In the resulting dialog window, select Yes to generate the necessary repository manager files.After the process completes, select OK to go back to the Repository Manager window.
6. From the Repository Manager window, select Repository Registration. In theRepository Registration window, select New.
7. In the Register Repository (New) window, type WBREPOS (in uppercase) in theRepository field. For path, specify the location of WBREPOS of your WebHound
Installation Instructions and System Administrator’s Guide for the SAS System under UNIX Environments 117
environment. For example, if your WebHound environment directory is $HOME/datastore,then WBREPOS path is $HOME/datastore/mddbs/WBREPOS.
8. Select OK to close the Register Repository (New) window. Select Close to exit theRepository Registration window.
9. Select Setup Repository Manager again.a. Reset the Path to its original value as recorded in Step 4 above. If you cannot reset the
Path to its original value because your path field was blank, skip to Step 10 below.b. Select OK.c. In the resulting dialog window, select OK.d. Select Exit, and disregard the remaining steps in this section.
10. If your path field was blank, go to your !SASUSER and see whether you have a rposmgrdirectory in that directory.
• If rposmgr directory does not exist in !SASUSER, follow these steps:a. Create a rposmgr directory in !SASUSER.b. In Setup Repository Manager, set your path to !SASUSER/rposmgr. Do not check
the Write values to system registry check box. Select OK.c. In the resulting dialog window, select Yes to generate the necessary repository manager
files.d. After the process completes, select OK to go back to the Repository Manager window.
Select Exit.
• If rposmgr directory exists in !SASUSER , follow these steps:a. In Setup Repository Manager, set your path to !SASUSER/rposmgr. Select OK.b. After the process completes, select OK to go back to the Repository Manager window.
Select Exit.
Application Server Setup
After the previous procedure has been followed to register WBREPOS to a repository manager, thissection provides details about setting up an application server for use with WebHound.
First, set up an application server SAS/Intrnet appserver service named webhound. This willcreate an appstart.sas file in a directory named webhound in the path you pointed to in theapplication server setup. See the appendix “Installing SAS/IntrNet Software” on page 75 for moreinformation on SAS/Intrnet configuration.
The appstart.sas file must be updated to surface the repository information defined in theprevious section to SAS/IntrNet. Modify either an existing appstart.sas file for your site towork with WebHound, or use the sample appstart.sas delivered with WebHound.
Using the Sample Provided with WebHound
To use the WebHound-provided sample, follow these steps:
1. Copy !SASROOT/misc/webhound/appstrux.sas to the application server directory forthe WebHound IntrNet service (described above).

118 Installation Instructions and System Administrator’s Guide for the SAS System under UNIX Environments
2. Rename the file appstart.sas, and edit it as detailed below.
3. The path to the repository manager specified above in Step 1 of the section “Creating theApplication Server Repository Manager” should be entered on the following line, which isfound near the top of the file:
%let reposmgr = /usr/webhound/stayarea/mddbs/RPOSMGR;
4. Finish updating appstart.sas as directed by the comments within it.
5. Start your application server.
Using An Existing Site-Specific File
To use an existing site-specific appstart.sas, make the following modifications to PROCAPPSRV, using the WebHound sample appstrux.sas file as a guide:
1. Allocate a data library for RPOSMGR, pointing to the application server repository manager.
2. Allocate a program library called mrvsys to !SASROOT/sashelp.
3. Add the following statement:
proglibs sashelp.wbtvdemo;
4. Allocate a data library called mrv to !SASROOT/sashelp.
5. Allocate data libraries called mddbs, summary, and detail, pointing to<datastore>/mddbs, <datastore>/summary, and <datastore>/detail,respectively.
You may want to cut-and-paste these statements from the sample appstrux.sas into thereal appstart.sas and edit them appropriately.
6. Start your Application server.
Configuring your Web server for use with WebHound
You will need to have access to a Web server or to install a Web server (for example, Apache WebServer, Microsoft’s Personal Web Server, etc.). Refer to your Web server installation instructionsto install and/or setup your Web server. After this procedure is complete, performing thefollowing steps will configure your Web server for use with WebHound.
1. Install SAS/IntrNet CGI Tools from the SAS Client-Side Components CD to your Web server.
2. A platform-specific archive file, webhdsrv (webhdsrv.exe for Windows platform,webhdsrv.tar for UNIX platform) contains HTML and applets files that need to be on theWeb server. Determine the platform of your Web server, Windows or UNIX, and extract theappropriate webhdsrv archive file for the platform of your Web server.
Installation Instructions and System Administrator’s Guide for the SAS System under UNIX Environments 119
• For a Windows Web server, copy or ftp the webhdsrv.exe file to your Windows Webserver. It will be located in the !SASROOT\webhound\sasmisc directory if WebHoundis installed on Windows, or the !SASROOT/misc/webhound if WebHound is installedon UNIX.
Click on webhdsrv.exe and unzip to <wwwroot> or unzip to a staging area first andcopy to <wwwroot>. For example, if your Web server’s root directory isc:\Inetpub\wwwroot, then unzip webhdsrv.exe into that directory.
• For a UNIX Web server, copy or ftp the file webhdsrv.tar to your UNIX Web server. Itwill be located in the !SASROOT\webhound\sasmisc directory if WebHound isinstalled on Windows, in !SASROOT/misc/webhound if WebHound is installed onUNIX.
Extract into the <wwwroot> directory of your UNIX Web server, or extract to a stagingarea first and copy to <wwwroot>. For example, if your Web server’s root directory is/local/inetpub/wwwroot, then enter the following commands:
cd /local/inetpub/wwwroottar xvf webhdsrv.tar
3. You will have a broker.cfg file that can be used as-is or merged into an existingbroker.cfg file.
If you plan to merge into an existing broker.cfg file, make sure you add the WebHound-specific parameters that are defined in WebHound’s shipped version of the broker.cfg file.
If you use WebHound’s broker.cfg file, you need to modify the broker configuration file toadd your application server’s hostname and the port number that you define when you startyour application server. The provided broker.cfg file sets up a socket service to localhoston Port 5001. Update the Server, Port, and Serviceout values as needed.
Note: The service name must be webhound.
Copy this broker.cfg file to the location where your broker executable resides.WebHound’s shipped version of the broker configuration file, broker.cfg, is in thedirectory c:\Inetpub\wwwroot\sasweb\WebHound\misc if your Windows Web serverroot directory is c:\Inetpub\wwwroot.
On UNIX, the broker.cfg file will be in the directory/local/inetpub/wwwroot/sasweb/webhound/misc if your Web server root directoryis /local/inetpub/wwwroot.
4. If your broker executable file is not located in the <wwwroot>/cgi-bin directory of yourUNIX Web server or in the <wwwroot>\cgi-bin directory of your Windows Web server,set up a virtual directory /cgi-bin aliased to the directory containing your brokerexecutable file.
On Windows, the name of the broker executable file is broker.exe. On UNIX, the name ofthe broker executable file is broker.

120 Installation Instructions and System Administrator’s Guide for the SAS System under UNIX Environments
5. Copy the reports directory from your WebHound environment directory to the reportsdirectory of your Web server. If your Web server is on UNIX, the reports directory is locatedin the <wwwroot>/sasweb/webhound directory. If your Web server is on Windows, thereports directory in the <wwwroot>\sasweb\webhound directory.
Your WebHound environment directory is defined using WebHound Administrator GUI.These reports are files that are generated after running WebHound’s SAS macros to processyour Web logs.
6. Bring up your browser and enterhttp://<webserver>/sasweb/webhound/index.html where <webserver> is thelocation of your Web server.
121
Appendix S, Using Host Sort Routines
This appendix provides instructions for making host sort routines available to the SAS System.Supported host sort routines are SyncSort and CoSORT. To use host sort routines with the SASSystem, complete the following steps:
1. Install the host sort library on your system by following the instructions provided by thevendor. Ensure that the host sort routine works outside of the SAS System.
2. Make the host sort library available to the SAS System by following the instructions in thefollowing section, “Making Host Sort Routines Available.”
3. Submit an options statement in a SAS session to specify the host sort routine by following theinstructions in the section “Using Host Sort Routines in a SAS Session.”
Making Host Sort Routines Available
This section describes the system-specific instructions for making host sort routines available tothe SAS System.
For AIX
Use either of the following two methods:
Create symbolic links to the host sort libraries from one of the directories searched bydefault, such as /usr/lib, as shown in the following example for SyncSort:
ln –s /usr/local/syncsort/lib/libsyncsort.a /usr/lib
or
Set the environment variable $LIBPATH to the directory containing the host sort library,as shown in the following example for SyncSort:
Note: If you are running SAS programs through a batch facility, make sure theenvironment variables described below are set correctly.
q Using Bourne Shell
LIBPATH=/usr/local/syncsort/lib:$LIBPATHexport LIBPATH
122 Installation Instructions and System Administrator’s Guide for the SAS System under UNIX Environments
q Using C Shell
setenv LIBPATH /usr/local/syncsort/lib:$LIBPATH
For ABI+ for Intel® Architecture, Compaq Tru64 UNIX, IRIX, and Solaris
Use either of the following two methods:
Create symbolic links to the host sort libraries from one of the directories searched bydefault, such as /usr/lib as shown in the following example for CoSORT:
ln –s /usr/local/cosort/lib/libsyncsort.so /usr/lib
or
Set the environment variable $LD_LIBRARY_PATH to the directory containing the hostsort library as shown in the following example for CoSORT:
Note: If you are running SAS programs through a batch facility, make sure theenvironment variables described below are set correctly.
q Using Bourne Shell
LD_LIBRARY_PATH=/usr/local/cosort/lib:$LD_LIBRARY_PATHexport LD_LIBRARY_PATH
q Using C Shell
setenv LD_LIBRARY_PATH /usr/local/cosort/lib:$LD_LIBRARY_PATH
For HP-UX
Use either of the following two methods:
Create symbolic links to the host sort libraries from one of the directories searched bydefault, such as /usr/lib, as shown in the following example for SyncSort:
ln –s /usr/local/syncsort/lib/libsyncsort.sl /usr/libln –s /usr/local/syncsort/lib/libmfsyncsort.sl /usr/lib
or
Set the environment variable $SHLIB_PATH to the directory containing the host sortlibrary as shown in the following example for SyncSort:
Note: If you are running SAS programs through a batch facility, make sure theenvironment variables described below are set correctly.

Installation Instructions and System Administrator’s Guide for the SAS System under UNIX Environments 123
q Using Bourne Shell
SHLIB_PATH=/usr/local/syncsort/lib:$SHLIB_PATHexport SHLIB_PATH
q Using C Shell
setenv SHLIB_PATH /usr/local/syncsort/lib:$SHLIB_PATH
Using Host Sort Routines in a SAS Session
Note: The options statements throughout this section specify the syntax to submit to the SASSystem. You can also specify these options as command line options and options in thesasv8.cfg file. Refer to SAS Companion for UNIX Environments: for more informationon setting options.
Use the SORTNAME option to tell the SAS System which host sort routine should be used.Submit one of the following options statements in a SAS session:
q To use SyncSort (the default):
OPTIONS SORTNAME=SYNCSORT;
q To use CoSORT:
OPTIONS SORTNAME=COSORT;
Once the host sort routine is available, use the SORTPGM=HOST or SORTPGM=BEST optionsstatements to tell the SAS System when to use the host sort routine.
Submit one of the following options statements in a SAS session:
q OPTIONS SORTPGM=HOST;
tells the SAS System to always use the host sort routine made available.
q OPTIONS SORTPGM=BEST;
tells the SAS System to choose the best sorting method in a given situation, the SAS Systemsort or the host sort.
There are two options that define how the SAS System chooses the “best” sort algorithm. Thefollowing examples use the syntax of an options statement that needs to be submitted to theSAS System:
q -sortcut <n> , where n specifies a number of observations.
OPTIONS SORTPGM=BEST SORTCUT=500;
124 Installation Instructions and System Administrator’s Guide for the SAS System under UNIX Environments
-sortcut tells the SAS System to choose the host sort routine if the number ofobservations is greater than the number you specify, and to use the SAS System sort if thenumber of observations is equal to or less than the number specified.
q -sortcutp <size>[kKmM], where <size> specifies a file size in either kilobytes ormegabytes.
OPTIONS SORTPGM=BEST SORTCUTP=40M;
-sortcutp tells the SAS System to choose the host sort routine if the size of the databeing sorted exceeds the size you specify, and to use the SAS System sort if the size of thedata is equal to or smaller than the size you specify.
If these options are not defined or these options are set to zero, the SAS System choosesthe SAS System sort routine. If you specify both options and either condition is met, theSAS System chooses the host sort routine.
You can change the work directory used for temporary sort files by using the option sortdev<dir>, where <dir> is the directory in which you want the temporary files to be created. Forexample, submit the following statement if you want the temporary files to be created in /tmp:
OPTIONS SORTPGM=BEST SORTCUT=500 sortdev="/tmp";
You can specify the host sort option sortanom t to print timing and resource information tothe SAS log after each phase of a sort. The following is an example of this option:
OPTIONS SORTPGM=HOST SORTANOM=t;
You can specify the host sort option sortanom v to print to the SAS log the arguments passedto the sort, which may be useful for tuning or debugging:
OPTIONS SORTPGM=HOST SORTANOM=v;
You can attempt to increase your sort performance by increasing the values of the sortsize andmemsize SAS options. However, make sure that sortsize is at least 4M less than memsize.
You can see other SAS performance statistics in the SAS log using the FULLSTIMER option:
OPTIONS FULLSTIMER;

125
Government Notice
If you are a government site, information specific to your site is extracted during the productinstallation phase of the installation procedure and put into the !SASROOT/misc/notice file.
It is important that you read this file, and that you make other users at your site aware of thisinformation. To have the government notice automatically display in the SAS log, issue thefollowing UNIX command:
cat !SASROOT/misc/notice >> !SASROOT/misc/base/news
This will append the government notice file onto the existing news file. The default configurationfile uses the -news option to specify that this file is displayed in the log after each invocation ofthe SAS System.