installation instructions for … instructions are a general guide for installing the international...
TRANSCRIPT

RV Products Division
INSTALLATION INSTRUCTIONS
FOR
INTERNATIONAL
9000 SERIES
ROOF TOP AIR CONDITIONERS
Service Contact:
Coast to Coast RV Services Pty Ltd.
20 George Young St.
Auburn NSW 2144 Australia
1300 COASTRV (1300 262 7878)
Tel: +61-2-9645 7600

2
TABLE OF CONTENTS
I. General Information . . . . . . . . . . . . . . . . . . . . . . . . . . . . . . . . . . . . . . . . . . . . . 2
II. Air Conditioning Sizing . . . . . . . . . . . . . . . . . . . . . . . . . . . . . . . . . . . . . . . . . . . 3
III. Selecting an Installation Location . . . . . . . . . . . . . . . . . . . . . . . . . . . . . . . . . . 3
IV. Installing the Roof Top Unit . . . . . . . . . . . . . . . . . . . . . . . . . . . . . . . . . . . . . . . 3
V. Securing the Air Conditioner to the Roof . . . . . . . . . . . . . . . . . . . . . . . . . . . . 5
VI. Electrical Wiring . . . . . . . . . . . . . . . . . . . . . . . . . . . . . . . . . . . . . . . . . . . . . . . . 6
VII. Installing the Ceiling Assembly (9000 Series) . . . . . . . . . . . . . . . . . . . . . . . . . 7
VIII. Completing the Installation (9000 Series) . . . . . . . . . . . . . . . . . . . . . . . . . . . . 9
These instructions are a general guide for installing the International Series Coleman-Mach roof top air conditioners. For specific air
conditioner details, it will be necessary to refer to the printed Customer Envelope Package supplied with each air conditioner.
IMPORTANT NOTICE
These instructions are for the use of qualified individuals
specially trained and experienced in installation of this type
equipment and related system components.
Installation and service personnel are required to be licensed.
PERSONS NOT QUALIFIED SHALL NOT INSTALL NOR
SERVICE THIS EQUIPMENT.
NOTE
The words “Shall” or “Must” indicate a
requirement which is essential to
satisfactory and safe product performance.
The words “Should” or “May” indicate a
recommendation or advice which is not
essential and not required but which may
be useful or helpful.
WARNING – SHOCK HAZARD
To prevent the possibility of severe personal injury or
equipment damage due to electrical shock, always be sure
the electrical power source to the appliance is
disconnected.
CAREFULLY FOLLOW ALL INSTRUCTIONS AND
WARNINGS IN THIS BOOKLET TO AVOID DAMAGE
TO THE EQUIPMENT, PERSONAL INJURY OR FIRE.
WARNING
Improper installation may damage equipment, can create
a hazard and will void the warranty.
The use of components not tested in accordance with these
units will void the warranty, may make the equipment in
violation of state codes, may create a hazard and may ruin
the equipment.
SAFETY WARNING
This appliance is not intended for use by young children or
infirm persons unless they have been adequately
supervised by a responsible person to ensure they can use
the appliance safely.
1. GENERAL INFORMATION
OEM – Please make sure the Customer Envelope Package
accompanies the air conditioner.
INSTALLER AND/OR DEALER – Please make sure the
Customer Envelope Package is presented to the product
consumer.
INQUIRIES ABOUT THE A/C UNIT – Inquiries to your
Airxcel, Inc. representative or to Airxcel, Inc. pertaining to
product installation should contain both the model and serial
numbers of the roof top air conditioner. All roof top air
conditioning units have model and serial number identification
in two locations; (1) rating plate sticker may be viewed by
looking through the shroud louvers on the compressor side of
the roof top air conditioning unit. The rating plate sticker can
be seen without removing the outer plastic shroud, (2)
model/serial number sticker (silver color) is located on the
bottom of the basepan of the roof top air conditioner. If the air
conditioner is installed, the sticker may be viewed by lowering
the ceiling assembly shroud.
3
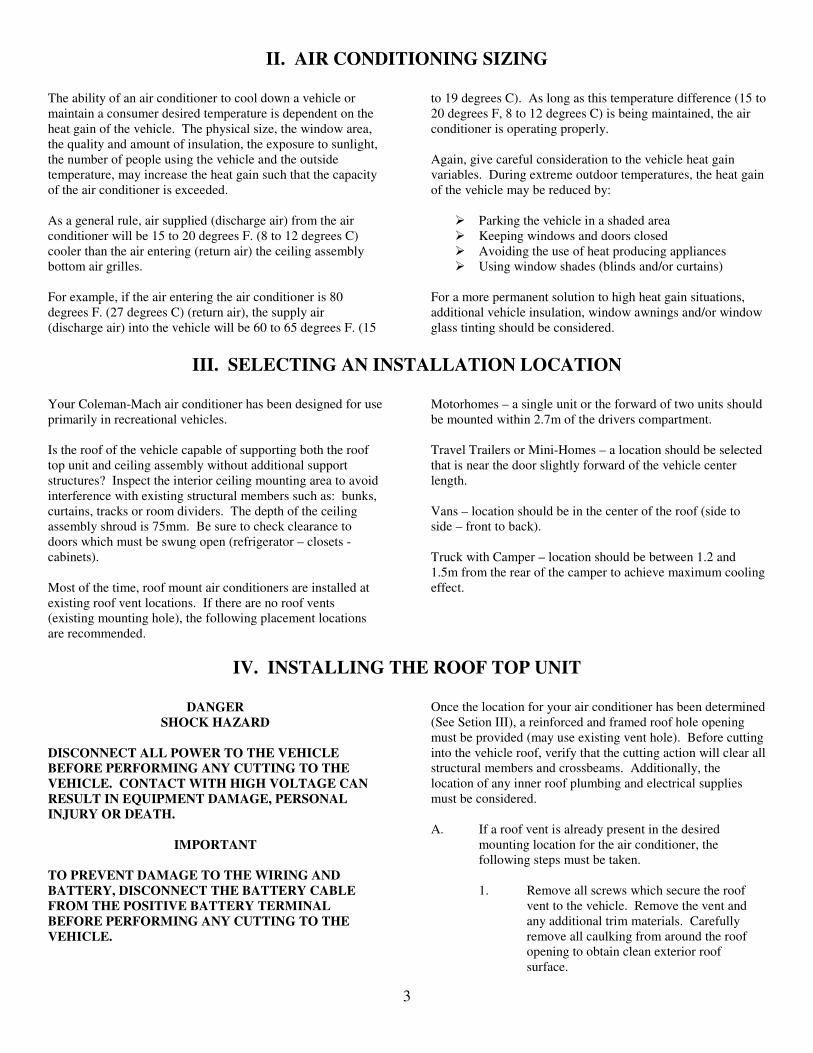
II. AIR CONDITIONING SIZING
The ability of an air conditioner to cool down a vehicle or
maintain a consumer desired temperature is dependent on the
heat gain of the vehicle. The physical size, the window area,
the quality and amount of insulation, the exposure to sunlight,
the number of people using the vehicle and the outside
temperature, may increase the heat gain such that the capacity
of the air conditioner is exceeded.
As a general rule, air supplied (discharge air) from the air
conditioner will be 15 to 20 degrees F. (8 to 12 degrees C)
cooler than the air entering (return air) the ceiling assembly
bottom air grilles.
For example, if the air entering the air conditioner is 80
degrees F. (27 degrees C) (return air), the supply air
(discharge air) into the vehicle will be 60 to 65 degrees F. (15
to 19 degrees C). As long as this temperature difference (15 to
20 degrees F, 8 to 12 degrees C) is being maintained, the air
conditioner is operating properly.
Again, give careful consideration to the vehicle heat gain
variables. During extreme outdoor temperatures, the heat gain
of the vehicle may be reduced by:
� Parking the vehicle in a shaded area
� Keeping windows and doors closed
� Avoiding the use of heat producing appliances
� Using window shades (blinds and/or curtains)
For a more permanent solution to high heat gain situations,
additional vehicle insulation, window awnings and/or window
glass tinting should be considered.
III. SELECTING AN INSTALLATION LOCATION
Your Coleman-Mach air conditioner has been designed for use
primarily in recreational vehicles.
Is the roof of the vehicle capable of supporting both the roof
top unit and ceiling assembly without additional support
structures? Inspect the interior ceiling mounting area to avoid
interference with existing structural members such as: bunks,
curtains, tracks or room dividers. The depth of the ceiling
assembly shroud is 75mm. Be sure to check clearance to
doors which must be swung open (refrigerator – closets -
cabinets).
Most of the time, roof mount air conditioners are installed at
existing roof vent locations. If there are no roof vents
(existing mounting hole), the following placement locations
are recommended.
Motorhomes – a single unit or the forward of two units should
be mounted within 2.7m of the drivers compartment.
Travel Trailers or Mini-Homes – a location should be selected
that is near the door slightly forward of the vehicle center
length.
Vans – location should be in the center of the roof (side to
side – front to back).
Truck with Camper – location should be between 1.2 and
1.5m from the rear of the camper to achieve maximum cooling
effect.
IV. INSTALLING THE ROOF TOP UNIT
DANGER
SHOCK HAZARD
DISCONNECT ALL POWER TO THE VEHICLE
BEFORE PERFORMING ANY CUTTING TO THE
VEHICLE. CONTACT WITH HIGH VOLTAGE CAN
RESULT IN EQUIPMENT DAMAGE, PERSONAL
INJURY OR DEATH.
IMPORTANT
TO PREVENT DAMAGE TO THE WIRING AND
BATTERY, DISCONNECT THE BATTERY CABLE
FROM THE POSITIVE BATTERY TERMINAL
BEFORE PERFORMING ANY CUTTING TO THE
VEHICLE.
Once the location for your air conditioner has been determined
(See Setion III), a reinforced and framed roof hole opening
must be provided (may use existing vent hole). Before cutting
into the vehicle roof, verify that the cutting action will clear all
structural members and crossbeams. Additionally, the
location of any inner roof plumbing and electrical supplies
must be considered.
A. If a roof vent is already present in the desired
mounting location for the air conditioner, the
following steps must be taken.
1. Remove all screws which secure the roof
vent to the vehicle. Remove the vent and
any additional trim materials. Carefully
remove all caulking from around the roof
opening to obtain clean exterior roof
surface.

4
2. It may be necessary to seal some of the old
roof vent mounting screw holes which may
fall outside of the air conditioner basepan
gasket.
3. Examine the roof opening. If the opening is
smaller than 356mm x 356mm, the opening
must be enlarged.
B. If a roof vent opening is not used, a new opening
(See Figure 1) will have to be cut into the vehicle
roof. A matching opening will also have to be cut
into the interior vehicle ceiling. If the ceiling
opening is carpeted, snagging could occur. After the
opening in the roof and interior ceiling are the correct
size, a framed support structure must be provided
between the exterior roof top and interior ceiling.
The reinforced framed structure must provide the
following guidelines:
1. Capable of supporting both the weight of
the roof top air conditioner and the interior
ceiling assembly.
2. Capable of holding or supporting the roof
outer surface and interior ceiling apart, so
that when the roof top air conditioner and
ceiling assembly are bolted together, no
collapsing occurs.
Airxcel, Inc. recommends that the spacing from the
vehicle roof top to the interior ceiling top be no less
than 25mm. A typical support frame is shown in
Figure 1.
The frame must provide an opening through the
frame to allow passage for the power supply wiring.
Route the supply wiring through the frame at the
same time the support frame is being installed.
IMPORTANT – Allow 600mm of supply wiring
through the support frame (working length).
After the support frame is installed, seal all gaps
between the frame and both the roof exterior and the
interior ceiling of the vehicle (cavity walls).
Additionally, seal the gap around the electrical
supply wiring.
C. The air conditioner must be mounted as near level
from front to rear and side to side as is possible when
the vehicle is parked on a level plane. Figure 2
shows the maximum allowable degree deviations
(mounting degrees from total surface flat plane).
FIGURE 1
FIGURE 2

5
If the roof of the vehicle is sloped (not level) such
that the air conditioner cannot be mounted within the
maximum allowable degree deviations, an exterior
leveling shim will need to be added to make the air
conditioner level. A typical front to back leveling
shim is shown in Figure 3.
FIGURE 3
Once the air conditioner has been leveled, some
additional shimming may be required above the
interior ceiling assembly. The air conditioner and
the interior ceiling assembly must have a squared
installation relationship before they are secured
together.
D. After the mounting hole is properly prepared, remove
the carton and shipping pads from around the air
conditioner. Carefully lift the unit to the top of the
vehicle. Do not use the outer plastic shroud for
lifting. Place the air conditioner over the prepared
mounting hole. The pointed end (nose) of the shroud
must face towards the front of the vehicle. Pull the
electrical conduit down from the air conditioner
through the mounting opening and let hang.
V. SECURING THE AIR CONDITIONER TO THE ROOF
A mounting frame is supplied with the ceiling assembly.
Follow the steps below to secure the air conditioner to the
roof. Refer to Figure 4.
A. Locate the air conditioner mount gasket over the
356mm to 381mm square opening in the roof.
B. Install the ceiling assembly mount frame using the
four bolts found with the ceiling assembly.
C. Proper tension has been achieved for each bolt when
any portion of each gasket indicating tab has been
pulled down even with the roof. See Figure 4. The
upper unit has now been properly installed with
optimum gasket compression.
D. If the air conditioner is equipped with an optional
evaporator condensate pump, a ½” I.D. hose must
be provided that runs from the 14” square opening,
through the vehicle ceiling and down the side wall
to allow water to drain under the vehicle. The
hose must not be allowed to kink shut while making
a bend. Connect the top end of the drain hose to
the barbed fitting shown in figure 4.

6
FIGURE 4
VI. ELECTRICAL WIRING
ROUTING 240 VAC WIRING
Following high voltage wiring specifications and all local and
national electrical codes, route the roof top unit 240 VAC
supply wiring from its power source to the wirebox.
High Voltage Wiring Specifications
Refer most recent Australian/NZ Standard for Wiring Rules
(i.e. AS/NZS 3000:2007)
DANGER – SHOCK HAZARD
MAKE SURE THAT ALL POWER SUPPLY TO THE
UNIT IS DISCONNECTED BEFORE PERFORMING
ANY WORK ON THE UNIT TO AVOID THE
POSSIBILITY OF SHOCK INJURY OR DAMAGE TO
THE EQUIPMENT.
DANGER
WHEN USING NON-METALLIC
SHEATH CABLES (ROMEX, ETC.),
STRIP SHEATH BACK TO EXPOSE
100-150mm OF THE SUPPLY LEADS.
STRIP THE INDIVIDUAL WIRE LEAD
ENDS FOR WIRE CONNECTION
(ABOUT 19mm BARE WIRE). INSERT
THE SUPPLY WIRES INTO THE
ELECTRICAL CONNECTOR CLAMP.
SHEATH MUST PROTRUDE PAST
THE CLAMP BUSHING INSIDE THE
BOX AS ILLUSTRATED. MAKE SURE
SHEATH CABLE IS CENTERED IN
CLAMP BEFORE TIGHTENING UP
ON IT. DO NOT OVERTIGHTEN!!

7
THIS COULD RESULT IN PINCHING
THROUGH THE PLASTIC WIRE
INSULATION AND CAUSE SHORTING
OR “HOT” WIRES TO GROUND
(SHOCK HAZARD). THE CLAMP IS
INTENDED FOR STRAIN RELIEF OF
THE WIRES. SLIGHT PRESSURE IS
USUALLY SUFFICIENT TO
ACCOMPLISH THIS.
IF OTHER THAN NON-METALLIC
CABLES ARE USED FOR SUPPLY
CONDUCTORS, APPROPRIATE
STRAIN RELIEF CONNECTORS OR
CLAMPS SHOULD BE USED.
IN NO CASE SHOULD CLAMPING
OR PINCHING ACTION BE APPLIED
TO THE INDIVIDUAL SUPPLY LEADS
(NEUTRAL AND “HOT” WIRES).
DANGER
SHOCK HAZARD
TO PREVENT THE POSSIBILITY OF
SHOCK INJURY, THE WHITE WIRE
MUST BE CONNECTED TO NEUTRAL
IN THE SERVICE BOX ENTRANCE
AND THE MECHANICAL GROUND
MUST BE CONNECTED TO A
GROUNDING LUG EITHER IN THE
SERVICE BOX OR THE MOTOR
GENERATOR COMPARTMENT.
VII. INSTALLING THE CEILING ASSEMBLY (9000 SERIES)
NOTE
The optional Electric Heating Element is intended to take the
chill out of the indoor air when the air is a few degrees too
cool for comfort The heating element is an effective “chill
chaser”. It is not a substitute for a furnace.
Make sure that you have properly matched the roof top air
conditioner and interior ceiling assembly. The following step
by step instructions must be performed in the following
sequence to insure proper installation.
A. Carefully uncarton the ceiling assembly. Controls
are factory installed in the ceiling assembly (except
ceiling assemblies for applications with remote
control box/thermostat).
B. Remove the grille and filters from the ceiling
assembly.
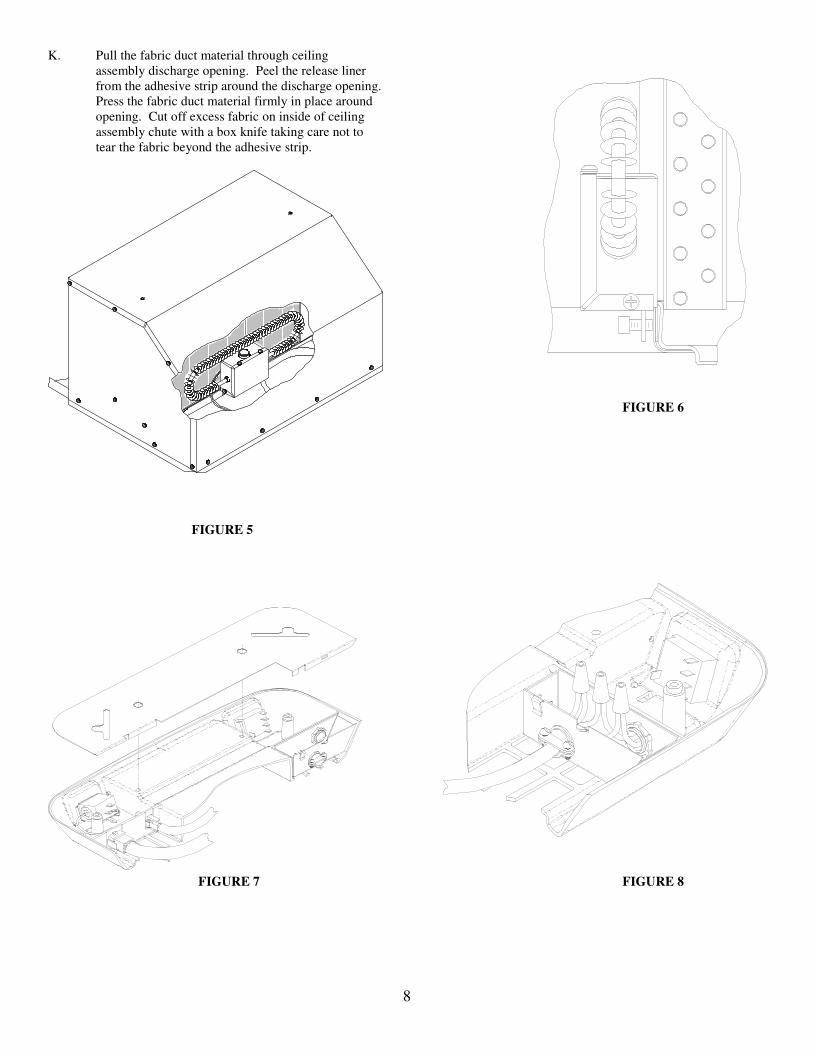
C. If installing the optional (9470*4551) Electric
Heating Element, position the heater assembly in the
air conditioner return air opening as shown in Figure
5. The heater bracket must be installed over the
metal basepan extrusion and positioned between the
basepan and the plastic drain pan (See Figure 6).
Tighten set screw to secure the assembly so as to
prevent movement.
TIE ALL WIRING TO INSURE NO CONTACT
WITH THE HEATER OR ANY SHARP EDGES.
KEEP IN MIND THAT HIGH VELOCITY AIR
WILL BE ENCOUNTERED IN THIS AREA.
D. Fasten the duct collar to the basepan of the air
conditioner with three (3) screws (See Figure 9).
E. Plug the roof top air conditioner electrical conduit
into the 9 position receptacle located in the
thermostat side of the ceiling assembly. If installing
an Electric Heating Element, plug the heater cord
into the 2 position receptacle (See Figure 7).
F. Insert the supply wiring through the cable clamp and
into the field wiring box so that 100-150mm of
supply conductor is inside the box. Secure the cable
clamp over the supply wire sheath so that no
movement is possible (See Figure 8).
G. Connect the supply power conductors to the “A” and
“N” lugs on the terminal board. IMPORTANT – If
power is from one “Hot” and one “Neutral”
conductor, connect the neutral to “N”. Connect the
ground wire to the “E” lug on the terminal board (See
Figure 8).
H. Place the metal control box shield over the
thermostat, switch and field wiring boxes. Make
certain that all wires are pushed into the control
boxes or laying in the wireway between the
thermostat and switch boxes and will not be
pinched by the control box shield. Control box
shield is properly installed when the two holes in
shield are aligned with the two screw holes in the
ceiling assembly chute (See Figure 7).
I. Raise the ceiling assembly and secure to the
mounting frame with 4 provided shoulder
screw/spring assemblies. The front two screws
should pass through the clearance holes in the metal
control box shield (See Figure 9).
J. The ceiling assembly shroud is curved to contour to a
crowned ceiling. If installation is to a flat ceiling
and gaps are present on the sides of the shroud,
insert the four optional 3/4 inch screws (provided)
through the mounting posts and secure them to the
mounting frame above (See Figure 7, 8 & 9 for
screw locations).
8
K. Pull the fabric duct material through ceiling
assembly discharge opening. Peel the release liner
from the adhesive strip around the discharge opening.
Press the fabric duct material firmly in place around
opening. Cut off excess fabric on inside of ceiling
assembly chute with a box knife taking care not to
tear the fabric beyond the adhesive strip.
FIGURE 6
FIGURE 5
FIGURE 7 FIGURE 8
9
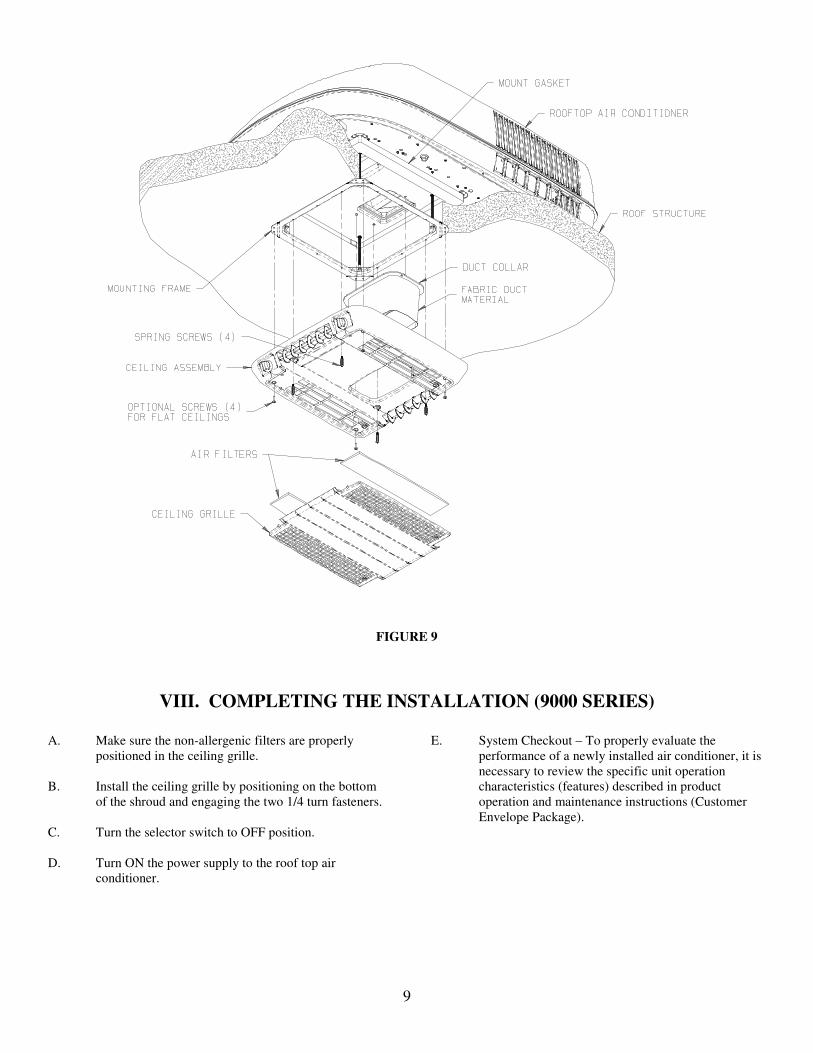
FIGURE 9
VIII. COMPLETING THE INSTALLATION (9000 SERIES)
A. Make sure the non-allergenic filters are properly
positioned in the ceiling grille.
B. Install the ceiling grille by positioning on the bottom
of the shroud and engaging the two 1/4 turn fasteners.
C. Turn the selector switch to OFF position.
D. Turn ON the power supply to the roof top air
conditioner.
E. System Checkout – To properly evaluate the
performance of a newly installed air conditioner, it is
necessary to review the specific unit operation
characteristics (features) described in product
operation and maintenance instructions (Customer
Envelope Package).

10
RV Products Division
Airxcel, Inc.
RV Products Division
P.O. Box 4020
Wichita, KS 67204
1976C491 (9-12) PP