installation manual for easysuite range xxhfl3011 manual for easysuite range xxhfl3011 status:...
TRANSCRIPT

Installation Manual for EasySuite range
xxHFL3011
Status: Release Version 1.1 Date: November 2016 Author: Bart Coppens

2 | P a g e
Contents Changelog ................................................................................................................................................ 5
1. General information ........................................................................................................................ 6
1.1 Notice ...................................................................................................................................... 6
1.2 Help and support ..................................................................................................................... 6
1.3 How to navigate, open menu’s and make selections .............................................................. 7
2. Requirements before starting the installation of a TV .................................................................... 8
2.1 Remote control ........................................................................................................................ 8
2.1.1 Master remote control 22AV9573 .................................................................................. 8
2.1.2 Guest remote control 22AV1503A ......................................................................................... 8
2.1.3 Easy Remote 22AV1601A ....................................................................................................... 9
2.1.4 Health Care remote (22AV1604A) ......................................................................................... 9
2.2 Professional Settings menu ................................................................................................... 10
2.3 Software upgrade .................................................................................................................. 10
3 Starting the installation ................................................................................................................. 11
3.1 Virgin mode ........................................................................................................................... 11
3.2 Professional Mode ON/OFF ................................................................................................... 12
3.2.1 Disable the Professional mode ...................................................................................... 13
3.2.2 Enable the Professional mode ....................................................................................... 13
4 Reinstall TV .................................................................................................................................... 14
5 Virgin installation wizard ............................................................................................................... 15
5.1 Instant Initial Cloning (IIC) ..................................................................................................... 15
5.1.1 General .......................................................................................................................... 15
5.1.2 Upgrading and configuring the set ................................................................................ 15
5.2 Virgin Configuration .............................................................................................................. 16
6 Professional Settings ..................................................................................................................... 18
6.1 General Settings .......................................................................................................................... 18
6.1.1 Picture Settings .............................................................................................................. 18
6.1.2 Sound Settings ............................................................................................................... 22
6.1.3 General Settings ............................................................................................................ 26
6.2 Switch on Settings ................................................................................................................. 27
6.2.1 Channel Settings ................................................................................................................... 27
6.2.2 Feature Settings .................................................................................................................... 28
6.2.3 Picture Settings ..................................................................................................................... 28

3 | P a g e
6.2.4 Sound Settings ...................................................................................................................... 30
6.2.5 Subtitles ................................................................................................................................ 32
6.2.6 Region and Language ........................................................................................................... 32
6.3 Install Channels............................................................................................................................ 32
6.4 Channel and Source Settings ....................................................................................................... 33
6.4.1 Channel Settings ................................................................................................................... 33
6.4.2 Common Interface ................................................................................................................ 36
6.4.3 Languages ............................................................................................................................. 37
6.4.4 EasyLink ................................................................................................................................ 39
6.4.5 Mono/stereo Preference ...................................................................................................... 40
6.5 Feature Settings ........................................................................................................................... 41
6.5.1 Room ID ................................................................................................................................ 41
6.5.2 SmartInfo .............................................................................................................................. 41
6.5.3 ThemeTv ............................................................................................................................... 41
6.5.4 MyChoice .............................................................................................................................. 42
6.5.5 Scheduler .............................................................................................................................. 42
6.5.6 Date & Time .......................................................................................................................... 43
6.5.7 Switch Off timer .................................................................................................................... 44
6.5.8 On screen clock..................................................................................................................... 45
6.5.9 External Clock ....................................................................................................................... 45
6.5.10 Welcome Logo .................................................................................................................... 45
6.5.11 USB Autoplay ...................................................................................................................... 46
6.5.12 USB Media Browser ............................................................................................................ 46
6.5.13 Multi Remote Control ......................................................................................................... 46
6.6 Advanced settings ....................................................................................................................... 47
6.6.1 Professional mode ................................................................................................................ 47
6.6.2 Power .................................................................................................................................... 47
6.6.3 Input control ......................................................................................................................... 48
6.6.4 Security ................................................................................................................................. 50
6.6.5 Vsecure ................................................................................................................................. 51
6.6.6 Serial Xpress ......................................................................................................................... 53
6.6.7 UI .......................................................................................................................................... 54
6.6.8 Diagnostic Logging ................................................................................................................ 54
6.6.9 Reset ..................................................................................................................................... 55

4 | P a g e
6.7 Upgrade and clone settings ......................................................................................................... 55
6.7.1 USB Base Upgrade and cloning ............................................................................................ 55
6.7.2 RF Based Upgrade and cloning ............................................................................................. 56
6.7.3 Software and Clone information .......................................................................................... 57
6.7.4 Settings Overview ................................................................................................................. 58
7 Channel installation wizard ........................................................................................................... 59
7.1 Configuration ......................................................................................................................... 60
7.1.1 Analogue ........................................................................................................................ 61
7.1.2 DVB-T ............................................................................................................................. 62
7.1.3 DVB-C ............................................................................................................................. 62
7.2 Digital Settings ............................................................................................................................. 63
7.3 Reset ............................................................................................................................................ 63
7.4 Signal Testing ............................................................................................................................... 64
7.4.1 Analogue ............................................................................................................................... 64
7.4.2 Digital .................................................................................................................................... 64
7.5 Installing channels ....................................................................................................................... 65
8 SmartInfo ....................................................................................................................................... 69
8.1 SmartInfo Show ..................................................................................................................... 69
8.2 SmartInfo Browser................................................................................................................. 69
9 MyChoice ....................................................................................................................................... 70
9.1 Configuring the TV ................................................................................................................. 72
9.2 Checking MyChoice functionality. ............................................................................................... 74
10 Scheduler ................................................................................................................................... 76
11 CSM (Customer Service Menu)......................................................................................................... 79
Appendix 1 ............................................................................................................................................. 80
Appendix 2 ............................................................................................................................................. 81
Appendix 3 ............................................................................................................................................. 82

5 | P a g e
Changelog
Author Date Changes Bart Coppens 26 October 2016 First Release finalized Bart Coppens 16 November 2016 Added “Scheduler” chapter

6 | P a g e
1. General information
1.1 Notice 2016 © TP Vision Belgium NV All rights reserved. Specifications are subject to change without notice. Trademarks are the property of Koninklijke Philips Electronics NV or their respective owners. TP Vision Belgium NV reserves the right to change products at any time without being obliged to adjust earlier supplies accordingly. TP Vision Belgium NV cannot be held responsible neither for any errors in the content of this document nor for any problems as a result of the content in this document. Errors reported to Philips will be adapted and published on the Philips support website as soon as possible.
1.2 Help and support
Visit the Philips support website at http://www.philips.com/support/ for:
Leaflet and product documentation
Download a printable PDF version of the user manual
Contact details of the helpdesk
Download the latest available software Visit the Philips support ticketing system at http://philipshtv.supportsystem.com/ for:
Entering after sales issues
Asking technical questions
Searching through the knowledge base that will enable you to find answers to questions we receive on regular basis (FAQs)
An NDA section which contains specific questions that require an NDA to be in place to get the detailed feedback
Visit the CMND website to find all info about CMND https://cmnd.io/ Definitions, Acronyms and Abbreviations
[ ]: The values between brackets are referring to a TV menu item “ “: The values between quotation marks are referring to a remote button DVB-T: Digital Video Broadcasting - Terrestrial DVB-C: Digital Video Broadcasting - Cable HTTP: Hyper Text Transfer Protocol IR: Infrared MB: Megabyte MHz: Megahertz OSD: On Screen Display RC: Remote Control SI: System Integrator STBY: Standby SW: Software TV: Television

7 | P a g e
1.3 How to navigate, open menu’s and make selections
Navigating in the menu can be done with the “up-down-left-right arrow” buttons on the remote control
Opening a menu can be done with the “OK” button
The “OK” button can also be used to activate buttons that can be seen on the screen like [Done], [Cancel], [Close], [Yes], [No], …
In many places in the menu you need to press the “OK” button after you selected an item to confirm your selection. Navigating to this menu item and going back to the menu will not store your selection
Changing the value of a slider can be done using the “up-down arrow”, your selection will be remembered without pressing the “OK” button
8 | P a g e
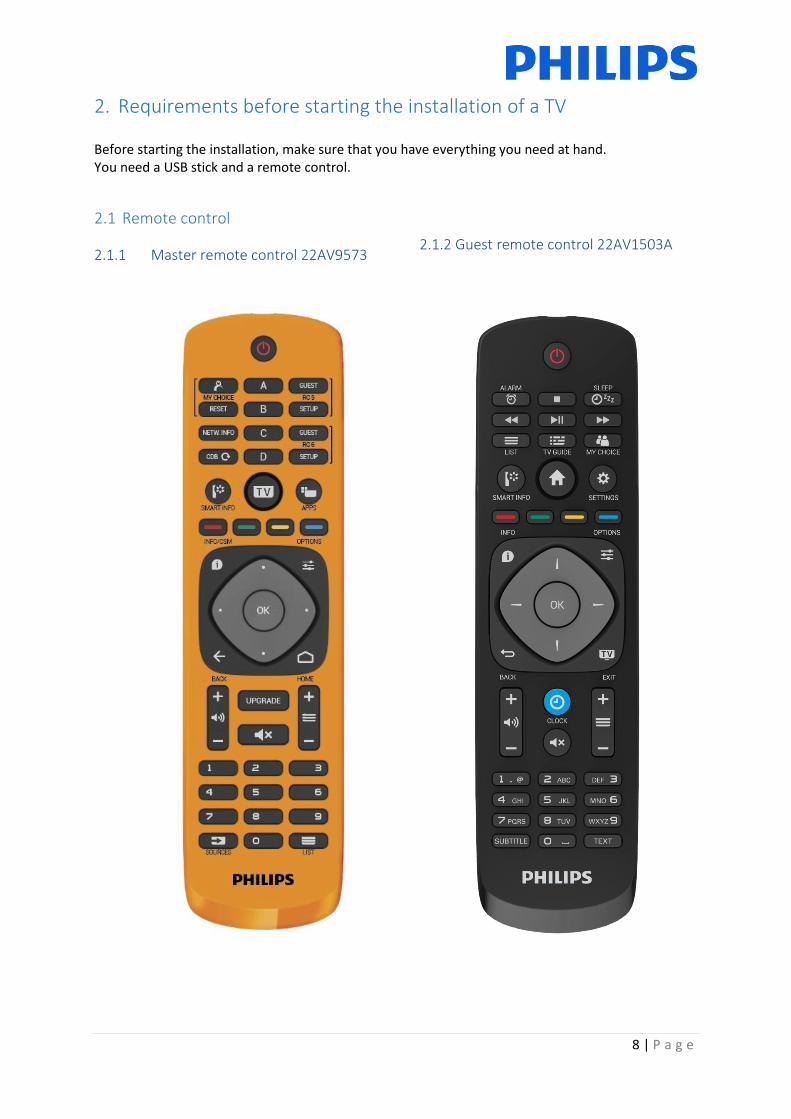
2. Requirements before starting the installation of a TV Before starting the installation, make sure that you have everything you need at hand. You need a USB stick and a remote control.
2.1 Remote control
2.1.1 Master remote control 22AV9573
2.1.2 Guest remote control 22AV1503A
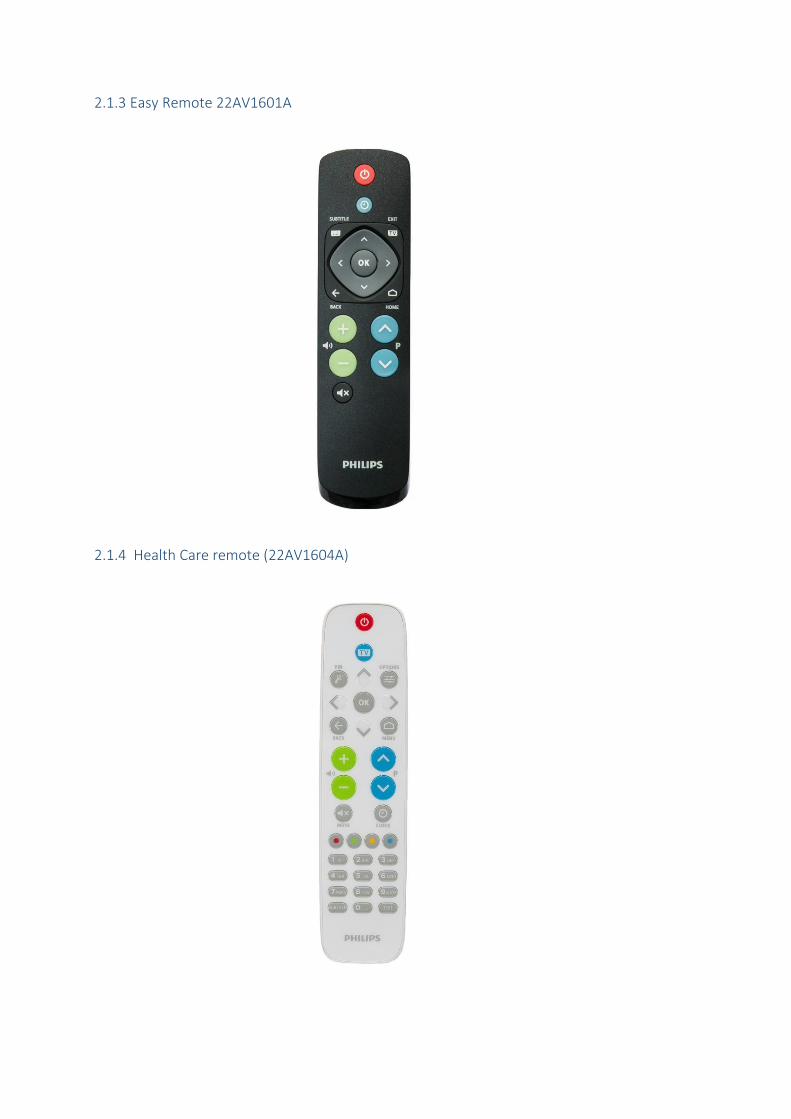
2.1.3 Easy Remote 22AV1601A
2.1.4 Health Care remote (22AV1604A)

10 | P a g e
2.2 Professional Settings menu
To access the [Professional Settings] menu you have 2 possibilities:
Using the master remote control, press the “RC 6 SETUP” key and then press the “Home/Menu” button
Using the guest remote control, press the following keys sequentially: “3,1,9,7,5,3,MUTE” Note: The sequence: “3,1,9,7,5,3,MUTE” will not show the [Professional Settings] if [High Security] option is enabled.
2.3 Software upgrade For the best guest experience it is highly recommended to use the latest software version available. Go to: http://www.philips.com/support/
Select your country, enter the model number and download the latest software version available
Unzip the software and follow the instructions how to upgrade the software on the TV
The USB flash drive used for software upgrade must be formatted as FAT32 and preferably empty to avoid an accidental upload of a wrong setting or software
It’s recommended to first upgrade the TV and afterwards to perform the installation The latest software version and cloning data can be stored on the same USB drive for a 2 in 1 action: software upgrade and cloning during the instant initial cloning. See chapter “Instant Initial Cloning (IIC)” for more information.

11 | P a g e
3 Starting the installation It is important to know if a TV is in Virgin mode (out of the box) or if it has been installed before.
3.1 Virgin mode
If you can see below screen, you know that the TV is in ‘out of the box’ state and you can install the set by using procedure described in chapter “Virgin install wizard” of this manual.

12 | P a g e
3.2 Professional Mode ON/OFF
If your set is not in virgin mode you can check if the professional mode is ON or OFF. This can be done by opening the professional menu (“3,1,9,7,5,3,MUTE”), navigating to “Advanced settings” and pressing “OK”. See below screenshot to know if the professional mode is ON or OFF. Professional mode ON/OFF:
When you enable/disable there is a clear difference seen when opening the [Home] menu. Professional mode ON
13 | P a g e
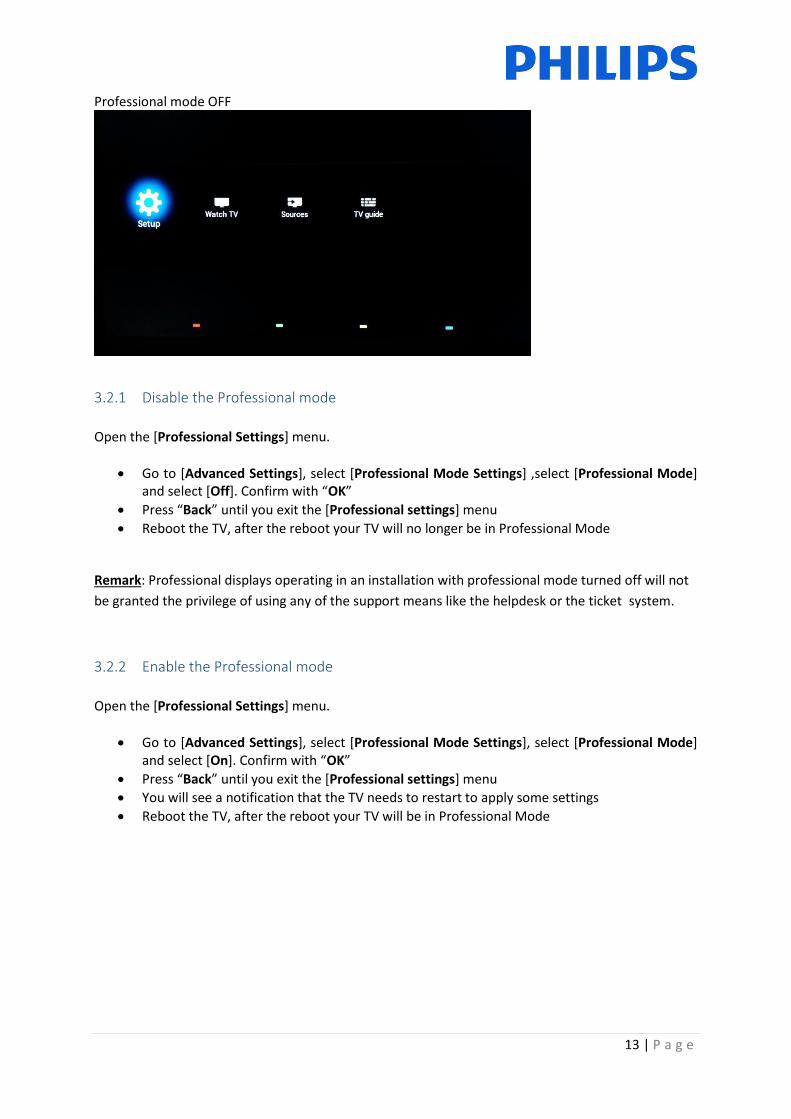
Professional mode OFF
3.2.1 Disable the Professional mode
Open the [Professional Settings] menu.
Go to [Advanced Settings], select [Professional Mode Settings] ,select [Professional Mode] and select [Off]. Confirm with “OK”
Press “Back” until you exit the [Professional settings] menu
Reboot the TV, after the reboot your TV will no longer be in Professional Mode
Remark: Professional displays operating in an installation with professional mode turned off will not
be granted the privilege of using any of the support means like the helpdesk or the ticket system.
3.2.2 Enable the Professional mode
Open the [Professional Settings] menu.
Go to [Advanced Settings], select [Professional Mode Settings], select [Professional Mode] and select [On]. Confirm with “OK”
Press “Back” until you exit the [Professional settings] menu
You will see a notification that the TV needs to restart to apply some settings
Reboot the TV, after the reboot your TV will be in Professional Mode

14 | P a g e
4 Reinstall TV If you want to start an installation from scratch you can always reinstall the TV. All settings will be reset to the default values and installed channels will be deleted. Open the [Professional Settings] menu, go to [Advanced Settings] and navigate to [Reset], press right cursor and select [Re-install TV]

15 | P a g e
5 Virgin installation wizard When you get a new TV it will be in virgin mode. This means that you will have to go through the virgin installation wizard to perform the first configuration of the TV.
5.1 Instant Initial Cloning (IIC)
5.1.1 General
When starting up the TV in virgin mode you see the first screen indicating Instant Initial Cloning (IIC). The TV is now searching on USB and RF for a new clone file containing all new settings for the TV. You can also see the model name and SW version of the TV. If there is no need to load a clone file on this TV (for example if you want to make a new installation to create a master clone file) then you need to press “OK” to activate the skip button.
5.1.2 Upgrading and configuring the set
If you want to upgrade the TV software and load a new clone file in the TV you have to perform the following steps:
Power on the set in virgin mode
Insert a USB device with both the new SW and the clone file you want to load in the TV
The TV will first upgrade the new SW version. After upgrade of new SW version is done, the TV will restart and will detect the clone file to update the TV settings.
Remark: An EasySuite 3011 upgrade consists of 2 UPG’s that have to be run sequentially. The first is the Autorun.upg which contains the firmware for TV. And the Autorun_webkit.upg which contains the web browser engine. Note: If multiple clone files are on a USB device, the file called “MasterCloneData” will be used for cloning

16 | P a g e
During this process you will see following: o Detection of the Clone file o SW upgrade will start, both UPG’s will be programmed o Cloning update progress will be shown o You have to press OK to close the overview screen, TV will then reboot with the new
settings and software Remark: If you don’t press OK, the TV will go to standby after 30 minutes
5.2 Virgin Configuration
When you skip the IIC screen you will have to set several settings:
Language selection Here you can choose the main language of the TV menu.
Country selection Here you can choose the country where the TV will be installed in. This setting has an influence on clock and channel installation
Picture style Standard will have the best energy consumption Natural will be display more color and contrast and will seem brighter Other styles can be selected in the professional menu.

17 | P a g e
Room ID Room ID is used to identify the TV in a specific room. Using “Digit numbers” you can define the Room ID.
After finishing the Virgin installation you will see below professional settings menu.

18 | P a g e
6 Professional Settings
Below you can find an overview of all the professional settings with a small description of what the function or impact is on the TV. The professional settings are divided in several parts on this set. Below you can see an overview per menu item.
6.1 General Settings
6.1.1 Picture Settings
Here you can find all advanced picture settings that will be set each time the Tv starts up. These settings can’t be changed by the guest.
[Activity style] This setting will change the response time of the Tv. Depending on the chosen setting, [TV] [Game] or [Computer]. Please experiment for best result in your environment. When changing to [Computer] this will have an impact as well on the overscan setting.

19 | P a g e
[Colour enhancement] will have an influence on how vivid the pictures will be. Depending on the set you can have less or more boosting of the colours. [Colour Temperature] will change the complete color temperature. You can use the standard settings or go for a custom setting where you can influence RGB separately
[Contrast] Under this category you will be able to change everything pertaining to contrast
[Contrast modes] Here you can influence the contrast mode meaning that depending on the setting there will be a high or lower difference between white and dark value. This setting will also influence the energy consumption of the set

20 | P a g e
[Dynamic Contrast] If turned on the Tv will automatically adapt the contrast to the content that is being displayed
[Brightness] This setting will adjust the brightness of the displayed content
[Video Contrast] This setting will change the contrast of the video. When set to 0 the video will not be visible anymore.

21 | P a g e
[Gamma] You will see a slider to set a non-linear setting for picture luminance and contrast Note: This is an expert users settings and should normally not be changed
[Sharpness] Below this category you can find the settings that will influence the sharpness of the content displayed on the TV
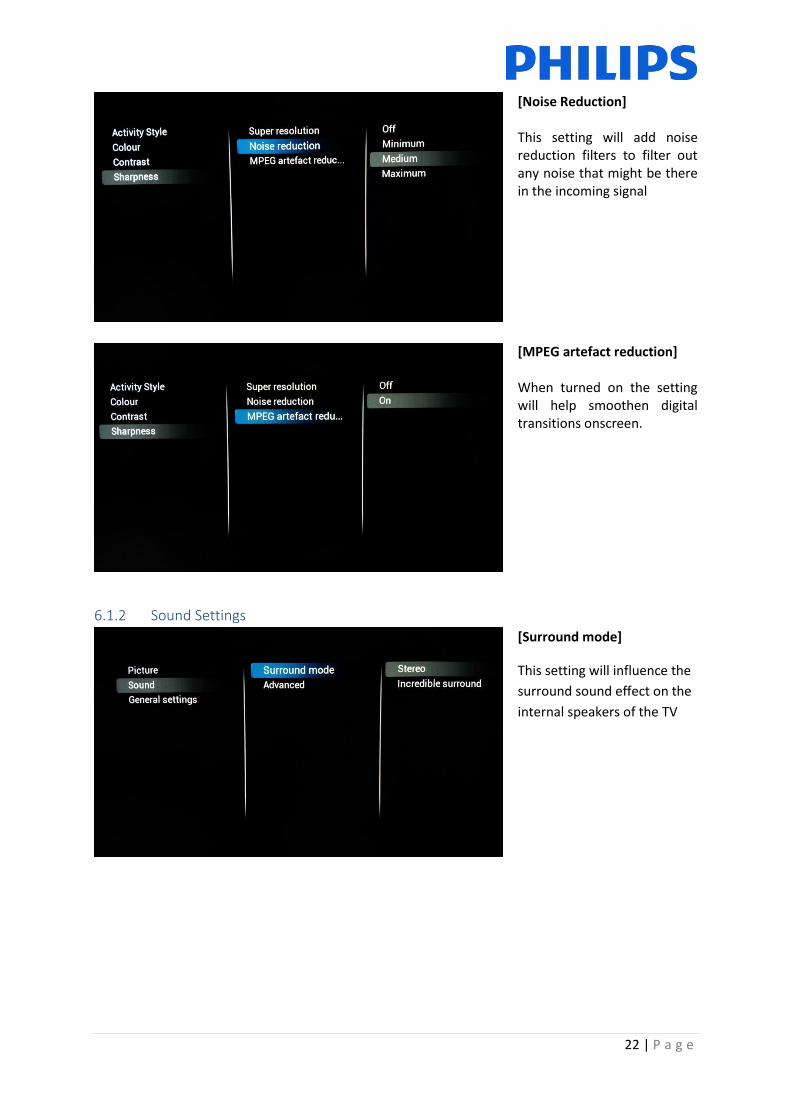
[Super resolution] Super resolution will add sharpness on the contours and lines shown onscreen
22 | P a g e
[Noise Reduction] This setting will add noise reduction filters to filter out any noise that might be there in the incoming signal
[MPEG artefact reduction] When turned on the setting will help smoothen digital transitions onscreen.
6.1.2 Sound Settings
[Surround mode]
This setting will influence the
surround sound effect on the
internal speakers of the TV

23 | P a g e
[Auto volume leveling]
When turned on this feature
will try to equalize the volume
differences between different
media
[TV Speakers]
TV Speakers can be turned
[On] or [Off]. Also you can
choose to use external
speakers which you can
control using [EasyLink]
If the external speakers need
to automatically start when
the TV is turned on then use
[Easylink autostart]
[Headphones]
Turn [On] or [Off] to enable
the headphone jack

24 | P a g e
[Bathroom speaker]
Turn [On] or [Off] to control
the audio out jack
[Maximum volume]
This setting will limit the
maximum volume that a
guest will be able to reach on
his TV
[Clear Sound]
Select if you want to switch
the Clear Sound to improve
the sound for speech [On] or
[Off]
25 | P a g e
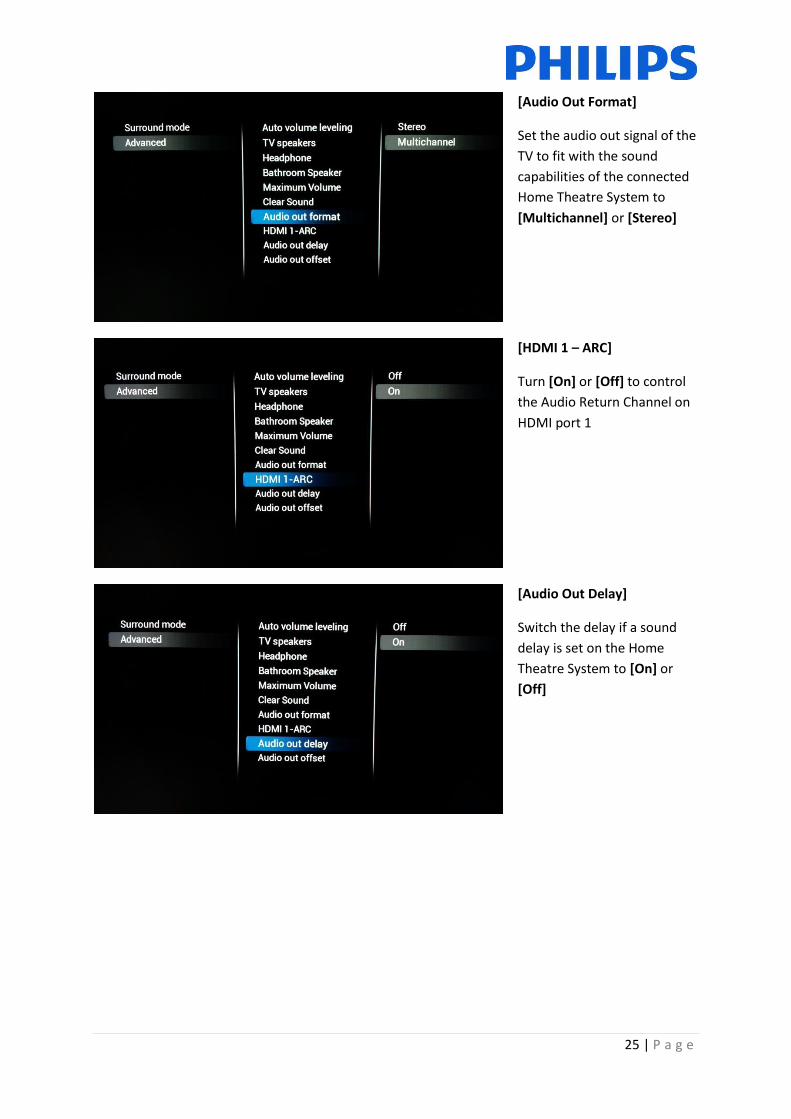
[Audio Out Format]
Set the audio out signal of the
TV to fit with the sound
capabilities of the connected
Home Theatre System to
[Multichannel] or [Stereo]
[HDMI 1 – ARC]
Turn [On] or [Off] to control
the Audio Return Channel on
HDMI port 1
[Audio Out Delay]
Switch the delay if a sound
delay is set on the Home
Theatre System to [On] or
[Off]

26 | P a g e
[Audio Out Offset]
Set an audio offset if you
cannot set a sound delay on
the Home Theatre System by
changing the slider value
6.1.3 General Settings
[TV Placement] You can adjust the TV placement by selecting [On the wall] or [On a TV stand] changing this will have an influence on the sound performance

27 | P a g e
6.2 Switch on Settings
These settings will be used as default each time the TV will be switched on.
6.2.1 Channel Settings
[Channel]
[Switch on channel filter]
will configure the TV channel
list that will be available for
the guest at start up
In [Switch on Channel] you
are able to choose the startup
channel

28 | P a g e
6.2.2 Feature Settings
[Switch on feature] will
configure the feature that will
be available for the guest at
startup. Depending on the
enabled features the choices
might vary.
[MyChoice] will start the
application which requests
the PIN code
[SmartInfo] will start the
SmartInfo feature after TV
starts up
[None] will disable the
startup feature.
6.2.3 Picture Settings
[Picture Style]
Change the default Picture
Style to your preference
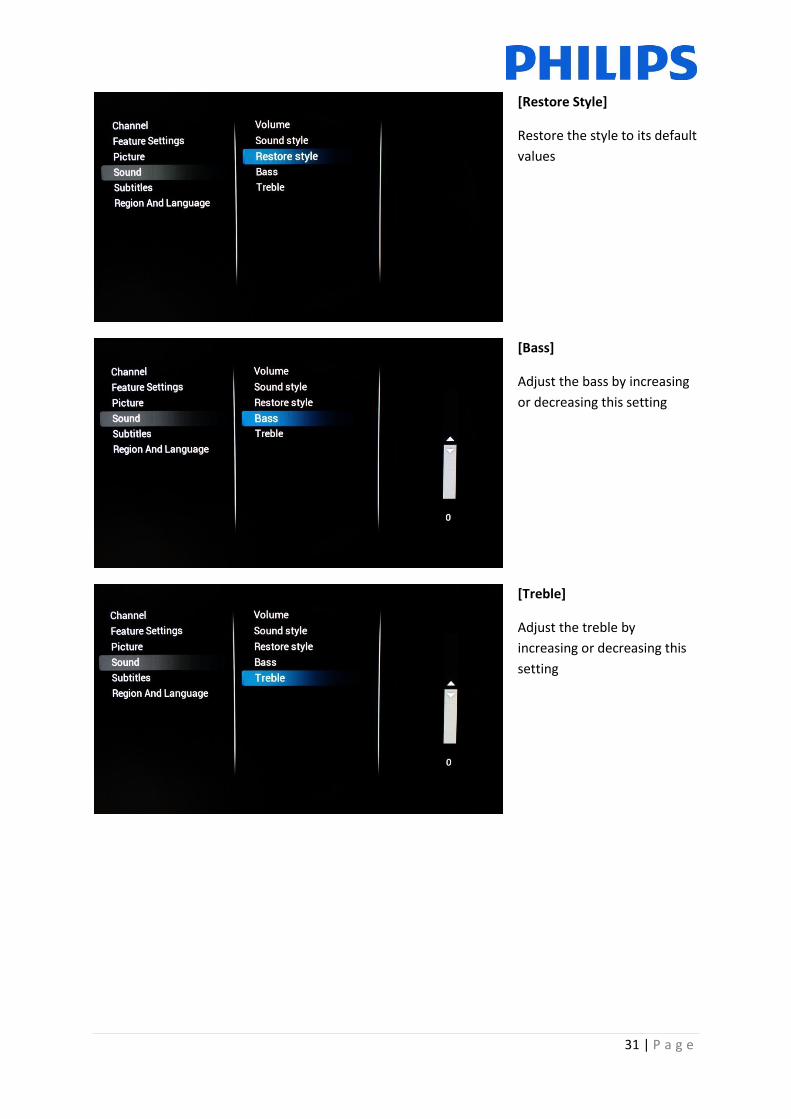
[Restore Style]
Restore the style to its default
values

29 | P a g e
[Picture Format]
Will determine in which size
the content on the TV will be
displayed
[Colour]
To change saturation you can
edit this setting to your liking
[Contrast]
To change the contrast of the
content displayed on the TV
you can increase or decrease
this setting

30 | P a g e
[Sharpness]
To change the sharpness of
the content displayed on the
TV you can increase or
decrease this setting
6.2.4 Sound Settings
[Volume]
Here you can configure the
startup value for our three
audio outputs: [TV Speakers],
[Headphone] and [Bathroom
Speakers]
[Sound Style]
Change the default sound
style to your preference
31 | P a g e
[Restore Style]
Restore the style to its default
values
[Bass]
Adjust the bass by increasing
or decreasing this setting
[Treble]
Adjust the treble by
increasing or decreasing this
setting

32 | P a g e
6.2.5 Subtitles
[Subtitles]
To enable subtitles you can
turn [On] the subtitle feature.
If you want to have the
subtitles (when available)
each time the sound is muted
then select [Automatic] or
[Off] to disable
6.2.6 Region and Language
[Menu Language]
To change the default menu
language for the guest you
can edit this setting to the
preferred language.
6.3 Install Channels
Check out chapter 7 for channel installation.

33 | P a g e
6.4 Channel and Source Settings
6.4.1 Channel Settings
[Manage Channels and Sources] Here you are able to manage your channel list. Reordering, hiding or blanking channels are all options you can choose Note: The channel list can also be edited using CMND. This is by far the easiest method of organizing your channel list
[Enable Sources] Using checkboxes you can enable or disable all sources separately
[Media channels] Change setting to enable or disable Media Channels. Media channels refer to Media files that are mapped as channels as part of a combined channel list. Media channels can be created from Audio, Video or Image files Note: Check appendix 1 for an example

34 | P a g e
[Automatic Channel update] Change setting to enable or disable automatic channel update
[Channel update message] Change setting to enable or disable showing a message after automatic channel update has been performed
[Display scrambled channel banner] Enable this setting and you will see a message on scrambled channels indicating that they are scrambled

35 | P a g e
[Enable EPG] Change setting to enable or disable the Electronic Program Guide
[Enable Subtitles] Change setting to enable or disable the subtitle feature
[Enable Teletext] Change setting to enable or disable Teletext

36 | P a g e
[Enable MHEG] Change setting to enable or disable MHEG. Note: MHEG will only work if the country selected at the time of broadcast installation supports this feature.
6.4.2 Common Interface
[CI+ enable] Change setting to enable or disable the CI+ interface in the TV
[Common Interface application] Open to select CI+ specific application
37 | P a g e
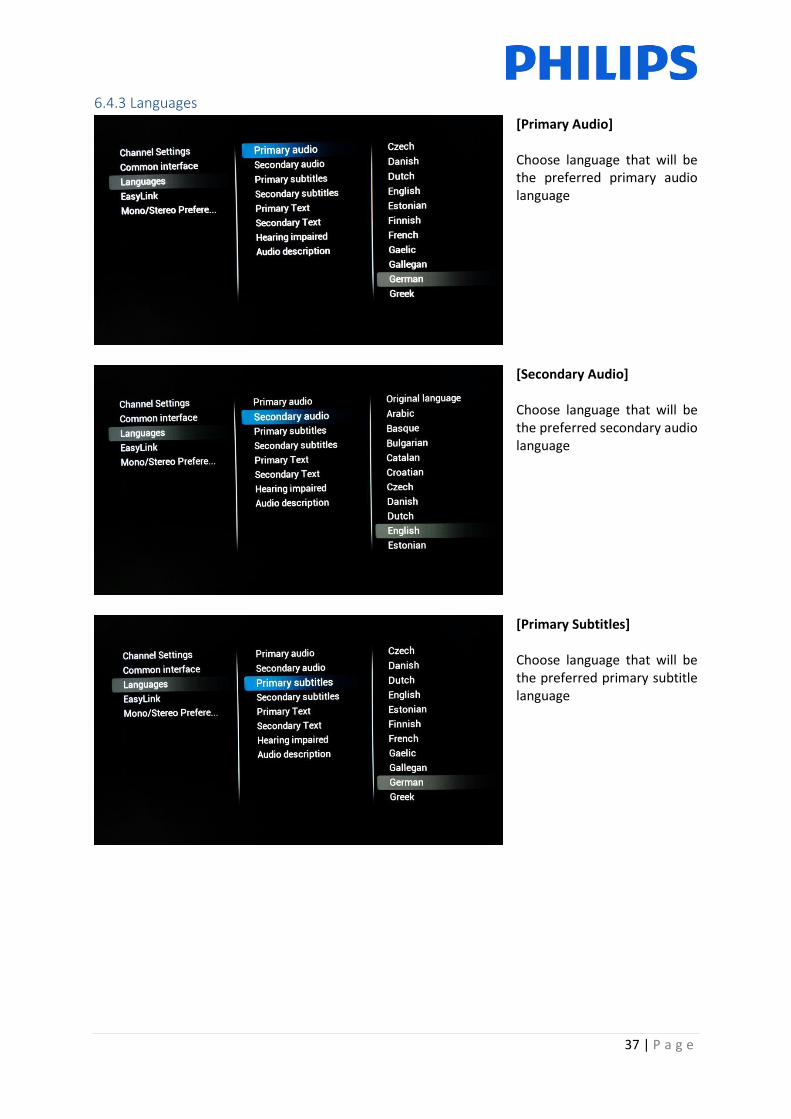
6.4.3 Languages
[Primary Audio] Choose language that will be the preferred primary audio language
[Secondary Audio] Choose language that will be the preferred secondary audio language
[Primary Subtitles] Choose language that will be the preferred primary subtitle language

38 | P a g e
[Secondary Subtitles] Choose language that will be the preferred secondary subtitle language
[Primary Text] Choose language that will be the preferred primary Text language. Which is used as language in broadcast
[Secondary Text] Choose language that will be the preferred secondary Text language. Which is used as language in broadcast

39 | P a g e
[Hearing impaired] Switching on this setting will enable adapted audio and subtitles when available
[Audio Description] When enabled this setting will add audio commentary to the visible broadcast when available
6.4.4 EasyLink
[Enable] Enabling Easylink will configure the Tv to use HDMI CEC
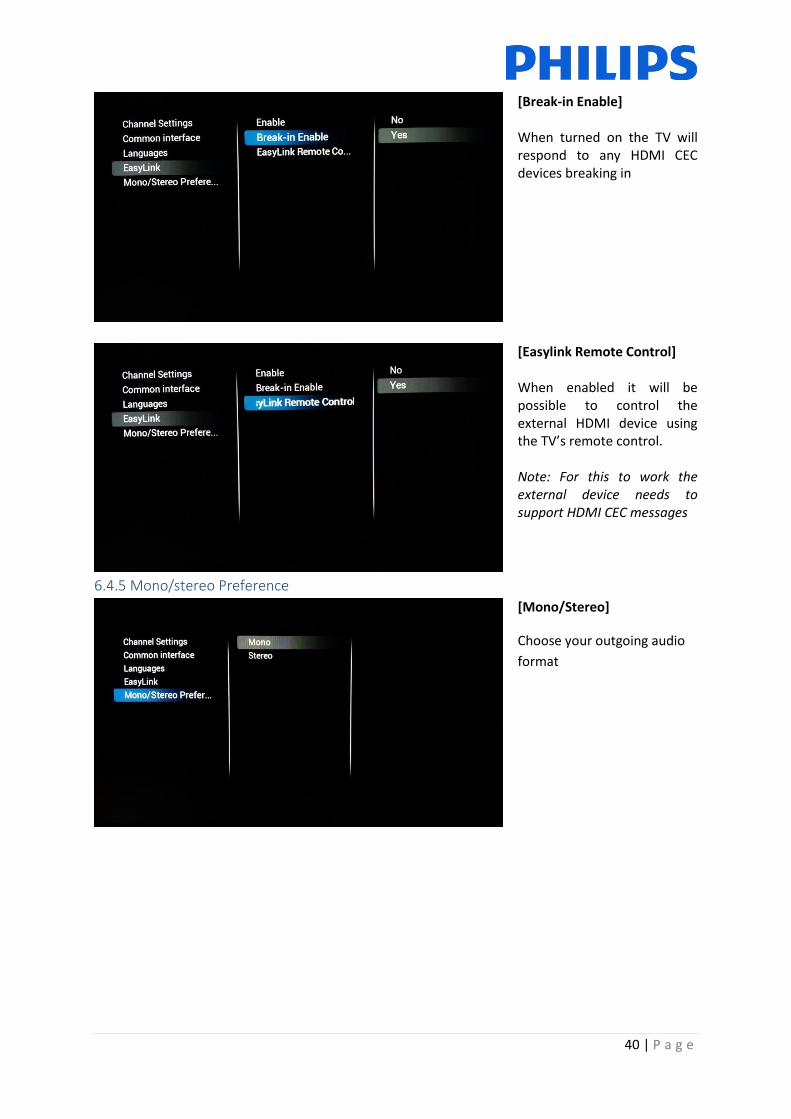
40 | P a g e
[Break-in Enable] When turned on the TV will respond to any HDMI CEC devices breaking in
[Easylink Remote Control] When enabled it will be possible to control the external HDMI device using the TV’s remote control. Note: For this to work the external device needs to support HDMI CEC messages
6.4.5 Mono/stereo Preference
[Mono/Stereo]
Choose your outgoing audio
format
41 | P a g e
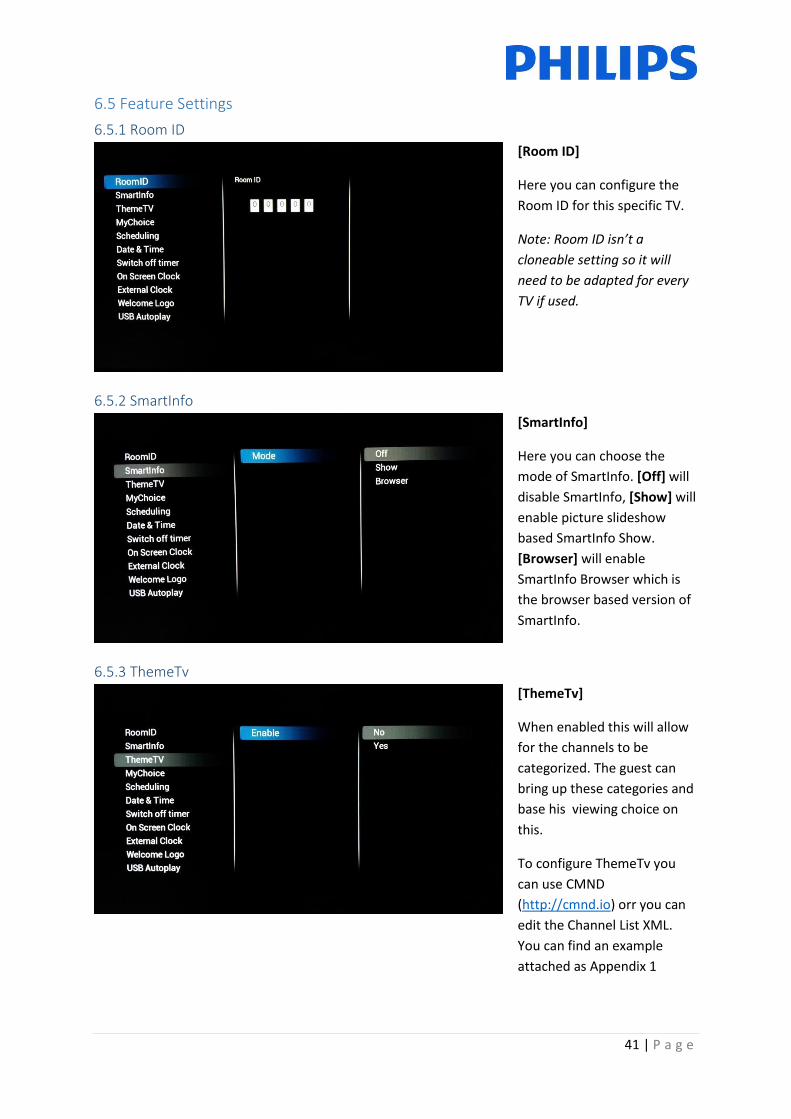
6.5 Feature Settings
6.5.1 Room ID
[Room ID]
Here you can configure the
Room ID for this specific TV.
Note: Room ID isn’t a
cloneable setting so it will
need to be adapted for every
TV if used.
6.5.2 SmartInfo
[SmartInfo]
Here you can choose the
mode of SmartInfo. [Off] will
disable SmartInfo, [Show] will
enable picture slideshow
based SmartInfo Show.
[Browser] will enable
SmartInfo Browser which is
the browser based version of
SmartInfo.
6.5.3 ThemeTv
[ThemeTv]
When enabled this will allow
for the channels to be
categorized. The guest can
bring up these categories and
base his viewing choice on
this.
To configure ThemeTv you
can use CMND
(http://cmnd.io) orr you can
edit the Channel List XML.
You can find an example
attached as Appendix 1

42 | P a g e
6.5.4 MyChoice
[MyChoice]
First of all you can [Enable] the feature. If set to [On] you can start by setting up the different packages by adding or removing channels from the packages. [Request for PIN] will force the guest to enter his PIN code every time the TV starts up. This feature can be used in locations were guest change happens very often or to make sure explicit content will need a valid PIN to be shown. Note: More information on setting up MyChoice can be found in chapter 9
6.5.5 Scheduler
[Scheduling]
On/Off Scheduler is a feature inherited from Signage line of products. This feature enables the SI to set specific times, at which TV can be automatically turned on or Turned off. It also allows the TV to override the SwitchOnChannel and Switch On Feature settings after been woken up by the Scheduler, which maintains its own list of wakeup sources.
43 | P a g e
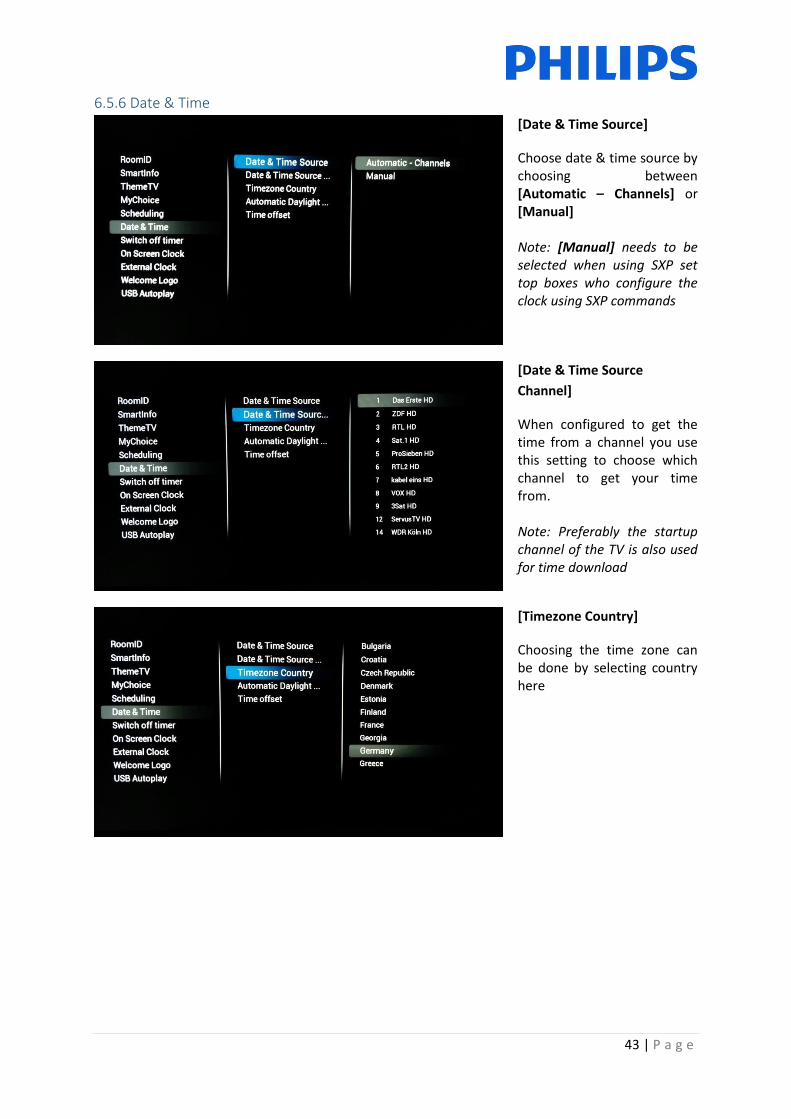
6.5.6 Date & Time
[Date & Time Source]
Choose date & time source by choosing between [Automatic – Channels] or [Manual] Note: [Manual] needs to be selected when using SXP set top boxes who configure the clock using SXP commands
[Date & Time Source
Channel]
When configured to get the time from a channel you use this setting to choose which channel to get your time from. Note: Preferably the startup channel of the TV is also used for time download
[Timezone Country]
Choosing the time zone can be done by selecting country here

44 | P a g e
[Automatic Daylight Savings]
Enable or disable the adaptation of the TV clock to daylight savings time
[Time Offset]
If needed the clock can be adapted with an offset to suite every scenario
6.5.7 Switch Off timer
[Switch off timer]
This setting can be configured between 240 minutes and Off where Off disables the feature Values are 240,120,60,30 and Off

45 | P a g e
6.5.8 On screen clock
[On screen clock]
When set to [Yes] [Display clock always in standby] will show a clock when TV is in standby [Display clock on Radio channels] will enable or disable clock being shown on radio channels [Clock format] can be configured to [24 hour] or [AM/PM]
6.5.9 External Clock
[External Clock] [Enable] configures the feature. When turned [Yes] the clock can be configured to react to the environment light [Brightness At Dim light] and [Brightness At Intense light] can be used to change the brightness behavior [Light Sensor Sensitivity] will also change external clock behavior. Note: For this feature to work you need the extra accessory 22AV1120C
6.5.10 Welcome Logo
When [Enable] is set to [On] there will be an image shown on startup of the TV The [Time Out] will determine how long the image is shown on startup

46 | P a g e
6.5.11 USB Autoplay
[USB Autoplay]
When enabled this will allow for media playback using the USB stick once the TV starts up. This feature can be used for instance for showing hotel information in the lobby
6.5.12 USB Media Browser
[USB Media Browser]
When enabled this will give the guest access to the USB interface for playing back any media files
6.5.13 Multi Remote Control
Here you can configure the Multi Remote feature. This can be used when multiple sets are in each other’s vicinity to make sure the RC signals aren’t sent to the wrong TV Note: When changing the setting in the menu it will immediately become active so there will be a need to reprogram the remote to the chosen setting. For more configuration information check Appendix 2

47 | P a g e
6.6 Advanced settings
6.6.1 Professional mode
Turn [On] to enable professional mode, turn [Off] to disable the professional mode Note: TV’s where professional mode is turned off will not be eligible for support!
6.6.2 Power
[Power ON] will start up the set to the requested state [Standby] will start the set in Standby when the set is powered. [On] will boot the set immediately after power is received
[Standby Mode] will change the standby behavior of the TV. [Green] will power off the set. This is the best energy saving mode [Fast] mode will keep the set awake enough to boot fast and show AV as soon as possible
48 | P a g e
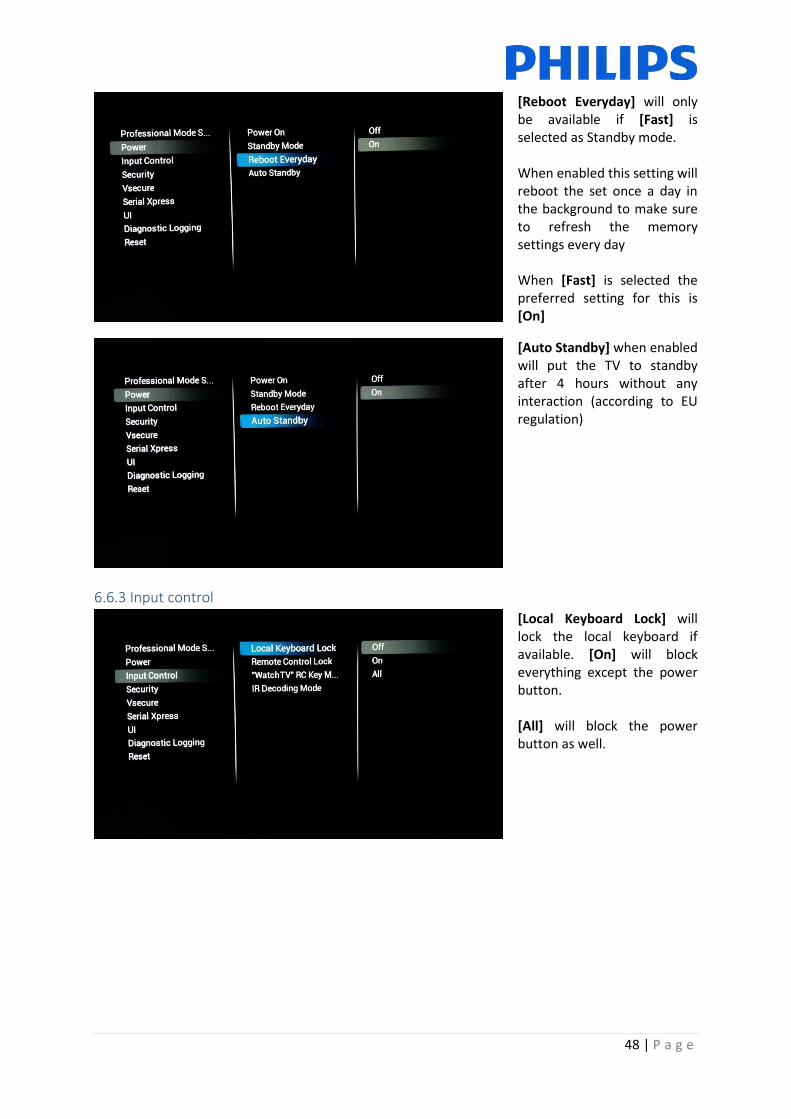
[Reboot Everyday] will only be available if [Fast] is selected as Standby mode. When enabled this setting will reboot the set once a day in the background to make sure to refresh the memory settings every day When [Fast] is selected the preferred setting for this is [On]
[Auto Standby] when enabled will put the TV to standby after 4 hours without any interaction (according to EU regulation)
6.6.3 Input control
[Local Keyboard Lock] will lock the local keyboard if available. [On] will block everything except the power button. [All] will block the power button as well.

49 | P a g e
[Remote Control Lock] when turned [On] the normal remote won’t work anymore. This can be used when STB’s are used Note: The master remote will continue to work even with this feature turned [On]
[“WatchTv” RC Key mapping] instead of going to Tv source the button can be overridden to move to the selected input
[IR Decoding mode]
This will change the system code for the remote control. Choices are [RC5] or [RC6] Note: After exiting the menu the setting will become immediately active so there will be a need to switch system on the RC as well

50 | P a g e
6.6.4 Security
[High Security]
When turned [On] the TV will block all key codes to open special menu’s like the professional menu Note: This doesn’t affect the Master remote

51 | P a g e
6.6.5 Vsecure
The Vsecure system, defines a method to prevent unauthorized viewing and copying of digital video data that is broadcasted on a closed hospitality television network. For this purpose, the VSecure system provides a method of scrambling the digital Audio/video data at the head-end, and a method of descrambling the Audio/video data inside the clients such as television sets. The descrambling keys are transported from the head-end to the clients under the protection of each client’s public key. To receive more information on this system and how to configure it you can create a ticket at https://philipshtv.supportsystem.com/ requesting more information.
[Vsecure Keys Via USB] Load your Vsecure keys using a USB stick
[Vsecure Keys Via RF] It is possible to stuff the Vsecure keys in the TS format as well. When turned [On] the TV will check for the keys using RF

52 | P a g e
[Frequency (Vsecure RF)] This will set the RF frequency on which the TV will look for the Vsecure key
[Medium(Vsecure RF)] You can select the medium on which the TV needs to check for Vsecure keys
[Symbol rate(Vsecure RF)] If needed also the symbol rate can be added to configure the RF checking

53 | P a g e
[Vsecure Key to Erase] This menu gives you control on selecting Vsecure keys for deletion
[Erase Selected Key] When pressed the selected keys in [Vsecure Key To Erase] will be deleted from the TV
6.6.6 Serial Xpress
[Baud Rate]
Here you can change the baud rate of the SXP RJ48 port

54 | P a g e
6.6.7 UI
[Display OSD]
When set to [No] the TV won’t display the UI layer anymore. This will mean that for instance the information when zapping like channel number and channel name won’t be shown anymore
6.6.8 Diagnostic Logging
[Enable]
Turn the feature to by
selecting [Yes] or to off by
selecting [No]
[Destination]
[Internal] will log any
feedback to the internal
memory using a FIFO storing
algorithm. When choosing
[USB] the log will be purged
from the memory to the USB
with the [Frequency] that can
be set in minutes.

55 | P a g e
6.6.9 Reset
[Reset Settings]
When executed all changes in the menu will be reset to the default values [Re-Install TV]
When executed the TV will go to virgin mode and you will be able to reinstall the TV or use IIC. In this case you will lose all settings on the TV. Menu settings and channel installation and so on
6.7 Upgrade and clone settings
6.7.1 USB Base Upgrade and cloning
[Clone USB To Tv]
Press “Ok” when you want to clone a new configuration from the USB drive to the TV [Clone TV to USB]
Press “OK” when you want to copy your existing configuration to a USB drive for backup purposes, make adaptations or to create a masterclone
[Firmware Upgrade from
USB]
Press “OK” to perform a firmware upgrade. When pressed the TV will look for available software in the ‘upgrades’ folder located on the root of the stick

56 | P a g e
[Select Clone To TV]
When multiple clone files are available on the USB drive you can use this menu to select the appropriate clone to flash on the TV The format for the Clone file name is the following: RoomID (5digits) CloneData eg. 00124CloneData
6.7.2 RF Based Upgrade and cloning
[Auto Upgrade and Clone]
When turning on the TV will systematically check for an upgrade being broadcasted using the RF network
[Auto-Clone on Wakeup]
When turned [On] the TV will check with every wake up to see if there is a new clone file available. This setting can be used to personalize the TV experience per guest. For instance by adapting the channel list Note: This might affect the boot time

57 | P a g e
[Frequency]
This setting can be used to set the primary frequency where the TV will check for updates to be available The default will be 498Mhz
[Clone RF to TV]
After pressing “OK” this will trigger the TV immediately to look for an upgrade on the RF network
6.7.3 Software and Clone information
When opened this will display all related information to the TV software and the clone file

58 | P a g e
6.7.4 Settings Overview
When opened this will display a summary of all professional settings

59 | P a g e
7 Channel installation wizard To install channels you have to go to the [Professional Settings] [Install Channels]. In the menu you have a ton of options to change your channel installation. You can choose which mediums to use, to use Analogue vs Digital and so on. Below we will explain the configuration possibilities and how to install the channels. Note: Some screens will be shown depending on your settings or selections made, some screens will not be shown. Also the content of the screens is depending on your selections.
Below is the start screen when you open the [Install Channels] item under the professional settings.

60 | P a g e
7.1 Configuration
The first choice that needs to be made will be which medium’s need to be used during the channel search. A choice can be made to turn [On] or [Off] DVB-T, DVB-C and analogue channels before starting the search.
For each individual medium there are specific settings that can be tweaked depending on the installation that needs to be performed

61 | P a g e
7.1.1 Analogue
For analogue you can enable or disable the PAL and/or SECAM scan. When either one is turned [On] the channel search will include the package during the channel search. SECAM
PAL
62 | P a g e
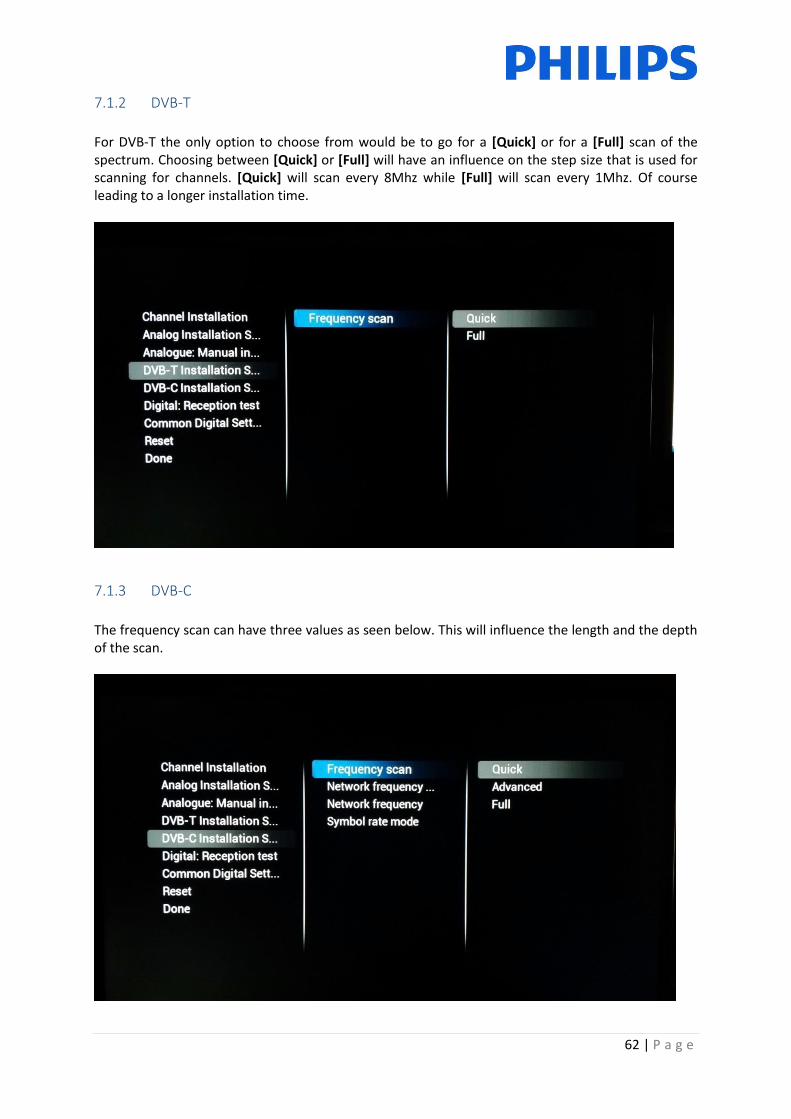
7.1.2 DVB-T
For DVB-T the only option to choose from would be to go for a [Quick] or for a [Full] scan of the spectrum. Choosing between [Quick] or [Full] will have an influence on the step size that is used for scanning for channels. [Quick] will scan every 8Mhz while [Full] will scan every 1Mhz. Of course leading to a longer installation time.
7.1.3 DVB-C
The frequency scan can have three values as seen below. This will influence the length and the depth of the scan.

63 | P a g e
Depending on the broadcaster you can also immediately indicate the [Network Frequency], the [Network ID] and the [Symbol rate mode]
7.2 Digital Settings
Besides the individual medium settings you can also find a [Common Digital settings] menu where it’s possible to change some additional items specifically for digital broadcasts. [Enable LCN Sorting] when turned [On] will provide a sorting algorithm for the channels as intended by the broadcaster. [Free/Scrambled] will give you the opportunity to show [Free channels Only] when you don’t want scrambled to be visible for the guest.
7.3 Reset
To return to the default settings you can use the [Reset] functionality.

64 | P a g e
7.4 Signal Testing
Before installing channels or possibly for checking something it might be needed to check for a signal without the need for completely reinstalling all channels. With the below menu’s you have the ability to do so. Also upgrading the channel package can be done using this mechanism so that the TV doesn’t require a complete channel search.
7.4.1 Analogue
It’s possible to search for channels without installing them. When opening [Analogue: Manual Installation] you can look for channels manually. By choosing the [System], entering the frequency in [Search Channel] and fine tuning the channel in [Fine Tune] you can check if an analogue channel can be received by the TV. If you searched for a signal that you wish to add to a possible existing channel list you can choose between [Store Current Channel] and [Store as new channel] where the definitions already say where the channel will be stored.
7.4.2 Digital
[Digital Reception Test] will give you the same tools as the analogue wizard but adapted towards digital signals. After choosing the [Broadcast Type] you will be able to [Search] for a frequency. Once found the channel can also be stored if needed.
65 | P a g e
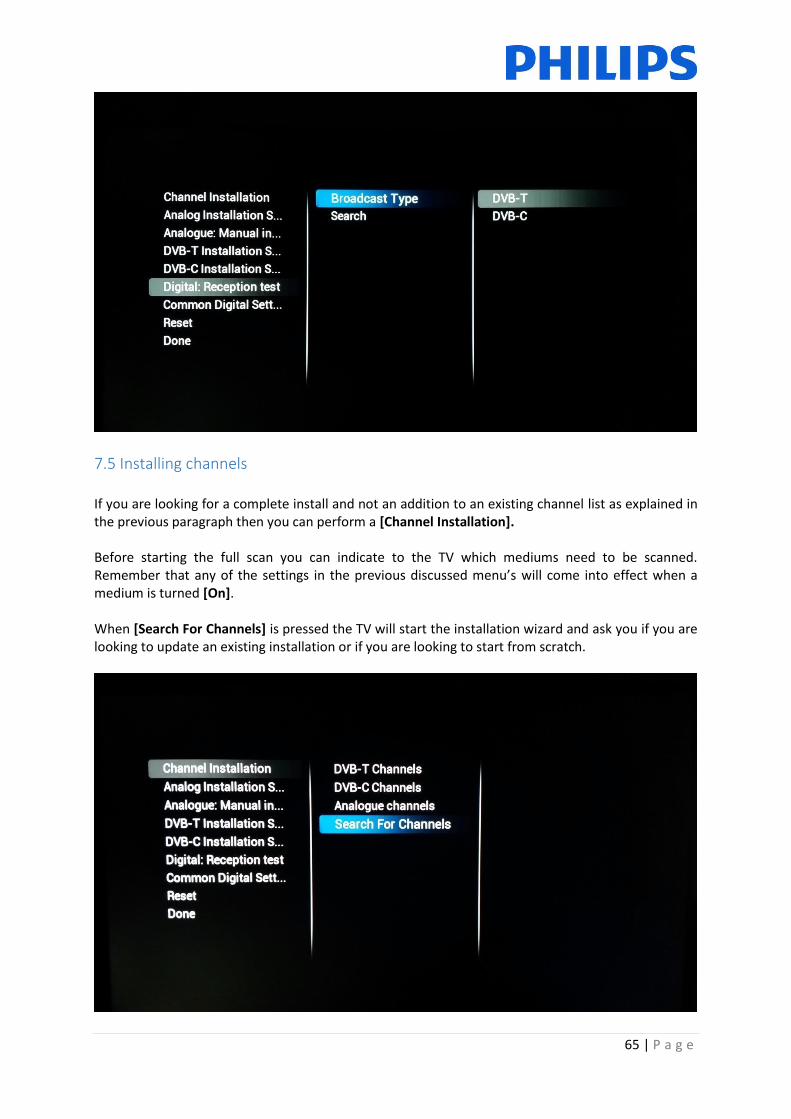
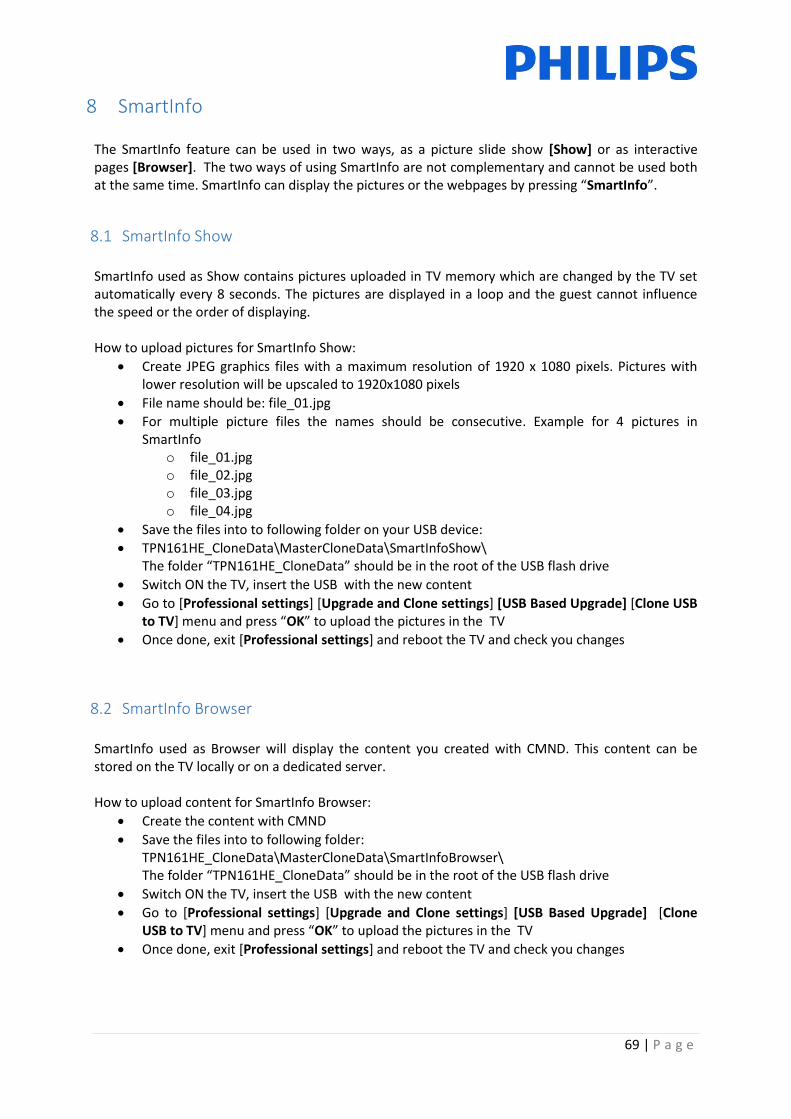
7.5 Installing channels
If you are looking for a complete install and not an addition to an existing channel list as explained in the previous paragraph then you can perform a [Channel Installation]. Before starting the full scan you can indicate to the TV which mediums need to be scanned. Remember that any of the settings in the previous discussed menu’s will come into effect when a medium is turned [On]. When [Search For Channels] is pressed the TV will start the installation wizard and ask you if you are looking to update an existing installation or if you are looking to start from scratch.

66 | P a g e
When [Update Channels] is pressed the TV will look for any changes in the RF network and will adapt the current channel list to reflect those changes.
When [Re-Install Channels] is pressed the TV will ask you for all the necessary input such as Country and Broadcaster. Once all necessary questions have been answered the TV will remove any current channel list and will start creating a new one. Choosing the Country

67 | P a g e
Choosing the broadcaster
Starting the search

68 | P a g e
Searching channels
Search completed
After [Re-Install Channels] finishes successfully you will end up with a new channel list.
69 | P a g e
8 SmartInfo The SmartInfo feature can be used in two ways, as a picture slide show [Show] or as interactive pages [Browser]. The two ways of using SmartInfo are not complementary and cannot be used both at the same time. SmartInfo can display the pictures or the webpages by pressing “SmartInfo”.
8.1 SmartInfo Show
SmartInfo used as Show contains pictures uploaded in TV memory which are changed by the TV set automatically every 8 seconds. The pictures are displayed in a loop and the guest cannot influence the speed or the order of displaying. How to upload pictures for SmartInfo Show:
Create JPEG graphics files with a maximum resolution of 1920 x 1080 pixels. Pictures with lower resolution will be upscaled to 1920x1080 pixels
File name should be: file_01.jpg
For multiple picture files the names should be consecutive. Example for 4 pictures in SmartInfo
o file_01.jpg o file_02.jpg o file_03.jpg o file_04.jpg
Save the files into to following folder on your USB device:
TPN161HE_CloneData\MasterCloneData\SmartInfoShow\ The folder “TPN161HE_CloneData” should be in the root of the USB flash drive
Switch ON the TV, insert the USB with the new content
Go to [Professional settings] [Upgrade and Clone settings] [USB Based Upgrade] [Clone USB to TV] menu and press “OK” to upload the pictures in the TV
Once done, exit [Professional settings] and reboot the TV and check you changes
8.2 SmartInfo Browser
SmartInfo used as Browser will display the content you created with CMND. This content can be stored on the TV locally or on a dedicated server. How to upload content for SmartInfo Browser:
Create the content with CMND
Save the files into to following folder: TPN161HE_CloneData\MasterCloneData\SmartInfoBrowser\ The folder “TPN161HE_CloneData” should be in the root of the USB flash drive
Switch ON the TV, insert the USB with the new content
Go to [Professional settings] [Upgrade and Clone settings] [USB Based Upgrade] [Clone USB to TV] menu and press “OK” to upload the pictures in the TV
Once done, exit [Professional settings] and reboot the TV and check you changes

70 | P a g e
9 MyChoice In this manual we will cover only the configuration of MyChoice on the TV, all details about the account and credits are covered in a different manual. Please contact your TP Vision country sales manager to setup an account and buy the credits. During the installation of the TV sets please collect the following information:
Room number TV model Serial number
101 xxHFL3011D/10 FZ1A xxxx xxxx xxxx
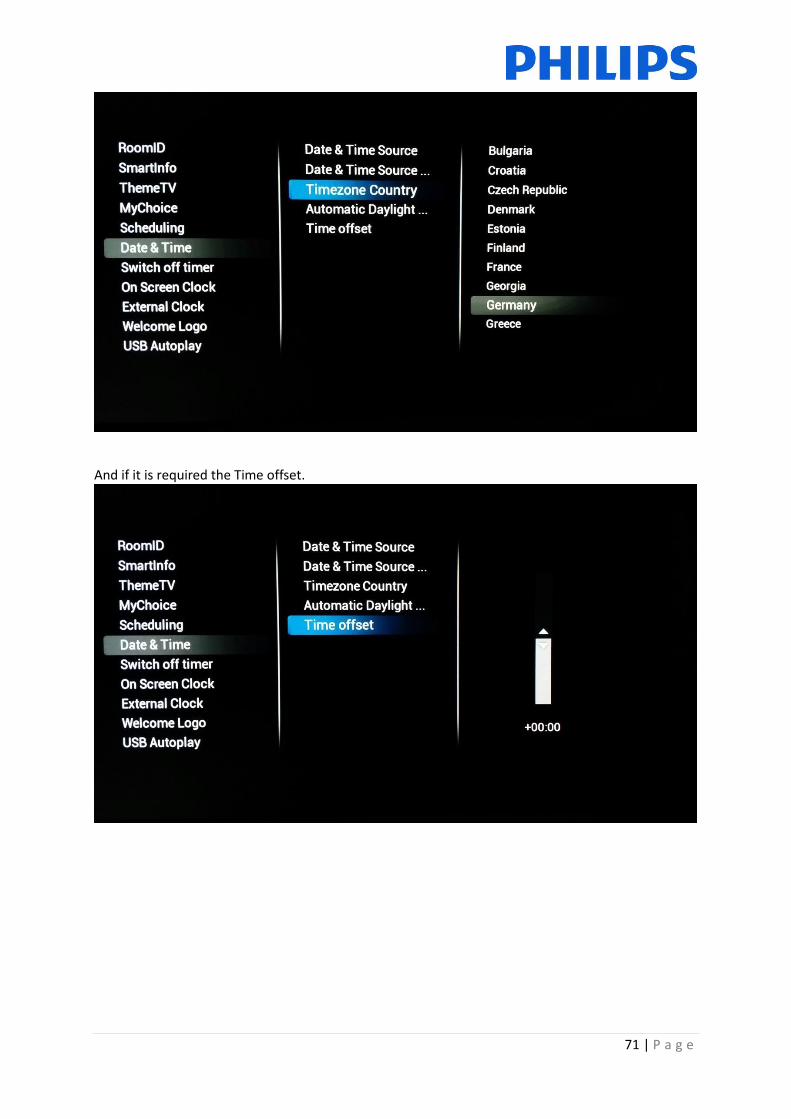
Room number, TV model and serial number are required on MyChoice website when rooms are configured. Make sure that all values are correct because the MyChoice website is generating pin codes based on this information. You can gather all these details during the installation and afterwards enter them in the administration part of the MyChoice website. How to configure the MyChoice is described below: The most important step for MyChoice is the clock. If the clock is not defined or the TV doesn’t have the correct time, MyChoice will display the following message: MyChoice is not available, please contact the reception. To set up the clock correctly please refer to chapter ‘6.5.6 Date & time’. Enter the Professional menu go to: Clock setup and configure the Download program.
Afterwards define the country in which the TV is installed.
71 | P a g e
And if it is required the Time offset.

72 | P a g e
9.1 Configuring the TV
Go to [Feature Settings] and enable MyChoice.
In this case two options are available. These are:
[No]: This means that MyChoice is disabled and the packages are not available. [Yes] MyChoice is enabled
Defining the channel packages is the second step in the MyChoice configuration. Based on the pin code the TV channels will be displayed. Three packages are available: Free package: This package will include all channels which are available without any pin code. To add a channel to a package you have to select the channel and press “OK” to tick the box in front of the channel.

73 | P a g e
Package 1: In package 1 you can add the channels which will be available with the MyChoice pin code.
Keep in mind that the MyChoice pin code for package 1 will enable only the channels from this package. To have a proper package configuration add all the “Free channels” to this package. If you don’t add the [Free channels] in this package after the MyChoice activation, the channel plan will include only Extra channels without possibility to view the [Free channels package]. Package 1 = Free Channels + Extra channels Note: Extra channels can contain some movie channels or sport channels like: HBO, Comedy Central, Sky Sport.

74 | P a g e
Package 2: In this package you can add channels which will be activated with a different MyChoice pin code. This package can contain [Free channels], [Package 1] and another few channels which will be available only if the pin code is valid for Package 2.
Few configuration possibilities are: Package 2 = Free channels + VIP Channels Note: VIP channels can contain channels which are included in Package 1 and a few extra.
Package 2 = Free channels + Package 1 + VIP Channels Each package can be configured independently without having any influence on other packages, but you have to keep in mind that after activation the TV will show only the channels which are ticked for this package.
9.2 Checking MyChoice functionality.
Power ON the TV and wait to see the Switch on channel. Press the MyChoice button on the remote control. The following window will appear on TV:

75 | P a g e
Enter the pin code received from the website or generated with a scratch card. After entering the pin
code press OK to submit the code.
If the pin code is correct, the following message will be displayed. Also the message will display the
remaining viewing time.
After few seconds the message will disappear and the channel grid will pop up showing all channels available. The MyChoice channels will have a star inside the box. If you enter an invalid pin code or an expired pin code the following message will be displayed.
Note: If you do a power cycle of the TV and press the MyChoice button again, you can enter the same pin code if this code is still valid. Important remark: If you enter a new pin code, the previous code will become invalid despite the fact that the code could be still valid. Example: If you enter a pin code for Package 1 valid for 24 hours and after 4 hours you entered a pin code for Package 2, the pin code for Package 1 will become invalid; the TV will report the message above.

76 | P a g e
10 Scheduler This function allows you to program up to 7 different scheduled time intervals for this TV to activate. You can set:
- Which input source the TV will use for each scheduled activation period. - The time for the display to turn on and turn off. - The days in a week for the display to activate.
Note: We recommend you to set up current date and time correctly before using this function.
Below you can find an example of how to enable and configure a scenario for the Scheduler feature. The first step will be to select the a schedule [Status] and set it to [Enabled]. Once the schedule [Status] is set to [Enabled] the following items shall be configurable: o Wakeup Source o Switch on time o Switch off time o Repeat modes

77 | P a g e
• Wakeup Source : the wakeup source shall be able to select any channel from the combined channel list as well as USB Autoplay or SmartInfo. This will be the source at startup of the Tv when the schedule is active.
• Switch on time: is the time at which the TV will wake up for the selected schedule. Switch on time is set on a Pop-Up OSD displayed when [Switch On Time] is selected. If the selected schedule is not [Enabled], this time shall not be configurable.

78 | P a g e
• Switch off time: is the time at which the TV will switch off (go to standby) for the selected schedule. If the selected schedule is not [Enabled], this time shall not be configurable.
• Repeat modes: will define the day of repeat activation for selected Schedule for a given week. Only one [Repeat Mode] can be selected at a time. If [Repeat mode] selected is “No repeat”; The current Schedule shall be only executed once, after which the [Schedule Status] will be reset to [Disabled]
• Resume will let the currently selected Schedule to run immediately once. Once activated, if not interrupted by other schedules, the Schedule that is ran using Resume function shall end as per the original [Switch Off Time] setting. And if no [Switch off time] is configured it will stay on permanently.

79 | P a g e
11 CSM (Customer Service Menu) The CSM contains data about the TV software, serial number and other details. The menu can be accessed using a standard remote control or using the master remote control.
Using the guest RC: “1 2 3 6 5 4”
Using the master RC “Info” You can navigate the 9 pages using “Up/Down”.
When a USB device is connected to the TV a text file will be written to the USB device with some details about the TV. The CSM data is also stored on the USB drive during the cloning from USB to TV. The data is stored in
the folder CSM Dump which is inside of the cloned folder TPN161HE_CloneData/DataDump.
The CSM.txt file contains all the specific information about this TV. The file can be viewed using any
text editor and doesn’t affect the cloning data.

80 | P a g e
Appendix 1 <?xml version="1.0" encoding="UTF-8" standalone="yes"?> <SchemaVersion MajorVerNo="2" MinorVerNo="0"/> <TvContents> <ChannelMap> <Channel> <Source Type=”HDMI1” > </Source> < Setup presetnumber="40" name="DVD Player" blank="0" skip="0" FreePKG="0" PayPKG1="1" PayPKG2="1" TTV1=”0” TTV2=”3” TTV3=”1” TTV4=”0” TTV5=”0” TTV6=”1” TTV7=”0” TTV8=”0” TTV9=”0” TTV10=”0”></Setup> </Channel> <Channel> <Media url=”file://xxx/yy.mpg” > </Media> < Setup presetnumber="42" name="MyVideo" blank="0" hide="0" FreePKG="0" PayPKG1="1" PayPKG2="1" TTV1=”0” TTV2=”3” TTV3=”1” TTV4=”0” TTV5=”0” TTV6=”1” TTV7=”0” TTV8=”0” TTV9=”0” TTV10=”0”></Setup> </Channel> <Channel> <Media url=”file://xxx/yy.jpg” > </Media> <Setup presetnumber="43" name="MyPicture" blank="0" hide="0" FreePKG="1" PayPKG1="1" PayPKG2="1" TTV1=”0” TTV2=”3” TTV3=”1” TTV4=”0” TTV5=”0” TTV6=”1” TTV7=”0” TTV8=”0” TTV9=”0” TTV10=”0”></Setup> </Channel> </ChannelMap> </TvContents> Note: Maximum size allocated for media channels shall be 128Mb

81 | P a g e
Appendix 2 This is an example of the channeltable. This can be found back in the clone file as ChannelList.xml under the ChannelList folder. <?xml version="1.0" encoding="UTF-8" standalone="yes"?> <SchemaVersion MajorVerNo="2" MinorVerNo="0"/> <TvContents> <ChannelMap> <Channel> <Broadcast medium="dvbc" frequency="306000" system="west" serviceID="1005" ONID="1" TSID="10" modulation="256" symbolrate="6875000" bandwidth="Auto" servicetype="TV" ></Broadcast> <Setup presetnumber="1" name="vtm HD" blank="0" skip="0" FreePKG="1" PayPKG1="1" PayPKG2="1" TTV1=”1” TTV2=”4” TTV3=”0” TTV4=”0” TTV5=”0” TTV6=”0” TTV7=”1” TTV8=”0” TTV9=”0” TTV10=”1”></Setup> </Channel> <Channel> <Broadcast medium="analog" frequency="161250" system="west" serviceID="318" ONID="0" TSID="0" modulation="8" symbolrate="0" bandwidth="Auto" servicetype="TV"></Broadcast> <Setup presetnumber="2032" name="-----" blank="0" skip="0" FreePKG="1" PayPKG1="1" PayPKG2="1" TTV1=”0” TTV2=”3” TTV3=”1” TTV4=”0” TTV5=”0” TTV6=”1” TTV7=”0” TTV8=”0” TTV9=”0” TTV10=”0”></Setup> </Channel> <Channel> <Source Type=”HDMI1” > </Source> < Setup presetnumber="40" name="DVD Player" blank="0" skip="0" FreePKG="0" PayPKG1="1" PayPKG2="1" TTV1=”0” TTV2=”3” TTV3=”1” TTV4=”0” TTV5=”0” TTV6=”1” TTV7=”0” TTV8=”0” TTV9=”0” TTV10=”0”></Setup> </Channel> <Channel> <Media url=”file://xxx/yy.jpg” > </Media> <Setup presetnumber="43" name="MyPicture" blank="0" hide="0" FreePKG="1" PayPKG1="1" PayPKG2="1" TTV1=”0” TTV2=”3” TTV3=”1” TTV4=”0” TTV5=”0” TTV6=”1” TTV7=”0” TTV8=”0” TTV9=”0” TTV10=”0”></Setup> </Channel> </ChannelMap> <ThemeTV> <TTV1 Name="ThemeName1"> </TTV1> <TTV2 Name="ThemeName2"> </TTV2> <TTV3 Name="ThemeName3"> </TTV3> <TTV4 Name="ThemeName4"> </TTV4> <TTV5 Name="ThemeName5"> </TTV5> <TTV6 Name="ThemeName6"> </TTV6> <TTV7 Name="ThemeName7"> </TTV7> <TTV8 Name="ThemeName8"> </TTV8> <TTV9 Name="ThemeName9"> </TTV9> <TTV10 Name="ThemeName10"> </TTV10> </ThemeTV> </TvContents>

82 | P a g e
Appendix 3 [Multi RC] This function allows that up to ten televisions can be installed in a room whereas every TV will listen to its own RC. Once the TV is set, also every RC can be set to remember its connected TV: [Off] This function is not used; all TVs will listen to a ‘blue’ RC. [TV Blue] The TV will listen to a ‘Blue’ RC [TV Red] The TV will listen to a ‘Red’ RC [TV Yellow] The TV will listen to a ‘Yellow’ RC [TV Green] The TV will listen to a ‘Green’ RC [TV0] The TV will listen to a ‘0’ RC. [TV1] The TV will listen to a ‘1’ RC. [TV2] The TV will listen to a ‘2’ RC. [TV3] The TV will listen to a ‘3’ RC. [TV4] The TV will listen to a ‘4’ RC. [TV5] The TV will listen to a ‘5’ RC. [TV6] The TV will listen to a ‘6’ RC. [TV7] The TV will listen to a ‘7’ RC. [TV8] The TV will listen to a ‘8’ RC. [TV9] The TV will listen to a ‘9’ RC. Remark: MultiRC Off and MultiRC On configured to Blue is exactly the same configuration. To change the configuration press and hold both the menu and the respective number or color button on the RC for about five seconds.
Press and hold the OK button while pointing to the TV that’s powered on for about five seconds to check the current color of the Multi Remote settings of TV and Guest remote.

83 | P a g e
© 2016 TP Vision Belgium NV All Rights reserved. Specifications are subject to change without notice. Trademarks are the property of Koninklijke Philips NV or their respective owners.
www.philips.com