installation manual september 2017 - protect-all flooring · 1 installation manual september 2017...
TRANSCRIPT

1
Installation Manual
September 2017
Protect-All Flooring
5585 N. Huron Avenue
Oscoda, MI 48750
800-544-9538 (Phone)
989-739-1494 (Fax)
www.protect-allflooring.com

2
Table of Contents
Installation Quick Tips ................................................................................................................. 3
1. Before You Start .................................................................................................................... 4
2. Tools and Equipment ............................................................................................................ 4
3. Definitions ............................................................................................................................. 5
a. Grade Levels ............................................................................................................. 5
b. Sub-Floors and Underlayment ................................................................................... 5
4. Interior and Exterior Preparations .......................................................................................... 5 a. Concrete Floor Preparations/Testing ......................................................................... 5
b. Wood Sub-Floor Preparation ..................................................................................... 7
c. Radiant-Heated Concrete Floor ................................................................................. 7
d. Existing Flooring ........................................................................................................ 7
e. Metal Floor ................................................................................................................ 7
5. Layout and Installation .......................................................................................................... 8
a. General Guidelines .................................................................................................... 8 b. Installation ................................................................................................................. 9
i. Fully-Adhered – Wet Areas ............................................................................ 9
ii. Fully-Adhered – Dry Areas ........................................................................... 19
iii. Loose-Lay .................................................................................................... 19
c. Cove Base ............................................................................................................... 20
6. Maintenance and Care ........................................................................................................ 26
a. Heavy Grease and High Traffic Areas...................................................................... 26
b. Cleaning Protect-All Gloss Products ........................................................................ 29

3
Installation Quick Tips
If you have not attended a Protect-All® flooring class please contact Protect-All for dates.
Concrete floors should follow appropriate commercial guidelines. A vapor barrier (10 mil.) should be installed under a concrete slab.
Proper moisture tests are recommended to be conducted on all commercial sub-floors. Relative humidity of slab should be under 85% and this test should supersede 5 lbs./1000 sq. ft./ 24 hrs. for the Calcium Chloride Test.
The sub-floor needs to be cleared of all foreign debris and dirt. This also includes coatings, curing compounds paint and any other material that could cause poor adhesion.
It is NOT recommended that Protect-All flooring be permanently installed over existing finished flooring of any kind or type.
Acclimation-Floor sheets should be acclimated (24-48 hours) on-site, cut and dry-fitted to perimeter walls, and all penetrations cut out (drain areas milled out with use of a router) before adhesive is applied to substrate.
Flooring Epoxy-Flooring should always be immediately adhered with Protect-All’s recommended adhesive. A 100 lb. roller is required to roll the flooring into the adhesive twice. The first after the initial installation and the second 45 minutes later.
Trowel Size-Use 1/8” x 1/8” x 1/16” v-notched trowels to spread adhesive for 1/4” material.
Protect-All Rapid Weld™- Recommended for Dark Gray, Light Gray, Brown, Black, Blue and Terra Cotta Protect-All installations. Verify the expiration date of Protect-All Rapid Weld before using by adding one year from the given production date. Check that material is coming from both openings in a consistent form before installation. Attach nozzle and dispense some Protect-All Rapid Weld to ensure product is coming out correctly. Protect-All Rapid Weld is used for both flooring and base welding.
Protect-All Heat-Welding System for Commercial Flooring-Available for installations in Burgundy and Green. Calibration of the heat gun is required. Test-weld samples of ordered sheet material and V-weld rod daily before any finish welding begins. Maximum speed of V-welding should be between 1-1/2 and 2 linear feet per minute for V-Rod.
Protect-All Rapid-Weld and E6100 sealant are not FAA compliant and cannot travel by air. These products can only be shipped by ground transportation.
Drain Rings and Transition Strips should be measured on-site to ensure accuracy. For the drain rings, measure the diameter and add 1/8” to the measurement when ordering. All accessories (screws, anchors, rings, etc.) need to be ordered from a Protect-All distributor with the flooring.

4
1. Before You Start
This installation manual is designed to assist the professional installer by presenting them with the unique characteristics of Protect-All flooring products and Protect-All installations.
A Protect-All flooring installation requires safe work habits in a safe environment. Installers should review and follow all safety and health information available such as Safety Data Sheets (SDS), labels, instructions, specifications, and other pertinent publications.
The installation of Protect-All should be performed by a professional flooring installer, familiar with Protect-All’s unique characteristics, local building codes, and ASTM Standards. The professional installers should have at least four years of commercial flooring experience. Professional installers must attend and pass our installation training class prior to any commercial installation. Contact Protect-All flooring at 800-544-9538 for complete details and eligibility requirements.
2. Tools and Equipment
The professional installer should have all the standard tools and equipment needed for testing and prepping the sub-floor/underlayment, floor layout, dry fitting, mixing/spreading adhesives, power grooving, heat-welding, and trimming homogeneous vinyl sheet flooring, base, corners and trim.
Unique tools required for Protect-All Rapid Weld:
Grooving blade 3.5mm “U” blade
Protect-All Rapid Weld gun with rechargeable batteries and charger
Protect-All Rapid Weld seam tool and base tool
Mixing nozzles and Protect-All Rapid Weld tape
Teflon roller
Tools required for heat welding:
Leister® heat gun
Heat welding tips: V-weld tip and radius weld tip
V-groove blade for Leister® or Wolff®
General flooring tools for all Protect-All flooring installations:
Electric seam groover (Wolff® Master Groover or Leister®)- call Protect-All for details
Skiving trim knife and sharpener
Electric or battery powered drill
Yellow straight-cut and aviation tin snips
1/8” x 1/8” x 1/16” v-notched trowel
2hp (minimum) wood plunge router with 1/2” straight bit
12” metal framing (speed) square
Metal paddle mixer (for the 2-part adhesive)
Caulking gun
Gorilla Tape® - or equivalent
Under scribes
Hammer

5
Electric hammer drill w/masonry bit
Compass
3. Definitions
a. Grade Levels:
i. Suspended: A suspended floor is one with a minimum of 18” of well-ventilated air
space below.
ii. On-Grade: An on-grade floor is one in direct contact with the ground or over filler
that is in direct contact with the ground. A concrete slab on ground level is an
example of this type of floor.
iii. Below Grade: A below grade floor is partially or completely below the surrounding
grade level in direct contact with the ground or over filler that is in direct contact
with the ground. NOTE: On-grade and below-grade floors should have vapor
barriers installed under the concrete slab.
b. Sub-Floors and Underlayment:
i. Sub-Floor: A sub-floor is selected for structural purposes and is the substrate for
the underlayment.
ii. Underlayment: The smooth and level surface used as the substrate for the floor
cover.
iii. Sub-Floor/Underlayment Combination: A surface that must meet structural
requirements as well as have a smooth and level surface for the floor covering.
4. Interior and Exterior Preparations
It is recommended to install Protect-All flooring only over structurally-sound, clean, dry concrete or concrete board (1/2” minimum), and underlayment grade plywood. Installing over other substrates and/or existing finishes is at the sole discretion of the professional installer and end-user. Protect-All does not warrant the performance of any installation not recommended in this installation manual.
a. Concrete Floor Preparations/Testing:
i. ALL on-grade and below-grade concrete floors should have an existing vapor
barrier (10 mil/0.010 in.) installed below the slab. Consult the following
standards; ASTM E1745-97, ASTM E96-00, ASTM E1643-11, and ACI 302.1R-
15 (www.astm.org and www.aci-int.net). The concrete sub-floor should be dry,
smooth, and structurally-sound. It must be flat (Fϝ20) and level (Fɩ15), except for
sloping to drains. It should be free of depression, scale, and foreign deposits of any
kind. Paint (any type), varnish, oil, wax, stain, and old adhesive residue must be
removed. Prior to the installation, the floor should be swept and shop vacuumed to
ensure all dust has been removed.

6
ii. The following tests should be performed prior to any Protect-All installation over
concrete: Tests 1, 2, 3 and 4 should be conducted three times in three different
testing areas within the first 1,000 square feet and one test every 1,000 square feet
thereafter. Reference ASTM F710-11 Standard Practice for Preparing Concrete
Flooring to Receive Resilient Flooring.
1. Calcium Chloride Test – Required results: Moisture vapor emission rate
of 5 lb./1,000 ft² per 24 hours (See 4.a.vii) Consult ASTM F1869.
2. Relative Humidity Test – Required results: 85% relative humidity. (See
4.a.vii) Consult ASTM F2170.
3. PH Test – Required results: 8 to 10 (See 4.a.vii).
4. PSI Test – Required results: 3500 psi – minimum.
5. Adhesion Test – If the results for test 1, 2 and 3 are acceptable, a final
adhesion test is recommended. In an inconspicuous area, a 12” x 12” piece
of Protect-All should be adhered using the appropriate sub-floor preparations
and either the #127 or #139 2-part adhesives. If after 72-hours the 12” x 12”
piece is completely bonded, the concrete sub-floor is satisfactory for a
Protect-All installation.
iii. Rough, uneven, score marked, cracked concrete (as long as it is structurally-
sound) should be filled using the appropriate filler. Fillers and leveling
compounds must be of a cementitious type (non-gypsum), must be moisture,
mildew-, and alkali-resistant, and must provide a minimum of 3500 psi. The
type of cementitious leveling compound to use is at the discretion of the installer
and end-user. Adhesion tests should be performed when considering what
filler/leveler to use (see 4.a.ii).
iv. Cement type underlayment boards (minimum 1/2”) can be used under Protect-All
flooring as long as they have been installed according to their manufacturer’s full
recommendations.
v. Concrete curing/drying compounds can reduce the adhesion of Protect-All
specified adhesives. Removal of these products is necessary prior to adhering
Protect-All. Adhesion tests should be performed prior to installation (see 4.a.ii).
vi. Suspended concrete floors should meet the standard criteria mentioned under
4.a.i-ix.
vii. If high Moisture Vapor Emission Rates (MVER), relative humidity levels, or
alkalinity levels exist, then a surface-applied vapor reduction system may be
needed. If a moisture reduction system is chosen it must be covered with a
cementitious skim coat with a minimum strength of 3500psi. Any compatibility
testing with Protect-All’s #127 or #139 epoxy adhesives should be done by that
system’s manufacturer, and not Protect-All. The moisture/vapor barrier’s
performance and warranty are the responsibility of their manufacturer, end-user,
and installer. Adhesion tests are also recommended with these products (see
4.a.ii). Some companies will test adhesives and will warranty flooring materials
and labor with their product system and specified procedures.
viii. Floor drains, of any type and size, should be properly sloped before applying
Protect-All flooring.

7
ix. Protect-All should never be installed over gypsum-based sub-floors,
underlayments or fillers.
b. Wood Sub-Floor Preparation:
i. Protect-All flooring can be installed over suspended wood sub-floors. On-grade or
below-grade installations will be at the discretion of the installer and end-user and
are not recommended.
1. 3/4” marine-grade plywood is recommended for the finished sub-
floor/underlayment in cooler and freezer areas.
ii. Sub-floor panels, strip wood, board or plank-type sub flooring may require covering
with an underlayment. Wood underlayments should be structurally-sound,
designed for resilient flooring underlayment purposes. Panels should be clean, free
of any dirt, wax, oil, or adhesive residue. All wood underlayments/sub-floor should
be solid, well nailed at the joints, and free from movement. Reference ASTM
F1482-15, Standard Practice for Installing and Preparation of Panel Type
Underlayments to Receive Resilient Flooring.
iii. Old wood floors to be covered should be stripped of paint, varnish, wax, oils, and
adhesives. If this is not possible, then cover with an appropriate underlayment.
Note: Luan products are not recommended for use under Protect-All flooring.
iv. Floor drains of any type and size should have a properly sloping substrate prior to
Protect-All being installed.
v. Prior to beginning the installation, it is recommended to broom sweep and shop
vacuum to ensure that all dust and debris has been removed.
c. Radiant-Heated Concrete Floors:
Protect-All flooring may be adhered over radiant-heated floors provided the maximum temperature of the floor does not exceed 85°F (see 4.a.i-ix), and maximum water temperature does not exceed 110°F.
d. Existing Flooring:
VCT, resilient (any type), polymeric, quarry, marble, terrazzo, epoxy, painted, waxed, sealed, stained, and all other existing finished floors. It is not recommended that Protect-All flooring be permanently installed over existing finished flooring of any kind or type. Protect-All recommends either completely removing the existing flooring down to the sub-floor, or applying an appropriate underlayment prior to installation.
e. Metal Floors:
Metal surfaces can be abraded to achieve adhesion. Another option may be to apply a 3/4” marine-grade plywood or 1/2” concrete board with a bond test prior to the installation of Protect-All.

8
5. Layout and Installation
a. General Guidelines:
i. Protect-All provides installation classes at its facility in Michigan.
Participation and successful completion of this class is required prior to any
first time commercial installation. For more information call 800-544-9538 or
visit www.protect-allflooring.com.
ii. Protect-All Matte (standard finish) products are designed for areas exposed to
high levels of moisture that require a floor with slip resistance. Protect-All matte is
also designed for high traffic and heavy-impact areas. Wet areas require the fully
adhered system (see 5.b.i). Protect-All should be installed with the rough side up
in areas where people are in their bare feet such as water parks and shower
rooms. Call Protect-All for details. NOTE: Protect-All does not recommend
wearing soft neoprene-soled shoes on its flooring because those soles tend
to be slippery.
iii. Protect-All Gloss products are designed for “dry areas” only. Protect-All Gloss is
to be adhered down using the PA #127 (Standard) or #139 (Fast Set) two-part
epoxy.
iv. The installation should not begin until the work of all other trades has been
completed. If the job requirements do not permit this, then cover the floor with 3/4”
plywood/OSB to protect the sub-floor, adhesive, and Protect-All flooring before,
during, and after installation.
v. Protect-All flooring should be acclimated to the job-site for a minimum of 24 hours
prior to installation. The building must be completely enclosed and watertight.
HVAC system must be on at least seven days prior to installation beginning,
keeping the interior temperature at 70° F. This temperature should be maintained
during the installation, and an additional eight days after installation is completed.
30’ rolls of cove base should also be on the jobsite and unrolled for the same time
period to allow the base to acclimate.
vi. Place curtains over windows and doors to prevent the flooring from being exposed
to direct sunlight during the installation. This will help prevent unwanted expansion
and contraction prior to the adhesive being fully set and cured.
vii. Protect-All flooring is DIRECTIONAL. The 5’ x 8’ and 5’ x 5’ sheets have arrow
stickers on the top of the sheet. Install with these directional arrows all facing the
same direction. Leave directional arrows in place until installation is complete. The
24” square cut tiles have a pen mark on the side of the tile indicating the machine
direction. The 5’ x 8’ and 5’ x 5’ sheets should be laid out to eliminate four-way
corners. A staggered joint is recommended with at least a 16” offset.
viii. Protect-All flooring can be cut using a standard utility knife. To ensure clean
straight seams, always use a straight edge and change blades often.
ix. Weights such as sand bags may be needed at drains, transitions, and slopes while
the adhesives cure.
9
x. The use of Gorilla Tape or an equivalent tape at perpendicular angles across the
seams will help ensure that ALL seams (flooring, base, and corners) remain tight
during the installation and curing process.
xi. Additional pieces of Protect-All may be required under weight lifting and exercise
equipment, heavy objects, and tires to help prolong the life of the finished floor.
xii. All Exterior Protect-All installations must be fully-adhered using Protect-All’s
specified adhesives. Standard floor preparations (4.a-e) apply. Temperature
changes, sunlight, and adhesive cure rates greatly affect exterior installations.
“Tenting” the area to provide constant shading is recommended given the day/night
temperature variables. Install no more flooring than can be adhered, welded, and
allowed to cure within the same day.
b. Installation:
i. Fully-Adhered – Factory training is required. Manufacturer’s sub-floor
preparations and requirements must be followed (see 4.a-e). Protect-All Gloss is
NOT recommended for exterior applications or interior wet applications.
1. After sub-floor preparation is completed, determine the best lay out of the floor
to avoid the need to use small short pieces at termination points. Offset the
joints a minimum of 16” to form a “T” and avoid 4-corner joints. Also, keep
seams from going through drains.
2. Stainless steel drain rings are required on 1/4” material to be installed around
all floor drains, floor troughs, floor sinks, cleanouts, and any floor penetration of
3” or greater. Measure the drains on-site and add 1/8” to each measurement
when ordering. Stainless steel drain rings are to be purchased from Protect-All
using the Drain Ring Order Form.
a. Using a router, milling for these drain rings should take place prior to
adhering the flooring down.
b. Set the depth of the router (using a straight bit) so that the top of the
drain is flush with the top of the finished floor. Practice milling with the
router on scrap pieces first.
3. Stainless Steel transition strips are required at locations where Protect-All
transitions with another flooring type or is terminated.
a. Milling these with the use of a router should take place prior to adhering
the floor down.
4. Install the flooring material using only Protect-All recommended adhesive,
ensuring that ALL horizontal and vertical seams (flooring, base, and corners)
and cuts around floor penetrations, perimeter, terminations, etc. fit tight, within
1/16” tolerance at all times. Do not allow gapping or voids between the seams.
Protect-All Rapid Weld and heat welding rod is not designed to fill voids in
seams. Door jambs, fixed objects, and floor penetrations, such as plumbing,
electrical, and condensation lines, must have Protect-All cut-in clean and tight.

10
Correct Protect-All Dry Laid Seams
(No Gaps or Voids)
Incorrect Protect-All Dry Laid Seams
(Gaps and Voids)
5. Protect-All Adhesive: Adhering Protect-All can begin after the floor, drain rings
and transition strips have been dry-fitted. Be sure to use Protect-All specified
adhesives for gluing the flooring. Current specified adhesives for use are
PA#127 (Standard) and PA#139 (Fast Set). Both are low VOC, solvent-free
and non-flammable. They are available in 1 gallon units only and will cover 80
sq. ft. with the appropriate trowel.
a. Mixing should take place over a large disposable tarp.
b. The adhesives are packaged in separate containers marked Part A and
Part B. Empty the complete contents of Part B into Part A. Mix using a
rotary motion while at the same time, lifting from the bottom until the
entire contents have been mixed thoroughly and the color is uniform.
(no streaking).
c. Pull sheets back at the seams to apply adhesive onto the substrate.
i. Apply 2 beads of E6100, the first tightly around the drain and the
second approximately 1” away from the drain. When applying
the epoxy, keep away from the E6100 beads.

11
ii. Apply a bead of E6100 under the Protect-All where the transition
strip will cover the seam.
iii. Apply the adhesive using a 1/8” x 1/8” x 1/16” v-notch trowel.
d. Always have a bucket of warm soapy water or mineral spirits available
for spills and clean-up. Unwanted adhesives on top of Protect-All must
be removed immediately with the warm soapy water or mineral spirits.
Dried adhesive cannot be removed.
e. Roll the floor within 15 minutes using a minimum 100 lb. roller, and
again 45 minutes to 1 hour later. Rolling should begin in the middle of
the sheets moving out towards the seams.
f. Adhesive that is squeezed up through the seams must be cleaned up
immediately.
g. All seams must remain tight. The use of Gorilla Tape or an equivalent
tape at perpendicular angles across the seams will help ensure this.
h. The adhesive must be allowed to set according to Protect-All flooring’s
recommendation before welding can begin.
Working Time* Weld Full Traffic
PA #127 (Standard) 30 Minutes 12 Hours 8 Days
PA #139 (Fast Set) 15 Minutes 6 Hours 8 Days
*Temperatures above 80° will cause the working time to decrease.
6. Protect-All Rapid Weld System: Our patent-pending seam sealing system is
used in Dark Gray, Light Gray, Brown, Black, Blue and Terra Cotta Protect-All
applications.
a. Groove Seams. Protect-All flooring seams must be grooved out 3/16”
using an electric power groover with a 3.5mm blade.
i. The finished groove must be performed so material is removed
equally on both sides of the seam.
ii. Seams that the power groover cannot reach must be hand-
grooved using a utility knife and straight edge. Ensure the hand-
grooved seam is of the same depth and width as the power
grooved seam.
b. Clean Groove. Remove any debris next to, and in the groove using a
wet/dry vacuum prior to applying the Protect-All Rapid Weld. – Image 1

12
Image 1: Grooved Protect-All Rapid
Weld Seam
c. Preparing the Groove. Apply the Protect-All Rapid Weld Seam Tape
so it is centered over the groove. Image – 2
i. Protect-All Rapid Weld Seam Tape should be applied so the
perforated center does not overlap into the groove. NOTE:
Overlapping Protect-All Rapid Weld Seam Tape into the grooved
edge can result in an improper finished weld. When taping a 5’
seam, be sure to tape both ends to eliminate any Protect-All
Rapid Weld from getting on the surface of the Protect-All.
ii. Remove the 1/4” perforated Protect-All Rapid Weld Seam Tape
to expose the groove. Image – 3 Seal the tape to the floor using
a small hand roller. Image – 4
Image 2: Protect-All Rapid Weld
Seam Tape over groove
Image 3: Remove perforation

13
Image 4: Seal the Protect-All
Rapid Weld Seam Tape
d. Cartridge Preparation. Verify the expiration date of Protect-All Rapid
Weld before using by adding one year from the given production date.
Insert the 490 ml Protect-All Rapid Weld cartridge into the cordless
dispensing gun, small cartridge on top. Unscrew the end cap and
remove the plastic insert. Image – 5
Image 5: Protect-All Rapid Weld Gun
i. Using a piece of cardboard or scrap Protect-All, dispense the
Protect-All Rapid Weld until Part A (white) and Part B (color)
flow from the end. The Part A should look shiny and white –
Image 6. If it comes out matted and chunky, then somewhere in
the delivery of the Protect-All Rapid Weld the product got cold.
It is not defective; it just needs to be warmed up. The best
method is to re-attach the plug, screw the cap back on and
submerge the tube for 20 minutes in warm water.

14
Image 6: Dispense Protect-All
Rapid Weld
ii. Once the cartridge is dispensing properly, install the mixing
nozzle and secure with the previously removed cap – Image 7.
Image 7: Attach Nozzle
iii. Dispense the Protect-All Rapid Weld onto scrap Protect-All or
cardboard until a consistent color is achieved. Once this step
has begun, you must continue to move product through the
nozzle – Image 8.
Image 8: Dispense Mixed Protect-
All Rapid Weld
e. Applying the Protect-All Rapid Weld.
i. Apply Protect-All Rapid Weld with the dispensing gun at a 90°
angle into the prepared groove so it is filled from bottom to top –

15
Image 9. NOTE: At any time during the installation process
where the Protect-All Rapid Weld is allowed to sit in the mixing
nozzle for more than 5 minutes, a new nozzle must be installed.
If any doubt, replace the nozzle.
Image 9: Dispense
Protect-All Rapid Weld into taped seam.
ii. Using the Protect-All Rapid Weld Floor Seam Finishing Tool,
immediately pull across the uncured weld at 20° with light
pressure to level the seam. Correct pressure is achieved when a
thin layer of Protect-All Rapid Weld is visible on the tape and
there is a crown in the seam. To achieve a smooth finished
weld, complete this step in one pass from start to finish. Note: if
the tape is clean after this step, then too much pressure was
applied – Image 10.
Image 10: Smooth seam
by maintaining 20° angle in one pass.
iii. All tape must be immediately removed prior to the Protect-All
Rapid Weld curing – Image 11. After the Protect-All Rapid Weld
has cured, if any visible low spots appear, the area of the low
spot should be re-taped and filled with additional Protect-All
Rapid Weld and leveled off with the Floor Seam Finishing Tool.

16
Image 11: Remove tape
immediately after smoothing
f. Foot Traffic. All foot traffic must remain off the Protect-All Rapid Weld
until a full cure has been achieved (20-30 minutes). Product will begin
to harden in 5-8 minutes.
g. Clean Up. Any uncured Protect-All Rapid Weld can be removed from
the surface of the Protect-All using a clean damp rag. Cured Protect-All
Rapid Weld on the surface of the Protect-All CANNOT be removed.
h. Cartridge Storage. Protect-All Rapid Weld cartridges should be stored
in a dry place with a temperature between 55° and 75°F. Partial
cartridges must be stored with insert or nozzle and end cap reinstalled.
i. Shipping. Protect-All Rapid Weld is not FAA compliant and cannot ship
by air. It can only be shipped by ground transportation. Make sure you
have enough Protect-All Rapid Weld on your jobsite to avoid delays in
completing the project.
7. V-Weld Heat Welding. Heat welding is used in applications where Burgundy
and Green Protect-All is being installed. Welding should only begin after the
adhesive has had its initial cure time (PA #127 – 12 hours and PA #139 – 6
hours).
a. Use a power seam groover with a Protect-All approved grooving blade
set to 1/16” above the source of the sub-floor –Image 12. Grooving
should be performed so that both sides of the seam have been grooved
equally and uniformly – Image 13.
Image 12: Power groove seam
3/16” deep

17
Image 13: Finish groove seam
b. Seams that the power groover cannot reach must be hand-grooved
using a utility knife and straight edge. Ensure the hand-grooved seam
is of the same depth and width as the power grooved seam.
c. Set temperature setting on the hot air welder, fitted with heat-welding
tips recommended by Protect-All. Calibration of the heat gun,
amperage supply, length of the extension cord, and room temperature
may affect the proper setting. Practice on scrap material first to test
settings.
d. Insert Protect-All V-Rod welding rod into heat-welding tip and begin
welding the grooved seams at 1 ½ to 2 linear feet per minute. Hold
the heat-welding gun at the correct angle so that the bottom of the tip
remains parallel with the top of the material. Correct heat gun
temperature, speed, and pressure must be maintained to correctly heat
weld Protect-All.
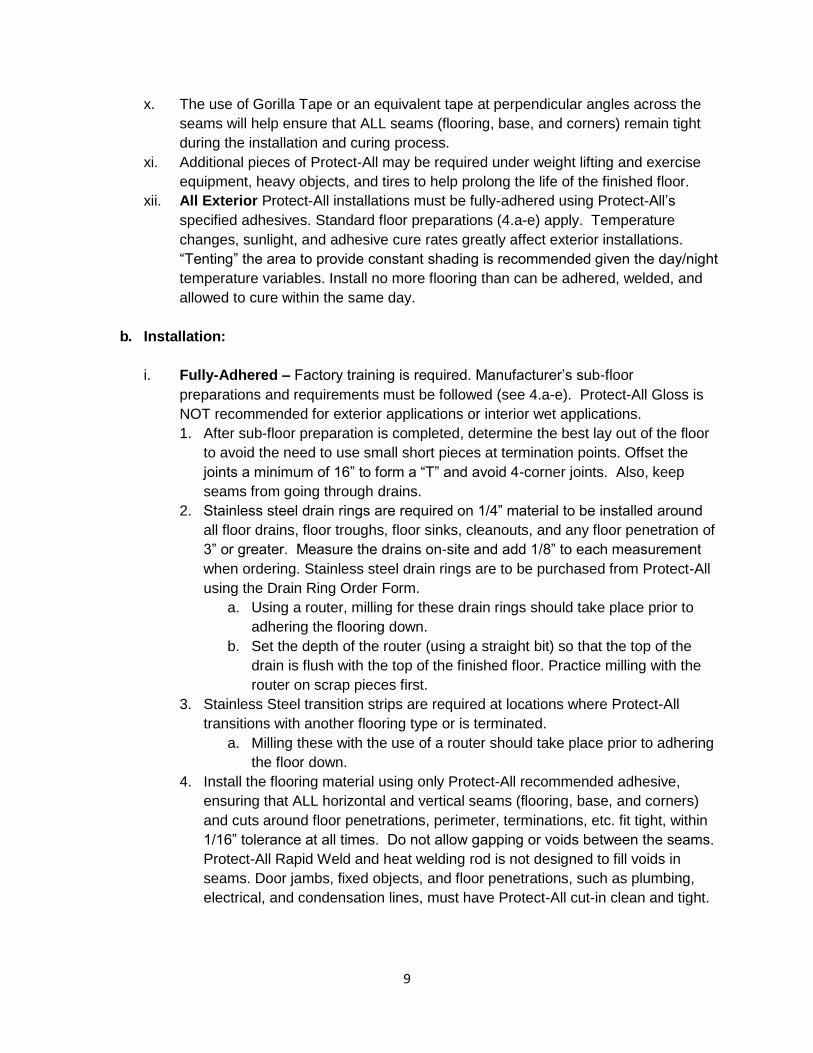
e. The correct weld will result in a visible “wash” on both sides of the rod
where the rod contacts the top of the finished floor – Image 14. If the
“wash” is not visible, the weld may be defective and could lead to a
seam failure. This “wash” will be flattened and alongside it, up to 1/4”
away, the flooring surface will exhibit fusing (flow). The raised back of
the v-weld rod will also show considerable flattening when the right
fusing temperature and speed is attained. Observing the fusing at weld
tip and flow of the weld rod into v-groove is the best indication that the
correct amperage, angle of weld tip, and speed per minute have been
reached. The pressure on weld tip, though important to control initial fit
and fusing of v-weld rod to v-groove, is not as critical as above three
18
indicators. Careful observance of all these indicators of successful
welding will ensure a weld with proper penetration and full fusion inside
weld zone and through the full 1/4” thickness of the sheet is performed
each time.
Image 14: Heat weld
f. When changing weld direction and overlapping weld, cut a small “V” in
the trimmed rod and start welding from the opposite direction until you
weld over the “V” for 2-3” and then lift the rod and heat gun away.
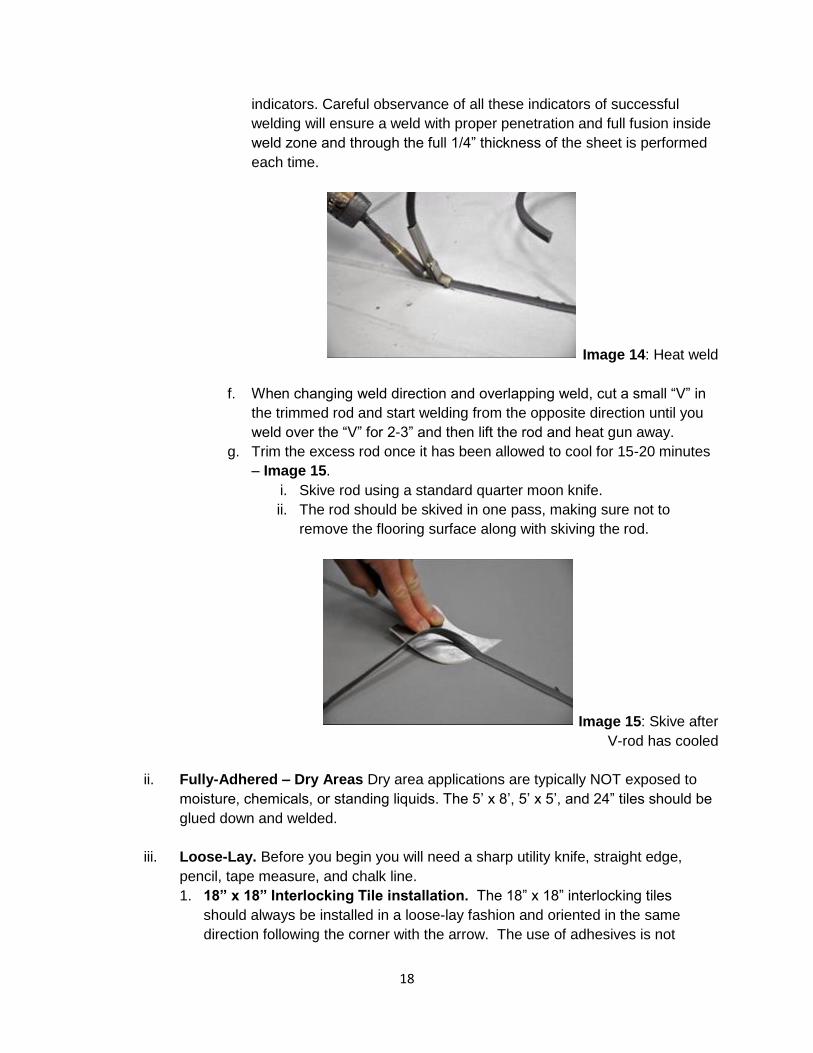
g. Trim the excess rod once it has been allowed to cool for 15-20 minutes
– Image 15.
i. Skive rod using a standard quarter moon knife.
ii. The rod should be skived in one pass, making sure not to
remove the flooring surface along with skiving the rod.
Image 15: Skive after
V-rod has cooled
ii. Fully-Adhered – Dry Areas Dry area applications are typically NOT exposed to
moisture, chemicals, or standing liquids. The 5’ x 8’, 5’ x 5’, and 24” tiles should be
glued down and welded.
iii. Loose-Lay. Before you begin you will need a sharp utility knife, straight edge,
pencil, tape measure, and chalk line.
1. 18” x 18” Interlocking Tile installation. The 18” x 18” interlocking tiles
should always be installed in a loose-lay fashion and oriented in the same
direction following the corner with the arrow. The use of adhesives is not

19
recommended. All standard floor preparations should be followed (see 4.a-e).
NOTE: Interlocking tiles are intended for dry, loose-laid applications and
should never be used as a substitute for permanent flooring in any wet area or
be permanently adhered or welded at the joints.
a. Measure the room and multiply with width by the length to find its total
area, (e.g. 12’ W x 10’ L = 120 square feet). Divide the total by 2.25 to
get the actual number of tiles needed, (e.g. 120 ÷ 2.25=53.33, round up
to 54). A cutting allowance of 7-10% should be added for rooms over
100 square feet in size.
b. For best appearance, establish how the tiles are to be set out before
starting the project. The arrowhead corner orientation must be
maintained throughout the installation for proper fit and appearance
(see diagram below).
c. Find the center point of the room.
i. Measure across the room and mark the center.
ii. Measure the room in the other direction and mark the center.
iii. Snap a chalk line across both center points, the intersection of
the two lines (illustrated above as the dotted lines) is the center
of the room.
d. Begin at the center and work out to each wall. Lay tiles in place until the
walls are reached, maintaining the orientation of the arrowhead tile
corners.
12’ W
2.25 Sq.
Ft.
2.25 Sq.
Ft.
2.25 Sq.
Ft.
2.25 Sq.
Ft.
12’ W
10’ L
20
e. Cut-offs from one side of room installation (up to 9” wide, for maximum
border width) can be used on the opposite side to fit against perimeter
of installation field (see illustration above, border shaded in gray).
f. Leave at least a 1/4” space at all perimeter walls to allow for expansion
and contraction.
2. Protect-All Floor Saver® – Protect-All Floor Saver are sheets that can be
used as a temporary cover to protect wood gymnasium flooring.
a. Protect-All Floor Saver should be laid out with an off-set joint.
b. Lay Protect-All Floor Saver down so that the seams are as tight as
possible.
c. Removable double-sided tape may be necessary around perimeter to
secure the edges.
d. When not in use, Protect-All Floor Saver should be properly stored and
uniformly stacked with the edges flat and even.
e. To transport Protect-All Floor Saver, custom-made pallets or carts (no
more than 30 sheets per pallet/cart) may have to be fabricated by the
facility.
c. Cove Base:
i. Protect-All currently offers 1/4” thick x 6” cove base in 30’ rolls. Please check with
your Protect-All distributor for availability of certain colors.
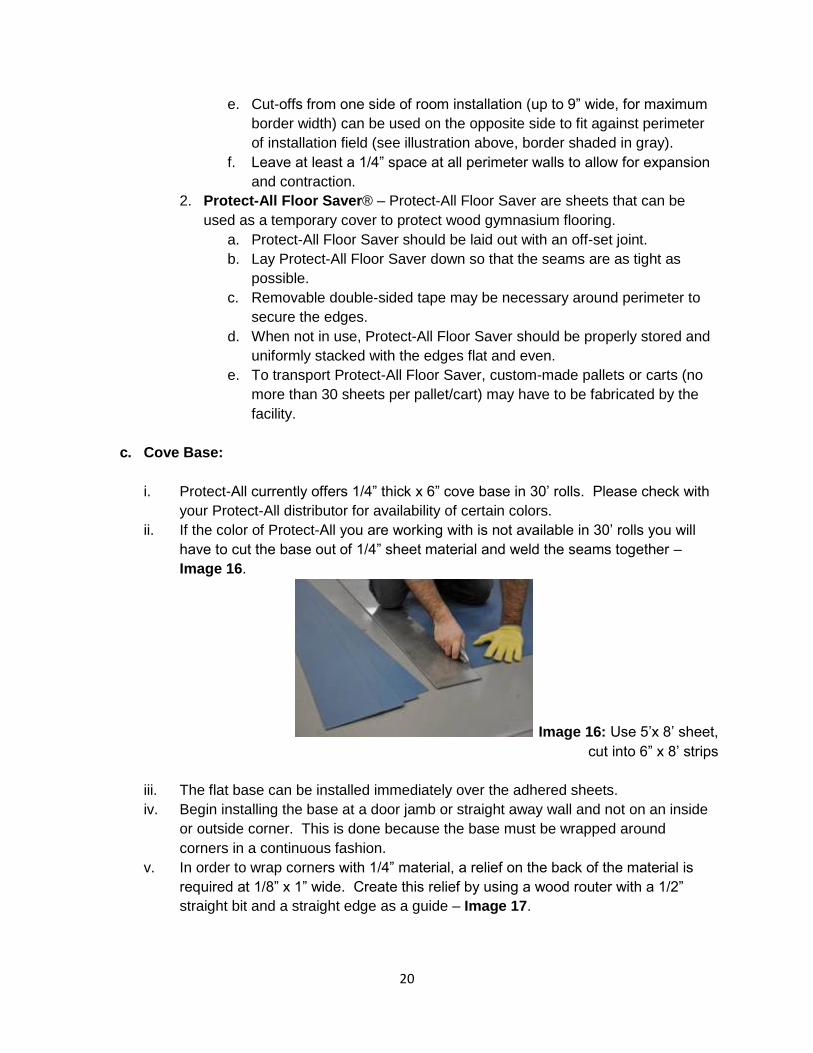
ii. If the color of Protect-All you are working with is not available in 30’ rolls you will
have to cut the base out of 1/4” sheet material and weld the seams together –
Image 16.
Image 16: Use 5’x 8’ sheet,
cut into 6” x 8’ strips
iii. The flat base can be installed immediately over the adhered sheets.
iv. Begin installing the base at a door jamb or straight away wall and not on an inside
or outside corner. This is done because the base must be wrapped around
corners in a continuous fashion.
v. In order to wrap corners with 1/4” material, a relief on the back of the material is
required at 1/8” x 1” wide. Create this relief by using a wood router with a 1/2”
straight bit and a straight edge as a guide – Image 17.

21
Image 17: Make a relief cut
1/8” deep by 1” wide
vi. Using any of Protect-All flooring’s specified adhesives (PA127,PA139, E6100 or
Protect-All Rapid Weld), adhere the base to the wall using a 1/4” bead in an “S”
pattern – Image 18. A 3” or 4” band of acrylic, web-reinforced, 2-sided tape can
also be used to adhere cove base – Image 19.
Image 18: Adhere using
a “S” pattern
Image 19: Adhere using a
3” or 4” band of web-reinforced, acrylic 2-sided tape
vii. Immediately hand-roll the base to smooth and set the adhesive. If using cove base
tape, use a rubber hammer to tap cove base against adhesive backing for
strongest adhesion – Image 20.

22
Image 20: Immediately hand-roll
or rubber hammer to set into cove base tape or adhesive
viii. Cove Cap/Z-Bar. Protect-All cove cap is available in aluminum, or stainless steel.
Cove Cap/Z-Bar is required at the top of the Protect-All cove base in wet
applications. Both cove caps are designed to be used when the base offsets the
wall by 1/4” (applied over wall tile or FRP), or prior to the wall tile or FRP being
installed.
1. Aluminum Cove Cap (1/2” x 1/2” (45°) x 1”) is designed to be applied either
before the wall tile or FRP and base, or after the cove base is attached.
a. The 1” flange faces down over the base unless the cap is being applied
ahead of the wall tile or FRP, in which case the 1” flange faces up. In
this circumstance, the cap should be secured to the wall using double
sided cove base tape and Protect-All specified sealant. Otherwise, cove
cap height must be coordinated with the 6” Protect-All cove base.
b. The Z-bar is temporarily attached and fitted around both inside and
outside corners – Image 21. The corners can be factory pre-notched or
hand cut in the field.
Image 21: Dry-fit Z-bar to wall.
ix. Protect-All Rapid Weld or radius welding can begin once the cove base is attached
to the wall and the Z-bar is attached.
1. Using Protect-All Rapid Weld on the Protect-All base. If the nozzle has been
used and been sitting for more than 5 minutes attach a new nozzle and re-
dispense more Protect-All Rapid Weld on a scrap piece of cardboard or
Protect-All.
a. Apply a continuous 1/4” bead of Protect-All Rapid Weld at the 90°
transition where the Protect-All base sits on the floor – Image 22.

23
Image 22: Apply 1/4” bead
along seam of base and floor
b. Using the Radius Finishing Tool, immediately begin to pull across the
uncured weld to create a 1/2” radius transition onto the floor – Image
23. NOTE: If too much weld was applied, use a clean rag to remove the
excess from the tool. Cured weld cannot be removed.
Image 23: Smoothing seam
with Radius Finishing Tool
2. Using radius rod on Protect-All base. Before radius welding, perform test welds
daily to ensure proper calibration of heat gun and the correct heat-welding
method is performed.
a. The angle of the heat gun should always be 45° to the wall/floor.
Additionally the angle of the radius weld tip to the weld rod filling this
joint should be closer to 90° when going into and out of inside cove
base corners.
b. During welding always look for the “wash” at the top and bottom of the
weld rod – Image 24.

24
Image 24: Look for the “wash” in the
rod
c. When splicing the welding rod:
i. Hand cut 1” V-notch splice.
ii. Weld the remaining rod into place. Minor trimming and glazing
will be required at all splices and be performed after the rod has
cooled. Use of a straight edge and hoop trimming tool is
recommended.
iii. Double-strike and glaze the finish weld as needed.
i. In high traffic areas, install 4” corner guards on outside to prevent the corners from
being impacted and possibly split open. Use stainless steel screws to secure and
E6100 to the backside of the guard.
ii. Once the Protect-All Rapid Weld has cured or the heat weld has cooled and the
corner guards have been added. Lay a bead of E6100 sealant to the top of the
cove base
1. Remove the Z-bar from the top of the base and seal the top of the base using
E6100 –Image 25.
Image 25: Seal the top of the cove
base with a continuous bead of sealant.
2. The 1/2” flange (facing up) that attaches to the wall needs to have 1/4” bead of
the E6100 applied to the back prior to the final securement to the wall – Image
26.

25
Image 26: Seal back of
cove cap (aluminum or stainless steel) with E6100 before securing to wall.
3. The cove cap should be mechanically-fastened to the wall every 10 – 16”or
where necessary, using the appropriate type and size of screw for the wall type
- Image 27. The screws should penetrate into the wall at least 1”.
Image 27: Pre-drill using
1/8” drill bit. Use screws and anchors appropriate for wall type.
4. Finish the cove cap by applying a small amount of E6100 to the finished inside
corners.
5. Door jambs, fixed objects, and floor penetrations, such as plumbing, electrical
and condensation lines, must be sealed by applying E6100. Pre-clean the area
using denatured alcohol on a clean rag to remove any dirt or oils prior to
applying the E6100. NOTE: E6100 is not FAA compliant and cannot be
shipped by air. It can only travel by ground transportation.
iii. Install stainless steel drain rings and transition strips. (Remember to add 1/8” to the
size of any drain before ordering)
1. Prior to the mechanical-fastening, apply two 1/4” bead of E6100 under the ring
and transition strip.
2. Using a hammer drill and masonry bit, drill holes through the concrete
substrate. Place some E6100 in each of the holes. Then use the #10 2-½” or
#12 1-¼” stainless steel screws with lead anchors to secure the drain rings and
transition strips – Image 28.

26
Image 28: Secure drain ring or
transition strip to substrate. Only use #10 2-½” or #12 1-¼”
stainless steel screws (tapered head) with lead anchors
6. Maintenance and Care
a. Heavy grease and high traffic areas. Cleaning procedures for Protect-All Matte
surface (non-gloss) only. It is NOT recommended to use a mop to clean a Protect-All
floor that has a matte surface. NOTE: NEVER use solvent-based products such as
oven cleaner, acetone, lacquer thinner, paint thinner, THF, MEK, etc. to clean
Protect-All products. If you require a poster for the end-user, please call Protect-All at
1-800-544-9538.
i. Tools and Materials Needed:
Recommended cleaning products: Simple Green® degreaser.
Nylon deck brush (optional weighted brush)
Hose attached to hot water source
Large squeegee with flexible vinyl or rubber blade
Safety glasses
Protective gloves
Wet floor sign
ii. Optional:
Power floor scrubber with blue or green cleaning pads
Wet vacuum (if floor drains do not exist)
Power pressure washer set at 180 psi and 180°
iii. Cleaning Frequency:
The following cleaning procedure should take place daily for heavy grease
areas and weekly for high traffic (non-greasy) areas.
27
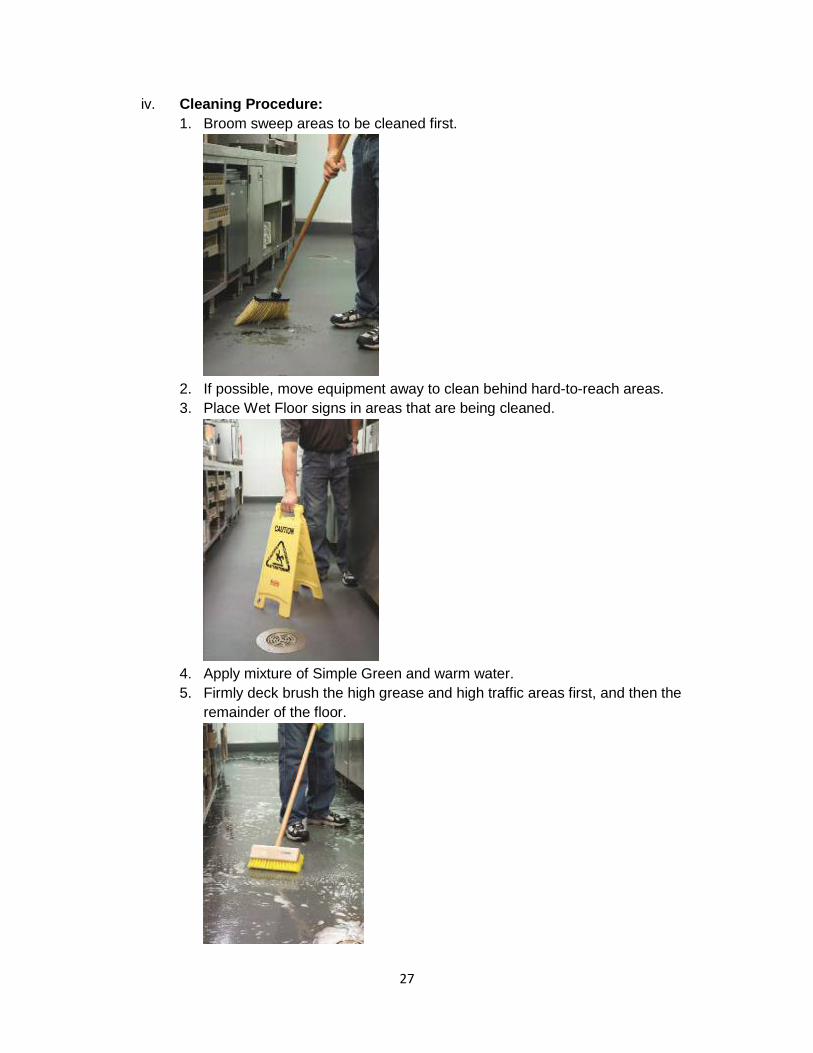
iv. Cleaning Procedure:
1. Broom sweep areas to be cleaned first.
2. If possible, move equipment away to clean behind hard-to-reach areas.
3. Place Wet Floor signs in areas that are being cleaned.
4. Apply mixture of Simple Green and warm water.
5. Firmly deck brush the high grease and high traffic areas first, and then the
remainder of the floor.

28
6. Squeegee to drain or wet/dry vacuum.
7. Complete with a final clean water rinse (hot water, if available). Remove water
with a squeegee to a drain or wet/dry vacuum.
a. If the floor has a significant buildup of grease and oil, use a power
scrubber with a blue or green pad to remove the buildup. If a power
scrubber is not available, then steps 1-6 will have to be repeated until all
grease, oils, animal fats, dirt, and stains have been removed.
b. If using a power floor scrubber, use only the blue or green cleaning
pads and keep the floor wet while scrubbing. NEVER DRY SCRUB
USING POWER SCRUBBERS.
b. Cleaning Protect-All Gloss products. NOTE: Protect-All Gloss products have a
factory-applied UV-cured urethane coating. Protect-All Gloss is designed for “dry
areas” only and should not be applied in areas that would expect to have moisture or
liquids on the floor on a regular basis. Protect-All Gloss products do not require any
special buffing, waxing, or cleaning. Light broom sweeping, dusting, dry or damp
mopping are all that is needed. NEVER use solvent-based products such as oven
cleaner, acetone, lacquer thinner, paint thinner, THF, MEK etc., to clean Protect-All
products.

29
i. Tools and Materials Needed:
Large floor duster or soft bristle broom
Mop bucket with ringer filled with warm water
Clean cotton mop
Wet floor signs, if damp mopping
ii. Cleaning Frequency:
Clean Protect-All Gloss flooring at least once weekly to maintain its natural
luster.
iii. Protect-All Gloss Cleaning Procedure:
1. Use a large floor duster, soft bristle broom or dry mop to clean the floor initially.
If there are dried spills, stains, or black heal marks go to step 2.
2. Place wet floor signs in areas to be cleaned. Apply a small amount of the
Simple Green mixed with warm water to any spill, stain, or black scuff mark
first. Continue using a damp mop and bucket to clean the remaining floor. The
damp mop must be rung out thoroughly, leaving a minimal amount of liquid on
the floor.
3. Stubborn black scuff marks can be removed by hand using a tennis ball and a
small amount of Simple Green.
4. The Protect-All Gloss finish is expected to have a 5-10 year wear layer under
normal foot traffic conditions and recommended care.
Oscoda Plastics, Protect-All and Protect-All Floor Saver are registered trademarks owned by Oscoda Plastics, Inc.
Protect-All’s Commercial Flooring is proudly manufactured in the United States of America.
Protect-All Installation Manual ORIG: 9.1.2011 REV: 9.15.17_v2