installation & operating instructions for · installation & operating instructions for...
TRANSCRIPT
P/N: P002152
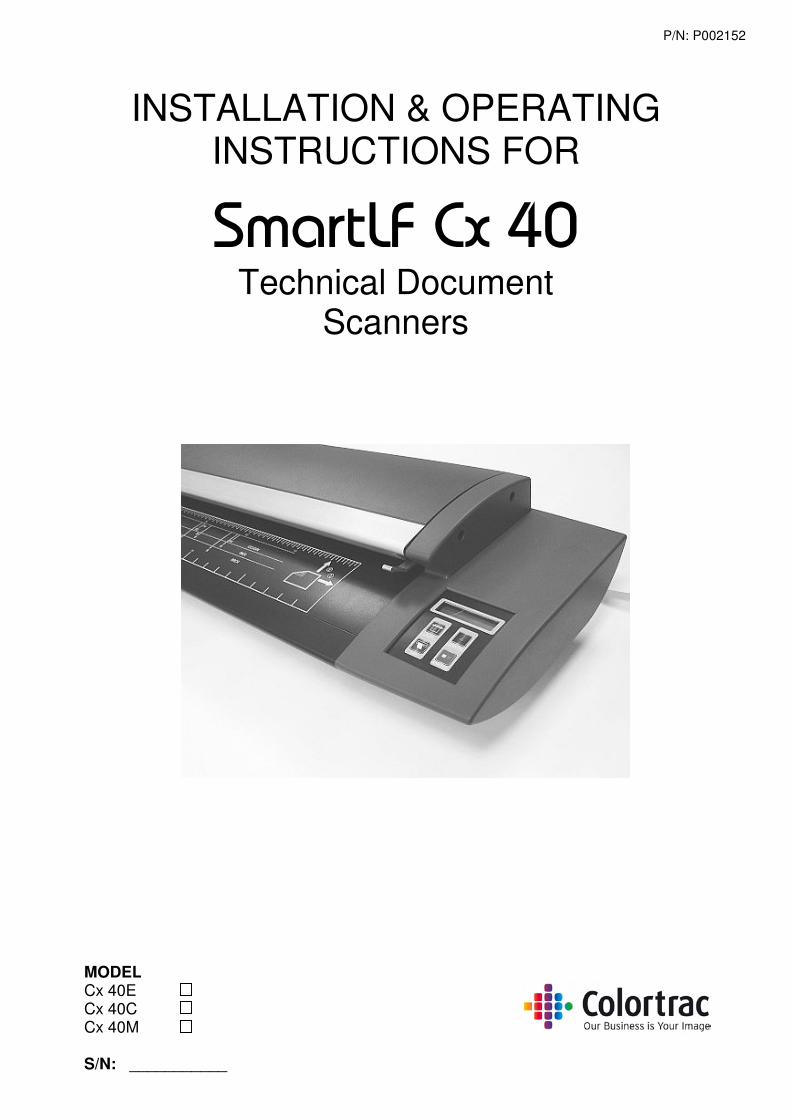
INSTALLATION & OPERATINGINSTRUCTIONS FOR
�����������Technical Document
Scanners
MODELCx 40ECx 40CCx 40M
S/N: ___________

Colortrac SmartLF Cx 40 Installation and Operating Manual
PAS153 P/N: P002152 Colortrac Ltd © 2008
2
1. SAFETY PRECAUTIONS
To prevent fire or shock hazard do not expose the scanner to rain or moisture.
Do not cover the scanner with paper or drawings which might obstruct the unit’s vents for long periods while the unit isbeing operated as this may lead to overheating and constitute a possible fire hazard.
Do not modify the desk mounted scanner by removing the rubber feet as this may impair the air circulation around theunit and lead to overheating.
Avoid leaning heavily on the scanner when it is mounted on the stand as the unit could be damaged or becomeunstable and result in personal injury.
This symbol is intended to alert the user to the presence of uninsulated“dangerous voltage” within the product’s enclosure that may be of sufficientmagnitude to constitute a risk of electric shock to persons.
This symbol is intended to alert the user to the presence of importantoperating and maintenance instructions in the literature accompanying theproduct.
This symbol is intended to alert the user to the presence of importantoperating and maintenance instructions. The equipment being usedconstitutes a potential finger trap and could cause personal injury.
SAFETY INSTRUCTIONS
DO NOT expose the scanner to extreme temperature conditions(below 15ºC or above 30ºC)DO NOT expose the scanner to extreme humidity conditions (lessthan 15% or more than 85% Relative Humidity).
DO NOT expose the scanner to direct sunlight, rain or storm.
Colortrac SmartLF Cx 40 Installation and Operating Manual
PAS153 P/N: P002152 Colortrac Ltd © 2008
3
2. CONTENTS
1. Safety precautions .................................................................................................................................................2Safety instructions .................................................................................................................................................2
2. Contents ................................................................................................................................................................33. Main Features of SmartLF Cx ...............................................................................................................................44. Unpacking SmartLF Cx from its box......................................................................................................................45. Parts List ................................................................................................................................................................46. Lifting the Scanner from its carton.........................................................................................................................47. Removing the shipping protection and setting up SmartLF Cx .............................................................................58. Opening the LID of SmartLF Cx ............................................................................................................................59. Closing the Lid of SmartLF Cx...............................................................................................................................610. Getting started .......................................................................................................................................................611. The Windows .NET (MSDN) Framework environment..........................................................................................612. Connecting the USB2 cable to SmartLF................................................................................................................713. Preparing to load the driver ...................................................................................................................................7
Windows asks for the driver – insert the cd now! ..................................................................................................7Windows locates and transfers the driver from cd ................................................................................................7Checking for the SmartLF driver............................................................................................................................8
14. Installing SmartLF s/w from the software installation CD......................................................................................915. Loading a document into SmartLF Cx...................................................................................................................9
The loading process . . . ......................................................................................................................................10Stopping SmartLF Cx when under program control ............................................................................................10
16. Windows XP and panel control of the scanner....................................................................................................1117. Your first scan (FILE) with SmartLF Cx ...............................................................................................................11
SmartLF Cx ‘SCAN-TO- ‘ functions .....................................................................................................................11SmartLF Cx COLOR modes and speed settings ................................................................................................12SmartLF USES intelligent file overwrite/ renaming .............................................................................................13SmartLF document sizes.....................................................................................................................................13The SmartLF Cx Preview window .......................................................................................................................13Cropping in SmartLF Cx ......................................................................................................................................13Copying from SmartLF ........................................................................................................................................14Document size markings on the scanner ............................................................................................................14Transparent and opaque originals.......................................................................................................................14Double-sided originals .........................................................................................................................................14Thickness of media compatible with SmartLF Cx ...............................................................................................14Stiffness of media compatible with SmartLF Cx..................................................................................................14
18. Scanner maintenance..........................................................................................................................................14Glass contamination and scratching....................................................................................................................14Cx Utilities - Automatic & Manual Normalisation of SmartLF Cx.........................................................................15
19. Field upgrade of SmartLF Cx to a higher model .................................................................................................1620. Appendix 1 - Computer requirements for SmartLF Cx ........................................................................................1721. Appendix 2 - How to check for a USB2 interface ................................................................................................1722. Appendix 3 - Windows .NET Framework environment........................................................................................1823. Appendix 4 - driver and firmware Cx 40 Utilities program...................................................................................1824. Appendix 5 - Warranty information ......................................................................................................................1925. Appendix 6 - DECLARATION OF CONFORMITY ..............................................................................................2026. SmartLF Cx 40 Technical Specification...............................................................................................................22
(The serial number of this unit will be required when seeking support or maintenance for SmartLF. Record it on thefront page of this manual for easy reference).
Colortrac SmartLF Cx 40 Installation and Operating Manual
PAS153 P/N: P002152 Colortrac Ltd © 2008
4
3. MAIN FEATURES OF SMARTLF CX
� High-speed 600 dpi optical resolution large format 1016mm (40”) scanning engine� State-of-art Colortrac electronic design and signal processing technology� Contact Image Sensor imaging technology (independent of glass) requiring no user stitching alignment� Chemically hardened, impact resistant scan glass to minimise scratching and damage during scanning� Exceptionally low maintenance� Advanced Media transport optimised for handling lower weight and lower stiffness papers� RGB limited color, indexed color, grayscale and black and white scanning modes� Lightweight portable desktop design with optional floor stand� Unique maintenance features - removable contact image sensor glass coverings� Simple to use and install USB2 computer interface (hot pluggable)� On-scanner controls and display for main functions and status reporting� Standard File, Copy and Email software included with scanner� High-specification software application options for optimised scanning-to-file and copying-to-printer� Low power consumption� Long product lifetime� Highly portable� Computer and Repro stand options available
4. UNPACKING SMARTLF CX FROM ITS BOX
SmartLF Cx ships in a single double-skinned box (35kgs). It is advisable to prepare a strong desk surface or similararea capable of taking the weight of the scanner (26.5kg). You will need an assistant to lift the scanner from its carton.
5. PARTS LIST
SmartLF Cx Installation & Operating Manual (this document) .............1Power cable (specified for country) ......................................................1USB2 scanner data cable (2m) ............................................................1Software installation CD (includes this manual in pdf format) ..............1Document Support Tray .......................................................................3
6. LIFTING THE SCANNER FROM ITS CARTON
1. Make sure the scanner box is resting on the floor the correct way up (look at the name on the side).
2. With the help of an assistant remove the lid from the larger box and then take out the three foam spacers thatprotect the inner box. The inner box contains the scanner.
3. Remove the lid from the smaller box and pull back the plastic wrapping to expose the top of the scanner.WARNING: DO NOT TRY TO REMOVE THE SCANNER WHILE STILL INSIDE ITS PLASTIC WRAPPING ASTHIS WILL MAKE IT MORE DANGEROUS TO HANDLE.
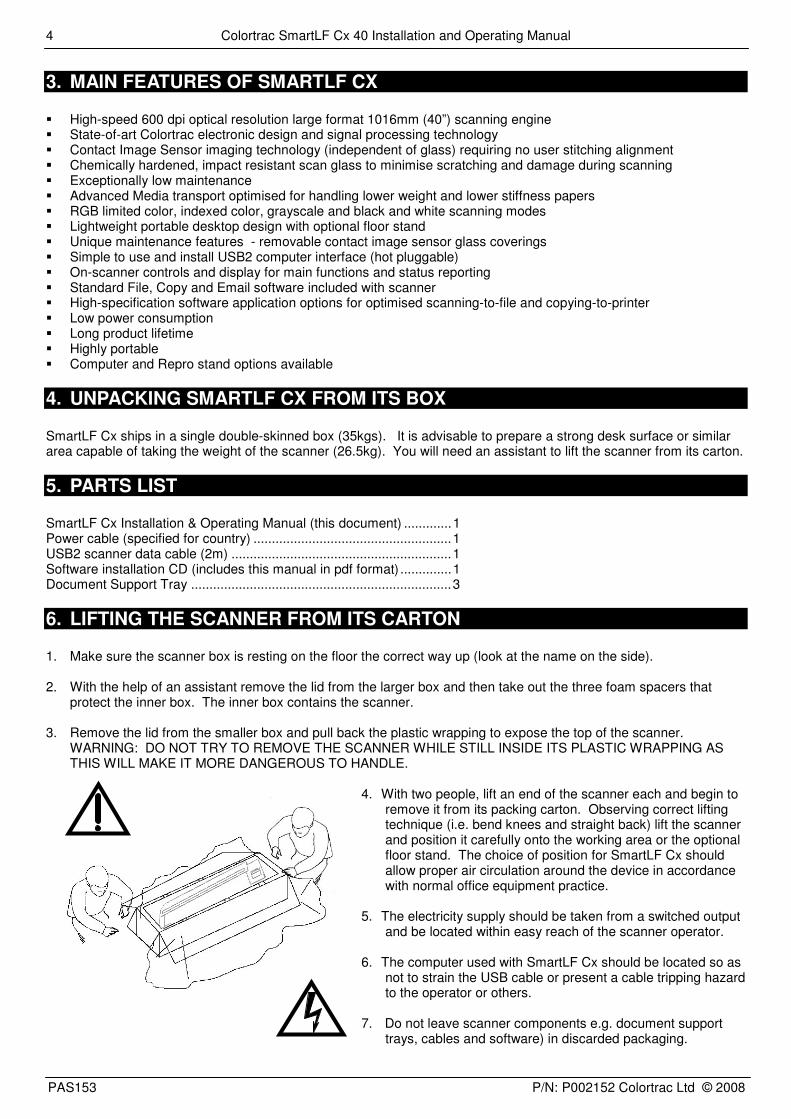
4. With two people, lift an end of the scanner each and begin toremove it from its packing carton. Observing correct liftingtechnique (i.e. bend knees and straight back) lift the scannerand position it carefully onto the working area or the optionalfloor stand. The choice of position for SmartLF Cx shouldallow proper air circulation around the device in accordancewith normal office equipment practice.
5. The electricity supply should be taken from a switched outputand be located within easy reach of the scanner operator.
6. The computer used with SmartLF Cx should be located so asnot to strain the USB cable or present a cable tripping hazardto the operator or others.
7. Do not leave scanner components e.g. document supporttrays, cables and software) in discarded packaging.

Colortrac SmartLF Cx 40 Installation and Operating Manual
PAS153 P/N: P002152 Colortrac Ltd © 2008
5
7. REMOVING THE SHIPPING PROTECTION AND SETTING UP SMARTLF CX
Before attempting to use SmartLF Cx it is essential that the foam shipping layer which protects the scan glass coversis removed from inside the scanner:
� Lift the catches on each side of the scanner and then raise the whole lid. Fit the support stay on the left-hand side (circled)
• Remove the piece of foam and retain with the packaging for the scanner (always replace this item when transporting SmartLF)
� While supporting the scanner lid with one hand release and store the stay and then gently lower the lid to close it.
� Fit the three paper support trays by compressing (springing) them into the slots on the back of the scanner (the precise design may vary)
� Connect the scanner to the electricity supply using the localised cable provided
IMPORTANT – DO NOT CONNECT THE SCANNER TO THE COMPUTER UNTIL INSTRUCTED
8. OPENING THE LID OF SMARTLF CX
The SmartLF Cx is a single part lid that provides access to the scanner optics. With the lid in the open position andsafely propped the scanner glasses can be inspected and cleaned if required.
• Always use two hands to open the lid
• Use one hand in the centre of thelid to steady it while using theother hand to secure the prop. Itis essential to use the prop whencleaning or inspecting thescanner optics for dirt or dustcontamination

Colortrac SmartLF Cx 40 Installation and Operating Manual
PAS153 P/N: P002152 Colortrac Ltd © 2008
6
9. CLOSING THE LID OF SMARTLF CX
To close the lid of the SmartLF Cx, first check that there are no obstructions. Support the lid at the centre with the righthand and using the left hand release the prop. DO NOT LET GO OF THE LID FROM THE RAISED POSITION ASTHE SCANNER MAY BE SEVERELY DAMAGED. Carefully lower the scanner lid from the centre until both catchesengage with their locks. It is not necessary to use extra pressure on the lid once the catches have engaged.
OPEN LOWERING CLOSED
The lid may need to be lifted slightly before releasing the prop.
WARNING: KEEP FINGERS CLEAR OF THE SIDES OF THE SCANNER LID AT ALL TIMES
10. GETTING STARTED
SmartLF Cx can now be switched on. The liquid crystal text display (LCD) will lightup and after a few seconds will display the word ‘ Initialising’. After about 35seconds or so the model number and firmware level of the scanner will bedisplayed.
If a document is loaded the display will change to the word ‘READY’
Start up Windows XP Professional / XP Home OR Windows 2000 on the connectedcomputer that will be used with SmartLF Cx. Wait for Windows to finish loading.
FOR MORE DETAIL ON MINIMUM SPECIFICATIONS FOR BEST SMARTLF CX PERFORMANCE SEE APPENDIX 1.
11. THE WINDOWS .NET (MSDN) FRAMEWORK ENVIRONMENT
The Colortrac SmartLF Cx software application has been created using Microsoft.NET in accordance with current Microsoft development practice. This means theconnected computer running Microsoft Windows XP Home or XP Professionalshould be upgraded if required by installing .NET Version 2.0. Microsoft Vista comespre-loaded with .NET 3.0. (V2.0 is sufficient).
http://msdn2.microsoft.com
Although SmartLF Cx will work with Windows 2000 it is highly recommended that Windows XP with the latest ServicePack (SP) upgrade or Microsoft Vista is used with the SmartLF Cx scanner. Colortrac advise that the .NETFramework be installed even if only using ScanWorks or CopySmart software options. SmartLF multi-functionsoftware is simple to use and can be run on any computer connected to the SmartLF Cx scanner without a licensekey.
NOTE: The belief is that in time .NET will become part of Windows XP or be included inside the regular Service Pack. See Appendix 3 in thisdocument for more information on .NET Framework and how to check if it is installed on the computer you intend to use with SmartLF Cx.
STEP 1 STEP 2 STEP 3

Colortrac SmartLF Cx 40 Installation and Operating Manual
PAS153 P/N: P002152 Colortrac Ltd © 2008
7
12. CONNECTING THE USB2 CABLE TO SMARTLF
With SmartLF Cx switched on, locate the included USB2 cable and plug thesmaller square end into the back of the scanner (see picture).
IMPORTANT: IF YOU ARE USING OTHER USB1.1 KEYS (DONGLES) ON THE SAMECOMPUTER ENSURE THAT SMARTLF CX DOES NOT SHARE THE SAME USB CIRCUITRYINSIDE THE COMPUTER OR SCANNING SPEEDS WILL BE REDUCED.
DO NOT CONNECT SMARTLF CX TO THE PC YET!
13. PREPARING TO LOAD THE DRIVER
PLUG THE REMAINING END (FLAT SECTION)OF THE USB2 CABLE INTO A SPARE USB2INTERFACE ON THE COMPUTER- THEDRIVER INSTALLATION WILL STARTAUTOMATICALLY.
NOTE: At this point Windows XP will detect the new hardware and display thefollowing message in the System Tray area (normally the lower right-hand sideof the screen).
AT THIS POINT WINDOWS SHOULD DETECT SMARTLF CX AND AUTOMATICALLY BEGIN RUNNINGTHE WINDOWS HARDWARE WIZARD. HAVE THE COLORTRAC SMARTLF CX SOFTWAREINSTALLATION CD READY.
WINDOWS ASKS FOR THE DRIVER – INSERT THE CD NOW!
WAIT for a few moments to allow Windows tostart the Hardware Wizard. The wizard will takeyou through the next steps of the installation.The wizard will respond by displaying thisscreen.
NOTE: If the CD is not detected in the next step you will need to tell the Wizardto search for the drivers automatically by clicking the first button or direct thesearch manually by clicking the second button.
WINDOWS LOCATES AND TRANSFERS THE DRIVER FROM CD
At this point insert the SmartLF Cx CD containing thedriver. After one or two seconds Windows will detectthe CD and replace the wizard Welcome screen(STEP2) with the ‘wizard searching’ screen shownhere.IF THE SMARTLF CX CD STARTS THE CD MENU,PRESS EXIT AND ALLOW THE HARDWARE WIZARDTO CONTINUE INSTALLING THE DRIVER
NOTE: In case of difficulty select ‘I will install the driver myself’ and use ‘Have disk’ tomanually direct Windows to the driver
������
SMARTLF Cx 40 MUST BE USED WITH A USB2 COMPUTER INTERFACE.ATTEMPTING TO USE SLOWER USB1.1 INTERFACES WILL CAUSE SMARTLF TOSCAN VERY SLOWLY AND POSSIBLE CALIBRATION MALFUNCTION MAY RESULT
������
������
Colortrac SmartLF Cx 40 Installation and Operating Manual
PAS153 P/N: P002152 Colortrac Ltd © 2008
8
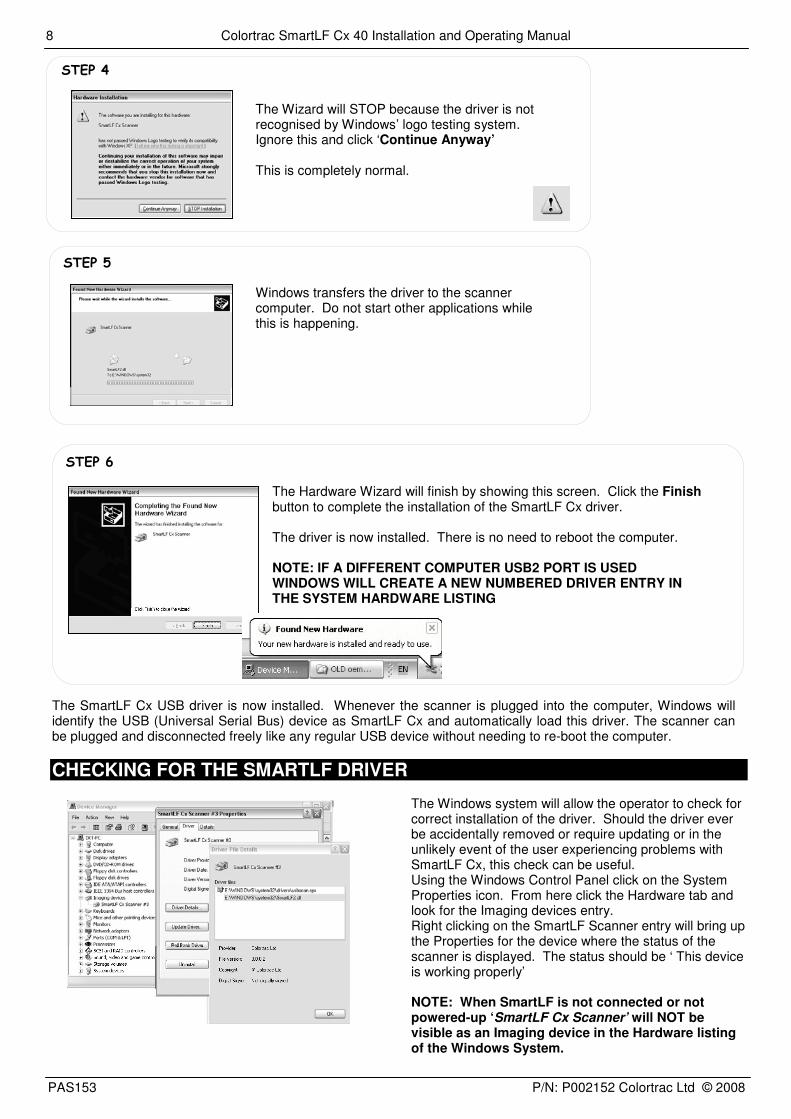
The Wizard will STOP because the driver is notrecognised by Windows’ logo testing system.Ignore this and click ‘Continue Anyway’
This is completely normal.
Windows transfers the driver to the scannercomputer. Do not start other applications whilethis is happening.
The Hardware Wizard will finish by showing this screen. Click the Finishbutton to complete the installation of the SmartLF Cx driver.
The driver is now installed. There is no need to reboot the computer.
NOTE: IF A DIFFERENT COMPUTER USB2 PORT IS USEDWINDOWS WILL CREATE A NEW NUMBERED DRIVER ENTRY INTHE SYSTEM HARDWARE LISTING
The SmartLF Cx USB driver is now installed. Whenever the scanner is plugged into the computer, Windows willidentify the USB (Universal Serial Bus) device as SmartLF Cx and automatically load this driver. The scanner canbe plugged and disconnected freely like any regular USB device without needing to re-boot the computer.
CHECKING FOR THE SMARTLF DRIVER
The Windows system will allow the operator to check forcorrect installation of the driver. Should the driver everbe accidentally removed or require updating or in theunlikely event of the user experiencing problems withSmartLF Cx, this check can be useful.Using the Windows Control Panel click on the SystemProperties icon. From here click the Hardware tab andlook for the Imaging devices entry.Right clicking on the SmartLF Scanner entry will bring upthe Properties for the device where the status of thescanner is displayed. The status should be ‘ This deviceis working properly’
NOTE: When SmartLF is not connected or notpowered-up ‘SmartLF Cx Scanner’ will NOT bevisible as an Imaging device in the Hardware listingof the Windows System.
�����
�����
������

Colortrac SmartLF Cx 40 Installation and Operating Manual
PAS153 P/N: P002152 Colortrac Ltd © 2008
9
14. INSTALLING SMARTLF S/W FROM THE SOFTWARE INSTALLATION CD
Insert the software installation CD. It should Auto-Play. If the CDfails to launch go to the CD drive using Explorer and double-click thelaunch file to start the installer manually.
1. The SmartLF CD guides the user through connecting thescanner, installing the software and utilities, lists the manualsavailable and provides details of the Colortrac third partysoftware partners (CLASP). To go straight ahead and install thesoftware click the ‘Installing the Software’ button
2. At the software installation screen proceed to STEP 1 to installthe .NET environment if your computer requires it.
3. Click STEP 2 to install the SmartLF application.
Once the installation is complete you will be able to locate theSmartLF program under Program Files > Colortrac > SmartLF.
You have now installed the SmartLF application.
Go to Programs from the Windows Start button and navigate to theSmartLF entry and release. After a small delay the SmartLF screenwill display. Note that if the scanner is not powered up or the USB2cable is not connected the software interface will appear greyed asshown below.
15. LOADING A DOCUMENT INTO SMARTLF CX
Documents are loaded right-side justified and face-down with the edge of the paper in line with the first mark of thedocument ruler markings. Look for the yellow paper symbol.
Colortrac SmartLF Cx is not limited to scanning recognised document sizes, for example A1, A2 and E size. Themaximum scan width for SmartLF is 1016mm (40”) but the maximum length is limited only by the attached computerand scanning software. As soon as the READY status is displayed (after 35 seconds) documents can be loaded intothe scanner.

Colortrac SmartLF Cx 40 Installation and Operating Manual
PAS153 P/N: P002152 Colortrac Ltd © 2008
10
THE LOADING PROCESS . . .
SmartLF Cx document loading is fully automatic – the document is detected using optical sensors.
With two hands, place the document on the scanner with the longest edge (if possible) towards the scanner opening.The document is now pushed against the stationary rollers, ‘squared up’ and held in this position. The display willchange to ‘LOAD’ as SmartLF Cx detects the media. After approximately one second SmartLF Cx will start to load thedocument. After the document is loaded the display will return to ‘Ready’
When a document is loaded and the SmartLF software is running, the software icons or the scanner panel buttons canbe used to start the scanning process. The panel display will show the word ‘Scanning’ just before and duringmovement of the document through the scanner.
REMOVING A LOADED DOCUMENT/ CORRECTING A SKEWED DOCUMENT
Pressing the red STOP / REWIND button on the Cx40 panel during orafter a document has been loaded will REWIND the document. Thedocument will rewind for as long as the button is held down. This isuseful when a document skews slightly, loads awkwardly or needs to berotated to present a better or longer side to the scanner.
A document can be rewound at any time. The STOP button may be pressed duringdisplay of the ‘Abort load?’ message.
ADVANCING (FORWARD FEEDING) THE DOCUMENT
After a document is loaded pressing this button will forward advance the document. SmartLF Cx will movethe document for as long as the button is held down.
EJECTING THE DOCUMENT
After a scan has completed and where the software is instructed to hold the document, this button can beused to forward eject the document from the rear of the scanner.
STOPPING SMARTLF CX WHEN UNDER PROGRAM CONTROL
STOPPING SMARTLF CX
SmartLF Cx During scanning, press STOP / REW to stop the scanner and abort a scan. Thedisplay will show the message ‘Rewind?’ At this point the operator can pressSTOP / REW again to rewind the document or do nothing to have the documentstay at its current position. A loaded document can be rewound at any time usingthe STOP / REW button
SmartLF Toggling* the software FILE, COPY or EMAIL icons will stop an operating scannerToggling* the panel STOP / REW, SCAN and COPY buttons will stop the scannermomentarily. To prevent SmartLF restarting itself and continuing to batch processthe next document toggle the relevant FILE, COPY or EMAIL buttons on-screen.Pressing the scanner STOP / REWIND button will rewind the document from thefront of the scanner if the scanner is already stopped.
ScanWorks Toggling* the software SCAN icon or pressing the panel STOP / REWIND buttonwill stop the scanner. If the software has been set for Eject on Save or Delete thedocument will be ejected. If ScanWorks has been set for Do nothing the documentwill remain in the scanner.Press the LOAD/FORWARD or STOP / REWIND button to remove a document.
NOTES: 1.The behaviour of the scanner will depend on the software driving the scanner and how it has been configured.2. Toggling means pressing the same function button a second time i.e. once for ON and again for OFF.
AUTO

Colortrac SmartLF Cx 40 Installation and Operating Manual
PAS153 P/N: P002152 Colortrac Ltd © 2008
11
16. WINDOWS XP AND PANEL CONTROL OF THE SCANNER
The XP Windows Image Acquisition Device Driver Interface (WIADDI) supports custom scanner interfaces allowingSmartLF Cx hardware to start key program operations. The SmartLF Cx scanner SCAN and COPY buttons can beused to start and stop these primary software functions from the scanner control panel instead of, or in conjunction withthe software. They operate with the standard SmartLF, ScanWorks and CopySmart software but only with theWindows XP operating system. To set up the panel buttons go to the Windows XP Control Panel and set theproperties for ‘Scanners and Cameras’ as below.
IMPORTANT: TO ACTIVATE THE SMARTLF S/W REMOTELY FROM THE SCANNER CONTROL PANEL THERELEVANT BUTTON MUST BE PRESSED FOR AT LEAST 0.5 SECONDS
17. YOUR FIRST SCAN (FILE) WITH SMARTLF CX
SmartLF Cx is designed to make scanning-to-file,scanning-to-copy and scanning-to-email extremelysimple to achieve.
Note that Colortrac recommend the emailing functionbe used for black and white TIFG4 technical drawingsor small, low detail color scans only.
Load a document into SmartLF Cx NOW
(Until a document is scanned and displayed in the preview window, no zoom and crop tools are visible)
SMARTLF CX ‘SCAN-TO- ‘ FUNCTIONS
FILE - SmartLF Cx scanning to file is started by pressing the diskette icon in the File button. First sse the Browsebutton to select the storage location for the new file.
CONTROL PANEL
PREVIEWWINDOW
Colortrac SmartLF Cx 40 Installation and Operating Manual
PAS153 P/N: P002152 Colortrac Ltd © 2008
12
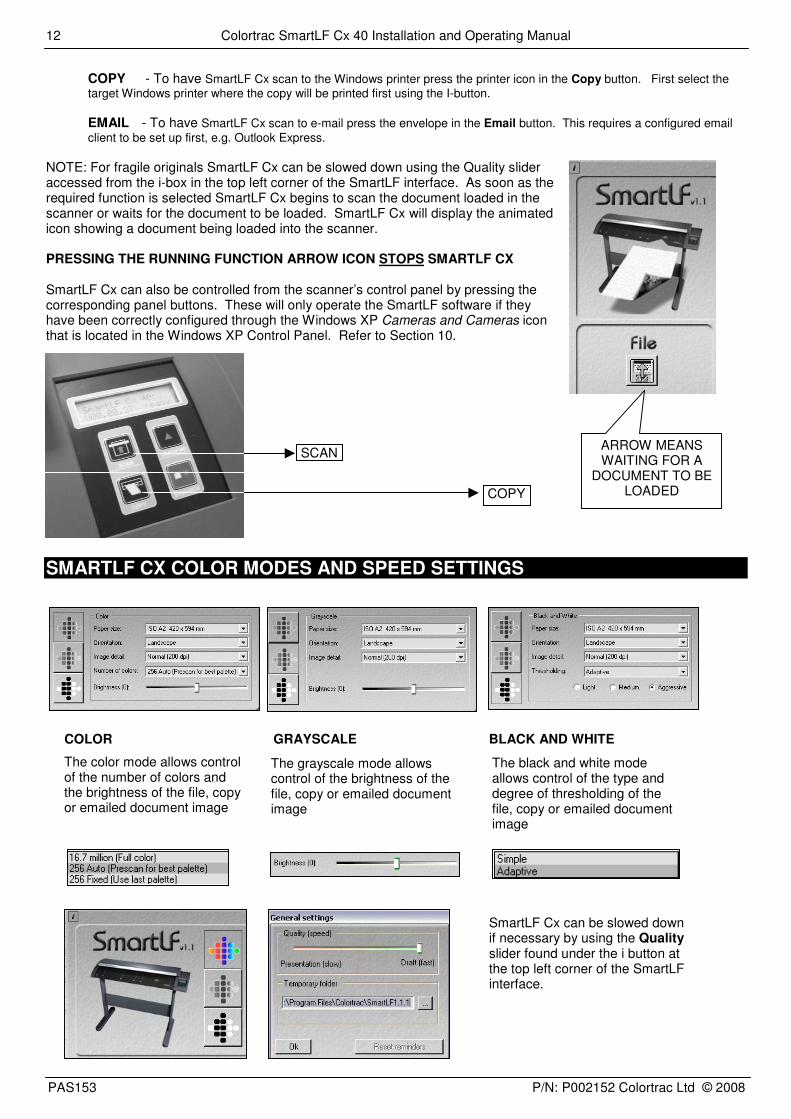
COPY - To have SmartLF Cx scan to the Windows printer press the printer icon in the Copy button. First select thetarget Windows printer where the copy will be printed first using the I-button.
EMAIL - To have SmartLF Cx scan to e-mail press the envelope in the Email button. This requires a configured emailclient to be set up first, e.g. Outlook Express.
NOTE: For fragile originals SmartLF Cx can be slowed down using the Quality slideraccessed from the i-box in the top left corner of the SmartLF interface. As soon as therequired function is selected SmartLF Cx begins to scan the document loaded in thescanner or waits for the document to be loaded. SmartLF Cx will display the animatedicon showing a document being loaded into the scanner.
PRESSING THE RUNNING FUNCTION ARROW ICON STOPS SMARTLF CX
SmartLF Cx can also be controlled from the scanner’s control panel by pressing thecorresponding panel buttons. These will only operate the SmartLF software if theyhave been correctly configured through the Windows XP Cameras and Cameras iconthat is located in the Windows XP Control Panel. Refer to Section 10.
SMARTLF CX COLOR MODES AND SPEED SETTINGS
COLOR GRAYSCALE BLACK AND WHITE
SmartLF Cx can be slowed downif necessary by using the Qualityslider found under the i button atthe top left corner of the SmartLFinterface.
The color mode allows controlof the number of colors andthe brightness of the file, copyor emailed document image
The grayscale mode allowscontrol of the brightness of thefile, copy or emailed documentimage
The black and white modeallows control of the type anddegree of thresholding of thefile, copy or emailed documentimage
SCAN
COPY
ARROW MEANSWAITING FOR A
DOCUMENT TO BELOADED
Colortrac SmartLF Cx 40 Installation and Operating Manual
PAS153 P/N: P002152 Colortrac Ltd © 2008
13
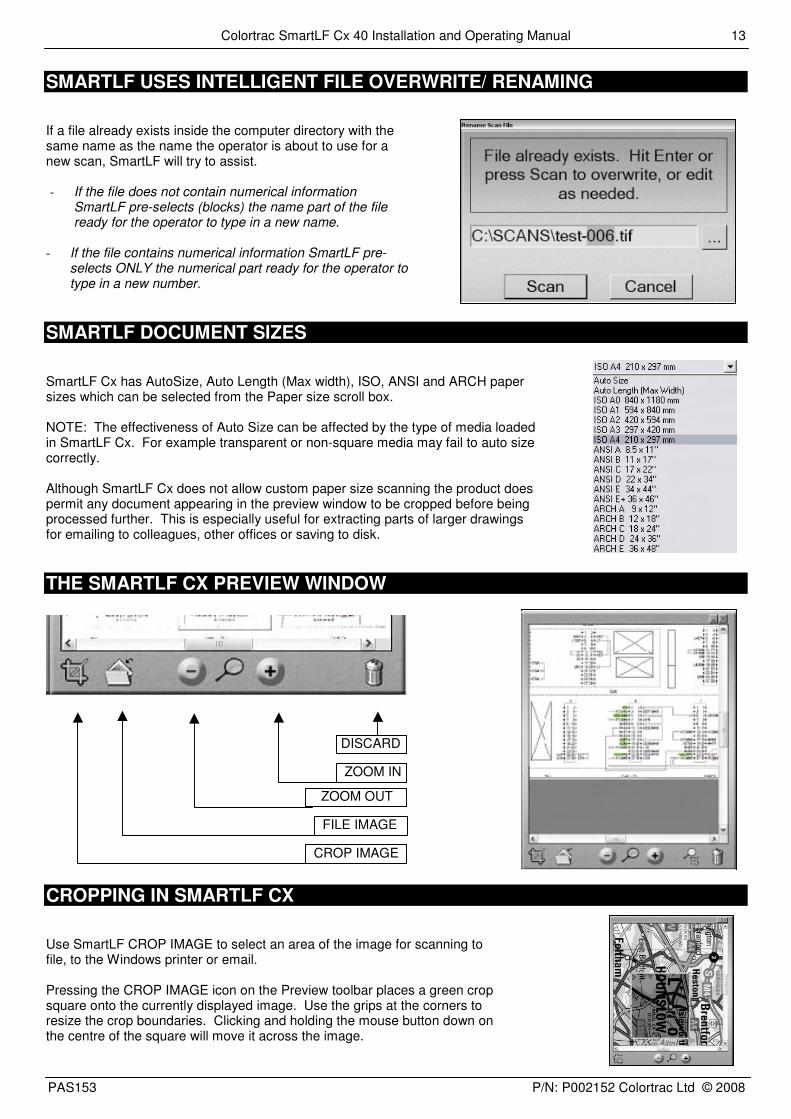
SMARTLF USES INTELLIGENT FILE OVERWRITE/ RENAMING
If a file already exists inside the computer directory with thesame name as the name the operator is about to use for anew scan, SmartLF will try to assist.
- If the file does not contain numerical informationSmartLF pre-selects (blocks) the name part of the fileready for the operator to type in a new name.
- If the file contains numerical information SmartLF pre-selects ONLY the numerical part ready for the operator totype in a new number.
SMARTLF DOCUMENT SIZES
SmartLF Cx has AutoSize, Auto Length (Max width), ISO, ANSI and ARCH papersizes which can be selected from the Paper size scroll box.
NOTE: The effectiveness of Auto Size can be affected by the type of media loadedin SmartLF Cx. For example transparent or non-square media may fail to auto sizecorrectly.
Although SmartLF Cx does not allow custom paper size scanning the product doespermit any document appearing in the preview window to be cropped before beingprocessed further. This is especially useful for extracting parts of larger drawingsfor emailing to colleagues, other offices or saving to disk.
THE SMARTLF CX PREVIEW WINDOW
CROPPING IN SMARTLF CX
Use SmartLF CROP IMAGE to select an area of the image for scanning tofile, to the Windows printer or email.
Pressing the CROP IMAGE icon on the Preview toolbar places a green cropsquare onto the currently displayed image. Use the grips at the corners toresize the crop boundaries. Clicking and holding the mouse button down onthe centre of the square will move it across the image.
CROP IMAGE
DISCARD
FILE IMAGE
ZOOM OUT
ZOOM IN

Colortrac SmartLF Cx 40 Installation and Operating Manual
PAS153 P/N: P002152 Colortrac Ltd © 2008
14
SIZE ISO/DIN SIZE ANSI SIZE ARCHA0 841mm x 1189mm E 34in x 44 in ARCH E 36inx 48in
A1 841mm x 594mm D 34in x 22 in ARCH D 36in x 24in
A2 594mm x 420mm C 22in x 17 in ARCH C 24in x 18in
A3 297mm x 420mm B 17in x 11in ARCH B 18in x 12in
A4 297mm x 210mm A 11in x 8.5in ARCH A 12in x 9in
COPYING FROM SMARTLF
SmartLF software uses any standard Windows printer driver for copying.The number of copies can be controlled from the COPY button by clicking onthe + and – icons.
The print quality of the copy is controlled from the Windows driver Propertiesdialogue in the normal way.
SmartLF will copy all images at 1:1 i.e. no scaling will take place unless setup in the Properties dialogue of the windows printer driver.
DOCUMENT SIZE MARKINGS ON THE SCANNER
To scan a non-standard size of document select adocument size that is larger than the document youneed to scan. The SmartLF software will allow‘cropping’ (removal of unwanted square edgesfrom) of the image before saving it to computer. Ifthe document is rectangular the auto-sizing optionwill detect the width of the document and determinethe length of the document automatically.
NOTE: Auto-sizing may not be 100% effective for all types of document.
TRANSPARENT AND OPAQUE ORIGINALS
SmartLF will set-size scan and auto-size scan, clear and opaque media. Clear acetate drawings will often producebetters results when used with a white backing sheet. A scanning wallet with an integral white backing sheet can beeffective. Auto-size detection may not work every time and may depend on the calibration quality of the scanner.
DOUBLE-SIDED ORIGINALS
Originals that have information on both sides can sometimes benefit from being scanned with a black backing sheetplaced behind the image to be captured. Wallets with a black backing surface and clear acetate front can be useful.
THICKNESS OF MEDIA COMPATIBLE WITH SMARTLF CX
SmartLF Cx is compatible with many types of media including synthetic, polyesters, Mylar and general office tracingand inkjet papers. The accuracy of SmartLF Cx is valid for media up to 0.8mm thick and may vary depending on theoperating environment. The document thickness limit for SmartLF Cx is 2mm.
STIFFNESS OF MEDIA COMPATIBLE WITH SMARTLF CX
SmartLF Cx will handle all regular media of 60g/m2 and above. Paper below this weight can have very low stiffness(for example some newspapers) and these may become creased in the scanner unless protected inside a suitablescan wallet. Wallets can be readily obtained from stationery suppliers or improvised by folding some clear acetate andplacing the document into the fold. Best results are obtained by loading the wallet fold-first into the scanner.
18. SCANNER MAINTENANCE
SmartLF Cx will need some occasional glass cleaning and white calibration (normalisation) maintenance. For bestresults follow the instructions below.
GLASS CONTAMINATION AND SCRATCHING
Each of the five SmartLF Cx scanner CIS glass covers is chemically treated and should resist scratching from paperclips, abrasive dust and staples but Colortrac recommend that the operator take all reasonable steps to ensure thatscan documents are clean and free from metallic appendages. The scan glass covers should be cleaned with a low-smear, high quality glass cleaning product and a clean lint-free cloth. In the event of the glass covers becoming badly
Colortrac SmartLF Cx 40 Installation and Operating Manual
PAS153 P/N: P002152 Colortrac Ltd © 2008
15
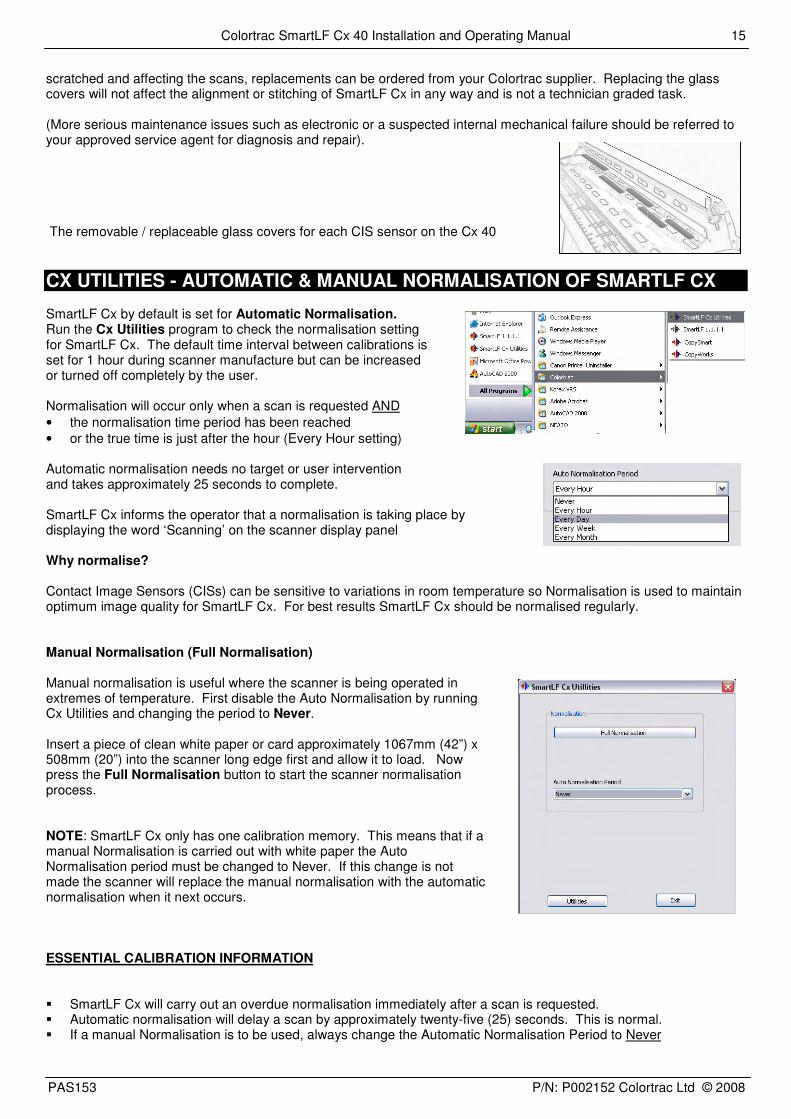
scratched and affecting the scans, replacements can be ordered from your Colortrac supplier. Replacing the glasscovers will not affect the alignment or stitching of SmartLF Cx in any way and is not a technician graded task.
(More serious maintenance issues such as electronic or a suspected internal mechanical failure should be referred toyour approved service agent for diagnosis and repair).
The removable / replaceable glass covers for each CIS sensor on the Cx 40
CX UTILITIES - AUTOMATIC & MANUAL NORMALISATION OF SMARTLF CX
SmartLF Cx by default is set for Automatic Normalisation.Run the Cx Utilities program to check the normalisation settingfor SmartLF Cx. The default time interval between calibrations isset for 1 hour during scanner manufacture but can be increasedor turned off completely by the user.
Normalisation will occur only when a scan is requested AND• the normalisation time period has been reached• or the true time is just after the hour (Every Hour setting)
Automatic normalisation needs no target or user interventionand takes approximately 25 seconds to complete.
SmartLF Cx informs the operator that a normalisation is taking place bydisplaying the word ‘Scanning’ on the scanner display panel
Why normalise?
Contact Image Sensors (CISs) can be sensitive to variations in room temperature so Normalisation is used to maintainoptimum image quality for SmartLF Cx. For best results SmartLF Cx should be normalised regularly.
Manual Normalisation (Full Normalisation)
Manual normalisation is useful where the scanner is being operated inextremes of temperature. First disable the Auto Normalisation by runningCx Utilities and changing the period to Never.
Insert a piece of clean white paper or card approximately 1067mm (42”) x508mm (20”) into the scanner long edge first and allow it to load. Nowpress the Full Normalisation button to start the scanner normalisationprocess.
NOTE: SmartLF Cx only has one calibration memory. This means that if amanual Normalisation is carried out with white paper the AutoNormalisation period must be changed to Never. If this change is notmade the scanner will replace the manual normalisation with the automaticnormalisation when it next occurs.
ESSENTIAL CALIBRATION INFORMATION
� SmartLF Cx will carry out an overdue normalisation immediately after a scan is requested.� Automatic normalisation will delay a scan by approximately twenty-five (25) seconds. This is normal.� If a manual Normalisation is to be used, always change the Automatic Normalisation Period to Never
Colortrac SmartLF Cx 40 Installation and Operating Manual
PAS153 P/N: P002152 Colortrac Ltd © 2008
16
19. FIELD UPGRADE OF SMARTLF CX TO A HIGHER MODEL
If your scanner is a model Cx 40m (mono only) or Cx 40c (low speed color) SmartLF Cx it can be upgraded bypurchasing one of the three SmartLF Cx Field Upgrade products available. The upgrades are ordered by ProductCode.
The process for model upgrading is as follows:
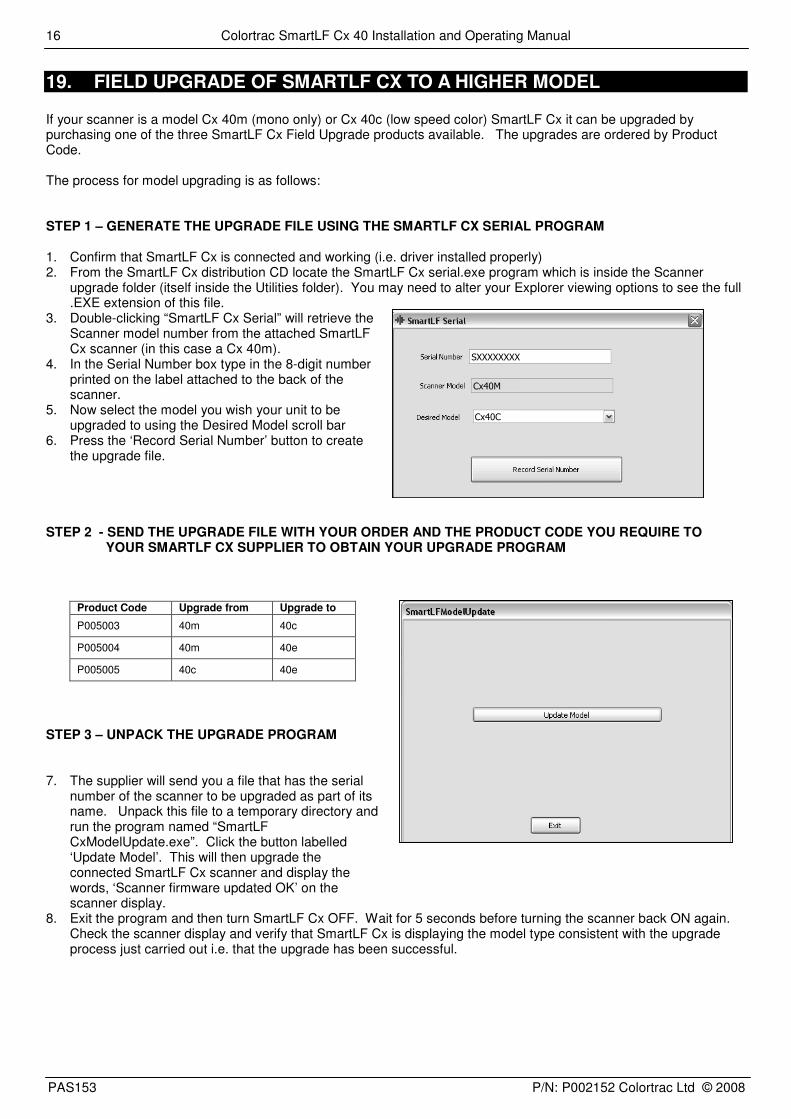
STEP 1 – GENERATE THE UPGRADE FILE USING THE SMARTLF CX SERIAL PROGRAM
1. Confirm that SmartLF Cx is connected and working (i.e. driver installed properly)2. From the SmartLF Cx distribution CD locate the SmartLF Cx serial.exe program which is inside the Scanner
upgrade folder (itself inside the Utilities folder). You may need to alter your Explorer viewing options to see the full.EXE extension of this file.
3. Double-clicking “SmartLF Cx Serial” will retrieve theScanner model number from the attached SmartLFCx scanner (in this case a Cx 40m).
4. In the Serial Number box type in the 8-digit numberprinted on the label attached to the back of thescanner.
5. Now select the model you wish your unit to beupgraded to using the Desired Model scroll bar
6. Press the ‘Record Serial Number’ button to createthe upgrade file.
STEP 2 - SEND THE UPGRADE FILE WITH YOUR ORDER AND THE PRODUCT CODE YOU REQUIRE TOYOUR SMARTLF CX SUPPLIER TO OBTAIN YOUR UPGRADE PROGRAM
Product Code Upgrade from Upgrade to
P005003 40m 40c
P005004 40m 40e
P005005 40c 40e
STEP 3 – UNPACK THE UPGRADE PROGRAM
7. The supplier will send you a file that has the serialnumber of the scanner to be upgraded as part of itsname. Unpack this file to a temporary directory andrun the program named “SmartLFCxModelUpdate.exe”. Click the button labelled‘Update Model’. This will then upgrade theconnected SmartLF Cx scanner and display thewords, ‘Scanner firmware updated OK’ on thescanner display.
8. Exit the program and then turn SmartLF Cx OFF. Wait for 5 seconds before turning the scanner back ON again.Check the scanner display and verify that SmartLF Cx is displaying the model type consistent with the upgradeprocess just carried out i.e. that the upgrade has been successful.
�����
�����
���������

Colortrac SmartLF Cx 40 Installation and Operating Manual
PAS153 P/N: P002152 Colortrac Ltd © 2008
17
20. APPENDIX 1 - COMPUTER REQUIREMENTS FOR SMARTLF CX
The minimum computer specification needed to achieve the stated SmartLF Cx performance is as follows:
Operating system: Windows XP or Windows Vista (see note 4)Processor: At least 2.8GHz, DUAL CORE (AMD), CORE-DUO (Intel) or HT (Hyper Threading) processorMemory: At least 512MB RAMData port: A USB2 compatible interface (see note 5)
Notes:
�������������� ��������� �������������������������������� ������������������������������������� ����� ����������������������������������������������������������� ���� ��������� ��������������� ����������������� ������������� ���� ��������������������� ������������ ��� ���!"�#$������������������� ��%������������&��#�'()�*�#+�,�- �'()���- �./�� ���������� ��������������������� ���������������������������� ����� �0 �����&������#��������������� �������� ������������ �������������� ���� �������������� �� ����#��������!����������������� ����������������������� � �� ���� �������� �����#���������� ����!"���������������#��������!���������������������������������������������� ��������� �����������#���� ����1�&��2�#��������!���
&��0 �����34� �������������� �������������� ���������� �����������������������������������"���0 �����&����������������������� � �� ������������� ����������� ����������������� ���!"�#$����������������� ����������� �������� ���
*������% ���������56���� ������ ���0 �����34� ��� ���4���7��������56�� ������������������� ��������� ���!"�#$������� ���!"����� �������� ���������%7 ���������������������������� �����������% ���������������������������� ��� ��� ������� ���������� ��������������� �������������� ���� �� ������������0 �����34������ ��������8�������������� ��� ���
9��0 �����:�+%6+5�9���0 �����&���� ����������������� ����� ��� ���!"�#$�
2����7 ;&���������� ������� �������������� ���������� ���!"�#$��� ������7 ;���� ��������� ����������������������������� ���� ���!"�#$������� �
21. APPENDIX 2 - HOW TO CHECK FOR A USB2 INTERFACE
It is very important that SmartLF Cx is connected to a computer that has aUSB2 interface. USB2 is approximately 40 times as fast as the older USB1.1standard. Run the Cx Utilities program and press the USB tab to run a checkon the speed of the USB interface to which the scanner is connected.
If the speed is OK and the interface passes the test, SmartLF Cx shouldoperate in accordance with the published specification.
If the USB interface fails the test this could be due to one of the following:
• This is a computer with a USB1.1 port (a pre-USB2 machine)• A USB2 port could be available but a USB1.1 device is sharing the connection• The USB2 port could be faulty or the cable may be too long• The USB2 interface of SmartLF Cx may be damaged
As an additional check it is wise to inspect the Properties of the USBinterface via the Device Manager of Windows’ Control Panel.Expand the Universal Serial Bus Controller device. If one of theUSB sub-branches contains the word ‘enhanced’ then the PC islikely to have a USB2 driver loaded on one of its USB ports.Unfortunately this does not guarantee that the scanner is pluggedinto the port using the USB2 driver.
Computers often have multiple USB ports and some more thanone USB controller. If SmartLF Cx has been successfullyinstalled on a computer but the scanner connection is changed toa different USB port (for example on the rear of the computer) thiswill cause the driver to be installed again. This is effectively anew installation.

Colortrac SmartLF Cx 40 Installation and Operating Manual
PAS153 P/N: P002152 Colortrac Ltd © 2008
18
NOTE: Every port can potentially have a different version of the SmartLFCx driver loaded for it so if you have recently upgraded the driver forSmartLF Cx and changed the USB port you regularly connect through youshould check the driver level using the Properties tab. Always reboot afterupdating a USB driver.
22. APPENDIX 3 - WINDOWS .NET FRAMEWORK ENVIRONMENT
The Microsoft .NET Framework allows users to run applications built using the .NET Framework like the ColortracSmartLF application. If the .NET Framework 2.0 is not installed on the scanner computer then the SmartLF multi-function software will not run.
CHECKING FOR AN EXISTING INSTALLATION OF MICROSOFT .NET (MSDN) FRAMEWORK 2.0
Go to the Control Panel and look for the highest number in the .NET programs listing.
ABOVE: Microsoft Windows XP Control Panel
If you are using Windows Server 2003 the .NET Framework is installed by default. Microsoft Windows Vista™ installs.NET 3.0 automatically and most Windows XP Home and Windows XP Professional installations (if they are takingadvantage of the Windows Automatic Update service) will already have .NET 2.0 installed. SmartLF users can upgradetheir XP machines to .NET V3.0 but there is no technical or performance reason for doing this.
23. APPENDIX 4 - DRIVER AND FIRMWARE CX 40 UTILITIES PROGRAM
Run the SmartLF Cx 40 Utilities programfrom the Windows Program menu bar todiscover the driver level and firmwarerevision installed in your Cx 40. You maybe required to supply this information toyour equipment provider if youexperience technical difficulties with thescanner.
Your SmartLF Cx scanner can be upgraded online. Please ask your SmartLF distributor or dealer about this facility.
v0.1 0.0.0.4

Colortrac SmartLF Cx 40 Installation and Operating Manual
PAS153 P/N: P002152 Colortrac Ltd © 2008
19
24. APPENDIX 5 - WARRANTY INFORMATION
SmartLF Cx is warranted for a period of twenty-four (24) months from the original date of supply against defectivematerials and workmanship. Supplementary cover may be offered under the warranty terms and contract offered bythe distributor or dealer in the local country where SmartLF Cx has been supplied. In either of these circumstances ifwarranty service is required the customer should first contact the dealer from whom the product was purchased andthe relevant warranty procedures followed.
In case of difficulty contact:
Colortrac LtdKings HallSt. Ives Business ParkSt. IvesHuntingdonCambridgeshirePE27 4WYUnited Kingdom
Tel: +44 (0) 1480 464618Fax: +44 (0) 1480 464620Web: [email protected]
COLORTRAC CONDITIONS OF WARRANTY1. The warranty will not be honoured in a situation where the ownership is in doubt or where there is no direct proof of purchase.2. The obligations of Colortrac are limited to the repair, or at its discretion, replacement of the product or the defective part.3. Warranty repairs must be carried out by an Authorised Colortrac Service Agent who has undergone service training by Colortrac (or their appointed distributor).
No reimbursement will be made for repairs carried out by non-Colortrac agents and any such repair work and damage to the product caused by such repair workwill not be covered by the warranty.
4. The product shall not be adapted or the warranty will be voided5. This warranty covers none of the following:
a) periodic maintenance and check-ups to replace or repair normal wear and tear itemsb) costs incurred in moving or transporting the scannerc) Misuse of the product or incorrect installation of the scanner.d) Damage caused by lightening, water, fire, or other natural causes, poor ventilation, incorrect electricity supply or any other causes beyond the control of
Colortrac Ltd6. This warranty is valid for anyone who legally acquired possession of the product inside the warranty period.
Colortrac or its distributors shall not be liable for indirect or consequential loss or damage to equipment or property as a result of using the device.
Colortrac SmartLF Cx 40 Installation and Operating Manual
PAS153 P/N: P002152 Colortrac Ltd © 2008
20
25. APPENDIX 6 - DECLARATION OF CONFORMITY
Manufacturer: Colortac Ltd.Kings HallSt Ives Business ParkSt IvesCambridgeshire, PE27 4WYUnited Kingdom
Details of Electrical Equipment
Model Number: SmartLF Cx 40
Description: Large Format Color Document Scanner
Directives this equipment complies with: LVD 73/23/EECEMC 89/336/EECCE Marking 92/31/EEC
Harmonised standards applied in order to verify compliance with Directive:
BS EN60950:1992EN55024-1:1998 (+A1/A2)EN61000:-4-2 to –4-6:-4-8:-4-11EN55022:1998 (+A1/A2)
This is a class A product. In a domestic environment this product may cause radio interference in which case the user may be required to take adequate measures (Note 1)
Other Standards Applied CFR47:2004 Class ATest Report Issued by : dB Technology 10 November 2005 (R2102)
Year in which CE mark was affixed: 2006
Issued: 1 January 2006
signed ..........................................
Graham TinnManaging DirectorColortrac Ltd.
Note 1: - The “domestic environment” is an environment where the use of broadcast radio and television receivers may be expected within a distance of 10 meters of the apparatus concerned.
Federal Communications Commission (FCC) Declaration of Electromagnetic Conformity
We refer 15.21 and 15.105 of the FCC regulations:
Section 15.21 Information to user.The users manual or instruction manual for an intentional or unintentional radiator shall caution the user that changesor modifications not expressly approved by the party responsible for compliance could void the user's authority tooperate the equipment. In cases where the manual is provided only in a form other than paper, such as on a computerdisk or over the Internet, the information required by this section may be included in the manual in that alternative form,provided the user can reasonably be expected to have the capability to access information in that form.
Section 15.105 Information to the user.(a) For a Class A digital device or peripheral, the instructions furnished the user shall include the following or similarstatement, placed in a prominent location in the text of the manual:NOTE: This equipment has been tested and found to comply with the limits for a Class A digital device, pursuant toPart 15 of the FCC Rules. These limits are designed to provide reasonable protection against harmful interferencewhen the equipment is operated in a commercial environment. This equipment generates, uses, and can radiate radiofrequency energy and, if not installed and used in accordance with the instruction manual, may cause harmfulinterference to radio communications. Operation of this equipment in a residential area is likely to cause harmfulinterference in which case the user will be requiredto correct the interference at his own expense.

Colortrac SmartLF Cx 40 Installation and Operating Manual
PAS153 P/N: P002152 Colortrac Ltd © 2008
21
CB Certification
This product has been tested and conforms to IEC 60950-1 (2001). The test report ref. E185864-A4-CB -1 appliesand was issued January 11th 2006.
Stand Accessories
CAN/CSA-C22.2 NO. 60950-1-03 + UL 60950-1 Section 4 Physical requirementsSub section 4.1 Stability
SmartLF stand accessories (where purchased) have been tested and comply with the stability and general safetyrequirements of UL guidelines. The scanner accessories are intended for use only with the SmartLF and must beassembled by a responsible person following the directions provided in the kits.
P005300 Colortrac Floor Stand Cx modelP005301 Colortrac Computer and LCD Monitor Mounting KitP005302 Colortrac Universal Repro StandP005303 Colortrac Catch Basket Upgrade Kit
UL Certification
This product has been tested and passed by representatives of Underwriters Laboratories Inc. The test report ref.E185864-A4-UL-1 Amendment 1 applies and was issued on January 10th 2006.
EU RoHS and WEEE Directives
This product (from mid-May 2006) is manufactured in accordance with the RoHS (Restriction of HazardousSubstances) which imposes controls against the use of lead in solder and other substances harmful to the environmentin the production of all new electrical equipment.
In accordance with WEEE (Waste Electrical & Electronic Equipment) it is the responsibility of the distributor or dealer inthe country where this product is sold to ensure that this device is recycled or disposed of properly at the end of itsuseful life.
Disclaimer
The entire risk of the use or the result of the use of this hardware or documentation remains with the user. No part ofthis documentation may be reproduced or transmitted in any means, electronic or mechanical, for any purpose, exceptwith the express prior written permission of Colortrac Ltd.
Colortrac Ltd makes no warranty claims with respect to this documentation and disclaims any implied warranties ofmerchantability or fitness for a particular purpose. The information contained in this document is subject to changewithout notice. Colortrac Ltd assumes no responsibility for errors or omissions that may appear in this documentation.
Revision 1.5 February 2008
© Colortrac 2007
This document should not be copied without prior permission from:
Colortrac LtdKings HallSt. Ives Business ParkSt. IvesHuntingdonCambridgeshirePE27 4WYUnited Kingdom
Tel: +44 (0) 1480 464618Fax: +44 (0) 1480 464620
��� www.colortrac.com ������ [email protected]
Colortrac SmartLF Cx 40 Installation and Operating Manual
PAS153 P/N: P002152 Colortrac Ltd © 2008
22
26. SMARTLF CX 40 TECHNICAL SPECIFICATION
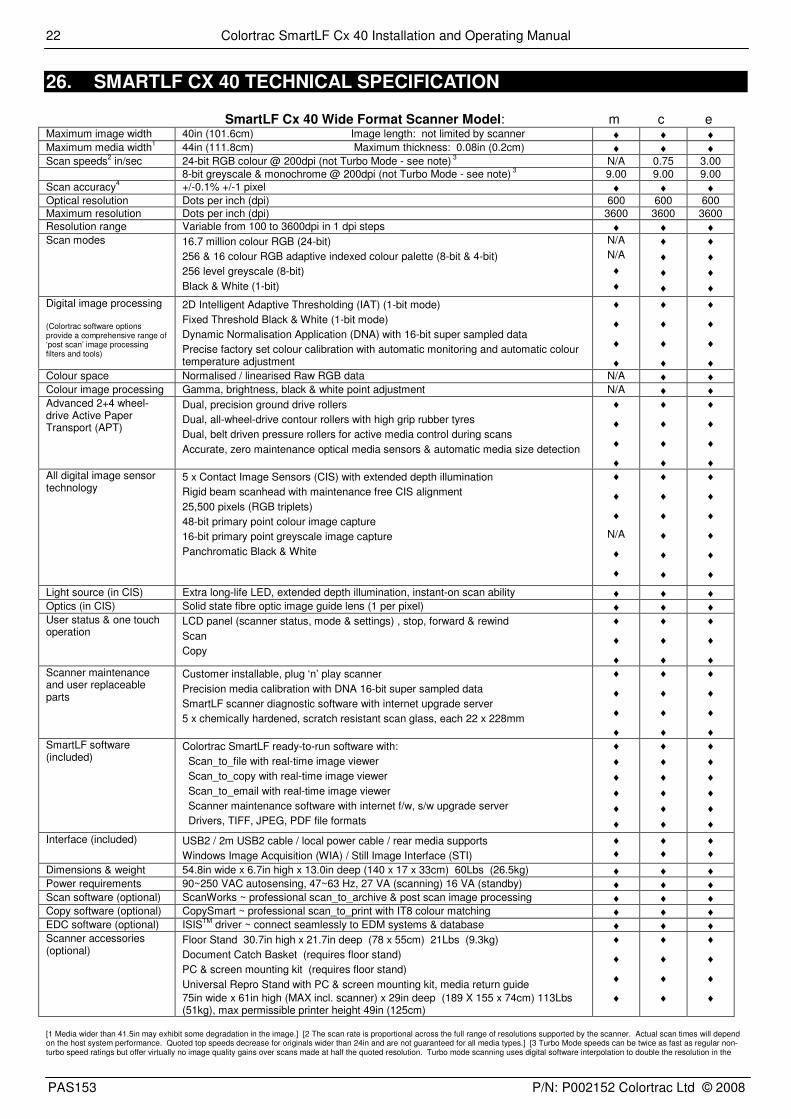
SmartLF Cx 40 Wide Format Scanner Model: m c eMaximum image width 40in (101.6cm) Image length: not limited by scanner ♦ ♦ ♦Maximum media width1 44in (111.8cm) Maximum thickness: 0.08in (0.2cm) ♦ ♦ ♦Scan speeds2 in/sec 24-bit RGB colour @ 200dpi (not Turbo Mode - see note) 3 N/A 0.75 3.00
8-bit greyscale & monochrome @ 200dpi (not Turbo Mode - see note) 3 9.00 9.00 9.00Scan accuracy4 +/-0.1% +/-1 pixel ♦ ♦ ♦Optical resolution Dots per inch (dpi) 600 600 600Maximum resolution Dots per inch (dpi) 3600 3600 3600Resolution range Variable from 100 to 3600dpi in 1 dpi steps ♦ ♦ ♦Scan modes 16.7 million colour RGB (24-bit)
256 & 16 colour RGB adaptive indexed colour palette (8-bit & 4-bit)256 level greyscale (8-bit)Black & White (1-bit)
N/AN/A♦♦
♦♦♦♦
♦♦♦♦
Digital image processing
(Colortrac software optionsprovide a comprehensive range of‘post scan’ image processingfilters and tools)
2D Intelligent Adaptive Thresholding (IAT) (1-bit mode)Fixed Threshold Black & White (1-bit mode)Dynamic Normalisation Application (DNA) with 16-bit super sampled dataPrecise factory set colour calibration with automatic monitoring and automatic colourtemperature adjustment
♦
♦
♦
♦
♦
♦
♦
♦
♦
♦
♦
♦Colour space Normalised / linearised Raw RGB data N/A ♦ ♦Colour image processing Gamma, brightness, black & white point adjustment N/A ♦ ♦Advanced 2+4 wheel-drive Active PaperTransport (APT)
Dual, precision ground drive rollersDual, all-wheel-drive contour rollers with high grip rubber tyresDual, belt driven pressure rollers for active media control during scansAccurate, zero maintenance optical media sensors & automatic media size detection
♦
♦
♦
♦
♦
♦
♦
♦
♦
♦
♦
♦All digital image sensortechnology
5 x Contact Image Sensors (CIS) with extended depth illuminationRigid beam scanhead with maintenance free CIS alignment25,500 pixels (RGB triplets)48-bit primary point colour image capture16-bit primary point greyscale image capturePanchromatic Black & White
♦
♦
♦
N/A
♦
♦
♦
♦
♦
♦
♦
♦
♦
♦
♦
♦
♦
♦
Light source (in CIS) Extra long-life LED, extended depth illumination, instant-on scan ability ♦ ♦ ♦Optics (in CIS) Solid state fibre optic image guide lens (1 per pixel) ♦ ♦ ♦User status & one touchoperation
LCD panel (scanner status, mode & settings) , stop, forward & rewindScanCopy
♦
♦
♦
♦
♦
♦
♦
♦
♦Scanner maintenanceand user replaceableparts
Customer installable, plug ‘n’ play scannerPrecision media calibration with DNA 16-bit super sampled dataSmartLF scanner diagnostic software with internet upgrade server5 x chemically hardened, scratch resistant scan glass, each 22 x 228mm
♦
♦
♦
♦
♦
♦
♦
♦
♦
♦
♦
♦SmartLF software(included)
Colortrac SmartLF ready-to-run software with: Scan_to_file with real-time image viewer Scan_to_copy with real-time image viewer Scan_to_email with real-time image viewer Scanner maintenance software with internet f/w, s/w upgrade server Drivers, TIFF, JPEG, PDF file formats
♦♦♦♦♦♦
♦♦♦♦♦♦
♦♦♦♦♦♦
Interface (included) USB2 / 2m USB2 cable / local power cable / rear media supportsWindows Image Acquisition (WIA) / Still Image Interface (STI)
♦♦
♦♦
♦♦
Dimensions & weight 54.8in wide x 6.7in high x 13.0in deep (140 x 17 x 33cm) 60Lbs (26.5kg) ♦ ♦ ♦Power requirements 90~250 VAC autosensing, 47~63 Hz, 27 VA (scanning) 16 VA (standby) ♦ ♦ ♦Scan software (optional) ScanWorks ~ professional scan_to_archive & post scan image processing ♦ ♦ ♦Copy software (optional) CopySmart ~ professional scan_to_print with IT8 colour matching ♦ ♦ ♦EDC software (optional) ISISTM driver ~ connect seamlessly to EDM systems & database ♦ ♦ ♦Scanner accessories(optional)
Floor Stand 30.7in high x 21.7in deep (78 x 55cm) 21Lbs (9.3kg)Document Catch Basket (requires floor stand)PC & screen mounting kit (requires floor stand)Universal Repro Stand with PC & screen mounting kit, media return guide75in wide x 61in high (MAX incl. scanner) x 29in deep (189 X 155 x 74cm) 113Lbs(51kg), max permissible printer height 49in (125cm)
♦
♦
♦
♦
♦
♦
♦
♦
♦
♦
♦
♦
[1 Media wider than 41.5in may exhibit some degradation in the image.] [2 The scan rate is proportional across the full range of resolutions supported by the scanner. Actual scan times will dependon the host system performance. Quoted top speeds decrease for originals wider than 24in and are not guaranteed for all media types.] [3 Turbo Mode speeds can be twice as fast as regular non-turbo speed ratings but offer virtually no image quality gains over scans made at half the quoted resolution. Turbo mode scanning uses digital software interpolation to double the resolution in the
Colortrac SmartLF Cx 40 Installation and Operating Manual
PAS153 P/N: P002152 Colortrac Ltd © 2008
23
paper direction to simulate higher resolution scanning.] [4 The quoted scan accuracy is valid for media up to 0.5mm thick and may vary depending on the operating environment and the type &thickness of media. Colortrac measures accuracy by scanning a paper original printed with a square target. The pixel co-ordinates of the target image are measured and compared with the knowndimensions of the original. SmartLF Cx 40 scanners are tested at 200C +/- 30C, 60% +/- 10% RH.] [4 The maximum resolution selectable for an image is limited by the file format specified & theavailable disk space.] [Colortrac recommends Intel Pentium, Core Duo, Core 2 Duo, HT (Hyper-Threading) and AMD Athlon Dual Core processors, at least 512MB RAM, USB2 and Windows™ XPHome, Windows™ XP Professional or Windows™ Vista operating systems. SmartLF drivers support 32-bit and 64-bit processor architectures. Contact your supplier for advice on the optimumsystem configuration for your application.] [Colortrac SmartLF Cx 40 scanners comply with CB, CE, FCC, UL and RoHS standards and regulations.] Colortrac Ltd makes no warranty of any kind withrespect to the information contained in this document and reserves the right to change specifications without notice. Colortrac and Smart LF® are trademarks of Colortrac Ltd. All other trademarksare the property of their respective owners. Copyright © 2007 Colortrac Ltd.

Colortrac SmartLF Cx 40 Installation and Operating Manual
PAS153 P/N: P002152 Colortrac Ltd © 2008
24