installation & operation instructions - flojak pump …flojak.com/content/earthstraw...
TRANSCRIPT

deep blue installation & operation instructions | multiple patents pending | © copyright 2016 baluster group, llc companies | v1.0 011016
Carefully remove the fully assembled pump from the box and uncoil it on the ground.
Lower the pump into the well, below the waterline, but several feet up from the silty bottom.
Grip the foam handle in one hand while stroking the aluminum handle with the other.
Congratulations! You now own the EarthStraw Deep Blue™ hand-well-pump system. This unique and versatile pump system is designed for rapid deployment and
existing electric pump. If the well doesn’t have an access point, we make accessories that will help you create one. If your Deep Blue™ system is too long for the well, we provide a length adjustments kit for shortening the system. Or, if you cannot shorten the system, or prefer to keep the length intact, Deep Blue™ may be partially inserted into the well to reach water. Simply stretch the remaining length over the ground
awkward, it’s a good temporary solution in an emergency. A much better option is to prepare your well in advance by pre-installing either the top or a side mount bracket kit. These affordable and easy-to-install accessories are available online. Installing the appropriate bracket will prepare you to quickly insert your Deep Blue™ when needed, and then remove and store it for future use
Installation
The system comes to you completely assembled. You will simply uncoil the pump and lay it out across the ground, preferably in the sunshine, allowing the coils to relax in a straighter line for easy installation.
Optional mounting brackets come with a gripper nut on the top of the bracket. Turn the nut counterclockwise to open up the access hole. Insert the pump assembly through the center of the gripper nut and lower it carefully into the well. Do not force it. If you encounter obstructions simply lift the pump and
Installation & Operation Instructions
PG
2
3
4
5

deep blue installation & operation instructions | multiple patents pending | © copyright 2016 baluster group, llc companies | v1.0 011016
Once the pump is fully inserted, position it to a comfortable pumping height, twist the gripper nut in a
position, the handle should be about 12 inches below your waistline for comfort. You may use a wrench to cinch the gripper nut tight, being careful not to over tighten. If your pump tends to slip during operation wrap
the gripper nut over the taped area. This will provide a better gripping surface for the nut.
on both the up and down strokes. The system comes equipped with a 4
sure to open the valve on the water carrier prior to pumping. As the system
Deep Blue™ is a self-priming pump system.
In extreme cold conditions it is recommended that you remove the system after pumping and store it in a space which will remain above
accomplished by penetrating the blue (or red) sidewall of your pump body 6 feet below ground level, using a very small diameter wire (like a paper clip). You can put a small straight section of the wire in your drill like a tiny drill bit, or heat it and melt through the side wall. This will cause a small amount of water loss while stroking, but will allow the above ground water to leak down to the weep hole level, reducing the chances
The Deep Blue™ hand well pump system has been tested in extreme conditions over hundreds of
(DBSK-001) containing several replaceable parts, it is available on our website.
Deep Blue™ comes with a one-year replacement-parts warranty, from date of purchase.
Deep Blue™ is designed to lift water 200 feet from static. Do not attempt to pump water more than 200
feet from your static water level. This will void the warranty on your system.
Once the pump is fully inserted, position it to a comfortable pumping height, twist the gripper nut in a
position, the handle should be about 12 inches below your waistline for comfort. You may use a wrench to cinch the gripper nut tight, being careful not to over tighten. If your pump tends to slip during operation wrap
the gripper nut over the taped area. This will provide a better gripping surface for the nut
PG2

deep blue installation & operation instructions | multiple patents pending | © copyright 2016 baluster group, llc companies | v1.0 011016
Deep Blue™ is a Rapid-Deployment, Take-
portable...it has to be lightweight. (A 100 foot system weighs less than 9 lbs.) And because it’s a water delivery system for emergency backup...It HAS to be ready to go
hand pump on the planet. It can retrieve water from more places than any other pump system anywhere...Period! It comes out of the box, ready to pump without a single second of assembly required. It will coil up, carry in one hand or sling over a shoulder, and tuck away in the trunk of your car for next time.
Deep Blue™ is the most affordable hand well pump system available...by a long shot. But we didn’t cut corners. Take a look:
pumping in harsh winter conditions.
and lightweight.
The foot valve is precision machined from solid brass and designed to withstand the demanding pressures created while pumping water from deep below the surface.
polymer available in an o-ring. Viton is temperature resistant, and resists abrasion in harsh environments. Viton
of thousands of strokes.
All of the critical valve and structural components inside are constructed from solid stainless steel or brass. These combine to produce a very innovative, corrosion resistant pumping mechanism like no other.
The trademark blue pump body of the Deep Blue™ system is made from a special cross-linked version of high density polyethylene (HDPE) which is resistant to wearing, kinking, and ovaling, while also withstanding the high internal pressures developed while pumping. The unique properties of this material make our proprietary “pump in a
PG3

deep blue installation & operation instructions | multiple patents pending | © copyright 2016 baluster group, llc companies | v1.0 011016
You will need to purchase an Earthstraw Deep Blue Length Adjustment Kit. The steps provided below are for reducing the
and wire to keep the ball from sliding down the wire.
(Yes, cut off an extra foot) with heavy duty wire cutters. Discard the cut off, but keep and reuse the stainless steel ball.
Pull the newly cut wire end out of the pump to make it easier to work with. Place the ball over the end of the newly cut wire and tape it in place temporarily, a few inches from the end.
Place the wire end over an anvil or other solid steel surface (like the ball
tape to rod end threads . Reinstall the rod into the aluminum handle. The threads should be fully engaged, but do not overtighten. You will strip the aluminum threads.
PG4

deep blue installation & operation instructions | multiple patents pending | © copyright 2016 baluster group, llc companies | v1.0 011016
Be careful to catch the stainless steel ball inside. You will need to reuse it.
feet from the end.
Using a sharp utility knife, at the cut-mark carefully cut through the blue pump body SQUARELY to square up the end if necessary.
Insert the blue ball-stop (looks like a Mercedes emblem) into the blue pump body and push it in up to the mark on the wooden guide .
.
Remove any plastic debris inside with needle nose pliers to avoid leaking.
Insert the stainless steel ball and screw the brass foot valve in. Do not overtighten.
It is a very good idea to install the appropriate mounting system in advance so that when you need water, the well is ready to go. Pre-mounting means that you will have access to water in minutes when needed. And, you can easily remove and store the pump after use, to avoid
(nominal) casing diameters.
The most complicated part of installing any hand well pump system is the mounting...until now! Deep Blue™ is engineered for simplicity, and our innovative mounting kits are no exception.
PG5
2
deep blue installation & operation instructions | multiple patents pending | © copyright 2016 baluster group, llc companies | v1.0 011016
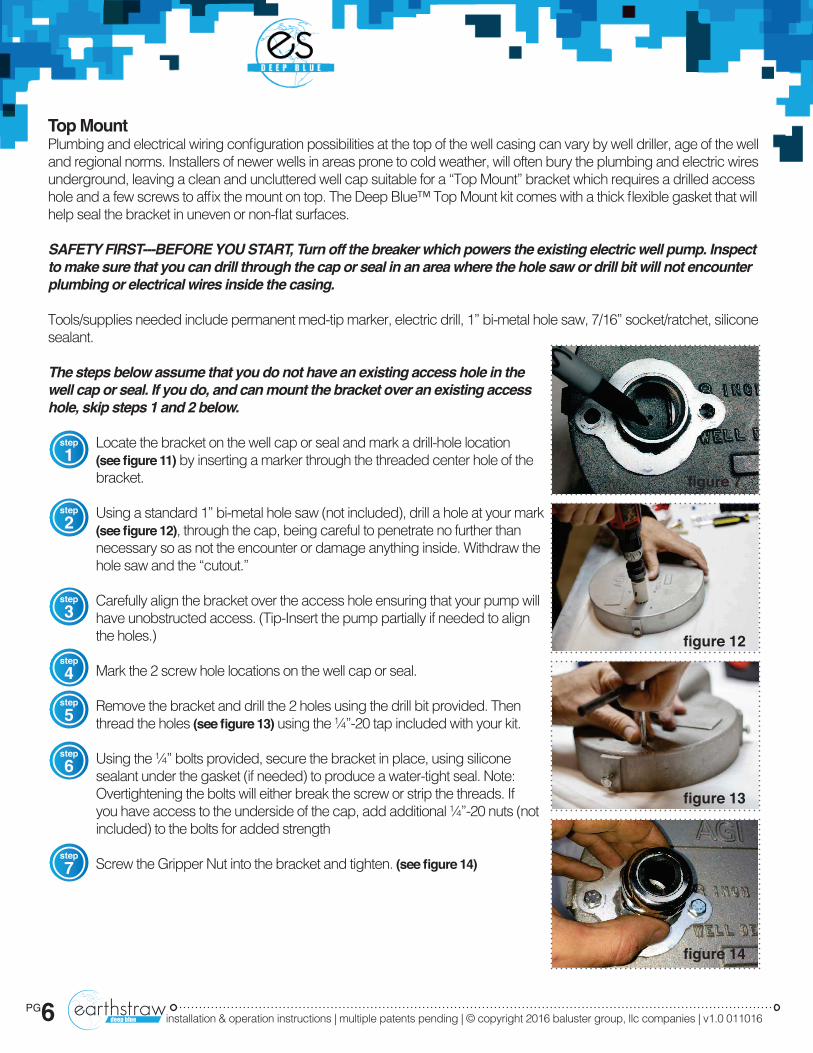
and regional norms. Installers of newer wells in areas prone to cold weather, will often bury the plumbing and electric wires
SAFETY FIRST---BEFORE YOU START, Turn off the breaker which powers the existing electric well pump. Inspect
to make sure that you can drill through the cap or seal in an area where the hole saw or drill bit will not encounter
plumbing or electrical wires inside the casing.
sealant.
The steps below assume that you do not have an existing access hole in the
well cap or seal. If you do, and can mount the bracket over an existing access
hole, skip steps 1 and 2 below.
Locate the bracket on the well cap or seal and mark a drill-hole location by inserting a marker through the threaded center hole of the
bracket.
, through the cap, being careful to penetrate no further than
Carefully align the bracket over the access hole ensuring that your pump will have unobstructed access. (Tip-Insert the pump partially if needed to align the holes.)
Mark the 2 screw hole locations on the well cap or seal.
Remove the bracket and drill the 2 holes using the drill bit provided. Then thread the holes
Overtightening the bolts will either break the screw or strip the threads. If
included) to the bolts for added strength
PG
7
5
4
3
2

deep blue installation & operation instructions | multiple patents pending | © copyright 2016 baluster group, llc companies | v1.0 011016
Some older wells, often in warmer climates, are cluttered on top leaving no room for a Top Mount bracket. The ingenious Side Mount bracket allows the Deep Blue™ to enter the side of the casing, away from the tangle of plumbing and wires. And while well casings have become more dimensionally uniform over the years, there are many inconsistencies in the
SAFETY FIRST---BEFORE YOU START, Turn off the breaker which powers the
existing electric well pump. Inspect to make sure that you can drill through the
casing in an area where the hole saw or drill bit will not encounter plumbing or
electrical wires inside the casing.
radius on the mounting bracket. Opening or closing the radius can be done by
careful and thoughtful use of pliers and a hammer.
Hold the bracket up to the casing in the approximate location for mounting and mark a drill-hole location by inserting a marker through the threaded center hole of the bracket.
mark, through the side of the casing, being careful to penetrate no further than necessary so as not the encounter or damage anything inside.
Carefully align the bracket over the freshly drilled access hole ensuring that your pump will have unobstructed access. (Tip-Insert the pump partially if needed to align the holes.)
Making sure the bracket is vertical, mark the 2 screw hole locations on the casing.
Remove the bracket and drill the 2 holes using the drill bit provided. Then
Using the screws provided, secure the bracket to the casing using silicone
tightening the screws will either break the screw or strip the threads.
PG7
7
5
4
3
2