installation & user guide - kwizcomcatalog.kwizcom.com/sites/pc/product documentation... ·...
TRANSCRIPT

SharePoint List Filter Plus
Web Part
Installation & User Guide

Copyright © 2005-2018 KWizCom corp. All rights reserved. www.kwizcom.com
2
Copyright ©2005-2018 KWizCom Corporation. All rights reserved.
Company Headquarters
KWizCom
95 Mural Street, Suite 600
Richmond Hill, Ontario
L4B 3G2, Canada
E-mail: [email protected]
Web site: http://www.KWizCom.com
Sales
E-mail: [email protected]
Telephone: +1-905-370-0333

Copyright © 2005-2018 KWizCom corp. All rights reserved. www.kwizcom.com
3
Table of Contents Table of Contents ...................................................................................... 3
Introduction ............................................................................................... 4
Overview ...................................................................................................... 5
Key Features & Benefits _______________________________________________ 8
Installation ................................................................................................. 9
Software prerequisites ________________________________________________ 9
Installation Procedure ________________________________________________ 9
Post Installation ____________________________________________________ 11
Un-installation procedure ___________________________________________ 12
Component Localization ....................................................................... 13
Translating a KWizCom component _________________________________ 13
Component Activation .......................................................................... 15
Administrator Guide .............................................................................. 20
Introduction ________________________________________________________ 20
Web Part Properties & Configuration Options _______________________ 21 Using the web part as a list filter .............................................................................. 21 Permalink functionality................................................................................................ 30 Using the web part as a generic query engine ...................................................... 31 Integration with KWizCom’s CalendarPlus web part ............................................ 34
FAQ ............................................................................................................... 36
I added the web part to my site but I can't modify the web part's
properties. What is wrong? _________________________________________ 36
I configured everything I need and clicked "OK" but nothing happened.
How do I fix this? ___________________________________________________ 36
Do I have to install anything on my company's client-PCs? __________ 36
Do I have to install anything besides List Filter Plus to use the
DataTable connection? ______________________________________________ 36
Copyright © 2005-2018 KWizCom corp. All rights reserved. www.kwizcom.com
4
Introduction
KWizCom's SharePoint List Filter Plus web part enables you to filter SharePoint lists with maximum ease.
SharePoint List Filter web part is compatible with both MOSS 2007 / WSS 3.0, SharePoint 2010 Server/Foundation and SharePoint 2013/2016
Server/Foundation.
This document provides all the information needed to install, evaluate and deploy this KWizCom product:
▪ Product overview
▪ Installation guide
▪ Component activation
▪ Administrator guide
▪ FAQ
Copyright © 2005-2018 KWizCom corp. All rights reserved. www.kwizcom.com
5
Overview
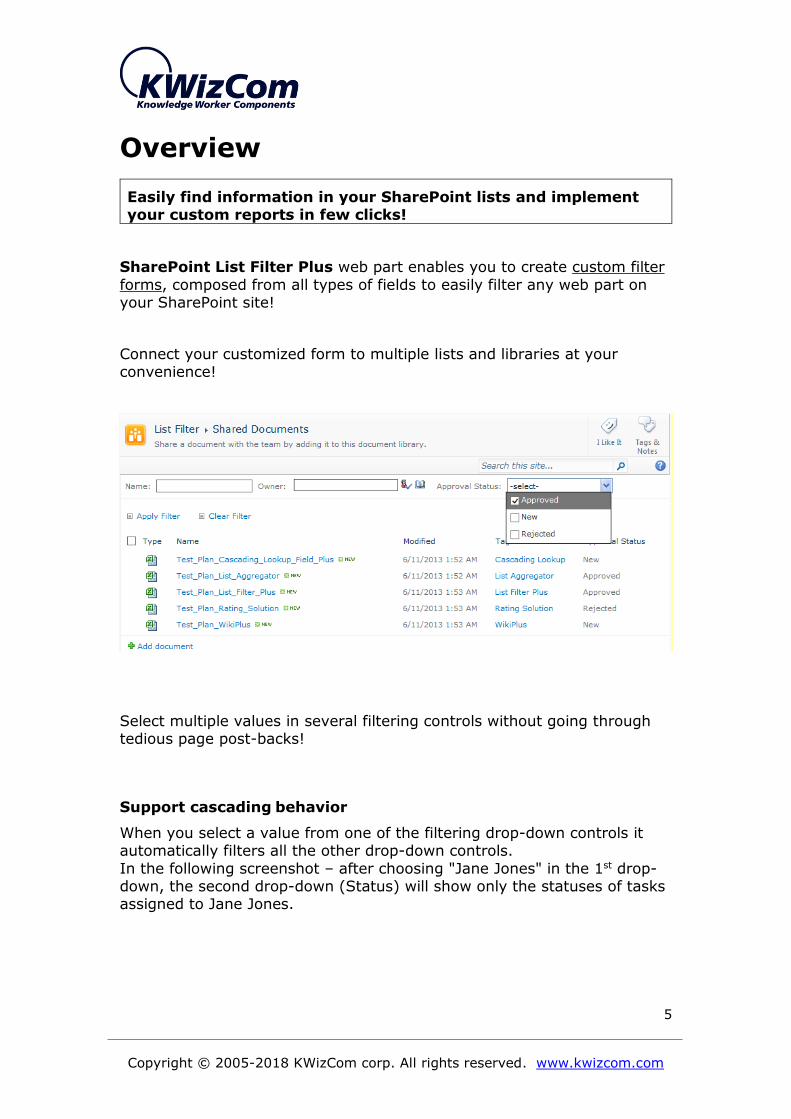
Easily find information in your SharePoint lists and implement your custom reports in few clicks!
SharePoint List Filter Plus web part enables you to create custom filter
forms, composed from all types of fields to easily filter any web part on your SharePoint site!
Connect your customized form to multiple lists and libraries at your convenience!
Select multiple values in several filtering controls without going through tedious page post-backs!
Support cascading behavior
When you select a value from one of the filtering drop-down controls it automatically filters all the other drop-down controls.
In the following screenshot – after choosing "Jane Jones" in the 1st drop-down, the second drop-down (Status) will show only the statuses of tasks assigned to Jane Jones.

Copyright © 2005-2018 KWizCom corp. All rights reserved. www.kwizcom.com
6
Easily run and display your required custom reports!
Now you can use The List Filter Plus web part as a generic query engine!
Instead of filtering one specific list, you can configure the web part to run your required custom query on multiple lists, located in various sites!
KWizCom also provides a FREE supporting web part which you receive simply by installing the KWizCom List Aggregator web part - “List Aggregator - Table Viewer”. This FREE web part consumes the List Filter
Plus’ query results and displays them in a configurable and printable grid layout.
Support different types of controls
Now you have a control type to match every desired field; choose between the text box, the drop down list, the single selection drop down list, the user picker and the date span (from… to…) controls to make the
filter extra efficient!

Copyright © 2005-2018 KWizCom corp. All rights reserved. www.kwizcom.com
7
Support for WSS/Foundation
Unlike SharePoint out-of-the-box filter web parts (which are available only
in SharePoint Server), KWizCom's SharePoint List Filter Plus web part is also available for WSS and SharePoint Foundation users!
Cross-browser support
KWizCom's List Filter Plus is compatible with Microsoft Internet Explorer,
Mozilla Firefox, Google Chrome and Safari.

Copyright © 2005-2018 KWizCom corp. All rights reserved. www.kwizcom.com
8
Key Features & Benefits
Feature KWizCom
SharePoint
List Filter
Plus
SharePoint
2007/2010/2013/2016
Availability of Filtering web parts All SharePoint editions
Filter web parts not available in
WSS/Foundation.
Enables the creation of a custom filter
form with all types of fields, including date span and user picker
Enables defining custom queries (any list type, cross site) and providing them
using a DataTable connection to any consumer.
The filter “remembers” your previous filter settings.
Fully customizable interface via CSS
Share filter definition by sending a permalink
Integration with KWizCom’s Calendar Plus web part
Customizable captions
Support CONTAINS and exact phrase search
Supports calculated fields
Enables multiple selections in drop-
downs
Comes with various skins
Supports cascading behavior
Saves the user's last filter settings
Can populate filter parameters from a query string (URL)
Multi-lingual by design – customize to the language of your choice with ease!
Cross browser - IE, Firefox, Google Chrome and Safari

Copyright © 2005-2018 KWizCom corp. All rights reserved. www.kwizcom.com
9
Support for accessibility standard –
WCAG
Installation
Software prerequisites
Server Requirements
1. SharePoint 2007 / WSS 3.0 or
2. SharePoint Server/Foundation 2010/2013/2016
Client PC Requirements
1. OS: Windows 7+ OR Mac iOS 10.8.4 or later.
2. Microsoft Internet Explorer 9+ or Firefox Mozilla (Latest version)
or Google Chrome (Latest version) or Safari (Latest version)
Installation Procedure
SharePoint 2007
1. Log in using SharePoint administrator account to your SharePoint
front-end server.
2. Download the product’s latest evaluation version from KWizCom’s
internet web site. This evaluation version is fully functional for 30
days. Further details about product activation can be found in the
Administrator guide (next section).
3. Unzip the product’s zip file on your SharePoint server.
4. Double-click the .msi file in order to begin the web installation.
5. When the installation process is complete it will recycle all
application pools automatically.

Copyright © 2005-2018 KWizCom corp. All rights reserved. www.kwizcom.com
10
SharePoint 2010/2013/2016
1. Log in as SharePoint administrator account to your SharePoint
front-end server.
2. Browse the product’s page on KWizCom’s website and click the “Go”
link under the “Install using our Web Installer” section.
This will start the KWizCom web installer
Note: The KWizCom Web Installer will automatically offer you to
upgrade other existing KWizCom products on your farm, in case you
have old versions installed. You can check which products you wish to
update at this time.
3. In case you prefer just to download the relevant .wsp packages and
manually deploy them, then in the web installer UI check the
“Download only” option (3rd page in the installer’s wizard). When
the installer finishes you will be able to go to the installer’s folder
on your server, and install the KWizCom packages by simply
running the “SP-WSPInstaller” powershell script.

Copyright © 2005-2018 KWizCom corp. All rights reserved. www.kwizcom.com
11
Post Installation SharePoint 20007
1. After completing the installation, you will see a new KWizCom entry in
Windows Start -> All Programs -> KWizCom containing the following programs:
About SharePoint List Filter Plus Web Part Displays general information about the component.
Activate SharePoint List Filter Plus Web Part
This utility enables you (the SharePoint Administrator) to activate the downloaded evaluation version.
SharePoint List Filter Plus Web Part Resource Editor This utility enables you to translate the web parts user interface to suit the language of your site.
2. When you browse your SharePoint Portal / Windows SharePoint
services site, a new List Filter Plus Web Part will be available for you under "virtual Server Gallery".
SharePoint 2010/2013/2016
After completing the package installation and deployment, Activate the
feature in site collection/s where you want this feature to be available:

Copyright © 2005-2018 KWizCom corp. All rights reserved. www.kwizcom.com
12
Un-installation procedure
SharePoint 2007
1. Log in using SharePoint administrator account to your SharePoint
front-end server.
2. Go to Control Panel and double-click Add or Remove Programs.
3. Select product entry and click Remove button.
4. Click Yes to approve the removal of the component.
5. Once the product was un-installed, close the Add or Remove Programs
screen.
SharePoint 2010/2013/2016
1. Retract and remove the solution using SharePoint central admin or by
using stsadm/powershell command line.

Copyright © 2005-2018 KWizCom corp. All rights reserved. www.kwizcom.com
13
Component Localization
Every KWizCom component comes with a localization utility called "Resource File Editor" that enables translation of the component user interface to any required language.
The following section describes this utility and the translation process.
Translating a KWizCom component
SharePoint 2007
1. On your Windows task bar, select:
Start->All Programs->KWizCom->SharePoint List Filter Plus web
part-> SharePoint List Filter Plus Resource Editor
2. Select your target language on the "Select Culture" drop-down list.
3. Translate all the displayed strings in the strings grid by entering a
translated value in the "Localized Value" column.
4. Click the "Create"/"Update" button in order to create/save a resource file for the selected target language.
5. If you want to create additional resource files for more target languages, simply repeat stages 2-4 for each language.
6. Close the utility by clicking the "Close" button.
SharePoint 2010/2013/2016
1. Go to: C:\Program Files\Common Files\Microsoft Shared\Web Server
Extensions\[14/15]\Resources.
2. Copy the product’s resource file:
KWizCom.SharePoint.WebParts.ComboListFilter.resx to a new resource
file, and add to its name the requested language’s suffix.
Example: to create a French resource file, copy the file to the following
file name:
KWizCom.SharePoint.WebParts.ComboListFilter.fr-FR.resx
3. Update the copied resource file and replace the English strings with the
translated strings. The translatable strings are located inside the <data

Copyright © 2005-2018 KWizCom corp. All rights reserved. www.kwizcom.com
14
name> nodes, in their <value> attributes.
Example:
<data name="btnAccept" xml:space="preserve">
<value>Accept Changes</value>
</data>
4. Save the new resource file.
Use the component in your preferred language
All KWizCom components use .NET localization mechanism. This means that a KWizCom component will automatically use a language resource file
according to the displayed application's language (this is true for all types of components).

Copyright © 2005-2018 KWizCom corp. All rights reserved. www.kwizcom.com
15
Component Activation
KWizCom components are available for evaluation prior to purchase. This
way you can try our components and verify that they indeed meet your
needs. An evaluation version for each KWizCom component contains all
features of the component's production version. The only difference is that
an evaluation version is time-limited, and will operate for a period of one
month.
Once you decide to order a KWizCom component, you will need to follow
the following steps:
SharePoint 2007
1. Order the component on the KWizCom website –
www.KWizCom.com.
2. Send us the installed evaluation version's product Code (you will
see the product Code on the "About" product page:
Please use the Activation Request web form, on KWizCom web site

Copyright © 2005-2018 KWizCom corp. All rights reserved. www.kwizcom.com
16
to send us your product code.
3. Get the component activation key – this key will be sent to you by
email once your order is processed.
4. Activate your installed evaluation version -
click Start -> All Programs -> KWizCom -> SharePoint List Filter
Plus Web Part-> Activate SharePoint List Filter Plus Web
Part
SharePoint 2010/2013/2016
1. Order the product on the KWizCom website – www.KWizCom.com,
or contact our sales team at [email protected].
2. After the order was made, you can activate your installed
evaluation version. Activation is done by the following steps:
a. Open SharePoint Central Admin. On the main “Central
Administration” page, you will see the “KWizCom Features
Administration” icon:

Copyright © 2005-2018 KWizCom corp. All rights reserved. www.kwizcom.com
17
b. Click the KWizCom Features Administration icon. You will be
redirected to a page that allows you to manage all your
installed KWizCom products’ licenses:
c. Click the “Manage License” link next to the product that you
wish to activate. You will be redirected to that product’s
license management page:
d. Click on the “Request product code and start your evaluation
now” link, under the required license type (Farm, Web
application, Site Collection).
A product code will be generated and displayed as in the
following screenshot:

Copyright © 2005-2018 KWizCom corp. All rights reserved. www.kwizcom.com
18
e. Copy the product code.
f. Browse the Product Activation Request page on KWizCom’s
web site: http://www.kwizcom.com/ProductReg.
Copy your Product Code into the “Product Code” field, and
after you fill-out all other form fields, click “Send Activation
Request button.
g. Once your order is confirmed, you will receive the Activation
Code for your product by email.

Copyright © 2005-2018 KWizCom corp. All rights reserved. www.kwizcom.com
19
h. Copy the activation code into the “Activation Code” field in
the product’s license management page and click “Activate
now!” link.
That’s it! Your product is now fully activated.

Copyright © 2005-2018 KWizCom corp. All rights reserved. www.kwizcom.com
20
Administrator Guide
Introduction
The SharePoint List Filter Plus web part supports the SharePoint web part connection framework, and provides you with 2 connection types:
1. Provide Filter To – In this mode the List Filter Plus web part provides to the connected
web part with filter parameters that are used to filter the displayed items on the other web part.
2. Send DataTable To – in this mode the web part performs some
defined query in a defined scope (you define the query and the scope in the web part’s tool pane), and provides the result of that query in
a data table to any consumer who supports that connection. This turns the List Filter Plus web part into a generic query engine that you can connect to your own custom web parts!
When you browse your SharePoint Portal / Windows SharePoint services
site, a new List Filter Plus will appear under "Virtual Server Gallery":
The following section reviews List Filter Plus Web Part's properties and configuration options.

Copyright © 2005-2018 KWizCom corp. All rights reserved. www.kwizcom.com
21
Web Part Properties & Configuration Options
Using the web part as a list filter
Before starting to configure the SharePoint List Filter Plus web part, you
need to connect it to the standard SharePoint List web part which you want to filter:
1. Click "Modify Shared Web Part" to modify SharePoint List Filter Plus web part properties:
2. When you are in Edit Mode, Go to the "edit" menu -> Connections -> Provide Filter To, and choose the list you wish to filter using the List Filter Plus:
After connecting the web part to the required list web part, you can
start configuring the web part's properties, which are grouped in 4 sections:
1. Filter
2. Advanced Filter Options
3. Advanced Display options
4. Errors
Each section is detailed below.
Copyright © 2005-2018 KWizCom corp. All rights reserved. www.kwizcom.com
22
Filter
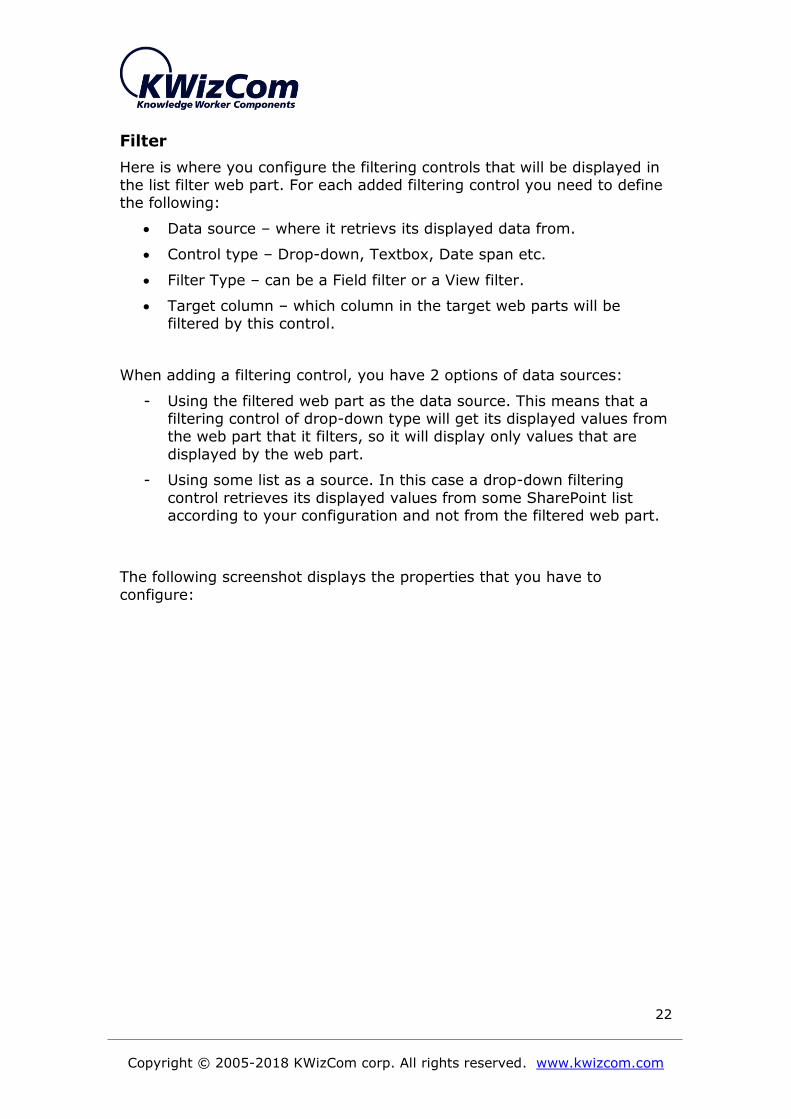
Here is where you configure the filtering controls that will be displayed in the list filter web part. For each added filtering control you need to define the following:
• Data source – where it retrievs its displayed data from.
• Control type – Drop-down, Textbox, Date span etc.
• Filter Type – can be a Field filter or a View filter.
• Target column – which column in the target web parts will be filtered by this control.
When adding a filtering control, you have 2 options of data sources:
- Using the filtered web part as the data source. This means that a filtering control of drop-down type will get its displayed values from the web part that it filters, so it will display only values that are
displayed by the web part.
- Using some list as a source. In this case a drop-down filtering
control retrieves its displayed values from some SharePoint list according to your configuration and not from the filtered web part.
The following screenshot displays the properties that you have to
configure:

Copyright © 2005-2018 KWizCom corp. All rights reserved. www.kwizcom.com
23
1. Use the list displayed in the connected web part as your source list – when checking this option, you'll be able to make one
of the connected list web parts become the data source for the drop-down controls in this filter web part.
Use this option if you want your drop-down filtering control to show only values that exist in the filtered web part.
If you are not checking this checkbox, you need to connect the

Copyright © 2005-2018 KWizCom corp. All rights reserved. www.kwizcom.com
24
added control to a source list from which it will retrieve its values (properties 3-5)
2. Select connected web part – choose the web part that you wish to be the data source for a drop-down control in your filter
(relevant only when the “Use the list displayed in the connected web part as your source list” checkbox is checked).
3. Source Site URL – choose the site you wish to connect to
4. Source list - choose the list or library you want to connect
5. Select a view – select the list view to apply to the connected
SharePoint list.
6. Filter Type – Select between Field filter and View filter. A Field
filter will filter a defined field at the target web part. A View filter will display a drop-down of views and will filter the target web part by the selected view.
The following properties appear only for a Field filter type:
7. Source Field – select the field that the control (in case it’s a drop-down) will retrieve its values from.
8. Target Field – this specifies which field in the target web part will
be filtered by this control.
9. Sort Order – this allows you to choose the display order of the non
choice fields, between ascending and descending.
10.Control Type:
- Drop down list control
- Textbox control
- User Picker control
- Date span control (from… to…)
The following 2 properties appear only for a View filter type:
11.Default View – select the view that will be displayed by default by the filtering control.
12.Hide views – Type the names of views that you wish to be hidden from the filtering control (“;” delimited)
13.Display only values showing in the filtered list – This checkbox
is relevant only when the “Use the list displayed in the connected web part as the source list" property is checked. In that case you can choose between showing in the filtering control

Copyright © 2005-2018 KWizCom corp. All rights reserved. www.kwizcom.com
25
only values that appear in the filtered web part, or show all values from connected web part’s source list, regardless of what actually
appears in the web part.
14.Operator applied when user selects multiple options -
This property is relevant only for multi-select drop-down control. It enables you to define how multiple selected choices will be
processed in the filter: as OR (default) or as AND operator.
15.Allow end-users to change AND/OR operation between multiple selected options -
This property is relevant only for multi-select drop-down control. When checked, end-user will be able to switch between OR/AND
operator on selected choices in a multi-select drop-down:
16.Control caption – create the caption of your choice to be displayed
next to the filtering drop-down box / textbox.
After you define a source field and target field pair, click the “Add” button in order to add this definition to the “Filtering Controls” list:

Copyright © 2005-2018 KWizCom corp. All rights reserved. www.kwizcom.com
26
Advanced Filter Options
Use this section to setup advanced Web Part options:

Copyright © 2005-2018 KWizCom corp. All rights reserved. www.kwizcom.com
27
• Always remember previous filter – checking this checkbox will make user's filter selection 'persistent' - the web part will
"remember' the filter settings even if the user closes the browser.
• Search for exact phrase in textboxes –If this property is left
unchecked, textboxes filtering will always be a “CONTAINS” filter (default). Check this property if you want to have exact text search
instead. In this mode users can use “*” wildcard for explicit CONTAINS search.
• Search for exact phrase in drop-down boxes –If this property
is left unchecked, drop-down filtering will always be a “CONTAINS” filter. Check this property if you want to have exact text search
instead.
• Control Width – Define the width of the web part.
• Empty Row Caption – Define the caption for the empty row option
that will be displayed in the drop-down box.
• When no filtering value is selected, show all filtered list
items- display all of the list items when the filter is empty
• Override original view's filter – checking this checkbox will make the selected user's filter override view settings of the filtered
list.
• Controls in row – Define the number of drop-down filter controls
to be displayed in a single row.
• Display “apply filter” and “clear filter” buttons for the entire filter – the “apply filter” and “clear filter” buttons will be available.
• "Apply Filter" button caption - Define the caption for the “Apply Filter” that will be displayed in the drop-down box.
• "Clear Filter" button caption - Define the caption for the “Clear Filter” option that will be displayed in the drop-down box.
• Show “Clear Selection” button for each drop – down control
– add an X next to each drop down to enables users to clear the
filter value
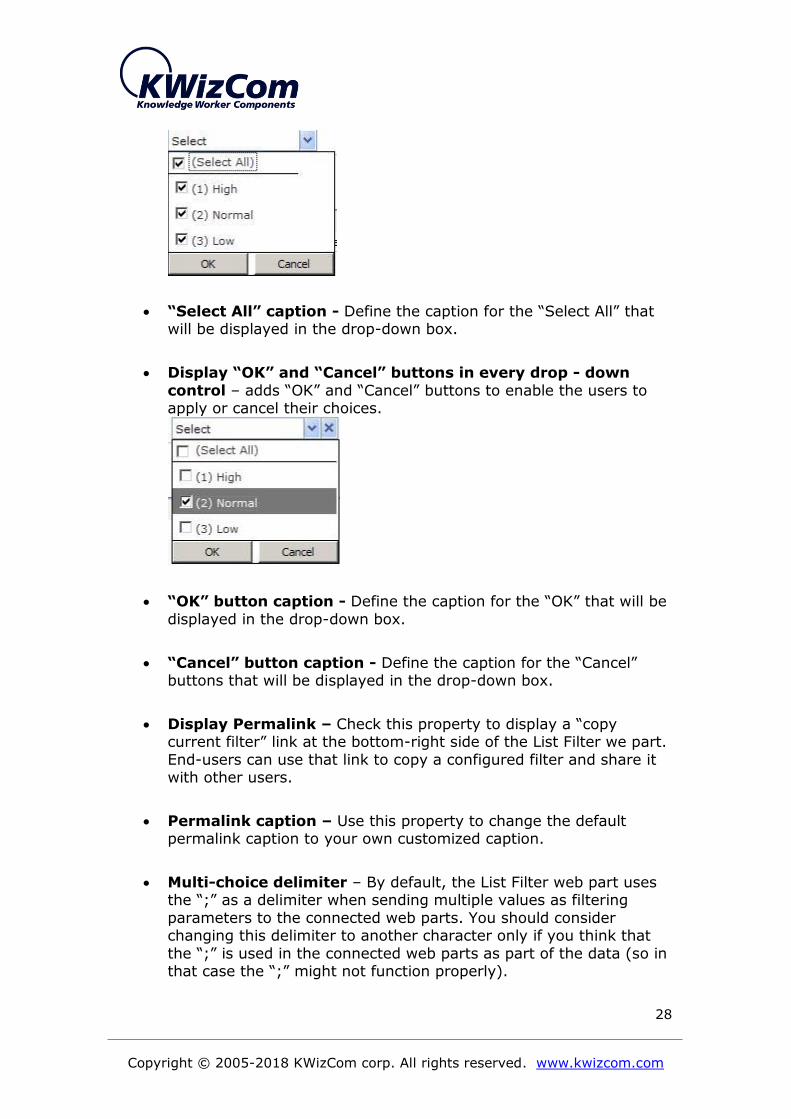
• Display a “Select All” option in every drop – down control – adds a “Select All” option that enables you to choose all checkboxes
at once
Copyright © 2005-2018 KWizCom corp. All rights reserved. www.kwizcom.com
28
• “Select All” caption - Define the caption for the “Select All” that will be displayed in the drop-down box.
• Display “OK” and “Cancel” buttons in every drop - down
control – adds “OK” and “Cancel” buttons to enable the users to apply or cancel their choices.
• “OK” button caption - Define the caption for the “OK” that will be
displayed in the drop-down box.
• “Cancel” button caption - Define the caption for the “Cancel” buttons that will be displayed in the drop-down box.
• Display Permalink – Check this property to display a “copy current filter” link at the bottom-right side of the List Filter we part.
End-users can use that link to copy a configured filter and share it with other users.
• Permalink caption – Use this property to change the default permalink caption to your own customized caption.
• Multi-choice delimiter – By default, the List Filter web part uses the “;” as a delimiter when sending multiple values as filtering
parameters to the connected web parts. You should consider changing this delimiter to another character only if you think that
the “;” is used in the connected web parts as part of the data (so in that case the “;” might not function properly).
Copyright © 2005-2018 KWizCom corp. All rights reserved. www.kwizcom.com
29
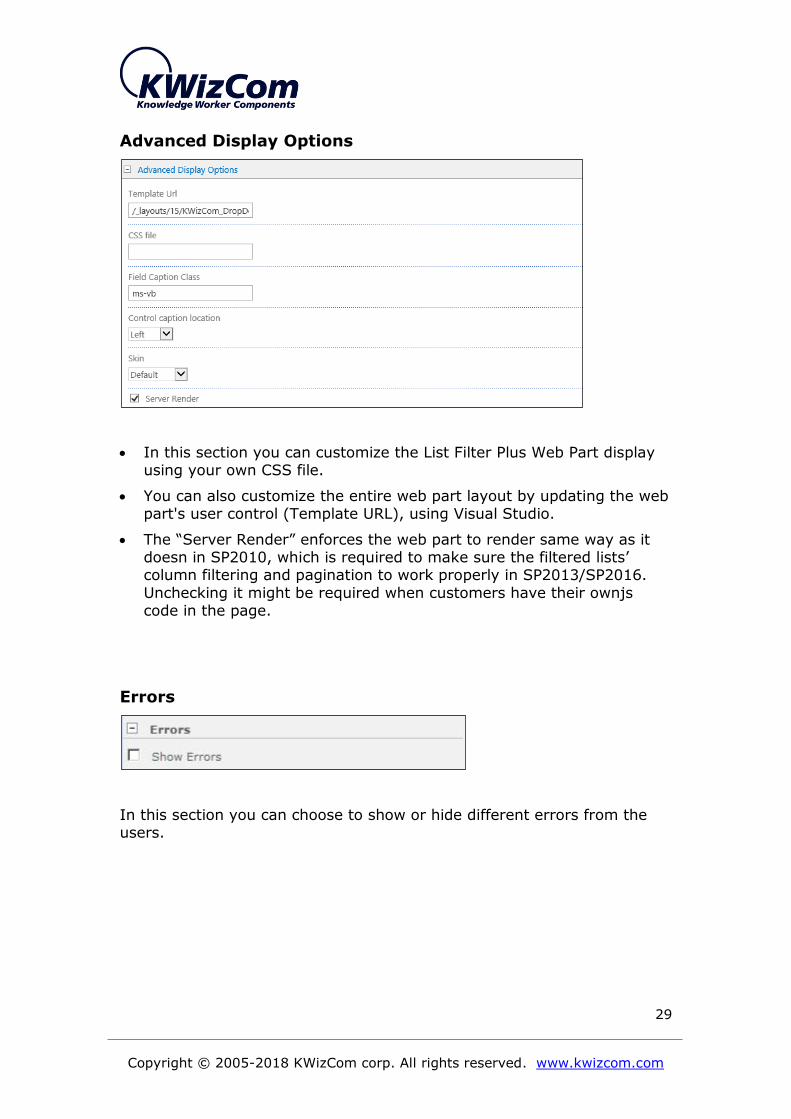
Advanced Display Options
• In this section you can customize the List Filter Plus Web Part display using your own CSS file.
• You can also customize the entire web part layout by updating the web part's user control (Template URL), using Visual Studio.
• The “Server Render” enforces the web part to render same way as it doesn in SP2010, which is required to make sure the filtered lists’ column filtering and pagination to work properly in SP2013/SP2016.
Unchecking it might be required when customers have their ownjs code in the page.
Errors
In this section you can choose to show or hide different errors from the users.

Copyright © 2005-2018 KWizCom corp. All rights reserved. www.kwizcom.com
30
Permalink functionality
In run-time, end-users use the List Filter web part to define required filtering values in order to get the required list items.
The List Filter web part enables end-users to share their configured filters with other users. This is done by clicking the “Copy current filter” link:
Once you click this link, you’ll get a popup window with the generated permalink URL. Copy this URL, and then you can send it to other users.
Using this URL will show other users the same filter configuration you’ve made.

Copyright © 2005-2018 KWizCom corp. All rights reserved. www.kwizcom.com
31
Using the web part as a generic query engine
In this mode the web part runs a pre-configured query and provides the result to another web part using a DataTable provider connection. In order
to connect the web part to some other consumer web part:
1. Click "Modify Shared Web Part" to modify SharePoint List Filter Plus web part properties:
2. When you are in Edit Mode, Go to the "edit" menu -> Connections -> Send DataTable To, and choose the web part
that supports this connection to get the query results and display them:
After connecting the web part to the required list web part, you can start configuring the web part's “Table Viewer” tool part properties:
Once you click the “Modify web part settings” button, you will see the following settings popup page:

Copyright © 2005-2018 KWizCom corp. All rights reserved. www.kwizcom.com
32
Use this settings page to define the query and scope:
• Query Root Site URL- insert here the SharePoint site address
where the aggregation list is located. After typing the address click on "Load..."
• Query Scope- choose the scope from which to want to choose the
list template
• List Type- choose the list type to provide the data for the Table
Viewer
Copyright © 2005-2018 KWizCom corp. All rights reserved. www.kwizcom.com
33
• Field Internal Name- insert the internal name of the field which data will be displayed in the Table Viewer (You can check the
internal name by clicking on the field name in a list and checking how it appears in the URL)
• Field Caption- insert the name of the field as it should appear in the Table Viewer
• Field Format- choose the format of the field between text, Date/Time and Boolean
• Display Field Settings- after filling the last 3 field settings make
sure you click "Add" (Check that your field appears correctly in the field list, in case you want to delete or modify it you can click "Edit"
or "Delete")
• Open Documents In Library- check this checkbox if your provider is to a library (in which case by default clicking on the
name of the document would bring you to the view item form), to open the document itself
• Open Item Field URL- for list items, if you wish to open another URL instead of the default, based on item properties, insert the field name (you may insert several fields and separate them with "/")
Copyright © 2005-2018 KWizCom corp. All rights reserved. www.kwizcom.com
34
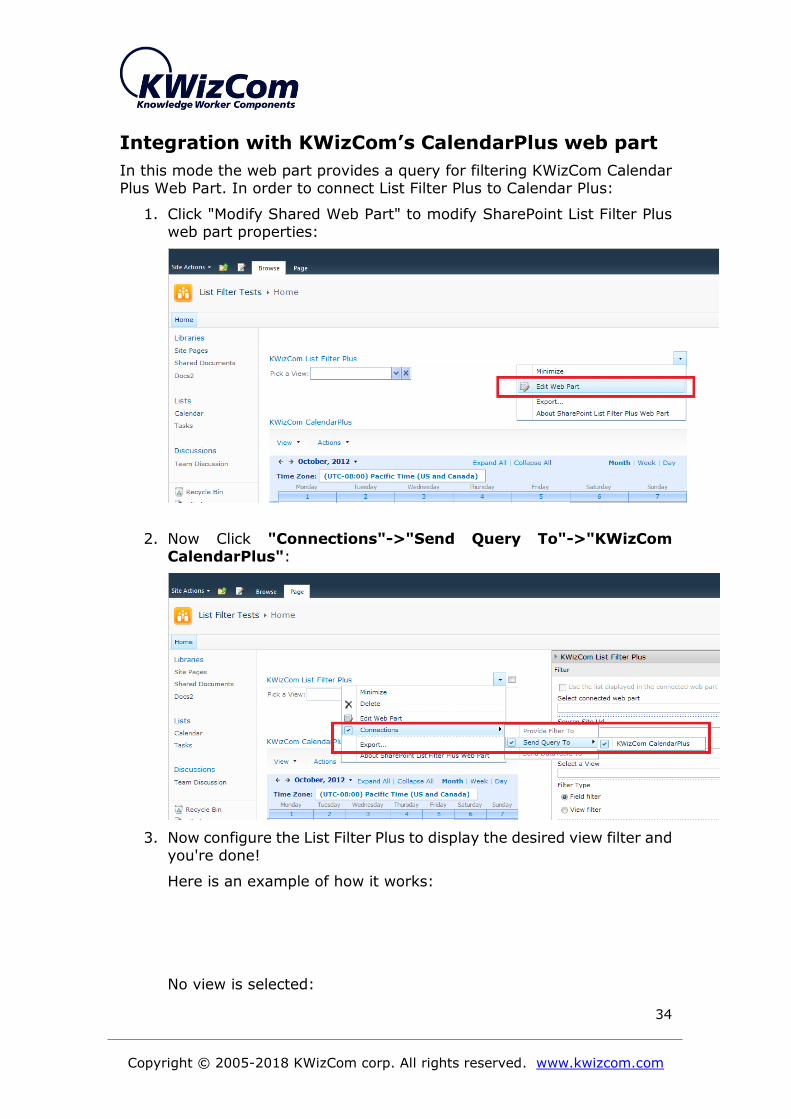
Integration with KWizCom’s CalendarPlus web part
In this mode the web part provides a query for filtering KWizCom Calendar Plus Web Part. In order to connect List Filter Plus to Calendar Plus:
1. Click "Modify Shared Web Part" to modify SharePoint List Filter Plus web part properties:
2. Now Click "Connections"->"Send Query To"->"KWizCom CalendarPlus":
3. Now configure the List Filter Plus to display the desired view filter and you're done!
Here is an example of how it works:
No view is selected:

Copyright © 2005-2018 KWizCom corp. All rights reserved. www.kwizcom.com
35
Selecting Meetings View will hide 'Thanksgiving':

Copyright © 2005-2018 KWizCom corp. All rights reserved. www.kwizcom.com
36
FAQ
I added the web part to my site but I can't
modify the web part's properties. What is
wrong?
Before starting to configure the SharePoint List Filter Plus web part, you need to connect it to the standard SharePoint List that you want to filter.
After connecting the web part to your desired list, you can start configuring the web part's properties. Please view the "Administrator Guide" to learn
how to connect a standard SharePoint list to the List Filter Plus.
I configured everything I need and clicked
"OK" but nothing happened. How do I fix this?
After configuring the desired filtering options in the Data Source section,
click the "Add" button – this will integrate your settings into the SharePoint List Filter Plus web part. You can see that your configurations have been stored by verifying that they are listed in the "Bound Fields" table.
Do I have to install anything on my company's
client-PCs?
No. The KWizCom SharePoint List Filter Plus is a server installation. Once installed on the server, it can be used from any client-PC connected to it.
Do I have to install anything besides List Filter
Plus to use the DataTable connection?
Yes. Install the KWizCom SharePoint List Aggregator and receive for free
the Data Table Web Part that stays available for you after the 30-day trial.