installation & user guide vodafone mobile … & user guide vodafone mobile broadband usb...
TRANSCRIPT
Installation & User GuideVodafone Mobile BroadbandUSB Stick
Designed for Vodafone
1
2
3
4
5
6
8
9
9
10
18
21
Welcome
Set up your USB Stick
Start the software
Software overview
Connect
SMS text messaging
SMS contacts
USB Stick LED light
Signal strength
For Apple® Mac® user
Hints and tips
Glossary
1
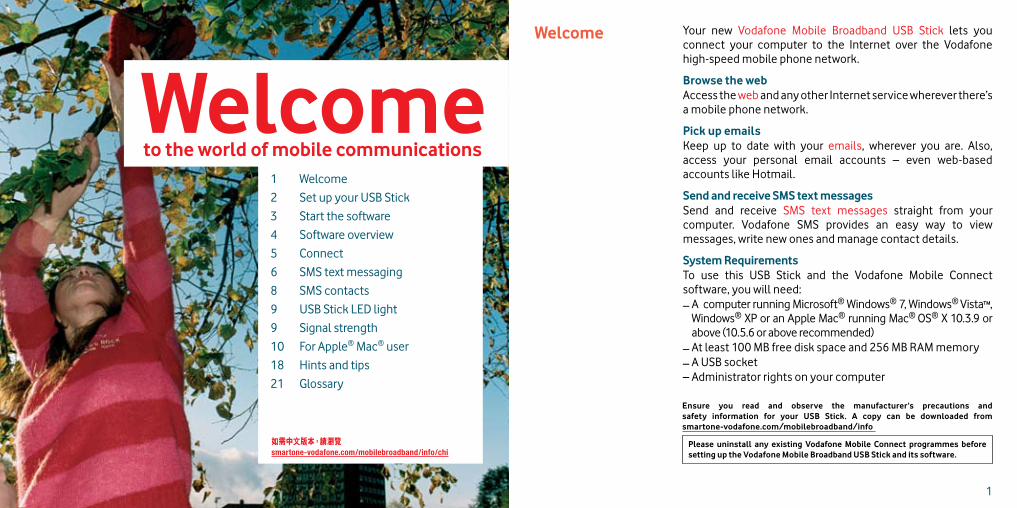
Your new Vodafone Mobile Broadband USB Stick lets you connect your computer to the Internet over the Vodafone high-speed mobile phone network.
Browse the webAccess the web and any other Internet service wherever there’s a mobile phone network.
Pick up emailsKeep up to date with your emails, wherever you are. Also, access your personal email accounts – even web-based accounts like Hotmail.
Send and receive SMS text messagesSend and receive SMS text messages straight from your computer. Vodafone SMS provides an easy way to view messages, write new ones and manage contact details.
System RequirementsTo use this USB Stick and the Vodafone Mobile Connect software, you will need:– A computer running Microsoft® Windows® 7, Windows® Vista™,
Windows® XP or an Apple Mac® running Mac® OS® X 10.3.9 or above (10.5.6 or above recommended)
– At least 100 MB free disk space and 256 MB RAM memory– A USB socket– Administrator rights on your computer
Welcome
Ensure you read and observe the manufacturer’s precautions and safety information for your USB Stick. A copy can be downloaded from smartone-vodafone.com/mobilebroadband/info
Please uninstall any existing Vodafone Mobile Connect programmes before setting up the Vodafone Mobile Broadband USB Stick and its software.
2 3
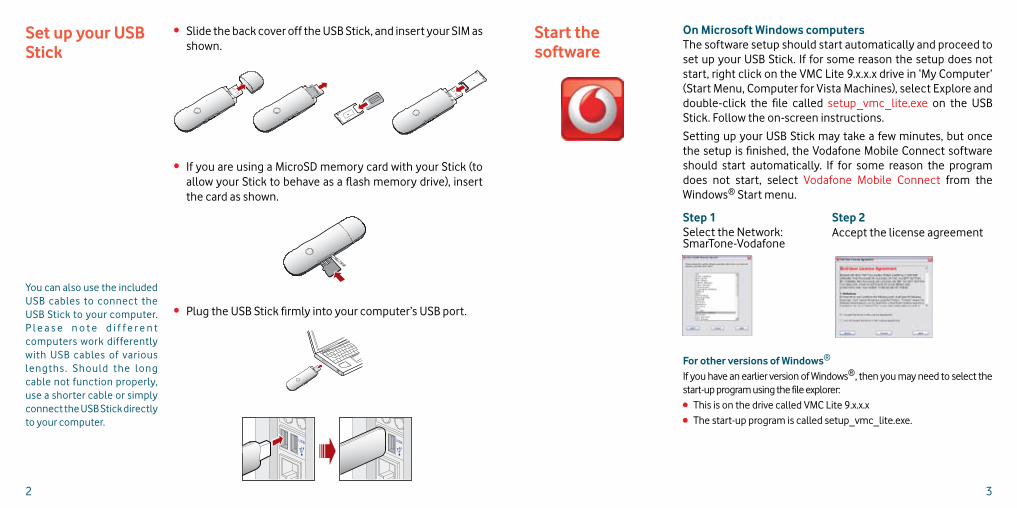
For other versions of Windows®
If you have an earlier version of Windows®, then you may need to select the start-up program using the file explorer: This is on the drive called VMC Lite 9.x.x.x The start-up program is called setup_vmc_lite.exe.
On Microsoft Windows computersThe software setup should start automatically and proceed to set up your USB Stick. If for some reason the setup does not start, right click on the VMC Lite 9.x.x.x drive in ‘My Computer’ (Start Menu, Computer for Vista Machines), select Explore and double-click the file called setup_vmc_lite.exe on the USB Stick. Follow the on-screen instructions.
Setting up your USB Stick may take a few minutes, but once the setup is finished, the Vodafone Mobile Connect software should start automatically. If for some reason the program does not start, select Vodafone Mobile Connect from the Windows® Start menu.
Start the software
Set up your USB Stick
Step 2 Accept the license agreement
Step 1 Select the Network: SmarTone-Vodafone
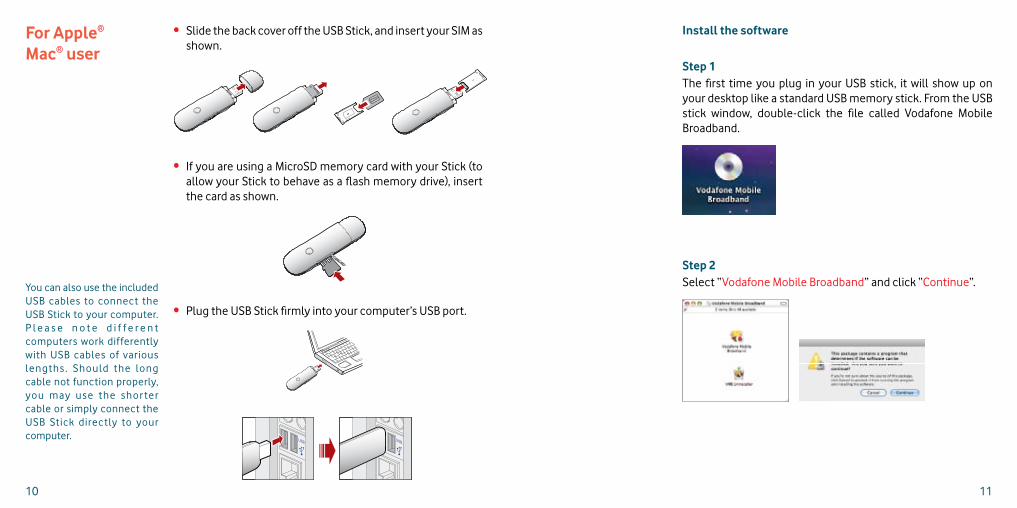
You can also use the included USB cables to connect the USB Stick to your computer. P l e a s e n o t e d i f f e r e n t computers work differently with USB cables of various lengths . Should the long cable not function properly, use a shorter cable or simply connect the USB Stick directly to your computer.
rd
• Slide the back cover off the USB Stick, and insert your SIM as shown.
• If you are using a MicroSD memory card with your Stick (to allow your Stick to behave as a flash memory drive), insert the card as shown.
• Plug the USB Stick firmly into your computer’s USB port.
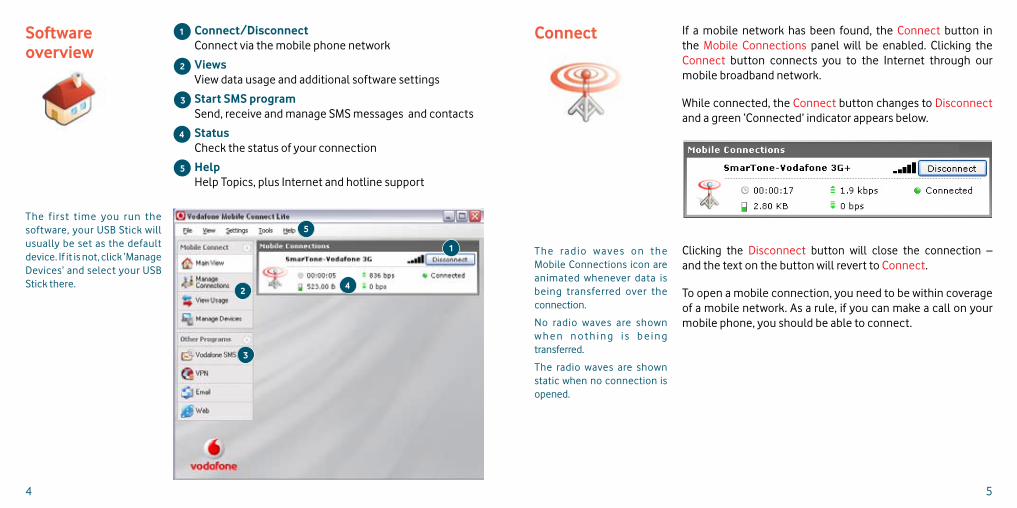
Connect/Disconnect Connect via the mobile phone network
Views View data usage and additional software settings
Start SMS program Send, receive and manage SMS messages and contacts
Status Check the status of your connection
Help Help Topics, plus Internet and hotline support
54
Software overview
5
1
42
3
2
1
5
3
4
The f irst t ime you run the software, your USB Stick will usually be set as the default device. If it is not, click ‘Manage Devices’ and select your USB Stick there.
T h e ra d i o w a ve s o n t h e Mobile Connections icon are animated whenever data is being transferred over the connection.
No radio waves are shown w h e n n o t h i n g i s b e i n g transferred.
The radio waves are shown static when no connection is opened.
If a mobile network has been found, the Connect button in the Mobile Connections panel will be enabled. Clicking the Connect button connects you to the Internet through our mobile broadband network.
While connected, the Connect button changes to Disconnect and a green ‘Connected’ indicator appears below.
Clicking the Disconnect button will close the connection – and the text on the button will revert to Connect.
To open a mobile connection, you need to be within coverage of a mobile network. As a rule, if you can make a call on your mobile phone, you should be able to connect.
Connect
6 7
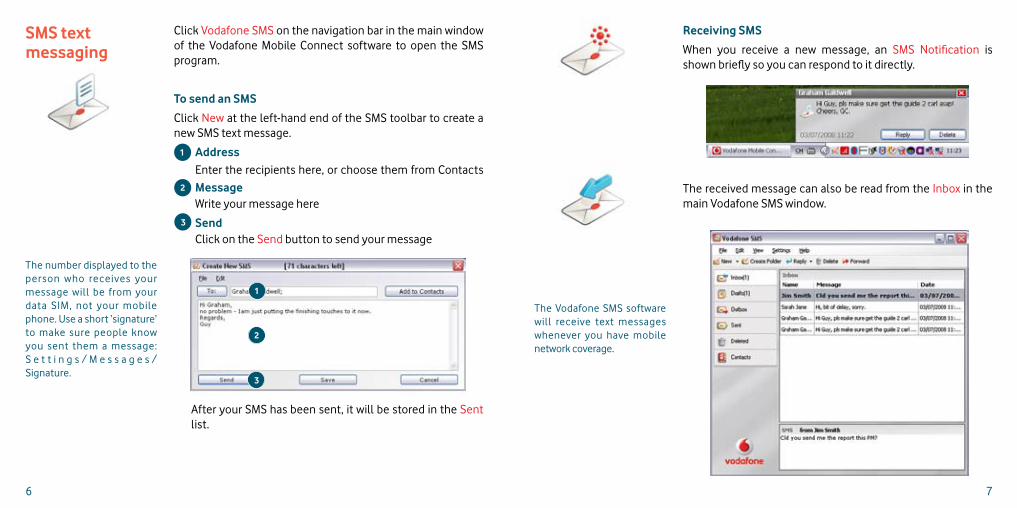
Receiving SMS
When you receive a new message, an SMS Notification is shown briefly so you can respond to it directly.
The received message can also be read from the Inbox in the main Vodafone SMS window.
The Vodafone SMS software will receive text messages whenever you have mobile network coverage.
Click Vodafone SMS on the navigation bar in the main window of the Vodafone Mobile Connect software to open the SMS program.
To send an SMS
Click New at the left-hand end of the SMS toolbar to create a new SMS text message.
AddressEnter the recipients here, or choose them from ContactsMessageWrite your message here
SendClick on the Send button to send your message
SMS text messaging
2
1
3
The number displayed to the person who receives your message will be from your data SIM, not your mobile phone. Use a short ‘signature’ to make sure people know you sent them a message: S e t t i n g s / M e s s a g e s /Signature.
2
1
3
After your SMS has been sent, it will be stored in the Sent list.
8 9
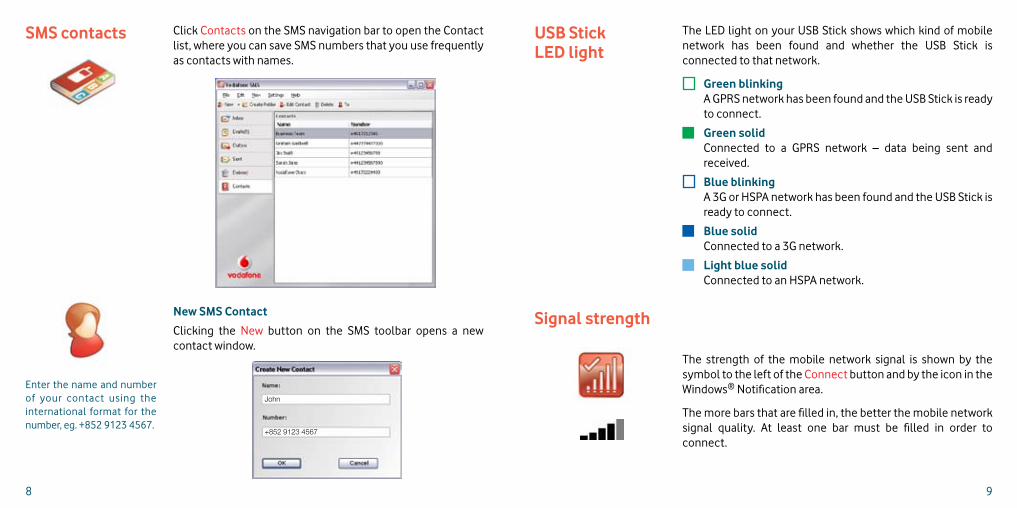
SMS contacts Click Contacts on the SMS navigation bar to open the Contact list, where you can save SMS numbers that you use frequently as contacts with names.
New SMS Contact
Clicking the New button on the SMS toolbar opens a new contact window.
Enter the name and number of your contact using the international format for the number, eg. +852 9123 4567.
+852 9123 4567
John
USB Stick LED light
Signal strength
Green blinkingA GPRS network has been found and the USB Stick is ready to connect.
Green solidConnected to a GPRS network – data being sent and received.
Blue blinkingA 3G or HSPA network has been found and the USB Stick is ready to connect.
Blue solidConnected to a 3G network.
Light blue solidConnected to an HSPA network.
The LED light on your USB Stick shows which kind of mobile network has been found and whether the USB Stick is connected to that network.
The strength of the mobile network signal is shown by the symbol to the left of the Connect button and by the icon in the Windows® Notification area.
The more bars that are filled in, the better the mobile network signal quality. At least one bar must be filled in order to connect.
10 11
You can also use the included USB cables to connect the USB Stick to your computer. P l e a s e n o t e d i f f e r e n t computers work differently with USB cables of various lengths . Should the long cable not function properly, you may use the shor ter cable or simply connect the USB Stick directly to your computer.
For Apple® Mac® user
Install the software
Step 1The first time you plug in your USB stick, it will show up on your desktop like a standard USB memory stick. From the USB stick window, double-click the file called Vodafone Mobile Broadband.
Step 2Select “Vodafone Mobile Broadband” and click “Continue”.
• Slide the back cover off the USB Stick, and insert your SIM as shown.
• If you are using a MicroSD memory card with your Stick (to allow your Stick to behave as a flash memory drive), insert the card as shown.
• Plug the USB Stick firmly into your computer’s USB port.
12 13
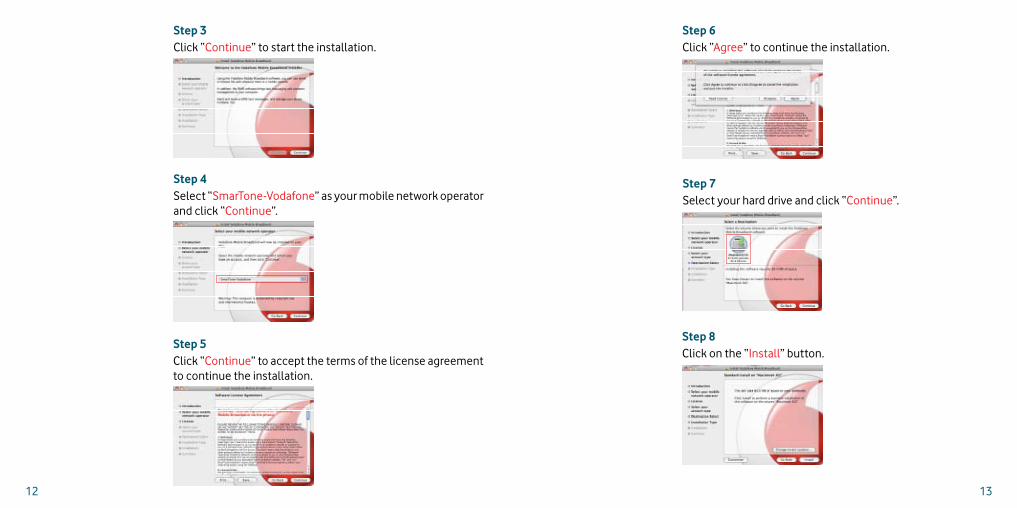
Step 3Click “Continue” to start the installation.
Step 4Select “SmarTone-Vodafone” as your mobile network operator and click “Continue”.
Step 5Click “Continue” to accept the terms of the license agreement to continue the installation.
Step 6Click “Agree” to continue the installation.
Step 8Click on the “Install” button.
Step 7Select your hard drive and click “Continue”.
14 15
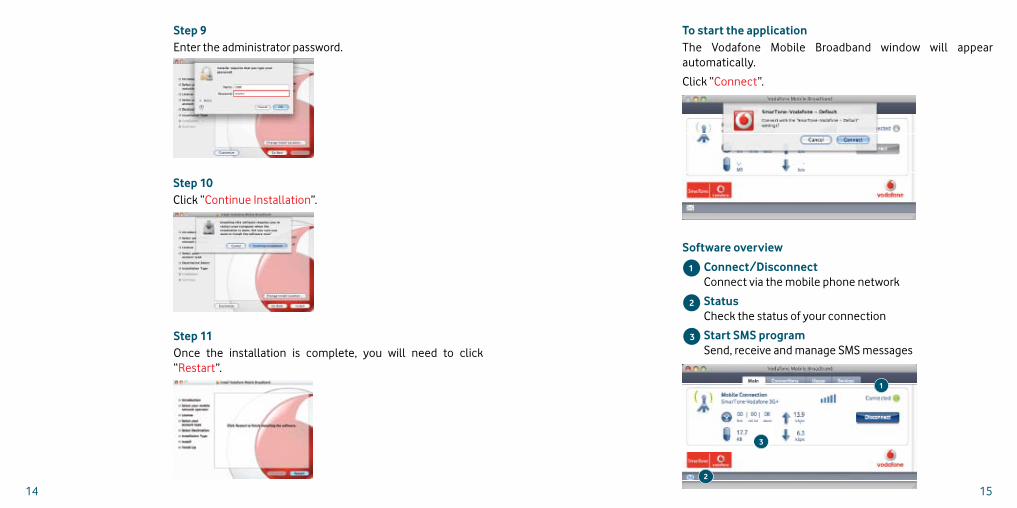
Step 9Enter the administrator password.
Step 10Click “Continue Installation”.
Step 11Once the installation is complete, you will need to click “Restart”.
To start the application
Software overview
The Vodafone Mobile Broadband window will appear automatically.
Click “Connect”.
Connect/Disconnect Connect via the mobile phone network
Status Check the status of your connection
Start SMS program Send, receive and manage SMS messages
2
1
3
1
2
3
16 17
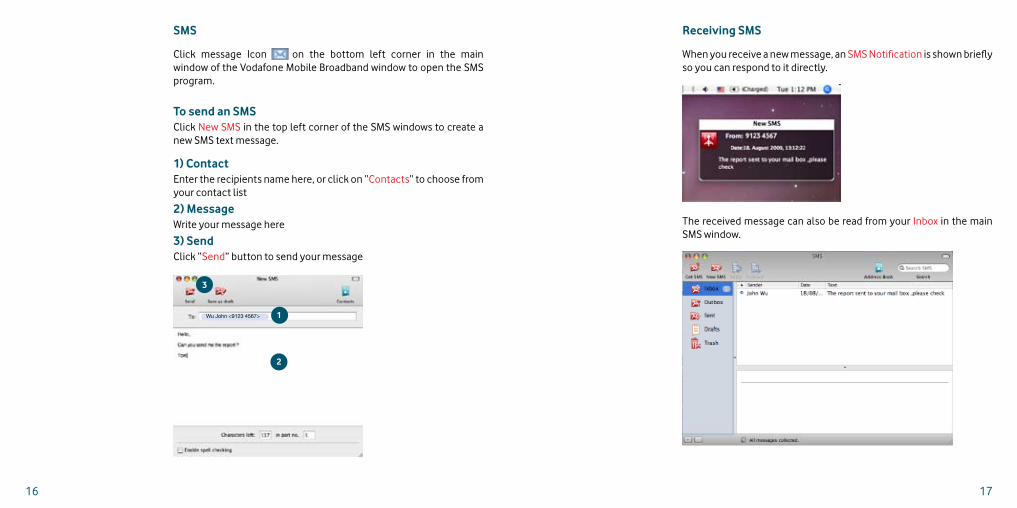
SMS
To send an SMSClick New SMS in the top left corner of the SMS windows to create a new SMS text message.
Click message Icon on the bottom left corner in the main window of the Vodafone Mobile Broadband window to open the SMS program.
1) ContactEnter the recipients name here, or click on “Contacts” to choose from your contact list
2) MessageWrite your message here
3) SendClick “Send” button to send your message
2
1
3
Receiving SMS
When you receive a new message, an SMS Notification is shown briefly so you can respond to it directly.
The received message can also be read from your Inbox in the main SMS window.
Wu John <9123 4567>
18 19
Hints and tips If you don’t see your USB Stick in the list of devices
– Remove the USB Stick
– Restart your computer
– Re-insert the USB Stick.
If no network can be found
– Change your physical location: in a building, move closer to a window, move higher up, or go outside
– Windows®: Select ‘View/View Available Mobile Connections’ and see if you can connect to a particular network in the list shown
– Contact Support and check that data services and roaming are enabled on your account.
If no connection can be opened
– Wait a few minutes and try to connect again. This is most often a temporary problem, especially if an ‘Error 631’ or ‘Error 619’ is referenced
– Select ‘File/Exit’ to exit the Vodafone Mobile Connect software completely and then restart it again
– Restart your computer
– Windows®: Click ‘Manage Connections’ and select a different Network Preference in the drop-down menu in the Mobile Connections panel, eg. ‘3G Only‘
– Mac®: Start the Vodafone Mobile Broadband software and select one of the other options in the lower part of the main window, eg. ‘3G Only’
– If you are using a VPN (Virtual Private Network), contact your company IT administrator.
For enquiries or support, please call our 24-hour hotline on +852 2880 2622 or send an email to [email protected].
– Uninstall any existing Vodafone Mobile Connect programmes first
– Go to Control Panel > Regional Language options > Advanced and select your preferred language, e.g. English (United Kingdom)
– Restart the computer and install the programme again.
If you have problems when roaming
– Windows®: Select ‘View/Available Mobile Connections’ and try opening one of the connections shown
– Contact Support and check roaming is enabled for your account
– Check the name of the current network in the Mobile Connections panel. If it is not Vodafone or a Partner, select a different network from ‘View/Available Mobile Connections’.
If the connection keeps switching between GPRS and 3G
– Windows®: Click ‘Manage Connections’ and select a different Network Preference in the drop-down menu in the Mobile Connections panel, eg. ‘3G Only’
– Mac®: Start Vodafone Mobile Broadband and select one of the other options in the lower part of the main window
– Switch back to your normal preference when you move locations.
Check software update preferences
– Set your operating system and other programs to notify you of software updates instead of downloading them automatically – otherwise they may slow down your mobile connection, or exceed your data usage limit.
Usage indication
– The usage window only displays an indication of your data usage. Please refer to your invoice for the actual amount of data transferred.
If you want to change the language of the Dashboard (Windows® only)
20 21
Glossary A device for a laptop or PC used to open a data connection over the mobile phone network.
Refers to the frequency bands supported by the USB Stick for GPRS and SMS (Short Message Service) in different world regions; UMTS has a single band worldwide. Most commonly, dual-band refers to the two bands used in most European networks (900 MHz/1800 MHz); tri-band adds support for networks in North America (1900 MHz); while quad-band adds further support for networks operating in the 850 MHz band (principally Latin America).
An enhancement to GPRS networks offering higher speeds, although not as fast as those provided by 3G/UMTS.
A high-speed mobile data standard. Used mostly in the USA, it is currently not part of the standard Vodafone Mobile Connect software.
Standard for transmitting data over mobile telecommunications (GSM) networks. It generally provides wide coverage and moderate data speeds. (General Packet Radio System).
A widely used standard for mobile telecommunications (Global System for Mobile communications). According to the GSM Association, GSM technology is supported by over 700 operators in 218 countries and territories.
Often referred to as the 3rd Generation of GSM technologies, UMTS (Universal Mobile Telecommunications System) provides higher data speeds.
High-Speed Packet Access. An evolution of 3G/UMTS to provide faster download and upload data speeds.
Connecting via networks other than your own operator’s network. This typically occurs when you are abroad, but is also possible in your own country.
The “Subscriber Identity Module” is the small, postage-stamp-sized chip that you will have received together with SmarTone-Vodafone Mobile Broadband pack. The SIM has gold contacts on one side.
USB Stick
Dual-band Tri-band
Quad-band
EDGE
EV-DO
GPRS
GSM
3G/UMTS
HSPA
Roaming
SIM
–
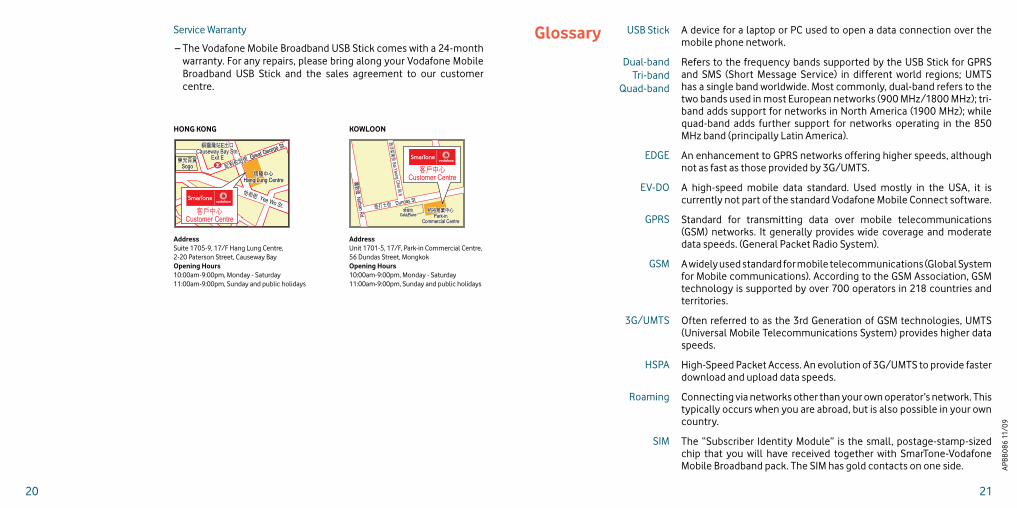
HONG KONG KOWLOON
銅鑼灣站E出口Causeway Bay Stn.
Exit E
銅鑼灣站E出口Causeway Bay Stn.
Exit E
恆隆中心Hang Lung Centre
記利佐治街 Great George St.
記利佐治街 Great George St.
恆隆中心Hang Lung Centre
怡和街 Yee Wo St.客戶中心
Customer Centre
崇光百貨Sogo
崇光百貨Sogo
家樂坊Gala Place
家樂坊Gala Place
彌敦
道 N
athan Rd.
登打士街 Dundas St
西洋
菜南
街 Sai Yeung C
hoi St S
客戶中心Customer Centre
柏裕商業中心Park-in
Commercial Centre
柏裕商業中心Park-in
Commercial Centre
AddressSuite 1705-9, 17/F Hang Lung Centre,2-20 Paterson Street, Causeway BayOpening Hours10:00am-9:00pm, Monday - Saturday11:00am-9:00pm, Sunday and public holidays
AddressUnit 1701-5, 17/F, Park-in Commercial Centre,56 Dundas Street, MongkokOpening Hours10:00am-9:00pm, Monday - Saturday11:00am-9:00pm, Sunday and public holidays
Service Warranty
The Vodafone Mobile Broadband USB Stick comes with a 24-month warranty. For any repairs, please bring along your Vodafone Mobile Broadband USB Stick and the sales agreement to our customer centre.
APB
B086
11/
09
© Vodafone 2009. Vodafone and the Vodafone logos are trademarks of the Vodafone Group. Any product or company names mentioned herein may be the trademarks of their respective owners.