installations instructions - lano.com · 9 4 7 10 5 8 11 6 9. instructions de pose nous vous...
TRANSCRIPT
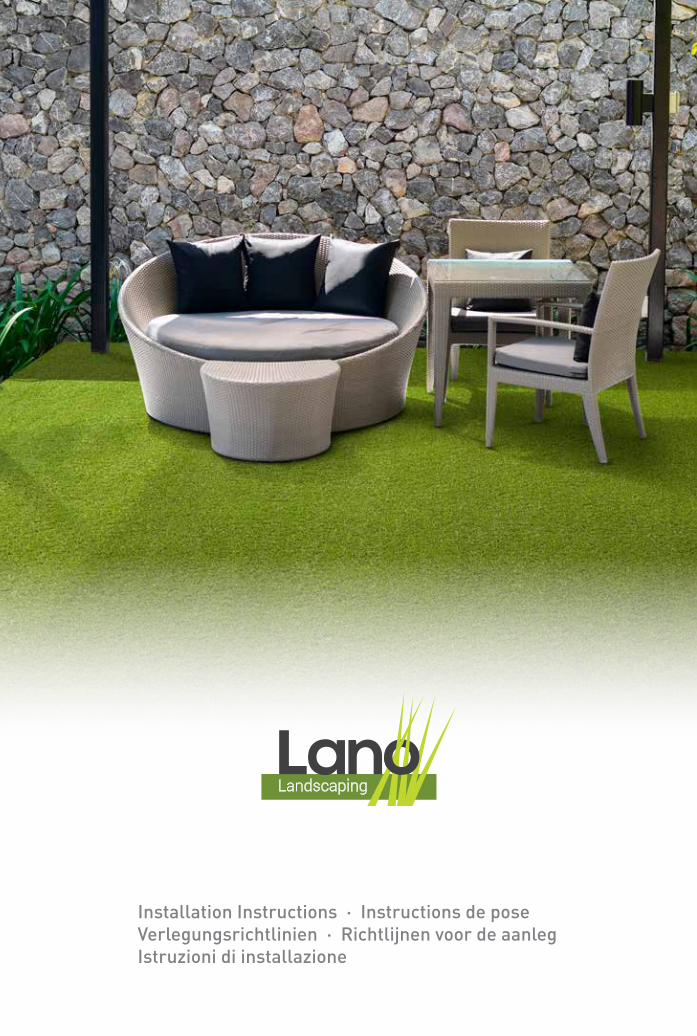
Installation Instructions · Instructions de poseVerlegungsrichtlinien · Richtlijnen voor de aanlegIstruzioni di installazione

installations instructions
We would recommend you call upon the services of a professional to carry out the installation of your artificial lawn. However, understanding that you may wish to undertake the project yourself, we hope that the guidelines below will help you along. There are various installation options available, so have provided the most commonly applied methods for your information.
Before you start
When determining the length and width you will require, please do allow some extra that will be lost during cutting. It is recommended to make a draft design, and determine how the turf can best be applied. If you require several rolls, we would like to point out that all rolls should be installed in the same direction, as the fibres of the lawn tend to settle a little towards one direction. When installing the rolls, it is recommended that you position yourself so you are looking against the natural fibre direction of the lawn.We advise against installation at temperatures below 10° Celsius and in damp weather conditions (rain, fog).
21 3
3
Preparation of the substrate
Remove all grass, vegetation and stones from the area. Proper drainage of the soil is essential.
If the turf is installed on an existing hard surface, it is recommended to repair or remove any irregularities. Ensure that sufficient drainage is possible. A drainage mat could act as a suitable substrate solution in this environment.
In other cases, you may opt to install the substrate using compacted material, or, if you prefer a perfectly level and stable substrate, you could install a stabilised substrate of cement and sand.
Depending on the type of substrate, sufficient soil must be excavate until a level and stable base is achieved, the escavating depth will depend on the existing substrate.
It is recommended to fit a (water/rot-proof) wooden frame around the complete installation. This will not only guarantee a perfect edge for the lawn on the one hand, but also allow the frame to secure the artificial turf. The frame is best placed immediately underneath the edge of adjacent zones (terraces, plants, ...).
Existing hard surface
Cement and sand
± 10 - 15 cm
Compacted material
± 5 - 15 cm
1
Fill the excavated area with a moist combination of cement and sand (ratio 1/7). Spread out this mixture, then level and compact, ideally using a vibrating plate. Leave enough time for the substrate to dry.
Fill the excavated area with fine gravel (up to 10 mm). Spread this mixture out, then level and compact, ideally using a vibrating plate. If necessary, finish with a layer of moist clay or angular sand, and compact once again with a vibrating plate until a perfectly smooth and level surface is obtained.2 2
After finishing the preparation of the substrate, spread an anti-rooting membrane/geotextile fabric over the surface. An overlap of ± 10 cm between the different rolls is ideal. If appropriate, the membrane can be fixed to the wooden frame with stainless steel screws.
E
installation instructions
Installation of artificial turf
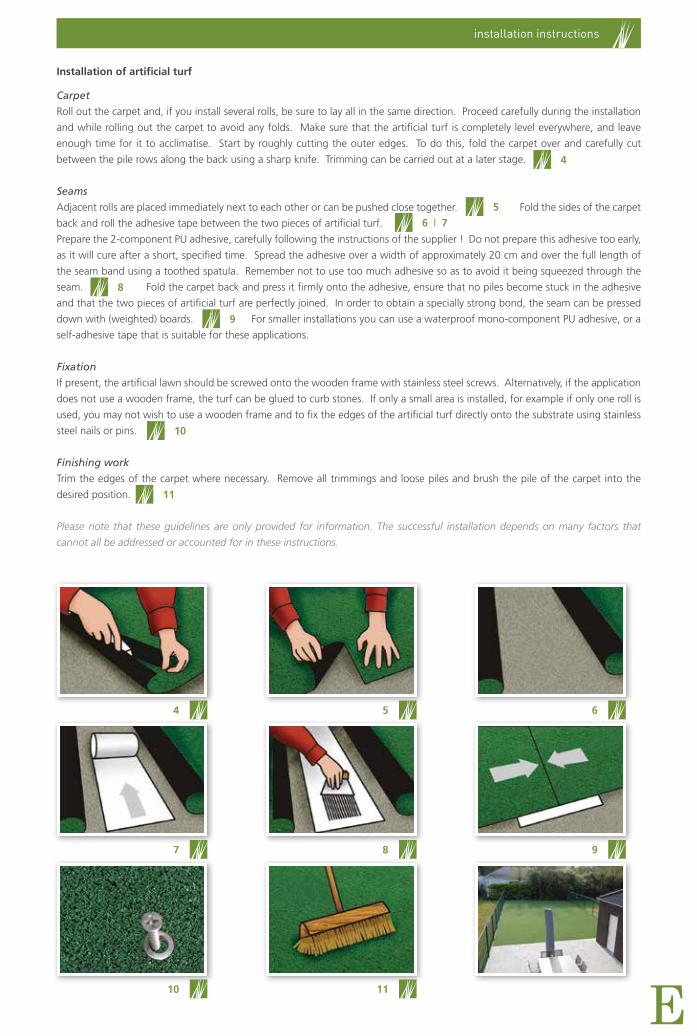
CarpetRoll out the carpet and, if you install several rolls, be sure to lay all in the same direction. Proceed carefully during the installation and while rolling out the carpet to avoid any folds. Make sure that the artificial turf is completely level everywhere, and leave enough time for it to acclimatise. Start by roughly cutting the outer edges. To do this, fold the carpet over and carefully cut between the pile rows along the back using a sharp knife. Trimming can be carried out at a later stage.
SeamsAdjacent rolls are placed immediately next to each other or can be pushed close together. Fold the sides of the carpet back and roll the adhesive tape between the two pieces of artificial turf.Prepare the 2-component PU adhesive, carefully following the instructions of the supplier ! Do not prepare this adhesive too early, as it will cure after a short, specified time. Spread the adhesive over a width of approximately 20 cm and over the full length of the seam band using a toothed spatula. Remember not to use too much adhesive so as to avoid it being squeezed through the seam. Fold the carpet back and press it firmly onto the adhesive, ensure that no piles become stuck in the adhesive and that the two pieces of artificial turf are perfectly joined. In order to obtain a specially strong bond, the seam can be pressed down with (weighted) boards. For smaller installations you can use a waterproof mono-component PU adhesive, or a self-adhesive tape that is suitable for these applications.
FixationIf present, the artificial lawn should be screwed onto the wooden frame with stainless steel screws. Alternatively, if the application does not use a wooden frame, the turf can be glued to curb stones. If only a small area is installed, for example if only one roll is used, you may not wish to use a wooden frame and to fix the edges of the artificial turf directly onto the substrate using stainless steel nails or pins.
Finishing workTrim the edges of the carpet where necessary. Remove all trimmings and loose piles and brush the pile of the carpet into the desired position.
Please note that these guidelines are only provided for information. The successful installation depends on many factors that cannot all be addressed or accounted for in these instructions.
4
10
11
56 | 7
8
9
4
7
10
5
8
11
6
9
instructions de pose
Nous vous conseillons de faire appel à un installateur professionnel pour placer votre gazon synthétique. Cependant, vous pouvez réaliser la pose vous-même en suivant les instructions suivantes. Il existe différentes techniques de pose; nous vous présentons les méthodes les plus utilisées qui donnent aussi le meilleur résultat.
Avant de commencer
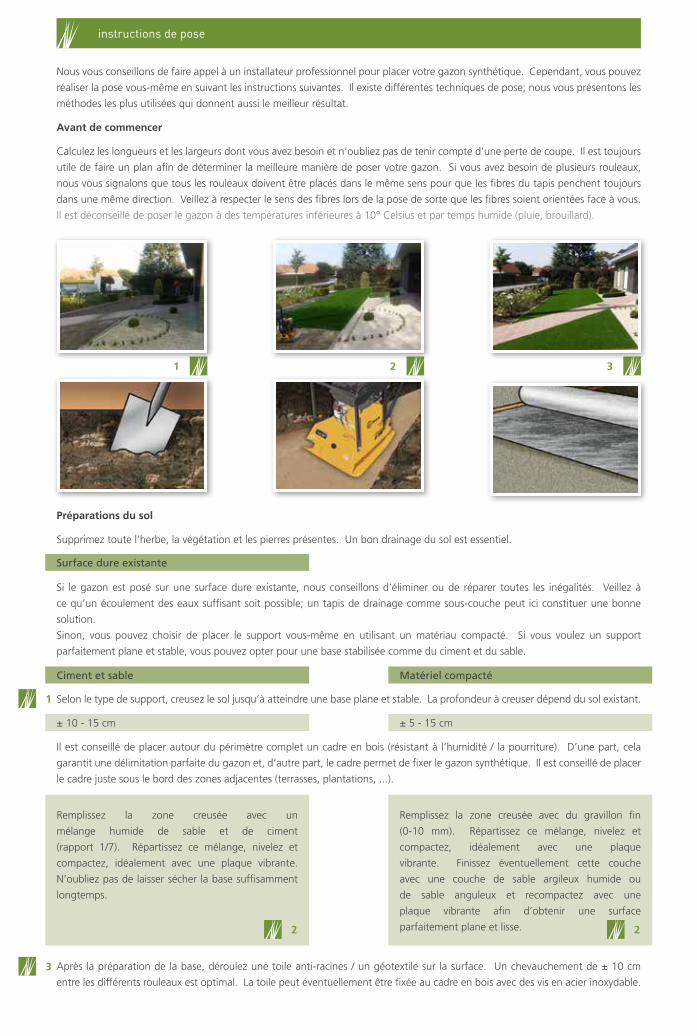
Calculez les longueurs et les largeurs dont vous avez besoin et n’oubliez pas de tenir compte d’une perte de coupe. Il est toujours utile de faire un plan afin de déterminer la meilleure manière de poser votre gazon. Si vous avez besoin de plusieurs rouleaux, nous vous signalons que tous les rouleaux doivent être placés dans le même sens pour que les fibres du tapis penchent toujours dans une même direction. Veillez à respecter le sens des fibres lors de la pose de sorte que les fibres soient orientées face à vous.Il est déconseillé de poser le gazon à des températures inférieures à 10° Celsius et par temps humide (pluie, brouillard).
21 3
3
Préparations du sol
Supprimez toute l’herbe, la végétation et les pierres présentes. Un bon drainage du sol est essentiel.
Si le gazon est posé sur une surface dure existante, nous conseillons d’éliminer ou de réparer toutes les inégalités. Veillez à ce qu’un écoulement des eaux suffisant soit possible; un tapis de drainage comme sous-couche peut ici constituer une bonne solution.Sinon, vous pouvez choisir de placer le support vous-même en utilisant un matériau compacté. Si vous voulez un support parfaitement plane et stable, vous pouvez opter pour une base stabilisée comme du ciment et du sable.
Selon le type de support, creusez le sol jusqu’à atteindre une base plane et stable. La profondeur à creuser dépend du sol existant.
Il est conseillé de placer autour du périmètre complet un cadre en bois (résistant à l’humidité / la pourriture). D’une part, cela garantit une délimitation parfaite du gazon et, d’autre part, le cadre permet de fixer le gazon synthétique. Il est conseillé de placer le cadre juste sous le bord des zones adjacentes (terrasses, plantations, ...).
Surface dure existante
Ciment et sable
± 10 - 15 cm
Matériel compacté
± 5 - 15 cm
1
Remplissez la zone creusée avec un mélange humide de sable et de ciment (rapport 1/7). Répartissez ce mélange, nivelez et compactez, idéalement avec une plaque vibrante. N’oubliez pas de laisser sécher la base suffisamment longtemps.
Remplissez la zone creusée avec du gravillon fin (0-10 mm). Répartissez ce mélange, nivelez et compactez, idéalement avec une plaque vibrante. Finissez éventuellement cette couche avec une couche de sable argileux humide ou de sable anguleux et recompactez avec une plaque vibrante afin d’obtenir une surface parfaitement plane et lisse.2 2
Après la préparation de la base, déroulez une toile anti-racines / un géotextile sur la surface. Un chevauchement de ± 10 cm entre les différents rouleaux est optimal. La toile peut éventuellement être fixée au cadre en bois avec des vis en acier inoxydable.

F
instructions de pose
Pose du gazon synthétique
TapisDéroulez le tapis et, si vous installez plusieurs rouleaux, n’oubliez pas de poser les rouleaux dans le même sens. Soyez prudent pendant le déplacement et le déroulement afin d’éviter les plis. Veillez à ce que le gazon synthétique soit partout bien à plat et laissez-lui le temps de s’acclimater. Faites d’abord une découpe brute des côtés extérieurs. Pour ce faire, pliez le tapis et coupez soigneusement le bord du dossier entre les rangées de fibres avec un couteau aiguisé. Vous pourrez ajuster la découpe à un stade ultérieur.
JointsLes rouleaux adjacents sont placés l’un à la suite de l’autre ou l’un à côté de l’autre. Repliez les bords du tapis et appliquez la bande de colle entre les deux morceaux de gazon synthétique.Préparez les 2 composants de la colle PU et suivez attentivement les indications du fournisseur ! Ne préparez pas cette colle trop tôt, car elle durcit rapidement. Appliquez la colle avec une spatule dentée d’environ 20 cm de large sur toute la longueur de la bande de jointure. N’utilisez pas trop de colle pour éviter qu’elle déborde de la jointure. Repliez le tapis et pressez-le fermement dans la colle, mais veillez à ce qu’il n’y ait pas de fibres dans la colle et à ce que les deux morceaux de gazon synthétique correspondent bien. Pour obtenir une jonction encore plus forte, la jointure peut être pressée avec des planches (alourdies). Pour les plus petites installations, vous pouvez éventuellement choisir une colle PU monocomposant étanche ou une bande autocollante conçue spécialement pour ces applications.
FixationVous pouvez fixer le tapis de gazon synthétique avec des vis en acier inoxydable au cadre en bois. Une alternative au cadre en bois sont les bordures en pierre auxquelles le gazon peut être fixé. Si vous posez une petite surface, où par exemple 1 rouleau suffit, vous pouvez choisir de ne pas installer de cadre en bois et de fixer le tapis de gazon sur les côtés dans le sol avec des clous ou des broches inoxydables.
FinitionRecoupez si nécessaire le tapis. Retirez tous les déchets de coupe et les fibres détachées et redressez les fibres du tapis avec une brosse.
Notez que ces instructions ne sont données qu’à titre d’information. La réussite de la pose dépend de nombreux facteurs qui ne sont pas tous prévus ou pris en compte dans ces instructions.
4
10
11
5
6 | 7
8
9
4
7
10
5
8
11
6
9
Richtlinien für die Verlegung
Wir empfehlen Ihnen, die Verlegung des Kunstrasens von einem Fachbetrieb vornehmen zu lassen. Wenn Sie die Verlegung jedoch selbst vornehmen möchten, sollten Sie die nachstehenden Richtlinien beachten. Es gibt verschiedene Verlengungsmöglichkeiten. Wir zeigen Ihnen die meistverwendeten, Arbeitsweisen, die auch das beste Ergebnis Liefern.
Bevor Sie beginnenBestimmen Sie die benötigten Längen und Breiten, und vergessen Sie nicht einen Schnittverlust einzukalkulieren. Es empfiehlt sich eine Skizze angzufertigen, um zu bestimmen, wie der Rasen am besten verlegt werden kann. Wenn Sie mehrere Rollen benötigen, möchten wir Sie darauf hinweisen, dass alle Rollen in die gleiche Richtung gelegt werden müssen, da die Fasern des Kunstrasens stets in eine bestimmte Richtung zeigen. Außerdem müssen Sie darauf achten, dass Sie bei der Positionierung der Rollen gegen die Faserrichtung schauen.Von einer Verlegung bei Temperaturen unter 10° Celsius und bei feuchtem Wetter (Regen, Nebel) wird abgeraten.
21 3
3
Vorbereitung des UntergrundsEntfernen Sie jeglichen Rasen, jegliche Vegetation und alle Steine. Ein gute Dränage des Bodens ist von entscheidender Bedeutung.
Wenn der Rasen auf einer bestehenden harten Oberfläche verlegt werden soll, empfiehlt es sich, alle Unebenheiten auszugleichen oder zu beseitigen. Stellen Sie sicher, dass eine ausreichende Wasserableitung möglich ist. Dabei bietet sich die Verwendung einer Dränagematte an.Ansonsten kann der Untergrund mit einem verdichteten Material aufgeschüttet werden. Wenn Sie einen absolut ebenen und stabilen Undergrund bevorzugen, können Sie sich auch für eine stabilisierende Unterbettung aus Zement und Sand entscheiden.
Je nach Untergrundtyp tragen Sie den Boden ab, bis Sie einen ebenen und stabilen Untergrund erreicht haben. Die Abtragungstiefe hängt vom jeweils vorhandenen Untergrund ab.
Es empfiehlt sich, die gesamte Fläche durch einen (wasser-/verrottungsbeständigen) Holzrahmen einzufassen. Dadurch lässt sich eine perfekte Abgrenzung der Rasenfläche realisieren, wobei der Rahmen zusätzlich eine Fixierung des Kunstrasen ermöglicht. Der Rahmen sollte möglichst dicht an den Rand der angrenzenden Zonen (Terrassen, Bepflanzung usw.) anschließen.
Bestehende harte Oberfläche
Zement und Sand
± 10 - 15 cm
Verdichtetes Material
± 5 - 15 cm
1
Füllen Sie die abgetragene Fläche mit einem feuchten Zement-/Sandgemisch auf (Verhältnis 1/7). Verteilen Sie das Gemisch. Nivellieren und verdichten Sie dieses vorzugsweise mit einer Rüttelplatte. Beachten Sie, dass der Untergrund ausreichend Zeit zum Trocknen benötigt.
Füllen Sie den abgetragenen Bereich mit einer feinen Steinschicht auf (0 - 10 mm). Verteilen Sie das Gemisch. Nivellieren, befeuchten und verdichten Sie dieses vorzugsweise mit einer Rüttelplatte. Runden Sie diese Schicht eventuell mit einer feuchten Sand-oder Splitschicht ab und verdichten Sie diese erneut mit einer Rüttelplatte, so dass Sie eine möglichst glatte und ebene Fläche erhalten.2 2
Nach Fertigstellung des Untergrunds kleiden Sie die Fläche mit einem Antiwurzeltuch bzw. einer Bodenplane aus. Optimal ist eine Überlappung von ± 10 cm zwischen den verschiedenen Rollen. Das Tuch kann eventuell mit Edelstahlschrauben am holzrahmen befestigt werden.

D
Richtlinien für die Verlegung
Verlegung des Kunstrasens
KunstrasenRollen Sie den Kunstrasen aus. Wenn Sie mehrere Rollen verlegen, müssen Sie darauf achten, dass Sie die Rollen in der gleichen Richtung auslegen. Achten Sie beim Ausrollen darauf, dass sich keine Falten bilden. Stellen Sie sicher, dass der Kunstrasen überall flach aufliegt, und lassen Sie ihm Zeit, sich zu akklimatisieren. Schneiden Sie die Außenkanten erst einmal nur grob ab. Knicken Sie den Kunstrasen zu diesem Zweck um und schneiden Sie vorsichtig mit einem scharfen Messer zwischen den Polreihen der Rückseite entlang. Das Nachschneiden kann in einem späteren Stadium erfolgen.
NächteAngrenzende Rollen werden aneinander so angelegt, dass sie aneinander anschließen. Schlagen Sie die Ränder des Kunstrasens zurück, um eine Rolle Nahtband zwischen den beiden Kunstrasenteilen auszurollen.Mischen Sie den 2-Komponenten-PU-Kleber an und helten Sie sich dabei genau an die Vorschriften des Herstellers ! Mischen Sie den Kleber nicht zu früh an, da der Kleber bereits nach kurzer Zeit aushärtet. Tragen Sie den Kleber mit einem gezahnten Spachtel ca. 20 cm breit über die gesamte Länge des Nahtbands auf. Achten Sie darauf, dass Sie nicht zu viel Kleber auftragen, um zu vermeiden, dass der Kleber zwischen den Nähten austritt. Schlagen Sie den Kunstrasen zurück und drücken Sie diesen fest auf den Kleber. Achten Sie jedoch darauf, dass sich keine Pole auf dem Kleber befinden und dass die beiden Kunstgrasbah-nen sauber aneinander anschließen. Um eine besonders stabile Verbindung zu erhalten, kann die Naht mit Latten als Gewicht angedrückt werden. Bei kleineren Installationen können Sie eventuell auch einen wasserfesten Einkomponenten-PU- Kleber oder ein speziell für diese Anwendungen geeignetes, selbstklebendes Klebeband verwanden
BefestigenSie befestigen den Kunstrasen mit Edelstahlschrauben am Holzrahmen. Als Alternative zum Holzrahmen, können Sie Bordsteine verwenden, auf denen der Kunstrasen festgeklebt wird. Wenn Sie eine kleine Fläche verlegen, bei der z. B. eine Rolle ausreicht, können Sie den Holzrahmen weglassen und den Kunstrasen an den Rändern mit Edelstahlnägeln oder-stiften im Untergrund fixieren.
FertigstellungSchneiden Sie den Kunstrasen nach, falls erforderlich. Entfernen Sie sämtliche Schnittreste und Florreste und bürsten Sie den Kunstrasen in Polrichtung gerade.
Beachten Sie bitte, dass diese Richtlinien nur zu Informationszwecken erteilt werden. Eine erfolgreiche Verlegung hängt von vielen Faktoren ab, die in diesen Richtlinien nicht alle berücksichigt werden können.
4
10
11
5
6 | 7
8
9
4
7
10
5
8
11
6
9
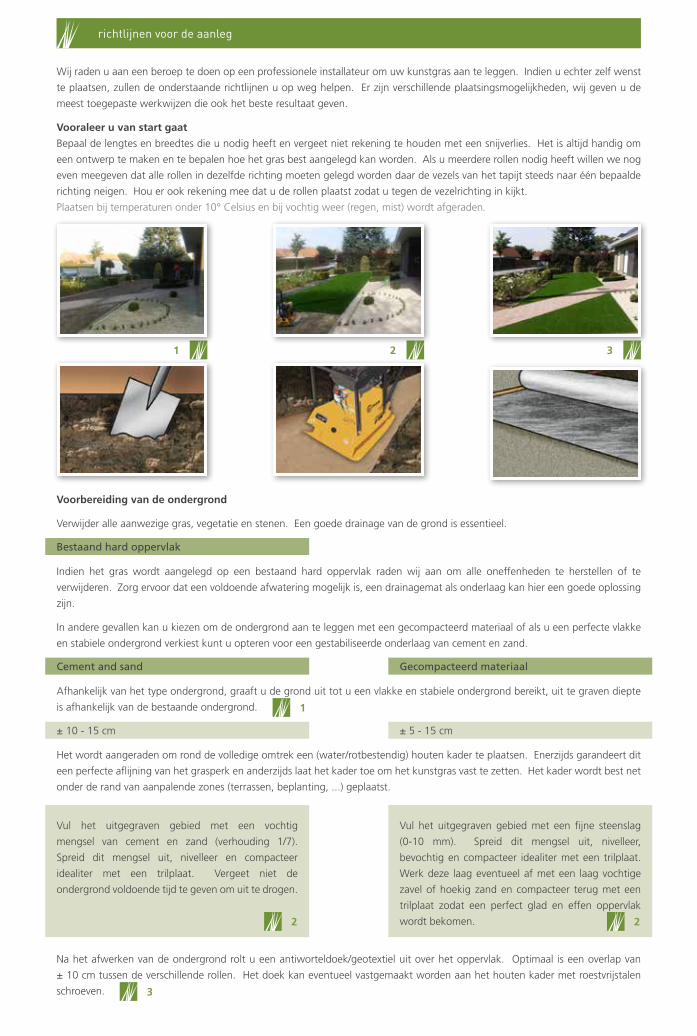
richtlijnen voor de aanleg
Wij raden u aan een beroep te doen op een professionele installateur om uw kunstgras aan te leggen. Indien u echter zelf wenst te plaatsen, zullen de onderstaande richtlijnen u op weg helpen. Er zijn verschillende plaatsingsmogelijkheden, wij geven u de meest toegepaste werkwijzen die ook het beste resultaat geven.
Vooraleer u van start gaatBepaal de lengtes en breedtes die u nodig heeft en vergeet niet rekening te houden met een snijverlies. Het is altijd handig om een ontwerp te maken en te bepalen hoe het gras best aangelegd kan worden. Als u meerdere rollen nodig heeft willen we nog even meegeven dat alle rollen in dezelfde richting moeten gelegd worden daar de vezels van het tapijt steeds naar één bepaalde richting neigen. Hou er ook rekening mee dat u de rollen plaatst zodat u tegen de vezelrichting in kijkt.Plaatsen bij temperaturen onder 10° Celsius en bij vochtig weer (regen, mist) wordt afgeraden.
21 3
3
Voorbereiding van de ondergrond
Verwijder alle aanwezige gras, vegetatie en stenen. Een goede drainage van de grond is essentieel.
Indien het gras wordt aangelegd op een bestaand hard oppervlak raden wij aan om alle oneffenheden te herstellen of te verwijderen. Zorg ervoor dat een voldoende afwatering mogelijk is, een drainagemat als onderlaag kan hier een goede oplossing zijn.
In andere gevallen kan u kiezen om de ondergrond aan te leggen met een gecompacteerd materiaal of als u een perfecte vlakke en stabiele ondergrond verkiest kunt u opteren voor een gestabiliseerde onderlaag van cement en zand.
Afhankelijk van het type ondergrond, graaft u de grond uit tot u een vlakke en stabiele ondergrond bereikt, uit te graven diepte is afhankelijk van de bestaande ondergrond.
Het wordt aangeraden om rond de volledige omtrek een (water/rotbestendig) houten kader te plaatsen. Enerzijds garandeert dit een perfecte aflijning van het grasperk en anderzijds laat het kader toe om het kunstgras vast te zetten. Het kader wordt best net onder de rand van aanpalende zones (terrassen, beplanting, ...) geplaatst.
Bestaand hard oppervlak
Cement and sand
± 10 - 15 cm
Gecompacteerd materiaal
± 5 - 15 cm
1
Vul het uitgegraven gebied met een vochtig mengsel van cement en zand (verhouding 1/7). Spreid dit mengsel uit, nivelleer en compacteer idealiter met een trilplaat. Vergeet niet de ondergrond voldoende tijd te geven om uit te drogen.
Vul het uitgegraven gebied met een fijne steenslag (0-10 mm). Spreid dit mengsel uit, nivelleer, bevochtig en compacteer idealiter met een trilplaat. Werk deze laag eventueel af met een laag vochtige zavel of hoekig zand en compacteer terug met een trilplaat zodat een perfect glad en effen oppervlak wordt bekomen.2 2
Na het afwerken van de ondergrond rolt u een antiworteldoek/geotextiel uit over het oppervlak. Optimaal is een overlap van ± 10 cm tussen de verschillende rollen. Het doek kan eventueel vastgemaakt worden aan het houten kader met roestvrijstalen schroeven.

N
richtlijnen voor de aanleg
Aanleg van het kunstgras
TapijtRol het tapijt uit en indien u meerdere rollen installeert mag u niet vergeten de rollen in dezelfde richting te leggen. Wees voorzichtig tijdens het verplaatsen en het uitrollen zodat plooien vermeden worden. Zorg ervoor dat het kunstgras overal goed plat ligt en geef het de nodige tijd om te acclimatiseren. Maak eerst een ruwe afsnijding van de buitenkanten. Vouw hiervoor het tapijt om en snijd voorzichtig langs de rugzijde tussen de poolrijen met een scherp mes. Bijknippen kan in een later stadium gebeuren.
NadenAangrenzende rollen worden aansluitend of stotend geplaatst. Vouw de zijden van het tapijt terug om en rol de lijmband tussen de 2 stukken kunstgras.Bereid de 2 componenten PU-lijm en volg hierbij nauwkeurig de voorschriften van de leverancier ! Maak deze lijm niet te vroeg aan daar de lijm na een bepaalde, korte tijd uithardt. Strijk de lijm met een getande spatel ongeveer 20 cm breed uit over de volledige lengte van de naadband. Denk eraan niet te veel lijm te gebruiken om te vermijden dat deze tussen de naad doorkomt. Vouw het tapijt terug en druk het stevig in de lijm maar let erop dat er geen pooltjes in de lijm kleven en de 2 stukken kunstgras mooi aansluiten. Om een extra stevige verbinding te bekomen kan de naad met (verzwaarde) planken aangedrukt worden. Voor kleinere installaties kan u eventueel opteren voor een waterbestendige mono-component PU-lijm of een speciaal voor deze toepassingen geschikte, zelfklevende lijmband.
VastmakenHet kunstgrastapijt maakt u met roestvrijstalen schroeven op het houten kader vast. Een alternatief voor het houten kader zijn boordstenen waarop het gras vastgelijmd wordt.Indien u een klein oppervlak aanlegt, waar bijvoorbeeld 1 rol volstaat, kunt u ervoor opteren om geen houten kader te plaatsen en het grastapijt aan de zijkanten vast te zetten in de ondergrond met roestvrije nagels of pennen.
AfwerkingSnijd waar nodig het tapijt bij. Verwijder alle snijresten en losse pooltjes en borstel de pool van het tapijt recht.
Merk op dat deze richtlijnen enkel ter informatie gegeven worden. Een succesvolle aanleg is afhankelijk van vele factoren die niet allemaal voorzien of in aanmerking genomen kunnen worden in deze richtlijnen.
4
10
11
56 | 7
8
9
4
7
10
5
8
11
6
9

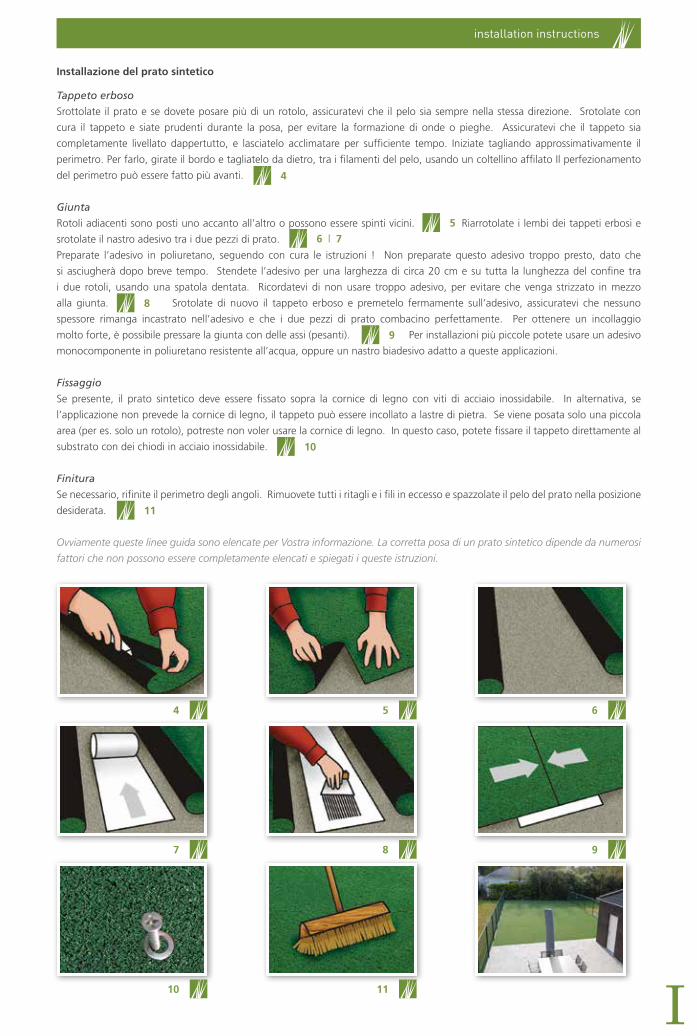
istruzioni di installazione
Raccomandiamo di rivolgersi ad un posatore professionista per l’installazione delle erbe sintetiche. Comunque, nell’eventualità in cui vogliate svolgere Voi stessi l’operazione di posa, queste spiegazioni Vi saranno utili. Ci sono diversi tipi di posa, illustriamo di seguito quelle maggiormente usate.
Prima di iniziare
Quando calcolate i metri che Vi serviranno, calcolate anche uno sfrido che andrà perso al momento del taglio. Consigliamo di fare una bozza dell’area in cui poserete il prato sintetico, in modo che Vi aiuti a calcolare i metri necessari. Se ordinate più rotoli, consigliamo di posarli tutti nella stessa direzione, in quanto i fili d’erba tendono leggermente ad indirizzarsi in un verso. Quando posate il prato, è preferibile che vi mettiate dal dell’orientamento dei fili del tappeto erboso.Sconsigliamo di iniziare la posa con temperature inferiori ai 10°C o con pioggia o fango.
21 3
3
Preparazione della superficie
Rimuovere tutta l’erba, vegetazione e sassi dall’area. Il drenaggio appropriato del terreno è fondamentale.
Se il prato viene installato su una superficie dura già esistente, raccomandiamo di riparare o rimuovere qualsiasi irregolarità. Assicuratevi che sia possibile un sufficiente drenaggio. Un materassino di sottofondo potrebbe essere la soluzione migliore per questa situazione.
In altri casi, potete installare un substrato di materiale compatto, o, se preferite una superficie d’appoggio perfettamente livellata e stabile, potete installare un substrato stabilizzato di cemento e sabbia.
Depending on the type of substrate, sufficient soil must be excavate until a level and stable base is achieved, the escavating depth will depend on the existing substrate.
Raccomandiamo di porre una cornice di legno (resistente ad acqua e decomposizione) intorno all installazione. Questa non solo garantirà una perfetta finitura, ma fisserà anche l’ancoraggio del tappeto erboso. E’ consigliabile fissare la cornice appena sotto l’angolo delle zone adiacenti (alberi, terrazze, ...).
Superficie dura esistente
Cemento e sabbia
± 10 - 15 cm
Materiale compatto
± 5 - 15 cm
1
Riempite l’area scavata con una mistura umida di cemento e sabbia (rapporto1/7). Spargete il composto, quindi livellatelo e compattatelo, possibilmente con una plancia vibrante. Aspettate fino a quando il substrato non sarà asciutto.
Riempite l’area scavata con ghiaia fine (fino a 10 mm). Spargetela uniformemente e poi livellate e compattate, possibilmente con una plancia vibrante. Se necessario, finite con uno strato di argilla umida o sabbia, compattate di nuovo fino a quando non ottenete una superficie perfettamente morbida e livellata.2 2
Dopo aver finito la preparazione del substrato, stendete un telo (membrana o tessuto geotessile) anti-decomposizione. Una sovrapposizione di circa 10 cm tra un rotolo e l’altro è l’ideale. Se appropriato, la membrana può essere fissata alla cornice di legno con viti in acciaio inossidabile.
I
installation instructions
Installazione del prato sintetico
Tappeto erbosoSrottolate il prato e se dovete posare più di un rotolo, assicuratevi che il pelo sia sempre nella stessa direzione. Srotolate con cura il tappeto e siate prudenti durante la posa, per evitare la formazione di onde o pieghe. Assicuratevi che il tappeto sia completamente livellato dappertutto, e lasciatelo acclimatare per sufficiente tempo. Iniziate tagliando approssimativamente il perimetro. Per farlo, girate il bordo e tagliatelo da dietro, tra i filamenti del pelo, usando un coltellino affilato Il perfezionamento del perimetro può essere fatto più avanti.
GiuntaRotoli adiacenti sono posti uno accanto all’altro o possono essere spinti vicini. Riarrotolate i lembi dei tappeti erbosi e srotolate il nastro adesivo tra i due pezzi di prato.Preparate l’adesivo in poliuretano, seguendo con cura le istruzioni ! Non preparate questo adesivo troppo presto, dato che si asciugherà dopo breve tempo. Stendete l’adesivo per una larghezza di circa 20 cm e su tutta la lunghezza del confine tra i due rotoli, usando una spatola dentata. Ricordatevi di non usare troppo adesivo, per evitare che venga strizzato in mezzo alla giunta. Srotolate di nuovo il tappeto erboso e premetelo fermamente sull’adesivo, assicuratevi che nessuno spessore rimanga incastrato nell’adesivo e che i due pezzi di prato combacino perfettamente. Per ottenere un incollaggio molto forte, è possibile pressare la giunta con delle assi (pesanti). Per installazioni più piccole potete usare un adesivo monocomponente in poliuretano resistente all’acqua, oppure un nastro biadesivo adatto a queste applicazioni.
FissaggioSe presente, il prato sintetico deve essere fissato sopra la cornice di legno con viti di acciaio inossidabile. In alternativa, se l’applicazione non prevede la cornice di legno, il tappeto può essere incollato a lastre di pietra. Se viene posata solo una piccola area (per es. solo un rotolo), potreste non voler usare la cornice di legno. In questo caso, potete fissare il tappeto direttamente al substrato con dei chiodi in acciaio inossidabile.
FinituraSe necessario, rifinite il perimetro degli angoli. Rimuovete tutti i ritagli e i fili in eccesso e spazzolate il pelo del prato nella posizione desiderata.
Ovviamente queste linee guida sono elencate per Vostra informazione. La corretta posa di un prato sintetico dipende da numerosi fattori che non possono essere completamente elencati e spiegati i queste istruzioni.
4
10
11
56 | 7
8
9
4
7
10
5
8
11
6
9
4

Venetiëlaan 33 - B-8530 Harelbeket +32 56 65 40 00 - f +32 56 65 40 [email protected] - www.lano.com