installing ar sys english 5.1
TRANSCRIPT

7/24/2019 Installing AR Sys English 5.1
http://slidepdf.com/reader/full/installing-ar-sys-english-51 1/200
Action Request System 5.1Installing AR System
PART NO: AR-510-IG-01

7/24/2019 Installing AR Sys English 5.1
http://slidepdf.com/reader/full/installing-ar-sys-english-51 2/200
Remedy Corporation
1585 Charleston Road, Mountain View, CA 94043
Tel 650.903.5200Fax 650.903.9001
www.remedy.com
Copyright © 1991–2002 Peregrine Remedy, Inc. All rights reserved.
Information contained in this document is proprietary to Peregrine Remedy, Inc., and may be used or
disclosed only with written permission from Peregrine Remedy, Inc. This book, or any part thereof, maynot be reproduced without the prior written permission of Peregrine Remedy, Inc. This document refers to
numerous products by their trade names. In most, if not all, cases these designations are claimed as
Trademarks or Registered Trademarks by their respective companies.
Remedy, the Remedy Corporation logo and design, Action Request System, and AR System are registered
or other trademarks of Peregrine Remedy, Inc., Mountain View, CA, USA.
This document and the related software described in this manual are supplied under license ornondisclosure agreement and may be used or copied only in accordance with the terms of the agreement.
The information in this document is subject to change without notice and does not represent a
commitment on the part of Peregrine Remedy, Inc. Contact Remedy Customer Support to verify the date
of the latest version of this document.
The names of companies and individuals used in the sample database and in examples in the manuals are
fictitious and are intended to illustrate the use of the software. Any resemblance to actual companies or
individuals, whether past or present, is purely coincidental.
If you need technical support for this product, or would like to request documentation for a product for
which you are licensed, contact Remedy Customer Support by email at [email protected].
If you have comments or suggestions about this documentation, contact Information Development by
email at [email protected].
This edition applies to version 5.1 of the licensed program.
U.S. GOVERNMENT RIGHTS. Use, duplication, or disclosure by the Government is subject to PeregrineRemedy, Inc.’s commercial software license(s). If you are the U.S. government, you agree that these writtenmaterials are “commercial computer software”-related documentation licensed pursuant to the terms ofPeregrine Remedy, Inc.’s commercial computer software license(s) in accordance with 48 C.F.R. 12.212 of theFederal Acquisition Regulations and its successors and 48 C.F.R. 227.7202-1 of the DoD FAR Supplement and itssuccessors. Unpublished rights are reserved under the copyright laws of the United States.

7/24/2019 Installing AR Sys English 5.1
http://slidepdf.com/reader/full/installing-ar-sys-english-51 3/200
Table of Contents! 3
Table of Contents
Preface . . . . . . . . . . . . . . . . . . . . . . . . . . . . . . . . . . . . . . 9
Obtaining System Requirements and Software . . . . . . . . . . . . . . 10
Troubleshooting the Installation . . . . . . . . . . . . . . . . . . . . 10
Action Request System Documents . . . . . . . . . . . . . . . . . . . 11
Chapter 1 Planning an AR System Installation . . . . . . . . . . . . . . . . . . . 13
Choosing a Configuration . . . . . . . . . . . . . . . . . . . . . . . 14
Sample Configurations . . . . . . . . . . . . . . . . . . . . . . . . . 16
Configuring with Minimum Requirements . . . . . . . . . . . . . . . 17
Extending Configuration to Multiple Servers . . . . . . . . . . . . . . 18
Extending Configuration to the Web. . . . . . . . . . . . . . . . . . 19
Extending Configuration to Email Access . . . . . . . . . . . . . . . . 20
Chapter 2 Choosing Server Options and Preparing the Environment . . . . . . . . . 23
Pre-Installation Steps . . . . . . . . . . . . . . . . . . . . . . . . . 24
Back Up the AR System Environment . . . . . . . . . . . . . . . . . 24
Ensure Database Version Compatibility . . . . . . . . . . . . . . . . 24
AR System Database Upgrade and Overwrite Options . . . . . . . . . . . 25Choosing Settings for a New AR System Database . . . . . . . . . . . . 25
Choosing the Upgrade or Overwrite Option. . . . . . . . . . . . . . . 26
Upgrading or Overwriting the Full Text Search Option . . . . . . . . . . 27

7/24/2019 Installing AR Sys English 5.1
http://slidepdf.com/reader/full/installing-ar-sys-english-51 4/200
4" Table of Contents
Action Request System 5.1
Choosing Optional Functionality for the AR System Server. . . . . . . . . 27
Centralized Preferences . . . . . . . . . . . . . . . . . . . . . . . 28
Custom Programming . . . . . . . . . . . . . . . . . . . . . . . . 28
Email Access . . . . . . . . . . . . . . . . . . . . . . . . . . . . 30
Localized Messages . . . . . . . . . . . . . . . . . . . . . . . . . 30
Centralized Report Processing . . . . . . . . . . . . . . . . . . . . 30
Choosing Port Number Options. . . . . . . . . . . . . . . . . . . . . 30
Registering with a Portmapper . . . . . . . . . . . . . . . . . . . . 31
Assigning Port Numbers . . . . . . . . . . . . . . . . . . . . . . . 32
Choosing a Startup Option . . . . . . . . . . . . . . . . . . . . . . . 34
Choosing a Server Name . . . . . . . . . . . . . . . . . . . . . . . . 34
Preparing to Install an AR System Server . . . . . . . . . . . . . . . . . 37
Installing on All Platforms . . . . . . . . . . . . . . . . . . . . . . 38
Installing with an Oracle Database . . . . . . . . . . . . . . . . . . . 41
Installing with an IBM DB2 Database . . . . . . . . . . . . . . . . . 49
Installing with a Microsoft SQL Server Database . . . . . . . . . . . . . 54Installing with an Informix Database . . . . . . . . . . . . . . . . . . 57
Installing with a Sybase Database . . . . . . . . . . . . . . . . . . . . 59
Chapter 3 Installing the AR System Server on UNIX . . . . . . . . . . . . . . . . 63
Installing an AR System Server on UNIX . . . . . . . . . . . . . . . . . 64
Installing on UNIX as Non-Root . . . . . . . . . . . . . . . . . . . 64
Installing the AR System Server from the Web. . . . . . . . . . . . . . 66
Running the AR System Server Installation Script . . . . . . . . . . . . 67
Restarting the Installation Process . . . . . . . . . . . . . . . . . . . . 77
Starting and Stopping the Server Manually . . . . . . . . . . . . . . . . 78
Chapter 4 Installing the AR System Server on Windows . . . . . . . . . . . . . . . 81
Installing an AR System Server on Windows . . . . . . . . . . . . . . . 82Starting and Stopping the AR System Server Manually . . . . . . . . . . . 88
Uninstalling an AR System Server . . . . . . . . . . . . . . . . . . . . 90

7/24/2019 Installing AR Sys English 5.1
http://slidepdf.com/reader/full/installing-ar-sys-english-51 5/200
Table of Contents! 5
Installing AR System
Chapter 5 Preparing to Install the AR System Mid Tier . . . . . . . . . . . . . . . 93
Configuring a Mid Tier Machine . . . . . . . . . . . . . . . . . . . . 94
Installing the Java Server Pages Engine . . . . . . . . . . . . . . . . . 94
Preparing AR System Servers for the Mid Tier . . . . . . . . . . . . . . 95
Worksheet for Preparing to Install the AR System Mid Tier withAll Web Servers. . . . . . . . . . . . . . . . . . . . . . . . . . . 96
Preparing to Install the AR System Mid Tier with iPlanet . . . . . . . . . 98
Worksheet for Installing the AR System Mid Tier on UNIXwith iPlanet . . . . . . . . . . . . . . . . . . . . . . . . . . . . 98
Worksheet for Installing the AR System Mid Tier on Windows with iPlanet 102Disabling the iPlanet JSP, Servlet Engine and Internal Java . . . . . . . 104
Refreshing the iPlanet Web Server . . . . . . . . . . . . . . . . . . 106
Preparing to Install the AR System Mid Tier with Apache . . . . . . . . . 107
Worksheet for Installing the AR System Mid Tier on UNIX with Apache . 107
Completing the Post-Installation Task for Apache Web Server . . . . . . 109
Preparing to Install the Mid Tier with Microsoft Internet Information Server. 109
Worksheet for Installing the AR System Mid Tier on Windowswith IIS . . . . . . . . . . . . . . . . . . . . . . . . . . . . . 110
Starting and Stopping ServletExec AS 4.1.1 Manually . . . . . . . . . . . 111
Chapter 6 Installing the AR System Mid Tier on UNIX . . . . . . . . . . . . . . . 113
Installing an AR System Mid Tier on UNIX. . . . . . . . . . . . . . . . 114
Installing the Mid Tier from the Web . . . . . . . . . . . . . . . . 114Running the AR System Mid Tier Installation Script . . . . . . . . . . . . 115
Verifying the Mid Tier Installation . . . . . . . . . . . . . . . . . . . 127
Uninstalling the Mid Tier on UNIX . . . . . . . . . . . . . . . . . . . 128
Checking the Uninstall . . . . . . . . . . . . . . . . . . . . . . 129
Chapter 7 Installing the AR System Mid Tier on Windows . . . . . . . . . . . . . . 131
Installing the AR System Mid Tier on Windows . . . . . . . . . . . . . . 132
Uninstalling the Mid Tier on Windows. . . . . . . . . . . . . . . . . . 138
Verifying the Mid Tier Installation . . . . . . . . . . . . . . . . . . . 139
7/24/2019 Installing AR Sys English 5.1
http://slidepdf.com/reader/full/installing-ar-sys-english-51 6/200
6" Table of Contents
Action Request System 5.1
Chapter 8 Installing AR System Clients on Windows . . . . . . . . . . . . . . . . 141
Preparing to Install AR System Clients . . . . . . . . . . . . . . . . . . 142
User Configuration Directory. . . . . . . . . . . . . . . . . . . . 142
Default Home Directory . . . . . . . . . . . . . . . . . . . . . . 142
Required Third-Party Components . . . . . . . . . . . . . . . . . 143
AR System Administrator . . . . . . . . . . . . . . . . . . . . . 150
AR System Windows User Tool . . . . . . . . . . . . . . . . . . . 150
AR System Alert . . . . . . . . . . . . . . . . . . . . . . . . . 151
AR System Client Installation Worksheet . . . . . . . . . . . . . . . 152
Installing an AR System Client . . . . . . . . . . . . . . . . . . . . . 153
Uninstalling AR System Clients . . . . . . . . . . . . . . . . . . . . . 156
Chapter 9 Licensing AR System . . . . . . . . . . . . . . . . . . . . . . . . . 159
AR System Licensing. . . . . . . . . . . . . . . . . . . . . . . . . . 160
Obtaining License Keys . . . . . . . . . . . . . . . . . . . . . . 161
Requesting License Keys Online . . . . . . . . . . . . . . . . . . . 161Viewing AR System Licenses . . . . . . . . . . . . . . . . . . . . 164
Adding and Applying Licenses . . . . . . . . . . . . . . . . . . . 168
Transferring Server Licenses to Other Servers . . . . . . . . . . . . . 168
Mid Tier Licensing. . . . . . . . . . . . . . . . . . . . . . . . . . . 169
Determining Current Mid Tier License Usage . . . . . . . . . . . . . 170
Obtaining License Keys for the Mid Tier . . . . . . . . . . . . . . . 171
Obtaining Preliminary Server and Mid Tier Information . . . . . . . . 171
Requesting License Keys . . . . . . . . . . . . . . . . . . . . . . 172
Adding and Applying Mid Tier Licenses . . . . . . . . . . . . . . . 174

7/24/2019 Installing AR Sys English 5.1
http://slidepdf.com/reader/full/installing-ar-sys-english-51 7/200
Table of Contents! 7
Installing AR System
Appendix A Locating AR System Files . . . . . . . . . . . . . . . . . . . . . . . . 179
AR System Server and Components . . . . . . . . . . . . . . . . . . . 180
AR System Mid Tier and Components . . . . . . . . . . . . . . . . . . 180
AR System Clients and Components . . . . . . . . . . . . . . . . . . . 180
AR System Files on UNIX . . . . . . . . . . . . . . . . . . . . . . . 181
UNIX AR System Server File Locations . . . . . . . . . . . . . . . . 181
UNIX AR System Mid Tier File Locations . . . . . . . . . . . . . . 182
AR System Files on Windows . . . . . . . . . . . . . . . . . . . . . . 183
Windows AR System Server File Locations . . . . . . . . . . . . . . 183
Windows AR System Mid Tier File Locations . . . . . . . . . . . . . 184
Windows AR System Client Files . . . . . . . . . . . . . . . . . . 185
Appendix B Customizing UNIX Options . . . . . . . . . . . . . . . . . . . . . . 187
Command Options to Suppress Installation Forms . . . . . . . . . . . . 188
Customizing the System Configuration . . . . . . . . . . . . . . . . . 188
ARCONFIGDIR . . . . . . . . . . . . . . . . . . . . . . . . . 189AR_SYSTEM_LICENSE_DIR. . . . . . . . . . . . . . . . . . . . 190
Language Options . . . . . . . . . . . . . . . . . . . . . . . . . . . 190
Specifying a Platform for Installation . . . . . . . . . . . . . . . . . . 190
Appendix C Mounting a CD-ROM on a UNIX System . . . . . . . . . . . . . . . . 191
Mounting the CD-ROM . . . . . . . . . . . . . . . . . . . . . . . . 192
Exporting the CD-ROM from a Remote Host . . . . . . . . . . . . . . . 193
Mounting the Remote CD-ROM at Your Local Host . . . . . . . . . . . . 194
Index . . . . . . . . . . . . . . . . . . . . . . . . . . . . . . . . . . . . . 195

7/24/2019 Installing AR Sys English 5.1
http://slidepdf.com/reader/full/installing-ar-sys-english-51 8/200
8" Table of Contents
Action Request System 5.1

7/24/2019 Installing AR Sys English 5.1
http://slidepdf.com/reader/full/installing-ar-sys-english-51 9/200
Preface! 9
Preface
This guide provides general information and step-by-step instructions
for installing the Action Request System® 5.1 server
(AR System® server), mid tier, clients, and optional components.
This guide is intended for administrators who will install and license
the server, mid tier, clients, and optional components.
This guide assumes that you are familiar with either UNIX or
Windows environments, database configuration, and web server
configuration.
When you have completed the steps in this guide, refer to the
Configuring AR System guide for information on how to configure the
server, and to the Developing AR System Applications: Basic guide for
information on how to create and maintain AR System applications.
Note: Read the AR System 5.1 Release Notes before you perform any ofthe steps in this chapter.

7/24/2019 Installing AR Sys English 5.1
http://slidepdf.com/reader/full/installing-ar-sys-english-51 10/200
10" Preface
Action Request System 5.1
Obtaining System Requirements and Software
System requirements vary for server machines and client machines, and for
international environments.
You might need to upgrade your operating system (or, in the case of servers, your relational database) to be compatible with the new version ofAR System. Refer to the following documents for the most currentinformation on system requirements, including international and clientrequirements and patch requirements:
! Product compatibility matrix: http://supportweb.remedy.com! Release notes: http://supportweb.remedy.com
AR System software is available by Electronic Software Distribution (ESD),or on CD-ROM. If you purchase AR System by ESD, you will receive apassword when you make your purchase. You must have an Internetconnection and your password to download the software anddocumentation.
Contact your sales representative, or go to http://www.remedy.com for moreinformation about obtaining software.
Clients are available for Windows only, and client machines must havenetwork access to the installed AR System servers they will connect to. Thisrequires any of the network adapter cards (that support TCP/IP protocol or
Windows sockets) needed by the networking software to connect to thenetwork where the AR System server resides.
Troubleshooting the Installation
The separate installers for AR System clients each provide a log file that
captures installer activity (*_install.log) located in the TEMP directory on thehard drive where you install the AR System client. Use these files totroubleshoot your installation, if necessary.

7/24/2019 Installing AR Sys English 5.1
http://slidepdf.com/reader/full/installing-ar-sys-english-51 11/200
Action Request System Documents! 11
Installing AR System
Action Request System Documents
Title and Part Number Description Audience Format
AR System Concepts Guide
AR-510-CG-01
Overview of AR System architecture andfeatures with in-depth examples;includes information about otherAR System products as well as acomprehensive glossary for the entireAR System documentation set.
Everyone Print andPDF
Developing AR System
Applications: Basic AR-510-DABG-01
Basic procedures for creating and
modifying an AR System application fortracking data and processes.
Administrators Print and
Developing AR System Applications: Advanced
AR-510-DAAG-01
Advanced procedures for extending andcustomizing AR System applications.
Administrators Print andPDF
Configuring AR System
AR-510-CFG-01
Server administration topics onconfiguring servers and the mid tier, and
maintaining AR System.
Administrators Print andPDF
Optimizing and Troubleshooting AR System
AR-510-OTG-01
Server administration topics andtechnical essays related to monitoringand maintaining AR System for thepurpose of optimizing performance andtroubleshooting problems.
Administrators Print andPDF
AR System Database Reference
GuideAR-510-DRG-01
Database administration topics and rules
related to how AR System interacts withspecific databases; includes an overviewof the data dictionary tables.
Administrators Print and
AR System Distributed ServerOption Administrator’s Guide
AR-510-DSOG-01
Server administration and procedures forimplementing a distributed AR Systemserver environment with the DistributedServer Option.
Administrators Print byspecialorder andPDF
AR System C API Reference Guide
AR-510-CAPI-01
Information about AR System data
structures, API function calls, and OLEsupport.
Administrators
andProgrammers
Print by
specialorder andPDF
AR System Java API Information about Java classes, methods,and variables that integrate withAR System.
AdministratorsandProgrammers
HTML
Installing AR System
AR-510-IG-01
Procedures for installing and licensing
AR System.
Administrators Print and

7/24/2019 Installing AR Sys English 5.1
http://slidepdf.com/reader/full/installing-ar-sys-english-51 12/200
12" Preface
Action Request System 5.1
AR System Email Engine Guide
AR-510-EEG-01
Procedures for installing, configuring,and using the AR System email engine.
Administrators Print byspecial
order andPDF
AR System Error Messages Guide
AR-510-EMG-01
List and expanded descriptions ofAR System error messages.
AdministratorsandProgrammers
Print byspecialorder andPDF
AR System Master Index
AR-510-MI-01
Combined index of all books. Everyone Print only
AR System Release Notes
AR-510-RN-01
New features list, compatibility lists,international issues, open and fixedissues.
Everyone Print andPDF
AR System Windows User ToolHelp
Procedures for using AR SystemWindows User Tool.
Everyone Helpmenu
AR System Import Help Procedures for using AR System Import. Administrators Help
menu
AR System Administrator Help Procedures for creating and modifyingan AR System application for trackingdata and processes.
Administrators Helpmenu
AR System Alert Help Procedures for using AR System Alert. Everyone HelpMenu
Unless otherwise noted, online documentation is available in Adobe Acrobat (PDF) format on AR Systemproduct installation CDs and/or on the Customer Support web site.
Title and Part Number Description Audience Format
7/24/2019 Installing AR Sys English 5.1
http://slidepdf.com/reader/full/installing-ar-sys-english-51 13/200
Planning an AR System Installation! 13
CHAPTER
1 Planning an AR System Installation
Before you install a new AR System server or upgrade an existing
server, you should:
! Review the information on system components and server optionsin this chapter and the next.
! Refer to the following documents for the most current informationon system requirements, including international and clientrequirements:
! Product compatibility matrix: http://supportweb.remedy.com
! Release notes: http://supportweb.remedy.com
Advance planning is important because you will be prompted by the
AR System installers to choose optional components that enable
various functions. If you review the descriptions of the various
components and how they fit together, installation will proceed more
smoothly.This chapter describes system components and how they can be
configured.
Note: Read the AR System 5.1 Release Notes before you perform any ofthe steps in this chapter.

7/24/2019 Installing AR Sys English 5.1
http://slidepdf.com/reader/full/installing-ar-sys-english-51 14/200
14"Chapter 1—Planning an AR System Installation
Action Request System 5.1
Choosing a Configuration
AR System consists of server and client components that you combine to
create the types of access you want to enable. Certain components arerequired for all AR System installations, while other components areoptional. This chapter describes a configuration with required components,in which users access AR System with the AR System clients, a configurationthat allows web access, and a configuration that allows email access.
Each component, shown below, is represented by a graphic icon in thesample configurations in this chapter.
The sample configurations shown in this chapter do not represent all possiblecombinations. Configurations are also flexible; you can change yourconfiguration any time.
After you have chosen a configuration, you must prepare your database andthe machine where you will install AR System before you start the
installation. Refer to the next chapter, which contains instructions forpreparing your database and AR System server machine.
AR System server
The AR System server can be installed on UNIX or Windows. However, the clientsused for licensing and administration are available only for Windows, so aWindows client machine is required to administer and license a UNIX server.
The AR System server is a required component that manages user interaction withthe underlying database. The AR System server interacts with the database andprovides information to the user independent of the underlying database.
The AR System server installer creates an AR System database and a series of tablesthat make up a data dictionary where form, filter, escalation, and other definitionsare stored. The structure of the AR System database varies depending on theunderlying relational database.
If you are upgrading an existing AR System server installation, you can choose to
upgrade the database, which preserves existing structures and updates the databaseto be compatible with the new server. You can also choose to overwrite thedatabase, which creates a new database, and overwrites your existing structures.
Database
The database can be installed on any machine that is accessible to the AR System server.
AR System can be installed with a variety of relational databases.

7/24/2019 Installing AR Sys English 5.1
http://slidepdf.com/reader/full/installing-ar-sys-english-51 15/200
Choosing a Configuration! 15
Installing AR System
AR System mid tier
The AR System mid tier can be installed on UNIX or Windows.
The AR System mid tier is optional middleware that enables AR System access
through a web browser. The web server and mid tier can be installed on a separatemachine with network access to the AR System server machine, or all can beinstalled on the same machine.
One mid tier can permit access to multiple AR System servers.
The following supporting components must be installed on the mid tier machine:
! A supported web server
! A supported web browser (to run the AR System Configuration Tool)
A supported Java Server Pages (JSP) engine (ServletExec 4.1.1 is included with themid tier, and is the recommended JSP engine)
! Java 2 SDK v1.3 or above
The AR System Configuration Tool is installed together with the mid tier. Use thistool to define which AR System servers to permit web access to, and for, othersettings.
Client machines must have a supported web browser installed. Users needAR System permissions to submit AR System requests and search the database
through the web.AR System Administrator
AR System Administrator is installed on Windows.
This client, which you can also use to manage multiple AR System servers, isrequired to administer and configure AR System servers, and design AR Systemapplications.
AR System Import is installed together with AR System Administrator.
AR System Import is a separate component that is designed for importing datainto AR System.
AR System Windows User Tool
AR System Windows User Tool is installed on Windows.
This client serves two functions. It permits users to access the AR System fromclient machines to submit requests and search the database. AR System WindowsUser Tool also provides some administrative functions. AR System Windows UserTool and AR System Administrator both are typically installed on client machines
used by administrators.AR System Windows User Tool is required for AR System access in configurationsthat do not include the mid tier. If the mid tier is installed, AR System WindowsUser Tool is not required for user access to AR System.
Mid Tier and
Web Server
A ti R t S t 5 1

7/24/2019 Installing AR Sys English 5.1
http://slidepdf.com/reader/full/installing-ar-sys-english-51 16/200
16"Chapter 1—Planning an AR System Installation
Action Request System 5.1
Sample Configurations
The graphics on the following pages show the required and optionalcomponents in sample configurations. These sample configurations do notdemonstrate all possibilities. AR System is flexible and adaptable, so you canmix and match components as needed.
AR System Alert
AR System Alert is installed on Windows.
AR System Alert is an optional component that informs users about AR System
transactions, such as when a ticket has been assigned to a user, when a ticket hasbeen escalated, and so on.
AR System Alert can be installed separately. Users can access alerts with AR SystemWindows User Tool, or, if the mid tier is installed and AR System Alert has beenconfigured for the web, through a web browser.
Email process
Email access to AR System servers is available for all supported platforms.
This server option enables users to search the database and submit AR System
requests using an email client.
Web browser
When the mid tier is installed, client machines must have a supported web browserfor AR System access through the web.
Email clientIf you enable email access to AR System through the mail service, client machinesmust have an email client.
Installing AR System

7/24/2019 Installing AR Sys English 5.1
http://slidepdf.com/reader/full/installing-ar-sys-english-51 17/200
Sample Configurations! 17
Installing AR System
Configuring with Minimum Requirements
The following figure shows a minimum configuration.
The minimum requirements for an AR System configuration are:
! A database
You can install the AR System server on the same machine as the database,or on a remote machine with network access to the database.
! An AR System server
The server communicates with and allows access to the database.
! One or more AR System Administrator clients for server administration
AR System Administrator can be installed on the same machine as aWindows AR System server, or installed on a remote machine with
network access to a Windows or UNIX AR System server.
Action Request System 5 1
7/24/2019 Installing AR Sys English 5.1
http://slidepdf.com/reader/full/installing-ar-sys-english-51 18/200
18"Chapter 1—Planning an AR System Installation
Action Request System 5.1
! One or more AR System Windows User Tool clients for administrationand user access
AR System Windows User Tool is required for some administrative tasks,
so both AR System Administrator and AR System Windows User Tool aretypically installed on client machines used by AR System administrators.
AR System Windows User Tool is required for user access in a minimumconfiguration and is often present, although not required, in otherconfigurations.
! One or more AR System Alert clients for user notification
AR System Alert is an optional tool that receives alert notifications andnotifies users proactively that an alert has arrived. It is installed on clientmachines in the same location as AR System Windows User Tool.
AR System Alert can be installed on client machines where AR SystemWindows User Tool is installed.
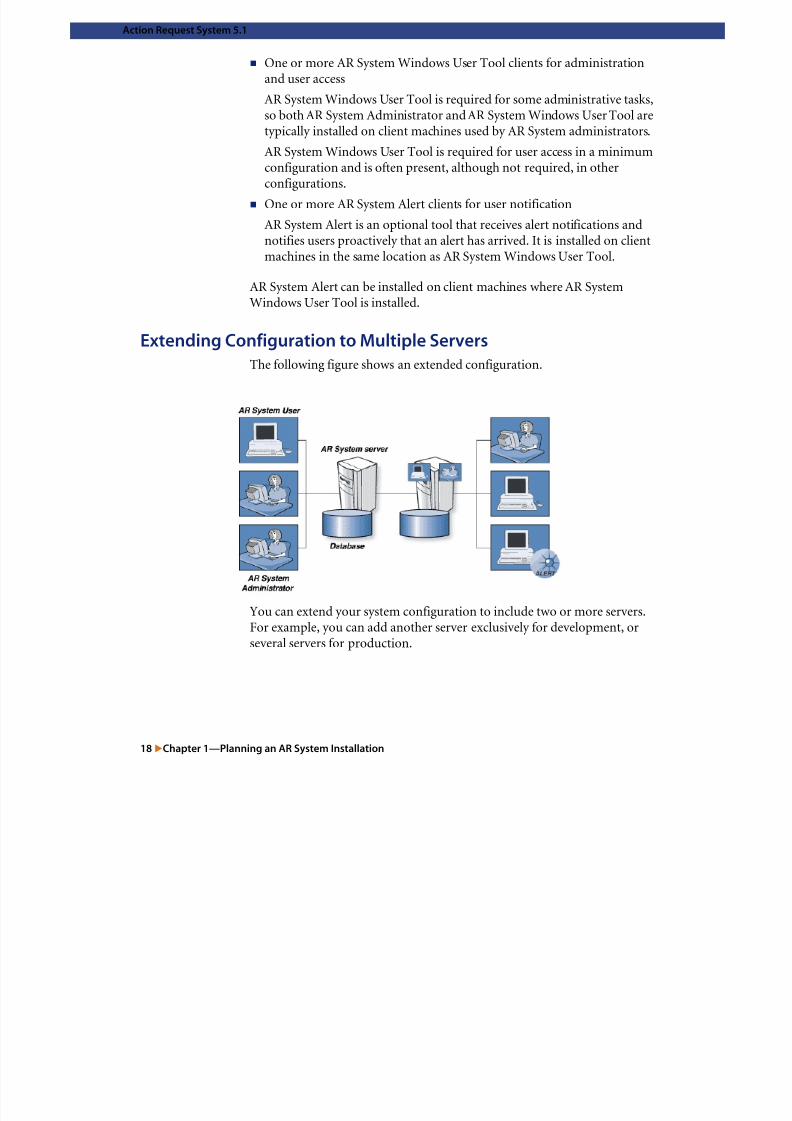
Extending Configuration to Multiple ServersThe following figure shows an extended configuration.
You can extend your system configuration to include two or more servers.For example, you can add another server exclusively for development, orseveral servers for production.
Installing AR System

7/24/2019 Installing AR Sys English 5.1
http://slidepdf.com/reader/full/installing-ar-sys-english-51 19/200
Sample Configurations! 19
g y
To extend your configuration, include the following:
! One or more databases
You can add additional databases to provide unique data sets for each
server. Or you can continue with one database if you use additional serversfor scalability of that database.
! Additional AR System Servers
Each AR System server can communicate with one database. MultipleAR System servers can communicate with the same database. MultipleAR System servers can reside on the same machine, as long as they areinstalled in separate directories.
Extending Configuration to the Web
You must install the AR System mid tier and required supportingcomponents on a web server machine to allow users to access AR Systemthrough a web browser. The web server and mid tier can be installed on aseparate machine with network access to the AR System server machine, or
all can be installed on the same machine.
Client machines require a supported web browser and internet or intranetaccess to the mid tier machine to access AR System.
In addition to the required configuration, web configuration requires thefollowing:
! One or more AR System mid tiersThe AR System mid tier must reside on a web server machine. A supportedweb server, Java 2 Software Development Kit (JDK), a supported JavaServer Pages (JSP) engine, and a supported web browser are required. Asingle mid tier can access multiple AR System servers.
See the compatibility matrix for more information.
! User clients that have a supported browser installed
No installation is required on client machines. You install AR System Alertto allow access to the Alert notification. You can use your browser toaccess the alert list without installing AR System Alert, but you will notreceive a proactive notice.
Action Request System 5.1

7/24/2019 Installing AR Sys English 5.1
http://slidepdf.com/reader/full/installing-ar-sys-english-51 20/200
20"Chapter 1—Planning an AR System Installation
y
A browser-only client configuration is suitable for environments in whichusers will access AR System through a web browser. However, you can alsoinstall AR System Windows User Tool on client machines to give users achoice of access tools.
The following figure shows a typical web configuration.
Extending Configuration to Email Access
To allow users to access AR System through an email client, you must enablethe mail service on each AR System server.
Client machines require an email client to submit AR System requests andsearch the database.
In addition to the required configuration, email configuration requires thefollowing:
! User machines that have an email client to send and receive emails
! An Email server that supports SMTP, POP3, IMAP, MBOX, and MAPI protocols accessible by the AR System server.
Installing AR System

7/24/2019 Installing AR Sys English 5.1
http://slidepdf.com/reader/full/installing-ar-sys-english-51 21/200
Sample Configurations! 21
The following figure shows an AR System configured to allow users to accessthe system through an email client.
2 0 0 1
I I O O
I O O I
O I, O O 1 1 1
1
1
14 SEP T
ALERT
AR System User
AR System Administrator
Email client -Client
AR System server
Mail Service
Database
Action Request System 5.1

7/24/2019 Installing AR Sys English 5.1
http://slidepdf.com/reader/full/installing-ar-sys-english-51 22/200
22"Chapter 1—Planning an AR System Installation

7/24/2019 Installing AR Sys English 5.1
http://slidepdf.com/reader/full/installing-ar-sys-english-51 23/200
Choosing Server Options and Preparing the Environment! 23
CHAPTER
2 Choosing Server Options andPreparing the Environment
When you install a new AR System server or upgrade an existing
AR System server installation, the installer will prompt you for system
settings, database information, and optional component installation.
You need to prepare your operating system and database before you
start the AR System server installer. If you have an existing AR System
server, you should ensure that you understand the difference between
upgrading and overwriting an existing installation. If you will be
upgrading or overwriting an existing installation, you should back up
any data and structures you want to save before you make changes.
This chapter describes the upgrade and overwrite options, explains
how to back up existing data and structures, provides an overview of
AR System server options, and contains worksheets where you can
record information that the installer will prompt you for. The
worksheets also serve as checklists that you can use to check off
preparatory tasks as you complete them.
Note: Read the AR System 5.1 Release Notes before you perform any ofthe steps in this chapter.
Action Request System 5.1

7/24/2019 Installing AR Sys English 5.1
http://slidepdf.com/reader/full/installing-ar-sys-english-51 24/200
24"Chapter 2—Choosing Server Options and Preparing the Environment
Pre-Installation Steps
Before you start the installation, perform the following preparatory steps.
Back Up the AR System Environment
If you are installing a new AR System server, skip this section and go toEnsure Database Version Compatibility
If you are installing over an existing AR System server, you should back upthe existing AR System environment (your forms, data, and workflow)
before you make changes.
Regular backups are always a good practice, particularly when yourestructure or make major changes to the system. Backups provide you withemergency recovery protection in case of upgrade failure.
Use one of the following steps to back up your AR System environment.
Backing Up the AR System Environment
" Back up your underlying database.
Refer to your database system documentation.
" Export AR System data and server structure definitions that you want to save.
Use the runmacro (runmacro.exe) utility or AR System Windows User Tool
to export all the data in the server into AR Export (.arx) file or XML (.xml)format. Refer to the Developing AR System Applications: Advanced guide formore information.
Use the AR System Administrator export capability to export all serverobjects. Refer to the AR System Administrator online help for instructions.
Ensure Database Version Compatibility
If you are upgrading, make sure that AR System 5.1 supports the version ofthe database you are installing on. For information on supported versions, goto the compatibility matrix at: http://supportweb.remedy.com
If your database version is not supported, upgrade the database to asupported version before you continue with the installation.
Installing AR System

7/24/2019 Installing AR Sys English 5.1
http://slidepdf.com/reader/full/installing-ar-sys-english-51 25/200
AR System Database Upgrade and Overwrite Options ! 25
AR System Database Upgrade and Overwrite Options
Before you install a new AR System server or upgrade an existing AR System
server, you should understand your choices regarding the AR Systemdatabase.
The AR System server installer creates an AR System database that containsthe AR System server form and field definitions. When you create workflowand applications, this is where your data and structures are stored.
The installer will prompt you for information about this database when you
install an AR System server for the first time, and when you upgrade anexisting server.
You will be prompted for specific settings, such as whether to specify a logdevice or a rollback segment. These settings depend on the relationaldatabase you choose and are described in the installation worksheet for yourplatform and database.
General settings that apply to all databases are described in the followingsections.
Choosing Settings for a New AR System Database
When you install a new AR System server, you must name the AR Systemdatabase and define a database user. The default values are as follows:
! AR System database name: ARSystem
! AR System database user name: ARAdmin
! AR System database user password: AR#Admin#
You should assign a database name that you will use only for this databasebecause each AR System server is associated with only one AR System
database. This name is permanent, and cannot be changed, even if youupgrade the AR System server that this database was created for. AR Systemservices rely on this database name.
After you have installed the AR System server, you can change the databaseuser password using AR System Administrator.
Action Request System 5.1

7/24/2019 Installing AR Sys English 5.1
http://slidepdf.com/reader/full/installing-ar-sys-english-51 26/200
26"Chapter 2—Choosing Server Options and Preparing the Environment
Choosing the Upgrade or Overwrite Option
If you install an Action Request System (AR System) 5.1 server over anexisting AR System server, you will be prompted to upgrade or overwrite the
existing AR System database.
If you upgrade the AR System database, your environment (forms, data, andworkflow) is retained, and the AR System database is updated to support thenew server. If you overwrite the AR System database, a new AR Systemdatabase will be created, and your existing data and structures will be lost.
If you overwrite the AR System database, you can choose a new databasename and define a new user.
Windows only : If you upgrade an existing AR System server, you cannotchange the database name or the user who you assigned when you installedthe existing AR System server.
UNIX only: You can add another user to this database. If you create a new
user during the installation, the new user will be added to the database andthe original database user remains unchanged. The user password must be
exactly AR#Admin# during the installation, but you can change it later inAR System Administrator.
Note the following when you upgrade an existing AR System database:
! The upgrade process can vary from a few minutes to over an hour,
depending on the size of your database.! The upgrade process does not change the database to a different type.
! You must have sufficient database transaction log space before youattempt to upgrade AR System. Log space needs will depend on thedatabase definition size, number of records in the database, currentversion of the database, block size, and extent size. It might require 50 MBor more.
Whether you choose to upgrade or overwrite the AR System database, youshould back up all data and structures that you want to save before you makeany changes to the system. If you back up your information, you can restoreit later if you go back to the pre-installation state. However, you mustreinstall the original AR System server version. For more information on howto back up the environment, refer to Back Up the AR System Environment on
page 24.
Installing AR System

7/24/2019 Installing AR Sys English 5.1
http://slidepdf.com/reader/full/installing-ar-sys-english-51 27/200
Choosing Optional Functionality for the AR System Server! 27
Upgrading or Overwriting the Full Text Search Option
If you use the full text search (FTS) option with your existing AR Systemserver, you can choose to overwrite your existing indexes, or you can leave
them unchanged.
The AR System server installer prompts you to specify the FTS collectiondirectory. If you choose to install FTS into the same directory that was usedin the previous installation, your existing indexes will be overwritten and youwill need to rebuild them after installation.
If you choose a different FTS collection directory, your indexes will remainunchanged. However, the AR System server will use indexes in the directory you specify during the installation. To use your existing indexes, you willneed to move them into the new directory after installation.
Refer to the Optimizing and Troubleshooting AR System guide for instructionson moving or rebuilding indexes after installation.
Choosing Optional Functionality for the AR SystemServer
When you install an AR System server, you are prompted to choose amongseveral options that enable functionality. The primary reason that you needto plan for these functions before you install an AR System server is that you
need to install the optional components or forms that enable these functions.In addition, you might want to determine the server functionality before youinstall the mid tier or AR System clients, because the mid tier and AR Systemclient installers prompt you to identify AR System servers with specificfunctionalities.
A single AR System server is not limited to a single type of functionality. You
can choose to install any or all of the options on the same AR System server,or you do not need to install any of the options.
The information in the following sections will help you decide which optionsto install. You can then record your selections on the worksheet for yourplatform and database.
Action Request System 5.1

7/24/2019 Installing AR Sys English 5.1
http://slidepdf.com/reader/full/installing-ar-sys-english-51 28/200
28"Chapter 2—Choosing Server Options and Preparing the Environment
Centralized Preferences
Centralized preferences preserve a user’s preferences when that user logs into AR System from different machines, using AR System Windows User Tool
or a web browser.
Centralized preferences are stored in forms that can be installed when youinstall the AR System server. To install centralized preference forms, choosethe option in the AR System server installer when you are prompted to do so.For more information on centralized preferences, refer to theDeveloping AR System Applications: Basic guide.
When you have finished with the server installation, refer to theDeveloping AR System Applications: Advanced guide for instructions onenabling the preferences forms.
If you do not choose this option, user preferences will be stored locally fornative clients, and will be available only on the machine where thepreferences are set. Local preferences are not available for web clients.
Custom Programming
AR System includes plug-ins and corresponding application programinterfaces (APIs) that extend AR System functionality to external datasources. The plug-in service, a companion server to the AR System server,loads and runs the plug-ins upon request from the AR System server.
When you install an AR System server, you are prompted to choose whetherto install the in-house Light-Weight Directory Access Protocol (LDAP)plug-ins (AREA LDAP and ARDBC LDAP), as well as the components tocreate your own AREA and ARDBC plug-ins, and the API package.
If you do not choose to install the in-house plug-ins, you can run theinstallation program again later, choose to install only the LDAP plug-ins
and choose the Upgrade option.
Installing AR System

7/24/2019 Installing AR Sys English 5.1
http://slidepdf.com/reader/full/installing-ar-sys-english-51 29/200
Choosing Optional Functionality for the AR System Server! 29
The AR System API suite is composed of a C application program interface(API), a Java API, a plug-in API, and three APIs that use plug-ins:
! AR System External Authentication (AREA)—Accesses networkdirectory services, such as Lightweight Directory Access Protocol (LDAP).You must create and configure this plug-in. The AREA plug-in alsoenables AR System users to consolidate user authentication informationfor external applications or data sources.
Alternatively, you can use the AREA LDAP plug-in, which is part of theAR System, to access LDAP services through forms in AR SystemAdministrator (the Administrator Tool). For more information on this
ready-to-use plug-in, refer to the AR System C API Reference Guide,Configuring AR System guide, and the Developing AR System Applications:Basic guide.
! AR System Database Connectivity (ARDBC)—Accesses primarilynon-database sources of data. The ARDBC plug-in, which you accessthrough external forms, enables you to perform the following tasks onexternal data:
! Create, delete, modify, and set external data! Retrieve lists for external data
! Populate search-style character menus
Alternatively, you can use the ARDBC LDAP plug-in, which is part of theAR System, to access LDAP services through forms in the AdministratorTool. For more information on this ready-to-use plug-in, refer to the AR System C API Reference Guide, Configuring AR System guide, and theDeveloping AR System Applications: Basic guide.
! AR System Filter API—Increases the transaction speed of run processesand enables the AR System server to return to its workflow faster. Thefilter plug-in and API also apply to escalations.
Install the API if you will install the mid tier or if you require functionalitythat is not included in the AR System client tools.
If you do not install the API package when you install the AR System server, you can install the API later. To do so, perform an upgrade installation,which preserves your data and structures, and choose the API option.
For additional information on the API package, refer to the AR System C API Reference Guide.
Action Request System 5.1

7/24/2019 Installing AR Sys English 5.1
http://slidepdf.com/reader/full/installing-ar-sys-english-51 30/200
30"Chapter 2—Choosing Server Options and Preparing the Environment
Email Access
If users will access AR System through email, then the AR System Emailprocess must be enabled on each AR System server that users will access
through email.
Localized Messages
To run the system with messages in multiple languages, use the AR SystemMessage Catalog form to create and store localized messages.
The AR System Message Catalog form is installed with the AR System server.To create a catalog server, enable the server localization after you install theAR System server.
When you install the mid tier, you specify which AR System server to use as your Catalog server. To localize messages, specify a server with an activelocalization Configuration option. If necessary, you can change this settingafter installation. Refer to the Developing AR System Applications: Basic guide
for more information.
Centralized Report Processing
Reporting forms allow the creation and storage of both AR System nativeforms and Crystal Reports. This central repository can be accessed byworkflow on both Windows and the web. Administrators can use reporting
forms to create standard reports in all supported formats, and these formscan be shared across the environment by all users. Refer to theDeveloping AR System Applications: Advanced guide for more information.
Choosing Port Number Options
The port number identifies a program or service that runs on a particular
server. The AR System installer prompts you to choose how port numbersare handled for the AR System server and its extensions, such as the plug-inserver. The TCP port number for the AR System server and the port numberfor the plug-in server cannot be the same.
You can choose to register the AR System server and plug-in server with aportmapper, you can assign port numbers to these servers, or both.
Installing AR System
i i i h

7/24/2019 Installing AR Sys English 5.1
http://slidepdf.com/reader/full/installing-ar-sys-english-51 31/200
Choosing Port Number Options! 31
Registering with a Portmapper
A portmapper is a service that runs independently of the AR System serverand serves as a “directory” of port numbers. If a server is registered with a
portmapper, it is not necessary to specify the port number in the clientbecause the portmapper can locate the port and direct clients to theappropriate location. If a server is not registered with a portmapper, or afirewall blocks the portmapper port, the client must know and specify theport that the server is running on in order to establish a connection.
When you start the server, it will open a port to listen to. You can specify aport for the server or let the server obtain an available port dynamically. If you specify a port, the server will open with the same port every time it runs.If you do not specify a port, the port might change with every run.
Portmapper is a directory that allows clients to look up the port that a processruns on. You can choose whether the server registers the port with theportmapper. If you do not specify a port for the server, you must register withportmapper or no client will be able to connect since the client will not know
what port the server is running on at any given time. If you specify a port, youare not required to register with the portmapper.
You can choose to register a server with a portmapper and assign a portnumber as well. For example, if you register a server with a portmapper andspecify a particular port, and you do not expose the portmapper outside afirewall, clients within the firewall do not need to be configured to access the
specified port number. They can access the portmapper, which directs themto the port. Clients outside the firewall must be configured to access thespecified port number.
Note: If you install two or more AR System servers on the same machine, you can only register one server with a portmapper. You must assignTCP and plug-in port numbers to all other servers on the samemachine (and you can assign to all servers on one machine). If youconfigure two or more servers to use the portmapper, only the serverthat you started most recently will be accessible with the portmapper.
On UNIX systems, if you choose to register the AR System server with aportmapper, the server is registered with the portmapper that is includedwith the operating system.
Action Request System 5.1
O Wi d t th AR S t i t ll h f i ti

7/24/2019 Installing AR Sys English 5.1
http://slidepdf.com/reader/full/installing-ar-sys-english-51 32/200
32"Chapter 2—Choosing Server Options and Preparing the Environment
On Windows systems, the AR System server installer searches for an existingportmapper. If a portmapper is installed and running and you choose toregister with a portmapper, the AR System will register the server with thatportmapper. If the installer does not detect a running portmapper, then
servers will be registered with AR System Portmapper, which is included inthe server installation. AR System Portmapper can be disabled.
Note: The AR System server does not have a default port. The portmapperrandomly assigns ports and will not always assign the same port to theAR System server. To ensure that the portmapper always uses the sameport for the AR System server, specify a port during install or use the
Administrator Tool to configure the AR System server after youinstall it.
Assigning Port Numbers
You must assign a port number to any server that you want clients to accessdirectly, without the use of a portmapper. Do not assign port numbers thatconflict with port numbers used by other applications or other programsrunning on your system. To find out which port numbers are already in use,
use the rpcinfo -p command (UNIX) or the netstat -a command (WindowsNT) at the command line prompt. If you do not check available ports, youcould assign port numbers that conflict with other applications and yourservers might not start as expected.
Port numbers within the range 1–1024 are only available for use by the
superuser, and many of these numbers are reserved. Additionally, portnumbers lower than 1024 cannot be accessed by clients earlier than version5.0. For these reasons, you should assign port numbers greater than 1024.
When you upgrade an AR System server, use the port numbers that you usedpreviously so that you remain compatible with previous server versions.
Installing AR System
You can enter your selections on the worksheet for your platform so that the

7/24/2019 Installing AR Sys English 5.1
http://slidepdf.com/reader/full/installing-ar-sys-english-51 33/200
Choosing Port Number Options! 33
You can enter your selections on the worksheet for your platform so that theinformation will be available when you run the AR System server installer.The following figure shows the Enter Server Port Number screen.
Figure 2-1: Entering a Server Port Number
To assign port numbers, select this box
and enter the port numbers in the fields.
The two port numbers cannot be the same.
Use port numbers greater than 1024.
If you choose Yes, this server will be registered with aportmapper. Users do not need to specify the port when
they log in to the server. You can also enter port
numbers in the fields if you choose Yes. If you choose
No, you must enter port numbers.
Action Request System 5.1
The following shows the portmapper selection section of the installation

7/24/2019 Installing AR Sys English 5.1
http://slidepdf.com/reader/full/installing-ar-sys-english-51 34/200
34"Chapter 2—Choosing Server Options and Preparing the Environment
The following shows the portmapper selection section of the installationscript with explanations and instructions for each question.
Choosing a Startup Option
The AR System server runs as a service, and can be restarted automatically onreboot. The AR System server installer will prompt you to choose whether tostart the service automatically (Windows) or whether to place the service ina system startup file (UNIX). You will need to decide how you will start the
service before you install the server.
Choosing a Server Name
Each AR System server must have a unique name that clients can resolve intoan IP address. If clients cannot resolve the name into an IP address, then theywill not communicate correctly with the server.
Do you want to register this AR System server with a portmapper? [y]
If you choose yes [y], this server will be registered with a portmapper, and usersdo not need to know the server port to log in to the server. If two or moreAR System servers are installed on the same machine, only one server can registerwith a portmapper.
If you choose no [n], you must assign two port numbers for this server; one for theAR System server and one for the plug-in server.
Do you want to run this AR System server on a specific port? [n]If you answered yes [y] to the previous prompt to register this server with a
portmapper, you can choose no [n] here. If you choose no [n] here, the server will
dynamically choose an available port. You can also choose yes [y] here and assignport numbers at the following prompts.
If you answered no [n] to the previous prompt, this server will not be registered
with a portmapper, and you must answer yes [y] here. You will be prompted as
follows:What TCP port will this AR Sytem server use?
Enter a port number greater than 1024.
What plug-in port will the Report Plugins use?
Enter another port number greater than 1024. This port number cannot be thesame as the TCP port number for the server.
Installing AR System
Individual AR System server names are required to distinguish between

7/24/2019 Installing AR Sys English 5.1
http://slidepdf.com/reader/full/installing-ar-sys-english-51 35/200
Choosing a Server Name! 35
Individual AR System server names are required to distinguish betweenmultiple AR System servers on a single machine. Individual AR Systemserver names do the following:
! Ensure that the correct licenses are used
! Identify the correct AR System database for each AR System server
! Allow you to selectively stop and start server processes
The AR System server name identifies the configuration file and theservice (armonitor), associated with each AR System server.
On Windows, the first server you install on a machine appears in theWindows Services screen as AR System Server. Additional servers appearas follows: AR System Server <servername>.
On UNIX, there are two services that are listed for each AR System serverthat is running: armonitor and arserverd. To display all services that arecurrently running, issue # ps -ef | egrep ar.
The AR System services will appear as follows:
! <ar_install_dir> /bin/armonitor -s <servername>
-c <ar_home_dir>
! <ar_install_dir> /bin/arserverd -s <servername> -i <ar_install_dir> -l <ar_license_dir>
The first time that you install an AR System 5.1 server on a machine, theinstaller does not prompt you for a server name. The AR System 5.1 serveruses the host name.
When you install another server on a machine where at least one AR System5.1 server is already installed, or when you reinstall a version 5.1 server, youwill be prompted during installation to enter the AR System server name.
To install a new server on a machine where another AR System server isinstalled, you must enter a new server name. This creates a new AR Systemserver and leaves the original server unchanged. To upgrade or overwrite anexisting AR System 5.1 server, enter an existing server name. You will be
prompted during the installation to choose whether to upgrade or overwritethe installation. This replaces the existing AR System server with the newversion.
Action Request System 5.1
If you plan to install multiple AR System servers on a single machine, you

7/24/2019 Installing AR Sys English 5.1
http://slidepdf.com/reader/full/installing-ar-sys-english-51 36/200
36"Chapter 2—Choosing Server Options and Preparing the Environment
y p p y g , yshould create AR System server names before you install the servers. If anAR System server will be accessible over a network, the server name must bea valid DNS entry.To ensure that clients can resolve the server name, use only
alphanumeric names containing uppercase and lowercase letters a through z and numbers 0 through 9. Avoid hyphens (-), underscores (_), and other
special characters ($, for example), as these characters do not comply withDNS rules. Server names are case sensitive. The following two figures showhow to select a server name in the AR System installers.
Figure 2-2: Entering a Server Name in the Windows Installer
If you enter a name that does not appear in
the list, a new server will be installed. In
this example, there will be three separate
AR System servers on this machine when
myserveris installed.
If you choose a server from the list, the
existing server will be upgraded or
overwritten, according to your choice at the
Existing Database screen, which appears
later in the installation. In this example,
there will still be only two servers after
arsys is upgraded.
Installing AR System

7/24/2019 Installing AR Sys English 5.1
http://slidepdf.com/reader/full/installing-ar-sys-english-51 37/200
Preparing to Install an AR System Server ! 37
Preparing to Install an AR System Server
This section explains how to install an AR System server on the following:
! All platforms—This subsection explains the steps common to allinstallations.
!
Oracle database! IBM DB2 database
! Microsoft SQL Server database
! Informix database
! Sybase database
To install a new AR System server, enter the new server name.
To upgrade or overwrite an existing AR System server, please enter the
name of the AR System server from the list: <Enter the server name here>
-------------------------------------------------------------------------------------------------
server2
server1
In this example, two AR System servers, server1 and server2, are installed
on this machine. The most recently installed server is listed at the top.If you enter another name, server3, for example, a new AR System server
named server3 will be installed.
If you enter server1 at this prompt, and then choose the upgrade option
when you are prompted, you will be upgrading server1. The existing
AR System database for server1 will be upgraded to support the new server.
Action Request System 5.1
Installing on All Platforms

7/24/2019 Installing AR Sys English 5.1
http://slidepdf.com/reader/full/installing-ar-sys-english-51 38/200
38"Chapter 2—Choosing Server Options and Preparing the Environment
g
Some preparatory tasks must be completed for all AR System serverinstallations. The common tasks are included in the following worksheet.
After you have completed the tasks in this worksheet, complete theworksheet for your database and platform.
Worksheet for All Platforms and Databases
Copy this worksheet and complete it for each system where you will installAR System.
Review the AR System 5.1 Release Notes
on the Customer Support website:http://supportweb.remedy.com
Prepare the system and environment
1 Refer to the compatibility matrix to verify system requirements:http://supportweb.remedy.com
2 Skip this step if you are installing a new AR System server.
Save your AR System environment before making changes to yourconfiguration.
Refer to Back Up the AR System Environment on page 24 for instructions.
3 Refer to Ensure Database Version Compatibility on page 24 if the relationaldatabase is not installed. Install the database.
If the relational database is already installed, back up the database that the
AR System server will connect to. Refer to Back Up the AR SystemEnvironment on page 24 for more information.
Refer to Ensure Database Version Compatibility on page 24 to check versioncompatibility.
4 Complete this step only if you are installing a new AR System server on amachine where one or more AR System servers are already installed.
Create an entry for the server. If the server will be accessible over a network,
this must be a valid DNS entry. Refer to Choosing a Server Name on page 34 for information.
When you have created the entry, record the server name.
AR System server name: ________________________________________
Installing AR System
5 Complete this step only if you will configure this AR System server for email

7/24/2019 Installing AR Sys English 5.1
http://slidepdf.com/reader/full/installing-ar-sys-english-51 39/200
Preparing to Install an AR System Server ! 39
access.
Prepare the system for AR System Email installation.
!
Ensure that the AR System mail server has access to your POP3, SMTP,MAP, MBOX, or IMAP mail service.
! Ensure that JDK 1.4 is installed on the AR System mail server system.
6 Create an email address for the AR System email process to use to send andreceive email.
Typically, the email address is established on the AR System server machine.To establish the email address on a remote machine with network access to
the AR System server, add an entry for the email address to the /etc/aliases file. A sample entry for the default address might be as follows:
ARSystem:/usr/spool/mail/ARSystem
For all other nodes in the network, make any changes that are required toforward email for the email process to the AR System email address.
If you are using NIS services, follow the rules for updating files under NIS.
AR System email address:_______________________________________
Refer to the Email Engine Guide when you install the AR System server withthe email server option.
Record information to enter at the installer prompt.
7 Determine how TCP port numbers will be assigned and record port
information.Refer to Choosing Port Number Options on page 30 before making yourselection.
Register with a portmapper? Circle one: Yes No
Assign ports numbers? Circle one: Yes No
TCP Port number: _____________________________________________
Plug-in port number: ___________________________________________
Action Request System 5.1
8 Choose the optional components to install.

7/24/2019 Installing AR Sys English 5.1
http://slidepdf.com/reader/full/installing-ar-sys-english-51 40/200
40"Chapter 2—Choosing Server Options and Preparing the Environment
__ API
Refer to Custom Programming on page 28 for information.
__ SamplesThis option installs a sample application that demonstrates many AR Systemfunctions and features.
__ LDAP plug-ins
This option installs the LDAP plug-ins that allow you to connect to LDAPservices without having to create your own LDAP plug-ins.
__ Centralized PreferencesRefer to Centralized Preferences on page 28 for information.
9 Record the installation directory for the AR System server you are installing.
The location must have adequate disk space and RAM, and be accessible toclients through a network. The installer assumes that you are connecting tothe local machine where you are installing the AR System server.
AR System server installation directory:_______________________________
The default is: \Program Files\AR System (Windows) or
/usr/ar/<server_name> (UNIX)
10 If you are upgrading or reinstalling an existing AR System server, and you usefull text search (FTS), specify the directory where FTS will be installed.
Refer to Upgrading or Overwriting the Full Text Search Option on page 27 forinformation.
FTS directory: ________________________________________________
The default is: \Program Files\AR System\Ftindex (Windows) or
/usr/ar/<server_name>/ftindex (UNIX)
11 Choose a startup option.
For Windows:! Start automatically after reboot
! Start service manually after reboot
List any special system startup or boot options you require. Refer to theoperating system documentation for information on options.
____________________________________________________________
____________________________________________________________
Installing AR System
For UNIX:
Pl h AR S i fil ? Ci l Y N

7/24/2019 Installing AR Sys English 5.1
http://slidepdf.com/reader/full/installing-ar-sys-english-51 41/200
Preparing to Install an AR System Server ! 41
! Place the AR System into a startup file? Circle one: Yes No
Startup file name: ______________________________________________
List any special system startup or boot options you require. Refer to theoperating system documentation for information on options.
12 Linux only:
Important: You must complete this step if you are installing on Linux.
Before installing the AR System server on Linux, you must comment out any
mention of nis or nisplus in the hosts line of the Linux /etc/nsswitch.conf system file.
For example, the line hosts: files nisplus nis dns will cause the server to crash,
but the line hosts: files dns will not.
Note: If you are going to use UNIX password authentication, you will also
need to remove any mention of nis or nisplus in the passwd line of the
Linux /etc/nsswitch.conf system file.
13 Complete this chapter’s installation worksheets, then complete thepost-installation steps after you install AR System.
When you complete the worksheets, continue with the installation of theAR System server. For UNIX instructions, refer to Chapter 3, Installing the AR System Server on UNIX . For Windows instructions, refer to Chapter 4,Installing the AR System Server on Windows.
Installing with an Oracle Database
The AR System server requires the Oracle client application to interface withthe Oracle database. The instructions in this chapter describe how toconfigure AR System with an Oracle client.
Note: The Oracle 8.1.7 client is required to install AR System on UNIX withOracle 9i.
Action Request System 5.1
You might need to obtain the following information from your systemadministrator or database administrator before you begin your installation:

7/24/2019 Installing AR Sys English 5.1
http://slidepdf.com/reader/full/installing-ar-sys-english-51 42/200
42"Chapter 2—Choosing Server Options and Preparing the Environment
administrator or database administrator before you begin your installation:
! AR System server TCP and RPC port numbers (Skip this step if youregistered the AR System server with a portmapper. For more
information, refer to Registering with a Portmapper on page 31.)
! Usernames and passwords for:
! AR System administrator (the username and password of theAR System user that has administrative privileges to use the AR SystemAdministrator tool; this user imports forms and sets values in thear.conf file to manage forms)
! Application (the AR System application password that AR Systemapplications use to connect to the server; this information is in theServer Information tab in the AR System Administrator tool.)
! Database SYSTEM user
! Information on how to prepare the system (refer to Prepare the system onpage 45).
Worksheet for Installing AR System on UNIX with Oracle
Use this worksheet to record information you will need to install anAR System server on UNIX with an Oracle database. Copy this worksheetand complete a separate worksheet for each server you plan to install in thisconfiguration. You might need to consult your database administrator forrelational database information.
Review the AR System 5.1 Release Notes on the Customer Support website:http://supportweb.remedy.com
Prepare the system
1 For both local and remote installs, as well as for Oracle 9i, install the Oracle8.1.7 client on the same system where you will install the AR System.
! Configure an SQL*Net (or Net 8) client on the machine where AR System
will be installed.
! Create an Oracle password account and Database Administrator group.For example, in some UNIX system, you can create these items by way of
/etc/password and /etc/group.
! Set up an Oracle Home directory ($ORACLE_HOME) on the machinewhere you will install the AR System server. The Home directory must be
the same directory as the 8.1.7 client directory.

7/24/2019 Installing AR Sys English 5.1
http://slidepdf.com/reader/full/installing-ar-sys-english-51 43/200
Action Request System 5.1
4 Record AR System database information.
Refer to Choosing the Upgrade or Overwrite Option on page 26 for

7/24/2019 Installing AR Sys English 5.1
http://slidepdf.com/reader/full/installing-ar-sys-english-51 44/200
44"Chapter 2—Choosing Server Options and Preparing the Environment
Refer to Choosing the Upgrade or Overwrite Option on page 26 forinformation.
AR System database name: ___________________________________AR System database user: ____________________________________
5 Specify a private rollback segment (optional).
Oracle 8.1.7 uses rollback segments that can be configured as private rollbacksegments. Oracle 9i uses undo tablespaces, which are managed by thedatabase and cannot be private.
Rollback segments hold information about transactions related to the size oramount of updating or creating that happens at any given time. Transactionsize will be affected by the number of concurrent users and the AR Systemconfiguration.
You should use a separate private rollback segment for each AR Systemdatabase, and each private rollback segment should be placed in a privatetablespace.
For a new installation, a private rollback segment can be created by theinstaller.
For an upgrade, the existing private rollback segment is used. The default
value is ARSystemRoll_<server_name>. You should use an existing rollbacksegment only if you are overwriting or upgrading an existing database.
Private rollback segment: ___________________________________
Note: You will need to add the rollback segment to the configuration fileafter installing AR System. Instructions are included in this worksheet.
6 Define the AR System tablespace file name and size.
File name: _________________________________________________
The default is $ORACLE_HOME/dbs/arsys1.
File size: __________________________________________________
The default size is 30 MB.
If you plan to install other AR System applications, such as CRM, refer toeach application’s associated release notes or installation guide before youselect your server database size.
7/24/2019 Installing AR Sys English 5.1
http://slidepdf.com/reader/full/installing-ar-sys-english-51 45/200
Action Request System 5.1
Refer to the Oracle documentation for details about using the InstanceManager.

7/24/2019 Installing AR Sys English 5.1
http://slidepdf.com/reader/full/installing-ar-sys-english-51 46/200
46"Chapter 2—Choosing Server Options and Preparing the Environment
Perform these steps to prepare the Oracle client on Windows.
1 Ensure that the AR System machine has the following items installed:
! Oracle client (8 for 8i compatible, or 9 for 9i compatible)
! SQL*Net 8 for Windows (that is, the Oracle client), which must beinstalled and configured on the local machine.
! Network or administrator directories that include the tnsnames.ora file.
! Administrator directories that link to the AR System server
2 Open the System control panel and verify that the <ORANT>\bin directory ispart of your system path and, if necessary, add this directory to the path.
3 If you make changes, restart Windows to make sure they take effect.
4 Make sure that you know the connect string for SQL*Plus and the passwordfor the System user within Oracle.
5 Verify that you have at least 50 MG of disk space available for the AR Systemdatabase.
6 Verify either that there is at least one existing Oracle rollback segment(depending on your configuration) with at least another 5 MB available otherthan the system segment, or that the database is configured for UndoManagement.
Record information to enter at the installer prompts
1 If the Oracle database is on a remote machine, record the connect string.Oracle connect string: _________________________________________
2 Record the Oracle system identifier (SID). You might need to consult yourDBA for this value.
Oracle SID: _________________________________________________
3 Record the Oracle system password.
The default is manager. Consult your DBA for changes.
Oracle system password: ______________________________________
4 Skip this step if you are upgrading an existing installation. Complete this steponly if you are installing a new AR System server or overwriting the AR Systemdatabase in an existing installation.
Record AR System database information.
Installing AR System
Refer to Choosing the Upgrade or Overwrite Option on page 26 forinformation.

7/24/2019 Installing AR Sys English 5.1
http://slidepdf.com/reader/full/installing-ar-sys-english-51 47/200
Preparing to Install an AR System Server ! 47
AR System database name: ___________________________________
The default is ARSystem.
AR System database user: ____________________________________
5 Skip this step if you are upgrading an existing installation. Complete this steponly if you are installing a new AR System server or overwriting the AR Systemdatabase in an existing installation.
Define the AR System tablespace file settings.
This is the physical file that holds the AR System database created.The AR System tablespace file name is the same as the AR System databasename from step 4. To change this name, return to step 4.
AR System database size: ______________________________________
The default is 30 MB.
Tablespace file name: ______________________________________
The default is arsys1.
If you plan to install other AR System applications, such as CRM, refer toeach application's associated release notes or installation guide before youselect your server database size.
6 Specify the temporary tablespace.
If a temporary tablespace has already been created (if an earlier version ofAR System was installed on this machine), the installer will use the existing
temporary tablespace.
If the tablespace has not been created, define the tablespace and a file to holdit.
Temporary tablespace name: ____________________________________
The default is ARTMPSPC.
Temporary tablespace file name: __________________________________
The default is artmpf .
Temporary database size: ______________________________________
The default is 15 MB.
Action Request System 5.1
7 Specify a private rollback segment, depending on your configuration.
Oracle 8.1.7 uses rollback segments that can be configured as private rollback
7/24/2019 Installing AR Sys English 5.1
http://slidepdf.com/reader/full/installing-ar-sys-english-51 48/200
48"Chapter 2—Choosing Server Options and Preparing the Environment
segments. Oracle 9i uses undo segments that are managed by the databaseand cannot be private. Oracle 9i can use rollback segments if the Undo
Management option is set to MANUAL.
If you use Oracle 9i, the installer detects which Undo Management mode is
used and, if the mode is AUTO, prompts for Undo Tablespace information.
Rollback segments hold information about transactions related to the size oramount of updating or creating that happens at any given time. Transactionsize will be affected by the number of concurrent users and the AR System
configuration.You should use a separate private rollback segment for each AR Systemdatabase, and each private rollback segment should be placed in a privatetablespace.
For a new installation, a private rollback segment is created by the installer.The default name is ARSystemRoll.
For an upgrade, the existing private rollback segment is used. You should use
an existing rollback segment only if you are overwriting or upgrading anexisting database.
Private rollback segment: ________________________________________
Note: You will need to add the rollback segment to the configuration fileafter installing AR System. Instructions are included in this worksheet.
To create a new rollback segment, leave the check box selected. To use anexisting segment, clear the check box.
Perform the postinstallation tasks
Add the private rollback segment name to the init<Oracle_SID>.ora file,
located in the %ORACLE_HOME%/dbs directory. You must stop and restartthe Oracle database for this change to take effect.
Installing AR System
Installing with an IBM DB2 Database
When you install the AR System server with an IBM DB2 database, the

7/24/2019 Installing AR Sys English 5.1
http://slidepdf.com/reader/full/installing-ar-sys-english-51 49/200
Preparing to Install an AR System Server ! 49
y y ,AR System database is created with three tablespaces. The term tablespace refers to the storage area or disk location where the database tables will bestored. How you choose to manage this space will determine how yourdatabase gets backed up or restored.
The three tablespaces are as follows:
! Catalog tablespace (SYSCATSPACE)—Contains all of the system tables forthe database.
!
User tablespace (USERSPACE1)—Contains all user-defined tables. Theuser tablespace is where the AR System tables will reside and will growaccording to the number of records or tickets that are added to the system.
! Temporary tablespace (TEMPSPACE1)—Contains temporary tables. Thetemporary tablespace is used by the database for activities such as sortingand displaying search results. This tablespace does not grow, so it needs tobe large enough to sustain database activity.
Each tablespace consists of containers that hold the physical data, managedin one of two ways:
! System Managed Space (SMS)—Managed by the operating system whenthe container location is specified by the user.
! Database Managed Space (DMS)—Managed by the DBA. Refer to yourDB2 database documentation for information on how to add containers
to tablespaces using DMS.
You are prompted to choose between SMS and DMS for each of the three
tablespaces, SYSCATSPACE, USERSPACE1, and TEMPSPACE1.
Note: For local installation only: all tables created and accessed byAR System are created using the account of the user who is installingthe AR System software. The AR System server will not functionunless its service is started using this account.
Action Request System 5.1
You might need to obtain the following information from your system,server, network or database administrator before you begin your installation:
L l i ll (AR S d DB2 d b i ll d h hi )

7/24/2019 Installing AR Sys English 5.1
http://slidepdf.com/reader/full/installing-ar-sys-english-51 50/200
50"Chapter 2—Choosing Server Options and Preparing the Environment
Local install (AR System and DB2 database installed on the same machine):
! AR System server TCP port number
! Usernames and passwords for:
! Application (the AR System application password that AR Systemapplications use to connect to the server; this information is in theServer Information tab in the AR System Administrator tool.)
! Application Service Password (required only if your systemadministrator already entered an Application Service Password in
AR System Administrator; to find out if there is a password, inAR System administrator go to File > Server Information, click theConnection Settings tab and check the Application Service Password.)
! Home directory of the local DB2 instance owner (UNIX only )
! Names of the following: AR System database, DB2 instance
Remote install (AR System and DB2 database installed on different
machines):! AR System server TCP port number
! Usernames and passwords for:
! AR System database user
! Application (the AR System application password that AR Systemapplications use to connect to the server; this information is in the
Server Information tab in the AR System Administrator tool.)! Application Service Password (required only if your system
administrator already entered an Application Service Password inAR System Administrator; to find out if there is a password, inAR System Administrator go to File > Server Information, click theConnection Settings tab and check the Application Service Password.)
! Administrator name and password of the remote DB2 instance
! Remote DB2 server name
! Port number of remote DB2 instance
! Home directory of the local DB2 instance owner (UNIX only )
! AR System database name
Installing AR System
Worksheet for Installing AR System on UNIX and Windows
with DB2
U hi k h d i f i ill d i ll

7/24/2019 Installing AR Sys English 5.1
http://slidepdf.com/reader/full/installing-ar-sys-english-51 51/200
Preparing to Install an AR System Server ! 51
Use this worksheet to record information you will need to install anAR System server with an IBM DB2 database. Copy this worksheet and
complete a separate worksheet for each server you plan to install in thisconfiguration. You might need to consult your database administrator forrelational database information.
Prepare the system
Review the AR System 5.1 Release Notes on the Customer Support website:http://supportweb.remedy.com
Local installs:
! Install the DB2 client and DB2 server on the machine where you willinstall the AR System server.
Unix only: Create the DB2 instance when you install the DB2 client.
Note: On Solaris and Linux, the AR System server is dynamically linked to
the DB2 library, so you must install the DB2 library (libdb2.so) on thesame machine as you install the AR System.
! Install the AR System server as root or as any other user that hasadministrative privileges for the specific DB2 instance on which you installthe AR System database. To ensure that the user has these privileges, makethat user a member of the groups created during the DB2 installation. The
groups include the default db2iadm1, db2fadm1, and db2asgrp groups.
Remote installs:
! Install the DB2 client on the machine where you will install the AR Systemserver.
Unix only: Create the DB2 instance when you install the DB2 client.
Note: On Solaris and Linux, the AR System server is dynamically linked to
the DB2 library, so you must install the DB2 library (libdb2.so) on the
same machine as you install the AR System.
! Install the DB2 server on a remote machine.
Action Request System 5.1
! Create an AR System database user (such as aradmin) on the remotemachine where you installed the DB2 server. The username should be inlower case.

7/24/2019 Installing AR Sys English 5.1
http://slidepdf.com/reader/full/installing-ar-sys-english-51 52/200
52"Chapter 2—Choosing Server Options and Preparing the Environment
UNIX only: The user password must be exactly AR#Admin# during the
installation, but you can change it later in AR System Administrator.
If you change the password, do so on the remote machine before you setthe new AR System server password in the Server Information tab in theAdministrator Tool. Refer to the Configuring AR System guide for moreinformation.
! Support TCP/IP on the DB2 database server.
Record information to enter at the installer prompts
1 Record AR System database information.
Refer to Choosing the Upgrade or Overwrite Option on page 26 forinformation.
AR System database name (maximum length is 8 characters): ____________
Note: For databases on a remote machine only : Make the AR System database
name different from any of the remote DB2 database alias names. If you make these names the same, the installation will fail.
Home directory of the local DB2 instance owner (UNIX only )__________________________________________________________
Place to create AR System database:
Path: ______________________________________________________
Drive name: ________________________________________________
(The default location is specified in the dftdbpath parameter in the DB2database configuration file.)
Note: On a UNIX-based DB2 database, specify the path on which to createthe AR System database. On a Windows-based DB2 database, specifythe letter of the drive on which to create the AR System database.
Local install:
Name of the DB2 instance:(default instance is the instance defined in DB2INSTANCE environmentvariable) ____________________________________________
Installing AR System
Remote install:
DB2 database server name: _______________________________________
R t DB2 i t d i i t t

7/24/2019 Installing AR Sys English 5.1
http://slidepdf.com/reader/full/installing-ar-sys-english-51 53/200
Preparing to Install an AR System Server ! 53
Remote DB2 instance administrator name: ________________________
Remote DB2 instance administrator password: _____________________Port number of remote DB2 instance: ___________________________
AR System database user: ____________________________________
Database alias name for AR System database: ______________________
2 Choose the option for managing the SYSCATSPACE tablespace.
Circle one: SMS DMS
! For SMS, you can only use Directory Container, for which you mustspecify the catalog tablespace location. To install in a location other thanthe default, you must provide an absolute or relative directory name. Therelative directory you provide is relative to the database directory. Ensurethat no other directories or files are stored in the location you named.
Directory Container:____________________________________________
! For DMS, you can only use File Container, for which you must specify thesize of the catalog tablespace and its container file name. Consult yourDBA for recommendations.
Tablespace size (default is 30 MB): _________________________________
File Container name:____________________________________________
3 Choose the option for managing the USERSPACE1 tablespace.
Circle one: SMS DMS
! For SMS, you can only use Directory Container, for which you mustspecify the catalog tablespace location. To install in a location other thanthe default, you must provide an absolute or relative directory name. Therelative directory you provide is relative to the database directory. Ensure
that no other directories or files are stored in the location you named.Directory Container: __________________________________________
! For DMS, you can only use File Container, for which you must specify thesize of the catalog tablespace and its container file name. Consult yourDBA for recommendations.
Tablespace size (default is 30 MB): _________________________________
File Container name: ___________________________________________
Action Request System 5.1
4 Choose the option for managing the TEMPSPACE1 tablespace.
Circle one: SMS DMS
! For SMS you can only use Directory Container for which you must

7/24/2019 Installing AR Sys English 5.1
http://slidepdf.com/reader/full/installing-ar-sys-english-51 54/200
54"Chapter 2—Choosing Server Options and Preparing the Environment
! For SMS, you can only use Directory Container, for which you mustspecify the catalog tablespace location. To install in a location other thanthe default, you must provide an absolute or relative directory name. Therelative directory you provide is relative to the database directory. Ensurethat no other directories or files are stored in the location you named. SMSis the recommended option for TEMPSPACE1 tablespace, because thesystem will free space as necessary.
Directory Container: ___________________________________________
!
For DMS, you can only use File Container, for which you must specify thesize of the catalog tablespace and its container file name. Consult yourDBA for recommendations.
Tablespace size (default is 30 MB): _________________________________
File Container name: ___________________________________________
5 Record the following AR System server information:
Registered with portmapper? ____________________________________AR System server TCP port number: ______________________________
AR System server installation directory: ____________________________
Installing with a Microsoft SQL Server Database
During installation, you are prompted for the initial size of the database and
for the device on which to locate the database. By default, a 30 MB databaseis created on the default device for your database installation. Ensure thatthere is sufficient space within the device to hold the new database beingcreated.
A log space for this new database is also created. You are prompted for alocation for the log device during installation. Store the data and log on
separate devices in the database. The devices must be on physically separatedisks for best performance and recoverability. Because running out of logspace is a significant issue, plan on a log that is at least as large as your largestsingle form.
Installing AR System
You might need to obtain the following information from your system,server, network or database administrator before you begin your installation:
! SQL Server instance

7/24/2019 Installing AR Sys English 5.1
http://slidepdf.com/reader/full/installing-ar-sys-english-51 55/200
Preparing to Install an AR System Server ! 55
Q
! Names for the AR System database, AR System user, database server, anddatabase server/AR System server domain (must be the same)
! Usernames and passwords for:
! AR System administrator (the username and password of theAR System user that has administrative privileges to use the AR SystemAdministrator tool; this user imports forms and sets values in thear.conf file to manage forms)
! AR System user! Domain account
! Names and sizes of the data and log devices (optional)
Worksheet for Installing AR System on Windows with MS SQL
Server
Use this worksheet to record information you will need to install anAR System server on Windows with a Microsoft SQL Server database. Copythis worksheet and complete a separate worksheet for each server you plan toinstall in this configuration. You might need to consult your databaseadministrator for relational database information.
Review the AR System 5.1 Release Notes on the Customer Support website:http://supportweb.remedy.com
Prepare the system
1 If the MS SQL Server database is installed on a remote machine, ensure thatthe MS SQL client utilities are installed on the AR System server machine.
2 Complete this step only if you are using MS SQL Server 2000 .
Record the SQL Server instance for this AR System server installation.
Consult your DBA for this value.
SQL Server instance: ____________________________________________
Action Request System 5.1
3 Complete this step only if you are using MS SQL Server and installing in alanguage other than English.
! Disable automatic conversion:

7/24/2019 Installing AR Sys English 5.1
http://slidepdf.com/reader/full/installing-ar-sys-english-51 56/200
56"Chapter 2—Choosing Server Options and Preparing the Environment
! Choose Start > Programs > MS SQL Server > Client Network Utility.
! Click the OLE DB Options tab.
! Deselect the Automatic ANSI to OEM conversion box.
Note: It is recommended that you install the SQL 8.0 provider on the samemachine on which you plan to install the AR System. Refer to thesection on relational databases in the AR System Database ReferenceGuide.
Record information to enter at the installer prompts
1 Record AR System database information.
Refer to Choosing the Upgrade or Overwrite Option on page 26 forinformation.
AR System database name: _____________________________________
AR System database user: ______________________________________
2 If the MS SQL database is on a remote machine, record the name of themachine where your database resides.
If you are using a remote MS SQL Server 7.0 database, and you are usingWindows NT Authentication, the database server and the AR System servermust be in the same domain. You must enter this domain name duringinstallation.
Database server: _____________________________________________
Domain: ____________________________________________________
3 If you will choose Windows NT Authentication, you must also set theARS_SECURE_CONNECT environment variable to 1 (one) before youbegin the installation. Delete the environment variable after the installation.
4 Record the system administrator (SA) password of the database.
SA password: _______________________________________________5 Record the domain and password for the AR System database user account.
This password and domain will be associated with the user you specified instep 1 on page 52.
If you are upgrading or overwriting a previous AR System installation, usethe information for the existing account.
For new installations, the installer creates this account.
Installing AR System
Refer to Choosing the Upgrade or Overwrite Option on page 26 forinformation on this user account.
Domain: ____________________________________________________

7/24/2019 Installing AR Sys English 5.1
http://slidepdf.com/reader/full/installing-ar-sys-english-51 57/200
Installing with an Informix Database! 57
Password: __________________________________________________
Optionally, record the names and sizes of the data and log devices.
SQL Server can choose these values for you. To allow SQL Server to choosevalues, leave the fields blank.
The database initial size should be set to at least 30 MB, but this will varybased on the growth rate of your system.
If you plan to install other AR System applications, such as CRM, refer to theassociated release notes or installation guide before you select your serverdatabase size.
The log initial size should be set to 75 percent of the database size, or about23 MB.
Data file: _____________________________________________________
Database initial size: ____________________________________________
Log file: ______________________________________________________
Log initial size: ________________________________________________
Installing with an Informix Database
If you install AR System with an Informix database, you are limited to themaximum connections configured on the Informix database. If you areoperating in a multiprocess server environment, be aware that each serverthread uses a connection.
If you are using an Informix database on your AR System server to access anexternal Informix database through direct SQL, you must set options to bethe same for both databases. By default, AR System is installed with log
options and non-ANSI options.
Action Request System 5.1
You might need to obtain the following information from your system,server, network or database administrator before you begin your installation:
! Informix home directory path

7/24/2019 Installing AR Sys English 5.1
http://slidepdf.com/reader/full/installing-ar-sys-english-51 58/200
58"Chapter 2—Choosing Server Options and Preparing the Environment
! Names for: database server, database, Informix configuration file
Ensure that the user who is installing the AR System server has permissionsto add databases and objects to the Informix server.
Worksheet for Installing AR System on UNIX with Informix
Use this worksheet to record information you will need to install anAR System server on UNIX with an Informix database. Copy this worksheet
and complete a separate worksheet for each server you plan to install in thisconfiguration. You might need to consult your database administrator forrelational database information.
Note: Informix does not support Linux.
Review the AR System 5.1 Release Notes on the Customer Support website:http://supportweb.remedy.com
Prepare the system
1 For shared libraries, install ESQL/C and manually specify the path to theESQL/C libraries by setting the shared library path for your platform:
HP-UX—$INFORMIXDIR/lib:$INFORMIXDIR/lib/esql:$SHLIB_PATH
Solaris—$INFORMIXDIR/lib:$INFORMIXDIR/lib/esql:$LD_LIBRARY_PATH
AIX—$INFORMIXDIR/lib:$INFORMIXDIR/lib/esql:$LIBPATH
2 Set the NETTYPE protocol to support the multithreaded AR System server,according to your platform:
onsoctcp for IBM AIX and HPUX
ontlitcp for Sun Solaris
Consult the Informix documentation for instructions.
Installing AR System
Record information to enter at the installer prompts
1 Record the home directory of the Informix database system.
The installer is designed to locate the directory $INFORMIXDIR.

7/24/2019 Installing AR Sys English 5.1
http://slidepdf.com/reader/full/installing-ar-sys-english-51 59/200
Installing with a Sybase Database! 59
Informix home directory: ________________________________________
2 Record the Informix configuration file name.
This is typically the default file onconfig, but consult your databaseadministrator for changes.
Configuration file: ____________________________________________
3 Record the database server name.
Typically, this is the system name. Consult your database administrator forthe fully qualified name.
If the Informix server is installed on a remote machine, obtain the name from
$INFORMIXDIR/etc/sqlhosts.
Database sever: ______________________________________________
4 Record AR System database information.
Refer to Choosing the Upgrade or Overwrite Option on page 26 forinformation.
AR System database name: ______________________________________
5 Record the database space where the AR System database will be installed.
Database space: _______________________________________________
The default is root.
Installing with a Sybase Database
Before you install an AR System server with a Sybase database, you need toset the required variables DSQUERY, SYBASE, and source the SYBASE.sh to setadditional variables.
You will not be able to install the AR System server if these variables are notset. The worksheet contains this information, along with additionalpreparatory steps you need to perform to install with Sybase.
Action Request System 5.1
You might need to obtain the following information from your system,server, network or database administrator before you begin your installation:
! Sybase home directory path
N f d b d b d i S b d b f

7/24/2019 Installing AR Sys English 5.1
http://slidepdf.com/reader/full/installing-ar-sys-english-51 60/200
60"Chapter 2—Choosing Server Options and Preparing the Environment
! Names for: database server, database, device, Sybase database user for
AR System
! Sybase system administration (SA) password
Worksheet for Installing AR System on UNIX with Sybase
Use this worksheet to record information you will need to install anAR System server on UNIX with a Sybase database. Copy this worksheet andcomplete a separate worksheet for each server you plan to install in thisconfiguration. You might need to consult your database administrator forrelational database information.
Review the AR System 5.1 Release Notes on the Customer Support website:http://supportweb.remedy.com
Prepare the system
Set the required variables. The examples shown are in Bourne shell.
Set DSQUERY as follows:
DSQUERY=<sybase_server>;export DSQUERY
Set SYBASE as follows:
SYBASE=<sybase_install_dir>;export SYBASE
Change directories to the Sybase home directory: $SYBASE.
Run . ./SYBASE.sh to set remaining variables.
Note: If you use a Sybase 12.0 database instead of Sybase 12.5, you mustinstall the 12.5 client library on your machine before you install
arserver. You must also set the SYBASE environment variable to < path
to the 12.5 directory> and the SYBASE_OCS to OCS-12_5.
Installing AR System
Record information to enter at the installer prompts
! Record the home directory of the Sybase database system.
The installer is designed to locate the directory $SYBASE.
S b h di

7/24/2019 Installing AR Sys English 5.1
http://slidepdf.com/reader/full/installing-ar-sys-english-51 61/200
Installing with a Sybase Database! 61
Sybase home directory:
__________________________________________
! Record the Sybase server name.
The Sybase server name is the name of the instance on a machine. The default
is SYBASE, but this can be configured to identify the server; for example:
$DSQUERY.
Sybase server name: ____________________________________________
! Record the Sybase system administration (SA) password.
Sybase SA password: ___________________________________________
There is no SA password by default.
! Record AR System database information.
Refer to Choosing the Upgrade or Overwrite Option on page 26 forinformation.
AR System database name: _______________________________________
AR System database user: _______________________________________
! Record the database device where the AR System database will be installed.
Database space: _______________________________________________
The default is master.
Note: If you are installing with Sybase 12.5, you must also install the 32-bitSybase libraries.
Action Request System 5.1

7/24/2019 Installing AR Sys English 5.1
http://slidepdf.com/reader/full/installing-ar-sys-english-51 62/200
62"Chapter 2—Choosing Server Options and Preparing the Environment

7/24/2019 Installing AR Sys English 5.1
http://slidepdf.com/reader/full/installing-ar-sys-english-51 63/200
Installing the AR System Server on UNIX ! 63
CHAPTER3 Installing the AR System Server on
UNIX
This chapter contains procedures for installing the AR System server
and the API package on UNIX. The instructions assume that you have
completed the appropriate installation worksheets. Refer to Chapter 2,
Choosing Server Options and Preparing the Environment for theinstallation worksheets.
Note: Read the AR System 5.1 Release Notes before you perform any ofthe steps in this chapter.
Action Request System 5.1
Installing an AR System Server on UNIX
The instructions in this chapter assume that you have reviewed theinformation on configurations, server options, and database preparation in
7/24/2019 Installing AR Sys English 5.1
http://slidepdf.com/reader/full/installing-ar-sys-english-51 64/200
64"Chapter 3—Installing the AR System Server on UNIX
g p p p
Chapters 1 and 2. Make sure that you have completed the installationworksheets for your platform and database combination.
You must use a Windows machine to license and administer the server.
You should retain the file structure created by the installer.
Note: To avoid installation problems, we recommend that you have only oneversion of AR System on your computer.
When you have completed the server installation, install the mid tier andclient applications. When you have completed all installations, refer to theConfiguring AR System guide for information on how to configure the server,and Developing AR System Applications: Basic guide for information on howto create and maintain AR System applications.
Installing on UNIX as Non-Root
In general, you should perform the AR System server installation as a rootuser. However, you can perform the installation as a non-root user.
When you install as a non-root user, you must update the systemconfiguration files manually. The installation script prompts you to do thisand instructs you to start a shell where you have root access or full read andwrite access.
Installing as non-root allows a user to maintain the AR System softwarewithout the assistance of a system administrator. However, to automaticallystart the AR System server when your computer restarts, you must request your UNIX system administrator to change the system startup scripts
accordingly.
Installing AR System
Installing the AR System Software Without Logging in as Root
1 Set the ARNONROOTINSTALL environment variable to TRUE.
Review Appendix B, Customizing UNIX Options to view other environmentvariable settings, such as those involving file locations for non-root

7/24/2019 Installing AR Sys English 5.1
http://slidepdf.com/reader/full/installing-ar-sys-english-51 65/200
Installing an AR System Server on UNIX ! 65
g , g
installations.
2 The installation script will prompt you to perform several actions. Before youperform these actions, ensure that you have permissions to the following:
! Network card device files
! Root directory, usually at: /etc/arsystem/<server_name>
! Multi-licence directory (usually at: /etc/arsystem/) and its
AR_SYSTEM_LICENSE_DIR directory (usually at: /etc/arsystem/<server_name>
! Configuration directory, <ar_install_dir> /conf , and its ar and ar.conf files
3 Perform the installation procedure as described in this chapter.
Some of the actions you will be prompted to do (as root or non root) include:
! Create a number of directories and set permissions for those directories.
For example, the script prompts you to create the /etc/arsystem directoryas root.
! Merge the contents of files, such as merge the
<ar_install directory> /ar-<database> /rpc file with the /etc/rpc file.
Action Request System 5.1
Installing the AR System Server from the Web
If you purchased software through the Electronic Software Distribution(ESD) process, follow these steps to access the software.

7/24/2019 Installing AR Sys English 5.1
http://slidepdf.com/reader/full/installing-ar-sys-english-51 66/200
66"Chapter 3—Installing the AR System Server on UNIX
Installing AR System on UNIX from the Web
1 Log in as the root user.
% suPassword: <password>
2 Copy the downloaded directory (arsystem_<platform>) and its contents tothe location from which you will install AR System.
If you have downloaded AR System using the Sm@rtCert client onto aplatform where you will not install AR System, copy the downloadeddirectory and its contents to the computer where you will install AR System.For example, if you used the Windows Sm@rtCert client to download
AR System for Solaris, copy the arsystem_Solaris directory and its contentsto your Solaris machine.
3 Change to the directory containing the copy of the downloaded files.4 Change to the directory containing the install program:
# cd <platform>
where <platform> is platform for the UNIX products. The download
directories are solaris, hpux, and aix, and linux, respectively.
5 Uncompress the file <unix>.tar.gz, which contains the UNIX installation files
for AR System.Use the gunzip utility to uncompress the file by entering the followingcommand:
# gunzip <unix>.tar.gz
where <unix> represents the brand of UNIX for which you downloaded
AR System; for example, solaris, hpux, aix, or linux.
If you do not have the gunzip utility, you can download it from the gzip home page: http://www.gzip.org.
Installing AR System
6 Extract the installation program file by entering the following command:
# tar -xvf <unix>.tar
where <unix> represents the brand of UNIX for which you downloaded
AR System; for example, solaris, hpux, aix, or linux.

7/24/2019 Installing AR Sys English 5.1
http://slidepdf.com/reader/full/installing-ar-sys-english-51 67/200
Installing an AR System Server on UNIX ! 67
<unix>.tar contains the directory arsystem, which contains the installationprogram.
7 Note the current directory to which the tar file was extracted. Enter the pathto this directory (<path_to_this_dir>/cdrom) when prompted for theproduct directory name during installation.
8 Change to the directory containing the installation program:
# cd <installation_program_dir> arsystem9 Perform the installation procedure described in this chapter.
Running the AR System Server Installation Script
This procedure contains instructions for installing a new AR System serveron a machine that has no existing AR System servers, and on a machine with
one or more existing AR System servers installed. Installing a second or laterAR System server on a single machine is similar to installing the firstAR System server. Differences are noted in the procedure.
The script writes a log file to: /usr/tmp/ar_install.log
Running the AR System Server Installation Script
1 Shut down any AR System processes that are currently running.2 Ensure that the database the AR System server will connect to is running.
3 Log in as the root user.
Typically, you will need at least temporary administrator privileges to installthe AR System server. To install the software without root privileges, refer toInstalling on UNIX as Non-Root on page 64.
4 Set any relevant environment variables to control the installation. See Appendix B, Customizing UNIX Options for details about the options thancan be set.
Action Request System 5.1
5 Access the installation software.
! If you are installing from the Action Request System (AR System) 5.1installation CD:
! Mount the CD locally or remotely.

7/24/2019 Installing AR Sys English 5.1
http://slidepdf.com/reader/full/installing-ar-sys-english-51 68/200
68"Chapter 3—Installing the AR System Server on UNIX
! Change to the directory containing the AR System installation script asfollows:
# cd <CD-ROM_mount_point> /arsystem
The default mount point is /cdrom.
Refer to Appendix A for details on how to mount the CD.
! If you are installing software obtained through Electronic SoftwareDistribution (ESD), refer to Installing the AR System Server from the Web on page 66 for instructions.
6 Run the AR System installation script:
#./ar_install
AR System product and copyright information appears.
The following message appears:You will be prompted to enter the product directory. This is the name ofthe CD mount directory which contains the<dir>/arsystem/<unix_platform > /arsystem.tar file.
For example:If the tar file is located at <dir>/arsystem/unix/arsystem.tar then theproduct directory would be <dir>.
7 At the prompt:
Enter the product directory [<product_directory>]
Do one of the following:
! Press Enter to accept the default value.
! Enter the name of the directory where the CD-ROM is mounted.
The screen displays information about package contents and spacerequirements.
Installing AR System
8 At the prompt:
Do you want to install the Server package? [y]
Do one of the following:
! Press Enter to proceed with the installation.

7/24/2019 Installing AR Sys English 5.1
http://slidepdf.com/reader/full/installing-ar-sys-english-51 69/200
Installing an AR System Server on UNIX ! 69
! Enter n to stop the installation script.
If this is the first AR System server installed on this machine, go to step 11on page 70. If one or more AR System servers already exist on thismachine, the following message appears. Go to step 9.
Each AR System server requires a unique name that clients can resolveinto an IP address. If clients cannot resolve the name into an IP address,
they will not communicate correctly with the AR System server. If youhave not defined a unique name for this server, you can open a separateshell and define a name, and then return to this script and enter thename. You can also stop the installer script, define the name, and startthe script again.
To install a new AR System server, enter the new server name.
To upgrade or overwrite an existing AR System server,
please enter the name of the AR System server from the list:
-----------------------------------------------------
<server_name>
AR System servers are listed from most recently installed at the top, to thefirst installed at the end.
9 At the prompt:
Enter the server name: [<server_name>]
For a new install, enter a new server name. For an upgrade or overwriteinstall, press enter to select the default server or enter the name of an existingserver from the list.
The following message appears:
You have chosen to upgrade or overwrite <server_name>.
Type y to continue.Type n to change your selection.
Type q to stop the installation.
Action Request System 5.1
10 At the prompt:
Enter your selection: [y]
Do one of the following:
! Press Enter to install a new server with the name you entered, and go to

7/24/2019 Installing AR Sys English 5.1
http://slidepdf.com/reader/full/installing-ar-sys-english-51 70/200
70"Chapter 3—Installing the AR System Server on UNIX
step 11.
! Enter n to change the server name. When you have selected a server name,go to step 11.
! Enter q to stop the installation. If you stop the installation, information onthe installer log files and restarting the installation appears.
11 At the prompt:
Do you want to register this AR System server with the Port Mapper? [y]
Do one of the following:
! Press Enter to register this server with a portmapper. (When two or moreAR System servers are installed on a single machine, only one server canbe registered with a portmapper.)
! Enter n if you do not want to register this server with a portmapper.
12 At the prompt:
Do you want to run this AR System server on a specific TCP port? [n]
Do one of the following:
! Press Enter if you have registered this server with a portmapper and do notwant to assign a port number. The server will choose a port numberdynamically, and the port number will direct clients to the correct port.
Go to step 15 on page 71.
! Enter y to assign a port number to this server. The server will use the portnumber you assign, and the portmapper will direct clients to it.
The following message appears:
The TCP port number is the port address used to connect to thisAR System Server. The port address must be unique for each server
installation. Preferably use port addresses greater than 1024.
13 At the prompt:
What TCP port will this ARSystem Server use? [ ]
Enter a TCP port number (greater than 1024) for the server to use.
The screen displays message related to port numbers and addresses.
Installing AR System
14 At the prompt:
What Plugin port will the Report Plugins use? []
The AR System server includes a reporting plug-in that is enabled by defaultand requires a port number.
E t l i t b ( t th 1024) f th l i t

7/24/2019 Installing AR Sys English 5.1
http://slidepdf.com/reader/full/installing-ar-sys-english-51 71/200
Installing an AR System Server on UNIX ! 71
Enter a plug-in port number (greater than 1024) for the plug-in server to use.
15 At the prompt:
Do you want to install the API package? [n]
Do one of the following:
! Press Enter if you do not want to install the API package.
! Enter y to install the API package.
The API package enables you to develop software that integrates withAR System, and requires 10 MB of space for installation.
If you do not install the API now, you can install the API later withoutlosing your AR System environment.
For more information on the API package, refer to Custom Programming onpage 28.
16 At the prompt:
Do you want to configure Web Services?
Enter yes to install and configure the web services option. If you enter yes, you must supply the path to the java executable in the JRE 1.3.1 or higher.
17 At the prompts:
Do you want to install the ARDBC LDAP Package?
Do you want to install the AREA LDAP Package?
Enter yes to install the LDAP plug-ins.
Note: To install the LDAP plug-ins later, run the installation program againand choose to install only the plug-ins.
18 At the prompt:
Which database system will the AR System use?[db2|informix|oracle|sybase]
Enter the database that this AR System server will connect to.
Action Request System 5.1
19 The prompts that follow in the installation script are specific to yourdatabase. At these prompts, enter the values from the installation worksheetfor your platform and database combination. If you have not completed theworksheet, refer to Chapter 2, Choosing Server Options and Preparing theEnvironment .

7/24/2019 Installing AR Sys English 5.1
http://slidepdf.com/reader/full/installing-ar-sys-english-51 72/200
72"Chapter 3—Installing the AR System Server on UNIX
Note: If you are using the relational database for other applications inaddition to AR System, the other application databases are notaffected by this installation.The underlying database must be running. If the database is notrunning, you can open another shell and start the database, or you canstop the installation script, start the database, and start the installationscript again.If any AR System processes are running, the following message andprompt appear:The following AR System programs are currently running...<service_information>Cannot upgrade software with these processes runningDo you want me to shut down the AR System processes? [y]
Press Enter to shut down the services and continue with the installation.
20 At the prompt:
Directory to install AR System? [/usr/ar/<server_name>]
Do one of the following:
! Press Enter to accept the default directory.
! Enter another directory path.
The following message appears:
AR System will be installed in the <directory> directory.
21 At the prompt:
Is this OK? [y]
Do one of the following:
!
Press Enter to accept this installation directory.! Press n to enter another directory.
If there is not enough space in the specified directory, you will be promptedto install in a different partition. To do so, type y at the prompt, and thenspecify the directory path.
Installing AR System
For new installs, the screen displays pathnames of created files.
For upgrade or overwrite installs, the screen displays a message indicatingthat existing directories were saved.
22 At the prompt:
Do you want to put the AR System server in a system startup file? [N]

7/24/2019 Installing AR Sys English 5.1
http://slidepdf.com/reader/full/installing-ar-sys-english-51 73/200
Installing an AR System Server on UNIX ! 73
Do you want to put the AR System server in a system startup file? [N]
Do one of the following:
! Enter y to put the AR System server into a startup file so that it will startautomatically as a service on reboot. Non-root users must have anadministrator modify the system to access this file.
! Type n if you will start the service manually.
23 At the prompt:
Which startup file do you want to use to start the AR System server?[<default_path>/arsystem_<server_name>]
Press Enter to accept the default, or specify another file.
If you specify another file, specify a different file name for each AR Systemserver. Multiple AR System servers on a single machine can be placed in the
system startup file, but they must have different names. By default, the servername is appended to the file name to distinguish the startup files.
Default paths vary depending on your platform. Refer to UNIX StartCommands on page 78 for more information.
If you put the AR System server in a startup file, place the database in thestartup file as well. If you do not do so, then when the system reboots,AR System will not find the database.
The following message appears:
Adding <server_name> to AR System server configuration file /usr/ar/<server_name>/conf/ar
You may need to wait a few minutes if you load media from a remote deviceor load on a remote file system.
Action Request System 5.1
At this point, the list of extracted files appears. For information about wherethe files are located, refer to Appendix A, Locating AR System Files Thefollowing lines are an example from the display:
---------- List of Extracted Files -----------
x bin 0 bytes 0 tape blocks

7/24/2019 Installing AR Sys English 5.1
http://slidepdf.com/reader/full/installing-ar-sys-english-51 74/200
74"Chapter 3—Installing the AR System Server on UNIX
x bin, 0 bytes, 0 tape blocksx bin/runmacro, 4066684 bytes, 7943 tape blocks
x bin/arforkd, 127308 bytes, 249 tape blocks
x bin/arplugin, 623844 bytes, 1219 tape blocks
. . .
For new installs:
The following message appears:
Creating new <database type> database files.
The installer displays information about the installation, including updatesto the configuration file and your installation selections.
If you are installing a new AR System server, go to step 28 on page 75.
For upgrade or overwrite installs, you are prompted to overwrite, upgrade,or quit the installation. The default is ufor upgrade.
24 At the prompt:
Action? [u]
Do one of the following:
! Press Enter to upgrade the existing AR System database.
! Type o to overwrite the existing AR System database. You cannot changethe user name or database name, because these are already associated withan AR System server.
! Type q to stop the installation.
Depending on your selection, the installer displays information about theupgrade or overwrite, including updates to the configuration file and yourinstallation selections.
25 At the prompt:
Are you sure? [n] y
Do one of the following:
! Press n and continue with the next step.
! Enter y to keep the same directory and continue with the installation.
Installing AR System
If you chose to upgrade or overwrite, the following messages appears:
Current FTS collection setting is :
Collection-directory: /usr/ar/<server_name> /ftindex
Your existing FTS collection data will be lost.

7/24/2019 Installing AR Sys English 5.1
http://slidepdf.com/reader/full/installing-ar-sys-english-51 75/200
Installing an AR System Server on UNIX ! 75
26 At the prompt:
Are you sure? [n]
Do one of the following:
! Press y to confirm the deletion of FTS collection data.
! Press n to continue with the next step.
27 At the prompt:
Directory for Full Text Search Collection?[/usr/ar/<server_name>/ftindex]
Do one of the following:
! Press Enter to accept the default FTS directory.
!
Specify another directory.You can have the installation script bypass your original FTS collectiondirectory, leaving it intact. However, you will need to use AR SystemAdministrator to rebuild the FTS index after this installation. Refer to theOptimizing and Troubleshooting AR System guide for information onindexing.
At this point the installer starts the service and loads several AR System
forms. The following message appears:The AR System software is installed and running. The remainder of theinstallation is to install a set of Central Preferences and sampledefinitions.
28 At the prompt:
Do you want to have the Central Preference forms installed? [y]Do one of the following:
! Press Enter to install the Centralized Preferences forms.
A series of status messages appears.
! Type n to skip these forms.
If this is an upgrade or overwrite of an existing database, go to Postinstallation
Steps on page 76.
Action Request System 5.1
At this point, the following message appears:
The sample provides examples of many user interface objects. If you areloading the system for the first time, we recommend that you installthese samples. If you are reinstalling, you can choose to have them
included or not.

7/24/2019 Installing AR Sys English 5.1
http://slidepdf.com/reader/full/installing-ar-sys-english-51 76/200
76"Chapter 3—Installing the AR System Server on UNIX
29 At the prompt:
Do you want to have the sample definitions installed? [y]
Do one of the following:
! Press Enter to install the sample definitions.
The installer displays information about the files being installed.! Type n to skip the definitions.
30 The following message indicates that the installation has been completedsuccessfully:
AR System Installation Complete.
At this point, you are asked if you want to install the AR System Email engine.
If you choose not to install the Email engine, continue with thepost-installation steps that follow. If you choose to install the Email engine,read through the post-installation steps that follow, then refer to the EmailEngine Guide.
Postinstallation Steps
1 If this is an upgrade or overwrite of an existing database, and the AR System
server uses FTS, then rebuild or move indexes, as applicable. Refer toUpgrading or Overwriting the Full Text Search Option on page 27 for moreinformation.
2 Review the database-specific worksheets from Chapter 2, Choosing ServerOptions and Preparing the Environment and perform any post-installationtasks for your database, if any.
3 Restart your machine.
Installing AR System
Restarting the Installation Process
If AR System installation fails or is interrupted, a message appears identifyingthe problem and the stage number where the process terminated. For
example, you might see the following message, which indicates that theinstallation terminated in Stage 3:

7/24/2019 Installing AR Sys English 5.1
http://slidepdf.com/reader/full/installing-ar-sys-english-51 77/200
Restarting the Installation Process! 77
p y g g ginstallation terminated in Stage 3:
Installation terminating; Fatal error occurred.AR System Installation terminated at Stage 3: Set up AR System databaseand directories.
The new AR System directories are installed. The previousAR System directories will be saved with .bak suffix.
Check /usr/tmp/ar_install.log and /usr/tmp/arErrorLogto identify the problem. If necessary, call Support toresolve the problem.
Once the problem has been resolved, continue the installation from thepoint at which it terminated by issuing the following command./ar_install -s<stage#>where <stage#> is the number of the stage at which the previousinstallation terminated.
You can restart a terminated installation by correcting the problem andissuing a command that identifies the stage number. The system loads the
information that was recently stored in the /usr/tmp/arEnvHistory file. Thescript then restarts the process at the stage where it was terminated.
Action Request System 5.1
Restarting the Installation After a Termination
1 Identify the problem by checking the ar_install.log and arErrorLog files in the
/usr/tmp directory.
2 Resolve the problem.
For example, if you ran out of log space, increase the amount of log space.
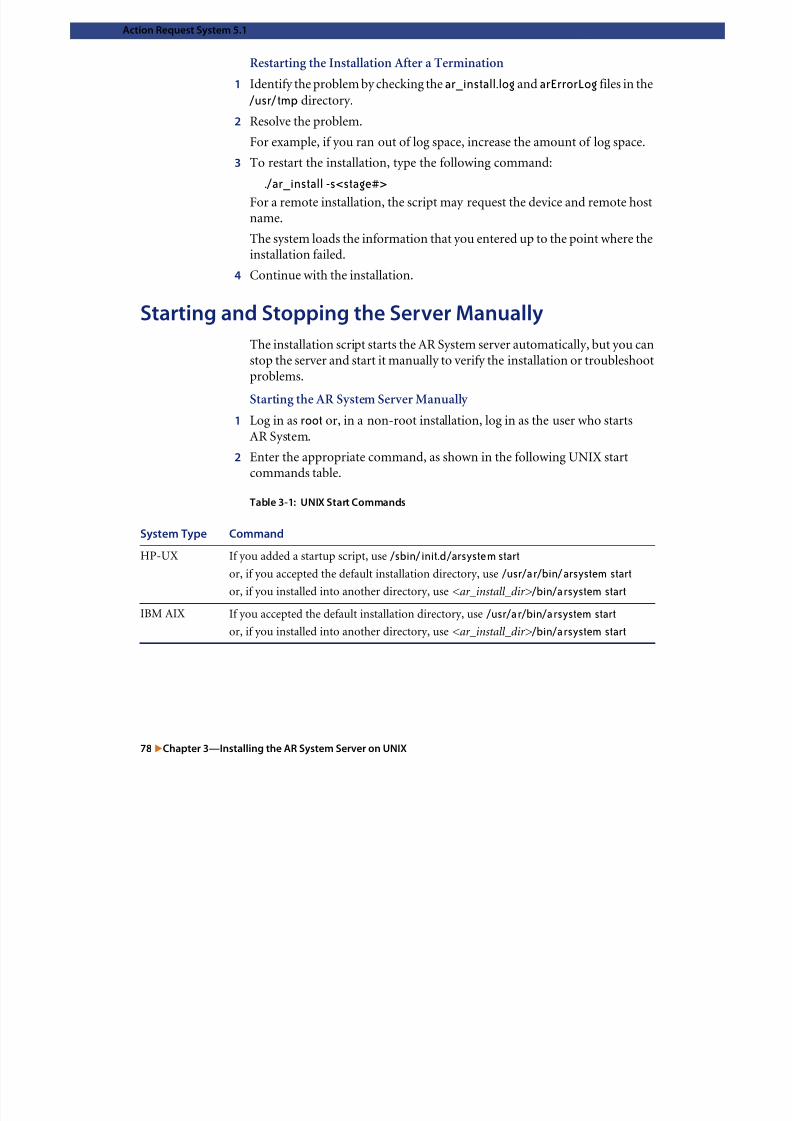
7/24/2019 Installing AR Sys English 5.1
http://slidepdf.com/reader/full/installing-ar-sys-english-51 78/200
78"Chapter 3—Installing the AR System Server on UNIX
3 To restart the installation, type the following command:
./ar_install -s<stage#>
For a remote installation, the script may request the device and remote hostname.
The system loads the information that you entered up to the point where the
installation failed.
4 Continue with the installation.
Starting and Stopping the Server Manually
The installation script starts the AR System server automatically, but you can
stop the server and start it manually to verify the installation or troubleshootproblems.
Starting the AR System Server Manually
1 Log in as root or, in a non-root installation, log in as the user who startsAR System.
2 Enter the appropriate command, as shown in the following UNIX startcommands table.
Table 3-1: UNIX Start Commands
System Type Command
HP-UX If you added a startup script, use /sbin/init.d/arsystem start
or, if you accepted the default installation directory, use /usr/ar/bin/arsystem start
or, if you installed into another directory, use <ar_install_dir> /bin/arsystem startIBM AIX If you accepted the default installation directory, use /usr/ar/bin/arsystem start
or, if you installed into another directory, use <ar_install_dir> /bin/arsystem start
Installing AR System
Solaris If you added a startup script, use /etc/init.d/arsystem start
or, if you accepted the default installation directory, use /usr/ar/bin/arsystem start
or, if you installed into another directory, use <ar_install_dir> /bin/arsystem start
Linux If you added a startup script, use /etc/init.d/arsystem start
System Type Command

7/24/2019 Installing AR Sys English 5.1
http://slidepdf.com/reader/full/installing-ar-sys-english-51 79/200
Starting and Stopping the Server Manually ! 79
If you install multiple servers, your directory might be calledarsystem_<servername>.
Stopping the AR System Server Manually
1 Log in as root or, in a non-root installation, log in as the user who startsAR System.
2 Enter the appropriate stop command, as shown below.
If you install multiple servers, your directory might be calledarsystem_<servername>.
Warning: Do not use the kill -9 command to stop the AR System server.Doing so may leave your database in an inconsistent state.
y p p y
or, if you accepted the default installation directory, use /usr/ar/bin/arsystem start
or, if you installed into another directory, use <ar_install_dir> /bin/arsystem start
System Type Command
HP-UX If you added a startup script, use /sbin/init.d/arsystem stop
or, if you accepted the default installation directory, use /usr/ar/bin/arsystem stop
or, if you installed into another directory, use <ar_install_dir> /bin/arsystem stop
IBM AIX If you accepted the default installation directory, use /usr/ar/bin/arsystem stop
or, if you installed into another directory, use <ar_install_dir> /bin/arsystem stop
Solaris If you added a startup script, use /etc/init.d/arsystem stop
or, if you accepted the default installation directory, use /usr/ar/bin/arsystem stop
or, if you installed into another directory, use <ar_install_dir> /bin/arsystem stop
Linux If you added a startup script, use /etc/init.d/arsystem stop
or, if you accepted the default installation directory, use /usr/ar/bin/arsystem stop
or, if you installed into another directory, use <ar_install_dir> /bin/arsystem stop
Action Request System 5.1

7/24/2019 Installing AR Sys English 5.1
http://slidepdf.com/reader/full/installing-ar-sys-english-51 80/200
80"Chapter 3—Installing the AR System Server on UNIX
4 Installing the AR System Server on

7/24/2019 Installing AR Sys English 5.1
http://slidepdf.com/reader/full/installing-ar-sys-english-51 81/200
Installing the AR System Server on Windows! 81
CHAPTER4 Installing the AR System Server on
Windows
This chapter contains procedures for installing the AR System server
on Windows.
The instructions assume that you have completed the appropriate
installation worksheets. Refer to Chapter 2, Choosing Server Options
and Preparing the Environment for the installation worksheets.
Note: Read the AR System 5.1 Release Notes before you perform any ofthe steps in this chapter.
Action Request System 5.1
Installing an AR System Server on Windows
This procedure contains instructions for installing a new AR System serveron a machine that has no existing AR System servers, and on a machine with
one or more existing AR System servers installed. Installing a second or laterAR System server on a single machine is similar to installing the firstAR S Diff d i h d

7/24/2019 Installing AR Sys English 5.1
http://slidepdf.com/reader/full/installing-ar-sys-english-51 82/200
82"Chapter 4—Installing the AR System Server on Windows
AR System server. Differences are noted in the procedure.
You can cancel installation any time. However, information you entered willnot be saved.
When you have completed the server installation, install the mid tier and
client applications. When you have completed all installations, refer to theConfiguring AR System guide for information on how to configure the server,and the Developing AR System Applications: Advanced guide for informationon how to create and maintain AR System applications.
Note: To avoid installation problems, we recommend that you have only oneversion of AR System on your computer.
Installing the AR System Server with the Windows Installer
1 Exit any AR System processes that are running.
2 Ensure that the database to which the AR System server will connect isalready running.
3 Record Windows Administrator information.
Administrator permissions are not necessary to start or administer theAR System server, and can be granted temporarily for the installation.
If your machine is part of a Windows domain, you must log in to the domainas a Windows Domain Administrator to install AR System. If your machineis not part of a Windows domain, you must log in as an administrator for thelocal system.
4 Record the user name and password for the Windows account that
AR System will use.User names cannot contain more than eight characters or the installation willfail. This restriction applies to users with Windows administrative privileges.
The user account must have administrator permissions to install theAR System server.
Installing AR System
5 Access the installation software.
! From the CD
Log in to Windows as an administrator and insert the CD into the drive.
If autorun is enabled, the CD browser opens. Click AR System Server.
If the CD browser does not start, open the server installer, server.exe.

7/24/2019 Installing AR Sys English 5.1
http://slidepdf.com/reader/full/installing-ar-sys-english-51 83/200
Installing an AR System Server on Windows! 83
! From ESD
If you downloaded Action Request System to a location where you will not install Action Request System, copy the downloaded directory and itscontents to the machine where you will install Action Request System. Forexample, if you used the Solaris Sm@rtCert client to download the Action
Request System for Windows, copy the directory and its contents to yourWindows machine.
From the download directory, run the file server.exe.
When you run this file, the installation files are unpacked into a temporarydirectory and the Setup program starts.
The Choose Setup Language screen appears. The default language selection
is the locale language of the operating system. However, you can change theselection.
6 Choose a language and click OK to display the Welcome screen.
7 Click Next to display the Select Database screen.
8 Click the button that corresponds to the type of database that will supportAR System.
! If you select Oracle or Microsoft SQL Server, the version selection screenappears. Go to step 9 on page 83.
! If you select IBM DB2, the Select Action Request System Componentsscreen appears. Go to step 10.
Note: If you do not have a database installed, you will get an error. Cancelthis installation, install the database, and restart the server installation.
9 Select your database version and click Next.The Select Action Request System Components screen appears.
Note: You will get an error message if you do not have the chosen databaseinstalled on your system. Cancel the installation, install the database,and restart the installation program.
Action Request System 5.1
10 Choose the components to install by selecting the appropriate check boxes.
! API—Installs the AR System application programming interface (API).Refer to Custom Programming on page 28 for a description of thecomponents that will be installed.
! Samples—Installs a sample AR System application that demonstratesmany AR System capabilities.

7/24/2019 Installing AR Sys English 5.1
http://slidepdf.com/reader/full/installing-ar-sys-english-51 84/200
84"Chapter 4—Installing the AR System Server on Windows
! Centralized Preferences—Installs the centralized preference forms thatenable users to store preferences on the server. Refer to CentralizedPreferences on page 28 for more information.
11 Click Next to display the Select Language Components screen.
12 Select the check boxes for the languages that the server error messages, forms,and data will be displayed in.
English is selected by default on all systems. In non-English systems, thelocale language for the operating system is also selected. English cannot bedeselected, because it is required for correct server performance. You canchoose additional languages.
13 Click Next to display the Select Plug-In Components screen.
14 Choose the items to install:
! ARDBC LDAP plug-in enables you to access common enterprise objectsin LDAP directories and view data remotely without having to import orexport data.
! AREA LDAP plug-in enables authentication of usernames and passwordsagainst an LDAP centralized user database.
! Web services plug-in enables the Set Fields From Web Service filter actionnecessary to consume a web service. (Installation recommended.) Formore information on Web services, refer to the Developing AR System Applications: Advanced guide.
15 If you are installing AR System server for the first time on this machine, orupgrading an earlier version of the AR System server to version 5.1, the EnterServer Port Number screen appears. (The host name is used as the server
name, so you are not prompted to enter a server name.) Go to step 18 onpage 85.
If you are installing a second or later AR System server on this machine, orreinstalling a version 5.1 server, the Enter AR System Server Name screenappears. Go to step 16.
Installing AR System
16 Enter the AR System server name in the Selected AR System Server field.
For information, refer to Choosing a Server Name on page 34.
17 Click Next to display the Enter Server Port Number screen.
18 Choose how port numbers are assigned.
! To register the server with a portmapper, select the Yes option and clickNext. If two or more AR System servers reside on this machine, only one

7/24/2019 Installing AR Sys English 5.1
http://slidepdf.com/reader/full/installing-ar-sys-english-51 85/200
Installing an AR System Server on Windows! 85
Next. If two or more AR System servers reside on this machine, only oneserver can register with a portmapper.
! To assign port numbers, select the check box Assign Port Numbers andenter port numbers for the AR System server, and the plug-in server. Theport numbers cannot be the same. For more information, refer toChoosing Port Number Options on page 30.
19 Click Next to display the Choose Destination Folder(s) for the AR SystemServer screen.
20 Select the destination folder for the AR System server or click Browse todisplay more folder names.
To install two or more AR System servers on this machine, install each server
into a separate folder.To upgrade or overwrite an existing AR System server, install the new versioninto the folder where the existing server is installed.
If you are upgrading an existing server, or installing another server on amachine where at least one AR System server is installed, select the Full TextSearch Folder. Refer to Upgrading or Overwriting the Full Text Search Option on page 27 for information.
21 Click Next to display the <database_name> Server Settings screen for yourdatabase version.
Note: If any AR System processes are running, you will be prompted to shutthem down.
Action Request System 5.1
22 Enter your database server settings information.
For this Database Enter this Information
Microsoft SQL Server Enter the server where SQL Server resides. If you areinstalling SQL Server 2000 with an instance, append theserver name with the instance as follows:
<servername>\ <instance>.

7/24/2019 Installing AR Sys English 5.1
http://slidepdf.com/reader/full/installing-ar-sys-english-51 86/200
86"Chapter 4—Installing the AR System Server on Windows
Select the check box if the SQL server is on a remotemachine.
Enter the password for the system user.
Specify the type of Windows Authentication to use.
! If you will use both Windows and SQL Server
authentication, leave the check box cleared. If you useboth types of authentication, you must use the SQL
Server database login to access SQL Server, and the
Windows login to access AR System.
! To use Windows authentication only, check the box
and enter a password and a domain for the database
user. With this option, you can use the Windows
login to access both the AR System and the SQL
Server database.
! For Microsoft SQL Server 2000, ensure that you have
set the authentication to mixed in the Enterprise
Manager. Refer to step 2 on page 56 in the Worksheet
for Installing AR System on Windows with MS SQL
Server on page 55.
If you did not set the ARS_SECURE_CONNECT
environment variable to 1 (one) before you began theinstallation, the installation might fail.
IBM DB2 Enter a password for the Windows user account for theuser who is installing the AR System server. This usermust have DB2 permissions.
Oracle Select the check box if the Oracle server is on a remotemachine.
If the Oracle server is on a remote machine, enter theconnect string.
Enter the Oracle SID (consult your databaseadministrator for this value).
Enter the password for the system user; if this field is leftblank, the installer returns an error.
Installing AR System
23 Click Next to display the Enter AR System Database Information screen.
24 Accept the defaults or enter a name for the database (tablespace for Oracle)and define a user, if these options are enabled. You do not have to enter adatabase name or user to upgrade.
25 Click Next.! If you are upgrading an existing AR System or overwriting an existing
AR S t t t 26

7/24/2019 Installing AR Sys English 5.1
http://slidepdf.com/reader/full/installing-ar-sys-english-51 87/200
Installing an AR System Server on Windows! 87
AR System server, go to step 26.
For information, refer to Choosing the Upgrade or Overwrite Option onpage 26
! If you are installing a new AR System server with a relational database, theNew AR System Database Settings screen appears, unless you are installingwith IBM DB2. Go to step 27 on page 87.
26 If you are installing with a relational database, choose one of the followingoptions in the Existing Database screen:
! Upgrade—This option upgrades the existing AR System database and theexisting AR System form and field information contained in it. Structuresare updated to support the new server. You might want to back up your
data before upgrading.! Overwrite—This option deletes and replaces the existing AR System
database. New forms are imported into this database, and data is notsaved. If you will restore your AR System information after thisinstallation, back up your information by exporting AR System data anddefinitions.
This screen appears if you are installing over an existing AR System server, or
if you uninstalled AR System before starting this installation. To preservedata integrity, the AR System uninstallers do not remove database files.
27 Click Next to display the Choose AR System Server Startup Settings screen.
28 Choose a startup option and click Next to display the Summary screen.
29 Review the settings.
To make changes, click Back until you reach the target screen, then click Next
to return to the settings screen.30 Click Next to begin the installation.
When all files have been copied and all forms have been imported, the SetupComplete screen appears.
31 Click Finish to complete the installation.
Action Request System 5.1
If system files were updated, you will be prompted to restart the system. TheAR System server starts at the end of the installation.
At this point, you are asked if you want to install the AR System Email engine.If you choose not to install the Email engine, continue with thepost-installation steps that follow. If you choose to install the Email engine,read through the post-installation steps that follow, use the Email EngineGuide to install the Email engine, then perform the post-installation steps.

7/24/2019 Installing AR Sys English 5.1
http://slidepdf.com/reader/full/installing-ar-sys-english-51 88/200
88"Chapter 4—Installing the AR System Server on Windows
Post-Installation Steps
If this is an upgrade or overwrite of an existing database, and the AR Systemserver uses FTS, then rebuild or move indexes, as applicable. Refer toUpgrading or Overwriting the Full Text Search Option on page 27 for moreinformation.
If you installed centralized preferences forms, or will use the reporting ormessage catalog forms, enable these forms.
Starting and Stopping the AR System Server Manually
You can choose to start the AR System server automatically or manually. Youcan also stop the server manually.
Starting the AR System Server on Windows
For Windows NT
1 Access the Services screen.
a Choose Start > Settings > Control Panel.
b Double-click the Services icon.
2 Select the appropriate server.
! The first or only AR System server installed on a machine is calledAR System Server.
! Additional servers are listed as AR System <server name>.
3 Click Start.
Installing AR System
For Windows 2000
4 Access the Services screen.
a Choose Start > Settings > Control Panel.
b Double-click Administrative Tools.
c Double-click the Services icon.
5 S l t th i t

7/24/2019 Installing AR Sys English 5.1
http://slidepdf.com/reader/full/installing-ar-sys-english-51 89/200
Starting and Stopping the AR System Server Manually! 89
5 Select the appropriate server.
! The first or only AR System server installed on a machine is calledAR System Server.
! Additional servers are listed as AR System <server name>.
6 Choose Action > Start.
Stopping the AR System Server on Windows
This procedure describes how to stop the AR System server. However, youcan stop other AR System Services using the same procedure. To stopmultiple AR System Services, stop them in the following order:
a AR System serverb AR System Email engine
c AR System Portmapper
For Windows NT
1 Access the Services screen.
aChoose Start
>
Settings>
Control Panel.b Double-click the Services icon.
2 Select the appropriate server.
! The first or only AR System server installed on a machine is calledAR System Server.
! Additional servers are listed as AR System <server name>.
3 Click Stop.
Action Request System 5.1
For Windows 2000
4 Access the Services screen.
a Choose Start > Settings > Control Panel.
b Double-click Administrative Tools.
c Double-click the Services icon.
5 Select the appropriate server

7/24/2019 Installing AR Sys English 5.1
http://slidepdf.com/reader/full/installing-ar-sys-english-51 90/200
90"Chapter 4—Installing the AR System Server on Windows
5 Select the appropriate server.
! The first or only AR System server installed on a machine is calledAR System Server.
! Additional servers are listed as AR System <server name>.
6 Choose Action > Stop.
Uninstalling an AR System Server
Follow this procedure to uninstall AR System.
The uninstall process does not remove the AR System database from yoursystem. This way, your data and structures remain intact, so that you canchoose to upgrade the AR System database if you reinstall the server.
If you uninstall an AR System server and install another server, the installerdetects the existing AR System database, and you are presented with thescreens for an upgrade or overwrite process, not a new installation process.
In other words, even if you uninstall an AR System server, when you run theinstaller, you will receive the screen giving you the option to upgrade oroverwrite the AR System database, and the installation directory screen willshow an FTS directory.
Installing AR System
Uninstalling an AR System Server
1 Choose Start > Settings > Control Panel.
2 Double-click the Add/Remove Programs icon.
The Add/Remove Programs Properties dialog box appears.
3 Select the AR System server from the list of installed software.
4 Click Add/Remove.

7/24/2019 Installing AR Sys English 5.1
http://slidepdf.com/reader/full/installing-ar-sys-english-51 91/200
Uninstalling an AR System Server! 91
The Action Request System uninstallation dialog box appears.
5 Click OK.
The uninstallation process stops any AR System services that are running.
You might be prompted to remove shared files. It is generally safe to removeshared files, because the registry tracks the applications that use files.However, applications that do not use the registry may use a shared file, so if you are not sure of the impact of removing a shared file, do not remove it.
If you do not remove shared files, some server files will remain on yoursystem. You can remove these files manually. Check the uninstall log forinformation.
You are also prompted to remove folders and their contents. Remove theseitems only if you are sure that you want to remove everything from thespecified folder.
Action Request System 5.1

7/24/2019 Installing AR Sys English 5.1
http://slidepdf.com/reader/full/installing-ar-sys-english-51 92/200
92"Chapter 4—Installing the AR System Server on Windows
5 Preparing to Install the AR SystemMid Tier

7/24/2019 Installing AR Sys English 5.1
http://slidepdf.com/reader/full/installing-ar-sys-english-51 93/200
Preparing to Install the AR System Mid Tier ! 93
CHAPTER5 Mid Tier
The Action Request System (AR System) mid tier enables user access
to AR System forms and applications through web browsers. The mid
tier resides on the web server machine. Typically, the mid tier is not
installed on the same machine as the AR System server, because themid tier is designed to communicate with multiple AR System servers.
Depending on your configuration, a single mid tier may suffice, or you
may install multiple mid tiers for additional scalability.
You can configure the AR System servers that the mid tier will
communicate with, along with other mid tier settings, in the
AR System Configuration Tool, which is included with the mid tier.
The mid tier requires advance configuration. This chapter describes
the requirements and provides checklists where you can check off
preparatory tasks and post-installation tasks as you complete them.
Note: Read the AR System 5.1 Release Notes before you perform any of
the steps in this chapter.
Action Request System 5.1
Configuring a Mid Tier Machine
The following components must be installed on the web server machinebefore you install the mid tier:
!
A supported web server! Java 2 Software Developer's Kit (Java 2 SDK), version 1.3. or above
Java 2 SDK is available from http://java.sun.com

7/24/2019 Installing AR Sys English 5.1
http://slidepdf.com/reader/full/installing-ar-sys-english-51 94/200
94"Chapter 5—Preparing to Install the AR System Mid Tier
J p //j
! Crystal Web Component Server, if you will use Crystal Reports on the web
Crystal Web Component Server is available fromhttp://www.crystaldecisions.net and requires advance configuration.
In addition, at least one AR System 5.1 server must be installed on anaccessible machine. The server can be installed locally, but the mid tier istypically installed on a separate machine with network access to AR Systemservers.
Finally, you will need a supported web browser within your environment touse and configure the mid tier after it is modified.
Installing the Java Server Pages Engine
The AR System mid tier requires a supported Java Server Pages (JSP) engine.ServletExec 4.1.1 is bundled with the mid tier, and is installed with the midtier as part of the mid tier installation by default.
Throughout this documentation, instructions and procedures assume that you will install the supported version of ServletExec that is bundled with themid tier. The out-of-process version of ServletExec, ServletExec AS 4.1.1, andthe in-process version for Solaris and iPlanet, are bundled with the mid tierinstallers for HP-UX, AIX, Solaris, and Linux. The out-of-process version ofServletExec needs to be started manually after you install the mid tier when you install into the following configurations:
! Apache web server on Solaris, HP-UX, AIX, and Linux ! iPlanet web server on HP-UX and AIX
For these configurations, instructions for starting this version of ServletExecmanually are provided.
Installing AR System
Although this document assumes that you will install the ServletExecbundled with the mid tier, if a compatible version of ServletExec is alreadyinstalled, you may choose to use your existing copy. However, if you do so, you are responsible for the configuration. In addition, you must also verifythe permission and ownership of the ServletExec files, as the mid tier
installation does not delete existing ServletExec files.
On UNIX, if you have an earlier version of ServletExec installed, you willd t th i ti di t b f i t lli S l tE
7/24/2019 Installing AR Sys English 5.1
http://slidepdf.com/reader/full/installing-ar-sys-english-51 95/200
Preparing AR System Servers for the Mid Tier! 95
need to remove or rename the existing directory before installing ServletExec4.1.1. If you choose to install ServletExec 4.1.1 in the mid tier installationscript, you should remove or rename the existing ServletExec directorybefore running the script.
To use a different JSP engine, you will need to install and enable that enginebefore you install the mid tier.
Basic testing has been performed using several of the major JSP engines, butfull functionality cannot be guaranteed with a different JSP engine.
For more information on product compatibility, refer to the compatibility
matrix at: http://supportweb.remedy.com
Preparing AR System Servers for the Mid Tier
If you will use centralized preferences, localized error messages, or a CrystalReports reporting server, you may want to configure these AR System serversbefore installing the mid tier. The mid tier installer prompts you to specifythese servers. If you specify them during the mid tier installation, you do notneed to set up these server connections in the AR System Configuration Toolafter installation. If you do not specify these servers during the mid tierinstallation, you use the AR System Configuration tool to do so afterinstallation.
Action Request System 5.1
Worksheet for Preparing to Install the AR System Mid Tier with All
Web Servers
To install the mid tier on any web server, you need installation, setup, andconfiguration information, some of which is specific to each web server. This
section covers general information for all types of web servers. Forweb-specific information, see the applicable worksheet in this chapter.
Prepare the system

7/24/2019 Installing AR Sys English 5.1
http://slidepdf.com/reader/full/installing-ar-sys-english-51 96/200
96"Chapter 5—Preparing to Install the AR System Mid Tier
Prepare the system
1 Review the AR System 5.1 Release Notes on the Customer Support website:
http://supportweb.remedy.com
2 Refer to the compatibility matrix to verify system requirements:
http://supportweb.remedy.com3 If a version of ServletExec earlier than 4.1.1 is installed, either uninstall that
version before installing the mid tier and ServletExec 4.1.1 or see the sectionentitled Installing the Java Server Pages Engine on page 94.
Record information to enter at the installer prompts
1 Record the mid tier installation directory.
The location must have adequate disk space and RAM, and be accessible toat least one AR System server locally or through a network. Clients must haveweb access to this location.
If you are installing on the same machine as an AR System server, choose aseparate directory for the mid tier.
Mid tier installation directory:______________________________________
The default directories are: UNIX: /usr/ar/mid tierWindows: C:\Program Files\AR System\Mid-Tier
2 Optionally, identify at least one AR System 5.1 server for the mid tier toconnect to.
If you do not specify servers during installation, you can do so after theinstallation.
AR System servers, with port and RPC numbers, if they have been assigned:
____________________________________________________________
____________________________________________________________
____________________________________________________________
Installing AR System
3 Optionally, identify the preference server or servers to be used with the midtier.
If you do not specify preference servers during installation, you can do soafter the installation.
Preference servers must be AR System servers and must be entered in the listof AR System servers.
If you identify two or more preference servers, separate each entry with a
comma but no space for example: server1 server2 server3

7/24/2019 Installing AR Sys English 5.1
http://slidepdf.com/reader/full/installing-ar-sys-english-51 97/200
Preparing AR System Servers for the Mid Tier! 97
comma but no space, for example: server1,server2,server3. . .
Preference servers, with port and RPC numbers, if they have been assigned:
___________________________________________________________
___________________________________________________________4 Optionally, identify the catalog server.
The catalog server must be an AR System server and must be entered in thelist of AR System servers.
Catalog server, with port and RPC numbers, if they have been assigned:
___________________________________________________________
Record information to enter at the installer promptsTo change the mid tier configuration password, perform the following:
1 Start the AR System Configuration Tool:
http://<web_server>:<port>/arsys/apps/shared/config/config.jsp
2 In the login screen, enter the default password: arsystem
3Click Change Password in the left panel.
4 Enter your new password.
After you complete the worksheets, continue with the installation of theAR System mid tier:
! For UNIX, refer to Chapter 6, Installing the AR System Mid Tier on UNIX .
! For Windows, refer to Chapter 7, Installing the AR System Mid Tier onWindows.
Action Request System 5.1
Preparing to Install the AR System Mid Tier with iPlanet
If you will use an iPlanet web server, you must disable the iPlanet JSP enginebefore you install the mid tier. Install the mid tier with the bundled versionof ServletExec after you disable the iPlanet JSP engine.
If you use the out-of-process version of ServletExec (ServletExec AS 4.1.1) you will also need to change the port number when you install the iPlanet
b S l tE AS 4 1 1 i b dl d ith th id ti f HP UX

7/24/2019 Installing AR Sys English 5.1
http://slidepdf.com/reader/full/installing-ar-sys-english-51 98/200
98"Chapter 5—Preparing to Install the AR System Mid Tier
web server. ServletExec AS 4.1.1 is bundled with the mid tier for HP-UX,AIX, and Linux. This version is also available for Solaris and Windows.
Warning:You should stop the iPlanet web server before you make anychanges to the configuration. In addition, you should refresh theWeb Server Administration Server page after you make changes,and if you are prompted to load configurations, do so. If you donot follow these guidelines, your web server could becomecorrupted.
To ensure that you prepare your system for the mid tier installation,complete the worksheet for your platform, and perform the appropriatepre-installation procedures as noted in the worksheet.
Worksheet for Installing the AR System Mid Tier on UNIX
with iPlanet
Use this worksheet if you are installing the AR System mid tier on UNIX withiPlanet. Copy this worksheet and complete a separate worksheet for each midtier you plan to install. This worksheet assumes that you have alreadyinstalled at least one AR System server.
Prepare the system
1 Ensure that you have root permissions to the UNIX machine.
User name: rootPassword: ___________________________________________________
2 Install the Java 2 JDK.
Java JDK installation directory: __________________________________

7/24/2019 Installing AR Sys English 5.1
http://slidepdf.com/reader/full/installing-ar-sys-english-51 99/200
Action Request System 5.1
Ensure that the installer has write privileges to the Netscape configuration file
obj.conf ; otherwise, the installer will not be able to configure iPlanet for thereports and attachments features. Also, the ServletExec installer will not beable to install the JSP engine as a plug-in.
For information on the obj.conf file, refer to the ServletExec User Guide,
installed with ServletExec (<ServletExec_install_dir> /Documentation bydefault), or from the ServletExec web site at http://www.servletexec.com.
User name: __________________________________________________

7/24/2019 Installing AR Sys English 5.1
http://slidepdf.com/reader/full/installing-ar-sys-english-51 100/200
100"Chapter 5—Preparing to Install the AR System Mid Tier
Password: ___________________________________________________
Port number: _________________________________________________
7 Enter the installation directory for the web server:
Web server installation directory: __________________________________
8 Disable the iPlanet JSP engine.
Refer to Disabling the iPlanet JSP, Servlet Engine and Internal Java onpage 104 for instructions.
9 When you invoke the web server, include umask 077 in the web server startsequence to minimize security exposure.
Web browsers may submit data that records user password information inthe web server’s log file. This is a known security risk.
10 Install Java 2 SDK v1.3. or above.
Obtain Java 2 SDK for your platform from one of these web sites, or consult your software vendor. Download sites might change.
! Solaris and Linux — http://java.sun.com
For the updated JDK version for HP-UX and AIX, you can also go tohttp://java.sun.com/j2se and choose the link to the correct version andplatform ports.
11 Complete this step only if you are using IBM Java 2 SDK 1.3 with AIX .
Modify the IBM directory structure by creating the following symbolic links:
mkdir -p /usr/java/jre
ln -s /<ibm_sdk_install_dir>/jre/sh /usr/java/bin
ln -s /<ibm_sdk_install_dir>/lib /usr/java/lib
ln -s /<ibm_sdk_install_dir>/jre/lib /usr/java/jre/lib

7/24/2019 Installing AR Sys English 5.1
http://slidepdf.com/reader/full/installing-ar-sys-english-51 101/200
Action Request System 5.1
Worksheet for Installing the AR System Mid Tier on Windows with
iPlanet
Use this worksheet if you are installing the AR System mid tier on Windowswith iPlanet. Copy this worksheet and complete a separate worksheet for
each mid tier you plan to install. This worksheet assumes that you havealready installed at least one AR System server.
Prepare the system

7/24/2019 Installing AR Sys English 5.1
http://slidepdf.com/reader/full/installing-ar-sys-english-51 102/200
102"Chapter 5—Preparing to Install the AR System Mid Tier
1 Ensure that you have local Windows Administrator account privileges to theweb server box.
! Windows 2000—You must be able to change registry entries. Otherwise,
the AR System configuration tool that is installed with the mid tier will notsave changes.
! Windows NT—Administrator privileges are required so that the installercan install the mid tier as an NT service.
Windows Administrator ID and password:____________________________________________________________
2 Ensure that you have the following permissions for the web server.You need a user name, password, and Administration Server port number sothat you can access the iPlanet Administration Server. These parameters areestablished when iPlanet is installed.
User name: ___________________________________________________
Password: ____________________________________________________
Port number: _________________________________________________3 Complete this step only if iPlanet is not yet installed.
Install the iPlanet web server.
Do the following when you install iPlanet:
! Choose the “typical” option.
! If you will use the out-of-process version of ServletExec (ServletExec AS
4.1.1), choose a port number other than 8888 when you install iPlanet.ServletExec and iPlanet both use port 8888 by default, and this cannot bechanged during the ServletExec installation. Changing the port when youinstall the web server prevents conflicts.
Installing AR System
4 Complete this step only if you will use the out-of-process version of ServletExec(ServletExec AS 4.1.1) and iPlanet is already installed .
If iPlanet is already installed and you will use ServletExec AS 4.1.1, changeeither the iPlanet port number or the ServletExec port number. Both iPlanetand ServletExec use port 8888 by default, so to avoid conflicts, at least one of
the port numbers must be changed.
To change the iPlanet port number, do the following:
a Stop the iPlanet admin server.

7/24/2019 Installing AR Sys English 5.1
http://slidepdf.com/reader/full/installing-ar-sys-english-51 103/200
Preparing to Install the AR System Mid Tier with iPlanet ! 103
b Access the file<iPlanet_install_dir> /https-adminserv/config/magnus.conf.
c Edit the line Port 8888 to assign another port (Port 8080, for example).
d Restart the iPlanet admin server.
To change the ServletExec port number, install ServletExec with the mid tierand perform step 1 on page 101 after installation.
5 Disable the iPlanet JSP engine.
Refer to Disabling the iPlanet JSP, Servlet Engine and Internal Java onpage 104 for instructions.
6 Install Java 2 SDK v1.3. or later.
Obtain Java 2 SDK from http://java.sun.com.
Or, consult your software vendor. Download sites might change.
7 Optionally, install Crystal Web Component Server.
Install this component if you will use Crystal Reports on the web. CrystalWeb Components Server is available from http://www.crystaldecisions.net.
Crystal Web Components Server can be installed remotely. If it is notinstalled locally, you will need to share the mid tier installation directory withthe remote Crystal server, specifying the full path to this directory. Note thisdirectory path if you will access Crystal Web Component Server over anetwork.
Crystal Reports Web Component Server path:
____________________________________________________________

7/24/2019 Installing AR Sys English 5.1
http://slidepdf.com/reader/full/installing-ar-sys-english-51 104/200
Installing AR System
Disabling the iPlanet JSP and Servlet Engine
1 If it is not installed, install iPlanet 4.1.1 using the “typical” option.
2 Access the iPlanet administration page.
a Open a web browser.
b Enter http://<host_name>:<port_number>.
For example: http://myserver.mydomain.com:8050.
The iPlanet Server Manager screen appears. Your server should belisted in the Select a Server field

7/24/2019 Installing AR Sys English 5.1
http://slidepdf.com/reader/full/installing-ar-sys-english-51 105/200
Preparing to Install the AR System Mid Tier with iPlanet ! 105
listed in the Select a Server field.
3 If you have two or more web servers, choose the target web server in thedrop-down list.
4 Click Manage.
If you are prompted to load configurations, do so.
The Server On/Off screen appears.
5 If the server is on, click Server Off.
A message appears, stating that the server has been shut down.
6 Click OK to dismiss the message.
7 Click the Servlets tab.
The Enable Servlets screen appears.
8 Do the following:
a Set Activate the Servlet Engine to No.
b Verify that Enable JSP option in the Servlets tab is set to No.
9 Click OK.
The Save and Apply Changes screen appears.
10 Click the Save and Apply.
A confirmation message appears.
11 Click OK to dismiss the message.
12 Close the browser.13 Install the mid tier, following the procedure for your platform.
! UNIX—refer to Chapter 6
! Windows—refer to Chapter 7
Action Request System 5.1
Disabling the iPlanet internal Java
1 Use your web browser to log in to the iPlanet 6 administrative serverinterface.
2 Choose the Servers tab.
3 Click the Manage Servers Link.4 Select the webserver instance that will have ServletExec installed and click
Manage.
5 Click the Java tab.

7/24/2019 Installing AR Sys English 5.1
http://slidepdf.com/reader/full/installing-ar-sys-english-51 106/200
106"Chapter 5—Preparing to Install the AR System Mid Tier
6 Uncheck Enable Java Globally.
7 Uncheck Enable Java for class.
8 Click Apply Link.9 Click Apply Changes.
Refreshing the iPlanet Web Server
After you install the mid tier, you need to refresh the iPlanet web server toincorporate updates made to the configuration file during the mid tier
installation.
Refreshing the iPlanet web server
1 Access the iPlanet administration page.
a Open a web browser.
b Enter http://<host_name>:<port_number>.
For example: http://myserver.mydomain.com:8050.The Web Server Administration Server screen appears. Your servershould be listed in the Select a Server field.
2 If you have two or more web servers, choose the target web server in thedrop-down list.
3 Click Manage.
4 Click Apply in the upper right corner of the screen. The Apply Changesscreen appears.
5 Click the Load Configuration Files.
A message appears stating that the edits are loaded.
6 Click OK to dismiss the message.
The Server On/Off screen appears.
Installing AR System
7 Click Server On.
8 Click OK on the server start-up message.
9 Close the browser.
Preparing to Install the AR System Mid Tier with ApacheIf you will use an Apache web server, complete the installation worksheet toensure that your system is set up correctly.

7/24/2019 Installing AR Sys English 5.1
http://slidepdf.com/reader/full/installing-ar-sys-english-51 107/200
Preparing to Install the AR System Mid Tier with Apache ! 107
Worksheet for Installing the AR System Mid Tier on UNIX with
ApacheUse this worksheet if you are installing the AR System mid tier on UNIX withApache. Copy this worksheet and complete a separate worksheet for eachmid tier you plan to install. This worksheet assumes that you have alreadyinstalled at least one AR System server.
Prepare the system
1 Install an ANSI C compiler and PERL software before you install ServletExec4.1.1 and Apache. Install the Apache web server and enable the DSO option.
2 Install the Apache web server and enable the DSO option.
3 Complete this step only if you are installing the mid tier on Red Hat Linux 7.xand you are using the Apache web server that is bundled with Red Hat Linux .
Edit the apache user ID.
The Apache web server bundled with Red Hat Linux 7.x runs with the userID apache. The shell for this account is set to
/bin/false so you cannot become superuser (su) to this ID.
To solve this, edit the password file:
Use the linuxconf user tool or vipw to access the password file. Delete the last
gecos field after the last colon (the /bin/false section).
4 Ensure that you have root permissions for the web server so that you canwrite to files and all parent directories.
5 When you invoke the web server, include umask 077 in the web server startsequence to minimize security exposure.
6 Web browsers may submit data that records user password information inthe web server’s log file. This is a known security risk.
Action Request System 5.1
7 Install Java 2 SDK v1.3 or later.
Obtain Java 2 SDK for your platform from one of these web sites, or consult your software vendor. Download sites might change.
For the updated JDK version for HP-UX and AIX, you can also go tohttp://java.sun.com/j2se and choose the link to the correct version andplatform ports.
8 Complete this step only if you are using IBM Java 2 SDK 1.3 with AIX .
Modify the IBM directory structure by creating the following symbolic links.
kdi / /j /j

7/24/2019 Installing AR Sys English 5.1
http://slidepdf.com/reader/full/installing-ar-sys-english-51 108/200
108"Chapter 5—Preparing to Install the AR System Mid Tier
mkdir -p /usr/java/jre
ln -s /<ibm_sdk_install_dir>/jre/sh /usr/java/bin
ln -s /<ibm_sdk_install_dir>/lib /usr/java/libln -s /<ibm_sdk_install_dir>/jre/lib /usr/java/jre/lib
If you do not run these commands before you install the mid tier, thenServletExec will not create the scripts that start and stop the ServletExec JSPengine, or update the web server configuration files. This step is unnecessaryif you are using Java 2 SDK 1.3.x with AIX.
Perform the post-installation task
1 Complete this step only if you use ServletExec AS.
Perform the procedure in the section Completing the Post-Installation Task for Apache Web Server on page 109.
This step is unnecessary if you chose to have ServletExec installed along withthe mid tier.
2 Complete this step only if you already installed the mid tier and the version of
ServletExec that is bundled with it on HP-UX, AIX, or Red Hat Linux.
Start ServletExec AS 4.1.1 manually.
Refer to Starting and Stopping ServletExec AS 4.1.1 Manually on page 111 forinstructions.
Installing AR System
Completing the Post-Installation Task for Apache Web Server
When you install ServletExec separately, that is, if you do not choose to installServletExec as part of the mid tier installation, the ownership and groupname for ServletExec installation directories is root. To run correctly, the
group name for the StartServletExec script must be the same as those for themid tier and web server.
Changing Permissions in the ServletExec Directory
The binary download of Apache installs with root directory ownership. To

7/24/2019 Installing AR Sys English 5.1
http://slidepdf.com/reader/full/installing-ar-sys-english-51 109/200
Preparing to Install the Mid Tier with Microsoft Internet Information Server ! 109
run a secure web site, the directory and file group permissions for the webserver, the runapache script, and the mid tier should all be set to the sameweb group ID.
1 Change to the ServletExec installation directory:
# cd <ServletExec_install_dir>
2 Change the ownership of the ServletExec directory, all subdirectories, andfiles to root by using the recursive option:
# chown -R root <ServletExec_install_dir>
3 Change the group name of the ServletExec directory, all subdirectories, andfiles to root by using the recursive option:
# chgrp -R <Web_Server_Group> <ServletExec_install_dir>
For further information, refer to the ServletExec documentation , installedwith the product: <ServletExec_install_dir> /ServletExecAS/Documentation
Preparing to Install the Mid Tier with Microsoft InternetInformation Server
Use this worksheet if you are installing the AR System mid tier on Windows.Copy this worksheet and complete a separate worksheet for each mid tier youplan to install. This worksheet assumes that you have completed theAR System server installation.
Action Request System 5.1
Worksheet for Installing the AR System Mid Tier on Windows
with IIS
Use this worksheet if you are installing the AR System mid tier on Windowswith IIS. Copy this worksheet and complete a separate worksheet for each
mid tier you plan to install. This worksheet assumes that you have alreadyinstalled at least one AR System server.
Prepare the system
1 Ensure that you have local Windows Administrator account privileges to the

7/24/2019 Installing AR Sys English 5.1
http://slidepdf.com/reader/full/installing-ar-sys-english-51 110/200
110"Chapter 5—Preparing to Install the AR System Mid Tier
web server box.
! Windows 2000—You must be able to change registry entries. Otherwise,
the AR System configuration tool that is installed with the mid tier will notsave changes.
! Windows NT—Administrator privileges are required so that the installercan install the mid tier as an NT service.
Windows Administrator ID and password:____________________________________________________________
2 Ensure that you have the following permissions for the web server.
Ensure that you have the correct logon information for the IIS administrator,so that you can access the IIS administration page.
User name: __________________________________________________
Password: ___________________________________________________
Port number: _________________________________________________
3 If it is not installed, install the IIS web server.4 Install Java 2 SDK v1.3 or later.
Obtain Java 2 SDK from http://java.sun.com.
Or, consult your software vendor. Download sites might change.
5 Optionally, install Crystal Web Component Server.
Install this component if you will use Crystal Reports on the web. Crystal
Web Components Server is available from http://www.crystaldecisions.net.
Installing AR System
Crystal Web Components Server can be installed remotely. If it is notinstalled locally, you will need to share the mid tier installation directory withthe remote Crystal server, specifying the full path to this directory. Note thisdirectory path if you will access Crystal Web Component Server over anetwork.
Crystal Reports Web Component Server path:____________________________________________________________
Starting and Stopping ServletExec AS 4.1.1 Manually

7/24/2019 Installing AR Sys English 5.1
http://slidepdf.com/reader/full/installing-ar-sys-english-51 111/200
Starting and Stopping ServletExec AS 4.1.1 Manually! 111
y
If you installed the mid tier and the version of ServletExec that is bundled
with it (ServletExec AS 4.1.1) in the following configurations, use thisprocedure to start ServletExec manually after you install the mid tier:
! Apache web server on Solaris, HP-UX, AIX, or Red Hat Linux
! iPlanet web server on HP-UX or AIX
The procedure assumes that ServletExec AS 4.1.1 has been installed.
Note: If you choose to install the mid tier with ServletExec AS 4.1.1 in anyother configuration, manual configuration of the web server and JSPengine is required. These configurations will not be supported.
Starting ServletExec AS 4.1.1 Manually
1 Navigate to the following directory:
cd <servletexec_41_as_install_dir> /
ServletExecAS/se-<hostname_instance>2 Assume the UNIX web user ID.
su <webuserid>
The web user ID (UID) is generally nobody, except on HP-UX where nobody may not be used.
For HP-UX, another UID must be created for the web user account (for
example, UID = web, GID = web).3 Start ServletExec 4.1.1.
./StartServletExec &
This command starts ServletExec AS 4.1.1 in the background.
Action Request System 5.1
4 Issue the exit command to assume your previous user ID (root).
5 Verify that ServletExec AS 4.1.1 is licensed and functioning.
a Go to http://<host_name>:<port_number>/servlet/admin in your webbrowser.
b Use the AR System Configuration Tool to perform a few basic operations,such as submitting a request.
Stopping ServletExec AS 4.1.1 Manually
There are two ways to stop ServletExec AS 4.1.1 manually.

7/24/2019 Installing AR Sys English 5.1
http://slidepdf.com/reader/full/installing-ar-sys-english-51 112/200
112"Chapter 5—Preparing to Install the AR System Mid Tier
! Issue the command ./StopServletExec in the directory
<ServletExec_install_dir> /ServletExecAS/se-<hostname_instance>
You can run this command while logged in as root. You do not need toassume the web user ID.
! Stop ServletExec AS 4.1.1 from the administrator page athttp://<host_name>:<port_number>/servlet/admin.
CHAPTER6 Installing the AR System Mid Tier onUNIX

7/24/2019 Installing AR Sys English 5.1
http://slidepdf.com/reader/full/installing-ar-sys-english-51 113/200
Installing the AR System Mid Tier on UNIX! 113
The AR System mid tier requires advance configuration and certain
components. Before you install the mid tier, ensure that you have
completed the worksheets in the previous chapter for your platform
and web server.
The AR System mid tier installer performs the following tasks:
! Creates the installation directory, if required
! Places mid tier files and directories in the correct locations
! Installs and registers ServletExec 4.1.1
Note: Read the AR System 5.1 Release Notes before you perform any ofthe steps in this chapter.

7/24/2019 Installing AR Sys English 5.1
http://slidepdf.com/reader/full/installing-ar-sys-english-51 114/200
Installing AR System
7 Note the current directory where the tar files were extracted. Enter the pathto that directory when prompted for the product directory name duringinstallation.
8 Change to the directory containing the installation program:
# cd arsystem
9 Perform the installation procedure in this chapter.
Running the AR System Mid Tier Installation Script
7/24/2019 Installing AR Sys English 5.1
http://slidepdf.com/reader/full/installing-ar-sys-english-51 115/200
Running the AR System Mid Tier Installation Script! 115
This procedure upgrades the AR System mid tier or installs it for the firsttime.
The script writes a log file to /usr/tmp/mt_install.log.
Running the AR System Mid Tier Installation Script
1 Ensure that you have System Administrator privileges.
2 Ensure that a supported web server is installed and running on the machine.
3 Access the installation software.
If you are installing from the Action Request System 5.1 installation CD:
a Mount the CD either locally or remotely. For instructions, refer to Appendix C, Mounting a CD-ROM on a UNIX System.
b Change to the directory containing the AR System installation script asfollows:
# cd <CD-ROM_mount_point> /arsystem
The default mount point is /cdrom.
Refer to Appendix C, Mounting a CD-ROM on a UNIX System for detailson how to mount the CD.
If you are installing software obtained through Electronic SoftwareDistribution (ESD), or changing the default installation directory, refer toInstalling the Mid Tier from the Web on page 114 for instructions.
4 Run the AR System mid tier installation script:
#./mt_install
The following message appears:
Welcome to the Action Request System(r) 5.1 Mid Tier installation.
Action Request System 5.1
5 At the prompt:
Do you wish to install Action Request System 5.1 mid tier (Y or N)> [Y]
Do one of the following:
! Type n to stop the installation script.
! Press Enter to proceed with the installation.
The following message appears after you press Enter:
A record of the installation will be preserved in /usr/tmp/mt_install.log
The following information also appears:

7/24/2019 Installing AR Sys English 5.1
http://slidepdf.com/reader/full/installing-ar-sys-english-51 116/200
116"Chapter 6—Installing the AR System Mid Tier on UNIX
! AR System product and copyright information
!
Your UNIX version information! Space requirements for mid tier installation
6 At the prompt:
Have you completed the pre-installation tasks described in the ActionRequest System Installation Guide? [Y]
You must install and configure certain components before you install the
mid tier. If you have not yet done so, refer to the installation worksheet for your platform and web server in Chapter 5 for information. The mid tier willnot install or function correctly if you do not prepare your system.
Do one of the following:
! Type n to stop the installation script.
! Press Enter to proceed with the installation.
The following message appears after you press Enter:
Action Request System 5.1 mid tier will not install unless you have acompatible JDK installed on your system. Refer to the Action RequestSystem 5.1 mid tier release notes for compatibility information.
7 At the prompt:
Have you installed a compatible version of JDK? If not, exit the installation
now and install JDK first. Continue? [Y]Do one of the following:
! Type n to stop the installation script.
! Press Enter to proceed with the installation.
Installing AR System
The following message appears after you press Enter:
Please select the web server you will be using with Action Request System5.1 mid tier.
Type A or a for Apache web server
Type I or i for iPlanet 4.0 web serverType J or j for iPlanet 6.0 web server
Type O or o for other web server
Type Q or q to CANCEL the install
8 At the prompt:

7/24/2019 Installing AR Sys English 5.1
http://slidepdf.com/reader/full/installing-ar-sys-english-51 117/200
Running the AR System Mid Tier Installation Script! 117
8 At the prompt:
Enter your selection:
Enter the letter that designates your web server. A supported web server mustbe installed to install the mid tier. If you have not installed a supported webserver, terminate the installation and install a web server.
9 At the prompt:
Please enter the web server install directory. (for example,'<web_server_install_directory>'):
Enter the directory where the web server you selected in step 8 is installed.
The following message appears.
**********************************************************
Action Request System 5.1 mid tier requires a JSP Engine to functioncorrectly.
Do you have a JSP Engine installed?
*********************************************************
Please type Y or y if you have a JSP Engine installed
Type N or n if you do not have a JSP Engine installed
Type Q or q to CANCEL the install
If ServletExec 4.1.1 is installed, the mid tier can use your installed copy of
ServletExec. If you have an earlier version of ServletExec, you should chooseto install ServletExec 4.1.1 and remove or rename the existing directorybefore installing ServletExec 4.1.1. Earlier versions of ServletExec are notcompatible with the mid tier.
If ServletExec is not installed, you can choose to install it as part of thisinstallation.
Action Request System 5.1
10 At the prompt:
Enter your selection:
Do one of the following:
! Type n if you would like to install ServletExec 4.1.1.
The following message appears.You do not have a JSP Engine installed. Action Request System 5.1 midtier will not function without one.
Would you like to install ServletExec from NewAtlanta?
Type Y or y to install ServletExec from NewAtlanta

7/24/2019 Installing AR Sys English 5.1
http://slidepdf.com/reader/full/installing-ar-sys-english-51 118/200
118"Chapter 6—Installing the AR System Mid Tier on UNIX
yp y
Type N or n to CANCEL the install
Go to step 11.
! Type y if another JSP engine is installed and you want the mid tier to use it.
The following message appears:
Please select the JSP engine you will be using with Action RequestSystem 5.1 mid tier.
Type S or s for New Atlanta ServletExec
If you choose this option, the product directory message appears. Go tostep 12.
Type O or o for another JSP engine
If you choose this option, the product directory message appears. Go tostep 12.
Type Q or q to CANCEL the install
11 At the prompt:
Enter your selection:
Do one of the following:
! Type n or q to terminate the installer script.
! Type y to install ServletExec when the mid tier installer completes.
Installing AR System
The product directory message appears as follows:
************************************************************
Please enter the product directory name.
This is the name of the CD mount directory, for example /cdrom
************************************************************
12 At the prompt:
Enter the product directory name: [/cdrom]

7/24/2019 Installing AR Sys English 5.1
http://slidepdf.com/reader/full/installing-ar-sys-english-51 119/200
Running the AR System Mid Tier Installation Script! 119
p y [/ ]
Enter the directory containing the mid tier files to be installed:
/<CD-ROM_mount_point> /cdrom
For ESD downloads, enter the directory of the installation program.
Refer to Installing the Mid Tier on UNIX from the Web on page 114 for furtherinformation.
The script confirms the path for the install files:
Product_path = <product_directory_name>
The following message appears.
Select the directory in which to install Action Request System 5.1 mid tier.
13 At the prompt:
Directory to install Action Request System 5.1 mid tier? [/usr/ar/mid-tier]
Do one of the following:
! Press Enter to accept the default installation directory.
! Enter an installation directory.
If an AR System server is installed on this machine, you should install the midtier into a separate directory. One mid tier can service multiple AR Systemservers.
The following confirmation message appears:
Action Request System 5.1 mid tier will be installed in the <your valuehere> directory.

7/24/2019 Installing AR Sys English 5.1
http://slidepdf.com/reader/full/installing-ar-sys-english-51 120/200
Installing AR System
16 At the prompt:
For a new installation, enter the full pathname to the base directory orchoose the default [/usr/local/NewAtlanta]>
Do one of the following:
! Press Enter to accept the default installation directory.
! Enter another directory.
The ServletExec license agreement appears.
17 At the prompt:
Do you accept these license conditions? [yes]>
D f h f ll i
7/24/2019 Installing AR Sys English 5.1
http://slidepdf.com/reader/full/installing-ar-sys-english-51 121/200
Running the AR System Mid Tier Installation Script! 121
Do one of the following:
! Press Enter to accept the license agreement.! Type n to terminate the installation.
18 When the following ServletExec readme text appears, enter the number ortext from the list.
Select the web server type on which to install :
1. <installed web server 1>
2. <installed web server 2>. . .
Enter number or text [1]>
If you are installing with iPlanet on Solaris, go to step 21 on page 122.
If you are installing with Apache or iPlanet on HP, AIX, or Linux, go tostep 19.
19 At the prompt:Would you like to install:
1) a web server adaptor and an instance of ServletExec.
2) only a web server adaptor.
3) only an instance of ServletExec.
[1]>
Type 1 unless you are certain that you have an existing web adapter. Mostinstallations require the first choice.
If you are installing with Apache, go to step 20, otherwise go to step 21. If you
chose iPlanet at step 18, and iPlanet is not installed at /usr/netscape, you willsee a message that prompts you for the directory name of the Netscape webserver installation.
Action Request System 5.1
20 Enter the Apache installation directory at the prompt:
Enter the directory name of your Apache Server installation.
[/usr/local/apache]>
Go to step 23.
21 If you only have one Netscape web server, go to step 22.
At the prompt (iPlanet on Solaris):
Choose one of the following <web server> installations upon which toinstall ServletExec, or enter the full pathname to the root directory forsome other installation:
1) /usr/netscape/server4

7/24/2019 Installing AR Sys English 5.1
http://slidepdf.com/reader/full/installing-ar-sys-english-51 122/200
122"Chapter 6—Installing the AR System Mid Tier on UNIX
1) /usr/netscape/server4
2) /usr/netscape/suitespot
Enter the number that corresponds to the installation to use.
The following confirmation appears:
Using <your_selection_here>
22 At the prompt:
Enter one of the following <web_server> servers in which to install
ServletExec:1) https-admserv
2) httpd-myserver.mydomain.com
Enter the number that corresponds to the server to use. Do not choose the
administration server, which is typically the first choice, https-admserv.
23 This step only applies when you are installing ServletExec Application Server(AS).
At the prompt (Apache, or iPlanet on HP or AIX):
Enter a unique name for this instance of ServletExec AS.
(To add other instances, run this installer again.)
[<hostname>]
Enter an instance name. The host name of the machine you are installing on
is chosen by default, but you can enter another name.After you enter a name, you receive ServletExec installation confirmationmessages, or a message telling you which user Netscape chose.

7/24/2019 Installing AR Sys English 5.1
http://slidepdf.com/reader/full/installing-ar-sys-english-51 123/200

7/24/2019 Installing AR Sys English 5.1
http://slidepdf.com/reader/full/installing-ar-sys-english-51 124/200

7/24/2019 Installing AR Sys English 5.1
http://slidepdf.com/reader/full/installing-ar-sys-english-51 125/200
Action Request System 5.1
36 At the prompt:
Is this correct? [y]
Do one of the following:
! Press Enter to continue
!
Type n to make corrections. Return to step 34 on page 125.
The following message appears.
Action Request System 5.1 mid tier installation complete.
37 If necessary, perform the appropriate post-installation tasks listed in theinstallation worksheet for your platform and web server. Reboot your systemafter you install AR System

7/24/2019 Installing AR Sys English 5.1
http://slidepdf.com/reader/full/installing-ar-sys-english-51 126/200
126"Chapter 6—Installing the AR System Mid Tier on UNIX
after you install AR System.

7/24/2019 Installing AR Sys English 5.1
http://slidepdf.com/reader/full/installing-ar-sys-english-51 127/200
Action Request System 5.1
Uninstalling the Mid Tier on UNIX
The uninstallation procedure included here describes ServletExec only. If you installed the mid tier with another JSP engine, refer to that product’sdocumentation for information.
Uninstalling the Mid Tier
1 If you are using a copy of ServletExec that was installed separately from themid tier, stop the ServletExec process. You can stop ServletExec two ways:
! Issue the command ./StopServletExec in the directory:
<ServletExec_install_dir> /ServletExecAS/se-<instance_name>

7/24/2019 Installing AR Sys English 5.1
http://slidepdf.com/reader/full/installing-ar-sys-english-51 128/200
128"Chapter 6—Installing the AR System Mid Tier on UNIX
You can run this command while logged in as root. You do not need toassume the web user ID.
! Stop SerlvetExec AS 4.1.1 from the administrator page at:http://<host_name>:<port_number>/servlet/admin
2 Stop the web server.
3 Uninstall ServletExec installer.
a Run the ServletExec installer.
b At the prompt for the installation directory, choose the existingServletExec directory.
You will be prompted to remove ServletExec or install a new instance.
c Choose the option to remove ServletExec.
4 Remove the mid tier directory.Navigate to the parent directory of the mid tier installation directory andissue the remove command:
rm -rf <mid_tier_install_dir>

7/24/2019 Installing AR Sys English 5.1
http://slidepdf.com/reader/full/installing-ar-sys-english-51 129/200

7/24/2019 Installing AR Sys English 5.1
http://slidepdf.com/reader/full/installing-ar-sys-english-51 130/200
CHAPTER7 Installing the AR System Mid Tier onWindows

7/24/2019 Installing AR Sys English 5.1
http://slidepdf.com/reader/full/installing-ar-sys-english-51 131/200
Installing the AR System Mid Tier on Windows ! 131
The AR System mid tier requires advance configuration and certain
components. Before you install the mid tier, ensure that you have
completed the worksheets for your platform and web server in the
previous chapter.
The AR System mid tier installer performs the following tasks:
! Creates the installation directory, if required
! Places mid tier files and directories in the correct locations
! Installs and registers ServletExec 4.1.1, if you choose to install
ServletExec
! Adds the following to the start of the %PATH% string: <Webtier Install
dir\Web-inf\lib>
! Installs the required DLL and sets up the driver for Crystal Reports
Note: Read the AR System 5.1 Release Notes before you perform any ofthe steps in this chapter.
Action Request System 5.1
Installing the AR System Mid Tier on Windows
The following procedure contains instructions for installing the mid tier witheither iPlanet or IIS.
You can cancel installation any time. However, information you entered willnot be saved.
Installing the AR System Mid Tier with the Installer
1 Ensure that a supported web server is installed and running on the machine.
2 Access the installation software.
! From CD

7/24/2019 Installing AR Sys English 5.1
http://slidepdf.com/reader/full/installing-ar-sys-english-51 132/200
132"Chapter 7—Installing the AR System Mid Tier on Windows
From CD
Log in to Windows as an administrator and insert the CD into the drive.
If autorun is enabled, the CD browser opens. Click AR System Mid Tier.
If the CD browser does not start, open the mid tier installer, midtier.exe.
! From ESD
If you downloaded the midtier.exe file to a location where you will not
install AR mid tier, copy the downloaded directory and its contents to themachine where you will install it.
Run the midtier.exe file.
When you run this file, the installation files are unpacked into a temporarydirectory and the Setup program starts.
The Select Language screen appears.
3Choose a language for this installation.The Welcome screen appears.
4 Click Next.
The Choose Destination Folder screen appears.
If you are installing the mid tier on a machine with one or more AR Systemservers installed, install the mid tier into its own directory. One mid tier canservice multiple AR System servers.

7/24/2019 Installing AR Sys English 5.1
http://slidepdf.com/reader/full/installing-ar-sys-english-51 133/200
Action Request System 5.1
! To use another installed JSP engine, select that engine in the list. You mustconfigure your JSP engine to communicate with the mid tier.
! If you do not have a JSP engine installed, or your JSP engine does notappear in the list, select Other. The mid tier will not be configured for aJSP engine.
9 Click Next.
If you are not using iPlanet and did not choose ServletExec as the JSP engine,go to step 10. If you are using iPlanet and chose ServletExec as the JSP engine, you will receive this message:

7/24/2019 Installing AR Sys English 5.1
http://slidepdf.com/reader/full/installing-ar-sys-english-51 134/200
134"Chapter 7—Installing the AR System Mid Tier on Windows
Ensure that you have disabled the iPlanet JSP engine, according to theprocedure Disabling the iPlanet JSP, Servlet Engine and Internal Java onpage 104. Click OK to dismiss the message and continue.
10 The Server Properties screen appears. Configure the AR System servers thatthe mid tier will connect to.
Use the Add, Modify, and Remove buttons to configure the list of servers.Identify the servers by the host name, or the server name specified when theAR System server was installed. If you are not using a portmapper, specify theport numbers.
You can continue with the installation without entering servers in the list.You can add, modify, and remove servers after installation using theAR System Configuration Tool.
11 Click Next.
The Preferences Servers screen appears.
12 Configure specific types of servers that the mid tier will connect to.
! If you have configured preference, catalog, or report servers, enter thenames of each server in the appropriate field. Servers entered here willappear in the AR System Configuration Tool, and be available to the midtier. If you have not configured servers for these purposes, leave the fieldsblank.
! If you enter an AR System server here, that server must also be entered inthe previous screen, Server Properties.
Installing AR System
! If the local machine is not a preference, catalog, or report server, removethe local machine name from the fields.
! To identify multiple preference servers, enter the server names separated
by commas, but no spaces. For example: server1,server2,server3, andothers.
! Enter only one catalog server, and one report server. The mid tier can onlyaccess one of each of these types of servers.
13 Click Next.
The Summary screen appears.
14 Click Next.
If you did not choose to install ServletExec, go to step 19.

7/24/2019 Installing AR Sys English 5.1
http://slidepdf.com/reader/full/installing-ar-sys-english-51 135/200
Installing the AR System Mid Tier on Windows! 135
y g p
If you chose to install ServletExec, the following message appears.
15 Click Yes to start the ServletExec installer.
The Welcome screen appears.
Note: If you click No, you are asked if you want to install the mid tier withoutServletExec. If you click No again, the mid tier installation terminates,and a message listing the location of the installation log file appears. To
install the mid tier, you must start the installer again. The values youentered up to this point will not be saved.
16 Click Next.
The ServletExec license agreement appears.
17 Click Yes to accept the agreement.
You cannot install ServletExec unless you accept the license agreement. If youclick No, installation terminates.
18 Click Next.
The Choose Destination Location screen appears.
Action Request System 5.1
19 Click Next to accept the default directory, or click Browse to select anotherdirectory, and then click Next.
The installation begins.
20 Select only one web server for ServletExec to manage and click Next.
The ServletExec installation begins.
The following prompt appears if you are using iPlanet.

7/24/2019 Installing AR Sys English 5.1
http://slidepdf.com/reader/full/installing-ar-sys-english-51 136/200
136"Chapter 7—Installing the AR System Mid Tier on Windows
If you are using IIS, you will get a warning telling you to stop the IISAdministrative server.
21 Click Yes or No to continue with the installation.
! iPlanet only : Click Yes and the program will update the obj.conf file, back
up your original obj.conf file, and inform you of the location of the
Install.log file for information. The DOS Command Prompt may bedisplayed briefly. Press Enter to continue.
An Information screen appears.
Click OK to continue the installation.
! Click No to reach the Setup Complete screen.
If you choose No, you must set the configurations manually. For
instructions, refer to the ServletExec documentation, located in theServletExec installation directory,
<ServletExec_install_dir> /Documentation.
An Information screen appears.
Click OK to dismiss the information screen and continue with theinstallation.
The InstallShield Wizard Complete screen appears.
22 Click Finish to install ServletExec and the mid tier.
A series of status messages appear, showing the mid tier installation progress.
The AR System mid tier Setup Complete screen appears.

7/24/2019 Installing AR Sys English 5.1
http://slidepdf.com/reader/full/installing-ar-sys-english-51 137/200
Action Request System 5.1
Uninstalling the Mid Tier on Windows
This procedure contains instructions for uninstalling the mid tier withServletExec. If you used another JSP engine, refer to that product’sdocumentation for information.
You will be prompted to choose whether to remove DLLs that the mid tieruses. If you choose not to remove all DLLs, some mid tier files will remain onthe system. You can inspect the uninstall log file and remove files manually.Applications are not uninstalled by the mid tier uninstallation program.
Uninstalling the Mid Tier
1 If you are using the out-of-process version of ServletExec or ServletExec AS,

7/24/2019 Installing AR Sys English 5.1
http://slidepdf.com/reader/full/installing-ar-sys-english-51 138/200
138"Chapter 7—Installing the AR System Mid Tier on Windows
stop ServletExec.
2 Stop the web server.
3 Choose Start > Settings > Control Panel.
4 Double-click the Add/Remove Programs icon.
The Add/Remove Programs screen appears.
5 Select Action Request System 5.1 Mid Tier from the list of applications.6 Click Add/Remove.
The Action Request System uninstallation screen appears.
7 Click OK to confirm your selection.
You may be prompted to remove shared files. It is generally safe to removeshared files, because the registry tracks the applications that use files.
However, applications that do not use the registry may use a shared file, so if you are not sure of the impact of removing a shared file, do not remove it.
If you do not remove shared files, some mid tier files will remain on yoursystem. You can remove these files manually. Check the uninstall log forinformation.
If you reinstall the mid tier on the same machine, you will need to manuallyremove the extra ServletExec application entry created by the mid tier
installer.
Installing AR System
Verifying the Mid Tier Installation
If you encounter any problems with ServletExec, first ensure that the productinstalled successfully. To do so, verify the registration.
Verifying the ServletExec Registration and Settings
1 Open your ServletExec Admin page. Windows only : Choose
Start > Programs > New Atlanta ServletExec 4.1 ISAPI >ServletExec Admin (for IIS)
Start > Programs > New Atlanta ServletExec 4.1 NSAPI >ServletExec Admin (for iPlanet)Or
G h // b / l / d i b b

7/24/2019 Installing AR Sys English 5.1
http://slidepdf.com/reader/full/installing-ar-sys-english-51 139/200
Verifying the Mid Tier Installation! 139
Go to http://<web_server>/servlet/admin in a web browser.
2 Verify that a license key appears in the License Key field.
If no key appears, contact Customer Support.
3 Click classpath under Virtual Machine in the left panel.
4 Verify that the tools.jar file appears in the class path list.
5 Click Manage (in version 4.1) under the Web Applications in the left panel.6 Verify that the web application ARSYSTEM appears in the list.
Verifying Virtual Options
1 Choose Web Application > Manage on the left panel.
2 Choose ARSYSTEM under the Configure column.
3 Fill in the following information:! Application Name: ARSYSTEM
! URL Context Path: /arsys/
! Location: <File system path for the mid tier install directory that youcreated in step 1>
Action Request System 5.1

7/24/2019 Installing AR Sys English 5.1
http://slidepdf.com/reader/full/installing-ar-sys-english-51 140/200
140"Chapter 7—Installing the AR System Mid Tier on Windows
CHAPTER8 Installing AR System Clients onWindows

7/24/2019 Installing AR Sys English 5.1
http://slidepdf.com/reader/full/installing-ar-sys-english-51 141/200
Installing AR System Clients on Windows! 141
AR System includes several client tools designed for various types of
user and administrator access. Clients are available for Windows only,
and must be installed on the machines that users and administrators
use to access AR System. The three clients that can be installed
separately, AR System Administrator, AR System Windows User Tool,and AR System Alert, are discussed in this chapter. This chapter
describes what you need to do to prepare target systems for
installation, and provides installation instructions for each client.
Note: Read the AR System 5.1 Release Notes before you perform any ofthe steps in this chapter.
Action Request System 5.1
Preparing to Install AR System Clients
Before you install any clients, you should familiarize yourself with thefollowing topics:
! User configuration directory.
Also known as the Home directory. Use a separate directory for local userinformation.
! Default Home directory.
! Third-party components installer.
AR System Windows clients require third-party components to functionproperly. Refer to Required Third-Party Components on page 143 for more
information.

7/24/2019 Installing AR Sys English 5.1
http://slidepdf.com/reader/full/installing-ar-sys-english-51 142/200
142"Chapter 8—Installing AR System Clients on Windows
information.
User Configuration Directory
The user configuration directory stores coding and user-specificconfigurations, such as preferences and saved searches. However, if youchoose the centralized preferences option, your user configurations arestored in the centralized preferences directory.
When you upgrade, the installers prompt you to identify an existing userconfiguration directory. When you install AR System clients for the firsttime, the installers prompt you to create a user configuration directory in alocation that you specify.
To ensure that clients share the user configuration directory, specify the same
directory path when you install each client. After the installation, you cancreate a separate directory for each user.
Default Home Directory
The default Home directory contains the settings for the default user that isprovided with the installation. The default user is Demo. There is no
password for this user. You are provided with a default user so that you canimmediately access AR System to verify the installation and create additionaluser accounts.
Installing AR System
Required Third-Party Components
AR System Windows clients require certain third-party components forfunctions such as viewing help files, communicating with networkapplications and databases, and supporting the Windows Socket API(Winsock).
AR System provides a third-party installer (Redist.exe)that is actually acollection of individual executables that launch separate installers for eachcomponent. Before you install any AR System clients on Windows 95,Windows 98, or Windows NT, run this installer to verify existingcomponents and install what you need. Windows 2000 and Windows MEmachines generally do not require updating because the latest versions ofthese components are included with the operating system.

7/24/2019 Installing AR Sys English 5.1
http://slidepdf.com/reader/full/installing-ar-sys-english-51 143/200
Preparing to Install AR System Clients! 143
If you attempt to install a AR System client on a machine which does not haveone or more of the required components, the missing components will belisted, and you will be prompted to run the third-party installer. Only thecomponents required by your system will be installed, so the installation willvary from machine to machine. In most cases, the third party componentsare installed into the system directory or as System Registry entries.
Third-party components may be used by other software (unrelated toAR System), so some components may be already installed. However, theinstalled components might not be the required versions for AR Systemclients. In cases where other software may depend on earlier versions of thethird-party components, back up those components before you run thethird-party installer. After you install the versions required by AR System,
test compatibility by performing tasks with the other software that requirethe components.
Note: Most of the installers for the Microsoft third-party components arealso available as separate executables you can obtain from the
Microsoft website at www.microsoft.com. If you are a SystemAdministrator, you may want to have these components pre-installedon the users’ machines, before having end-users run an AR Systemclient installer on their systems.
Action Request System 5.1
The components available in the Redist.exe installer are listed in thefollowing table. If your platform is listed in the right column, then theRedist.exe installer will check your system. You will be prompted to installonly those components that are not detected on your system.
Executable Component Platform and Function
50comupd.exe CommonTools
Windows 95, Windows 98, and Windows NT
This is the Windows Common Tools/Microsoft Windows Update.
DCOM95.EXE DCOM95 Windows 95 and Windows 98
Component Object Model (COM) providesAR System clients with the underlying services
of interface negotiation, life cycle management(determining when an object can be removed

7/24/2019 Installing AR Sys English 5.1
http://slidepdf.com/reader/full/installing-ar-sys-english-51 144/200
144"Chapter 8—Installing AR System Clients on Windows
( g jfrom a system), and event services (puttingone object into service as the result of an eventthat has happened to another object). COM isnecessary for the support of OLE Automationin Active Links and is required to integrateAR System client software with third-partysoftware that supports COM.
HHUPD.EXE HTML HelpInstallationand Updatepackage
Windows 95, Windows 98, and Windows NT
This component provides browsing help forsystems using the Microsoft HTML Helpstandard interface.
MDAC_TYP.EXE MicrosoftData AccessComponent
Windows 95, Windows 98, and Windows NT
Microsoft Open Database Connectivity(ODBC) is a standard application
programming interface (API) for accessing adatabase. ODBC is required for the AR Systemclients to communicate with ODBC clients ofthe underlying database. ODBC clients includeMicrosoft Access and Microsoft Excel. ODBCenables creating and viewing of CrystalReports as well.
ws2setup.EXE Winsock 2 Windows 95 and Windows 98
Winsock is a support system to enable theSockets interface. Sockets is a method forcommunicating between a client program anda server program in a network. A socket isdefined as “the endpoint in a connection.”AR System clients need Winsock to connect toAR System servers.
Installing AR System
Running the Third-Party Components Installer
1 Access the installation software.
! CD—Install the AR System server using the CD Browser. Log in toWindows as an administrator and insert the CD into the drive. The CDbrowser opens automatically if autorun is enabled. If it is not, start
Redist.exe.! ESD—Copy the downloaded directory and its contents to the location
from which you will install Action Request System.
If you downloaded Action Request System by using the Sm@rtCert clientonto a platform where you will not install Action Request System, copy thedownloaded directory and its contents to the computer where you willinstall Action Request System. For example, if you used the Solaris
Sm@rtCert client to download the Action Request System for Windows,th di t d it t t t Wi d hi

7/24/2019 Installing AR Sys English 5.1
http://slidepdf.com/reader/full/installing-ar-sys-english-51 145/200
Preparing to Install AR System Clients! 145
copy the directory and its contents to your Windows machine.
From the download directory, run the file Redist.exe.
When you run this file, the installation files are unpacked into a temporarydirectory, the Setup program starts, and the Choose Setup Languagescreen appears.
2 Choose a language and click OK.The Welcome screen appears.
3 Click Next.
The Third-Party Tools Installer information screen appears.
Review the text in this screen for information about the components that willbe installed, then click Next.
At this point, the installer scans your system, and if a required component isnot detected, you will be prompted to choose whether to install thecomponent. If you choose to install a particular component, the individualMicrosoft installer for that component starts. Table 8-1 on page 148 lists theprompts that can appear. You will only receive prompts for components thatare not detected, so you may not receive every prompt.
Action Request System 5.1
The Microsoft Data Access Component (mdac_typ.exe) is not a singlecomponent, but a collection of files that pertain to a dynamic link library(DLL). Therefore, MDAC cannot be detected as a single component. TheRedist.exe installer scans for two dll files (odbc32.dll and odbcan32.exe) thatmay indicate that the component is on the system. Therefore, you may beprompted to install MDAC even if you have the most recent version installed.
To verify installed components, go to the next step where you obtain a logshowing detected files. If you are certain that you do not have the latestversion of MDAC, you can skip the next step and go to step 7 on page 150.
4 To verify existing versions of any installed components before you install newversions, perform these steps:
a Click No at each component prompt. Component prompts start with thistext:The AR System needs <component_executable_name> for

7/24/2019 Installing AR Sys English 5.1
http://slidepdf.com/reader/full/installing-ar-sys-english-51 146/200
146"Chapter 8—Installing AR System Clients on Windows
communication. . .
b At the Setup Complete screen, click Finish.
c Inspect the third-party component installer log for information about
detected components. Go to your Temp directory and open the file
rd_install.log.
Installing AR System
Following is a sample rd_install.log file from a Windows NT system. The
<installer_screen_text> indicates the installer prompts which have beenremoved:
This is a AR System installation log file for Third Party Tools.
Checking ODBC...
Found odbc32.dll at C:\WINNT\System32\ Found odbcad32.exe at C:\WINNT\System32\
<installer screen text>
Checking Comupd...
The version number for comctl32.dll is 5.80.2614.3600
<installer screen text>
Checking html help...--First check IE version

7/24/2019 Installing AR Sys English 5.1
http://slidepdf.com/reader/full/installing-ar-sys-english-51 147/200
Preparing to Install AR System Clients! 147
First, check IE version...
--The current version number for Shdocvw.dll is 4.72.3110.3
Found\CLSID\{adb880a6-d8ff-11cf-9377-00aa003b7a11}\InprocServer32, andthe value is C:\WINNT\System32\hhctrl.ocx
The current version number for hhctrl.ocx is 4.73.8561.0 and it is not up
to date.
Action Request System 5.1
5 Install necessary components
Table 8-1: Component Prompts
If the message starts with Action
The AR System needsmdac_typ.exe ...
This indicates that the required version ofMicrosoft Data Access Component was not
detected. However, for this component, youshould verify whether MDAC is installed byperforming the previous step.
To preserve any existing versions that may beinstalled, click No. You will need to test theAR System client with the installed version.
To install the required version, click Yes.
If you click Yes, the Microsoft installer willstart. Install the component:
A h W l li k C i

7/24/2019 Installing AR Sys English 5.1
http://slidepdf.com/reader/full/installing-ar-sys-english-51 148/200
148"Chapter 8—Installing AR System Clients on Windows
! At the Welcome screen, click Continue.
! At the installation directory screen, click the
computer icon.
! At the screen which states Microsoft Data
Access 2.1 Setup was completed
successfully, click OK.
The installer mdac_typ.exe terminates. Ifanother component was not detected, you areprompted to install it.
Warning For Windows 95 machines that donot have the Microsoft Data AccessComponent (mdac_typ.exe) installed, youmust run the Redist.exe installer to install theDCOM component first and then immediatelyrestart the computer before proceeding toinstall the Microsoft Data Access Component(mdac_typ.exe).
Installing AR System
The AR System needs50comupd.exe ...
This indicates that the required version ofWindows Common Tools/ MicrosoftWindows Update was not detected.
You can choose Yes or No.
If you choose No, you will need to test theAR System client with the installed version.
If you choose Yes, and the correct version ofthe component exists, the installer will confirmthis.
If you click Yes and the component needs to beupdated, the Microsoft installer will start.Install the component.
The installer is not interactive, so the nextmessage you receive will confirm that thet l h b i t ll d
If the message starts with Action

7/24/2019 Installing AR Sys English 5.1
http://slidepdf.com/reader/full/installing-ar-sys-english-51 149/200
Preparing to Install AR System Clients! 149
common tools have been installed.
! You will be prompted to restart your
machine.
To continue installing third-partycomponents, click No. You will be promptedto install the next component that was not
detected.If you click Yes, you will need to restart thethird-party installer.
The AR System needs hhupd.exe...
This indicates that the required versions ofHTML Help and Windows Common Tools/Microsoft Windows Update were not detected.
You can choose either Yes or No.
If you click No, you will need to test theAR System client with the installed version.
If you choose Yes, and the correct version ofthe component exists, the installer will confirmthis.
If you click Yes and the component needs to beupdated, the Microsoft installer will start.
The installer is not interactive, so the next
screen you see will confirm that HTML Help1.31 update is complete.
Click OK.
DCOM98 (For Win 95 only)
win2setup (For Win 95 only)
Action Request System 5.1
6 When all the installations are complete, the summary screen appears. ClickFinish. If you were prompted to restart your machine after any of theinstallers, restart the machine now.
7 Continue with AR System client installations.
AR System AdministratorAR System Administrator is required to configure AR System servers, createforms and workflow, and create user accounts. A separate tool, AR SystemImport, is installed together with AR System Administrator. AR SystemImport provides the capability to import data from a variety of sources intoAR System forms.
AR System Administrator can be installed on Windows server machines toprovide local administration. It can be installed on Windows client machines

7/24/2019 Installing AR Sys English 5.1
http://slidepdf.com/reader/full/installing-ar-sys-english-51 150/200
150"Chapter 8—Installing AR System Clients on Windows
with network access to Windows or UNIX AR System servers to provideremote administration.
If you have elected to use centralized preferences, one of the AR Systemservers entered should be a preference server.
For complete functionality, Microsoft Internet Explorer (IE) 5.5 or greatermust be installed on the client machine where you will install AR SystemAdministrator. If IE 5.5 or greater is not installed, some AR SystemAdministrator functions will not be enabled.
AR System Windows User Tool
AR System Windows User Tool is used to submit new AR System requests,search existing requests, and perform some administrative functions, such asexporting data.
AR System Windows User Tool can be installed on Windows servermachines to provide local access. It can be installed on Windows clientmachines with network access to Windows or UNIX AR System servers to
provide remote access.
Installing AR System
Two optional components are available for AR System Windows User Tool.The Crystal Reports option installs the Crystal Reports engine libraries thatenable users to print predefined Crystal reports. This is an alternative to theAR System Windows User Tool reporting function. You must install thisoption to use Crystal Reports for report generation. You do not need toinstall this option if you will use the reporting capability only to export data.
The ODBC option installs the AR System ODBC driver, which offerscompatibility with a range of ODBC clients such as Microsoft Access andMicrosoft Excel. This option is required for Crystal Reports. If you choose toinstall the Crystal Reports option, this option will also be installed.
AR System Alert
AR System Alert informs users when they have received alerts from anAR System server An alert contains information about AR System
7/24/2019 Installing AR Sys English 5.1
http://slidepdf.com/reader/full/installing-ar-sys-english-51 151/200
Preparing to Install AR System Clients! 151
AR System server. An alert contains information about AR Systemtransactions, such as ticket assignments or escalations.
AR System Alert can be installed separately, so users can install AR SystemAlert even if they will not install AR System Windows User Tool. Alerts canbe viewed in AR System Windows User Tool and through a web browser, if
the mid tier is installed and the AR System administrator has enabled alertson the web.
AR System Alert will not process notifications from a version of theAR System server earlier than 5.1. However, Remedy Notifier and AR SystemAlert can be installed on the same machine, and will process notificationsfrom different versions of AR System servers.
If users will access alerts with AR System Windows User Tool, ensure thatAR System Windows User Tool is upgraded to version 5.1 before installingAR System Alert.
For information on configuring a server to process alerts, refer to theConfiguring AR System guide after you install AR System Alert.
Action Request System 5.1
AR System Client Installation Worksheet
Use the following worksheet to ensure that you have prepared the clientmachine and that you have all the information you will be prompted for bythe AR System client installer available. When you have completed theworksheet, you can install AR System clients. For instructions, refer to the
following section.
Review the AR System 5.1 Release Notes on the Customer Support website athttp://supportweb.remedy.com
Worksheet for Preparing to Install AR System Clients
Verify the operating system requirements in the compatibility matrix athttp://supportweb.remedy.com
1 Choose one of the following options:

7/24/2019 Installing AR Sys English 5.1
http://slidepdf.com/reader/full/installing-ar-sys-english-51 152/200
152"Chapter 8—Installing AR System Clients on Windows
1 Choose one of the following options:
! For AR System Administrator, ensure that Internet Explorer 5.5 or greateris installed locally.
! For AR System Alert, if you are upgrading a client machine that usedRemedy Notifier, and you will replace Remedy Notifier, upgrade
AR System Windows User Tool to version 5.1. Complete this step only ifusers will access AR System Alert through the AR System Windows UserTool client. If users will access AR System Alert through a web browser,skip this step.
! For AR System Windows User Tool, if you have not installed any otherAR System 5.1 clients, run the Third-Party Components installer
(Redist.exe) to ensure that your system has required components.
You need to run the Third-Party Components installer only one time ona machine. If you have already installed other AR System clients, you mayhave already run the Third-Party Components installer.
2 Record the AR System servers that AR System Alert will connect to, alongwith the TCP and RPC port numbers, if you assigned them. (Skip this step if you registered the AR System server with a portmapper. For moreinformation, refer to Registering with a Portmapper on page 31.)
_______________________________________________
_______________________________________________
_______________________________________________
_______________________________________________
Installing AR System
3 Specify the default Home directory location.
______________________________________________
4 For AR System Windows User Tool, choose the optional components toinstall.
__ Crystal Reports
__ ODBC5 Install AR System Alert.
For instructions, refer to Installing an AR System Client .
Although not required to install the AR System client, at least one ActionRequest System 5.1 server must be installed before you can use the installedclient. The AR System server can be installed locally or accessible through anetwork. The AR System client installer prompts you to identify the
AR System servers that will be available. If you have elected to use centralizedpreferences, one of the AR System servers entered should be a preference

7/24/2019 Installing AR Sys English 5.1
http://slidepdf.com/reader/full/installing-ar-sys-english-51 153/200
Installing an AR System Client! 153
server.
Installing an AR System Client
This procedure provides instructions for installing AR SystemAdministrator, AR System Windows User Tool, and AR System Alert. Stepsapply to each client unless otherwise noted.
Running the AR System Client Installers
1 Exit any AR System client tools that are running.
2 Access the installation software.
! From CDLog in to Windows as an administrator and insert the CD into the drive.
If autorun is enabled, the CD browser opens. Click AR System Clients.
If the CD browser does not start, open the appropriate client installer:
! admin.exe (AR System Administrator)
! user.exe (AR System Windows User Tool)
! alert.exe (AR System Alert)
Action Request System 5.1
! From ESD
If you downloaded AR System clients to a location where you will not install AR System clients, copy the downloaded directory and its contentsto the machine where you will install the clients. For example, if you usedthe Solaris Sm@rtCert client to download Action Request System forWindows, copy the directory and its contents to your Windows machine.
From the download directory, run the appropriate client installer:
! admin.exe (AR System Administrator)
! user.exe (AR System Windows User Tool)
! alert.exe (AR System Alert)
When you run this file, the installation files are unpacked into a temporary
directory, and the Setup program starts.
At any time during setup, you may exit the installer. However, your settings

7/24/2019 Installing AR Sys English 5.1
http://slidepdf.com/reader/full/installing-ar-sys-english-51 154/200
154"Chapter 8—Installing AR System Clients on Windows
y g p y y y gup to that point in the installer are not saved when you return.
For AR System Administrator
If you are alerted that Internet Explorer 5.5 or later is not installed, click OK.You will need to install IE 5.5 after you install AR System Administrator.
The Welcome screen appears. Go to step 8 on page 155.For AR System Windows User Tool and AR System Alert
The Choose Setup Language screen appears. The default language selectionis the locale language of the operating system. However, you can change theselection.
3 Choose a language and click OK.
The Welcome screen appears.4 Click Next.
For AR System Administrator and For AR System Windows User Tool
The Select Components screen appears. Go to the next step.
For AR System Alert
The Select Action Request System Resource screen appears.
Go to step 7.
5 Select the optional components to install.
Both options are selected by default, but you can deselect them.
Installing AR System
6 Click Next.
The Select Action Request System Resource screen appears.
7 Select the language or languages for this installation.
English is selected by default on English language systems.
On non-English language systems, English and the operating system
language of the local system, if available, are selected.
English cannot be deselected because English is required to submit requeststo Customer Support.
You can select multiple languages.
8 Click Next.
The Choose Destination Folders screen appears.
9 Select installation folders.
For information about the user configuration directory, refer to User

7/24/2019 Installing AR Sys English 5.1
http://slidepdf.com/reader/full/installing-ar-sys-english-51 155/200
Installing an AR System Client! 155
For information about the user configuration directory, refer to UserConfiguration Directory on page 142.
10 Click Next when you are finished.
The AR System Server Locations screen appears.
11 Enter the AR System servers that the AR System client will connect to.
Use the Add, Edit, and Remove buttons to configure the list of servers.Identify servers by the server name, which is either the host name or the nameentered during AR System server installation.
If you plan to use centralized preferences, one of the servers should be apreference server. Refer to Centralized Preferences on page 28.
If any clients have been installed on this machine, the AR System serversconfigured in the previous installation will be listed.
At least one AR System server must be available to use the AR System client.After installation, you can add, modify, and remove servers when you log into the client.
12 Click Next when you have finished.
The Summary screen appears.
13 Review your selections.
To change settings, click Back until you reach the target screen.
14 Click Next to begin the installation.
When the installation is complete, the Setup Complete screen appears.
Action Request System 5.1
15 Click Finish to complete the installation.
If the Locked Files Found message appears, this indicates that a previousinstallation of AR System Windows User Tool has been uninstalled. Someitems were not removed. Remove these files manually and continue theinstallation.
For AR System Windows User Tool
Only AR System Windows User Tool provides the option to start AR SystemAlert automatically. When you install AR System Windows User Tool, if youleave the check box selected, the AR System Alert log-in screen appears after you click Finish. If you deselect the check box, you will need to startAR System Alert from the Start menu.
Uninstalling AR System ClientsFollow this procedure to uninstall AR System clients

7/24/2019 Installing AR Sys English 5.1
http://slidepdf.com/reader/full/installing-ar-sys-english-51 156/200
156"Chapter 8—Installing AR System Clients on Windows
Follow this procedure to uninstall AR System clients.
Uninstalling AR System Clients
1 Choose Start > Settings > Control Panel.
2 Double-click the Add/Remove Programs icon.
The Add/Remove Programs Properties screen appears.
3 Select AR System Administrator 5.1, AR System Windows User Tool 5.1, orAR System Alert 5.1 from the list of applications.
4 Click Add/Remove.
You will be prompted to confirm your selection.
5 Click Yes to continue.The Remove Programs From Your Computer screen appears.
A series of prompts appear, asking whether you want to delete the directoriesthat contain the user configuration files (Home directories). You will beprompted to delete the configuration files from each Home directory youcreated, along with the default user’s files, located in the default directory:C:\Program Files\AR System\Home
You will also be prompted to remove files from the installation directory.
Remove these items only if you are sure that you want to remove everythingfrom the specified folders. You should not remove the installation directoryuntil after all clients have been uninstalled.
Installing AR System
6 Choose Yes or No as appropriate.
You may be prompted to remove shared files. It is generally safe to removeshared files, because the registry tracks the applications that use files.However, applications that do not use the registry may use a shared file, so if you are not sure of the impact of removing a shared file, do not remove it.
If you do not remove shared files, some client files will remain on yoursystem.
7 When the uninstall is complete, choose OK to quit the uninstaller, or clickDetails to view information about the files that were not removed.
You can remove these files manually. Check the uninstall log forinformation.

7/24/2019 Installing AR Sys English 5.1
http://slidepdf.com/reader/full/installing-ar-sys-english-51 157/200
Uninstalling AR System Clients! 157
Action Request System 5.1

7/24/2019 Installing AR Sys English 5.1
http://slidepdf.com/reader/full/installing-ar-sys-english-51 158/200
158"Chapter 8—Installing AR System Clients on Windows
CHAPTER9 Licensing AR SystemThis chapter describes licensing the AR System and Mid Tier software.
You can evaluate the Action Request System without purchasing or
activating any licenses. However, you are limited to a maximum of
2000 records per form.
Note: Read the AR System 5.1 Release Notes before you perform any of

7/24/2019 Installing AR Sys English 5.1
http://slidepdf.com/reader/full/installing-ar-sys-english-51 159/200
Licensing AR System! 159
the steps in this chapter.
Action Request System 5.1
AR System Licensing
AR System licensing grants the full and legal use of AR System and isnecessary for performing operations that change or update the database (forexample, updating requests or records). To run an unlimited AR Systemserver at your site, an AR System server license is required. There are
additional AR System server options, such as the Distributed Server Option(DSO), that require a separate, additional license. There are three kinds oflicenses you can use to access the AR System server: read, fixed write, andfloating write. The base AR System product, once licensed with theAR System server license, comes with three Fixed Write licenses andunlimited Read licenses. You can purchase additional user Fixed Writelicenses and user Floating Write licenses by contacting your Remedy Product
sales representative or an authorized reseller.
A license key consists of an encrypted character string to initialize or enable

7/24/2019 Installing AR Sys English 5.1
http://slidepdf.com/reader/full/installing-ar-sys-english-51 160/200
160"Chapter 9—Licensing AR System
the use of AR System by users as specified in the license key. This key allows you to enable functionality, allow users to access the AR System andauthorize the type of access for each user. Two key pieces of information in your License Key are the Site Name and Host ID. The Site Name is a string
that is used to link all available licenses together. For this reason, each licenseon each of your servers should use the same, case-sensitive site name. TheHost ID is a value that ties your license keys to your Server.
The number of users authorized to access the AR System installed on theserver and the type of access granted to such users (for example, fixed writelicense or floating write license), and the site name and host ID (the servernetwork ID) are established by the license keys issued to you. You then use
this key to apply or add the licenses for AR System servers, server options,and users.
Note: As some licenses are linked by site name, each license on each of yourservers should use the same, case-sensitive site name.
For more information on licensing and licensing types, refer to the
Concepts Guide.
Installing AR System
Obtaining License Keys
Use one of the following methods to obtain AR System license keys.
! Go to the Customer Support product licensing web site.
! Send an email to Customer Support at: [email protected] to receive
your license keys by return email. The section entitled Requesting LicenseKeys Online on page 161 explains the type of information you must supplyin your email.
! Fax Customer Support at (925) 469-4001. Use the AR System LicenseInformation Worksheet on page 167 to organize the required information.
! Call Customer Support at (925) 469-4200 (U.S.A.) or your local supportcenter (see the Support website for local numbers), and supply the
required information (see Requesting License Keys Online for the requiredinformation). Use the AR System License Information Worksheet onpage 167 to organize the required information.

7/24/2019 Installing AR Sys English 5.1
http://slidepdf.com/reader/full/installing-ar-sys-english-51 161/200
AR System Licensing! 161
Your Customer Support contact will send you the information you need toactivate your licenses.
Due to case sensitivity, note the information on the worksheet exactly as it
appears in the fields.
Requesting License Keys Online
To generate keys online, access the Customer Support web site.
Once you have gathered your information, you can use the followingprocedure to obtain your license key:
Making a New License Request Online
1 At the Customer Support website http://supportweb.remedy.com, type yoursingle sign-on information from your web profile.
2 Select License Request.
3 Click I Agree next to Other License Agreement to accept the terms.
Action Request System 5.1
The License Agreement screen appears, as the following figure shows.

7/24/2019 Installing AR Sys English 5.1
http://slidepdf.com/reader/full/installing-ar-sys-english-51 162/200
162"Chapter 9—Licensing AR System
Figure 9-1: General License Screen
Installing AR System
4 Type the required information in the fields.
! Email address
! Purchase order number
! Site name and host ID
To obtain the site name and host ID:
! In the AR System License window, choose Edit > Clear to clear anyvalues in the AR System License fields.
! Select the AR System Server from the Product Feature field list.
AR System License displays your Site Name and Host ID.
! The Product Feature you wish to license
You can view the available features in the Product Feature field list in
AR System License.
! Quantity of licenses for each option or product
5 Click Submit

7/24/2019 Installing AR Sys English 5.1
http://slidepdf.com/reader/full/installing-ar-sys-english-51 163/200
AR System Licensing! 163
5 Click Submit.
Customer Support will send you an email with the license key information oran email requesting additional required information. Use AR System Licenseto apply this information to the server that is running the AR System server.
Note: If you plan to install any AR System application that requires a licensekey (for example, the Approval Server), you can obtain the license keyinformation for all your products at one time. You can then submit asingle license key request to take care of all your applications at once.For application-specific licensing information, refer to theappropriate Release Notes and Installation Guide for the application.
Once you have obtained your license keys, see Adding and Applying Licenses on page 168 for information on applying your licenses.
Action Request System 5.1
Viewing AR System Licenses
Use AR System License to view license information. AR System Licenseinstalls automatically when you install AR System Administrator. You mustuse a Windows AR System License tool for licensing and administering thesystem.
Viewing License Information on Windows
Use the following procedure to view license information:
1 Choose Start > Programs > Action Request System > AR System License. TheLog On screen appears.
The following table describes each field of the logon screen.
Table 9-1: Logon Field Descriptions
Field Description

7/24/2019 Installing AR Sys English 5.1
http://slidepdf.com/reader/full/installing-ar-sys-english-51 164/200
164"Chapter 9—Licensing AR System
2 Click OK to display the Product License Tool screen.
User Name Your user name (required).
Password Your password (required).
Server Name The name of the server you want to access (required).
AuthenticationString
An identifying authentication string (optional).
TCP Port Number The TCP Port number of the server you want to access(required only if you use a firewall or if you installed multipleservers on the same server).
If you do not provide a TCP port number, the License Toolwill connect to the default server that you registered with theport mapper.
Installing AR System
Select a license in the list to view license details in the fields at the bottom ofthe window. The following table describes the License Tool fields.
Field Description
Product Feature The product feature that is being licensed.
Type The type of license, which varies depending on the contentsof the Product Feature field. For example, if the productfeature is the AR System server, the Type menu items includeDemo and Server.
Issue Date The date on which the license is issued. Normally this is thecurrent date. If the license is being installed on a date after thelicense key was generated, this field must be set to the datethat the license was created.
Note Use the dd-mm-yy format for the issue date, such as:17-Sept-01.
Expire Date The date on which the license will expire. If this field ist th i i ti d t F f ll d t ti

7/24/2019 Installing AR Sys English 5.1
http://slidepdf.com/reader/full/installing-ar-sys-english-51 165/200
AR System Licensing! 165
empty, there is no expiration date. For full demonstrationlicenses, this field is normally set for 30 days after the issueddate.
Site Name The site name, which is a case-sensitive variable and is
usually the TCP/IP domain name of the site. You should usethe same site name for all license keys assigned to the sameserver.
Host ID The unique, case-sensitive address of the primary networkadapter card in the server to be licensed.
Note: For Windows, AR System License uses SNMP to get
the MAC address for the Host ID field. If it is unable
to return a valid MAC Address, it will revert to
NetBIOS and attempt to obtain a valid MAC address.
To get a true host ID reading:
! Do an “Edit Clear.”
! Select AR SERVER from the Product Feature menu.
This will auto populate a valid host ID for the server that youare currently connected to. The AR System server will
recognize the key even if the MAC address is not the default(Auto-Populated Hostid) if:
! You are applying an existing key.
! The Host ID of the License Key is a valid MAC address
on this system.
! The License key is valid.
Action Request System 5.1
License Key The license key that validates the contents of the license.There is only one encrypted key that is valid, given thecontents of the preceding fields. This key is provided byCustomer Support or your authorized reseller of AR System.
# of Licenses The number of right-to-use licenses for this license. This field
contains an integer.
Depending on the licensing options you choose, you mightreceive email information to enter information into theunnamed field to the right of the # of Licenses field. Leave theunnamed field blank unless you receive further information.
unnamed field Used to when you apply for approval client licenses such asApproval Server and AR System Migrator licenses.
Max Forms The maximum number of forms allowed on the server withthis license. This field is enabled in the lower portion of thewindow when you select AR System server in the ProductFeature field. If this field is left blank, there is no limit to the
Field Description

7/24/2019 Installing AR Sys English 5.1
http://slidepdf.com/reader/full/installing-ar-sys-english-51 166/200
166"Chapter 9—Licensing AR System
number of forms that can be created. This is only used forAR System server licenses.
AR System Server ID The ID number of the server. This field is enabled in thelower portion of the window when you select the AR System
server in the Product Feature field. This is used forAR System server and Flashboards licenses.
Multi-Server The selection of this check box indicates whether aMulti-Processing Server Option (MPSO) of AR System isavailable with a server license. This check box becomesactivated in the lower portion of the window when you selectthe AR System server in the Product Feature field. This isonly used for AR System server licenses.
Installing AR System
AR System License Information Worksheet
Use this worksheet to record the case-sensitive information you need toobtain licenses.
Technical Support
Generate a license key for an AR System product based on the followinginformation.
Contact Information
Name: ____________________________________________
Date: _____________________________________________
Company name: ___________________________________
Site ID: ___________________________________________
Purchase order number: ____________________________

7/24/2019 Installing AR Sys English 5.1
http://slidepdf.com/reader/full/installing-ar-sys-english-51 167/200
AR System Licensing! 167
Fax number: ______________________________________
Phone number:_____________________________________
Server Identification
Server host ID: ________________________
Site name: __________________________
Product Feature
License Type Quantity
Distributed Server Option
AR System Approval Server
Flashboards
Mid Tier
Mid Tier Host IDs
AR System user fixed
AR System user floating
AR System user text fixed
AR System user text floating
Action Request System 5.1
Adding and Applying Licenses
Use AR System License to activate an AR System license that you have alreadypurchased. To run AR System License, you must have a Windows machinethat has the AR System Administrator installed and has network access to theAR System server. You must log in with a username that is an AR SystemAdministrator.
Note: For Windows NT systems, the NETBIOS Interface Service must beinstalled on the Windows NT server where the AR System server isinstalled and running. This ensures the verification of the license key.
Applying the License Keys to Your Server
Repeat the steps in this procedure for each AR System product or option to
be licensed.
1 After you obtain the license keys, select the appropriate option from theProduct Feature list on AR System License.

7/24/2019 Installing AR Sys English 5.1
http://slidepdf.com/reader/full/installing-ar-sys-english-51 168/200
168"Chapter 9—Licensing AR System
Product Feature list on AR System License.
2 Enter the remaining information exactly as specified (includingcapitalization) in the appropriate fields.
All fields, including the appropriate license key for the Product Feature anddate, must match the information that Customer Service or your authorizedreseller provides.
3 Click Add License to activate the server license.
Transferring Server Licenses to Other Servers
Transferring an AR System server license from one server to another isknown as a “purge process” or migration. In this process, you change thephysical location of the AR System server by installing the AR Systemsoftware on the new server, then purging the old license of the previous serverbefore applying new license keys you obtain from Customer Support. Toperform a migration, do the following:
Transferring Server Licenses
1 Install AR System on the new server.
2 Open the Purge Agreement Form from the Customer Support web site at:
http://supportweb.remedy.com.
Installing AR System
3 Add the following information to the online Purge Agreement Form:
! License keys to transfer to the new server. Obtain this information fromthe AR System License tool on the old server.
! Site name and host ID
To obtain the site name and host ID:
! In the AR System License window, choose Edit →Clear to clear anyvalues in the AR System License fields.
! Select the AR System Server from the Product Feature field list.
AR System License displays your Site Name and Host ID.
4 Click OK to submit the information.
You will receive email confirmation from Customer Support.
5 Open the AR System License tool in the old server and select the server licenseto be transferred.
6 Press Delete to remove the server license.

7/24/2019 Installing AR Sys English 5.1
http://slidepdf.com/reader/full/installing-ar-sys-english-51 169/200
Mid Tier Licensing! 169
Mid Tier Licensing
This section contains information on licensing the AR System mid tier.
You are entitled to one mid tier license for each AR System server license,with the option to purchase additional mid tier licenses. The mid tier will runwithout a license, but will only process one transaction at a time (i.e., it willonly run one thread).
All AR System licenses are stored in (and validated against) an AR Systemserver. You add the mid tier license to one of the AR System servers to whichthe mid tier connects. Once the mid tier is licensed on one AR System server,this license is valid for any number of AR System servers to which the mid tierconnects. If you have multiple mid tiers installed on different machines, youcan license all of them on the same AR System server (or different AR Systemservers, as you desire).
Each mid tier has a unique identifier which is displayed in the ConfigurationTool. You will use this identifier, along with your site name, the host ID ofthe AR System server on which you will license each mid tier, and a license key provided by Customer Support, to create a mid tier license.
Action Request System 5.1
To license the mid tier, do the following:
! Gather the information needed to request a license key from CustomerSupport. Refer to Obtaining Preliminary Server and Mid Tier Information on page 171.
! Request a license key from Customer Support, as explained in Requesting
License Keys Online on page 161.! Add the license, according to the procedures in Adding and Applying
Mid Tier Licenses on page 174.
In the Configuration Tool, you may also specify which AR System server isthe license server , or the AR System server that the mid tier first checks for alicense. If your mid tier connects to multiple AR System servers, you maywant to specify a license server to improve efficiency during startup, and to
document the location of the license. For more information on the licenseserver and how to specify it, refer to Configuring the License Server onpage 176.

7/24/2019 Installing AR Sys English 5.1
http://slidepdf.com/reader/full/installing-ar-sys-english-51 170/200
170"Chapter 9—Licensing AR System
You can determine whether the mid tier is using a valid license, and whichAR System server it was licensed from, since the last web server startup. Referto the next section, Determining Current Mid Tier License Usage, next
Determining Current Mid Tier License Usage
To determine whether the mid tier is using a valid license, use the followingprocedure.
Determining the Current Mid Tier License
1 Start the Configuration Tool for that mid tier.Access the Configuration Tool from your browser. The default location ishttp://<host>/arsys/apps/shared/config/config.jsp. The default password
is arsystem.
2 On the Overview page, in the Current Configuration Settings table, look forthe value for the License property.
If the mid tier is using a valid license, the License property will have a value
such as Validated on server - <server_name>.
Installing AR System
Obtaining License Keys for the Mid Tier
You will need to know the site name and host ID for the AR System server onwhich you will license each mid tier. You will also need the unique identifierfor each mid tier that you will license on that server. After you obtain thisinformation, you must request a license key from Customer Support.
Obtaining Preliminary Server and Mid Tier Information
Use AR System License to view the site name and host ID for the AR Systemserver. AR System License installs automatically when you install AR SystemAdministrator.
Use the Configuration Tool to view the identifier for the mid tier. A
Configuration Tool is installed with each mid tier.
Obtaining the Server Site Name and Host ID
Use the following procedure to obtain the server site name and host ID.

7/24/2019 Installing AR Sys English 5.1
http://slidepdf.com/reader/full/installing-ar-sys-english-51 171/200
Mid Tier Licensing! 171
Remember, the mid tier must be connected to the server on which you locatethe license. Ensure that the server is listed in the ARServer Settings page of theConfiguration Tool for that mid tier.
1 Choose Start > Programs > Action Request System > AR System License.
The Logon screen appears.
2 Enter appropriate information into each field:
User Name Your user name (required).
Password Your password (optional).
Server Name The name of the server you want to access (required).
AuthenticationString
An identifying authentication string (optional).
TCP Port Number The TCP Port number of the server you want to access(required only if you use a firewall or if you installedmultiple servers on the same machine).
If you do not provide a TCP port number, the License Toolwill connect to the default server that you registered with theport mapper.
Action Request System 5.1
3 Click OK to display the Product License Tool screen.
4 Select the server license for the server on which you want to license the midtier.
The site name and host ID are displayed in the Site Name and Host ID fields.
Obtaining the Mid Tier Identifier
1 Start the Configuration Tool for the mid tier you want to license.
Access the Configuration Tool from your browser. The default location ishttp://<host>/arsys/apps/shared/config/config.jsp. The default password
is arsystem.
2 On the Overview page, in the Mid Tier System Information table, locate theidentifier.
The identifier is the value contained in the field called Host ID.
Repeat these steps for each mid tier that you will license on a particularAR System server.

7/24/2019 Installing AR Sys English 5.1
http://slidepdf.com/reader/full/installing-ar-sys-english-51 172/200
172"Chapter 9—Licensing AR System
Requesting License Keys
Use one of the following methods to obtain an AR System mid tier license
key. Refer to step 4 on page 174 for the type of information you must supply.
Note: Due to case sensitivity, provide all information exactly as it appears inthe AR System License tool.
! Request keys online.
! Send an email to Customer Support at: http://supportweb.remedy.com to
receive your license keys by return email.! Fax Customer Support at (925) 469-4001.
! Call Customer Support at (925) 469-4200.
Your Customer Support contact will send you the information you need toactivate your licenses.
Installing AR System
Making a New License Request Online
Once you have gathered your information, you can use these steps to obtain your license key:
1 At the Customer Support website http://supportweb.remedy.com, type yoursingle sign-on information from your web profile.
2 Select License Request.
The License Agreement screen appears.
3 Click I Agree next to For Mid-Tier License to display the Mid Tier LicenseRequest screen, as the following figure shows.

7/24/2019 Installing AR Sys English 5.1
http://slidepdf.com/reader/full/installing-ar-sys-english-51 173/200
Mid Tier Licensing! 173
Figure 9-2: Mid Tier License Screen
Action Request System 5.1
4 Type the required information in to the fields.
! Support Contract Id
! Purchase order number
! Email address
! Product Feature (choose AR Mid-Tier)
! Site name and host ID
To obtain the site name and host ID:
! In the AR System License window, choose Edit →Clear to clear anyvalues in the AR System License fields.
! Select the AR System Server from the Product Feature field list.
AR System License displays your Site Name and Host ID.
! Host ID - Mid Tier
Enter a mid tier identifier, as shown in the example below, and click Add.Repeat this step for each mid tier to be licensed.
The field to the right displays the identifiers you entered in a string with

7/24/2019 Installing AR Sys English 5.1
http://slidepdf.com/reader/full/installing-ar-sys-english-51 174/200
174"Chapter 9—Licensing AR System
The field to the right displays the identifiers you entered in a string withthe following format:
ID=<identifier1>, <identifier2>
Enter the string of identifiers into the # of Licenses field in the AR SystemLicense tool, as explained in Applying the License Keys to Your Server .
5 Click Submit.
Customer Support will send you an email with the license key information.Use AR System License to apply this information to the server that is runningthe AR System server.
Adding and Applying Mid Tier Licenses
Use AR System License to activate the AR System license that you purchased.Use the Configuration Tool to specify the license server for each mid tier.
The last procedure in this section explains how to migrate a mid tier licenseto a new server.
Note: For Windows NT systems, the NETBIOS Interface Service must beinstalled on the Windows NT server where the AR System server isinstalled and running. This ensures the verification of the license key.
Installing AR System
Applying the License Key
1 Start AR System License, according to the procedure Obtaining the Server Site Name and Host ID on page 171.
2 Select AR Mid-Tier from the Product Feature list.
3 Enter the following information exactly as specified (includingcapitalization) in the appropriate fields.
Type Server
License Key The license key provided by Customer Support
Site Name The site name for the server to which each mid tier licenseapplies
Host ID The host ID for the server to which each mid tier license
applies
# of Licenses In the left-hand field, enter the number of mid tier licenses,
such as 1 or 3.
In the right-hand field, enter ID= followed by the identifierf h d l d b
7/24/2019 Installing AR Sys English 5.1
http://slidepdf.com/reader/full/installing-ar-sys-english-51 175/200
Mid Tier Licensing! 175
4 Click Add License to activate the license.
5 Stop and restart the appropriate web server processes so that each mid tierrecognizes the newly applied license.
for each mid tier you are licensing, separated by commas.
For example, if you have one license, you would enterID=identifier. If you have two licenses, you would enter
ID=identifier1, identifier2.Note: You must specify mid tier identifiers in the same
order in which you provided them to CustomerSupport when you requested a license key.Otherwise, the license will not be accepted.
Action Request System 5.1
Configuring the License Server
If your mid tier connects to multiple AR System servers, you may want tospecify a license server. If a license server is not specified, the mid tier searchesall configured servers to locate a valid license. If a license server is specified,the mid tier searches for a valid license on this server first. If no license isfound, the mid tier continues to search all other servers to which it is
connected. Use the Configuration Tool to configure the license server,according to the following procedure.
1 Start the Configuration Tool.
Access the Configuration Tool from your browser. The default location ishttp://<host>/arsys/apps/shared/config/config.jsp. The default password
is arsystem.
2 Go to the General Settings page.
3 Select a server from the License Server list.
4 Click Save Changes.
5 Stop and restart the appropriate web server processes so that each mid tier

7/24/2019 Installing AR Sys English 5.1
http://slidepdf.com/reader/full/installing-ar-sys-english-51 176/200
176"Chapter 9—Licensing AR System
5 Stop and restart the appropriate web server processes so that each mid tierrecognizes the newly applied license.
Transferring a Mid Tier License to Another ServerTransferring an AR System server or mid tier license from one server toanother is known as a “purge process” or migration. In this process, youchange the physical location of the AR System server by installing theAR System software on the new server, then purging the old license from theprevious server before applying the new license key you obtain fromCustomer Support.
To perform a mid tier license migration, do the following:
1 Install the AR System mid tier on the new server.
2 At the Customer Support website: http://supportweb.remedy.com, type your single sign-on information from your web profile.
3 Select License Purge/Exchange.
The License Agreement screen appears.
4 Next to the phrase For Mid-Tier License Purge, click the I Agree link toaccept the terms.
Installing AR System
5 At the next screen, type the required information in the fields.
! Support Contract Id under which the old license was issued.
! Email address where the new license key can be sent.
! License keys to transfer to the new server. Obtain this information fromthe AR System License tool on the old server.
!
Site name and host ID for the new server that will contain the mid tierlicense. Obtain this information from the AR System License tool on thenew server.
! Identifiers for each mid tier. Obtain this information from each newConfiguration Tool on the new servers.
6 Click Submit.
You will receive email confirmation from Customer Support.
7 Open the AR System License tool in the old server and select the mid tierlicense to be transferred.
8 Select Purge from the Tools menu to remove the mid tier license.

7/24/2019 Installing AR Sys English 5.1
http://slidepdf.com/reader/full/installing-ar-sys-english-51 177/200
Mid Tier Licensing! 177
Action Request System 5.1

7/24/2019 Installing AR Sys English 5.1
http://slidepdf.com/reader/full/installing-ar-sys-english-51 178/200
178"Chapter 9—Licensing AR System
APPENDIXA
Locating AR System Files
This appendix describes the files that AR System server, mid tier, and
client installers create and modify on the target system.

7/24/2019 Installing AR Sys English 5.1
http://slidepdf.com/reader/full/installing-ar-sys-english-51 179/200
Locating AR System Files! 179
You cannot move AR System server files. You must reinstall
AR System if you want to move the server to a new machine. You can
preserve the environment by exporting data and structures andimporting them in the new location. Refer to Chapter 2, Choosing
Server Options and Preparing the Environment for information on
backing up an AR System environment.
If you do not specify other directories during the installations, files are
created in the default directories described in the following sections.
Note: Read the AR System 5.1 Release Notes before you perform any ofthe steps in this chapter.
Action Request System 5.1
AR System Server and Components
The default installation directories are as follows:
! UNIX—/usr/ar
! Windows—c:\Program Files\AR System
In the AR System documentation, these directories are referred to as<ar_install_dir>. In other words, if you accept the default installation
directory when you install the AR System server, the text <ar_install_dir> in
the documentation refers to c:\Program Files\AR System or /usr/ar. If you
choose another directory, then the text <ar_install_dir> in the documentrefers to your installation directory.
AR System Mid Tier and Components
The default installation directories are as follows:
! UNIX—/usr/ar/mid-tier

7/24/2019 Installing AR Sys English 5.1
http://slidepdf.com/reader/full/installing-ar-sys-english-51 180/200
180"Appendix A—Locating AR System Files
! Windows—c:\Program Files\AR System\Mid-Tier
In the AR System documentation, these directories are referred to as<mt_install_dir>. In other words, if you accept the default installation
directory when you install the AR System server, the text <mt_install_dir> in
the documentation refers to c:\Program Files\AR System\Mid-Tier or
/usr/ar/mid-tier. If you choose another directory, then the text
<mt_install_dir> in the document refers to your installation directory.
AR System Clients and Components
The AR System clients—AR System Administrator, AR System WindowsUser Tool, AR System Alert, and AR System Import—are available forWindows. AR System Import is installed together with AR SystemAdministrator. The default installation directories are as follows:
! Executables—c:\Program Files\AR System! User configuration settings—c:\Program Files\AR System\Home
Installing AR System
In the AR System documentation, the text <ar_install_dir> refers to theclient installation directory. If you choose another directory, then the text
<ar_install_dir> in the document refers to your installation directory.
AR System client installers also create and modify a directory to contain auser’s personal configuration information. This file is referred to in the
AR System documentation as <ar_home_dir>. For information on thisdirectory and its contents, refer to User Configuration Directory on page 142.
AR System Files on UNIX
The following tables show the locations of files that are installed into thedefault directories on a UNIX system.
UNIX AR System Server File Locations
These files are created or modified when you install the AR System server onUNIX.

7/24/2019 Installing AR Sys English 5.1
http://slidepdf.com/reader/full/installing-ar-sys-english-51 181/200
AR System Files on UNIX! 181
File Location
Executable files <ar_install_dir> /bin
Configuration file /etc/arsystem/<server_name> /armonitor.conf
/<ar_server_install_dir>/conf/ar.conf
<ar_install_dir> /conf/armaild.conf
AR System servers <ar_install_dir> /conf/ar
/etc/init.d/arserver /etc/init.d/arserver_<server_name>
License files /etc/arsystem/multilicense /<ar_server_install_dir> /<server_name> /arsystem.lic
Default log file <ar_install_dir> /db/*.log
Install log file /usr/tmp/ar_install.log
Error file <ar_install_dir> /db/arerror.log
Lock files <ar_install_dir> /db/*.lck
FTS indexes (default) <ar_install_dir> /ftindex
Action Request System 5.1
API Package <ar_install_dir> /api
Java doc files:
<ar_install_dir>/api/doc
Header files:
<ar_install_dir> /api/include/*.hLibrary files:
<ar_install_dir> /api/lib/*.a
Source code examples:
<ar_install_dir> /api/src
Sample Application <ar_install_dir> /sample_db
Catalog files /usr/lib/locale/C/LC_MESSAGES(Sun SPARC System and Linux)
/usr/lib/nls/C (HP 9000 Series 700/800)
/usr/lib/nls/msg/En_US (IBM RS/6000)
System Error Messages Help <ar install dir>/help
File Location

7/24/2019 Installing AR Sys English 5.1
http://slidepdf.com/reader/full/installing-ar-sys-english-51 182/200
182"Appendix A—Locating AR System Files
UNIX AR System Mid Tier File LocationsThese files are created or modified when you install the AR System mid tieron UNIX.
System Error Messages Help <ar_install_dir> /help
File Location
Executables <mt_install_dir>
Installed applications <mt_install_dir> /apps
JSP and HTML files, images,Javascript, and configuration
<mt_install_dir> /shared
Web application, java class files,libraries
<mt_install_dir> /WEB-INF
Report form <mt_install_dir> /reports
Installing AR System
AR System Files on Windows
The following tables show the locations of files that are installed into thedefault directories on a Windows system.
Windows AR System Server File Locations
These files are created or modified when you install the AR System server onWindows.
Note: We recommend that you retain this file structure. Do not remove DLLfiles from the arsystem/bin directory. If DLLs are not located in thebin directory, the thread running a process that requires a missingDLL will hang.
File Location
Executable/DLL files <ar_install_dir>
Configuration file <ar_install_dir>\conf\ar.cfg
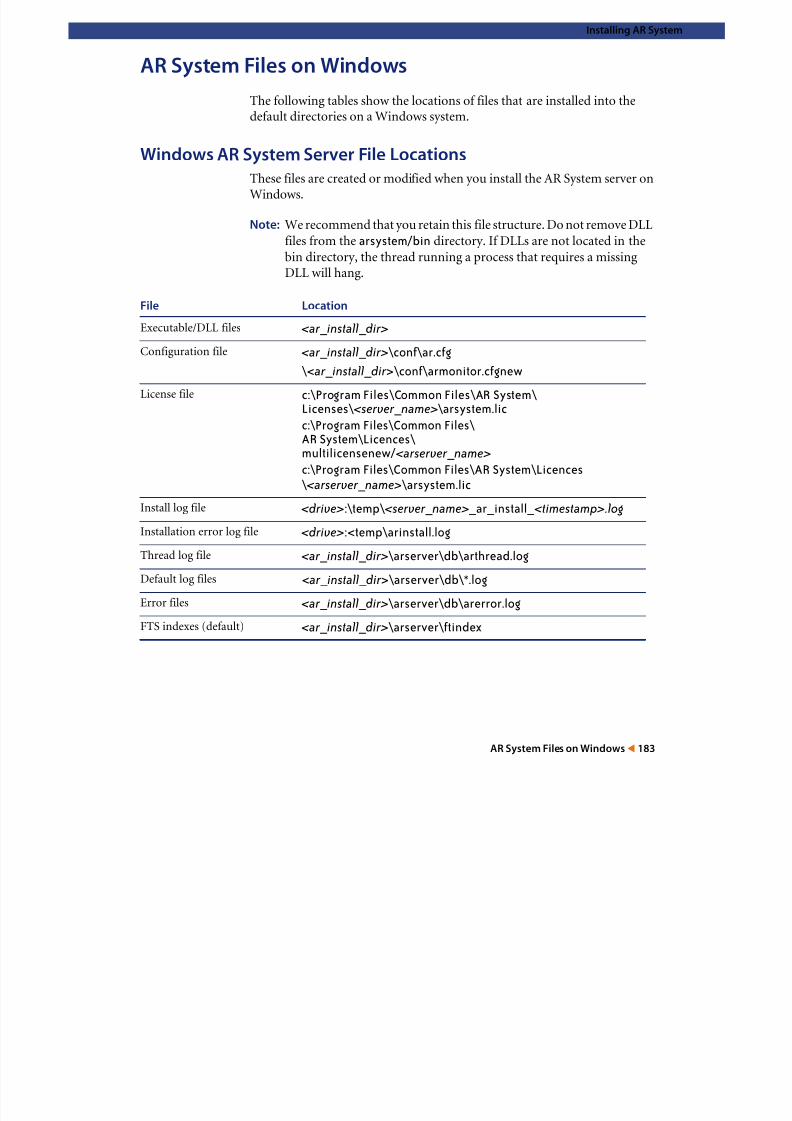
7/24/2019 Installing AR Sys English 5.1
http://slidepdf.com/reader/full/installing-ar-sys-english-51 183/200
AR System Files on Windows! 183
\<ar_install_dir>\conf\armonitor.cfgnew
License file c:\Program Files\Common Files\AR System\ Licenses\ <server_name>\arsystem.licc:\Program Files\Common Files\ AR System\Licences\ multilicensenew/<arserver_name>
c:\Program Files\Common Files\AR System\Licences\ <arserver_name>\arsystem.lic
Install log file <drive>:\temp\ <server_name>_ar_install_<timestamp>.logInstallation error log file <drive>:<temp\arinstall.log
Thread log file <ar_install_dir>\arserver\db\arthread.log
Default log files <ar_install_dir>\arserver\db\*.log
Error files <ar_install_dir>\arserver\db\arerror.log
FTS indexes (default) <ar_install_dir>\arserver\ftindex
Action Request System 5.1
API Package <ar_install_dir>\arserver\api
Java doc files:
<ar_install_dir>\arserver\api\doc
Header files:
<ar_install_dir>\arserver\api\include\*.hLibrary files:
<ar_install_dir>\arserver\api\lib*.dll
Source code:
<ar_install_dir>\arserver\api\driver
Sample files <ar_install_dir>\arserver\samples
Email notification andsubmission configuration <ar_install_dir>\arserver\conf\armaild.cfg
Online AR Systemdocumentation
docs folder on the CD or ESD location
System Error Messages Help <ar_install_dir>\arserver\help
File Location

7/24/2019 Installing AR Sys English 5.1
http://slidepdf.com/reader/full/installing-ar-sys-english-51 184/200
184"Appendix A—Locating AR System Files
Windows AR System Mid Tier File LocationsThese files are created or modified when you install the AR System mid tieron Windows.
File Location
Executables <mt_install_dir>
Configuration file <mt_install_dir>/Web-inf/classes/config.properties
Installed applications <mt_install_dir>\apps
JSP and html files <mt_install_dir>\shared
gif files <mt_install_dir>\shared\images
Javascript <mt_install_dir>\shared\javascript
Installing AR System
Windows AR System Client Files
These files are created or modified when you install AR System clients onWindows. The user settings contained in the <ar_home_dir> are defaultvalues until the user customizes these settings.
Configuration files <mt_install_dir>\shared\config
ServletExec configuration files:
vmoptions.propertiesapplication.propertiesservers.properties
Web application <mt_install_dir>\web-inf
Java class files <mt_install_dir>\web-inf\classes
Shared libraries <mt_install_dir>\web-inf\lib
Report form <mt_install_dir>\reports
File Location

7/24/2019 Installing AR Sys English 5.1
http://slidepdf.com/reader/full/installing-ar-sys-english-51 185/200
AR System Files on Windows! 185
Note: If you use centralized preferences, the <ar_home_dir> files will bestored on the server and not in the local directories.
Category Location
Executables <ar_home_dir>\*.exe
Help information <ar_home_dir>\resdlls\0009\*chm
User configuration <ar_home_dir>\ar.ini
AR System servers <ar_home_dir>\ar
Macros <ar_home_dir>\arcmds\ <macro_name>.arq
User defaults <ar_home_dir>\ <form_name>.ard
User views <ar_home_dir>\ <form_name>.arv
Form definition cache <ar_home_dir>\ <form_name>.arf
Custom report design <ar_home_dir>\arcmds\
<report_name>.arr
Action Request System 5.1

7/24/2019 Installing AR Sys English 5.1
http://slidepdf.com/reader/full/installing-ar-sys-english-51 186/200
186"Appendix A—Locating AR System Files
APPENDIXB
Customizing UNIX Options
This appendix describes ways you can customize your system when
installing AR System on UNIX.
Note: Make sure you have the most updated patches for Solaris and

7/24/2019 Installing AR Sys English 5.1
http://slidepdf.com/reader/full/installing-ar-sys-english-51 187/200
Customizing UNIX Options! 187
that you have read the Release Notes before you install the
AR System and JDK.
Action Request System 5.1
Command Options to Suppress Installation Forms
To suppress the installation of all installation forms, including the User andGroup forms, enter the following:
# ./ar_install -noschemasNote: Use this option only when you intend to immediately load forms from
a previous installation of AR System.
Customizing the System Configuration
In some cases, you may want to move the files that are stored in system areasto nonsystem areas. To accomplish this, you must use a set of environment
variables.
You can set these variables before you run the installation script. If set, theyare read and followed by the installation process. In addition, the variablesmust be set before any of the AR System server executables are run(arserverd, arservdsd, arservftd, and armonitor).

7/24/2019 Installing AR Sys English 5.1
http://slidepdf.com/reader/full/installing-ar-sys-english-51 188/200
188"Appendix B—Customizing UNIX Options
Note: The installation script does not place these variables in the startup filefor you if you request that the installation script create a startup file.You must update the startup file yourself to add these variables.During the installation, specify that the installation updates thestartup file. After the installation is complete, edit the startup file toinclude the appropriate environment variables before the AR Systemserver is run.
The files that are stored in system areas include:! ar
! ar.conf
! ardb.conf
! armaild.conf
! /etc/arsystem/<server_name> /arsystem.lic
! /etc/arsystem/<server_name> /.multilicenseThe message catalog files are also put into system areas if you have access.However, these files already have environment variables to allow you tospecify alternate locations. These files are not discussed here.
Installing AR System
For information about customizing your system configuration by modifying
your ar and ar.conf files, refer to Configuring the AR System.
The following variables will allow you to install the system without placingmost files in system areas:
! ARCONFIGDIR
! AR_SYSTEM_LICENSE_DIRYou still must place the armonitor.conf and the .multilicense files in
/etc/arsystem/<server_name>.
ARCONFIGDIR
The environment variable ARCONFIGDIR indicates to the servers where the
ar and ar.conf files are located.
You can set this variable as follows:
! Before installation, in which case all the ar and ar.conf files are created or
updated in the directory that the ARCONFIGDIR variable specifies.
! Before running a client in which case the ar file is read from the directory
7/24/2019 Installing AR Sys English 5.1
http://slidepdf.com/reader/full/installing-ar-sys-english-51 189/200
Customizing the System Configuration! 189
! Before running a client, in which case the ar file is read from the directory
that the ARCONFIGDIR variable specifies.
! Before running the server, in which case files are read from the directorythat the ARCONFIGDIR variable specifies. However, if you specify the -i option in the command line, the files are read from the directory that the
-i option specifies.
Note: The armonitor.conf file specifies the -i option. If you change the
ARCONFIGDIR, you must also edit the armonitor.conf file.
If the variable is not set, the files are read from the default directory:
<ar_install_dir> /conf
Action Request System 5.1
AR_SYSTEM_LICENSE_DIR
The environment variable AR_SYSTEM_LICENSE_DIR indicates to all
AR System products where the arsystem.lic file exists. All licenses created forthe system are stored in this file.
If the variable is set before installation, a file named arsystem.lic is created in
the specified directory and set to the correct permissions. (If the variable isnot set, the default directory is /etc/arsystem/<server_name>.) Whenrunning any server of AR System (or any AR System application), thearsystem.lic file in the indicated directory is checked to see if there is a validlicense.
Language Options
If you use UNIX, you will need to set the LANG environment variable.
Specifying a Platform for Installation
G ll h i ll i i d i ll d i h l f

7/24/2019 Installing AR Sys English 5.1
http://slidepdf.com/reader/full/installing-ar-sys-english-51 190/200
190"Appendix B—Customizing UNIX Options
Generally, the installation script dynamically determines the platform on
which you are installing AR System. However, you can set an environmentvariable to force the installation to use a particular platform. The variable is
AROS. Set it as described below.
Platform Value
HP 9000 Series 700/800 HP or HPUX
IBM RS/6000IBM or AIX
Sun SPARC running Solaris SOLARIS
Linux LINUX
APPENDIXC
Mounting a CD-ROM on a UNIXSystem
You can run the UNIX AR System server and mid tier installation
scripts from either a locally attached CD-ROM drive or from a remote
drive. Remote and local systems can have different operating systems.
For example, you can install AR System on a Sun SPARC station

7/24/2019 Installing AR Sys English 5.1
http://slidepdf.com/reader/full/installing-ar-sys-english-51 191/200
Mounting a CD-ROM on a UNIX System ! 191
running Solaris from a remote CD-ROM mounted on an HP
workstation.
This appendix provides instructions for preparing a UNIX system to
run the install script from either a locally mounted or remotely
mounted CD-ROM.
Action Request System 5.1
Mounting the CD-ROM
Follow these steps to mount the Action Request System 5.1 for UNIXinstallation CD-ROM.
Mounting the CD-ROM
1 Log in as the root user:% su% Password: <root_user_password>
2 Insert the CD into the drive.
3 Create a CD-ROM mount point, if necessary.
# mkdir /cdrom
4 Mount the CD-ROM device on the mount point, and verify its contents withthe command for your operating system.
Platform Command
Solaris The volume manager automatically mounts the CD-ROM when itis inserted into the drive. By default, the directory is

7/24/2019 Installing AR Sys English 5.1
http://slidepdf.com/reader/full/installing-ar-sys-english-51 192/200
192"Appendix C—Mounting a CD-ROM on a UNIX System
5 Continue with the appropriate procedure.! If the drive is mounted locally, install the AR System server.
Refer to Chapter 3, Installing the AR System Server on UNIX forinstructions.
! If you are installing remotely, perform the following procedures to exportthe CD-ROM from the host and mount it over the network.
y y
/cdrom/<arsystem_cd-rom_label>.
or
# cd <AR_System_5.1_CD-ROM_mount_point> /arsystem
HP-UX # /etc/mount <device_name> /cdrom
AIX # /usr/sbin/mount /cdrom
Installing AR System
Exporting the CD-ROM from a Remote Host
Perform these steps at the remote host to make the device accessible over thenetwork.
Exporting the CD-ROM from a Remote HP or AIX Host
1 Open the file /etc/exports in a text editor.2 If the following entry does not exist, add the following line:
/cdrom -rom
This line enables the remote host to export the /cdrom mount point.
3 Export the directory from the remote host, using the appropriate command.
4 Verify that this host is exporting the mount point:
Platform Command
HP-UX # exportfs /cdrom
AIX # /usr/sbin/exportfs /cdrom

7/24/2019 Installing AR Sys English 5.1
http://slidepdf.com/reader/full/installing-ar-sys-english-51 193/200
Exporting the CD-ROM from a Remote Host! 193
# exportfsThe listing should include the /cdrom mount point.
5 Go to Mounting the Remote CD-ROM at Your Local Host on page 194.
Exporting the CD-ROM from a Remote Solaris Host
1 Start the NFS-related daemons:
# /usr/lib/nfs/nfsd 8# /usr/lib/nfs/mountd
2 Share the mount point from the remote host:
# share -F nfs -o ro /cdrom/ars_5_0/
3 Verify that this host is exporting the mount point:
# share
The listing should include the /cdrom mount point.4 Go to Mounting the Remote CD-ROM at Your Local Host on page 194.
Action Request System 5.1
Mounting the Remote CD-ROM at Your Local Host
Perform these steps at your local host, where you will install the AR Systemserver.
Mounting the Remote CD-ROM at Your Local Host
1 Create a mount point if one does not already exist:# mkdir /cdrom
2 Mount the remote directory.
Where <remote_host> is the machine with the CD-ROM drive, from where you just exported the drive.
3 Install the AR System server. Refer to Chapter 3 for instructions.
Platform Command
HP-UX or AIX # mount -r <remote_host>:/cdrom /cdrom
Solaris # mount -r <remote_host>:/cdrom/ars_5_0 /cdrom

7/24/2019 Installing AR Sys English 5.1
http://slidepdf.com/reader/full/installing-ar-sys-english-51 194/200
194"Appendix C—Mounting a CD-ROM on a UNIX System
Index
A
Apache web server, post installation tasks 109applying license keys, mid tier 175
AR System
components, choosing configurations 14
installing from the web 66
licensing 160
licensing worksheet 167
ser er naming 160
AR System mid tier
installation requirements 15preparing to install 95
AR System server
optional functionality 27
preparing to install 37
starting manually
UNIX 78
Windows 88

7/24/2019 Installing AR Sys English 5.1
http://slidepdf.com/reader/full/installing-ar-sys-english-51 195/200
Index! 195
server naming 160
site name 165transferring server licenses 168
AR System Administrator
adding log in servers 155
preparing to install 150
AR System Alert
installing 153
preparing to install 151
using the Windows installer 153AR System clients
AR System Alert, preparing to install 151
AR System Windows User Tool, preparing to
install 150
client installation 141
third-party components and 148
uninstalling 156
AR System Licenseaccessing 164
applying license keys 168
AR System Server ID 166
Windows 88
stopping manually UNIX 79
Windows 89
AR System server, installing from the web 66
AR System User, preparing to install 150
AR_SYSTEM_LICENSE_DIR variable 190
ARCONFIGDIR variable 189
Bbacking up the environment 24
C
CD-ROM
exporting from a remote host 193
exporting on UNIX 193
mounting on the local host 194
mounting on UNIX 192centralized preferences 28
centralized report processing 30
checking uninstall on UNIX 129
Action Request System 5.1
client files, location 185
client installation
AR System clients 141
preinstallation considerations 142
third-party components 148
client installation installers on Windows,
running 153
compatibility, databases 24
configuration
choosing 14
email access 20
extended 18
minimal 17
web 19
configurations, sample 16
configuring the license server, mid tier 176Crystal Web, component server 94
current usage of mid tier licenses 170
custom programming 28
customizing, system configuration 188
D
database compatibility 24
F
file locations, Windows NT 183
files, UNIX startup 188
full text search (FTS) option
overwriting 27
upgrading 27
H
HTML Help 144
I
installation
all platforms 38
AR System Administrator, preparation 150
AR System server
UNIX 64with Windows installer 82
DB2 database 49
Informix database 57
Microsoft SQL server database 54
mid tier, preparation 93
non-root 64
restarting on UNIX 77

7/24/2019 Installing AR Sys English 5.1
http://slidepdf.com/reader/full/installing-ar-sys-english-51 196/200
196" Index
p y
database settings, new 25databases
Microsoft SQL, preparing
version 7.0 56
Oracle, remote client installation 43
default Home directory 142
default installation directories 180
clients and components 180
mid tier and components 180
E
Electronic Software Distribution 10
email access 30
configuration 20
environment
AR_SYSTEM_LICENSE_DIR variable 190
ARCONFIGDIR variable 189backing up 24
ESD 10
extended configuration 18
restarting on UNIX 77
suppressing sample forms 188Sybase database 59
system requirements 10
troubleshooting 10
worksheets, mid tier with web server 96
installation directories, default 180
installation platforms, specifying 190
installation script, running on UNIX 67
installingmid tier, from the web 114
Oracle database 41
iPlanet JSP, disabling 104
iPlanet web server, refreshing 106
J
Java Server Pages engine, installing 94
Installing AR System
K
keys, license
applying 168
obtaining 161
requesting online 161
L
LANG environment variable 190language options 190
license keys
applying 168
obtaining 161
requesting online 161
licenses
adding and applying 168
viewing 164licenses, types 160
licensing
host ID 165
overview 160
Purge Agreement Form 168
retrieving site name 165
transferring server licenses 168
mid tier
configuration 94
configuring the license server 176
installation requirements 15
installing
Apache 107
iPlanet, preparation 98
Microsoft Internet Information
Server 109
UNIX, script for 115
web servers 96
Windows 132
installing from the web 114
obtaining license keys 171
preparing AR System servers for
installation 95requesting license keys 172
uninstalling
UNIX 128
Windows 138
UNIX files, location 182
using the Windows installer 132
verifying installation

7/24/2019 Installing AR Sys English 5.1
http://slidepdf.com/reader/full/installing-ar-sys-english-51 197/200
Index! 197
g
viewing licenses 164worksheet 167
localized messages 30
log in servers, adding in
AR System Administrator 155
M
messages, localized 30
Microsoft SQL serverversion 7.0, preparing 56
worksheet, preparing 57
y g
UNIX 127Windows 139
mid tier identifier, obtaining 172
mid tier licenses, current usage 170
mid tier licensing 169
mid tier Windows files, locations 184
minimum configuration 17
N
non-root installation 64
number options for ports 30
Action Request System 5.1
O
OBDC 144, 148
obtaining license keys, mid tier 171
obtaining the mid tier identifier 172
Oracle client, remote installations 43
Oracle system password, default 43
Oracle, installing Windows clients 46
overwrite option 25, 26
P
permissions, changing in ServletExec
directory 109
port numbers
assigning 32
in use 32
portmapper, registering 31ports, number options 30
post-installation steps for server 76
preference servers 28
pre-installation steps 24
programming, custom 28
Purge Agreement Form 168
server name, choosing 34
server, post-installation steps 76
server, uninstalling manually on Windows 90
servers, AR System
naming for licenses 160
transferring licenses 168
ServletExec AS 4.1.1, starting and stopping
manually 111
ServletExec directory, changing permissions 109
ServletExec registration, verifying 127
ServletExec, verifying registration and settings 139
settings, new database 25
Sm@rtCert client 83, 145, 154
specifying installation platforms 190
start commands, UNIX 78
startup file, UNIX 188startup options, choosing 34
suppressing installation forms 188
system configuration, customizing 188
system requirements, installation 10
T
tablespace default

7/24/2019 Installing AR Sys English 5.1
http://slidepdf.com/reader/full/installing-ar-sys-english-51 198/200
198" Index
R
registering with a portmapper 31
Remedy License
host ID 165
retrieving site name 165
report processing, centralized 30
requesting license keys, mid tier 172
S
sample configurations 16
sample forms, suppressing installation 188
server installation
preparation 37
Windows 81
worksheets
UNIX AR System mid tier 98
UNIX AR System mid tier withApache 107
Windows AR System mid tier 102
Windows AR System mid tier
with IIS 110
Windows AR System server 51
file name 44file size 44
TCP port numbers, TCD 32
third-party components
clients, required 143
installer 145
troubleshooting the installation 10
types of licenses 160
U
uninstalling
AR System clients 156
server, manually on Windows 90
UNIX
environment variables 188
exporting a CD-ROM 193
mounting a CD-ROM 192startup file 188
UNIX files, locations 181
UNIX start command 78
upgrade option 25, 26
user configuration directory 142
Installing AR System
V
variables, UNIX environment 188
verifying the ServletExec registration 127
verifying the ServletExec registration and settings,
Windows 139
verifying virtual options 127
W
web configuration 19
web installation, AR System server 66
Windows files, locations 183
Winsock 144
worksheets
AR System mid tier installation
UNIX 98
UNIX with Apache 107web servers 96
Windows 102
Windows with IIS 110
AR System server installation, Windows 51
client installation on Windows 152
database preparation, Microsoft SQL 57
installing

7/24/2019 Installing AR Sys English 5.1
http://slidepdf.com/reader/full/installing-ar-sys-english-51 199/200
Index! 199
all platforms and databases 38DB2 database
UNIX 51
Windows 51
Informix database, UNIX 58
Microsoft SQL server database,
Windows 55
Oracle database, UNIX 42
Oracle database, Windows 45Sybase database, UNIX 60
installing Windows clients 152
licensing 167
Action Request System 5.1

7/24/2019 Installing AR Sys English 5.1
http://slidepdf.com/reader/full/installing-ar-sys-english-51 200/200
200" Index