installing biztalk server 2010 on windows 7 and windows vista (2)
TRANSCRIPT
Installing BizTalk Server 2010 on Windows 7 and Windows Vista
Microsoft Corporation
Published: September 2010
Copyright
This document supports a preliminary release of a software product that may be changed
substantially prior to final commercial release. This document is provided for informational
purposes only and Microsoft makes no warranties, either express or implied, in this document.
Information in this document, including URL and other Internet Web site references, is subject to
change without notice. The entire risk of the use or the results from the use of this document
remains with the user. Unless otherwise noted, the companies, organizations, products, domain
names, e-mail addresses, logos, people, places, and events depicted in examples herein are
fictitious. No association with any real company, organization, product, domain name, e-mail
address, logo, person, place, or event is intended or should be inferred. Complying with all
applicable copyright laws is the responsibility of the user. Without limiting the rights under
copyright, no part of this document may be reproduced, stored in or introduced into a retrieval
system, or transmitted in any form or by any means (electronic, mechanical, photocopying,
recording, or otherwise), or for any purpose, without the express written permission of Microsoft
Corporation.
Microsoft may have patents, patent applications, trademarks, copyrights, or other intellectual
property rights covering subject matter in this document. Except as expressly provided in any
written license agreement from Microsoft, the furnishing of this document does not give you any
license to these patents, trademarks, copyrights, or other intellectual property.
© 2010 Microsoft Corporation. All rights reserved.
Microsoft, Active Directory, ActiveX, BizTalk, Excel, InfoPath, JScript, IntelliSense, Internet
Explorer, MSDN, Outlook, PivotChart, PivotTable, PowerPoint, SharePoint, Tahoma, Visio, Visual
Basic, Visual C++, Visual C#, Visual SourceSafe, Visual Studio, Win32, Windows, Windows NT,
Windows PowerShell, Windows Server, Windows Server System, and Windows Server are
trademarks of the Microsoft group of companies.
SAP, R/3, mySAP, mySAP.com, xApps, xApp, SAP NetWeaver, and other SAP products and
services mentioned herein as well as their respective logos are trademarks or registered
trademarks of SAP AG in Germany and in several other countries all over the world. All other
product and service names mentioned are the trademarks of their respective companies. Data
contained in this document serves informational purposes only. National product specifications
may vary.
All other trademarks are property of their respective owners.

Contents
Installing BizTalk Server 2010 on Windows 7 and Windows Vista..................................................4
Introduction.................................................................................................................................. 4
How to Use this Document.......................................................................................................4
Checklist: Planning Your Installation........................................................................................5
Choosing your BizTalk Server Features and Components.......................................................5
Feature Dependency Matrix.....................................................................................................7
Hardware Requirements..........................................................................................................8
Software Requirements............................................................................................................9
Considerations When Installing BizTalk Server 2010.............................................................11
Preparing Your Computer for Installation...................................................................................12
Install Critical Windows Updates............................................................................................12
Enable Internet Information Services.....................................................................................12
Install Microsoft Office Excel 2010 or 2007............................................................................13
Install Visual Studio 2010.......................................................................................................14
Install SQL Server 2008 R2/ SP1...........................................................................................14
Install Prerequisites for MQSeries Agent................................................................................16
Install SQL Server 2005 Notification Services........................................................................16
Disable the Shared Memory Protocol.....................................................................................17
Join the Local Administrators Group......................................................................................17
Configure the Application Event Log......................................................................................18
Installing and Configuring BizTalk Server..................................................................................18
Verify Your Installation............................................................................................................19
Configure BizTalk Server........................................................................................................20
Enable TCP/IP and Named Pipes..........................................................................................20
Enable DTC on the Local Host Server...................................................................................21
Uninstalling BizTalk Server........................................................................................................22
Uninstall BizTalk Runtime Components.................................................................................22
Uninstall Enterprise Single Sign-On.......................................................................................22
Remove All Remaining Components......................................................................................23
Uninstallation Complete.........................................................................................................24
Appendix A: Silent Installation...................................................................................................24
Appendix B: Redistributable CAB Files.....................................................................................28
Appendix C: Customer Experience Improvement Program in BizTalk Server 2010..................29
Customer Experience Improvement Program........................................................................30
Installing BizTalk Server 2010 on Windows 7 and Windows Vista
Documentation Feedback and Updates
Microsoft values your feedback. To send feedback and comments about this topic to the
documentation team, click here.
IntroductionThis document describes the process for installing and configuring Microsoft® BizTalk® Server on
a single computer running Windows 7 or Windows® Vista.
We recommend that you read this entire document before beginning your installation. This is
because BizTalk Server connects many disparate components both internal and external to your
enterprise so information can flow smoothly and securely in many directions. While even the most
basic single-server deployment relies on many variables, most real-world deployment scenarios
extend much farther to include multiple servers and eventually clusters of both physical and
virtual computers.
No two deployments of BizTalk Server are the same. Before you begin the installation process,
gather information on the needs of your enterprise, and discuss the scope of your deployment
with the IT Professionals, System Administrators, and Developers who will use BizTalk Server. By
studying this Installation Guide and carefully analyzing the specific needs of your enterprise, you
will eventually create your own deployment roadmap.
For information about installing BizTalk Server 2010 on multiple computers, see Installing BizTalk
Server 2010 and BAM in a Multi-Computer Environment (http://go.microsoft.com/fwlink/?
LinkID=191321).
You can also download and install the BizTalk Server Best Practices Analyzer
(http://go.microsoft.com/fwlink/?LinkID=196491). The Best Practices Analyzer (BPA) examines a
BizTalk Server deployment and generates a list of best practices issues it discovers. BPA
performs configuration-level verification, by reading and reporting only, and uses the gathered
data to determine whether best practices are being followed.
How to Use this DocumentThis guide is divided into the following four sections:
Introduction gives an overview of the installation process and tells what information you’ll need
during the installation process. The section also lists important considerations regarding
Windows® and SQL Server®.
Preparing your computer for installation walks you through installing and configuring all
prerequisite software, and setting necessary permissions.
4
Installing and Configuring BizTalk Server walks you through installing and configuring BizTalk
Server. The section includes procedures for determining whether your installation was successful.
Appendices
A. Silent Installation lists commands and options for an unattended installation.
B. CAB Files links to the redistributable CAB files containing BizTalk Server prerequisites.
C. Customer Experience Improvement Program in BizTalk Server 2010 provides information about providing feedback to Microsoft about BizTalk Server 2010.
Checklist: Planning Your InstallationBelow is a high-level glimpse of the installation process. Installation on a single computer usually
takes 4-6 hours. Note that each of these steps must be carried out in the order shown, and that
each step contains many variables relevant to your enterprise. All of these issues will be
addressed in later sections of this guide.
Preparing your computer for installation
Install any critical updates for Windows
Enable Internet Information Services (IIS)
Install Microsoft Office Excel 2010/2007
Install Visual Studio® 2010
Install SQL Server 2008 R2/2008 SP1
Install SQL Server 2005 Notification Services (required only for BAM Alerts)
Install prerequisites for MQSeries Agent (required only for MQSeries Agent)
Install .Net Framework 4 and 3.5 SP1
Disable shared Memory Protocol
Join the local Administrators group
Configure the Application Event Log
*Only necessary if you are using the Windows SharePoint Services Adapter Web Service.
Installing and configuring BizTalk Server
Install BizTalk Server 2010
Verify your installation
Configure BizTalk Server
Enable TCP/IP and named pipes in the SQL Server Configuration Manager
Enable Microsoft Distributed Transaction Coordinator (MS DTC) on the Local Host Server (LHS)
Choosing your BizTalk Server Features and ComponentsReview this list of features and components before beginning your installation, and decide which
ones you want to install. Items are listed here in the same order that they appear in the Setup
program feature tree.
5
Documentation Core documentation, tutorials, UI reference (F1 Help), programmer’s reference,
and usage instructions for the SDK samples and utilities.
Server Runtime The essential runtime services for BizTalk Server.
BizTalk EDI/AS2 Runtime Runtime services providing native support for Electronic Data
Interchange (EDI) data exchange and Applicability Statement 2 (AS2) data transport messaging
functionality.
Windows Communication Foundation (WCF) Adapter Runtime Adapters enabling BizTalk
Server to communicate with WCF-based applications.
Portal Components Also known as Business Activity Monitoring (BAM), these are a set of
services enabling users to communicate and collaborate, and also to configure and monitor
business processes and workflows.
Administrative Tools Software necessary to administer BizTalk Server on both the local
computer and a remote server.
Windows Communication Foundation (WCF) Administration Tools Administration services
for WCF components.
Developer Tools and SDK Samples and utilities that enable the rapid creation of BizTalk Server
2010 solutions. This includes SDK samples and supporting documentation, BizTalk Explorer,
schema and map designers, and Visual Studio project templates.
You must install this component if you plan to do any development work. The Visual
Studio extensions used by BizTalk Server will not work without the Developer Tools and
SDK component installed.
Additional Software The following components enable a more flexible BizTalk deployment:
Enterprise Single Sign-On (SSO) Administration Module: The interface for managing SSO Affiliate Applications and their mappings.
Enterprise Single Sign-On Master Secret Server: The SSO server that stores the master secret. All other SSO servers in the system get the master secret from this server. The Master Secret Server is required in a BizTalk Server environment.
Business Rules Components: Used for composing policies to be consumed by the Business Rules Engine.
MQSeries Agent: Provides communication between the BizTalk Adapter for MQSeries and MQSeries Server for Windows.
Windows SharePoint Services Adapter Web Service: Allows the Windows SharePoint Services Adapter to process incoming and outgoing documents through Windows SharePoint Services.
BAM Alert Provider for SQL Notification Services: Allows BAM Alerts.
BAM Client: Client-side software enabling business users to work with BAM.
BAM Eventing: Interceptors for Windows Workflow Foundation and Windows Communication Foundation. Also includes the BAM Event API, which sends events to the BAM database from custom applications.
Important
6
Project Build Component: A tool enabling you to build BizTalk Server solutions without using Visual Studio.
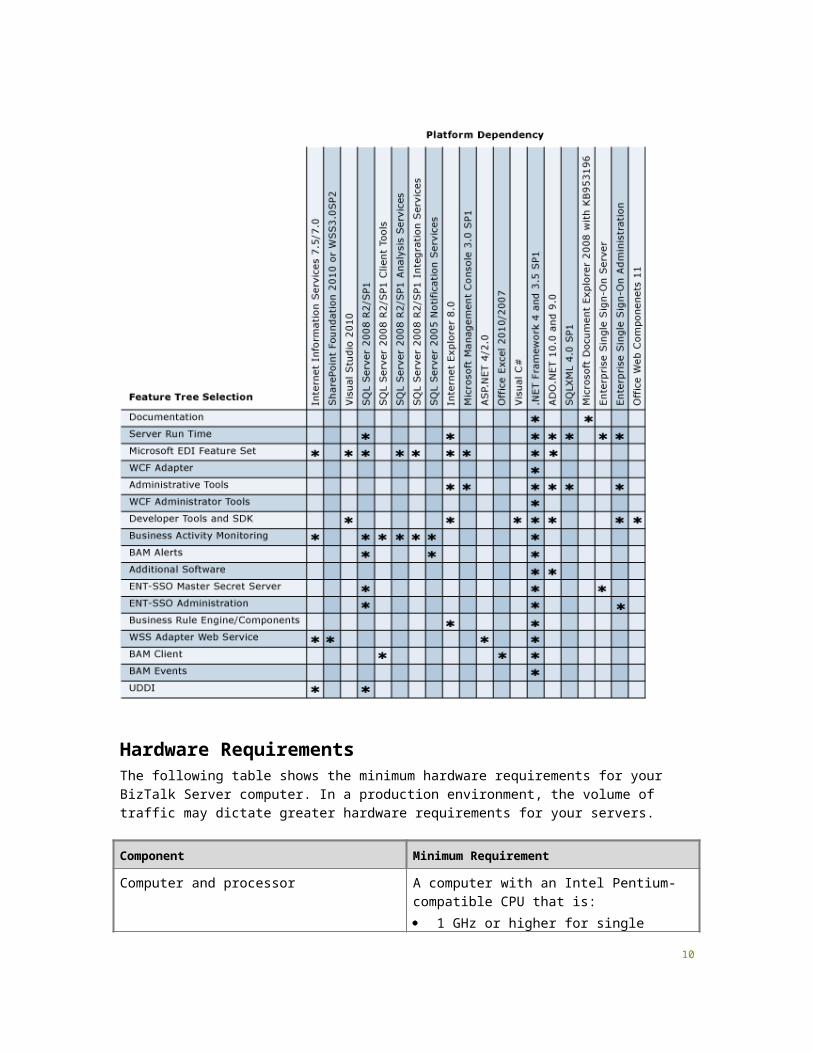
Feature Dependency MatrixThe following table indicates which software you must install before installing BizTalk Server,
based on the BizTalk Server features you plan to install.
Microsoft .NET Framework 4 and .Net Framework 3.5 with Service Pack 1 (SP1) are included as part of the BizTalk Server 2010 setup process.
Microsoft Document Explorer 2008 and Enterprise Single Sign-On can be installed from the BizTalk Server 2010 product DVD.
Office Web Components 11 can be installed from Appendix B: Redistributable CAB Files.
Note
7
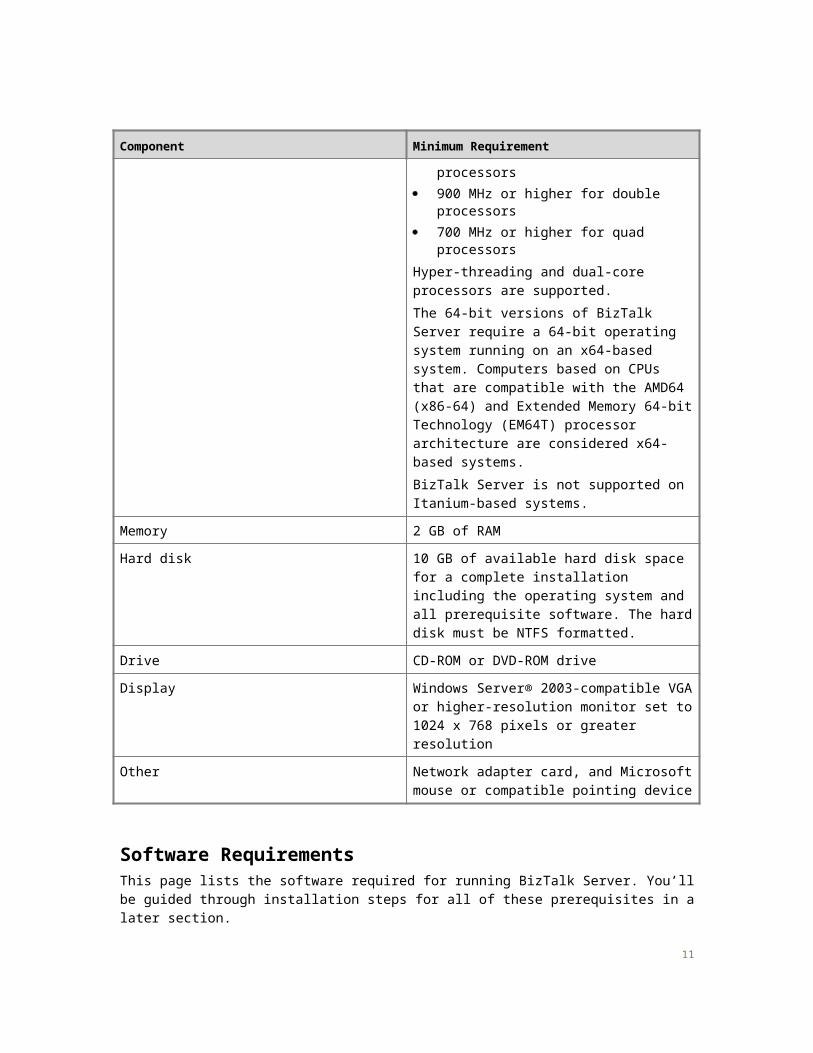
Hardware RequirementsThe following table shows the minimum hardware requirements for your BizTalk Server computer.
In a production environment, the volume of traffic may dictate greater hardware requirements for
your servers.
Component Minimum Requirement
Computer and processor A computer with an Intel Pentium-compatible
CPU that is:
1 GHz or higher for single processors
8
Component Minimum Requirement
900 MHz or higher for double processors
700 MHz or higher for quad processors
Hyper-threading and dual-core processors are
supported.
The 64-bit versions of BizTalk Server require a
64-bit operating system running on an x64-
based system. Computers based on CPUs that
are compatible with the AMD64 (x86-64) and
Extended Memory 64-bit Technology (EM64T)
processor architecture are considered x64-
based systems.
BizTalk Server is not supported on Itanium-
based systems.
Memory 2 GB of RAM
Hard disk 10 GB of available hard disk space for a
complete installation including the operating
system and all prerequisite software. The hard
disk must be NTFS formatted.
Drive CD-ROM or DVD-ROM drive
Display Windows Server® 2003-compatible VGA or
higher-resolution monitor set to 1024 x 768
pixels or greater resolution
Other Network adapter card, and Microsoft mouse or
compatible pointing device
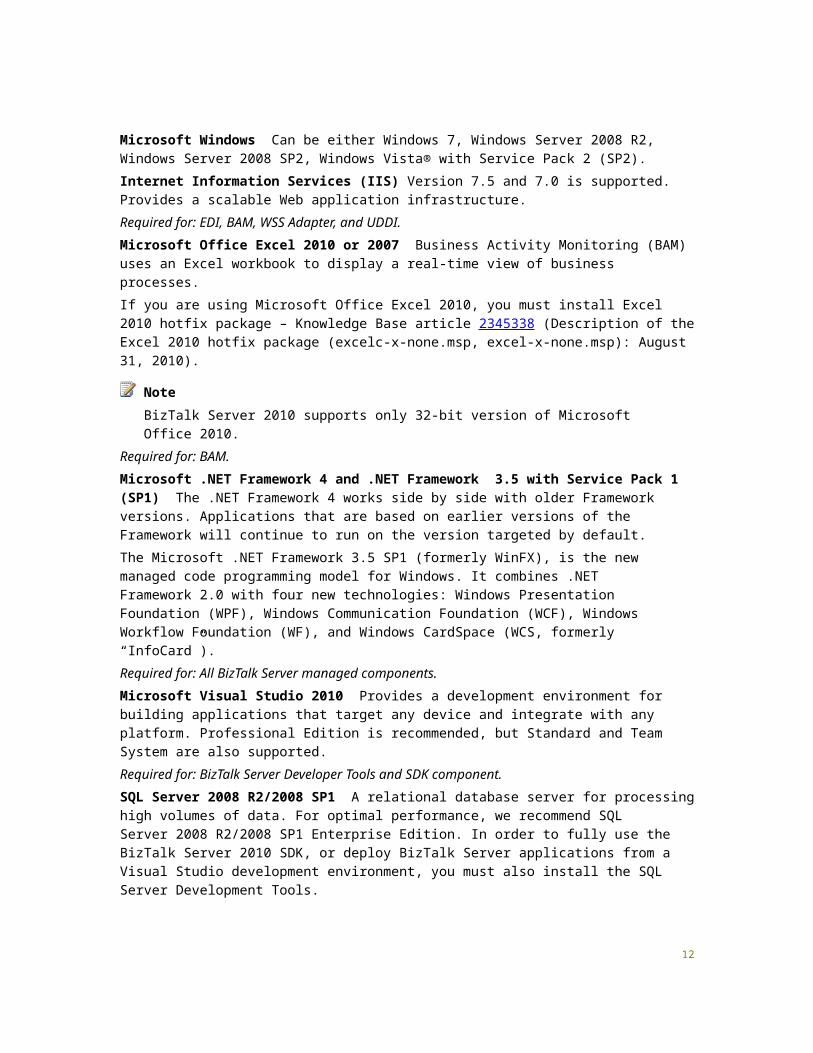
Software RequirementsThis page lists the software required for running BizTalk Server. You’ll be guided through
installation steps for all of these prerequisites in a later section.
Microsoft Windows Can be either Windows 7, Windows Server 2008 R2, Windows Server 2008
SP2, Windows Vista® with Service Pack 2 (SP2).
Internet Information Services (IIS) Version 7.5 and 7.0 is supported. Provides a scalable Web
application infrastructure.
Required for: EDI, BAM, WSS Adapter, and UDDI.
Microsoft Office Excel 2010 or 2007 Business Activity Monitoring (BAM) uses an Excel
workbook to display a real-time view of business processes.
9
If you are using Microsoft Office Excel 2010, you must install Excel 2010 hotfix package –
Knowledge Base article 2345338 (Description of the Excel 2010 hotfix package (excelc-x-
none.msp, excel-x-none.msp): August 31, 2010).
BizTalk Server 2010 supports only 32-bit version of Microsoft Office 2010.
Required for: BAM.
Microsoft .NET Framework 4 and .NET Framework 3.5 with Service Pack 1 (SP1) The .NET
Framework 4 works side by side with older Framework versions. Applications that are based on
earlier versions of the Framework will continue to run on the version targeted by default.
The Microsoft .NET Framework 3.5 SP1 (formerly WinFX), is the new managed code
programming model for Windows. It combines .NET Framework 2.0 with four new technologies:
Windows Presentation Foundation (WPF), Windows Communication Foundation (WCF),
Windows Workflow Foundation (WF), and Windows CardSpace (WCS, formerly “InfoCard”).
Required for: All BizTalk Server managed components.
Microsoft Visual Studio 2010 Provides a development environment for building applications
that target any device and integrate with any platform. Professional Edition is recommended, but
Standard and Team System are also supported.
Required for: BizTalk Server Developer Tools and SDK component.
SQL Server 2008 R2/2008 SP1 A relational database server for processing high volumes of
data. For optimal performance, we recommend SQL Server 2008 R2/2008 SP1 Enterprise
Edition. In order to fully use the BizTalk Server 2010 SDK, or deploy BizTalk Server applications
from a Visual Studio development environment, you must also install the SQL Server
Development Tools.
BAM real-time aggregation (RTA) is not supported in SQL Server 2008 R2/2008 SP1 Standard Edition. In order to use BAM RTA, you must install SQL Server 2008 R2/2008 SP1 Enterprise Edition.
Using SQL Server Express Edition in a production environment is not recommended. The Express edition does not include certain features needed by BizTalk Server.
Required for: BizTalk Server Runtime, EDI, and BAM.
SQL Server 2005 Notification Services Enables the use of BAM Alerts. Note that this SQL
Server 2005 feature is not included in SQL Server 2008 R2/2008 SP1, and must be downloaded
separately.
Required for: BAM Alerts.
SQLXML 4.0 with Service Pack 1 Enables XML support for your SQL Server database and
allows developers to bridge the gap between XML and relational data. You can create an XML
view of your existing relational data and work with it as if it were an XML file. To install SQLXML
4.0 SP1, see Microsoft SQL Server 2008 Feature Pack (http://go.microsoft.com/fwlink/?
LinkID=189325).
Note
Important
10
Required for: BizTalk Server Runtime, Administrative Tools, and BAM.
Considerations When Installing BizTalk Server 2010You should understand the following before beginning your installation:
Account names You should use the default account names whenever possible. The BizTalk
Server setup program automatically configures installed components to use the default accounts.
While using the default names simplifies setup and configuration, it is not always possible. For
example, there may be multiple BizTalk Server groups within an Active Domain forest. In this
situation the account names must be modified to avoid conflicts. If you must change the names,
note that BizTalk Server supports only <NetBIOS domain name>\<user> name formats for service
accounts and Windows groups.
Account names with BAM Management Web Service BizTalk Server does not support use of
either built-in accounts or accounts without passwords for the BAM Management Web Service
User. This is because the web service accesses the BizTalk database, and such accounts may
represent a security threat.
Configuring BizTalk Server with such accounts may appear to succeed, but the BAM
Management Web Service will fail.
Note that use of such accounts for the BAM Application pool is supported.
BizTalk Assembly Viewer Use of the BizTalk Assembly viewer is not supported on a 64-bit
platform.
Install and Uninstall Uninstalling BizTalk Server is fully supported. However it requires manually
deleting a number of databases which can be complicated and time consuming. If you are
installing BizTalk Server as a developer or evaluator, consider installing on a virtual computer.
This way, if you need to reinstall, you can easily roll back to a preset checkpoint without having to
go through the uninstall process.
32-bit and 64-bit computers There are relatively few differences between installing BizTalk
Server on 32-bit editions of Windows compared to installation on 64-bit editions of Windows. This
document covers both 32-bit and 64-bit installations. Differences between them are noted in the
instructions to follow.
Workgroups Installing and configuring BizTalk Server in the workgroup environment on a single
computer is supported. SQL Server and BizTalk Server features and components are installed
and configured on the same computer.
Terminal Server Installing BizTalk Server using Terminal Server running in application mode is
not supported. For more information, see the support article at http://go.microsoft.com/fwlink/?
LinkId=88092.
Bam Portal If the BAM portal is configured on a website used by applications that are
running .Net Framework 2.0 then you must host the BAM portal on a new website. To add a new
website see Create a Web Site (IIS 7) (http://go.microsoft.com/fwlink/?LinkID=196470). After
creating the new website, do these steps:
1. Open BizTalk Server 2010 Configuration.
11
2. Configure the BAM portal by selecting the new website from the BAM Portal Web Site list.
Preparing Your Computer for Installation In this section you’ll prepare your environment by installing and configuring all software
prerequisites, and then creating accounts and setting permissions.
You must perform these procedures in the order listed.
Install Critical Windows UpdatesBefore installing BizTalk Server or its prerequisites, make sure you have installed the latest critical
Windows updates from Microsoft.
1. Click Start, point to All Programs, and then click Windows Update.
2. Follow the directions on the Windows Update site.
3. If prompted, restart your computer.
Enable Internet Information ServicesMicrosoft Internet Information Services (IIS) provides a Web application infrastructure for many
BizTalk Server features. BizTalk Server requires IIS for the following features:
HTTP adapter
SOAP adapter
Windows SharePoint Services adapter
Secure Sockets Layer (SSL) encryption
BAM Portal
1. Click Start and then click Control Panel.
2. In Control Panel, click Programs and then click Turn Windows features on or off.
3. In the Windows Features dialog box, click Internet Information Services.
4. Expand Internet Information Services. Additional categories of IIS features are displayed. Select Internet Information Services.
5. Expand Web Management Tools and then select IIS 6 Management Compatibility.
6. Expand World Wide Web Services, select Application Development Features, under Security, select Basic Authentication and Windows Authentication. Click Ok
Important
To install Windows updates
To enable Internet Information Services 7.5
Important
12
The .NET Framework 4 can be installed side-by-side with previous versions of the .NET
Framework on a single computer. If IIS was previously enabled on the computer, the
setup process for the .NET Framework automatically registers ASP.NET 4 with IIS.
However, if you install the .NET Framework 4 before you enable IIS, you must run the
ASP.NET IIS Registration tool in order to register the .NET Framework with IIS and create
application pools that use the .NET Framework 4. To manually register ASP.NET 4 with
IIS, at the command prompt, type the following command and press Enter: %windir%\
Microsoft.NET\Framework\v4.0.30319\aspnet_regiis.exe /i.
After registering ASP.NET 4, you must ensure that the restriction status of ASP.Net
v4.0.30319 is set to Allowed. To check the registration status, follow these steps:
1. Open IIS Manager. In Features View, double-click ISAPI and CGI Restrictions.
2. The restriction status of ASP.Net v4.0.30319 should be set to Allowed. You can change the restriction status by selecting the restriction and clicking Allow or Deny in the Actions pane
3. Click Ok
Install Microsoft Office Excel 2010 or 2007Microsoft Office Excel is required for using the Business Activity Monitoring (BAM) feature in
BizTalk Server. You use the BAM Office Excel Workbook to define the business processes you
want to monitor. You also use the BAM Excel Workbook to define the way in which business
users see the data collected by BAM.
BizTalk Server 2010 supports only 32-bit version of Microsoft Office 2010.
The following procedure installs only Office Excel. You can install additional Microsoft Office
system applications and tools if you wish, but they are not necessary to complete the installation
of BizTalk Server.
To successfully load BAM.xla into Excel, install the Visual Basic for Applications option
under Office Shared Features. Otherwise, you may get the error “This workbook has
lost its VBA project, ActiveX controls and any other programmability-related features.”
1. Insert the Microsoft Office installation disk into the DVD-ROM drive.
2. When you reach the Type of Installation screen, select Custom Install, and then click Next.
3. On the Custom Setup screen, ensure that Excel is selected, and then click Next.
4. Click Install.
5. On the Setup Completed screen, click Finish.
Note
Note
To install Microsoft Office Excel
13
Install Visual Studio 2010The BizTalk Server development tools are based on Visual Studio 2010. Therefore, at a minimum,
you must have the Microsoft Visual C#® .NET portion of Visual Studio 2010 installed on your
computer before installing the BizTalk Server Developer Tools and SDK component.
Visual Studio 2010 is not required if you are installing BizTalk Server on a production computer
(runtime only), on which no application development or debugging will occur.
The BizTalk Server runtime components require .Net Framework 4 and .NET Framework 3.5
SP1. In addition, the .NET Framework 3.0 is required if the Windows Communication Foundation
(WCF) adapter or WCF Interceptor is installed.
If you install Visual Studio and BizTalk Server, and then upgrade to Visual Studio Team
Explorer, it may be necessary to repair your BizTalk Server installation by using Control
Panel (View by: Large/Small icons) - Programs and Features.
1. Insert the Visual Studio 2010 installation disk into the DVD-ROM drive.
2. Click Install Visual Studio 2010.
3. After the installation loads, click Next.
4. On the Start page, accept the license agreement, type your Product Key and any other necessary information, and then click Next.
5. On the Options page, select Custom, and then click Next.
6. Under Select features to install, clear all features except Visual C#, and then click Install.
Important
Your version of Visual Studio may include Microsoft SQL Server Express as an
optional feature. Do not install this feature, as it will cause BizTalk Server setup to
fail.
7. On the Finish page, click Finish.
8. On the Visual Studio Setup screen, click Exit.
Install SQL Server 2008 R2/ SP1BizTalk Server provides the capability to specify a business process and also a mechanism by
which the applications used in that business process can communicate with each other. SQL
Server is the main repository for this communication mechanism. You must install SQL Server
2008 R2/2008 SP1 (Enterprise Edition is recommended).
Note
To install Visual Studio 2010
14
BAM real-time aggregation (RTA) is not supported in SQL Server 2008 R2/2008 SP1
Standard Edition. In order to use BAM RTA, you must install SQL Server 2008 R2/2008
SP1 Enterprise Edition.
1. Insert the SQL Server 2008 R2 installation disk into the DVD-ROM drive. The setup program will begin automatically. If prompted for automatic installation of prerequisite software, click OK.
2. On the SQL Server Installation Center, click Installation.
3. Click New Installation or Add Features to an Existing Installation.
4. Review the information on the Setup Support Rules screen, and then click OK.
5. On the Product Key screen, enter your product key and click Next.
6. On the License Terms screen, select I accept the license terms, and then click Next.
7. On the Setup Support Files screen, click Install.
8. On the Feature Selection screen, select the following features, and then click Next.
Database Engine Services
SQL Server Replication
Full-Text Search
Analysis Services
Reporting Services
Shared Features
Business Intelligence Development Studio
Client Tools Connectivity
Integration Services
Management Tools - Basic
Management Tools - Complete
9. On the Instance Configuration screen, select Default instance, and then click Next.
10. Review the information on the Disk Space Requirements screen, and then click Next.
11. On the Server Configuration screen, click Use the same account for all SQL Server instances, enter a local account or domain account and password, and then click Next.
12. On the Database Engine Configuration screen, select Windows authentication mode, click Add Current User, and then click Next.
13. On the Analysis Services Configuration screen, click Add Current User, and then click Next.
14. On the Reporting Services Configuration screen, select Install the native mode default configuration, and then click Next.
15. On the Error and Usage Reporting screen, leave the default values, and then click Next.
Important
To install SQL Server 2008 R2
15
16. On the Installation Rules screen, review the information and resolve any issues, and then click Next.
17. On the Ready to Install screen, review the information, and then click Install.
18. On the Installation Progress screen, after setup has finished, click Next.
19. On the Complete screen, click Close.
Install Prerequisites for MQSeries AgentIf you plan to use the MQSeries Agent, you will need to download the following:
.Net Framework 4 (http://go.microsoft.com/fwlink/?LinkID=189318) and .Net Framework 3.5 SP1 (http://go.microsoft.com/fwlink/?linkid=160478).
You will also need to download one of the following:
IBM WebSphere MQ 5.3 with CSD 10 (or later), or
IBM WebSphere MQ 7.0
IBM WebSphere is not supported by Microsoft, and Microsoft makes no guarantees
about the suitability of this program. Use of these programs is entirely at your own
risk. For more information about these utilities, including download instructions, see
the IBM Web site at www.ibm.com.
Finally, you must run the MQSAgent COM+ Configuration Wizard (MQSConfigWiz.exe) on the
computer where MQSAgent is installed prior to using either the MQSeries Adapter or the
Windows SharePoint Services Web service.
Install SQL Server 2005 Notification ServicesIf you plan to use BAM Alerts in your BizTalk Server project, you must install SQL Notification
Services and its prerequisites on your BizTalk Server computer. This SQL Server 2005 feature is
not included in SQL Server 2008 R2/2008 SP1, but you can install it from the Microsoft Download
Center.
1. Click or navigate to the Feature Pack for Microsoft SQL Server 2005 - December 2008.
2. Depending on your platform, download the appropriate package from the following three components:
Microsoft SQL Server Native Client
X86 Package (sqlncli.msi)
X64 Package (sqlncli_x64.msi)
Microsoft SQL Server 2005 Management Objects Collection
X86 Package (SQLServer2005_XMO.msi)
X64 Package (SQLServer2005_XMO_x64.msi)
Caution
To install SQL Server 2005 Notification Services
16

Microsoft SQL Server 2005 Notification Services Client Components
X86 Package (SQLServer2005_NS.msi)
X64 Package (SQLServer2005_NS_x64.msi)
Disable the Shared Memory ProtocolUnder certain stress conditions (such as clients accessing SQL Server from the same computer),
the SQL Server Shared Memory protocol may lower BizTalk Server performance. You can resolve
this problem by disabling the use of the Shared Memory network protocol in the SQL Server
Client Network Utility.
1. Click Start, point to All Programs, point to Microsoft SQL Server 2008 R2, click Configuration Tools, and then click SQL Server Configuration Manager.
2. In SQL Server Configuration Manager, expand SQL Server Network Configuration, and then click Protocols for MSSQLSERVER.
3. Right-click Shared Memory, and then click Disable.
4. Click SQL Server Services, right-click SQL Server (MSSQLSERVER), and then click Stop. After the service has stopped, right-click SQL Server (MSSQLSERVER) again, and then click Start.
5. Close SQL Server Configuration Manager.
Join the Local Administrators GroupYou must be an administrator to install and configure BizTalk Server 2010. Use this procedure to
join the Administrators group on the local computer.
1. Click Start, click Control Panel, and then double-click User Accounts.
2. Click Manage User Accounts.
3. In the User Accounts dialog box, click the Advanced tab.
4. Under Advanced user management, click Advanced.
5. In the left-hand pane, click Groups.
6. In the right-hand pane, double-click Administrators.
7. In the Administrators Properties dialog box, look for your name in the Members list.
8. If your name is in the list, proceed to Step 9.
If your name is not in the Members list, do the following:
Click Add.
In the Enter the object names to select box, type your name, and then click Check Names.
Once your name is recognized, click OK.
To disable Shared Memory protocol for SQL Server
Join the local Administrators group
17

9. Click OK to close the Administrators Properties dialog box, and then close the Local Users and Groups pane.
10. Click OK to close the User Accounts dialog box.
11. Close the Users Accounts pane.
Configure the Application Event LogBizTalk Server setup keeps a record of events in the Application Event Log. Depending on the
BizTalk Server features installed, the amount of space required in the log may exceed its limit. If
the application event log runs out of space during BizTalk Server setup, the installation will fail.
To prevent this from happening, you can change the settings in the Application Event Log.
1. Click Start, click Control Panel (View by: Large/Small icons), and then double-click Administrative Tools.
2. Double-click Event Viewer.
3. In the Event Viewer, expand Windows Logs.
4. Right-click Application, and then click Properties. This opens the Log Properties dialog box.
To see how much available space your log has, compare the Log Size field with the Maximum log size field.
To provide more space in the event log, enter a higher number in the Maximum log size field.
To enable overwriting of old events when the log becomes full, select Overwrite events as needed.
To clear the log events, click Clear log.
5. Click OK, close the Event Viewer, and close Administrative Tools.
Installing and Configuring BizTalk Server In this section you’ll install BizTalk Server, confirm that the installation succeeded, and then
configure BizTalk Server.
When you installed SQL Server, setup granted your account Database Administrator rights.
Since these rights are also required for installing BizTalk Server, you must do one of the following:
Use the same account you used when you installed SQL Server.
Make sure the account you’re using now also has Database Administrator rights.
1. Close any programs you have open.
2. Insert the BizTalk Server 2010 installation disk into the DVD-ROM drive.
To change settings in the Application Event Log
To install BizTalk Server 2010
18
3. On the Start screen, click Install Microsoft BizTalk Server 2010.
4. On the Customer Information screen, type your user name and organization, enter your product key, and then click Next.
5. On the License Agreement screen, click Yes, I accept the terms of the license agreement, and then click Next.
6. Use the Customer Experience Improvement Program page of the BizTalk Server 2010 Installation Wizard to enable feature usage reporting functionality for BizTalk Server. For more information, see Customer Experience Improvement Program in BizTalk Server 2010 section in this guide.
7. On the Component Installation screen, review the available components and select the ones you want to install.
8. Accept the default installation location or click Browse to move to the location where you want to install BizTalk Server 2010, and then click Next.
9. If your computer is missing a prerequisite component such as ADOMD.NET, Setup can install the redistributable prerequisites. You can either:
Select Automatically install the redistributable prerequisites from the web OR
Select Automatically install the redistributable prerequisites from a CAB file if you have downloaded the CAB file. If you select this, you can then browse to the location of the CAB file and select it.
10. On the Summary screen, verify that the components that you select to install are correct.
11. To enable auto-logon after a system reboot, click Set and provide your logon information. Auto-logon is enabled only for reboots during setup, and is disabled when setup is complete.
12. Click Install to start the installation process.
13. On the Microsoft Update Setup page, click Use the Microsoft Update when I check for updates (recommended).
14. On the Installation Completed screen, clear the Launch BizTalk Server Configuration check box, and then click Finish.
Verify Your InstallationYou can check to see whether your installation was successful by using either Programs and
Features or the Registry.
1. Click Start, click Control Panel (View by: Large/Small icons), and double-click Programs and Features.
2. When the list is fully populated, look for BizTalk Server 2010. If it appears in the list, setup succeeded.
1. Open a command prompt.
To verify installation using Programs and Features
To verify installation using the Registry
19
2. Type regedit and then press Enter.
3. When the Registry opens, browse to HKEY_LOCAL_MACHINE\SOFTWARE\Microsoft\BizTalk Server\3.0
4. If files exist in the 3.0 folder, setup succeeded.
5. Close the Registry, and then close the command prompt.
Configure BizTalk ServerUse the following procedure to complete a basic configuration of BizTalk Server. For information
on customizing your configuration, see Custom Configuration in the BizTalk Server Help.
1. Click Start, click All Programs, click Microsoft BizTalk Server 2010, right-click BizTalk Server Configuration, and then click Run as Administrator.
2. In the Database field, enter the name of the local computer.
3. In the Service Credential field, type the User name and Password for the account that the BizTalk services will run under.
4. Click Configure.
Note
You may receive a warning if you enter a user name with administrative
credentials on this computer. Click OK to continue.
5. On the Summary screen, review the configuration about to be performed, and then click Next.
6. On the Completion screen, click Finish.
To configure BizTalk Server 2010 using Basic Configuration
20
Enable TCP/IP and Named PipesTo facilitate transactions between SQL Server and BizTalk Server, you must enable TCP/IP and
Named Pipes in SQL Server.
1. Click Start, click All Programs, click Microsoft SQL Server 2008 R2, click Configuration Tools, and then click SQL Server Configuration Manager.
2. In the left-hand pane, expand SQL Server Network Configuration.
3. Click Protocols for MSSQLSERVER.
4. Verify that both TCP/IP and Named Pipes are enabled. If they are, proceed to Step 5.
If either is not, follow these steps:
Right-click the protocol, and then click Enable.
Repeat to enable the other protocol if necessary.
In the left-hand pane, click SQL Services.
In the right-hand pane, right-click SQL Server (MSSQLSERVER), and click Stop.
When the service has stopped, right-click SQL Server (MSSQLSERVER) again, and click Start.
5. The steps listed above stops the NS$BAMAlerts service. You must restart the service.
6. When the service has restarted, close the Configuration Manager.
Enable DTC on the Local Host ServerTo facilitate transactions between SQL Server and BizTalk Server, you must enable Microsoft
Distributed Transaction Coordinator (MS DTC) on the Local Host Server (LHS).
1. Click Start, click Run, type dcomcnfg and then click OK to open Component Services.
2. In the console tree, expand Component Services, expand Computers, expand My Computer, expand Distributed Transaction Coordinator, and then click Local DTC.
3. Right-click Local DTC and click Properties to display the Local DTC Properties dialog box.
4. Click the Security tab.
5. Ensure that each of the following four options is selected, and all others are cleared:
Network DTC Access
Allow Inbound
Allow Outbound
No Authentication Required
6. Click OK to close the Local DTC Properties dialog box. If prompted to restart the MSDTC service, click Yes.
7. Close Component Services.
To enable TCP/IP and Named Pipes
To enable Distributed Transaction Coordinator (DTC) on the LHS
21
8. Click Start, click Control Panel (View by: Large/Small icons), clickAdministrative Tools, and then click Windows Firewall with Advanced Security.
9. In Windows Firewall with Advanced Security, click Inbound Rules.
10. In the Inbound Rules pane, right-click Distributed Transaction Coordinator * (as appropriate), and then click Enable Rule.
11. In Windows Firewall with Advanced Security, click Outbound Rules.
12. In the Outbound Rules pane, right-click Distributed Transaction Coordinator * (as appropriate), and then click Enable Rule.
13. On the Control Panel (View by: Large/Small icons), double-click Administrative Tools.
14. In the right-hand pane, double-click Services.
15. In the right-hand pane of Services (Local), right-click COM+ System Application, click Restart, and wait for the service to restart.
16. Right-click and restart the Distributed Transaction Coordinator service.
17. Right-click and restart the SQL Server (MSSQLSERVER) service.
18. Close Services (Local), and then close Administrative Tools.
Uninstalling BizTalk Server Use the procedures in the following pages to uninstall BizTalk Server 2010.
At this point you have successfully installed BizTalk Server. If you want to uninstall
BizTalk Server, use the following procedures. Otherwise, stop here.
The following procedures list numerous jobs, packages, and databases to be deleted.
The names listed here are only the default names. In your deployment of BizTalk Server
the names may have been changed.
You must perform these actions in the order shown, or uninstallation will not be complete.
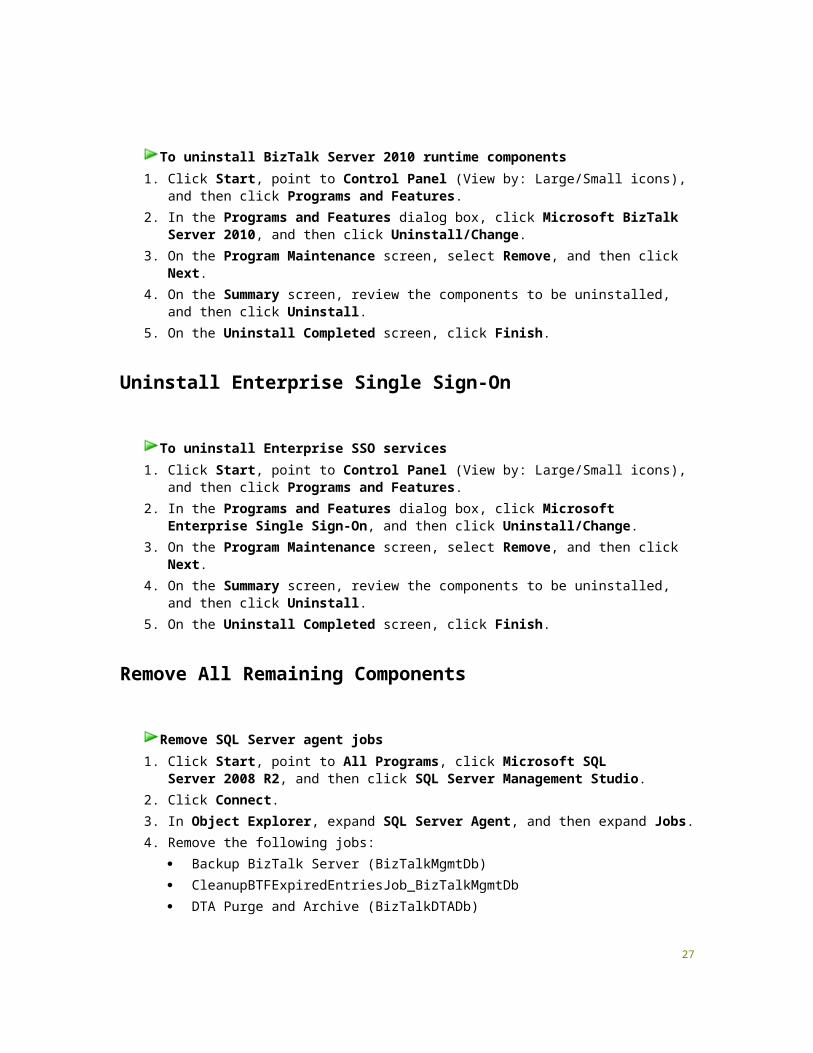
Uninstall BizTalk Runtime Components
1. Click Start, point to Control Panel (View by: Large/Small icons), and then click Programs and Features.
2. In the Programs and Features dialog box, click Microsoft BizTalk Server 2010, and then click Uninstall/Change.
3. On the Program Maintenance screen, select Remove, and then click Next.
Important
Important
Important
To uninstall BizTalk Server 2010 runtime components
22

4. On the Summary screen, review the components to be uninstalled, and then click Uninstall.
5. On the Uninstall Completed screen, click Finish.
Uninstall Enterprise Single Sign-On
1. Click Start, point to Control Panel (View by: Large/Small icons), and then click Programs and Features.
2. In the Programs and Features dialog box, click Microsoft Enterprise Single Sign-On, and then click Uninstall/Change.
3. On the Program Maintenance screen, select Remove, and then click Next.
4. On the Summary screen, review the components to be uninstalled, and then click Uninstall.
5. On the Uninstall Completed screen, click Finish.
Remove All Remaining Components
1. Click Start, point to All Programs, click Microsoft SQL Server 2008 R2, and then click SQL Server Management Studio.
2. Click Connect.
3. In Object Explorer, expand SQL Server Agent, and then expand Jobs.
4. Remove the following jobs:
Backup BizTalk Server (BizTalkMgmtDb)
CleanupBTFExpiredEntriesJob_BizTalkMgmtDb
DTA Purge and Archive (BizTalkDTADb)
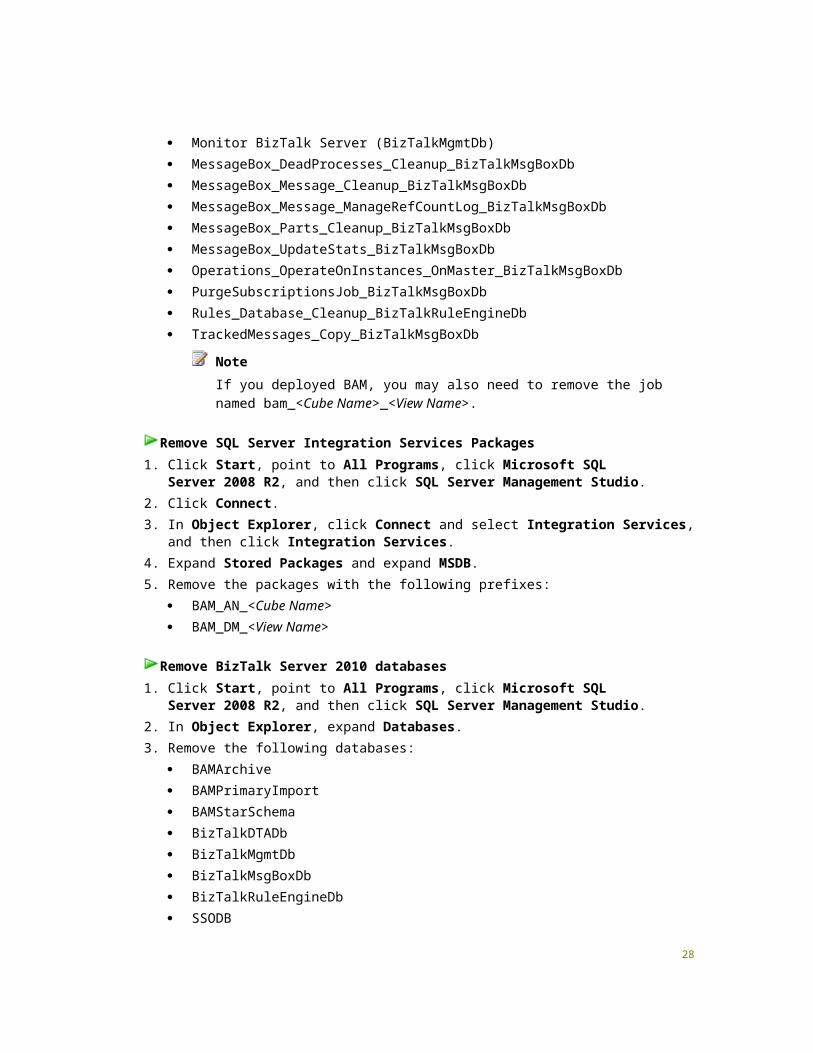
Monitor BizTalk Server (BizTalkMgmtDb)
MessageBox_DeadProcesses_Cleanup_BizTalkMsgBoxDb
MessageBox_Message_Cleanup_BizTalkMsgBoxDb
MessageBox_Message_ManageRefCountLog_BizTalkMsgBoxDb
MessageBox_Parts_Cleanup_BizTalkMsgBoxDb
MessageBox_UpdateStats_BizTalkMsgBoxDb
Operations_OperateOnInstances_OnMaster_BizTalkMsgBoxDb
PurgeSubscriptionsJob_BizTalkMsgBoxDb
Rules_Database_Cleanup_BizTalkRuleEngineDb
To uninstall Enterprise SSO services
Remove SQL Server agent jobs
23

TrackedMessages_Copy_BizTalkMsgBoxDb
Note
If you deployed BAM, you may also need to remove the job named
bam_<Cube Name>_<View Name>.
1. Click Start, point to All Programs, click Microsoft SQL Server 2008 R2, and then click SQL Server Management Studio.
2. Click Connect.
3. In Object Explorer, click Connect and select Integration Services, and then click Integration Services.
4. Expand Stored Packages and expand MSDB.
5. Remove the packages with the following prefixes:
BAM_AN_<Cube Name>
BAM_DM_<View Name>
1. Click Start, point to All Programs, click Microsoft SQL Server 2008 R2, and then click SQL Server Management Studio.
2. In Object Explorer, expand Databases.
3. Remove the following databases:
BAMArchive
BAMPrimaryImport
BAMStarSchema
BizTalkDTADb
BizTalkMgmtDb
BizTalkMsgBoxDb
BizTalkRuleEngineDb
SSODB
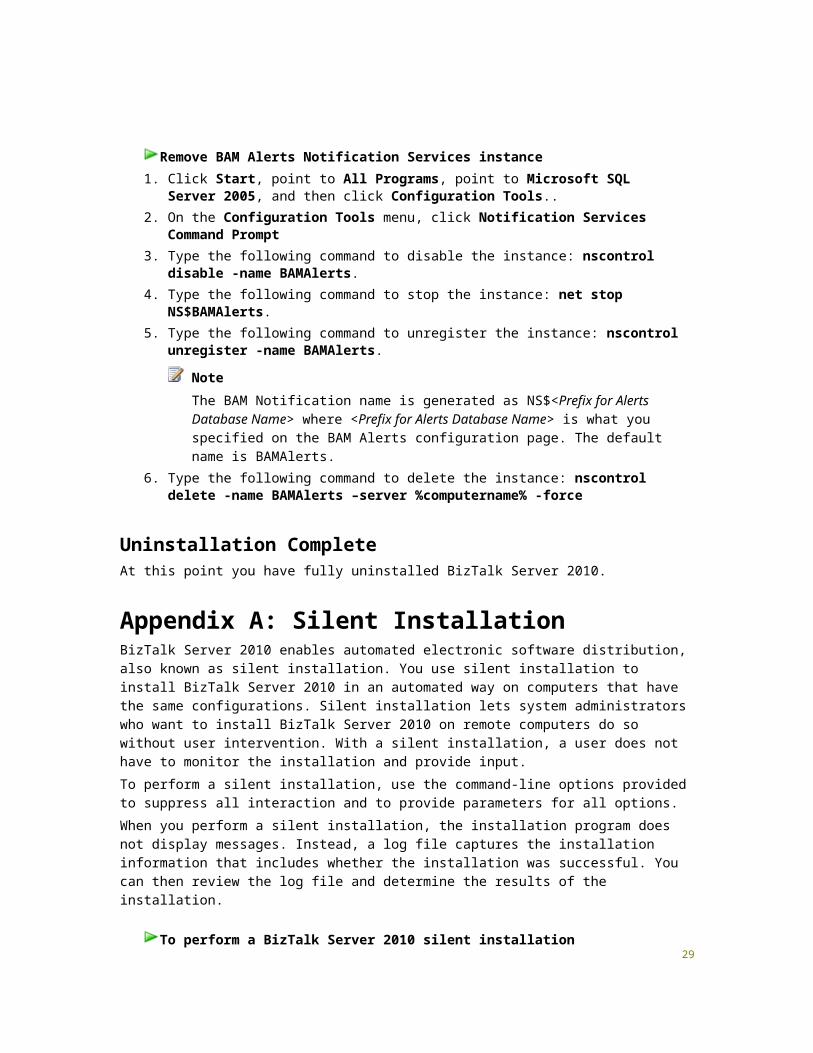
1. Click Start, point to All Programs, point to Microsoft SQL Server 2005, and then click Configuration Tools..
2. On the Configuration Tools menu, click Notification Services Command Prompt
3. Type the following command to disable the instance: nscontrol disable -name BAMAlerts.
4. Type the following command to stop the instance: net stop NS$BAMAlerts.
5. Type the following command to unregister the instance: nscontrol unregister -name BAMAlerts.
Remove SQL Server Integration Services Packages
Remove BizTalk Server 2010 databases
Remove BAM Alerts Notification Services instance
24
Note
The BAM Notification name is generated as NS$<Prefix for Alerts Database
Name> where <Prefix for Alerts Database Name> is what you specified on the
BAM Alerts configuration page. The default name is BAMAlerts.
6. Type the following command to delete the instance: nscontrol delete -name BAMAlerts –server %computername% -force
Uninstallation CompleteAt this point you have fully uninstalled BizTalk Server 2010.
Appendix A: Silent Installation BizTalk Server 2010 enables automated electronic software distribution, also known as silent
installation. You use silent installation to install BizTalk Server 2010 in an automated way on
computers that have the same configurations. Silent installation lets system administrators who
want to install BizTalk Server 2010 on remote computers do so without user intervention. With a
silent installation, a user does not have to monitor the installation and provide input.
To perform a silent installation, use the command-line options provided to suppress all interaction
and to provide parameters for all options.
When you perform a silent installation, the installation program does not display messages.
Instead, a log file captures the installation information that includes whether the installation was
successful. You can then review the log file and determine the results of the installation.
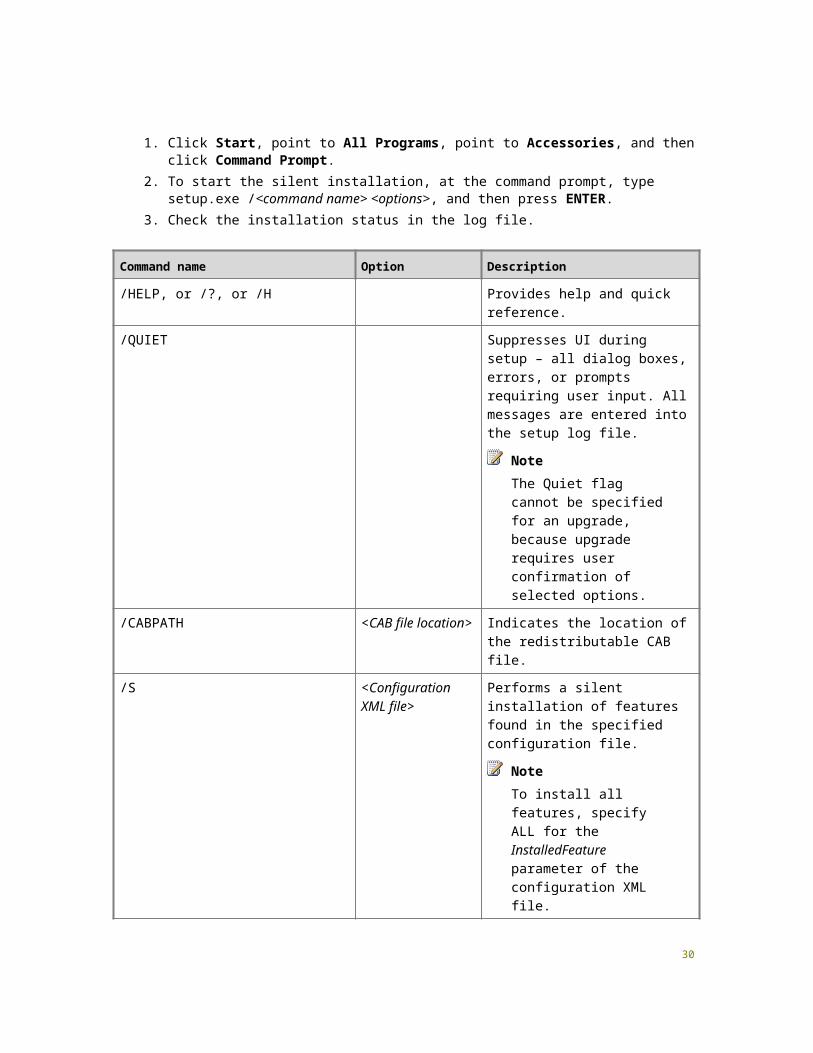
1. Click Start, point to All Programs, point to Accessories, and then click Command Prompt.
2. To start the silent installation, at the command prompt, type setup.exe /<command name> <options>, and then press ENTER.
3. Check the installation status in the log file.
Command name Option Description
/HELP, or /?, or /H Provides help and quick reference.
/QUIET Suppresses UI during setup – all
dialog boxes, errors, or prompts
requiring user input. All messages
are entered into the setup log file.
Note
The Quiet flag cannot be
specified for an upgrade,
To perform a BizTalk Server 2010 silent installation
25
Command name Option Description
because upgrade requires
user confirmation of
selected options.
/CABPATH <CAB file location> Indicates the location of the
redistributable CAB file.
/S <Configuration
XML file>
Performs a silent installation of
features found in the specified
configuration file.
Note
To install all features,
specify ALL for the
InstalledFeature
parameter of the
configuration XML file.
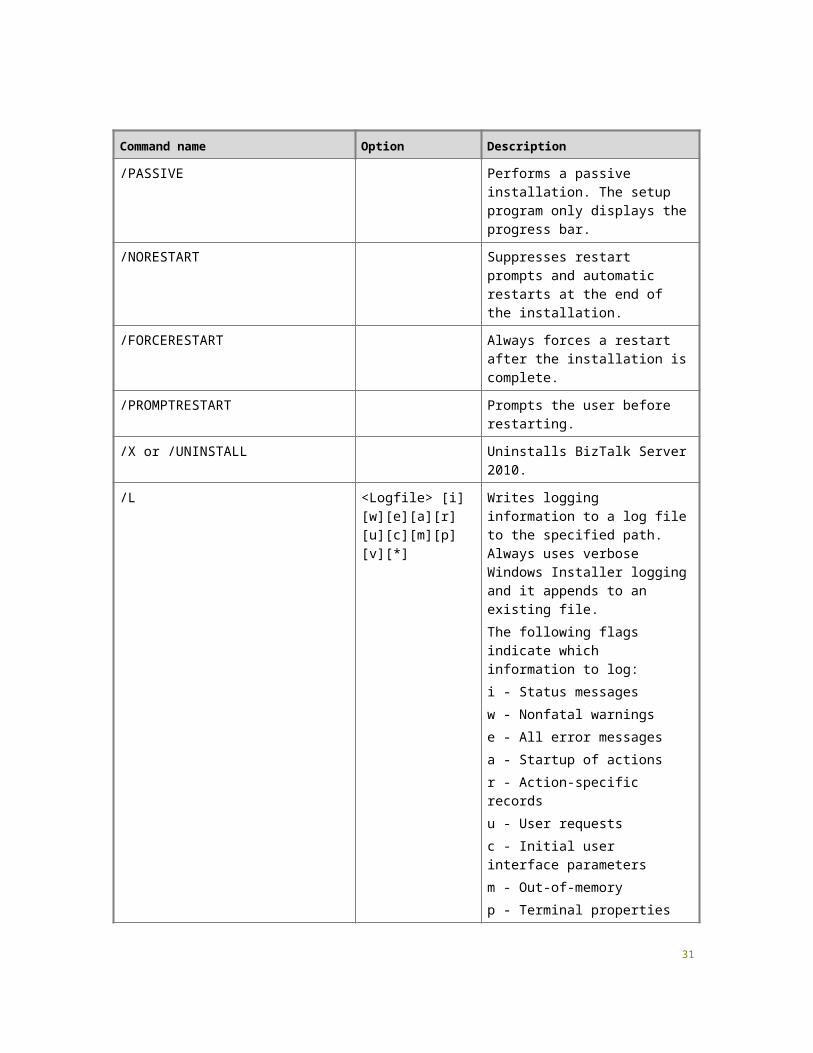
/PASSIVE Performs a passive installation.
The setup program only displays
the progress bar.
/NORESTART Suppresses restart prompts and
automatic restarts at the end of the
installation.
/FORCERESTART Always forces a restart after the
installation is complete.
/PROMPTRESTART Prompts the user before restarting.
/X or /UNINSTALL Uninstalls BizTalk Server 2010.
/L <Logfile> [i][w][e]
[a][r][u][c][m][p][v]
[*]
Writes logging information to a log
file to the specified path. Always
uses verbose Windows Installer
logging and it appends to an
existing file.
The following flags indicate which
information to log:
i - Status messages
w - Nonfatal warnings
e - All error messages
a - Startup of actions
26
Command name Option Description
r - Action-specific records
u - User requests
c - Initial user interface parameters
m - Out-of-memory
p - Terminal properties
v – Verbose output
* - All
/IGNOREDEPENDENCIES Bypasses the checks for
downloadable prerequisites.
/INSTALLDIR <install path> <program files
folder>
Specifies the full path to product
install location.
/COMPANYNAME <company name> Sets the company or organization
name.
/USERNAME <user name> Sets the user name.
/ADDLOCAL ALL Installs all features. For more
information about ADDLOCAL
command, see Listing of Values for
the ADDLOCAL Command
(http://go.microsoft.com/fwlink/?
LinkID=189319).
/REMOVE ALL Removes all features.
/REPAIR ALL Repairs all features.
/CEIP Enables Customer Experience
Improvement Program (CEIP) in
BizTalk Server 2010.
/PRODUCT UDDI Installs UDDI
msiexec.exe /i [MSIPATH]
INSTALLDIR=[INSTALLDIRPATH]
DATADIR=[DATADIRPATH]
SQLSERVERMACHINENAME=[SQLS
ERVERNAME]
OVERWRITERFIDSTORE=1
INSTALLLEVEL=5 /lvxp
RfidServicesInstall.txt /q
Installs Microsoft BizTalk Server
RFID 2010
27
Command name Option Description
For example: msiexec.exe /i "\\ABC\
XYZ\RFID_x86\RfidServices.msi"
INSTALLDIR=“C:\Program Files\
Microsoft BizTalk RFID\”
DATADIR=“C:\Program Files\Microsoft
BizTalk RFID\”
SQLSERVERMACHINENAME=(local)
OVERWRITERFIDSTORE=1
INSTALLLEVEL=5 /lvxp
RfidServicesInstall.txt /q
Appendix B: Redistributable CAB FilesBizTalk Server relies on diverse products and technologies to provide essential services and
features. This software will be installed on your computer during the installation of BizTalk Server
if it is not already present. Setup gives you the option of downloading software prerequisites from
the Web or extracting them from CAB files that you download before running setup.
You cannot use CAB files from previous versions of BizTalk Server to install BizTalk
Server 2010, including CAB files intended for BizTalk Server 2006. To ensure that you
have the correct CAB file, please download the latest version from the links given in the
tables below.
You cannot download the CAB files through a Telnet session.
Each CAB file contains localized versions of the following software:·
Microsoft Office 2003 Web Components (OWC11) Version 4
Microsoft .NET Framework 4 and 3.5 SP1
SQLXML 4.0 with SP1
ADOMD.NET 9.0
ADOMD.NET 10
CAB Files for 32-bit Edition
Langu
age
Windows 7 Windows Vista
EN http://go.microsoft.com/fwlink/?
LinkID=189403&clcid=0x409
http://go.microsoft.com/fwlink/?
LinkID=189406&clcid=0x409
Important
Note
28
Langu
age
Windows 7 Windows Vista
CN http://go.microsoft.com/fwlink/?
LinkID=189403&clcid=0x804
http://go.microsoft.com/fwlink/?
LinkID=189406&clcid=0x804
DE http://go.microsoft.com/fwlink/?
LinkID=189403&clcid=0x407
http://go.microsoft.com/fwlink/?
LinkID=189406&clcid=0x407
ES http://go.microsoft.com/fwlink/?
LinkID=189403&clcid=0x40a
http://go.microsoft.com/fwlink/?
LinkID=189406&clcid=0x40a
FR http://go.microsoft.com/fwlink/?
LinkID=189403&clcid=0x40c
http://go.microsoft.com/fwlink/?
LinkID=189406&clcid=0x40c
IT http://go.microsoft.com/fwlink/?
LinkID=189403&clcid=0x410
http://go.microsoft.com/fwlink/?
LinkID=189406&clcid=0x410
JA http://go.microsoft.com/fwlink/?
LinkID=189403&clcid=0x411
http://go.microsoft.com/fwlink/?
LinkID=189406&clcid=0x411
KO http://go.microsoft.com/fwlink/?
LinkID=189403&clcid=0x412
http://go.microsoft.com/fwlink/?
LinkID=189406clcid=0x412
TW http://go.microsoft.com/fwlink/?
LinkID=189403&clcid=0x404
http://go.microsoft.com/fwlink/?
LinkID=189406&clcid=0x404
CAB Files for 64-bit Edition
Langu
age
Windows 7 Windows Vista
EN http://go.microsoft.com/fwlink/?
LinkID=189404&clcid=0x409
http://go.microsoft.com/fwlink/?
LinkID=189405&clcid=0x409
CN http://go.microsoft.com/fwlink/?
LinkID=189404&clcid=0x804
http://go.microsoft.com/fwlink/?
LinkID=189405&clcid=0x804
DE http://go.microsoft.com/fwlink/?
LinkID=189404&clcid=0x407
http://go.microsoft.com/fwlink/?
LinkID=189405&clcid=0x407
ES http://go.microsoft.com/fwlink/?
LinkID=189404&clcid=0x40a
http://go.microsoft.com/fwlink/?
LinkID=189405&clcid=0x40a
FR http://go.microsoft.com/fwlink/?
LinkID=189404&clcid=0x40c
http://go.microsoft.com/fwlink/?
LinkID=189405&clcid=0x40c
IT http://go.microsoft.com/fwlink/?
LinkID=189404&clcid=0x410
http://go.microsoft.com/fwlink/?
LinkID=189405&clcid=0x410
29
Langu
age
Windows 7 Windows Vista
JA http://go.microsoft.com/fwlink/?
LinkID=189404&clcid=0x411
http://go.microsoft.com/fwlink/?
LinkID=189405&clcid=0x411
KO http://go.microsoft.com/fwlink/?
LinkID=189404&clcid=0x412
http://go.microsoft.com/fwlink/?
LinkID=189405clcid=0x412
TW http://go.microsoft.com/fwlink/?
LinkID=189404&clcid=0x404
http://go.microsoft.com/fwlink/?
LinkID=189405&clcid=0x404
Appendix C: Customer Experience Improvement Program in BizTalk Server 2010Microsoft introduces the Customer Experience Improvement Program in BizTalk Server 2010. As
part of this support in Beta, you are automatically opted-in to provide useful feedback to Microsoft
regarding feature usage reporting functionality of BizTalk Server. The data collected from you is
anonymous and cannot be used to identify you. Microsoft collects feature usage statistics as part
of this program.
By participating in this program, you can help improve the reliability and performance of various
features of BizTalk Server. Post BizTalk Server 2010 Beta, you may also choose to opt out of this
program. For more information about this program and its privacy policy, see Microsoft BizTalk
Server CEIP Privacy Policy (http://go.microsoft.com/fwlink/?LinkId=188553).
Customer Experience Improvement ProgramUse the Customer Experience Improvement Program page of the BizTalk Server 2010
Installation Wizard to enable feature usage reporting functionality for BizTalk Server.
Options
On the Customer Experience Improvement Program page, select one of the following options
Yes, I want to participate in the program (Recommended).
No, I don’t want to participate in the program.
If you select Yes, users can decide whether they want to report Customer Experience
Improvement Program events to Microsoft.
30