installing em12c& oracle’btm 12.1.0 - · pdf...
TRANSCRIPT

Installing EM12c – Oracle BTM 12.1.0.3 Date: 23/03/2013 Author: Rob Zoeteweij http://oemgc.wordpress.com This paper describes the installation of Oracle Business Transaction Management 12.1.0.3 As a basis for the installation of Oracle BTM I have used the following figure (from the Oracle Business Transaction Management Installation Guide 121.0.3)
for this I have created 5 Virtual Servers as described in the following table: myserver2.mycorpdomain.com Database orcl1.mycorpdomain.com mybtmserver1.mycorpdomain.com btmMain mybtmserver2.mycorpdomain.com btmTransactionServer mybtmserver3.mycorpdomain.com btmPerformanceServer mybtmserver4.mycorpdomain.com btmMonitor

On each of the BTM servers I have installed Oracle Weblogic Server 10.3.6.0 and Oracle SOA Suite 11.1.1.6. On the Database Server I have installed Oracle database 11.2.0.3 and created a ‘General Purpose’ Database using DBCA. Please notice that I have chosen to use only one ‘Monitor’ Server and use one Database to accommodate each of the necessary database schemas.
Install WLS 10.3.6 Download the wls1036_generic.jar and type: java –jar wls1036_generic.jar
Press [Next]

Enter the Middleware Home Directory (/u01/app/oracle/product/11.1.1/middleware in this example)
In this example I have unchecked the ‘I wish to receive security updates via My Oracle Support’ checkbox Press [Next]

And yes in this example I also want to bypass the initiation of the configuration manager so press [Yes]
Check the ‘I wish to remain uninformed of security issues in my….’ Obviously, when installing for production you should consider this a bit more careful…
We choose for the ‘Typical’ install

You might consider choosing for ‘Custom’ install and deselect the installation of ‘Oracle Coherence’ as we are not going to use it Press [Next]
The installer found out that there is a 1.6.0 version of the Sun JDK on my server Press [Next]

In this example I agree with the suggested locations for WebLogic Server and Oracle Coherence. Please notice my previously made remark on the installation of Coherence. Press [Next]
Press [Next] to initiate the installation of the software

Uncheck the ‘Run Quickstart’ as we don’t want to create the WebLogic domain at this moment Press [Done]
Install SOA Suite 11.1.1.6 Unzip ofm_soa_generic_11.1.1.6.0_disk1_1of2.zip and ofm_soa_generic_11.1.1.6.0_disk1_2of2.zip to a temporary directory
/usr/java/jdk1.6.0_31/jre

Press [Next] to proceed with the installation
In this example I have chosen to skip installation of Software Updates Press [Next]

Assuming all prerequisite checks finish successfully, press [Next]
As Oracle Middleware Home we choose the directory we used when installing Oracle WebLogic Server: /u01/app/oracle/product/11.1.1/middleware We will leave the name for the Oracle Home Directory

Press [Next]
The installer noticed that the Middleware Home contains an Software Instance of Oracle Weblogic Server Press [Next]
Press [Install]

Installation of the software completed successful Press [Next]
We are now instructed to run the oracleRoot.sh as user root to set some things right After this press [OK] [oracle@mybtmserver1 u01]$ su - Password: [root@mybtmserver1 ~]# /u01/app/oracle/product/11.1.1/middleware/Oracle_SOA1/oracleRoot.sh Changing permissions of /u01/app/oraInventory Adding read,write permissions for group,Removing read,write,execute permissions for world. Changing groupname of /u01/app/oraInventory to oinstall. The execution of the script is complete Changing permissions of /u01/app/oraInventory Adding read,write permissions for group,Removing read,write,execute permissions for world. Changing groupname of /u01/app/oraInventory to oinstall. The execution of the script is complete

Press [OK]
Press [Finish] to complete the installation of Oracle SOA Suite
Configure WebLogic Domain cd /u01/app/oracle/product/11.1.1/middleware/oracle_common/common/bin ./config.sh

Select ‘Create a new WebLogic domain’ Press [Next]
The WLS domain we are about to create should include ‘Oracle Enterprise Manager – 11.1.1.0 [oracle_common]’ and ‘Oracle JRF – 11.1.1.0 [oracle_common]’ The [oracle_common] specification refers to the subdirectory the products will get installed

Press [Next]
For this example we will use ‘BTM_domain’ as the name for the Domain to be created and accept the Domain and Application location Press [Next]
We will accept the Administrator User name and description and will enter a password Press [Next]

The installer has found the Sun SDK 1.6 Press [Next]
Check ‘Administration Server’ and ‘Managed Servers, Clusters and Machines’ Press [Next]

Enter the name and port for the Administration Server Press [Next]
Enter the name, Listen address and Listen port for the Managed Server to be created In this example: ‘btmMainServer’, ‘mybtmserver1.mycorpdomain.com’ and ‘7003’ Press [Next]

As we are not going to configure a Cluster, press [Next]
Select the ‘Unix Machine’ tab (well that is in this example) Enter a name and the Node manager listen address (In this example: ‘BTM_MACHINE1’ and ‘mybtmserver1.mycorpdomain.com’)

In this page we need to assign the Managed server to be created to the Unix Machine to be created Press [Next]
When being sure we have entered the proper values, we press [Create]

After just a short while, creation of the WLS Domain has finished Press [Done]
Start the node manager [oracle@mybtmserver1 u01]$ cd /u01/app/oracle/product/11.1.1/middleware/wlserver_10.3/server/bin [oracle@mybtmserver1 bin]$ . ./setWLSEnv.sh [oracle@mybtmserver1 bin]$ nohup /u01/app/oracle/product/11.1.1/middleware/wlserver_10.3/server/bin/startNodeManager.sh > nohup.out < /dev/null & [1] 13747
Start the Admin Server [oracle@mybtmserver1 bin]$ cd /u01/app/oracle/product/11.1.1/middleware/user_projects/domains/BTM_domain/bin [oracle@mybtmserver1 bin]$. ./setDomainEnv.sh [oracle@mybtmserver1 bin]$ nohup /u01/app/oracle/product/11.1.1/middleware/user_projects/domains/BTM_domain/bin/startWebLogic.sh > nohup.out < /dev/null & [2] 13849
Starting the WLS Admin Console Start your browser and navigate to the Administration Server (In this example: http://mybtwserver1.mycorpdomain.com:7001/console)

Enter the administrative user name and password and press [Login]
Next from the left side pane, select Environment Servers Select the btmMainServer

Navigate to the Server Start tab and enter the following string in the ‘Arguments’ field: -Xms256m -Xmx768m -XX:MaxPermSize=256m Press [Save]
Select Servers and in the Summary of Servers page select the ‘Control’ tab

Select the btmMainServer and press [Start]
Preparing the other BTM Servers We now installed WLS and SOA Suite on mybtmserver1, after which we created the BTM_domain, the Admin Server and the first of 3 Central BTM Managed Servers, the btmMainServer. We will now repeat the installation of WLS and SOA Suite on the servers: mybtmserver2, mybtmserver3 and mybtmserver4. So for each of these servers we will perform the following:
• Install WLS 10.3.6 • Install SOA Suite 11.1.1.6
On the first BTM server we do the following: [oracle@mybtmserver1 domains]$ cd /u01/app/oracle/product/11.1.1/middleware/wlserver_10.3/common/bin [oracle@mybtmserver1 bin]$ ./pack.sh -managed=true -domain=/u01/app/oracle/product/11.1.1/middleware/user_projects/domains/BTM_domain -template=/u01/app/oracle/product/11.1.1/middleware/wlserver_10.3/common/templates/BTM_Template.jar -template_name="BTM Managed Server Template" << read domain from "/u01/app/oracle/product/11.1.1/middleware/user_projects/domains/BTM_domain" >> succeed: read domain from "/u01/app/oracle/product/11.1.1/middleware/user_projects/domains/BTM_domain" << set config option Managed to "true" >> succeed: set config option Managed to "true" << write template to "/u01/app/oracle/product/11.1.1/middleware/wlserver_10.3/common/templates/BTM_Template.jar" ....................................................................................................

>> succeed: write template to "/u01/app/oracle/product/11.1.1/middleware/wlserver_10.3/common/templates/BTM_Template.jar" << close template >> succeed: close template
oracle@mybtmserver1 bin]$ cd /u01/app/oracle/product/11.1.1/middleware/wlserver_10.3/common/templates [oracle@mybtmserver1 templates]$ ls BTM_Template.jar applications domains scripts silent_scripts [oracle@mybtmserver1 templates]$ scp BTM_Template.jar mybtmserver2:/u01/app/oracle/product/11.1.1/middleware/wlserver_10.3/common/templates oracle@mybtmserver2's password: BTM_Template.jar 100% 391KB 390.9KB/s 00:00 [oracle@mybtmserver1 templates]$ scp BTM_Template.jar mybtmserver3:/u01/app/oracle/product/11.1.1/middleware/wlserver_10.3/common/templates oracle@mybtmserver3's password: BTM_Template.jar 100% 391KB 390.9KB/s 00:00 [oracle@mybtmserver1 templates]$ scp BTM_Template.jar mybtmserver4:/u01/app/oracle/product/11.1.1/middleware/wlserver_10.3/common/templates oracle@mybtmserver4's password: BTM_Template.jar 100% 391KB 390.9KB/s 00:00
Next on each of the servers mybtmserver2, mybtmserver3 and mybtmserver4 perform: cd /u01/app/oracle/product/11.1.1/middleware/wlserver_10.3/common/bin ./unpack.sh -template=/u01/app/oracle/product/11.1.1/middleware/wlserver_10.3/common/templates/BTM_Template.jar -domain=/u01/app/oracle/product/11.1.1/middleware/user_projects/domains/BTM_domain << read template from "/u01/app/oracle/product/11.1.1/middleware/wlserver_10.3/common/templates/BTM_Template.jar" >> succeed: read template from "/u01/app/oracle/product/11.1.1/middleware/wlserver_10.3/common/templates/BTM_Template.jar" << set config option DomainName to "BTM_domain" >> succeed: set config option DomainName to "BTM_domain" << write Domain to "/u01/app/oracle/product/11.1.1/middleware/user_projects/domains/BTM_domain" ............................................................................................... >> succeed: write Domain to "/u01/app/oracle/product/11.1.1/middleware/user_projects/domains/BTM_domain" << close template >> succeed: close template $
This will create the domain BTM_domain on the server

Creating the additional BTM Central Servers In the WLS Admin Console navigate Environment Machines
Press [New]
Enter the name of the Unix Machine to be created and make sure the proper Machine OS has been selected (Unix in this example) Press [Next]

Enter the name of the Node Manager server (in our example mybtmsever1.mycorpdomain.com) and leave the Listen Port to 5556 Press [Finish]
Perform the same actions to create Machines BTM_MACHINE3 and BTM_MACHINE4 on mybtmserver3 and mybtmserver4.

Creating the new Managed Server In the WLS Admin Console navigate Environment Servers – Configuration
Press [New]
Enter the name for the Server, the Listen Address and Listen Port (In this example: ‘btmTransactionServer’, ‘mybtmserver2.mycorpdomain.com’ and ‘7003’) Press [Finish]

Now select the server we have just created
Select the proper Machine for this server (‘BTM_MACHINE2’ in this example) Press [Save] Navigate to the Server Start tab and enter the following string in the ‘Arguments’ field: -Xms256m -Xmx768m -XX:MaxPermSize=256m

Press [Save] Navigate to Servers Control
Start the newly create server from the server command prompt: On mybtmserver2: cd /u01/app/oracle/product/11.1.1/middleware/user_projects/domains/BTM_domain/bin [oracle@mybtmserver2 bin]$ ./startManagedWebLogic.sh btmTransactionServer http://mybtmserver1.mycorpdomain.com:7001

This procedure will ask you for the Weblogic admin username and password After noticing the Managed Server started properly I did the following: Canceled by [ctrl-‐c] Starting the Managed Server with the startManagedWebLogic.sh created the directory structure for the managed server: cd /u01/app/oracle/product/11.1.1/middleware/user_projects/domains/BTM_domain/servers [oracle@mybtmserver2 servers]$ ls AdminServer btmTransactionServer domain_bak [oracle@mybtmserver2 servers]$ cd btmTransactionServer [oracle@mybtmserver2 btmTransactionServer]$ ls cache data logs tmp [oracle@mybtmserver2 btmTransactionServer]$ mkdir security [oracle@mybtmserver2 btmTransactionServer]$ cd security/ [oracle@mybtmserver2 security]$ [oracle@mybtmserver2 security]$ vi boot.properties [oracle@mybtmserver2 security]$ cat boot.properties username=weblogic password=welcome01
You can now start the managed server without needing to enter the Weblogic admin username and password. The entries in the boot.properties file are now encrypted. /u01/app/oracle/product/11.1.1/middleware/user_projects/domains/BTM_domain/servers/btmTransactionServer/security [oracle@mybtmserver2 security]$ cat boot.properties #Tue Mar 12 18:25:49 CET 2013 password={AES}fafZSb3nLaRLOs2ZuDtbzkEaQV73mLb0dlV7Afkcki4\= username={AES}FxOfKBkvp8jWdBmvqY4uLGqBZWFkOxwnwhI+XcSPqc8\=
Now we will start the managed server using the nohup: cd /u01/app/oracle/product/11.1.1/middleware/user_projects/domains/BTM_domain/bin nohup /u01/app/oracle/product/11.1.1/middleware/user_projects/domains/BTM_domain/bin/startManagedWebLogic.sh btmTransactionServer http://mybtmserver1.mycorpdomain.com:7001 > nohup.out < /dev/null &
Repeat the steps under Creating the new Managed Server to create BTM Server: btmPerformanceServer and btmMonitor After this all BTM servers are Up and Running

Setting up the Business Transaction Management Databases Database orcl1.mycorpdomain.com Unzip file BTM_Servers_12.1.0.3.2.zip to a temporary directory The following database users need to be created:
• sphereDB • measurementDB • transactionDB • messageLogDB
These database users could be created in separated database or all in one and the same database and must have create table, drop table, create index, create view, and analyze privileges. Note that it is not sufficient to assign the privileges to the roles associated with the user. You must explicitly assign the privileges to the user. The creation of the schema tables and indexes can be done in 2 different ways:
• Beforehand using the datastoreUtil (only users sphereDB, measurementDB, transactionDB)
• Automatically during configuration of BTM [oracle@mybtmserver1 tools]$ ./datastoreUtil.sh AmberPoint Data Store Utility [Java] - 12.1.0.3.2 Copyright (c) AmberPoint Inc. 2001-2007. All rights reserved. Enter a command or 'help' to display the list of commands. To connect to a database, use 'connect'. You might specify the database type: 'connect mssql | db2 | oracle | sybase' > generateSchema sphere oracle DDL for schema sphere has been generated in directory /tmp/btm/tools/. > generateSchema exm oracle

DDL for schema exm has been generated in directory /tmp/btm/tools/. > generateSchema performance oracle -nopartition DDL for schema performance has been generated in directory /tmp/btm/tools/. > generateSchema msglog oracle DDL for schema msglog has been generated in directory /tmp/btm/tools/. > exit [oracle@mybtmserver1 tools]$ ls -al *.sql -rw-r--r-- 1 oracle oinstall 114452 Mar 12 19:59 OracleExMSchema.sql -rw-r--r-- 1 oracle oinstall 14720 Mar 12 19:59 OracleMsgLogSchema.sql -rw-r--r-- 1 oracle oinstall 119944 Mar 12 19:59 OraclePerformanceSchema.sql -rw-r--r-- 1 oracle oinstall 106575 Mar 12 19:59 OracleSphereSchema.sql [oracle@mybtmserver1 tools]$
Now first we will create the schemas:
• sphereDB -‐ OracleSphereSchema.sql • measurementDB -‐ OraclePerformanceSchema.sql • transactionDB -‐ OracleExMSchema.sql • messageLogDB -‐ OracleMsgLogSchema.sql
I copied the *.sql scripts to my database server myserver2.mycorpdomain.com Next on myserver2: [oracle@myserver2 tmp]$ . oraenv ORACLE_SID = [orcl1] ? orcl1 The Oracle base remains unchanged with value /u01/app/oracle [oracle@myserver2 tmp]$ ls -la *.sql -rw-r--r-- 1 oracle oinstall 114452 Mar 12 20:08 OracleExMSchema.sql -rw-r--r-- 1 oracle oinstall 14720 Mar 12 20:08 OracleMsgLogSchema.sql -rw-r--r-- 1 oracle oinstall 119944 Mar 12 20:08 OraclePerformanceSchema.sql -rw-r--r-- 1 oracle oinstall 106575 Mar 12 20:08 OracleSphereSchema.sql [oracle@myserver2 tmp]$ sqlplus sphereDB/welcome01 SQL> @OracleExMSchema.sql SQL> exit [oracle@myserver2 tmp]$ [oracle@myserver2 tmp]$ sqlplus measurementDB /welcome01 SQL> @OraclePerformanceSchema.sql SQL> exit [oracle@myserver2 tmp]$ [oracle@myserver2 tmp]$ sqlplus transactionDB /welcome01 SQL> @OracleExMSchema.sql SQL> exit [oracle@myserver2 tmp]$ [oracle@myserver2 tmp]$ sqlplus messageLogDB /welcome01 SQL> @OracleMsgLogSchema.sql SQL> exit [oracle@myserver2 tmp]$

Deploying the BTM Central Servers and Monitor OK, all Managed Servers and Database schemas are now created. The next thing to do would be to deploy the BTM Central Servers and Monitor to the WLS Managed Servers. I have downloaded and unzipped to a temporary directory BTM_Servers_12.1.0.3.2.zip From the temporary directory I will start deploying the Central Servers and Monitor For this we need to access the WLS Admin Console. From the left side pane we select ‘Deployments’
From here we press [Install]

We need to deploy these ear files to servers mybtmserver1 (btmMain.ear), mybtmserver2 (btmTransactionServer.ear), mybtmserver3 (btmPerformanceServer.ear) and mybtmserver4 (btmMonitor.ear) Press [Next]
Select ‘Install this deployment as an application’ Press [Next]
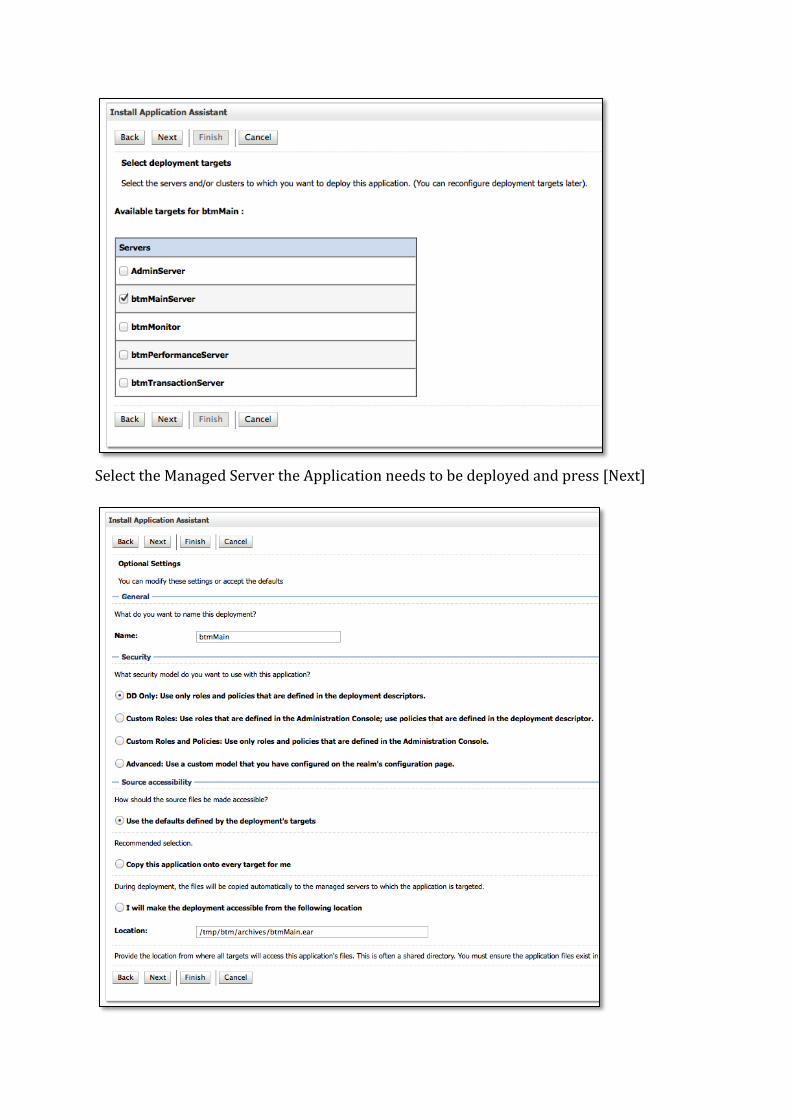
Select the Managed Server the Application needs to be deployed and press [Next]
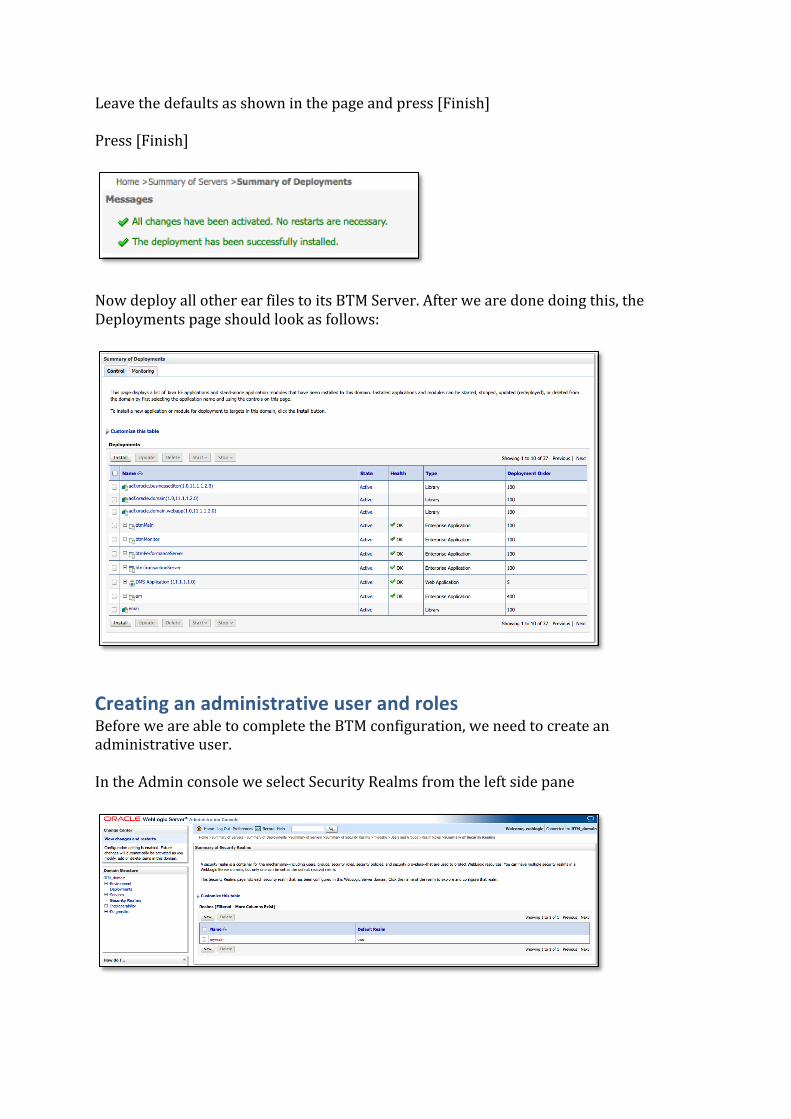
Leave the defaults as shown in the page and press [Finish] Press [Finish]
Now deploy all other ear files to its BTM Server. After we are done doing this, the Deployments page should look as follows:
Creating an administrative user and roles Before we are able to complete the BTM configuration, we need to create an administrative user. In the Admin console we select Security Realms from the left side pane
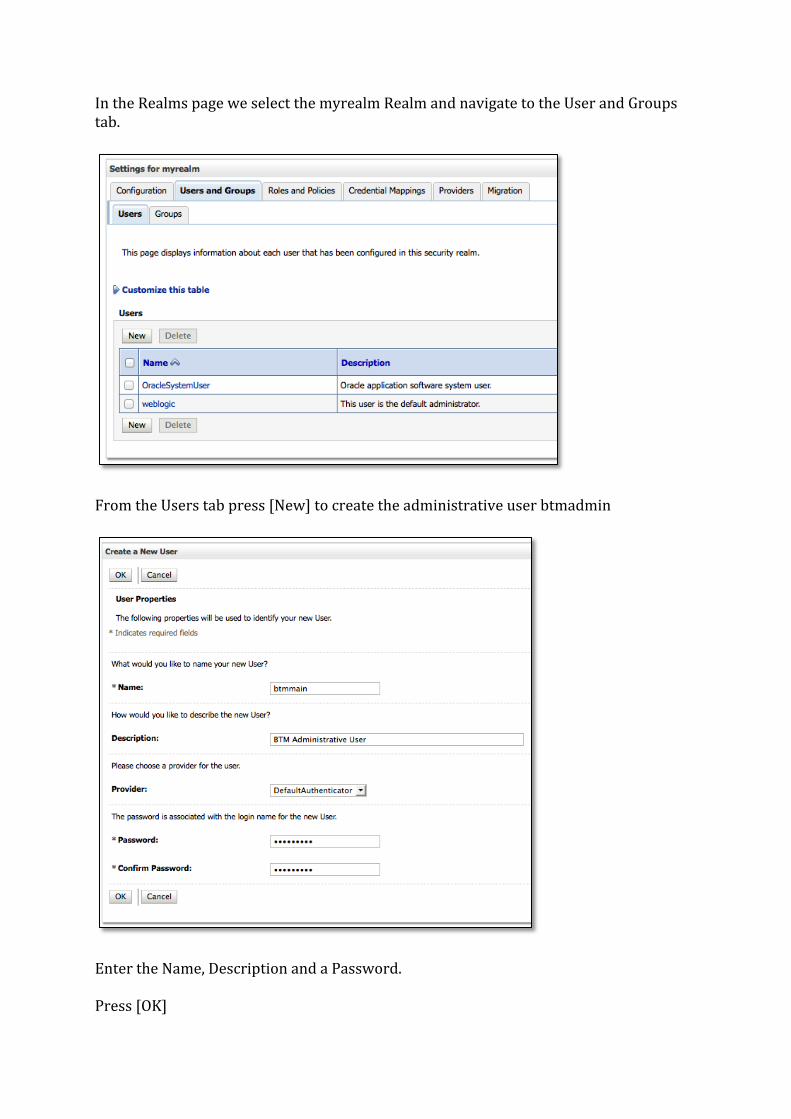
In the Realms page we select the myrealm Realm and navigate to the User and Groups tab.
From the Users tab press [New] to create the administrative user btmadmin
Enter the Name, Description and a Password. Press [OK]

Now we select the newly created user btmadmin
In the Groups tab, we assign the Administrators, Monitors and Operators group. Press [Save]

Mapping Users to Roles
In a WebLogic server, the role of Business Transaction Management administrator (btmAdmin) is automatically mapped to the Administrators group defined in your WebLogic server. The role of Business Transaction Management user (btmUser) is mapped to the groups Operators and Monitors. The role of Business Transaction Management observer (btmObserver) is mapped to the group Everyone, granting all authenticated users observer privileges. The following table lists the Business Transaction Management application roles and their default mappings to application server groups:
Role Mapping in WebLogic
Business Transaction Management Application Role Application Server Group
btmAdmin Administrators btmUser Operators, Monitors
btmObserver Everyone btmInspector (Note that this is singular.) btmInspectors (Note that this is
plural.) In the previous paragraph we assigned some of the Application Server Groups to the administrative user btmadmin
Configuration of the BTM Application We can now access the BTM application via http://mybtmserver1.mycorpdomain.com:7003/btmui

Press [Next]
As we have chosen to use an external Oracle Database to create the BTM schemas, select ‘External Database’ and press [Next]
In this page need to enter the proper Schema names and passwords Press [Next]

Check that the proper URL to contact the sphere is entered. In fact the suggested URL in this example is the correct one Select Test Next a Status page is shown, including all configuration details
SphereService Status
URL http://mybtmserver1.mycorpdomain.com:7003/btmcentral/sphere/
Id uuid:48049492-‐8BD9-‐11E2-‐BC36-‐773864F51CFB
Status UNCONFIGURED: Service awaiting configuration of required resource or database.
Env Runtime environment details.
Resources
Performance
Status OK: Resource running and working correctly.
Last Access March 13, 2013 1:26:50 PM
Last Successful Access March 13, 2013 1:26:50 PM
perf.Memory.Free 142922024
perf.Memory.Max 518979584
perf.Memory.Total 259588096
perf.PercentCpuSince 0
perf.TotalCpu 65210
Database Configuration
Status UNCONFIGURED: Resource or database missing required configuration.
Last Access March 13, 2013 1:26:50 PM
Last Error This service has not been configured with its database connection information and therefore cannot complete initialization. Please provide the necessary configuration so that the service can initialize properly.
SphereService
Status OK: Resource running and working correctly.
Last Access March 13, 2013 1:26:50 PM
Last Successful Access March 13, 2013 1:26:50 PM
Sphere fragment manager creates 0
Sphere fragment manager events raised 0
Sphere fragment manager gets 0
Sphere fragment manager removes 0
Sphere fragment manager updates 0
Sphere putObjects 0

Sphere startup events raised 0
perf.Sphere combined events in last batch 0
perf.Sphere events in last batch 0
perf.Sphere maximum combined events in one batch 0
perf.Sphere maximum events in one batch 0
Plug-‐in Agent
Status OK: Resource running and working correctly.
Last Access March 13, 2013 1:26:52 PM
Last Successful Access March 13, 2013 1:26:52 PM
Sphere Service -‐ http://mybtmserver1.mycorpdomain.com:7003/btmcentral/sphere/
Status UNUSABLE: Resource or database not working.
Last Access March 13, 2013 3:29:23 PM
Last Error The sphere has not been fully configured and therefore is not ready for use.
As you can see the SphereStatus service page shows the status ‘UNCONFIGURED’. This is expected behavior, as the service will be configured on completion of the configuration.
Press [Next] (Assuming you don’t want to enter any DNS aliases to address the node)
Press [Next]
Press [Next] (Assuming you don’t want to enter any DNS aliases to address the node)

Press [Next]
Press [Next] (Assuming you don’t want to enter any DNS aliases to address the node)
When pressing [Finish] the following message shows and configuration starts:
After some minutes (nothing more than 1 minute in my test environment) the following page shows up, indicating configuration completed successful.

Browsing the BTM UI We can now browse through the BTM User Interface. Navigate Administration System Service Containers
Navigate Administration System Services

Navigate Administration System Policies
Navigate Administration Policy Templates

Registering the Monitor ./btmcli.sh registerMonitor -e http://mybtmserver4.mycorpdomain.com:7003/btmmonitor/agent/agent -fn myBTMmonitor -s http://mybtmserver1.mycorpdomain.com:7003/btmcentral/sphere -l btmadmin:welcome01 The btmcli responds with: http://mybtmserver4.mycorpdomain.com:7003/btmmonitor/agent/agent/ If you now look at the BTM page you will notice the Monitor we just registered

Installing the a BTM Observer For a detailed description of the installation BTM Observers, please see Oracle® Business Transaction Management Installation Guide -‐ 12.1.0.3 http://docs.oracle.com/cd/E24628_01/install.121/e37016/observer_weblogic.htm#CIHBEFHD After the installation of the BTM infrastructure, we will now install an Observer. Observers are the BTM equivalents of an EM12c Agent. An Observer must be installed in the Managed Server that runs the Application to be monitored. As I don’t have a SOA demo application running at the time of writing this paper I will install an Observer in the Managed Server running the ‘Medrec’ demo application. The ‘Medrec’ application runs on myserver3.mycorpdomain.com In this example I will install the BTMObserver_Wls_10.3_Universal_12.1.0.3.2 For this I create a sub directory BTM in directory /u01/app/oracle/product/11.1.0/middleware/wlserver_10.3 As this managed server is a ‘Script-‐configured’ Server (and not a Node manager configured Server) I will proceed as follows: /u01/app/oracle/product/11.1.0/middleware/wlserver_10.3/BTM [oracle@myserver3 BTM]$ unzip /home/nfs_software/BTMObserver_Wls_10.3_Universal_12.1.0.3.2.zip [oracle@myserver3 BTM]$ ls -al total 16 drwxr-xr-x 4 oracle oinstall 4096 Mar 25 17:18 . drwxr-xr-x 10 oracle oinstall 4096 Mar 25 17:17 .. drwxr-xr-x 5 oracle oinstall 4096 Jan 13 20:40 nanoagent drwxr-xr-x 3 oracle oinstall 4096 Jan 13 20:40 security_add_ons
Next I navigate to /u01/app/oracle/product/11.1.0/middleware/wlserver_10.3/samples/domains/medrec/bin Here you need to modify the startWebLogic.sh script # Call setDomainEnv here. DOMAIN_HOME="/u01/app/oracle/product/11.1.0/middleware/wlserver_10.3/samples/domains/medrec" . ${DOMAIN_HOME}/bin/setDomainEnv.sh $* . ${WL_HOME}/BTM/nanoagent/bin/nanoEnvWeblogic.sh SAVE_JAVA_OPTIONS="${JAVA_OPTIONS}" …
Make sure you add the red colored line immediately after the setDomainEnv.sh

Next navigate to: /u01/app/oracle/product/11.1.0/middleware/wlserver_10.3/BTM/nanoagent/bin
here you need to modify the nanoEnvWeblogic.sh script Make sure the NANOAGENT_HOME points to the proper directory NANOAGENT_HOME=$WL_HOME/BTM/nanoagent
and make sure the proper Monitor is referred to in: NANOAGENT_CONFIGURATION_URL=http://mybtmserver4.mycorpdomain.com:7003/btmmonitor/agent/agent/
Next restart the server After the Managed server is restarted, navigate to the BTM console
As you can see, the Observer is now present in the BTM Console as well as several Services to Endpoints and Operations. Let’s show some more interesting screens.

As you notice in this screen, the Medrec demo application is just a bunch of Enterprise Beans. All of these Services have been discovered automatically and monitoring is activated instantly.

With these screenshots I complete this paper. I will start getting a SOA Demo application in place and then show you BTM in more detail.

Commands
Start the node manager cd /u01/app/oracle/product/11.1.1/middleware/wlserver_10.3/server/bin . ./setWLSEnv.sh nohup /u01/app/oracle/product/11.1.1/middleware/wlserver_10.3/server/bin/startNodeManager.sh > nohup.out < /dev/null &
Start the Admin Server cd /u01/app/oracle/product/11.1.1/middleware/user_projects/domains/BTM_domain/bin . ./setDomainEnv.sh nohup /u01/app/oracle/product/11.1.1/middleware/user_projects/domains/BTM_domain/bin/startWebLogic.sh > nohup.out < /dev/null &
Starting the WLS Admin Console Notice you need to use the Firefox browser to browse in the Admin console without any issues… Start your browser and navigate to http://mybtwserver1.mycorpdomain.com:7001/console
Starting the managed Servers
mybtmserver1 cd /u01/app/oracle/product/11.1.1/middleware/user_projects/domains/BTM_domain/bin . ./setDomainEnv.sh nohup /u01/app/oracle/product/11.1.1/middleware/user_projects/domains/BTM_domain/bin/startManagedWebLogic.sh btmMainServer http://mybtmserver1.mycorpdomain.com:7001 > nohup.out < /dev/null &
mybtmserver2 cd /u01/app/oracle/product/11.1.1/middleware/user_projects/domains/BTM_domain/bin . ./setDomainEnv.sh nohup /u01/app/oracle/product/11.1.1/middleware/user_projects/domains/BTM_domain/bin/startManagedWebLogic.sh btmTransactionServer http://mybtmserver1.mycorpdomain.com:7001 > nohup.out < /dev/null &
mybtmserver3 cd /u01/app/oracle/product/11.1.1/middleware/user_projects/domains/BTM_domain/bin . ./setDomainEnv.sh nohup /u01/app/oracle/product/11.1.1/middleware/user_projects/domains/BTM_domain/bin/startManagedWebLogic.sh btmPerformanceServer http://mybtmserver1.mycorpdomain.com:7001 > nohup.out < /dev/null &

mybtmserver4 cd /u01/app/oracle/product/11.1.1/middleware/user_projects/domains/BTM_domain/bin . ./setDomainEnv.sh nohup /u01/app/oracle/product/11.1.1/middleware/user_projects/domains/BTM_domain/bin/startManagedWebLogic.sh btmMonitor http://mybtmserver1.mycorpdomain.com:7001 > nohup.out < /dev/null &