installing final cut studio 2
TRANSCRIPT

1
Installing Your Software
The following information is intended to get you up and running as quickly as possible and covers these topics:Â
About the Final Cut Studio Installation and Content Discs (p. 1)Â
Upgrading Mac OS X and QuickTime (p. 3)Â
Installing Final Cut Studio (p. 4)Â
Installing Content (p. 9)Â
Registering Final Cut Studio (p. 13)Â
About Onscreen Help (p. 13)Â
About Spotlight and Final Cut Studio Documentation (p. 14)Â
Contacting AppleCare Support (p. 15)
Make sure to also review the
Before You Install Final Cut Studio
document on the Final Cut Studio installation disc. For the latest information about Final Cut Studio, go to the Final Cut Studio website at http://www.apple.com/finalcutstudio.
About the Final Cut Studio Installation and Content Discs
Final Cut Studio 2 includes all of the installation and content discs required to install Final Cut Pro 6, Color, Motion 3, Soundtrack Pro 2, Compressor 3, DVD Studio Pro 4.2, Apple Qmaster 3, LiveType 2.1, and Cinema Tools 4. Also included with Final Cut Studio is an Apple Pro Training tutorial disc. Following is a description of each disc’s contents.
Note:
These discs contain the files required to install Final Cut Studio 2 on either PowerPC-based or Intel-based Macintosh computers. The installation process is identical for both.

2
Final Cut Studio Installation Disc
This disc contains the files necessary to install Final Cut Pro, Color, Motion, Soundtrack Pro, Compressor, DVD Studio Pro, Apple Qmaster, LiveType, and Cinema Tools. It is the first disc you will use to install Final Cut Studio. It also contains the following files and folders:Â
Before You Install Final Cut Studio:
This document provides system requirements and things to do before you install the applications and content. Make sure to read this before installing Final Cut Studio.
Â
Install Final Cut Studio icon:
Double-click this icon to begin the installation process.Â
Documentation folder:
This folder contains PDF documentation for all of the Final Cut Studio applications. Many of the PDF documents contain an access page with links to additional documents and related Apple websites.
Â
Extras folder:
This folder contains the following additional installers, applications, and documentation:Â
LiveType Extras:
A folder that contains LiveFont samples and documentation for creating your own LiveFonts.
Â
EDL Access:
A folder that contains documentation and the EDL Access application. Â
Head Leaders for Cinema Tools:
A folder
that contains documentation, movies, and a project using leaders.
Â
DVX-100 Audio Sync Tool:
A folder that contains documentation and the DVX-100 Audio Sync Tool.
Â
Apple Qmaster Nodes.mpkg:
An installer for Apple Qmaster, which is an application you can use to configure a distributed encoding network. See the Distributed Processing Setup link on the
Compressor User Manual
access page for information about installing and configuring Apple Qmaster.
Â
Spotlight Importer:
A folder that contains the Spotlight Importer script. See “About Spotlight and Final Cut Studio Documentation” on page 14 for more information on when to use this.
Â
Template Intro Movies for DVD Studio Pro:
A folder that contains documentation and NTSC and PAL versions of several movies to be used with the Apple templates that come with DVD Studio Pro.

3
Audio Content Discs
These discs contain an extensive library of sound effects, music beds, and loops in the new, compressed Apple Loops format for use with Soundtrack Pro, Motion, DVD Studio Pro, and Final Cut Pro. The Final Cut Studio installer will let you know when to insert the discs.
Motion Content Disc
This disc contains all of the Motion content. The Final Cut Studio installer will let you know when to insert the disc.
DVD Studio Pro Content Disc
This disc contains all of the DVD Studio Pro content. The Final Cut Studio installer will let you know when to insert the disc.
LiveType Media Discs
These discs provide media content for LiveType, including LiveFonts, templates, objects, and textures. The Final Cut Studio installer will let you know when to insert the discs.
Apple Pro Training Final Cut Studio Tutorials Disc
This disc provides content to support the
Apple Pro Training Final Cut Studio Tutorials
manual, which is included on this disc as a PDF file. This disc is not installed by the Final Cut Studio installer.
Upgrading Mac OS X and QuickTime
Before you install Final Cut Studio, update your system software to make sure that you have the latest version of Mac OS X v10.4 or later installed. You also need to upgrade to the latest version of QuickTime. QuickTime is an industry standard for working with digital video and is required for Final Cut Studio.
Note:
For minimum software requirements, see the
Before You Install Final Cut Studio
document on the Final Cut Studio installation disc.
To update your system software:1
Choose Apple menu > Software Update.
A dialog appears showing new or updated software available for your computer.
2
If necessary, follow the onscreen instructions to update Mac OS X and QuickTime to the latest versions.
Important:
Installing Final Cut Studio and entering the serial number automatically unlocks the extended multimedia capabilities of QuickTime Pro.

4
Installing Final Cut Studio
When you install Final Cut Studio, its applications are placed in the Applications folder on your startup disk. You can choose whether the content for each application (such as templates) is placed in the default location or in a custom location.
Important:
Refer to the
Before You Install Final Cut Studio
document on the Final Cut Studio installation disc for a list of minimum system requirements for the Final Cut Studio applications.
Installing Final Cut Studio requires you to insert each of the discs, starting with the Final Cut Studio installation disc. After you finish installing that disc, you then continue installing Final Cut Studio by inserting each of the remaining discs when prompted.
∏
Tip:
See “Installing the Content” on page 11 for information on installing an individual application’s content directly from its content disc.
Note:
Before you can install the software, you need to log in to your computer with an administrator account, using the administrator password. See Mac Help for more information.
To enter the serial number and install Final Cut Studio:1
Insert the Final Cut Studio
installation disc into your computer’s DVD drive.
2
Double-click the Install Final Cut Studio icon, then follow the onscreen instructions.
3
The installer performs a system requirements check to determine if the Final Cut Studio applications can be installed. Click Continue.
4
Read the Welcome information, then click Continue.
5
Read the Software License Agreement, click Continue, then (if you agree) click Agree.
6
Select the startup disk, then click Continue.

5
7
In the User Information pane, enter your first and last name. Entering an organization is optional.
8
In the Serial Number field, enter the Final Cut Studio serial number printed on the Software Serial Number label attached to the front of this document, then click Continue.
Following are some tips for entering your serial number correctly:
Â
Make sure you are copying the original serial number that is on the front of this document.
Â
Make sure you enter the software serial number, not the Support ID number.Â
Make sure you enter a zero and not an O, a 1 and not a lowercase L, where appropriate. Â
Include dashes in the serial number. Â
Don’t enter spaces before or after the serial number.Â
Verify that you have typed the serial number correctly.
Enter your name (required).
Enter your organization (optional).
Enter your serial number, including dashes (required).

6
Note:
If you are installing the upgrade version, the installer looks for a Final Cut Pro or Final Cut Studio serial number from a previous installation. If the installer is unable to locate a Final Cut Pro or Final Cut Studio serial number, the installer asks you to enter the serial number now.
Important:
After three incorrect serial number entries, the installer quits. To begin the installation process again, return to step 2.
The Compressor Service Sharing pane appears.
9
In the Compressor Service Sharing pane, do one of the following, then click Continue:
Â
Select Yes to make this computer available to others on your local network for use in their distributed processing services. This means that another computer on your local network can, in the background, use your computer to help with processing its batches.
Â
Select No to prevent this computer from being available for distributed processing.
Important:
You can manually change this configuration later if needed. See the
Distributed Processing Setup
document in the Compressor and Apple Qmaster Help menus.
7
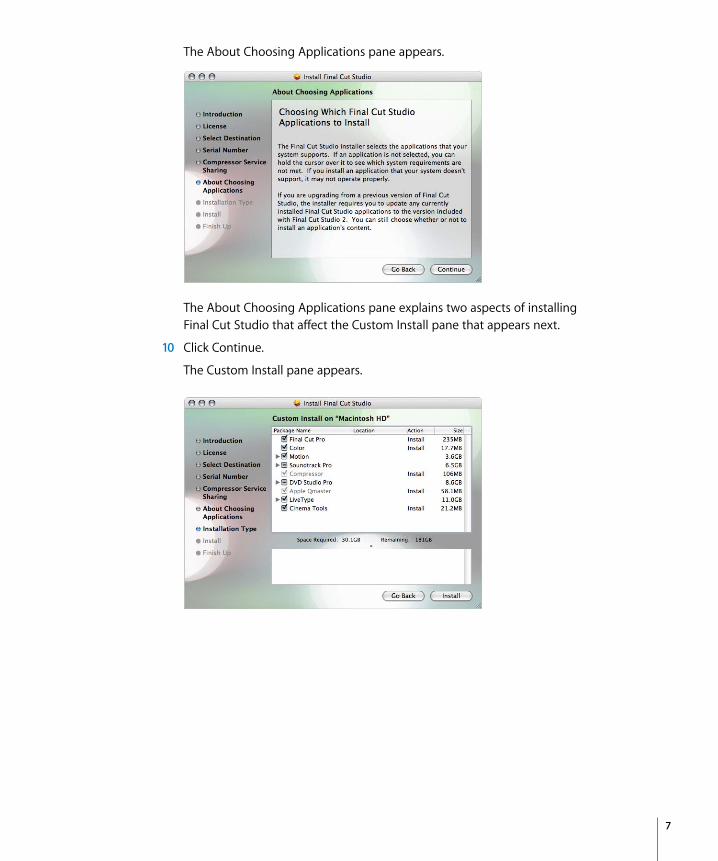
The About Choosing Applications pane appears.
The About Choosing Applications pane explains two aspects of installing Final Cut Studio that affect the Custom Install pane that appears next.
10
Click Continue.
The Custom Install pane appears.

8
11
Customize your installation by selecting and deselecting items in the Custom Install pane.
Many items include a disclosure triangle that, when clicked, reveals additional items you can select or deselect.
The Final Cut Studio installer automatically selects all of the applications that your system’s hardware supports. If an application is not selected, your hardware does not meet the minimum system requirements for that application. You can hold the pointer over any of these applications to see specific requirements that your system does not meet. You can select any of these applications and install them; however, they may not open or operate properly.
Note:
You may need to expand the window and drag the edge of the Package Name heading to show the full names of some items.
Important:
If you are upgrading from a previous Final Cut Studio installation, you may find that you cannot deselect some of the applications. To avoid compatibility issues, the Final Cut Studio installer requires you to update all existing Final Cut Studio applications to the version included with Final Cut Studio 2. You are, however, still able to choose whether or not to install the content for these applications by clicking the disclosure triangles and selecting or deselecting the checkboxes.
12
Optionally, click the folder icons in the Location column and then choose Other from the pop-up menu to choose a custom location for the content.
See “Installing Content” on page 9 for information about installing content and choosing custom locations for items that allow it.
13
After you have configured the Custom Install pane, click Install or Upgrade.
Important:
You may see the Upgrade option even on computers that do not have previous versions of the Final Cut Studio applications installed. This is because the installer has detected at least one file on your system in common with the files it installs, and is considered normal.
14
A message appears listing the discs required to complete the installation. Click Continue Installation.
15
A dialog appears requiring you to authenticate yourself by typing your name and password. Click OK when finished.
The installer displays a progress bar to indicate its status and prompts you to insert specific discs to continue the installation.
9
Note:
You will need to insert the Final Cut Studio installation disc again to finish the installation.
After you have finished the installation, you are ready to begin using the Final Cut Studio applications.
Installing Content
Many of the Final Cut Studio applications include additional content, such as templates, fonts, and audio content, that you can choose to install.
About the Content
Following is a brief description of the content included with each of the Final Cut Studio applications, along with the default installation locations. In most cases, you can also choose custom locations to place this content, such as a second hard disk or a custom folder.
Audio Content
The Audio Content discs include an extensive library of sound effects, music beds, and Apple Loops files. The content from these discs can be used by the Final Cut Studio applications, as well as Logic Pro and GarageBand. In addition to many new audio files, these discs include all of the Apple Loops from earlier versions of Soundtrack Pro.
Important:
The audio content on these discs uses the new Apple Loops file format based on Core Audio Format (CAF). These files use Apple Lossless compression to retain the highest quality while reducing the space required to hold them on your hard disk. Older Apple Loops files were based on the AIFF format. See “Installing Content When Upgrading” on page 12 for information on upgrading from a previous Soundtrack Pro installation.
Warning:
The discs you insert while installing Final Cut Studio include their own individual installers, which the Finder displays.
Do not
click anything in a disc’s Finder window; instead, only follow the Final Cut Studio installer’s prompts. Starting an individual disc’s installer while the Final Cut Studio installer is still running may cause an incomplete Final Cut Studio installation and may require you to start again.
10
You can choose to install the following items:Â
Surround Impulse Response files:
These files are required if you intend to work with surround sound projects and the Space Designer effect.
Note:
These files are installed in /Library/Audio/Impulse Response/Apple/ and cannot be installed in a custom location.
Â
Sound Effects:
Includes an extensive collection of sound effects.Â
Music Beds:
Includes a variety of music beds.Â
Music Loops:
Includes all of the latest Apple Loops as well as those from previous versions of Soundtrack Pro.
The default location for the Soundtrack Pro content is /Library/Audio/Apple Loops/Apple/.
Note:
This collection of Apple Loops files can also be accessed by other applications that support the Apple Loops format, such as Logic Pro and GarageBand.
Motion Content
Motion content is included on the Motion Content disc. There are three types of content:Â
Motion Template Content:
A set of professionally designed templates that you can use and customize to suit your needs.
Â
Motion Library Content:
Includes animated vector graphics, backgrounds, and royalty-free still images.
 Motion Sample Media: Includes the content used throughout the Motion User Manual, making it easier to follow along with the examples.
The default location for the Motion content is /Library/Application Support/Final Cut Studio/Motion/.
Note: LiveFonts can be used by both Motion and LiveType. They are installed as part of the LiveFonts and LiveType Media choice in the LiveType section.

11
DVD Studio Pro ContentDVD Studio Pro content is included on the DVD Studio Pro Content disc. The content includes iDVD theme elements and templates and transitions. Â NTSC and PAL Templates: DVD Studio Pro provides templates and transitions for both
SD and HD projects, including all templates and transitions provided with previous DVD Studio Pro releases. You can choose which groups of templates and transitions to install in the Custom Install pane.
 iDVD Theme Elements: DVD Studio Pro 4 can import projects from iDVD 3 and iDVD 4 as long as your system has the iDVD theme elements installed (in addition to having iDVD 3 or iDVD 4 installed).
Important: Projects from other versions of iDVD, including iDVD 5 and iDVD 6, cannot be imported into DVD Studio Pro 4.
Installing iDVD theme elements replaces existing iDVD theme element files. This does not have any impact on the functionality of iDVD; it only enhances functionality by allowing iDVD projects to open in DVD Studio Pro.
The default location for the DVD Studio Pro content is /Library/Application Support/Final Cut Studio/DVD Studio Pro/.
LiveFonts and LiveType MediaThe LiveType Media discs provide LiveFonts, templates, objects, and textures. LiveFonts can be used by both Motion and LiveType.
The default location for the LiveType content is /Library/Application Support/LiveType/.
Installing the ContentThe Final Cut Studio installer includes a Custom Install pane where you can specify the applications and content to install. You can also configure the Custom Install pane to install only selected content items later if you choose not to install them with the applications.
If you use the Final Cut Studio installer to install selected content items later, the process is the same as is described in “Installing Final Cut Studio” on page 4, except you are not required to enter your serial number again.
You can also choose to use the installers included on each content disc if you want to install content for one of the applications.
Note: To install the audio content for Soundtrack Pro using its own installer, begin with Audio Content Disc 1. The installer will prompt you to insert Audio Content Discs 2 and 3 as needed.
12
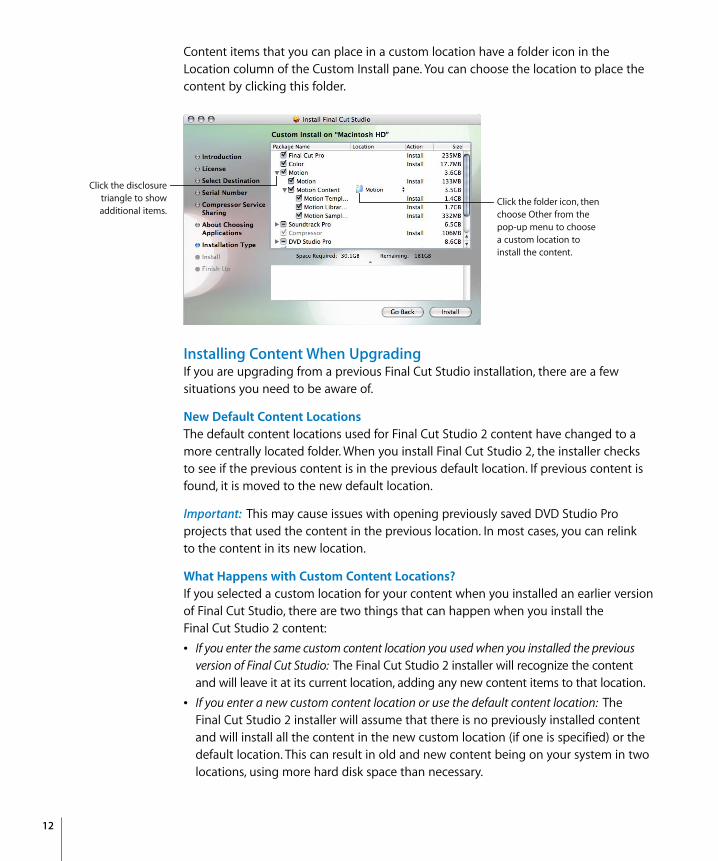
Content items that you can place in a custom location have a folder icon in the Location column of the Custom Install pane. You can choose the location to place the content by clicking this folder.
Installing Content When UpgradingIf you are upgrading from a previous Final Cut Studio installation, there are a few situations you need to be aware of.
New Default Content LocationsThe default content locations used for Final Cut Studio 2 content have changed to a more centrally located folder. When you install Final Cut Studio 2, the installer checks to see if the previous content is in the previous default location. If previous content is found, it is moved to the new default location.
Important: This may cause issues with opening previously saved DVD Studio Pro projects that used the content in the previous location. In most cases, you can relink to the content in its new location.
What Happens with Custom Content Locations?If you selected a custom location for your content when you installed an earlier version of Final Cut Studio, there are two things that can happen when you install the Final Cut Studio 2 content:Â If you enter the same custom content location you used when you installed the previous
version of Final Cut Studio: The Final Cut Studio 2 installer will recognize the content and will leave it at its current location, adding any new content items to that location.
 If you enter a new custom content location or use the default content location: The Final Cut Studio 2 installer will assume that there is no previously installed content and will install all the content in the new custom location (if one is specified) or the default location. This can result in old and new content being on your system in two locations, using more hard disk space than necessary.
Click the folder icon, then choose Other from the pop-up menu to choose a custom location to install the content.
Click the disclosuretriangle to showadditional items.

13
What Happens with Soundtrack Pro Content?If you select a location, either the default location or the previously used custom location, that contains Soundtrack Pro audio content using the AIFF format, that content will remain on your hard disk and only the new surround audio content in the new CAF format will be installed.
Registering Final Cut StudioThe first time you open one of the Final Cut Studio applications, the application prompts you for registration information. By default, the Me card information in your Address Book is automatically entered in the appropriate fields.
To register Final Cut Studio to a user other than the user listed in the Me card in your Address Book:
1 Fill out the Name, Address, Organization, and Email address fields.
2 If you want information about Apple news and software updates sent to your email account, select the checkbox.
3 If you want to review the Apple Privacy Policy, click Privacy Policy.
4 When you have finished, click Register Now.
Final Cut Studio is now registered.
Note: If you decide to click the Register Later button, you will be prompted to register again after opening any of the Final Cut Studio applications five times.
About Onscreen HelpOnscreen help allows you to access information onscreen while you’re working in any of the Final Cut Studio applications. Onscreen user manuals are available here, as well as links to other documentation and related Apple websites.
Onscreen User ManualsOnscreen user manuals for each of the Final Cut Studio applications can be accessed from each application’s Help menu.
To access the onscreen user manual for an application:m In the application, choose the application’s user manual from the Help menu.

14
Release NotesMost of the Final Cut Studio applications have a Release Notes document that contains information about issues with third-party hardware and software and other known issues.
Note: You must be connected to the Internet to download the Release Notes document.
To access Release Notes for an application:m In the application, choose Help > Release Notes.
The latest Release Notes document is downloaded each time you access this menu item.
New FeaturesMost of the Final Cut Studio applications have a New Features document describing features that have been added or enhanced since the last version.
To access the New Features document for an application:m In the application, choose Help > New Features.
About Spotlight and Final Cut Studio DocumentationThe Final Cut Studio 2 installer automatically configures Spotlight to index the Final Cut Studio PDF onscreen help files so they can be included in Spotlight searches.
If you need to reindex your system for Spotlight, you will need to reconfigure the index to include the Final Cut Studio PDF files again. The Extras folder of the Final Cut Studio installation disc includes a utility named Spotlight Importer that you can use to index the Final Cut Studio PDF files again.
To run the Spotlight Importer utility:1 Insert the Final Cut Studio installation disc and locate the Spotlight Importer file in the
Spotlight Importer folder, inside the Extras folder.
2 Double-click the Spotlight Importer file to run the utility.
Note: You should only run this utility if you need to reindex your system for Spotlight.
Contacting AppleCare SupportInformation about the support options available from Apple is included in your Final Cut Studio box. Several levels of support are available.
Whatever your issue, it’s a good idea to have the following information immediately available when you contact Apple for support. The more of this information you have to give to the support agents, the faster they will be able to address your issue. Â The Final Cut Studio Support ID number found on the front of this document.
Note: The 11-digit Support ID number is different from the product serial number used to install Final Cut Studio.
 The version of Mac OS X you have installed. To find the version of Mac OS X, choose Apple menu > About This Mac.
 The version of the application you have installed that you have a question about. To find the version of the application on your computer, choose [Application Name] > About [Application Name] (where “Application Name” is the name of the application).Alternatively, you can Control-click the application’s icon in the Finder and choose Get Info from the shortcut menu.
 The model of computer you are using.  The amount of RAM installed in your computer. You can determine this by choosing
Apple menu > About This Mac. Â What other third-party hardware is connected to or installed in the computer, and
who the manufacturers are. Include hard drives, graphics cards, and so on.
AppleCare Support can be reached online at http://www.apple.com/support. You can select the application to see specific information about it.
There is also an item in each application’s Help menu that will take you directly to the AppleCare website.
To go to the AppleCare website from within an application:m Choose Help > [Application Name] Support.
Copyright © 2007 Apple Inc. All rights reserved.Apple, the Apple logo, DVD Studio Pro, Final Cut, Final Cut Pro, Final Cut Studio, iDVD, LiveType, Logic, Mac, Macintosh, Mac OS, QuickTime, and Soundtrack are trademarks of Apple Inc., registered in the U.S. and other countries. Cinema Tools, Finder, GarageBand, Spotlight, and Tiger are trademarks of Apple Inc. AppleCare is a service mark of Apple Inc., registered in the U.S. and other countries. Intel, Intel Core, and Xeon are trademarks of Intel Corp. in the U.S. and other countries. PowerPC and the PowerPC logo are trademarks of International Business Machines Corporation, used under license therefrom. Other company and product names mentioned herein are trademarks of their respective companies.