installing mysql for use with hrd log and converting … mysql for use with hrd log and converting...
TRANSCRIPT
Installing MySQL for use with HRD log and Converting existing logs to use the MySQL database.
This document has been produced with the assistance of Laurie, VK7ZE who spent considerable hours discovering how to setup MySQL, performing the conversion of his Access log to a MyQSL one and then making it all work across his network. I came along some weeks later and Laurie guided me through the procedure. Other ‘guide notes’ are available, but they are so far out of date that they were almost useless. Because so many steps were involved, I thought others might benefit from this updated information so here ‘tis, step by step, with pictures.
John VK7XX UPDATE 21 August 2013 de W4RP I recently purchased HRD and wanted to access the log from my laptop and have it synchronized with my main computer. The method described here accomplishes that. However, I found that this article was written several years ago, and the versions of mysql , etc. have changed, and some of the options have changed. I have successfully installed mysql as the HRD database and do access it remotely by following these instructions AS UPDATED. I have installed this successfully on windows 7 64bit and Windows 8 64 bit, BUT bear in mind, we will be using the 32 bit applications of MySQL as HRD is a 32bit application. Rick W4RP 21-Aug-2013 -------------------------------------------------------------------------------------------------------------------------------------------------------------
The following applies to computers running Windows 7 and Windows 8. Other versions of Windows and other operating systems may vary from what is shown here. You are going to need 3 packages. At the time of writing, (August 21, 2013) all the packages were available for download from http://www.mysql.com/downloads/ . A couple of notes. ORACLE now owns MySQL and you must register at the site in order to download the software. Registration is free and a pain, but do it, and you can download everything just fine. If you follow the link above, it will take you to the download page. Go to the bottom of the page where it says “MySQL Community Edition (GPL)” and click the link: Download from MySQL Developer Zone » That page will give you several paragraphs of software packages to download. You will need to download three (3) different packages:
1) MySQL Community Server (GPL)
(Current Generally Available Release: 5.6.13) MySQL Community Server is the world's most
popular open source database. DOWNLOAD
There are 3 options to download. Download the first one labeled “Windows (x86, 64-bit), MySQL Installer MSI”. Don’t worry about the 64-bit – clicking the link will take you to the 32
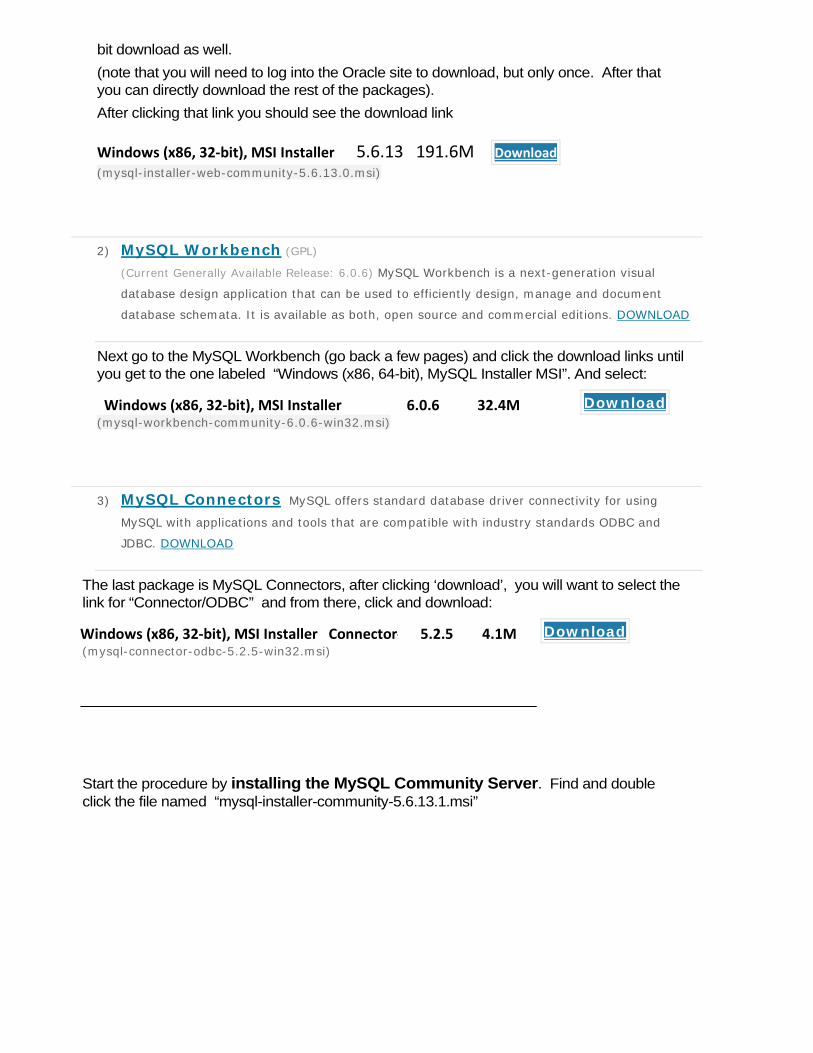
bit download as well. (note that you will need to log into the Oracle site to download, but only once. After that you can directly download the rest of the packages). After clicking that link you should see the download link Windows (x86, 32-bit), MSI Installer 5.6.13 191.6M Download (mysql-installer-web-community-5.6.13.0.msi)
2) MySQL Workbench (GPL)
(Current Generally Available Release: 6.0.6) MySQL Workbench is a next-generation visual
database design application that can be used to efficiently design, manage and document
database schemata. It is available as both, open source and commercial editions. DOWNLOAD
Next go to the MySQL Workbench (go back a few pages) and click the download links until you get to the one labeled “Windows (x86, 64-bit), MySQL Installer MSI”. And select:
Windows (x86, 32-bit), MSI Installer 6.0.6 32.4M Download
(mysql-workbench-community-6.0.6-win32.msi)
3) MySQL Connectors MySQL offers standard database driver connectivity for using
MySQL with applications and tools that are compatible with industry standards ODBC and
JDBC. DOWNLOAD
The last package is MySQL Connectors, after clicking ‘download’, you will want to select the link for “Connector/ODBC” and from there, click and download:
Windows (x86, 32-bit), MSI Installer Connector- 5.2.5 4.1M Download
(mysql-connector-odbc-5.2.5-win32.msi)
Start the procedure by installing the MySQL Community Server. Find and double click the file named “mysql-installer-community-5.6.13.1.msi”

Click the first line “Install MySQL Products” , go through the license screens and accept, the next screen, you can select the box at the bottom for ‘skip the check for updates’ since you just downloaded it from their site, and click ‘Execute’. And you will get the MySQL Installer screen:
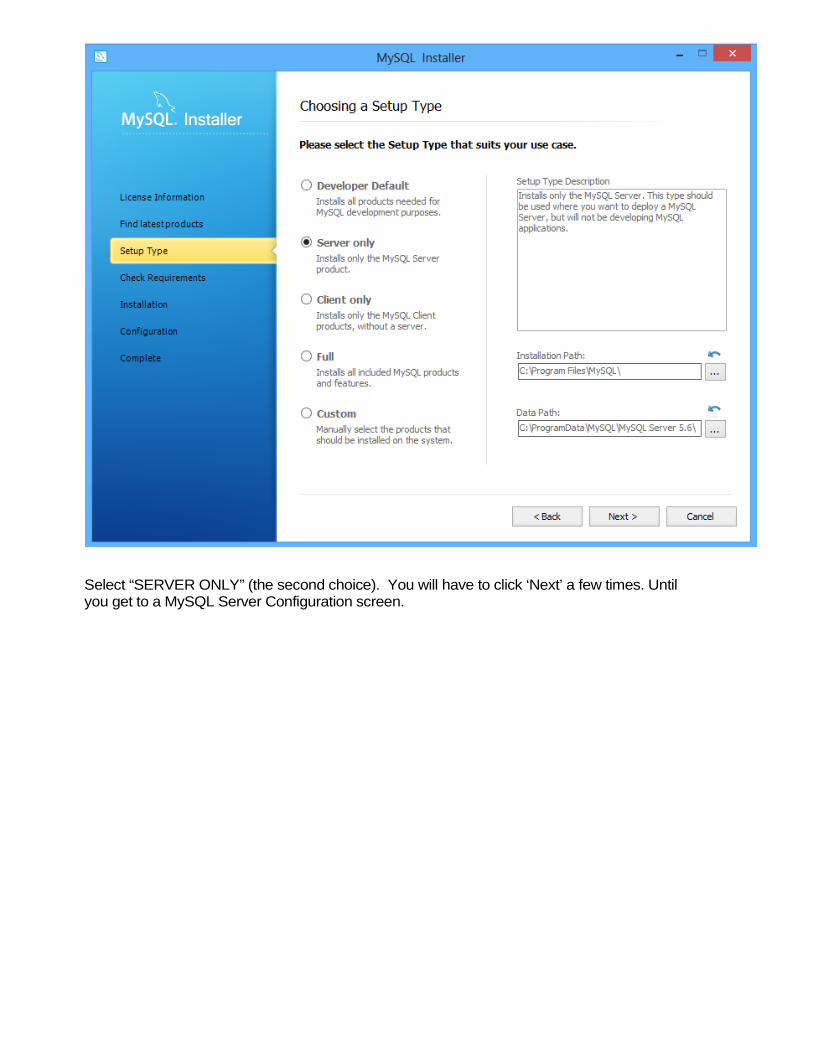
Select “SERVER ONLY” (the second choice). You will have to click ‘Next’ a few times. Until you get to a MySQL Server Configuration screen.
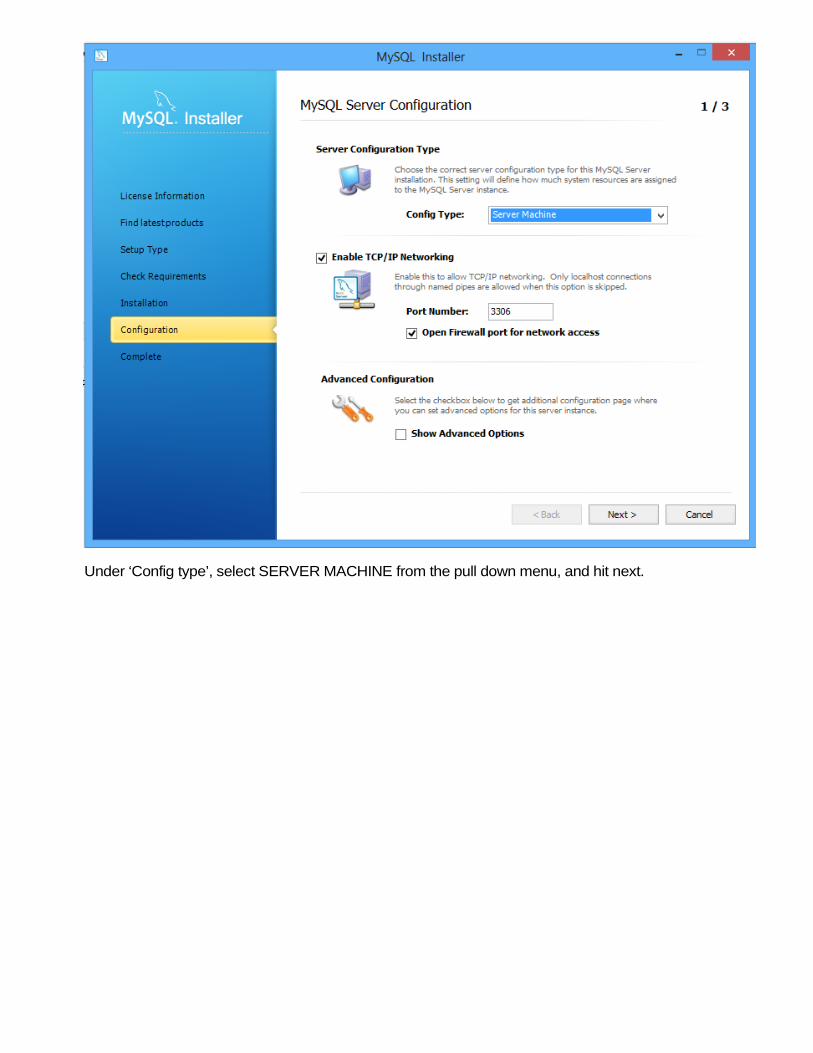
Under ‘Config type’, select SERVER MACHINE from the pull down menu, and hit next.
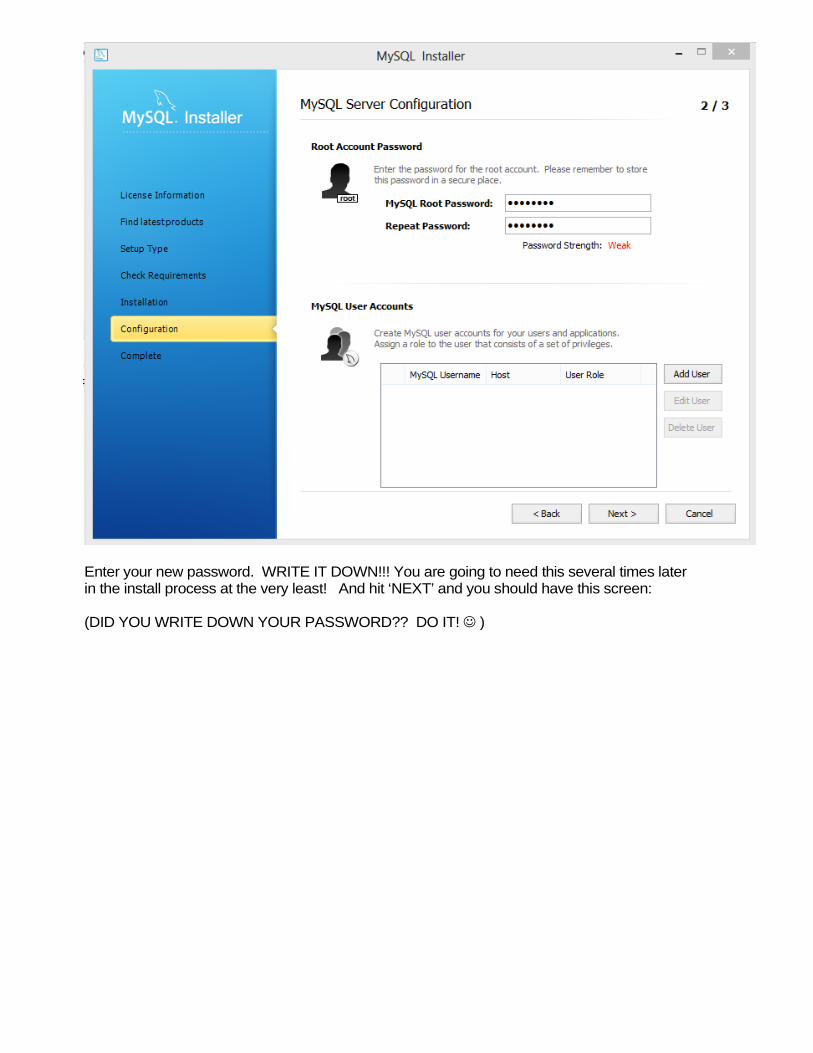
Enter your new password. WRITE IT DOWN!!! You are going to need this several times later in the install process at the very least! And hit ‘NEXT’ and you should have this screen: (DID YOU WRITE DOWN YOUR PASSWORD?? DO IT! )
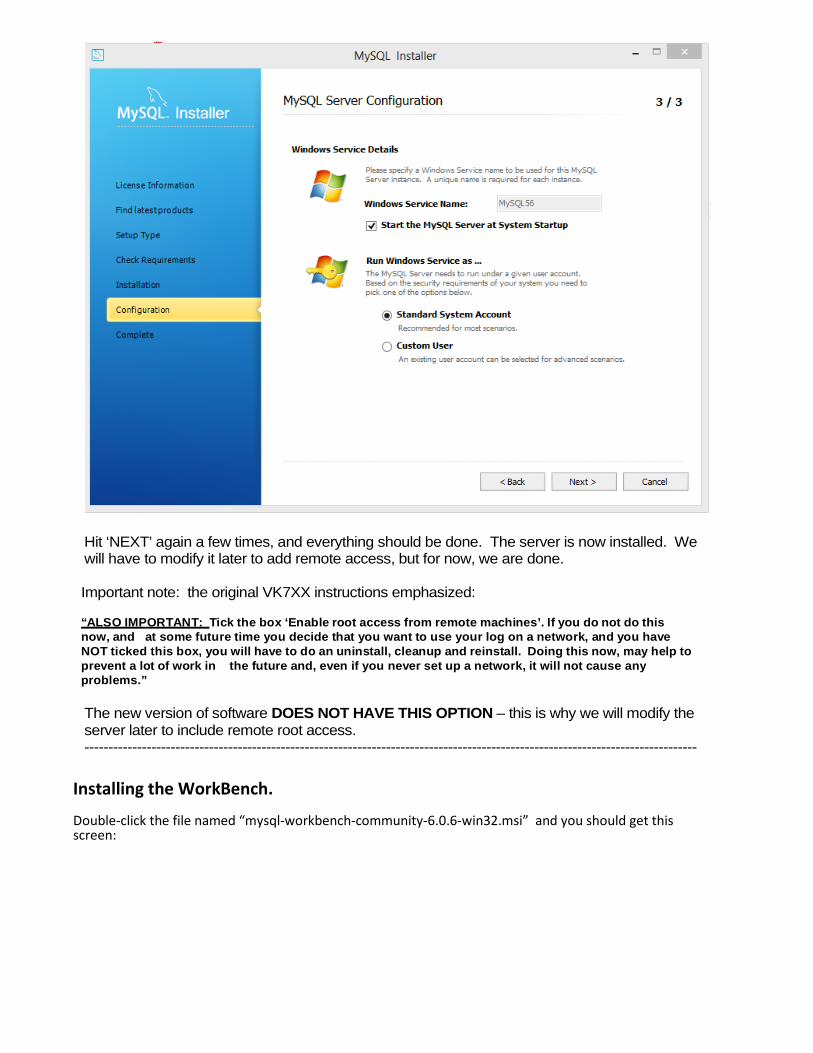
Hit ‘NEXT’ again a few times, and everything should be done. The server is now installed. We will have to modify it later to add remote access, but for now, we are done. Important note: the original VK7XX instructions emphasized:
“ALSO IMPORTANT: Tick the box ‘Enable root access from remote machines’. If you do not do this now, and at some future time you decide that you want to use your log on a network, and you have NOT ticked this box, you will have to do an uninstall, cleanup and reinstall. Doing this now, may help to prevent a lot of work in the future and, even if you never set up a network, it will not cause any problems.” The new version of software DOES NOT HAVE THIS OPTION – this is why we will modify the server later to include remote root access. --------------------------------------------------------------------------------------------------------------------------------
Installing the WorkBench. Double-click the file named “mysql-workbench-community-6.0.6-win32.msi” and you should get this screen:
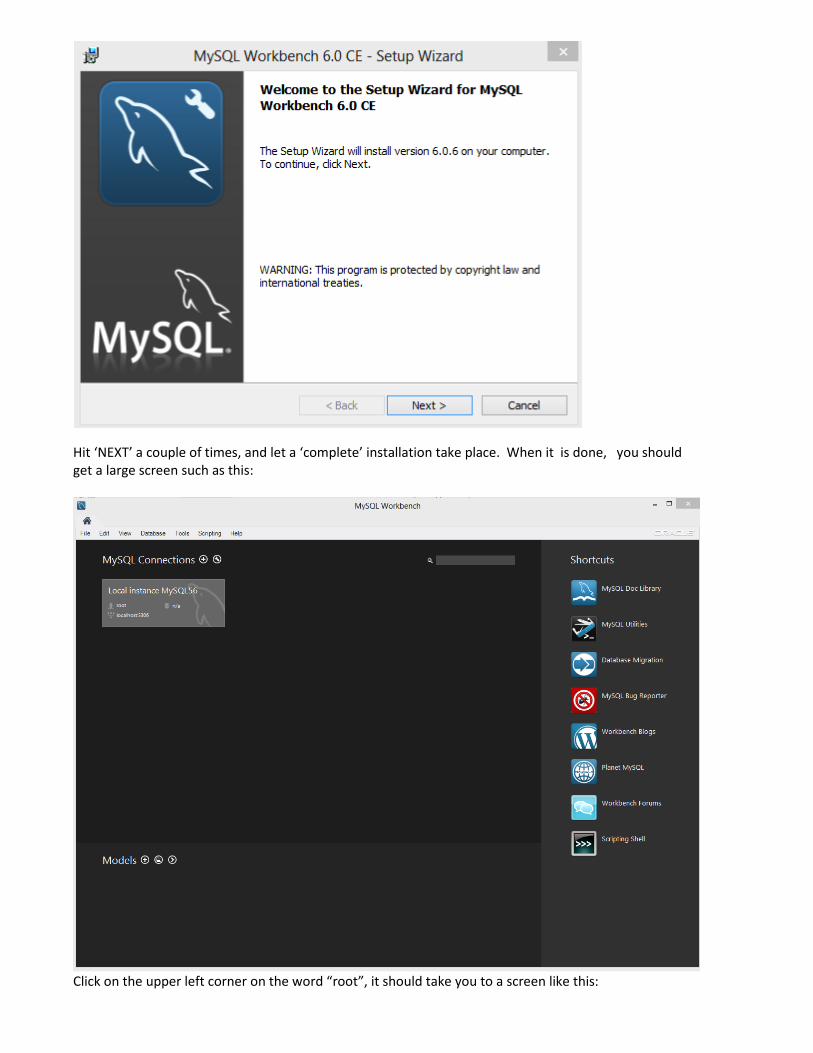
Hit ‘NEXT’ a couple of times, and let a ‘complete’ installation take place. When it is done, you should get a large screen such as this:
Click on the upper left corner on the word “root”, it should take you to a screen like this:

If you got this far, you are doing great. If not, I would advise you to go back and start again. OK – now click the ‘barrel’ with the plus sign. This is at the top of the page, the bottom tool bar.
I have the bar blown up here – there are two pages with ‘SQL’ on the top, then two disk drive icons (or barrels) , click the one with the plus (+) sign on the lower left. This is the 4th icon from the left. You should get a screen like this:

We will want to enter something in the box shown below:
Replace ‘new schema” with : hrd_sql_log

And click “Apply” NOTE: VK7XX says “enter a meaningful name for your logbook database and WRITE THIS DOWN as you will need the name in a later step. I also suggest that you choose a name that is in no way similar to any existing logs (databases) to avoid any later confusion. “ I choose to use his: “hrd_sql_log” because it makes it easy to follow his instructions. So that is what I named my schema. But you can use anything you want so long as you WRITE IT DOWN because it will be needed several times.
A “Review” screen will open. Click the ‘Apply’ button on this screen. When that process concludes, click ‘Finish’.
The “new schema” window will now show (bottom of its screen) that ‘Changes have been applied’ .
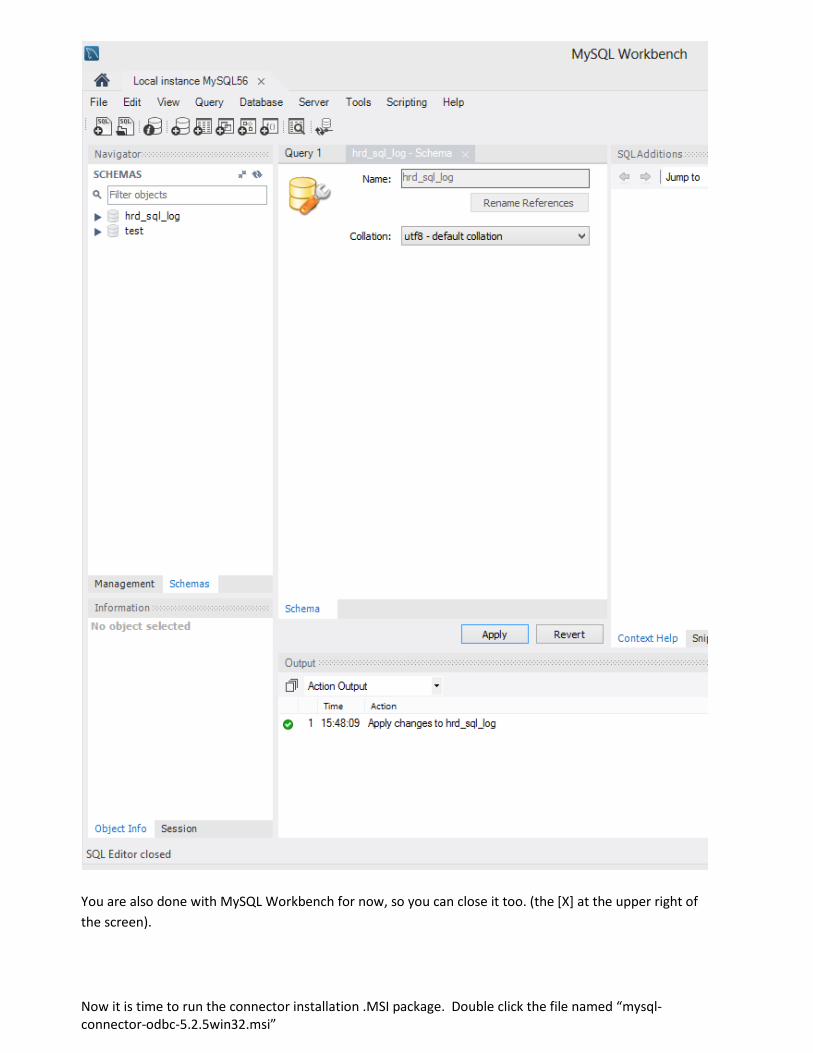
You are also done with MySQL Workbench for now, so you can close it too. (the [X] at the upper right of the screen).
Now it is time to run the connector installation .MSI package. Double click the file named “mysql-connector-odbc-5.2.5win32.msi”
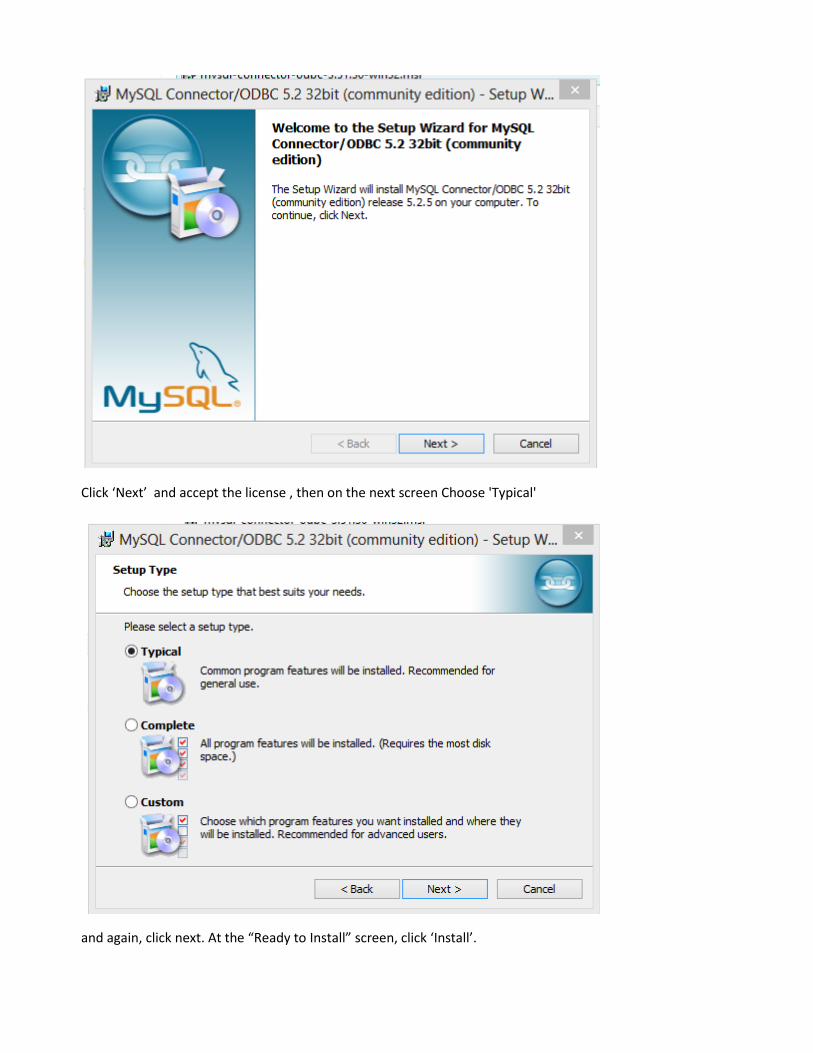
Click ‘Next’ and accept the license , then on the next screen Choose 'Typical'
and again, click next. At the “Ready to Install” screen, click ‘Install’.
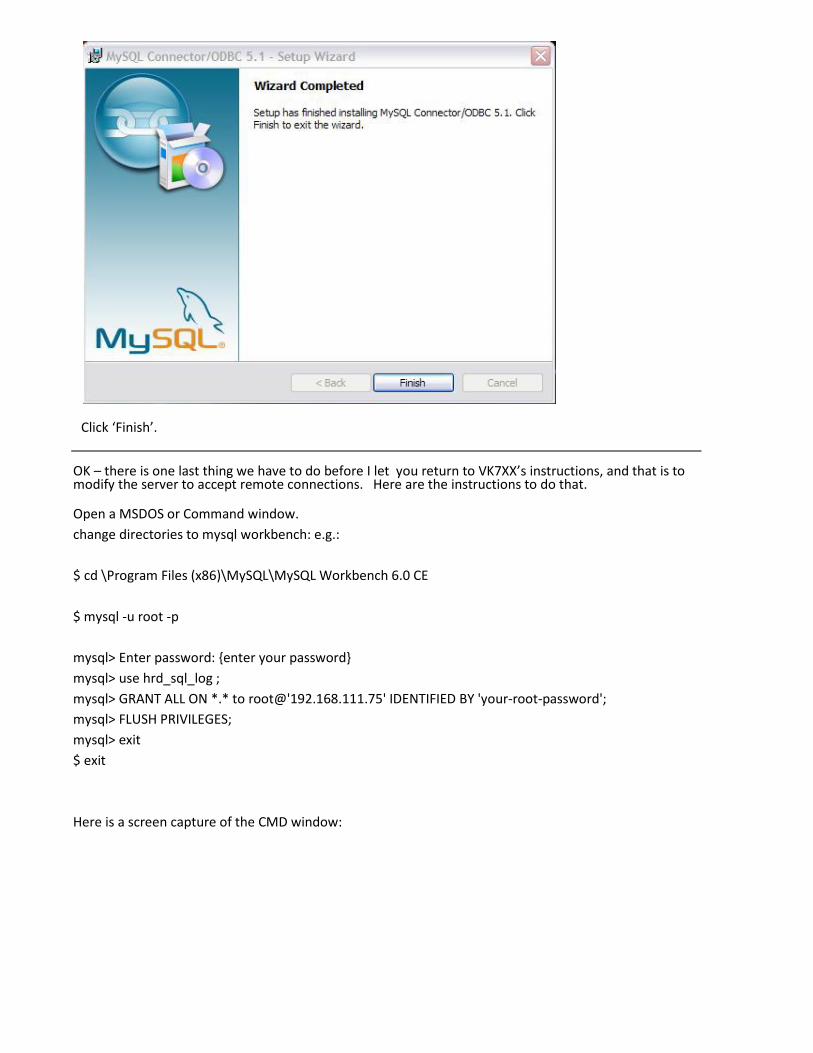
Click ‘Finish’.
OK – there is one last thing we have to do before I let you return to VK7XX’s instructions, and that is to modify the server to accept remote connections. Here are the instructions to do that. Open a MSDOS or Command window. change directories to mysql workbench: e.g.: $ cd \Program Files (x86)\MySQL\MySQL Workbench 6.0 CE $ mysql -u root -p mysql> Enter password: {enter your password} mysql> use hrd_sql_log ; mysql> GRANT ALL ON *.* to root@'192.168.111.75' IDENTIFIED BY 'your-root-password'; mysql> FLUSH PRIVILEGES; mysql> exit $ exit Here is a screen capture of the CMD window:
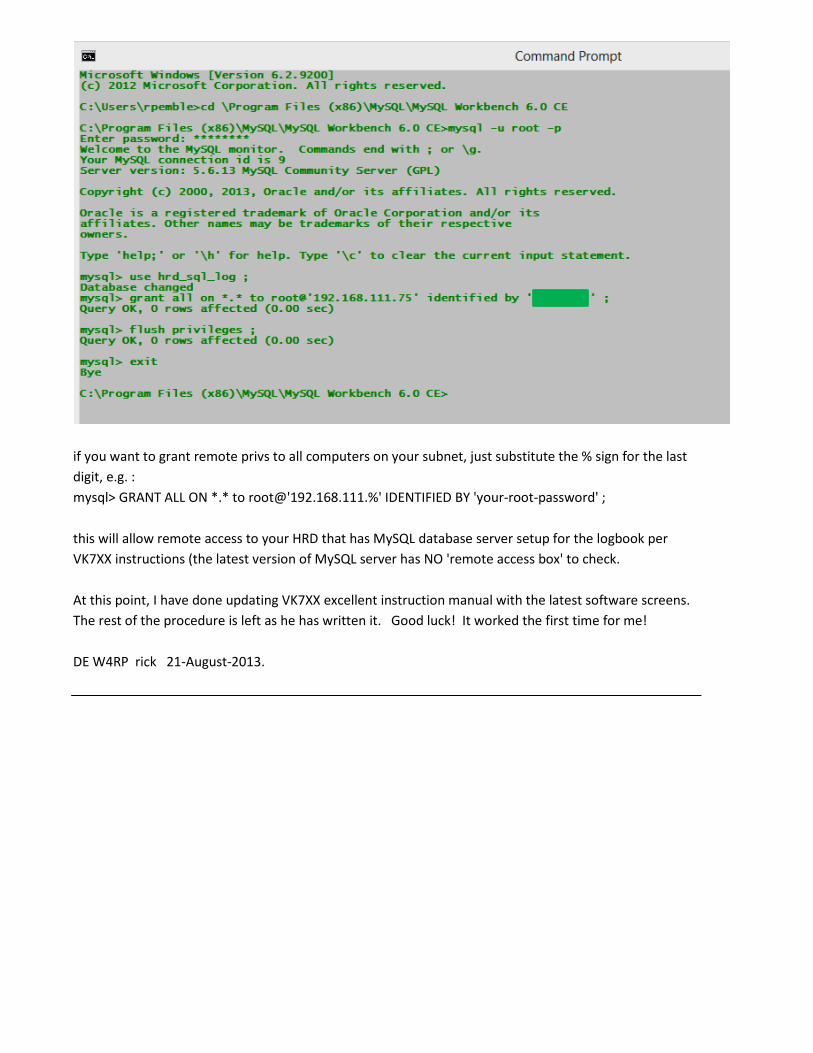
if you want to grant remote privs to all computers on your subnet, just substitute the % sign for the last digit, e.g. : mysql> GRANT ALL ON *.* to root@'192.168.111.%' IDENTIFIED BY 'your-root-password' ; this will allow remote access to your HRD that has MySQL database server setup for the logbook per VK7XX instructions (the latest version of MySQL server has NO 'remote access box' to check. At this point, I have done updating VK7XX excellent instruction manual with the latest software screens. The rest of the procedure is left as he has written it. Good luck! It worked the first time for me! DE W4RP rick 21-August-2013.
That’s all the installations completed. Now to get things working within HRDlog.
Open HRD and then HRDlog.
This next step is only required if you are going to convert your existing ‘Access’ database log file to the ‘MySQL’ database.
If you are NOT converting an existing log, scroll down to the next section, marked by two red stars (**)
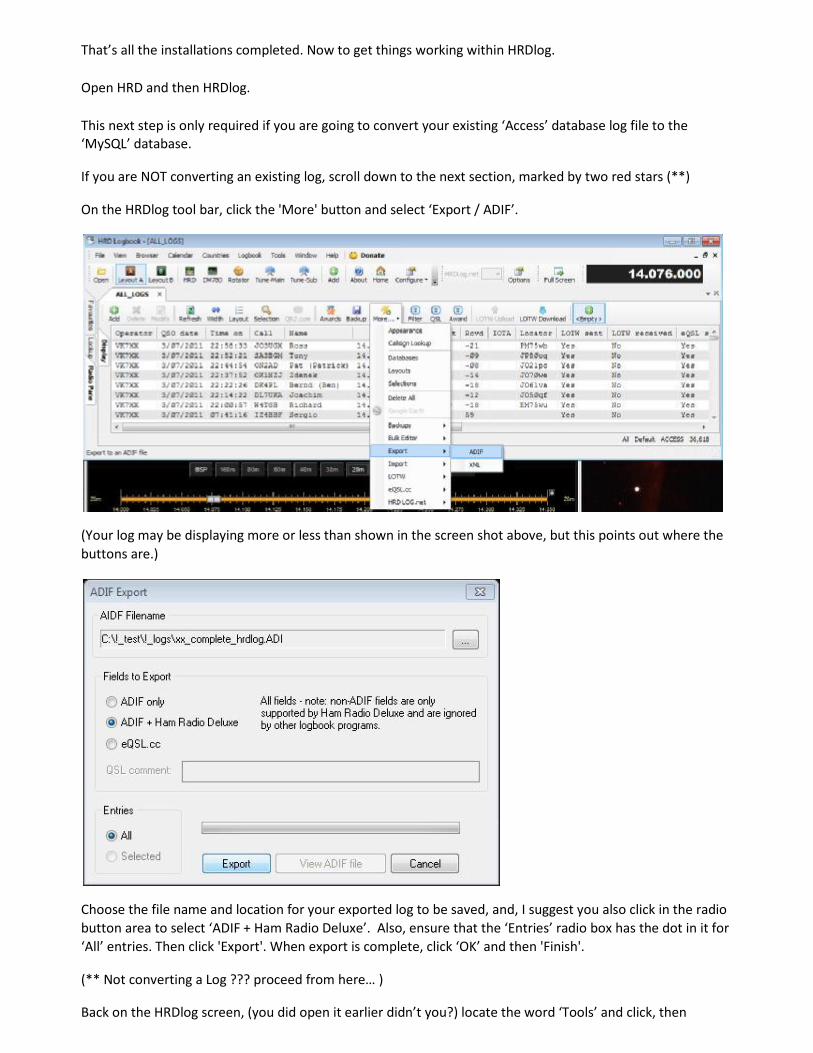
On the HRDlog tool bar, click the 'More' button and select ‘Export / ADIF’.
(Your log may be displaying more or less than shown in the screen shot above, but this points out where the buttons are.)
Choose the file name and location for your exported log to be saved, and, I suggest you also click in the radio button area to select ‘ADIF + Ham Radio Deluxe’. Also, ensure that the ‘Entries’ radio box has the dot in it for ‘All’ entries. Then click 'Export'. When export is complete, click ‘OK’ and then 'Finish'.
(** Not converting a Log ??? proceed from here… )
Back on the HRDlog screen, (you did open it earlier didn’t you?) locate the word ‘Tools’ and click, then
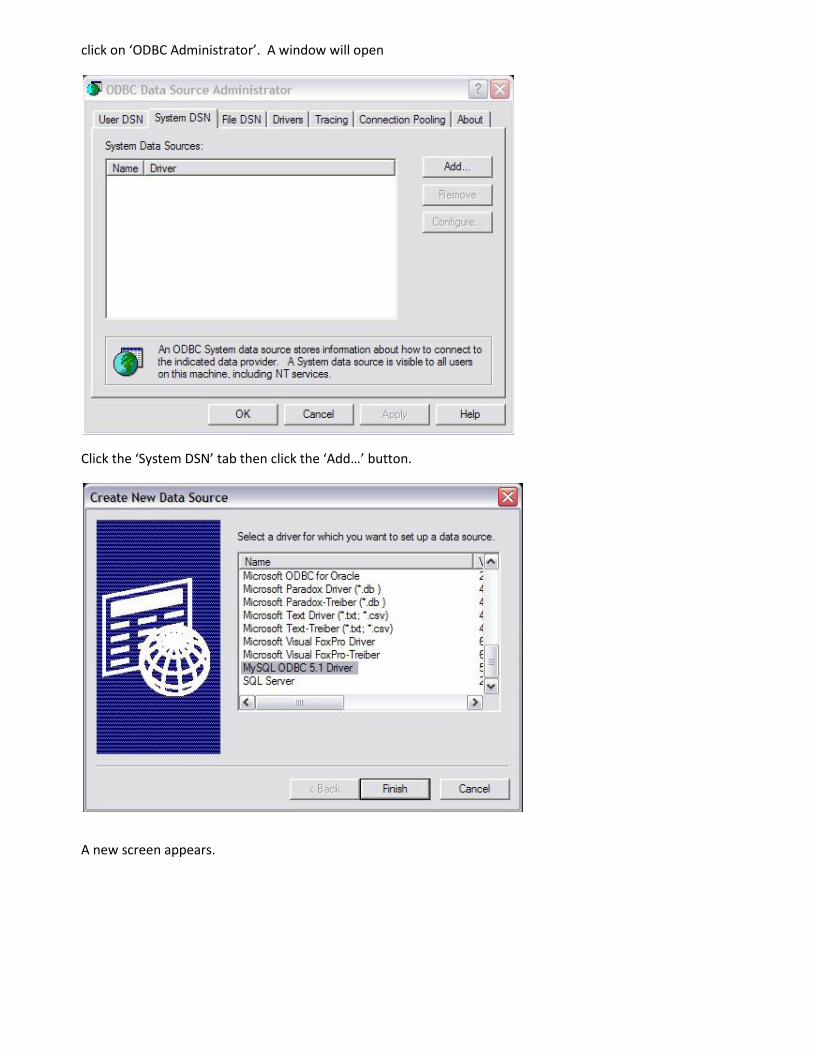
click on ‘ODBC Administrator’. A window will open
Click the ‘System DSN’ tab then click the ‘Add…’ button.
A new screen appears.
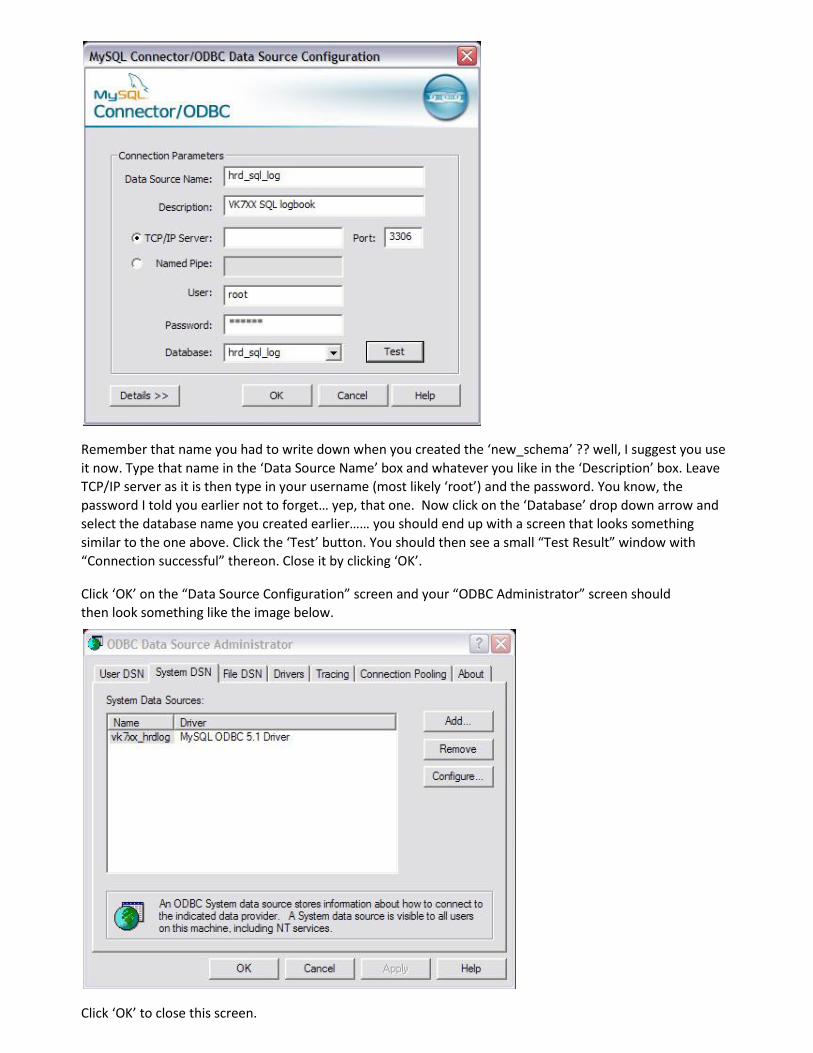
Remember that name you had to write down when you created the ‘new_schema’ ?? well, I suggest you use it now. Type that name in the ‘Data Source Name’ box and whatever you like in the ‘Description’ box. Leave TCP/IP server as it is then type in your username (most likely ‘root’) and the password. You know, the password I told you earlier not to forget… yep, that one. Now click on the ‘Database’ drop down arrow and select the database name you created earlier…… you should end up with a screen that looks something similar to the one above. Click the ‘Test’ button. You should then see a small “Test Result” window with “Connection successful” thereon. Close it by clicking ‘OK’.
Click ‘OK’ on the “Data Source Configuration” screen and your “ODBC Administrator” screen should then look something like the image below.
Click ‘OK’ to close this screen.
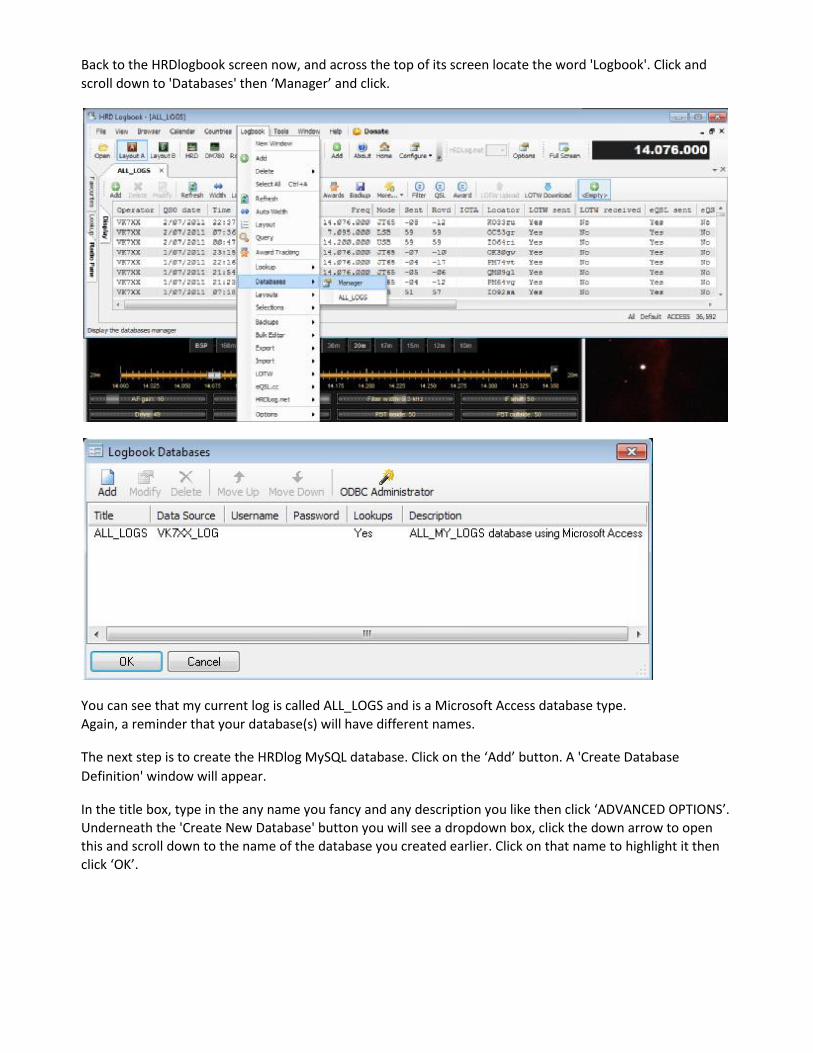
Back to the HRDlogbook screen now, and across the top of its screen locate the word 'Logbook'. Click and scroll down to 'Databases' then ‘Manager’ and click.
You can see that my current log is called ALL_LOGS and is a Microsoft Access database type. Again, a reminder that your database(s) will have different names.
The next step is to create the HRDlog MySQL database. Click on the ‘Add’ button. A 'Create Database Definition' window will appear.
In the title box, type in the any name you fancy and any description you like then click ‘ADVANCED OPTIONS’. Underneath the 'Create New Database' button you will see a dropdown box, click the down arrow to open this and scroll down to the name of the database you created earlier. Click on that name to highlight it then click ‘OK’.

You will see that this database now appears in the list. Click on the new database name to highlight it, then click the Move Up button as many times as required to move it to the top of the list. The top most database in the list is the one that opens by default when HRDlog is started.
Then click ‘OK’ to close.
Go back to the word Logbook, scroll down to databases and click the name of your new logbook.
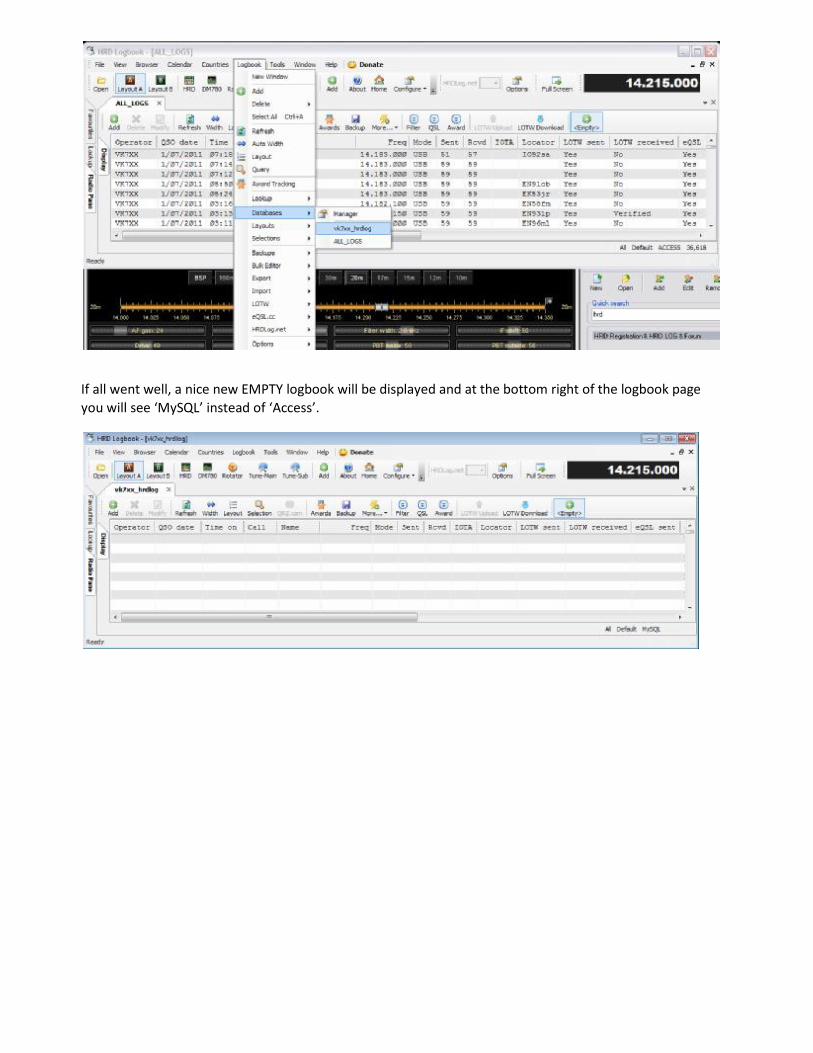
If all went well, a nice new EMPTY logbook will be displayed and at the bottom right of the logbook page you will see ‘MySQL’ instead of ‘Access’.

If you are performing a conversion, it is just a matter of now importing the ADI file you exported in the first step... When import completes, click ‘Save to Database’, and you are done….
That’s it. All done.
73 John VK7XX