installing vault and locator - john j. jacobs · parametric technology corporation installing vault...
TRANSCRIPT
Parametric Technology Corporation
Installing Vault and Locator
Optegra® Release 7
DOC-GI60086-EN-070

Copyright © 2002 Parametric Technology Corporation. All Rights Reserved.User and training documentation from Parametric Technology Corporation (PTC) is subject to thecopyright laws of the United States and other countries and is provided under a license agreementthat restricts copying, disclosure, and use of such documentation. PTC hereby grants to the licenseduser the right to make copies in printed form of this documentation if provided on software media,but only for internal/personal use and in accordance with the license agreement under which theapplicable software is licensed. Any copy made shall include the PTC copyright notice and any otherproprietary notice provided by PTC. This documentation may not be disclosed, transferred, modified,or reduced to any form, including electronic media, or transmitted or made publicly available by anymeans without the prior written consent of PTC and no authorization is granted to make copies forsuch purposes.
Information described herein is furnished for general information only, is subject to change withoutnotice, and should not be construed as a warranty or commitment by PTC. PTC assumes noresponsibility or liability for any errors or inaccuracies that may appear in this document.
The software described in this document is provided under written license agreement, containsvaluable trade secrets and proprietary information, and is protected by the copyright laws of theUnited States and other countries. It may not be copied or distributed in any form or medium,disclosed to third parties, or used in any manner not provided for in the software licenses agreementexcept with written prior approval from PTC. UNAUTHORIZED USE OF SOFTWARE OR ITSDOCUMENTATION CAN RESULT IN CIVIL DAMAGES AND CRIMINAL PROSECUTION.
Registered Trademarks of Parametric Technology Corporation or a SubsidiaryAdvanced Surface Design, CADDS, Computervision, Computervision Services,Electronic Product Definition, EPD, EPD.Connect, Expert Machinist, Flexible Engineering,HARNESSDESIGN, Info*Engine, InPart, Optegra, Parametric Technology,Parametric Technology Corporation, PHOTORENDER, Pro/DESKTOP, Pro/E, Pro/ENGINEER,Pro/HELP, Pro/INTRALINK, Pro/MECHANICA, Pro/TOOLKIT, PTC, PT/Products,Shaping Innovation, and Windchill.
Trademarks of Parametric Technology Corporation or a Subsidiary3DPAINT, Associative Topology Bus, Behavioral Modeling, CDRS, CounterPart,Create Collaborate Control, CV, CVact, CVaec, CVdesign, CV-DORS, CVMAC, CVNC,CVToolmaker, DataDoctor, DesignSuite, DIMENSION III, DIVISION, DVS, DVSAFEWORK, EDE,e/ENGINEER, Electrical Design Entry, EMX, eNC Explorer, Expert MoldBase, Expert Toolmaker,GRANITE, ISSM, KDiP, Knowledge Discipline in Practice, Knowledge System Driver, ModelCHECK,MoldShop, NC Builder, PartSpeak, Pro/ANIMATE, Pro/ASSEMBLY, Pro/CABLING, Pro/CASTING,Pro/CDT, Pro/CMM, Pro/COLLABORATE, Pro/COMPOSITE, Pro/CONCEPT, Pro/CONVERT,Pro/DATA for PDGS, Pro/DESIGNER, Pro/DETAIL, Pro/DIAGRAM, Pro/DIEFACE, Pro/DRAW,Pro/ECAD, Pro/ENGINE, Pro/FEATURE, Pro/FEM-POST, Pro/FICIENCY, Pro/FLY-THROUGH,Pro/HARNESS, Pro/INTERFACE, Pro/LANGUAGE, Pro/LEGACY, Pro/LIBRARYACCESS,Pro/MESH, Pro/Model.View, Pro/MOLDESIGN, Pro/NC-ADVANCED, Pro/NC-CHECK,Pro/NC-MILL, Pro/NCPOST, Pro/NC-SHEETMETAL, Pro/NC-TURN, Pro/NC-WEDM,Pro/NC-Wire EDM, Pro/NETWORK ANIMATOR, Pro/NOTEBOOK, Pro/PDM, Pro/PHOTORENDER,Pro/PIPING, Pro/PLASTIC ADVISOR, Pro/PLOT, Pro/POWER DESIGN, Pro/PROCESS,Pro/REPORT, Pro/REVIEW, Pro/SCAN-TOOLS, Pro/SHEETMETAL, Pro/SURFACE, Pro/VERIFY,Pro/Web.Link, Pro/Web.Publish, Pro/WELDING, Product Development Means Business,Product First, Products First, ProductView, PTC Precision, Shrinkwrap,The Product Development Company, The Way to Product First, Wildfire,Windchill DynamicDesignLink, Windchill PartsLink, Windchill PDMLink, Windchill ProjectLink, andWindchill SupplyLink.

Third-Party TrademarksAdobe is a registered trademark of Adobe Systems. Advanced ClusterProven, ClusterProven, andthe ClusterProven design are trademarks or registered trademarks of International BusinessMachines Corporation in the United States and other countries and are used under license.IBM Corporation does not warrant and is not responsible for the operation of this software product.AIX is a registered trademark of IBM Corporation. Allegro, Cadence, and Concept are registeredtrademarks of Cadence Design Systems, Inc. AutoCAD is a registered trademark of Autodesk, Inc.Baan is a registered trademark of Baan Company. CADAM and CATIA are registered trademarks ofDassault Systemes. COACH is a trademark of CADTRAIN, Inc. DOORS is a registered trademark ofTelelogic AB. FLEXlm is a registered trademark of GLOBEtrotter Software, Inc. Geomagic is aregistered trademark of Raindrop Geomagic, Inc. EVERSYNC, GROOVE, GROOVEFEST,GROOVE.NET, GROOVE NETWORKS, iGROOVE, PEERWARE, and the interlocking circles logoare trademarks of Groove Networks, Inc. Helix is a trademark of Microcadam, Inc. HOOPS is atrademark of Tech Soft America, Inc. HP-UX is a registered trademark and Tru64 is a trademark ofthe Hewlett-Packard Company. I-DEAS, Metaphase, Parasolid, SHERPA, Solid Edge, andUnigraphics are trademarks or registered trademarks of Electronic Data Systems Corporation(EDS). InstallShield is a registered trademark and service mark of InstallShield Software Corporationin the United States and/or other countries. Intel is a registered trademark of Intel Corporation. IRIXis a registered trademark of Silicon Graphics, Inc. MatrixOne is a trademark of MatrixOne, Inc.Mentor Graphics and Board Station are registered trademarks and 3D Design, AMPLE, andDesign Manager are trademarks of Mentor Graphics Corporation. Netscape and the Netscape N andShip’s Wheel logos are registered trademarks of Netscape Communications Corporation in the U.S.and other countries. Oracle is a registered trademark of Oracle Corporation. OrbixWeb is aregistered trademark of IONA Technologies PLC. PDGS is a registered trademark ofFord Motor Company. RAND is a trademark of RAND Worldwide. Rational Rose is a registeredtrademark of Rational Software Corporation. RetrievalWare is a registered trademark of ConveraCorporation. RosettaNet is a trademark and Partner Interface Process and PIP are registeredtrademarks of "RosettaNet," a non-profit organization. SAP and R/3 are registered trademarks ofSAP AG Germany. SolidWorks is a registered trademark of SolidWorks Corporation. All SPARCtrademarks are used under license and are trademarks or registered trademarks of SPARCInternational, Inc. in the United States and in other countries. Products bearing SPARC trademarksare based upon an architecture developed by Sun Microsystems, Inc. STHENO is a trademark ofCAD Schroer GmbH. Sun, Sun Microsystems, the Sun logo, Solaris, UltraSPARC, Java and all Javabased marks, and "The Network is the Computer" are trademarks or registered trademarks of SunMicrosystems, Inc. in the United States and in other countries. VisTools is a trademark of VisualKinematics, Inc. (VKI). VisualCafé is a trademark of WebGain, Inc. WebEx is a trademark of WebExCommunications, Inc. Microsoft, Windows, Windows NT, Visual Basic, and the Visual Basic logo areregistered trademarks of Microsoft Corporation in the United States and/or other countries.
Licensed Third-Party Technology InformationCertain PTC software products contain licensed third-party technology: Rational Rose 2000E iscopyrighted software of Rational Software Corporation. RetrievalWare is copyrighted software ofConvera Corporation. VisualCafé is copyrighted software of WebGain, Inc. VisTools library iscopyrighted software of Visual Kinematics, Inc. (VKI) containing confidential trade secret informationbelonging to VKI. HOOPS graphics system is a proprietary software product of, and is copyrightedby, Tech Soft America, Inc. G-POST is copyrighted software and a registered trademark of Intercim.VERICUT is copyrighted software and a registered trademark of CGTech. Pro/PLASTIC ADVISORis powered by Moldflow technology. Moldflow is a registered trademark of Moldflow Corporation. TheJPEG image output in the Pro/Web.Publish module is based in part on the work of the independentJPEG Group. DFORMD.DLL is copyrighted software from Compaq Computer Corporation and maynot be distributed. METIS, developed by George Karypis and Vipin Kumar at the University ofMinnesota, can be researched at http://www.cs.umn.edu/~karypis/metis. METIS is © 1997 Regents
of the University of Minnesota. LightWork Libraries are copyrighted by LightWork Design 1990-2001.Visual Basic for Applications and Internet Explorer is copyrighted software of Microsoft Corporation.Adobe Acrobat Reader is copyrighted software of Adobe Systems. Parasolid © Electronic DataSystems Corporation (EDS). Windchill Info*Engine Server contains IBM XML Parser for Java Editionand the IBM Lotus XSL Edition. Pop-up calendar components Copyright © 1998 NetscapeCommunications Corporation. All Rights Reserved. TECHNOMATIX is copyrighted software andcontains proprietary information of Technomatix Technologies Ltd. Apache Server, Tomcat, Xalan,and Xerces are technologies developed by, and are copyrighted software of, the Apache SoftwareFoundation (http://www.apache.org/) – their use is subject to the terms and limitations at:http://www.apache.org/LICENSE.txt. UnZip (© 1990-2001 Info-ZIP, All Rights Reserved) is provided"AS IS" and WITHOUT WARRANTY OF ANY KIND. For the complete Info-ZIP license seeftp://ftp.info-zip.org/pub/infozip/license.html. Gecko and Mozilla components are subject to theMozilla Public License Version 1.1 at http://www.mozilla.org/MPL/. Software distributed under theMPL is distributed on an "AS IS" basis, WITHOUT WARRANTY OF ANY KIND, either express orimplied. See the MPL for the specific language governing rights and limitations. Technology"Powered by Groove" is provided by Groove Networks, Inc. Technology "Powered by WebEx" isprovided by WebEx Communications, Inc. Acrobat Reader is Copyright © 1998 Adobe Systems Inc.Oracle 8i run-time, Copyright © 2000 Oracle Corporation. The JavaTM Telnet Applet(StatusPeer.java, TelnetIO.java, TelnetWrapper.java, TimedOutException.java), Copyright © 1996,97 Mattias L. Jugel, Marcus Meißner, is redistributed under the GNU General Public License. Thislicense is from the original copyright holder and the Applet is provided WITHOUT WARRANTY OFANY KIND. You may obtain a copy of the source code for the Applet at http://www.mud.de/se/jta (fora charge of no more than the cost of physically performing the source distribution), by sending ane-mail to [email protected] or [email protected]—you are allowed to choose either distribution method.The source code is likewise provided under the GNU General Public License.GTK+The GIMP Toolkit are licensed under the GNU LPGL. You may obtain a copy of the sourcecode at http://www.gtk.org/, which is likewise provided under the GNU LPGL.
UNITED STATES GOVERNMENT RESTRICTED RIGHTS LEGENDThis document and the software described herein are Commercial Computer Documentation andSoftware, pursuant to FAR 12.212(a)-(b) (OCT’95) or DFARS 227.7202-1(a) and 227.7202-3(a)(JUN’95), is provided to the US Government under a limited commercial license only. Forprocurements predating the above clauses, use, duplication, or disclosure by the Government issubject to the restrictions set forth in subparagraph (c)(1)(ii) of the Rights in Technical Data andComputer Software Clause at DFARS 252.227-7013 (OCT’88) or Commercial ComputerSoftware-Restricted Rights at FAR 52.227-19(c)(1)-(2) (JUN’87), as applicable. 110102
Parametric Technology Corporation, 140 Kendrick Street, Needham, MA 02494 USA

Installing Vault and Locator Contents-v
Table of Contents
PrefaceRelated Documents ______________________________________ xviiBook Conventions ________________________________________ xviiiOnline User Documentation________________________________ xixPrinting Documentation ___________________________________ xxResources and Services ____________________________________ xxDocumentation Comments ________________________________ xx
Preparing to Install Vault Software on UNIXPreinstallation Steps for Configuration _____________________________ 1-2
New Installations ______________________________________________ 1-2
Refreshing Previous Releases of Vault to the Current Release ____ 1-3
Determining Disk Space Requirements_____________________________ 1-4
Allocating Directories on Disk Drives _______________________________ 1-4
Planning for Vault Storage Pools __________________________________ 1-6
Storage Pool Description ______________________________________ 1-6
Creating Vault Storage Pools _____________________________________ 1-6
Creating Local Storage Pools __________________________________ 1-7
Creating NFS-mounted Storage Pools __________________________ 1-7
Planning for Oracle Tablespaces _________________________________ 1-7

Contents
Contents-vi Installing Vault and Locator
Tablespaces in One Directory _________________________________ 1-8
Tablespaces in Two Directories ________________________________ 1-8
Using the Vault Checklist and Worksheet __________________________ 1-8
Installation Input Worksheet___________________________________ 1-8
Preinstallation Checklist_______________________________________ 1-9Additional Tasks for Existing Vault Sites ____________________ 1-10
Installing Vault Software on UNIXAddressing Oracle Requirements _________________________________ 2-2
Comparing the Contents of .ora Files__________________________ 2-2
Using an Existing Oracle Database ____________________________ 2-2
Increasing the Maximum Datafiles ____________________________ 2-4Determine the Parameter Value ___________________________ 2-4Export the Database and Remove Files ____________________ 2-5Specify the Maximum Datafiles ____________________________ 2-6
Running the Installation or Refresh Tools ___________________________ 2-6
Before You Proceed __________________________________________ 2-6
Installation or Refresh Procedures _____________________________ 2-7Exiting the Automated Tool _______________________________ 2-7Adding Storage Pools for a First-Time Installation ____________ 2-7
Step 1: Entering the Required Information _________________________ 2-8
Step 2: Setting Up the Vault Account ____________________________ 2-13
Step 3: Creating Vault Tablespaces______________________________ 2-14
Description of Vault RDBMS Tablespaces _____________________ 2-18CV_ASMGR______________________________________________ 2-18EDM_ARCHIVE ___________________________________________ 2-18EDM_ATTRDATA __________________________________________ 2-18EDM_ATTRIBUTES _________________________________________ 2-19EDM_AUDIT_LOG ________________________________________ 2-19EDM_FILE_BACKUP _______________________________________ 2-19EDM_FILE_DIRECTORY ____________________________________ 2-19EDM_HISTORY____________________________________________ 2-19EDM_ROLLSPACE ________________________________________ 2-19EDM_SYSTEM ____________________________________________ 2-20

Installing Vault and Locator Contents-vii
Contents
EDM_TEMPSPACE ________________________________________ 2-20
Step 4: Creating and Loading Vault Tables ______________________ 2-20
Step 5: Updating the EDMADMIN Password ______________________ 2-23
Step 6: Loading the Revision Code Scheme______________________ 2-24
Step 7: Starting the Server Network Processes ____________________ 2-25
Step 8: Adding Storage Pools ___________________________________ 2-26
Step 9: Installing Vault Attributes and Views ______________________ 2-27
Step 10: Activating the E-Mail Trigger ____________________________ 2-33
Postinstallation Tasks for UNIXSupporting the Data Dictionary ___________________________________ 3-2
Assigning Database Users to TemporaryTablespace ______________________________________________________ 3-2
Changing Your Account Passwords _______________________________ 3-3
Adding Clients and Changing Passwordsin the NSM Configuration File _____________________________________ 3-3
Specifying Attribute Server Informationin the NSM Configuration File ___________________________________ 3-13
Implementing Client Entries _____________________________________ 3-14
Distributing the PM Configuration File ____________________________ 3-14
Creating Additional Storage Pools ______________________________ 3-15
Setting Storage Pool Ownership and Permissions _________________ 3-16
NFS Pool Support _______________________________________________ 3-16
Enabling Archivelog Mode______________________________________ 3-17
Setting Up a Second Oracle Control File _________________________ 3-18
Setting Environment Variables for Interfaces _____________________ 3-19
Setting Up EPD Interfaces for Vault on UNIX ______________________ 3-19
Pro/ENGINEER Support ______________________________________ 3-20
MEDUSA Interface __________________________________________ 3-21
Contents
Contents-viii Installing Vault and Locator
CATIA Interface _____________________________________________ 3-22
Backing Up the Vault Database _________________________________ 3-23
Installing Distributed Vault on UNIXInstalling Multiple Vaults __________________________________________ 4-2
Before Installing Distributed Vault______________________________ 4-2
Procedure for Installing DV on Two Vaults ______________________ 4-2Start Installation on Vault1 and Install the DOD _____________ 4-3
Installing Vault2 with the DOD Remote ________________________ 4-4
Installing DV on Three or More Vaults __________________________ 4-5
Adding a New DOD to a Distributed Vault ________________________ 4-6
Adding a Primary DOD ____________________________________ 4-6Adding a Secondary DOD ________________________________ 4-6
Sample Distributed Vault Installation ______________________________ 4-6
Description of Distributed Vault Tablespaces _____________________ 4-19
EDM_ACTIONDATA_______________________________________ 4-19EDM_DISTCONTROL ______________________________________ 4-19EDM_DISTCONT_INDX ____________________________________ 4-20EDM_DISTDATA __________________________________________ 4-20EDM_DISTDATA_INDX_____________________________________ 4-20EDM_EDITSUPPORT _______________________________________ 4-21EDM_EVENT_MANAGER __________________________________ 4-21EDM_EVENTMAN_INDX ___________________________________ 4-21EDM_OBJ_DIRECTORY ____________________________________ 4-21EDM_SUBSCRIPTION ______________________________________ 4-22EDM_SUBSCR_INDX_______________________________________ 4-22
Changing Your Password________________________________________ 4-23
DV Setup for Rulebases _________________________________________ 4-24
Installing Oracle9i for VaultPreinstallation Tasks ______________________________________________ 5-2
Preparing Directories and Accounts ___________________________ 5-2
Location of $ORACLE_HOME__________________________________ 5-2

Installing Vault and Locator Contents-ix
Contents
Installing Oracle on Sun Solaris ____________________________________ 5-3
Setting Up the Oracle Account ________________________________ 5-3
Installing the Oracle Server ____________________________________ 5-6
Installing Oracle on HP HP-UX ___________________________________ 5-10
Setting Up the Oracle Account ______________________________ 5-10
Installing the Oracle Server __________________________________ 5-14Mounting the CD-ROM __________________________________ 5-14Installing the Server ______________________________________ 5-15
Installing Oracle on IBM AIX _____________________________________ 5-19
Setting Up the Oracle Account ______________________________ 5-19
Installing the Oracle Server __________________________________ 5-23
Installing Oracle on Windows NT_________________________________ 5-26
Installing the Oracle Server __________________________________ 5-26
Postinstallation Tasks on UNIX____________________________________ 5-29
Changing the Oracle Undo Management Parameter_________ 5-29
Changing the Oracle Password______________________________ 5-29
Verifying Oracle Initialization Parameters File _________________ 5-30
Configuring the Oracle Instance for Optegra_________________ 5-30
Enabling the ARCHIVELOG Feature __________________________ 5-31
Starting the Oracle Server ___________________________________ 5-32
Postinstallation Tasks on Windows NT_____________________________ 5-32
Changing the Oracle Undo Management Parameter_________ 5-32
Changing the Oracle Password______________________________ 5-33
Verifying the Oracle Initialization Parameters File _____________ 5-33
Configuring the Oracle Instance for Optegra_________________ 5-34
Enabling the ARCHIVELOG Feature __________________________ 5-35
Starting the Oracle Server ___________________________________ 5-36
Language Support for Oracle _______________________________ 5-37
Preparing the Oracle Database for a Vault Refresh on UNIXBacking Up of the Vault Data _____________________________________ 6-2
Contents
Contents-x Installing Vault and Locator
Migrating the Vault Database fromPrevious Oracle Releases to Oracle9i Release 2 (9.2.0.1.0) _________ 6-2
Exporting the Vault Database_________________________________ 6-2
Importing the Vault Database ________________________________ 6-4Requirements for Importing the Database__________________ 6-5
Downloading and Setting Up the Current Release _________________ 6-5
Refreshing Previous Releases of Vault onUNIX
Preparing for a Vault Software Refresh ____________________________ 7-2
Loading the New Vault _______________________________________ 7-2
Loading the New Vault Software ______________________________ 7-2
Input Worksheet______________________________________________ 7-3
Step 1: Invoking the Refresh Tool andValidating Information __________________________________________ 7-3
Step 2: Shutting Down the Network _______________________________ 7-5
Step 3: Refreshing Relational Database Tables ____________________ 7-6
Step 4: Starting the Server Network Processes _____________________ 7-8
Step 5: Activating the E-Mail Trigger ______________________________ 7-8
Step 6: Refreshing Distributed Vault _______________________________ 7-9
Step 7: Refreshing the Data Dictionary ___________________________ 7-15
Step 8: Refreshing Vault Attributes and Views_____________________ 7-16
Postinstallation Tasks ____________________________________________ 7-20
Customizing the Installation or Refresh on UNIXEnabling the E-mail Trigger _______________________________________ 8-2
Manually Changing the CADDS Part Definition ____________________ 8-2
Creating and Loading the RevisionCode Scheme___________________________________________________ 8-4
Revision Code Scheme Rules _________________________________ 8-4
Installing the Revision Code Table _____________________________ 8-5

Installing Vault and Locator Contents-xi
Contents
UNIX Vault TroubleshootingStarting the Process Manager _____________________________________ 9-2
Starting Other Network Processes _________________________________ 9-2
Listing Started Processes _________________________________________ 9-3
Processes for Vault ____________________________________________ 9-3
Processes for Distributed Vault _________________________________ 9-4
Processes for Distributed Vault with the DOD ___________________ 9-6
Stopping and Restarting Network Processes________________________ 9-8
Adjusting .tmp Files When Rerunning Scripts________________________ 9-8
Intermediate .tmp Files ________________________________________ 9-8
Final .tmp Files ________________________________________________ 9-9
Override Intermediate .tmp Files When Necessary ______________ 9-9
Working Around $ORACLE_HOME Errors ___________________________ 9-9
Tracing Execution of Install or Refresh Scripts ____________________ 9-11
Logging the Install, Migrate, or Refresh Script Output _____________ 9-12
Changing Previously Entered Defaults ___________________________ 9-12
Internationalization Considerations for UNIXSetting the Language Environment Variable ____________________ 10-2
Multilingual Option of Oracle ___________________________________ 10-3
Introduction to Vault and Distributed Vault on Windows NTOverview of Vault and Distributed Vault _________________________ 11-2
Required Steps for Vault Installation _____________________________ 11-3
Addressing Oracle Requirements________________________________ 11-4
Refreshing Vault from a Previous to the Current Release __________ 11-4
Refreshing the Data Dictionary__________________________________ 11-6
Refreshing the Data Dictionary on DOD ______________________ 11-6

Contents
Contents-xii Installing Vault and Locator
Installing or Refreshing EPD.Connectand Navigator Attributes ________________________________________ 11-7
Windows NT Vault Setup and ConfigurationPostinstallation Setup ___________________________________________ 12-2
Installing the Portmapper ____________________________________ 12-2
Installing the Data Dictionary ________________________________ 12-2
Starting and Stopping Vault _____________________________________ 12-3
Starting Optegra Service for the First Time ____________________ 12-3
Starting Vault _______________________________________________ 12-3Starting Vault from the Interface__________________________ 12-4Starting Vault from the Command Line____________________ 12-6
Stopping Vault _____________________________________________ 12-6Stopping Vault from the Interface ________________________ 12-6Stopping Vault from the Command Line __________________ 12-6
Configuration __________________________________________________ 12-6
Creating Storage Pools ______________________________________ 12-7Creating Storage Pools with Commands __________________ 12-7Creating Storage Pools from Vault Administrator __________ 12-7
Using E-Mail Triggers ________________________________________ 12-7Setting Up an E-Mail Trigger ______________________________ 12-8Activating the E-Mail Triggers _____________________________ 12-8
Postinstallation Considerations___________________________________ 12-9
Startup and the Portmapper _____________________________ 12-9Startup and Optegra Vault Service ______________________ 12-10Addition of Storage Pools _______________________________ 12-10
Setting Up EPD Interfaces for Vault______________________________ 12-10
MEDUSA Support ___________________________________________ 12-11
CATIA Support _____________________________________________ 12-11
EPD Interface for Pro/ENGINEER Support _____________________ 12-11
Managing and Customizing Vault ______________________________ 12-13
Backing Up the Vault Database ________________________________ 12-13
Installing Vault and Locator Contents-xiii
Contents
Windows NT Distributed Vault Setup and ConfigurationInstallation Process for Distributed Vault _________________________ 13-2
Setting Up Distributed Vault ____________________________________ 13-2
Autoregistration on Distributed Vault ____________________________ 13-4
Creating Tag Files ______________________________________________ 13-4
Starting Distributed Vault _______________________________________ 13-5
Processes for Distributed Vault _______________________________ 13-5
Processes for Distributed Vault with the DOD _________________ 13-7
Installation of Sample Distributed Vault __________________________ 13-9
Installing Distributed Vault for Windows NTas a DOD Vault—Example1_________________________________ 13-10
Installing Distributed Vault for Windows NTas a Non-DOD Vault—Example 2 ___________________________ 13-10
Installing Distributed Vault for Windows NTas a Non-DOD Vault—Example 3 ___________________________ 13-11
Preparing the ORACLE Database for a Vault Refresh onWindows NT
Preparing to Refresh Vault ______________________________________ 14-2
Preparing to Migrate the Oracle Database ______________________ 14-2
Migrating the Vault Database to Oracle9i Release 2 (9.2.0.1.0) ___ 14-3
Exporting the Vault Database _______________________________ 14-3
Importing the Vault Database _______________________________ 14-4Requirements for Importing the Database ________________ 14-5
Migrating Vault Across PlatformsPreparing to Migrate Vault______________________________________ 15-2
Migrating Vault Objects and User Passwords _____________________ 15-2
On the Source Platform _____________________________________ 15-2
On the Destination Platform _________________________________ 15-3
Setting Up Vault After the Migration _____________________________ 15-5
Contents
Contents-xiv Installing Vault and Locator
Windows NT Tape DrivesUsing Tape Drives _______________________________________________ 16-2
Installing Locator on UNIX SystemsPostinstallation Steps ____________________________________________ 17-2
Using the Locator Worksheet ____________________________________ 17-2
Running the Locator Installation Tool ___________________________ 17-2
Invoking the Locator Installation Tool _________________________ 17-3
Exiting and Restarting the Installation Tool ____________________ 17-3
Accepting Defaults _________________________________________ 17-4
Overriding Defaults__________________________________________ 17-4
Obtaining Online Help_______________________________________ 17-4
Entering Setup Information ______________________________________ 17-5
Using an Existing UNIX Account for Locator ___________________ 17-5
Creating a UNIX Account for Locator_________________________ 17-6
Editing the NSM Configuration Files ______________________________ 17-7
Editing the PM Configuration Files ______________________________ 17-10
Searching for the PM Configuration File _____________________ 17-11
Using the System’s PM Configuration File_____________________ 17-12
Editing the PM Configuration File for a Single Vault ___________ 17-13
Editing the PM Configuration File for Multiple Vaults __________ 17-13
Accessing Online Documentation ______________________________ 17-14
Editing the EDM_DEFAULTS File ______________________________ 17-14
Editing the Edmgui File _____________________________________ 17-15
Refreshing Locator on UNIX SystemsBefore Running a Refresh _______________________________________ 18-2
Running the Locator Refresh Tool _______________________________ 18-2
Exiting and Restarting the Refresh Tool________________________ 18-2
Starting the Refresh__________________________________________ 18-3
Accepting Defaults _________________________________________ 18-3
Installing Vault and Locator Contents-xv
Contents
Overriding Defaults _________________________________________ 18-3
Obtaining Online Help ______________________________________ 18-3
Sample Output _____________________________________________ 18-4
Loading Application Software __________________________________ 18-6

Installing Vault and Locator xvii
Preface
Installing Vault and Locator provides system administrators withinstructions for installing Vault, Distributed Vault, Vault Programming, andLocator. The instructions also apply for installations or upgrades.
For information about
• Installing Vault on UNIX-based systems—See chapters 1 to 10
• Installing Oracle for Vault—See chapter 5
• Installing Vault on Windows NT—See chapters 11 to 16
• Installing Locator—See chapters 17 and 18
Related Documents
The following documents may be helpful as you use Installing Vault andLocator:
• Installing Optegra Applications
• Using the License Manager
• Vault System Administrator Guide

Preface
xviii Installing Vault and Locator
Book Conventions
The following table illustrates and explains conventions used in writingabout Optegra applications.
Convention Example Explanation
EPD_HOME cd $EPD_HOME/install(UNIX)
cd %EPD_HOME%\install(Windows)
Represents the default pathwhere the current version ofthe product is installed.
Menu selections Vault > Check Out > Lock Indicates a command that youcan choose from a menu.
Command buttons andoptions
Mandatory check box, Addbutton, Description text box
Names selectable items fromdialog boxes: options, buttons,toggles, text boxes, andswitches.
User input and code Wheel_Assy_details
-xvf /dev/rst0
Enter command> plot_config
Enter the text in a text box oron a command line.
Where system output and userinput are mixed, user input isbold.
System output CT_struct.aename Indicates system responses.
Parameter andvariable names
tar -cvf /dev/rst0 filename Supply an appropriatesubstitute for each parameteror variable; for example,replace filename with anactual file name.
Commands andkeywords
The ciaddobj command creates aninstance of a binder.
Shows command syntax.
Text string "SRFGROUPA" or ’SRFGROUPA’ Shows text strings. Enclosetext strings with single ordouble quotation marks.
Integer n Supply an integer for n.
Real number x Supply a real number for x.
# # mkdir /cdrom Indicates the root (superuser)prompt on command lines.
% % rlogin remote_system_name -lroot
Indicates the C shell prompton command lines.

Installing Vault and Locator xix
Preface
Online User Documentation
Online documentation for each Optegra book is provided in HTML if thedocumentation CD-ROM is installed. You can view the onlinedocumentation from an HTML browser or from the HELP command.
You can also view the online documentation directly from the CD-ROMwithout installing it.
From an HTML Browser:
1. Navigate to the directory where the documents are installed. Forexample,
$EPD_HOME/data/html/htmldoc/ (UNIX)
%EPD_HOME%\data\html\htmldoc\ (Windows NT)
2. Click mainmenu.html. A list of available Optegra documentationappears.
3. Click the book title you want to view.
From the HELP Command:
To view the online documentation for your specific application, click HELP.(Consult the documentation specific to your application for moreinformation.)
From the Documentation CD-ROM:
1. Mount the documentation CD-ROM.
2. Point your browser to:
CDROM_mount_point/htmldoc/mainmenu.html (UNIX)
CDROM_Drive:\htmldoc\mainmenu.html (Windows NT)
$ $ rlogin remote_system_name -lroot
Indicates the Bourne shellprompt on command lines.
> > copy filename Indicates the MS-DOS prompton command lines.
Keystrokes Return or Control-g Indicates the keys to press ona keyboard.
Convention Example Explanation

Preface
xx Installing Vault and Locator
Printing Documentation
A PDF (Portable Document Format) file is included on the CD-ROM foreach online book. See the first page of each online book for the documentnumber referenced in the PDF file name. Check with your systemadministrator if you need more information.
You must have Acrobat Reader installed to view and print PDF files.
The default documentation directories are:
• $EPD_HOME/data/html/pdf/doc_number.pdf (UNIX)
• %EPD_HOME%\data\html\pdf\doc_number.pdf (Windows NT)
Resources and Services
For resources and services to help you with PTC (Parametric TechnologyCorporation) software products, see the PTC Customer Service Guide. Itincludes instructions for using the World Wide Web or fax transmissions forcustomer support.
Documentation Comments
PTC welcomes your suggestions and comments. You can send feedbackelectronically to [email protected].

Installing Vault and Locator 1-1
Chapter 1 Preparing to InstallVault Software onUNIX
This chapter provides instructions you must follow before installing theVault software. Refer to Optegra Release Notes and Installing OptegraApplications before using this book.
• Preinstallation Steps for Configuration
• Determining Disk Space Requirements
• Allocating Directories on Disk Drives
• Planning for Vault Storage Pools
• Creating Vault Storage Pools
• Planning for Oracle Tablespaces
• Using the Vault Checklist and Worksheet

Preparing to Install Vault Software on UNIXPreinstallation Steps for Configuration
1-2 Installing Vault and Locator
Preinstallation Steps for ConfigurationSteps to load Vault and Locator vary with the configuration and the hostoperating system. Refer to the information below to find the appropriatesteps for new or existing customers. Use these steps on each Vault and eachclient.
Please note: In this document, $EDM_HOME represents the Vaulthome directory. The default is /opt/epd/dm/current_release. If youchoose to install Vault software in another directory, identify the correctlocation when executing commands.
Install the Oracle applications before installing Vault and Distributed Vault.See Installing Optegra Applications for Oracle requirements to executeVault.
New Installations
To install the current release of Optegra applications, new customers mustperform the following steps:
1. Make sure your operating system is at the correct level. For the latestinformation, refer to the Optegra Release Notes for your softwarerelease.
2. Install the Oracle Server (RDBMS). Refer to Installing OptegraApplications.
3. Download Vault from the Optegra CD-ROM. Refer to Installing OptegraApplications.
4. Request your Vault licenses. Refer to Using the License Manager.
5. Install Vault. Refer to Chapter 2, “Installing Vault Software on UNIX.”
6. Install Distributed Vault, if purchased. Refer to Chapter 4, “InstallingDistributed Vault on UNIX.”
7. Perform the postinstallation steps. Refer to Chapter 3, “PostinstallationTasks for UNIX.”
Installing Vault and Locator 1-3
Preparing to Install Vault Software on UNIXPreinstallation Steps for Configuration
Refreshing Previous Releases of Vault to theCurrent Release
To refresh Vault to the current release, follow this procedure:
1. Make sure your operating system is at the correct level. For the latestinformation, refer to the Optegra Release Notes for your softwarerelease.
2. Install the Oracle Server (RDBMS). Refer to Installing OptegraApplications.
3. Download your products from the Optegra CD-ROM. Refer to InstallingOptegra Applications.
4. Request Vault licenses. Refer to Using the License Manager.
5. Refresh Vault to the current release. Refer to Chapter 7, “RefreshingPrevious Releases of Vault on UNIX.”
6. Refresh Distributed Vault. Refer to “Step 6: Refreshing DistributedVault” on page 7-9.
7. Perform the postinstallation steps. Refer to Chapter 3, “PostinstallationTasks for UNIX.”
Preparing to Install Vault Software on UNIXDetermining Disk Space Requirements
1-4 Installing Vault and Locator
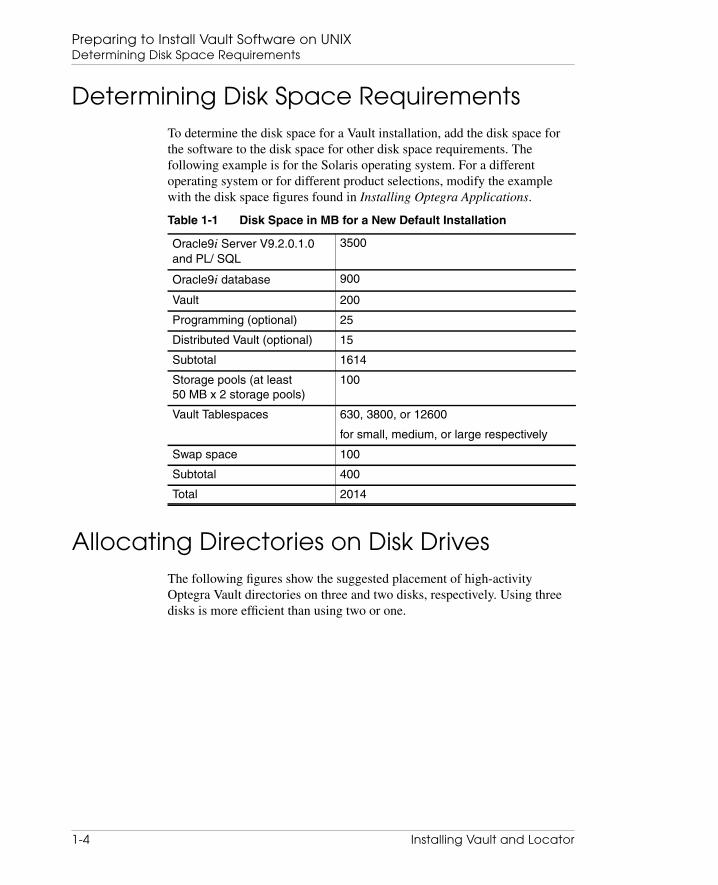
Determining Disk Space RequirementsTo determine the disk space for a Vault installation, add the disk space forthe software to the disk space for other disk space requirements. Thefollowing example is for the Solaris operating system. For a differentoperating system or for different product selections, modify the examplewith the disk space figures found in Installing Optegra Applications.
Allocating Directories on Disk DrivesThe following figures show the suggested placement of high-activityOptegra Vault directories on three and two disks, respectively. Using threedisks is more efficient than using two or one.
Table 1-1 Disk Space in MB for a New Default Installation
Oracle9i Server V9.2.0.1.0and PL/ SQL
3500
Oracle9i database 900
Vault 200
Programming (optional) 25
Distributed Vault (optional) 15
Subtotal 1614
Storage pools (at least50 MB x 2 storage pools)
100
Vault Tablespaces 630, 3800, or 12600
for small, medium, or large respectively
Swap space 100
Subtotal 400
Total 2014

Installing Vault and Locator 1-5
Preparing to Install Vault Software on UNIXAllocating Directories on Disk Drives
Figure 1-1 Optegra Directories on Three Disks (most efficient)
Figure 1-2 Optegra Directories on Two Disks (less efficient)
Please note: Consider the following guidelines when you decidewhich disk drives will have the Optegra software and storage pools:
• Optegra software should not be installed on the system disk. Dedicate aseparate disk partition to Optegra software and another disk partition toOracle9i V9.2.0.1.0 software.
• The Oracle9i V9.2.0.1.0 tablespaces contain information about the filesstored in Optegra storage pools. Therefore, do not place Oracle9iV9.2.0.1.0 tablespaces and Optegra storage pools on the same disk drive.
• To optimize Vault performance and to minimize the damage from mediafailure, use three or more disk drives to store Optegra software andstorage pools.
• Set up disk partitions used for Optegra storage pools (one disk partitionper storage pool) across multiple disk drives. Put storage pools andOptegra software on different disks.

Preparing to Install Vault Software on UNIXPlanning for Vault Storage Pools
1-6 Installing Vault and Locator
Planning for Vault Storage PoolsBefore installing Vault, create storage pools. A storage pool is a diskpartition mounted on your local file system. A storage pool stores parts andother files. Vault requires two storage pools.
A recommended minimum number of storage pools for your use of Vault canbe calculated using the formula:
Number of Pools = Number of Data Distribution Servers + 1
Storage Pool Description
Each storage pool occupies a partition on a disk. Defining Vault storagepools is part of the installation process and requires planning. Before youcreate the storage pools:
• Decide which disk device(s) to allocate to the storage pools. For the bestperformance, set up your storage pools across multiple disk devices.Have the storage pools reside on a disk different from the Vault software.
• Determine the size of the storage pools. The size determines the amountof data that can be stored online. Mounted file systems allocated to Vaultstorage pools require at least 50 megabytes.
• Establish naming conventions for the storage pools. You want to easilytell which disk device and partition go with each Vault storage pool.(Storage pool names limited to 8 characters.)
• Decide if you want to use particular storage pools for certain types offiles. You can assign labels to your storage pools and customize thestorage pool selection process to allocate files appropriately.
After you decide which disk devices to allocate to the Vault storage pools,you can create them and set them up for Vault use. You can create localstorage pools on the Vault server, NFS-mounted storage on another system,or a combination of local and NFS-mounted storage pools.
Creating Vault Storage PoolsEach operating system has utilities for partitioning disk drives to create localand NFS-mounted storage pools.
Installing Vault and Locator 1-7
Preparing to Install Vault Software on UNIXPlanning for Oracle Tablespaces
Creating Local Storage Pools
For each operating system, the utility for partitioning disk drives to createlocal storage pools follows.
• AIX — Use the SMIT utility (System Management Interface Tool).Refer to your system documentation for more information.
• HP-UX — Use the System Administration Manager (SAM) utility tocreate storage pools. This utility helps you set up the needed mounted filesystems for the Vault storage pools. See your HP-UX documentation forinstructions.
• Solaris — Use the format and newfs utilities to create storage pools.See your Sun documentation for instructions and for information aboutUNIX file systems.
Creating NFS-mounted Storage Pools
Documentation for your operating system provides information about NFS.To use NFS-mounted storage pools, follow these steps:
1. On the system with the disk drive, create the mounted file system.
2. On the system running Vault, use NFS to mount the remote file system.
Please note: Oracle does not support the use of NFS-mounted filesystems for its database files.
For instructions on adding storage pools to the database independent of Vaultinstallation, see “Step 8: Adding Storage Pools” on page 2-26.
Planning for Oracle TablespacesTablespaces can be in one tablespace directory or separated into two; Vaulttablespaces and rollback tablespaces. The minimum required disk spacerequired for a tablespaces is 500 megabytes. An additional 150 megabytes isneeded for Distributed Vault.
Preparing to Install Vault Software on UNIXUsing the Vault Checklist and Worksheet
1-8 Installing Vault and Locator
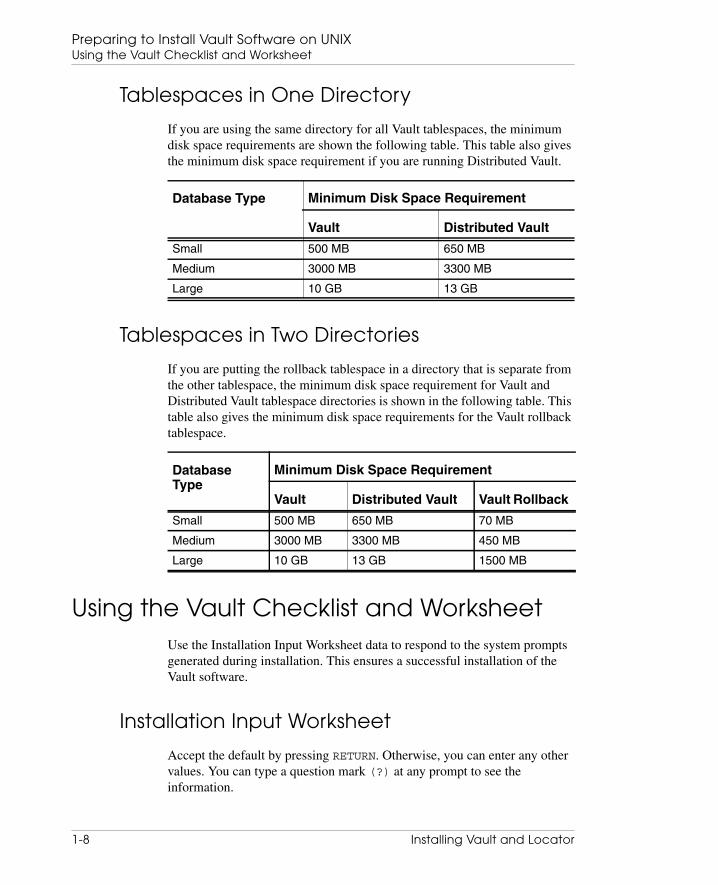
Tablespaces in One Directory
If you are using the same directory for all Vault tablespaces, the minimumdisk space requirements are shown the following table. This table also givesthe minimum disk space requirement if you are running Distributed Vault.
Tablespaces in Two Directories
If you are putting the rollback tablespace in a directory that is separate fromthe other tablespace, the minimum disk space requirement for Vault andDistributed Vault tablespace directories is shown in the following table. Thistable also gives the minimum disk space requirements for the Vault rollbacktablespace.
Using the Vault Checklist and WorksheetUse the Installation Input Worksheet data to respond to the system promptsgenerated during installation. This ensures a successful installation of theVault software.
Installation Input Worksheet
Accept the default by pressing RETURN. Otherwise, you can enter any othervalues. You can type a question mark (?) at any prompt to see theinformation.
Database Type Minimum Disk Space Requirement
Vault Distributed Vault
Small 500 MB 650 MB
Medium 3000 MB 3300 MB
Large 10 GB 13 GB
DatabaseType
Minimum Disk Space Requirement
Vault Distributed Vault Vault Rollback
Small 500 MB 650 MB 70 MB
Medium 3000 MB 3300 MB 450 MB
Large 10 GB 13 GB 1500 MB

Installing Vault and Locator 1-9
Preparing to Install Vault Software on UNIXUsing the Vault Checklist and Worksheet
If you enter an invalid value, the system instructs you on how to enter a validvalue.
Preinstallation Checklist
The following steps prepare you for installing Vault. Check off each stepafter you complete it.
1. _______ Operating system and software backups performed?
_______ Operating system
_______ Vault software (for existing installations)
Table 1-2 Input Installation Worksheet
Prompt Default Value
Vault account name: edm
Vault account user ID number: 200
Oracle account name: oracle
Oracle SID: oracle
Database type: 1=small, 2=medium, 3=large
Vault tablespace directory: $ORACLE_HOME/dbs/edm_dbs
Vault rollback tablespace directory: $ORACLE_HOME/dbs/edm_dbs
Vault revision code scheme: 1=alphabet, 2=letters, 3=numbers (default=3)
Set up storage pools? yes
First storage pool directory name: example: /pool1Pool name:_____________________(8 chars.)example: pool1
Second storage pool directory name: Pool Name______________________ (8 chars.)
Third storage pool directory name: Pool Name______________________ (8 chars.)
Fourth storage pool directory name: Pool Name______________________ (8 chars.)
Fifth storage pool directory name: Pool Name______________________ (8 chars.)
Sixth storage pool directory name: Pool Name______________________ (8 chars.)
Seventh storage pool directory name: Pool Name______________________ (8 chars.)
Activate email trigger? no default
Vault TAPE1 tape device: no default
Vault TAPE2 tape device: no default
Vault TAPE3 tape device: no default
Vault TAPE4 tape device: no default

Preparing to Install Vault Software on UNIXUsing the Vault Checklist and Worksheet
1-10 Installing Vault and Locator
_______ Oracle software (for existing installations)
_______ Oracle database(s) (for existing or shared installations)
2. _______ Required version of operating system running?
3. _______ Oracle Server 9.2.0.1.0 software revision installed?
4. _______ Storage pools created for first time users?
5. _______ Input Worksheet filled out?
6. _______ Vault software loaded using SLIC?
(Refer to Installing Optegra Applications)
7. _______ Vault software licenses requested and installed?
(For information on software license management, see Installing OptegraApplications and Using the License Manager.)
Additional Tasks for Existing Vault Sites
1. _______ Oracle account password set to default of manager?
2. _______ Vault Oracle account passwords set to their defaults?
(asm, edmattr, edmui, pdmdm, pdmqf, and edmdv (for DV))
3. _______ Name changed on the Vault account?
4. _______ Name changed on the Vault home directory?
5. _______ Vault configuration files saved?
Installing Vault and Locator 2-1
Chapter 2 Installing VaultSoftware on UNIX
This chapter provides background information about using the automatedtools for installations and migrations. Follow the suggestions provided inthis chapter to ensure successful installation of your Vault software. Includedin this chapter are installation procedures for the first-time user. CurrentVault users are directed to the appropriate chapters for their installationneeds.
• Addressing Oracle Requirements
• Running the Installation or Refresh Tools
• Step 1: Entering the Required Information
• Step 2: Setting Up the Vault Account
• Step 3: Creating Vault Tablespaces
• Step 4: Creating and Loading Vault Tables
• Step 5: Updating the EDMADMIN Password
• Step 6: Loading the Revision Code Scheme
• Step 7: Starting the Server Network Processes
• Step 8: Adding Storage Pools
• Step 9: Installing Vault Attributes and Views
• Step 10: Activating the E-Mail Trigger

Installing Vault Software on UNIXAddressing Oracle Requirements
2-2 Installing Vault and Locator
Addressing Oracle RequirementsBefore installing Vault or Distributed Vault, install the necessary Oracleapplications. Refer to Installing Optegra Applications for the Oraclerequirements. Also refer to the documentation for your operating system oninstallation and system maintenance. If you purchased Oracle with yourEPD.Connect and Optegra applications, use the Oracle CD-ROM providedfor your Oracle software installation.
Please note: If you are using a previously-installed Oracle9i(9.2.0.1.0) RDBMS for Vault 7, ensure that you have both the Oracle9i(9.2.0.1.0) server and the Procedural Option running.
If you are installing Vault applications for the first time and are using anexisting Oracle database or if you have an existing Vault installation, youmay need to modify the Oracle9i (9.2.0.1.0) installation before you load theVault CD-ROM. Refer to the next topics in this section.
Comparing the Contents of .ora Files
A Vault installation creates a new init.ora file and renames your existingfile to init$ORACLE_SID.ora.orig. Compare the contents of bothfiles for any changes that you might want in the new one.
For example, the db_files parameter is reset to 40 in the new init.ora
file. If your previous file had a value greater than 40, change the value ofdb_files in the new init.ora file to that number.
If you are unsure of using the old or new value, contact Customer Service.
Using an Existing Oracle Database
If you want to share an existing Oracle database with your new Optegrasoftware, you must perform the following steps to increase the size of yourOracle initialization parameters:
1. Log in to the Oracle software account.
2. Make sure that the Oracle initialization parameters in theinit$ORACLE_SID.ora file meet the minimum requirements forOptegra software. The init$ORACLE_SID.ora file is usually locatedin the directory $ORACLE_HOME/dbs.
Installing Vault and Locator 2-3
Installing Vault Software on UNIXAddressing Oracle Requirements
The following table shows the Oracle initialization parameters and theOptegra software requirements for each Oracle parameter. Increase thevalues as needed in the init$ORACLE_SID.ora file to meet theminimum requirements for the Optegra software.
Please note: The default value for an Oracle variable can result inthe message maximum open cursors exceeded when you are deletingobjects. To avoid this, edit the file init$ORACLE_SID.ora by giving theparameter open_cursors the value 512. The file’s name depends on thevalue of the $ORACLE_SID parameter which it includes. Two directoriescontain this same file through links. Shutting down and restarting thedatabase instance makes the new value effective.
$ORACLE_BASE/admin/$ORACLE_SID/pfile$ORACLE_HOME/dbs.
Please note: If you modify any Oracle initialization parameter in theinit$ORACLE_SID.ora file, you must shut down and restart your Oracledatabase. This puts these changes into effect. For more information on thisparameter, refer to ORACLE9i Release 2 Database Administrator’s Guide.
3. Create the edm_dbs directory.
% cd $ORACLE_HOME/dbs% mkdir edm_dbs
If your system meets the requirements for rollback segments and you do notwant the edminstall script to create tablespaces for rollback segments andtemporary segments in this directory, create a custom RDBMS tempspaceusing step 4.
4. Create the custom_rdbms.tmp file in the edm_dbs directory where theOptegra tablespace files are created.
% cd edm_dbs% touch custom_rdbms.tmp
Oracle InitializationParameter
OracleDefault
Optegra MinimumRequirement
db_block_buffers 200 200
log_checkpoint_interval 10000 10000
open_cursors 100 512
processes 100 50
db_files 80 512

Installing Vault Software on UNIXAddressing Oracle Requirements
2-4 Installing Vault and Locator
The custom_rdbms.tmp file flags the Relational Database Setup Module(edmrdsm) to indicate that the database already has other applicationsrunning against it.
Increasing the Maximum Datafiles
To increase your maxdatafile parameter for Oracle, follow theinstructions in the next section. Perform this operation if you expectsignificant growth in your Oracle database. Only someone who is familiarwith Oracle database administration should attempt this procedure. Contactyour support center with any questions.
To increase the maximum datafiles, follow the process as described in thefollowing sections:
1. Determine the parameter value for your datafiles
2. Export the database and remove files
3. Specify the maximum datafiles
Determine the Parameter Value
First, determine the parameter value for your datafiles.
1. Query your database for the number of datafiles in use and theirrespective path names:
% sqlplus /nologSQL> connect / as sysdba;SQL> spool datafile.info.log;SQL> select count(*) from v$datafile;SQL> select name from v$datafile;SQL> select name from v$controlfile;SQL> select member from v$logfile;SQL> spool off;SQL> exit;
2. Determine your maxdatafile parameter; see if the sum of the valuereturned from the first query plus 30 is greater than 60. Otherwise, simplyuse 60 as your new value.
Example 1: If the query above produced the value 22
22+30=52 —> use 60.
Example 2: If the query above produced the value 35
35+30=65 —> use 65.

Installing Vault and Locator 2-5
Installing Vault Software on UNIXAddressing Oracle Requirements
Please note: The 60 and the 65 represent the minimum value for themaxdatafile parameter in each example. Use a higher value if you expectsignificant growth on your database.
Export the Database and Remove Files
Oracle must be running to export the database. However, you must restrictaccess to the database during the export. In this example, the name of yourdatabase is $ORACLE_SID and $ORACLE_HOME is the path to yourOracle home directory.
1. As the user, shut down the network:
% nsmstop -all% nsmstop -pca
2. Bring down Oracle and restart it in restricted mode:
% sqlplus /nologSQL> connect / as sysdba;SQL> shutdown;SQL> startup restrict;SQL> exit;
3. Export the full database from the Oracle account. See ORACLE RDBMSUtilities User’s Guide for details.
Warning
To avoid losing your database, back up theexported file and keep the tape in a safe place.
% exp system/manager full=y grants=yfile=export_filename log=export.log
4. Shut down Oracle:
% sqlplus /nologSQL> connect / as sysdba;SQL> shutdown;
5. At the operating system level remove the datafiles, control files, and redolog files associated with this database. The paths for these files arerecorded in the second, third, and fourth queries issued in step 1 above.
Warning
If you are uncertain of the location of the files inthis step, please contact your support center.
Installing Vault Software on UNIXRunning the Installation or Refresh Tools
2-6 Installing Vault and Locator
Specify the Maximum Datafiles
To specify the maximum datafiles, follow these steps. Set the value to 60 orgreater. See “Determine the Parameter Value” on page 2-4.
1. Edit the crdb$ORACLE_SID.sql file in the $ORACLE_HOME/dbsdirectory. After the maxlogfiles statement add the following line:
maxdatafiles 60
2. Edit the init$ORACLE_SID_0.ora file to change the db_filesparameter to the value specified above.
3. Edit the init$ORACLE_SID.ora file to change the db_filesparameter to the value specified previously.
Running the Installation or Refresh ToolsInstallation or refresh tools for Vault software are easy to use andself-explanatory. The tools prompt you to answer questions and then wait foryour responses. Most questions have default values. To get online help ateach prompt, type help.
Before You Proceed
Before you proceed, take the actions listed below. They ensure a successfulinstallation of your Vault software. Your installation may fail if you havemissed any of the steps.
1. Meet all Oracle requirements as suggested in Installing OptegraApplications.
2. Complete the Preinstallation Checklist in Chapter 1, “Preparing to InstallVault Software on UNIX,” including performing necessary backups.
3. Log in to the local system on which you are installing the software.
4. Refer to your completed Input Worksheet from Chapter 1, “Preparing toInstall Vault Software on UNIX,” and follow the instructions.
Please note: Software licenses are required before you install yourVault software. See Optegra Release Notes for more information.

Installing Vault and Locator 2-7
Installing Vault Software on UNIXRunning the Installation or Refresh Tools
Installation or Refresh Procedures
After you have installed your software and licenses, use the procedures indescribed in this section for a first-time installation using the AutomatedInstallation Tool (edminstall). See Chapter 4, “Installing Distributed Vaulton UNIX,” to install Distributed Vault.
If you fail to install edminstall, refer to Chapter 9, “UNIX VaultTroubleshooting,”for instructions on how to rerun edminstall.
Exiting the Automated Tool
You can exit the automated tool in two ways:
• Press Control-c to exit the procedure at any time.
• Answer n (no) to one of the continuation prompts displayed by the tool,for example;
Would you like to continue [yes]? n
If you exit the automated tool in the middle of the process, you can restart itby reentering the command. The tool resumes where you left off.
Adding Storage Pools for a First-TimeInstallation
You must add storage pools when you install Vault for the first time. Refer toInstalling Optegra Applications for instructions on creating mounted filesystems in preparation for adding the storage pools. This must be donebefore installation.
Chapter 3, “Postinstallation Tasks for UNIX,” contains instructions foradding additional storage pools after the installation is completed.

Installing Vault Software on UNIXStep 1: Entering the Required Information
2-8 Installing Vault and Locator
Step 1: Entering the Required InformationStart your Vault installation by invoking the automated installation tool. Login as root, then follow these steps.
1. Change to the Vault Home install directory:
# cd $EDM_HOME/install
To create a history file of the procedure, follow the instructions in item 2.
If you do not want a history file, follow the instructions in item 3.
2. To invoke the Automated Installation Tool, install Vault for the first timeand create a history log, enter
# ./edminstall | tee edminstall.log
To read the history log, look for it in the $EDM_HOME/installdirectory.
3. To invoke the Automated Installation Tool to install Vault for the firsttime without creating a history log, enter
# ./edminstall
Next, provide essential values as shown in the following procedure. Defaultvalues are shown in brackets ( [ ] ).
Please note: After you do this, the system displays your input andasks if it is correct. It then gives you the chance to fix whatever is incorrect.
EDM163I*******************************************EDM163I Vault Software Installation module.EDM163I (edminstall)EDM163IEDM163I This module installs the Vault Software onEDM163I your system.EDM163IEDM163I The Vault Software Installation moduleEDM163I installs the Vault Software on yourEDM163I system by calling the following VaultEDM163I Software Installation Modules:EDM163IEDM163I edmsirm [Vault Software InstallationEDM163I Requirements Module]EDM163I edmsasm [Vault Software Account SetupEDM163I Module]

Installing Vault and Locator 2-9
Installing Vault Software on UNIXStep 1: Entering the Required Information
EDM163I edmrdsm [Vault Relational Database SetupEDM163I Module]EDM163I edmrdlm [Vault Relational Database TableEDM163I Creation and Loading Module]EDM163I edmepum [Vault User EDMADMIN PasswordEDM163I Update Module]EDM163I edmrclm [Vault Revision Code LoadingEDM163I Module]EDM163I edmsnsm [Vault Server Network StartupEDM163I Module]EDM163I edmspcm [Vault Storage Pool CreationEDM163I Module]EDM163I edmaetm [Vault Activate E-MAIL TriggerEDM163I Module]EDM163IEDM163I It uses as input, the edmodule.defaults.shEDM163I file to obtain the appropriate informationEDM163I to EDM163I perform these tasks.EDM163I *******************************************
Would you like to continue [yes]? :
EDM164I *******************************************EDM164I Running Vault Software InstallationEDM163I Requirements ModuleEDM164I (edmsirm).EDM164I *******************************************
EDM000I *******************************************EDM000I Vault Software Installation RequirementsEDM000I module [edmsirm]EDM000IEDM000I This module gathers and validates allEDM000I required information pertaining toEDM000I installing Vault EDM163I Software on aEDM000I system.EDM000IEDM000I It copies edmodule.defaults-template.sh toEDM000I edmodule.defaults.sh and updates theEDM000I edmodule.defaults.sh whenever the installerEDM000I deviates an input value from the originalEDM000I default value.EDM000IEDM000I Special Features:EDM000I

Installing Vault Software on UNIXStep 1: Entering the Required Information
2-10 Installing Vault and Locator
EDM000I 1) On-line HelpEDM000I [enter help, ?, HELP, h, H; at anyEDM000I prompt]EDM000I 2) Supplied DefaultsEDM000I [hit RETURN; to accept default value]EDM000I 3) Dynamic DefaultsEDM000I [override default with your value]EDM000I 4) Exit/QuitEDM000I [enter exit, quit, cntrl-c; at anyEDM000I prompt]EDM000I 5) Escape to shellEDM000I [enter sh; at any prompt. enter exit;EDM000I to returns prompt]EDM000I 6) Invalid Input Data ValidationEDM000I [Invalid Input Data not allowed asEDM000I input]EDM000I 7) Rerun capabilityEDM000I [enter edmsirm; will resume where youEDM000I left EDM000I off]EDM000I *******************************************
Would you like to continue [yes]? :
Enter the Vault account name [edm]:edm
Enter the ORACLE account name [oracle]:oracleEnter the Vault account userid number [200]:200Enter the ORACLE SID [oracle]:EDMEnter the database type to install1)Small (requires 630MB)2)Medium (requires 3800MB)3)Large (requires 12600MB)Enter 1,2, or 3 [1]:1Enter the Vault Tablespace directory[/opt/app/oracle/product/9.2.0.1.0/dbs/edm_dbs]:/opt/app/oracle/product/9.2.0.1.0/dbs/edm_dbsEnter the Vault Rollback Tablespace directory[/opt/app/oracle/product/9.2.0.1.0/dbs/edm_dbs]:/opt/app/oracle/ product/9.2.0.1.0/dbs/edm_dbsEnter the Vault Revision Code Scheme filename1) ALPHABET.REVCODES2) LETTERS.REVCODES3) NUMBERS.REVCODES (CADDS supports only
NUMBERS.REVCODES)

Installing Vault and Locator 2-11
Installing Vault Software on UNIXStep 1: Entering the Required Information
Enter 1, 2, or 3 [3]: 3
Please note: If you answer yes to the next question, the file systemsmust have been previously created.
Would you like to setup the Vault Storage Pools[yes]?:yes
Enter Vault Storage Pool Directory names andStorage Pool names,one on each line, for example;/pool1 pool1/pool2 pool2.End the list with a period (.) on a separate line:/pool20 pool20
Please note: Enter one pool’s directory name and storage pool namefollowed by a carriage return. Your data is echoed and the full promptrepeated after each pool that you enter, as shown in the example.
Vault Storage Pool Information = /pool20 pool20Enter Vault Storage Pool Directory names andStorage Pool names, one on each line, for example;/pool1 pool1/pool2 pool2.End the list with a period (.) on a separateline:/pool21 pool21Vault Storage Pool Information = /pool20pool20Vault Storage Pool Information = /pool21pool21
Enter Vault Storage Pool Directory names andStorage Pool names, one on each line, for example;/pool1 pool1/pool2 pool2.End the list with a period (.) on a separate line: .
Would you like the Vault E-Mail Trigger Interfaceactivated (*optional)[no]?:y

Installing Vault Software on UNIXStep 1: Entering the Required Information
2-12 Installing Vault and Locator
Would you like to setup the Vault Tape Devices(*optional) [no]?:y
Please note: You only see the next four lines if you answer yes tothe previous question. These lines require that you specify a real devicename. Do not use the defaults. Issue the ls -l command on the devicedirectory to determine the real device names. Enter the real device nameshere and be sure to enter them when using edminstall.
Enter the Vault TAPE1 tape device name[No_Default]: nrst0Enter the Vault TAPE2 tape device name[No_Default]: nrst8Enter the Vault TAPE3 tape device name[No_Default]: nrst16Enter the Vault TAPE4 tape device name[No_Default]: nrst24If you have filled everything in or accepted thedefaults, your values will be displayed as in thefollowing example.Here are the Input Values that you have entered.Please confirm that they are correct.
Vault account name = edmVault account userid = 200Vault home directory = $EDM_HOMEVault group name = operatorOracle account name = oracleOracle SID = EDMVault Tablespace directory =/opt/app/oracle/product/9.2.0.1.0/dbs/edm_dbsVault Rollback Tablespace directory =/opt/app/oracle/product/9.2.0.1.0/dbs/edm_dbsVault Revision Code Scheme = NUMBERSVault Storage Pool Information = /pool20 pool20Vault Storage Pool Information = /pool21 pool21Vault E-Mail Trigger Activation= noVault TAPE1 tape device= nrst0Vault TAPE2 tape device= nrst8Vault TAPE3 tape device= nrst16Vault TAPE4 tape device= nrst24
Are these correct [yes]?:y
EDM162I *******************************************

Installing Vault and Locator 2-13
Installing Vault Software on UNIXStep 2: Setting Up the Vault Account
EDM162I The Vault Software InstallationEDM162I Requirements Module hasEDM1621 completed successfullyEDM162I *******************************************
If you answer no, the installation tool prompts you to indicate whether youwant to modify a single value you entered, a single default value youaccepted, all values you entered, or all defaults you accepted.
Step 2: Setting Up the Vault AccountDuring the rest of the procedure, you need take only a few actions. The tooloccasionally checks to see if you want to continue; you can enter either yesor no. If you enter no, you can restart the procedure later at the point whereyou left off; the automated tool saves your answers and keeps track of thesteps you have already completed.
In this step, the automated tool sets up the Vault software account.
EDM168I *******************************************EDM168I Running Vault Software Account Setup ModuleEDM168I (edmsasm).EDM168I *******************************************
EDM001I *******************************************EDM001I Vault Software Account Setup module.EDM001I (edmsasm)EDM001IEDM001I This module creates the Vault SoftwareEDM001I Account if appropriate; and customizes theEDM001I .cshrc, .login, nsm.config, pm.config,EDM001I and EDM.DEFAULTS files for this VaultEDM001I Installation.EDM001IEDM001I It uses as input, the edmodule.defaults.shEDM001I file to EDM001I obtain the appropriateEDM001I information to perform theseEDM001I tasks.EDM001I *******************************************
Would you like to continue [yes]?:
EDM028I *******************************************

Installing Vault Software on UNIXStep 3: Creating Vault Tablespaces
2-14 Installing Vault and Locator
EDM028I Customizing the Vault Account's .cshrcEDM001I file.EDM028I *******************************************
EDM029I *******************************************EDM029I Customizing the Vault Account's .loginEDM001I file.EDM029I *******************************************
EDM030I *******************************************EDM030I Customizing the nsm.config and pm.configEDM030I files.EDM030I *******************************************
EDM077W *******************************************EDM077W Customizing the EDM.DEFAULTS file forEDM077W Rulebase Support. EDM077W The file existsEDM077W and has been renamed toEDM077W $EDM_HOME/data/EDM.DEFAULTS.orig.copy.EDM077W If you have additional customizations, theyEDM077W will need to be added to the newEDM077W $EDM_HOME/data/EDM.DEFAULTS file.EDM077W *******************************************
Customizing the Vault TAPE devices.
EDM155I *******************************************EDM155I The Vault Software Account Setup module hasEDM155I completed EDM155I successfully.EDM155I *******************************************
Step 3: Creating Vault TablespacesThe installation tool next sets up the Vault relational database, creatingtablespace files, rollback segments, and tempspaces. You must do this for afirst time installation.
A tablespace is the location within the relational database where the Vaultrelational database tables are created. A rollback segment is the locationwithin the relational database where a Vault relational database transaction isstored until a commit operation is accomplished.
EDM170I *******************************************
Installing Vault and Locator 2-15
Installing Vault Software on UNIXStep 3: Creating Vault Tablespaces
EDM170I Running Vault Relational Database SetupEDM170I Module (edmrdsm).EDM170I *******************************************
ORACLE_SID = oracle
EDM033I *******************************************EDM033I Vault Relational Database Setup module.EDM033I (edmrdsm)EDM033IEDM033I This module creates the Vault RelationalEDM033I Database Tablespace files and generatesEDM033I the Vault Relational Database RollbackEDM033I Segments and Tempspaces.EDM033IEDM033I It uses as input, the edmodule.defaults.shEDM033I file to obtain the appropriate informationEDM033I to perform these tasksEDM033I *******************************************
Would you like to continue [yes]?:
EDM034I *******************************************EDM034I Creating the Vault Relational DatabaseEDM034I Tablespaces/Rollback Segments.EDM034I *******************************************
EDM048I *******************************************EDM048I Creating non-system Rollback Segment.EDM048I *******************************************
EDM049I *******************************************EDM049I Shutting down ORACLE, so we can restartEDM049I ORACLE and see EDM049I the non-systemEDM049I Rollback Segment.EDM049I *******************************************
EDM050I *******************************************EDM050I Starting up ORACLE, so we can see theEDM050I non-system Rollback Segment.EDM050I *******************************************
EDM051I *******************************************EDM051I Creating the EDM_ROLLSPACE Tablespace.EDM051I *******************************************

Installing Vault Software on UNIXStep 3: Creating Vault Tablespaces
2-16 Installing Vault and Locator
EDM052I *******************************************EDM052I Creating the RBS_01 Rollback Segment in theEDM052I EDM_ROLLSPACE Tablespace.EDM052I *******************************************
EDM053I *******************************************EDM053I Creating the RBS_02 Rollback Segment in theEDM053I EDM_ROLLSPACE Tablespace.EDM053I *******************************************
EDM054I *******************************************EDM054I Creating the RBS_03 Rollback Segment in theEDM054I EDM_ROLLSPACE Tablespace.EDM054I *******************************************
EDM055I *******************************************EDM055I Creating the RBS_04 Rollback Segment in theEDM055I EDM_ROLLSPACE Tablespace.EDM055I *******************************************
EDM056I *******************************************EDM056I Creating the RBS_05 Rollback Segment in theEDM056I EDM_ROLLSPACE Tablespace.EDM056I *******************************************
EDM057I *******************************************EDM057I Creating the RBS_06 Rollback Segment in theEDM057I EDM_ROLLSPACE Tablespace.EDM057I *******************************************
EDM058I *******************************************EDM058I Creating the CV_ASMGR Tablespace.EDM058I *******************************************
EDM059I *******************************************EDM059I Creating the EDM_ARCHIVE Tablespace.EDM059I *******************************************
EDM060I *******************************************EDM060I Creating the EDM_AUDIT_LOG Tablespace.EDM060I *******************************************
EDM061I *******************************************EDM061I Creating the EDM_FILE_BACKUP Tablespace.EDM061I *******************************************

Installing Vault and Locator 2-17
Installing Vault Software on UNIXStep 3: Creating Vault Tablespaces
EDM062I *******************************************EDM062I Creating the EDM_FILE_DIRECTORY Tablespace.EDM062I *******************************************
EDM063I *******************************************EDM063I Creating the EDM_HISTORY Tablespace.EDM063I *******************************************
EDM064I *******************************************EDM064I Creating the EDM_SYSTEM Tablespace.EDM064I *******************************************
EDM065I *******************************************EDM065I Creating the EDM_ATTRIBUTES Tablespace.EDM065I *******************************************
EDM066I *******************************************EDM066I Creating the EDM_ATTRDATA Tablespace.EDM066I *******************************************
EDM249I *******************************************EDM249I Creating the EDM_TEMPSPACE Tablespace.EDM249I *******************************************
EDM067I *******************************************EDM067I Shutting down ORACLE, so we can startupEDM067I ORACLE and see the Rollback SegmentsEDM067I RBS_01, RBS_02, ..., RBS_06.EDM067I *******************************************
EDM068I *******************************************EDM068I Starting up ORACLE to see the RollbackEDM068I Segments RBS_01, RBS_02, ..., RBS_06.EDM068I *******************************************
EDM069I *******************************************EDM069I Dropping the non-system Rollback SegmentEDM069I that we added earlier. We no longer needEDM069I this Rollback Segment, EDM069I because weEDM069I added the EDM RBS_01 through RBS_06 PrivateEDM069I Rollback Segments.EDM069I *******************************************
EDM161I *******************************************

Installing Vault Software on UNIXStep 3: Creating Vault Tablespaces
2-18 Installing Vault and Locator
EDM161I The Vault Relational Database Setup ModuleEDM161I has completed successfully.EDM161I *******************************************
Description of Vault RDBMS Tablespaces
The following table shows the names and default sizes for Vault tablespaces.Each Vault tablespace is described after the table.
CV_ASMGR
This tablespace contains all the security and concurrency control logic tablesand associated logic, it has high-activity read-only access.
EDM_ARCHIVE
This tablespace contains all archived file entries generated by the Vaultcommand ARCHIVE; it has low-activity read and insert access.
EDM_ATTRDATA
This tablespace contains the values assigned to user-defined attributes forVault parts and files. This data is generated by the Vault commands STORE,
Tablespace File Disk Storage in MB
Small Medium Large
CV_ASMGR 40 240 800
EDM_ARCHIVE 24 144 480
EDM_ATTRDATA 24 144 480
EDM_ATTRIBUTES 40 240 800
EDM_AUDIT_LOG 40 240 800
EDM_FILE_BACKUP 24 144 480
EDM_FILE_DIRECTORY 40 240 800
EDM_HISTORY 15 90 300
EDM_ROLLSPACE 70 420 1400
EDM_SYSTEM 100 600 2000
EDM_TEMPSPACE 40 240 800
Installing Vault and Locator 2-19
Installing Vault Software on UNIXStep 3: Creating Vault Tablespaces
UPDATE, and REPLACE; it has high-activity read and insert access. Thistablespace includes pointers to other tablespaces, as well as actual data.
EDM_ATTRIBUTES
This tablespace contains the administrative information for user-definedattributes and parts and files. This includes the attribute and set definitions,which attributes belong to which sets, and data validation rules for applyingeach set. Depending on usage, this tablespace may have very high activity.
EDM_AUDIT_LOG
This tablespace contains all audit log entries generated by Vault; it hashigh-activity insert access.
EDM_FILE_BACKUP
This tablespace contains all backup entries for files currently residing onVault incremental backup tapes or files that are candidates for backup by theIncremental Backup utility; it has very high activity.
EDM_FILE_DIRECTORY
This tablespace contains all entries for items managed by Vault, includingfile directory table entries, file set definitions, and work tables required forrecursive file set checking and set explosion; it has very high activity.
EDM_HISTORY
This tablespace contains the history of all items managed by Vault. Tablesstored in this tablespace contain status code changes, revision changes,successful and failed reviews, and all review votes by reviewers. Thistablespace has low-activity insert access.
EDM_ROLLSPACE
This tablespace contains Oracle9i (9.2.0.1.0) rollback segments for use byVault. This tablespace has very high activity; however, it is not required forsites that are already set up with Oracle9i (9.2.0.1.0) rollback segments.
Installing Vault Software on UNIXStep 4: Creating and Loading Vault Tables
2-20 Installing Vault and Locator
EDM_SYSTEM
This tablespace contains various static and dynamic control tables used byVault. Tables stored in this tablespace contain command description tables,menu description and command-to-menu cross-reference tables, theuser-defined revision code table, all Help tables, message tables, storagepool information tables, and all control tables needed to manage a Vaultinstallation. This tablespace has very high activity.
EDM_TEMPSPACE
This tablespace contains Oracle9i (9.2.0.1.0) temporary segments for use byVault. This tablespace has very high activity; however, it is not required forsites that are already set up with Oracle9i (9.2.0.1.0) temporary segments.
Step 4: Creating and Loading Vault TablesIn this step, the tool creates and loads all Vault database tables for the firsttime. Enter either yes or no when the tool asks you whether it shouldcontinue.
EDM172I *******************************************EDM172I Running Vault Relational Database TableEDM172I Creation and Loading Module (edmrdlm).EDM172I *******************************************
EDM035I *******************************************EDM035I Vault Relational Database Table CreationEDM035I and Loading module. (edmrdlm)EDM035I This module creates and loads the VaultEDM035I Relational Database Tables.EDM035I It uses as input, the edmodule.defaults.shEDM035I file to obtain the appropriate informationEDM035I to perform these tasks.EDM035I *******************************************
Would you like to continue [yes]?:
EDM036I *******************************************EDM036I Creating and Loading the Vault RelationalEDM036I Database Tables.EDM036I *******************************************

Installing Vault and Locator 2-21
Installing Vault Software on UNIXStep 4: Creating and Loading Vault Tables
EDM093I *******************************************EDM093I Generating the Access and Security ManagerEDM093I Tables.EDM093I *******************************************
./asmgen: Access and Security Manager
./asmgen: SQL table and view creation.
EDM094I *******************************************EDM094I Generating the Vault Database Tables.EDM094I *******************************************
./edmgen: EDMVault SQL Table and View Creation
EDM271I *******************************************EDM271I Generating the Vault Database TableEDM271I Indexes.EDM271I *******************************************
./edmindex: EDMVault SQL Database Index Creation
EDM095I *******************************************EDM095I Generating the Vault Database Table Views.EDM095I *******************************************
./edmview: EDMVault SQL View Creation
EDM096I *******************************************EDM096I Generating the Attribute Management Tables.EDM096I *******************************************
./attrgen: Vault attribute management control tablegeneration for EDMVault
EDM273I *******************************************EDM273I Generating the Attribute ManagementEDM273I Database Table Indexes.EDM273I *******************************************
./attrindx: EDMVault Attribute Management SQLDatabase Index Creation
EDM346I *******************************************EDM346I Generating the Unit of Measurement relatedEDM346I tables
Installing Vault Software on UNIXStep 4: Creating and Loading Vault Tables
2-22 Installing Vault and Locator
EDM346I *******************************************
./uomgen: Vault attribute management control tablegeneration for EDMVault
EDM097I *******************************************EDM097I Generating the Attribute Management TableEDM097I Views.EDM097I *******************************************
./attrview: Vault attribute management controltable view generation for EDMVault
EDM098I *******************************************EDM098I Generating the Graphical User InterfaceEDM098I Tables.EDM098I *******************************************
./guigen: Vault SQL Table Creation
EDM099I *******************************************EDM099I Generating the Graphical User InterfaceEDM099I Table Views.EDM099I *******************************************
./guiview: Vault SQL View Creation
EDM225I *******************************************EDM225I Assigning Vault ORACLE Userid's to theEDM225I EDM_TEMPSPACE Tablespace.EDM225I *******************************************
./tempgen: Assigning Vault ORACLE Userid's
./tempgen: to the EDM_TEMPSPACE Tablespace
EDM100I *******************************************EDM100I Loading the Access and Security ManagerEDM100I (EDMVault) EDM100I Tables.EDM100I *******************************************
./ldasmba: EDMVault Run-time SQL Logic load.
EDM101I *******************************************EDM101I Loading the Vault Database (EDMVault)EDM101I Tables.

Installing Vault and Locator 2-23
Installing Vault Software on UNIXStep 5: Updating the EDMADMIN Password
EDM101I *******************************************
./ldedmba: Vault control table load for EDMVault
EDM102I *******************************************EDM102I Loading the Attribute Management Tables.EDM102I *******************************************
./ldedmam: Vault Attribute Management control tableload for EDMVault
EDM103I *******************************************EDM103I Loading the Access and Security ManagerEDM103I (EDMProjects) Tables.EDM103I *******************************************
./ldasmpa: EDMProjects Run-time SQL Logic load.
EDM104I *******************************************EDM104I Loading the Vault Database (EDMProjects)EDM104I Tables.EDM104I *******************************************
./ldedmpa: Vault control table load for EDMProjects
EDM348I *******************************************EDM348I Loading the Unit of Measurement relatedEDM348I Tables.EDM348I *******************************************
./ldattr: Vault control table load for EDMVault
EDM156I *******************************************EDM156I The Vault Relational Database TableEDM156I Creation and Loading module has completedEDM156I successfully.EDM156I *******************************************
Step 5: Updating the EDMADMIN PasswordIn this step, the tool encrypts the EDMADMIN password.
Enter either yes or no when the tool asks you whether it should continue.

Installing Vault Software on UNIXStep 6: Loading the Revision Code Scheme
2-24 Installing Vault and Locator
EDM176I *******************************************EDM176I Running Vault User EDMADMIN Password UpdateEDM176I Module (edmepum).EDM176I *******************************************
EDM118I *******************************************EDM118I Vault User EDMADMIN Password Update module.EDM118I (edmepum)EDM118IEDM118I This module updates the Vault UserEDM118I EDMADMIN's password in the Vault RelationalEDM118I Database.EDM118IEDM118I It uses as input, the edmodule.defaults.shEDM118I file to obtain the appropriate informationEDM118I to perform these tasks.EDM118I *******************************************
Would you like to continue [yes]?:
EDM120I *******************************************EDM120I Updating the Vault User EDMADMIN's PasswordEDM120I in the Vault Relational Database.EDM120I *******************************************
CINAPW008I The Vault password for Vault userEDMADMIN has been updated.
EDM158I *******************************************EDM158I The Vault User EDMADMIN Password UpdateEDM158I Module has completed successfully.EDM158I *******************************************
Step 6: Loading the Revision CodeScheme
In this step, the tool loads the revision code scheme.
Enter either yes or no when the tool asks you whether it should continue.
EDM178I *******************************************EDM178I Running Vault Revision Code Loading ModuleEDM178I (edmrclm).
Installing Vault and Locator 2-25
Installing Vault Software on UNIXStep 7: Starting the Server Network Processes
EDM178I *******************************************
EDM121I *******************************************EDM121I Vault Revision Code Scheme Loading module.EDM121I (edmrclm)EDM121IEDM121I This module loads the Vault Revision CodeEDM121I Scheme into the Vault Relational Database.EDM121IEDM121I It uses as input, the edmodule.defaults.shEDM121I file to obtain the appropriate informationEDM121I to perform these tasks.EDM121I *******************************************
Would you like to continue [yes]?:
EDM123I *******************************************EDM123I Loading the Vault Revision Code Scheme intoEDM123I the Vault Relational Database.EDM123I *******************************************
Therevisioncodeshavebeensuccessfullyloaded.
EDM159I *******************************************EDM159I The Vault Revision Code Scheme LoadingEDM159I Module has completed successfully.EDM159I *******************************************
Step 7: Starting the Server NetworkProcesses
In this step, the tool starts up the server network processes in background.
Enter either yes or no when the tool asks you whether it should continue.
EDM180I *******************************************EDM180I Running Vault Server Network Startup ModuleEDM180I (edmsnsm).EDM180I *******************************************
EDM124I *******************************************EDM124I Vault Server Network Startup module.EDM124I (edmsnsm)
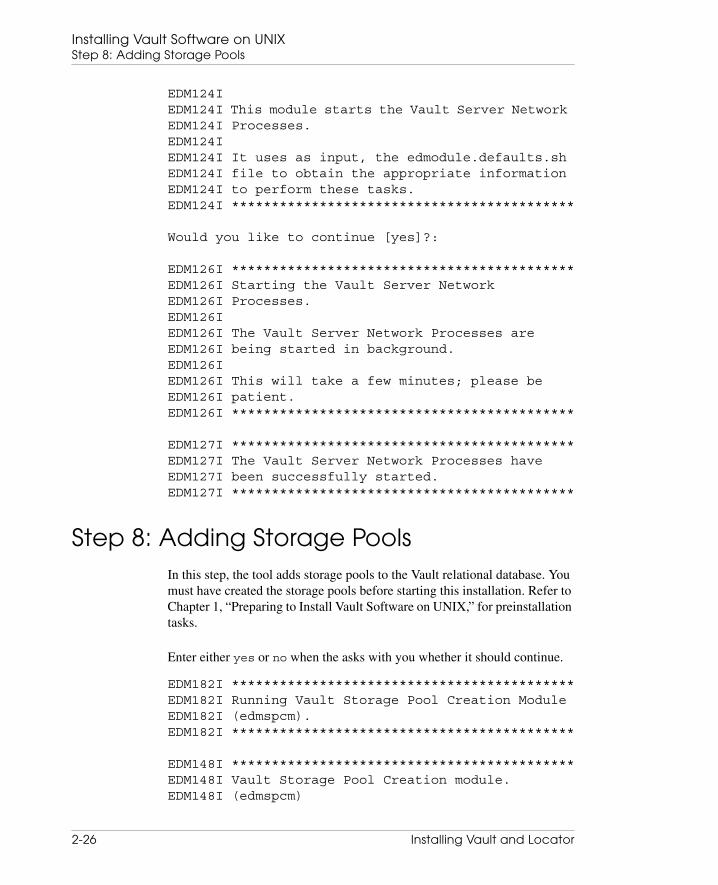
Installing Vault Software on UNIXStep 8: Adding Storage Pools
2-26 Installing Vault and Locator
EDM124IEDM124I This module starts the Vault Server NetworkEDM124I Processes.EDM124IEDM124I It uses as input, the edmodule.defaults.shEDM124I file to obtain the appropriate informationEDM124I to perform these tasks.EDM124I *******************************************
Would you like to continue [yes]?:
EDM126I *******************************************EDM126I Starting the Vault Server NetworkEDM126I Processes.EDM126IEDM126I The Vault Server Network Processes areEDM126I being started in background.EDM126IEDM126I This will take a few minutes; please beEDM126I patient.EDM126I *******************************************
EDM127I *******************************************EDM127I The Vault Server Network Processes haveEDM127I been successfully started.EDM127I *******************************************
Step 8: Adding Storage PoolsIn this step, the tool adds storage pools to the Vault relational database. Youmust have created the storage pools before starting this installation. Refer toChapter 1, “Preparing to Install Vault Software on UNIX,” for preinstallationtasks.
Enter either yes or no when the asks with you whether it should continue.
EDM182I *******************************************EDM182I Running Vault Storage Pool Creation ModuleEDM182I (edmspcm).EDM182I *******************************************
EDM148I *******************************************EDM148I Vault Storage Pool Creation module.EDM148I (edmspcm)

Installing Vault and Locator 2-27
Installing Vault Software on UNIXStep 9: Installing Vault Attributes and Views
EDM148IEDM148I This module adds the Vault Storage Pools toEDM148I the Vault Relational Database.EDM148IEDM148I It uses as input, the edmodule.defaults.shEDM148I file to obtain the appropriate informationEDM148I to perform these to tasks.EDM148I *******************************************
Would you like to continue [yes]?:
EDM150I *******************************************EDM150I Adding the Vault Storage Pools to the VaultEDM150I Relational Database.EDM150I *******************************************
EDM151I *******************************************EDM151I Signing on to Vault.EDM151I *******************************************
EDM152I *******************************************EDM152I Adding the Vault Storage Pools.EDM152I *******************************************
CDMASP354I Storage poolPOOL1hasbeenadded.CDMASP354I Storage poolPOOL2hasbeenadded.
EDM153I *******************************************EDM153I Signing off from Vault.EDM153I *******************************************
CDMSOF017I Sign off from Vault completedsuccessfully.
EDM154I *******************************************EDM154I Vault Storage Pools have been successfullyEDM154I added to the Vault Relational Database.EDM154I *******************************************
Step 9: Installing Vault Attributes and ViewsIn this step, to update Oracle tables and install Vault attribute rules, Vaultviews, and Vault attributes, run the navinstall script.

Installing Vault Software on UNIXStep 9: Installing Vault Attributes and Views
2-28 Installing Vault and Locator
Please note: Before running this script on a Vault that is to bedistributed, perform the tasks described in Chapter 4, “Installing DistributedVault on UNIX.”
Run the navinstall script twice. The first time, the Vault attribute rules areinstalled. Stop and restart Vault and run the script again to install the Vaultattributes.
The navinstall program is interactive. It asks you to accept or supplysystem data and prompts you to confirm that information.
To run navinstall, follow these steps:
1. Log in as root and set the $EPD_HOME environment variable to theappropriate Optegra home directory.
2. At the prompt run the navinstall script as follows:
# $EPD_HOME/install/navinstall
In the result generated, default values are shown in brackets ([]). PressReturn to accept them.
If the environment variable LANG is not set, it defaults to C and askswhether you want to accept LANG=C. If you accept the default yes bypressing Return, it will continue processing. If you enter No,navinstall aborts. Set the LANG variable and run the navinstallscript again.
*******************************************Environment variable LANG is undefined*******************************************LANG will default to C (English), Continue? [yes]:
3. Enter the user ID of your Optegra Vault Administration account after thefollowing prompt:
Please note: In this sample result, the Vault Administration accountis edm and the $EPD_HOME environment variable is set to the/opt/epd/dm/v70/bin.
Enter the user ID of your Optegra VaultAdministration account: edm
4. Verify the values and press Return to accept them or enter yes andcorrect them.
**************************************************Installation details you have specified are:-

Installing Vault and Locator 2-29
Installing Vault Software on UNIXStep 9: Installing Vault Attributes and Views
Optegra Vault Administration account: edmOptegra Vault/EPD.Connect installation directory:/opt/epd/dm/v70************************************************** Do you want to re-enter any values [no] ? :
5. Press Return to install the EPD.Connect Oracle tables. Then, eitherpress Return to confirm the default pdmdm values, or enter new values.
OK to install the EPD.Connect Oracle Tables [yes]:
Enter the Optegra Vault Oracle database manageruserid [pdmdm]:Enter the Optegra Vault Oracle database managerpassword [pdmdm]:
Enter the Optegra Vault Oracle IQF userid [pdmqf]:Enter the Optegra Vault Oracle IQF password [pdmqf]:
Enter the Optegra Vault Batch Transfer Concurrency[6]:
Creating New Tables in ORACLE Database.**************************************************Processing completed.***************************************************
6. Press Return to install the Optegra Vault. Then, either press Return toconfirm the default pdmqf values, or enter new values.
OK to install the EPD.Connect Optegra Vault Views[yes]:
Enter the Optegra Vault Oracle database manageruserid [pdmdm]:Enter the Optegra Vault Oracle database managerpassword [pdmdm]:
Enter the Optegra Vault Oracle IQF userid [pdmqf]:Enter the Optegra Vault Oracle IQF password [pdmqf]:
***************************************************Creating New Views and Synonyms in ORACLE Database.***************************************************Press Return to install DV support for Oracle IQFuser.Install the DV support for Oracle IQF user [yes]:

Installing Vault Software on UNIXStep 9: Installing Vault Attributes and Views
2-30 Installing Vault and Locator
***************************************************Granting SELECT to Optegra Vault Oracle IQF User.**************************************************Processing completed.
7. Press Return not to install EPD.Connect DV Views.
OK to install the EPD.Connect DV Views [no]:**************************************************Requested NOT to install EPD.Connect DV Views.**************************************************Sun Microsystems Inc.SunOS 5.6 Generic August 1997
8. Press Return to install the Navigator Optegra Vault Attributes.
OK to install the Navigator Optegra VaultAttributes [yes]:
Enter the EDMADMIN user password [edmadmin]:*******************************************Signing on to the Optegra Vaults as edmadmin:*******************************************
*******************************************Adding mandatory attribute set and attributes.*******************************************
CAMAAS100I CONFIG_SET has been added.CAMAAT100I COMPONENT-NAME has been added.CAMAAT100I ITEM-NAME has been added.CAMAAT100I REVISION has been added.CAMAAT100I TYPE has been added.CAMAAT100I PARENT-NAME has been added.CAMAAT100I COMPONENT-ORDER has been added.CAMAMA100I COMPONENT-NAME has been added.CAMAMA100I ITEM-NAME has been added.CAMAMA100I REVISION has been added.CAMAMA100I TYPE has been added.CAMAMA100I PARENT-NAME has been added.CAMAMA100I COMPONENT-ORDER has been added.CAMAAS100I CONFIG_OPTIONAL has been added.
*******************************************Adding Optional Attributes.*******************************************

Installing Vault and Locator 2-31
Installing Vault Software on UNIXStep 9: Installing Vault Attributes and Views
CAMAAT100I ATTRIBUTE has been added.CAMAAT100I SYMMETRY-FLAG has been added.CAMAAT100I TIM-FLAG has been added.CAMAAT100I TIM-SOURCE has been added.CAMAAT100I ORIENTATION has been added.CAMAAT100I GLOBAL-ORIENT has been added.CAMAAT100I ADRAW has been added.CAMAAT100I PARENT-RELATION has been added.CAMAAT100I ATTR-GROUP has been added.CAMAAT100I ATTR-DEFINITION has been added.
*******************************************Populating Attribute Sets.*******************************************
CAMAMA100I SYMMETRY-FLAG has been added.CAMAMA100I TIM-FLAG has been added.CAMAMA100I TIM-SOURCE has been added.CAMAMA100I ORIENTATION has been added.CAMAMA100I GLOBAL-ORIENT has been added.CAMAMA100I ADRAW has been added.CAMAMA100I PARENT-RELATION has been added.CAMAMA100I ATTR-GROUP has been added.CAMAMA100I ATTR-DEFINITION has been added.CAMAMA100I ATTRIBUTE has been added.
*******************************************Adding config rules.*******************************************
*******************************************Attribute Installation completed.*******************************************
9. At the following prompt, enter no and exit navinstall.
OK to install EPD Interface to CADDS5[yes]:
To install CADDS rulebase, accept the default yes for the following option.The following is a sample log of the CADDS rulebase installation:
OK to add CADDS Application Environment to OptegraVault [yes]:
Enter the Vault Oracle database manageruserid [pdmdm]:

Installing Vault Software on UNIXStep 9: Installing Vault Attributes and Views
2-32 Installing Vault and Locator
Enter the Vault Oracle database managerpassword [pdmdm]:
Checking New Tables in ORACLE Database.....Enter the Vault Oracle database manageruserid [pdmdm]:Enter the Vault Oracle database managerpassword [pdmdm]:
Checking New Tables in ORACLE Database.....
Enter the Vault Oracle IQF userid [pdmqf]:Enter the Vault Oracle IQF password [pdmqf]:
Creating New Tables and Views in ORACLE Database.....
Toolkit Table creation Complete.
Enter the Vault Oracle database manager userid[pdmdm]:Enter the Vault Oracle database manager password[pdmdm] :
Adding CADDS Application to Optegra Vault.
Addition of CADDS Application to Optegra Vault
OK to install the CADDS Vault Attributes [yes]:
Enter the EDMADMIN user password [edmadmin]:
Signing on to the Vault as edmadmin...
Adding CADDS attributes.CAMARL100I CONFIG_RULE_DB1 has been added.CAMARL100I CONFIG_RULE_PS has been added.CAMARL100ICONFIG_OPT_RULE_DB1hasbeenadded.CAMARL100I CONFIG_OPT_RULE_PS has been added.
CADDS attributes added.
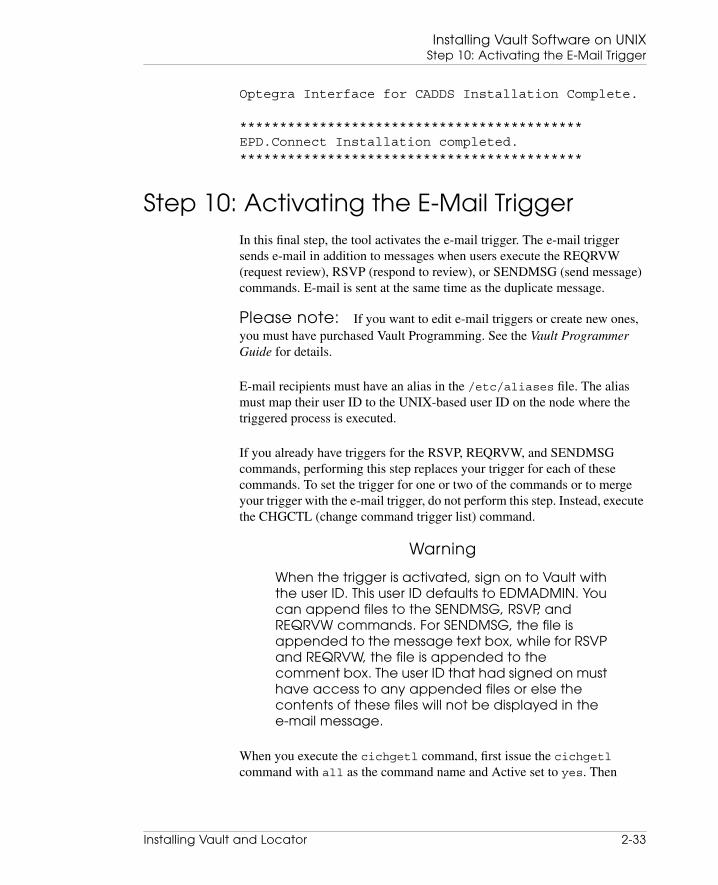
Installing Vault and Locator 2-33
Installing Vault Software on UNIXStep 10: Activating the E-Mail Trigger
Optegra Interface for CADDS Installation Complete.
*******************************************EPD.Connect Installation completed.*******************************************
Step 10: Activating the E-Mail TriggerIn this final step, the tool activates the e-mail trigger. The e-mail triggersends e-mail in addition to messages when users execute the REQRVW(request review), RSVP (respond to review), or SENDMSG (send message)commands. E-mail is sent at the same time as the duplicate message.
Please note: If you want to edit e-mail triggers or create new ones,you must have purchased Vault Programming. See the Vault ProgrammerGuide for details.
E-mail recipients must have an alias in the /etc/aliases file. The aliasmust map their user ID to the UNIX-based user ID on the node where thetriggered process is executed.
If you already have triggers for the RSVP, REQRVW, and SENDMSGcommands, performing this step replaces your trigger for each of thesecommands. To set the trigger for one or two of the commands or to mergeyour trigger with the e-mail trigger, do not perform this step. Instead, executethe CHGCTL (change command trigger list) command.
Warning
When the trigger is activated, sign on to Vault withthe user ID. This user ID defaults to EDMADMIN. Youcan append files to the SENDMSG, RSVP, andREQRVW commands. For SENDMSG, the file isappended to the message text box, while for RSVPand REQRVW, the file is appended to thecomment box. The user ID that had signed on musthave access to any appended files or else thecontents of these files will not be displayed in thee-mail message.
When you execute the cichgetl command, first issue the cichgetlcommand with all as the command name and Active set to yes. Then
Installing Vault Software on UNIXStep 10: Activating the E-Mail Trigger
2-34 Installing Vault and Locator
execute cichgetl for cireqrvw, cisendmsg, or cirsvp with the valuesthat follow.
• Active = Y
• Trigger at beginning = N
Timeout = 0
• Trigger at end = Y
Timeout = 0
• Application entity name = COMMAND_TRIGGER
You must have Vault Programming installed in order to use the CHGCTLcommand. For additional information, see the Vault System AdministratorGuide.
Enter either yes or no when the tool asks you whether it should continue.
EDM184I *******************************************EDM184I Running Vault Activate E-Mail TriggerEDM184I Module (edmaetm).EDM184I *******************************************
EDM128I *******************************************EDM128I Vault Activate E-Mail Trigger module.EDM128I (edmaetm)EDM128I This module Activates the Vault E-MailEDM128I Trigger.EDM128I It uses as input, the edmodule.defaults.shEDM128I file to obtain the appropriate informationEDM128I to perform these tasks.EDM128I *******************************************
Would you like to continue [yes]?:
EDM151I *******************************************EDM151I Signing on to Vault.EDM151I *******************************************CDMSON016I Sign on to Vault server SHWETHAcompleted successfully. You have 55 Vaultmessage(s).EDM130I *******************************************EDM130I Activating the Vault E-Mail Trigger.EDM130I *******************************************
Installing Vault and Locator 2-35
Installing Vault Software on UNIXStep 10: Activating the E-Mail Trigger
CDMCTL387I The command trigger for SENDMSG has beenCDMCTL387I changed.CDMCTL387I The command trigger for REQRVW has beenCDMCTL387I changed.CDMCTL387I The command trigger for RSVP has beenCDMCTL387I changed.CDMCTL388I The command trigger list has beenCDMCTL387I changed to active.
EDM153I *******************************************EDM153I Signing off from Vault.EDM153I *******************************************CDMSOF017I Sign off from Vault completedsuccessfully.
EDM160I *******************************************EDM160I The Vault Activate E-Mail Trigger ModuleEDM160I has completed successfully.EDM160I *******************************************
EDM186I *******************************************EDM186I The Vault Software Installation Module hasEDM186I finished successfully.EDM186IEDM186I The Vault Software has been successfullyEDM186I installed.EDM186I *******************************************


Installing Vault and Locator 3-1
Chapter 3 Postinstallation Tasksfor UNIX
This chapter discusses the final tasks in the installation of Vault andProgramming. Perform these tasks after you have installed Vault for the firsttime or after you have performed your refresh or migration.
• Supporting the Data Dictionary
• Assigning Database Users to Temporary Tablespace
• Changing Your Account Passwords
• Adding Clients and Changing Passwords in the NSM Configuration File
• Specifying Attribute Server Information in the NSM Configuration File
• Implementing Client Entries
• Distributing the PM Configuration File
• Creating Additional Storage Pools
• Setting Storage Pool Ownership and Permissions
• NFS Pool Support
• Enabling Archivelog Mode
• Setting Up a Second Oracle Control File
• Setting Environment Variables for Interfaces
• Setting Up EPD Interfaces for Vault on UNIX
• Backing Up the Vault Database

Postinstallation Tasks for UNIXSupporting the Data Dictionary
3-2 Installing Vault and Locator
Supporting the Data DictionaryAfter your first installation of Vault, you must run a script (once) to supportthe Data Dictionary for the graphical user interface and the binders facility.From the $EDM_HOME/dictionary directory, as the UNIX Vaultaccount, enter:
% ./ddinstall
If you need more information, refer to the README file in the above directory.
Assigning Database Users to TemporaryTablespace
Use the Oracle alter user command to assign the following databaseusers to a temporary tablespace so that they can create the temporarysegments within:
asm edmattr edmui pdmdm pdmqf
Here is a sample of the alter user command, showing the Oracle user IDasm being set up to use tempspace_name:
% sqlplus /nologSQL> connect / as sysdba;SQL> alter user asm temporary tablespacetempspace_name;SQL> exit;
Refer to ORACLE Server Administrator’s Guide for specific informationpertaining to the alter user command.
If you choose not to assign the database users to your own temporarytablespace, the Vault database users default to using the temporary segmentslocated in the EDM_TEMPSPACE tablespace.
Please note: Oracle9i V9.2.0.1.0 does not recommend usingtemporary segments in the Oracle9i V9.2.0.1.0 system tablespace forthird-party applications.

Installing Vault and Locator 3-3
Postinstallation Tasks for UNIXChanging Your Account Passwords
Changing Your Account PasswordsIt is optional, but recommended, that you change the passwords for theOracle accounts: asm, edmattr, edmui, pdmdm, pdmqf, and edmdv (for DVonly). To do this, enter the following commands:
% sqlplus /nologSQL> connect / as sysdba;SQL> grant connect to asm identified bynewpassword1;SQL> grant connect to edmattr identified bynewpassword2;SQL> grant connect to edmui identified bynewpassword3;SQL> grant connect to pdmdm identified bynewpassword4;SQL> grant connect to pdmqf identified bynewpassword5;SQL> grant connect to system identified bynewpassword6;
The password parameter is for the Oracle9i V9.2.0.1.0 user system andnewpassword1-n is for the new password (8 or fewer characters) for eachaccount.
Please note:
• If, as recommended, you change the passwords for the Oracle9iV9.2.0.1.0 users edmattr, edmui, pdmdm, and pdmqf, you must changethem in the nsm.config file, as shown in “Adding Clients and ChangingPasswords in the NSM Configuration File” on page 3-3.
• For the asm user, do not modify the nsm.config file.
Adding Clients and Changing Passwordsin the NSM Configuration File
After successfully installing Vault, edit the NSM configuration file to createsystem entries for your client nodes. The installation tool has already createda workable version of the file.
An example of an edited nsm.config file follows. Edited parameters are inbold. These are the portions that you must edit.

Postinstallation Tasks for UNIXAdding Clients and Changing Passwords in the NSM Configuration File
3-4 Installing Vault and Locator
Create a workstation entry for each workstation in your Vault network.
#################################################### Vault#################################################### EDMVault NSM Configuration file template## To use this template:# 1. Copy nsm.config-template to# $EDM_HOME/data/nsm.config# Edit this file by:## 1. Globally substituting “largo” for your servers# node name.# 2. Globally substituting “LARGO” for your servers# node name in upper case.# 3. Make a copy of the Client Model for each# workstation node.# Change “NODE(name)” to be the workstation’s# node name and “ALIAS(NAME)” to be the# workstation’s node name in upper case.# 4. Change OWNER(edm) to an appropriate value for# your installation.This parameter value should# match the group id for the EDMVault server# process accounts (LOG,DM,DD,,etc.). If not# properly set then the Process Control Agent# (PCA) may NOT be able to start EDM processes.# 5. Save the file after editing.###################################################
#################################################### EDMVault Server node Configuration###################################################
GROUP(edmgrp,1)
##DISTRIBUTED-VAULT##GROUP(edm1_dvgroup,1)##DISTRIBUTED-VAULT##
NODE(largo) ALIAS(LARGO,largo-gw,LARGO-GW,PDM)
DOMAIN(process_manager_domain) AE(process_manager_AE)
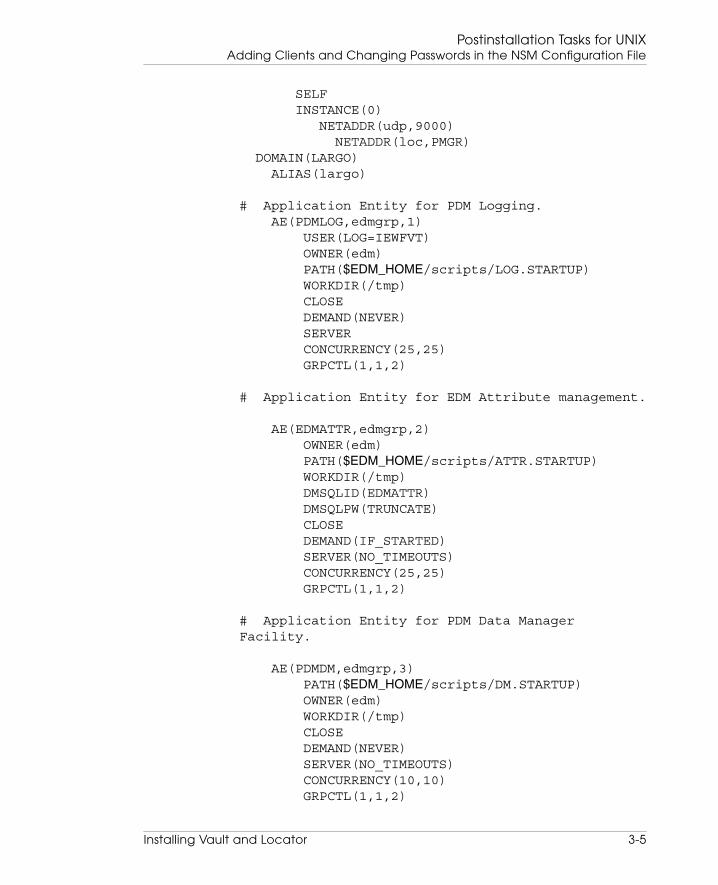
Installing Vault and Locator 3-5
Postinstallation Tasks for UNIXAdding Clients and Changing Passwords in the NSM Configuration File
SELF INSTANCE(0) NETADDR(udp,9000)
NETADDR(loc,PMGR) DOMAIN(LARGO) ALIAS(largo)
# Application Entity for PDM Logging. AE(PDMLOG,edmgrp,1) USER(LOG=IEWFVT) OWNER(edm) PATH($EDM_HOME/scripts/LOG.STARTUP) WORKDIR(/tmp) CLOSE DEMAND(NEVER) SERVER CONCURRENCY(25,25) GRPCTL(1,1,2)
# Application Entity for EDM Attribute management.
AE(EDMATTR,edmgrp,2) OWNER(edm) PATH($EDM_HOME/scripts/ATTR.STARTUP) WORKDIR(/tmp) DMSQLID(EDMATTR) DMSQLPW(TRUNCATE) CLOSE DEMAND(IF_STARTED) SERVER(NO_TIMEOUTS) CONCURRENCY(25,25) GRPCTL(1,1,2)
# Application Entity for PDM Data ManagerFacility.
AE(PDMDM,edmgrp,3) PATH($EDM_HOME/scripts/DM.STARTUP) OWNER(edm) WORKDIR(/tmp) CLOSE DEMAND(NEVER) SERVER(NO_TIMEOUTS) CONCURRENCY(10,10) GRPCTL(1,1,2)

Postinstallation Tasks for UNIXAdding Clients and Changing Passwords in the NSM Configuration File
3-6 Installing Vault and Locator
# Application Entity for PDM Data DistributionFacility.
AE(PDMDD,edmgrp,4) PATH($EDM_HOME/scripts/DD.STARTUP) OWNER(edm) WORKDIR(/tmp) USER(AUTOREGISTER=NO) USER(REGLEVEL=R) CLOSE DEMAND(IF_STARTED) SERVER CONCURRENCY(1,1) MAXINST(6) GRPCTL(1,1,2)
# Application Entity for PDM AdministrativeCommands.
AE(PDMADMN,edmgrp,5) PATH($EDM_HOME/scripts/ADMN.STARTUP) OWNER(edm) WORKDIR(/tmp) CLOSE DEMAND(IF_STARTED) SERVER CONCURRENCY(1,1) MAXINST(4) GRPCTL(1,1,2)
# Application Entity For Administrative Commands.
AE(ADMIN_SERVER,edmgrp,6) ALIAS(EDMADMINSVR) PATH($EDM_HOME/scripts/ADMIN.STARTUP) OWNER(edm) WORKDIR(/tmp) CLOSE DMSQLID(PDMDM) DMSQLPW(TRUNCATE) DEMAND(IF_STARTED) SERVER(NO_TIMEOUTS) CONCURRENCY(1,1) USER(SVR_DISPATCH=SQLSVR) USER(SVR_DB_CONNECT=YES)

Installing Vault and Locator 3-7
Postinstallation Tasks for UNIXAdding Clients and Changing Passwords in the NSM Configuration File
MAXINST(3) GRPCTL(1,1,2)
## The following AE should be uncommented in order# to run the Pro/INTRALINK Optegra Interface.# This requires the Pro/INTRALINK Optegra Software# to be installed first.#
# Application Entity for OPTCHECKER
AE(OPTCHECKER,edmilink,1) DMSQLID(PDMDM) DMSQLPW(TRUNCATE) OWNER(edm) USER(SVR_PM_BIND=YES) USER(SVR_OPTCHECKER=YES) USER(SVR_DB_CONNECT=YES) DEMAND(ANYTIME) USER(OPTCHECKER_EXECUTION_FREQUENCY=60)USER(OPTCHECKER_INIT=$EDM_HOME/reposit/optchecker.ini) USER(ILINK_HOME=$EDM_HOME) PATH($EDM_HOME/scripts/OPTCHECKER.STARTUP) WORKDIR(/tmp) MAXINST(1) CLOSE GRPCTL(1,1,2)
## The following AE should be uncommented in order# to run the E-Mail Trigger,# but this requires the EDMProjects Software to be# installed first.#
# E-Mail Command Trigger
AE(COMMAND_TRIGGER,edmgrp,7) ALIAS(TRIGGER) PATH($EDM_HOME/trig/start-COMMAND-TRIGGER) OWNER(edm) USER(CT_USERID=edmadmin) USER(CT_USERPW=TRUNCATE)

Postinstallation Tasks for UNIXAdding Clients and Changing Passwords in the NSM Configuration File
3-8 Installing Vault and Locator
WORKDIR(/tmp) CLOSE MAXINST(2) GRPCTL(1,1,0)
# TRIGGER MANAGER DEFINITION## The following AE is the TRIGGER MANAGER for# triggers for the following commands and# for the following post_command triggers;## delete# get# marka# markd# replace# store# unmark# update## These triggers, named with the following format;# pre_<cmd>_00 - for pre command triggers# post_<cmd>_00 - for post command triggers## where <cmd> is one of the preceding list,# reside, by at location;## $EDM_HOME/triggers/run/post_<cmd>_00 etc.## Uncomment this AE for using the GTM triggers, and# make appropriate changes for your site.## Please note, and modify, as necessary;## GTM_ORACLEID=PDMDM# GTM_ORACLEPW=TRUNCATE# GTM_USERID=EDMADMIN# GTM_USERPW=CHANGE# TRIG_ORACLEID=PDMDM# TRIG_ORACLEPW=TRUNCATE## You should also note the commands indicated# above must be# enabled, via the CHGCTL command for post command# triggering.
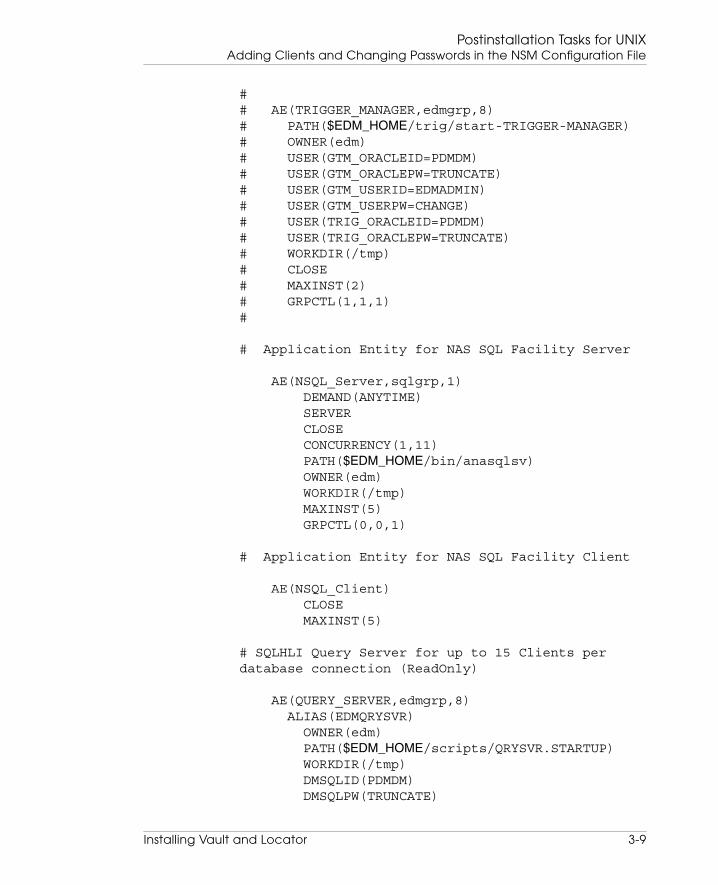
Installing Vault and Locator 3-9
Postinstallation Tasks for UNIXAdding Clients and Changing Passwords in the NSM Configuration File
## AE(TRIGGER_MANAGER,edmgrp,8)# PATH($EDM_HOME/trig/start-TRIGGER-MANAGER)# OWNER(edm)# USER(GTM_ORACLEID=PDMDM)# USER(GTM_ORACLEPW=TRUNCATE)# USER(GTM_USERID=EDMADMIN)# USER(GTM_USERPW=CHANGE)# USER(TRIG_ORACLEID=PDMDM)# USER(TRIG_ORACLEPW=TRUNCATE)# WORKDIR(/tmp)# CLOSE# MAXINST(2)# GRPCTL(1,1,1)#
# Application Entity for NAS SQL Facility Server
AE(NSQL_Server,sqlgrp,1) DEMAND(ANYTIME) SERVER CLOSE CONCURRENCY(1,11) PATH($EDM_HOME/bin/anasqlsv) OWNER(edm) WORKDIR(/tmp) MAXINST(5) GRPCTL(0,0,1)
# Application Entity for NAS SQL Facility Client
AE(NSQL_Client) CLOSE MAXINST(5)
# SQLHLI Query Server for up to 15 Clients perdatabase connection (ReadOnly)
AE(QUERY_SERVER,edmgrp,8)ALIAS(EDMQRYSVR)
OWNER(edm) PATH($EDM_HOME/scripts/QRYSVR.STARTUP) WORKDIR(/tmp) DMSQLID(PDMDM) DMSQLPW(TRUNCATE)

Postinstallation Tasks for UNIXAdding Clients and Changing Passwords in the NSM Configuration File
3-10 Installing Vault and Locator
CLOSE DEMAND(ANYTIME) SERVER CONCURRENCY(15,15) USER(SVR_DISPATCH=SQLSVR) USER(SVR_DB_CONNECT=YES) MAXINST(5) GRPCTL(1,1,2)
# SQLHLI SQL Server one Client per Server anddatabase connection (ReadWrite)
AE(SQL_SERVER,edmgrp,9)ALIAS(EDMSQLSVR)ALIAS(SQLSVR)
OWNER(edm) PATH($EDM_HOME/scripts/SQLSVR.STARTUP) WORKDIR(/tmp) DMSQLID(PDMDM) DMSQLPW(TRUNCATE) CLOSE DEMAND(ANYTIME) SERVER(NO_TIMEOUTS) CONCURRENCY(1,1) USER(SVR_DISPATCH=SQLSVR) USER(SVR_DB_CONNECT=YES) MAXINST(5) GRPCTL(1,1,2)
# PC Server for Desktop Support
AE(DESKTOP_SERVER,edmgrp,10) OWNER(edm)
PATH($EDM_HOME/scripts/DESKTOP_SERVER.STARTUP) WORKDIR(/tmp) CLOSE GRPCTL(1,1,1)
# EDM_O Server for Desktop Support
AE(DESKTOP_EDMOSRV,edmgrp,11) OWNER(edm)
PATH($EDM_HOME/scripts/DESKTOP_EDMOSRV.STARTUP)
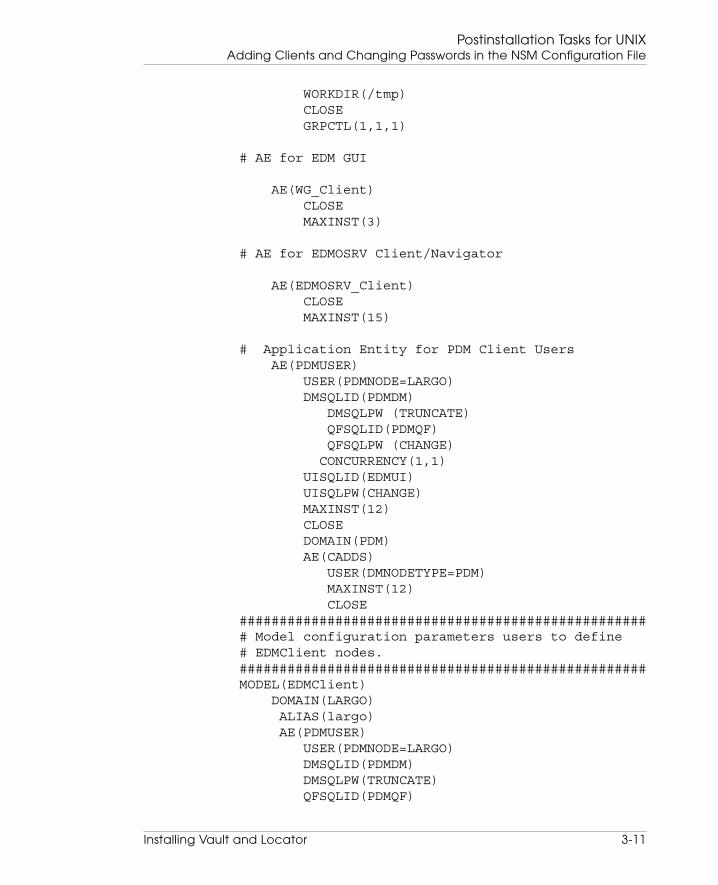
Installing Vault and Locator 3-11
Postinstallation Tasks for UNIXAdding Clients and Changing Passwords in the NSM Configuration File
WORKDIR(/tmp) CLOSE GRPCTL(1,1,1)
# AE for EDM GUI
AE(WG_Client) CLOSE MAXINST(3)
# AE for EDMOSRV Client/Navigator
AE(EDMOSRV_Client) CLOSE MAXINST(15)
# Application Entity for PDM Client Users AE(PDMUSER) USER(PDMNODE=LARGO) DMSQLID(PDMDM) DMSQLPW (TRUNCATE) QFSQLID(PDMQF) QFSQLPW (CHANGE) CONCURRENCY(1,1) UISQLID(EDMUI) UISQLPW(CHANGE) MAXINST(12) CLOSE DOMAIN(PDM) AE(CADDS) USER(DMNODETYPE=PDM) MAXINST(12) CLOSE#################################################### Model configuration parameters users to define# EDMClient nodes.###################################################MODEL(EDMClient) DOMAIN(LARGO) ALIAS(largo) AE(PDMUSER) USER(PDMNODE=LARGO) DMSQLID(PDMDM) DMSQLPW(TRUNCATE) QFSQLID(PDMQF)
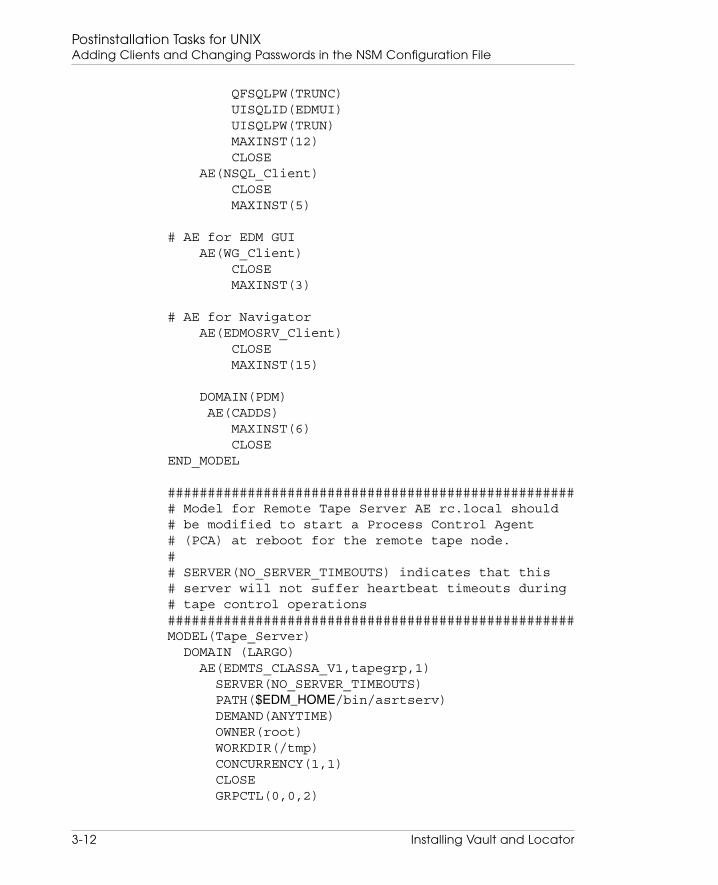
Postinstallation Tasks for UNIXAdding Clients and Changing Passwords in the NSM Configuration File
3-12 Installing Vault and Locator
QFSQLPW(TRUNC) UISQLID(EDMUI) UISQLPW(TRUN) MAXINST(12) CLOSE AE(NSQL_Client) CLOSE MAXINST(5)
# AE for EDM GUI AE(WG_Client) CLOSE MAXINST(3)
# AE for Navigator AE(EDMOSRV_Client) CLOSE MAXINST(15)
DOMAIN(PDM) AE(CADDS) MAXINST(6) CLOSEEND_MODEL
#################################################### Model for Remote Tape Server AE rc.local should# be modified to start a Process Control Agent# (PCA) at reboot for the remote tape node.## SERVER(NO_SERVER_TIMEOUTS) indicates that this# server will not suffer heartbeat timeouts during# tape control operations###################################################MODEL(Tape_Server) DOMAIN (LARGO) AE(EDMTS_CLASSA_V1,tapegrp,1) SERVER(NO_SERVER_TIMEOUTS) PATH($EDM_HOME/bin/asrtserv) DEMAND(ANYTIME) OWNER(root) WORKDIR(/tmp) CONCURRENCY(1,1) CLOSE GRPCTL(0,0,2)
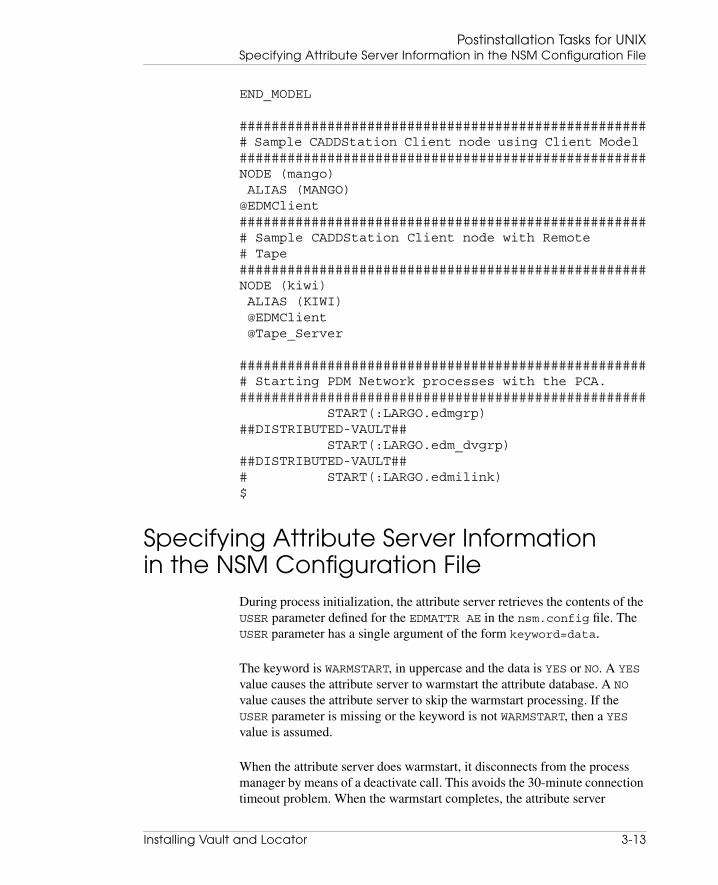
Installing Vault and Locator 3-13
Postinstallation Tasks for UNIXSpecifying Attribute Server Information in the NSM Configuration File
END_MODEL
#################################################### Sample CADDStation Client node using Client Model###################################################NODE (mango) ALIAS (MANGO)@EDMClient#################################################### Sample CADDStation Client node with Remote# Tape###################################################NODE (kiwi) ALIAS (KIWI) @EDMClient @Tape_Server
#################################################### Starting PDM Network processes with the PCA.################################################### START(:LARGO.edmgrp)##DISTRIBUTED-VAULT## START(:LARGO.edm_dvgrp)##DISTRIBUTED-VAULT### START(:LARGO.edmilink)$
Specifying Attribute Server Informationin the NSM Configuration File
During process initialization, the attribute server retrieves the contents of theUSER parameter defined for the EDMATTR AE in the nsm.config file. TheUSER parameter has a single argument of the form keyword=data.
The keyword is WARMSTART, in uppercase and the data is YES or NO. A YES
value causes the attribute server to warmstart the attribute database. A NO
value causes the attribute server to skip the warmstart processing. If theUSER parameter is missing or the keyword is not WARMSTART, then a YESvalue is assumed.
When the attribute server does warmstart, it disconnects from the processmanager by means of a deactivate call. This avoids the 30-minute connectiontimeout problem. When the warmstart completes, the attribute server
Postinstallation Tasks for UNIXImplementing Client Entries
3-14 Installing Vault and Locator
reconnects to the process manager and announces to the process managerthat it is available for user input.
Implementing Client EntriesAfter editing the nsm.config file to create entries for the client nodes,bring down the network and restart it. The network will then recognize thenew nodes. The procedure follows.
1. Log in to the Vault account.
2. To bring down the network, enter these commands:
% nsmstop -pca% nsmstop -all
3. Verify that the processes are down.
4. To bring up the network, enter this command to start the processmanager:
% PMGR.STARTUP &
5. Enter this command to start all other network processes:
% PCA.STARTUP &
Distributing the PM Configuration FileAfter you have restarted the Vault processes, distribute the Process Manager(pm.config-client) file to the client stations. The pm.config filedefines where the NSM Process Manager resides.
Copy the pm.config file (located in the $EDM_HOME/data directory) toeach workstation that will access Vault. The pm.config file must exist oneach workstation in the directory $EDM_HOME. You can use the FileTransfer Protocol (ftp) to transfer the file to each workstation that willaccess Vault.
Perform the following sequence for each Locator or Vault client system thatyou have set up in the nsm.config file to access the server.
Installing Vault and Locator 3-15
Postinstallation Tasks for UNIXCreating Additional Storage Pools
1. Log in to the Vault account:
# cd $EDM_HOME/data
2. Use the File Transfer Protocol (ftp) to connect to the client system:
# ftp client_system_nameName (client_system_name: user): edm_client_account_name
Password:
3. Change directory to the client’s $EDM_HOME/data:
ftp> cd $EDM_HOME/data
4. Copy the pm.config file to the client’s $EDM_HOME/data directory:
ftp> put pm.config-client pm.config ftp> bye
Creating Additional Storage PoolsBefore installing Vault refer to Installing Optegra Applications and followthe instructions on planning and creating storage pools.
To add the storage pools to the Vault database, you must have read and writeaccess to the storage pool directories. Storage pools must have been createdbefore your installation, refresh, or migration for you to be able to addadditional ones.
To add a storage pool, sign on to Vault as user edmadmin and issue theADDSP (Add Storage Pool) command. The ADDSP command makes astorage pool directory available for Vault file storage by mapping a Vaultlogical storage pool name to a storage pool directory.
Storage pool names can have up to 8 characters.
Warning
Once a storage pool has been added to the Vaultdatabase, neither the storage pool nor thestorage pool directory name can be removed.Files within the directory can be removed only byauthorized Vault users.
An example using the command-line format follows.
% cisignon userid=edmadmin userpw=edmadmin% ciaddsp poolname=pool1 poolinfo=/pool1

Postinstallation Tasks for UNIXSetting Storage Pool Ownership and Permissions
3-16 Installing Vault and Locator
Here is an example of adding an NFS-mounted storage pool to the database:
% ciaddsp poolname=pool2 poolinfo=/farm.pool2
Setting Storage Pool Ownership andPermissions
You can establish the ownership of storage pools and set the permissions bylogging in to the Vault server system as root:
# cd /
Next, enter the following command to change the ownership as shown in thisexample:
# chown -R edm pool1 /farm.pool2# chgrp -R dba pool1 /farm.pool2
where edm is the name of your Vault account and dba is the number of theVault group name.
Next, enter the following command to change the permissions:
# chmod -R 770 pool1 /farm.pool2
Please note: Additional steps must be performed if you are addingNFS storage pools. These are provided in the next topic, “NFS PoolSupport” on page 3-16.
NFS Pool SupportIf you have created or added NFS storage pools, you must perform thefollowing steps:
1. Get the Vault Account’s password entry information from the actualVault Server system:
% grep ^edm_account_name: /etc/passwdedm::12:5:EDM account:$EDM_HOME:/bin/csh
2. Log in as root to the REMOTE system where the NFS storage poolsactually reside.
% rlogin remote_system_name -l root

Installing Vault and Locator 3-17
Postinstallation Tasks for UNIXEnabling Archivelog Mode
3. Add the Vault Account’s password entry to the REMOTE system’s/etc/passwd file.
# vi /etc/passwdedm::12:5:EDM account:$EDM_HOME:/bin/csh
4. Make the Vault Account the owner of the NFS pool directories.
# cd / # chown -R edm pool1 pool2 # chgrp -R dba pool1 pool2
where edm is the name of your Vault account and dba is the number ofthe Vault group name.
5. Set the file protection mode to 770 for the nfs pool directories
# cd / # chmod -R 770 pool1 pool2
Enabling Archivelog ModeVault’s database recovery mechanisms require that the database be run inarchivelog mode to provide complete roll-forward recovery in the event of amedia failure, for example, a disk crash.
If the database is not in the archivelog mode, the recsp (recover storagepool) command cannot be used to restore storage pools, because theOracle9i V9.2.0.1.0 and Vault databases would no longer be synchronized.
Warning
Oracle9i V9.2.0.1.0 online redo log files should beon a different disk drive from the database files.Offline redo log files, those files that have beenarchived, should be copied to tape and removed.
See the ORACLE RDBMS Database Administrator’s Guide for instructions.

Postinstallation Tasks for UNIXSetting Up a Second Oracle Control File
3-18 Installing Vault and Locator
Setting Up a Second Oracle Control FileIt is advisable to use at least two Oracle control files, each located on adifferent device. To set up a second control file, follow these steps:
1. Log in as root on the Vault server system.
2. On another device (where Oracle is not installed), create an Oracledirectory to hold the second control file:
# cd /usr2# mkdir oracle# chown oracle_owner oracle
Where oracle_owner is the owner of the oracle account.
# chgrp dba oracle
3. Log in as Oracle on the Vault server system and shut down the Oracledatabase:
% sqlplus /nologSQL> connect / as sysdba;SQL> shutdown;SQL> exit;
4. Change to the Oracle database directory:
# cd ${ORACLE_HOME}/dbs
5. Copy the first control file to make the second control file:
# cp cntrl${ORACLE_SID}.dbf /usr2/oracle
6. Edit the init${ORACLE_SID}.ora file, adding the following line:
control_files =${ORACLE_HOME}/dbs/cntrl${ORACLE_SID}.dbf,/usr2/oracle/cntrl${ORACLE_SID}.dbf
7. Start up Oracle.
% sqlplus /nologSQL> connect / as sysdba;SQL> startup;SQL> exit;
Repeat these steps whenever you need to add more control files.
Installing Vault and Locator 3-19
Postinstallation Tasks for UNIXSetting Environment Variables for Interfaces
Setting Environment Variables forInterfaces
Log in as Vault Administrator and set the following environment variables inthe .login file after installing or refreshing Vault:
• CVEPD_WIN_CONFIG=${EPD_HOME}/data/reposit/cfgmotif.ini
• CVEPD_INIT=$HOME/cvepd.ini
Please note: Set the preceding variable if cvepd.ini is present inthe home directory.
• CVEPD_INIT=${EPD_HOME}/data/reposit/cvepd.ini
Please note: Set the preceding variable if cvepd.ini is not presentin the home directory.
• CA_BINDIR=${EPD_HOME}/bin
• CA_LIBDIR=${EPD_HOME}/data/explorer/library
• STEP_DIR=${EPD_HOME}/data/step
Please note: These variables exist in the .login-template file.When a Vault refresh is performed, the .login file of the VaultAdministrator account is not replaced by the .login-template file.Therefore, when you perform a Vault refresh, you must set these variables.
Setting Up EPD Interfaces for Vault on UNIXAfter installing or refreshing Vault, set up the EPD interfaces forPro/ENGINEER, MEDUSA, and CATIA on Vault if you use any of theseproducts. Set up these interfaces after installing Vault for the first time aswell as after a Vault refresh.
Before setting up an EPD interface on Vault, do the following:
1. Log in as Vault Administrator.
2. Add $EPD_HOME/cvperl/bin to the PATH environment variable.
3. Set the LANG variable to the appropriate value (for example, en_US andfr) depending on the locale.

Postinstallation Tasks for UNIXSetting Up EPD Interfaces for Vault on UNIX
3-20 Installing Vault and Locator
Pro/ENGINEER Support
To set up the EPD interface for Pro/ENGINEER support on Vault, do thefollowing:
1. Change directory to $EPD_HOME/install:
% cd $EPD_HOME/install
2. Execute the following command:
% ./proeinst
In the resulting output, default values are shown in brackets ([]). PressReturn to accept them. The following is a sample of the output:
Enter the user id of your Vault Administrationaccount: edm
Enter the Vault Oracle database manageruserid [pdmdm]:Enter the Vault Oracle database managerpassword [pdmdm]:
OK to add Pro/E Application Environment to OptegraVault [yes]:
Enter the Vault Oracle database manageruserid [pdmdm]:Enter the Vault Oracle database managerpassword [pdmdm]:Checking New Tables in ORACLE Database.....New tables already exist.
Enter the Vault Oracle database manageruserid [pdmdm]:Enter the Vault Oracle database managerpassword [pdmdm]:
Adding Pro/E Application to Optegra Vault.
Addition of Pro/E Application to optegra VaultComplete.
OK to install the Pro/E Vault Attributes [yes]:
Enter the EDMADMIN user password [edmadmin]:
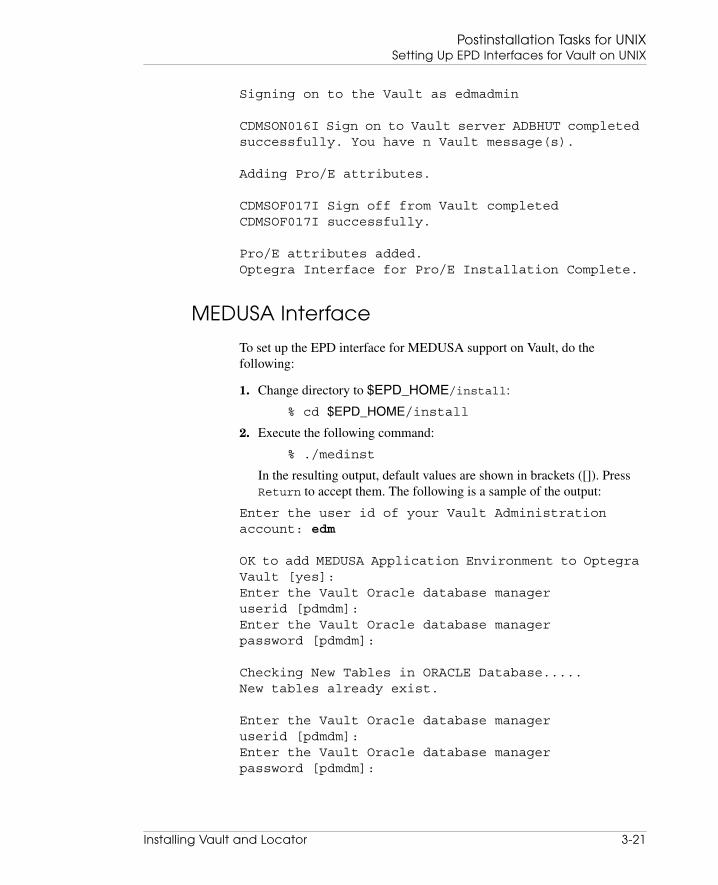
Installing Vault and Locator 3-21
Postinstallation Tasks for UNIXSetting Up EPD Interfaces for Vault on UNIX
Signing on to the Vault as edmadmin
CDMSON016I Sign on to Vault server ADBHUT completedsuccessfully. You have n Vault message(s).
Adding Pro/E attributes.
CDMSOF017I Sign off from Vault completedCDMSOF017I successfully.
Pro/E attributes added.Optegra Interface for Pro/E Installation Complete.
MEDUSA Interface
To set up the EPD interface for MEDUSA support on Vault, do thefollowing:
1. Change directory to $EPD_HOME/install:
% cd $EPD_HOME/install
2. Execute the following command:
% ./medinst
In the resulting output, default values are shown in brackets ([]). PressReturn to accept them. The following is a sample of the output:
Enter the user id of your Vault Administrationaccount: edm
OK to add MEDUSA Application Environment to OptegraVault [yes]:Enter the Vault Oracle database manageruserid [pdmdm]:Enter the Vault Oracle database managerpassword [pdmdm]:
Checking New Tables in ORACLE Database.....New tables already exist.
Enter the Vault Oracle database manageruserid [pdmdm]:Enter the Vault Oracle database managerpassword [pdmdm]:

Postinstallation Tasks for UNIXSetting Up EPD Interfaces for Vault on UNIX
3-22 Installing Vault and Locator
Adding MEDUSA Application to Optegra Vault.
OK to install the MEDUSA Vault Attributes [yes]:
Enter the EDMADMIN user password [edmadmin]:Signing on to the Vault as edmadminCDMSON016I Sign on to Vault server CHANDINICDMSON016I completed successfully. You haveCDMSON016I 69 Vault message(s).
Adding MEDUSA attributes.MEDUSA attributes added.
Optegra Interface for MEDUSA Installation Complete.
CATIA Interface
To set up the EPD interface for CATIA on Vault, do the following:
1. Change directory to $EPD_HOME/install:
% cd $EPD_HOME/install
2. Execute the following command:
% ./catinst
In the resulting output, default values are shown in brackets ([]). PressReturn to accept them. The following is a sample of the output:
Enter the user id of your Vault Administrationaccount:edm
OK to add CATIA Application Environment to OptegraVault [yes]:Enter the Vault Oracle database manageruserid [pdmdm]:Enter the Vault Oracle database managerpassword [pdmdm]:
Checking New Tables in ORACLE Database.....New tables already exist.
Enter the Vault Oracle database manageruserid [pdmdm]:Enter the Vault Oracle database managerpassword [pdmdm]:
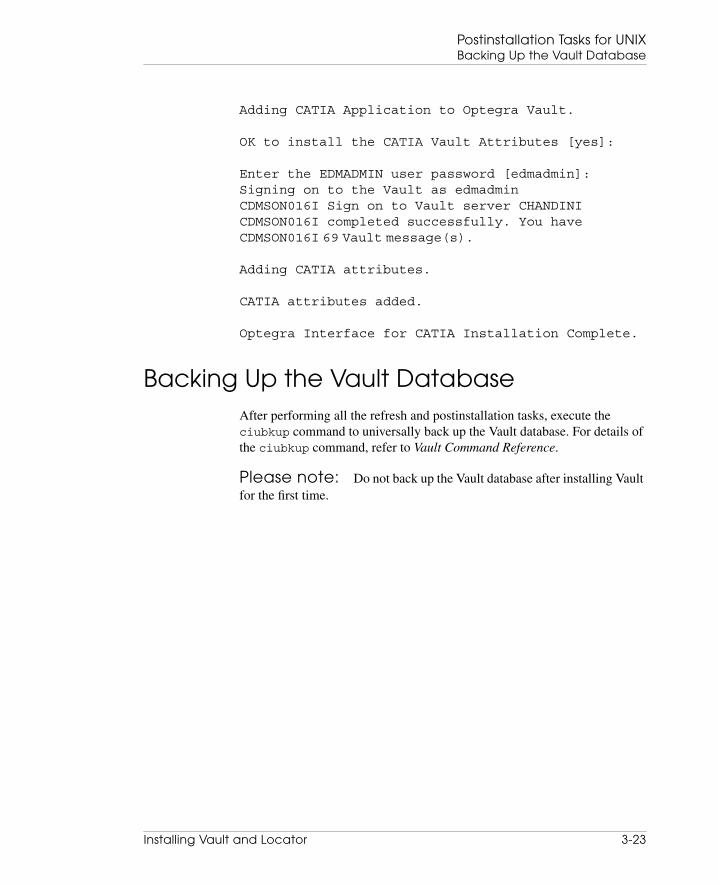
Installing Vault and Locator 3-23
Postinstallation Tasks for UNIXBacking Up the Vault Database
Adding CATIA Application to Optegra Vault.
OK to install the CATIA Vault Attributes [yes]:
Enter the EDMADMIN user password [edmadmin]:Signing on to the Vault as edmadminCDMSON016I Sign on to Vault server CHANDINICDMSON016I completed successfully. You haveCDMSON016I 69 Vault message(s).
Adding CATIA attributes.
CATIA attributes added.
Optegra Interface for CATIA Installation Complete.
Backing Up the Vault DatabaseAfter performing all the refresh and postinstallation tasks, execute theciubkup command to universally back up the Vault database. For details ofthe ciubkup command, refer to Vault Command Reference.
Please note: Do not back up the Vault database after installing Vaultfor the first time.

Installing Vault and Locator 4-1
Chapter 4 Installing DistributedVault on UNIX
This chapter contains information on installing multiple Vaults for adistributed Vault environment.
• Installing Multiple Vaults
• Adding a New DOD to a Distributed Vault
• Sample Distributed Vault Installation
• Description of Distributed Vault Tablespaces
• Changing Your Password
• DV Setup for Rulebases
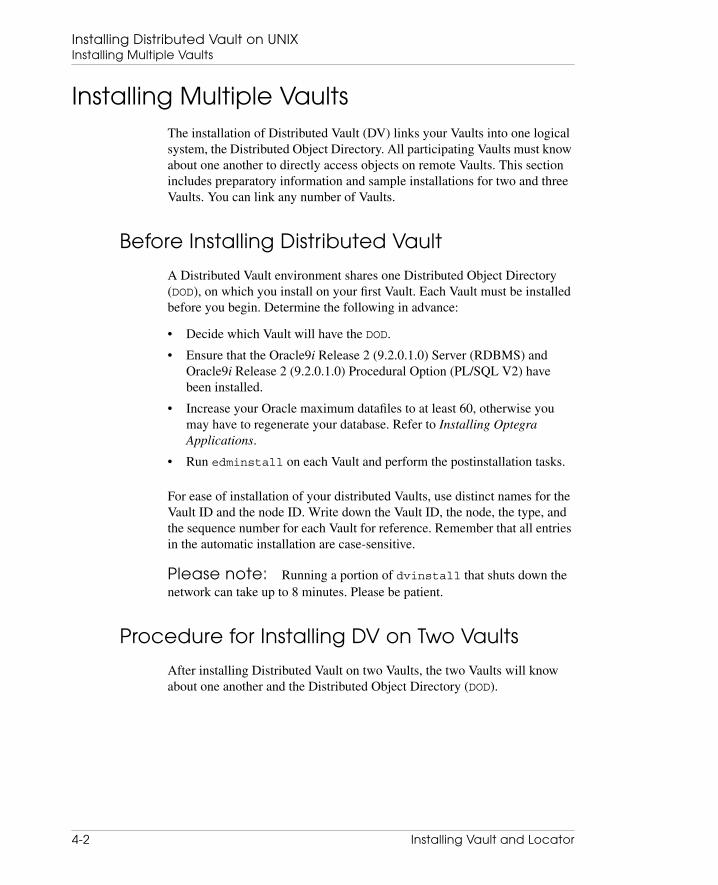
Installing Distributed Vault on UNIXInstalling Multiple Vaults
4-2 Installing Vault and Locator
Installing Multiple VaultsThe installation of Distributed Vault (DV) links your Vaults into one logicalsystem, the Distributed Object Directory. All participating Vaults must knowabout one another to directly access objects on remote Vaults. This sectionincludes preparatory information and sample installations for two and threeVaults. You can link any number of Vaults.
Before Installing Distributed Vault
A Distributed Vault environment shares one Distributed Object Directory(DOD), on which you install on your first Vault. Each Vault must be installedbefore you begin. Determine the following in advance:
• Decide which Vault will have the DOD.
• Ensure that the Oracle9i Release 2 (9.2.0.1.0) Server (RDBMS) andOracle9i Release 2 (9.2.0.1.0) Procedural Option (PL/SQL V2) havebeen installed.
• Increase your Oracle maximum datafiles to at least 60, otherwise youmay have to regenerate your database. Refer to Installing OptegraApplications.
• Run edminstall on each Vault and perform the postinstallation tasks.
For ease of installation of your distributed Vaults, use distinct names for theVault ID and the node ID. Write down the Vault ID, the node, the type, andthe sequence number for each Vault for reference. Remember that all entriesin the automatic installation are case-sensitive.
Please note: Running a portion of dvinstall that shuts down thenetwork can take up to 8 minutes. Please be patient.
Procedure for Installing DV on Two Vaults
After installing Distributed Vault on two Vaults, the two Vaults will knowabout one another and the Distributed Object Directory (DOD).

Installing Vault and Locator 4-3
Installing Distributed Vault on UNIXInstalling Multiple Vaults
Start Installation on Vault1 and Install the DOD
Install the DOD during the first installation. At the end of this procedure,Vault1 will know about Vault2.
1. Log in as Administrator (edmadmin) on Vault1.
2. Change to the $EDM_HOME/install directory.
3. Run edmdvinstall. The portion that shuts down the Vault network cantake up to 8 minutes. See the sample installation of Distributed Vault atthe end of this chapter.
# ./edmdvinstall
Please note: Answer yes when asked about installing the DOD onthis node. Continue with the installation and answer the rest of the questions.
4. Sign on as Administrator (edmadmin).
% cisignon userid=edmadmin userpw=edmadmin
5. To add Vault2, enter this command:
% ciaddvault vaultid=VAULT2 node=vault2type=vault seqno=2
Where VAULT2 is the name of the Vault you are adding.
Please note: The vaultid and node parameters are case sensitive.Shut down and restart the network processes so the command takes effect.
6. Run the following script to support Distributed Vault as the Optegraaccount, depending on either of the following two situations:
a. If ddinstall and dddvinstall were not run during thepostinstallation process of Vault installation, then do the following:
i) % cd $EDM_HOME/dictionary % ./ddinstall
Answer yes when asked about installing Distributed Vault.
ii) % cd $EDM_HOME/dictionary/dv % ./dddvinstall
Please note: The dddvinstall script is to be executed on the DODVault only.
OR
b. If ddinstall and dddvinstall were already run during thepostinstallation process of Vault installation, do the following:
i) % cd $EDM_HOME/dictionary
Installing Distributed Vault on UNIXInstalling Multiple Vaults
4-4 Installing Vault and Locator
% ./ddrefresh
Answer yes when asked about installing Distributed Vault.
ii) % cd $EDM_HOME/dictionary/dv % ./dddvrefresh
Please note: The dddvrefresh script is to be executed on the DODVault only.
For more information, refer to the README file in$EDM_HOME/dictionary.
Installing Vault2 with the DOD Remote
This procedure lets Vault2 know about the DOD location and about Vault1.
1. Log in as Administrator (edmadmin) on Vault2.
2. Change to the $EDM_HOME/install directory.
3. Run edmdvinstall.
# ./edmdvinstall
Answer no, the default, when asked about installing the DOD on thisnode.
Respond with Vault1 and Node1 about the DOD. Vault and node namesare case-sensitive.
Continue with the installation and answer the rest of the questions.
4. Sign on as Administrator (edmadmin).
% cisignon userid=edmadmin userpw=edmadmin
5. To let Vault2 know about Vault1, enter this command:
% ciaddvault vaultid=VAULT1 node=vault1type=vault seqno=2
Where VAULT1 is the name of the system you are adding.
Please note: The vaultid and node parameter is case sensitive.
Shut down and restart the network processes, so the command takeseffect.

Installing Vault and Locator 4-5
Installing Distributed Vault on UNIXInstalling Multiple Vaults
6. Run the following script to support Distributed Vault as the Optegraaccount, depending on either of the following two situations:
a. If ddinstall and dddvinstall were not run during thepostinstallation process of Vault installation, then do the following:
% cd $EDM_HOME/dictionary% ./ddinstall
OR
b. For a previously installed Vault, changed to a Distributed Vault. Ifddinstall and dddvinstall were already run during thepostinstallation process of Vault installation, then do the following:
% cd $EDM_HOME/dictionary% ./ddrefresh
Please note: For more information, refer to the README file in$EDM_HOME/dictionary.
This completes the installation for two Distributed Vaults.
Installing DV on Three or More Vaults
To install Distributed Vault on three or more Vaults, familiarize yourself withthe previous procedure for installing two Distributed Vaults. The followingmust be true of all the Vaults in the distributive vault environment:
• Each Vault knows about all other Vaults in the distributed environment.
• Each additional Distributed Vault is linked remotely to the DistributedObject Directory (DOD).
In general, if you are adding Vaults to an existing Distributed Vaultenvironment, follow this process:
1. Execute edmdvinstall to both configure the new Vault with theDistributed Vault feature and to identify the DOD-Vault to this new vault.
2. Execute ciaddvault to identify all of the other non-DOD Vaults to thenew Vault.
For all the existing Vaults, you must execute ciaddvault there as well,identifying the new Vault to each of them. Keep in mind that in order for anytwo Vaults to perform together in a Distributed Vault environment, bothvaults must be configured to know each other.

Installing Distributed Vault on UNIXAdding a New DOD to a Distributed Vault
4-6 Installing Vault and Locator
Adding a New DOD to a Distributed VaultPerform the following steps to add a new primary or secondary DOD to adistributed Vault.
Adding a Primary DOD
1. Add the primary DOD.
${EDM_HOME}/bin/adcci ADDVAULT vaultid=${DODID}vault-type=D vault-seqno=1
2. Create a LOCALDOD list.
${EDM_HOME}/bin/adcci ADDVLIST vaultlst=LOCALDOD
3. Add a primary DOD to the LOCALDOD.
${EDM_HOME}/bin/adcci ADDVLMEM vaultid=${DODID}vaultlst=LOCALDOD
Adding a Secondary DOD
1. Add the secondary DOD.
${EDM_HOME}/bin/adcci ADDVAULT vaultid=${DODID}vault-type=O vault-seqno=2
2. Create a LOCALDOD list. (The list may be already created while addingthe primary DOD.)
# ${EDM_HOME}/bin/adcci ADDVLIST vaultlst=LOCALDOD
3. Add the secondary DOD to the LOCALDOD.
${EDM_HOME}/bin/adcci ADDVLMEM vaultid=${DODID}vaultlst=LOCALDOD
Sample Distributed Vault InstallationThe following sample Distributed Vault installation is provided forreference.
Enter either yes or no when the tool asks you whether it should continue.The default values are indicated in the brackets [].
DVI001I *******************************************DVI001I Distributed Vault Software InstallationDVI001I module. (edmdvinstall)

Installing Vault and Locator 4-7
Installing Distributed Vault on UNIXSample Distributed Vault Installation
DVI001IDVI001I This Installation module installs the VaultDVI001I Software on your system by calling theDVI001I following Vault DVI001I SoftwareDVI001I Installation Modules:DVI001IDVI001I edmsncm [Vault Network Shutdown Module]DVI001I edmdvfifm [Vault Relational Database FixDVI001I Module]DVI001I edmdvmcnf [Vault Network Setup Module]DVI001I edmdvrdsm [Vault DV Relational DatabaseDVI001I Setup Module]DVI001I edmdvrdlm [Vault DV RDBMS Table CreationDVI001I and Loading Module]DVI001I edmdodrdsm [Vault DOD Relational DatabaseDVI001I Setup Module]DVI001I edmdodrdlm [Vault DOD RDBMS Table CreationDVI001I and Loading Module]DVI001I edmsnsm [Vault Network Startup Module]DVI001I edmdvadvm [Vault Add Vault and DOD toDVI001I Database Module]DVI001IDVI001I It uses as input, the edmodule.defaults.shDVI001I file to obtain the appropriate informationDVI001I to DVI001I perform these tasks.DVI001I *******************************************
Would you like to continue [yes]? :DVI088I *******************************************DVI088I Verifying ${EDM_TBL_DIRECTORY} hasDVI088I sufficient space for DistributedDVI088I Vault and Distributed Object DirectoryDVI088I Tablespaces.DVI088I *******************************************
EDM211I *******************************************EDM211I Running Vault Server Network Cleanup ModuleEDM211I (edmsncm).EDM211I *******************************************
EDM206I *******************************************EDM206I Vault Server Network Cleanup module.EDM206I (edmsncm)EDM206I

Installing Distributed Vault on UNIXSample Distributed Vault Installation
4-8 Installing Vault and Locator
EDM206I This module stops the Vault Server NetworkEDM206I Processes in preparation for an VaultEDM206I Software Refresh.EDM206IEDM206I It uses as input, the edmodule.defaults.shEDM206I file to obtain the appropriate informationEDM206I to perform these tasks.EDM206I *******************************************
Would you like to continue [yes]? :
EDM207I *******************************************EDM207I Stopping the Vault Server NetworkEDM207I Processes.EDM207IEDM207I This will take a few minutes; please beEDM207I patient.EDM207I *******************************************
EDM208I *******************************************EDM208I The Vault Server Network Processes haveEDM208I been successfully stopped.EDM208IEDM208I *******************************************DVI053I *******************************************DVI053I Running the Distributed Vault DatabaseDVI053I Configuration Module (edmdvfifm).DVI053I *******************************************
DVI061I *******************************************DVI061I Distributed Vault Database ConfigurationDVI061I Module (edmdvfifm).DVI061IDVI061I This module ensures the db_files parameterDVI061I in the init${ORACLE_SID}.ora file isDVI061I sufficient.DVI061IDVI061I It uses as input, the edmodule.defaults.shDVI061I file to obtain the appropriate informationDVI061I to perform these DVI061I tasks.DVI061I *******************************************
Would you like to continue [yes]? :
DVI054I *******************************************
Installing Vault and Locator 4-9
Installing Distributed Vault on UNIXSample Distributed Vault Installation
DVI054I Counting the number of Database files.DVI054I *******************************************
DVI055I *******************************************DVI055I Shutting Down the Oracle Database Instance.DVI055I *******************************************
DVI056I *******************************************DVI056I Modifying the "db_files" parameter in theDVI056I init${ORACLE_SID}.ora file.DVI056I *******************************************
DVI057I *******************************************DVI057I Restarting the Oracle Database Instance.DVI057I *******************************************
DVI059I *******************************************DVI059I The Distributed Vault DatabaseConfiguration Module hasDVI059I completed successfully.DVI059I *******************************************DVI089I *******************************************DVI089I Running the Distributed Vault NetworkDVI089I Configuration Module (edmdvmcnf).DVI089I *******************************************
DVI062I *******************************************DVI062I Distributed Vault Network ConfigurationDVI062I Module (edmdvmcnf).DVI062IDVI062I This module adds the Distributed Vault AE'sDVI062I to the network configuration file.DVI062IDVI062I It uses as input, the edmodule.defaults.shDVI062I file to obtain the appropriate informationDVI062I to perform these tasks.DVI062I *******************************************
Would you like to continue [yes]? :
DVI110I *******************************************DVI110I Modifying nsm.config file for AutomaticDVI110I Registration with STORE/GET.DVI110I *******************************************

Installing Distributed Vault on UNIXSample Distributed Vault Installation
4-10 Installing Vault and Locator
Would you like to enable AUTO REGISTRATION(*optional) [YES]:
Please enter REGISTRATION LEVEL (R, W, Q, or O)[R]:DVI110I *******************************************DVI110I Modifying nsm.config file for AutomaticDVI110I Registration with STORE/GET.DVI110I *******************************************
DVI111I *******************************************DVI111I You must shutdown and restart Vault forDVI111I Automatic Registration setup changes to beDVI111I effective.DVI111I *******************************************
Please note: The lines of code between the # marks appear only ifyou alter the existing settings for Autoregistration. For further details onAutoregistration refer “Sample Distributed Vault Installation” on page 4-6.
DVI059I *******************************************
DVI059I The Distributed Vault DatabaseDVI059I Configuration Module has completedDVI059I successfully.DVI059I *******************************************
DVI091I *******************************************DVI091I You will be asked to select the name of theDVI091I LOCAL Vault. A list of Vault names will beDVI091I read from the DVI091I nsm.config file. YouDVI091I must select one from the list.DVI091I *******************************************
DVI065I *******************************************DVI065I Adding the Distributed Vault AE's to theDVI065I installation configuration files.DVI065I *******************************************
DVI063I *******************************************DVI063I Please specify where the Distributed VaultDVI063I Object Directory will reside.DVI063I *******************************************
Install Distributed Object Directory on this node?[no]: yes

Installing Vault and Locator 4-11
Installing Distributed Vault on UNIXSample Distributed Vault Installation
DVI066I *******************************************DVI066I Adding the Distributed Vault ObjectDVI066I Directory AE's to the installationDVI066I configuration files.DVI066I *******************************************
DVI059I *******************************************DVI059I The Distributed Vault DatabaseDVI059I Configuration Module has completedDVI059I successfully.DVI059I *******************************************
DVI002I *******************************************DVI002I Running the Distributed Relational DatabaseDVI002I Setup Module (edmdvrdsm).DVI002I *******************************************DVI026I *******************************************DVI026I Distributed Vault Database Setup module.DVI026I (edmdvrdsm)DVI026IDVI026I This module creates the Distributed VaultDVI026I Database Tablespace files.DVI026IDVI026I It uses as input, the edmodule.defaults.shDVI026I file to obtain the appropriate informationDVI026I to perform these tasks.DVI026I *******************************************
Would you like to continue [yes]? :
DVI027I *******************************************DVI027I Creating the EDM_DISTDATA Tablespace.DVI027I *******************************************
DVI029I *******************************************DVI029I Creating the EDM_DISTDATA_INDX Tablespace.DVI029I *******************************************
DVI031I *******************************************DVI031I Creating the EDM_EVENT_MANAGER Tablespace.DVI031I *******************************************
DVI033I *******************************************DVI033I Creating the EDM_EVENTMAN_INDX Tablespace.

Installing Distributed Vault on UNIXSample Distributed Vault Installation
4-12 Installing Vault and Locator
DVI033I *******************************************
DVI035I *******************************************DVI035I Creating the EDM_ACTIONDATA Tablespace.DVI035I *******************************************
DVI037I *******************************************DVI037I Creating the EDM_ACTDATA_INDX Tablespace.DVI037I *******************************************
DVI039I *******************************************DVI039I Creating the EDM_SUBSCRIPTION Tablespace.DVI039I *******************************************
DVI041I *******************************************DVI041I Creating the EDM_SUBSCR_INDX Tablespace.DVI041I *******************************************
DVI043I *******************************************DVI043I Creating the EDM_DISTCONTROL Tablespace.DVI043I *******************************************
DVI045I *******************************************DVI045I Creating the EDM_DISTCONT_INDX Tablespace.DVI045I *******************************************
DVI047I *******************************************DVI047I Creating the EDM_EDITSUPPORT Tablespace.DVI047I *******************************************
DVI049I *******************************************DVI049I Creating the EDM_EDITSUPP_INDX Tablespace.DVI049I *******************************************
DVI051I *******************************************DVI051I The Distributed Vault Relational DatabaseSetup ModuleDVI051I has completed successfully.DVI051I *******************************************
DVI004I *******************************************DVI004I Running the Distributed Relational DatabaseTableDVI004I Creation and Loading Module (edmdvrdlm).DVI004I *******************************************

Installing Vault and Locator 4-13
Installing Distributed Vault on UNIXSample Distributed Vault Installation
DVI008I *******************************************DVI008I Distributed Vault Database Table CreationDVI008I and Loading module. (edmdvrdlm)DVI008IDVI008I This module creates and loads theDVI008I Distributed Vault Database Tables.DVI008IDVI008I It uses as input, the edmodule.defaults.shDVI008I file to obtain the appropriate informationDVI008I to perform these tasks.DVI008I *******************************************
Would you like to continue [yes]? :DVI023I *******************************************DVI023I Creating and Loading the Distributed VaultDVI023I Database Tables.DVI023I *******************************************
DVI009I *******************************************DVI009I Generating the Distributed Vault DatabaseDVI009I Tables.DVI009I *******************************************
./edmdvgen: EDMVault SQL Table and View Creationfor Distributed Vaults
DVI011I *******************************************DVI011I Generating the Distributed Vault DatabaseDVI011I Table Indexes.DVI011I *******************************************
./edmdvindex: EDMVault SQL Index Creation forDistributed Vault
DVI013I *******************************************DVI013I Generating the Distributed Vault DatabaseDVI013I Table Views.DVI013I *******************************************
./edmdvview: Distributed Vault View Creation
DVI015I *******************************************DVI015I Loading the Distributed Vault DatabaseDVI015I Triggers.
Installing Distributed Vault on UNIXSample Distributed Vault Installation
4-14 Installing Vault and Locator
DVI015I *******************************************
./edmdvdbt: EDMVault Database Trigger Load forDistributed Vault
DVI017I *******************************************DVI017I Loading the Distributed Vault Access andDVI017I Security Manager Logic.DVI017I *******************************************
./ldasmdv: EDMVault Run-time SQL Logic load forDistributed VaultDVI019I *******************************************DVI019I Loading the Distributed Vault DatabaseDVI019I Tables.DVI019I *******************************************
./ldedmdv: EDMVault Control Table Load forDistributed Vault
DVI021I *******************************************DVI021I Loading the Distributed Vault EditingDVI021I Logic.DVI021I *******************************************
./ldedmedi: EDMVault Control Table Load forDistributed Vault
DVI024I *******************************************DVI024I The Distributed Vault Relational DatabaseDVI024I Table Creation and Loading module hasDVI024I completed successfully.DVI024I *******************************************
DVI071I *******************************************DVI071I Running the Distributed Object DirectoryDVI071I Tablespace Creation Module (edmdodrdsm).DVI071I *******************************************
DVI072I *******************************************DVI072I Distributed Object Directory TablespaceDVI072I Creation Module (edmdodrdsm).DVI072IDVI072I This module create the Distributed ObjectDVI072I Directory Tablespace in the

Installing Vault and Locator 4-15
Installing Distributed Vault on UNIXSample Distributed Vault Installation
DVI072I ${EDM_TBL_DIRECTORY} directory.DVI072IDVI072I It uses as input, the edmodule.defaults.shDVI072I file to obtain the appropriate informationDVI072I to perform these tasks.DVI072I *******************************************
Would you like to continue [yes]? :
DVI074I *******************************************DVI074I Creating the EDM_OBJ_DIRECTORY Tablespace.DVI074I *******************************************
DVI086I *******************************************DVI086I Creating the EDM_OBJ_DIR_INDX Tablespace.DVI086I *******************************************
DVI073I *******************************************DVI073I The Distributed Object Directory TablespaceDVI073I Creation Module has completedDVI073I successfully.DVI073I *******************************************
DVI071I *******************************************DVI071I Running the Distributed Object DirectoryDVI071I Tablespace Creation Module (edmdodrdsm).DVI071I *******************************************
DVI076I *******************************************DVI076I Distributed Vault Object Directory DatabaseDVI076I Table Creation and Loading moduleDVI076I (edmdodrdlm).DVI076IDVI076I This module creates and loads theDVI076I Distributed Object Directory DatabaseDVI076I Tables.DVI076IDVI076I It uses as input, the edmodule.defaults.shDVI076I file to obtain the appropriate informationDVI076I to perform these tasks.DVI076I *******************************************
Would you like to continue [yes]? :
DVI083I *******************************************

Installing Distributed Vault on UNIXSample Distributed Vault Installation
4-16 Installing Vault and Locator
DVI083I Creating and Loading the Distributed ObjectDVI083I Directory Database Tables.DVI083I *******************************************
DVI077I *******************************************DVI077I Generating the Distributed Object DirectoryDVI077I Database Tables.DVI077I *******************************************
./edmdodgen: EDMVault SQL Table and View Creationfor Distributed Vaults
DVI108I *******************************************DVI108I Running alter the object directory tableDVI108I for DV part num changes.DVI108I *******************************************
./optpartnumdv: Alter the object directory tablefor DV part num changes.
DVI082I *******************************************DVI082I Generating the Distributed Object DirectoryDVI082I Database Table Indexes.DVI082I *******************************************
./edmdodindex: EDMVault SQL Index Creation forDistributed Vault
DVI084I *******************************************DVI084I The Distributed Object Directory RelationalDVI084I Database Table Creation and Loading moduleDVI084I has completed successfully.DVI084I *******************************************
EDM180I *******************************************EDM180I Running Vault Server Network Startup ModuleEDM180I (edmsnsm).EDM180I *******************************************
EDM124I *******************************************EDM124I Vault Server Network Startup module.EDM124I (edmsnsm)EDM124IEDM124I This module starts the Vault Server NetworkEDM124I Processes.
Installing Vault and Locator 4-17
Installing Distributed Vault on UNIXSample Distributed Vault Installation
EDM124IEDM124I It uses as input, the edmodule.defaults.shEDM124I file to obtain the appropriate informationEDM124I to perform these tasks.EDM124I *******************************************
Would you like to continue [yes]? :
EDM126I *******************************************EDM126I Starting the Vault Server NetworkEDM126I Processes.EDM126IEDM126I The Vault Server Network Processes areEDM126I being started in background.EDM126IEDM126I This will take a few minutes; please beEDM126I patient.EDM126I *******************************************
EDM127I *******************************************EDM127I The Vault Server Network Processes haveEDM127I been successfully started.EDM127I *******************************************
DVI096I *******************************************DVI096I Adding the Local Vault and the DistributedDVI096I Object Directory to the Database.DVI096I *******************************************
DVI095I *******************************************DVI095I Distributed Vault Add Vault and DistributedDVI095I Object Directory Module (edmdvadvm).DVI095IDVI095I This module adds the Local Vault and theDVI095I Distributed Object Directory to theDVI095I database.DVI095IDVI095I It uses as input, the edmodule.defaults.shDVI095I file to obtain the appropriate informationDVI095I to perform these tasks.DVI095I *******************************************
Would you like to continue [yes]? :
EDM151I *******************************************
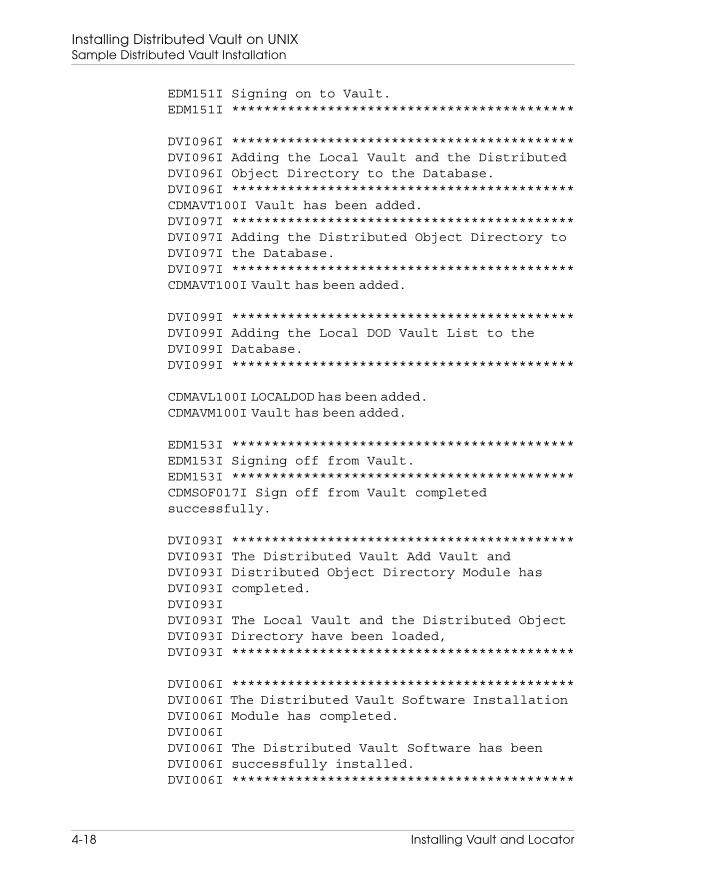
Installing Distributed Vault on UNIXSample Distributed Vault Installation
4-18 Installing Vault and Locator
EDM151I Signing on to Vault.EDM151I *******************************************
DVI096I *******************************************DVI096I Adding the Local Vault and the DistributedDVI096I Object Directory to the Database.DVI096I *******************************************CDMAVT100I Vault has been added.DVI097I *******************************************DVI097I Adding the Distributed Object Directory toDVI097I the Database.DVI097I *******************************************CDMAVT100I Vault has been added.
DVI099I *******************************************DVI099I Adding the Local DOD Vault List to theDVI099I Database.DVI099I *******************************************
CDMAVL100I LOCALDOD has been added.CDMAVM100I Vault has been added.
EDM153I *******************************************EDM153I Signing off from Vault.EDM153I *******************************************CDMSOF017I Sign off from Vault completedsuccessfully.
DVI093I *******************************************DVI093I The Distributed Vault Add Vault andDVI093I Distributed Object Directory Module hasDVI093I completed.DVI093IDVI093I The Local Vault and the Distributed ObjectDVI093I Directory have been loaded,DVI093I *******************************************
DVI006I *******************************************DVI006I The Distributed Vault Software InstallationDVI006I Module has completed.DVI006IDVI006I The Distributed Vault Software has beenDVI006I successfully installed.DVI006I *******************************************

Installing Vault and Locator 4-19
Installing Distributed Vault on UNIXDescription of Distributed Vault Tablespaces
Description of Distributed VaultTablespaces
This section describes the RDBMS tablespaces for Distributed Vault. Atablespace is the location within the relational database where the relationaldatabase tables are created. A rollback segment is the location within therelational database where a relational database transaction is stored until acommit operation is accomplished.
EDM_ACTIONDATA
DM_ACTION_TEMPLATEDM_ACTTEMPLATE_SUBDM_ACTION_QUEUEDM_ACTION_DATADM_ACTMANAGER
This tablespace contains tables related to the Action Manager.DM_ACTION_TEMPLATE, DM_ACTTEMPLATE_SUB tables are static and definepossible actions for subscription purposes.
DM_ACTION_QUEUE, DM_ACTION_DATA, and DM_ACTMANAGER are highlyactive insert/query/delete tables, driven by the Event Manager, whichpopulates DM_ACTION_QUEUE and DM_ACTION_DATA, and the ActionManager, which queries and deletes from those tables and inserts/deletesfrom DM_ACTMANAGER.
These tables — DM_ACTION_QUEUE, DM_ACTION_DATA, andDM_ACTMANAGER — receive high activity rates when registered files/partsare accessed or when subscriptions are being executed.
EDM_DISTCONTROL
DM_DISTRIBUTION_HISTDM_DISTRIBUTION_CONTROL
These tables are accessed by Export/Import and the Import Manager. Theyare used to control export/import activities and to record the history ofexport/import. For the DM_DISTRIBUTION_CONTROL table, a row is createdfor each export operation, for each importer listed in the export vault list.The DM_DISTRIBUTION_HIST table will contain a row for each exportoperation and a row for each import operation.
Installing Distributed Vault on UNIXDescription of Distributed Vault Tablespaces
4-20 Installing Vault and Locator
EDM_DISTCONT_INDX
DM_DISTH_INDX ON DM_DISTRIBUTION_HIST (by ObjectName)DM_DISTHT_INDX ON DM_DISTRIBUTION_HIST (by Tag)DM_DISTC_INDX ON DM_DISTRIBUTION_CONTROL (by Tag)
This tablespace contains the indexes for the DM_DISTRIBUTION_HIST andDM_DISTRIBUTION_CONTROL tables.
EDM_DISTDATA
DM_VAULT_CONFIGDM_USER_ALIASDM_VAULT_LISTDM_VAULT_LISTIDDM_DIST_TAG
This tablespace contains essential control tables for Distributed Vault.
Most notable is the DM_VAULT_CONFIG table, which is accessed for alldistributed Vault transactions (query access, for the most part), includingCILOCATE, CIEXPORT, CILOCATE, CIIMPORT, the Import Manager, EventManager, and the Action Manager.
Update/Insert accesses are minimal.
EDM_DISTDATA_INDX
DM_VAULT_INDX ON DM_VAULT_CONFIGDM_USERALIAS_INDX ON DM_USER_ALIASDM_VAULTLIST_INDX ON DM_VAULT_LISTDM_VAULTLISTID_INDX ON DM_VAULT_LISTIDDM_TAG_INDX ON DM_DIST_TAG
This tablespace contains indexes for the table located in EDM_DISTDATA
tablespace.

Installing Vault and Locator 4-21
Installing Distributed Vault on UNIXDescription of Distributed Vault Tablespaces
EDM_EDITSUPPORT
DM_KEYWORD_EDIT
This tablespace contains the table used for editing subscription parameters.Access rates are low, occurring only during the processing of CIADDSUB.
EDM_EVENT_MANAGER
DM_EVENT_CODEDM_EVENT_QUEUE
This tablespace contains the DM_EVENT_QUEUE, the table which holds allevents arising out of the Vault for files/parts that are either registered or thathave outstanding subscriptions.
DM_EVENT_QUEUE table is highly active with frequent insert/query/deleteactivity. The degree of activity is a function of the amount of Vault activitythat takes place on registered or subscribed files/parts.
DM_EVENT_CODE table is used by graphical user interface only.
EDM_EVENTMAN_INDX
DM_EVENT_INDX ON DM_EVENT_CODEDM_EQ_SUB_INDX ON DM_EVENT_QUEUEDM_EQ_XCTN_INDX ON DM_EVENT_QUEUE
This tablespace contains the indexes for EDM_EVENT_MANAGER tables.
EDM_OBJ_DIRECTORY
DM_OBJECT_DIRECTORYDM_OBJ_NAME1_INDX ON DM_OBJECT_DIRECTORYDM_OBJ_NAME3_INDX ON DM_OBJECT_DIRECTORYDM_OBJ_NAMROW_INDX ON DM_OBJECT_DIRECTORY
This tablespace contains the Distributed Object Directory and its indexes.This table is highly accessed for all types of insert, update, query, and deleteactivity. The volume of activity is directly influenced by the number ofregistered files/parts stored therein, in conjunction with the rate of theiraccess within the participating vaults.

Installing Distributed Vault on UNIXDescription of Distributed Vault Tablespaces
4-22 Installing Vault and Locator
EDM_SUBSCRIPTION
DM_REGISTRATIONDM_SUBSCRIPTIONDM_SUBSCRIPT_SUB
This tablespace contains the registration and subscription tables used byREGISTER, ADDSUB, DELSUB, EXPORT, IMPORT, and the ImportManager.
These tables are highly accessed for query purposes. Update activity issmall, on the order of <10 updates per registered file/part.DM_REGISTRATION is EDM_SUBSCR_INDX
This tablespace contains indexes for EDM_SUBSCRIPTION tables.
EDM_SUBSCR_INDX
This tablespace contains indexes for EDM_SUBSCRIPTION tables.
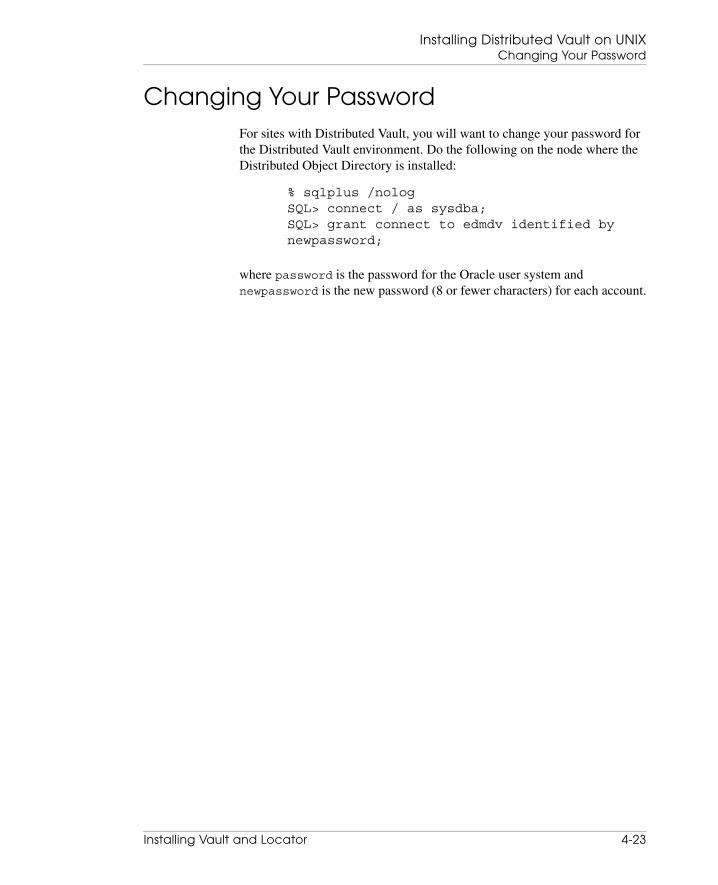
Installing Vault and Locator 4-23
Installing Distributed Vault on UNIXChanging Your Password
Changing Your PasswordFor sites with Distributed Vault, you will want to change your password forthe Distributed Vault environment. Do the following on the node where theDistributed Object Directory is installed:
% sqlplus /nologSQL> connect / as sysdba;SQL> grant connect to edmdv identified bynewpassword;
where password is the password for the Oracle user system andnewpassword is the new password (8 or fewer characters) for each account.
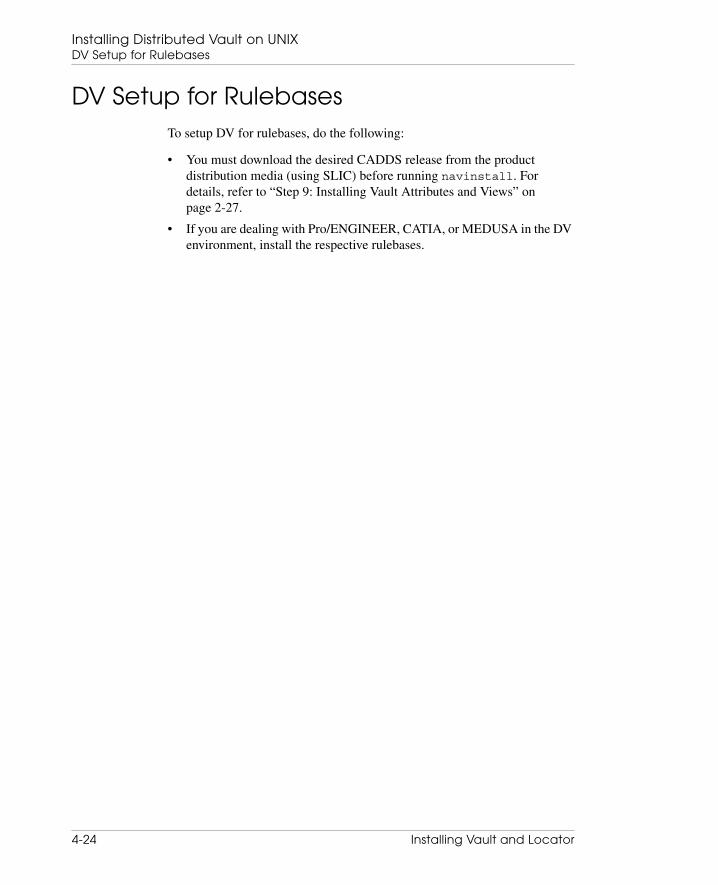
Installing Distributed Vault on UNIXDV Setup for Rulebases
4-24 Installing Vault and Locator
DV Setup for RulebasesTo setup DV for rulebases, do the following:
• You must download the desired CADDS release from the productdistribution media (using SLIC) before running navinstall. Fordetails, refer to “Step 9: Installing Vault Attributes and Views” onpage 2-27.
• If you are dealing with Pro/ENGINEER, CATIA, or MEDUSA in the DVenvironment, install the respective rulebases.
Installing Vault and Locator 5-1
Chapter 5 Installing Oracle9i forVault
This release of Optegra supports Oracle9i Release 2 (9.2.0.1.0). This chapterprovides instructions on installing Oracle on operating systems supported byOptegra.
Please note: Unless specifically mentioned, the term “Oracle” inthis chapter refers to Oracle9i Release 2 (9.2.0.1.0).
• Preinstallation Tasks
• Installing Oracle on Sun Solaris
• Installing Oracle on HP HP-UX
• Installing Oracle on IBM AIX
• Installing Oracle on Windows NT
• Postinstallation Tasks on UNIX
• Postinstallation Tasks on Windows NT

Installing Oracle9i for VaultPreinstallation Tasks
5-2 Installing Vault and Locator
Preinstallation TasksBefore you install Oracle, perform the following tasks described in thissection.
Preparing Directories and Accounts
Before you install Oracle or Optegra, set up the directory structure for bothaccounts:
1. Decide where to locate the Oracle home directory, $ORACLE_HOME.For example, /opt/app/oracle. Refer to “Location of$ORACLE_HOME” on page 5-2.
Please note: For all platforms, $ORACLE_HOME must point toan actual path, not a link.
2. Pick a name for the Oracle database ($ORACLE_SID).
3. Decide where to locate the $EPD_HOME home directory.
4. Create Vault and Oracle accounts in the /etc/passwd file.
Location of $ORACLE_HOME
When you install Optegra applications, the installation setup programexpects the $ORACLE_HOME directory to be the same as the homedirectory of the Oracle Administration account. If it has another location,follow these steps:
1. Run edminstall as explained in the Vault Programmer Guide.
a. Complete the edmsirm module for installation requirements. Themodule creates edmodule.defaults.sh in$EDM_HOME/install and prompts you with a series ofquestions.
b. Answer no when asked if you want to continue to the next step. Youcan return to this point after you complete the next step.
2. Open a shell window. Edit the edmodule.defaults.sh file by enteringthe correct value of Oracle home.
3. Go back to the install process and answer yes when asked if you want tocontinue.
4. Follow the installation procedures for your operating system in thischapter.

Installing Vault and Locator 5-3
Installing Oracle9i for VaultInstalling Oracle on Sun Solaris
Installing Oracle on Sun SolarisThe following sections provide instructions for installing Oracle on the SunSolaris operating system.
Setting Up the Oracle Account
To set up an Oracle account:
1. Log in as root.
2. Verify that the required Solaris packages are installed:
# pkginfo -i SUNWarc SUNWbtool SUNWlibm# pkginfo -i SUNWlibms SUNWsprot SUNWtoo# pkginfo -i SUNWhea
3. Set the following shared memory and semaphore parameters in the/etc/system file:
# Shared memory, semaphore parameters for# Oracle 9i 9.2.0.1.0:
set shmsys:shminfo_shmmax=4294967295set shmsys:shminfo_shmmin=1set shmsys:shminfo_shmseg=10set shmsys:shminfo_shmmni=100
set semsys:seminfo_semmns=1000set semsys:seminfo_semmni=100set semsys:seminfo_semmsl=250
4. Configure the operating system resources such that the system has atleast the following resources:
• If the /tmp and /var/tmp directories have less than 400 MBavailable space, identify a directory (alt_tmp_dir) containing atleast 400 MB.
For C shell:
# setenv TEMP alt_tmp_dir# chmod 777 $TEMP
For Bourne shell:
# set TEMP=alt_tmp_dir# export TEMP# chmod 777 $TEMP

Installing Oracle9i for VaultInstalling Oracle on Sun Solaris
5-4 Installing Vault and Locator
Use the alt_tmp_dir directory in circumstances where /tmp cannotbe expanded to meet the free space requirements.
• 256 MB of RAM.
5. Verify that ftp is working.
# ftp remote_server_nameftp> put test_filenameftp> get test_filename
6. Verify that the following line exists in the /etc/services file (used bythe TCP/IP Protocol Adapter).
listener_name port#/protocol
where,
• listener_name is the name of the Oracle listener. The default orrecommended name is listener
• port# is the port number on which the Oracle listener listens forTCP/IP connections. The recommended port number is 1521.
• protocol is the protocol of the Oracle listener.
Example:
listener 1521/tcp
7. Create and identify the mount point (mp0) for the Oracle owner andsoftware. The Oracle software typically needs 3.5 GB of space. Createthe app directory if it does not exist.
# cd mp0
# mkdir app
Please note: Define the user and group locally rather than resolvingvia network service, such as NIS.
8. Add the dba group. Verify by checking the /etc/group file:
# more /etc/group | grep dba# groupadd -g 101 -o dba
9. Create the oracle owner.
# useradd -c “Optegra Oracle dba” -d \/mp0/app/oracle -g dba -s /bin/csh \-m oracle_owner
where oracle_owner is the UNIX ID of the Oracle owner.
The -s option sets the C shell as the default shell. Do not use this optionfor the Bourne shell.
10.Set the Oracle owner's password:
# passwd oracle_owner
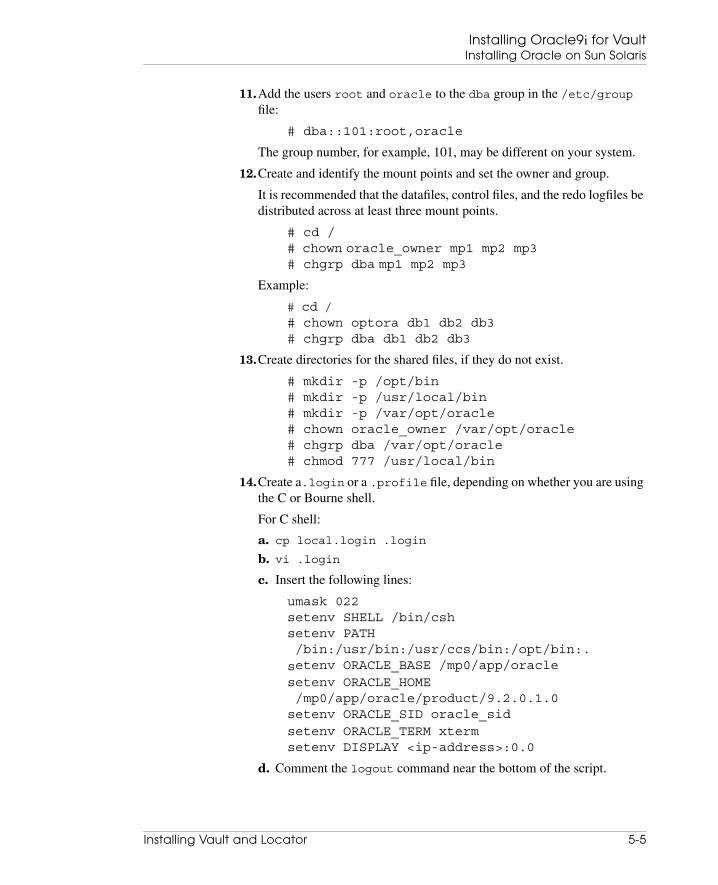
Installing Vault and Locator 5-5
Installing Oracle9i for VaultInstalling Oracle on Sun Solaris
11.Add the users root and oracle to the dba group in the /etc/groupfile:
# dba::101:root,oracle
The group number, for example, 101, may be different on your system.
12.Create and identify the mount points and set the owner and group.
It is recommended that the datafiles, control files, and the redo logfiles bedistributed across at least three mount points.
# cd /# chown oracle_owner mp1 mp2 mp3# chgrp dba mp1 mp2 mp3
Example:
# cd /# chown optora db1 db2 db3# chgrp dba db1 db2 db3
13.Create directories for the shared files, if they do not exist.
# mkdir -p /opt/bin# mkdir -p /usr/local/bin# mkdir -p /var/opt/oracle# chown oracle_owner /var/opt/oracle# chgrp dba /var/opt/oracle# chmod 777 /usr/local/bin
14.Create a.login or a .profile file, depending on whether you are usingthe C or Bourne shell.
For C shell:
a. cp local.login .loginb. vi .login
c. Insert the following lines:
umask 022setenv SHELL /bin/cshsetenv PATH /bin:/usr/bin:/usr/ccs/bin:/opt/bin:.setenv ORACLE_BASE /mp0/app/oraclesetenv ORACLE_HOME /mp0/app/oracle/product/9.2.0.1.0setenv ORACLE_SID oracle_sidsetenv ORACLE_TERM xtermsetenv DISPLAY <ip-address>:0.0
d. Comment the logout command near the bottom of the script.

Installing Oracle9i for VaultInstalling Oracle on Sun Solaris
5-6 Installing Vault and Locator
For Bourne shell:
a. chmod 755 .profileb. vi .profile
c. Comment the following lines:
PATH=/usr/bin:/usr/ucb:/etc:.export PATH
d. Insert the following lines:
umask 022PATH=/bin:/usr/bin:/usr/ccs/bin:/opt/bin:.ORACLE_BASE=/mp0/app/oracleORACLE_HOME=/mp0/app/oracle/product/9.2.0.1.0ORACLE_SID=oracle_sidORACLE_TERM=xtermDISPLAY=<ip-address>:0.0export PATH ORACLE_BASE ORACLE_HOMEexport ORACLE_SID ORACLE_TERM DISPLAY
e. Comment the exit command near the bottom of the script.
Please note: If the /usr/ucb directory is required, place it at theend of the path.
15.Before running the Oracle Universal Installer, verify whether you can runthe following command:
# /usr/bin/x11/xclock
16.Restart the computer. Log in as the Oracle user and check the loginenvironment.
Please note: Ensure that the CLASS_PATH variable is not set in thesystem environment.
Installing the Oracle Server
To install the Oracle server:
1. Log in as oracle.
Please note: The Oracle user name is assumed to be oracle.
2. Insert the first CD-ROM from the set of Oracle 9.2.0.1.0 (Enterpriseedition) CD-ROMs.

Installing Vault and Locator 5-7
Installing Oracle9i for VaultInstalling Oracle on Sun Solaris
3. Change (cd) to the / directory and type:
% ./cdrom/runInstaller
4. The Oracle Universal Installer window opens along with the Welcomescreen.
a. Click Installed Products. In the Inventory window that opens,verify that there are no installed products and click Close.
b. Click Next in the Welcome screen.
5. The Inventory Location window opens.
a. Specify the base directory in What would you like as the basedirectory? field. The default base directory is$ORACLE_BASE/oraInventory.
b. Click OK.
6. The UNIX Group Name window opens. Specify the UNIX Group Nameas dba and click Next.
7. The File Locations window opens.
a. In the Source field, specify the path of the file representing theproduct or products that you want to install.
/cdrom/stage/products.jar
b. In the Destination field, specify the path for Oracle Home:
/mp0/app/oracle/product/9.2.0.1.0
c. Click Next.
8. The Available Products window opens. Select Oracle9i Database9.2.0.1.0 and click Next.
9. The Installation Types window opens. Select the Custom option andclick Next.
10.The Available Product Components window opens allowing you to selectthe component. Clear all options except Oracle9i 9.2.0.1.0. ClickNext.
11.The Component Locations window opens. You can select alternativelocations for some components and also verify the required and availabledisk space for installation of the selected components. Click Next.
12. In the Privileged Operating System Groups window, specify the groupsas follows:
Database Administrator (OSDBA) Group: dbaDatabase Operator (OSOPER) Group: dba
Click Next.

Installing Oracle9i for VaultInstalling Oracle on Sun Solaris
5-8 Installing Vault and Locator
13.The Upgrading or Migrating an Existing Database window opens if anOracle installation exists on the machine. Do not select the Upgrade orMigrate option. Click Next.
14.The Create Database window opens. Click Yes and then Next.
15.The Choose JDK Home Directory window opens. In the Enter JDKHome field, specify the path for the JDK home directory.
16.The Summary window opens. Verify the summary of all the settings. If atree option appears in red, verify and correct it. Click Install. The Oracleinstallation procedure starts and the progress is displayed in a progresswindow.
17.You may be prompted to insert the next CD-ROM from the set of Oracle9.2.0.1.0 (Enterprise edition) CD-ROMs. If prompted, remove the earlierCD-ROM, insert the next CD-ROM, and specify the complete path of theCD-ROM.
18.The Setup Privileges window opens and prompts you to run/mp0/app/oracle/product/9.2.0.1.0/root.sh.
To perform root installation for Oracle:
a. Log in as root.
b. Run the root.sh script as follows:
sucd $ORACLE_HOME/./root.sh
The following messages are displayed:
Running Oracle9 root.sh script...
The following environment variables are setas:ORACLE_OWNER=optoraORACLE_HOME=/opt/app/oracle/product/9.2.0.1.0
c. When prompted specify the path for the local bin directory as follows.
Enter the full pathname of the local bindirectory: [/usr/local/bin]:
The following messages are displayed:
Entry will be added to the/var/opt/oracle/oratabfile by Database Configuration Assistant whena database is created.Finished running generic part of root.shscript. Now product-specific root actionswill be performed.
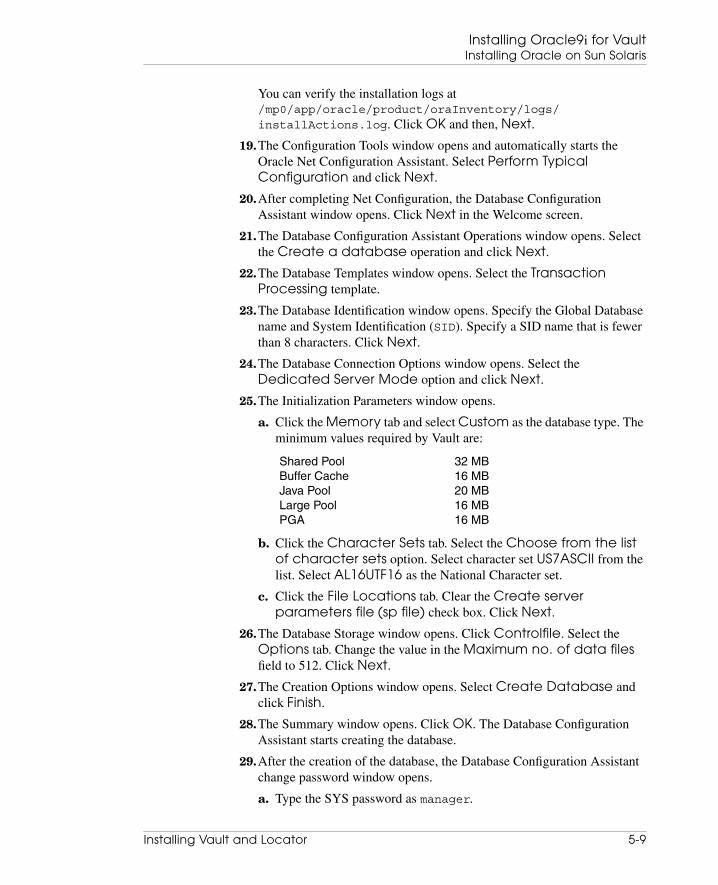
Installing Vault and Locator 5-9
Installing Oracle9i for VaultInstalling Oracle on Sun Solaris
You can verify the installation logs at/mp0/app/oracle/product/oraInventory/logs/installActions.log. Click OK and then, Next.
19.The Configuration Tools window opens and automatically starts theOracle Net Configuration Assistant. Select Perform TypicalConfiguration and click Next.
20.After completing Net Configuration, the Database ConfigurationAssistant window opens. Click Next in the Welcome screen.
21.The Database Configuration Assistant Operations window opens. Selectthe Create a database operation and click Next.
22.The Database Templates window opens. Select the TransactionProcessing template.
23.The Database Identification window opens. Specify the Global Databasename and System Identification (SID). Specify a SID name that is fewerthan 8 characters. Click Next.
24.The Database Connection Options window opens. Select theDedicated Server Mode option and click Next.
25.The Initialization Parameters window opens.
a. Click the Memory tab and select Custom as the database type. Theminimum values required by Vault are:
b. Click the Character Sets tab. Select the Choose from the listof character sets option. Select character set US7ASCII from thelist. Select AL16UTF16 as the National Character set.
c. Click the File Locations tab. Clear the Create serverparameters file (sp file) check box. Click Next.
26.The Database Storage window opens. Click Controlfile. Select theOptions tab. Change the value in the Maximum no. of data filesfield to 512. Click Next.
27.The Creation Options window opens. Select Create Database andclick Finish.
28.The Summary window opens. Click OK. The Database ConfigurationAssistant starts creating the database.
29.After the creation of the database, the Database Configuration Assistantchange password window opens.
a. Type the SYS password as manager.
Shared Pool 32 MBBuffer Cache 16 MBJava Pool 20 MBLarge Pool 16 MBPGA 16 MB

Installing Oracle9i for VaultInstalling Oracle on HP HP-UX
5-10 Installing Vault and Locator
b. For the SYSTEM password, specify a password other than manager,as the SYSTEM password cannot be the same as the default password(manager) at this stage.
c. Click Exit.
30.The End of Installation window opens. Click Exit. You are prompted forconfirmation. Click Yes.
31.For the postinstallation tasks, refer “Postinstallation Tasks on UNIX” onpage 5-29.
Installing Oracle on HP HP-UXThe following sections provide instructions for installing Oracle on theHP HP-UX operating system.
Setting Up the Oracle Account
To set up the Oracle account on an HP HP-UX operating system:
1. Log in as root.
2. Set the shared memory and semaphore parameters in the/stand/system file using the sam utility as follows:
a. Choose Kernel Configuration.
b. Choose Configurable Parameters.
c. Set the following variables to the values shown next to them:
shmmax=1073741824shmmni=100shmseg=10semmns=200semmni=70
d. Choose Actions/Create a New Kernel. A new kernel is createdand you are forced to restart the system. This results in moving thenew kernel into place and saving existing information to thestand/system directory. If necessary, perform a soft restart of thesystem using /etc/reboot.
e. After the system has been restarted, run the HP_UX systemadministration utility sam to ensure that the changed parameters havetaken affect.
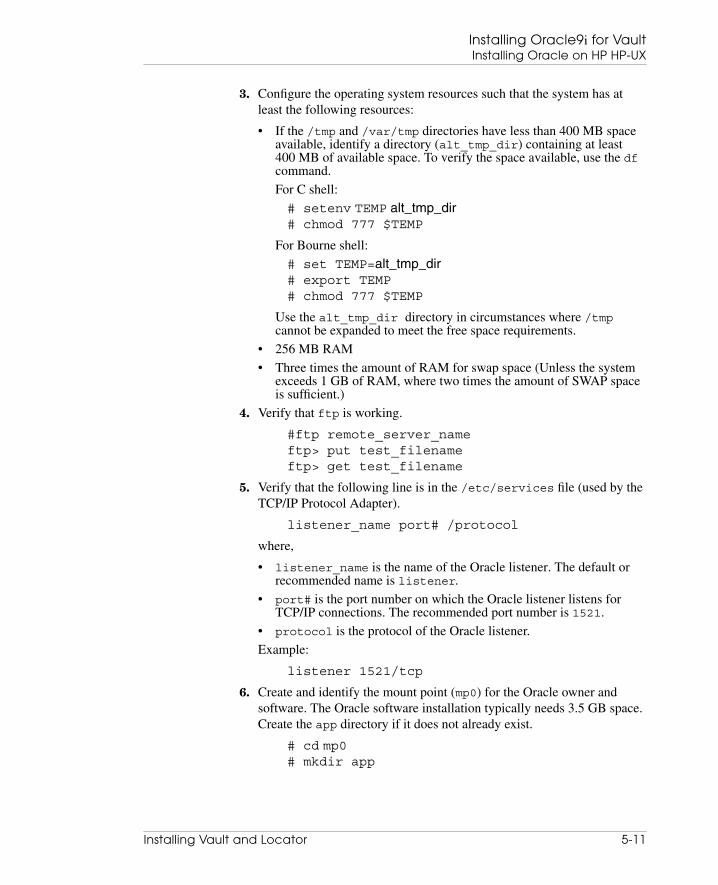
Installing Vault and Locator 5-11
Installing Oracle9i for VaultInstalling Oracle on HP HP-UX
3. Configure the operating system resources such that the system has atleast the following resources:
• If the /tmp and /var/tmp directories have less than 400 MB spaceavailable, identify a directory (alt_tmp_dir) containing at least400 MB of available space. To verify the space available, use the dfcommand.
For C shell:
# setenv TEMP alt_tmp_dir# chmod 777 $TEMP
For Bourne shell:
# set TEMP=alt_tmp_dir# export TEMP# chmod 777 $TEMP
Use the alt_tmp_dir directory in circumstances where /tmpcannot be expanded to meet the free space requirements.
• 256 MB RAM
• Three times the amount of RAM for swap space (Unless the systemexceeds 1 GB of RAM, where two times the amount of SWAP spaceis sufficient.)
4. Verify that ftp is working.
#ftp remote_server_nameftp> put test_filenameftp> get test_filename
5. Verify that the following line is in the /etc/services file (used by theTCP/IP Protocol Adapter).
listener_name port# /protocol
where,
• listener_name is the name of the Oracle listener. The default orrecommended name is listener.
• port# is the port number on which the Oracle listener listens forTCP/IP connections. The recommended port number is 1521.
• protocol is the protocol of the Oracle listener.
Example:
listener 1521/tcp
6. Create and identify the mount point (mp0) for the Oracle owner andsoftware. The Oracle software installation typically needs 3.5 GB space.Create the app directory if it does not already exist.
# cd mp0# mkdir app

Installing Oracle9i for VaultInstalling Oracle on HP HP-UX
5-12 Installing Vault and Locator
Please note: Define the user and group locally rather than resolvingvia network service, such as NIS.
7. Add the dba group. Verify by checking the /etc/group file:
# more /etc/group | grep dba# groupadd -g 101 -o dba
8. Create the oracle owner:
useradd -c “Optegra Oracle dba” -d/mp0/app/oracle -g dba -s /bin/csh-m oracle_owner
where oracle_owner is the UNIX ID of the Oracle owner.
The -s option indicates C shell. Do not use this option for Bourne shell.
9. Set the Oracle owner's password:
# passwd oracle_owner
10.Add the users root and oracle to the dba group in the /etc/groupfile:
# dba::101:root,oracle
The group number, for example, 101, may be different on your system.
11.Create and identify the mount points and set the owner and group.
It is recommended that the datafiles, control files, and the redo logfiles bedistributed across at least three mount points.
# cd /# chown oracle_owner mp1 mp2 mp3# chgrp dba mp1 mp2 mp3
Example:
# cd /
# chown optora db1 db2 db3# chgrp dba db1 db2 db3
12.Create directories for the shared files, if they do not exist.
# mkdir -p /opt/bin# mkdir -p /usr/local/bin# mkdir -p /var/opt/oracle# chown oracle_owner /var/opt/oracle# chgrp dba /var/opt/oracle# chmod 777 /usr/local/bin
Installing Vault and Locator 5-13
Installing Oracle9i for VaultInstalling Oracle on HP HP-UX
13.Create a .login or a .profile file, depending on whether you areusing the C or Bourne shell:
For C shell:
a. chmod 744 .login
b. vi .login
c. Insert the following lines:
umask 022setenv SHELL /bin/cshsetenv PATH \/bin:/usr/bin:/usr/ccs/bin:/opt/bin:.setenv ORACLE_BASE /mp0/app/oraclesetenv ORACLE_HOME/mp0/app/oracle/product/9.2.0.1.0setenv ORACLE_SID oracle_sidsetenv ORACLE_TERM xtermsetenv DISPLAY <ip-address>:0.0
d. Comment the logout command near the bottom of the script.
For Bourne shell:
a. chmod 744 .login (to enable editing)
b. vi .profile
c. Comment the following lines:
PATH=/usr/bin:/usr/ucb:/etc:.export PATH
d. Insert the following lines:
umask 022PATH=/bin:/usr/bin:/usr/ccs/bin:/opt/bin:.ORACLE_BASE=/mp0/app/oracleORACLE_HOME=/mp0/app/oracle/product/9.2.0.1.0ORACLE_SID=oracle_sidORACLE_TERM=xtermDISPLAY=<ip-address>:0.0export PATH ORACLE_BASE ORACLE_HOMEexport ORACLE_SID ORACLE_TERM DISPLAY
e. Comment the exit command near the bottom of the script.
14.Before running the Oracle Universal Installer, verify whether you can runthe following command:
# /usr/bin/x11/xclock
15.Check if you have the X-library symbolic links under the /usr/libdirectory. Due to a known HP problem (Doc.id. KBRC00003627), the

Installing Oracle9i for VaultInstalling Oracle on HP HP-UX
5-14 Installing Vault and Locator
default HP-UX 64 operating system installation does not create a fewrequired X-library symbolic links. Create these links manually beforestarting the Oracle9i installation. You must have superuser privileges torun the following commands.
# su - root# cd /usr/lib# ln -s /usr/lib/libX11.3 libX11.sl# ln -s /usr/lib/libXIE.2 libXIE.sl# ln -s /usr/lib/libXext.3 libXext.sl# ln -s /usr/lib/libXhp11.3 libXhp11.sl# ln -s /usr/lib/libXi.3 libXi.sl# ln -s /usr/lib/libXm.4 libXm.sl# ln -s /usr/lib/libXp.2 libXp.sl# ln -s /usr/lib/libXt.3 libXt.sl# ln -s /usr/lib/libXtst.2 libXtst.sl
16.Download and install JDK 1.3.1 from the following location:
http://www.hp.com/products1/unix/java/
Contact HP support if you need assistance in downloading or installingthe JDK.
17.Shut down any Oracle database instances before running therootpre.sh script. Do not run the rootpre.sh script if you have anewer version of an Oracle database already installed on your system.
Use the following command to run the rootpre.sh script:
# /cdrom/rootpre.sh
18.Restart the machine. Log in as oracle and check the login environment.
Please note: Ensure that the CLASSPATH variable is not set in thesystem environment.
Installing the Oracle Server
Follow the installation instructions outlined in the following sections.
Mounting the CD-ROM
To mount the CD-ROM:
1. Use a system editor to add the following line to the etc/pfs_fstab file:
device_file mount_point filesystem_typetranslation_method
Installing Vault and Locator 5-15
Installing Oracle9i for VaultInstalling Oracle on HP HP-UX
where,
device_file is the CD-ROM device file.
mount_point is the mount point.
filesystem_type is the CD-ROM to be mounted.
For example:
/dev/dsk/c5t2d0 /SD_CDROM pfs-rrip xlat=unix 0 0
Use the following command to determine the device file:
# ioscan -fun -Cdisk
2. Log in as root.
3. Run the following command:
# nohup /usr/sbin/pfs_mountd &
4. Run the following command:
# nohup /usr/sbin/pfsd &
5. Insert the CD-ROM and run the following command to mount theCD-ROM:
# /usr/sbin/pfs_mount /SD_CDROM
6. Exit the superuser account.
# exit
Installing the Server
To install the Oracle server:
1. Log in as oracle.
2. Insert the first CD-ROM from the set of Oracle 9.2.0.1.0 (Enterpriseedition) CD-ROMs. Mount the CD-ROM as described in the sectionabove.
3. Change (cd) to the / directory and type:
% ./cdrom/runInstaller
4. The Oracle Universal Installer window opens along with the Welcomescreen.
a. Click Installed Products. In the Inventory window that opens,verify that there are no installed products and click Close.
b. Click Next in the Welcome screen.
5. The Inventory Location window opens.

Installing Oracle9i for VaultInstalling Oracle on HP HP-UX
5-16 Installing Vault and Locator
a. Specify the base directory in What would you like as the basedirectory? field. The default base directory is$ORACLE_BASE/oraInventory.
b. Click OK.
6. The UNIX Group Name window opens. Specify the UNIX Group Nameas dba. Click Next.
7. The File Locations window opens.
a. In the Source field, specify the path of the file representing theproduct or products that you want to install.
/cdrom/stage/products.jar
b. In the Destination field, specify the path for Oracle Home:
/mp0/app/oracle/product/9.2.0.1.0
c. Click Next.
8. The Available Products window opens. Select Oracle9i EnterpriseEdition 9.2.0.1.0 and click Next.
9. The Installation Types window opens. Select the Custom option andthen click Next.
10.The Available Product Components window opens allowing you to selectthe component. Clear all options except Oracle9i 9.2.0.1.0. ClickNext.
11.The Component Locations window opens. You can select alternativelocations for some components and also verify the required and availabledisk space for installation of the selected components. Click Next.
12. In the Privileged Operating System Groups window, specify groups asfollows:
Database Administrator (OSDBA) Group: dbaDatabase Operator (OSOPER) Group: dba
Click Next.
13.The Upgrading or Migrating an Existing Database window opens if anOracle installation exists on the machine. Do not select the Upgrade orMigrate option. Click Next.
14.The Create Database window opens. Click Yes and then Next.
15.The Choose JDK Home Directory window opens. In the Enter JDKHome field, specify the path for the JDK home directory.
16.The Summary window opens. Verify the summary of all the settings. If atree option appears in red, verify and correct it. Click Install. The Oracleinstallation procedure starts and the progress is displayed in a progresswindow.
Installing Vault and Locator 5-17
Installing Oracle9i for VaultInstalling Oracle on HP HP-UX
17.You may be prompted to insert the next CD-ROM from the set of Oracle9.2.0.1.0 (Enterprise edition) CD-ROMs. If prompted, remove the earlierCD-ROM, insert the next CD-ROM, and specify the complete path of theCD-ROM.
18.The Setup Privileges window opens and prompts you to run/mp0/app/oracle/product/9.2.0.1.0/root.sh.
To perform the root installation for Oracle:
a. Log in as root.
b. Run the root.sh script as follows:
sucd $ORACLE_HOME/./root.sh
The following messages are displayed:
Running Oracle9 root.sh script...
The following environment variables are setas:ORACLE_OWNER=optoraORACLE_HOME=/opt/app/oracle/product/9.2.0.1.0
c. When prompted specify the path for the local bin directory as follows.
Enter the full pathname of the local bindirectory: [/usr/local/bin]:
The following messages are displayed:
Entry will be added to the/var/opt/oracle/oratabfile by Database Configuration Assistant whena database is created.Finished running generic part of root.shscript. Now product-specific root actionswill be performed.
You can verify the installation logs at/mp0/app/oracle/product/oraInventory/logs/installActions.log. Click OK and then, Next.
19.The Configuration Tools window opens and automatically starts theOracle Net Configuration Assistant. Select Perform TypicalConfiguration and click Next.
20.After completing Net Configuration, the Database ConfigurationAssistant window opens. Click Next in the Welcome screen.
21.The Database Configuration Assistant Operations window opens. Selectthe Create a database operation and click Next.

Installing Oracle9i for VaultInstalling Oracle on HP HP-UX
5-18 Installing Vault and Locator
22. .The Database Templates window opens. Select the TransactionProcessing template.
23.The Database Identification window opens. Specify the Global Databasename and System Identification (SID). Choose a SID name that is lessthan 8 characters.Click Next.
24.The Database Connection Options window opens. Select theDedicated Server Mode option and click Next.
25.The Initialization Parameters window opens.
a. Click the Memory tab and select Custom as the database type. Theminimum values required by Vault are:
b. Click the Character Sets tab. Select the Choose from the listof character sets option. Select character set US7ASCII from thelist. Select AL16UTF16 as the National Character set.
c. Click the File Locations tab. Clear the Create serverparameters file (sp file) check box. Click Next.
26.The Database Storage window opens. Click Controlfile. Select theOptions tab. Change the value in the Maximum no. of data filesfield to 512. Click Next.
27.The Creation Options window opens. Select Create Database andclick Finish.
28.The Summary window opens. Click OK. The Database ConfigurationAssistant starts creating the database.
29.After the creation of the database, the Database Configuration Assistantchange password window opens.
a. Type the SYS password as manager.
b. For the SYSTEM password, specify a password other than manager,as the SYSTEM password cannot be the same as the default password(manager) at this stage.
c. Click Exit.
30.The End Of Installation window opens. Click Exit. A message asking forconfirmation appears. Click Yes.
31.For the postinstallation tasks refer to “Postinstallation Tasks on UNIX”on page 5-29.
Shared Pool 32 MBBuffer Cache 16 MBJava Pool 20 MBLarge Pool 16 MBPGA 16 MB

Installing Vault and Locator 5-19
Installing Oracle9i for VaultInstalling Oracle on IBM AIX
Installing Oracle on IBM AIXThe following sections provide instructions for installing Oracle in an IBMAIX operating environment.
Setting Up the Oracle Account
To set up the Oracle account on an IBM AIX operating system:
1. Log in as root.
2. The operating system manages the kernel parameters. Do not changethem. Use the smit utility to monitor the usage of the various systemresources.
3. Configure operating system resources such that the system has at leastthe following resources:
• If the /tmp and /var/tmp directories have less than 400MB spaceavailable, identify a directory (alt_tmp_dir) containing at least400MB of available space that can be used temporarily. This can beverified using the df command.
For C shell:
# setenv TEMP alt_tmp_dir# chmod 777 $TEMP
For Bourne shell:
# set TEMP=alt_tmp_dir# export TEMP# chmod 777 $TEMP
Use the alt_tmp_dir directory in circumstances where /tmpcannot be expanded to meet the free space requirements.
• 256 MB RAM
• Two times the amount of RAM for swap space (On systems withmore than 2 GB of RAM, the requirements for swap space can belowered. Swap space should never be less than RAM.)
4. Verify that ftp is working.
#ftp remote_server_nameftp> put test_filenameftp> get test_filename
5. Verify that the following line is in the /etc/services file (used by theTCP/IP Protocol Adapter).
listener_name port#/protocol

Installing Oracle9i for VaultInstalling Oracle on IBM AIX
5-20 Installing Vault and Locator
where,
• listener_name is the name of the Oracle listener. The default orrecommended name is listener.
• port# is the port number on which the Oracle listener listens forTCP/IP connections. The recommended port number is 1521.
• protocol is the protocol of the Oracle listener.
Example:
listener 1521/tcp
6. Create and identify a mount point (mp0) for the Oracle owner andsoftware. The Oracle software installation typically needs 3.5 GB ofspace. Create the app directory if it does not already exist.
# cd mp0# mkdir app
Please note: Define the user and group locally rather than resolvingvia network service, such as NIS.
7. Add the dba group with a group ID (GID) of 101:
# mkgroup - “A” id=101 dba
8. Use mkuser, which supplies the UID number and adds the Oracle user(named oracle) to both the dba and oper groups.
# mkuser -id=101 pgrp=dba \home=/mp0/app/oracle \shell=/bin/csh oracle
9. Set the Oracle owner's password:
# passwd oracle_owner
10.Add the users root and oracle to the dba group in the /etc/groupfile:
# dba::101:root,oracle
The group number, for example, 101, may be different on your system.
11.Create and identify the mount point and set the owner and group.
It is recommended that the datafiles, control files, and the redo logfiles bedistributed across at least three mount points.
# cd /# chown oracle_owner mp1 mp2 mp3# chgrp dba mp1 mp2 mp3
Installing Vault and Locator 5-21
Installing Oracle9i for VaultInstalling Oracle on IBM AIX
Example:
# cd /# chown optora db1 db2 db3# chgrp dba db1 db2 db3
12.Create directories for shared files (if they do not already exist):
# mkdir -p /opt/bin# mkdir -p /usr/local/bin# chmod 777 /usr/local/bin
13.Create a .login or a .profile file, depending on whether you areusing the C or Bourne shell.
For C shell:
a. chmod 744 .login
b. vi .login
c. Insert the following lines:
umask 022setenv SHELL /bin/cshsetenv PATH/bin:/usr/bin:/usr/ccs/bin:/opt/bin:.setenv ORACLE_BASE /mp0/app/oraclesetenv ORACLE_HOME \/mp0/app/oracle/product/9.2.0.1setenv ORACLE_SID oracle_sidsetenv ORACLE_TERM xtermsetenv DISPLAY <ip-address>:0.0
d. Comment out the logout command near the bottom of the script.
For Bourne shell:
a. chmod 744 .profile (to enable editing)b. vi .profile
c. Comment the following lines:
PATH=/usr/bin:/usr/ucb:/etc:.export PATH
d. Insert the following lines:
umask 022PATH=/bin:/usr/bin:/usr/ccs/bin:/opt/bin:.ORACLE_BASE=/mp0/app/oracleORACLE_HOME=/mp0/app/oracle/product/9.2.0.1.0ORACLE_SID=oracle_sidORACLE_TERM=xtermDISPLAY=<ip-address>:0.0

Installing Oracle9i for VaultInstalling Oracle on IBM AIX
5-22 Installing Vault and Locator
export PATH ORACLE_BASE ORACLE_HOMEexport ORACLE_SID ORACLE_TERM DISPLAY
e. Comment the exit command near the bottom of the script.
Please note: If the /usr/ucb directory is required, place it at theend of the path.
14.Before running the Oracle Universal Installer, verify whether you can runthe following command:
# /usr/bin/x11/xclock
15.Ensure that asynchronous I/O (aio) is configured at system restart (asroot user):
# lsdev -Cc aio
16.Verify that the status shown is Available. If the status shown isDefined, then change the state to be configured at system restart toAvailable after running the following command:
# smit chaio
17.Verify that the fileset bos.adt.libm has been installed.
# lslpp -l bos.adt.libm
If it is not installed, install it using the smit utility.
18.Download and install JDK 1.3.1 from the following location:
http://www.ibm.com/developersworks/java/jdk/aix/index.html.
Contact IBM support if you need assistance in downloading or installingthe JDK.
Please note: Ensure that the variables EXTSHM and LINK_CNTRLare not set in the system environment.
19.Mount the CD-ROM (as root user) as follows:
# mkdir / cdrom# mount -rv cdrfs /dev/cdo /cdrom
20.Shut down any Oracle database instances before running therootpre.sh script. Do not run the rootpre.sh script if you have anewer version of an Oracle database already installed on this system.
Use the following command to run the rootpre.sh script:
# /cdrom/rootpre.sh
21.Restart the machine. Log in as the Oracle user and check the loginenvironment.
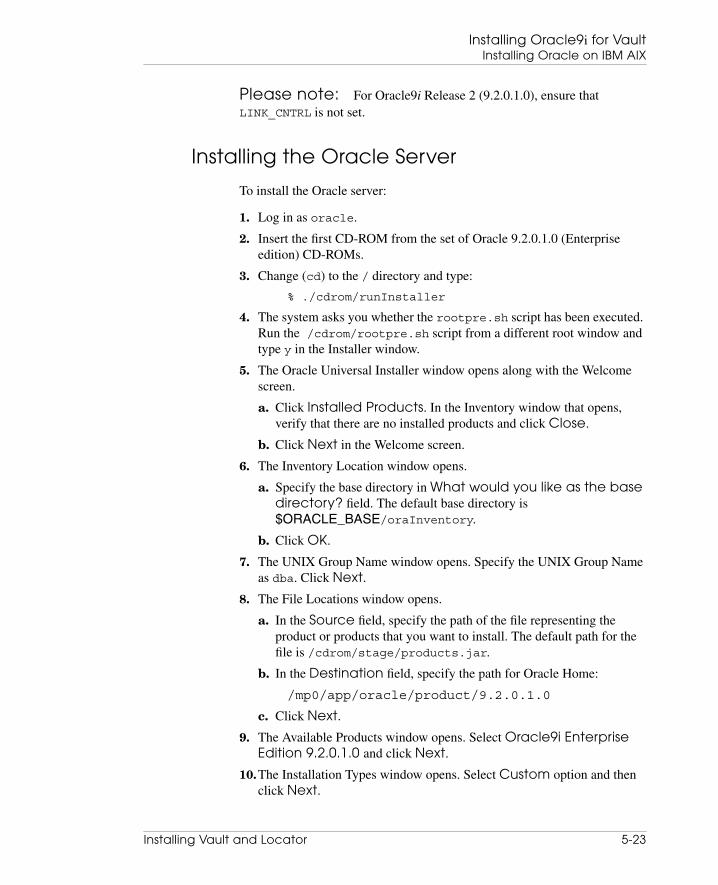
Installing Vault and Locator 5-23
Installing Oracle9i for VaultInstalling Oracle on IBM AIX
Please note: For Oracle9i Release 2 (9.2.0.1.0), ensure thatLINK_CNTRL is not set.
Installing the Oracle Server
To install the Oracle server:
1. Log in as oracle.
2. Insert the first CD-ROM from the set of Oracle 9.2.0.1.0 (Enterpriseedition) CD-ROMs.
3. Change (cd) to the / directory and type:
% ./cdrom/runInstaller
4. The system asks you whether the rootpre.sh script has been executed.Run the /cdrom/rootpre.sh script from a different root window andtype y in the Installer window.
5. The Oracle Universal Installer window opens along with the Welcomescreen.
a. Click Installed Products. In the Inventory window that opens,verify that there are no installed products and click Close.
b. Click Next in the Welcome screen.
6. The Inventory Location window opens.
a. Specify the base directory in What would you like as the basedirectory? field. The default base directory is$ORACLE_BASE/oraInventory.
b. Click OK.
7. The UNIX Group Name window opens. Specify the UNIX Group Nameas dba. Click Next.
8. The File Locations window opens.
a. In the Source field, specify the path of the file representing theproduct or products that you want to install. The default path for thefile is /cdrom/stage/products.jar.
b. In the Destination field, specify the path for Oracle Home:
/mp0/app/oracle/product/9.2.0.1.0
c. Click Next.
9. The Available Products window opens. Select Oracle9i EnterpriseEdition 9.2.0.1.0 and click Next.
10.The Installation Types window opens. Select Custom option and thenclick Next.
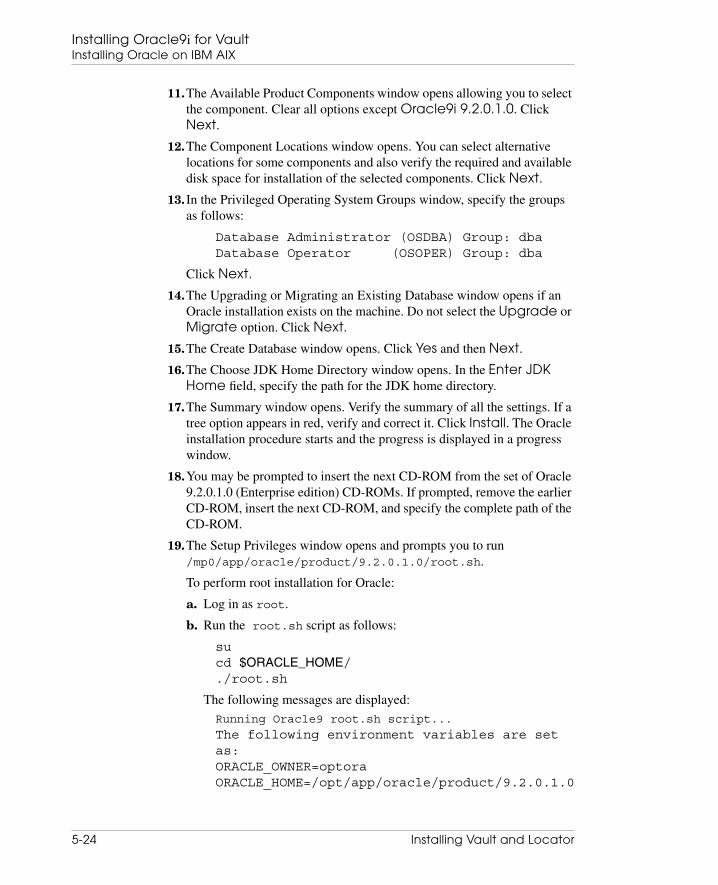
Installing Oracle9i for VaultInstalling Oracle on IBM AIX
5-24 Installing Vault and Locator
11.The Available Product Components window opens allowing you to selectthe component. Clear all options except Oracle9i 9.2.0.1.0. ClickNext.
12.The Component Locations window opens. You can select alternativelocations for some components and also verify the required and availabledisk space for installation of the selected components. Click Next.
13. In the Privileged Operating System Groups window, specify the groupsas follows:
Database Administrator (OSDBA) Group: dbaDatabase Operator (OSOPER) Group: dba
Click Next.
14.The Upgrading or Migrating an Existing Database window opens if anOracle installation exists on the machine. Do not select the Upgrade orMigrate option. Click Next.
15.The Create Database window opens. Click Yes and then Next.
16.The Choose JDK Home Directory window opens. In the Enter JDKHome field, specify the path for the JDK home directory.
17.The Summary window opens. Verify the summary of all the settings. If atree option appears in red, verify and correct it. Click Install. The Oracleinstallation procedure starts and the progress is displayed in a progresswindow.
18.You may be prompted to insert the next CD-ROM from the set of Oracle9.2.0.1.0 (Enterprise edition) CD-ROMs. If prompted, remove the earlierCD-ROM, insert the next CD-ROM, and specify the complete path of theCD-ROM.
19.The Setup Privileges window opens and prompts you to run/mp0/app/oracle/product/9.2.0.1.0/root.sh.
To perform root installation for Oracle:
a. Log in as root.
b. Run the root.sh script as follows:
sucd $ORACLE_HOME/./root.sh
The following messages are displayed:
Running Oracle9 root.sh script...
The following environment variables are setas:ORACLE_OWNER=optoraORACLE_HOME=/opt/app/oracle/product/9.2.0.1.0
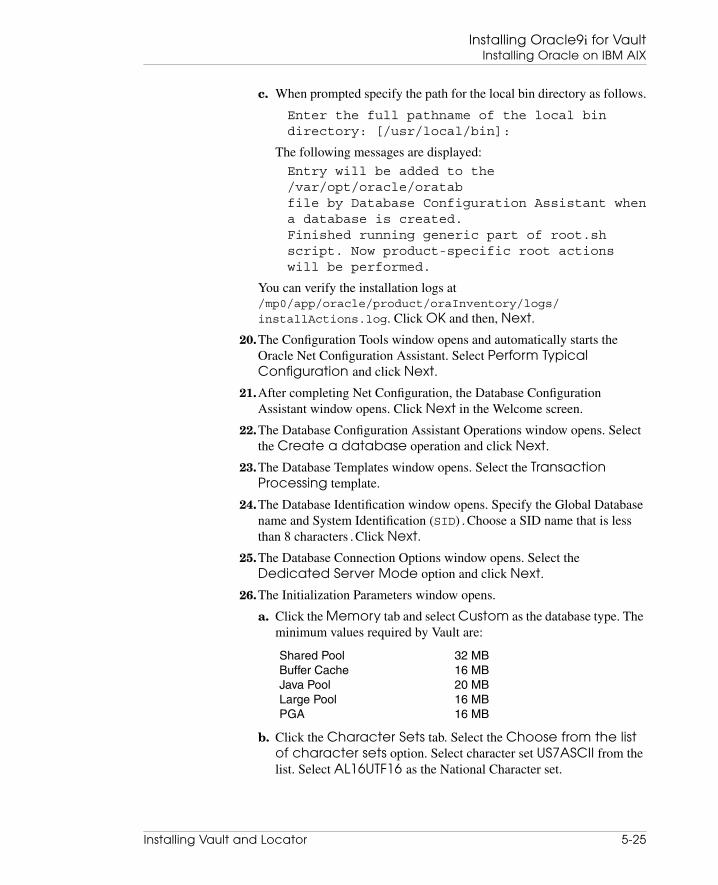
Installing Vault and Locator 5-25
Installing Oracle9i for VaultInstalling Oracle on IBM AIX
c. When prompted specify the path for the local bin directory as follows.
Enter the full pathname of the local bindirectory: [/usr/local/bin]:
The following messages are displayed:
Entry will be added to the/var/opt/oracle/oratabfile by Database Configuration Assistant whena database is created.Finished running generic part of root.shscript. Now product-specific root actionswill be performed.
You can verify the installation logs at/mp0/app/oracle/product/oraInventory/logs/installActions.log. Click OK and then, Next.
20.The Configuration Tools window opens and automatically starts theOracle Net Configuration Assistant. Select Perform TypicalConfiguration and click Next.
21.After completing Net Configuration, the Database ConfigurationAssistant window opens. Click Next in the Welcome screen.
22.The Database Configuration Assistant Operations window opens. Selectthe Create a database operation and click Next.
23.The Database Templates window opens. Select the TransactionProcessing template.
24.The Database Identification window opens. Specify the Global Databasename and System Identification (SID).Choose a SID name that is lessthan 8 characters.Click Next.
25.The Database Connection Options window opens. Select theDedicated Server Mode option and click Next.
26.The Initialization Parameters window opens.
a. Click the Memory tab and select Custom as the database type. Theminimum values required by Vault are:
b. Click the Character Sets tab. Select the Choose from the listof character sets option. Select character set US7ASCII from thelist. Select AL16UTF16 as the National Character set.
Shared Pool 32 MBBuffer Cache 16 MBJava Pool 20 MBLarge Pool 16 MBPGA 16 MB
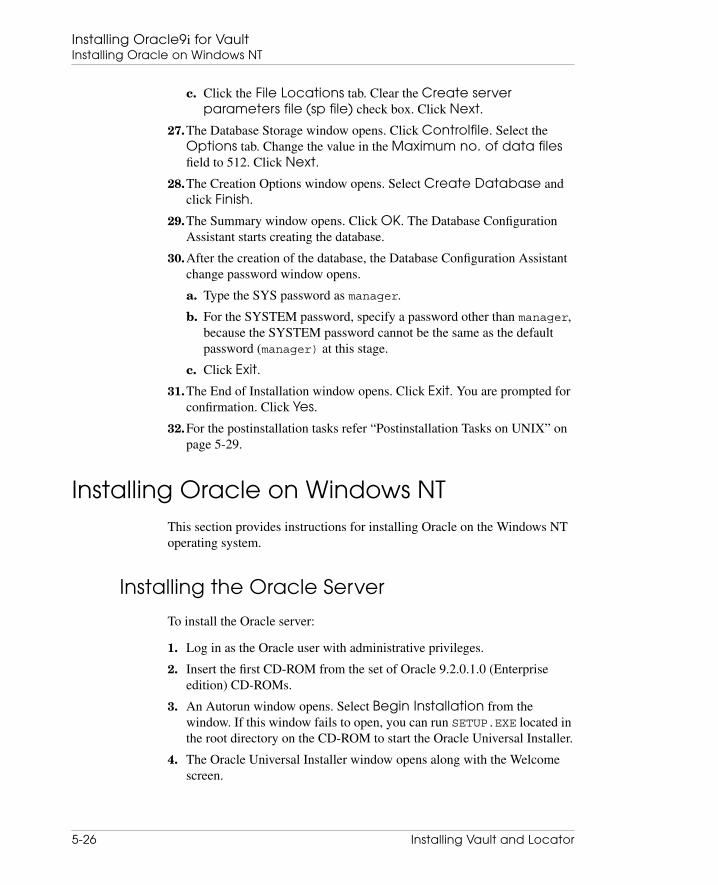
Installing Oracle9i for VaultInstalling Oracle on Windows NT
5-26 Installing Vault and Locator
c. Click the File Locations tab. Clear the Create serverparameters file (sp file) check box. Click Next.
27.The Database Storage window opens. Click Controlfile. Select theOptions tab. Change the value in the Maximum no. of data filesfield to 512. Click Next.
28.The Creation Options window opens. Select Create Database andclick Finish.
29.The Summary window opens. Click OK. The Database ConfigurationAssistant starts creating the database.
30.After the creation of the database, the Database Configuration Assistantchange password window opens.
a. Type the SYS password as manager.
b. For the SYSTEM password, specify a password other than manager,because the SYSTEM password cannot be the same as the defaultpassword (manager) at this stage.
c. Click Exit.
31.The End of Installation window opens. Click Exit. You are prompted forconfirmation. Click Yes.
32.For the postinstallation tasks refer “Postinstallation Tasks on UNIX” onpage 5-29.
Installing Oracle on Windows NTThis section provides instructions for installing Oracle on the Windows NToperating system.
Installing the Oracle Server
To install the Oracle server:
1. Log in as the Oracle user with administrative privileges.
2. Insert the first CD-ROM from the set of Oracle 9.2.0.1.0 (Enterpriseedition) CD-ROMs.
3. An Autorun window opens. Select Begin Installation from thewindow. If this window fails to open, you can run SETUP.EXE located inthe root directory on the CD-ROM to start the Oracle Universal Installer.
4. The Oracle Universal Installer window opens along with the Welcomescreen.
Installing Vault and Locator 5-27
Installing Oracle9i for VaultInstalling Oracle on Windows NT
a. Click Installed Products. In the Inventory window that opens,verify that there are no installed products and click Close.
b. Click Next in the Welcome screen.
5. The File Locations window opens.
a. In the Source field, specify the path of the file representing theproduct or products that you want to install.
C:\stage\products.jar
b. In the Destination field, specify the path for Oracle Home:
C:\Oracle\ora92
c. Click Next.
6. The Available Products window opens. Select Oracle9i DatabaseEnterprise Edition 9.2.0.1.0 and click Next.
7. The Installation Types window opens. Select the Custom option andclick Next.
8. The Available Product Components window opens allowing you to selectthe component. Clear all options except Oracle9i 9.2.0.1.0. ClickNext to proceed.
9. The Component Locations window opens. You can select alternativelocations for some components and also verify the required and availabledisk space for installation of the selected components. Click Next.
10.The Upgrading or Migrating an Existing Database window opens if anOracle installation exists on the machine. Do not select the Upgrade orMigrate option. Click Next.
11.The Create Database window opens. Click Yes and then Next.
12.The Choose JDK Home Directory window opens. In the Enter JDKHome field, specify the path for the JDK home directory
13.The Summary window opens. Verify the summary of all the settings. If atree option appears in red, verify and correct it. Click Install. The Oracleinstallation procedure starts and the progress is displayed in a progresswindow.
14.You may be prompted to insert the next CD-ROM from the set of Oracle9i 9.2.0.1.0 (Enterprise edition) CD-ROMs. If prompted, remove theearlier CD-ROM, insert the next CD-ROM, and specify the completepath of the CD-ROM.
15.The Configuration Tools window opens and automatically starts theOracle Net Configuration Assistant. Select Perform TypicalConfiguration and click Next.
16. .After completing Net Configuration, the Database ConfigurationAssistant window opens. Click Next in the Welcome screen.

Installing Oracle9i for VaultInstalling Oracle on Windows NT
5-28 Installing Vault and Locator
17.The Database Configuration Assistant Operations window opens. Selectthe Create a database operation and click Next.
18.The Database Templates window opens. Select the TransactionProcessing template.
19.The Database Identification window opens. Specify the Global Databasename and System Identification (SID). Choose a SID name that is lessthan 8 characters.Click Next.
20.The Database Connection Options window opens. Select theDedicated Server Mode option and click Next.
21.The Initialization Parameters window opens.
a. Click the Memory tab and select Custom as the database type. Theminimum values required by Vault are:
b. Click the Character Sets tab. Select the Use the Default option.
c. Click the File Locations tab. Clear the Create serverparameters file (sp file) check box. Click Next.
22.The Database Storage window opens. Click Controlfile. Select theOptions tab. Change the value in the Maximum no. of data filesfield to 512. Click Next.
23.The Creation Options window opens. Select Create Database andclick Finish.
24.The Summary window opens. Click OK. The Database ConfigurationAssistant starts creating the database.
25.After the creation of the database, the Database Configuration Assistantchange password window opens.
a. Type the SYS password as manager.
b. For the SYSTEM password, specify a password other than manager.This is because the SYSTEM password cannot be the same as thedefault password manager at this stage.
c. Click Exit.
26.The End of Installation window opens. Click Exit. You are prompted forconfirmation. Click Yes.
27.For the postinstallation tasks refer “Postinstallation Tasks on WindowsNT” on page 5-32
Shared Pool 32 MBBuffer Cache 16 MBJava Pool 20 MBLarge Pool 16 MBPGA 16 MB
Installing Vault and Locator 5-29
Installing Oracle9i for VaultPostinstallation Tasks on UNIX
Postinstallation Tasks on UNIXAfter you install Oracle, perform the following tasks described in thissection.
Changing the Oracle Undo ManagementParameter
1. Log in as oracle and shut down Oracle.
# sqlplus /nolog SQL> connect / as sysdba; SQL> shutdown; SQL> exit;
2. Edit the $ORACLE_HOME/dbs/init$ORACLE_SID.ora file andchange the value of the undo_management parameter to MANUAL.
undo_management=MANUAL
3. Restart the Oracle database.
# sqlplus /nolog SQL> connect / as sysdba; SQL> startup; SQL> exit;
Changing the Oracle Password
For all installation and migration steps, the Oracle user system must have thedefault password of manager. After installing or migrating the Optegrasoftware, change the password back to the original password.
To change the default password to manager:
1. Make sure that the Oracle database is running before you begin.
2. Log in to the Oracle account.
3. Run the following commands:
# sqlplus /nologSQL> connect / as sysdba;SQL> grant connect to system identified bymanager;SQL> exit;
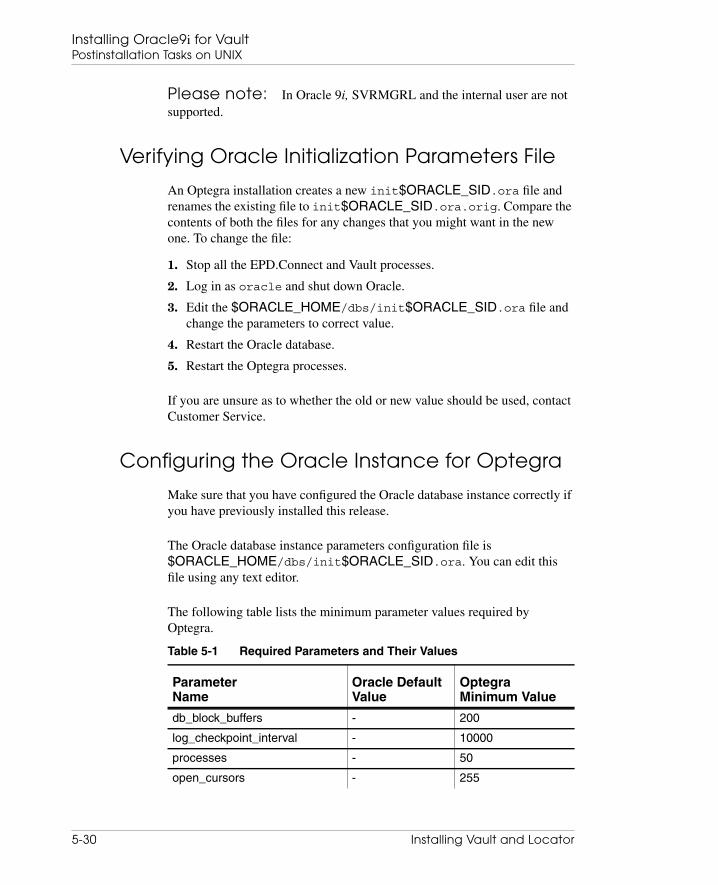
Installing Oracle9i for VaultPostinstallation Tasks on UNIX
5-30 Installing Vault and Locator
Please note: In Oracle 9i, SVRMGRL and the internal user are notsupported.
Verifying Oracle Initialization Parameters File
An Optegra installation creates a new init$ORACLE_SID.ora file andrenames the existing file to init$ORACLE_SID.ora.orig. Compare thecontents of both the files for any changes that you might want in the newone. To change the file:
1. Stop all the EPD.Connect and Vault processes.
2. Log in as oracle and shut down Oracle.
3. Edit the $ORACLE_HOME/dbs/init$ORACLE_SID.ora file andchange the parameters to correct value.
4. Restart the Oracle database.
5. Restart the Optegra processes.
If you are unsure as to whether the old or new value should be used, contactCustomer Service.
Configuring the Oracle Instance for Optegra
Make sure that you have configured the Oracle database instance correctly ifyou have previously installed this release.
The Oracle database instance parameters configuration file is$ORACLE_HOME/dbs/init$ORACLE_SID.ora. You can edit thisfile using any text editor.
The following table lists the minimum parameter values required byOptegra.
Table 5-1 Required Parameters and Their Values
ParameterName
Oracle DefaultValue
OptegraMinimum Value
db_block_buffers - 200
log_checkpoint_interval - 10000
processes - 50
open_cursors - 255

Installing Vault and Locator 5-31
Installing Oracle9i for VaultPostinstallation Tasks on UNIX
After changing any parameter value, you must restart Oracle for the changesto take effect.
If you are sharing an existing database application, make sure that thepassword for the SYSTEM account of that database is manager. Refer to“Changing the Oracle Password” on page 5-29.
You can share the rollback segments with another Oracle application inaddition to Optegra. The rollback tablespace must have a minimum of sixrollback segments, each capable of expanding to 11 MB.
Enabling the ARCHIVELOG Feature
For increased protection from catastrophic media failure, you can enable theARCHIVELOG feature of Oracle. This feature provides roll-forward recoveryin the event of a simultaneous media failure of both the RDBMS and thestorage pool. The ARCHIVELOG mode synchronizes the Oracle and theOptegra databases. This allows the Optegra Recover Storage Poolcommand to work correctly. The default setting is disabled (NOARCHIVELOGmode).
After installing Vault, you can enable the Oracle ARCHIVELOG mode asfollows:
1. Add the following to the parameter file$ORACLE_HOME/dbs/init$ORACLE_SID.ora
LOG_ARCHIVE_START=TRUELOG_ARCHIVE_DEST=pathname
The pathname is the one to be used for storing redo log files (forexample, F:\Optegra_ARC).
Please note: Oracle redo log files that are online should be on adifferent physical disk drive from the database file.
db_file_multiblock_read_count 8 8
db_files 20 60
shared_pool_size 3,500,000 9437184
Table 5-1 Required Parameters and Their Values
ParameterName
Oracle DefaultValue
OptegraMinimum Value

Installing Oracle9i for VaultPostinstallation Tasks on Windows NT
5-32 Installing Vault and Locator
2. Shut down the database with normal priority if necessary, start up thedatabase in the exclusive mode, activate and verfiy ARCHIVELOG mode.Run the following commands:
# sqlplus /nologSQL> connect / as sysdbaSQL> shutdown normal;SQL> startup mount exclusive;SQL> alter database archivelog;SQL> archive log list;SQL> exit;
3. You must restart Oracle for the changes to take effect.
Starting the Oracle Server
You can start the Oracle server manually from the command prompt.
1. Log in as an administrator.
2. Open a new command window and run sqlplus.
3. Run the following commands:
# sqlplus /nologSQL> connect / as sysdba;SQL> startup;SQL> exit;
If the password for oracle user SYSTEM is not MANAGER, refer to the section“Changing the Oracle Password” on page 5-29.
Postinstallation Tasks on Windows NTAfter you install Oracle, perform the following tasks described in thissection.
Changing the Oracle Undo ManagementParameter
1. Log in as oracle and shut down Oracle.
C:\> sqlplus /nolog SQL> connect / as sysdba;

Installing Vault and Locator 5-33
Installing Oracle9i for VaultPostinstallation Tasks on Windows NT
SQL> shutdown normal; SQL> exit
2. Edit the%ORACLE_HOME%\database\init%ORACLE_SID%.ora fileand change the value of the undo_management parameter to MANUAL.
undo_management=MANUAL
3. Restart the Oracle database.
C:\> sqlplus /nolog SQL> connect / as sysdba; SQL> startup; SQL> exit;
Changing the Oracle Password
For all installation and migration steps, the Oracle user system must have thedefault password of manager. After installing or migrating the Optegrasoftware, change the password back to the original password.
To change the default password to manager:
1. Make sure that the Oracle database is running before you begin.
2. Log in to the Oracle account.
3. Run the following commands:
C:\> sqlplus /nologSQL> connect / as sysdba;SQL> grant connect to system identified bymanager;SQL> exit;
Verifying the Oracle Initialization ParametersFile
An Optegra installation creates a new init$ORACLE_SID.ora file andrenames the existing file to init$ORACLE_SID.ora.orig. Compare thecontents of both the files for any changes that you might want in the newone. To change the file:
1. Stop all the EPD.Connect and Vault processes.
2. Log in as oracle and shut down Oracle.

Installing Oracle9i for VaultPostinstallation Tasks on Windows NT
5-34 Installing Vault and Locator
3. Edit the $ORACLE_HOME/dbs/init$ORACLE_SID.ora file andchange the parameters to correct value.
4. Restart the Oracle database.
5. Restart the Optegra processes.
If you are unsure as to whether the old or new value should be used, contactCustomer Service.
Configuring the Oracle Instance for Optegra
Make sure that you have configured the Oracle database instance correctly ifyou have previously installed this release.
The Oracle database instance parameters configuration file is%ORACLE_HOME%\database\init%ORACLE_SID%.ora. Youcan edit this file using any text editor.
The following table lists the minimum parameter values required byOptegra.
After changing any parameter value, you must restart Oracle for the changesto take effect.
If you are sharing an existing database application, make sure that thepassword for the SYSTEM account of that database is manager. Refer to“Changing the Oracle Password” on page 5-33.
Table 5-2 Required Parameters and Their Values
ParameterName
Oracle DefaultValue
OptegraMinimum Value
db_block_buffers - 200
log_checkpoint_interval - 10000
processes - 50
open_cursors - 255
db_file_multiblock_read_count 8 8
db_files 20 60
shared_pool_size 3,500,000 9437184

Installing Vault and Locator 5-35
Installing Oracle9i for VaultPostinstallation Tasks on Windows NT
You can share the rollback segments with another Oracle application inaddition to Optegra. The rollback tablespace must have a minimum of sixrollback segments, each capable of expanding to 11 MB.
Enabling the ARCHIVELOG Feature
For increased protection from catastrophic media failure, you can enable theARCHIVELOG feature of Oracle. This feature provides roll-forward recoveryin the event of a simultaneous media failure of both the RDBMS and thestorage pool. The ARCHIVELOG mode synchronizes the Oracle and theOptegra databases. This allows the Optegra Recover Storage Poolcommand to work correctly. The default setting is disabled (NOARCHIVELOGmode).
After installing Vault, you can enable the Oracle ARCHIVELOG mode asfollows:
1. Add the following to the parameter file%ORACLE_HOME%\database\init%ORACLE_SID%.ora.
LOG_ARCHIVE_START=TRUELOG_ARCHIVE_DEST=pathname
The pathname is the one to be used for storing redo log files (forexample, F:\Optegra_ARC).
Please note: Oracle redo log files that are online should be on adifferent physical disk drive from the database file.
2. Shut down the database with normal priority if necessary, start up thedatabase in the exclusive mode, activateand verify ARCHIVELOG mode.Run the following commands:
C:\> sqlplus /nologSQL> connect / as sysdbaSQL> shutdown normal;SQL> startup mount exclusive;SQL> alter database archivelog;SQL> archive log list;SQL> exit;
3. You must restart Oracle for the changes to take effect.
Installing Oracle9i for VaultPostinstallation Tasks on Windows NT
5-36 Installing Vault and Locator
Starting the Oracle Server
The Oracle server service is named OracleService<SID>. For mostsystems, the OracleService<SID> is set to start automatically whensystem is restarted. Consult the Windows NT documentation on configuringservice startup.
Please note: The default SID is ORCL.
To start the Oracle server either from the Services panel or manually fromthe command prompt, log in as an Administrator.
From the Services Panel:
1. Start OracleService<SID> from the Services window. Open theServices window as follows:
On the Windows NT taskbar, selectStart > Settings > Control Panel > Services.
2. Select OracleService<SID> and click Start to start the service. Thisstarts the Oracle Optegra database. For more information about Services,the Administrator accounts, and logging on, consult the Windows NTdocumentation.
From the Command Prompt:
1. Open a new command prompt and run sqlplus.
2. Run the following commands:
C:\> sqlplus /nologSQL> connect / as sysdba;SQL> startupSQL> exit
If the password for the oracle user SYSTEM is not MANAGER, refer“Changing the Oracle Password” on page 5-33.
Installing Vault and Locator 5-37
Installing Oracle9i for VaultPostinstallation Tasks on Windows NT
Language Support for Oracle
If you have installed Oracle in a language other than English, set the Oraclevariable NLS_LANG to the name of the installed character set. Perform thefollowing steps before installing Vault on Windows NT:
1. At the command prompt, run regedit.exe. The Registry Editorwindow opens.
2. Open the HKEY_LOCAL_MACHINE on the local machine window.
3. Click SOFTWARE and double-click ORACLE.
4. Double-click the NLS_LANG line to display the menu in the Variablemenu. This has a value in the form language_territory.charset.
5. Remove the language_territory portion from NLS_LANG.
For example, change FINNISH_FINLAND.WE8ISO8859P1 toWE8ISO8859P1.

Installing Vault and Locator 6-1
Chapter 6 Preparing the OracleDatabase for a VaultRefresh on UNIX
This chapter discusses the tasks you must perform before refreshing Vaultfrom a previous release to the current release on the UNIX platform.
• Backing Up of the Vault Data
• Migrating the Vault Database from Previous Oracle Releases to Oracle9iRelease 2 (9.2.0.1.0)
• Downloading and Setting Up the Current Release
Please note: You can use the procedure discussed in this chapteronly if you want to migrate to the Vault database for Oracle9i (9.2.0.1.0) onthe same machine. To migrate to the Vault database for Oracle9i (9.2.0.1.0)from a UNIX machine to a different machine on the same platform, refer tothe procedure discussed in Chapter 15, “Migrating Vault Across Platforms.”
Preparing the Oracle Database for a Vault Refresh on UNIXBacking Up of the Vault Data
6-2 Installing Vault and Locator
Backing Up of the Vault DataTo back up the Vault data perform the following:
1. Log in to the account on which you are refreshing Vault.
2. Back up the following files and directories:
$EDM_HOME/.login$EDM_HOME/.cshrc$EDM_HOME/data/pm.config$EDM_HOME/data/nsm.config$EDM_HOME/install/temp_flags/*
3. Back up the storage pools.
Migrating the Vault Database fromPrevious Oracle Releases to Oracle9iRelease 2 (9.2.0.1.0)
Before refreshing previous Vault revisions on UNIX or Windows NT toVault 7.0 on UNIX, migrate the Vault database from previous Oraclereleases to Oracle9i Release 2 (9.2.0.1.0.)
Exporting the Vault Database
To export the existing Vault database from previous Oracle releases toOracle9i Release 2 (9.2.0.1.0), perform the following steps:
1. Export the Oracle database as follows:
> cd $ORACLE_HOME/bin> exp system/password
Please note: In the following steps, accept the default by pressingReturn at the prompt unless otherwise specified.
Enter array fetch buffer size: 4096 >Export file: expdat.dmp >
If you want to specify another file, you can do so; otherwise, pressReturn. The default is expdat.dmp.
(1)E(ntire database), (2)U(sers), or(3)T(ables): (2)U >Export grants (yes/no): yes >

Installing Vault and Locator 6-3
Preparing the Oracle Database for a Vault Refresh on UNIXMigrating the Vault Database from Previous Oracle Releases to Oracle9i Release 2
Export table data (yes/no): yes >Compress extents (yes/no): yes >User to be exported: (Press Return to quit)>username
At this prompt, enter the user names as listed one at a time:
pdmdmpdmqfedmattredmdv (for DOD only)edmuiasm
2. Remove the existing Oracle version.
3. Install Oracle9i (9.2.0.1.0).
4. Change the ORACLE_HOME and ORACLE_SID variables settings inthe $EDM_HOME/.login file according to the new Oracle homedirectory and SID.
5. Download Vault and the related products from the CD-ROM using theSLIC utility with root privileges.
6. Delete the edmsirm.tmp file from the following path:$EPD_HOME/install/temp_flags.
7. Run edmsirm to create edmodule.defaults.sh from$EPD_HOME/INSTALL as the edm user.
8. Run edmsasm as the edm user.
9. Delete the following files from $EPD_HOME/install/temp_flags
• edmrdsm.tmp
• edmdvrdsm.tmp (for DV)
• edmdodrdsm.tmp (for DOD)
10.Run the following scripts with root privileges to create tablespace:
• edmrdsm.root
• edmdvrdsm.root (for DV only)
• edmdodrdsm.root (if the DOD is in this node)
11.Create users ASM, EDMATTR, EDMDV (for DOD only), EDMUI, PDMDM,PDMQF as follows:
% sqlplus /nologSQL> connect / as sysdba;Connected.SQL> CREATE USER ASM IDENTIFIED BY ASMDEFAULT TABLESPACE "SYSTEM" TEMPORARYTABLESPACE "EDM_TEMPSPACE" PROFILE "DEFAULT";
Preparing the Oracle Database for a Vault Refresh on UNIXMigrating the Vault Database from Previous Oracle Releases to Oracle9i Release 2
6-4 Installing Vault and Locator
SQL> GRANT "CONNECT" TO ASM;SQL> GRANT "RESOURCE" TO ASM;
SQL> CREATE USER EDMATTR IDENTIFIED BYEDMATTR DEFAULT TABLESPACE "EDM_TEMPSPACE"TEMPORARY TABLESPACE "EDM_TEMPSPACE" PROFILE"DEFAULT";SQL> GRANT "CONNECT" TO EDMATTR;SQL> GRANT "RESOURCE" TO EDMATTR;
SQL> CREATE USER EDMDV IDENTIFIED BY EDMDVDEFAULT TABLESPACE "EDM_DISTDATA" TEMPORARYTABLESPACE "EDM_TEMPSPACE" PROFILE "DEFAULT";SQL> GRANT "CONNECT" TO EDMDV;SQL> GRANT "RESOURCE" TO EDMDV;
SQL> CREATE USER EDMUI IDENTIFIED BY EDMUIDEFAULT TABLESPACE "SYSTEM" TEMPORARYTABLESPACE "EDM_TEMPSPACE" PROFILE "DEFAULT";SQL> GRANT "CONNECT" TO EDMUI;SQL> GRANT "RESOURCE" TO EDMUI;
SQL> CREATE USER PDMDM IDENTIFIED BY PDMDMDEFAULT TABLESPACE "EDM_SYSTEM" TEMPORARYTABLESPACE "EDM_TEMPSPACE” PROFILE "DEFAULT";SQL> GRANT "CONNECT" TO PDMDM;SQL> GRANT "RESOURCE" TO PDMDM;
SQL> CREATE USER PDMQF IDENTIFIED BY PDMQFDEFAULT TABLESPACE "SYSTEM" TEMPORARYTABLESPACE "EDM_TEMPSPACE" PROFILE "DEFAULT";SQL> GRANT "CONNECT" TO PDMQF;SQL> GRANT "RESOURCE" TO PDMQF;
Importing the Vault Database
Import the Oracle database as follows:
> cd $ORACLE_HOME/bin> imp system/password
Please note: In the following steps, press Return at the prompt toaccept the default unless otherwise specified.

Installing Vault and Locator 6-5
Preparing the Oracle Database for a Vault Refresh on UNIXDownloading and Setting Up the Current Release
Import file: expdat.dmp >Enter insert buffer size (minimum sizeis 4096) 30720 >Export the file created by EXPORT:V08.00.04via the conventional pathList the contents of import file only(yes/no): No >Ignore create error due to objectexistence (yes/no): No >Import grants (yes/no): YES >Import table data (yes/no): YES >Import entire export file (yes/no): No > yes
Requirements for Importing the Database
The following requirements must be satisfied before you import the Vaultdatabase:
1. The free space in system tablespace must be greater than 100 MB afterinstalling Oracle9i Release 2 (9.2.0.1.0).
2. The system should have at least 10 MB of free space in addition to thespace allocated for all the other EDM tablespaces likeEDM_ATTRIBUTES, EDM_FILE_DIRECTORY, EDM_AUDIT_LOG andEDM_HISTORY.
3. Use the correct number of rollback segments.
Downloading and Setting Up the CurrentRelease
To set up the current release, do the following:
1. Download Vault and the related products from the CD-ROM using theSLIC (Software Loading and Installation Command) utility with rootprivileges. (As this step has already been performed earlier in “Exportingthe Vault Database” on page 6-2, you do not need to repeat it here.)
2. Copy backed up data from storage pool back in place.
3. Edit the $EDM_HOME/data/nsm.config file to make sure that thepasswords for the EDMATTR, EDMDV (for DOD only), EDMUI, PDMDM, andPDMQF users are as indicated in parentheses for all occurrences of thefollowing lines:
DMSQLPW(EDMATTR)

Preparing the Oracle Database for a Vault Refresh on UNIXDownloading and Setting Up the Current Release
6-6 Installing Vault and Locator
DMSQLPW(EDMDV)DMSQLPW(PDMDM)QFSQLPW(PDMQF)UISQLPW(EDMUI)
4. Refresh Vault to the current release. For the detailed procedure, referChapter 7, “Refreshing Previous Releases of Vault on UNIX.”

Installing Vault and Locator 7-1
Chapter 7 Refreshing PreviousReleases of Vault onUNIX
This chapter provides instructions for a software refresh from previousreleases of Vault to the current release on UNIX. A refresh installs a newerversion of Vault. A refresh can only be performed on an existing version ofVault.
• Preparing for a Vault Software Refresh
• Step 1: Invoking the Refresh Tool and Validating Information
• Step 2: Shutting Down the Network
• Step 3: Refreshing Relational Database Tables
• Step 4: Starting the Server Network Processes
• Step 5: Activating the E-Mail Trigger
• Step 6: Refreshing Distributed Vault
• Step 7: Refreshing the Data Dictionary
• Step 8: Refreshing Vault Attributes and Views
• Postinstallation Tasks

Refreshing Previous Releases of Vault on UNIXPreparing for a Vault Software Refresh
7-2 Installing Vault and Locator
Preparing for a Vault Software RefreshUse the refresh process only if you are already running an earlier version ofVault. A refresh installs a newer version of Vault.
Please note: When you are refreshing Vault, notify all Vault users ofthe upgrade. Tell the users not to access Vault until notified.
Warning
Do not proceed until you have completed all thepreparatory steps in the Preinstallation Checklist inChapter 1, “Preparing to Install Vault Software onUNIX.” Your refresh might fail if you have not met allrefresh prerequisites. See the backgroundinformation on using the automated tools inChapter 4, “Installing Distributed Vault on UNIX.”
Loading the New Vault
Use the refresh process only if you are already running an earlier version ofVault. A refresh installs a newer version of Vault.
Loading the New Vault Software
To load your new Vault software perform the following:
1. Migrate the Oracle data from the previous version to the current version.
For information on exporting and importing the Vault database, refer toChapter 6, “Preparing the Oracle Database for a Vault Refresh onUNIX.”
2. Log in to the account on which you are refreshing Vault.
3. Back up the following files and directories:
$EDM_HOME/.login$EDM_HOME/.cshrc$EDM_HOME/data/pm.config$EDM_HOME/data/nsm.config$EDM_HOME/install/temp_flags/*
4. Back up the storage pools.
5. Download Vault and the related products from the CD-ROM using theSLIC utility with root privileges.

Installing Vault and Locator 7-3
Refreshing Previous Releases of Vault on UNIXStep 1: Invoking the Refresh Tool and Validating Information
6. Copy the backed up data from the storage pool back in place.
7. Edit the $EDM_HOME/data/nsm.config file to make sure that thepasswords for the EDMATTR, EDMDV (for DV only), EDMUI, PDMDM, andPDMQF users are as indicated in the parentheses for all occurrences of thefollowing lines:
DMSQLPW(EDMATTR)DMSQLPW(EDMDV)DMSQLPW(PDMDM)QFSQLPW(PDMQF)UISQLPW(EDMUI)
Input Worksheet
The input worksheet is a list of system prompts and their default valuesgenerated during installation. Refer to the section, “Installation InputWorksheet” on page 1-8 for details.
Step 1: Invoking the Refresh Tool andValidating Information
Load Vault to your system according to the instructions in Installing OptegraApplications. Log in as root to refresh from a CD-ROM.
Invoke the Software Refresh Main Tool from root to start refresh. Performthe following steps:
1. Change to the $EDM_HOME/install directory:
# cd $EDM_HOME/install
2. If you want to create a history file of your refresh, follow the instructionsin step 3. If you do not want to create a history file, follow theinstructions in step 4.
3. Invoke the automated refresh tool and create a history log by entering:
# ./edmrefresh | tee edmrefresh.log
To read the history log, look for it in $EDM_HOME/install.
4. Invoke the automated refresh tool without creating a history log byentering:
# ./edmrefresh
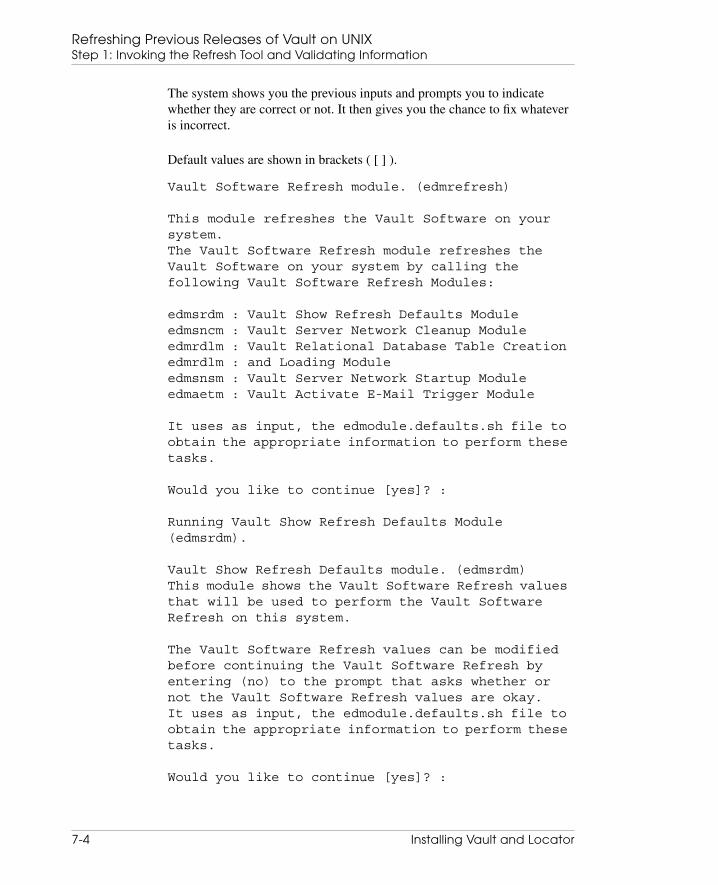
Refreshing Previous Releases of Vault on UNIXStep 1: Invoking the Refresh Tool and Validating Information
7-4 Installing Vault and Locator
The system shows you the previous inputs and prompts you to indicatewhether they are correct or not. It then gives you the chance to fix whateveris incorrect.
Default values are shown in brackets ( [ ] ).
Vault Software Refresh module. (edmrefresh)
This module refreshes the Vault Software on yoursystem.The Vault Software Refresh module refreshes theVault Software on your system by calling thefollowing Vault Software Refresh Modules:
edmsrdm : Vault Show Refresh Defaults Moduleedmsncm : Vault Server Network Cleanup Moduleedmrdlm : Vault Relational Database Table Creationedmrdlm : and Loading Moduleedmsnsm : Vault Server Network Startup Moduleedmaetm : Vault Activate E-Mail Trigger Module
It uses as input, the edmodule.defaults.sh file toobtain the appropriate information to perform thesetasks.
Would you like to continue [yes]? :
Running Vault Show Refresh Defaults Module(edmsrdm).
Vault Show Refresh Defaults module. (edmsrdm)This module shows the Vault Software Refresh valuesthat will be used to perform the Vault SoftwareRefresh on this system.
The Vault Software Refresh values can be modifiedbefore continuing the Vault Software Refresh byentering (no) to the prompt that asks whether ornot the Vault Software Refresh values are okay.It uses as input, the edmodule.defaults.sh file toobtain the appropriate information to perform thesetasks.
Would you like to continue [yes]? :

Installing Vault and Locator 7-5
Refreshing Previous Releases of Vault on UNIXStep 2: Shutting Down the Network
Here are the Vault Software Refresh Values thatwill be used to perform the Vault Software Refreshfor this system. Please confirm that they arecorrect:
Vault account name = edmVault home directory = $EDM_HOMEOracle account name = oracleOracle SID = oracleVault E-Mail Trigger Activation = yes
If the Vault Software Refresh Values are notcorrect, then answer no to the next prompt. Youwill be given the opportunity to modify the VaultSoftware Refresh Values:
Are these correct [yes]? :
The Vault Show Refresh Defaults Module hascompleted successfully.
Step 2: Shutting Down the NetworkFor the remainder of the automated refresh, you need take only a fewactions. The tool occasionally checks to see if you want to continue. You canenter either yes or no. If you enter no, you may restart the refresh later at thepoint where you left off. The automatic refresh tool will remember youranswers.
In the following sequence, the tool shuts down the network to prepare for thenew software.
Running Vault Server Network Cleanup Module(edmsncm).
Vault Server Network Cleanup module. (edmsncm) Thismodule stops the Vault Server Network Processes inpreparation for a Vault Software Refresh. It usesas input, the edmodule.defaults.sh file to obtainthe appropriate information to perform these tasks.Would you like to continue [yes]? :
Stopping the Vault Server Network Processes.

Refreshing Previous Releases of Vault on UNIXStep 3: Refreshing Relational Database Tables
7-6 Installing Vault and Locator
This will take a few minutes; please be patient.
The Vault Server Network Processes have beensuccessfully stopped.
Step 3: Refreshing Relational DatabaseTables
In this step, the tool loads all relational database tables if the refresh includeschanges to these tables.
Running Vault Relational Database Table Creationand Loading Module (edmrdlm).
Vault Relational Database Table Creation andLoading module. (edmrdlm) This module creates andloads the Vault Relational Database Tables. It usesas input, the edmodule.defaults.sh file to obtainthe appropriate information to perform these tasks.
Would you like to continue [yes]? :
Creating and Loading the Vault Relational DatabaseTables.
Skipping the generate Access and Security ManagerTables step, this step has already been done.
Skipping the generate Vault Database Tables step,this step has already been done.
Generating the Vault Database Table Indexes.Vault SQL Database Index CreationGenerating the Vault Database Table Views.Vault SQL View Creation
Skipping the generate Attribute Management Tablesstep, this step has already been done.
Generating the Attribute Management Database TableIndexes.
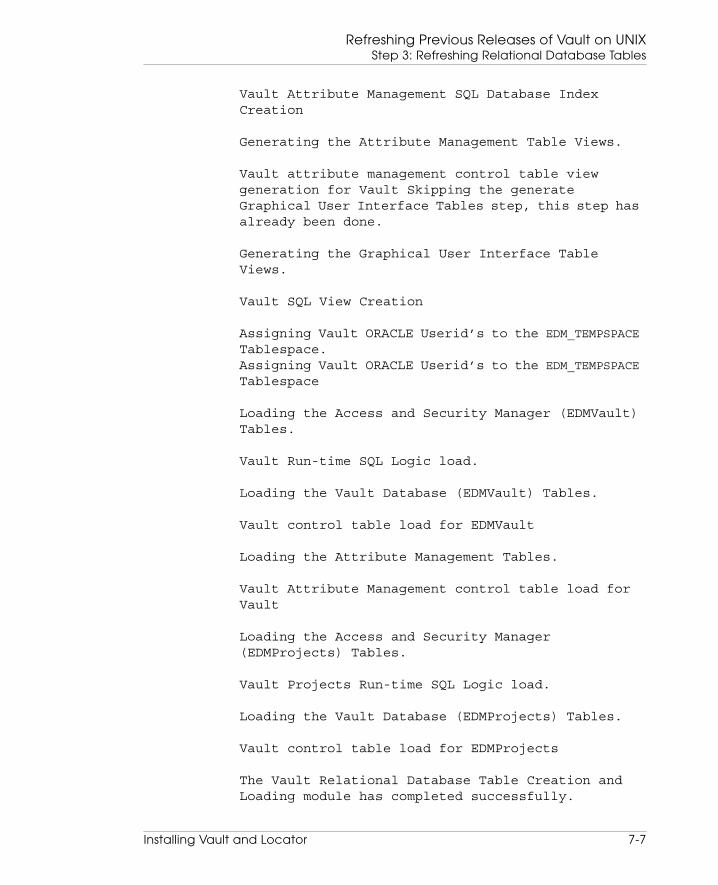
Installing Vault and Locator 7-7
Refreshing Previous Releases of Vault on UNIXStep 3: Refreshing Relational Database Tables
Vault Attribute Management SQL Database IndexCreation
Generating the Attribute Management Table Views.
Vault attribute management control table viewgeneration for Vault Skipping the generateGraphical User Interface Tables step, this step hasalready been done.
Generating the Graphical User Interface TableViews.
Vault SQL View Creation
Assigning Vault ORACLE Userid’s to the EDM_TEMPSPACE
Tablespace.Assigning Vault ORACLE Userid’s to the EDM_TEMPSPACE
Tablespace
Loading the Access and Security Manager (EDMVault)Tables.
Vault Run-time SQL Logic load.
Loading the Vault Database (EDMVault) Tables.
Vault control table load for EDMVault
Loading the Attribute Management Tables.
Vault Attribute Management control table load forVault
Loading the Access and Security Manager(EDMProjects) Tables.
Vault Projects Run-time SQL Logic load.
Loading the Vault Database (EDMProjects) Tables.
Vault control table load for EDMProjects
The Vault Relational Database Table Creation andLoading module has completed successfully.
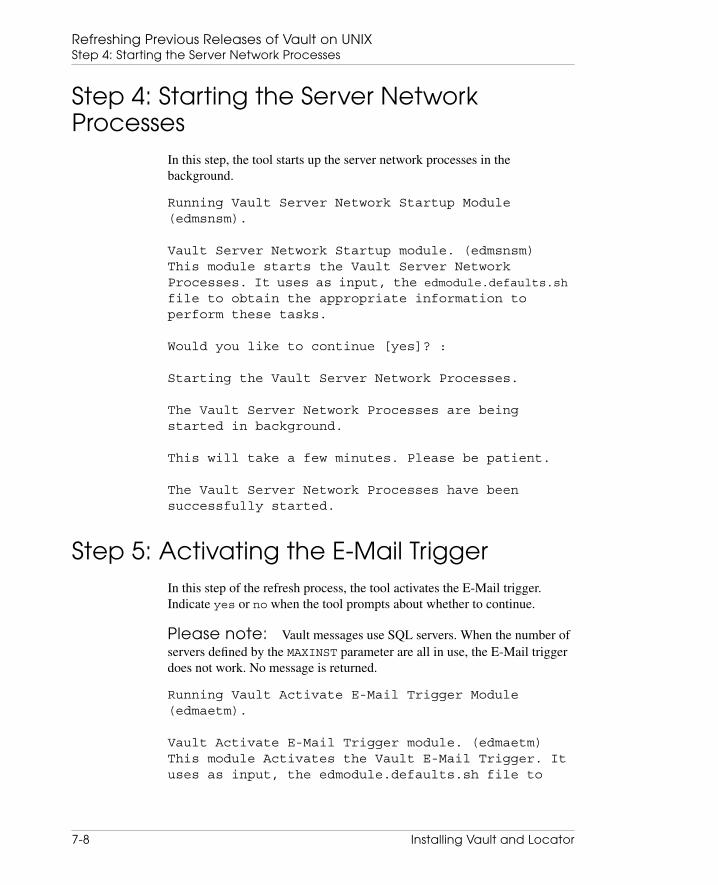
Refreshing Previous Releases of Vault on UNIXStep 4: Starting the Server Network Processes
7-8 Installing Vault and Locator
Step 4: Starting the Server NetworkProcesses
In this step, the tool starts up the server network processes in thebackground.
Running Vault Server Network Startup Module(edmsnsm).
Vault Server Network Startup module. (edmsnsm)This module starts the Vault Server NetworkProcesses. It uses as input, the edmodule.defaults.sh
file to obtain the appropriate information toperform these tasks.
Would you like to continue [yes]? :
Starting the Vault Server Network Processes.
The Vault Server Network Processes are beingstarted in background.
This will take a few minutes. Please be patient.
The Vault Server Network Processes have beensuccessfully started.
Step 5: Activating the E-Mail TriggerIn this step of the refresh process, the tool activates the E-Mail trigger.Indicate yes or no when the tool prompts about whether to continue.
Please note: Vault messages use SQL servers. When the number ofservers defined by the MAXINST parameter are all in use, the E-Mail triggerdoes not work. No message is returned.
Running Vault Activate E-Mail Trigger Module(edmaetm).
Vault Activate E-Mail Trigger module. (edmaetm)This module Activates the Vault E-Mail Trigger. Ituses as input, the edmodule.defaults.sh file to

Installing Vault and Locator 7-9
Refreshing Previous Releases of Vault on UNIXStep 6: Refreshing Distributed Vault
obtain the appropriate information to perform thesetasks.
Would you like to continue [yes]? :
Signing on to Vault.
Sign on to Vault server BETELGEUSE completedsuccessfully. You have 6 Vault message(s).
Activating the Vault E-Mail Trigger.
The command trigger for SENDMSG has been changed.The command trigger for REQRVW has been changed.The command trigger for RSVP has been changed.The command trigger list has been changed toactive.
Signing off from Vault.Sign off from Vault completed successfully.
The Vault Activate E-Mail Trigger Module hascompleted successfully.
The Vault Software Refresh Module has finishedsuccessfully.
The Vault Software has been successfully refreshed.
Step 6: Refreshing Distributed VaultStart the Software Distributed Vault Refresh Main Tool from root to startrefresh. Perform the following steps:
Please note: Perform the tasks in this step only on a machine withDistributed Vault already installed.
To refresh Distributed Vault:
1. Shut down the Optegra network. Otherwise, the edmdvindex portioncan fail and terminate the refresh.
2. Change to the $EDM_HOME/install directory:
# cd $EDM_HOME/install

Refreshing Previous Releases of Vault on UNIXStep 6: Refreshing Distributed Vault
7-10 Installing Vault and Locator
3. At this stage, you can either:
• Execute the refresh tool and create a history log by entering:
# ./edmdvrefresh | tee edmdvrefresh.log
To read the history log, look for it in the $EDM_HOME/installdirectory.
OR
• Execute the refresh tool without creating a history log by entering:
# ./edmdvrefresh
The system now shows you the previous inputs and prompts you toindicate whether or not they are correct. You can fix whatever isincorrect.
An example follows. Default values are shown in brackets ( [ ] ).
******************************************Distributed Vault Software Refresh module.(edmdvrefresh)
This Installation module refreshes the DistributedVault Software on your system by calling thefollowing Vault Software Installation Modules:
edmdvrdlm [Vault DV RDBMS Table Creation andLoading Module]edmdodrdlm[Vault DOD RDBMS Table Creation andLoading Module]
It uses as input, the edmodule.defaults.sh toobtain the appropriate information to perform thesetasks.******************************************
Would you like to continue [yes]?:
******************************************Skipping the Vault Server Network Cleanup Module(edmsncm).
This module has already been run.******************************************
******************************************Running the Distributed Relational Database TableCreation and Loading Module (edmdvrdlm).
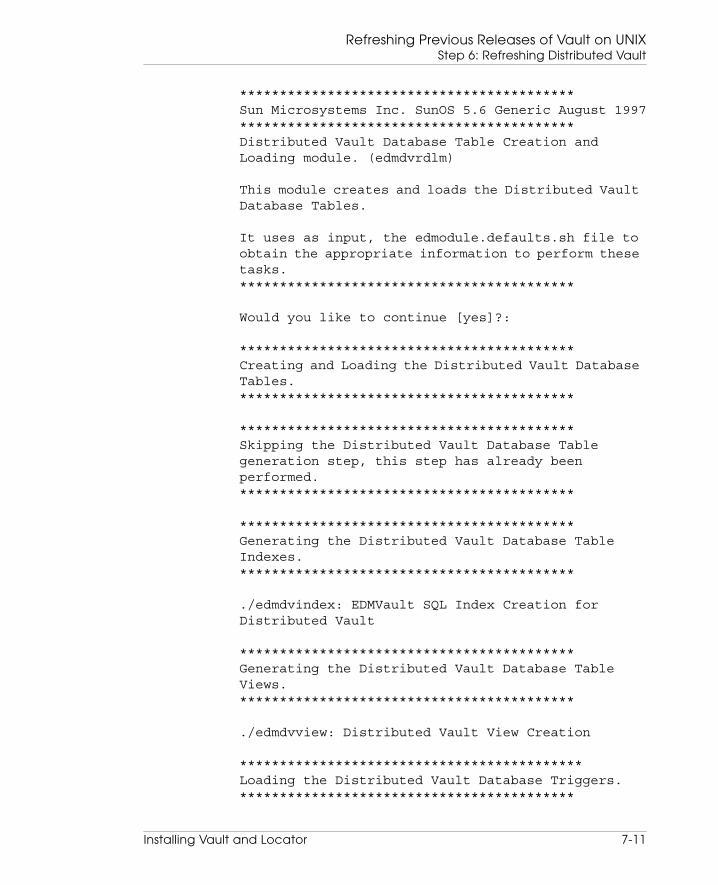
Installing Vault and Locator 7-11
Refreshing Previous Releases of Vault on UNIXStep 6: Refreshing Distributed Vault
******************************************Sun Microsystems Inc. SunOS 5.6 Generic August 1997******************************************Distributed Vault Database Table Creation andLoading module. (edmdvrdlm)
This module creates and loads the Distributed VaultDatabase Tables.
It uses as input, the edmodule.defaults.sh file toobtain the appropriate information to perform thesetasks.******************************************
Would you like to continue [yes]?:
******************************************Creating and Loading the Distributed Vault DatabaseTables.******************************************
******************************************Skipping the Distributed Vault Database Tablegeneration step, this step has already beenperformed.******************************************
******************************************Generating the Distributed Vault Database TableIndexes.******************************************
./edmdvindex: EDMVault SQL Index Creation forDistributed Vault
******************************************Generating the Distributed Vault Database TableViews.******************************************
./edmdvview: Distributed Vault View Creation
*******************************************Loading the Distributed Vault Database Triggers.******************************************
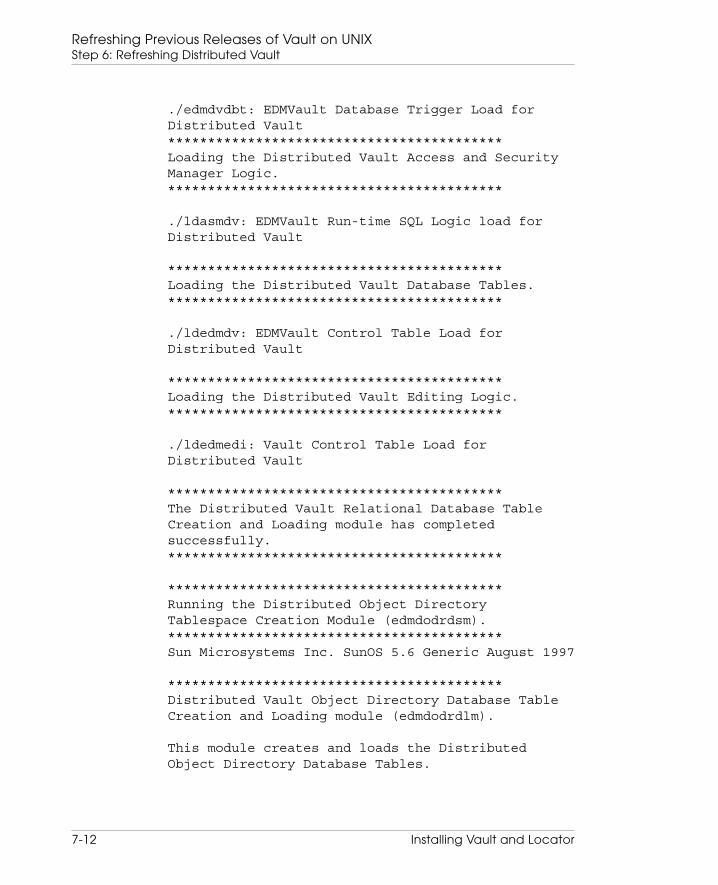
Refreshing Previous Releases of Vault on UNIXStep 6: Refreshing Distributed Vault
7-12 Installing Vault and Locator
./edmdvdbt: EDMVault Database Trigger Load forDistributed Vault******************************************Loading the Distributed Vault Access and SecurityManager Logic.******************************************
./ldasmdv: EDMVault Run-time SQL Logic load forDistributed Vault
******************************************Loading the Distributed Vault Database Tables.******************************************
./ldedmdv: EDMVault Control Table Load forDistributed Vault
******************************************Loading the Distributed Vault Editing Logic.******************************************
./ldedmedi: Vault Control Table Load forDistributed Vault
******************************************The Distributed Vault Relational Database TableCreation and Loading module has completedsuccessfully.******************************************
******************************************Running the Distributed Object DirectoryTablespace Creation Module (edmdodrdsm).******************************************Sun Microsystems Inc. SunOS 5.6 Generic August 1997
******************************************Distributed Vault Object Directory Database TableCreation and Loading module (edmdodrdlm).
This module creates and loads the DistributedObject Directory Database Tables.

Installing Vault and Locator 7-13
Refreshing Previous Releases of Vault on UNIXStep 6: Refreshing Distributed Vault
It uses as input, the edmodule.defaults.sh file toobtain the appropriate information to perform thesetasks.******************************************
At this stage, accept the default yes only if you are performing therefresh on a Vault with DOD installed. Otherwise, enter no and the scriptexits.
Would you like to continue [yes]?:******************************************Creating and Loading the Distributed ObjectDirectory Database Tables.******************************************
******************************************Skipping the Distributed Object DirectoryDatabase Table generation step, this step hasalready been performed.******************************************
******************************************Generating the Distributed Object DirectoryDatabase Table Indexes.******************************************
./edmdodindex: EDMVault SQL Index Creation forDistributed Vault
*******************************************Generating the Distributed Object DirectoryDatabase Table Views.******************************************
./edmdodview: Create views/synonym on LOCAL DOD forInfoBrowser DV support
******************************************The Distributed Object Directory RelationalDatabase Table Creation and Loading module hascompleted successfully.******************************************
******************************************Running the Distributed Vault Network ConfigurationModule (edmdvmcnf).

Refreshing Previous Releases of Vault on UNIXStep 6: Refreshing Distributed Vault
7-14 Installing Vault and Locator
******************************************Sun Microsystems Inc. SunOS 5.6 GenericAugust 1997******************************************Distributed Vault Network Configuration Module(edmdvmcnf).
This module adds the Distributed Vault AE's to thenetwork configuration file.
It uses as input, the edmodule.defaults.sh file toobtain the appropriate information to perform thesetasks.******************************************
Would you like to continue [yes]?:******************************************Modifying nsm.config file for AutomaticRegistration with STORE/GET.******************************************
Would you like to enable AUTO REGISTRATION(*optional) [NO]:******************************************The Distributed Vault Database Configuration Modulehas completed successfully.******************************************
******************************************Running Vault Server Network Startup Module(edmsnsm).******************************************Sun Microsystems Inc. SunOS 5.6 GenericAugust 1997
******************************************Vault Server Network Startup module. (edmsnsm)
This module starts the Vault Server NetworkProcesses.
It uses as input, the edmodule.defaults.sh file toobtain the appropriate information to perform thesetasks.******************************************
Would you like to continue [yes]?:

Installing Vault and Locator 7-15
Refreshing Previous Releases of Vault on UNIXStep 7: Refreshing the Data Dictionary
******************************************Starting the Vault Server Network Processes.
The Vault Server Network Processes are beingstarted in background.
This will take a few minutes; please be patient.******************************************
******************************************The Vault Server Network Processes have beensuccessfully started.******************************************
******************************************The Distributed Vault Software Refresh Module hascompleted.
The Distributed Vault Software has beensuccessfully refreshed.******************************************
Step 7: Refreshing the Data DictionaryIn this step, run the ddrefresh script to refresh the data dictionary. Log inas Administrator and enter the following at the command prompt:
# cd $EDM_HOME/dictionary# ./ddrefresh
In the output, default values are shown in brackets ([]). Press Return toaccept them. The following is a sample of the output:
Please enter the Oracle password for the userSYSTEM (manager):
Please enter the Oracle password for the user PDMDM(pdmdm):
Select yes if you are installing Vault in adistributed environment.
Have you installed distributed Vault? [y,n] (n):y

Refreshing Previous Releases of Vault on UNIXStep 8: Refreshing Vault Attributes and Views
7-16 Installing Vault and Locator
Updating Data in the Data Dictionary Tables.
Data Updation in the Data Dictionary TablesCompleted.
Do you want to install JAPANESE? [y,n] (n):Do you want to install GERMAN ? [y,n] (n):Do you want to install FRENCH ? [y,n] (n):
Creating Indexes of Data Dictionary.
Data Dictionary Refresh Completed.
When performing the refresh on a DOD node, execute the dddvrefreshscript after executing the ddrefresh script. An example follows.
Please enter the Oracle password for the userSYSTEM (manager):
Please enter the Oracle password for the user EDMDV(edmdv) :
Updating Data in the Data Dictionary Tables.
Data Updation in the Data Dictionary TablesCompleted.
Do you want to install JAPANESE? [y,n] (n):Do you want to install GERMAN ? [y,n] (n):Do you want to install FRENCH ? [y,n] (n):
Distributed Vault (DV) Data Dictionary RefreshCompleted.
Step 8: Refreshing Vault Attributes andViews
In this step, run the navrefresh script to refresh Vault attributes and views.Perform the following steps:
1. Log in as root and set the $EPD_HOME environment variable to theappropriate Optegra home directory.

Installing Vault and Locator 7-17
Refreshing Previous Releases of Vault on UNIXStep 8: Refreshing Vault Attributes and Views
2. At the prompt, run the navrefresh script as follows:
# cd $EPD_HOME/install# ./navrefresh
In the output, default values are shown in brackets ([]). Press Return toaccept them.
Please note: In the following sample output, the VaultAdministration account is edm and the $EPD_HOME environment variableis set to the /opt/epd/dm/v60/bin.
Database Refresh Utility for EPD.ConnectNavigator
Enter the user id of your Optegra VaultAdministration account:edm
Installation details you have specified are:-
Optegra Vault Administration account : edmOptegra Vault/EPD.Connect installation directory
: /opt/epd/dm/v60
Do you want to re-enter any values [no]?:
OK to refresh the EPD.Connect Oracle Tables [yes]:
Sun Microsystems Inc.SunOS 5.6Generic August 1997
Enter the Optegra Vault Oracle database manageruserid [pdmdm]:
Enter the Optegra Vault Oracle database managerpassword [pdmdm]:
Enter the Optegra Vault Oracle IQF userid [pdmqf]:
Enter the Optegra Vault Oracle IQF password[pdmqf]:
Updating Tables in ORACLE Database.
Processing completed.
Sun Microsystems Inc.SunOS 5.6 Generic August 1997
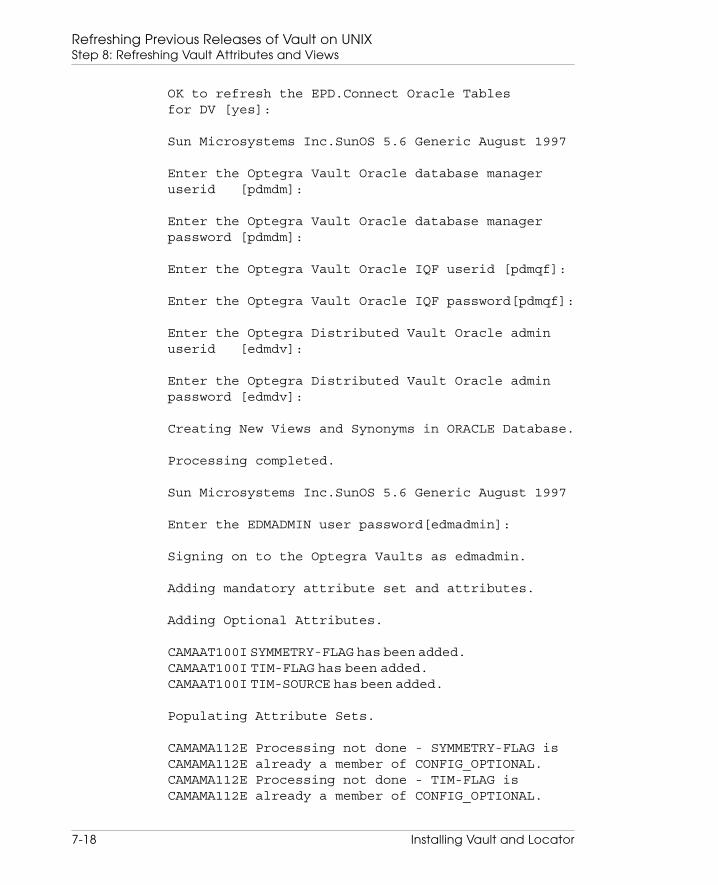
Refreshing Previous Releases of Vault on UNIXStep 8: Refreshing Vault Attributes and Views
7-18 Installing Vault and Locator
OK to refresh the EPD.Connect Oracle Tablesfor DV [yes]:
Sun Microsystems Inc.SunOS 5.6 Generic August 1997
Enter the Optegra Vault Oracle database manageruserid [pdmdm]:
Enter the Optegra Vault Oracle database managerpassword [pdmdm]:
Enter the Optegra Vault Oracle IQF userid [pdmqf]:
Enter the Optegra Vault Oracle IQF password[pdmqf]:
Enter the Optegra Distributed Vault Oracle adminuserid [edmdv]:
Enter the Optegra Distributed Vault Oracle adminpassword [edmdv]:
Creating New Views and Synonyms in ORACLE Database.
Processing completed.
Sun Microsystems Inc.SunOS 5.6 Generic August 1997
Enter the EDMADMIN user password[edmadmin]:
Signing on to the Optegra Vaults as edmadmin.
Adding mandatory attribute set and attributes.
Adding Optional Attributes.
CAMAAT100I SYMMETRY-FLAG has been added.CAMAAT100I TIM-FLAG has been added.CAMAAT100I TIM-SOURCE has been added.
Populating Attribute Sets.
CAMAMA112E Processing not done - SYMMETRY-FLAG isCAMAMA112E already a member of CONFIG_OPTIONAL.CAMAMA112E Processing not done - TIM-FLAG isCAMAMA112E already a member of CONFIG_OPTIONAL.

Installing Vault and Locator 7-19
Refreshing Previous Releases of Vault on UNIXStep 8: Refreshing Vault Attributes and Views
CAMAMA112E Processing not done - TIM-SOURCE isCAMAMA112E already a member of CONFIG_OPTIONAL.
OK to install the EPD Interface to CADDS5 [yes]:
Sun Microsystems Inc.SunOS 5.6 GenericAugust 1997
Installation Utility
OK to add CADDS Application Environment to OptegraVault [yes]:
Enter the Vault Oracle database manageruserid [pdmdm]:
Enter the Vault Oracle database managerpassword [pdmdm]:
Checking New Tables in ORACLE Database.....
New tables already exist.
Enter the Vault Oracle database manageruserid [pdmdm]:
Enter the Vault Oracle database managerpassword [pdmdm]:
Adding CADDS Application to Optegra Vault.
OK to install the CADDS Vault Attributes [yes]:
Enter the EDMADMIN user password [edmadmin]:
Adding CADDS attributes.
CAMARL103E Processing not done - CONFIG_RULE_DBCAMARL103E already exists.CAMARL103E Processing not done - CONFIG_RULE_PSCAMARL103E already exists.CAMARL103E Processing not done - CONFIG_OPT_RULE_DBCAMARL103E already exists.CAMARL103E Processing not done - CONFIG_OPT_RULE_PSCAMARL103E already exists.

Refreshing Previous Releases of Vault on UNIXPostinstallation Tasks
7-20 Installing Vault and Locator
TRI292I CADDS attributes added.
TRI211I Optegra Interface for CADDS InstallationTRI211I Complete.
Migrating filesets in IN-REVIEW statusfrom 2.0.6 to 6.0 if any.
Sun Microsystems Inc.SunOS 5.6 GenericAugust 1997
Enter the Optegra Vault Oracle database manageruserid [pdmdm]:
Enter the Optegra Vault Oracle database managerpassword [pdmdm]:
Updating Tables in ORACLE Database.
Processing completed.
EPD.Connect Refresh completed.
Postinstallation TasksThe Vault refresh has been completed. Perform the final postinstallationprocedures as described in Chapter 3, “Postinstallation Tasks for UNIX.”

Installing Vault and Locator 8-1
Chapter 8 Customizing theInstallation or Refreshon UNIX
This chapter provides instructions for additional customization of your Vaultinstallation or refresh.
• Enabling the E-mail Trigger
• Manually Changing the CADDS Part Definition
• Creating and Loading the Revision Code Scheme
Customizing the Installation or Refresh on UNIXEnabling the E-mail Trigger
8-2 Installing Vault and Locator
Enabling the E-mail TriggerIf you did not enable the e-mail trigger when you installed Vault softwareand you now want to use e-mail command triggers, perform the followingsteps:
1. Shut down Vault or verify that it is down.
2. Correct the nsm.config file by uncommenting the e-mail trigger AEdefinition.
3. Restart Vault.
4. From the $EDM_HOME/install directory run edmaetm to enablethe e-mail command triggers.
Manually Changing the CADDS PartDefinition
As an optional step, you can customize the list of CADDS files that constitutea CADDS part to include any file of a type recognized by CADDS. (You canalso change the definition of a CADDS part any time after installing Vault.)See Vault Manager Guide for additional information about the LoadCADDS Part Definition utility.
Warning
Any changes you make to the default definition ofa CADDS part are global changes and will affectall CADDS users who store parts in Vault. Before youchange the definition of a CADDS part, make surethat the changes are appropriate to yourenvironment and inform all CADDS users of thechange.
To customize this file, follow these steps:
1. Using the command line interface, sign on as the Administrator accountuser. For example:
% cisignon userid=edmadmin userpwd=edmadmin
2. In another window, log in to the Vault software account.
3. Enter
% cd $EDM_HOME/install

Installing Vault and Locator 8-3
Customizing the Installation or Refresh on UNIXManually Changing the CADDS Part Definition
4. Enter
% cp DEFAULT.CDPRTDEF INSTALL.CDPRTDEF
5. Edit and customize the INSTALL.CDPRTDEF file.
6. To load what you customized, enter
% ldedmcpd
7. Stop and restart the network server processes.
A printout of the file you want to customize follows.
”INSTALL.CDPRTDEF” 17 lines, 51 characters00202122232425262728292A2B2C2D2E2F~~~~

Customizing the Installation or Refresh on UNIXCreating and Loading the Revision Code Scheme
8-4 Installing Vault and Locator
Creating and Loading the RevisionCode Scheme
Three files are provided as possible revision code schemes. You can use anyone of these, or you can create your own file with the system editor. (Formore information about Vault revision codes, see Vault Manager Guide.)The three files and their contents are described below.
• NUMBERS.REVCODES — This file contains 500 numerical revision codesfrom 1 through 500.
• LETTERS.REVCODES — This file contains 552 standard engineeringalphabetic revision codes from A to ZZ. In this file, the letters I, O, and Qare not used.
• ALPHABET.REVCODES — This file contains 702 alphabetic revisioncodes from A to ZZ, using all letters in the alphabet.
Revision Code Scheme Rules
If you create a file containing your own revision code scheme, the followingrules apply:
• Each entry (record) in the file will match the corresponding Vault internalrevision number. For example, the first entry is internal revision number1, the second entry is internal revision number 2 and so forth.
• The entries in the file will be ordered as an ascending sequence ofrevision codes. For example, if the entries in the file are
ZAYB
then the translation to Vault internal revision numbers will be
1. Z2. A3. Y4. B
• The number of the entries (records) in the file determines the maximumnumber of revisions a file can have.
• Revision codes consist of 20 or fewer numbers, or uppercase characterswith no embedded blanks. If lowercase alphabetic characters are presentin the file, they will be translated to uppercase before being inserted intothe revision code table.
Installing Vault and Locator 8-5
Customizing the Installation or Refresh on UNIXCreating and Loading the Revision Code Scheme
• Revision codes can contain special characters. However, remember thatnot all special characters exist on all terminal keyboards.
• Duplicate revision codes are not allowed.
Please note: CADDS does not support alphanumeric revisioncodes. When you enter GET PART READ, you can supply only an integerrevision code.
Installing the Revision Code Table
To install the revision code translation table, do the following:
1. Copy your selected revision code file into the file INSTALL.REVCODES.For example, if you select the MY_OWN.REVCODES file as your revisioncode scheme, enter
% cp MY_OWN.REVCODES INSTALL.REVCODES
(If you created your own revision code file, enter the same commandshown above with the name of your file in place of MY_OWN.REVCODES.)
2. Execute the ldedmrev command file to load the revision codes into therevision code table in the database.
% ldedmrev
Please note: The ldedmrev command file loads these revisioncodes under the revision sequence named DEFAULT. You can create otherrevision code sequences, as described in Chapter 4 of Vault Manager Guide.


Installing Vault and Locator 9-1
Chapter 9 UNIX VaultTroubleshooting
This chapter provides information on troubleshooting techniques that can beused during the installation, migration, or refresh of Vault.
• Starting the Process Manager
• Starting Other Network Processes
• Listing Started Processes
• Stopping and Restarting Network Processes
• Adjusting .tmp Files When Rerunning Scripts
• Working Around $ORACLE_HOME Errors
• Tracing Execution of Install or Refresh Scripts
• Logging the Install, Migrate, or Refresh Script Output
• Changing Previously Entered Defaults

UNIX Vault TroubleshootingStarting the Process Manager
9-2 Installing Vault and Locator
Starting the Process ManagerYou can start the network Process Manager to run in the foreground byfollowing these steps:
1. Log in to the Vault software account.
2. Enter these commands:
% setenv ANSTLEVL 31
Use the previous command only if you want to use the tracing capability,but use the following command whether you are using tracing or not.
% PMGR.STARTUP
To run the above command in the background:
% PMGR.STARTUP &
Please note: For more information about network processes and thecommands used to start, stop, and query them, see Vault SystemAdministrator Guide.
Starting Other Network ProcessesAfter you start the Process Manager, you can automatically start the DataManagement Log, the Administrator processes, the Attribute Managementprocess, the Data Management process, and the Data Distribution processesusing the Process Control Agent (pca).
To start the pca, running in the foreground, follow these steps:
1. Log in to the Vault software account.
2. Enter these commands:
% setenv ANSTLEVL 31
Use the previous command only if you want to use the tracing capability,but use the following command whether you are using tracing or not.
% PCA.STARTUP
To run the above command in the background:
% PCA.STARTUP &
Messages are displayed on your terminal as each AE binds to the ProcessManager.

Installing Vault and Locator 9-3
UNIX Vault TroubleshootingListing Started Processes
Listing Started ProcessesTo make sure all network processes have been started, enter thesecommands:
% ps x% nsmquery -pm | more% nsmquery -ds | more
The last command produces a display similar to the examples that follow forVault and Distributed Vault.
Processes for Vault
*********** PM_BIND TABLES ***************
process name matthew:MATTHEW:PDMLOG:0process id 646process state CONFIRMEDlast heartbeat Tue Nov 21 15:35:07 2002
process name matthew:MATTHEW:EDMATTR:0process id 659process state CONFIRMEDlast heartbeat Tue Nov 21 15:34:57 2002
process name matthew:MATTHEW:PDMDM:0process id 677process state CONFIRMEDlast heartbeat Tue Nov 21 15:35:49 2002
process name matthew:MATTHEW:PDMDD:0process id 691process state CONFIRMEDlast heartbeat Tue Nov 21 15:35:22 2002
process name matthew:MATTHEW:PDMADMN:0process id 705process state CONFIRMEDlast heartbeat Tue Nov 21 15:35:10 2002
process name matthew:MATTHEW:ADMIN_SERVER:0 process id 714

UNIX Vault TroubleshootingListing Started Processes
9-4 Installing Vault and Locator
process state CONFIRMEDlast heartbeat Tue Nov 21 15:35:12 2002
process name matthew:MATTHEW:COMMAND_TRIGGER:0process id 725process state CONFIRMEDlast heartbeat Tue Nov 21 15:35:39 2002
process name matthew:MATTHEW:DESKTOP_SERVER:0process id 764process state CONFIRMEDlast heartbeat Tue Nov 21 15:35:06 2002
process name matthew:MATTHEW:DESKTOP_EDMOSRV:0process id 777process state CONFIRMEDlast heartbeat Tue Nov 21 15:34:54 2002
Processes for Distributed Vault
*********** PM_BIND TABLES ***************
process name whoisnext:WHOISNEXT:PDMLOG:0process id 9428process state CONFIRMEDlast heartbeat Tue Nov 21 15:37:26 2002
process name whoisnext:WHOISNEXT:EDMATTR:0process id 9488process state CONFIRMEDlast heartbeat Tue Nov 21 15:36:44 2002
process name whoisnext:WHOISNEXT:PDMDM:0process id 9535process state CONFIRMEDlast heartbeat Tue Nov 21 15:37:23 2002
process name whoisnext:WHOISNEXT:PDMDD:0process id 9596process state CONFIRMEDlast heartbeat Tue Nov 21 15:36:43 2002
process name whoisnext:WHOISNEXT:PDMADMN:0process id 9658
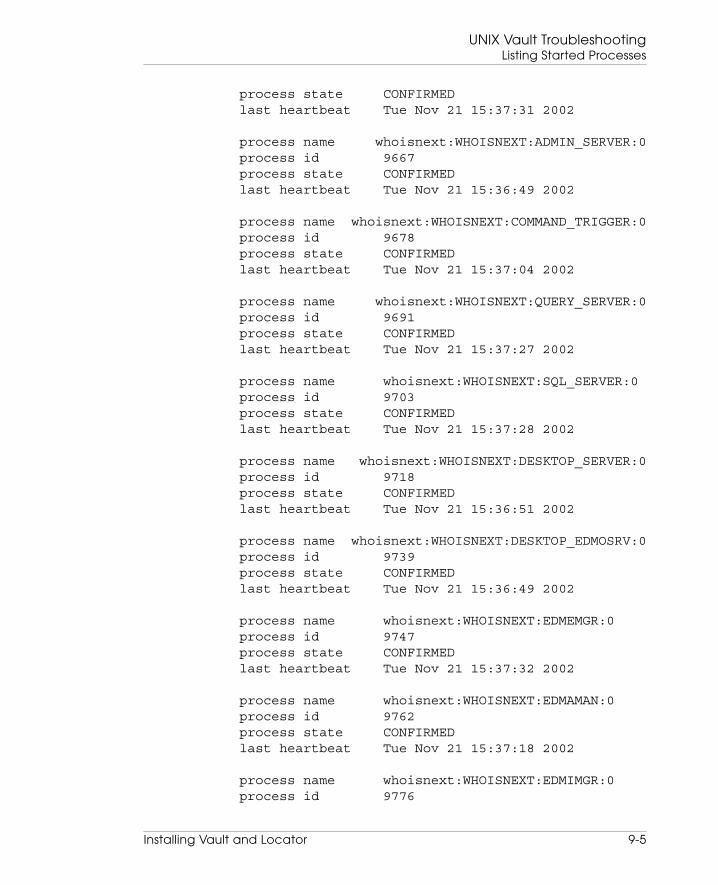
Installing Vault and Locator 9-5
UNIX Vault TroubleshootingListing Started Processes
process state CONFIRMEDlast heartbeat Tue Nov 21 15:37:31 2002
process name whoisnext:WHOISNEXT:ADMIN_SERVER:0process id 9667process state CONFIRMEDlast heartbeat Tue Nov 21 15:36:49 2002
process name whoisnext:WHOISNEXT:COMMAND_TRIGGER:0process id 9678process state CONFIRMEDlast heartbeat Tue Nov 21 15:37:04 2002
process name whoisnext:WHOISNEXT:QUERY_SERVER:0process id 9691process state CONFIRMEDlast heartbeat Tue Nov 21 15:37:27 2002
process name whoisnext:WHOISNEXT:SQL_SERVER:0process id 9703process state CONFIRMEDlast heartbeat Tue Nov 21 15:37:28 2002
process name whoisnext:WHOISNEXT:DESKTOP_SERVER:0process id 9718process state CONFIRMEDlast heartbeat Tue Nov 21 15:36:51 2002
process name whoisnext:WHOISNEXT:DESKTOP_EDMOSRV:0process id 9739process state CONFIRMEDlast heartbeat Tue Nov 21 15:36:49 2002
process name whoisnext:WHOISNEXT:EDMEMGR:0process id 9747process state CONFIRMEDlast heartbeat Tue Nov 21 15:37:32 2002
process name whoisnext:WHOISNEXT:EDMAMAN:0process id 9762process state CONFIRMEDlast heartbeat Tue Nov 21 15:37:18 2002
process name whoisnext:WHOISNEXT:EDMIMGR:0process id 9776

UNIX Vault TroubleshootingListing Started Processes
9-6 Installing Vault and Locator
process state CONFIRMEDlast heartbeat Tue Nov 21 15:36:49 2002
process name whoisnext:WHOISNEXT:OAXIS:0process id 9794process state CONFIRMEDlast heartbeat Tue Nov 21 15:37:22 2002
Processes for Distributed Vault with the DOD
*********** PM_BIND TABLES ***************
process name tiger:TIGER:PDMLOG:0process id 27422process state CONFIRMEDlast heartbeat Tue Nov 21 15:47:54 2002
process name tiger:TIGER:EDMATTR:0process id 27436process state CONFIRMEDlast heartbeat Tue Nov 21 15:48:27 2002
process name tiger:TIGER:PDMDM:0process id 27525process state CONFIRMEDlast heartbeat Tue Nov 21 15:48:17 2002
process name tiger:TIGER:PDMDD:0process id 27562process state CONFIRMEDlast heartbeat Tue Nov 21 15:48:05 2002
process name tiger:TIGER:PDMADMN:0process id 27575process state CONFIRMEDlast heartbeat Tue Nov 21 15:47:51 2002
process name tiger:TIGER:ADMIN_SERVER:0process id 27592process state CONFIRMEDlast heartbeat Fri Nov 9 11:06:51 2002
process name tiger:TIGER:COMMAND_TRIGGER:0process id 27620
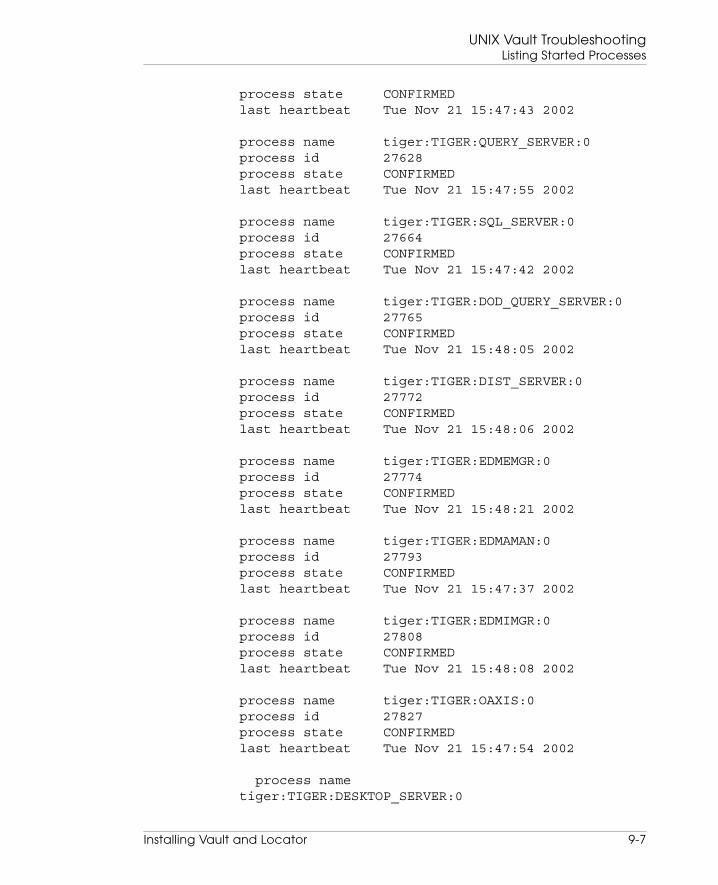
Installing Vault and Locator 9-7
UNIX Vault TroubleshootingListing Started Processes
process state CONFIRMEDlast heartbeat Tue Nov 21 15:47:43 2002
process name tiger:TIGER:QUERY_SERVER:0process id 27628process state CONFIRMEDlast heartbeat Tue Nov 21 15:47:55 2002
process name tiger:TIGER:SQL_SERVER:0process id 27664process state CONFIRMEDlast heartbeat Tue Nov 21 15:47:42 2002
process name tiger:TIGER:DOD_QUERY_SERVER:0process id 27765process state CONFIRMEDlast heartbeat Tue Nov 21 15:48:05 2002
process name tiger:TIGER:DIST_SERVER:0process id 27772process state CONFIRMEDlast heartbeat Tue Nov 21 15:48:06 2002
process name tiger:TIGER:EDMEMGR:0process id 27774process state CONFIRMEDlast heartbeat Tue Nov 21 15:48:21 2002
process name tiger:TIGER:EDMAMAN:0process id 27793process state CONFIRMEDlast heartbeat Tue Nov 21 15:47:37 2002
process name tiger:TIGER:EDMIMGR:0process id 27808process state CONFIRMEDlast heartbeat Tue Nov 21 15:48:08 2002
process name tiger:TIGER:OAXIS:0process id 27827process state CONFIRMEDlast heartbeat Tue Nov 21 15:47:54 2002
process nametiger:TIGER:DESKTOP_SERVER:0

UNIX Vault TroubleshootingStopping and Restarting Network Processes
9-8 Installing Vault and Locator
process id 15390 process state CONFIRMED last heartbeat Tue Nov 21 15:47:49 2002
process nametiger:TIGER:DESKTOP_EDMOSRV:0 process id 27712 process state CONFIRMED last heartbeat Tue Nov 21 15:48:09 2002
Stopping and Restarting NetworkProcesses
If the network processes are currently running in the foreground, stop thenetwork processes and restart them in the background, as shown in thefollowing steps:
1. Log in to the software account (edm).
2. Stop all network processes with these commands:
% nsmstop -pca% nsmstop -all
3. Start the Process Manager and the other network processes in thebackground by executing the following commands:
% pmgr.startup &% pca.startup &
Adjusting .tmp Files When RerunningScripts
All the installation, migration, and refresh scripts create .tmp files to allowthem to be rerun and pick up from where they left off.
Intermediate .tmp Files
Each script creates intermediate .tmp files in the account’s Vault installdirectory while the script is running.

Installing Vault and Locator 9-9
UNIX Vault TroubleshootingWorking Around $ORACLE_HOME Errors
An intermediate .tmp file is created after the successful completion of arequired step in the script. Some scripts perform multiple steps and thuscreate multiple .tmp files, one for each successful step.
If the script that is running is aborted, whether by user intervention or by anerror, it will pick up where it left off by checking for the existence of theintermediate .tmp files when it is rerun. If it finds an intermediate .tmp filefor a particular step, it will skip that step.
Final .tmp Files
Once a script finishes running successfully, all intermediate .tmp files areremoved. A final .tmp file is created in the Vault account’sinstall/temp_flags directory. The final .tmp file name is the scriptname with .tmp added at the end.
The final .tmp file remains in the account’s install/temp_flagsdirectory. If the script that created the final .tmp file is rerun, it checks to seeif the final .tmp file exists that is related to this script. If it exists, the scriptwill not rerun. Instead, the script issues the appropriate message that it hasalready been run successfully to completion and that in order to rerun thisscript you will have to manually delete the final .tmp file that is associatedwith that script.
Override Intermediate .tmp Files WhenNecessary
If a Vault installation, migration or refresh script erroneously creates anintermediate .tmp file because the script’s error checking logic did notdetermine that an error had occurred for that step, you can abort the script.
After you have corrected the problem that caused the error, you can deletethe appropriate intermediate .tmp file for the step that you would like torerun and rerun the script. After the script reruns the step you chose, itcontinues with the rest of the steps.
Working Around $ORACLE_HOME ErrorsDuring the installation, migration, or refresh of Vault, you may encounter thefollowing error.

UNIX Vault TroubleshootingWorking Around $ORACLE_HOME Errors
9-10 Installing Vault and Locator
ORA-00205: error in identifying control file’?/dbs/[email protected]’ORA-09782: sfifi: another instance has the samedatabase mounted.
This error occurs because the $ORACLE_HOME value being used to startthe database is not the same $ORACLE_HOME value which was used tocreate the database. Possible causes of the error are:
• The database was created with $ORACLE_HOME equal to a realdirectory (for example, /usr2/oracle9) but $ORACLE_HOME isnow set to a soft link (for example, /usr/oracle > /usr2/oracle9).
• The database was created with $ORACLE_HOME equal to a soft link(for example, $ORACLE_HOME > /usr2/oracle9), but$ORACLE_HOME is now set to the real directory (for example,/usr2/oracle9).
When the error occurs, the script exits and you must use the followingworkaround to finish the Vault installation, migration, or refresh.
1. Switch to the Oracle user.
% su - oracle
2. Manually start the database.
% cd ${ORACLE_HOME}/dbs/edm_dbs% sqlplus /nologSQL> connect / as sysdba;SQL> startup pfile=init1.ora;
3. Touch the setup file.
SQL> touch setup_rdbms_3_done.tmp;
4. Exit the Oracle session and return to root.
SQL> exit;
5. Restart the automated script you were using, either edminstall,edmigrate, or edmrefresh. If you were performing a manualprocedure, restart the module you were in when you received the error.
The script continues, but after a while the same Oracle error occurs againand you receive the message again. The workaround is slightly different thistime. The installation, migration, or refresh completes successfully after youperform the steps below.
1. Switch to the Oracle user.
% su - oracle

Installing Vault and Locator 9-11
UNIX Vault TroubleshootingTracing Execution of Install or Refresh Scripts
2. Manually start the database.
% cd $ORACLE_HOME/dbs/edm_dbs% sqlplus /nologSQL> connect / as sysdba;SQL> startup pfile=init2.ora;
3. Touch the setup file.
SQL> touch setup_rdbms_22_done.tmp;
4. Exit the Oracle session and return to root.
SQL> exit;
5. Restart the automated script you were using. If you were performing amanual procedure, restart the module you were in when you received theerror.
Tracing Execution of Install or RefreshScripts
Output generated by the Vault script tracing capability is a behind-the-sceneslook at everything the Vault installation or refresh script does as it executes.When you run without the tracing capability activated, you only see thegenerated errors, messages, and prompts.
The tracing capability is most useful when an error is causing an installationor refresh to fail and the reason for the failure is not apparent. When youexecute a Vault installation, migration, or refresh script with the scripttracing capability activated, the reason for the failure might become clear.Thus, you can take corrective action because of the additional informationthat the script tracing capability has provided.
To enable the script tracing capability, run the appropriate installation,migration or refresh script with the -t tracing parameter. For example,
% edmigrate -t
— to have all tracing information output to the screen.
or
% edmigrate -t | tee edmigrate.log
— to have all tracing information output to the edmigrate.log file.
The -t parameter activates the script tracing capability.
UNIX Vault TroubleshootingLogging the Install, Migrate, or Refresh Script Output
9-12 Installing Vault and Locator
If you are not able to determine the reason for the script failure, even withthe additional information provided by the script tracing capability, save thescript tracing output in a log file so that a Service Representative canresearch and correct the failure.
Logging the Install, Migrate, or RefreshScript Output
You can generate a log file of output generated by an installation, migration,or refresh script by using the UNIX “tee” utility. The tee utility transcribesthe standard input to the standard output and outputs this information into afilename that you provide.
You can execute any of the installation, migration, or refresh scripts andredirect the output to a log file that you specify.
The following example shows how to use the tee utility to output allinformation generated by the edmrefresh script:
% edmrefresh | tee edmrefresh.log
Output generated by an installation, migration, or refresh script that is beingredirected to a log file is also displayed on the screen. Thus, you are able tosee the output while it is being logged.
See the UNIX man pages for more information on the tee utility.
Changing Previously Entered DefaultsThe Vault Software Installation/Migration Requirements Module DefaultsFile controls the behavior of all Vault installation, migration, and refreshscript modules. The name of this file is edmodule.defaults.sh and it islocated in the account’s install directory.
The edmodule.defaults.sh file is generated by the SoftwareInstallation/Migration Requirements, known as edmsirm in the installationscript and edmsmrm in the migration script. This script is also located in theVault account’s install directory.
Installing Vault and Locator 9-13
UNIX Vault TroubleshootingChanging Previously Entered Defaults
If you want to change the software requirement default value to somethingdifferent from what you had entered earlier, you can do this by rerunningedmsirm or edmsmrm. To rerun either of them, do the following:
1. Log in to the Vault account if one exists at this point, or use the rootaccount if the account does not exist yet.
2. Change directory to the Vault account’s install directory.
% cd $EDM_HOME/install
3. Execute the Software Installation/Migration Requirements part.
% edmsirm (for a new installation)% edmsmrm (for a migration)
You are informed that the respective part has previously been run tocompletion. You are then asked whether you would like to continue andare offered two options:
• Continue with the input values that you had entered earlier beingdisplayed as the defaults shown in brackets ( [ ] ) at each input valueprompt.
• Continue with the original default values being displayed as thedefaults shown in brackets ( [ ] ) at each input value prompt
Whichever option you choose, you are again prompted for each inputvalue and given the opportunity to make appropriate changes.
Warning
Depending on how far along you were in theinstallation, migration, or refresh process, youmight be modifying a Vault installation, migration,or refresh required input value that affects a stepthat has already been performed.
If this is the case, you will need to rerun the affected step after youmodify the appropriate input value.
To determine the impact of changing a particular input value, look in theedmodule.defaults.sh file and find the input value that you want tomodify. Then, search the edm* scripts in the Vault account’s install directory.The edm* scripts that are affected by this input value have references to thisinput value. Thus, you will have to rerun these edm* scripts.
Refer “Adjusting .tmp Files When Rerunning Scripts” on page 9-8 forinformation on how to rerun a particular Vault script.

UNIX Vault TroubleshootingChanging Previously Entered Defaults
9-14 Installing Vault and Locator
Here is an example where the EDM_TBL_DIRECTORY (Vault TablespaceDirectory) is changed from what was entered originally when therequirements were gathered:
• The edmodule.defaults.sh file was checked for the Vault TablespaceDirectory input value name and was determined to beEDM_TBL_DIRECTORY.
• The edm* installation, migration and refresh scripts weresearched to see what scripts reference the EDM_TBL_DIRECTORY inputvalue.
% grep EDM_TBL_DIRECTORY edm* | grep # | grep -vedmodule.defaults-template.sh | grep -vedmodule.defaults.sh | grep -v edmsmrm
Here is the output from the search command line above:
edmrdmm:# EDM_TBL_DIRECTORY - EDM TablespaceDirectoryedmdmsm:# EDM_TBL_DIRECTORY - EDM TablespaceDirectory
4. It has now been determined that if the EDM_TBL_DIRECTORY input valueis changed, then the edmrdmm and edmdmsm scripts need to be rerun ifthey have already been run successfully to completion using the oldEDM_TBL_DIRECTORY input value.
We recommend that if you need to modify an input value that is stored in theedmodule.defaults.sh file, you use the Vault SoftwareInstallation/Migration Requirements and not edit theedmodule.defaults.sh file manually to make modifications.
The Vault Software Installation/Migration Requirements performs inputvalue validation checks on all required Vault input values to ensure that theinput value you are using is acceptable for use by the Vault installation,migration, and refresh scripts.
Installing Vault and Locator 10-1
Chapter 10 InternationalizationConsiderations forUNIX
This chapter describes considerations for localizing Vault and relatedproducts.
• Setting the Language Environment Variable
• Multilingual Option of Oracle
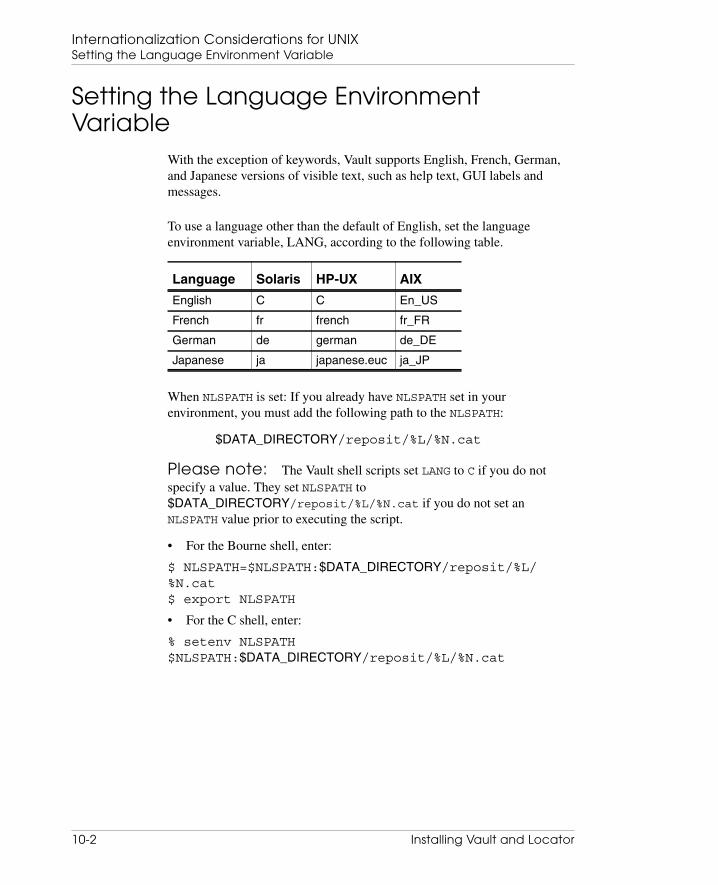
Internationalization Considerations for UNIXSetting the Language Environment Variable
10-2 Installing Vault and Locator
Setting the Language EnvironmentVariable
With the exception of keywords, Vault supports English, French, German,and Japanese versions of visible text, such as help text, GUI labels andmessages.
To use a language other than the default of English, set the languageenvironment variable, LANG, according to the following table.
When NLSPATH is set: If you already have NLSPATH set in yourenvironment, you must add the following path to the NLSPATH:
$DATA_DIRECTORY/reposit/%L/%N.cat
Please note: The Vault shell scripts set LANG to C if you do notspecify a value. They set NLSPATH to$DATA_DIRECTORY/reposit/%L/%N.cat if you do not set anNLSPATH value prior to executing the script.
• For the Bourne shell, enter:
$ NLSPATH=$NLSPATH:$DATA_DIRECTORY/reposit/%L/%N.cat$ export NLSPATH
• For the C shell, enter:
% setenv NLSPATH$NLSPATH:$DATA_DIRECTORY/reposit/%L/%N.cat
Language Solaris HP-UX AIX
English C C En_US
French fr french fr_FR
German de german de_DE
Japanese ja japanese.euc ja_JP
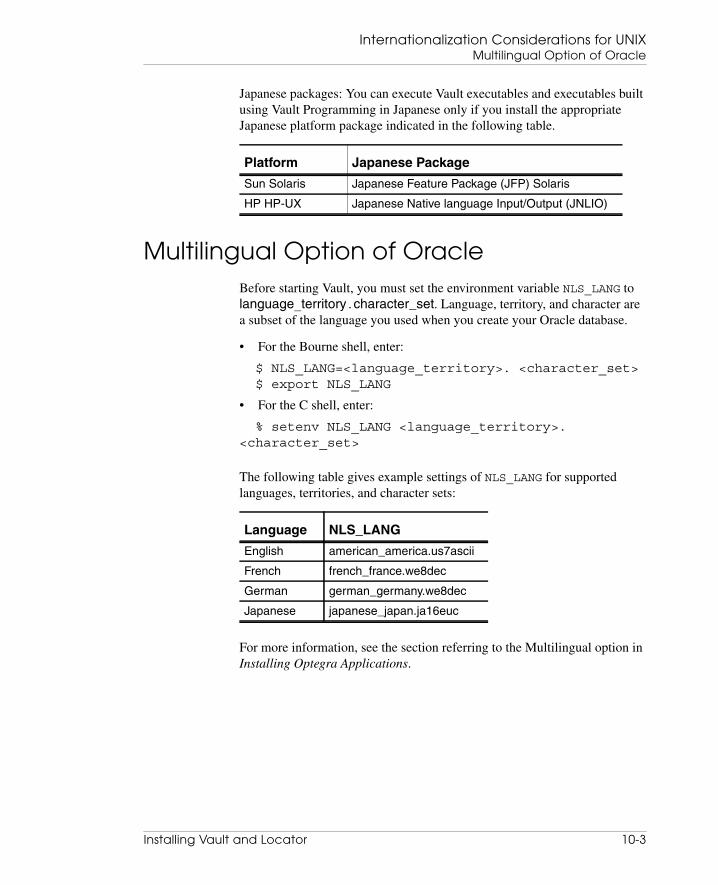
Installing Vault and Locator 10-3
Internationalization Considerations for UNIXMultilingual Option of Oracle
Japanese packages: You can execute Vault executables and executables builtusing Vault Programming in Japanese only if you install the appropriateJapanese platform package indicated in the following table.
Multilingual Option of OracleBefore starting Vault, you must set the environment variable NLS_LANG tolanguage_territory.character_set. Language, territory, and character area subset of the language you used when you create your Oracle database.
• For the Bourne shell, enter:
$ NLS_LANG=<language_territory>. <character_set>$ export NLS_LANG
• For the C shell, enter:
% setenv NLS_LANG <language_territory>.<character_set>
The following table gives example settings of NLS_LANG for supportedlanguages, territories, and character sets:
For more information, see the section referring to the Multilingual option inInstalling Optegra Applications.
Platform Japanese Package
Sun Solaris Japanese Feature Package (JFP) Solaris
HP HP-UX Japanese Native language Input/Output (JNLIO)
Language NLS_LANG
English american_america.us7ascii
French french_france.we8dec
German german_germany.we8dec
Japanese japanese_japan.ja16euc


Installing Vault and Locator 11-1
Chapter 11 Introduction to Vaultand Distributed Vaulton Windows NT
This chapter introduces Vault and Distributed Vault (DV) on Windows NT. Itprovides an overview of the setup and configuration process.
• Overview of Vault and Distributed Vault
• Required Steps for Vault Installation
• Refreshing Vault from a Previous to the Current Release
• Refreshing the Data Dictionary
• Installing or Refreshing EPD.Connect and Navigator Attributes
Please note: Refer to Optegra Release Notes and Installing OptegraApplications before performing the postinstallation tasks in this book.
Introduction to Vault and Distributed Vault on Windows NTOverview of Vault and Distributed Vault
11-2 Installing Vault and Locator
Overview of Vault and Distributed VaultVault and Distributed Vault (DV) combine relational database managementsystems (RDBMS) with task-oriented applications to control, manage, anddistribute electronic objects. These objects may come from any computerapplication and may include computer-aided engineering (CAE, CAD, andCAM) parts, word processing documents, spreadsheet files, and plain text.
Vault and Distributed Vault are customizable, modular, multiuser,client-server products. The core modules are the Vault server, DV, and theLocator end-user software. Vault for Windows NT uses the full 32-bit,preemptive multitasking operating system of Windows NT.
Vault for Windows NT includes:
• Vault
• Distributed Vault
• Programming
• EPD Interface for Pro/ENGINEER
• CATIA
• MEDUSA
Please note: For information on programming, refer to the VaultProgrammer Guide. You can find information on the EPD Interface toPro/ENGINEER in the EPD.Connect User Guide.
Installing Vault and Locator 11-3
Introduction to Vault and Distributed Vault on Windows NTRequired Steps for Vault Installation
Required Steps for Vault InstallationTo install Vault on Windows NT successfully, you must perform a sequenceof steps. Do not skip any steps. Use the following documents for your Vaultinstallation:
• Optegra Release Notes
• Installing Optegra Applications
• Using the License Manager
• Vault Administrator for Windows NT User Guide
For steps 1 through 8, use the documents indicated for each task.
1. Refer to Optegra Release Notes for last-minute information.
2. Meet the hardware and software prerequisites for your operation system.Refer to Installing Optegra Applications.
3. Create partitions for your storage pools. First determine the size andnumber of NTFS volume requirements.
4. Install Oracle. Refer to Chapter 5, “Installing Oracle9i for Vault.”
5. Load Vault from the EPD.Connect and Optegra CD-ROM. Refer toInstalling Optegra Applications.
6. Load the HTML and PDF files for the documentation of your choice.Refer to Installing Optegra Applications.
7. Request your EPD licenses. See Using the License Manager for detailsabout the License Manager and license files.
8. Start the EPD License Manager Daemon. For complete information onhow to receive, install, and use the EPD license daemon and license files,see Using the License Manager.
9. Initiate Vault, referring to “Postinstallation Setup” on page 12-2 forfurther details.
Before starting the Vault installation:
1. Select the Oracle{ORACLE_HOME_NAME}Agent service if itexists.
2. Stop the service if it is running. (You must restart after Vault installationis complete.)
3. Click Startup.
4. The Service startup window opens.
5. Change the startup type to Manual. Click Ok.
Introduction to Vault and Distributed Vault on Windows NTAddressing Oracle Requirements
11-4 Installing Vault and Locator
6. In the Service window, click Close.
The value of the ORACLE_HOME_NAME variable is specified in the registryunder ORACLE > HOME.
Addressing Oracle RequirementsBefore installing Vault or Distributed Vault, install the necessary Oracleapplications. Refer to Installing Optegra Applications for the Oraclerequirements for your application. Also refer to the documentation for youroperating system for installation and system maintenance information. Ifyou purchased Oracle with your EPD.Connect and Optegra applications, usethe Oracle CD-ROM provided for your Oracle software installation.
To install Vault on a Windows NT machine that has multiple Oracle versionssuch as Oracle 8.1.7 and Oracle9i 9.2.0.1.0, select the appropriateORACLE_HOME. Use Start > Programs > Oracle for Windows NT >Oracle Home Selector.
Select the ORACLE_SID values. Use Start > Settings > Control Panel >System > Environment.
Refreshing Vault from a Previous to theCurrent Release
To refresh Vault from a previous release to the current release, do thefollowing:
1. Request Vault licenses. (See the Using the License Manager manual forfurther information.)
2. Log in as administrator.
3. Make sure that all Optegra services are stopped.
4. Shut down the Portmapper for TCP from the Service control panel.
Installing Vault and Locator 11-5
Introduction to Vault and Distributed Vault on Windows NTRefreshing Vault from a Previous to the Current Release
5. Export the registry entries of the previous software installations to a file.You must do this because certain registry entries can be lost if theinstallation stops before it is complete. In such a case, you cannotcontinue with the refresh. To export the appropriate registry entries to afile, do the following:
a. Choose Start > Run to start regedit.
b. Enter regedit and click OK. The Registry Editor is launched.
c. Open the folders HKEY_LOCAL_MACHINE\SOFTWARE.
d. Highlight the entry named Parametric Technology Corporation.
e. Choose Registry > Export Registry File.
f. Enter a file name in which to store the registry information and clickSave. If the refresh stops, import the registry information that waspreviously exported.
Please note: To recover the registry entries, import the file asfollows:
a. Choose Start > Run to start regedit.
b. Enter regedit and click OK. The Registry Editor is launched.
c. Choose Registry > Import Registry File.
d. Browse and select the file to which you exported the registry entries instep 7.
e. Click OK in the Import Registry File window.
6. Make sure that Oracle services and the database are running.
7. Run setup.exe from the installation CD-ROM.
8. Select the language from the Choose Setup Language window.
Please note: The refresh uses the current location of the Vault byusing the EDM_HOME information located in the registry. The DestinationFolder information is used to upgrade the clients and Perl installations.
9. Select the Destination Folder in which Vault is already installed. TheSelect Components window opens.
10.Select Vault Server and confirm whether you want the services ofDistributed Vault, CATIA Support, MEDUSA Support, Programmer, orPro/ENGINEER Support.
11.Click Next when finished.
Please note: Distributed Vault must be refreshed separately. Theprocedure for this is the same as refreshing Vault.

Introduction to Vault and Distributed Vault on Windows NTRefreshing the Data Dictionary
11-6 Installing Vault and Locator
12.Choose the Oracle SID. Click Next.
13.Choose Refresh and click Next. Selecting this option automaticallyupgrades the existing installation to the current release.
14.Select the name of the Program Folder and click Next. You are promptedto confirm the settings of the software to be copied.
15.Click Next to continue.
If the refresh is successful, a confirmation window opens.
Refreshing the Data DictionaryAfter refreshing Vault, to refresh the Data Dictionary, run the following atthe command prompt:
C:\> cd %EDM_HOME%\dictionaryC:\epd\dm\v70\dictionary> ddrefresh.exe
In the resulting output, default values are shown in brackets ([]). PressReturn to accept them.
For a sample of the output, refer to the section “Refreshing the DataDictionary,” on page 11-6.
Refreshing the Data Dictionary on DOD
To refresh the data dictionary on a Vault with Distributed Object Directoryinstalled, perform these steps:
1. Shut down the Optegra network.
2. Change to the $EDM_HOME/install directory:
C:\> cd %EPD_HOME%\dictionary\dv
3. Run the refresh tool as follows:
C:\epd\dm\v70\dictionary\dv> dddvrefresh.exe
After you do this, the system shows you the previous inputs and prompts youto indicate whether or not they are correct. You can fix whatever is incorrect.
Installing Vault and Locator 11-7
Introduction to Vault and Distributed Vault on Windows NTInstalling or Refreshing EPD.Connect and Navigator Attributes
Installing or Refreshing EPD.Connectand Navigator Attributes
If you are running EPD.Connect or Navigator, install the attributes requiredfor EPD.Connect and Navigator using nav_install.exe when you installVault for the first time. This procedure is not necessary for Vault as astandalone application.
If you are refreshing Vault to the current release, run nav_refresh.exe torefresh the EPD.Connect and Navigator Attributes.
Please note: If you are installing EPD.Connect and Navigatorattributes on a system that has Distributed Vault installed but is not a DODVault, respond No to the following prompt when you runnav_install.exe or nav_refesh.exe:
NNT116P OK to refresh the EPD.Connect Oracle Tablesfor DV [yes]:
If you enter Yes by mistake, the Vault is not affected. To correct theresponse, rerun the scripts and enter No.
To install EPD.Connect and Navigator attributes:
1. Shut down Vault.
2. Change the directory to %EDM_HOME%\bin.
3. Run connect.bat and note the entry for the PERL_PATH variable forlater use.
4. Click Start > Settings > Control Panel > System. The SystemsProperties window opens. Click the Environment tab.
5. Set PERL_PATH=<value of PERL_PATH as in the connect.bat file>
6. Click OK and set the following variables:
• CVEPD_WIN_CONFIG=%EPD_HOME%\data\reposit\cfgmotif.ini
• CVEPD_INIT=WINDIR/cvepd.ini
Please note: The preceding environment variable overrides defaultsettings in the cvepd.ini file.
• CA_BINDIR=%EPD_HOME%\bin
• CA_LIBDIR=%EPD_HOME%\data\explorer\library
• STEP_DIR=%EPD_HOME%\data\step

Introduction to Vault and Distributed Vault on Windows NTInstalling or Refreshing EPD.Connect and Navigator Attributes
11-8 Installing Vault and Locator
7. Change directory to %EDM_HOME%\install.
8. Start up Vault from Services.
9. Set the variable LANG before running nav_install.exe.
Please note: You can set the LANG ENVIRONMENT variable to any ofthe following:
English — enu
German — de
French — fr
Japanese — ja
If the LANG ENVIRONMENT variable is not set, the following messageappears when you run nav_install.exe:
NNT001P LANG will default to enu (English),Continue ? [yes] :
10.Run the command nav_install from the %EPD_HOME%\install
directory.
Warning
Before executing nav_install make sure that noOptegra products are running simultaneously. Thismay result in an error indicated by the messageException Access violation.
This installs the required Oracle database objects and EPD.Connectattributes for Vault on Windows NT.
11.Click Start > Settings > Control Panel > System. The SystemProperties window opens.
12.Click the Environment tab.
13.Set the following system variable:
dbms_array_size=30
To create a system variable, select an existing system variable (top list)and then edit the Variable and Value fields. Click Set and then clickApply.
Please note: To refresh database objects and EPD.Connectattributes already installed, run nav_refresh.exe from the%EPD_HOME%\install directory.
Installing Vault and Locator 12-1
Chapter 12 Windows NT VaultSetup andConfiguration
This chapter enables you to set up, start, configure, stop, and customize Vaulton Windows NT for first-time users. For instructions on upgrading yourcurrent Vault installation, refer to “Introduction to Vault and DistributedVault on Windows NT” on page 11-1.
• Postinstallation Setup
• Starting and Stopping Vault
• Configuration
• Postinstallation Considerations
• Setting Up EPD Interfaces for Vault
• Managing and Customizing Vault
• Backing Up the Vault Database
Windows NT Vault Setup and ConfigurationPostinstallation Setup
12-2 Installing Vault and Locator
Postinstallation SetupAfter you load Vault on Windows NT, use the following process forpost-installation. Detailed steps for each item follow in this chapter.
• Install the Portmapper
• Install the Data Dictionary
Installing the Portmapper
Install the NobleNet Portmapper as follows:
1. Log out and log in as administrator.
2. Install the Portmapper using the portinst.exe script located in%EDM_HOME%\scripts directory:
a. At the command prompt, type:
% portinst.exe
The NobleNet Portmapper Utility window opens.
b. Select Install NobleNet Portmapper and Startautomatically during system startup and click OK.
3. Start the Noblenet Portmapper. Make sure that the Noblenet Portmapperfor TCP service is started as follows:
a. Choose Start > Settings > Control Panel > Services.
b. Click NobleNet Portmapper for TCP.
You can view the portmapping using the portview.exe command.
Installing the Data Dictionary
Install the Data Dictionary as follows:
1. At the command prompt run ddinstall.exe. The ddinstall.exe islocated in the %EDM_HOME%\dictionary directory.
2. You are prompted with the following:
Have you installed Distributed Vault? [y,n] <n> :n
Choose n for installing Distributed Vault.
3. Shut down and restart the machine.
Installing Vault and Locator 12-3
Windows NT Vault Setup and ConfigurationStarting and Stopping Vault
Starting and Stopping VaultThis section describes how to start and stop Optegra Service for the firsttime. This process starts and stops the Vault.
Starting Optegra Service for the First Time
Make sure that you installed and started Oracle and the Noblenet Portmapperfor TCP service before you start Optegra service:
1. In the Services window, select Optegra Service.
2. Click Startup. The Service startup window opens.
3. Change the startup type to Manual.
4. Select the System Account option for logging on. Click OK.
5. In the Services window, click Start.
6. In the Services window, click Close.
You may need to restart the computer. When you try to start the OptegraService using the Services panel and get the following message, restart yourcomputer:
Dr. Watson for Windows NTAn application error has occurredand an application error log is being generated.
gtm.exe
Exception access violation (0x0000005).Address: 0x77f6741b
Starting Vault
Installing Vault activates the Optegra Service. If the server has been shutdown, you must perform the following steps in the Services panel to startVault. Refer to the Windows NT documentation for more information onWindows NT Services and Administrator accounts. You can start the Vaultfrom the interface or from the command line.

Windows NT Vault Setup and ConfigurationStarting and Stopping Vault
12-4 Installing Vault and Locator
Starting Vault from the Interface
To start Vault using the graphical user interface, follow these steps:
1. Click Start > Settings > Control Panel > Services.
2. Select OracleService%ORACLE_SID% and click Start. SeeInstalling Optegra Applications for this procedure.
3. Verify that the EPD License Manager Service, the FLEXlm LicenseServer, is started. The service must be set to the automatic mode.
4. Select Optegra and click Start.
Note: Make sure that the Optegra Service is set to manual mode.
5. To make sure that all network processes have been started, enter thesecommands:
% nsmquery -pm | more% nsmquery -ds | more
The last command displays Vault processes similar to the examples thatfollow.
*********** PM_BIND TABLES ***************process namesystemname:SYSTEMNAME:PDMLOG:0process id PID_UNKNOWNprocess state CONFIRMEDlast heartbeat Fri Jan 30 16:06:02 2003
process namesystemname:SYSTEMNAME:EDMATTR:0process id PID_UNKNOWNprocess state CONFIRMEDlast heartbeat Fri Jan 30 16:05:54 2003
process namesystemname:SYSTEMNAME:PDMDM:0process id PID_UNKNOWNprocess state CONFIRMEDlast heartbeat Fri Jan 30 16:05:56 2003
process namesystemname:SYSTEMNAME:PDMDD:0process id PID_UNKNOWNprocess state CONFIRMEDlast heartbeat Fri Jan 30 16:05:56 2003

Installing Vault and Locator 12-5
Windows NT Vault Setup and ConfigurationStarting and Stopping Vault
process namesystemname:SYSTEMNAME:PDMADMN:0process id PID_UNKNOWNprocess state CONFIRMEDlast heartbeat Fri Jan 30 16:06:02 2003
process namesystemname:SYSTEMNAME:ADMIN_SERVER:0process id PID_UNKNOWNprocess state CONFIRMEDlast heartbeat Fri Jan 30 16:05:57 2003
process namesystemname:SYSTEMNAME:QUERY_SERVER:0process id PID_UNKNOWNprocess state CONFIRMEDlast heartbeat Fri Jan 30 16:05:58 2003
process namesystemname:SYSTEMNAME:SQL_SERVER:0process id PID_UNKNOWNprocess state CONFIRMEDlast heartbeat Fri Jan 30 16:05:59 2003
process namesystemname:SYSTEMNAME:DESKTOP_SERVER:0process id PID_UNKNOWNprocess state CONFIRMEDlast heartbeat Fri Jan 30 16:05:59 2003
process namesystemname:SYSTEMNAME:DESKTOP_EDMOSRV:0process id PID_UNKNOWNprocess state CONFIRMEDlast heartbeat Fri Jan 30 16:05:59 2003
process namesystemname:SYSTEMNAME:TRIGGER_MANAGER:0process id PID_UNKNOWNprocess state CONFIRMEDlast heartbeat Fri Jan 30 16:06:03 2003

Windows NT Vault Setup and ConfigurationConfiguration
12-6 Installing Vault and Locator
Starting Vault from the Command Line
You can also start Vault from the command line:
1. Run anspmgr.exe. Wait for 10 seconds.
2. Run ansprcoa.exe from another command line. This executabledisplays all the Application Entities on the screen.
Please note: Starting Vault from the command prompt invokes otherC:\winnt\system32> command prompt windows. These windows tracethe process of initiating Vault and can be ignored, that is, you can closethem.
Stopping Vault
To stop Vault, you must shut down Optegra Service. Refer to the WindowsNT documentation for more information on Windows NT Services andAdministrator accounts. You can stop Vault from the interface or from thecommand line.
Stopping Vault from the Interface
To stop Vault using the graphical user interface, follow these steps:
1. Click Start > Settings > Control Panel Services.
2. Select Optegra and click Stop.
Stopping Vault from the Command Line
You can also stop Vault from the command prompt. Enter the following:
% nsmstop -pca% nsmstop -all
ConfigurationAfter the basic setup tasks, you can complete the final configuration for theinstallation of Vault on Windows NT. These tasks include the following:
• Creating storage pools
• Using e-mail triggers
Installing Vault and Locator 12-7
Windows NT Vault Setup and ConfigurationConfiguration
Creating Storage Pools
Install two storage pools from either the command line or the Administrator.See the Vault Administrator for Windows NT User Guide for details.
Creating Storage Pools with Commands
Please note: Before you attempt to create storage pools, make surethat license management support is properly configured on your system.Refer to Using the License Manager.
To create storage pools using the command line, follow these steps:
1. Start Vault as explained in “Starting and Stopping Vault” on page 12-3.
2. Sign on to the Vault from the command line:
% cisignon userid=edmadmin userpw=edmadmin
3. Add at least two storage pools using the following command syntax:
% ciaddsp poolname=poolname poolinfo=drive_name
poolname is the name of the pool, for example POOL1, and drive_nameis the name of the drive, for example e:\. The following example usesthese values:
% ciaddsp poolname=POOL1 poolinfo=e:\
Please note: Make sure that the $PATH variable definition has nomore than one semicolon. For example, the following is incorrect and mayresult in failure while adding storage pools.
PATH=C:\WINNT\system32;;C:\WINNT
Creating Storage Pools from VaultAdministrator
You must have Administrator installed on your computer. For more details,refer to the Vault Administrator for Windows NT User Guide.
Using E-Mail Triggers
Please note: If you want to edit e-mail triggers or create new ones,you must have purchased Vault Programming. See the Vault ProgrammerGuide for details.

Windows NT Vault Setup and ConfigurationConfiguration
12-8 Installing Vault and Locator
Vault on Windows NT supports the MSMail setup to send e-mail in additionto Vault messages when users run the REQRVW (request review), RSVP(respond to review), or SENDMSG (send message) commands. E-mail is sentconcurrently with the duplicate message.
Setting Up an E-Mail Trigger
To set up an e-mail trigger, create a new user in MSMail named edmadmin
with the password edmadmin.
The Vault user ID, the e-mail recipient’s mailbox user ID, and the WindowsNT user ID must all have the same name. The e-mail recipient must alsohave an alias in the \%EDM_HOME%\data\aliases file. This aliasmust map the user’s Vault user ID to the MSMail user ID on the node onwhich the triggered process is executed.
Activating the E-Mail Triggers
To activate the e-mail triggers for the rsvp, reqrvw, or sendmsgcommands, run the chgctl command as follows:
1. Sign on to the Vault as user edmadmin.
2. Run chgctl for reqrvw, sendmsg, or rsvp with the following values:
• Active = Y
• Trigger at beginning = N
Timeout = 0
• Trigger at end = Y
Timeout = 0
• Application entity name = COMMAND_TRIGGER
The following code illustrates this:
CICHGCTL COMMAND=SENDMSG ACTIVE=Y BEGIN=N WBTIME=0END=Y WETIME=0 AENAME=COMMAND_TRIGGERCICHGCTL COMMAND=RSVP ACTIVE=Y BEGIN=N WBTIME=0END=Y WETIME=0 AENAME=COMMAND_TRIGGERCICHGCTL COMMAND=REQRVW ACTIVE=Y BEGIN=N WBTIME=0END=Y WETIME=0 AENAME=COMMAND_TRIGGER
3. Run the chgctl command with parameters Command=ALL andActive=YES.
The following code illustrates this:
CICHGCTL COMMAND=ALL ACTIVE=Y

Installing Vault and Locator 12-9
Windows NT Vault Setup and ConfigurationPostinstallation Considerations
4. Uncomment the section titled Sample Command Trigger in thensm.config file for the e-mail trigger.
5. Stop Vault and restart it.
6. Enter the following at the command line to verify that AECOMMAND_TRIGGER has started:
% nsmquery -pm
For information on nsmquery, refer to “Starting Distributed Vault” onpage 13-5.
Postinstallation ConsiderationsYou may encounter problems on startup after performing the postinstallationsetup for Vault. Adding storage pools may also be a problem. Considerationsfollow.
Startup and the Portmapper
If the portmapper is already installed and running during the Vaultinstallation, you may encounter problems in the Vault startup. To avoidproblems, run the Vault setup and follow the procedure given below:
1. Click Start > Programs > Control Panel > Services and stop theNoblenet Portmapper process.
2. Run portinst.exe from the command prompt and select the RemoveNoblenet Portmapper option. Click OK.
3. Run portinst.exe from the command prompt and perform the stepsgiven below:
a. Click the Install Noblenet Portmapper option.
b. Select start automatically during system startup and clickOK.
c. Select Yes for the following prompt:
Noblenet Portmapper installed successfully.Would you like to start it?
d. Click Cancel when the Noblenet Portmapper Utility appears.

Windows NT Vault Setup and ConfigurationSetting Up EPD Interfaces for Vault
12-10 Installing Vault and Locator
Startup and Optegra Vault Service
You may encounter the following problem, while starting the Optegra VaultService:
Could not start Optegra Service on <Machine_name>.Error 1069:The service did not start due to logonfailure.
In this case, follow the steps given below:
1. Click Start > Programs > Control Panel > Services and selectOptegra service.
2. Click Startup and change the service information by selecting theSystem Account option for logging on.
3. Click OK.
Addition of Storage Pools
If the Recycle folder exists on the driver selected for the Vault pool, you maynot be able to add storage pools to Vault. To avoid this problem, do not movefiles to the Recycle Bin. Remove all the deleted files immediately and use thesame setting for all the drives.
Setting Up EPD Interfaces for VaultAfter you install or refresh Vault, set up the EPD interfaces forPro/ENGINEER, MEDUSA, and CATIA if you use any of these products.
Please note: When you install Vault, the base Vault server and thecorresponding options do not get installed at the same time. Install the Vaultserver first and then set up the interfaces for its components such as,MEDUSA, CATIA, Pro/ENGINEER, and Distributed Vault support.
Before setting up an EPD interface on Vault, do the following:
1. Log on as Vault Administrator.
2. Add %EPD_HOME%\perl5\bin to the PATH environment variable.
3. Set the LANG variable to the appropriate value (for example, enu forEnglish and ja for Japanese) depending on the locale.
Installing Vault and Locator 12-11
Windows NT Vault Setup and ConfigurationSetting Up EPD Interfaces for Vault
MEDUSA Support
To set up the EPD interface for MEDUSA support on Vault, do thefollowing:
1. Log on as the Vault Administrator.
2. Change directory to %EPD_HOME%\install.
3. Run the following command at the command prompt:
%EPD_HOME%\install> %PERL_PATH%-console medinst
4. In the resulting output, press RETURN at the prompt to accept thedefault unless otherwise specified.
For a sample of the output, refer to the section “MEDUSA Interface” onpage 3-21.
CATIA Support
To set up the EPD interface for CATIA support on Vault, do the following:
1. Log on as the Vault Administrator.
2. Change directory to %EPD_HOME%\install.
3. Run the following command:
%EPD_HOME%\install> %PERL_PATH%-console catinst
4. In the resulting output, press Return at the prompt to accept the defaultunless otherwise specified.
For a sample of the output, refer to the section “CATIA Interface,” onpage 3-22.
EPD Interface for Pro/ENGINEER Support
To set up Pro/ENGINEER support on the Vault, log on as the VaultAdministrator and proceed as follows:
1. Add %EPD_HOME%\perl5\bin to the PATH environmentvariable.
2. Set the LANG variable to the appropriate value (for example, en_US andfr) depending on the locale.
3. Change directory to %EPD_HOME%\install.
4. Run the following command:

Windows NT Vault Setup and ConfigurationSetting Up EPD Interfaces for Vault
12-12 Installing Vault and Locator
%EPD_HOME%\perl5\bin>%perl_path%-consoleproeinstThis command displays the following:TRI002P Enter the user id of your VaultAdministration account :
TRI008P Enter the Vault Oracle database manageruserid [pdmdm] :TRI009P Enter the Vault Oracle database managerpassword [pdmdm] :
TRI502P OK to add Pro/E Application Environment toOptegra Vault [yes] :
TRI008P Enter the Vault Oracle database manageruserid [pdmdm] :TRI009P Enter the Vault Oracle database managerpassword [pdmdm] :
TRI152I Checking New Tables in ORACLE Database.....TRI169I New tables already exist.
TRI008P Enter the Vault Oracle database manageruserid [pdmdm] :TRI009P Enter the Vault Oracle database managerpassword [pdmdm] :
TRI553I Adding Pro/E Application to Optegra Vault.
TRI555I Addition of Pro/E Application to OptegraVault Complete.
TRI505P OK to install the Pro/E Vault Attributes[yes] :TRI012P Enter the EDMADMIN user password[edmadmin]:
TRI013I Signing on to the Vault as edmadmin
CDMSON016I Sign on to Vault server ADBHUT completedsuccessfully. You have n Vault message(s).
TRI591I Adding Pro/E attributes.

Installing Vault and Locator 12-13
Windows NT Vault Setup and ConfigurationManaging and Customizing Vault
CDMSOF017I Sign off from Vault completedsuccessfully.
TRI592I Pro/E attributes added.TRI511I Optegra Interface for Pro/E InstallationComplete.
Managing and Customizing VaultTo manage and customize your Vault or Distributed Vault, use the VaultAdministrator software program. Refer to the Vault Administrator forWindows NT User Guide for further details.
Backing Up the Vault DatabaseWhen a backup is needed, run the ciubkup command to universally back upthe Vault database. For details of the ciubkup command, refer to VaultCommand Reference.


Installing Vault and Locator 13-1
Chapter 13 Windows NTDistributed Vault Setupand Configuration
This chapter helps a user to set up, start, and configure Distributed Vault onWindows NT for first-time users.
Please note: Make sure that you have Vault installed and set upbefore performing the steps in this chapter.
• Installation Process for Distributed Vault
• Setting Up Distributed Vault
• Autoregistration on Distributed Vault
• Creating Tag Files
• Starting Distributed Vault
• Installation of Sample Distributed Vault

Windows NT Distributed Vault Setup and ConfigurationInstallation Process for Distributed Vault
13-2 Installing Vault and Locator
Installation Process for Distributed VaultBefore installing Distributed Vault, determine the name of the machine onwhich you want to install the Distributed Object Directory (DOD). You needthis information to reply to a prompt from the installation script.
The following steps install Distributed Vault on Windows NT. For details onsteps 1 through 4, see chapters 10 and 11.
Please note: These steps are detailed in the body of this manual.
1. Verify that your system already has Vault installed.
2. Make sure that you have enough space for your Distributed Vaultinstallation.
3. Stop Vault if it is running.
4. Shut down the Portmapper from the services control panel.
5. Install Distributed Vault. See Chapter 11, “Introduction to Vault andDistributed Vault on Windows NT” for more information.
6. Set up Distributed Vault, see “Setting Up Distributed Vault” onpage 13-2.
7. Enable autoregistration, see “Autoregistration on Distributed Vault” onpage 13-4.
8. Create the tag files, see “Creating Tag Files” on page 13-4.
Setting Up Distributed VaultAfter installing Distributed Vault, follow these steps:
1. Start Vault. For more details, see “Starting and Stopping Vault” onpage 12-3.
Run the cisignon and adcci commands from the command line.
2. Sign on to Vault as follows:
% cisignon userid=edmadmin userpw=edmadmin
3. (Mandatory) Add a new vault to the Distributed Vault (DV) environment.You can add either the self vault or another vault into the DVenvironment.
a. To add a self vault, type:
% adcci ADDVAULT vaultid=DOMAINNAMEvault-type=S vault-seqno=1

Installing Vault and Locator 13-3
Windows NT Distributed Vault Setup and ConfigurationSetting Up Distributed Vault
DomainName is the name of the Vault (in caps) on which you areinstalling DV.
vault-type=S indicates a self vault.
b. To add the DOD vault, type:
adcci ADDVAULT vaultid=Domain Namevault-type=D vault-seqno=1
Domain name is the name of the vault (in caps) where the DOD islocated. If the DOD is installed on the current system, then thedomain name is the same as above.
vault-type=D indicates DOD vault.
% adcci ADDVLIST vaultlst=LOCALDOD% adcci ADDVLMEM vaultid=DomainNamevaultlst=LOCALDOD
Domain name is the name of the DOD vault (in caps).
4. (Optional) To add other vaults to the distributed environment, enter thiscommand:
% ciaddvault vaultid=vaultid type=VAULTseqno=2 node=node
vaultid is the name of the other vault (in caps) in the distributedenvironment
type=VAULT indicates another Vault.
seqno=2 represents the order of the vault names in search operations. Itis a number between 1 and n. The default is none.
node is the system name of the other vault (not in caps) in the distributedenvironment.
Please note: Run the ciaddvault command for every Vault youwant to add to the distributed environment. For example, if you want to addtwo vaults to the distributed environment, you need to run this commandtwice.
5. (Optional) If you are installing the DOD in the current vault, then run thedddvinstall from %EDM_HOME%\dictionary\dv.
6. Stop and start the Optegra Service.

Windows NT Distributed Vault Setup and ConfigurationAutoregistration on Distributed Vault
13-4 Installing Vault and Locator
Autoregistration on Distributed VaultTo implement automatic registration on Distributed Vault, you have tomanually edit the nsm.config file located in the %EDM_HOME%\data
directory. Locate the following lines of code in the configuration file:
# Application Entity for PDM Data DistributionFacility.
AE(PDMDD,edmgrp,3) PATH(%EDM_HOME%\scripts\DD.STARTUP) OWNER(edm) WORKDIR(\tmp) CLOSE SERVER CONCURRENCY(1,1) MAXINST(6) GRPCTL(1,1,2)
To enable autoregistration insert the following lines after WORKDIR(\tmp).
USER(AUTOREGISTER=YES)USER(REGLEVEL=W)
The Registration levels can be:
• W — Write
• R — Read only
• Q — Queryable only
• O — Ownership
To discontinue autoregistration replace the value YES with NO.
Creating Tag FilesTo create the tag files follow these steps:
1. Change the directory to %EDM_HOME%\data\oaxis\tags.
2. Run the following commands:
echo INTENT=COPY>copyecho INTENT=MOVE>moveecho INTENT=RETURN_ORIGINAL>replace
Installing Vault and Locator 13-5
Windows NT Distributed Vault Setup and ConfigurationStarting Distributed Vault
echo INTENT=REPLICATE_FOR_READ>replicate_readecho INTENT=REPLICATE_FOR_WRITE>replicate_writeecho INTENT=UPDATE_ORIGINAL>update
Starting Distributed VaultTo start Distributed Vault follow these steps:
1. Start the Distributed Vault.
2. Make sure that all network processes have been started. Enter thesecommands:
% nsmquery -pm | more% nsmquery -ds | more
The last command produces a listing of Distributed Vault processes. Yourlisting will be similar to the following sample.
Processes for Distributed Vault
The following listing shows the various processes for Distributed Vault.
*********** PM_BIND TABLES ***************
process name shwetha:SHWETHA:PDMLOG:0process id PID_UNKNOWNprocess state CONFIRMEDlast heartbeat Wed Nov 25 16:09:53 2002
process name shwetha:SHWETHA:EDMATTR:0process id PID_UNKNOWNprocess state CONFIRMEDlast heartbeat Wed Nov 25 16:09:40 2002
process name shwetha:SHWETHA:PDMDM:0process id PID_UNKNOWNprocess state CONFIRMEDlast heartbeat Wed Nov 25 16:09:46 2002
process name shwetha:SHWETHA:PDMDD:0process id PID_UNKNOWNprocess state CONFIRMEDlast heartbeat Wed Nov 25 16:09:47 2002
Windows NT Distributed Vault Setup and ConfigurationStarting Distributed Vault
13-6 Installing Vault and Locator
process name shwetha:SHWETHA:PDMADMN:0process id PID_UNKNOWNprocess state CONFIRMEDlast heartbeat Wed Nov 25 16:09:49 2002
process name shwetha:SHWETHA:ADMIN_SERVER:0process id PID_UNKNOWNprocess state CONFIRMEDlast heartbeat Wed Nov 25 16:09:48 2002
process name shwetha:SHWETHA:COMMAND_TRIGGER:0process id PID_UNKNOWNprocess state CONFIRMEDlast heartbeat Wed Nov 25 16:09:49 2002
process name shwetha:SHWETHA:QUERY_SERVER:0process id PID_UNKNOWNprocess state CONFIRMEDlast heartbeat Wed Nov 25 16:09:50 2002
process name shwetha:SHWETHA:SQL_SERVER:0process id PID_UNKNOWNprocess state CONFIRMEDlast heartbeat Wed Nov 25 16:09:50 2002
process name shwetha:SHWETHA:DESKTOP_SERVER:0process id PID_UNKNOWNprocess state CONFIRMEDlast heartbeat Wed Nov 25 16:09:50 2002
process name shwetha:SHWETHA:DESKTOP_EDMOSRV:0process id PID_UNKNOWNprocess state CONFIRMEDlast heartbeat Wed Nov 25 16:09:51 2002
process name shwetha:SHWETHA:EDMEMGR:0process id PID_UNKNOWNprocess state CONFIRMEDlast heartbeat Wed Nov 25 16:09:52 2002
process name shwetha:SHWETHA:EDMAMAN:0process id PID_UNKNOWNprocess state CONFIRMEDlast heartbeat Wed Nov 25 16:09:52 2002
Installing Vault and Locator 13-7
Windows NT Distributed Vault Setup and ConfigurationStarting Distributed Vault
process name shwetha:SHWETHA:EDMIMGR:0process id PID_UNKNOWNprocess state CONFIRMEDlast heartbeat Wed Nov 25 16:09:53 2002
process name shwetha:SHWETHA:OAXIS:0process id PID_UNKNOWNprocess state CONFIRMEDlast heartbeat Wed Nov 25 16:09:53 2002
Processes for Distributed Vault with the DOD
The following listing shows the various processes for Distributed Vault withthe DOD.
*********** PM_BIND TABLES ***************
process name panchali:PANCHALI:PDMLOG:0 process id 314 process state CONFIRMED last heartbeat Wed Nov 25 16:07:48 2002
process namepanchali:PANCHALI:EDMATTR:0 process id 351 process state CONFIRMED last heartbeat Wed Nov 25 16:07:48 2002
process name panchali:PANCHALI:PDMDM:0 process id 312 process state CONFIRMED last heartbeat Wed Nov 25 16:07:51 2002
process name panchali:PANCHALI:PDMDD:0 process id 341 process state CONFIRMED last heartbeat Wed Nov 25 16:07:52 2002
process namepanchali:PANCHALI:PDMADMN:0 process id 198 process state CONFIRMED last heartbeat Wed Nov 25 16:07:52 2002

Windows NT Distributed Vault Setup and ConfigurationStarting Distributed Vault
13-8 Installing Vault and Locator
process namepanchali:PANCHALI:ADMIN_SERVER:0 process id 190 process state CONFIRMED last heartbeat Wed Nov 25 16:08:01 2002
process namepanchali:PANCHALI:QUERY_SERVER:0 process id 285 process state CONFIRMED last heartbeat Wed Nov 25 16:07:46 2002
process namepanchali:PANCHALI:SQL_SERVER:0 process id 114 process state CONFIRMED last heartbeat Wed Nov 25 16:08:17 2002
process namepanchali:PANCHALI:DESKTOP_SERVER:0 process id 135 process state CONFIRMED last heartbeat Wed Nov 25 16:08:04 2002
process namepanchali:PANCHALI:DESKTOP_EDMOSRV:0 process id 193 process state CONFIRMED last heartbeat Wed Nov 25 16:08:16 2002
process namepanchali:PANCHALI:TRIGGER_MANAGER:0 process id 262 process state CONFIRMED last heartbeat Wed Nov 25 16:07:46 2002
process namepanchali:PANCHALI:DIST_SERVER:0 process id 330 process state CONFIRMED last heartbeat Wed Nov 25 16:07:49 2002
process namepanchali:PANCHALI:DOD_QUERY_SERVER:0 process id 175

Installing Vault and Locator 13-9
Windows NT Distributed Vault Setup and ConfigurationInstallation of Sample Distributed Vault
process state CONFIRMED last heartbeat Wed Nov 25 16:07:39 2002
process namepanchali:PANCHALI:EDMEMGR:0 process id 66 process state CONFIRMED last heartbeat Wed Nov 25 16:08:00 2002
process namepanchali:PANCHALI:EDMIMGR:0 process id 266 process state CONFIRMED last heartbeat Wed Nov 25 16:09:00 2002
process namepanchali:PANCHALI:EDMAMAN:0 process id 234 process state CONFIRMED last heartbeat Wed Nov 25 16:09:36 2002
process name panchali:PANCHALI:OAIXS:0 process id 321 process state CONFIRMED last heartbeat Wed Nov 25 16:10:36 2002
Installation of Sample Distributed VaultPlease note: Before installing Distributed Vault, shut down thePortmapper from the Services section of the Control panel.
In the sample procedures that follow, the Distributed Vault environmentcontains the following three Vaults:
• Example 1 - owl (Assume that this is the DOD vault.)
• Example 2 - tiara
• Example 3 - gargant
Substitute your own Vault names when installing the Distributed Vault onyour system.
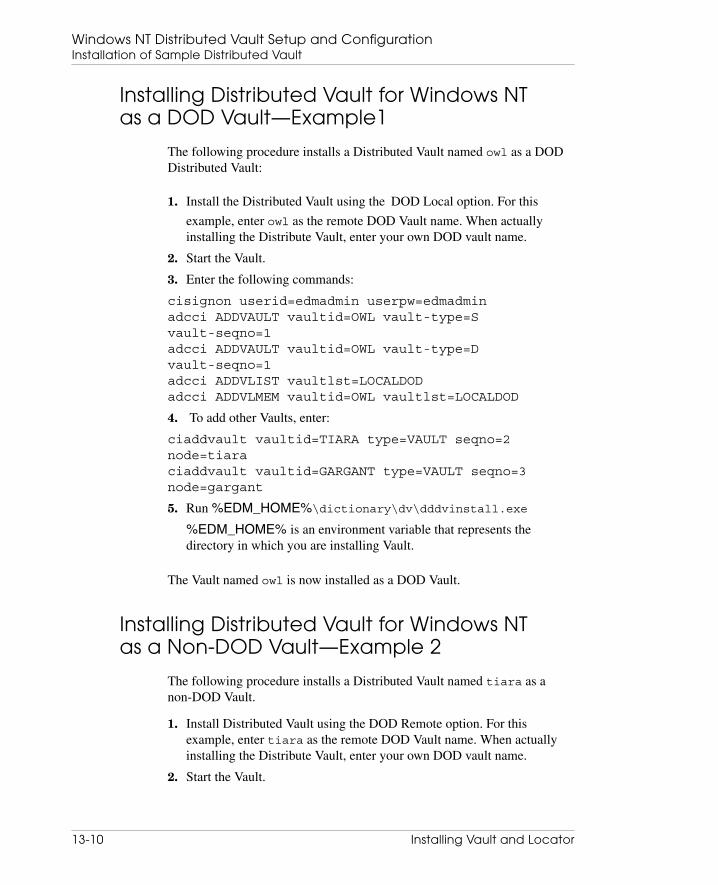
Windows NT Distributed Vault Setup and ConfigurationInstallation of Sample Distributed Vault
13-10 Installing Vault and Locator
Installing Distributed Vault for Windows NTas a DOD Vault—Example1
The following procedure installs a Distributed Vault named owl as a DODDistributed Vault:
1. Install the Distributed Vault using the DOD Local option. For this
example, enter owl as the remote DOD Vault name. When actuallyinstalling the Distribute Vault, enter your own DOD vault name.
2. Start the Vault.
3. Enter the following commands:
cisignon userid=edmadmin userpw=edmadminadcci ADDVAULT vaultid=OWL vault-type=Svault-seqno=1adcci ADDVAULT vaultid=OWL vault-type=Dvault-seqno=1adcci ADDVLIST vaultlst=LOCALDODadcci ADDVLMEM vaultid=OWL vaultlst=LOCALDOD
4. To add other Vaults, enter:
ciaddvault vaultid=TIARA type=VAULT seqno=2node=tiaraciaddvault vaultid=GARGANT type=VAULT seqno=3node=gargant
5. Run %EDM_HOME%\dictionary\dv\dddvinstall.exe
%EDM_HOME% is an environment variable that represents thedirectory in which you are installing Vault.
The Vault named owl is now installed as a DOD Vault.
Installing Distributed Vault for Windows NTas a Non-DOD Vault—Example 2
The following procedure installs a Distributed Vault named tiara as anon-DOD Vault.
1. Install Distributed Vault using the DOD Remote option. For thisexample, enter tiara as the remote DOD Vault name. When actuallyinstalling the Distribute Vault, enter your own DOD vault name.
2. Start the Vault.

Installing Vault and Locator 13-11
Windows NT Distributed Vault Setup and ConfigurationInstallation of Sample Distributed Vault
3. Enter the following commands:
cisignon userid=edmadmin userpw=edmadminadcci ADDVAULT vaultid=tiara vault-type=Svault-seqno=1adcci ADDVAULT vaultid=OWL vault-type=Dvault-seqno=1adcci ADDVLIST vaultlst=LOCALDODadcci ADDVLMEM vaultid=OWL vaultlst=LOCALDOD
4. Enter the following commands:
ciaddvault vaultid=OWL type=VAULT seqno=2 node=owlciaddvault vaultid=GARGANT type=VAULT seqno=3node=gargant
The Vault named tiara is now installed as a non-DOD Vault.
Installing Distributed Vault for Windows NTas a Non-DOD Vault—Example 3
The following procedure installs a Distributed Vault named gargant as anon-DOD Vault:
1. Install Distributed Vault using the DOD Remote option. For thisexample, enter owl as the remote DOD Vault name when prompted.When actually installing the Distribute Vault, enter your own DOD vaultname.
2. Start the Vault.
3. Enter the following commands:
cisignon userid=edmadmin userpw=edmadminadcci ADDVAULT vaultid=gargant vault-type=Svault-seqno=1adcci ADDVAULT vaultid=OWL vault-type=Dvault-seqno=1adcci ADDVLIST vaultlst=LOCALDODadcci ADDVLMEM vaultid=OWL vaultlst=LOCALDOD
4. To add other Vaults, enter:
ciaddvault vaultid=OWL type=VAULT seqno=2 node=owlciaddvault vaultid=TIARA type=VAULT seqno=3node=tiara
The Vault named gargant is now installed as a non-DOD Vault.


Installing Vault and Locator 14-1
Chapter 14 Preparing the ORACLEDatabase for a VaultRefresh on Windows NT
This chapter discusses the tasks that you must perform before refreshingVault from a previous release to the current release on Windows NT.
• Preparing to Refresh Vault
• Preparing to Migrate the Oracle Database
• Migrating the Vault Database to Oracle9i Release 2 (9.2.0.1.0)
Please note: You can use the procedure discussed in this chapteronly if you want to migrate to the Vault database for Oracle9i Release 2(9.2.0.1.0) on the same machine. To migrate to the Vault database forOracle9i Release 2 (9.2.0.1.0) to a different machine on the same platform,refer to the procedure discussed in Chapter 15, “Migrating Vault AcrossPlatforms.”
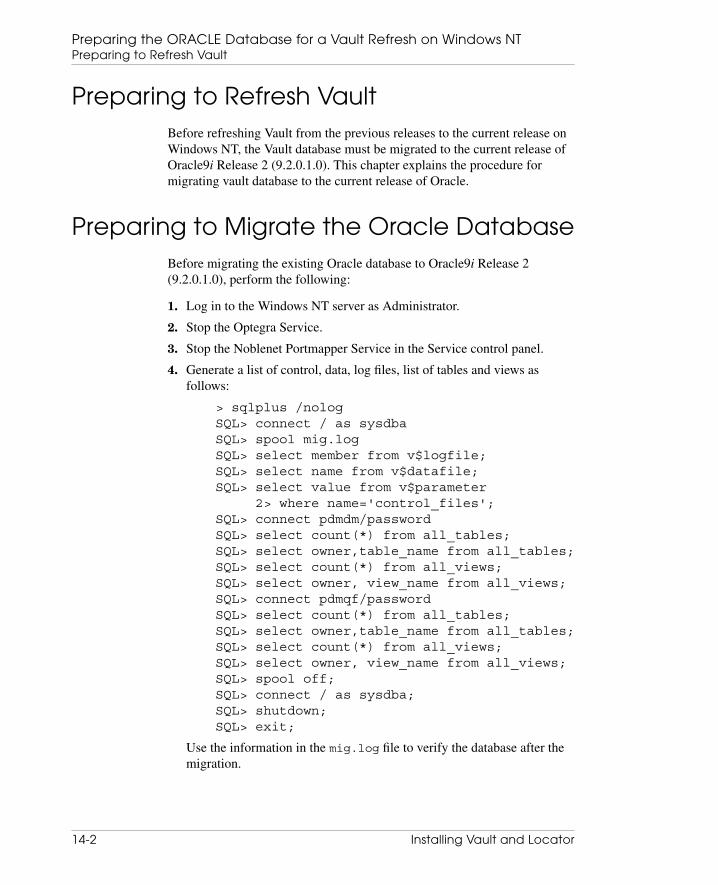
Preparing the ORACLE Database for a Vault Refresh on Windows NTPreparing to Refresh Vault
14-2 Installing Vault and Locator
Preparing to Refresh VaultBefore refreshing Vault from the previous releases to the current release onWindows NT, the Vault database must be migrated to the current release ofOracle9i Release 2 (9.2.0.1.0). This chapter explains the procedure formigrating vault database to the current release of Oracle.
Preparing to Migrate the Oracle DatabaseBefore migrating the existing Oracle database to Oracle9i Release 2(9.2.0.1.0), perform the following:
1. Log in to the Windows NT server as Administrator.
2. Stop the Optegra Service.
3. Stop the Noblenet Portmapper Service in the Service control panel.
4. Generate a list of control, data, log files, list of tables and views asfollows:
> sqlplus /nologSQL> connect / as sysdbaSQL> spool mig.logSQL> select member from v$logfile;SQL> select name from v$datafile;SQL> select value from v$parameter
2> where name='control_files';SQL> connect pdmdm/passwordSQL> select count(*) from all_tables;SQL> select owner,table_name from all_tables;SQL> select count(*) from all_views;SQL> select owner, view_name from all_views;SQL> connect pdmqf/passwordSQL> select count(*) from all_tables;SQL> select owner,table_name from all_tables;SQL> select count(*) from all_views;SQL> select owner, view_name from all_views;SQL> spool off;SQL> connect / as sysdba;SQL> shutdown;SQL> exit;
Use the information in the mig.log file to verify the database after themigration.

Installing Vault and Locator 14-3
Preparing the ORACLE Database for a Vault Refresh on Windows NTMigrating the Vault Database to Oracle9i Release 2 (9.2.0.1.0)
Migrating the Vault Database to Oracle9iRelease 2 (9.2.0.1.0)
Before refreshing Vault to Vault 7.0 on Windows NT, migrate the Vaultdatabase from the previous Oracle release to Oracle9i Release 2 (9.2.0.1.0).The Oracle database can be migrated from a previous release either usingexport and import utilities or by using the Oracle Database UpgradeAssistant.
Exporting the Vault Database
To export the existing Vault database from a previous Oracle release,perform the following steps:
1. Export the Oracle database as follows:
> cd %ORACLE_HOME%\bin> exp system/password
Please note: In the following steps, accept the default by pressingReturn at the prompt unless otherwise specified.
Enter array fetch buffer size: 4096 >Export file: expdat.dmp >
If you want to specify another file, you can do so; otherwise, pressReturn. The default is expdat.dmp.
(1)E(ntire database), (2)U(sers), or(3)T(ables): (2)U >Export grants (yes/no): yes >Export table data (yes/no): yes >Compress extents (yes/no): yes >User to be exported: (Press Return to quit)>username
At this prompt, enter the user names, as listed, one at a time:
pdmdmpdmqfedmattredmdv (for DOD only)edmuiasm

Preparing the ORACLE Database for a Vault Refresh on Windows NTMigrating the Vault Database to Oracle9i Release 2 (9.2.0.1.0)
14-4 Installing Vault and Locator
2. Extract the following files (from the Optegra Release 7 on theWindows NT CD-ROM) on the source Vault database:
<CDROM-Drive>:\intel_nt32\dm\v70\vault\install\mkcrtblspc.sql
<CDROM-Drive>:\intel_nt32\dm\v70\vault\install\getsizes.sql
<CDROM-Drive>:\intel_nt32\dm\v70\vault\install\migrate.README
Extract these files in a local directory where you have write permissions,for example, C:\migrate.
3. Run the mkcrtblspc.sql script (in the Vault database on the previousOracle release) as created above:
% cd migrate% sqlplus /nologSQL> connect / as sysdba;SQL> @mkcrtblspc.sql%
4. The preceding script creates the crtblspc.sql script. This script isused in the new Oracle database to create vault-specific tablespaces,rollback segments, and users. This script automatically decides whichtablespaces and users are to be created based on whether the earlierinstallation was a Distributed Vault installation or not.
Copy the mkcrtblspc.sql, getsizes.sql, migrate.README,getoldsz.sql and crtblspc.sql files to the destination Vaultmachine.
Importing the Vault Database
To import the Vault database perform the following:
1. Install Oracle9i Release 2 (9.2.0.1.0) software and database.
2. Change the ORACLE_HOME and ORACLE_SID variable settings to the newOracle home directory and SID.

Installing Vault and Locator 14-5
Preparing the ORACLE Database for a Vault Refresh on Windows NTMigrating the Vault Database to Oracle9i Release 2 (9.2.0.1.0)
3. Run the crtblspc.sql script (as created in “Exporting the VaultDatabase” on page 14-3) in the newly created Oracle database:
% sqlplus /nologSQL> connect / as sysdba;SQL> @crtblspc.sql%
4. Import the Oracle database as follows:
> cd $ORACLE_HOME/bin> imp system/password
Please note: In the following steps, press Return at the prompt toaccept the default unless otherwise specified.
Import file: expdat.dmp >Enter insert buffer size (minimum sizeis 4096) 30720 >Export the file created by EXPORT:V08.00.04 via theconventional pathList the contents of import file only (yes/no): no >Ignore create error due to objectexistence (yes/no): no >Import grants (yes/no): yes >Import table data (yes/no): yes >Import entire export file (yes/no): No > yes
Requirements for Importing the Database
The following requirements must be satisfied before you import the Vaultdatabase:
1. The free space in system tablespace must be greater than 100 MB afterinstalling Oracle 9i (9.2.0.1.0).
2. The system should have at least 10 percent free space in addition to thespace allocated for all the other EDM tablespaces such asEDM_ATTRIBUTES, EDM_FILE_DIRECTORY, EDM_AUDIT_LOG, andEDM_HISTORY.
3. Use the correct number of rollback segments.


Installing Vault and Locator 15-1
Chapter 15 Migrating Vault AcrossPlatforms
This chapter describes the procedure for migrating Vault from previousrevisions to Release 7 across platforms.
• Preparing to Migrate Vault
• Migrating Vault Objects and User Passwords
• Setting Up Vault After the Migration
Please note: Refer to the Vault Command Reference for informationabout the Vault commands used in this chapter.

Migrating Vault Across PlatformsPreparing to Migrate Vault
15-2 Installing Vault and Locator
Preparing to Migrate VaultThe Oracle and Vault versions you require must be installed and set up onthe source and destination systems. For example, to migrate Vault Revision5.x and Oracle 8.0.4 on a UNIX platform to Vault Release 7 and Oracle9.2.0.1.0 on Windows NT, these products must be already installed on boththe UNIX and Windows NT machines. Refer to Chapter 1, “Preparing toInstall Vault Software on UNIX,” and Chapter 2, “Installing Vault Softwareon UNIX,” for the installation and refresh procedures.
Migrating Vault Objects and UserPasswords
To migrate Vault objects and user passwords from one platform to another,use the $EPD_HOME/install/adpwmig utility. The procedure isdescribed in this section.
On the Source Platform
Perform the following steps on the source platform:
Please note: In this example, Solaris (UNIX) is the source platformwith Vault Revision 5 and Oracle 8.0.4 installed.
1. Change directory to the $EDM_HOME/install directory.
% cd $EDM_HOME/install
2. Execute the adpwmig utility with the export option as follows:
% adpwmig export
3. Export the entire database from the Oracle account. For moreinformation, refer to the section “Exporting the Vault Database,” onpage 6-2 of this book.

Installing Vault and Locator 15-3
Migrating Vault Across PlatformsMigrating Vault Objects and User Passwords
On the Destination Platform
Perform the following steps on the destination platform:
Please note: In this example, Windows NT is the destinationplatform with Vault Release 7 and Oracle9i Release 2 (9.2.0.1.0) installed.
1. Log in as Administrator.
2. Stop all Vault processes as follows:
> nsmstop -pca> nsmstop -all
3. Drop the Oracle users from the Oracle account as follows:
> Drop user asm cascade;> Drop user edmui cascade;> Drop user pdmdm cascade;> Drop user pdmqf cascade;> Drop user edmdv cascade;> Drop user edmattr cascade;
Please note: Export, drop, or import edmdv user only if the sourceor destination Vault is a DOD.
4. Create users ASM, EDMATTR, EDMDV (for DOD only), EDMUI, PDMDM,PDMQF as follows:
> % sqlplus /nologSQL> connect / as sysdbaConnected.SQL> CREATE USER ASM IDENTIFIED BY ASM DEFAULTTABLESPACE "SYSTEM" TEMPORARY TABLESPACE"EDM_TEMPSPACE" PROFILE "DEFAULT";SQL> GRANT "CONNECT" TO ASM;SQL> GRANT "RESOURCE" TO ASM;
SQL> CREATE USER EDMATTR IDENTIFIED BY EDMATTRDEFAULT TABLESPACE "SYSTEM" TEMPORARY TABLESPACE"EDM_TEMPSPACE" PROFILE "DEFAULT";SQL> GRANT "CONNECT" TO EDMATTR;SQL> GRANT "RESOURCE" TO EDMATTR;

Migrating Vault Across PlatformsMigrating Vault Objects and User Passwords
15-4 Installing Vault and Locator
SQL> CREATE USER EDMDV IDENTIFIED BY EDMDV DEFAULTTABLESPACE "EDM_DISTDATA" TEMPORARY TABLESPACE"SYSTEM" PROFILE "DEFAULT";SQL> GRANT "CONNECT" TO EDMDV;SQL> GRANT "RESOURCE" TO EDMDV;
SQL> CREATE USER EDMUI IDENTIFIED BY EDMUI DEFAULTTABLESPACE "SYSTEM" TEMPORARY TABLESPACE"EDM_TEMPSPACE" PROFILE "DEFAULT";SQL> GRANT "CONNECT" TO EDMUI;SQL> GRANT "RESOURCE" TO EDMUI;
SQL> CREATE USER PDMDM IDENTIFIED BY PDMDM DEFAULTTABLESPACE "EDM_SYSTEM" TEMPORARY TABLESPACE"EDM_TEMPSPACE” PROFILE "DEFAULT";SQL> GRANT "CONNECT" TO PDMDM;SQL> GRANT "RESOURCE" TO PDMDM;
SQL> CREATE USER PDMQF IDENTIFIED BY PDMQF DEFAULTTABLESPACE "SYSTEM" TEMPORARY TABLESPACE"EDM_TEMPSPACE" PROFILE "DEFAULT";SQL> GRANT "CONNECT" TO PDMQF;SQL> GRANT "RESOURCE" TO PDMQF;
5. Import the entire database from the Oracle account using the Oracleimport utility imp80.
Please note: Log any errors that the import utility generates andrefer to the Oracle documentation for information on how to fix them. Afterfixing the errors repeat steps 1 through 5.
6. Change directory to %EDM_HOME%/install.
> cd %EDM_HOME%/install
7. Execute the adpwmig utility with the import option as follows:
> adpwmig import
8. Update the dm_pool_info table to reflect the destination storage drivesas follows:
> sqlplus pdmdm/passwordSQLPLUS> update dm_pool_info set dm_pool_text=’H:\’where dm_pool_name=’POOL1’;
In the preceding example, H: is the path of the storage pool and POOL1 isthe name of the corresponding storage pool.
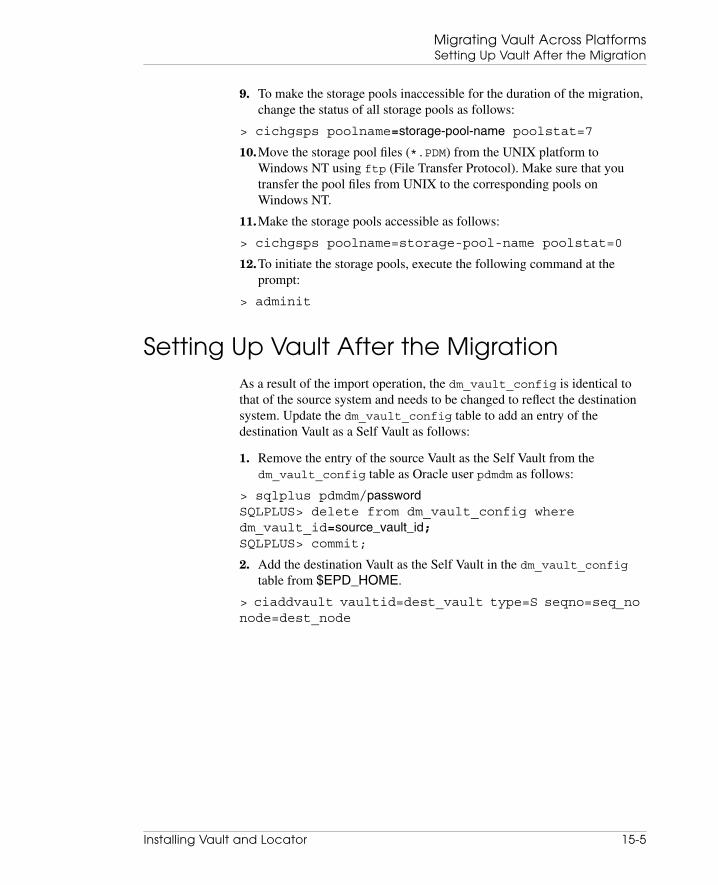
Installing Vault and Locator 15-5
Migrating Vault Across PlatformsSetting Up Vault After the Migration
9. To make the storage pools inaccessible for the duration of the migration,change the status of all storage pools as follows:
> cichgsps poolname=storage-pool-name poolstat=7
10.Move the storage pool files (*.PDM) from the UNIX platform toWindows NT using ftp (File Transfer Protocol). Make sure that youtransfer the pool files from UNIX to the corresponding pools onWindows NT.
11.Make the storage pools accessible as follows:
> cichgsps poolname=storage-pool-name poolstat=0
12.To initiate the storage pools, execute the following command at theprompt:
> adminit
Setting Up Vault After the MigrationAs a result of the import operation, the dm_vault_config is identical tothat of the source system and needs to be changed to reflect the destinationsystem. Update the dm_vault_config table to add an entry of thedestination Vault as a Self Vault as follows:
1. Remove the entry of the source Vault as the Self Vault from thedm_vault_config table as Oracle user pdmdm as follows:
> sqlplus pdmdm/passwordSQLPLUS> delete from dm_vault_config wheredm_vault_id=source_vault_id;SQLPLUS> commit;
2. Add the destination Vault as the Self Vault in the dm_vault_configtable from $EPD_HOME.
> ciaddvault vaultid=dest_vault type=S seqno=seq_nonode=dest_node

Migrating Vault Across PlatformsSetting Up Vault After the Migration
15-6 Installing Vault and Locator
For a Distributed Vault, if the destination Vault is a DOD, make an entry forit in the dm_vault_config type D as follows:
1. If there already is an entry of some other Vault as a Self DOD, give thefollowing command as Oracle user pdmdm to remove it:
> sqlplus pdmdm/passwordSQLPLUS> delete from dm_vault_config wheredm_vault_type=’D’;SQLPLUS> commit;
2. Add the destination Vault as the DOD Vault as follows:
> ciaddadod vaultid=dest_vault_idnode=dest_vault_name type=SELF
Finally, stop and start the Vault servers and refresh Vault on the destinationsystem. This ensures that the database contains the correct release of Vault.
This completes the procedure for migrating Vault across platforms.

Installing Vault and Locator 16-1
Chapter 16 Windows NT TapeDrives
This chapter provides information on tape drives for Windows NT.
• Using Tape Drives

Windows NT Tape DrivesUsing Tape Drives
16-2 Installing Vault and Locator
Using Tape DrivesOptegra for Windows NT supports 4mm and 8mm media. Supportedmechanisms are listed in the [SUPPORTED_TAPES] section of the EDM.INIfile located in the Optegra Vault \optegra directory on the Vault drive.Only supported mechanisms appear in the Tape Device lists in SystemAdministrator. This safeguard avoids problems with using unsupported tapedrives with Optegra Vault for Windows NT.
To add a tape drive mechanism, you add a line to the [SUPPORTED_TAPES]section. The line begins with the keyword TAPEn followed by (at least) thefirst 16 characters of the mechanism identifier in the Registry.
For example:
[SUPPORTED_TAPES] TAPE1=”HP HP35480A” TAPE2=”Exabyte EXB-8200 8mm”
Warning
Only the system Administrator should edit theregistry information. An incorrect keystroke maycause your system to hang when it is started.
The Registry can be viewed with the regedt32.exe Windows NT utilitylocated in the \WINNT\SYSTEM32\ subdirectory. A tape drive's mechanismis shown in the Identifier field in the following parameters for the tapedevice's SCSI port, bus, and ID.
HKEY_LOCAL_MACHINE\HARDWARE\DEVICEMAP\SCSI
Please note:
• On some systems, this file is located in the \WINNT35\SYSTEM32\subdirectory.
You can put the lines in the [SUPPORTED_TAPES] section in any order.
• Set the tape drive to low-density mode. Windows NT does not supporthigh-density mode.
• Remote tape drives are not available on Windows NT.

Installing Vault and Locator 17-1
Chapter 17 Installing Locator onUNIX Systems
This chapter provides postinstallation instructions for Locator on UNIXsystems. For information on loading Locator from the CD-ROM for bothUNIX and Windows, see Installing Optegra Applications.
• Postinstallation Steps
• Using the Locator Worksheet
• Running the Locator Installation Tool
• Entering Setup Information
• Editing the NSM Configuration Files
• Editing the PM Configuration Files
• Accessing Online Documentation

Installing Locator on UNIX SystemsPostinstallation Steps
17-2 Installing Vault and Locator
Postinstallation StepsAfter you load Locator by following the instructions in Installing OptegraApplications, perform the tasks in this book. Postinstallation steps for Vaultand Locator vary with your configuration and the host operating system.Refer to this chapter to find the steps that apply to new and existingcustomers. Use these steps on each Vault and each client.
Please note: For localization information for Vault, Locator, andOracle, refer to Chapter 10, “Internationalization Considerations for UNIX.”
You may also need to use documentation provided by other vendorsdepending on your setup, particularly for installation and systemmaintenance.
Using the Locator WorksheetTo ensure a successful installation, fill out the following worksheet and referto it during the automated installation.
There is a valid range for the values you supply. Enter a question mark (?) atany prompt for information.
Please note: Before you set up and run Locator, install your Locatorsoftware licenses. See Installing Optegra Applications for details.
Running the Locator Installation ToolThe Installation Tool (edmcinstall) prompts you for the informationnecessary to install Locator, checks this information, records validinformation, and updates its own default settings with any valid informationyou supply that deviates from these defaults. Back up your operating systembased on UNIX before you install Locator.
Table 17-1 Installation Worksheet
Vault account name: default=vault
Vault account userid number: default=200
Vault home directory: default=$EDM_HOME
Vault group name: default=operator

Installing Vault and Locator 17-3
Installing Locator on UNIX SystemsRunning the Locator Installation Tool
Invoking the Locator Installation Tool
1. Log in as the root UNIX user:
su -r
2. Change to the $EDM_HOME/install directory, where$EDM_HOME is the directory in which you have installed the software:
# cd $EDM_HOME/install
3. Invoke the installation tool and record installation events by entering:
# ./edmcinstall | tee edmcinstall.log
The following message appears:
**************************************************EDM Client Software Installation module.(edmcinstall)This module installs the EDM Client Software onyour system.
The EDM Client Software Installation moduleinstalls the EDM Client Software on your system bycalling the following EDM Software InstallationModules:
edmcirm [EDM Client Software InstallationRequirements Module]edmsasm [EDM Software Account Setup Module]
It uses as input, the edmodule.defaults.sh file toobtain the appropriate information to perform thesetasks.
Would you like to continue [yes]? :***************************************************
Exiting and Restarting the Installation Tool
You can exit the installation tool in three ways:
• Enter sh at any prompt, then enter exit to escape to a shell.
• Press CTRL-C to abort the installation procedure at any time.

Installing Locator on UNIX SystemsRunning the Locator Installation Tool
17-4 Installing Vault and Locator
• Answer n (no) to a continuation prompt:
Would you like to continue [yes]? n
To restart the installation tool, invoke the installation tool and recordinstallation events by entering the following:
# ./edmcinstall | tee edmcinstall.log
If you do not want to resume the original session, you may initiate a newinstallation session and overwrite previously entered information.
Accepting Defaults
Default values are shown in brackets ( [ ] ).
Would you like to continue [yes]?:
To accept a default, press RETURN.
Would you like to continue [yes]?: RETURN
Overriding Defaults
You may override certain default Vaults with your own value.
Enter the Vault account name [vault]: edmdev
Obtaining Online Help
Get help at a prompt by typing help
Would you like to continue [yes]? help

Installing Vault and Locator 17-5
Installing Locator on UNIX SystemsEntering Setup Information
Entering Setup InformationThe installation tool begins gathering setup information at the followingprompt:
Enter the Vault account name [vault]:
Enter the name of the UNIX user who will own the Locator account:
Enter the Vault account name [vault]: edmdev
Using an Existing UNIX Account for Locator
If you enter an account name already in use, the following message appears:
***************************************************The UNIX username that you have entered for the EDMaccount is already in use.Do you want to use this account ? [no]:***************************************************
To create a new account with the installation tool, select [no] by pressingRETURN, and move to the next section.
Do you want to use this account ? [no]: RETURN
To use this account, type yes and press RETURN.
Do you want to use this account ? [no]: yes
If the account you chose is shared by more than one group, the followingmessage appears:
***************************************************More than one GROUP Name exists for this accountname.You can either Exit and rectify this or choose anyone of the following GROUP names.***************************************************
To select a group, type one of the names enclosed in brackets, and pressRETURN.
Enter any one of the Group Names [ daemon operator ]: operator

Installing Locator on UNIX SystemsEntering Setup Information
17-6 Installing Vault and Locator
Creating a UNIX Account for Locator
If you are using an existing UNIX account, the Locator installation will notprompt you for the following information. Skip to the next section.
If the account name you enter does not already exist, the installation tool willprompt you for a UNIX user ID:
Enter the Vault account userid [200]: 9985
Enter a home directory for the Locator UNIX account. Press RETURN toselect the default.
Enter the Vault home directory [$EDM_HOME]:
Enter the group name. Press RETURN to select the default.
Enter the EDM group name [operator]:***************************************************Here are the Input Values that you have entered,Please confirm that they are correct:EDM account name = edmdevEDM account userid = 9985EDM home directory = $EDM_HOME EDM group name=operator***************************************************Are these correct [yes]? :***************************************************The EDM Client Software Installation RequirementsModule has completed successfully.***************************************************Running EDM Software Account Setup Module(edmsasm).***************************************************
If you choose, the automatic installation tool customizes the .cshrc,.login, nsm.config, pm.config, and EDM.DEFAULTS files for thisLocator installation. It uses the edmodule.defaults.sh file as input toobtain the appropriate information to perform these tasks.
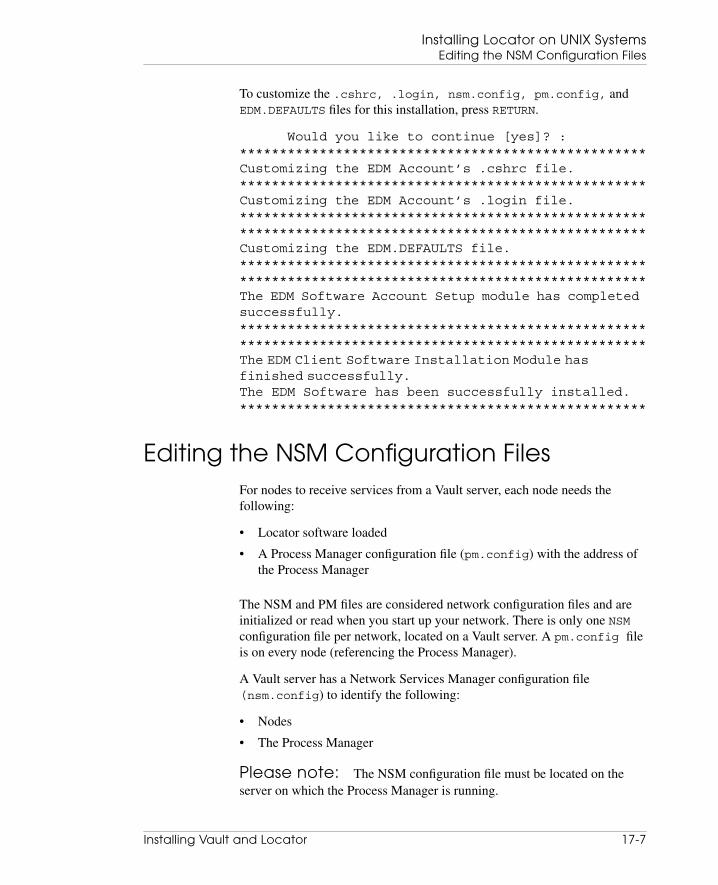
Installing Vault and Locator 17-7
Installing Locator on UNIX SystemsEditing the NSM Configuration Files
To customize the .cshrc, .login, nsm.config, pm.config, andEDM.DEFAULTS files for this installation, press RETURN.
Would you like to continue [yes]? :***************************************************Customizing the EDM Account’s .cshrc file.***************************************************Customizing the EDM Account’s .login file.******************************************************************************************************Customizing the EDM.DEFAULTS file.******************************************************************************************************The EDM Software Account Setup module has completedsuccessfully.******************************************************************************************************The EDM Client Software Installation Module hasfinished successfully.The EDM Software has been successfully installed.***************************************************
Editing the NSM Configuration FilesFor nodes to receive services from a Vault server, each node needs thefollowing:
• Locator software loaded
• A Process Manager configuration file (pm.config) with the address ofthe Process Manager
The NSM and PM files are considered network configuration files and areinitialized or read when you start up your network. There is only one NSMconfiguration file per network, located on a Vault server. A pm.config fileis on every node (referencing the Process Manager).
A Vault server has a Network Services Manager configuration file(nsm.config) to identify the following:
• Nodes
• The Process Manager
Please note: The NSM configuration file must be located on theserver on which the Process Manager is running.

Installing Locator on UNIX SystemsEditing the NSM Configuration Files
17-8 Installing Vault and Locator
The installation tool edminstall sets up both the nsm.config and thepm.config files automatically. If the network configuration files at your siterequire adjustments, edit the NSM and PM configuration files.
Template NSM and PM configuration files are provided with Vault software.Before you can start up your network, edit these files. These files are callednsm.config_template and pm.config_template and are found in$EDM_HOME/install
The NSM configuration file (nsm.config) contains the node configurationof a Vault including port addresses, node names, and a list of domains (suchas Vault application domains and the domain of the Process Manager).

Installing Vault and Locator 17-9
Installing Locator on UNIX SystemsEditing the NSM Configuration Files
Add to the NSM configuration file the names of nodes that will access Vault.Only those nodes recorded in the NSM file will be visible to Vault.

Installing Locator on UNIX SystemsEditing the PM Configuration Files
17-10 Installing Vault and Locator
The following figure shows a sample of a Client Node Entry.
Figure 17-1 Sample of a Client Node Entry in the nsm.config File
Warning
After you have edited the network configurationfiles, stop and restart your Vault processes.Otherwise, updated client nodes will not berecognized by Vault.
Editing the PM Configuration FilesThe PM configuration file (pm.config) specifies the network address of theProcess Manager (PM) for each Vault. Each node must have a pm.configto provide this address. The RESOURCE statement in the pm.config mapsto corresponding fields in the NSM configuration file. Note that the ProcessManager looks for the ANSPATH UNIX environment variable to findpm.config.Editing the PM Configuration files involves the followingtasks:
• Searching for the pm.config file (done by the Process Manager)
• Using the system’s pm.config file in$EDM_HOME/data/pm.config
• Editing the pm.config_template to run Locator remotely from asingle Vault
• Editing the pm.config_template so that Locator can access multipleVaults
Installing Vault and Locator 17-11
Installing Locator on UNIX SystemsEditing the PM Configuration Files
Searching for the PM Configuration File
The Process Manager searches for a pm.config file in the following order:
1. A path defined by the ANSPATH UNIX environment variable and set inthe user’s .cshrc file or .login file:
setenv ANSPATH /absolute_path/pm.config
2. A pm.config file in the user’s home directory:
3. The default directory $EDM_HOME/data
Make sure that a valid copy of the pm.config file exists in one of thesethree locations.

Installing Locator on UNIX SystemsEditing the PM Configuration Files
17-12 Installing Vault and Locator
Using the System’s PM Configuration File
If the Locator is running on the same node as the Process Manager, use thesystem pm.config file by adding the following line to the user’s .login or.cshrc file:
setenv ANSPATH $EDM_HOME/data/pm.config
The following figure shows a sample pm.config file:
Figure 17-2 Sample pm.config File
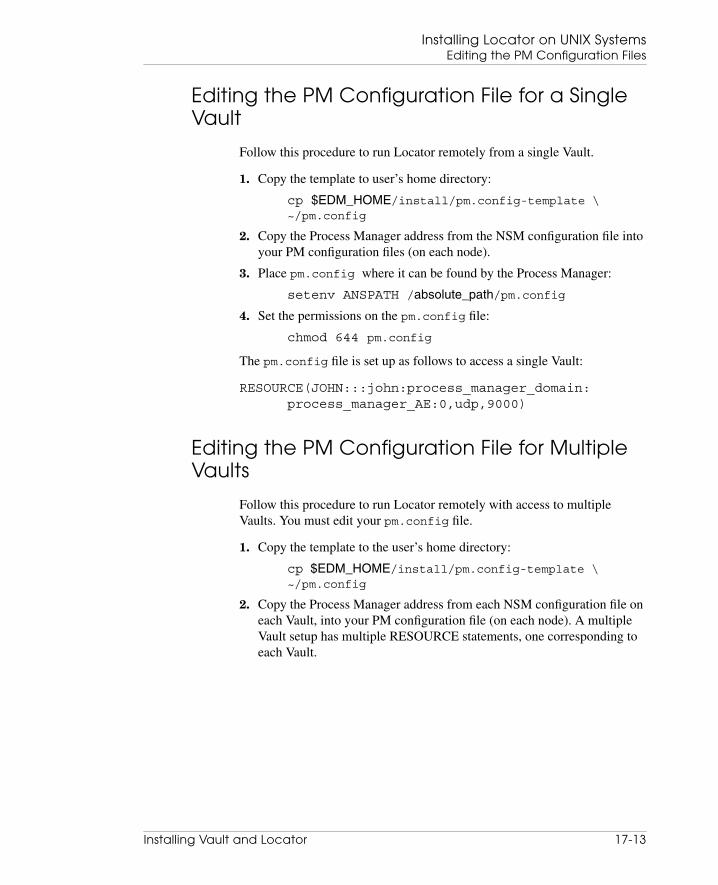
Installing Vault and Locator 17-13
Installing Locator on UNIX SystemsEditing the PM Configuration Files
Editing the PM Configuration File for a SingleVault
Follow this procedure to run Locator remotely from a single Vault.
1. Copy the template to user’s home directory:
cp $EDM_HOME/install/pm.config-template \~/pm.config
2. Copy the Process Manager address from the NSM configuration file intoyour PM configuration files (on each node).
3. Place pm.config where it can be found by the Process Manager:
setenv ANSPATH /absolute_path/pm.config
4. Set the permissions on the pm.config file:
chmod 644 pm.config
The pm.config file is set up as follows to access a single Vault:
RESOURCE(JOHN:::john:process_manager_domain:process_manager_AE:0,udp,9000)
Editing the PM Configuration File for MultipleVaults
Follow this procedure to run Locator remotely with access to multipleVaults. You must edit your pm.config file.
1. Copy the template to the user’s home directory:
cp $EDM_HOME/install/pm.config-template \~/pm.config
2. Copy the Process Manager address from each NSM configuration file oneach Vault, into your PM configuration file (on each node). A multipleVault setup has multiple RESOURCE statements, one corresponding toeach Vault.
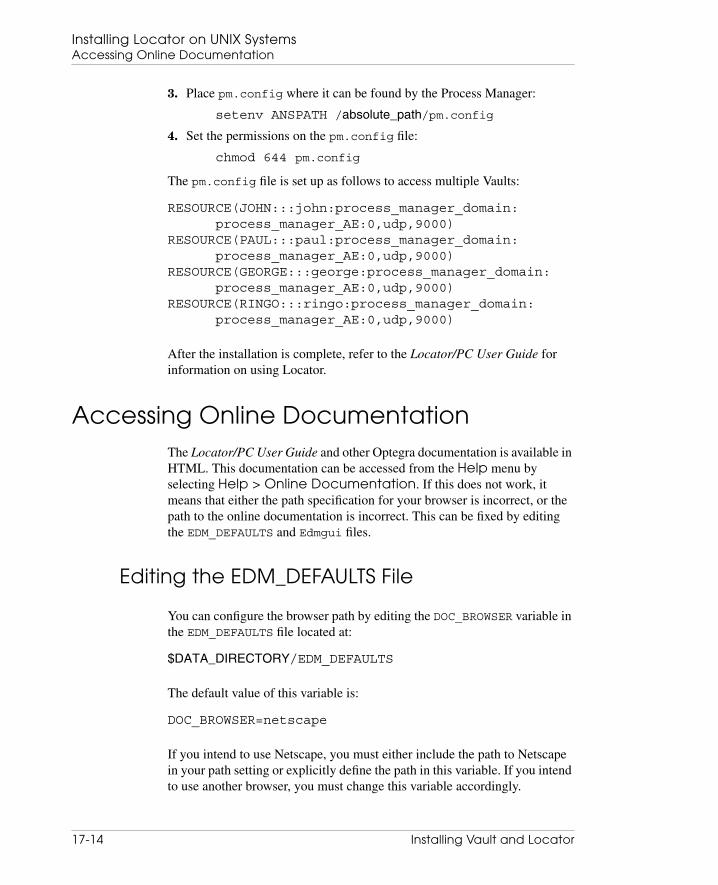
Installing Locator on UNIX SystemsAccessing Online Documentation
17-14 Installing Vault and Locator
3. Place pm.config where it can be found by the Process Manager:
setenv ANSPATH /absolute_path/pm.config
4. Set the permissions on the pm.config file:
chmod 644 pm.config
The pm.config file is set up as follows to access multiple Vaults:
RESOURCE(JOHN:::john:process_manager_domain:process_manager_AE:0,udp,9000)
RESOURCE(PAUL:::paul:process_manager_domain:process_manager_AE:0,udp,9000)
RESOURCE(GEORGE:::george:process_manager_domain:process_manager_AE:0,udp,9000)
RESOURCE(RINGO:::ringo:process_manager_domain:process_manager_AE:0,udp,9000)
After the installation is complete, refer to the Locator/PC User Guide forinformation on using Locator.
Accessing Online DocumentationThe Locator/PC User Guide and other Optegra documentation is available inHTML. This documentation can be accessed from the Help menu byselecting Help > Online Documentation. If this does not work, itmeans that either the path specification for your browser is incorrect, or thepath to the online documentation is incorrect. This can be fixed by editingthe EDM_DEFAULTS and Edmgui files.
Editing the EDM_DEFAULTS File
You can configure the browser path by editing the DOC_BROWSER variable inthe EDM_DEFAULTS file located at:
$DATA_DIRECTORY/EDM_DEFAULTS
The default value of this variable is:
DOC_BROWSER=netscape
If you intend to use Netscape, you must either include the path to Netscapein your path setting or explicitly define the path in this variable. If you intendto use another browser, you must change this variable accordingly.

Installing Vault and Locator 17-15
Installing Locator on UNIX SystemsAccessing Online Documentation
Editing the Edmgui File
You can configure the path to your online documentation by editing theEdmgui.E300.source variable located in the Edmgui file. This file can befound at:
$DATA_DIRECTORY/app-defaults/$LANG/Edmgui
The default setting for this variable is:
Edmgui.E300.source:$EDM_DOC_BROWSER$DATA_DIRECTORY/html/htmldoc/mainmenu.html &
The default page mainmenu.html lists all the documents available forOptegra.


Installing Vault and Locator 18-1
Chapter 18 Refreshing Locator onUNIX Systems
This chapter provides instructions for refreshing previous releases to thecurrent release of Locator on UNIX systems.
• Before Running a Refresh
• Running the Locator Refresh Tool
• Loading Application Software

Refreshing Locator on UNIX SystemsBefore Running a Refresh
18-2 Installing Vault and Locator
Before Running a RefreshFollow the instructions in this section only if you are already running anearlier version of Locator. This section shows how to upgrade the executablefiles for previous releases to the current release Locator.
Warning
Back up your Vault client software and youroperating system before you refresh Vault Client.
Please note: Schedule the refresh and notify all Vault Client userswhen it will take place. Discontinue Vault Client access until the refresh iscomplete.
Running the Locator Refresh ToolYou can obtain online help for the automated refresh tool (edmcrefresh) ateach prompt by typing HELP (uppercase or lowercase). All prompts havedefault values, but you can override these if necessary.
Exiting and Restarting the Refresh Tool
You can exit the refresh tool by:
• Pressing CTRL-C to abort the refresh procedure at any time
• Answering n (no) to one of the continuation prompts displayed by thetool. For example:
Would you like to continue [yes]? n
If you exit the refresh tool, you can restart it by running the edmcrefreshcommand file again. The tool resumes the refresh where you aborted byreading one or more .tmp files it creates after the successful completion ofeach portion of the refresh.
You must be logged in as root to run edmcrefresh.

Installing Vault and Locator 18-3
Refreshing Locator on UNIX SystemsRunning the Locator Refresh Tool
Starting the Refresh
Follow this procedure to start the refresh.
1. Change to the $EDM_HOME/install directory:
# cd $EDM_HOME/install
Please note: If you want to create a history file of your refresh, go tostep 2. If you do not want to create a history file, go to step 3.
2. Invoke the automated refresh tool and create a history log by entering:
# edmcrefresh | tee edmcrefresh.log
A history log will be created in the $EDM_HOME/install directory.
3. Invoke the automated refresh tool with no history log by entering:
# edmcrefresh
Accepting Defaults
Default values are shown in brackets ( [ ] ).
Would you like to continue [yes]?:
To accept a default, press RETURN.
Would you like to continue [yes]?: RETURN
Overriding Defaults
You may override certain default vaults with your own value.
Enter the Vault account name [vault]: edm
Obtaining Online Help
Get help at a prompt by typing help.
Would you like to continue [yes]? help
Check the values you previously entered into Vault to make sure that they arethe ones you want to keep. You can fix whatever is incorrect. Default valuesare shown in brackets ( [ ] ).

Refreshing Locator on UNIX SystemsRunning the Locator Refresh Tool
18-4 Installing Vault and Locator
Sample Output
The following is a sample of the output generated when running the refreshtool.
root> edmcrefresh**************************************************Vault Client Software Refresh. (edmcrefresh)This module refreshes the Vault Client Software onyour system.
The Vault Client Software Refresh module refreshesthe Vault ClientSoftware on your system by calling the followingVault Software Refresh Modules:
edmcrdm [EDM Show Client Refresh Defaults Module]It uses as input, the edmodule.defaults.sh file toobtain appropriate information to perform thesetasks.
Would you like to continue [yes]? :***************************************************Running Vault Show Client Refresh Defaults Module(edmcrdm).******************************************************************************************************Vault Show Client Refresh Defaults module.(edmcrdm)
This module shows the EDM Client Software Refreshvalues that will be used to perform the EDM ClientSoftware Refresh on this system.
The Vault Client Software Refresh values can bemodified before continuing the EDM Client SoftwareRefresh by entering (no) to the prompt that askswhether or not the EDM Client Software Refreshvalues are okay.
It uses as input, the edmodule.defaults.sh file toobtain the appropriate information to perform thesetasks.***************************************************

Installing Vault and Locator 18-5
Refreshing Locator on UNIX SystemsRunning the Locator Refresh Tool
Would you like to continue [yes]? :***************************************************Here are the Vault Client Software Refresh Valuesthat will be used to perform the EDM ClientSoftware Refresh for this system
Please confirm that they are correct:Vault account name = edmdevVault home directory = $EDM_HOME
If the Vault Client Software Refresh Values are notcorrect, then answer no to the next prompt; and youwill be given the opportunity to modify the EDMClient Software Refresh Values:
Are these correct [yes]? :******************************************************************************************************The Vault Show Client Refresh Defaults Module hascompleted successfully.******************************************************************************************************The Vault Client Software Refresh Module hasfinishedsuccessfully.The Vault Client Software has been successfullyrefreshed.***************************************************

Refreshing Locator on UNIX SystemsLoading Application Software
18-6 Installing Vault and Locator
Loading Application SoftwareIn this step, the refresh tool downloads the application software into theVault home directory. Loading Navigator is not a requirement. The followingsample assumes that you want to load Navigator, as indicated by the refreshvalues in the preceding sample.
**************************************************Loading the applications which are to be refreshed.Running Vault Software Downloading Module(edmsdlm).
Vault Software Downloading module. (edmsdlm)
This module downloads the required EDM softwareinto the Vault Home Directory.
***************************************************It uses as input, the edmodule.defaults.sh file toobtain the appropriate information to perform thesetasks.***************************************************Would you like to continue [yes]? :About to download the Vault Configuration NavigatorSoftware from CDROM.

Installing Vault and Locator Index-1
Index
AAccounts
ASM, EDMATTR, EDMUI, PDMQF,SYSTEM 3-3
changing passwords 3-3
ORACLE 3-3
Activatinge-mail trigger
during installation 2-33
AddingClients 3-3
ADDSP command 3-15
Administrator processesstarting 9-2
AIXSMIT utility 1-6
Alter user (Oracle command)using with installation 3-2
ANSTLEVL environment variable 9-2
ARCHIVELOG modeenabling 3-17
Attribute management processstarting 9-2
Attribute serverNSM configuration file
specification 3-13
Attributesuser-defined
tablespace 2-18
Audit filestablespace 2-19
Automatedinstallation tool
exiting 2-7
using 2-1
refresh toolusing 7-3
Automated refreshLocator 18-1
autoregistration 13-4
BBacking up
and recovery 3-17
tablespace containing entries 2-19

Index
Index-2 Installing Vault and Locator
CCADDS
file types included in a partflexible part definition 8-2
CADDS Part Definitionchanging 8-2
Changingparts definition
Flexible CADDS PartDefinition 8-2
Checklistinstallation 1-8
Command filesedminstall 2-8
Commands 1-6
ADDSP 3-15
nsmquery 9-3
nsmstop 3-14, 9-8
psUNIX 9-3
RECSP 3-17
Concurrency controltables and logic 2-18
Configuration filesediting 3-3
Control filessetting up a second 3-18
Control PanelServices 5-36
Creatingrollback segments 2-14
tablespaces 2-14
tempspaces 2-14
DData distribution processes
starting 9-2
Data managementlog
starting 9-2
processstarting 9-2
Databaseadding storage pools 3-15
backup 3-17
recovery 3-17
setup 2-14
tablescreating and loading 2-20
Defaultschanging at installation 9-12
parts definitionFlexible CADDS Part
Definition 8-2
Determining the Parameter Value 2-4
df command 1-6
Directories 1-6
Directory tablestablespace 2-19
Disk partitionsstorage pools
local 1-6
disklabel utilitycreating storage pools 1-6
Disksdrives
allocation of storagepools 1-4
I/O activity 1-4
placement of storagepools 1-4, 1-6
partitionsstorage pools 1-6
storageallocation considerations 1-5
requirements calculation 1-4
Distributed Vaultadding a new DOD 4-6

Installing Vault and Locator Index-3
Index
autoregistration 13-4
configuring 13-1
creating tablespaces for 4-19
installing multiple 4-2
setting up 13-1, 13-2
starting 12-3, 13-1
stopping 12-6
Documentation, printing fromPortable Document Format(PDF) file xx
DODadding new 4-6
Eedminstall 2-8
edmsirmmodule
rerunning 9-12
E-Mail triggersactivating 12-7
during installation 2-33
editing and creating 2-33, 12-7
Environment variables$ORACLE_HOME 5-2
$ORACLE_SID 5-2
ANSTLEVL 9-2
EPD interface for Pro/ENGINEER(Windows) 12-11
Errors$ORACLE_HOME
fixing 9-9
Exporting Database and RemovingFiles 2-5
FFiles
defining types in a part
flexible CADDS partdefinition 8-2
HHistory log
tablespace 2-19
HP-UXinstalling Oracle 5-14
Oracle setup 5-10
IIBM AIX
installing Oracle 5-23
Oracle setup 5-19
Incremental backuptablespace containing entries 2-19
init.orainitialization parameters 2-3
Installationchecklist 1-8
log 9-11
resource filesentering setup information
for 17-5
worksheet 1-8, 7-3
Installing Oracle Server onHP-UX 5-14
IBM AIX 5-23
Sun Solaris 5-6
Windows NT 5-26
LLanguage Environment Variable
setting 10-2
Index
Index-4 Installing Vault and Locator
Language support 5-37
LDEDMCPD utilityusing 8-3
Loadingpart file types utility 8-3
LocatorAutomated install
running 17-2
Automated refreshrunning 18-2
command filesedmcinstall 17-3
edmcinstallinvoking as UNIX root user 17-2
invoking with install log 17-2
envsetting ANSPATH
variable 17-10
Group ownershipselecting for Locator UNIX
user 17-5
Installationaborting 17-3
edmcinstall script 17-3
worksheet 17-2
Installation tool 17-2
restarting 17-3
Installation tool (edmcinstall) 17-3
Invokinginstallation tool 17-2
Loading applications for autorefresh
EDMVault 5.1.1 and 5.1 18-6
Networkconfiguration files 17-7
configuration files, purposeof 17-7
nsm.config, identifying clientnode in 17-7
pm.config, customizing 17-10
pm.config, editing for multi-ple Vault access 17-13
pm.config, editing for singleVault access 17-13
pm.config, ProcessManager 17-11
updating client nodes 17-7
Network Services configurationfile 17-7
nsm.configindentifying client node
in 17-7
preparing for RefreshEDMVault 5.1.1 and 5.1 18-1
Process Manager configurationfile 17-7
Refresh tool edmcrefreshinvoking 18-2
Setup network filesnsm.config 17-7
Setup UNIX userusing an existing account 17-5
UNIX userchoosing a group for 17-5
creating account for 17-5
Worksheetinstallation 17-2
Locator Serversnetwork processes
shutting down for EDMVaultrefresh 18-2
Log fileinstallation or refresh 9-11
tablespace containing entries 2-19
Logginginstallation or refresh output 9-12
MMaximum Datafiles for Oracle
Installing Vault and Locator Index-5
Index
increasing 2-4
Media failureprotection against 5-35
Mounted file systems 1-6
Nnavinstall 2-28
Networkconfiguration files 3-3
process managerstarting 9-2
processesquerying 9-3
starting 2-25, 7-8
stopping 7-5
stopping and restarting 3-14,9-8
New InstallationsVault and Distributed Vault 1-2
newfs utility 1-6
NFS-mounted storage poolscreating 1-6
installing 3-16
NSM configuration fileattribute server information 3-13
nsm.config fileediting 3-3
nsmquery commandchecking network processes 9-3
nsmstop commandstopping network processes 3-14, 9-8
using 3-14
OORACLE
accounts 3-3
backups 3-17
errors, workaround 9-9
redo log files 3-17
running in ARCHIVELOG mode 3-17
second control file 3-18
OracleARCHIVELOG feature 5-35
database name 5-2
home directory 5-2
initialization parameters 2-3
prerequisite actionsdirectory and accounts
preparation 5-2
Oracle installation 5-2
service 5-36
starting 5-36
software requirements 2-2, 11-4
tablespacestemporary 3-2
temporary tablespace 3-2
using an existing database 2-2
using an existing installation 3-2
Oracle setup forHP-UX 5-10
IBM AIX 5-19
Sun Solaris 5-3
ORACLE_HOME 5-2
ORACLE_SID 5-2
Oracle7using an existing database 11-4
OSF/1newfs utility 1-6
OverviewDistributed Vault (DV) 11-2
setup and configurationprocess 11-3
Vault 11-2
Ownersetting for storage pools 3-16

Index
Index-6 Installing Vault and Locator
PParts
determining part membershipflexible CADDS part
definition 8-2
file types included inflexible CADDS part
definition 8-2
Passwordschanging 3-3
after installation 3-3
updating EDMADMIN 2-23
PCA.STARTUPstarting process control agent 3-14,
9-2, 9-8
Permissionsfor storage pools 3-16
pm.config fileediting 3-3
PMGR.STARTUPstarting process manager 3-14, 9-2,
9-8
Postinstallationtasks 3-1
Post-Installation TasksDistributed Vault 13-2
Preparing ORACLE DATABASE forVault Refresh 6-1, 14-1
Prerequisitesfor Vault installation 2-2, 11-4
Printing documentation fromPortable Document Format(PDF) file xx
Pro/ENGINEER support, setting up(Windows) 12-11
Process control agentusing to start processes 9-2
Process Managerediting file 3-3
starting 3-14, 9-2, 9-8
ps command
checking network processes 9-3
RRDBMS
creating tablespaces 2-18
Recoveringusing ARCHIVELOG 3-17
RECSP commandusing to recover storage pools 3-17
Redo log filesORACLE 3-17
Refreshlog 9-11
of Locator 18-1
using automated tool 7-3
Relational database tablesrefreshing automatically 7-6
Requirements modulererunning to change defaults 9-12
Revision codesloading 2-24
Rollback segmentscreating 2-14
definition 2-14
RulesFlexible CADDS Part Definition 8-2
SSample Installation Procedure 13-9
Scriptsnavinstall 2-28
Securitytables 2-18
Serversnetwork processes
starting in auto install 2-25
starting in auto refresh 7-8
Installing Vault and Locator Index-7
Index
stopping in auto refresh 7-5
Setting the Language EnvironmentVariable 10-2
Setting upVault software account 2-13
SMIT utilitycreating storage pools 1-6
Solarisdf command 1-6
newfs utility 1-6
Specifying the Maximum Datafiles 2-6
StartingOptegra service for the first time on
Windows NT 12-3
Vault/Distributed Vault 12-3
StoppingVault/Distributed Vault 12-6
Storage Poolsallocation to disk drives 1-4, 1-5
Storage poolsadding 2-26, 3-15
creating disk partitions forlocal 1-6
customizing pool selection 1-6
disk placement 1-6
mounting to directory name 1-6
names 3-15
NFS-mounted 1-6
installing 3-16
planning 1-6
setting ownership andpermissions 3-16
Storage Pools creatingusing the command line 12-7
Storage Pools, creatingusing Administrator 12-7
Sun Solarisinstalling Oracle 5-6
Oracle setup 5-3
TTables
static and dynamictablespace 2-20
Tablespacesallocation to disk drives 1-5
creating 2-14
definition 2-14
disk space required 1-7
for Distributed Vault 4-19
ORACLE rollback segments 2-19
ORACLE temporary segments 2-20
sizes 2-18
temporaryfor installation 3-2
Tape Drivesusing for Windows NT 16-2
Tapesbacking up data 3-17
redo log files 3-17
Temporary tablespaceassigning database users to 3-2
Tempspacescreating 2-14
Toolsinstallation 2-1, 2-7
re-running 9-8
Trace utilitiesinstallation or refresh 9-11
Troubleshooting 9-1
UUNIX
ps command 9-3

Index
Index-8 Installing Vault and Locator
VVault
accountsetting up 2-13
adding clients 3-3
overview of installation 11-3
post-installation tasksactivating e-mail triggers 12-7
creating storage pools withcommands 12-7
data dictionaryinstallation 12-2
installing the Portmapper 12-2
starting 12-3
stopping 12-6
WWARMSTART keyword 3-13
Windows NTControl Panel 5-36
installing Oracle 5-26
language support 5-37
running Oracle 5-36
Services 5-36
Vault overview 11-1
Windows NT Vaultcustomizing 12-1
setting up 12-1
starting 12-1
stopping 12-1
WorkaroundORACLE error 9-9
Worksheetinstallation 1-8
Worksheetsinstallation 7-3