instantcheck ecg user manual - favoriteplus · real-time electrocardiogram (ecg). electrical...
TRANSCRIPT
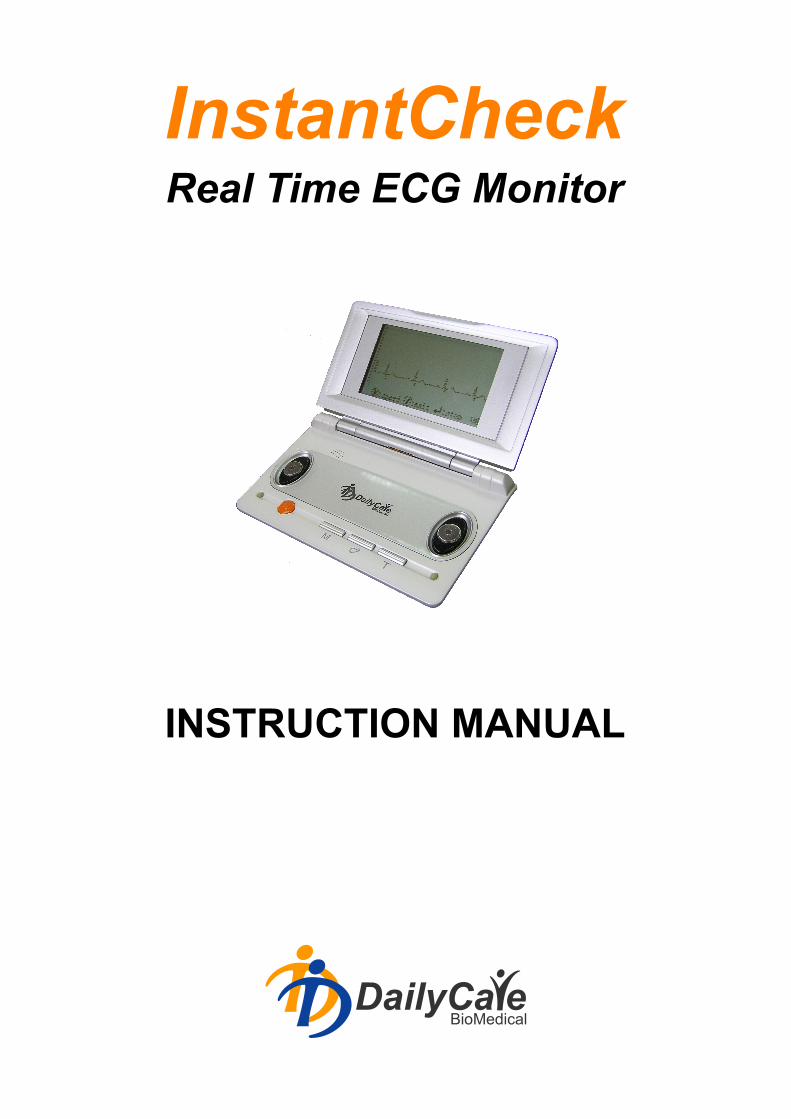
InstantCheckReal Time ECG Monitor

I
IMPORTANT NOTICE
© 2010 DailyCare BioMedical Inc. All rights reserved. No part of
this publication may be reproduced in any manner whatsoever
without written permission from the owner.
Proprietary rights of DailyCare BioMedical Inc. are involved with
the subject matter of this document and all manufacturing,
reproduction, use, and sales rights pertaining to such subject
matter are expressly reserved. The recipient, by accepting this
document, agrees that the information contained herein will not
be copied or reproduced in whole or in part, nor its contents
revealed in any manner or to any person, except to meet the
purpose for which this document was prepared and delivered
without the express permission of DailyCare BioMedical Inc.
MEDICAL DEVICE WARRANTY
DailyCare BioMedical Inc. warrants each new device to be free
from defects in material and workmanship. This warranty is not
transferable. This warranty is effective for a continuous period
of one year from initial date of shipment against the original
order to the original purchaser. This warranty covers parts and
labor costs when, upon examination by the manufacturer, the
device is determined to be in fact defective. In order to
implement the provisions of warranty repair, the purchaser must
notify DailyCare BioMedical Inc. concerning suspected defects
and then, if so instructed, ship the instrument to the designated
facility, correctly packed in an appropriate shipping container,
for examination and servicing. www.dcbiomed.com.

II
LIMITATIONS AND EXCLUSIONS
This warranty does not cover repairs necessitated by any
damage to equipment caused by mishandling, neglect, abuse,
customer modification or failure of the user to follow the
published operating instructions. Repaired devices are
warranted for a period of 30 days and are subject to the
limitations and exclusions described in this document.
DailyCare BioMedical Inc. reserves the right to make
design changes in its products without incurring the
obligation to incorporate these changes in products
previously delivered. This warranty applies unless DailyCare
BioMedical Inc. has agreed to and provided a written exception
to this policy.
III
ATTENTION!
DailyCare BioMedical Inc. assumes no responsibility for
any personal injuries or damages sustained by or through
use of this product.
The InstantCheck
will NOT tell you if you have heart problems. Only your
physician can do that. You should NOT interpret the
measurement results yourself.
is NOT a diagnostic device. It is only an ECG recorder.
is NOT a substitute for a traditional ECG diagnosis.
is NOT recommended for users with pacemakers.
What you should NOT do:
Do NOT operate InstantCheck while using other electrical
devices.
Do NOT connect InstantCheck to the PC via USB cable
when acquiring ECG.
Do NOT use accessories other than those provided by the
manufacturer. Do NOT use USB cable other than that
supplied by manufacturer.
Do NOT subject the device to water and liquid spillage. Do
NOT clean with alcohol, acetones or any other flammable
chemical agents. Do NOT use with any lotions.
Do NOT place the device and its accessories under direct
sunlight and harsh environments.
Do NOT disassemble InstantCheck. It may cause device
malfunction, device failure or damage and you will loose
all warranty.

IV
Table of Contents
IMPORTANT NOTICE ................................................................. I
INTRODUCTION ........................................................................ 1
1.1 WHAT IS INSTANTCHECK ........................................................ 1
1.2 BENEFITS OF INSTANTCHECK ................................................ 2
1.3 ECG VARIABLES ................................................................... 3
1.4 COMMON CAUSES OF ABNORMAL ECG TRACINGS ................. 4
1.5 BASIC FUNCTION OF THE HEART ............................................ 5
1.6 CONDUCTION SYSTEM OF THE HEART .................................... 5
PRODUCT DESCRIPTION ......................................................... 7
2.1 PRODUCT DESIGN ................................................................. 7
2.1.1 Main Unit ...................................................................... 7
2.1.2 Product Package ......................................................... 9
2.1.3 Product Label ............................................................... 9
2.2 TAKING A MEASUREMENT ..................................................... 10
2.2.1 Dry Thumb Conduction Electrodes ............................ 10
2.2.2 Optional External Electrode Cable .............................. 11
2.3 DISPLAY PANEL ................................................................... 12
2.3.1 LCD Display ............................................................... 12
2.3.2 LCD Display Description ............................................ 13
2.4 MENU ................................................................................. 14
2.4.1 Transmit Data ............................................................. 14
2.4.2 Continuous Mode ....................................................... 15
2.4.3 Review ECG Data ...................................................... 16
V
2.4.4 System Setting ........................................................... 17
2.4.5 Erase all ECG Data .................................................... 19
2.4.6 Attention ..................................................................... 20
2.5 PRODUCT SPECIFICATIONS .................................................. 21
INSTANTCHECK SOFTWARE ................................................ 22
3.1 SYSTEM REQUIREMENTS ..................................................... 22
3.2 INSTALLATION ...................................................................... 22
3.3 TRANSMIT DATA .................................................................. 23
3.4 SOFTWARE INTERFACE ........................................................ 26
3.5 USER AND FILE MANAGEMENT ............................................. 27
3.5.1 Add New User ............................................................ 28
3.5.2 Display or Change User’s Information ....................... 29
3.5.3 Search for User .......................................................... 30
3.5.4 Move ECG File to Other User .................................... 30
3.5.5 Delete, E-mail, Save, Preview and Print a File .......... 31
3.5.6 Set Report Header ..................................................... 31
3.5.7 Review ECG Trace and Parameters .......................... 32
3.5.8 Redefine ECG Parameters ........................................ 33
3.5.9 Reading the Graph .................................................... 34
3.5.10 ECG Waves and Parameters ................................... 35
FREQUENTLY ASKED QUESTIONS ...................................... 37
GLOSSARY .............................................................................. 41
REFERENCES ......................................................................... 43
CONTACT INFORMATION ....................................................... 43

1
INTRODUCTION
1.1 What is InstantCheck
InstantCheck is a non-invasive, handheld heart monitoring
device. It allows users to measure and record electrical activities
of the heart anywhere and anytime. It records and displays
real-time electrocardiogram (ECG).
Electrical signals of the heart can be obtained using two methods.
The first method is by placing thumbs on InstantCheck’s specially
designed dry conducting electrodes. The second method is by
using external electrode cable and adhesive ECG electrode pads.
InstantCheck records 30 seconds of “Modified ECG signal”1 for
each measurement. After measurement, the device will instantly
display the average of 3 parameters on the LCD panel: the
average heart rate (HR), ST segment deviation (ST) and QRS
interval (QRS). These parameters are not the traditional standard
ECG readings, but rather, a “Modified Lead I -ECG”2.
InstantCheck can transfer all recorded measurements to a
personal computer through USB connection for management and
analysis of ECG data.
1 InstantCheck uses two conducting electrodes to measure cardiac activities, unlike
traditional ECG device which requires at least 3 electrodes. ECG measured by
InstantCheck is designated as a modified Lead I ECG. 2 These parameters from InstantCheck are for reference only. For interpretation of the
parameters, please consult professional physicians. Additional standard 12 lead ECG
test may need to be performed.
2
1.2 Benefits of InstantCheck
InstantCheck is a recording device used to monitor or spot-check
the electrical activities of the heart anytime and anywhere. It is
designed to be small, portable and easy to use. With
InstantCheck you can:
The New Vital Sign
InstantCheck enables qualified medical personnel to
quickly spot-check for irregular heart beat during primary
assessment.
Take measurements anytime anywhere
InstantCheck’s compact design allows the user to carry the
device anywhere, anytime for periodic monitoring of his/her
heart throughout the day.
Manage ECG recordings over time
InstantCheck software allows users to manage ECG
recording with a time stamped record.
Patient to Physician
Data generated by the InstantCheck can be printed, faxed,
or emailed using the accompanying software. The
InstantCheck also stores up to 100 records for review using
the LCD screen.
3
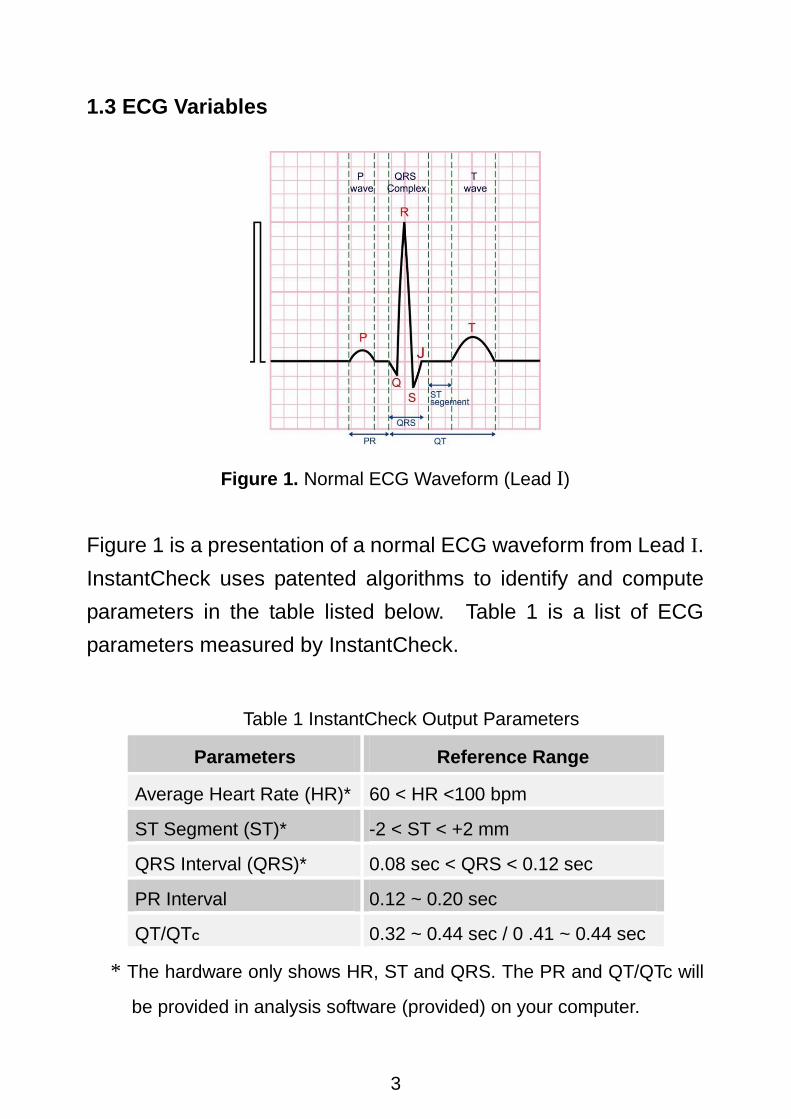
1.3 ECG Variables
Figure 1. Normal ECG Waveform (Lead I)
Figure 1 is a presentation of a normal ECG waveform from Lead I.
InstantCheck uses patented algorithms to identify and compute
parameters in the table listed below. Table 1 is a list of ECG
parameters measured by InstantCheck.
Table 1 InstantCheck Output Parameters
Parameters Reference Range
Average Heart Rate (HR)* 60 < HR <100 bpm
ST Segment (ST)* -2 < ST < +2 mm
QRS Interval (QRS)* 0.08 sec < QRS < 0.12 sec
PR Interval 0.12 ~ 0.20 sec
QT/QTC 0.32 ~ 0.44 sec / 0 .41 ~ 0.44 sec
* The hardware only shows HR, ST and QRS. The PR and QT/QTc will
be provided in analysis software (provided) on your computer.

4
Table 2 InstantCheck Display Messages
Message Description
1. Regular Heart Rate
- Fast Heart Rate
- Slow Heart Rate
- High ST Value
- Low ST Value
- High QRS Value
Heart rhythm is REGULAR
- If heart rate is too fast (HR > 100 bpm) it will be indicated.
- If heart rate is too slow (HR < 60 bpm) it will be indicated.
- If ST value is too high (ST > +2 mm), it will be indicated.
- If ST value is too low (ST < -2 mm), it will be indicated.
- If QRS value is too high (QRS > 0.12 sec), it will be indicated.
2. Irregular Heart Rate Heart rhythm is IRREGULAR
- If this warning appears frequently, regardless if you have any
uncomfortable symptoms or not, please consult your physician.
3. Impossible to Analyze
(Please measure again.)
Acquired signals CANNOT be analyzed.
Please measure again.
ATTENTION:
The parameters and messages provided by the device are for
reference ONLY. If the user feels any discomfort, regardless
of the results from the device, please consult an appropriate
physician immediately. Measured data by InstantCheck may be
provided to a physician for reference and further analysis.
1.4 Common Causes of Abnormal ECG Tracings
Abnormal ECG tracings may be caused by many different factors,
including:
Coronary artery disease
Electrolyte imbalances in your blood (such as sodium or
potassium)
Changes in your heart muscle
Injury from a heart attack
Healing process after heart surgery

5
Please consult your physician if you are concerned about your
ECG recording and symptoms to get more information about your
condition.
1.5 Basic Function of the Heart
The heart has 4 chambers that act together to pump blood
throughout the body. The 2 smaller upper chambers are called
atria, and the larger lower chambers are called ventricles. The
right atrium receives oxygen-depleted blood coming back from
the body via 2 large veins: the superior vena cava and inferior
vena cava. The right atrium pumps this blood into the right
ventricle, which then pumps the blood into the lungs, which is
oxygenated. The blood then comes back into the left atrium,
which is then pumped into the left ventricle. The left ventricle
then pumps the blood back to the circulatory system via the aorta,
the largest artery in the body. The pressure that the left ventricle
exerts to keep the blood moving throughout the whole body is the
blood pressure.
1.6 Conduction System of the Heart
The chambers of the heart pump with the automatic discharge of
electricity from the sinoatrial (SA) node, a group of specialized
cells in the right atrium. On average, there are 60 to 100 times
discharges per minute. When the SA node discharges, both
atria contract, and the electrical impulse is relayed to the
atrioventricular (AV) node that is between the 2 ventricles. The
electrical wave that is propagated across the AV node causes
both ventricles to contract and pump blood. The normal delay

6
between the atrium and ventricle contractions is 0.12 to 0.20
seconds. By studying the electrical activity that results when
heart muscle cells contract, we gain insight to the health and
workings of the heart. These electrical activities can be detected,
recorded and studied with ECG monitoring device, for example
InstantCheck.

7
PRODUCT DESCRIPTION
2.1 Product Design
2.1.1 Main Unit
H
E F
I
L
K
M
J
A B C D
G

8
Parts Descriptions
Items Descriptions
A. Power on/off button Turns the power on and off.
B. Start button Press to start measuring
C. Menu button Enter menu mode.
D. Enter/OK button Press to select. Press to confirm.
E/F. Left and right electrodes Dry conduction electrodes for thumbs
G. Speaker Sound
H. LCD panel Large LCD panel to display parameters and waveform
I. Battery cover Open cover to insert batteries
J. Product label Description of device information
K. External electrode cable
socket
Insert external electrode cable in this socket
L. Sliding socket cover Protection mechanism to make sure USB cable and external electrode cable is NOT used at the same time
M. USB socket Only Insert USB cable provided by manufacturer.
Note: Only use USB cable provided by manufacturer. Other
USB cables will cause serious damage to device. Please visit:
www.dcbiomed.com to re-order USB cable.

9
2.1.2 Product Package
Standard Package:
InstantCheck X 1
InstantCheck Software CD X 1
InstantCheck User’s Manual X 1
Carrying Case X 1
USB Cable X 1
Auxiliary Electrode Cable X 1
Not Included:
1) Electrode gel pad. These pads can be purchased at qualified
local drug stores.
2) AAA alkaline battery. InstantCheck needs two batteries to
operate.
2.1.3 Product Label
InstantCheck is TYPE B EQUIPMENT WITH F-TYPE APPLIED PART IN EN
IEC60601-1 STANDARD
Attention, consult
ACCOMPANYING
DOCUMENT
TYPE BF APPLIED PART
CERTIFIED CE
MARKING, NOTIFIED
BODY NO. 0197
PRODUCT BATCH
NO.

10
2.2 Taking a Measurement
2.2.1 Dry Thumb Conduction Electrodes
Steps Descriptions
Wash and dry your hands before use. Be sure
hands are clean of any lotions.
Sit down and place your hands comfortably on a table
or on your laps.
Open the lid and press once to power on the
device.
Press Start to start measuring. Each
measurement will take 30 seconds. During measurement, you can stop it anytime by
press OK.*
Simply press again to start the next
measurement.
Place right and left thumbs GENTLY on the
conduction electrodes. Calm and relax yourself with
regular breathing.
Do NOT Move and Do NOT Talk during
measurement.
Press for 3 seconds to power off the device
manually anytime during measurement. Data will
NOT be saved.
The device will power off automatically if left idle for
more than 1 minute.
NOTE: If measurement is stopped in less than 30 seconds, the
recorded data is not enough for calculation. The ECG
parameters will not be display or recorded. The hardware
and software will only show ECG trace measured.

11
2.2.2 Optional External Electrode Cable
InstantCheck has optional electrode cable as an alternative way
for users to take an ECG reading, instead of dry thumb
conduction electrode. Please only use one method at a time.
Follow the steps below when using the auxiliary electrodes:
Steps Descriptions
1
Slide the socket cover to expose the optional electrode cable
socket and connect one end of the cable to the device.
Connect the split ends of the cable to the adhesive ECG
electrode pads. (Users can buy qualified electrode pads
from qualified medical device and pharmacy stores.)
2
Place the RED electrode on the right
arm and the BLUE electrode on the
left arm as shown.
Do NOT put your thumbs on the dry
conduction electrodes when using
this method.
3 Start the measurement by pressing Start.
NOTE: Both auxiliary electrode and USB sockets on the device
are to be used only with the standard accessories
provided. Warranty will NOT cover damages that result
from failure to comply with these instructions. Visit:
www.dcbiomed.com to order replacement parts.

12
2.3 Display Panel
InstantCheck has a large LCD panel to display operating steps,
results of ECG measurements, date/time settings and playback.
2.3.1 LCD Display
LCD Display Panel – During measuring
LCD Display Panel – After measuring
A
B
C E
D
J
H
I
G
K
F
L

13
2.3.2 LCD Display Description
# Item Descriptions
A Scale
Indicator ECG scale
B Amplitude Indicator
Calibration Mark, Unit amplitude (1mV)
C Heart rate
Display Display Heart rate during measurement
D ECG trace ECG waveform display during measuring and review mode
E Timer Timer
F Date/Time Day/Month/Year Hour/Minute
G Messages The messages may include Regular Heart Rate (Fast/Slow Heart Rate, High/Low ST, High QRS), Irregular Heart Rate and Please Measure Again.
H indicates the battery is normal.
indicates the battery is low.
I HR Average Heart Rate. Reference range: 60 < HR < 100 bpm
J ST ST segment.
Reference range: -2 < ST < +2 mm
K QRS QRS interval.
Reference range: 0.08 < QRS < 0.12 sec
L Data Stored Shows how many readings are stored. The device has a looping memory and can store up to 100 readings.

14
2.4 Menu
Press to power on the device then press to enter
Menu mode. In Menu, press menu button to scroll through
options. Press OK to enter. Press to start
measurement anytime. Below is a list of choices in the menu :
Items Descriptions
Transmit Data Transmit data to PC.
Continuous Mode Special measuring mode: ECG will be continuously displayed on the LCD. The user can manually stop measurement. Only the last 30 seconds of data will be stored.
Review ECG Select a file to review the ECG parameters and waveform.
System Setting Three functions: Date & Time*, LCD Brightness, and LCD Contrast can be adjusted.
Erase All Data Erase all readings stored in memory.
Attention Attention to using the device.
NOTE: Please set the Date & Time before use
2.4.1 Transmit Data
a. Press to enter menu selection when the device is on.
b. Press to send data to PC.
NOTE: Make sure the USB cable is connected to the device
and the PC. Make sure the software shows connected.

15
Transmit Data
Continuous Mode
Review ECG
System Setting
Erase All Data
Attention
2.4.2 Continuous Mode
This is an alternative recording mode. Selecting this mode will
allow you to measure and display your ECG waveform
continuously for up to 2 hours. You can choose to stop
anytime or manual stop anytime. Only the last 30 seconds will
be recorded and stored in memory.
a. Press to enter menu selection when the device is on.
b. Continuous mode will be highlighted.
Transmit Data
Continuous Mode
Review ECG
System Setting
Erase All Data
Attention
c. Press to start measuring and displaying ECG waveform
on LCD.
Press again when you want to manually stop. The device
will record the last 30 seconds of data.
16
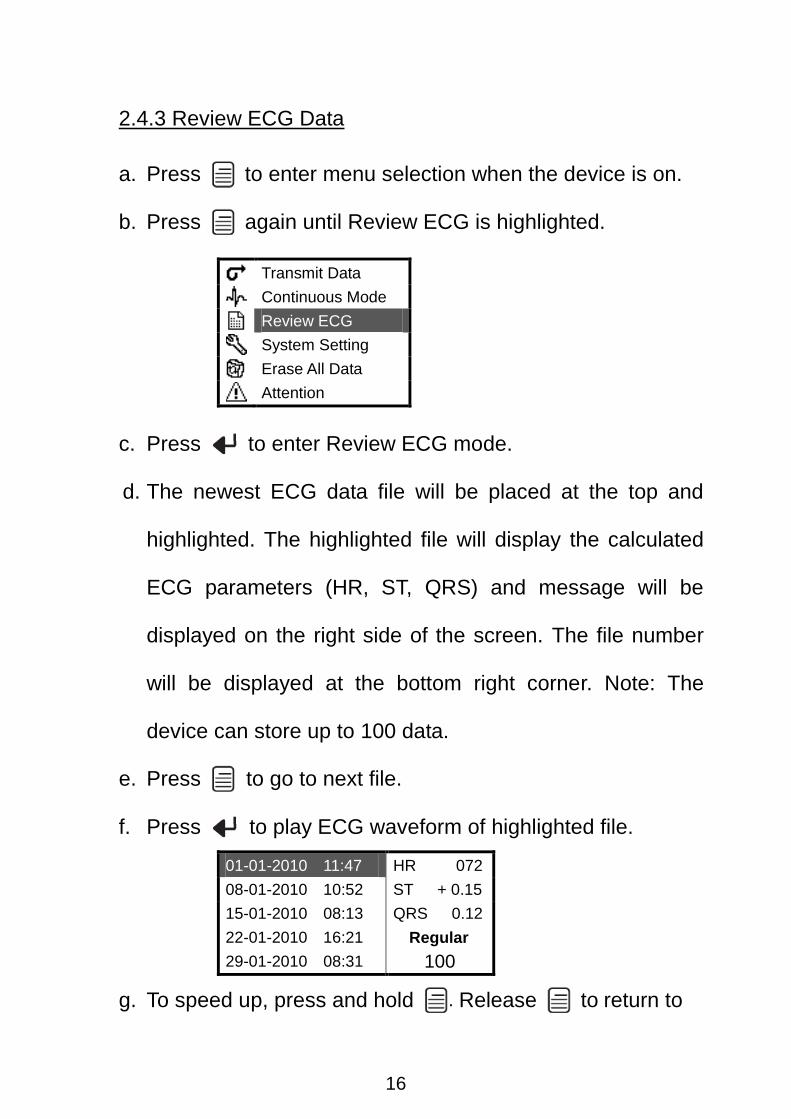
2.4.3 Review ECG Data
a. Press to enter menu selection when the device is on.
b. Press again until Review ECG is highlighted.
Transmit Data
Continuous Mode
Review ECG
System Setting
Erase All Data
Attention
c. Press to enter Review ECG mode.
d. The newest ECG data file will be placed at the top and
highlighted. The highlighted file will display the calculated
ECG parameters (HR, ST, QRS) and message will be
displayed on the right side of the screen. The file number
will be displayed at the bottom right corner. Note: The
device can store up to 100 data.
e. Press to go to next file.
f. Press to play ECG waveform of highlighted file.
01-01-2010 11:47 HR 072
08-01-2010 10:52 ST + 0.15
15-01-2010 08:13 QRS 0.12
22-01-2010 16:21 Regular
29-01-2010 08:31 100
g. To speed up, press and hold . Release to return to

17
normal speed.
h. To exit, press .
i. To stop, press . To start again, press .
2.4.4 System Setting
Please make sure you have set the right date and time before
using the device. Adjust the date and time when needed. The
date and time are important information of an ECG data.
a. Press to power on the device.
b. Press to enter menu selection.
c. Press again until System setting is highlighted.
Transmit Data
Continuous Mode
Review ECG
System Setting
Erase All Data
Attention
d. Press to enter setting menu selection.
1. Set and Adjust Date and Time:
a. Press to enter Date & Time adjustment mode.
Data & Time
Brightness
Contrast

18
b. The digit to be changed will be highlighted. Press to go
to next digit to change. Press to increase the number.
c. When time is set, device will go back to setting menu.
d. Press to go back to menu.
2. Set and Adjust Backlight Brightness:
The default brightness has been pre-set in the optimal
operation for both visual check and battery power
consumption. Keep the default brightness is strongly
recommended.
a. Press again until brightness is highlighted.
b. The scale will be changed when brightness is changed.
Press to decrease the brightness. Press to
increase the brightness. Press to go back to setting
menu.
c. Press to go back to menu.
3. Set and Adjust Backlight Contrast
Data & Time
Brightness
Contrast

19
The default contrast has been pre-set in the optimal operation
for both visual check and battery power consumption. Keep
the default contrast is strongly recommended.
a. Press again until contrast is highlighted.
b. The scale will be changed when contrast is changed. Press
to decrease the contrast. Press to increase the
contrast. Press to go back to setting menu.
c. Press to go back to menu.
2.4.5 Erase all ECG Data
You have the option to erase and clear all ECG readings
stored. (This will permanently delete all data)
a. Press to enter menu selection.
b. Press again until Erase All Data is highlighted.
Transmit Data
Continuous Mode
Review ECG
System Setting
Erase All Data
Attention
Data & Time
Brightness
Contrast

20
c. Press to enter. Message will show to confirm if you
want to erase all readings. Press to select Yes or No.
Press to confirm.
2.4.6 Attention
a. Press to enter menu selection.
d. Press again until Attention is highlighted.
Transmit Data
Continuous Mode
Review ECG
System Setting
Erase All Data
Attention
e. Press to enter and the following message will show.
“The device will not tell if you have heart problems. Only
your physician can do that.”
NOTE: This message is to remind that user that if you feel any
discomfort, regardless of the results of the measurement by
the device, you should consult your physician.

21
2.5 Product Specifications
Input impedance > 20 M – Ohm
Input dynamic range +/- 3 mV
Bandwidth 0.1 – 40 Hz
CMRR
(Common Mode Rejection Ratio) > 95 dB
A/D conversion 12 bit
Sampling Rate 250 samples/sec
Measurement Time 30 seconds
Display 240 X 128 Dot-matrix LCD display
Input Dry conduction electrodes and/or external auxiliary electrodes
Output USB interface
Power Supply 1.5V (AAA) X 2
Size 124 x 78 x 22 mm
Weight 150 g excluding batteries
Environmental Conditions:
Storage temperature -4°F ~122°F (-20°C~ 50°C)
Operating temperature 50°F ~104°F (10°C ~ 40°C)
Humidity 25% ~ 95%
Measurement Range:
Average heart rate 45 to 180 bpm
ST segment -3 to +3 mm
QRS interval < 0.20 sec

22
InstantCheck SOFTWARE
3.1 System Requirements
Operating System: Windows 98/98SE/2000/XP/Vista
Hardware Requirements:
CPU: Pentium III and above
Memory: 100MB and above
Hard disk capacity: 100MB and above
Data transmission media: Universal Serial Bus (USB)
Screen resolution: 1024 x 768
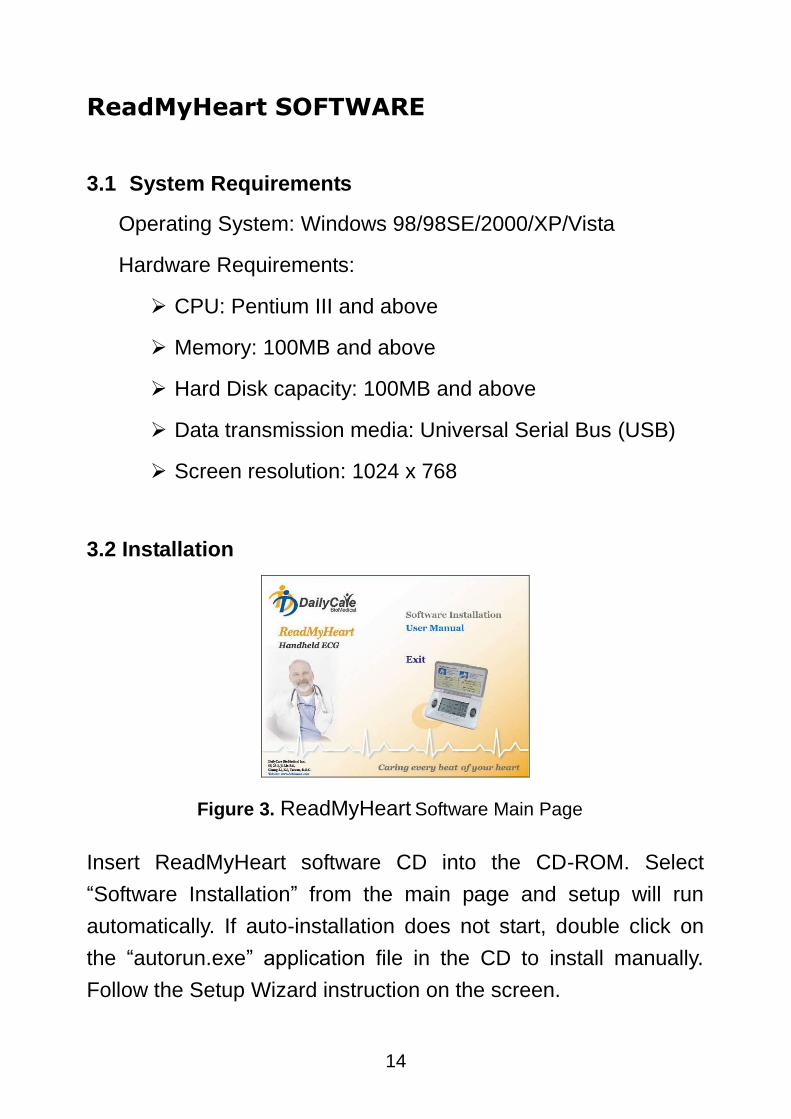
3.2 Installation
InstantCheck Software Main Page
Insert InstantCheck software CD into the CD-ROM. Select
“Software Installation” from the main page and setup will run
automatically. If auto-installation does not start, double click on
Software Installation
User’s Manual
Exit

23
the “autorun.exe” application file in the CD to install manually.
Follow the Setup Wizard instruction on the screen.
3.3 Transmit Data
All data files recorded in InstantCheck can be transferred to PC
for analysis through the USB port on the left side of InstantCheck
shown as below. Slide the socket cover to expose the USB
socket.
InstantCheck USB port
Steps for file transfer. Please follow the following steps:
1. Start the InstantCheck software by selecting DailyCare
BioMedical Inc. InstantCheck from the File Menu or by
clicking on the on your desktop.
2. A “Disconnected” status will be shown initially on the bottom
USB Port
Only use USB cable
provided by
manufacturer to
transmit data.

24
left of the main menu.
Connect one end of the USB cable (small) to the USB socket
on the hardware first (A). Then connect the other end of the
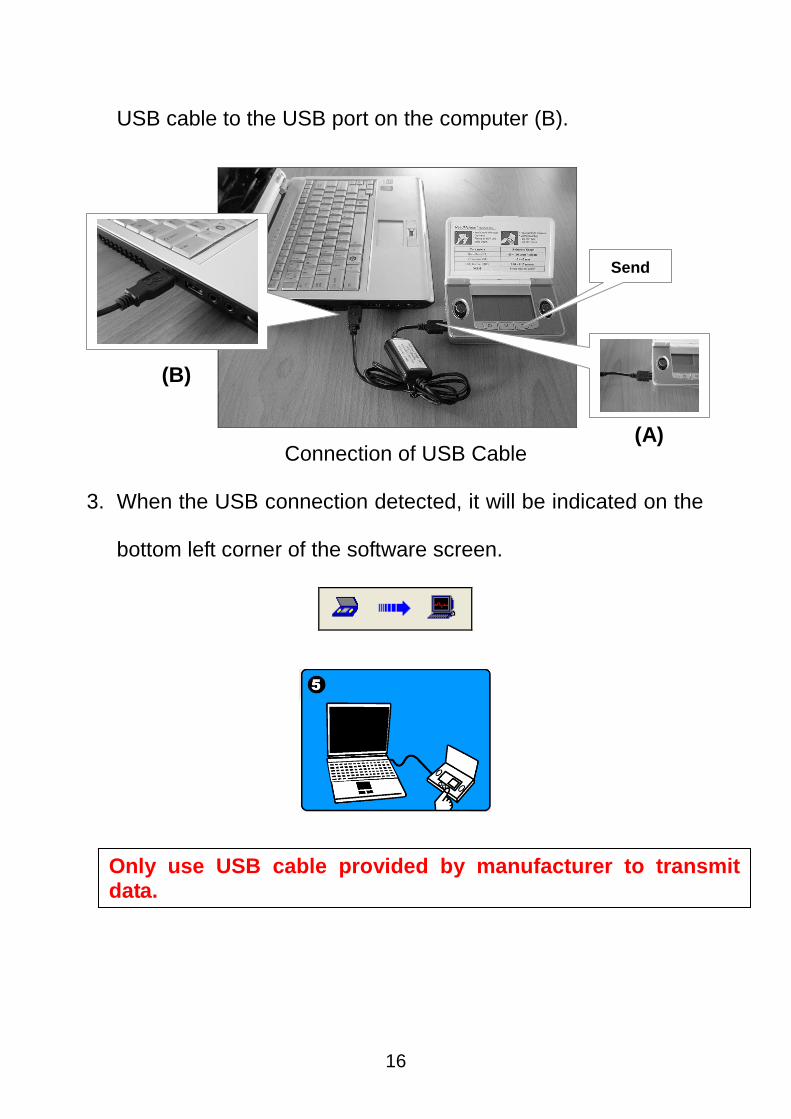
USB cable to the USB port on the computer (B).
3. When the USB connection detected, it will be indicated on the
bottom left corner of the software screen.
(A)
(B)
Only use USB cable provided by manufacturer to transmit data.

25
4. Press until Transmit Data is highlighted. Then press
OK to transmit data to PC. Arrow will appear on the
LCD panel indicating the transferring of data. Data
transmission progress window will pop up on the monitor.
Note: Please confirm/select the right user before the
transmitted data save to the PC. The user confirm window as
below.
Note: After data files have been successfully transferred to the
PC and when you start your next measurement, InstantCheck
hardware will erase its memory automatically.
Transmission
Progress

26
Note: The default file name is the time-stamp of the reading. By
clicking the selected file name, the user can change the name.
Note: If flashes after pressing or during file transfer, it
means the connection between InstantCheck and the PC has
failed. Please close and start the software again, and/or
reconnect the USB cable.
3.4 Software Interface
InstantCheck Software User Interface
4
1
2
3

27
InstantCheck has a simple analysis interface. This analysis and
database management system is divided into four main parts:
(1) User and file management;
(2) Average ECG parameters display and remarks;
(3) Connection status of ECG to PC;
(4) ECG diagram analysis display (Maximum of 30 seconds).
3.5 User and File Management
Function Keys Description
Add new user
Display and change user’s information
Delete selected user
Search for user
Move ECG file to other user folder
Delete selected file
Email ECG data
User management
File Management

28
Save ECG waveform as graphic file
Preview ECG report for printing
Print ECG report
View between 10mm/mV or 20mm/mV
Set ECG report header
Detailed descriptions of Function Keys are as follows:
3.5.1 Add New User
1. To add a new user, click on function key. The “Create
new user” window will appear as shown below.
2. Enter user information such as name, sex, ID, weight, date of
birth (DOB) and height. NOTE: Name has to be keyed to
create a new user.
3. Click on Add and a new user will be added to the patient
information user list. Name of user must be keyed. Otherwise,

29
a warning window will appear.
4. Repeat step 1 and 2 to add more new users.
5. Click on X to close the user management window.
3.5.2 Display or Change User’s Information
1. Select a file/user first.
2. Select function key. The user’s information will appear as
shown below.
3. You can modify the values on the table after click Modify .
Then click Save , all the modified values will be saved
automatically. Click Exit , The values will NOT be changed.
Step 1
Step 2
Step 3

30
3.5.3 Search for User
1. Select function key. A window will appear. You can search
by “User Name” or by “ID”. Please type in your search
characters in the String field.
2. Select Find to start finding. If the user is found, the name
will be highlighted.
3.5.4 Move ECG File to Other User
1. Select the files first (Multiple files can be selected).
2. Click function key. A window will appear. You can move
the selected ECG file to other user.
Step 1
Step 2

31
3.5.5 Delete, E-mail, Save, Preview and Print a File
1. Select the files first (Multiple files can be selected).
2. Click delete, email, save, preview, or print function.
3.5.6 Set Report Header
1. Select function key. The “Report information” window will
appear as shown below.
2. Enter header information. Click on Save , and the header
information will show on the top of the ECG report.
Step 1
Step 2
Step 3

32
3.5.7 Review ECG Trace and Parameters
1. Select a user and click on a file.
2. A 30 seconds ECG trace will be shown on the right side of the
screen in quadrant 1. (Q1)
NOTE: If you stop ECG measurement in less than 30 seconds,
you will not have the full 30 seconds ECG trace.
Q1
Q2

33
3. The average ECG parameters (HR, PR, QRS, QT, QTc, ST)
will be displayed in quadrant 2. (Q2)
4. You can also select a particular section of the ECG trace, by
clicking left click once to start and left click again to end the
section in Q1. The selected part of the trace will turn blue. The
average ECG parameters will be displayed in Q2 accordingly.
3.5.8 Redefine ECG Parameters
This section is highly recommended for doctors only. The
power of the device lies in the algorithm which identifies and
defines P, Q, R, S and T wave intervals to generate the
parameters observed on the file. The algorithm is highly precise
and accurate which is observed in a correlation study with
standard ECG device.
In order to present a flexible format, the software is developed
with the ability to redefine the waves. This should only be done
by a medical professional who has great experience with ECG
analysis and interpretation. Therefore, users are strongly advised
against performing the function in this section unless under the
guidance of a medical professional.

34
Steps to redefine ECG waves:
1. ECG parameters will be calculated automatically.
2. If you click on the vertical bars on the ECG waveform, it will
change to a red bar. Use the left and right arrow key to move it.
The software will automatically recalculate the parameters.
3. Left click on the ECG waveform after you have finish adjusting
the bar.
3.5.9 Reading the Graph
The Y-axis represents voltage in mV. The bar indicated below
represents 1millivolt (mV). This denotes the electrical strength of
the signal. Therefore, each big square represent 0.5 mV and
each small square represent 0.1mV.
The X-axis represents time in seconds. Each big square
represents 0.2 seconds. Therefore, each small square
represents 0.04 seconds.

35
ECG graph
3.5.10 ECG Waves and Parameters
The following is a summary of the ECG wave morphologies and
parameters that users can use as a guide to interpret their ECG
recordings. For more technical information, please refer to the
reference section.
P wave: The P wave results from atria contraction. P wave
is generally about 1 box wide or 1 box tall. P wave that
exceeds these might indicate atria hypertrophy, i.e.,
enlargement.
PR Interval: The PR interval is measured from the start of
the P wave to the start of Q wave. It represents the
duration of atria depolarization. Normal duration is from
0.12 to 0.20 seconds. If the PR interval is greater than
0.20 seconds, then an AV block might be present.
QRS Duration: The QRS duration is measured from the
start of Q wave to the end of S wave. It represents the
1 bar
= 1mV
0.2 seconds

36
duration of ventricle depolarization. Normal duration is
from 0.08 ~ 0.12 seconds. If duration is longer, it might
indicate presence of bundle branch blocks.
QT/QTc: The QT/QTc is measured from the start of the Q
wave to the end of T wave. QT interval represents the
duration of activation and recovery of the ventricular
muscle. This duration varies inversely with the heart rate.
The normal QTc is approximately 0.41 seconds, it is
corrected with the heart rate with the following formula to get
QTC: QTC = QT / sqrt (RR)
RR is interval between R to R peak.
ST Segment: The ST segment is measured from end of S
wave, J point, to the start of T wave. This segment is
important in identifying pathology such as myocardial
infarction (elevation) and ischemia (depression).
To learn more about the analysis of ECG parameters, please refer
to the list of references provided in the Reference Section.

37
FREQUENTLY ASKED QUESTIONS
Q1: What is InstantCheck?
A1: InstantCheck is a handheld ECG monitor. The main function of
InstantCheck is to record ECG tracings anywhere and anytime. Users
only need to place both thumbs on the electrodes, and their ECG will
be recorded. The parameters measured will be displayed on the LCD
screen. Together with the software, users can transfer data files to PC
for analysis and management of data.
Q2: Why does “Noise” appear? Why does P wave sometimes disappear
during measurement?
A2: InstantCheck measures the micro-electrical activities emitted by the
heart. “Noise” means there is the interference with the recording of
these signals due to poor contact between the thumbs and the
electrodes, excessive movement of the body, and other strong
environment EMI (Electro Magnetic Interference) noise, etc.
No P-wave or small Lead I signal: Please try using Lead II by using the
external electrode cable and adhesive ECG pad. Please the red end on
right arm, and the blue end on left leg.
Q3: What are some of the factors that may affect the measurement by
InstantCheck?
A3: Besides the factors mentioned in Q2, the followings are some of the
factors that may also affect measurements:
a. Thumbs may be greasy, which may affect the transmission of
signals. Please use clean water to clean the thumbs first.
b. Thumbs may be too dry. Do NOT use cream. Please use external
auxiliary electrode cable & adhesive ECG electrode pads.
c. Contact pressure between the thumbs and the electrodes may be too
strong. Please place the thumbs on the electrodes GENTLY.
Even when users have followed the regular procedure described in the
User’s Manual to operate InstantCheck, the user may still experience a
weak signal. Please contact the distributor, retailer, or visit DailyCare
BioMedical Inc.’s website:http://www.dcbiomed.com

38
Q4: Why do you need to use auxiliary electrode cable? How do you use the
optional auxiliary electrodes?
A4: The auxiliary electrode cable is for users who cannot hold InstantCheck
steadily without shaking, or users whose thumbs are too dry, or if the
signals are too small using dry electrodes. For detailed instructions,
please follow the steps described in P.11 of the User’s Manual. Please
buy extra adhesive ECG electrode pads from a qualified medical device
store.
Q5: Can InstantCheck be stopped or powered off in the middle of the
measurement?
A5: During the 30 seconds measurement, InstantCheck can be stopped or
powered off. The measured data will be saved if you stop in the middle
of the measurement. If you power off the device in the middle of the
measurement, the data will not be saved.
Q6: Will static electricity affect the measurement of InstantCheck ?
A6: InstantCheck is CE certified and has passed electromagnetic
interference and compatibility tests. Under normal circumstances, static
electricity will not affect the operation of InstantCheck. However, strong
EMI (Electromagnetic Interference) may affect the operation of the
device.
Q7: How do you manage ECG signals if multiple people use a single
InstantCheck device?
A7: Data cannot be managed on the InstantCheck device directly. If there is
more than one user, please use the software provided for data
management.
Q8: Why does the temperature of InstantCheck rise after the batteries are
inserted?
A8: The rise in temperature is caused by the improper direction (polarities)
of the poles of the batteries when inserted. Please remove the batteries
quickly and then reinsert the batteries correctly. Please allow the
InstantCheck to drop to a normal operating temperature before making
any measurements.
Q9: Can the parameters measured by InstantCheck be used for clinical
diagnosis?

39
A9: The ECG tracings recorded by InstantCheck is not for clinical
diagnostic purposes. It is only to be used for physician’s reference, and
to be used for personal home care health management.
Q10: Why does the data recorded in the InstantCheck disappear after
batteries are replaced?
A10: Data will remain in the memory for approximately 2 minutes only during
battery replacement. Thus, please replace batteries as quickly as
possible to preserve data.
Q11: What is the maximum memory of InstantCheck hardware?
A11: InstantCheck can store up to 100 data files in its memory only. When
the 100 files limit is exceeded, InstantCheck has a looping memory and
will delete the oldest data and save the newest data. Please try to
transfer data files to the PC regularly. It is important to save all ECG
data for personal health management.
Q12: How do you transfer InstantCheck ’s ECG data files by internet?
A12: ECG report can be saved as JPG file using the software. You can send
the report as an attached file to your physician for reference, using your
regular email account.
Q13: How do you maintain InstantCheck?
A13: When the dry conduction electrodes on InstantCheck are used
regularly, grease and dirt may accumulate, which may affect the
recording of signal. Please use a clean wiping cloth to remove grease
and dirt. Please Do NOT use any cleaning solutions or organic solvents
to prevent damaging the device.
Q14: Can InstantCheck use other external power supply?
A14: NO. InstantCheck is to be operated by two replaceable 1.5V (AAA)
alkaline batteries. Please Do NOT use other external power supply
which may be hazardous and may damage the system and the device.
Q15: Can InstantCheck use accessories other than the ones provided in the
standard package?
A15: All standard package accessories meet special specifications of
medical device regulations. Please Do NOT use any other accessories
other than the ones provided in the standard package to avoid hazards
and subsequent damages to the device and to avoid hazards.

40
Q16: What to do if the parameters measured by InstantCheck Do NOT
correspond with the user’s condition?
A16: In case of an emergency physical condition, users should contact
emergency services immediately, or go report immediately to the
hospital. If the measured parameters Do NOT correspond with user’s
condition, please make sure all standard operating procedures are
followed. If not, please contact a physician for further check up.
Q17: Can any other fingers be used beside the thumbs for measurement of
ECG?
A17: You may use other fingers other than the thumbs for measurment using
InstantCheck. Please make sure you place the fingers gently on the
electrodes and Do NOT move and talk during measurement. You may
choose to use external electrode cable and ECG pads for better ECG
trace measurement.
Q18: Can InstantCheck be used while the user is standing up, sitting down,
or lying down? Will the measurements make any difference?
A18: Different body positions may affect the cardiac signals slightly.
However, by following the standard operating procedure closely,
InstantCheck is able to record ECG signals correctly.
Q19: After exercising, can ECG be measured using InstantCheck? Will the
measurement be correct?
A19: Yes, ECG can be recorded after exercise. During measurement, please
remain in a stable position to avoid noise interference.
Q20: Can InstantCheck be used during commuting?
A20: During commuting, if user is able to keep a stable position,
InstantCheck can be used to measure ECG. The usage of InstantCheck
is not recommended during the operation of any vehicle.
Q21: Can conducting gel or other fluids be used when using InstantCheck?
A21: InstantCheck is designed to be operated without any conducting gel or
other fluids. Please Do NOT apply any conducting gel or other fluids to
avoid damaging the thumb electrodes and the device.

41
GLOSSARY
Aorta
The main trunk of the systemic arteries, carrying blood from the left side of
the heart to the arteries of all limbs and organs except the lungs.
Arrhythmia
Irregularity in the heart rhythm.
Atrioventricular (AV) Node
A small mass of specialized cardiac conducting tissue, located in the wall of
the right atrium of the heart, that receives heartbeat impulses from the
sinoatrial node and directs them to the walls of the ventricles.
Bundle of His
A slender bundle of modified cardiac conducting tissue that passes from the
atrioventricular node in the right atrium to the right and left ventricles by way
of the septum and that maintains the normal sequence of the heartbeat by
conducting the wave of excitation from the right atrium to the ventricles
called also atrioventricular bundle, His bundle.
Electrocardiogram
The curve traced by an electrocardiograph.
Electrocardiograph
An instrument used in the detection of heart abnormalities. It measures
electrical potentials on the body surface and generates a record of the
electrical currents associated with heart muscle activity.
Heart Rate (HR)
The number of heartbeat per unit time, usually in minutes.
Hypertrophy
A non-tumorous enlargement of an organ or a tissue as a result of an
increase in the size rather than number of constituent cells.
Inferior Vena Cava
Large vein formed by the union of the two common iliac veins that receives
blood from the lower limbs and the pelvic and abdominal viscera and
empties into the right atrium of the heart.
Left Atrium
Top left chamber of the heart.

42
Left Ventricle
Bottom left chamber of the heart.
mm
One mm is one small square on the electrocardiograph.
Myocardial Infarction
Formation of an area of tissue that undergo necrosis as a result of
obstruction of local blood supply, as by a thrombus or embolus.
P Wave
Atrial Depolarization (contraction). Normal duration is 0.06 - 0.11 seconds.
Parameters
A distinguishing characteristic or feature.
PR Interval
Atrial and AV node depolarization. Regular duration is 0.12 - 0.20
seconds.
QRS Interval
Ventricular depolarization. Regular duration is no longer than 0.1 seconds.
QT Interval
Ventricular refractory time. Duration varies according to rate, age and sex.
Right Atrium
Top right chamber of the heart.
Right Ventricle
Bottom right chamber of the heart.
Right/Left Bundle Branch
Either of the parts of the bundle of His passing respectively to the right and
left ventricles.
Sinoatrial (SA) Node
A small mass of specialized cardiac muscle fibers located in the posterior
wall of the right atrium of the heart that acts as a pacemaker by generating
at regular intervals the electric impulses of the heartbeat.
ST Segment
ST segment represents the period from the end of ventricular depolarization

43
to the beginning of ventricular repolarization.
Superior Vena Cava
A large vein formed by the union of the two brachiocephalic veins and the
azygos vein that receives blood from the head, neck, upper limbs, and
chest, and empties into the right atrium of the heart.
T Wave
Ventricular Repolarization. Usually 0.5mV or less in Lead I, II and III.
REFERENCES
1. American Heart Association www.americanheart.org
2. National Heart, Lung and Blood Institute www.nhlbi.nih.gov
3. ECG Library www.ecglibrary.com
4. eMedicine www.emedicine.com
5. HeartCenterOnline www.heartcenteronline.com
6. Arrhythmia Alliance www.heartrhythmcharity.org.uk
CONTACT INFORMATION
Manufacturer:
DailyCare BioMedical Inc.
8F, 25-3, Ji-Lin Rd, Chungli 320, Taiwan, ROC
European Authorized Representative:
Obelis S.A.
Avenue de Tervueren 34 bte 44
B-1040 Brussels, Belgium
Tel: +32.(0)2.732.59.54 Fax: +32.(0)2.732.60.03
Website: www.obelis.net R40 V2.01 0000/ 000 00
ReadMyHeartHandheld ECG Monitor
INSTRUCTION MANUAL

I
IMPORTANT NOTICE
© 2009 DailyCare BioMedical, Inc. All rights reserved. No part
of this publication may be reproduced in any manner
whatsoever without written permission from the owner.
Proprietary rights of DailyCare BioMedical are involved with the
subject matter of this document and all manufacturing,
reproduction, use, and sales rights pertaining to such subject
matter are expressly reserved. The recipient, by accepting this
document, agrees that the information contained herein will not
be copied or reproduced in whole or in part, nor its contents
revealed in any manner or to any person, except to meet the
purpose for which this document was prepared and delivered
without the express permission of DailyCare Biomedical Inc.
MEDICAL DEVICE WARRANTY
DailyCare Biomedical Inc warrants each new device to be free
from defects in material and workmanship. This warranty is not
transferable. This warranty is effective for a continuous period
of one year from initial date of shipment against the original
order to the original purchaser. This warranty covers parts and
labor costs when, upon examination by the manufacturer, the
device is determined to be in fact defective. In order to
implement the provisions of warranty repair, the purchaser must
notify DailyCare Biomedical Inc concerning suspected defects
and then, if so instructed, ship the instrument to the designated
facility, correctly packed in an appropriate shipping container,
for examination and servicing. Hwww.dcbiomed.com H

II
LIMITATIONS AND EXCLUSIONS
This warranty does not cover repairs necessitated by any
damage to equipment caused by mishandling, neglect, abuse,
customer modification or failure of the user to follow the
published operating instructions. Repaired devices are
warranted for a period of 30 days and are subject to the
limitations and exclusions described in this document.
DailyCare Biomedical Inc reserves the right to make design
changes in its products without incurring the obligation to
incorporate these changes in products previously
delivered. This warranty applies unless DailyCare Biomedical
Inc has agreed to and provided a written exception to this
policy.

III
ATTENTION!
DailyCare Biomedical Inc assumes no responsibility for
any personal injuries or damages sustained by or through
use of this product.
ReadMyHeart™
will NOT tell you if you have heart problems. Only your
physician can do that. You should NOT interpret the
measurement results yourself.
is NOT a diagnostic device. It is only an ECG recorder.
is NOT a substitute for a traditional ECG diagnosis.
is NOT recommended for users with pacemakers.
What you should not do:
Do NOT operate ReadMyHeart while using other electrical
devices.
Do NOT connect ReadMyHeart to the PC via USB cable
when acquiring ECG.
Do NOT use accessories other than those provided by the
manufacturer. Do NOT use USB cable other than that
supplied by manufacturer.
Do NOT subject the device to water and liquid spillage. Do
NOT clean with alcohol, acetones or any other flammable
chemical agents. Do NOT use with any lotions.
Do NOT place the device and its accessories under direct
sunlight and harsh environments.
Do NOT disassemble ReadMyHeart. It may cause device
malfunction, device failure or damage and you will loose
all warranty.

IV
ATTENTION!
Please use the device properly by following standard
operating procedure. (Please refer to Section 2.2 Page 9)
Improper use of the device will cause inaccurate
representation of measured results. NOISE indicator may
appear if the device is not operated correctly. If you
readings are NOT within the reference range, multiple
readings are recommended.
As a rule, if you are feeling uncomfortable, regardless of
the numbers and symbols on the device, please consult
your physicians immediately!

V
Table of Contents
IMPORTANT NOTICE ................................................................. I
MEDICAL DEVICE WARRANTY ................................................ I
LIMITATIONS AND EXCLUSIONS ............................................ II
ATTENTION! ............................................................................. III
INTRODUCTION ........................................................................ 1
1.1 WHAT IS READMYHEART™ ................................................... 1
1.2 BENEFITS OF READMYHEART™ ............................................ 2
1.3 ECG VARIABLES ................................................................... 3
1.4 COMMON CAUSES OF ABNORMAL ECG TRACINGS ................. 4
1.5 BASIC FUNCTION OF THE HEART ............................................ 4
1.6 CONDUCTION SYSTEM OF THE HEART .................................... 5
PRODUCT DESCRIPTION ......................................................... 6
2.1 PRODUCT DESIGN ................................................................. 6
2.1.1 Main Unit ...................................................................... 6
2.1.2 Control Buttons ............................................................ 7
2.1.3 Product Package ......................................................... 8
2.1.4 Product Label ............................................................... 8
2.2 TAKING A MEASUREMENT ...................................................... 9
2.2.1 Dry Thumb Conduction Electrodes .............................. 9
2.2.2 Optional External Electrode Cable ............................. 10
2.3 DISPLAY PANEL .................................................................... 11
2.3.1 LCD Display ................................................................ 11
2.3.2 LCD Display Description ............................................ 12

VI
2.4 PRODUCT SPECIFICATIONS................................................... 13
READMYHEART SOFTWARE ................................................. 14
3.1 SYSTEM REQUIREMENTS ..................................................... 14
3.2 INSTALLATION ...................................................................... 14
3.3 TRANSMIT DATA ................................................................... 15
3.4 SOFTWARE INTERFACE ........................................................ 18
3.5 USER MANAGEMENT ............................................................ 19
3.5.1 Add a New User.......................................................... 20
3.5.2 Display or Change User’s Information ........................ 21
3.5.3 Search for User .......................................................... 22
3.5.4 Move ECG file to other User folder ............................ 22
3.5.5 Delete, E-mail, Save, Preview and Print a File ........... 23
3.5.6 Set report header ........................................................ 23
3.5.7 Review ECG Trace and Parameters .......................... 25
3.5.8 Redefine ECG Parameters ......................................... 26
3.5.9 Reading the Graph ..................................................... 27
3.5.10 ECG Waves and Parameters ................................... 28
FREQUENTLY ASKED QUESTIONS ....................................... 30
GLOSSARY ............................................................................... 34
REFERENCES .......................................................................... 36
CONTACT INFORMATION ....................................................... 37

1
INTRODUCTION
1.1 What is ReadMyHeart
ReadMyHeart is a non-invasive, handheld heart monitoring
device. It allows users to measure and record electrical activities
of the heart anywhere and anytime. It records and displays
real-time electrocardiogram (ECG).
Electrical signals of the heart can be obtained using two methods.
The first method is by placing thumbs on ReadMyHeart’s specially
designed dry conducting electrodes. The second method is by
using external electrode cable and adhesive ECG electrode pads.
ReadMyHeart records 25 seconds of “Modified ECG signal” F
1F for
each measurement. After measurement, the device will instantly
display the average of 3 parameters on the LCD panel: the
average heart rate (HR), ST segment deviation (ST) and QRS
interval (QRS). These parameters are not the traditional
standard ECG readings, but rather, a “Modified Lead I -ECG”F
2F.
ReadMyHeart can transfer all recorded measurements to a
personal computer through USB connection for management and
analysis of ECG data.
1 ReadMyHeart uses two conducting electrodes to measure cardiac activities, unlike
traditional ECG device which requires at least 3 electrodes. ECG measured by
ReadMyHeart is designated as a modified Lead I ECG. 2 These parameters from ReadMyHeart are for reference only. For interpretation of the
parameters, please consult professional physicians. Additional standard 12 lead ECG
test may need to be performed.

2
1.2 Benefits of ReadMyHeart
ReadMyHeart is a recording device used to monitor or spot-check
the electrical activities of the heart anytime and anywhere. It is
designed to be small, portable and easy to use. With
ReadMyHeart you can:
The New Vital Sign
ReadMyHeart enables qualified medical personnel to
quickly spot-check for irregular heart beat during primary
assessment.
Take measurements anytime anywhere
ReadMyHeart’s compact design allows the user to carry the
device anywhere, anytime for periodic monitoring of his/her
heart throughout the day.
Manage ECG recordings over time
ReadMyHeart software allows users to manage ECG
recording with a time stamped record.
Patient to Physician
Data generated by the ReadMyHeart can be printed, faxed,
or emailed using the accompanying software. The
ReadMyHeart also stores up to 30 records

3
1.3 ECG Variables
Figure 1. Normal ECG Waveform (Lead I)
Figure 1 is a presentation of a normal ECG waveform from Lead I.
ReadMyHeart uses patented algorithms to identify and compute
parameters in the table listed below. Table 1 is a list of ECG
parameters measured by ReadMyHeart.
Table 1 ReadMyHeart Output Parameters
Parameters Reference Range
Average Heart Rate (HR)* 60 < HR <100 bpm
ST Segment (ST)* -2 < ST < +2 mm
QRS Interval (QRS)* 0.08 sec < QRS < 0.12 sec
PR Interval 0.12 ~ 0.20 sec
QT/QTC 0.32 ~ 0.44 sec / 0 .41 ~ 0.44 sec
* The hardware only shows HR, ST and QRS. The PR and QT/QTc will
be provided in analysis software (provided) on your computer.

4
1.4 Common Causes of Abnormal ECG Tracings
Abnormal ECG tracings may be caused by many different factors,
including:
Coronary artery disease
Electrolyte imbalances in your blood (such as sodium or
potassium)
Changes in your heart muscle
Injury from a heart attack
Healing process after heart surgery
Please consult your physician if you are concerned about your
ECG recording and symptoms to get more information about your
condition.
1.5 Basic Function of the Heart
The heart has 4 chambers that act together to pump blood
throughout the body. The 2 smaller upper chambers are called
atria, and the larger lower chambers are called ventricles. The
right atrium receives oxygen-depleted blood coming back from
the body via 2 large veins: the superior vena cava and inferior
vena cava. The right atrium pumps this blood into the right
ventricle, which then pumps the blood into the lungs, which is
oxygenated. The blood then comes back into the left atrium,
which is then pumped into the left ventricle. The left ventricle
then pumps the blood back to the circulatory system via the aorta,
the largest artery in the body. The pressure that the left ventricle
exerts to keep the blood moving throughout the whole body is the
blood pressure.

5
1.6 Conduction System of the Heart
The chambers of the heart pump with the automatic discharge of
electricity from the sinoatrial (SA) node, a group of specialized
cells in the right atrium. On average, there are 60 to 100 times
discharges per minute. When the SA node discharges, both
atria contract, and the electrical impulse is relayed to the
atrioventricular (AV) node that is between the 2 ventricles. The
electrical wave that is propagated across the AV node causes
both ventricles to contract and pump blood. The normal delay
between the atrium and ventricle contractions is 0.12 to 0.20
seconds. By studying the electrical activity that results when
heart muscle cells contract, we gain insight to the health and
workings of the heart. These electrical activities can be detected,
recorded and studied with ECG monitoring device, for example
ReadMyHeart.

6
PRODUCT DESCRIPTION
2.1 Product Design
2.1.1 Main Unit
Front Cover
Right Thumb Electrode
LCD Display
On/Off/Start Button
Data Recall Button
Data Transfer Button
Time setting
Left Thumb Electrode
Sliding Socket Cover
External Auxiliary Electrode Socket
USB Cable Socket
Product Label
Battery cover

7
2.1.2 Control Buttons
Control Button Descriptions
Note: Only use USB cable provided by manufacturer. Other
USB cables will cause serious damage to device. Please visit: www.InstantCheck.com to re-order USB cable.
Buttons Descriptions
(Button 1)
On / Off / Start Button
~Press once to power on and start measurement.
~Hold for 3 seconds to power off.
~After measuring, press again to start another
measurement.
(Button 2)
Data Recall button / Data Clearance
~Press once to enter data recall mode. The latest data
recorded will be displayed.
~Press again to recall other recorded data, starting from
the first.
~Hold for 3 seconds, or press any other button, to leave
data recall mode.
~Hold and together for 3 seconds to manually
clear all stored data.
(Button 3)
Data Transfer Button / Data Clearance
~Connect ReadMyHeart to PC with USB cable and
press once to start transferring of stored data.
~Hold and together for 3 seconds to manually
clear all stored data.
(Hidden
Button)
Time Setting
~When the device is on, press once to set the right time.
~Press Button 2 to select month/date/time.
~Press Button 3 to adjust value.

8
2.1.3 Product Package
Standard Package:
ReadMyHeart device X 1
ReadMyHeart Software CD X 1
ReadMyHeart User’s Manual X 1
Carrying Case X 1
USB Cable X 1
Auxiliary Electrode Cable X 1
Not Included:
1) Electrode gel pad. These pads can be purchased at local drug
stores.
2) AAA alkaline battery. ReadMyHeart needs two to operate.
2.1.4 Product Label
ReadMyHeart is TYPE B EQUIPMENT WITH F-TYPE APPLIED PART
IN EN IEC60601-1 STANDARD
Attention, consult
ACCOMPANYING
DOCUMENT
TYPE BF APPLIED PART
CERTIFIED CE
MARKING, NOTIFIED
BODY NO. 0197
PRODUCT BATCH
NO.

9
2.2 Taking a Measurement
2.2.1 Dry Thumb Conduction Electrodes
Steps Descriptions
1 Wash and dry your hands before use.
2 Sit down and place your hands comfortably on a table or on your laps. Hold ReadMyHeart
in your hands steadily. Calm
and relax yourself with regular breathing.
3
Press once and place right and left thumbs gently on the conduction electrodes to start measurement.
- During measurement, a timer will be displayed at the right bottom corner of LCD screen.
- During the 25 seconds of measurement, avoid talking and keep a steady but gentle contact of the thumbs to the conduction electrodes.
- ReadMyHeart can store up to a maximum of 30 data files. The device will stop recording. If you want to do the next measurement, you need to transfer data to PC, or erase the memory. Record number will start to flash at 26th data files to remind you that memory is almost full.
- Three parameters of the measured results will be displayed on the LCD screen. To start another measurement, simply press again. Please note that ReadMyHeart
cannot be powered off during
recording.
Open the cover of
ReadMyHeart.
Press once to start
measuring. (Allow 30 memories)
LCD screen will display the parameters after measurement.

10
4
Hold for 3 seconds to power off the device. ReadMyHeart will be powered off automatically if left idle for more than 2 minutes to save power.
2.2.2 Optional External Electrode Cable
ReadMyHeart has optional auxiliary electrodes as an alternative
way for users to take ECG readings. Please follow the steps
below when using the auxiliary electrodes:
Steps Descriptions
1
Place the sticky electrode pad (not included) on the middle of the inner forearms.
(Users can buy qualified electrode pads from any medical device stores.)
2
Slide the socket cover to expose the
optional electrode socket, and connect
the cable to ReadMyHeart accordingly.
Please connect the RED electrode on
the right arm and the BLUE electrode
on the left arm as shown in figure on
the right.
3 Start the measurement as described above. (Section 2.2.1)
NOTE: Both auxiliary electrode and USB sockets on the device
are to be used only with the standard accessories provided. Warranty will NOT cover damages that result from failure to comply with these instructions.

11
2.3 Display Panel
2.3.1 LCD Display
Figure 2. LCD Display Panel
Reference Range of Measured Results
Reference Range Warning Sign
HR 60 < HR<100 bpm Flash
ST -2 < ST<+2 mm Flash
QRS 0.08 < QRS<0.12 sec Flash
Attention: The information above is for reference ONLY. If the
measured parameters fall within the reference range
and user feels any discomfort, user should contact a
physician. Measured data by RMH may be provided
to a physician for reference, monitoring, or further
analysis.

12
2.3.2 LCD Display Description
# Item Descriptions
Displays when ReadMyHeart is searching for
signals. (Takes around 3~5 seconds)
Flashes when measurement is in progress. Flashing stops when measurement is completed.
Displays when ReadMyHeart is in data recall
mode.
Displays when ReadMyHeart is transferring data.
Total Number/ Data File Number
During power on mode, the number represents the total number of data files recorded. In data recall mode, the number represents the serial number of data file being displayed.
Battery
Condition indicates the battery is normal.
indicates the battery is low.
is displayed after measurement when noisy signals are detected more than 5 times during measurement. PLEASE MEASURE AGAIN.
Note: Under above conditions, parameters
displayed on LCD may not be accurate but will still be stored in the device.
HR Average Heart Rate of 15 seconds. Flashes right after measurement when the numbers are out of reference range.
ST ST segment. Flashes right after measurement when the numbers are out of reference range.
QRS QRS interval. Flashes right after measurement when the numbers are out of reference range.
Date/Time Month/Day/Hour/Minute

13
2.4 Product Specifications
Input impedance > 10 M - Ohm
Input dynamic range +/- 2 mV
Bandwidth 0.15 – 40 Hz
CMRR
(Common Mode Rejection Ration) > 60 db
A/D conversion 12 bit
Sampling frequency 250 samples/sec
Measurement Time ~25 seconds (First 10 seconds is to search for signals)
Display LCD display panel
Input Dry conduction electrodes and/or external auxiliary electrodes
Output USB interface
Power Supply 1.5V (AAA) X 2
Size 12 × 8 × 2 cm
Weight 134 g (Not including batteries)
Environmental Conditions:
Storage temperature -4°F ~122°F (-20°C~ 50°C)
Operating temperature 50°F ~104°F (10°C ~ 40°C)
Humidity 25% ~ 95%
Measurement Range:
Average heart rate 45 to 180 bpm
ST segment -3 to +3 mm
QRS interval < 0.20 sec
14
ReadMyHeart SOFTWARE
3.1 System Requirements
Operating System: Windows 98/98SE/2000/XP/Vista
Hardware Requirements:
CPU: Pentium III and above
Memory: 100MB and above
Hard Disk capacity: 100MB and above
Data transmission media: Universal Serial Bus (USB)
Screen resolution: 1024 x 768
3.2 Installation
Figure 3. ReadMyHeart Software Main Page
Insert ReadMyHeart software CD into the CD-ROM. Select
“Software Installation” from the main page and setup will run
automatically. If auto-installation does not start, double click on
the “autorun.exe” application file in the CD to install manually.
Follow the Setup Wizard instruction on the screen.

15
3.3 Transmit Data
All data files recorded in ReadMyHeart can be transferred to PC
for analysis through the USB port on the left side of ReadMyHeart
shown in below. Slide the socket cover to expose the USB socket.
ReadMyHeart USB port
Steps for file transfer. Please follow the following steps:
1. Start the ReadMyHeart software by selecting DailyCare
Biomedical Inc ReadMyHeart from the File Menu or by
clicking on the on your desktop.
2. A “Disconnected” status will be shown initially on the bottom
left of the main menu.
Connect one end of the USB cable (small) to the USB socket
on the hardware first (A). Then connect the other end of the
USB port
Only use USB cable
provided by
manufacturer to
transmit data.
16
USB cable to the USB port on the computer (B).
Connection of USB Cable
3. When the USB connection detected, it will be indicated on the
bottom left corner of the software screen.
Send
(A)
(B)
Only use USB cable provided by manufacturer to transmit data.

17
4. Press on ReadMyHeart and will appear on the
LCD display, indicating a transfer of the data files to the PC.
The number below is the serial number of the data files
currently downloading to the PC. A transmission window will
appear on the PC to show data transmission in progress as
shown below.
Data Transmission Progress Window
Note: Please confirm/select the right user before the
transmitted data save to the PC. The user confirm window
shown as below.
Note: After data files have been successfully transferred to the
PC and when you start your next measurement, ReadMyHeart
hardware will erase its memory automatically.
Data Transmission
Status

18
Note: The default file name is the time-stamp of the reading. By
clicking the selected file name, the user can change the name.
Note: If flashes after pressing or during file transfer,
it means the connection between ReadMyHeart and the PC
has failed. Please close and then re-start the software again,
and/or reconnect the USB cable.
3.4 Software Interface
Figure 4. ReadMyHeart Software and Database Interface Details
4
2
3
1

19
ReadMyHeart has a simple analysis interface as shown in Figure
4. This analysis and database management system is divided
into four main parts:
(1) User and file management;
(2) Average ECG parameters display and remarks;
(3) Connection status of ReadMyHeart to PC;
(4) ECG waveform diaplay (Maximum of 15 seconds).
3.5 User Management
Function Keys Description
Add a new user
Display and change user’s
information
Delete selected user
Search for user
Move ECG file to other user folder
Delete selected file
User management
File Management

20
Email ECG data
Save ECG waveform as graphic file
Preview ECG report for printing
Print ECG report
View between 10mm/mV or
20mm/mV
Set report’s header
Detailed descriptions of Function Keys are as follows:
3.5.1 Add a New User
1. To add a new user, click on function key. The “Create
new user” window will appear as shown below.
2. Enter user information such as name, sex, ID, weight, date of
birth (DOB) and height.
3. Click on Add and a new user will be added to the user
information list. Name of user must be keyed. Otherwise, a

21
warning window will appear.
4. Repeat step 1 and 2 to add more new users.
5. Click on X to close the user management window.
3.5.2 Display or Change User’s Information
1. Select a file/user first.
2. Select function key. The user’s information will appear as
shown below.
You can modify the values on the table after click Modify .
Then click Save , all the modified values will be saved
automatically. Click Exit , The values will NOT be changed.
Step 1
Step 2
Step 3

22
3.5.3 Search for User
1. Select function key. A window will appear. You can search
by “User Name” or by “ID”. Please type in your search
characters in the String field.
2. Select Find to start finding. If the user is found, the name
will be highlighted.
3.5.4 Move ECG file to other User folder
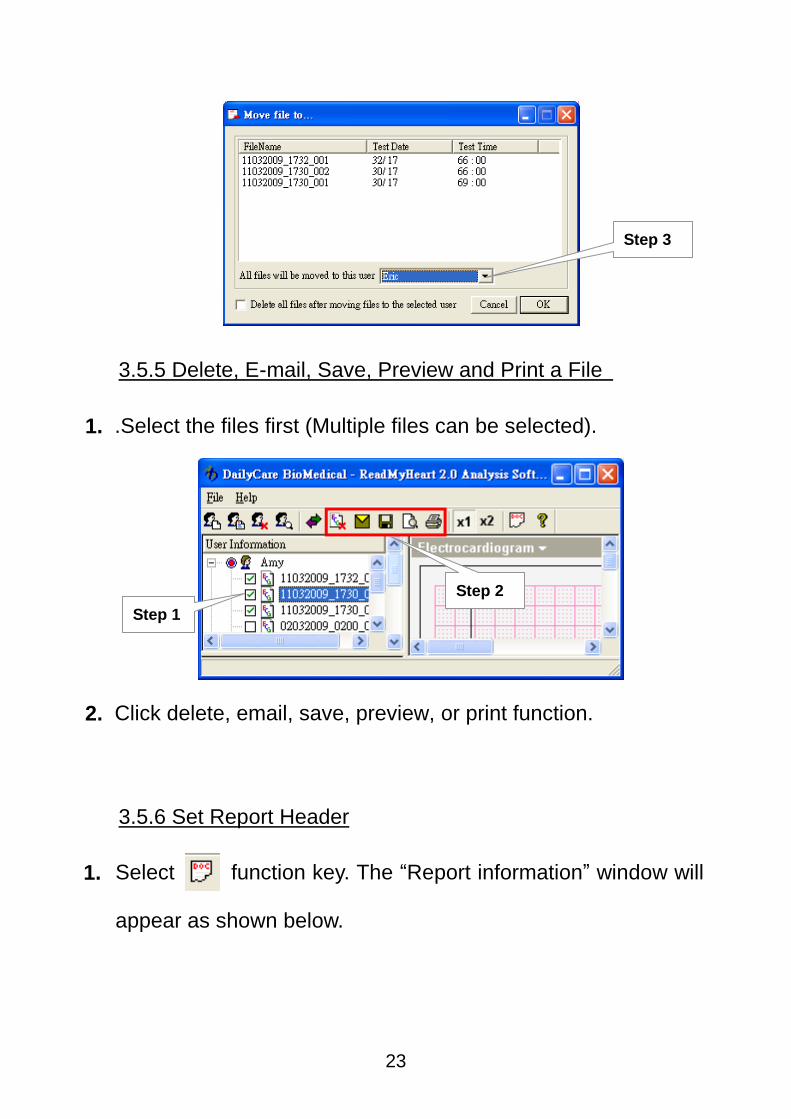
1. Select the files first (Multiple files can be selected).
2. Click function key. A window will appear. You can move
the selected ECG file to other user.
Step 1 Step 2
23
3.5.5 Delete, E-mail, Save, Preview and Print a File
1. .Select the files first (Multiple files can be selected).
2. Click delete, email, save, preview, or print function.
3.5.6 Set Report Header
1. Select function key. The “Report information” window will
appear as shown below.
Step 3
Step 1
Step 2

24
2. Enter header information. Click on Save , and the header
information will show on the top of the ECG report.

25
3.5.7 Review ECG Trace and Parameters
1. Select a user and click on a file.
2. A 15 seconds ECG trace will be shown on the right side of the
screen in quadrant 1. (Q1)
NOTE: If you stop ECG measurement in less than 25 seconds,
you will not have the full 15 seconds ECG trace.
3. The average ECG parameters (HR, PR, QRS, QT, QTc, ST)
will be displayed in quadrant 2. (Q2)
4. You can also select a particular section of the ECG trace, by
Q1
Q2

26
clicking left click once to start and left click again to end the
section in Q1. The selected part of the trace will turn blue. The
average ECG parameters will be displayed in Q2 accordingly.
3.5.8 Redefine ECG Parameters
This section is highly recommended for doctors only. The
power of the device lies in the algorithm which identifies and
defines P, Q, R, S and T wave intervals to generate the
parameters observed on the file. The algorithm is highly precise
and accurate which is observed in a correlation study with
standard ECG device.
In order to present a flexible format, the software is developed
with the ability to redefine the waves. This should only be done
by a medical professional who has great experience with ECG
analysis and interpretation. Therefore, users are strongly
advised against performing the function in this section unless
under the guidance of a medical professional.

27
Steps to redefine ECG waves:
1. ECG parameters will be calculated automatically.
2. If you click on the vertical bars on the ECG waveform, it will
change to a red bar. Use the left and right arrow key to
move it. The software will automatically recalculate the
parameters.
3. Left click on the ECG waveform after you have finish
adjusting the bar.
3.5.9 Reading the Graph
The Y-axis represents voltage in mV. The bar indicated
below represents 1millivolt (mV). This denotes the electrical
strength of the signal. Therefore, each big square represent
0.5 mV and each small square represent 0.1mV.
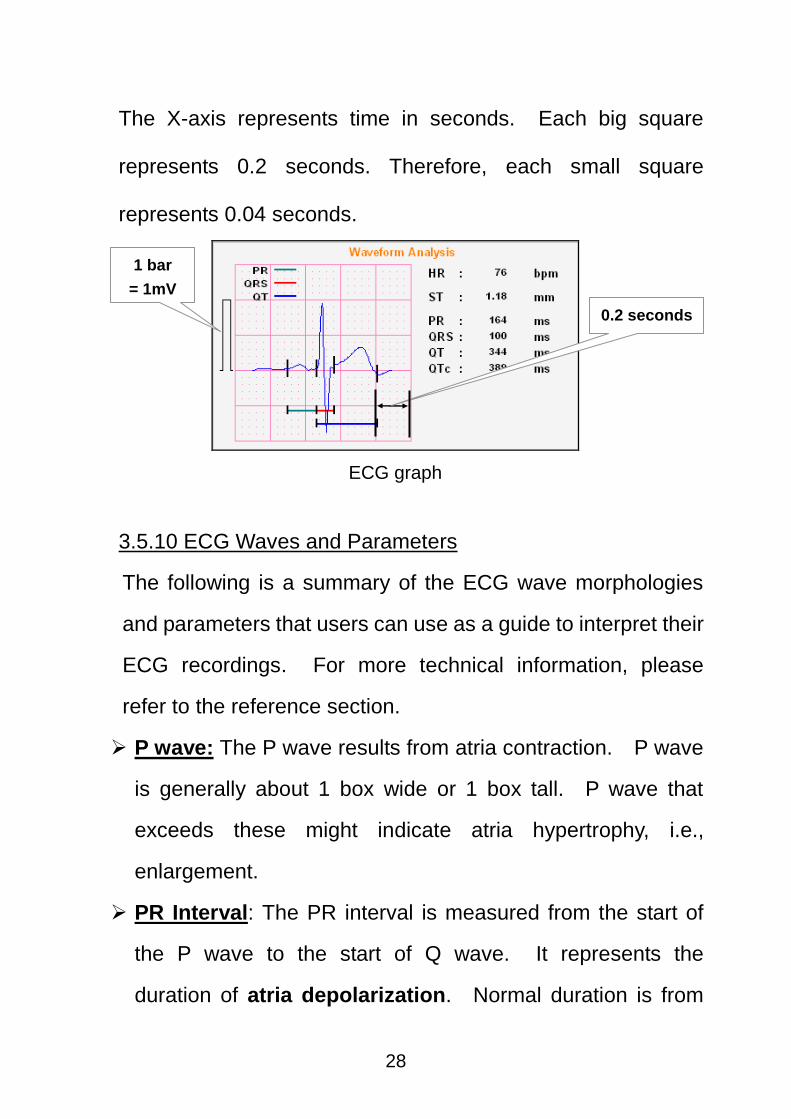
28
The X-axis represents time in seconds. Each big square
represents 0.2 seconds. Therefore, each small square
represents 0.04 seconds.
ECG graph
3.5.10 ECG Waves and Parameters
The following is a summary of the ECG wave morphologies
and parameters that users can use as a guide to interpret their
ECG recordings. For more technical information, please
refer to the reference section.
P wave: The P wave results from atria contraction. P wave
is generally about 1 box wide or 1 box tall. P wave that
exceeds these might indicate atria hypertrophy, i.e.,
enlargement.
PR Interval: The PR interval is measured from the start of
the P wave to the start of Q wave. It represents the
duration of atria depolarization. Normal duration is from
1 bar
= 1mV
0.2 seconds

29
0.12 to 0.20 seconds. If the PR interval is greater than
0.20 seconds, then an AV block might be present.
QRS Duration: The QRS duration is measured from the
start of Q wave to the end of S wave. It represents the
duration of ventricle depolarization. Normal duration is
from 0.08 ~ 0.12 seconds. If duration is longer, it might
indicate presence of bundle branch blocks.
QT/QTc: The QT/QTc is measured from the start of the Q
wave to the end of T wave. QT interval represents the
duration of activation and recovery of the ventricular
muscle. This duration varies inversely with the heart rate.
The normal QTc is approximately 0.41 seconds, it is
corrected with the heart rate with the following formula to get
QTC: QTC = QT / sqrt (RR)
RR is interval between R to R peak.
ST Segment: The ST segment is measured from end of S
wave, J point, to the start of T wave. This segment is
important in identifying pathology such as myocardial
infarction (elevation) and ischemia (depression).
To learn more about the analysis of ECG parameters, please refer
to the list of references provided in the Reference Section.

30
FREQUENTLY ASKED QUESTIONS
Q1: What is ReadMyHeart?
A1: ReadMyHeart is a personalized, home care heart monitoring device.
The main function of ReadMyHeart is to record ECG tracings anywhere
and anytime. Using uniquely designed dry electrodes, users only need
to place both thumbs on the electrodes, and their ECG will be recorded.
The parameters measured will be displayed on the LCD screen.
Together with the software, users can transfer data files to PC for the
management of data.
Q2: Why does “Noise” appear during measurement?
A2: ReadMyHeart measures the electrical activities emitted by the heart.
The “Noise” is the interference with the recording of these signals due
to poor contact between the thumbs and the electrodes, excessive
movement of the body, and other the environment, etc. When using
ReadMyHeart, it is recommended that users take a stable sitting
position, with their feet insulated from the ground. Please measure
again when “Noise” appears on LCD screen after the device finishes
recording. For detailed operating procedure, please refer to P.9 of the
User’s Manual.
Q3: What are some of the factors that may affect the measurement by
ReadMyHeart?
A3: Besides the factors mentioned in Q2, the followings are some of the
factors that may also affect measurements:
1. Thumbs may be greasy, which may affect the transmission of
signals. Please use clean water to clean thumbs.
2. Thumbs may be too dry. DO NOT use cream. Please use external
auxiliary electrode cable & sticky electrode pad.
3. Contact pressure between the thumbs and the electrodes may be
too strong. Please place thumbs on the electrodes gently.
Even when users have followed the regular procedure described in the
User’s Manual to operate ReadMyHeart, the user may still experience a
weak signal. Please contact the distributor, retailer, or visit DailyCare
BioMedical’s website: Hwww.dcbiomed.comH.

31
Q4: How do you use the optional auxiliary electrodes?
A4: The optional auxiliary electrodes are for users who cannot hold
ReadMyHeart steadily without shaking, or users whose thumbs are too
dry. For detailed instructions, please follow the steps described in
P.10 of the User’s Manual. Please note that the electrode pads are NOT
included. Please buy the electrode pads from a medical device store.
Q5: Can ReadMyHeart be stopped or powered off in the middle of the
measurement?
A5: During the 25 seconds measurement, ReadMyHeart cannot be stopped
or powered off.
Q6: Will static electricity affect the measurement of ReadMyHeart?
A6: ReadMyHeart is CE certified and has passed electromagnetic
interference and compatibility tests. Under normal circumstances, static
electricity will not affect the operation of ReadMyHeart.
Q7: How do you manage ECG signals if multiple people use a single
ReadMyHeart device?
A7: Data cannot be managed on the ReadMyHeart device directly. If there
is more than one user, please use the software provided for data
management. For detailed information, please refer to the User’s
Manual.
Q8: Why does the temperature of ReadMyHeart rise after the batteries are
inserted?
A8: The rise in temperature is caused by the improper direction of the poles
of the batteries when inserted. Please remove the batteries quickly and
then reinsert the batteries correctly. Please allow the ReadMyHeart to
drop to a normal operating temperature before making any
measurements.
Q9: Can the parameters measured by ReadMyHeart be used for clinical
diagnosis?
A9: The ECG tracings recorded by ReadMyHeart is not for clinical
diagnostic purposes. It is only to be used for physician’s reference, and
to be used for personal home care health management.

32
Q10: Why does the data recorded in the ReadMyHeart disappear after
batteries are replaced?
A10: Data will remain in the memory for approximately 2 minutes only during
battery replacement. Thus, please replace batteries as quickly as
possible to preserve data.
Q11: Why does the transferred files to PC and the number of times
measured on ReadMyHeart not match?
A11: ReadMyHeart can store up to 30 data files in its memory only. Please
remember to transfer data files to the PC, or erase the memory, if you
want to make the next measurement. This is to make sure that you
record and transfer all important ECG data to the PC for health
management.
Q12: How do you transfer ReadMyHeart’s ECG data files by internet?
A12: User needs to SAVE the data files first using ReadMyHeart’s exclusive
software before sending the files by e-mail. For the detailed
procedures, please refer to the software instruction manual (P.23).
Q13: How do you maintain ReadMyHeart?
A13: When the dry conduction electrodes on ReadMyHeart are used
regularly, grease and dirt may accumulate, which may affect the
recording of signal. Please use a clean wiping cloth to remove grease
and dirt. Please DO NOT use any cleaning solutions or organic solvents
to prevent damaging the device.
Q14: Can ReadMyHeart use other external power supply?
A14: No. ReadMyHeart is to be operated by two replaceable 1.5V (AAA)
alkaline batteries. Please do not use other external power supply which
may be hazardous and may damage the device.
Q15: Can ReadMyHeart use accessories other than the ones provided in the
standard package?
A15: All standard package accessories meet special specifications of
medical device regulations. Please DO NOT use any other accessories
other than the ones provided in the standard package to avoid hazards
and subsequent damages to the device and to avoid hazards.

33
Q16: What to do if the parameters measured by ReadMyHeart do not
correspond with the user’s condition?
A16: In case of an emergency physical condition, users should contact
emergency services immediately, or go report immediately to the
hospital. If the measured parameters do not correspond with user’s
condition, please make sure all standard operating procedures are
followed. If not, please contact a physician for further check up.
Q17: Can any other fingers be used beside the thumbs for measurement of
ECG?
A17: You may use other fingers other than the thumbs for measurment using
ReadMyHeart. Please make sure you place the fingers gently on the
electrodes and Do NOT move and talk during measurement. You may
choose to use external electrode cable and ECG pads for better ECG
trace measurement.
Q18: Can ReadMyHeart be used while the user is standing up, sitting down,
or lying down? Will the measurements make any difference?
A18: Different body positions may affect the cardiac signals slightly.
However, by following the standard operating procedure closely,
ReadMyHeart is able to record ECG signals correctly.
Q19: After exercising, can ECG be measured using ReadMyHeart? Wiill the
measurement be correct?
A19: Yes, ECG can be recorded after exercise. During measurement, please
remain in a stable position to avoid noise interference.
Q20: Can ReadMyHeart be used during commuting?
A20: During commuting, if user is able to keep a stable position,
ReadMyHeart can be used to measure ECG. Usage of ReadMyHeart is
not recommended during the operation of any vehicle.
Q21: Can conducting gel or other fluids be used when using ReadMyHeart?
A21: ReadMyHeart is designed to be operated without any conducting gel or
other fluids. Please do not apply any conducting gel or other fluids to
avoid damaging the thumb electrodes and the device.

34
GLOSSARY
Aorta
The main trunk of the systemic arteries, carrying blood from the left side of
the heart to the arteries of all limbs and organs except the lungs.
Arrhythmia
Irregularity in the force or rhythm of the heart beat.
Atrioventricular (AV) Node
A small mass of specialized cardiac muscle fibers, located in the wall of the
right atrium of the heart, that receives heartbeat impulses from the
sinoatrial node and directs them to the walls of the ventricles.
Bundle of His
A slender bundle of modified cardiac muscle that passes from the
atrioventricular node in the right atrium to the right and left ventricles by
way of the septum and that maintains the normal sequence of the
heartbeat by conducting the wave of excitation from the right atrium to the
ventricles called also atrioventricular bundle, His bundle.
Electrocardiogram
The curve traced by an electrocardiograph.
Electrocardiograph
An instrument used in the detection of heart abnormalities. It measures
electrical potentials on the body surface and generates a record of the
electrical currents associated with heart muscle activity.
Heart Rate (HR)
The number of heartbeat per unit time, usually in minutes.
Hypertrophy
A non-tumorous enlargement of an organ or a tissue as a result of an
increase in the size rather than number of constituent cells.
Inferior Vena Cava
Large vein formed by the union of the two common iliac veins that receives

35
blood from the lower limbs and the pelvic and abdominal viscera and
empties into the right atrium of the heart.
Left Atrium
Top left chamber of the heart.
Left Ventricle
Bottom left chamber of the heart.
mm
One mm is one small square on the electrocardiograph.
Myocardial Infarction
Formation of an area of tissue that undergo necrosis as a result of
obstruction of local blood supply, as by a thrombus or embolus.
P Wave
Atrial Depolarization (contraction). Normal duration is 0.06 - 0.11 second.
Parameters
A distinguishing characteristic or feature.
PR Interval
Atrial and AV node depolarization. Regular duration is 0.12 - 0.20
seconds.
QRS Interval
Ventricular depolarization. Regular duration is no longer than 0.1 second.
QT Interval
Ventricular refractory time. Duration varies according to rate, age and
sex.
Right Atrium
Top right chamber of the heart.
Right Ventricle
Bottom right chamber of the heart.

36
Right/Left Bundle Branch
Either of the parts of the bundle of His passing respectively to the right and
left ventricles.
Sinoatrial (SA) Node
A small mass of specialized cardiac muscle fibers located in the posterior
wall of the right atrium of the heart that acts as a pacemaker by generating
at regular intervals the electric impulses of the heartbeat.
ST Segment
ST segment represents the period from the end of ventricular
depolarization to the beginning of ventricular repolarization.
Superior Vena Cava
A large vein formed by the union of the two brachiocephalic veins and the
azygos vein that receives blood from the head, neck, upper limbs, and
chest, and empties into the right atrium of the heart.
T Wave
Ventricular Repolarization. Usually 0.5mV or less in Lead I, II and III.
REFERENCES
1. American Heart Association Hwww.americanheart.org H
2. National Heart, Lung and Blood Institute Hwww.nhlbi.nih.govH
3. ECG Library Hwww.ecglibrary.com H
4. eMedicine Hwww.emedicine.com H
5. HeartCenterOnline www.heartcenteronline.com

37
CONTACT INFORMATION
Manufacturer:
DailyCare BioMedical Inc.
8F, 25-3, Ji-Lin Rd, Chungli 320, Taiwan, ROC
Website: www.dcbiomed.com
European Authorized Representative:
Obelis S.A.
Avenue de Tervueren 34 bte 44
B-1040 Brussels, Belgium
Tel: +32.(0)2.732.59.54 Fax: +32.(0)2.732.60.03
Website: Hwww.obelis.net H

38
59-0R20-0121 A6