instruction manual bcs - amazon web...
TRANSCRIPT

Instruction Manual
AMX AutoPatch Communication Protocol
BCS(Basic Control Structure)
Protocol
REV J: 02/06/2013

Contents
iInstruction Manual – BCS Basic Control Structure Protocol
ContentsIntroduction to BCS.............................................................................................1
Overview ................................................................................................................................. 1
Command String Formats........................................................................................................ 1
General Rules for Using BCS Commands................................................................................. 2
Generating BCS Commands .................................................................................................... 3
BCS Command Tables ............................................................................................................. 4
Command String Responses .................................................................................................... 5
Executing Switches..............................................................................................6Disconnecting Switches .......................................................................................7Verifying Signal Status ........................................................................................8Executing Presets ..............................................................................................10
Presets Overview................................................................................................................... 10
Local Presets.......................................................................................................................... 10
Global Presets ....................................................................................................................... 11
Adjusting and Verifying Audio ..........................................................................12General Rules for Audio ........................................................................................................ 12
Adjusting Volume .................................................................................................................. 13
Applying/Removing Mute to Volume .................................................................................... 14
Verifying Volume Status ........................................................................................................ 15
Adjusting Digital Input Gain .................................................................................................. 16
Verifying Digital Input Gain Status ........................................................................................ 18
Adjusting and Verifying Audio with DSP ...........................................................20General Audio Rules for Products with DSP .......................................................................... 20
Adjusting Balance.................................................................................................................. 21
Adjusting Tone ...................................................................................................................... 21
Adjusting Equalization Bands ................................................................................................ 22
Verifying DSP Command Status ............................................................................................ 23
Appendix A – Product Specific BCS Commands................................................25Product Specific Overview .................................................................................................... 25
Enova DGX 8, Enova DGX 16, and Enova DGX 32................................................................ 27
Epica-128 and Epica-256 ....................................................................................................... 28
Epica DG, Epica DGX 16, Epica DGX 32, and Epica DGX 144............................................... 29
HDMI-UTPRO-0808................................................................................................................ 30
Modula and Modula CatPro................................................................................................... 31
Octaire................................................................................................................................... 32
Optima and Optima SD ......................................................................................................... 33
Precis DSP ............................................................................................................................. 34

Contents
ii Instruction Manual – BCS Basic Control Structure Protocol
Precis LT ................................................................................................................................35
Precis SD................................................................................................................................35
Heritage Systems...................................................................................................................37
Appendix B – Error Code Reporting................................................................. 41Limited Error Codes; Error Code Numbers and Prefixes .......................................................41
Enabling Error Code Reporting .............................................................................................42
Common System Error Codes................................................................................................42
Technical Support ..................................................................................................................43
Appendix C – Programmer’s Interface for System Diagnostics ........................ 45System Component Information ............................................................................................45
Using BCS to Access System Diagnostic Information.............................................................47
Splash Screen Examples ........................................................................................................48

Introduction to BCS
1Instruction Manual – BCS Basic Control Structure Protocol
Introduction to BCS
This instruction manual is designed for programmers who wish to create their own control programs using the BCS (Basic Control Structure) protocol. BCS is a simple character stream control protocol used by external control devices attached to a number of AMX products, e.g., AutoPatch Matrix Switchers, the HDMI-UTPRO-0808, and Enova DGX 8/16/32 Digital Matrix Switchers. BCS commands are used primarily for control of a matrix switcher during system installation and setup and for diagnostic purposes. Internally, BCS commands are translated into XNNet protocol packets.
Important: We strongly recommend checking Appendix A (see page 25) for information about BCS commands specific to your equipment. Not all systems support all BCS commands.
OverviewBCS is a set of alphanumeric characters that combine to form control commands. BCS command strings are entered into a terminal emulation program (such as Windows® HyperTerminal) running on an external control device. The control device (AMX control device, PC, or third-party controller) sends the commands to the system. Control devices must be able to send and receive ASCII code via an RS-232 or RS-422 serial port. (For information on attaching external controllers, see the “Installation and Setup” chapter of the specific enclosure’s instruction manual.)
BCS commands can also be used for APWeb macros, diagnostics, and Telnet sessions, as well as in AMX AutoPatch software applications (e.g., APControl).
For advanced programmers who want access to the underlying XNNet packet based protocol, the AMX AutoPatch CD (that ships with each system) includes the XNNet Communication Library. This interface library supports C, Java, and Visual Basic and has examples of the XNNet Protocol in use.
General rules, as well as lists and tables for command string formats and command string responses, are provided first for quick reference. Detailed information and examples for creating and executing the various commands can be found in the subsequent chapters. For product specific information, see page 25.
Command String FormatsA command string is a series of command characters and numbers used to send commands to the system.
Commands can include basic ones for executing and disconnecting switches, as well as for verifying the status of switches. Commands can execute local presets or define and execute global presets. On systems with audio, commands can be used to control a variety of audio functions depending on the product (e.g., adjustments to tone and balance are available on the Precis DSP).
In a command string, each character is either a general command (e.g., “D” for Disconnect) or an identifier that indicates what the following number designates (e.g., “I” and the number following it designate an “input number”).
The command string CL1I27O160T can be interpreted as follows:[C] Change on [L1] Level 1, [I27] Input 27 to [O160] Output 160, [T] Take to execute the command.
For a complete list of command characters and their functions, see page 4.
Command characters and numbers are echoed back to the terminal screen as the system accepts them. When a command is successfully executed, all of the characters appear as entered. If a command character or a number is not accepted, the system responds with a different character and all or part of the command is not executed. For explanations of other possible responses, see page 5.

Introduction to BCS
2 Instruction Manual – BCS Basic Control Structure Protocol
General Rules for Using BCS Commands Command strings typically are not case-sensitive (for exceptions – see “Heritage Systems”
on page 37).
All command strings must end with the Take command “T” which tells the system to execute the command.
“O” is the letter O, not the number zero (0)
Entering “X” at any point in a command string cancels the command.
A command cannot be canceled after the “T” has been entered.
Command strings cannot be edited. If a mistake has been made, enter an “X” and then reenter the command.
To specify multiple outputs, inputs, levels, or local presets, enter a space “ ” between each number. Multiple inputs are only valid in Disconnect commands.
To specify a range of outputs, inputs, or local presets, insert a colon “:” between the lowest and highest numbers of the range (not supported if the command is otherwise invalid, e.g., cannot specify a range of inputs in a Change command; the first input only would be routed.).
Colons “:” and spaces “ ” can be used in the same command string.
If the level designation “L” is omitted, the command is executed on the default level, which is normally Level 0.
* For systems where all of the audio channels are not switched on the same level (e.g., an audio only Optima that routes 8 channels of audio on Level 1 and 16 channels on Level 2), volume and input gain commands for each of the levels must be entered separately.
Note: Groups of signals (e.g., RGBHV plus stereo) and breakaways of signals (e.g., RGBHV only or stereo only) are stored in the configuration definition as virtual matrices (VMs). While some methods of control (e.g., control panels) use the term “VM”, BCS commands on a serial controller use the equivalent term “level” designated by an “L”. For the purposes of this document, the terms virtual matrix and level are interchangeable.

Introduction to BCS
3Instruction Manual – BCS Basic Control Structure Protocol
Generating BCS CommandsImportant: We strongly recommend checking Appendix A (page 25) for information about BCS commands specific to your equipment. Not all systems support all BCS commands.
Basic and Preset Commands
To generate basic and preset BCS commands:
1. Enter commands using the formats from the tables below. Replace the “#”s with the appropriate level, input (source), output (destination), local preset, or global preset number.
Digital Output Volume and Digital Input Gain Commands
To use audio commands, your system must contain audio components that support the specific audio commands. The decibel level resulting from an output volume or input gain adjustment command must fall within the range of the audio specifications (for a specific audio output volume or input gain adjustment range, see the specifications for that specific audio board or connector set in the product’s instruction manual). Audio commands can only be executed on levels that switch audio.
Important: Do not use leading zeros for gain values in audio commands.
To generate digital output volume and digital input gain BCS commands:
1. Enter commands using the formats from the tables below. Replace the “#”s with the appropriate level and input (source) or output (destination) number. Replace the “^^^” with the decibel level entered as an integer number representing the desired decibel value multiplied by 10 (e.g., +8.0 dB is entered as 80 and -40.5 dB is entered as -405).
Caution: We strongly recommend that input gain adjustments be made only by a qualified installer or dealer.
Note: For information on DSP (Digital Signal Processing) commands, see page 20.
Basic Command Strings
To execute a switch CL#I#O#T or CL#O#I#T
To disconnect a switch DL#I#T or DL#O#T
To verify switch status SL#O#T or SL#I#T
Preset Command Strings
To execute a local preset RL#P#T
To define a global preset RR#T
To execute a global preset R#T
Digital Output Volume Command Strings
To adjust volume to a specific (absolute) value CL#O#VA^^^T
To adjust volume by a specific (relative) amount CL#O#VR^^^T
To adjust volume up or down a step (increment/decrement) CL#O#VS+T or CL#O#VS-T
To mute or un-mute the volume of an output CL#O#VMT or CL#O#VUT
To verify volume status SL#O#VT
Digital Input Gain Command Strings
To adjust input gain to a specific (absolute) value CL#I#VA^^^T
To adjust input gain by a specific (relative) amount CL#I#VR^^^T
To adjust input gain up or down a step (increment/decrement) CL#I#VS+T or CL#I#VS-T
To verify input gain status SL#I#VT

Introduction to BCS
4 Instruction Manual – BCS Basic Control Structure Protocol
BCS Command TablesThe table below shows BCS command characters (keys) used to generate control commands, their functions, and short function descriptions.
Basic and Preset Command Characters
Key Function Description
C Change Initiates a Change (execute switch) command; this must precede the level, input, and output specification
D Disconnect Initiates a Disconnect switch command; this must precede the level and input or output specification
S Status Initiates a Status command; this must precede the level and input or output specifications
L Level Indicates the number following is the level
0 - 9 Number Identifies input, output, preset, level, and decibel values; combine the digits to form larger numbers
I Input Indicates the number following is an input (source)
O Output Indicates the number(s) following is an output(s) (destination)Note: O is the letter O, not the number zero (0)
“i” Space Separates numbers in entries containing multiple numbers
: Range Specifies a range of numbers in entries containing multiple numbers
T Take Executes a command
X Exit Exits, or cancels, the command being entered
R Execute Preset Initiates an Execute Global Preset command by indicating that the number following it is a global preset numberAlso initiates an Execute Local Preset command when it precedes the level and the local preset character P
P Local Preset Indicates the number following is a local preset number
RR Define Global Preset
Initiates a Define Global Preset command
Digital Output Volume and Digital Input Gain Command Characters
Key Function Description
V Volume (for Status)
Used in Status commands for volume and input gain
VA Volume Absolute Indicates the number following is the volume adjustment to a specificdecibel level
VR Volume Relative Indicates the number following is the volume adjustment by a specific decibel amount
VS+ Volume Increment Adjusts volume of a specified output up a step
VS- Volume Decrement Adjusts volume of a specified output down a step
VM Volume Mute Applies mute to the volume
VU Volume Un-mute Removes mute from the volume
Digital Signal Processing (DSP) Command Characters
Key Function Description
P Balance Pan Pans the balance left or right by a percentage of total range
F Filter (Tone) Indicates the number following is the tone band (filter) designation
E Equalization Band Indicates the number following is an equalization band
G Gain Adjustment Indicates the number following is the decibel level, used only in tone and equalization commands

Introduction to BCS
5Instruction Manual – BCS Basic Control Structure Protocol
Command String ResponsesWhen command characters are entered into a terminal emulation program (such as HyperTerminal) and accepted by the system, they are echoed back to the terminal screen one at a time, as they are typed. The complete command has executed successfully when all of the entered characters including the entered Take command “T” appear. If a command character is not accepted, a different character than the one entered appears and all or part of the command is not executed.
BCS Response Table
The following table shows BCS response characters, with descriptions and meanings, that may appear instead of an entered character or number. If these characters appear, all or part of the command is not executed.
For troubleshooting strategies when error codes appear, see Appendix B “Error Code Reporting,” starting on page 41.
* For code number information on Error or Warning responses, note the specific number and see Appendix B, “Error Code Reporting” (page 41).
Command String Response Examples
Response Meaning Description
? Format Error Indicates an error in the command string format or syntax (e.g., not indicating an input in a Change command)
X General Error Indicates the system rejected all or part of the command (e.g., entering an invalid value such as Output 300 in a system that only has 256 outputs). All valid parts of the command will be executed
E# Error Indicates an error code number*
W# Warning Indicates a warning code number*
BCS Command Entered
Appears in Terminal
Emulation Program Explanation of Result
CL2I3O5T CL2I3O5T The command was successfully executed
CL2I3T CL2I3? The command was not executed because the output number was not included
CL2I3O55T CL2I3O55X The command was not executed because the system does not have an Output 55
CL2O5VA150T CL2O5VA150X The command was not executed because 15 dB is outside the volume range for Output 5
CL2I3O5T CL2I3O5E1000A The command was not executed because a timeout failure occured

Executing Switches
6 Instruction Manual – BCS Basic Control Structure Protocol
Executing Switches
A switch is an active connection between an input (source) signal and one or more output (destination) devices. The signals connected in a switch command are either individual signals or groups of signals coming through the connectors on the rear of the enclosure. When executing a switch, you must specify a level that contains all the signals you want to route (or the switch will execute on the default level, normally 0). Levels are determined in the configuration definition that has been loaded onto each CPU in the system.
A switch command string begins with the character “C” which initiates a Change command for routing a switch. The characters and numbers that follow the “C” command tell the system which inputs and outputs to connect on which level. The last character is the Take “T” command which tells the system to execute the command.
For example, the command string CL0I102O39T can be interpreted as follows: [C] Change on [L0] Level 0, [I102] Input 102 to [O39]Output 39, [T] Take to execute the command.
For a complete list of command characters and their functions, see page 4.
Command characters and numbers are echoed back to the terminal screen as the system accepts them. A command has successfully executed when the entered “T” command appears. If a command or number is not accepted, a different character appears and all or part of the command is not executed. For explanations of other possible responses, see page 5.
In each Change command, you can enter multiple levels and multiple outputs (destinations), but only one input (source). To enter multiple levels and outputs, include a space between each set of numbers. To enter a range of outputs, insert a colon “:” between the lowest and highest numbers of the range.
If the level is not specified in the Change command, the command is executed on the default level, which is normally Level 0 (e.g., CI72O35T routes Input 72 to Output 35 on Level 0).
Important: If the level is not specified in a BCS command, the command is executed on the default level (normally Level 0), which is defined in the configuration file. If the level is omitted and the BCS command executes on an unexpected level, check the default level in the configuration file (for systems without a configuration file, check the product documentation).
The following instructions provide command string formats for executing switches by designating either an input or one or more outputs first.
To execute a switch:
1. Enter the Change command below. Replace the “#”s with the level, input, and output number(s).CL#I#O#T or CL#O#I#T
Change Examples
BCS Command Action
CL1I6O24T Switches Input 6 to Output 24 on Level 1
CL1I6O2 4 9T Switches Input 6 to Outputs 2, 4, and 9 on Level 1
CI6O9T Switches Input 6 to Output 9 on the default level (defined in configuration file,normally Level 0)
CL0O2I5T Switches Input 5 to Output 2 on Level 0
CL2I6O4:8T Switches Input 6 to Outputs 4, 5, 6, 7, and 8 on Level 2
CL1 2I4O5 6T Switches Input 4 to Outputs 5 and 6 on Levels 1 and 2
CL0I3O4:7 9 13:16T Switches Input 3 to Outputs 4, 5, 6, 7, 9, 13, 14, 15, and 16 on Level 0
CL2I6X Cancels the incomplete command

Disconnecting Switches
7Instruction Manual – BCS Basic Control Structure Protocol
Disconnecting Switches
The characters and numbers in a Disconnect command tell the system which input or output to disconnect on which level. Command characters and numbers appear on the screen when the system accepts them. A command string has successfully executed when the entered “T” command appears. If a character or number is not accepted, a different character appears and all or part of the command is not executed. For explanations of other possible responses, see page 5.
In disconnect commands, enter multiple levels and outputs or inputs by including a space between each set of numbers. (You cannot enter multiple inputs and outputs in the same disconnect command.) Enter a range of outputs or inputs by inserting a colon “:” between the lowest and highest numbers of the range.
If the level is not specified in the Disconnect command, the command is executed on the default level, which is normally Level 0 (e.g., DO67T disconnects Output 67 on Level 0).
Important: If the level is not specified in a BCS command, the command is executed on the default level (normally Level 0), which is defined in the configuration file. If the level is omitted and the BCS command executes on an unexpected level, check the default level in the configuration file (for systems without a configuration file, check the product documentation).
Caution: Disconnecting an input disconnects all the outputs receiving that source signal.
The following instructions provide command string formats for disconnecting switches by designating either inputs (sources) or outputs (destinations).
To disconnect a switch:
1. Enter the Disconnect command below. Replace the “#”s with the level and output number(s) or the level and input number(s).DL#O#T or DL#I#T
Disconnect Examples
BCS Command Action
DL0O8T Disconnects Output 8 on Level 0
DO3T Disconnects Output 3 on the default level (defined in configuration file, normally Level 0)
DL2O3 5:9 11T Disconnects Outputs 3, 5, 6, 7, 8, 9, and 11 on Level 2
DL2I5T Disconnects all outputs connected to Input 5 on Level 2
DL3I7 9 15T Disconnects all outputs connected to Inputs 7, 9, and 15 on Level 3

Verifying Signal Status
8 Instruction Manual – BCS Basic Control Structure Protocol
Verifying Signal Status
Switch status can be checked to confirm that the switch has executed correctly or to confirm correct routing to multiple outputs. Digital output volume status (see page 15) and digital input gain status(see page 18) can also be verified. The characters and numbers in a Status command tell the system which input or output to verify on which level. A Status command has successfully executed when the entered “T” appears followed by the result of the status query in parenthesis. Empty parenthesis ( ) indicate that the input or output specified is not routed on the specified level. For status response examples responses, see below.Fragmented status results (see page 9) are available for systems that support this feature. Fragmented Status Reporting must be enabled in XNConnect before valid fragmented results can be returned (see the XNConnect Help file).
General Rules for Verifying StatusMultiple inputs, outputs, or levels cannot be entered in a Status command.
If the level is not specified in the Status command, the command is executed on the default level, which is normally Level 0 (e.g., SI83T verifies the routing status of Input 83 on Level 0).
If you check the status for an input or an output on an audio-follow-video level and only the video or the audio is routed on that level, the result will come back as not routed, unless the system supports fragmented status reporting.
Important: If the level is not specified in a BCS command, the command is executed on the default level (normally Level 0), which is defined in the configuration file. If the level is omitted and the BCS command executes on an unexpected level, check the default level in the configuration file (for systems without a configuration file, check the product documentation).
To verify signal status:
1. Enter the Status command below. Replace the “#”s with the level and input number or the level and output number.SL#I#T or SL#O#TThe results of the BCS command will display in parentheses; empty parentheses ( ) indicate that no input is routed to the output being verified or that no outputs are receiving a signal from the input being verified.
Status Examples
BCS Command Response Explanation of Result
SL3O4T SL3O4T( 6 ) Output 4 is connected to Input 6 on Level 3
SL0I4T SL0I4T( 2 7 8 11 ) Input 4 is routed to Outputs 2, 7, 8, and 11 on Level 0
SL1O17T SL1O17T( ) Output 17 is not connected to an input on Level 1
Verifying Signal Status
9Instruction Manual – BCS Basic Control Structure Protocol
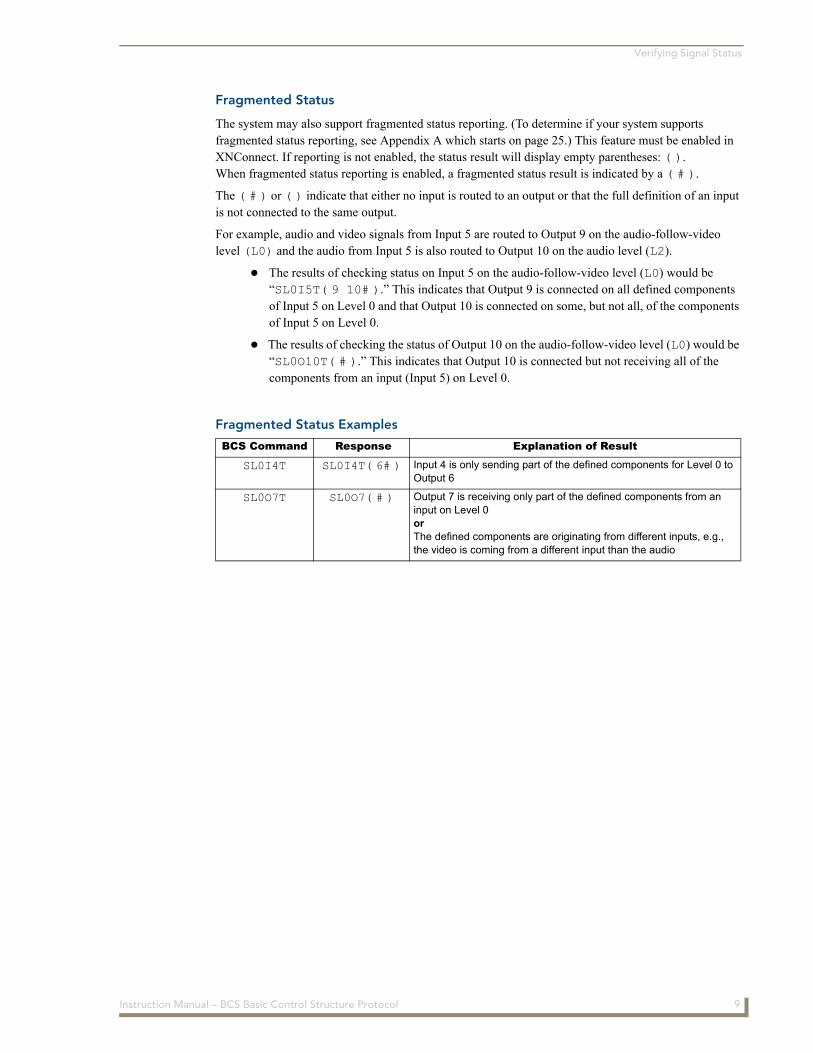
Fragmented Status
The system may also support fragmented status reporting. (To determine if your system supports fragmented status reporting, see Appendix A which starts on page 25.) This feature must be enabled in XNConnect. If reporting is not enabled, the status result will display empty parentheses: ( ). When fragmented status reporting is enabled, a fragmented status result is indicated by a ( # ).
The ( # ) or ( ) indicate that either no input is routed to an output or that the full definition of an input is not connected to the same output.
For example, audio and video signals from Input 5 are routed to Output 9 on the audio-follow-video level (L0) and the audio from Input 5 is also routed to Output 10 on the audio level (L2).
The results of checking status on Input 5 on the audio-follow-video level (L0) would be “SL0I5T( 9 10# ).” This indicates that Output 9 is connected on all defined components of Input 5 on Level 0 and that Output 10 is connected on some, but not all, of the components of Input 5 on Level 0.
The results of checking the status of Output 10 on the audio-follow-video level (L0) would be “SL0O10T( # ).” This indicates that Output 10 is connected but not receiving all of the components from an input (Input 5) on Level 0.
Fragmented Status Examples
BCS Command Response Explanation of Result
SL0I4T SL0I4T( 6# ) Input 4 is only sending part of the defined components for Level 0 to Output 6
SL0O7T SL0O7( # ) Output 7 is receiving only part of the defined components from an input on Level 0orThe defined components are originating from different inputs, e.g., the video is coming from a different input than the audio

Executing Presets
10 Instruction Manual – BCS Basic Control Structure Protocol
Executing Presets
Presets OverviewThis chapter provides information for executing local presets and for defining and executing global presets using BCS commands. Presets are not supported on all systems (see Appendix A on page 25).
Local Preset
A local preset is a predetermined collection of switches (on the same level) to be routed simultaneously. Executing a local preset will affect only those inputs and outputs specified, not the whole system.
If your system supports local presets, they must be defined (created) in XNConnect and then loaded into the system. For directions for creating local presets, see the XNConnect Help file.
Global Preset
A global preset allows you to replicate an entire system state (all signal routings regardless of the number of levels involved), including audio gain/volume settings. If your system supports global presets, they can be defined (created) using BCS commands during runtime and stored by the system. If the system is reconfigured, global presets may be lost, depending on the method used to load the configuration file (see the XNConnect Help file).
Local PresetsA local preset is a set of switches on a single level that is stored in a system’s configuration file. If requested, local presets can be programmed at the factory; contact your AMX representative. To program them yourself, use the XNConnect software located on the AMX AutoPatch CD or at www.amx.com.
General Rules for Local Presets
Executing a local preset does not change any system routings that are not part of the preset.
Local presets cannot be used to change any of the audio settings.
If two local presets are executed in the same command, both will be executed. If both include routing instructions for the same input or output, the input or output will be routed according to the last local preset entered.
You can execute multiple local presets on the same level by including a space between each local preset number in the BCS command.
You can execute a sequential range of local presets by inserting a colon “:” between the lowest and highest local preset numbers in the BCS command.
If the level designation “L” is omitted, the Execute Local Preset command is executed on the default level, which is normally Level 0.
Multiple levels can be entered in an Execute Local Preset command provided that a local preset with the same number resides on all the specified levels. For example, RL1 2P3T would execute the switch(es) defined as Local Preset 3 on Level 1 and execute the switch(es) defined as Local Preset 3 on Level 2.
Important: If the level is not specified in a BCS command, the command is executed on the default level (normally Level 0), which is defined in the configuration file. If the level is omitted and the BCS command executes on an unexpected level, check the default level in the configuration file.
Tip: When you know you will need to disconnect all the switches routed by one or more local presets (on the same level), an efficient strategy is to create another local preset to do so.

Executing Presets
11Instruction Manual – BCS Basic Control Structure Protocol
To execute a local preset:
1. Enter the Execute Local Preset command below. Replace the “#”s with the level and local preset number(s).RL#P#T
Execute Local Preset Examples
Global PresetsA global preset is a snapshot of a system’s routing state. The routing state is all routings on all levels (including audio settings) for all enclosures in a system. Once the system state has been captured with an “RR” Define Global Preset command, it can then be restored at any time with the “R” Execute Global Preset command. Global presets cannot be defined in XNConnect.
Note: We strongly recommend keeping track of the numbers and the system state routings used for each global preset. If another system state is assigned to a previously used number, the former state will automatically be overwritten.
To define a global preset:
1. Route the system to the desired state and enter the Define Global Preset command below. Replace the “#” with the global preset number.RR#T It may take several seconds for the “T” to appear, depending on the type and size of the system.
Define Global Preset Examples
To execute a global preset:
1. Enter the Execute Global Preset command below. Replace the “#” with the global preset number.R#T
Execute Global Preset Examples
Note: Status is not invalidated by global presets.
BCS Command Action
RL0P2T Executes Local Preset 2 on Level 0
RL1P12T Executes Local Preset 12 on Level 1
RLP7T Executes Local Preset 7 on the default level (defined in configuration file, normally 0)
RL3P1 2T Executes Local Presets 1 and 2 on Level 3
RL3 1P1T Executes Local Preset 1 on Level 3 and Local Preset 1 on Level 1
BCS Command Action
RR1T Defines the current system state as Global Preset 1
RR3T Defines the current system state as Global Preset 3
RR5X Cancels the incomplete command
BCS Command Action
R1T Executes Global Preset 1
R3T Executes Global Preset 3
R2X Cancels the incomplete command

Adjusting and Verifying Audio
12 Instruction Manual – BCS Basic Control Structure Protocol
Adjusting and Verifying Audio
For BCS purposes, adjustments to input audio signals are referred to as digital gain adjustments, while similar adjustments to output audio signals are referred to as volume adjustments. Not all systems support digital input gain or digital output volume control. If your system supports these features, adjustments may be made at any time during normal operation.
General Rules for Audio Volume is adjusted using any of the following three methods:
Absolute – adjusts volume to a specific decibel level.
Relative – increases or decreases volume by a specific decibel amount.
Increment/Decrement – increases or decreases volume a step.
An output does not need to be routed to adjust the volume; however, it may be helpful to hear the adjustment.
Audio adjustments can only be executed on a valid level that switches audio signals. If an audio adjustment is attempted on a level that does not include audio, an error code may be sent out (see page 41).
For systems where all of the audio channels are not switched on the same level (e.g., an audio only Optima that routes 8 channels of audio on Level 1 and 16 channels on Level 2), volume and input gain commands for each of the levels must be entered separately.
Output volume adjustments remain in effect when the output is switched to receive a different input or is switched on a different level (e.g. from audio only to audio-follow-video).
Specify multiple outputs by including a space between each output number. Specify a range of outputs by inserting a colon “:” between the first and last numbers of the range.
Enter decibel levels as an integer number representing the desired decibel value multiplied by 10. For example, +5 dB is entered as 50 and -60.5 dB is entered as -605. (Interpret results for a volume status command in the same way.)
Do not use leading zeros for gain values in audio commands.
When a muted output is un-muted, the output returns to its previously un-muted volume.
When a Volume command is sent to a muted output, the output is automatically un-muted and then the volume adjustment is applied. When an input gain command is sent to an input connected to a muted output, the gain is applied to the input and the output remains muted.
The volume range of an output is determined by the audio board/connector. For a specific audio volume range, see the specific board/connector documentaion. If the requested volume change results in a decibel level outside the range specified by the board/connector, the system responds with “X” indicating that an invalid value was entered.
The total through-system gain (the amount of input gain plus the amount of output gain) for any input to output routing path is automatically limited by the matrix switcher. (For the value of through-system gain and other audio specifications, see your matrix switcher’s instruction manual.) If a volume command is entered that exceeds the matrix switcher’s specifications, the command will be accepted (and will be indicated in status results) but will not result in an audible difference if the dB value entered is outside of the matrix switcher’s audio range.
Important: If the level is not specified in a BCS command, the command is executed on the default level (normally Level 0), which is defined in the configuration file. If the level is omitted and the BCS command executes on an unexpected level, check the default level in the configuration file (for systems without a configuration file, check the product documentation).

Adjusting and Verifying Audio
13Instruction Manual – BCS Basic Control Structure Protocol
Adjusting Volume To adjust volume use any of the following three methods:
Absolute – adjusts the volume to a specific decibel level
Relative – increases/decreases the volume by a specific decibel amount
Increment/Decrement – increases or decreases the volume a step
Absolute Method
The Absolute Method adjusts the volume of an output to a specific decibel level.
To adjust an output’s volume to a specific decibel level:
1. Enter the Volume Absolute command below. Replace the “#”s with the level and output number(s) and replace the “^^^” with the decibel level (entered as a decimal number; see “General Rules for Audio” on the previous page).CL#O#VA^^^T
Volume Absolute Examples
Note: If the decibel level requested is outside the range for the selected output, the system will respond with an “X” indicating an invalid value was entered (for a specific audio board’s volume adjustment range, see that board’s documentation).
Relative Method
The Relative Method adjusts the volume of an output by a specific decibel amount.
To adjust an output’s volume by a specific decibel amount:
1. Enter the Volume Relative command below. Replace the “#”s with the level and output number(s) and replace the “^^^” with the decibel level (entered as a decimal number; see “General Rules for Audio” on the previous page).CL#O#VR^^^T
Volume Relative Examples
Note: If the decibel level requested is outside the range for the selected output, the system will respond with an “X” indicating an invalid value was entered (for a specific audio board’s volume adjustment range, see the board’s documentation).
BCS Command Action
CL0O3VA100T Adjusts volume to 10.0 dB for Output 3 on Level 0
CL0O6 7VA-700T Adjusts volume to -70.0 dB for Outputs 6 and 7 on Level 0
BCS Command Action
CL0O3VR60T Increases volume by 6.0 dB for Output 3 on Level 0
CL0O1 2VR-120T Decreases volume by 12.0 dB for Outputs 1 and 2 on Level 0

Adjusting and Verifying Audio
14 Instruction Manual – BCS Basic Control Structure Protocol
Increment/Decrement Method
The Increment/Decrement Method increases or decreases the volume of an output by a step. You may need to repeat the command to hear an audible difference.
To increase an output’s volume by a step:
1. Enter the Volume Increment command below. Replace the “#”s with the level and output number(s).CL#O#VS+T
To decrease an output’s volume by a step:
1. Enter the Volume Decrement command below. Replace the “#”s with the level and output number(s).CL#O#VS-T
Volume Increment and Decrement Examples
Note: If the decibel level requested is outside the range for the selected output, the system will respond with an “X” indicating an invalid value was requested (for a specific audio board’s volume adjustment range, see the board’s documentaion).
Applying/Removing Mute to VolumeNot all systems with audio support the mute option. If your system supports the mute option, outputs can be muted and un-muted using BCS commands. Inputs cannot be muted.
Note: For BCS purposes, VM refers to volume mute, not virtual matrix.
Applying Mute
To mute an output:
1. Enter the Volume Mute command below. Replace the “#”s with the level and output number(s).CL#O#VMT
Removing Mute
Un-mute returns an output to its previous un-muted volume level. (Entering any other Volume command for that output will also un-mute the signal).
To un-mute an output:
1. Enter the Volume Un-mute command below. Replace the “#”s with the level and output number(s).CL#O#VUT
BCS Command Action
CL0O3VS+T Increases volume a step for Output 3 on Level 0
CL0O4 8VS-T Decreases volume a step for Outputs 4 and 8 on Level 0

Adjusting and Verifying Audio
15Instruction Manual – BCS Basic Control Structure Protocol
Volume Mute and Unmute Examples
Verifying Volume StatusNote: Multiple levels or outputs cannot be entered in volume status commands.
The volume setting of the output will display in parentheses ( ), even if the output is not receiving a signal. The decibel amount in the result is specified as an integer number representing the actual decibel value multiplied by 10. For example, if the result is -480, the decibel level is at -48 or if the result is 65, the decibel level is at 6.5. If the status result is ( M ), the volume is muted.
To verify the volume status of a specific output:
1. Enter the Verify Volume Status command below. Replace the “#”s with the level and output number.SL#O#VT
Volume Status Examples
BCS Command Action
CL0O24VMT Mutes Output 24 on Level 0
CL0O2 4VMT Mutes Outputs 2 and 4 on Level 0
CL0O2:8VMT Mutes Outputs 2, 3, 4, 5, 6, 7, and 8 on Level 0
CL0O5VUT Unmutes Output 5 on Level 0
CL0O11 15VUT Unmutes Outputs 11 and 15 on Level 0
BCS Command Status Result Explanation of Result
SL0O37VT SL0O37VT( 100 ) Volume for Output 37 on Level 0 is at 10 dB
SL0O8VT SL0O8VT( 5 ) Volume for Output 8 on Level 0 is at 0.5 dB
SL0O22VT SL0O22VT( -700 ) Volume for Output 22 on Level 0 is at -70 dB
SL0O41VT SL0O41VT( M ) Verifies the volume is muted for Output 41 on Level 0

Adjusting and Verifying Audio
16 Instruction Manual – BCS Basic Control Structure Protocol
Adjusting Digital Input GainFor BCS purposes, adjustments to input signals are referred to as digital gain adjustments, while similar adjustments to output signals are referred to as volume adjustments. Not all systems with audio support digital input gain adjustments. Although digital input gain is normally set during installation, if your system supports digital input gain control, gain adjustments can be made at any time during normal operation. Digital input gain range is -10 dB to +10 dB. Inputs cannot be muted.
Digital input gain should be adjusted as part of system setup. If adjusting input gain, we recommend doing so before making any output adjustments.
Caution: We strongly recommend that input gain adjustments be made only by a qualified installer or dealer.
The purpose of controlling the input gain (the nominal level of the signal from the source device) is to allow source signals of various amplitudes to be equalized before they are routed and the volume is adjusted. Equalizing source levels provides a consistent reference for volume adjustments and eliminates jumps when routing a new input to an output.
Typical uses for input gain include switching consumer and professional grade audio equipment (whose levels can vary noticeably) in the same routing system. Input gain adjustment is also used for equalizing amplitudes between balanced and unbalanced inputs.
Note: The total through-system gain (the amount of input gain plus the amount of output gain) for any input to output routing path is automatically limited by the matrix switcher. (For the value of through-system gain and other audio specifications, see your matrix switcher’s instruction manual.) If a volume command is entered that exceeds the matrix switcher’s specifications, the command will be accepted (and will be indicated in status results) but will not result in an audible difference if the dB value entered is outside of the matrix switcher’s audio range.
The following section describes three methods used to adjust digital input gain as part of the process of equalizing input levels. We recommend routing an input before adjusting its gain; although not necessary, it can be helpful to hear the adjustment.
To adjust digital input gain use any of the following three methods:
Absolute – adjusts input gain to a specific decibel value
Relative – adjusts input gain by a specific decibel amount
Increment/Decrement – adjusts input gain up or down a step
Important: If the level is not specified in a BCS command, the command is executed on the default level (normally Level 0), which is defined in the configuration file. If the level is omitted and the BCS command executes on an unexpected level, check the default level in the configuration file (for systems without a configuration file, check the product documentation).
To adjust inputs to equalize source levels:
1. Route an input (source) to the first output (destination).
2. Adjust the digital input gain for the input to the desired dB level by using one of the three methods on the following two pages.
3. Repeat Steps 1 and 2 for additional inputs that will be routed to the same output.

Adjusting and Verifying Audio
17Instruction Manual – BCS Basic Control Structure Protocol
Absolute Method
The Absolute Method adjusts digital input gain to a specific decibel level.
To adjust digital input gain to a specific decibel level:
1. Enter the Absolute command below. Replace the “#”s with the level and input number(s) and replace the “^^^” with the decibel level (entered as a decimal number; see “General Rules for Audio” on page 12).CL#I#VA^^^T
2. Repeat Step 1 as necessary for additional sources (inputs) that will be routed to the same destination (output).
Digital Input Gain Absolute Examples
Note: If the input gain adjustment requested results in an overall decibel level outside of the range (above or below) for the specific type of audio board that has been selected for adjustment, the system will respond with an “X” indicating an invalid value was entered. For a specific audio board’s input gain adjustment range, see the specific board’s documentation.
Relative Method
The Relative Method adjusts digital input gain by a specific decibel amount.
To adjust digital input gain by a specific decibel amount:
1. Enter the Relative command below. Replace the “#”s with the level and input number(s) and replace the “^^^” with the decibel level (entered as a decimal number; see “General Rules for Audio” on page 12).CL#I#VR^^^T
2. Repeat Step 1 as necessary for additional sources (inputs) that will be routed to the same destination (output).
Digital Input Gain Relative Examples
Note: If the input gain adjustment requested results in an overall decibel level outside of the range (above or below) for the specific type of audio board that has been selected for adjustment, the system will respond with an “X” indicating an invalid value was entered. For a specific audio board’s input gain adjustment range, see the specific board’s documentation.
BCS Command Action
CL0I22VA70T Adjusts input gain to 7.0 dB for Input 22 on Level 0
CL0I6 7VA-700T Adjusts input gain to -70.0 dB for Inputs 6 and 7 on Level 0
BCS Command Action
CL0I3VR60T Increases input gain for Input 3 by 6.0 dB on Level 0
CL0I1 2VR-120T Decreases input gain for Inputs 1 and 2 by 12.0 dB on Level 0

Adjusting and Verifying Audio
18 Instruction Manual – BCS Basic Control Structure Protocol
Increment/Decrement Method
The Increment/Decrement Method increases or decreases digital input gain by a step.
To adjust digital input gain up a step:
1. Enter the Increment command below. Replace the “#”s with the level and input number.CL#I#VS+T
2. Repeat Step 1 as necessary for additional sources (inputs) that will be routed to the same destination (output).
To adjust digital input gain down a step:
1. Enter the Decrement command below. Replace the “#”s with the level and input number.CL#I#VS-T
2. Repeat Step 1 as necessary for additional sources (inputs) that will be routed to the same destination (output).
Digital Input Gain Increment and Decrement Examples
Note: If the input gain adjustment requested results in an overall decibel level outside of the range (above or below) for the specific type of audio board that has been selected for adjustment, the system will respond with an “X” indicating an invalid value was entered. For a specific audio board’s input gain adjustment range, see the specific board’s documentation.
Verifying Digital Input Gain StatusThe digital input gain setting will display in parentheses ( ), even if the input is not receiving a signal. The decibel amount in the result is specified as a decimal number to the tenth place without the decimal point. For example, if the result is -480, the decibel level is at -48 or if the result is 65, the decibel level is at 6.5.
To verify digital input gain status:
1. Enter the Verify Status command below. Replace the “#”s with the level and input number.SL#I#VT
Digital Input Gain Status Examples
BCS Command Action
CL0I3VS+T Adjusts input gain for Input 3 up a step on Level 0
CL0I4 8VS-T Adjusts input gain for Inputs 4 and 8 down a step on Level 0
BCS Command Status Result Explanation of Result
SL0I133VT SL0I133VT( 100 ) Verifies the gain of Input 133 is 10 dB on Level 0
SL0I240VT SL0I240VT( -700 ) Verifies the gain of Input 240 is -70 dB on Level 0
SL0I6VT SL0I6VT( 75 ) Verifies the gain of Input 16 is at 7.5 dB on Level 0

Adjusting and Verifying Audio
19Instruction Manual – BCS Basic Control Structure Protocol

Adjusting and Verifying Audio with DSP
20 Instruction Manual – BCS Basic Control Structure Protocol
Adjusting and Verifying Audio with DSP
This chapter covers information unique to products with Digital Signal Processing (DSP) functionality. For information on general audio functions, see “Adjusting and Verifying Audio” on page 12.
AMX AutoPatch products with DSP use BCS commands to make volume adjustments at anytime during normal operation. Balance and tone can also be adjusted at any time using BCS commands.
Equalization bands (see page 22) and digital input gain (see page 16) should be adjusted during system setup.
Caution: We strongly recommend that input gain adjustments be made only by a qualified installer or dealer.
If adjusting input gain, we recommend doing so before making any output adjustments.
General Audio Rules for Products with DSPVolume is adjusted using any of the following three methods:
Absolute – adjusts volume to a specific decibel level (see page 13).
Relative – increases or decreases volume by a specific decibel amount (see page 13).
Increment/Decrement – increases or decreases volume a step (see page 14).
An output does not need to be routed to adjust the volume; however, it may be helpful to hear the adjustment. This also applies to adjusting input gain.
Enter decibel levels as integer numbers representing the desired decibel value multiplied by 10. For example, +5 dB is entered as 50 and -60.5 dB is entered as -605. (Interpret volume status results in the same way.)
Do not use leading zeros for gain values in audio commands.
If the requested volume change results in a decibel level outside the valid range for that particular audio component, the system responds with an “X”.
When a muted output is un-muted, the output returns to its previously un-muted volume.
When an output volume command is sent to a muted output, the output is un-muted and then the volume adjustment is applied.
Inputs cannot be muted.
When an input gain command is sent to an input connected to a muted output, the gain is applied to the input and the output remains muted.
To cancel an incorrect or incomplete command, enter “X”.
Important: If the level is not specified in a BCS command, the command is executed on the default level (normally Level 0), which is defined in the configuration file. If the level is omitted and the BCS command executes on an unexpected level, check the default level in the configuration file(for systems without a configuration file, check the product documentation).

Adjusting and Verifying Audio with DSP
21Instruction Manual – BCS Basic Control Structure Protocol
Adjusting Balance Note: The examples below assume a default level which is audio or includes audio. If the default level does not include audio, you must enter a level that includes audio.
Balance commands tell the output to pan to the left or to the right by a percentage of the total range. Positive percentages pan to the right, and negative percentages pan to the left.
To adjust balance for an output:
1. Enter the balance command below. Replace the “#”s with the output number and replace “^^^” with the percentage.CO#P^^^T
Balance Examples
Adjusting Tone Tone bands (filters) for bass and treble can be adjusted to a specific decibel level at anytime during normal operations. Each tone band has a range of -12 dB to +12 dB. Further frequency adjustments can be made to each output by adjusting the equalization bands (see page 22).
To adjust the gain of a tone band (filter) for an output:
1. Enter the tone command below. Replace the “#”s with the output number and tone band (filter) number and replace “^^^” with the decibel level. (Enter the decibel level as an integer number representing the desired decibel value multiplied by 10, e.g., -5.0 dB is entered as -50.)CO#F#G^^^T
Tone Band Examples
BCS Command Action
CO9P100T Pans Output 9 to the right 100%
CO7P-25T Pans Output 7 to the left 25%
Tone Band (filter) Range
1 Bass
2 Mid (Mid range is not supported in Precis DSP products)
3 Treble
BCS Command Action
CO5F1G100T Adjusts the bass band to 10 dB for Output 5
CO13F3G-120T Adjusts the trebel band to -12 dB for Output 13

Adjusting and Verifying Audio with DSP
22 Instruction Manual – BCS Basic Control Structure Protocol
Adjusting Equalization Bands BCS commands can be used to adjust the gain of each EQ band for each output to a specific decibel level. Each equalization band is identified by its center frequency and spans one octave (see the chart below for frequency to band number correspondence). The bands are set for a flat response at the factory. The adjustment range is -12 dB to +12 dB.
Multiple bands can be entered in the same command by including spaces or commas between the EQ band numbers. When adjusting multiple bands in the same command, an “E” and a list of the bands is entered first, followed by a “G” and a list of the corresponding gain settings. The number of gain settings must be equal to the number of bands.
To adjust equalization bands for an output:
1. Enter the following command string. Replace the “#”s with the output number(s) and equalization band number(s) and replace the “^^^” with the decibel level. CO#E#G^^^T
Equalization Bands Example (with visual representation below)
EQ Band Frequency 32 Hz 64 Hz 125 Hz 250 Hz 500 Hz 1 kHz 2 kHz 4 kHz 8 kHz 16 kHz
EQ Band (BCS) Number 1 2 3 4 5 6 7 8 9 10
BCS Command Action
CO3E2 5 6 7 9G80 10 -60 40 60T Adjusts the gain of EQ band 2 to 8 dB, band 5 to 1 dB, band 6 to -6 dB, band 7 to 4 dB, and band 9 to 6 dB for Output 3
FIG. 1 Visual representation of equalizing output example

Adjusting and Verifying Audio with DSP
23Instruction Manual – BCS Basic Control Structure Protocol
Verifying DSP Command StatusThe status for DSP command settings will display in parentheses ( ). Balance results are a percentage of the pan right (positive number) or pan left (negative number). Gain results for tone bands and for equalization bands are decibel amounts specified as a decimal number to the tenth place without the decimal point. For example, if the result is -480, the decibel level is at -48 or if the result is 65, the decibel level is at 6.5.
Note: Multiple levels or outputs cannot be entered in status commands.
To verify the balance setting of an output:
1. Enter the following command string. Replace the “#”s with the output number.SO#PT
To verify the gain of a tone band for an output:
1. Enter the following command string. Replace the “#”s with the output number and tone band (filter) number.SO#F#T
To verify the gain of an equalization band for an output:
1. Enter the following command string. Replace the “#”s with the output number and EQ band.SO#E#T
DSP Command Status Examples
BCS Command Status Result Explanation of Result
SO3PT SO3PT( 100 ) Verifies the balance of Output 3 is set 100% to the right
SO2PT SO2PT( -33 ) Verifies the balance of Output 2 is set 33% to the left
SO6F1T SO6F1T( -120 ) Verifies the bass band for Output 6 is at -12 dB
SO3F3T SO3F3T( 90 ) Verifies the treble band for Output 3 is at +9 dB
SO17E1T SO17E1T( 90 ) Verifies the gain of EQ band 1 is set to +9 dB for Output 17
SO4E1 2 3T SO4E1 2 3T( 60 -90 -120 )
Verifies the gain of EQ band 1 is set to +6 dB, band 2 is set to -9 dB, and band 3 is set to -12 dB for Output 4

Adjusting and Verifying Audio with DSP
24 Instruction Manual – BCS Basic Control Structure Protocol

Appendix A – Product Specific BCS Commands
25Instruction Manual – BCS Basic Control Structure Protocol
Appendix A – Product Specific BCS Commands
Product Specific OverviewThis appendix provides an overview of BCS command information that applies to specific AMX products. Product families are listed in alphabetical order; heritage systems follow current products.
AMX Products Covered
Enova DGX 8, Enova DGX 16, and Enova DGX 32 (page 27)
Epica-128 and Epica-256 (page 28)
Epica DG, Epica DGX 16, Epica DGX 32, and Epica DGX 144 (page 29)
HDMI-UTPRO-0808 (page 30)
Modula and Modula CatPro (page 31)
Octaire (page 32)
Optima and Optima SD (page 33)
Precis DSP (page 34)
Precis LT (page 35)
Precis SD (page 35)
Heritage Systems (page 37)
1Y Series, 4Y-DM, 8Y-DM, and 8Y-XL
8Y-3000
Precis 6x2
Precis (300 MHz)
Precis HT
Basic Support
BCS command characters are listed in the tables on page 4. Basic command string formats are listed in the tables on page 3.
All supported enclosures (with the exception of some heritage systems) support these commands:
Change
Disconnect
Status
All enclosures that have digital gain support these commands:
Digital output volume adjustments
Digital input gain adjustments
Audio status for output volume and input gain
The chart on the following page indicates additional features supported by specific product families.

Appendix A – Product Specific BCS Commands
26 Instruction Manual – BCS Basic Control Structure Protocol
BCS Quick Reference Chart
The chart below lists AMX products (heritage products are not included; see page 37) and indicates which BCS commands in addition to the ones listed on the previous page they support.
* Error code reporting displays a seven-digit code (e.g., EFF8002) when a command string is entered and not accepted. This code is in addition to (or instead of) the single character that displays when an error is in a command string.
** Not all models of this product family support this command; to determine which models do, see the specific product section in this appendix.
If you have any questions regarding which features are supported by your system, record the system serial number(s), determine the Application Code version (see below), and contact technical support (see page 43).
Application Code Version
Important: We recommend determining which Application Code version your enclosure uses; full support of some BCS commands depends upon the Application Code version. Most of the heritage systems do not support the ~scr! command to display a splash screen. To determine the Application Code version for these systems, before applying power, attach a PC to the enclosure’s serial port with a null modem serial cable. Open HyperTerminal (or other terminal emulation program) on the PC and power up the system. View the display in HyperTerminal for system information including the Application Code version.
To determine the system’s Application Code version:
1. View the long splash screen by entering ~scr! (see the table above for products that support Diagnostic commands and enter ~scr1v3!) into HyperTerminal.The “Hardware Driver” is the enclosure’s Application Code version. To determine if the Application Code version displayed supports the relevant BCS command, see the applicable section for your system in the following pages.
General CommandsDSP Commands
(Digital Signal Processing)
Exe
cute
Loc
al P
rese
ts(d
efin
ed in
XN
Con
nect
)pa
ge1
0
Def
ine
and
Exe
cute
Glo
bal P
rese
ts
page
11
Err
or C
ode
Rep
ortin
g*pa
ge4
1
Dia
gnos
tic
page
45
(che
ck p
rodu
ct a
lso)
Fra
gme
nted
Sta
tus
Re
port
ing
(en
able
d in
XN
Con
nec
t)pa
ge9
Bal
ance
Pan
page
21
Filt
er T
one
page
21
Equ
aliz
atio
n B
and
page
22
Epica-128
Epica-256 ** **
Enova DGX 8/16/32
Epica DG
Epica DGX 16/32
Epica DGX 144
**
HDMI-UTPRO-0808
ModulaModula CatPro
** **
Octaire
OptimaOptima SD
**
Precis DSP
Precis LT *
Precis SD

Appendix A – Product Specific BCS Commands
27Instruction Manual – BCS Basic Control Structure Protocol
Enova DGX 8, Enova DGX 16, and Enova DGX 32The Enova DGX 8, Enova DGX 16, and Enova DGX 32 support the following items:
General Commands
Executing and disconnecting switches (see page 6 and page 7)Verifying signal status (see page 8)Executing local presets – predefined in XNConnect (see page 10); the Enova DGX 8/16/32
supports 64 local presetsDefining and executing global presets (see page 11); these products support 64 global presets
ICSP SEND_COMMANDs
The Enova DGX 8/16/32 supports basic BCS commands incorporated into SEND_COMMANDs (up to 1024 characters packaged in a single BCS command) for control and switching. See the product manual for additional information on using SEND_COMMANDs.
Important: SEND_COMMANDs for Enova DGX 8/16/32 require a final “T” to execute the command.
Specific Commands
The Enova DGX 8/16/3232 supports fragmented status reporting (see page 9) and error code reporting (see page 41).
Diagnostic Commands
The Enova DGX 8/16/32 displays system information in the splash screen for diagnostic purposes. The information indicates the current status and well-being for some of the system components. For information on system diagnostics that includes the commands and applies to all systems that support diagnostic commands, see page 45.
Component Settings
The Enova DGX 8/16/32 supports the eight component identity number settings (i0 through i7) in the following table.
Tip: The information in the table above is displayed when you enter ~scr! or ~scrv0i0!
Auxiliary Commands
Component Identity NumberAll Components i0
Enclosure i1
Storage Blocks i2
Communication Interfaces i3
Hardware / Boards i4
VM Configuration i5
Power System i6
System Sensors i7
Auxiliary Commands Supported by Enova DGX 8/16/32
To cause a warm reboot ~app!
To back up system settings to the SD card ~sysb!
To restore system settings from the SD card ~sysr!
Appendix A – Product Specific BCS Commands
28 Instruction Manual – BCS Basic Control Structure Protocol
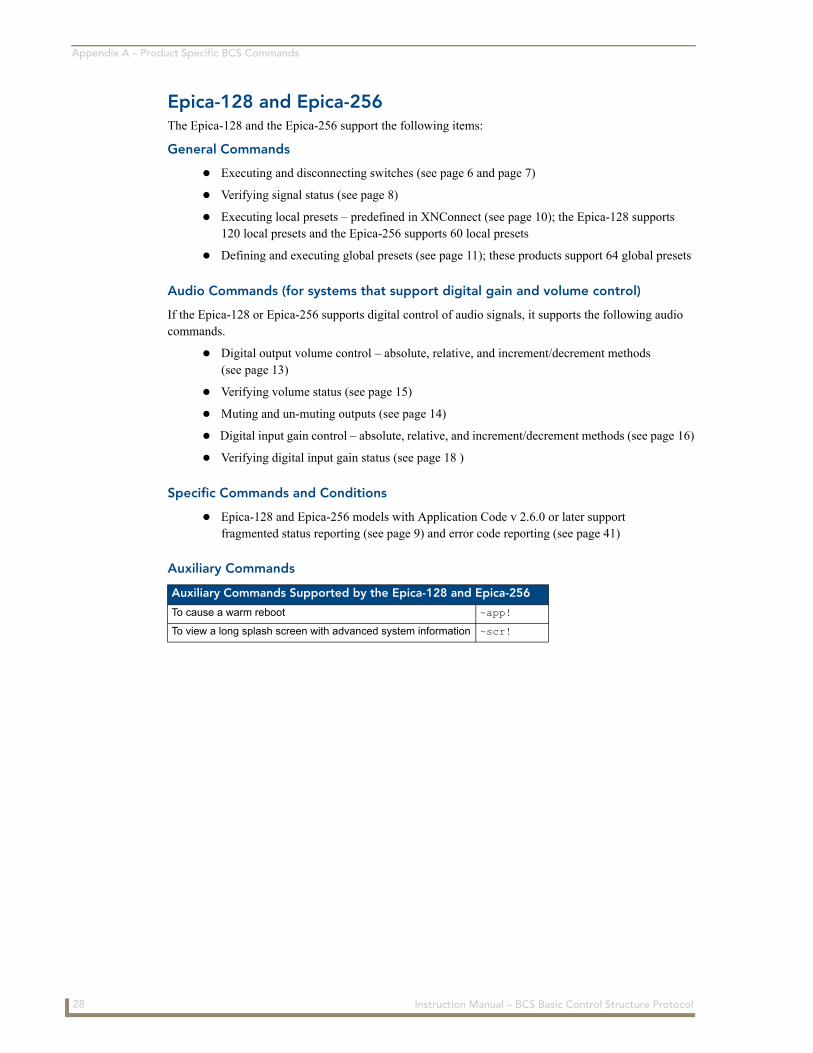
Epica-128 and Epica-256The Epica-128 and the Epica-256 support the following items:
General Commands
Executing and disconnecting switches (see page 6 and page 7)
Verifying signal status (see page 8)
Executing local presets – predefined in XNConnect (see page 10); the Epica-128 supports120 local presets and the Epica-256 supports 60 local presets
Defining and executing global presets (see page 11); these products support 64 global presets
Audio Commands (for systems that support digital gain and volume control)
If the Epica-128 or Epica-256 supports digital control of audio signals, it supports the following audio commands.
Digital output volume control – absolute, relative, and increment/decrement methods (see page 13)
Verifying volume status (see page 15)
Muting and un-muting outputs (see page 14)
Digital input gain control – absolute, relative, and increment/decrement methods (see page 16)
Verifying digital input gain status (see page 18 )
Specific Commands and Conditions
Epica-128 and Epica-256 models with Application Code v 2.6.0 or later support fragmented status reporting (see page 9) and error code reporting (see page 41)
Auxiliary Commands
Auxiliary Commands Supported by the Epica-128 and Epica-256
To cause a warm reboot ~app!
To view a long splash screen with advanced system information ~scr!

Appendix A – Product Specific BCS Commands
29Instruction Manual – BCS Basic Control Structure Protocol
Epica DG, Epica DGX 16, Epica DGX 32, and Epica DGX 144The Epica DG, Epica DGX 16, Epica DGX 32, and Epica DGX 144 support the following items:
General Commands
Executing and disconnecting switches (see page 6 and page 7)
Verifying signal status (see page 8)
Executing local presets – predefined in XNConnect (see page 10); the Epica DG and Epica DGX 144 each support 335 local presets, and the Epica DGX 16 and Epica DGX 32 each support 64 local presets
Defining and executing global presets (see page 11); these products support 64 global presets
Specific Commands
The Epica DG, Epica DGX 16, Epica DGX 32, and Epica DGX 144 support fragmented status reporting (see page 9) and error code reporting (see page 41).
Diagnostic Commands
The Epica DG, Epica DGX 16, Epica DGX 32, and Epica DGX 144 display system information in the splash screen for diagnostic purposes. The information indicates the current status and well-being for some of the system components. For information on system diagnostics that includes the commands and applies to all systems that support diagnostic commands, see page 45.
Component Settings
The Epica DG, Epica DGX 16, Epica DGX 32, and Epica DGX 144 all support the eight component identity number settings (i0 through i7) in the following table.
Tip: The information in the above table is displayed when you enter ~scr! or ~scrv0i0!
Auxiliary Commands
Component Identity Number
All Components i0
Enclosure i1
Storage Blocks i2
Communication Interfaces i3
Hardware / Boards i4
VM Configuration i5
Power System i6
System Sensors i7
Auxiliary Commands Supported by Epica DG, Epica DGX 16, Epica DGX 32, and Epica DGX 144
To cause a warm reboot ~app!

Appendix A – Product Specific BCS Commands
30 Instruction Manual – BCS Basic Control Structure Protocol
HDMI-UTPRO-0808HDMI UTPro systems support the following items:
General Commands
Executing and disconnecting switches (see page 6 and page 7)
Verifying signal status (see page 8)
Defining and executing global presets (see page 11); this product supports 16 global presets
Error Code Reporting (see page 41)
ICSP SEND_COMMANDs
The HDMI UTPro supports basic BCS commands incorporated into SEND_COMMANDs (up to 1024 characters packaged in a single BCS command) for control and switching. See the product manual for additional information on using SEND_COMMANDs.
Important: SEND_COMMANDs for the HDMI UTPro do not use a final “T” to execute the command.
Diagnostic Commands
The HDMI UTPro displays system information in the splash screen for diagnostic purposes. The information indicates the current status and well-being for some of the system components. For information on system diagnostics that includes the commands and applies to all systems that support diagnostic commands, see page 45.
Component Settings
The HDMI UTPro supports the 6 component identity number settings (i0 through i5) in the following table.
Tip: The information in the above table is displayed when you enter ~scr! or ~scrv0i0!
Auxiliary Commands
* For additional information on persisting and clearing the Sink Key cache, see the Instruction Manual – HDMI-UTPRO-0808.
Note: The @et command also disconnects all currently routed signals. The response to the @et command is @eV.
Component Identity Number
All Components i0
Enclosure i1
Storage Blocks i2
Communication Interfaces i3
Hardware / Boards i4
VM Configuration i5
Auxiliary Commands Supported by HDMI-UTPRO-0808
To cause a warm reboot ~app!
To persist the Sink Key cache (system will warm boot)* ~app!
To clear the Sink Key cache* @et

Appendix A – Product Specific BCS Commands
31Instruction Manual – BCS Basic Control Structure Protocol
Modula and Modula CatProModula and Modula CatPro systems support the following items:
General Commands
Executing and disconnecting switches (see page 6 and page 7)
Verifying signal status (see page 8)
Executing local presets – predefined in XNConnect (see page 10); these products support 254 local presets
Defining and executing global presets (see page 11); these products support 64 global presets
Audio Commands (for systems that support digital gain and volume control)
If the Modula or Modula CatPro supports digital control of audio signals, it supports the following audio commands.
Digital output volume control – absolute, relative, and increment/decrement methods (see page 13)
Verifying volume status (see page 15)
Muting and un-muting outputs (see page 14)
Digital input gain control – absolute, relative, and increment/decrement methods (see page 16)
Verifying digital input gain status (see page 18)
Specific Commands and Conditions
Modula and Modula CatPro models with Application Code v 2.6.0 or later support fragmented status reporting (see page 9)
Modula and Modula CatPro models with Application Code v 2.4.2 support a limited set of system error codes. Error code reporting is always enabled by default and cannot be turned off (see page 41)
Important: If the Modula system contains RS-422 boards (which do bi-directional switching), we recommend reading the information in the “Instruction Manual – Modula” on these boards before using BCS commands to control them.
Auxiliary Commands
Auxiliary Commands Supported by Modula and Modula CatPro
To cause a warm reboot ~app!
To view a long splash screen with advanced system information ~scr!

Appendix A – Product Specific BCS Commands
32 Instruction Manual – BCS Basic Control Structure Protocol
OctaireOctaire systems support the following items:
General Commands
Executing and disconnecting switches (see page 6 and page 7)
Verifying signal status (see page 8)
Defining and executing global presets (see page 11); this product supports 64 global presets
Error Code Reporting (see page 41)
Audio Commands (if system contains audio)
If the Octaire routes audio signals, it supports the following audio commands.
Digital output volume control – absolute, relative, and increment/decrement methods (see page 13)
Verifying volume status (see page 15)
Muting and un-muting outputs (see page 14)
Digital input gain control – absolute, relative, and increment/decrement methods (see page 16)
Verifying input gain status (see page 18)
Specific Commands and Conditions
When entering commands, use L0 (or omit level) for routing the All level (audio-follow-video), L1 for routing the Video level, and L2 for routing the Audio level
Does not support local preset commands
Diagnostic Commands
The Octaire displays system information in its splash screen for diagnostic purposes. The information indicates the current status and well-being for some of the system components. For information on system diagnostics that includes the commands and applies to all systems that support diagnostic commands, see page 45.
Component Settings
The Octaire supports six component identity number settings (i0 through i4 and i7) in the following table.
Tip: The information in the table above is displayed when you enter ~scr! or ~scri0v0!
Auxiliary Commands
Component Identity Number
All Components i0
Enclosure i1
Storage Blocks i2
Communication Interfaces i3
Hardware / Boards i4
System Sensors i7
Auxiliary Commands Supported by Octaire
To cause a warm reboot ~app!
To view a splash screen with the lowest level of verbosity ~scr!

Appendix A – Product Specific BCS Commands
33Instruction Manual – BCS Basic Control Structure Protocol
Optima and Optima SDOptima and Optima SD systems support the following items:
General Commands
Executing and disconnecting switches (see page 6 and page 7)
Verifying signal status (see page 8)
Executing local presets – predefined in XNConnect (see page 10); these products support16 local presets
Defining and executing global presets (see page 11); these products support 16 global presets
Error Code Reporting (see page 41)
Audio Commands (for systems that support digital gain and volume control)
If the Optima or Optima SD supports digital control of audio signals, it supports the following audio commands.
Digital output volume control – absolute, relative, and increment/decrement methods (see page 13)
Verifying volume status (see page 15)
Muting and un-muting outputs (see page 14)
Digital input gain control – absolute, relative, and increment/decrement methods (see page 16)
Verifying input gain status (see page 18)
Specific Commands and Conditions
Optima and Optima SD models with Application Code v 1.2.0 or later support fragmented status reporting (see page 9)
Diagnostic Commands
Optima and Optima SD models display system information in their splash screens for diagnostic purposes. The information indicates the current status and well-being for some of the system components. For information on system diagnostics that includes the commands and applies to all systems that support diagnostic commands, see page 45.
Component Settings
Optima and Optima SD models support six component identity number settings (i0 through i5) in the following table.
Tip: The information in the table above is displayed when you enter ~scr! or ~scri0v0!
Auxiliary Commands
* Used only in Optima enclosures containing HDMI I/O boards. For additional information on persisting and clearing the Sink Key cache, see the Instruction Manual – Optima.
Note: The @et command also disconnects all currently routed signals. The response to the @et command is @eV.
Component Identity NumberAll Components i0Enclosure i1Storage Blocks i2Communication Interfaces i3Hardware / Boards i4VM Configuration i5
Auxiliary Commands Supported by Optima and Optima SDTo cause a warm reboot ~app!To view a long splash screen with advanced system information ~scr!To persist the Sink Key cache (system will warm boot)* ~app!To clear the Sink Key cache* @et

Appendix A – Product Specific BCS Commands
34 Instruction Manual – BCS Basic Control Structure Protocol
Precis DSPPrecis DSP models support the following items:
General Commands and Conditions
Executing and disconnecting switches (see page 6 and page 7)
Verifying signal status (see page 8)
Specific Commands and Conditions
If the Level “L” designation is omitted, the command is executed on the audio level. When entering BCS commands, either omit the Level designation or use Level 0 or Level 2 (Level 0 indicates all levels and the Precis DSP models only have one level)
Does not support global or local preset commands
Supports using a colon “:” to designate a range of destination numbers in multiple number entries
Audio Commands
Supports full DSP functionality (see page 25)
Digital output volume control – absolute, relative, and increment/decrement methods (see page 13)
Verifying volume status (see page 15)
Muting and un-muting outputs (see page 14)
Digital input gain control – absolute, relative, and increment/decrement methods (see page 16)
Verifying digital input gain status (see page 18)
Diagnostic Commands
Precis DSP models display system information in their splash screens for diagnostic purposes. The information indicates the current status and well-being for some of the system components. For information on system diagnostics that includes the commands and applies to all systems that support diagnostic commands, see page 45.
Component Settings
The Precis DSP supports six component identity number settings (i0 through i5) in the following table.
Tip: The information in the table above is displayed when you enter ~scr! or ~scri0v0!
Auxiliary Commands
Component Identity Number
All Components i0
Enclosure i1
Storage Blocks i2
Communication Interfaces i3
Hardware / Boards i4
VM Configuration i5
Auxiliary Commands Supported by Precis DSP
To cause a warm reboot ~app!
To view a long splash screen with advanced system information ~scr!

Appendix A – Product Specific BCS Commands
35Instruction Manual – BCS Basic Control Structure Protocol
Precis LT
Precis LT models support the following items:
General Commands and Conditions
Executing and disconnecting switches (see page 6 and page 7)
Verifying signal status (see page 8)
Specific Commands and Conditions
The Precis LT uses Level 1 for video and Level 2 for audio. To route video or audio signals separately, enter Level 1 for video only or Level 2 for audio only. Precis LT does not recognize Level 0 (L0)as part of a BCS command. To achieve the equivalent of routing signals on Level 0 (audio-follow-video), either omit the level command, (CI3O8T) or enter both level numbers by entering a space between each number (CL1 2I3O8T)
Does not support audio commands
Does not support global or local preset commands
Does not support using a colon “:” to designate a range of destination numbers in multiple number entries. To designate a range of numbers, insert a space between each number in the range
Precis SDNote: This section also applies to any Precis (500 MHz) models built before the Precis SD was released.
Precis SD models support the following items:
General Commands and Conditions
Executing and disconnecting switches (see page 6 and page 7)
Verifying signal status (see page 8)
Executing local presets – predefined in XNConnect (see page 10); this product supports64 local presets
Defining and executing global preset (see page 11); this product supports 64 global presets
Error Code Reporting (see page 41)
Specific Commands and Conditions
Precis SD models with front control panels will accept BCS commands while the panel is locked, but BCS commands cannot be used to unlock the front panel
Executing local presets – predefined in XNConnect (see page 10)
Supports auxiliary commands
Supports diagnostic commands
To designate a range of numbers: enter the first number in the range, followed by a colon “:”, and then enter the last number in the range
Supports limited error code reporting. An “E” appearing as the result of a Status command indicates a communication failure between the CPU and the control panel. To establish communication, use the control panel to execute a switch or power down and then power up the system

Appendix A – Product Specific BCS Commands
36 Instruction Manual – BCS Basic Control Structure Protocol
Precis SD (continued)Audio Commands (for systems that support digital gain and volume control)
If the control panel has a Volume Adjust Key, then the system supports the following audio commands:
Digital output volume control – absolute, relative, and increment/decrement methods (see page 13)
Verifying volume status (see page 15)
Muting and un-muting outputs (see page 14)
Digital input gain control – absolute, relative, and increment/decrement methods (see page 16)
Verifying digital input gain status (see page 18)
Diagnostic Commands
The Precis SD displays system information on the splash screen for diagnostic purposes. The information indicates the current status and well-being for some of the system components. For information on system diagnostics that includes the commands and applies to all systems that support diagnostic commands, see page 45.
Component Settings
The Precis SD supports six component identity number settings (i0 through i5) in the following table.
Tip: The information in the table above is displayed when you enter ~scr! or ~scri0v1!
Auxiliary Commands
Component Identity Number
All Components i0
Enclosure i1
Storage Blocks i2
Communication Interfaces i3
Hardware / Boards i4
VM Configuration i5
Auxiliary Commands Supported by Precis SD
To cause a warm reboot ~app!
To view a splash screen with advanced system information ~scr!

Appendix A – Product Specific BCS Commands
37Instruction Manual – BCS Basic Control Structure Protocol
Heritage SystemsNote: If you have a heritage product (a discontinued product, i.e., not listed in the previous pages), refer to this section. Typically, older heritage products use BCS commands similar to the way the 1Y Series does.
1Y Series, 4Y-DM, 8Y-DM, and 8Y-XL
1Y Series, 4Y-DM, 8Y-DM, and 8Y-XL systems support the following items:
General Commands
Executing and disconnecting* switches (see page 6 and page 7)
Verifying signal status (see page 8)
Defining and executing global presets (see page 11)**
* The heritage products 4Y-DM, 8Y-DM, and 8Y-XL do not support the Disconnect command.
** The 1Y and the 4Y-DM are the only heritage products that support global presets.
Specific Commands and Conditions
Does not support local presets
Some models may be case-sensitive and require BCS commands to be entered in all caps
Tip: If the response to a command string contains the characters “?” or “x”, instead of the characters you entered, re-enter the command with all capital letters.
BCS commands can be used to program and change the configuration word on some heritage systems. The configuration word is a hexadecimal number that tells the matrix how to set the baud rate, choose the number of SBCs to poll, and whether or not to echo serial commands on the control panel. For instructions on changing the configuration word, see the Instruction Manual – 1Y Series Matrix Switchers at www.amx.com.
8Y-3000
8Y-3000 systems support the following items:
General Commands
Executing and disconnecting switches (see page 6 and page 7)
Verifying signal status (see page 8)
Executing local presets – predefined in XNConnect (see page 10)
Defining and executing global presets (see page 11)
Specific Commands and Conditions
8Y-3000 models with Application Code v 1.2.0 or later support fragmented status reporting (see page 9)
8Y-3000 models with Application Code v 2.4.2 or later support a limited set of system error codes. Error code reporting is always enabled by default and cannot be turned off (see page 41)

Appendix A – Product Specific BCS Commands
38 Instruction Manual – BCS Basic Control Structure Protocol
8Y-3000 (continued)
Audio Commands (for systems that support digital gain and volume control)
If the 8Y-3000 supports digital control of audio signals, it supports the following audio commands.
Digital output volume control – absolute, relative, and increment/decrement methods (see page 13)
Verifying volume status (see page 15)
Muting and un-muting outputs (see page 14)
Digital input gain control – absolute, relative, and increment/decrement methods (see page 16)
Verifying digital input gain status (see page 18)
Auxiliary Commands
Precis 6x2
Precis 6x2 models support the following items:
General Commands
Executing and disconnecting switches (see page 6 and page 7)
Verifying signal status (see page 8)
Specific Commands and Conditions
If the Level “L” designation is omitted, the command is executed on the default level, which is Level 0 (audio-follow-video). To route video or audio signals separately, enter Level 1 for video only or Level 2 for audio only
The Precis 6x2 with a front control panel will accept BCS commands while the panel is locked, but BCS commands cannot be used to unlock the front panel
The Precis 6x2 is equipped with a Standby switch. During Standby mode, BCS commands cannot be entered
Does not support audio commands
Does not support global or local preset commands
Does not support auxiliary commands
Supports limited error code reporting. An “E” appearing as the result of a Status command indicates a communication failure between the CPU and the control panel. To establish communication, use the control panel to execute a switch or power down and then power up the system
Auxiliary Commands Supported by 8Y-3000
To cause a warm reboot ~app!
To view a long splash screen with advanced system information ~scr!

Appendix A – Product Specific BCS Commands
39Instruction Manual – BCS Basic Control Structure Protocol
Precis (300 MHz)
Precis (300 MHz) models support the following items:
General Commands and Conditions
Executing and disconnecting switches (see page 6 and page 7)
Verifying signal status (see page 8)
Executing local presets – predefined in XNConnect (see page 10)
Specific Commands and Conditions
Precis (300 MHz) models with front control panels will accept BCS commands while the panel is locked, but BCS commands cannot be used to unlock the front panel
A range of numbers cannot be entered by using a colon “:” To designate a range of numbers, insert a space between each number in the range
Does not support global presets
Does not support auxiliary commands
Supports limited error code reporting. An “E” appearing as the result of a Status command indicates a communication failure between the CPU and the control panel. To establish communication, use the control panel to execute a switch or power down and then power up the system
Audio Commands (systems that support digital gain and volume control)
If control panel has a Volume Adjust Key, then the system supports the following audio commands:
Digital output volume control – absolute, relative, and increment/decrement methods (see page 13)
Verifying volume status (see page 15)
Digital input gain control – absolute, relative, and increment/decrement methods (see page 16)
Verifying digital input gain status (see page 18)
Precis HT
Precis HT models support the following items:
General Commands and Conditions
Executing and disconnecting switches (see page 6 and page 7)
Verifying signal status (see page 8)
Executing local presets – predefined in XNConnect (see page 10); supports 1280 local presets
Specific Commands and Conditions
Precis HT models will accept BCS commands while the front control panel is locked, but BCS commands cannot be used to unlock the front panel
A range of numbers cannot be entered by using a colon “:” To designate a range of numbers, insert a space between each number in the range
Does not support global presets
Does not support auxiliary commands
Supports limited error code reporting. An “E” appearing as the result of a Status command indicates a communication failure between the CPU and the control panel. To establish communication, use the control panel to execute a switch or power down and then power up the system
Audio Commands (for analog audio signals only)
Digital output volume control – absolute, relative, and increment/decrement methods (see page 13)
Verifying volume status (see page 15)
Digital input gain control – absolute, relative, and increment/decrement methods (see page 16)
Verifying digital input gain status (see page 18)

Appendix A – Product Specific BCS Commands
40 Instruction Manual – BCS Basic Control Structure Protocol

Appendix B – Error Code Reporting
41Instruction Manual – BCS Basic Control Structure Protocol
Appendix B – Error Code Reporting
When a command string is entered but not accepted, a different character than the one entered will appear. All of the AMX systems listed in the “Product Specific” Appendix support limited error code reporting (displaying a single character). Advanced systems support error codes numbers (alone or in addition to a single character) if the error code reporting is enabled.
Limited Error Codes; Error Code Numbers and PrefixesLimited Error Codes
If a “?” appears instead of the command character or number you entered, the system did not understand the command because the command string format contained an error (e.g., not indicating an input in a Change command).
If an “X” appears instead of the command character or number you entered, the system understood the command, but did not execute all or part of the command. For example, an “X” may appear when entering an invalid value (such as Output 272 in a system that only has 256 outputs) or requesting a volume setting which results in a decibel level that is outside of the range for the board / connector set.
Precis LT only – If an “E” appears instead of the command character or number entered in a Status command, a communication failure occured between the CPU and the control panel.
Troubleshooting
When error code reporting is enabled, error codes can appear in a terminal emulation program (such as HyperTerminal).
When you are using BCS commands, one common troubleshooting strategy is to enter the command again. Often the command has simply been entered incorrectly (e.g., omitting an output in a Change command). In other cases, the command has specified a value that is not valid.
When you are using an external controller, one of the most common troubleshooting strategies is to resend the command to see if the error was simply a time out error.
Error Code Numbers
In systems that support error code reporting, an error code number beginning with E# or W# will be displayed in addition to the command string with a ? or x. In some systems, the error code will appear alone. Sometimes error codes appear if the system’s status changes, even though a command string was not entered.
This following section provides an overview of common error codes that can appear for systems when this feature is enabled.
Error Code Prefixes
First letter of the code indicates:
E – Error
W – Warning
A – Alarm*
I – Information*
* Because these codes very rarely appear, they are not included in the table on the following page.
For systems that support system error code reporting, the default is error code reporting disabled. We recommend enabling error code reporting when a command string response contains the characters“?” or “X”, when troubleshooting the system, or when directed by technical support.

Appendix B – Error Code Reporting
42 Instruction Manual – BCS Basic Control Structure Protocol
Enabling Error Code ReportingError code reporting can be enabled or turned off with BCS commands entered into a terminal emulation program.
To enable error code reporting:
1. Enter $ERR=1!The system responds with V.
Note: If the power is cycled, you will need to enable error code reporting again.
To turn off error code reporting:
1. Enter $ERR=0!
Common System Error CodesThe table below lists the error code, the name of the code, the meaning of the code, and some basic troubleshooting strategies. This list is not intended to be comprehensive, nor does it apply to all products. If an error code appears that is not listed, note the specific number and contact technical support (see page 43).
Most Common System Error Codes
Error Code Meaning Troubleshooting Strategies
E01000AEnclosure timeout error
One or more of the enclosures in a multi-enclosure system did not acknowledge a control operation command.
• Resend the command.
• Check the Status LED on the rear of each enclosure. If any of the LEDs are red, contact technical support.
• Check the power indicators.
• Check the link connectors between enclosures.
EFF8002Transaction timeout error
The operation was not completed before the timer expired.
• Resend the command.
• Check the power indicators.
• Check the link connections in multi-enclosure systems.
• Check that the level used in the command was valid.
E01DFFFAudio request error
Missing hardware support error, e.g., a volume or gain request was made on a level that does not switch audio.
• Resend the command on a level that includes audio.
W010005Sync timeout error
The system did not receive the vertical interval sync signal. Note that the switch occurred, but not at the sync interval.
• Resend the command.
• Check the sync cable connections.
• Check the HyperTerminal splash screen to verify that sync is enabled (see the vertical interval sync board / connector documentation).
• Check that the sync signal from the generator is being received by the system.
• Power the system down and check sync board alignment.

Appendix B – Error Code Reporting
43Instruction Manual – BCS Basic Control Structure Protocol
Technical SupportIf this manual has not satisfactorily answered your questions regarding BCS commands, please contact your AMX representative or technical support. Have the system’s serial number ready. The system’s serial number is normally located on the rear of the enclosure.
We recommend recording the system’s serial number in an easily accessible location.
AMX Contact Information
3000 Research Drive, Richardson, TX 75082
800.222.0193
469.624.8000
Fax 469.624.7153
Technical Support 800.932.6993
www.amx.com

Appendix B – Error Code Reporting
44 Instruction Manual – BCS Basic Control Structure Protocol

Appendix C – Programmer’s Interface for System Diagnostics
45Instruction Manual – BCS Basic Control Structure Protocol
Appendix C – Programmer’s Interface for System Diagnostics
System Component InformationSome of the AMX systems listed in the “Product Specific” Appendix display system information in a splash screen* for diagnostic purposes (see the individual product in the table on page 26 to determine if your system supports diagnostic commands). The information indicates the current status and well-being of the system components.
The splash screen can be accessed using a terminal emulation program, such as HyperTerminal. One of four verbosity** settings is specified to provide a level of detail for information on up to seven system components. Only one verbosity setting and one component identity setting can be entered in a command. The order in which the verbosity and component identity settings are entered is interchangeable. For the number of components a system supports, see the individual product in “Appendix A – Product Specific BCS Commands” starting on page 25.
Note: In a multi-enclosure system, the splash screen displays information only for the enclosure that is connected directly to the PC.
* AMX reserves the right to add to the contents of the splash screen at any time, without notice.
** Verbosity (i.e., wordiness) refers to the amount of information provided; the higher the verbosity setting, the more information is displayed.
FIG. 2 Example of a default Epica DG splash screen
Command entered to display minimal information for all system components
The system’s component identity numbers are to the left of each component
~scr!
[1:Enclosure] AutoPatch Epica DG
[2:Storage Blocks] cleared
[3:Communication Interfaces] count = 3
[4:Hardware Boards] detected
[5:VM Configuration] count = 1
[6:Power System] good
[7:System Sensors] detected

Appendix C – Programmer’s Interface for System Diagnostics
46 Instruction Manual – BCS Basic Control Structure Protocol
Verbosity Settings
The verbosity (v) settings (v0, v1, v2, v3) correspond to the level of detail that will be displayed, with v0 being the lowest level of detail and v3 being the highest level.
Component Identity Settings
Detailed information for a single system component can be specified (if the system supports it) by using its identity (i) number setting (i1 through i7) in the following table. Minimal information for all supported components can be specified by using the identity number i0.
Note: For the number of components that individual products support, see “Appendix A – Product Specific BCS Commands” on page 25.
Default Settings
At system boot, the ~scrv0i1! setting is displayed.
If the verbosity setting is omitted, the verbosity level will be the lowest (v0).
The component setting must be included; otherwise, entering any of the verbosity settings alone will result in a display equivalent to v0i0.
If both settings are omitted during a query (~scr!), the information displayed will be at the lowest verbosity level for all components (v0i0) (FIG. 2 on page 45).
Component Identity Number
All Components i0
Enclosure i1
Storage Blocks i2
Communication Interfaces i3
Hardware / Boards i4
VM Configuration i5
Power System i6
System Sensors i7
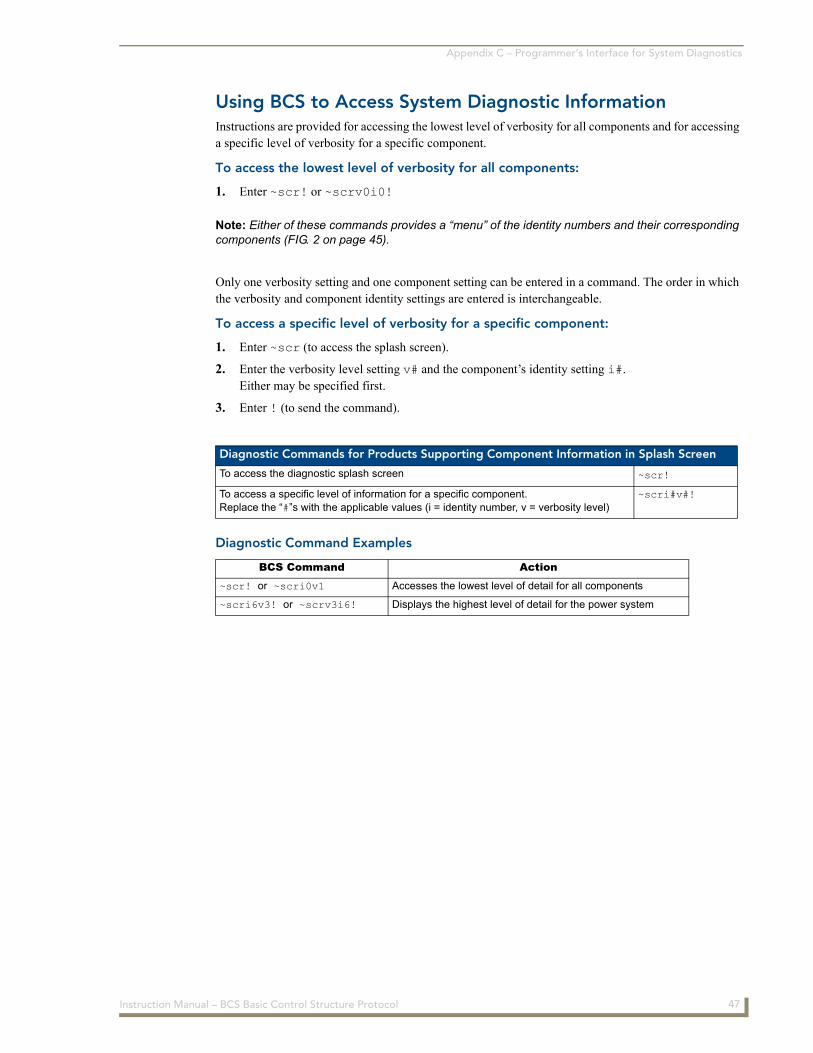
Appendix C – Programmer’s Interface for System Diagnostics
47Instruction Manual – BCS Basic Control Structure Protocol
Using BCS to Access System Diagnostic InformationInstructions are provided for accessing the lowest level of verbosity for all components and for accessing a specific level of verbosity for a specific component.
To access the lowest level of verbosity for all components:
1. Enter ~scr! or ~scrv0i0!
Note: Either of these commands provides a “menu” of the identity numbers and their corresponding components (FIG. 2 on page 45).
Only one verbosity setting and one component setting can be entered in a command. The order in which the verbosity and component identity settings are entered is interchangeable.
To access a specific level of verbosity for a specific component:
1. Enter ~scr (to access the splash screen).
2. Enter the verbosity level setting v# and the component’s identity setting i#. Either may be specified first.
3. Enter ! (to send the command).
Diagnostic Command Examples
Diagnostic Commands for Products Supporting Component Information in Splash Screen
To access the diagnostic splash screen ~scr!
To access a specific level of information for a specific component. Replace the “#”s with the applicable values (i = identity number, v = verbosity level)
~scri#v#!
BCS Command Action
~scr! or ~scri0v1 Accesses the lowest level of detail for all components
~scri6v3! or ~scrv3i6! Displays the highest level of detail for the power system

Appendix C – Programmer’s Interface for System Diagnostics
48 Instruction Manual – BCS Basic Control Structure Protocol
Splash Screen ExamplesFollowing are four examples of splash screen information that could display when different verbosity/component identity settings are specified. Depending on the amount of detail provided, you may need to scroll to see the entire display. All examples provided are for an Epica DG system.
FIG. 3 Display for v1i7 (verbosity 1, component 7)
FIG. 4 Display for v3i7 (verbosity 3, component 7)
FIG. 5 Display for v3i6 (verbosity 3, component 6)
~scrv1i7!
[7:System Sensors] detected
[cpu pol] detected
[io board 5 sensors] detected
[center board 1 sensors] detected
[center board 2 sensors] detected
[fan controller 1] detected
[fan controller 2] detected
~scrv3i7!
[7:System Sensors] detected
[cpu pol] detected
[temp] 51c
[io board 5 sensors] detected
[temp 1] 32.3c
[temp 2] 33.9c
[center board 1 sensors] detected
[temp 1] 28.5c
[center board 2 sensors] detected
[temp 1] 29.3c
~scrv3i6!
[6:Power System] good
[status flags] 0x0000
[available system power] 2418w
[required system power] 990w
[ac power slot 1] good
[status flags] 0x0000
[available power] 806w
[output power] 150.850w
[voltage] 12.248V
[current] 12.248v

Appendix C – Programmer’s Interface for System Diagnostics
49Instruction Manual – BCS Basic Control Structure Protocol
Splash Screen Examples (continued)
FIG. 6 Display for v3i4 (verbosity 3, component 4)
~scrv3i4!
[4:Hardware Boards] detected
[switching drivers] count = 4
[mtx driver 1] M21151 144 x 144 driver
[revision code] 0x4
[product code] 0xc0
[mtx driver 2] M21151 144x144 driver
[revision code] 0x4
[product code] 0xc0
[mtx driver 3] M21151 144x144 driver

02/1
3 ©20
13 A
MX
. All
right
s re
serv
ed. A
MX
and
the
AM
X lo
go
are
reg
iste
red
tra
dem
arks
of A
MX
. AM
X r
eser
ves
the
rig
ht t
o a
lter
spec
ifica
tions
with
out
no
tice
at a
ny t
ime.
3000 RESEARCH DRIVE, RICHARDSON, TX 75082 USA • 800.222.0193 • 469.624.8000 • 469-624-7153 fax • 800.932.6993 technical support • www.amx.com
Increase Your Revenuethrough education + knowledge
In the ever-changing AV industry, continual education is key to success. AMX University is dedicated to ensuring that you have the opportunity to gather the information and experience you need to deliver strong AMX solutions. Plus, AMX courses also help you earn CEDIA, NSCA, InfoComm, and AMX continuing education units (CEUs).
Visit AMX University online for 24/7/365 access to:- Schedules and registration for any AMX University course- Travel and hotel information- Your individual certification requirements and progress