instruction manual for owner’s use - 2helpu€¦ · 6 g b 1. precautions all users must read and...
TRANSCRIPT
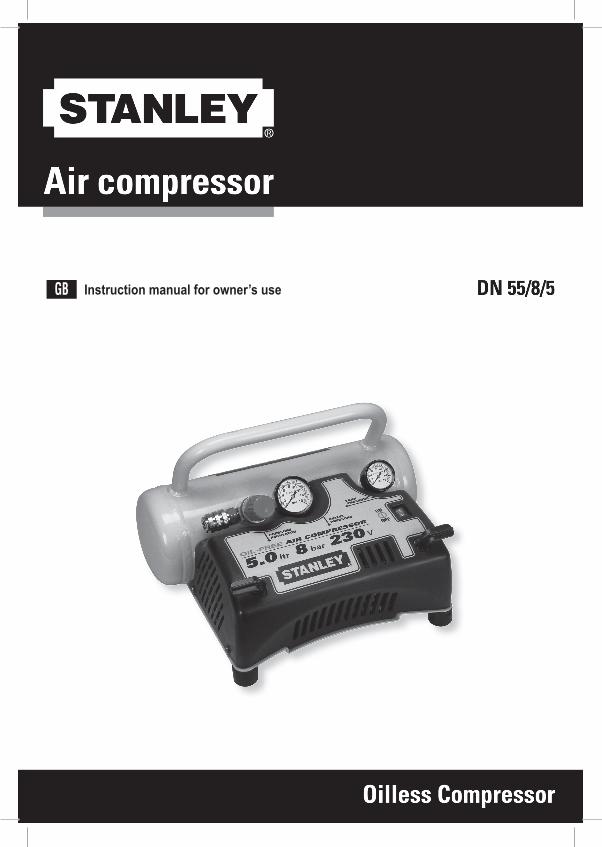
Instruction manual for owner’s useGB

Manufactured under license by:Nu Air Compressors And Tools S.p.A. - via Einaudi 6, 10070 Robassomero (TO) ItalyStanley® is a registered trademark of The Stanley Works or its affiliates and is used under license.
GB Before operating this tool, all operators should study this manual to understand and follow the safety warnings and instructions. Keep these instructions with the tool for future reference. If you have any questions, contact your STANLEY representative or distributor.

GB KEY TO PRODUCT SAFETY SIGNS
Before use, read the handbook carefully
Warning, hot surfaces
Dangerous voltage
Danger - automatic control (closed loop)
Hearing, sight and respiratory protection must be worn
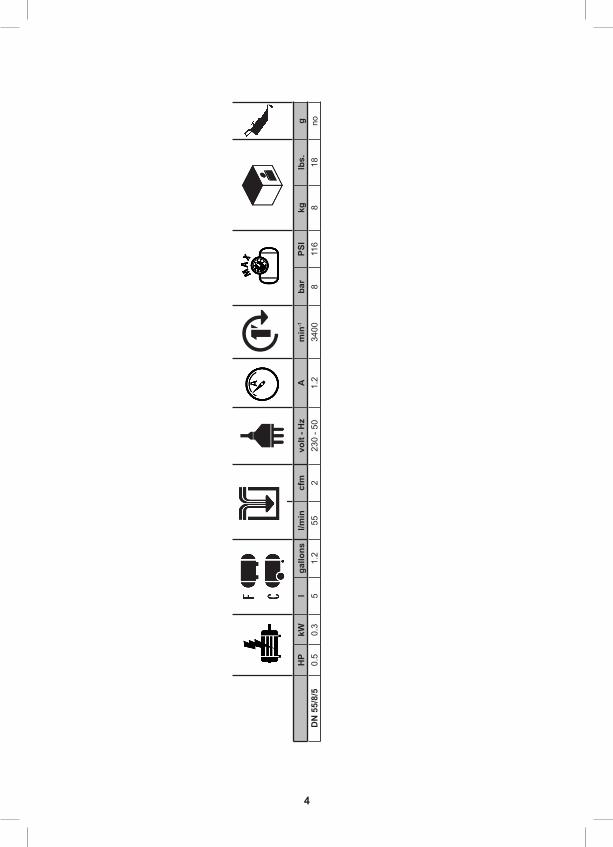
4
HP
kWl
gallo
nsl/m
incf
mvo
lt - H
zA
min
-1ba
rPS
Ikg
lbs.
gD
N 5
5/8/
50.
50.
35
1.2
552
230
- 50
1.2
3400
811
68
18no

5
1
32
E
4
Brown: Live (L) or RedBlue: Neutral (N) or Black
G
AD C
F
B

6
GB 1. PRECAUTIONS
All users must read and fully understand all information contained in this owner’s manual before assembling, operating, or maintaining this air compressor.Carefully review the following rules for safe operation and fully understand all warnings.
THINGS TO DO● The compressor must be used in a suitable environment
(well ventilated with an ambient temperature of between +5°C and +40°C) and never in places affected by dust, acids, vapours, explosive or flammable gases.
● Always maintain a safety distance of at least 4 meters between the compressor and the work area.
● Any coloring of the belt guards of the compressor during painting operations indicates that the distance is too short.
● Insert the plug of the electric cable in a socket of suitable shape, voltage and frequency complying with current regulations.
● Use extension cables with a maximum length of 5 meters and of suitable cross-section.
● The use of extension cables of different length and also of adapters and multiple sockets should be avoided.
● Always use the I/O switch to switch off the compressor.● Always use the handle to move the compressor.● Always disconnect power cord and air hose from the air
compressor before transporting.● When operating, the compressor must be placed on a
stable, horizontal surface.
THINGS NOT TO DO● Never direct the jet of air towards persons, animals or your
body. (Always wear safety goggles to protect your eyes against flying objects that may be lifted by the jet of air).
● Never direct the jet of liquids sprayed by tools connected to the compressor towards the compressor.
● Never use the appliance with bare feet or wet hands or feet.
● Never pull the power cable to disconnect the plug from the socket or to move the compressor.
● Never leave the appliance exposed to adverse weather conditions.
● Never transport the compressor with the receiver under pressure.
● Do not weld or machine the receiver. In the case of faults or rusting, replace the entire receiver.
● Never allow inexpert persons to use the compressor. Keep children and animals at a distance from the work area.
● Do not position flammable or nylon/fabric objects closed to and/or on the compressor.
● Never clean the compressor with flammable liquids or
solvents. Check that you have unplugged the compressor and clean with a damp cloth only.
● The compressor must be used only for air compression. Do not use the compressor for any other type of gas.
● The compressed air produced by the compressor cannot not be used for pharmaceutical, food or medical purposes except after particular treatments and cannot be used to fill the air bottles of scuba divers.
● To avoid serious burns, never touch the cylinder head parts or tubing during or immediately after operation.
THINGS YOU SHOULD KNOW● To avoid overheating of the electric motor, this
compressor is designed for intermittent operation (do not operate on more than a 50% duty cycle. If this air compressor pumps air more than 50% of one hour, then the compressor’s capability is less than the air delivery required by the application. Always match the air volume requirements of the attachment or accessory with the air volume delivery of the compressor). In the case of overheating, the thermal cut-out of the motor trips, automatically cutting off the power when the temperature is too high. The motor restarts automatically when normal temperature conditions are restored.
● When the compressor is plugged into an electrical source and the pressure switch is in the “ON” position, this compressor will cycle automatically.– Never touch any moving parts.– Keep all body parts, hair, clothing, and jewelry away from
moving parts.– Never operate the air compressor without all guards and
shrouds in place.– Never stand on the compressor.
● The compressor is fitted with a safety valve that is tripped in the case of malfunctioning of the pressure switch in order to assure machine safety.
● When fitting a tool, the flow of air in output must be switched off.
● When using compressed air, you must know and comply with the safety precautions to be adopted for each type of application (inflation, pneumatic tools, painting, washing with water-based detergents only, etc.).
● Never exceed the maximum allowable pressure recommended by the manufacturer of any attachment or accessory you use with this compressor.
● This appliance is not intended for use by persons (including children) with reduced physical, sensory or mental capabilities, or lack of experience and knowledge, unless they have been given supervision or instruction concerning the use of the appliance by a person responsible for their safety.
● Children should be supervised to ensure that they do not play with the appliance.
Preserve this handbook for future reference.

7
GB
2. FEATURES (Pics. 1-2-3)A. Pressure Switch: The pressure switch is the
activation mechanism that is used to start and stop the compressor. When the switch is “On”, the motor and pump will compress air until tank pressure reaches the upper limit of the factory set operating pressure. When tank pressure falls below the factory set “cut in” pressure, the compressor will again automatically start to compress air.
B. Tank Pressure Gauge: The tank pressure gauge indicates the air pressure that is present in the tank in PSI (and BAR).
C. Regulated Pressure Gauge: The regulated pressure gauge indicates the amount of pressure that is allowed into the discharge line according to the setting of the regulator.
D. Regulator Knob: The regulator knob is used to adjust the air pressure that is available at the discharge line. The discharge air pressure is increased by turning the knob clockwise and decreased by turning the knob counter clockwise.
E. Drain Valve: Ball style valve that drains moisture from the tank when opened.
F. Quick Coupler: The quick coupler is used to connect the airline to your tool.
G. Safety valve: The safety valve is set to avoid over-pressurization of the air tanks. This valve is factory pre-set at 8 bar (116 PSI) and will not function unless tank pressure reaches this pressure. Do not attempt to adjust or eliminate this safety device. Any adjustments to this valve could cause serious injury. If this device requires service or maintenance, see an Authorized Service Center.
3. SCOPE OF USEThe compressor is designed for generating compressed air for tools operated by compressed air.Please note that our equipment has not been designed for use in commercial, trade or industrial applications. Our warranty will be voided if the machine is used in commercial, trade or industrial businesses or for equivalent purposes.The machine is to be used only for its prescribed purpose. Any other use is deemed to be a case of misuse. The user/operator and not the manufacturer will be liable for any damage or injuries of any kind caused as a result of this.
4. ELECTRICAL GROUNDING INSTRUCTIONS
This product should be electrically grounded. In the event of an electrical short circuit, grounding reduces the risk of electrical shock by providing an escape wire for electrical
current. This product is equipped with a cord having a grounding wire with an appropriate grounding plug. The plug must be plugged into an outlet that is properly installed and grounded in accordance with all local codes and ordinances.
4.1 Connection of the mains plug Important!
The wires in the mains lead fitted to this product are coloured in accordance with the code shown in pic. 4.● Thisproductisdoubleinsulatedandthereforedoes
not require a connection to earth.● The3pinplugmustcomplytoBS1363/A.● FusemustcomplytoBS1362.If for any reason the 13 amp plug fitted to this product requires replacement it must be wired in accordance with the following instruction:Do not connect the brown (live) or blue (neutral) to the earth pin marked ‘E’ onthe3pinplug.
Connect the Blue wire to the terminal marked Neutral (N). Connect the Brown wire to the terminal marked Live (L). Ensure that the outer insulation is gripped by the cord grip and that the wires are not trapped when replacing the plug cover. The mains lead on this product is fitted with a 13 amp (BS1363/A) plug. A 13 amp (BS1362) fuse must be fitted in the plug.
If in doubt consult a qualified electricianThere are no user serviceable parts inside this product except those referred to in the manual. Always refer servicing to qualified service personnel. Never remove any part of the casing unless qualified to do so; this unit contains dangerous voltages.
Warning! For your protection if this product is to be used outdoors it should not be exposed to rain or used in damp locations. Do not place the product on damp surfaces, use a workbench if available. For added protection use a suitable residual current device (R.C.D.) at the socket outlet.
Note: If the mains cable requires replacing it must be replaced with an identical one and fitted by a qualified person.
5. PRE-START PROCEDURES● Examine the machine for signs of transit damage.
Report any damage immediately to the company which delivered the compressor.
● Verifythatthetankshavebeendrainedandareclearofany moisture or dirt.
● The compressor should be set up near the workingconsumer.
● Avoidlongairlinesandlongsupplylines(extensions).● Makesuretheintakeairisdryanddust-free.
8
GB
● Donotsetupthecompressorindamporwetrooms.● The compressormay only be used in suitable rooms
(with good ventilation and an ambient temperature from +5°C to +40°C). There must be no dust, acids, vapours, explosive gases or inflammable gases in the room.
● Thecompressorisdesignedtobeusedindryrooms.Itis prohibited to use the compressor in areas where work is conducted with sprayed water.
6. OPERATION INSTRUCTIONS6.1 Start-UpProcedures1. VerifythattheOn/OffswitchisintheOffposition.2. Verifythatthetankairpressureisat0PSI.3. Attach the air hose to the discharge line.4. Plug the unit into a properly grounded outlet.5. Push the On/Off switch to On. The On/Off switch
will light-up to indicate the compressor is on. The compressor will automatically cycle on and off to keep the tank pressure maintained .
6. Adjust the pressure regulator to the proper pressure setting required for the air tool.
6.2 Shut-OffProcedures1. Push in the On/Off switch to the Off position.
7. CLEANING AND mAINTENANCE Warning!
Pull the power plug before doing any cleaning andmaintenance work on the appliance.
Warning! Wait until the compressor has completely cooled down. Risk of burns!
Warning! Always depressurize the tank before carrying out any cleaning and maintenance work.
7.1 Cleaning● Keep the safety devices free of dirt and dust as far
as possible. Wipe the equipment with a clean cloth or blow it with compressed air at low pressure.
● We recommend that you clean the applianceimmediately after you use it.
● Clean the appliance regularly with a damp clothand some soft soap. Do not use cleaning agents or solvents; these may be aggressive to the plastic parts in the appliance. Ensure that no water can get into the interior of the appliance.
● Youmustdisconnectthehoseandanysprayingtoolsfrom the compressor before cleaning. Do not clean the compressor with water, solvents or the like.
7.2 DrainingtankThe condensation water must be drained off each day by opening the drain valve (ref. E) (on the bottom of the pressure vessel).1. VerifythatthecompressoristurnedOff.2. Holding the handle, tilt the compressor toward the
drain valve so that they are positioned at the bottom of the tank.
3. Turn the drain valve to open the valve.4. Keep the compressor tilted until all moisture has been
removed.
Warning! The condensation water from the pressure vesselwill contain residual oil. Dispose of the condensation water in an environmentally compatible manner at the appropriate collection point.
7.3 Safetyvalve(ref.G)The safety valve has been set for the highest permitted pressure of the pressure vessel. It is prohibited to adjust the safety valve or remove its seal. Actuate the safety valve from time to time to ensure that it works when required. Pull the ring with sufficient force until you can hear the compressed air being released. Then release the ring again.
7.4 Storage Warning!
Pullthemainsplugoutofthesocketandventilatetheappliance and all connected pneumatic tools.Switch off the compressor andmake sure that it issecured in such a way that it cannot be started up again by any unauthorized person.
Warning! Storethecompressoronlyinadrylocationwhichisnot accessible to unauthorized persons.Always store upright, never tilted!
8. DISPOSAL AND RECYCLINGThe unit and its accessories are made of various types of material, such as metal and plastic.Defective components must be disposed of as special waste. Ask your dealer or your local council.

9
GB
9. TROUBLE SHOOTING GUIDENote: Remove power source and drain tank pressure prior to making any repairs or adjustments.
FAULT PROBABLE CAUSE REmEDY
Unit will not run Tank pressure exceeds “cut in” pressure
Once pressure drops below “cut in” pressure, the unit will start.
Extension cord causing excessive amp draw
Check guidelines for proper cord gauge (use of extension cords is not recommended).
Fuse or circuit tripped Replace fuse or reset breaker.
Unit not turned on or not plugged in Check pressure switch and verify that it isintheOnposition.Verifythatunitisplugged in.
Cold weather conditions (typically temperatures below freezing)
Place compressor in warmer environment for at least 30 minutes then try restarting.
Airleaksatfittings Fittings loose Tightenfitting.Checkwithsoapywater.DONOTOVERTIGHTEN.
Air leak at pressure switch Clogged check valve Remove and clean check valve.
Unit will not build pressure Application requires excessive air demand
Reduce demand on compressor.
Loose head Tighten bolts on head.
Blown gasket Remove head and check for broken or deformed gasket. Replace if needed.
Open drain valve Close drain valve.
Unit will not build pressure Worn or broken valves Remove head and replace valves.
Air leak at tank or air tank welds. Damaged air tank Warning!
Do not drill into, weld or otherwise modifyairtank.Damagedormodifiedtanks can rupture. Replace tank immediately.
Any other type of operation must be carried out by authorized Service Centers, requesting original parts.Tamperingwiththemachinemayimpairitssafetyandinanycasemakethewarrantynullandvoid.

10
memo
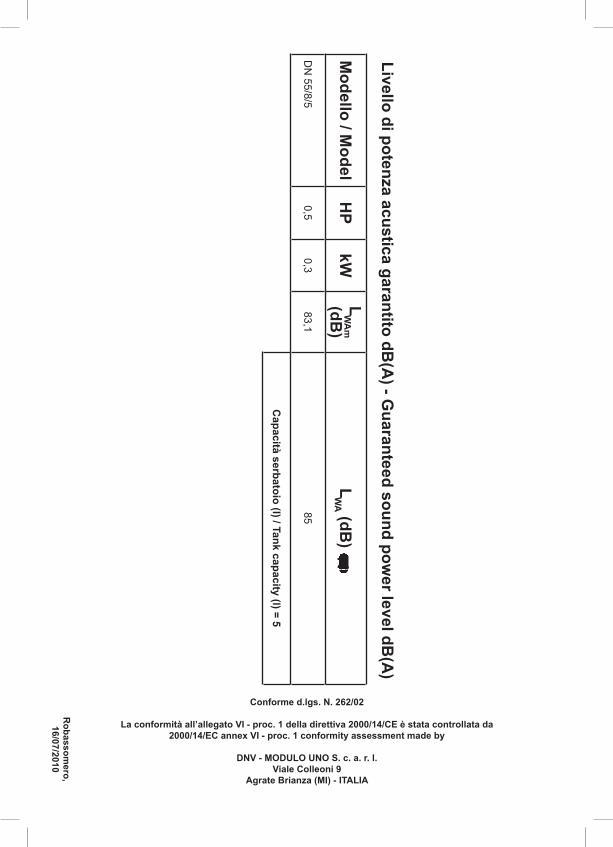
Conforme d.lgs. N. 262/02
La conformità all’allegato VI - proc. 1 della direttiva 2000/14/CE è stata controllata da2000/14/EC annex VI - proc. 1 conformity assessment made by
DNV - mODULO UNO S. c. a. r. l.Viale Colleoni 9
Agrate Brianza (mI) - ITALIA
Robassom
ero,16/07/2010
modello / m
odelH
PkW
LW
Am
(dB)
LW
A (dB)
DN
55/8/50,5
0,383,1
85
Capacità serbatoio (l) / Tank capacity (l) = 5
Livello di potenza acustica garantito dB(A
) - Guaranteed sound pow
er level dB(A
)
Dichiarazione di conformità CE - Declaration of compliance EEC - Déclaration de conformité CE - EG Konformitätserklärung Declaración de conformidad CE - Declaração de conformidade CE - Verklaring van overeenstemming EEG - CE-Overensstemmelseserklæring
Försäkran om CE-överensstämmelse - CE Vaatimustenmukaisuusvakuutus - Δηλωση συμμορφωσης CE - Oświadczenie o zgodności KE - Izjava o sukladnosti direktivama EZ - Izjava o skladnosti ES - EK Megfelelési nyilatkozat - ES Prohlášení o shodě - Prehlásenie ES o zhode - Декларация о соответствии нормам
ЕO - EF-overensstemmelseserklæring - AT uygunluk beyanı - Declaraţie de conformitate CE - Декларация за съответствие по стандарт на ЕO Izjava o sukladnosti propisima EZ - Deklaracija dėl EB reikalavimų vykdymų - Vastavusdeklaratsioon EK - Paziņojums par atbilstību EK prasībām
NOI DICHIARIAMO CHE LA COSTRUZIONE DEL SEGUENTE PRODOTTO - WE DECLARE THAT THE FOLLOWING PRODUCT - LA SOCIETÉ DECLARE QUE LA CONSTRUCTION DU PRODUIT SUIVANT - WIR ERKLÄREN HIERMIT, DASS DIE KONSTRUKTION DES NACHFOLGEND AUFGEFÜHRTEN PRODUKTES
NOSOTROS DECLARAMOS QUE LA CONSTRUCCIÓN DEL SIGUIENTE PRODUCTO - NÓS DECLARAMOS QUE A CONSTRUÇÃO DO PRODUCTO SEGUINTE WIJ VERKLAREN DAT DE CONSTRUCTIE VAN ONDERSTAAND PRODUCT - VI ERKLÆRER, AT KONSTRUKTIONEN AF NEDENSTÅENDE PRODUKT
VI FÖRSÄKRAR ATT KONSTRUKTIONEN HOS FÖLJANDE PRODUKT - VAKUUTAMME, ETTÄ SEURAAVA TUOTE ON VALMISTETTU ΕΜΕΙΣ ΔΗΛΩΝΟΥΜΕ ΟΤΙ Η ΚΑΤΑΣΚΕΥΗ ΤΟΥ ΠΑΡΑΚΑΤΩ ΠΡΟΪΟΝΤΟΣ - OŚWIADCZAMY, ŻE BUDOWA NASTĘPUJĄCEGO WYROBU
MI POTVRĐUJEMO DA JE OVAJ PROIZVOD KONSTRUIRAN - IZJAVLJAMO, DA JE V NADALJEVANJU NAVEDEN PROIZVOD KIJELENTJÜK, HOGY AZ ALÁBBI TERMÉK SZERKEZETE - PROHLAŠUJEME, ŽE VÝROBA TOHOTO VÝROBKU - PREHLASUJEME, ŽE VÝROBA TOHOTO VÝROBKU ЗАЯВЛЯЕМ, ЧТО КОНСТРУКЦИЯ ИЗДЕЛИЯ - VI ERKLÆRER AT KONSTRUKSJONEN AV DET FØLGENDE PRODUKTET - AŞAĞIDA BELİRTİLEN ÜRÜN İMALİNİN
SE DECLARĂ CĂ DIN PUNCT DE VEDERE CONSTRUCTIV PRODUSUL - ДЕКЛАРИРАМЕ, ЧЕ ИЗРАБОТВАНЕТО НА СЛЕДНИЯ ПРОДУКТ MI POTVRĐUJEMO DA JE OVAJ PROIZVOD KONSTRUISAN - PAREIŠKIAME, KAD ŠIS PRODUKTAS - KINNITAME, ET JÄRGMINE TOODE
MĒS PAZIŅOJAM, KA SEKOJOŠAIS PRODUKTS
È CONFORME ALLE SEGUENTI DISPOSIZIONI - WAS BUILT IN COMPLIANCE WITH THE FOLLOWING DISPOSITIONS EST CONFORME AUX DISPOSITIONS SUIVANTES - MIT DEN FOLGENDEN VORSCHRIFTEN ÜBEREINSTIMMT
ESTÁ CONFORME CON LAS SIGUIENTES DISPOSICIONES - ESTÁ EM CONFORMIDADE COM AS SEGUINTES DISPOSIÇÕES IN OVEREENSTEMMING IS MET DE VOLGENDE BEPALINGEN - OPFYLDER FØLGENDE FORSKRIFTER
ÄR I ÖVERENSSTÄMMELSE MED FÖLJANDE FÖRESKRIFTER - ALLAOLEVIEN SÄÄDÖSTEN MUKAISESTI - ΣΥΜΜΟΡΦΩΝΕΤΑΙ ΜΕ ΤΙΣ ΑΚΟΛΟΥΘΕΣ ΔΙΑΤΑΞΕΙΣJEST ZGODNA Z NIŻEJ WYMIENIONYMI NORMAMI - U SUKLADU SA SLIJEDEČIM PROPISIMA - V SKLADU S SLEDEČIMI ODREDBAMI
MEGFELELŐ AZ ALÁBBI RENDELETEKNEK - JE V SOULADU S NÁSLEDUJÍCÍMI SMĚRNICEMI - JE V SÚLADE S NASLEDOVNÝMI SMERNICAMIОТВЕЧАЕТ ТРЕБОВАНИЯМ СЛЕДУЮЩИХ НОРМАТИВОВ - ER I OVERENSSTEMMELSE MED FØLGENDE BESTEMMELSER
İZLEYEN KURALLARA UYGUNLUĞUNU BEYAN EDERİZ - A FOST EXECUTAT CONFORM DISPOZIŢIILOR Е В СЪОТВЕТСТВИЕ СЪС СЛЕДНИТЕ РАЗПОРЕДБИ - U SKLADU SA SLEDEĆIM PROPISIMA - PAGAMINTAS, REMIANTIS SEKANČIOMIS DIREKTYVOMIS
ON VALMISTATUD KOOSKÕLAS JÄRGMISTE DIREKTIIVIDEGA - TIKA IZGATAVOTS ATBILSTOŠI SEKOJOŠAJĀM DIREKTĪVĀM
2006/42/CE - 2004/108/CE - 2006/95/CE - 2000/14/CE (Annex VI - proc. 1)
EN 1012-1 - EN 60204-1 - EN 60335-1 - EN 55014-1 - EN 55014-2 - EN 61000-3-2 - EN 61000-3-3
AMANTE GAETANO - via Einaudi, 6 - Robassomero (TO) 10070 ITALY
Consigliere delegato - Deputy director - Conseiller délégué-Geschäftsleitung-Consejero delegado - Conselheiro delegadoGemachtigdlidvandeRaadvanBestuur - Juridisk ombud - Juridiskt ombud - Varajohtaja-Πληρεξοúσιοςδιαχειρισтής
Pełnomocnik-Zastupnik-Zastopnik-Avállalattanácsosa-Pověřenýporadce-PoverenýPoradca-УполномоченныйсоветчикAutoriserttekniker-Yönetimkurulubaşkani-Consilierdelegat-Упълномощенсъветник - Zastupnik-Administratorius
Delegeeritudnõunik-Pilnvarotspadomdevējs
9039
374Robassomero, 16/07/2010
ED AUTORIZZIAMO - AND WE AUTHORIZE - ET NOUS AUTORISONS - UND WIR GENEHMIGEN - Y AUTORIZAMOS - E AUTORIZAMOS - EN WIJ GEVEN TOESTEMMING - HERVED GODKENDER VI - OCH VI GODKÄNNER - JA ANNAMME LUVAN - ΚΑΙ ΕΞΟΥΣΙΟΔΟΤΟΥΜΕ - UPOWAŻNIAMY - I OVLAŠĆUJEMO
IN DOVOLJUJE SE, DA SE - ÉS FELHATALMAZZUK - A POVOLUJEME - A AUTORIZUJEME - И РАЗРЕШАЕМ - OG VI AUTORISERER - VE YETKILI KILMAKTAYIZ SI AUTORIZĂM - ДАВА СЕ РАЗРЕШЕНИЕ - I OVLAŠĆUJEMO - IR DUODAME LEIDIMĄ - JA VOLITAME - UN MĒS PILNVAROJAM
A COSTITUIRE IL FASCICOLO TECNICO PER NOSTRO CONTO - TO DRAW UP THE TECHNICAL FILE ON OUR BEHALF - À RÉALISER LE FASCICULE TECHNIQUE POUR NOTRE COMPTE - DIE TECHNISCHE BROSCHÜRE AUF UNSERE RECHNUNG ZU GRÜNDEN - LA CREACIÓN DEL EXPEDIENTE TÉCNICO A NUESTRO
NOMBRE - A FORMAR O FASCÍCULO TÉCNICO POR NOSSA CONTA - HET TECHNISCHE DOSSIER NAMENS ONS OP TE STELLEN - OPRETTELSE AF DET TEKNISKE HÆFTE PÅ VORES VEGNE - ATT SKAPA DEN TEKNISKA DOKUMENTATIONEN Å VÅRA VÄGNAR - TEKNISEN OPPAAN LAATIMISELLE PUOLESTAMME
ΝΑ ΔΗΜΙΟΥΡΓΗΣΕΙ ΤΟ ΤΕΧΝΙΚΟ ΦΑΚΕΛΟ ΓΙΑ ΛΟΓΑΡΙΑΣΜΟ ΜΑΣ - DO WYKONANIA DLA NAS TECZKI TECHNICZNEJ - FORMIRANJE TEHNIČKIH UPUTA ZA NAŠ RAČUN - NA NAŠ RAČUN IZDELA POPOLNO TEHNIČNO DOKUMENTACIJO - HOGY RÉSZÜNKRE ELKÉSZÍTSE A MŰSZAKI DOKUMENTÁCIÓT
VYTVOŘIT TECHNICKOU SLOŽKU NA NÁŠ ÚČET - VYTVORIŤ TECHNICKÚ ZLOŽKU NA NÁŠ ÚČET - СОСТАВЛЯТЬ ТЕХНИЧЕСКУЮ БРОШЮРУ ВМЕСТО НАС TIL Å UTFORME DEN TEKNISKE DOKUMENTASJONEN FOR OSS - BIZIM HESABIMIZA TEKNIK BIR FASIKÜLÜN OLUSTURULMASINA - SĂ SE REALIZEZE PENTRU NOI
BROŞURA TEHNICĂ - ЗА СЪСТАВЯНЕ НА ТЕХНИЧЕСКО РЪКОВОДСТВО ОТ НАШЕ ИМЕ - PRAVLJENJE TEHNIČKIH UPUTSTAVA PO NAŠEM NALOGU MUMS PARENGTI TECHNINĮ APRAŠĄ - MEIE NIMEL TEHNILISE BROŜÜÜRI KOOSTAMIST - IZSTRĀDĀT MŪSU VĀRDĀ TEHNISKO INFORMĀCIJU
Gaetano Amante