instruction manual hims / htg and vapour pressure (p3 ... · page 6 introduction instruction manual...
TRANSCRIPT

Instruction manual HIMS / HTG and vapour pressure (P3) measurement Page 1
Instruction manual
HIMS / HTG and vapour
pressure (P3) measurement
July 2014
Part no. 4416645
Rev. 2
Enraf B.V.
P.O. Box 812
2600 AV Delft
Netherlands
Tel. : +31 15 2701100
Fax : +31 15 2701111
E-mail : [email protected]
Website: : www.honeywellenraf.com

Page 2
Instruction manual HIMS / HTG and vapour pressure (P3) measurement
Copyright 2014 Enraf B.V. All rights reserved.
Reproduction in any form without the prior consent of Enraf B.V. is not allowed. This manual is for information
only. The contents, descriptions and specifications are subject to change without notice. Enraf B.V. accepts no
responsibility for any errors that may appear in this manual.
The warranty terms and conditions applicable in the country of purchase in respect to Enraf B.V. products are
available from your supplier. Please retain them with your proof of purchase.
Instruction manual HIMS / HTG and vapour pressure (P3) measurement Page 3
Preface
Preface
This manual is intended for technicians involved with the commissioning and service of the Honeywell Enraf
gauges with the optional HCU board or ICU_HPI board installed for the function of HIMS (Hybrid Inventory
Measurement System), HTG (Hydrostatic Tank Gauge) and vapour pressure measurement with pressure
transmitter P3.
A description preceding the technical procedures gives the technical information necessary to understand its
functioning. It is recommended to read this description prior to performing any of the procedures.
Safety and prevention of damage
Refer to the chapter Safety in the instruction manual of the applicable instrument (servo/radar gauge or indicator)
for detailed safety instructions.
"Warnings", "Cautions", and "Notes" have been used throughout this manual to bring special matters to the
immediate attention of the reader.
• A Warning concerns danger to the safety of the technician or user;
• A Caution draws attention to an action which may damage the equipment;
• A Note points out a statement deserving more emphasis than the general text, but does not deserve a
"Warning" or a "Caution".
The sequence of steps in a procedure may also be important from the point of view of personal safety and
prevention of damage; it is therefore advised not to change the sequence of procedural steps or alter a
procedure.
Legal aspects
The information in this manual is the copyright property of Enraf B.V., Netherlands.
Enraf B.V. disclaims any responsibility for personal injury or damage to equipment caused by:
• Deviation from any of the prescribed procedures;
• Execution of activities that are not prescribed;
• Neglect of the general safety precautions for handling tools, use of electricity and microwave radiation.
EC declaration of conformity
The Honeywell Enraf instrument, in which the optional HCU or ICU_HPI board is installed, is in conformity with
the protection requirements of EC Council Directive 93/68/EEC. Refer to the CE declaration of conformity
delivered with the instrument.
Additional information
Please do not hesitate to contact Enraf or its representative if you require additional information.

Page 4
Table of contents
Instruction manual HIMS / HTG and vapour pressure (P3) measurement
Table of contents
Preface . . . . . . . . . . . . . . . . . . . . . . . . . . . . . . . . . . . . . . . . . . . . . . . . . . . . . . . . . . . . . . . . . . . . . . . . . . . . . 3
1 Introduction . . . . . . . . . . . . . . . . . . . . . . . . . . . . . . . . . . . . . . . . . . . . . . . . . . . . . . . . . . . . . . . . . . . . . . . . . . 6
1.1 HCU board . . . . . . . . . . . . . . . . . . . . . . . . . . . . . . . . . . . . . . . . . . . . . . . . . . . . . . . . . . . . . . . . . . . . . 6
1.2 ICU_HPI board . . . . . . . . . . . . . . . . . . . . . . . . . . . . . . . . . . . . . . . . . . . . . . . . . . . . . . . . . . . . . . . . . . 6
1.3 Overview of functions . . . . . . . . . . . . . . . . . . . . . . . . . . . . . . . . . . . . . . . . . . . . . . . . . . . . . . . . . . . . . 7
1.4 HCU compatibility . . . . . . . . . . . . . . . . . . . . . . . . . . . . . . . . . . . . . . . . . . . . . . . . . . . . . . . . . . . . . . . . 7
1.4.1 Replacement or adding optional board in 854 ATG or 854 XTG servo gauges . . . . . . . . . . 8
1.4.2 Replacement or adding optional board in 873 SmartRadar . . . . . . . . . . . . . . . . . . . . . . . . . 8
1.4.3 Replacement or adding optional board in 877 FDI Field Display & Interface . . . . . . . . . . . . 8
1.5 Optional functions in this manual . . . . . . . . . . . . . . . . . . . . . . . . . . . . . . . . . . . . . . . . . . . . . . . . . . . . 8
2 HIMS . . . . . . . . . . . . . . . . . . . . . . . . . . . . . . . . . . . . . . . . . . . . . . . . . . . . . . . . . . . . . . . . . . . . . . . . . . . . . . . 9
2.1 Introduction into HIMS . . . . . . . . . . . . . . . . . . . . . . . . . . . . . . . . . . . . . . . . . . . . . . . . . . . . . . . . . . . . 9
2.1.1 HIMS calculations . . . . . . . . . . . . . . . . . . . . . . . . . . . . . . . . . . . . . . . . . . . . . . . . . . . . . . . . . 9
2.1.2 Corrections for ambient air and vapour density . . . . . . . . . . . . . . . . . . . . . . . . . . . . . . . . . 10
2.2 Commissioning of HIMS system . . . . . . . . . . . . . . . . . . . . . . . . . . . . . . . . . . . . . . . . . . . . . . . . . . . 11
2.2.1 Selecting pressure and density dimension . . . . . . . . . . . . . . . . . . . . . . . . . . . . . . . . . . . . . 11
2.2.2 Tank and gauge data . . . . . . . . . . . . . . . . . . . . . . . . . . . . . . . . . . . . . . . . . . . . . . . . . . . . . 12
2.2.3 Set-up and configuration of the pressure transmitters . . . . . . . . . . . . . . . . . . . . . . . . . . . . 14
2.2.4 Zero calibration of the pressure transmitters . . . . . . . . . . . . . . . . . . . . . . . . . . . . . . . . . . . 14
2.2.5 Compensation for pressure transmitter P1 position . . . . . . . . . . . . . . . . . . . . . . . . . . . . . . 14
2.3 Operation . . . . . . . . . . . . . . . . . . . . . . . . . . . . . . . . . . . . . . . . . . . . . . . . . . . . . . . . . . . . . . . . . . . . . 15
2.3.1 Display . . . . . . . . . . . . . . . . . . . . . . . . . . . . . . . . . . . . . . . . . . . . . . . . . . . . . . . . . . . . . . . . 15
2.3.2 Manual inputs . . . . . . . . . . . . . . . . . . . . . . . . . . . . . . . . . . . . . . . . . . . . . . . . . . . . . . . . . . . 15
2.3.3 Data items . . . . . . . . . . . . . . . . . . . . . . . . . . . . . . . . . . . . . . . . . . . . . . . . . . . . . . . . . . . . . . 16
3 HTG . . . . . . . . . . . . . . . . . . . . . . . . . . . . . . . . . . . . . . . . . . . . . . . . . . . . . . . . . . . . . . . . . . . . . . . . . . . . . . 17
3.1 Introduction into HTG . . . . . . . . . . . . . . . . . . . . . . . . . . . . . . . . . . . . . . . . . . . . . . . . . . . . . . . . . . . . 17
3.1.1 HTG calculations . . . . . . . . . . . . . . . . . . . . . . . . . . . . . . . . . . . . . . . . . . . . . . . . . . . . . . . . . 17
3.1.2 Volume and Mass calculations . . . . . . . . . . . . . . . . . . . . . . . . . . . . . . . . . . . . . . . . . . . . . . 18
3.1.3 Corrections for ambient air and vapour density . . . . . . . . . . . . . . . . . . . . . . . . . . . . . . . . . 19
3.2 Commissioning . . . . . . . . . . . . . . . . . . . . . . . . . . . . . . . . . . . . . . . . . . . . . . . . . . . . . . . . . . . . . . . . . 21
3.2.1 Selecting pressure and density dimension . . . . . . . . . . . . . . . . . . . . . . . . . . . . . . . . . . . . . 21
3.2.2 Tank and gauge data . . . . . . . . . . . . . . . . . . . . . . . . . . . . . . . . . . . . . . . . . . . . . . . . . . . . . 22
3.2.3 Alarm settings . . . . . . . . . . . . . . . . . . . . . . . . . . . . . . . . . . . . . . . . . . . . . . . . . . . . . . . . . . . 24
3.2.4 Ullage readout . . . . . . . . . . . . . . . . . . . . . . . . . . . . . . . . . . . . . . . . . . . . . . . . . . . . . . . . . . . 25
3.2.5 Set-up and configuration of the pressure transmitters . . . . . . . . . . . . . . . . . . . . . . . . . . . . 25
3.2.6 Zero calibration of the pressure transmitters . . . . . . . . . . . . . . . . . . . . . . . . . . . . . . . . . . . 26
3.2.7 Compensation for pressure transmitter P1 - P2 distance . . . . . . . . . . . . . . . . . . . . . . . . . . 26
3.3 Operation . . . . . . . . . . . . . . . . . . . . . . . . . . . . . . . . . . . . . . . . . . . . . . . . . . . . . . . . . . . . . . . . . . . . . 27
3.3.1 Display . . . . . . . . . . . . . . . . . . . . . . . . . . . . . . . . . . . . . . . . . . . . . . . . . . . . . . . . . . . . . . . . 27
3.3.2 Manual inputs . . . . . . . . . . . . . . . . . . . . . . . . . . . . . . . . . . . . . . . . . . . . . . . . . . . . . . . . . . . 27
3.3.3 Data items . . . . . . . . . . . . . . . . . . . . . . . . . . . . . . . . . . . . . . . . . . . . . . . . . . . . . . . . . . . . . . 28
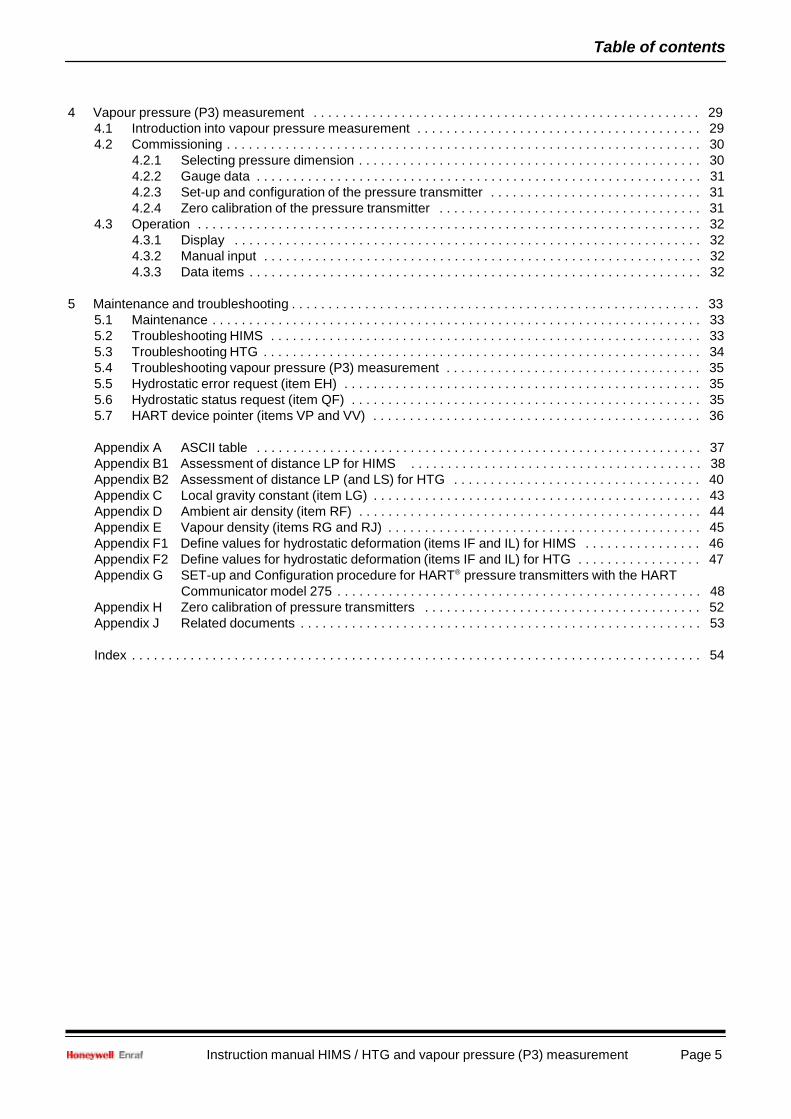
Instruction manual HIMS / HTG and vapour pressure (P3) measurement Page 5
Table of contents
4 Vapour pressure (P3) measurement . . . . . . . . . . . . . . . . . . . . . . . . . . . . . . . . . . . . . . . . . . . . . . . . . . . . . 29
4.1 Introduction into vapour pressure measurement . . . . . . . . . . . . . . . . . . . . . . . . . . . . . . . . . . . . . . . 29
4.2 Commissioning . . . . . . . . . . . . . . . . . . . . . . . . . . . . . . . . . . . . . . . . . . . . . . . . . . . . . . . . . . . . . . . . . 30
4.2.1 Selecting pressure dimension . . . . . . . . . . . . . . . . . . . . . . . . . . . . . . . . . . . . . . . . . . . . . . . 30
4.2.2 Gauge data . . . . . . . . . . . . . . . . . . . . . . . . . . . . . . . . . . . . . . . . . . . . . . . . . . . . . . . . . . . . . 31
4.2.3 Set-up and configuration of the pressure transmitter . . . . . . . . . . . . . . . . . . . . . . . . . . . . . 31
4.2.4 Zero calibration of the pressure transmitter . . . . . . . . . . . . . . . . . . . . . . . . . . . . . . . . . . . . 31
4.3 Operation . . . . . . . . . . . . . . . . . . . . . . . . . . . . . . . . . . . . . . . . . . . . . . . . . . . . . . . . . . . . . . . . . . . . . 32
4.3.1 Display . . . . . . . . . . . . . . . . . . . . . . . . . . . . . . . . . . . . . . . . . . . . . . . . . . . . . . . . . . . . . . . . 32
4.3.2 Manual input . . . . . . . . . . . . . . . . . . . . . . . . . . . . . . . . . . . . . . . . . . . . . . . . . . . . . . . . . . . . 32
4.3.3 Data items . . . . . . . . . . . . . . . . . . . . . . . . . . . . . . . . . . . . . . . . . . . . . . . . . . . . . . . . . . . . . . 32
5 Maintenance and troubleshooting . . . . . . . . . . . . . . . . . . . . . . . . . . . . . . . . . . . . . . . . . . . . . . . . . . . . . . . . 33
5.1 Maintenance . . . . . . . . . . . . . . . . . . . . . . . . . . . . . . . . . . . . . . . . . . . . . . . . . . . . . . . . . . . . . . . . . . . 33
5.2 Troubleshooting HIMS . . . . . . . . . . . . . . . . . . . . . . . . . . . . . . . . . . . . . . . . . . . . . . . . . . . . . . . . . . . 33
5.3 Troubleshooting HTG . . . . . . . . . . . . . . . . . . . . . . . . . . . . . . . . . . . . . . . . . . . . . . . . . . . . . . . . . . . . 34
5.4 Troubleshooting vapour pressure (P3) measurement . . . . . . . . . . . . . . . . . . . . . . . . . . . . . . . . . . . 35
5.5 Hydrostatic error request (item EH) . . . . . . . . . . . . . . . . . . . . . . . . . . . . . . . . . . . . . . . . . . . . . . . . . 35
5.6 Hydrostatic status request (item QF) . . . . . . . . . . . . . . . . . . . . . . . . . . . . . . . . . . . . . . . . . . . . . . . . 35
5.7 HART device pointer (items VP and VV) . . . . . . . . . . . . . . . . . . . . . . . . . . . . . . . . . . . . . . . . . . . . . 36
Appendix A ASCII table . . . . . . . . . . . . . . . . . . . . . . . . . . . . . . . . . . . . . . . . . . . . . . . . . . . . . . . . . . . . . 37
Appendix B1 Assessment of distance LP for HIMS . . . . . . . . . . . . . . . . . . . . . . . . . . . . . . . . . . . . . . . . 38
Appendix B2 Assessment of distance LP (and LS) for HTG . . . . . . . . . . . . . . . . . . . . . . . . . . . . . . . . . . 40
Appendix C Local gravity constant (item LG) . . . . . . . . . . . . . . . . . . . . . . . . . . . . . . . . . . . . . . . . . . . . . 43
Appendix D Ambient air density (item RF) . . . . . . . . . . . . . . . . . . . . . . . . . . . . . . . . . . . . . . . . . . . . . . . 44
Appendix E Vapour density (items RG and RJ) . . . . . . . . . . . . . . . . . . . . . . . . . . . . . . . . . . . . . . . . . . . 45
Appendix F1 Define values for hydrostatic deformation (items IF and IL) for HIMS . . . . . . . . . . . . . . . . 46
Appendix F2 Define values for hydrostatic deformation (items IF and IL) for HTG . . . . . . . . . . . . . . . . . 47
Appendix G SET-up and Configuration procedure for HART® pressure transmitters with the HART
Communicator model 275 . . . . . . . . . . . . . . . . . . . . . . . . . . . . . . . . . . . . . . . . . . . . . . . . . . 48
Appendix H Zero calibration of pressure transmitters . . . . . . . . . . . . . . . . . . . . . . . . . . . . . . . . . . . . . . 52
Appendix J Related documents . . . . . . . . . . . . . . . . . . . . . . . . . . . . . . . . . . . . . . . . . . . . . . . . . . . . . . . 53
Index . . . . . . . . . . . . . . . . . . . . . . . . . . . . . . . . . . . . . . . . . . . . . . . . . . . . . . . . . . . . . . . . . . . . . . . . . . . . . . 54

Page 6
Introduction
Instruction manual HIMS / HTG and vapour pressure (P3) measurement
1 Introduction
1.1 HCU board
The optional HCU board is used in Honeywell Enraf servo gauges 854 ATG, 854 XTG, 873 SmartRadar and Field Indicator 877 FDI to interface optional equipment as:
• spot temperature element;
• average temperature element;
• water bottom probe;
• pressure transmitters.
and to provide for an analog level output.
This option board has two HART® channels:
• HART® input 1, standard used for the Honeywell Enraf 762 VITO Interface;
• HART® input 2, standard used for the connection of pressure transmitters for HIMS™, HTG or vapour
pressure measurement.
Note 1:
HTG: Hydrostatic Tank Gauging; only applicable with 877 FDI. HIMS is available with the level gauges (servo and radar). Vapour pressure measurement is mostly performed on pressurized vessels with the level gauges.
Note 2:
Standard, the 762 VITO Interface is connected to HART input 1 and pressure transmitters are connected to HART input 2 of the optional HCU board.
It must be verified that the maximum values for current and power of the HCU option board HART input 2 circuit are not exceeding the maximum values of the connected HART® pressure transmitters. If the values of HART input 2 circuit are too high, then connect the pressure transmitters to HART input 1 and the 762 VITO Interface to HART input 2 (only possible when HART input 1 is available).
1.2 ICU_HPI board
The optional ICU_HPI board is used in Honeywell Enraf 973 SmartRadar LT, 971 SmartRadar LTi and 970
SmartRadar ATi to interface optional equipment as:
• spot temperature element;
• average temperature element;
• water bottom probe;
• pressure transmitters.
Note:
Analog level output with the 97x SmartRadar is provided by the optional ICU_HPO board.
For a description of these functions, refer to section 1.1.
The ICU_HPI board has the same input functions as the HCU board; the only difference is its shape, which
makes it to fit in the 97x SmartRadar.

Instruction manual HIMS / HTG and vapour pressure (P3) measurement Page 7
Introduction
1.3 Overview of functions
The HCU / ICU_HPI option board has the following hardware channels:
• SPOT input: for spot temperature element (RTD) Pt100
• HART input 1: for 762 VITO Interface
• HART input 2: for HART® pressure transmitters and/or external water bottom probe
• 4-20 mA output: for analog level output (only with HCU option board)
The hardware combinations, together with software emulations gives in total 8 different models according to the
table below:
Sales code
for option
Function with HCU and ICU_HPI option board
Emulation mode
B
Spot temperature Pt100
TPU-2 / HSU
C
VITO temperature and/or water probe
HPU
J
VITO temperature and/or water probe + HART device(s)
HPU
U
Spot temperature + HART device(s)
HSU
V
Analog level output
MPU
W
Analog level output + VITO temperature and/or water probe
HCU
X
Analog level output + VITO temperature probe
MPU
Y
Analog level output + Spot temperature Pt100 +
VITO temperature and/or water probe + HART device(s)
HCU
Notes: 1 Option codes: V, W and X are not available with the 970 / 971 / 973 SmartRadar types as the analog level
output is provided by the ICU_HPO option board.
2 Please note that with option code Y in the 970 / 971 / 973 SmartRadar types, the analog level output is provided by the ICU_HPO option board.
3 Option code Y is not available in the 854 XTG servo gauge.
4 Option code U can only be available in the 854 XTG servo gauge without connection for 977 TSI Tank Side Indicator (in 854 ATG connection for 977 TSI is possible).
5 HART devices can be: - HART® pressure transmitters for HIMS / HTG configuration or vapour pressure measurement;
- HART® water bottom sensor e.g. Side mounted water probe.
6 With sales code Y (all HCU functions), the spot temperature measurement is disabled if the VITO temperature (and water) probe is present.
1.4 HCU compatibility
The HCU board can be used to replace an existing optional board in the 854, 873 and 877 gauges. However, it
requires some checking if more boards in the instrument must be updated or external equipment must be
replaced. The HCU board can be used to replace the following optional boards:
• HPU board (for average temperature measurement, restricted to MTT or VITO probes only)
• HSU board (for spot temperature measurement, restricted to Pt100 RTD’s only)
Note:
Read carefully the installation guide of the HCU board before starting to replace the existing option board.

Page 8
Introduction
Instruction manual HIMS / HTG and vapour pressure (P3) measurement
1.4.1 Replacement or adding optional board in 854 ATG or 854 XTG servo gauges
The HCU optional board requires an XPU-2 board in the 854 ATG and 854 XTG servo gauges. If there is no
XPU-2 board installed, then the installed XPU (or XPU-1) board must be replaced by an XPU-2 board.
Notes:
1 When the HCU board is used to replace an optional board with average temperature measurement, please note the following: The 863 MRT with 862 MIR or the 864 MTT with 862 MIT temperature connection cannot be maintained. • The 864 MTT can be connected to the 762 VITO-MTT Interface for connection to the HCU board; • The 863 MRT can be connected to the 762 VITO-MRT Interface for connection to the HCU board.
2 The optional data transmission channel on the XPU-2 (i.s. channel for 977 TSI or RS-232C/RS-485 channel) is only possible when backplane-2 is installed. Backplane-2 is standard installed in instruments • 854 ATG with series number: 854-20-400 and higher; • 854 XTG with series number: 894-02-001 and higher.
1.4.2 Replacement or adding optional board in 873 SmartRadar
The HCU optional board can be installed in the 873 SmartRadar without any problem.
Refer to Note 1 section 1.4.1.
1.4.3 Replacement or adding optional board in 877 FDI Field Display & Interface
The HCU optional board can be installed in an 877 FDI Field Display & Interface when there is an XPU or XPU-1
board. However, be informed that water bottom measurement with the VITO probe or Side mounted water probe
is not possible. If this function is required, then the installed XPU (or XPU-1) board must be replaced by an
XPU-2 board. Refer to note 1 in section 1.4.1.
Notes:
1 Please be aware that an XPU-2 board in the 877 FDI does not have the ability to ‘listen’ to the Enraf Fieldbus signals. Hence, the “Indicator” functionality is not available. It will then function as an HTG or ‘Stand Alone’ temperature gauge.
2 The optional data transmission channel on the XPU-2 (i.s. channel for 977 TSI or RS-232C/RS-485
channel) is only possible when backplane-2 is installed. Backplane-2 is standard installed in indicators 877 FDI with series number: 877-17-001 and higher.
1.5 Optional functions in this manual
This instruction manual describes the optional functions for:
• HIMS (Hybrid Inventory Measurement) chapter 2
• HTG (Hydrostatic Tank Gauging) chapter 3
• Vapour pressure (P3) measurement chapter 4
The optional functions for temperature and water bottom measured are described in the instruction manual:
VITO interface and average temperature (and water) probes for 854 servo, 97x SmartRadar and 877 FDI.

Instruction manual HIMS / HTG and vapour pressure (P3) measurement Page 9
HIMS
2 HIMS
2.1 Introduction into HIMS
The HIMS (Hybrid Inventory Management System) combines the direct mass measurement as used with HTG
(Hydrostatic Tank Gauging) with the level gauge principle to one powerful system. All tank quantities as level,
volume, mass, density, etc. can be measured and calculated.
For level measurement can be used the Honeywell Enraf series 854 ATG / XTG servo gauge or the
Honeywell Enraf series SmartRadar gauge. The HIMS option is also available with the 877 FDI (Field
Display & Interface). Pressure transmitters communicating with the HART® protocol can be used.
2.1.1 HIMS calculations
The pressure transmitters P1 and P3 used with an HIMS
system are of the differential type. That means one side
(low pressure side) is open to atmosphere.
P3 is not required for tanks which are free vented to
atmosphere and with floating roof tanks.
A temperature measuring device is optional and only
required when standard volume and reference density is
to be calculated.
The pressure measured by P1 is the result of the static
liquid head above P1 (height h) and the pressure in the
vapour space, measured by P3.
The liquid height above P1 is the level (l), measured by
the level gauge, minus the distance LP.
LP represents the distance between the tank zero point
(datum plate) and the zero point of P1.
The observed density is calculated as:
Figure 2.1 Principle HIMS configuration
where:
P7 : (P1 - P3) + corr. [Pa]
P1 : pressure of pressure transmitter P1 [Pa]
P3 : pressure of pressure transmitter P3 [Pa]
corr. : for corrections, refer to section 2.1.2
LP : distance zero point tank to zero point pressure transmitter P1 [m]
LG : local gravity acceleration [m/s2]
Level : measured level from level gauge [m]
The measured level and (optionally) temperature, and the calculated observed density are transmitted to the
tank gauging system.
The tank gauging system (a Honeywell Enraf Entis Pro system, Honeywell Enraf CIUPlus or other host system)
needs the Tank Capacity Table and optionally the ASTM table to calculate the Gross Observed Volume, Mass,
and optionally the Gross Standard Volume and reference density.

Page 10
HIMS
Instruction manual HIMS / HTG and vapour pressure (P3) measurement
2.1.2 Corrections for ambient air and vapour density
Ambient air density correction
The pressure at the atmospheric side measured by pressure transmitter P1, compared to P3, is increased by the
column of air over the distance (LM - LP). Refer to figure 2.1.
That is compensated in the calculated pressure P7 by the term:
where:
(LM - LP) x RF x LG [Pa]
LM : distance zero point tank to zero point pressure transmitter P3 [m]
LP : distance zero point tank to zero point pressure transmitter P1 [m]
RF : ambient air density [kg/m3]
LG : local gravity acceleration [m/s2]
The default value for the ambient air density (item RF) is set at 1.225 kg/m3 (floating point format).
Vapour density correction
The vapour space above the product in a fixed roof tank consists of a mixture from air and product vapour.
The density of this vapour mixture in the tank is different from the density of the air outside the tank.
That is compensated in the calculated pressure P7 by the term:
where:
(LM - Level) x RG x LG [Pa]
LM : distance zero point tank to zero point pressure transmitter P3 [m]
Level : measured level from level gauge [m]
RG : vapour density [kg/m3]
LG : local gravity acceleration [m/s2]
The default value for the vapour density (item RG) is set at 1.25 kg/m3 (floating point format).
Pressure P7
The pressure difference (P1 - P3), compensated for ambient air density and vapour density (item P7) is
calculated as:
P7 = (P1 - P3) + (LM - LP) x RF x LG - (LM - Level) x RG x LG [Pa]
Density in air
With the default values used in items RF and RG, the observed density is the density in vacuum. If the density
value is required as density in air, then item RF must be set to 0, and from item RG the value of the ambient air
density must be subtracted.
The table below summarizes the values for items RF and RG for density in vacuum and density in air.
HIMS density: in vacuum in air
ambient air density (item RF)
1.225 kg/m3 (default)
0 kg/m3
vapour density (item RG)
1.25 kg/m3 (default)
(RG - ambient air density)

HIMS
Instruction manual HIMS / HTG and vapour pressure (P3) measurement Page 11
2.2 Commissioning of HIMS system
For information how to program items, refer to the instruction manual of the used level gauge or to the instruction
manual of the 847 Portable Enraf Terminal.
For connection of the pressure transmitters to the instrument, refer to the installation guide of the used level
gauge.
2.2.1 Selecting pressure and density dimension
When the pressure and/or density dimension has to be changed from default, all items with related formats have
to be changed and the values must be converted to the new dimension.
Note:
When the instrument is equipped with the XPU-2 board, then all dimension depended items will be automatically changed and the values will be automatically converted.
Item Name Description
W2= Protection level 2 Enter protection level 2
PI= Pressure dimension Selects the pressure dimension and converts the format.
This item contains one character, which can be:
P : Pa; format: sign X X X X X X separator X
K : kPa; format: sign X X X X separator X X X
I : psi; format: sign X X separator X X X X X
S : psi; format: sign X X X separator X X X X
Default set on: P [Pa]
DI= Density dimension Selects the density dimension and converts the format.
This item contains one character, which can be:
K : kg/m3; format: sign X X X X X separator X X
A : °API; format: sign X X X X separator X X X
L : lbs/ft3; format: sign X X X separator X X X X
Default set on: K [kg/m3]
. .= format depended items Not required with XPU-2 board.
Program all pressure depended and/or density depended items to
the new dimension. Refer to the table below for an overview of
these items.
EX Exit Exit protection level.
Items from which the format depends
on the pressure dimension (item PI)
Items from which the format
depends on the density
dimension (item DI)
29 M1 O2
H1 M2 O3
H2 M3 P0
H3 O1 PH
28 HD
DD
DL
DU

Page 12
HIMS
Instruction manual HIMS / HTG and vapour pressure (P3) measurement
2.2.2 Tank and gauge data
Figure 2.2 HIMS tank data
Item Name Description
W2= Protection level 2 Enter protection level 2
LM= Distance P3 - tank zero Format according to item LD. This distance is used in tank gas
correction and ambient air density correction. If pressure
transmitter P3 is not installed, use a value equal to the upper
reference point.
Alternatively, use the value of item TT (with servo level gauges),
or item PR (with SmartRadar gauges).
LN= Minimum HIMS level Format according to item LD. Default, item LN is set to 3.5
metres.
The distance LN can be lowered to approximately 2 metres.
The purpose is of LN is as follows:
If the level drops below the setting of LN, the last valid density will
be stored and used as the density value, as lower levels gives
inaccurate density results.
LP= Distance P1 - tank zero Format according to item LD. The setting of item LP directly
influences the density calculation. It therefore must be assessed
accurately. Refer to Appendix B1 for some methods to assess
this distance.

HIMS
Instruction manual HIMS / HTG and vapour pressure (P3) measurement Page 13
Continue:
Item Name Description
PA= Available pressure transmitters Three characters; 123, or a ‘ - ’ for the pressure transmitter which
is not installed. For HIMS, item PA can be:
1 - 3 : Pressure transmitters P1 and P3 are installed; or
1 - - : Pressure transmitter P1 is installed.
LG= Local gravity Standard floating point format; units: m/s2. Item LG must be set to
the local gravity constant. Appendix C gives information about the
local gravity constant.
RF= Ambient air density Standard floating point format; units: kg/m3. Default, RF is set to
+.12250000E+01. Refer to Appendix D for more information about
the ambient air density.
RG= Tank gas density Standard floating point format; units: kg/m3. Default RG is set to
+.12500000E+01. Refer to Appendix E for more information about
the vapour density.
HT= HIMS / HTG selection One character; either I (for HIMS) or T (for HTG).
Check if item HT is set to I; if not change it.
DL= Density lower limit Format according to item DI. Low density alarm set point.
Default value: +00000.00 [kg/m3].
DU= Density upper limit Format according to item DI. High density alarm set point.
Default value: +00000.00 [kg/m3].
HD= Density alarm hysteresis Format according to item DI. Hysteresis around the density lower
and density upper limits (items DL and DU).
Default value: +00005.00 [kg/m3].
M1= Minimum trip pressure P1 Format according to item PI. Sets a minimum trip pressure for
pressure transmitter P1. Default value: +000000.0 [Pa].
M3= Minimum trip pressure P3 Format according to item PI. Sets a minimum trip pressure for
pressure transmitter P3. Default value: +000000.0 [Pa].
H1= Maximum trip pressure P1 Format according to item PI. Sets a maximum trip pressure for
pressure transmitter P1. Default value: +000000.0 [Pa].
H3= Maximum trip pressure P3 Format according to item PI. Sets a maximum trip pressure for
pressure transmitter P3. Default value: +000000.0 [Pa].
PH= Pressure alarm hysteresis Format according to item PI. Hysteresis around the minimum and
maximum trip pressures (items M1, M3, H1 and H3).
Default value: +000160.0 [Pa].
EX Exit Exit protection level.

Page 14
HIMS
Instruction manual HIMS / HTG and vapour pressure (P3) measurement
2.2.3 Set-up and configuration of the pressure transmitters
For the Set-up and Configuration of the pressure transmitters with the HART Communicator refer to Appendix G.
2.2.4 Zero calibration of the pressure transmitters
For the zero calibration procedure of the pressure transmitters, refer to Appendix H.
2.2.5 Compensation for pressure transmitter P1 position
The tank shell will bulge due to the hydrostatic pressure
caused by the liquid stored in the tank.
This can have an influence on the position of pressure
transmitter P1 (refer to figure 2.3).
The amount of movement of pressure transmitter P1
depends on the height of P1 above the bottom, the
structure of the tank shell and the density of the product.
In many cases, pressure transmitter P1 is located as low
as possible to the tank bottom and the influence of tank
shell bulging is negligible.
However, in those cases where the influence is present,
items IF and IL can be used to compensate for the
position of pressure transmitter P1.
Item IF (hydrostatic deformation factor) decreases
distance LP for (IF) mm/m level above the level IL
(hydrostatic deformation level). In formula:
Figure 2.3 Tank shell bulging
LPcomp. = LPprogr. - (Level - IL) x IF [m]
where: LPcomp.
LPprogr.
: LP compensated for hydrostatic tank deformation [m]
: the programmed value for LP [m]
Level : measured level from level gauge [m] IL : hydrostatic deformation level (item IL) [m]
IF : hydrostatic deformation factor (item IF) [mm/m]
Item Name Description
W2= Protection level 2 Enter protection level 2
IF= Hydrostatic deformation factor Standard floating point format; units: mm/m.
Default value: +.00000000E+00. When left at the default value,
the hydrostatic deformation compensation is disabled.
Refer to Appendix F1 for information how to obtain a correct
setting for item IF.
IL= Hydrostatic deformation level Format according to item LD. Default value: +002.0000 [m].
Item IL contains the level value above the hydrostatic deformation
compensation becomes effective. Refer to Appendix F1 how to
obtain a correct setting for item IL.
EX Exit Exit protection level.

HIMS
Instruction manual HIMS / HTG and vapour pressure (P3) measurement Page 15
2.3 Operation
2.3.1 Display
For operation of the display and the information on it, refer to the instruction manual of the applicable level gauge
(or 877 FDI). Below, only an overview is given which display formats give information about the pressure and
density measurement.
Display format Displayed information
E HIMS density
F Pressure P1
H Pressure P3
2.3.2 Manual inputs
For two quantities the operator can give a manual input by means of the PET (Portable Enraf Terminal), which
are not protected by protection level 1 or 2. These quantities are:
Item Name Description
RJ= Manual tank gas density Standard floating point format; units: kg/m3. The value must be
preceded by one status character:
V : Valid manual tank gas density
I : Invalid manual tank gas density
The tank gas density is used in the same way as with item RG.
If the status of the manual tank gas density is valid (V), then the
manual tank gas density (item RJ) is used.
If the status of the manual tank gas density is invalid (I), then the
value of item RG is used as tank gas density.
P0= Manual pressure P3 Format according to item PI. The value must be preceded by one
status character:
V : Valid manual vapour pressure
I : Invalid manual vapour pressure
If there is no P3 pressure transmitter installed, and the vapour
pressure can be assumed constant, a manual vapour pressure
value can be entered.

Page 16
HIMS
Instruction manual HIMS / HTG and vapour pressure (P3) measurement
2.3.3 Data items
Below, a summary is given of available data items. They contain measured and calculated data, verification data
and error data.
The verification data can be used to check the results of certain steps in the measuring sequence.
The hydrostatic status indicates the validity of the measured / calculated data.
The diagnostic data provides low level error information about the pressure measurement and density
calculation.
There is only one operational command with HIMS.
Item Description
P1
P3
P4
P7
DQ
N1
N3
Q1
Q3
QF
Measured / Measured pressure of pressure transmitter P1
calculated data Measured pressure of pressure transmitter P3
P1 minus P3
(P1 - P3) compensated for ambient air density and vapour density
Calculated HIMS density (preceded by 5 status characters of item QF)
Abbreviated HIMS density (preceded by 1 status character)
Serial number of pressure transmitter P1
Serial number of pressure transmitter P3
Temperature of pressure transmitter P1 (if available)
Temperature of pressure transmitter P3 (if available)
Hydrostatic status request (refer to section 5.6)
VV Verification data Refer to description at section 5.7
EH
FH
H0
HE
Diagnostic data Error HCU / ICU_HPI request (refer to section 5.5)
Fatal HCU / ICU_HPI errors
Last fatal HCU / ICU_HPI error
HART communication errors
Operational command:
SR Stop HART request (used with HART communicator).

Instruction manual HIMS / HTG and vapour pressure (P3) measurement Page 17
HTG
3 HTG
3.1 Introduction into HTG
An HTG (Hydrostatic Tank Gauge) system measures the tank quantities by means of pressure transmitters.
Depending on the configuration, one to three pressure transmitters are required. The pressure transmitters,
communicating with the HART® protocol, are connected to an 877 FDI (Field Display & Interface).
Unlike level based tank gauges, as servo or radar, the HTG system is a direct mass measurement system.
One pressure transmitter (P1), located at a shell nozzle near the bottom, is used to measure the liquid head.
A second pressure transmitter (P2) is located approximately 2 to 2.5 metres (6 to 8 feet) above P1.
If there exists a pressure in the vapour space, the vapour pressure must be measured with a separate pressure
transmitter (P3). P3 is not required on a floating roof tank, or with a free vented cone roof tank.
3.1.1 HTG calculations
The pressure transmitters used with an HTG system are of the
differential type. That means one side (low pressure side) is
open to atmosphere.
A temperature measuring device is optional and only required
when standard volume and reference density is to be calculated.
The principle HTG formulas for level and observed density are:
Observed density is calculated as:
Level is calculated as:
where:
P1 : pressure of pressure transmitter P1 [Pa]
P2 : pressure of pressure transmitter P2 [Pa]
P3 : pressure of pressure transmitter P3 [Pa]
LG : local gravity acceleration [m/s2]
Figure 3.1 Principle HTG configuration
LS : distance zero point pressure transmitter P1 to P2 [m]
LP : distance zero point pressure transmitter P1 to zero point tank [m]
The calculated level and observed density and (optional) measured temperature are transmitted to the tank
gauging system. The tank gauging system (an Honeywell Enraf Entis system, Honeywell Enraf CIUPlus or other
host system) needs the Tank Capacity Table and (optionally) the ASTM table to calculate the Mass, Gross
Observed Volume, and optionally the Gross Standard Volume and reference density.
When the product density is known and does not change, pressure transmitter P2 is not required. The density
will be a manual input value, from which the level can be calculated by:

Page 18
HTG
Instruction manual HIMS / HTG and vapour pressure (P3) measurement
3.1.2 Volume and Mass calculations
The standard HTG mass and volume calculations are:
where: Vol.heel : Volume below the zero point of pressure transmitter P1 [m
3]
Areaeq. : Equivalent area over the (calculated) tank level [m2]
Honeywell Enraf transmits the calculated HTG level and observed density values to the tank gauging
system (Entis, CIUPlus or other host system).
In the tank gauging system the Gross Observed Volume is obtained from the level value via the tank capacity
table. Then Mass is calculated as:
Mass = Gross Observed Volume x Dens. obs.
This is equivalent to the standard HTG mass calculation as is shown in the following conversion equations:
Mass = Gross Observed Volume x Dens. obs.
Mass = (Level x Areaeq.) x Dens.obs.
Mass = (Level LP) x Areaeq. x Dens.obs. + LP x Areaeq. x Dens.obs.
substitute of HTG level and density formulas gives:
the above formula can be reduced to:
which is the standard HTG mass formula.

Instruction manual HIMS / HTG and vapour pressure (P3) measurement Page 19
HTG
3.1.3 Corrections for ambient air and vapour density
Ambient air density
The pressure at the atmospheric side measured by pressure transmitter P1, compared to P2 and to P3, is
increased by the column of air over respectively the distances LS and (LM - LP). Refer to figure 2.1.
That is compensated in the calculated pressures P7 and P8 by the terms:
(LM - LP) x RF x LG [Pa] for P7 (P1 - P3)
LS x RF x LG [Pa] for P8 (P1 - P2)
where:
LM : distance zero point pressure transmitter P3 to zero point tank [m]
LP : distance zero point pressure transmitter P1 to zero point tank [m]
LS :
RF :
LG :
distance zero point pressure transmitter P1
ambient air density [kg/m3]
local gravity acceleration [m/s2]
to P2 [m]
The default value for the ambient air density (item RF) is set at: 1.225 kg/m3 (floating point format).
Vapour density correction
The vapour space above the product in a fixed roof tank consists of a mixture from air and product vapour. The
density of this vapour mixture in the tank is different from the density of the air outside the tank.
That is compensated in the calculated pressure P7 by the term:
(LM - Level) x RG x LG [Pa]
where:
LM : distance zero point pressure transmitter P3 to zero point tank [m]
Level : calculated HTG level (item HQ) [m]
RG : vapour density [kg/m3]
LG : local gravity acceleration [m/s2]
The default value for the vapour density (item RG) is set at: 1.25 kg/m3 (floating point format).
Pressures P7 and P8
The pressure differences (P1 - P3) and (P1 - P2), compensated for ambient air density and vapour density, are:
P7 = (P1 - P3) + (LM - LP) x RF x LG - (LM - Level) x RG x LG [Pa]
P8 = (P1 - P2) + LS x RF x LG [Pa]

Page 20
HTG
Instruction manual HIMS / HTG and vapour pressure (P3) measurement
Density calculation
The calculated density, corrected for ambient air density (item DQ) will then become:
Level calculation
The calculated level, corrected for ambient air density and vapour density (item HQ), becomes:
Item ‘HQ’ is non-explicit. However, after conversion the level (item HQ) can directly be obtained:
Density in air
With the default values used in items RF and RG, the observed density is the density in vacuum.
If the density value is required as density in air, then item RF must be set to 0, and from item RG the value of the
ambient air density must be subtracted.
The table below summarizes the values for items RF and RG for density in vacuum and density in air.
HTG Density in vacuum in air
Ambient air density (item RF) 1.225 kg/m3 (default) 0 kg/m
3
Vapour density (item RG) 1.25 kg/m3 (default) (RG ambient air density)

HTG
Instruction manual HIMS / HTG and vapour pressure (P3) measurement
Page 21
3.2 Commissioning
For information how to program items, refer to the instruction manual 877 FDI or to the instruction manual of the
847 Portable Enraf Terminal. It is assumed that the basic settings for the 877 FDI are already programmed,
according to the instruction manual 877 FDI.
For connection of the pressure transmitters to the instrument, refer to the installation guide 877 FDI.
3.2.1 Selecting pressure and density dimension
When the pressure and/or density dimension has to be changed from default, all items with related formats have
to be changed and the values must be converted to the new dimension.
Note:
When the 877 FDI is equipped with the XPU-2 board, then all dimension depended items will be automatically changed and the values will be automatically converted.
Item Name Description
W2= Protection level 2 Enter protection level 2
PI= Pressure dimension Selects the pressure dimension and converts the format. This
item contains one character, which can be:
P : Pa; format: sign X X X X X X separator X
K : kPa; format: sign X X X X separator X X X
I : psi; format: sign X X separator X X X X X
S : psi; format: sign X X X separator X X X X
Default set on: P [Pa]
DI= Density dimension Selects the density dimension and converts the format. This item
contains one character, which can be:
K : kg/m3; format: sign X X X X X separator X X
A : °API; format: sign X X X X separator X X X
L : lbs/ft3; format: sign X X X separator X X X X
Default set on: K [kg/m3]
. .= format depended items Not required with XPU-2 board.
Program all pressure depended and/or density depended items
to the new dimension. Refer to the table below for an overview
of these items.
EX Exit Exit protection level.
Items from which the format depends
on the pressure dimension (item PI)
Items from which the format
depends on the density
dimension (item DI)
29 M1 O2
H1 M2 O3
H2 M3 P0
H3 O1 PH
28 HD
DD
DL
DU

Page 22
HTG
Instruction manual HIMS / HTG and vapour pressure (P3) measurement
3.2.2 Tank and gauge data
P3
AH
P2 LM
HH HA
LS
AH P1
LN
LA
LL
LP Tank zero (datum plate)
Figure 3.2 HTG tank data
Item Name Description
W2= Protection level 2 Enter protection level 2
LM= Distance P3 - tank zero Format according to item LD. This distance is used in tank gas
correction and ambient air density correction. If pressure
transmitter P3 is not installed, use a value equal to the upper
reference point.
LN= Minimum HTG level Format according to item LD. Default, item LN is set to 3.5
metres.
The distance LN can be lowered to a level which is approximately
0.5 m (20") above the pressure transmitter P2.
The purpose is of LN is as follows:
If the level drops below the setting of LN, the last valid density will
be stored and used as the density value. This is, because as the
level drops below P2, density cannot be calculated anymore.
LP= Distance P1 - tank zero Format according to item LD. The setting of item LP influences
the level and hence the volume calculation. It therefore must be
assessed accurately. Refer to Appendix B2 for some methods to
assess this distance.
LS= Distance P1 - P2 Format according to item LD. The distance between pressure
transmitters P1 and P2 (item LS) is used in the level and density
calculation. It can be directly measured by means of a measuring
tape from flange to flange, or from the zero marks on both
pressure transmitters. Refer to Appendix B2 for some other
methods to assess this distance.

HTG
Instruction manual HIMS / HTG and vapour pressure (P3) measurement
Page 23
Continue:
Item Name Description
PA= Available pressure transmitters Three characters; 123, or a ‘ - ’ for the pressure transmitter which
is not installed. For example, item PA can be set to:
123 : Pressure transmitters P1, P2 and P3 are installed; or
12 - : Pressure transmitters P1 and P2 are installed, etc.
LG= Local gravity Standard floating point format; units: m/s2. Item LG must be set to
the local gravity constant. Appendix C gives information about the
local gravity constant.
RF= Ambient air density Standard floating point format; units: kg/m3. Default, RF is set to
+.12250000E+01. Refer to Appendix D for more information about
the ambient air density.
RG= Tank gas density Standard floating point format; units: kg/m3. Default RG is set to
+.12500000E+01. Refer to Appendix E for more information about
the vapour density.
HT= HIMS / HTG selection One character; either I (for HIMS) or T (for HTG).
Item HT must be set to: T.
OB= Optional board selection Three characters; selects the optional board. Must be set to: HPU
for the optional HCU and ICU_HPI boards.
IM= Indicator mode One character; selects the indicator mode of the 877 FDI.
For HTG mode, item IM must be set to: H.
DL= Density lower limit Format according to item DI. Low density alarm set point.
Default value: +00000.00 [kg/m3]. *)
DU= Density upper limit Format according to item DI. High density alarm set point.
Default value: +00000.00 [kg/m3]. *)
HD= Density alarm hysteresis Format according to item DI. Hysteresis around the density lower
and density upper limits (items DL and DU).
Default value: +00005.00 [kg/m3].
M1= Minimum trip pressure P1 Format according to item PI. Sets a minimum trip pressure for
pressure transmitter P1. Default value: +000000.0 [Pa].
M2= Minimum trip pressure P2 Format according to item PI. Sets a minimum trip pressure for
pressure transmitter P2. Default value: +000000.0 [Pa].
M3= Minimum trip pressure P3 Format according to item PI. Sets a minimum trip pressure for
pressure transmitter P3. Default value: +000000.0 [Pa].
*) Do enter a good estimate for the density upper limit (item DU) and density lower limit (item DL).
These values are also used in the level calculation (and checking) when the tank is filled after a complete
tank discharge whereby the level dropped below the P2 (and P1) pressure transmitter(s).

Page 24
HTG
Instruction manual HIMS / HTG and vapour pressure (P3) measurement
Continue:
Item Name Description
H1= Maximum trip pressure P1 Format according to item PI. Sets a maximum trip pressure for
pressure transmitter P1. Default value: +000000.0 [Pa].
H2= Maximum trip pressure P2 Format according to item PI. Sets a maximum trip pressure for
pressure transmitter P2. Default value: +000000.0 [Pa].
H3= Maximum trip pressure P3 Format according to item PI. Sets a maximum trip pressure for
pressure transmitter P3. Default value: +000000.0 [Pa].
PH= Pressure alarm hysteresis Format according to item PI. Hysteresis around the minimum and
maximum trip pressures (items M1, M2, M3, H1, H2 and H3).
Default value: +000160.0 [Pa].
LU= Level status conversion One character; default: ? The character, specified in item LU, is
used in the level status byte of the level record to the host to
indicate a ‘reduc ’ level accuracy condition. Most Honeywell
Enraf tank gauging systems accept the “?” character as
reduced accuracy status.
With the following conditions, the contents of item LU is placed in
the level status:
• manual or last valid P3 used;
• manual or last valid density used;
• manual gas density used;
• level below minimum HTG (item LN).
EX Exit Exit protection level.
3.2.3 Alarm settings
Refer to figure 3.2. The high level alarm (HA) and low level alarm (LA) conditions are transmitted in the level
alarm byte of the level record to the host.
Item Name Description
W1= Protection level 1 Enter protection level 1
AH= Level alarm hysteresis Format according to item LD. Sets level alarm hysteresis.
Default value: +000.1000 (m).
HA= High level alarm Format according to item LD. High level alarm set point.
Default value: +026.0000 (m).
HH= High high level alarm Format according to item LD. High high level alarm set point.
Default value: +026.1000 (m).
LA= Low level alarm Format according to item LD. Low level alarm set point.
Default value: +002.0000 (m).
LL= Low low level alarm Format according to item LD. Low low level alarm set point.
Default value: +001.9000 (m).
EX Exit Exit protection level.

HTG
Instruction manual HIMS / HTG and vapour pressure (P3) measurement
Page 25
3.2.4 Ullage readout
When an ullage reading is required, the two items shown below must
be changed.
The ullage value is also transmitted to the host via the two wire Enraf
field bus.
The ullage, or outage, measurement is referred to a zero point at the
tank top (upper reference point).
The level, or innage, measurement is referred to a zero point at the
tank bottom (datum plate).
Refer to figure 3.3.
Note:
The high and low level alarms are “innage” alarms.
Hence, a high alarm condition occurs when there is a low ullage and visa verse.
Figure 3.3 Upper reference value
Item Name Description
W2= Protection level 2 Enter protection level 2.
UR= Upper reference Format according to item LD.
Distance UR represents the distance from the ‘i ’ zero point
(datum plate) to the upper reference point at a dip hatch (or other
point at the tank top).
DE= Level type One character; either I or U.
I : for innage measurement (default)
U : for ullage measurement.
EX Exit Exit protection level.
3.2.5 Set-up and configuration of the pressure transmitters
For the Set-up and Configuration of the pressure transmitters with the HART Communicator refer to Appendix G.

Page 26
HTG
Instruction manual HIMS / HTG and vapour pressure (P3) measurement
3.2.6 Zero calibration of the pressure transmitters
For the zero calibration procedure of the pressure transmitters, refer to Appendix H.
3.2.7 Compensation for pressure transmitter P1 - P2 distance
The tank shell will bulge due to the hydrostatic pressure
caused by the liquid stored in the tank. This can have an
influence on the position of pressure transmitters P1 and P2
(refer to figure 3.4). The amount of movement depends on the
position of P1 and P2, the length of the ‘ar ’ (nozzle - ball
valve), the structure of the tank shell and the density of the
product. In some cases, the influence of the tank shell bulging
is negligible.
However, in those cases where the influence is present,
several methods can be followed to limited the influence.
• Mechanical solution: U-bend or rigid bar (refer to
Installation Info 003)
• Compensation for the distance P1 - P2 (item LS).
This section describes how to compensate for the distance LS.
Figure 3.4 Tank shell bulging
Item IF (hydrostatic deformation factor) increases distance LS for (IF) mm/m level above the level IL (hydrostatic
deformation level). In formula:
LScomp. = LSprogr. + (Level - IL) x IF [m]
where: LScomp.
LSprogr.
: LS compensated for hydrostatic tank deformation [m]
: the programmed value for LS [m]
Level : calculated HTG level (item HQ) [m]
IL : hydrostatic deformation level [m]
IF : hydrostatic deformation factor [mm/m]
Item Name Description
W2= Protection level 2 Enter protection level 2
IF= Hydrostatic deformation factor Standard floating point format; units: mm/m.
Default value: +.00000000E+00. When left at the default value,
the hydrostatic deformation compensation is disabled.
Refer to Appendix F2 for information how to obtain a correct
setting for item IF.
IL= Hydrostatic deformation level Format according to item LD. Default value: +002.0000 [m].
Item IL contains the level value above which the hydrostatic
deformation compensation becomes effective.
Refer to Appendix F2 for information how to obtain a correct
setting for item IL.
EX Exit Exit protection level

HTG
Instruction manual HIMS / HTG and vapour pressure (P3) measurement
Page 27
3.3 Operation
3.3.1 Display
For operation of the display and the information on it, refer to the instruction manual 877 FDI.
Below, only an overview is given which display formats give information about the level, pressure and density
measurement.
Display format Displayed information
A HTG level and temperature
B HTG level and status
E HTG density
F Pressure P1
G Pressure P2
H Pressure P3
3.3.2 Manual inputs
For three quantities the operator can give a manual input by means of the PET (Portable Enraf Terminal), which
are not protected by protection level 1 or 2. These quantities are:
Item Name Description
RJ= Manual tank gas density Standard floating point format; units: kg/m3. The value must be
preceded by one status character:
V : Valid manual tank gas density
I : Invalid manual tank gas density
The tank gas density is used in the same way as with item RG.
If the status of the manual tank gas density is valid (V), then the
manual tank gas density (item RJ) is used.
If the status of the manual tank gas density is invalid (I), then the
value of item RG is used as tank gas density.
P0=
Manual pressure P3
Format according to item PI. The value must be preceded by one
status character:
V : Valid manual vapour pressure I : Invalid manual vapour pressure
If there is no P3 pressure transmitter installed, and the vapour
pressure can be assumed constant, a manual vapour pressure
value can be entered.
DD=
Manual density
Format according to item DI. The value must be preceded by one
status character:
V : Valid manual density I : Invalid manual density
If there is no P2 pressure transmitter installed, and the product
density can be assumed constant, a manual product density must
be given.
Note: The manual density is the observed density.

Page 28
HTG
Instruction manual HIMS / HTG and vapour pressure (P3) measurement
3.3.3 Data items
Below, a summary is given of available data items. They contain measured and calculated data, verification data
and error data.
The verification data can be used to check the results of certain steps in the measuring sequence.
The hydrostatic status indicates the validity of the measured / calculated data.
The diagnostic data provides low level error information about the pressure measurement and density
calculation.
There is only one operational command with HTG.
Item Description
P1
P2
P3
P4
P5
P7
P8
DQ
HQ
VQ
N1
N2
N3
Q1
Q2
Q3
QF
Measured / Measured pressure of pressure transmitter P1
calculated data Measured pressure of pressure transmitter P2
Measured pressure of pressure transmitter P3
P1 minus P3
P1 minus P2
(P1 - P3) compensated for ambient air density and vapour density
(P1 - P2) compensated for ambient air density
Calculated HTG density (preceded by 5 status characters from item QF)
Abbreviated HTG density (preceded by 1 status character)
Calculated HTG level (preceded by 5 status characters from item QF)
Calculated HTG ullage (preceded by 5 status characters from item QF)
Serial number of pressure transmitter P1
Serial number of pressure transmitter P2
Serial number of pressure transmitter P3
Temperature of pressure transmitter P1 (if available)
Temperature of pressure transmitter P2 (if available)
Temperature of pressure transmitter P3 (if available)
Hydrostatic status request (refer to section 5.6)
VV Verification data Refer to description at section 5.7
EH
FH
H0
HE
Diagnostic data Error HCU / ICU_HPI request (refer to section 5.5)
Fatal HCU / ICU_HPI errors
Last fatal HCU / ICU_HPI error
HART communication errors
Operational command:
SR Stop HART request (used with HART communicator).

Vapour pressure (P3) measurement
Instruction manual HIMS / HTG and vapour pressure (P3) measurement
Page 29
4 Vapour pressure (P3) measurement
4.1 Introduction into vapour pressure measurement
The vapour pressure measured on spheres, spheroids, bullets, etc. is used in the calculation of the Total Gross
Standard Volume. That is the volume which includes the amount of evaporated product in the vapour space.
The vapour pressure measurement can be integrated in the Enraf level gauge.
The following level gauges can be equipped with an option board to measure the vapour pressure:
• 854 ATG servo gauge
• SmartRadar with high pressure antenna
Alternatively, the vapour pressure measurement can be connected to an 877 FDI (Field Display & interface) with
an appropriate option board.
Pressure transmitters communicating with the HART® protocol can be connected to the Enraf gauges with the
optional HCU or ICU_HPI board.
The measured pressure by the roof pressure transmitter (P3) is transmitted to the tank gauging system.
The tank gauging system (an Enraf Entis system, Enraf CIUPlus or other host system) performs the corrections
on the Gross Standard Volume and Mass for the amount of product in the vapour space.

Page 30
Vapour pressure (P3) measurement
Instruction manual HIMS / HTG and vapour pressure (P3) measurement
4.2 Commissioning
For information how to program items, refer to the instruction manual of the used level gauge or to the instruction
manual of the 847 PET (Portable Enraf Terminal).
For connection of the pressure transmitter to the instrument, refer to the installation guide of the used level
gauge.
4.2.1 Selecting pressure dimension
When the pressure dimension has to be changed from default, all items with a pressure format have to be
changed and the value must be converted to the new dimension.
Note:
When the instrument is equipped with the XPU-2 board, then all dimension depended items will be automatically changed and the values will be automatically converted.
Item Name Description
W2= Protection level 2 Enter protection level 2
PI= Pressure dimension Selects the pressure dimension and converts the format.
This item contains one character, which can be:
P : Pa; format: sign X X X X X X separator X
K : kPa; format: sign X X X X separator X X X
I : psi; format: sign X X separator X X X X X
S : psi; format: sign X X X separator X X X X
Default set on: P [Pa]
. .= format depended items Not required with XPU-2 board.
Program all pressure depended items to the new dimension.
Refer to the table below for an overview of these items.
EX Exit Exit protection level 2
Items from which the format depends on the pressure dimension (item PI)
29 H1 H2 H3
M1 M2 M3 O1
O2 O3 P0 PH
Vapour pressure (P3) measurement
Instruction manual HIMS / HTG and vapour pressure (P3) measurement Page 31
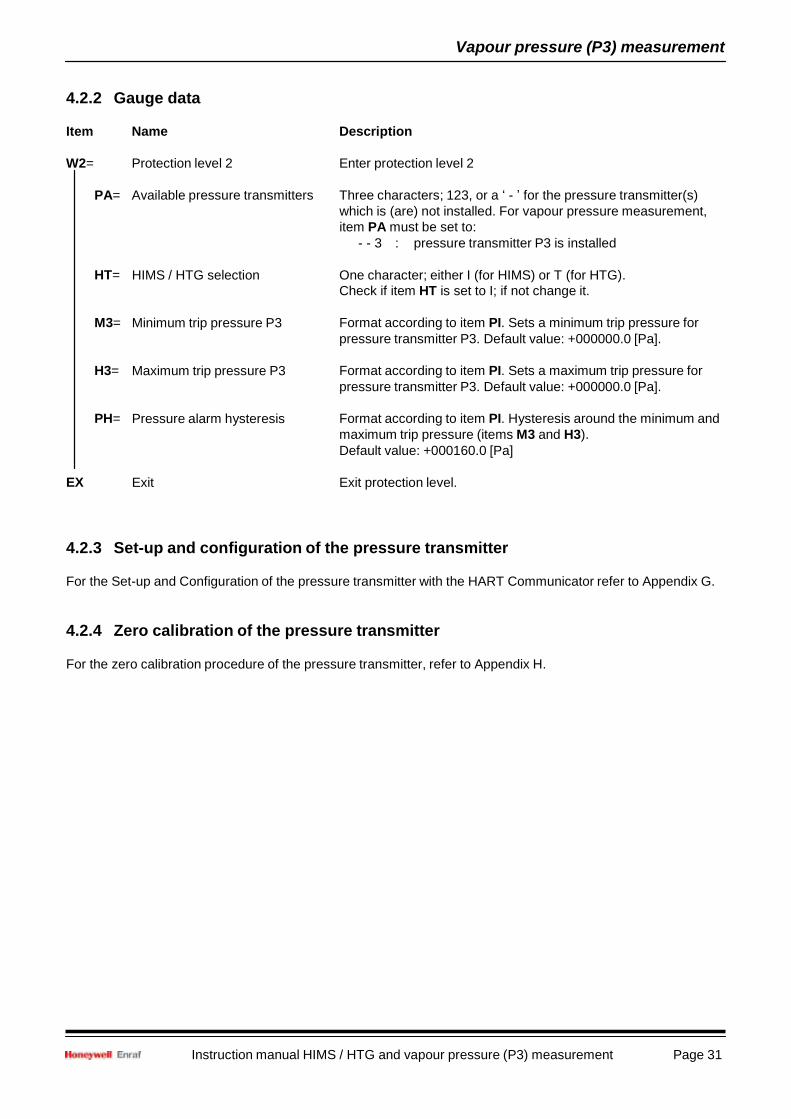
4.2.2 Gauge data
Item Name Description
W2= Protection level 2 Enter protection level 2
PA= Available pressure transmitters Three characters; 123, or a ‘ - ’ for the pressure transmitter(s)
which is (are) not installed. For vapour pressure measurement,
item PA must be set to:
- - 3 : pressure transmitter P3 is installed
HT= HIMS / HTG selection One character; either I (for HIMS) or T (for HTG).
Check if item HT is set to I; if not change it.
M3=
Minimum trip pressure P3
Format according to item PI. Sets a minimum trip pressure for
pressure transmitter P3. Default value: +000000.0 [Pa].
H3=
Maximum trip pressure P3
Format according to item PI. Sets a maximum trip pressure for
pressure transmitter P3. Default value: +000000.0 [Pa].
PH=
Pressure alarm hysteresis
Format according to item PI. Hysteresis around the minimum and
maximum trip pressure (items M3 and H3).
Default value: +000160.0 [Pa]
EX
Exit
Exit protection level.
4.2.3 Set-up and configuration of the pressure transmitter
For the Set-up and Configuration of the pressure transmitter with the HART Communicator refer to Appendix G.
4.2.4 Zero calibration of the pressure transmitter
For the zero calibration procedure of the pressure transmitter, refer to Appendix H.
Page 32
Vapour pressure (P3) measurement
Instruction manual HIMS / HTG and vapour pressure (P3) measurement
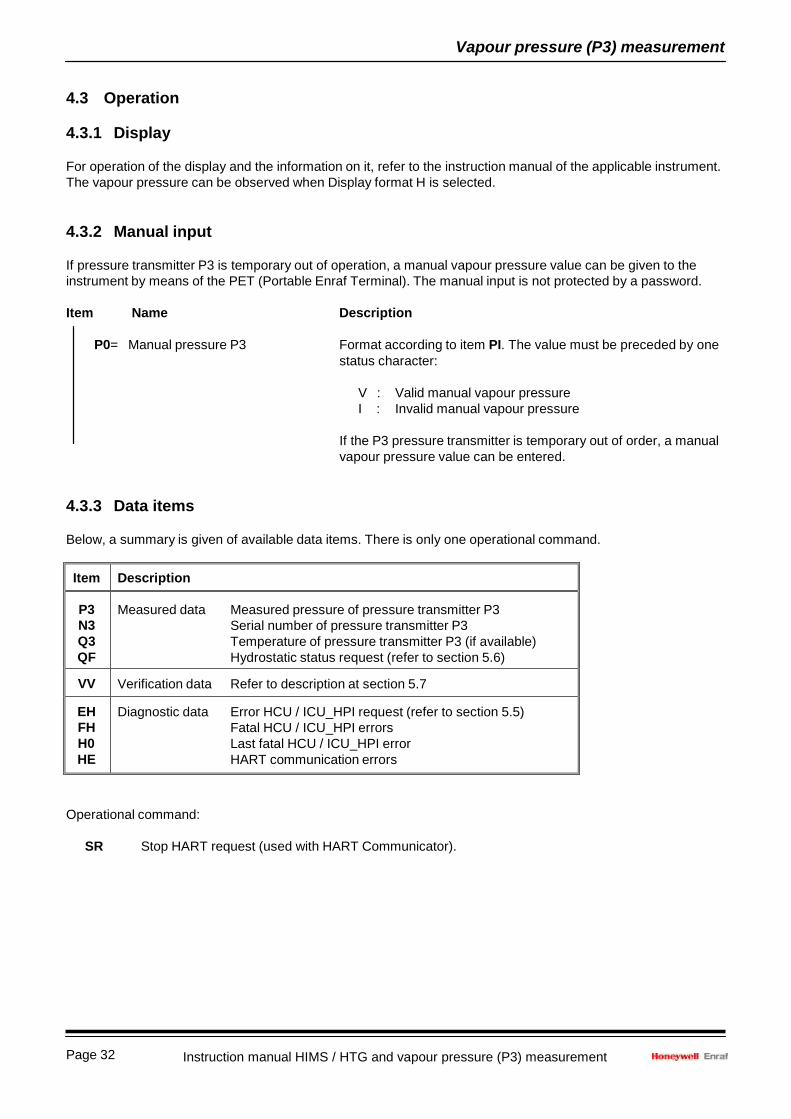
4.3 Operation
4.3.1 Display
For operation of the display and the information on it, refer to the instruction manual of the applicable instrument.
The vapour pressure can be observed when Display format H is selected.
4.3.2 Manual input
If pressure transmitter P3 is temporary out of operation, a manual vapour pressure value can be given to the
instrument by means of the PET (Portable Enraf Terminal). The manual input is not protected by a password.
Item Name Description
P0= Manual pressure P3 Format according to item PI. The value must be preceded by one
status character:
V : Valid manual vapour pressure
I : Invalid manual vapour pressure
If the P3 pressure transmitter is temporary out of order, a manual
vapour pressure value can be entered.
4.3.3 Data items
Below, a summary is given of available data items. There is only one operational command.
Item Description
P3
N3
Q3
QF
Measured data Measured pressure of pressure transmitter P3
Serial number of pressure transmitter P3
Temperature of pressure transmitter P3 (if available)
Hydrostatic status request (refer to section 5.6)
VV
Verification data Refer to description at section 5.7
EH
FH
H0
HE
Diagnostic data Error HCU / ICU_HPI request (refer to section 5.5)
Fatal HCU / ICU_HPI errors
Last fatal HCU / ICU_HPI error
HART communication errors
Operational command:
SR Stop HART request (used with HART Communicator).

Instruction manual HIMS / HTG and vapour pressure (P3) measurement Page 33
Maintenance and Troubleshooting
5 Maintenance and troubleshooting
5.1 Maintenance
For preventive maintenance on the pressure transmitters, refer to the maintenance instructions of the used
pressure transmitters.
It is recommended to check the zero calibration of the pressure transmitters once per year. Refer to Appendix H.
5.2 Troubleshooting HIMS
This section is intended as a help in finding the cause with start-up problems and when no correct reading of the
pressure or density is obtained.
1) No or incorrect level reading.
Please refer to the section maintenance / trouble shooting of the instruction manual from the used level
gauge (servo or radar). An incorrect level reading results in a wrong volume reading and wrong density
reading, but mass remains unaffected.
2) No pressure value with items P1 and P3.
• Check item PA (available pressure transmitters);
• Request for items EH and QF. Decode the displayed error codes as given in sections 5.5 and 5.6.
Find from the decoded message the cause of the problem;
• Check the wiring from the pressure transmitters to the instrument terminals (mind the polarity!);
• Check if the pressure transmitters are correctly configured (refer to Appendix G);
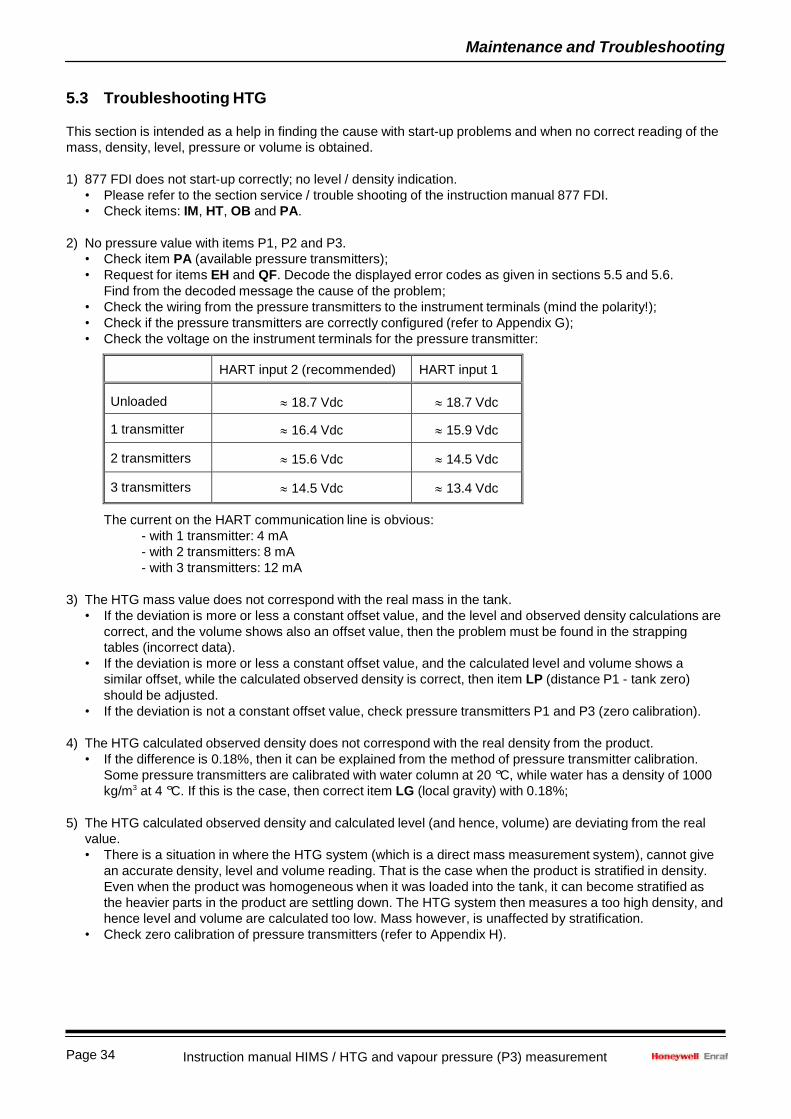
• Check the voltage on the instrument terminals for the pressure transmitter:
HART input 2 (recommended) HART input 1
Unloaded
18.7 Vdc
18.7 Vdc
1 transmitter
16.4 Vdc
15.9 Vdc
2 transmitters
15.6 Vdc
14.5 Vdc
The current on the HART communication line is obvious:
- with 1 transmitter: 4 mA
- with 2 transmitters: 8 mA
3) The HIMS observed density does not correspond with the real density from the product.
• If the difference is 0.18%, then it can be explained from the method of pressure transmitter calibration.
Some pressure transmitters are calibrated with water column at 20 °C, while water has a density of 1000
kg/m3 at 4 °C. If this is the case, then correct item LG (local gravity) with 0.18%;
• Check zero calibration of pressure transmitters (refer to Appendix H);
• If there exists a density difference at mainly lower levels (thus not at higher levels), then the cause must
be found in a wrong value for item LP. Check on distance LP. Eventually check the level gauge on its
correct reading;
• If there is more or less a constant density difference, check on settings of items:
LG, LM, RF, RG (or RJ).
Page 34
Maintenance and Troubleshooting
Instruction manual HIMS / HTG and vapour pressure (P3) measurement
5.3 Troubleshooting HTG
This section is intended as a help in finding the cause with start-up problems and when no correct reading of the
mass, density, level, pressure or volume is obtained.
1) 877 FDI does not start-up correctly; no level / density indication.
• Please refer to the section service / trouble shooting of the instruction manual 877 FDI.
• Check items: IM, HT, OB and PA.
2) No pressure value with items P1, P2 and P3.
• Check item PA (available pressure transmitters);
• Request for items EH and QF. Decode the displayed error codes as given in sections 5.5 and 5.6.
Find from the decoded message the cause of the problem;
• Check the wiring from the pressure transmitters to the instrument terminals (mind the polarity!);
• Check if the pressure transmitters are correctly configured (refer to Appendix G);
• Check the voltage on the instrument terminals for the pressure transmitter:
HART input 2 (recommended) HART input 1
Unloaded
18.7 Vdc
18.7 Vdc
1 transmitter
16.4 Vdc
15.9 Vdc
2 transmitters
15.6 Vdc
14.5 Vdc
3 transmitters
14.5 Vdc
13.4 Vdc
The current on the HART communication line is obvious:
- with 1 transmitter: 4 mA
- with 2 transmitters: 8 mA
- with 3 transmitters: 12 mA
3) The HTG mass value does not correspond with the real mass in the tank.
• If the deviation is more or less a constant offset value, and the level and observed density calculations are
correct, and the volume shows also an offset value, then the problem must be found in the strapping
tables (incorrect data).
• If the deviation is more or less a constant offset value, and the calculated level and volume shows a
similar offset, while the calculated observed density is correct, then item LP (distance P1 - tank zero)
should be adjusted.
• If the deviation is not a constant offset value, check pressure transmitters P1 and P3 (zero calibration).
4) The HTG calculated observed density does not correspond with the real density from the product.
• If the difference is 0.18%, then it can be explained from the method of pressure transmitter calibration.
Some pressure transmitters are calibrated with water column at 20 °C, while water has a density of 1000
kg/m3 at 4 °C. If this is the case, then correct item LG (local gravity) with 0.18%;
5) The HTG calculated observed density and calculated level (and hence, volume) are deviating from the real
value.
• There is a situation in where the HTG system (which is a direct mass measurement system), cannot give
an accurate density, level and volume reading. That is the case when the product is stratified in density.
Even when the product was homogeneous when it was loaded into the tank, it can become stratified as
the heavier parts in the product are settling down. The HTG system then measures a too high density, and
hence level and volume are calculated too low. Mass however, is unaffected by stratification.
• Check zero calibration of pressure transmitters (refer to Appendix H).

Instruction manual HIMS / HTG and vapour pressure (P3) measurement Page 35
Maintenance and Troubleshooting
bit 0 : P1 exceeds min. or max. trip pressure
1 : P2 exceeds min. or max. trip pressure
2 : P3 exceeds min. or max. trip pressure *)
3 : exceeding range P1
4 : exceeding range P2
5 : exceeding range P3 *)
6 : 1
7 : 0
5.4 Troubleshooting vapour pressure (P3) measurement
No pressure value with item P3
Refer to step 2 at section 5.3.
5.5 Hydrostatic error request (item EH)
This item contains the most recent pressure transmitter error encountered by the optional HCU / ICU_HPI board.
xx00 No error xx11 Pressure transmitter P1; no reply on initial HART Pressure transmitter P1 in fail or not connected; check with HART
commands communicator. Or when P1 is not installed: set first character of
item PA to ‘-’ (e.g. - - 3).
xx12 Pressure transmitter P2; no reply on initial HART Pressure transmitter P2 in fail or not connected; check with HART
commands communicator. Or when P2 is not installed: set second character of
item PA to ‘-’ (e.g. 1 - 3).
xx13 Pressure transmitter P3; no reply on initial HART Pressure transmitter P3 in fail or not connected; check with HART
commands communicator. Or when P3 not installed: set third character of
item PA to ‘-’ (e.g. 1 - -).
xx35 Pressure transmitter P1; wrong PV dimension Primary Variable of pressure transmitter P1 must be set to: ‘kP ’.
xx36 Pressure transmitter P2; wrong PV dimension Primary Variable of pressure transmitter P2 must be set to: ‘kP ’.
xx37 Pressure transmitter P3; wrong PV dimension Primary Variable of pressure transmitter P3 must be set to: ‘kP ’.
xx99 HART input option print not mounted Change HCU or ICU_HPI board for correct type.
xx: 24 for HPU emulation
28 for HSU emulation
30 for HCU emulation
5.6 Hydrostatic status request (item QF)
The hydrostatic status request item contains five status bytes (Byte 0, Byte 1, Byte 2, Byte 3 and Byte 4) from
the optional HCU / ICU_HPI board. For decoding, refer to the ASCII table in appendix A.
Status byte 0: Status byte 1:
bit 0 : general HCU / ICU_HPI fail *)
1 : low level alarm 1)
2 : low low level alarm 1)
3 : high level alarm 1)
4 : high high level alarm 1)
5 : level time-out 2)
6 : 1
7 : 0
Status byte 2: Status byte 3:
bit 0 : fail P1 bit 0 : last valid density used
1 : fail P2 1 : manual density used
2 : fail P3 *) 2 : high density alarm
3 : manual P3 used *) 3 : low density alarm
4 : last valid P3 used *) 4 : HTG level fail 1)
5 : manual level used 2) 5 : no previous store command *)
6 : 1 6 : 1
7 : 0 7 : 0
Status byte 4:
bit 0 : manual gas density used Note: 1 : level below LN Only the bits which are set to ‘1’ have an active status.
2 : last valid level used 2)
3 : invalid level reading 2)
4 : °API underflow/overflow or negative density
5 : 0
6 : 1
1) With HTG only; ignore these bits for HIMS. 2) With HIMS only; ignore these bits for HTG.
7 : 0 *) Use only these bits with vapour pressure measurement.

Page 36
Maintenance and Troubleshooting
Instruction manual HIMS / HTG and vapour pressure (P3) measurement
5.7 HART device pointer (items VP and VV)
By means of the value pointer (item VP) a vector can be loaded to the HCU or ICU_HPI option board. Next, with
item VV, the selected data is returned. Item VP consists of 4 positions, in the middle separated by a ‘.’ or ‘,’ :
v w . x y (or v w , x y). The values for the value pointer are listed in the table together with the obtained data.
v w , x y Selected data Example / Dimension
0 0
0 0
0 0
0 0
0 3
0 3
0 3
,
,
,
,
,
,
,
0 0
0 1
0 2
0 3
0 0
0 1
0 9
HCU / ICU_HPI Emulation & Function
Emulation: HSU, HPU, HCU
Function: HC: HART channel installed
AO: analog output
ST: spot temperature
MT: VITO average temperature
WS: external water bottom probe
WT: VITO water bottom probe
PR: pressure transmitters
Configuration boot code
Sales code option: J boot code: 2E
U 25
Y 3F
HCU / ICU_HPI hardware version
Boot code software version
Error counters HART addresses 0, 1, 2 (for P1: counter 1,
for P2: counter 2)
Error counters HART addresses 3, 4, 5 (for P3: counter 0)
Detected HART device addresses (1 for P1; 2 for P2;
3 for P3)
VV=HCU HCAOMT- - PR
VV=HCU CONFIG: 3F
VV=HW VERSION: 00
VV=BOOTSW VERS:01
VV=0000:0000:0013
VV=0000:0000:0000
VV=1 - 3 - 5 - - - - - - - - -
Item
VP=
Name
HART device value pointer
Description
HART device value pointer; format: 2 digits, separator, 2 digits
(refer to table above).
Example: VP=03.09: value pointer loaded to request the
detected HART devices
VV
HART device pointer value
HART device pointer value.
This item holds the value requested by item VP (refer to table
above).
Example: the requested detected HART devices

Instruction manual HIMS / HTG and vapour pressure (P3) measurement Page 37
Appendix
Appendix A ASCII table

Page 38
Appendix
Instruction manual HIMS / HTG and vapour pressure (P3) measurement
Appendix B1 Assessment of distance LP for HIMS
In this Appendix three methods are described to obtain the distance: zero point tank - zero point pressure transmitter P1 (item LP).
B1.1 LP determination from measurement
The principle of this method consist of five measurements (refer to figure below). When performed well, the distance LP can be determined
within ±2 mm.
Step 1) Level This is the level reading of the level gauge. Make sure it is indicating the correct value (level).
Step 2) Ullage
Perform a manual ullage measurement from a dip hatch located closed to the pressure transmitter P1 (ullage).
Step 3) Roof distance
This is the distance from the selected dip hatch to a horizontal flat place on the tank railing above pressure transmitter P1
(roof distance).
We advise to measure this distance with a theodolite (optical measuring device), to bring over the horizontal distance from
the leveled rod on the dip hatch to the levelled rod next to the tank railing.
Step 4) TX distance
Measure the distance from the horizontal flat place on the tank railing to the top of the pressure transmitter flange
(TX height).
Use a measuring tape and perform this measurement at a time there is no (hard) wind.
Step 5) TX centre
With most pressure transmitters, the centre of the measuring diaphragm is also at the centre of the mounting flange
(TX centre).
For example: a 2", 150 lbs flange has a centre distance of 76.2 mm.
Calculate LP: LP = level + ullage + roof distance - TX height - TX centre
Level
gauge
Roof distance (3)
H1
H2
Ullage (2)
Level (1) TX-height (4)
Roof distance
TX-centre (5) Roof distance = H1 - H2
LP
Tank zero
LP determination by measurement
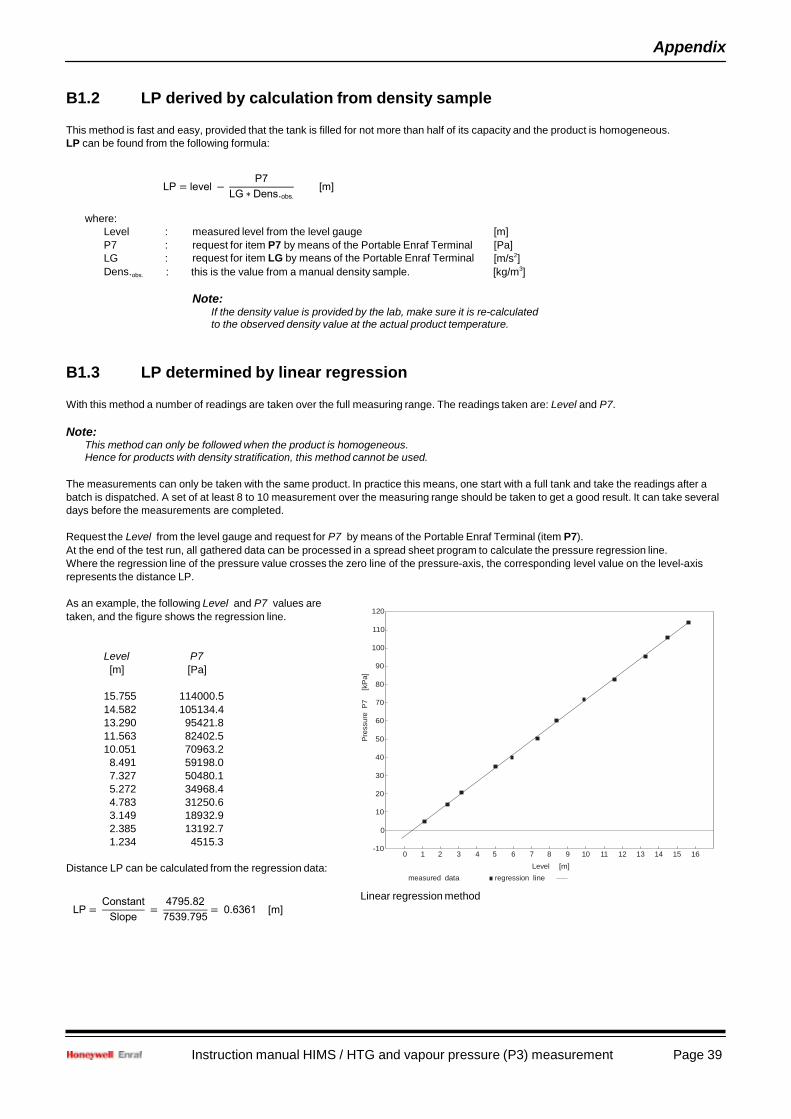
Instruction manual HIMS / HTG and vapour pressure (P3) measurement Page 39
Appendix
15.755 114000.5
14.582 105134.4
13.290 95421.8
11.563 82402.5
10.051 70963.2
8.491 59198.0
7.327 50480.1
5.272 34968.4
4.783 31250.6
3.149 18932.9
2.385 13192.7
1.234 4515.3
Pre
ssu
re P
7
[kP
a]
B1.2 LP derived by calculation from density sample
This method is fast and easy, provided that the tank is filled for not more than half of its capacity and the product is homogeneous.
LP can be found from the following formula:
where:
Level : measured level from the level gauge [m]
P7 :
LG :
request for item P7 by means of the Portable Enraf Terminal
request for item LG by means of the Portable Enraf Terminal
[Pa]
[m/s2]
Dens.obs. : this is the value from a manual density sample. [kg/m3]
Note: If the density value is provided by the lab, make sure it is re-calculated to the observed density value at the actual product temperature.
B1.3 LP determined by linear regression
With this method a number of readings are taken over the full measuring range. The readings taken are: Level and P7.
Note:
This method can only be followed when the product is homogeneous. Hence for products with density stratification, this method cannot be used.
The measurements can only be taken with the same product. In practice this means, one start with a full tank and take the readings after a
batch is dispatched. A set of at least 8 to 10 measurement over the measuring range should be taken to get a good result. It can take several
days before the measurements are completed.
Request the Level from the level gauge and request for P7 by means of the Portable Enraf Terminal (item P7).
At the end of the test run, all gathered data can be processed in a spread sheet program to calculate the pressure regression line.
Where the regression line of the pressure value crosses the zero line of the pressure-axis, the corresponding level value on the level-axis
represents the distance LP.
As an example, the following Level and P7 values are
taken, and the figure shows the regression line.
Level P7
[m] [Pa]
120
110
100
90
80
70
60
50
40
30
20
10
0
Distance LP can be calculated from the regression data:
-10
0 1 2 3 4 5 6 7 8 9 10 11 12 13 14 15 16
Level [m]
measured data Linear regression method
regression line

Page 40
Appendix
Instruction manual HIMS / HTG and vapour pressure (P3) measurement
Appendix B2 Assessment of distance LP (and LS) for HTG
In this Appendix three methods are described to obtain the distance: zero point tank - zero point pressure transmitter P1 (item LP).
B2.1 LP determination from measurement
The principle of this method consist of five measurements (refer to figure below). When performed well, the distance LP can be determined
within ±2 mm.
Step 1) Level The level can be taken from an innage dip at the datum plate, or from a manual ullage measurement at the upper reference
point. Take the level reading (level).
Step 2) Ullage
Perform a manual ullage measurement from a dip hatch located closed to the pressure transmitter P1 (ullage).
Step 3) Roof distance
This is the distance from the selected dip hatch to a horizontal flat place on the tank railing above pressure transmitter
P1(roof distance).
We advise to measure this distance with a theodolite (optical measuring device), to bring over the horizontal distance from
the leveled rod on the dip hatch to the leveled rod next to the tank railing.
Step 4) TX distance
Measure the distance from the horizontal flat place on the tank railing to the top of the pressure transmitter flange
(TX height).
Use a measuring tape and perform this measurement at a time there is no (hard) wind.
Step 5) TX centre
With most pressure transmitters, the centre of the measuring diaphragm is also at the centre of the mounting flange
(TX centre).
For example: a 2", 150 lbs flange has a centre distance of 76.2 mm.
Calculate LP: LP = level + ullage + roof distance - TX height - TX centre
Roof distance (3)
H1
H2
Ullage (2)
Level (1)
TX-height (4)
Roof
distance
TX-centre (5) Roof distance = H1 - H2
LP
Tank zero
LP determination by measurement

Appendix
Instruction manual HIMS / HTG and vapour pressure (P3) measurement Page 41
B2.2 LP derived from mass calculation
As the HTG system is a direct mass measuring system, it is obvious to calibrate the HTG system by means of a mass comparison method.
First of all, a good guess is made for the distance LP. In the worst case, LP can be left at zero.
The mass of the product in the tank, measured by the HTG system, will be compared with the mass, measured and calculated in the
traditional way or by means of another mass measuring system (such as mass-flow meters).
Note:
Before applying this method the density measurement (and thus distance LS) must be correct, as the density is used in the heel mass.
The traditional way is:
• manual dip (or ullage dip from URP, then convert to innage)
• find volume in tank capacity table
• measure the temperature from the product
• perform a density sample
• calculate the reference density
• calculate the standard volume
• calculate mass as standard volume times reference density
The outcome from this mass calculation (or from another mass measuring device) is then compared to the mass reading of the HTG system.
Find distance LP with a trial and error method.
B2.3 LP (and LS) determined by linear regression
With this method a number of level readings are taken over the full measuring range. The level reading from the HTG system and the level
reading from a manual measurement are compared.
Note:
Although the HTG system is a direct mass measurement system, the calibration described below is based on level measurement. The
level measurement from an HTG system is not that accurate that it can be used in a calibration method for a mass measurement system.
The reason that this method is described, is that it is a relative simple method. In general we do not recommend this method.
Note:
This method can only be followed when the product is homogeneous. Hence for products with density stratification, this method cannot be used.
Recall the basic HTG level formula:
An error in the distance LS will cause a gain error in the HTG level reading, and
an error in the distance LP will cause an offset error in the HTG level reading.
Take a good guess for the values of items LP and LS.
The measurements can only be taken with the same product. In practice this means, one start with a full tank and take the readings after a
batch is dispatched. A set of at least 8 to 10 measurement over the measuring range should be taken to get a good result. It can take several
days before the measurements are completed. At the end of the test run, all gathered data can be processed in a spread sheet program.
As an example, the following level data is taken:
(LP=+000.7500 m and LS=+002.1000 m)
Manual
level
[m]
HTG
level
[m]
Delta
level
[mm]
Regression data from
level difference
(against manual level)
From the level difference (defined as: Manual level - HTG
level), a regression line is calculated. From this regression
line data, correction factors can be obtained for the
distances LP and LS.
17.238 16.7998 438.2 Constant: 0.014946 m 15.755 15.4041 350.9 Slope: 0.024347 m/m The first approximation for the correction factor for LP is:
14.582 14.2574 324.6 LPcorr. = Constant + Slope x LP 13.290 12.9826 307.4 11.563 11.3063 256.7 A second (and perhaps third) recalculation may be required
10.051 9.8184 232.6 to find the proper correction factor for LP:
8.491 8.3102 180.8 LPcorr.’ = Constant + Slope x (LP + LPcorr.) 7.327 7.1500 177.0 5.272 5.1616 110.4 The recalculation can be terminated when the difference
4.783 4.6730 110.0 between the last correction factor and the one before the
last one is ≤0.0015 m. Distance LP then becomes:
LP = LP + LPcorr’

Page 42
Appendix
Instruction manual HIMS / HTG and vapour pressure (P3) measurement
correction on LP correction on LS
LPcorr.
LPcorr.’
∆ LPcorr.
0.003314
0.003395
0.000081
LScorr.
LScorr.’
∆ LScorr.
0.051128
0.052373
0.001245
LP
0.7534
LS
2.1524
The first approximation for the correction factor for LS is:
LScorr. = Slope x LS
A second (and perhaps third) recalculation may be required:
LScorr.’ = Slope x (LS + LScorr.)
The recalculation can be terminated when the difference
between the last correction factor and the one before the
last one is ≤0.0015 m. Distance LS then becomes:
LS = LS + LScorr.’
The table at the right upper corner shows the calculation
results for the example and the figure shows (a part) of
the regression line with the relevant data used in this
calculation example.
B2.4 LS derived from calculation of density sample
The distance LS can be calculated from a known density (taken by a sample) and the pressure value P8. The HTG density formula can be
re-arranged to calculate the distance LS:
All data are measured when the level in the tank is not moving and mixers are shut off. To perform density sampling, a dip hatch must be
opened, and time should be given to vent eventually over pressure and to stabilize the pressure readings.
P8 : The pressure P8 is read by means of the PET (Portable Enraf Terminal). Take more than one reading with a sufficient time
interval (for instance: 5 readings with an interval of one minute each). Average the readings.
LG : The value of item LG can also be requested by the PET or copied from the Set-up/Maintenance form or log-file of the 877
FDI.
Dens.obs. : This is the value from the manual density sample which must be taken.
The best place to take the density sample is as close as possible to the place where the pressure transmitters P1 and P2 are
installed. The samples can only be taken over the height between pressure transmitters P1 and P2. Make sure the density
sample is an average density sample over this height.
Since the density required is an observed density value, the product temperature must be measured as well.
If from Lab analyses a reference density is provided, recalculate it to the observed density value.
Note:
Mind to take the same type of density in the HTG and sample: density in air or density in vacuum.

Appendix
Instruction manual HIMS / HTG and vapour pressure (P3) measurement Page 43
gra
vity a
ccele
ration [
m/s
2 ]
Appendix C Local gravity constant (item LG)
The gravitational acceleration constant is not the same all over the world and depends on the latitude and height above sea level.
The table and graph below gives anapproximate gravity acceleration for several ellipsoidal latitudes at sea level.
Latitude [°] g [m/s2] Latitude [°] g [m/s2] Latitude [°] g [m/s2]
0
9.780490
30
9.793378
60
9.819239
5
9.780881
35
9.797455
65
9.822941
10
9.782043
40
9.801805
70
9.826139
15
9.783940
45
9.806294
75
9.828734
20
9.786517
50
9.810786
80
9.830647
25
9.789694
55
9.815146
85
9.831819
The following term must be added to the gravity figure from the table and graph for correction above sea level:
- 0.003086 [m/s2 /km]
9.84
9.83
9.82
9.81
9.80
9.79
9.78
9.77
9.8128
52.2
0 10 20 30 40 50 60 70 80 90
Latitude [°]
Gravity acceleration graph (for sea level)

Page 44
Appendix
Instruction manual HIMS / HTG and vapour pressure (P3) measurement
am
bie
nt
air
de
ns
ity (
RF
) [k
g/m
3 ]
Appendix D Ambient air density (item RF)
The barometric pressure decreases with the height above sea level. If for the average barometric pressure at sea level is taken 1013 mbar,
then the barometric pressure at different heights is given as:
Height above sea [m] Barometric pressure [m]
0
1013
500
955
1000
899
1500
846
The graph below gives the air density at different temperatures and different heights above sea level according to the barometric pressure
given in the table above.
Select for item RF a value, according to the height above sea and the average ambient temperature throughout the year.
For example: Netherlands; a country at sea level height; average barometric pressure: 1013 mbar; average day-time temperature: 15 °C.
Then, for the ambient air density, a value of 1.218 kg/m3 is found.
Air density at different heights
with 80% humidity (@1013 mbar)
1.5
1.4
1.3
1.218
1.2
0 m
500 m
1000 m
1500 m
1.1
1.0
0.9
0.8
-20 -10 0 10 15 20 30 40 50
average ambient temperature [°C]
Ambient air density
Density in air
With the true value of the ambient air density used in item RF, the product density is calculated as density in vacuum.
If the product density is required as density in air, then item RF must be set to 0. Refer also to appendix E.

Appendix
Instruction manual HIMS / HTG and vapour pressure (P3) measurement Page 45
Appendix E Vapour density (items RG and RJ)
The area above the liquid in a fixed roof tank contains a mixture of air and product vapour. The amount of evaporated product depends on
the vapour pressure of the liquid, which is a function of the temperature. The higher the temperature, the more product evaporates.
The density of the gas mix above the product can be calculated with the formula of the gas density, using the vapour pressure as a relation
between the amount of evaporated product and air. The formula is:
i
i i
where:
Dens.gas mix
: tank gas density used in items RG and RJ [kg/m3]
T : product temperature [°C]
Pvap.
Mliq.
Pamb.
Mair
: vapour pressure of the liquid [mbar]
: molecular weight of the liquid [g]
: vapour space pressure in the tank [mbar]
: molecular weight of air (28.964) [g]
For atmospheric tanks, Pamb. is the average barometric pressure. If there is some over pressure, then Pamb. must reflect this over pressure
value.
In general, lighter products evaporate more (have a higher vapour pressure) than heavier products.
As an example, the tank gas density of two different products is given in the table below.
The products are: Methanol (Mliq. = 32.04 g) and Isopropyl benzene (Mliq. = 120.2 g).
Methanol Isopropyl benzene
Temperature [°C]
Pvapour [mbar]
RG / RJ [kg/m3]
Temperature [°C]
Pvapour [mbar]
RG / RJ [kg/m3]
0
40
1.297
0
1.1
1.296
5
54
1.276
5
1.6
1.275
10
72
1.256
10
2.3
1.255
15
95
1.237
15
3.2
1.237
20
125
1.220
20
4.4
1.220
25
163
1.204
25
6.1
1.206
30
211
1.190
30
8.3
1.194
35
270
1.178
35
11.1
1.185
40
342
1.167
40
14.7
1.178
Both products appear to have nearly the same tank gas density due to the mechanism that heavier products evaporates less than lighter
products.
In case of a floating roof tank, or a tank with an inner floating roof, the tank gas density can be set equal to the ambient air density.
Density in air
With the true value of the tank gas density used in item RG (or RJ), the product density is calculated as density in vacuum.
If the product density is required as density in air, then the value of the ambient air density must be subtracted form the found value for the
tank gas density in item RG (or RJ). Refer also to appendix D.

Page 46
Appendix
Instruction manual HIMS / HTG and vapour pressure (P3) measurement
Mo
ve
me
nt
P1
[mm
]
Appendix F1 Define values for hydrostatic deformation (items IF and IL) for HIMS
If the installation of pressure transmitter P1 is such that movement due to tank shell bulging occurs, then items IF and IL can be programmed
to compensate for that movement. But first, the amount of movement must be known.
This Appendix describes a method of measuring the movement of pressure transmitter P1 and calculates from the measuring results the
hydrostatic deformation factor (item IF) and hydrostatic deformation level (item IL).
649
Tank shell 648
Ruler
647
646
Nozzle
Ball valve Pressure
transmitter P1
Tank bottom
Mark on P1
Heavy metal block
645
644
643
1 2 3 4 5 6 7 8 9 10 11 12 13 14 15 16
Level [m]
measured data best fit line
Measure and calculate the hydrostatic deformation compensation items IF and IL
On pressure transmitter P1 should be a mark for the zero line of the pressure transmitter. If there is not such a mark, just make one.
A (temporary) fixed and stable horizontal area should be made available as a reference point for the height measurements. For instance, a
heavy block of metal, made horizontal by sand or wood pieces.
The height measurements could be made with a dip tape, or by a ruler. Use with all measurements one and the same instrument.
Note with each measurement the height to the mark on P1 and the liquid level in the tank. At least a set of 8 to 10 measurements over the full
measuring range of the tank should be taken for a good result.
Level
[m]
Ruler reading
[mm]
As an example, some data is given in the table at the left, from which the calculations are made
to determine the values for items IF and IL.
15.755
14.582
13.290
11.563
10.051
8.491
7.327
5.272
4.783
3.149
2.385
1.234
644
644
645
646
646
647
647
647
648
648
648
648
In this example, for the first 5 metres level, distance LP does not change. Then, when there is
more product in the tank, distance LP starts to decrease.
From the point where LP decreases, a best fit line (regression line) is drawn through the
measuring points. The slope of this line (0.332 mm/m) is the figure to be used in item IF.
The point where this line crosses the line of measured point where LP did not changed yet is
used as the value in item IL (4.021 m).

Appendix
Instruction manual HIMS / HTG and vapour pressure (P3) measurement Page 47
Level
[m]
Distance LS
[m]
17.238 2.156
15.755 2.155
14.582 2.154
13.290 2.154
11.563 2.153
10.051 2.152
8.491 2.152
7.327 2.151
5.272 2.150
4.783 2.150
2.385 2.150
1.234 2.150
Dis
tance
LS
[m
]
Appendix F2 Define values for hydrostatic deformation (items IF and IL) for HTG
If the installation of pressure transmitters P1 and P2 is such that movement due to tank shell bulging occurs, then items IF and IL can be
programmed to compensate for that movement. But first, the amount of movement must be known.
The movement of pressure transmitters P1 and P2 can simply be measured by a (calibrated) measuring tape (or ruler) at several product
levels. Use with all measurements the same instrument.
The distance to be measured is the distance between the zero lines on the pressure transmitters P1 and P2 (if present). When such a zero
line is not present, the distance between any other fixed point on the pressure transmitter will do. Even a mark on the flanges of P1 and P2.
Note also the product level with each measurement of distance LS.
For a good result at least a set of 8 to 10 measurements over the measuring range of the tank should be taken. Then from the measuring
results the hydrostatic deformation factor (item IF) and hydrostatic deformation level (item IL) can be calculated.
As an example some data is given from which the calculations are made to determine the values for IF and IL:
2.157
2.156
2.155
2.154
2.153
2.152
2.151
2.150
0.469 mm/m
For the first 5 metres in the above example, LS does not
change. Then, when there is more product in the tank,
LS starts to increase.
2.149 1 2 3 4 5 6 7 8 9 10 11 12 13 14 15 16 17 18
IL HTG Level [m]
measured data best fit line
Distance LS compensation
From the point where LS increases, a best fit line (regression line) is drawn through the measuring points.
The slope of this line (0.469 mm/m) is the figure to be used in item IF.
The point where this line crosses the line of measuring points where LS did not change yet, is used as the value for item IL (5.104 m).

Page 48
Appendix
Instruction manual HIMS / HTG and vapour pressure (P3) measurement
Appendix G SET-up and Configuration procedure for HART®
pressure transmitters
with the HART Communicator model 275
Set- up The set-up procedure is meant to prepare the pressure transmitter for multi-drop mode operation as required for
use with Enraf gauges, equipped with the HCU or ICU_HPI option board.
If during this procedure any error message appears, or when the operation deviates from the description, please
refer to the Instruction manual supplied with the pressure transmitter.
If more than one pressure transmitter is connected to the Enraf gauge, disconnect temporary the other(s) and
set-up one transmitter at the time.
1 Enter protection level 2 of the instrument.
Note: If the 847 PET is being used, it is advised to disable the keyboard time-out function of the PET.
2 Issue the ‘ top HART reques ’ command (item SR). This command will abort the HART communication
scheduler.
Note: This is necessary since the optional HART board doesn’t allow a second master on the HART line.
3 Switch on the HART communicator. Wait for the self-test message that no device is found. Then press OK
<F4>.
4 Connect the HART communicator to the HART communication line (to the pressure transmitter).
5 The HART communicator shows the following message on the display:
Select “ nli ” by pressing the “” key and the “” key.
6 The following menu will be shown:
Select “Device s ” by pressing the “” key.
7 If the transmitters DDL is installed in the HART Communicator, all settings
can be given. If it isn’t installed, only a few of the settings can be given.
For configuration with Enraf gauging, the set-up for multi-drop mode can
be made, as well as the selection for Engineering units and damping. But
not the zero calibration.
HART Communicator
1Offline
2 Online
3 Frequency Device
4 Utility
Generic:
Online (Generic)
1Device setup
2 PV
3 PV AO
4 PV LRV
5 PV URV
In the following instructions the selections between brackets () are for the situation the DDL is not installed.
Select 4 Detailed setup
Select 3 Output condition
Select 4 (2) HART output
Select 1 Poll address
Press the “” key. Default the polling address is at 0 (analog mode).
For multi-drop mode the address must be different from 0. The lowest
mounted pressure transmitter is always called P1, and the software on
the HCU and ICU_HPI board assumes its address will be “1”. This applies
for both HTG and HIMS. The address for P2 (middle transmitter - only
with HTG) and P3 (roof transmitter for HTG, HIMS and vapour pressure
measurement) should be set to “ ” and “ ” likewise.

Appendix
Instruction manual HIMS / HTG and vapour pressure (P3) measurement Page 49
Give the desired address (1, 2 or 3) by means of the numerical key path
on the HART communicator.
Then press ENTER <F4>.
8 Press SEND <F2>, to store the new address in the transmitter’s memory.
9 Press OK <F4> (twice).
10 Press HOME <F3>.
The transmitter is now set in multi-drop mode. This concludes the set-up procedure, however certain
parameters still needs to be set. That is described in the configuration section.
10a
10b
If the configuration will be done in a later stage, then:
• switch off the HART communicator
• disconnect the probes from the HART communication lines
• give EX command on the 847 PET, which then re-starts the instrument and the HART
communication.
If the configuration is done directly after the set-up, then continue at point 6) of the configuration
section.
Configuration The configuration procedure describes how to program on-line certain parameters of the pressure transmitter
necessary for operation with the Enraf HCU or ICU_HPI board. It is assumed that the pressure transmitter is
already in multi-drop mode (refer to set-up procedure).
If during this procedure any error message appears, or when the operation deviates from the description, please
refer to the Instruction manual supplied with the pressure transmitter.
1 Enter protection level 2 of the instrument.
Note: If the 847 PET is being used, it is advised to disable the keyboard time-out function of the PET.
2 Issue the ‘ top HART reques ’ command (item SR). This command will abort the HART communication
scheduler.
Note: This is necessary since the optional HART board doesn’t allow a second master on the HART line.
3 Switch on the HART communicator. Wait for the self-test message that no device is found. Then press OK
<F4>.
4 Connect the HART communicator to the HART communication line (to the pressure transmitter)
5 The HART communicator shows the following message on the display:
Select “ nli ” by pressing the “” key and the “” key.
6 After the scanning is completed, the following message will be shown:
Note: If more HART® devices are connected, their addresses are shown too.
Select the required transmitter by pressing the “” key and then the
“” key.
HART Communicator
1Offline
2 Online
3 Frequency Device
4 Utility
HART Communicator
Online
11
2
3
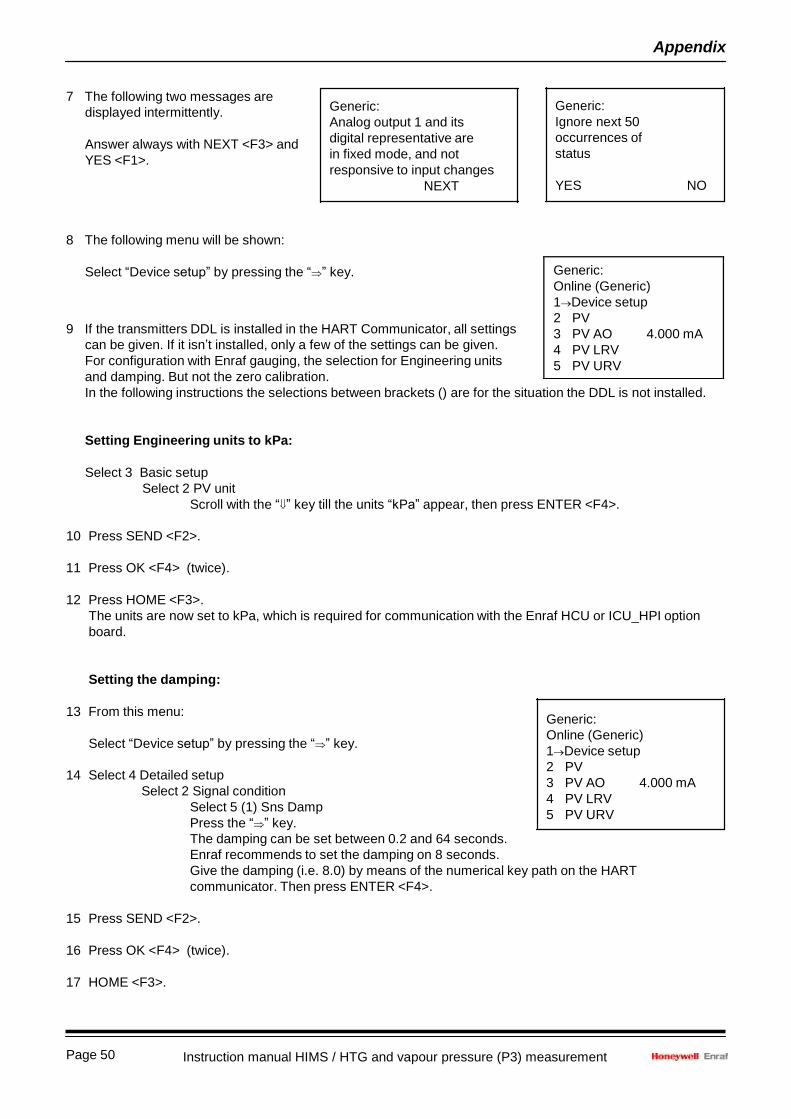
Page 50
Appendix
Instruction manual HIMS / HTG and vapour pressure (P3) measurement
7 The following two messages are
displayed intermittently.
Answer always with NEXT <F3> and
YES <F1>.
Generic:
Analog output 1 and its
digital representative are
in fixed mode, and not
responsive to input changes
NEXT
Generic:
Ignore next 50
occurrences of
status
YES NO
8 The following menu will be shown:
Select “Device s ” by pressing the “” key.
9 If the transmitters DDL is installed in the HART Communicator, all settings
can be given. If it isn’t installed, only a few of the settings can be given.
For configuration with Enraf gauging, the selection for Engineering units
and damping. But not the zero calibration.
In the following instructions the selections between brackets () are for the situation the DDL is not installed.
Setting Engineering units to kPa:
Select 3 Basic setup
Select 2 PV unit
Scroll with the “” key till the units “ P ” appear, then press ENTER <F4>.
10 Press SEND <F2>.
11 Press OK <F4> (twice).
12 Press HOME <F3>.
The units are now set to kPa, which is required for communication with the Enraf HCU or ICU_HPI option
board.
Setting the damping:
13 From this menu:
Select “Device s ” by pressing the “” key.
14 Select 4 Detailed setup
Select 2 Signal condition
Select 5 (1) Sns Damp
Press the “” key.
The damping can be set between 0.2 and 64 seconds.
Enraf recommends to set the damping on 8 seconds.
Generic:
Online (Generic)
1Device setup
2 PV
3 PV AO 4.000 mA
4 PV LRV
5 PV URV
Give the damping (i.e. 8.0) by means of the numerical key path on the HART
communicator. Then press ENTER <F4>.
15 Press SEND <F2>.
16 Press OK <F4> (twice).
17 HOME <F3>.
Generic:
Online (Generic)
1Device setup
2 PV
3 PV AO 4.000 mA
4 PV LRV
5 PV URV

Appendix
Instruction manual HIMS / HTG and vapour pressure (P3) measurement Page 51
2 PV 3 PV AO 4.000 mA
4 PV LRV 5 PV URV
Zero trim:
Zero trimming the pressure transmitter is necessary in order to compensate for the mounting position errors.
It should be done with the transmitter installed in its final mounting position with only static pressure applied.
I.e. the drain and vent plug must be open and the isolation valve must be closed. Let the temperature
stabilize for 10 to 15 minutes, in order to reduce influence caused by temperature gradients in the sensor
body.
The following procedure can only be followed when the transmitters DDL is installed in the HART
communicator. If this is not the case, then zero trimming has to be done by means of items O1, O2 and O3.
From this menu:
Select “Device s ” by pressing the “” key.
18 Select 2 Diag / Service
Select 3 Calibration
Select 3 Sensor trim
Select 1 Zero trim
19 Press OK <F4> (twice).
20 Wait for approximately 30 seconds to stabilize the zero reading, then press OK <F4>.
21 Press HOME <F3>.
This concludes the configuration of the pressure transmitter with the HART communicator.
22 Switch off the HART communicator.
23 Disconnect the probes from the HART communicator lines.
24 Give EX command on the 847 PET, which then re-starts the instrument and the HART communication.
Generic:
Online (Generic)
1Device setup 2 PV 3 PV AO 4.000 mA 4 PV LRV 5 PV URV

Page 52
Appendix
Instruction manual HIMS / HTG and vapour pressure (P3) measurement
Appendix H Zero calibration of pressure transmitters
After installation, the pressure transmitters will have a
small offset. This offset is caused by the mounting
position and hence a zero calibration is required.
Proceed as follows (refer to the figure):
• Close the isolation valve.
vent plug
Caution Having the isolation valve closed for prolonged
periods while the vent and drain plugs are closed, can permanent damage the pressure transmitters.
isolation valve
(ball valve)
drain plug
• Open the vent and drain plug and drain the
product from the transmitter body and piping.
• Allow a 5 minute stabilizing period.
Detail pressure transmitter installation
Do the zero calibration either with the HART Communicator (preferred; refer to Appendix G). Else use the
pressure offset items O1, O2 and O3 as described in the next step.
• Zero calibration by means of pressure offset items:
Item Name Description
W2= Protection level 2 Enter protection level 2
P1 Pressure of P1 Format according to item PI.
Read offset pressure from pressure transmitter P1.
O1= Pressure offset P1 Format according to item PI.
Copy the value from item P1 into O1.
P2 Pressure of P2 Format according to item PI.
Read offset pressure from pressure transmitter P2.
O2= Pressure offset P2 Format according to item PI.
Copy the value from item P2 into O2.
P3 Pressure of P3 Format according to item PI.
Read offset pressure from pressure transmitter P3.
O3= Pressure offset P3 Format according to item PI.
Copy the value from item P3 into O3.
EX Exit Exit protection level.
• Close the drain plug.
• Open the isolation valve
• When product starts to flow out from the vent plug, immediately close the vent plug.

Appendix
Instruction manual HIMS / HTG and vapour pressure (P3) measurement Page 53
Appendix J Related documents
Instruction manual series 854 ATG level gauge
Instruction manual series 854 XTG level gauge
Instruction manual 873 SmartRadar
Instruction manual 970 SmartRadar ATi Instruction manual 971 SmartRadar LTi
Instruction manual 973 SmartRadar LT
Instruction manual 877 FDI Field Display & Interface
Instruction manual 847 Portable Enraf Terminal
Item documentation for Enraf series 854 Level Gauges, 873 SmartRadar, 877 FDI
Installation Info 003 “Installation HTG / HIMS sys ”

Page 54
Index
Instruction manual HIMS / HTG and vapour pressure (P3) measurement
Index
Abbreviated HIMS/HTG density . . . . . . . . . . 16, 28
Ambient air density . . . . . . . . 10, 13, 19, 20, 23, 44
ASCII table . . . . . . . . . . . . . . . . . . . . . . . . . . 35, 37
Available pressure transmitters . . . . . . . 13, 23, 31
Calculated HIMS/HTG density . . . . . . . . . . . 16, 28
Caution . . . . . . . . . . . . . . . . . . . . . . . . . . . . . . . . . 3
Density . . . . . . . . . . . . . . . . . . . . . . . . . . 16, 18, 20
alarm hysteresis . . . . . . . . . . . . . . . . . . . 13, 23
dimension . . . . . . . . . . . . . . . . . . . . . . . . 11, 21
in air . . . . . . . . . . . . . . . . . . . . . . . 10, 20, 44, 45
in vacuum . . . . . . . . . . . . . . . . . . 10, 20, 44, 45
lower limit . . . . . . . . . . . . . . . . . . . . . . . . 13, 23
observed . . . . . . . . . . . . . . . . . . . . 9, 17, 39, 42
sample . . . . . . . . . . . . . . . . . . . . . . . . . . . 39, 42
upper limit . . . . . . . . . . . . . . . . . . . . . . . . 13, 23
Dimension . . . . . . . . . . . . . . . . . . . . . . . . 11, 21, 30
Display . . . . . . . . . . . . . . . . . . . . . . . . . . 15, 27, 32
Distance P1 - P2 . . . . . . . . . . . . . . . 22, 26, 41, 42
Distance P1 - tank zero . . . . . . . . 12, 14, 22, 38-41
Distance P3 - tank zero . . . . . . . . . . . . . . . . 12, 22
Drain plug . . . . . . . . . . . . . . . . . . . . . . . . . . . . . . 52
Equivalent area . . . . . . . . . . . . . . . . . . . . . . . . . . 18
Fatal HCU / ICU_HPI errors . . . . . . . . . . 16, 28, 32
HART . . . . . . . . . . . . . . . . . . . . . . . . 6, 7, 9, 17, 29
communication errors . . . . . . . . . . . . 16, 28, 32
Communicator . . . . . . . . . . . . . . . 14, 26, 31, 48
device pointer value . . . . . . . . . . . . . . . . . . . 36
device value pointer . . . . . . . . . . . . . . . . . . . 36
HCU board . . . . . . . . . . . . . . . . . . . . . . . . . . . . . 6-8
High high level alarm . . . . . . . . . . . . . . . . . . . . . 24
High level alarm . . . . . . . . . . . . . . . . . . . . . . . . . 24
HIMS / HTG selection . . . . . . . . . . . . . . . 13, 23, 31
HTG level . . . . . . . . . . . . . . . . . . . . . . . . . . . . . . 28
HTG ullage . . . . . . . . . . . . . . . . . . . . . . . . . . . . . 28
Hydrostatic deformation . . . . . . . . . . 14, 26, 46, 47
factor . . . . . . . . . . . . . . . . . . . . . . 14, 26, 46, 47
level . . . . . . . . . . . . . . . . . . . . . . . 14, 26, 46, 47
Hydrostatic error request . . . . . . . . . . . . . . . . . . 35
Hydrostatic status request . . . . . . . . . . . . . . . . . 35
ICU_HPI board . . . . . . . . . . . . . . . . . . . . . . . . . 6, 7
Indicator mode . . . . . . . . . . . . . . . . . . . . . . . . . . 23
Isolation valve . . . . . . . . . . . . . . . . . . . . . . . . . . . 52
EH . . . . . . . . . . . . . . . . . . . . . . . . . 16, 28, 32-35
FH . . . . . . . . . . . . . . . . . . . . . . . . . . . 16, 28, 32
H0 . . . . . . . . . . . . . . . . . . . . . . . . . . . 16, 28, 32
H1, H2, H3 . . . . . . . . . . . . 11, 13, 21, 24, 30, 31
HA . . . . . . . . . . . . . . . . . . . . . . . . . . . . . . . . . 24
HD . . . . . . . . . . . . . . . . . . . . . . . . 11, 13, 21, 23
HE . . . . . . . . . . . . . . . . . . . . . . . . . . . 16, 28, 32
HH . . . . . . . . . . . . . . . . . . . . . . . . . . . . . . . . . 24
HQ . . . . . . . . . . . . . . . . . . . . . . . . . . . 19, 20, 28
HT . . . . . . . . . . . . . . . . . . . . . . . . 13, 23, 31, 34
IF . . . . . . . . . . . . . . . . . . . . . . . . . 14, 26, 46, 47
IL . . . . . . . . . . . . . . . . . . . . . . . . . 14, 26, 46, 47
IM . . . . . . . . . . . . . . . . . . . . . . . . . . . . . . 23, 34
LA . . . . . . . . . . . . . . . . . . . . . . . . . . . . . . . . . 24
LD . . . . . . . . . . . . . . . . . . . . . . . . . . . . . . 12, 22
LG . . . . . . . 9, 10, 13, 17, 19, 23, 33, 39, 42, 43
LL . . . . . . . . . . . . . . . . . . . . . . . . . . . . . . . . . 24
LM . . . . . . . . . . . . . . . . . . . . . 10, 12, 19, 22, 33
LN . . . . . . . . . . . . . . . . . . . . . . . . . . . . . . 12, 22
LP . . . . . 9, 10, 12, 14, 17, 19, 22, 34, 38-41, 46
LS . . . . . . . . . . . . . . . . . . . . . 17, 19, 26, 41, 42
LU . . . . . . . . . . . . . . . . . . . . . . . . . . . . . . . . . 24
M1, M2, M3 . . . . . . . . . . . 11, 13, 21, 23, 30, 31
N1, N2, N3 . . . . . . . . . . . . . . . . . . . . . 16, 28, 32
O1, O2, O3 . . . . . . . . . . . . . . . . . 11, 21, 30, 52
OB . . . . . . . . . . . . . . . . . . . . . . . . . . . . . . 23, 34
P0 . . . . . . . . . . . . . . . . . . 11, 15, 21, 27, 30, 32
P1 . . . . . . . . . . . . . . . . . . . . . . 9, 16, 17, 28, 52
P2 . . . . . . . . . . . . . . . . . . . . . . . . . . . 17, 28, 52
P3 . . . . . . . . . . . . . . . . . . . 9, 16, 17, 28, 32, 52
P4 . . . . . . . . . . . . . . . . . . . . . . . . . . . . . . 16, 28
P5 . . . . . . . . . . . . . . . . . . . . . . . . . . . . . . . . . 28
P7 . . . . . . . . . . . . . . . . . . . 9, 10, 16, 19, 28, 39
P8 . . . . . . . . . . . . . . . . . . . . . . . . . . . 19, 28, 42
PA . . . . . . . . . . . . . . . . . . . . . 13, 23, 31, 33, 34
PH . . . . . . . . . . . . . . . . . . 11, 13, 21, 24, 30, 31
PI . . . . . . . . . . . . . . . . . . . . . . . . . . . . 11, 21, 30
PR . . . . . . . . . . . . . . . . . . . . . . . . . . . . . . . . . 12
Q1, Q2, Q3 . . . . . . . . . . . . . . . . . . . . 16, 28, 32
QF . . . . . . . . . . . . . . . . . . . . . . . . . 16, 28, 32-35
QQ . . . . . . . . . . . . . . . . . . . . . . . . . . . . . . 16, 28
RF . . . . . . . . . . . . . . . 10, 13, 19, 20, 23, 33, 44
Items RG . . . . . . . . . 10, 13, 15, 19, 20, 23, 27, 33, 45
28 . . . . . . . . . . . . . . . . . . . . . . . . . . . . . . 11, 21
29 . . . . . . . . . . . . . . . . . . . . . . . . . . . 11, 21, 30
AH . . . . . . . . . . . . . . . . . . . . . . . . . . . . . . . . . 24
DD . . . . . . . . . . . . . . . . . . . . . . . . . . . 11, 21, 27
DE . . . . . . . . . . . . . . . . . . . . . . . . . . . . . . . . . 25
DI . . . . . . . . . . . . . . . . . . . . . . . . . . . . . . . 11, 21
DL . . . . . . . . . . . . . . . . . . . . . . . . 11, 13, 21, 23
DQ . . . . . . . . . . . . . . . . . . . . . . . . . . . . . . 16, 28
DU . . . . . . . . . . . . . . . . . . . . . . . . 11, 13, 21, 23
RJ . . . . . . . . . . . . . . . . . . . . . . . . 15, 27, 33, 45
SR . . . . . . . . . . . . . . . . . . . . . 16, 28, 32, 48, 49
TT . . . . . . . . . . . . . . . . . . . . . . . . . . . . . . . . . 12
UR . . . . . . . . . . . . . . . . . . . . . . . . . . . . . . . . . 25
VP . . . . . . . . . . . . . . . . . . . . . . . . . . . . . . . . . 36
VQ . . . . . . . . . . . . . . . . . . . . . . . . . . . . . . . . . 28
VV . . . . . . . . . . . . . . . . . . . . . . . . . . . . . . . . . 36

Instruction manual HIMS / HTG and vapour pressure (P3) measurement Page 55
Index
Last fatal HCU / ICU_HPI error . . . . . . . 16, 28, 32
Level . . . . . . . . . . . . . . . . . . . . . . . . . . . 9, 10, 17-19
alarm hysteresis . . . . . . . . . . . . . . . . . . . . . . 24
alarms . . . . . . . . . . . . . . . . . . . . . . . . . . . . . . 24
status conversion . . . . . . . . . . . . . . . . . . . . . 24
type . . . . . . . . . . . . . . . . . . . . . . . . . . . . . . . . 25
Level gauge . . . . . . . . . . . . . . . . . . . . . . . . . . . . . 9
Level measurement . . . . . . . . . . . . . . . . . . . . . . . 9
Local gravity . . . . . . . . . . . . . . . . . . . . . . 13, 23, 43
Low level alarm . . . . . . . . . . . . . . . . . . . . . . . . . . 24
Low low level alarm . . . . . . . . . . . . . . . . . . . . . . 24
Pressure
alarm hysteresis . . . . . . . . . . . . . . . . 13, 24, 31
dimension . . . . . . . . . . . . . . . . . . . . . 11, 21, 30
measurement . . . . . . . . . . . . . . . . . . . . . . . . 29
offset P1, P2, P3 . . . . . . . . . . . . . . . . . . . . . . 52
P1, P2, P3 . . . . . . . . . . . . . . . . . . . . . . . . . . . 52
transmitter . . . . . . . . . . . 6, 9, 17, 29, 48, 49, 52
Serial number pressure transmitter . . . . 16, 28, 32
Stop HART request . . . . . . . . . . . . . . . . 16, 28, 32
Stratification . . . . . . . . . . . . . . . . . . . . . . . . . . . . 34
Tank gas density . . . . . . . . . . . . 10, 13, 19, 23, 45
Manual Temperature pressure transmitter . . . . . 16, 28, 32
density . . . . . . . . . . . . . . . . . . . . . . . . . . . . . . 27
tank gas density . . . . . . . . . . . . . . . . . . . 15, 27
vapour pressure . . . . . . . . . . . . . . . . 15, 27, 32
Mass . . . . . . . . . . . . . . . . . . . . . . . . . . . . . . . . . . 18
Maximum trip pressure . . . . . . . . . . . . . . 13, 24, 31
Minimum HIMS level . . . . . . . . . . . . . . . . . . . . . . 12
Minimum HTG level . . . . . . . . . . . . . . . . . . . . . . 22
Minimum trip pressure . . . . . . . . . . . . . . 13, 23, 31
Note . . . . . . . . . . . . . . . . . . . . . . . . . . . . . . . . . . . 3
Optional board selection . . . . . . . . . . . . . . . . . . . 23
Ullage . . . . . . . . . . . . . . . . . . . . . . . . . . . . . . . . . 25
Upper reference . . . . . . . . . . . . . . . . . . . . . . . . . 25
point . . . . . . . . . . . . . . . . . . . . . . . . . . . . . . . . 25
Vapour density . . . . . . . . . . . 10, 13, 19, 20, 23, 45
Vent plug . . . . . . . . . . . . . . . . . . . . . . . . . . . . . . 52
Volume . . . . . . . . . . . . . . . . . . . . . . . . . . . . . . . . 18
Warning . . . . . . . . . . . . . . . . . . . . . . . . . . . . . . . . 3
XPU board . . . . . . . . . . . . . . . . . . . . . . . . . . . . . . 8
Zero calibration . . . . . . . . . . . . . . . . . 33, 34, 51, 52

Page 56
Instruction manual HIMS / HTG and vapour pressure (P3) measurement